Breakdown features
If you follow the rules of operation, then the replacement of the bearing will be needed no earlier than after 6 years of using the machine. It is after this time that the part undergoes natural wear and tear. Failure earlier than the specified period indicates the influence of the following factors:
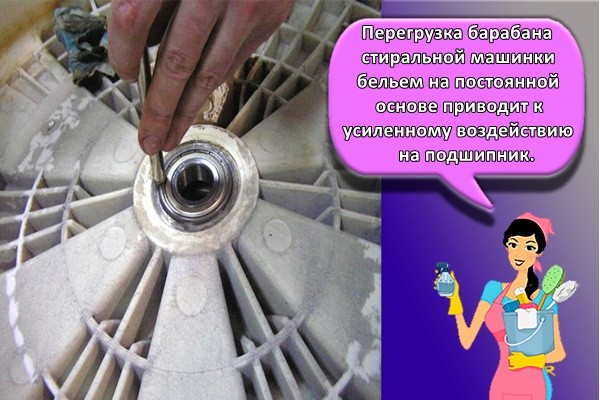
- constant overloading of the drum. The imbalance of the linen leads to an increased load on the supporting part and accelerated wear of the part;
- deformation of the stuffing box - a sealing rubber element that protects the bearing from moisture. If the packing is damaged, water will wash away the protective layer and seep into the bearing, causing corrosion and damage.
 Constant overloading of the drum can lead to rapid wear of the bearings.
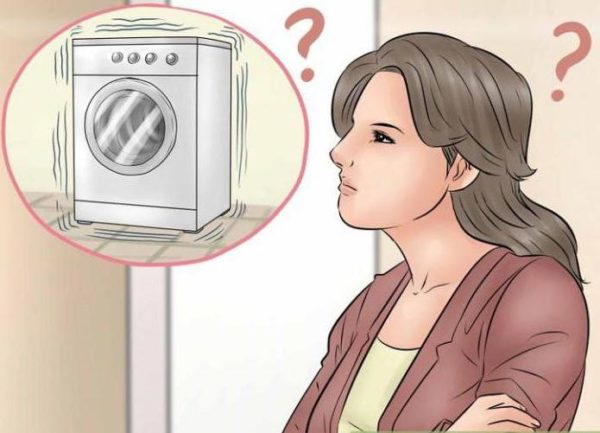
The main external sign of bearing failure is increased hum, noise and vibration of the washing machine, and sometimes an unpleasant grinding noise during the spin phase. You may also notice the appearance of moisture under the clipper. If, when turning the drum by hand, an uneven rotation is felt, this indicates the formation of a backlash - a gap between the drum and the tank. All these signs indicate the need to replace the bearing on the Indesit washing machine.
What is a bearing and why is it changed?
A person without appropriate experience may not at all pay attention to such an important structural element as a bearing, because it is not noticeable during an external examination. However, it is an important functional part that supports the shaft. It turns out that the bearing holds the shaft so that it can rotate. In other words, this element takes over all the load that it distributes to other nodes.
You can determine the level of wear of a part without outside help, because such a breakdown will be difficult not to hear. Especially often a faulty machine starts to vibrate in the "spin" mode.
 In the presence of faulty parts, the unit may bounce during washing
Of course, many people prefer to "ignore" the noisy operation of the drum, which is why they postpone repairs. Alas, over time this will lead to damage to the crosspiece on the drum, and such a breakdown already requires expensive repairs.
Sometimes, with a faulty bearing, liquid flows out from under it, which in turn enters the heating element. This will inevitably lead to the fact that the module closes, and then all that remains is to dispose of the device.
Prices for heating elements for a washing machine
Heating element for washing machine
Experts recommend replacing the bearing after a certain period, even if it is in working order, because it can fail at any time. In addition, this element deteriorates under the influence of water, because a serviceable bearing does not come into contact with it, and a broken element may get wet. As a result of a leak, rust appears, which also affects the oil seal - it is also recommended to change it, like the bearing, every five to six years.
 Any manufacturer's washing machine may require replacement of the bearing and oil seal
However, even if you do not plan on changing parts, you should periodically disassemble the washing machine to lubricate them. Indeed, in places where there is little lubrication, corrosion quickly forms.
Bearing Replacement Procedure

The tank requires complete disassembly, otherwise the bearing cannot be changed. It is recommended to remove the counterweights from the same part to work faster. Through fasteners are also unscrewed in this case. The front section around the cuff also needs to be removed.
Actions further have a certain order:
- The rubber twitches completely.It is pressed to the body by a round clamp, in the form of a spring.
- A 17mm socket is used to remove the pulley.
- It will take some effort, therefore it is recommended to use a kind of lever.
- To create the necessary strength, a regular metal pipe is also suitable.
- Special marks are applied to the rubber - this is done to prevent unwinding during rotation.
- The bolt from the retainer simply will not break off without additional effort.
- After completion of the operation, twisting will not cause problems. The Zanussi washing machine has been disassembled.
The small counterweight under the pulley will need to be removed.
Conventional bolts are used to attach the two halves to the tank. You will need to remove each of them. A socket wrench extension is indispensable.
The two halves of the tank are separated, after which the drum is pulled out. Sometimes it takes extra effort to get the device out. In this case, a hammer is used, several blows are made.
Do not hit the shaft directly, this will damage the part. It is necessary to fix a special bolt, and then hit it through the plate.
A complete cleaning of the tank seat from the inside is required. After that, we get rid of the oil seal. A chisel or a strong screwdriver will become indispensable helpers. A hammer is often added to solve the problem with the Zanussi washing machine.
In the next step, pull out the metal clamp. It is located below the oil seal, inside a kind of groove. This is necessary to fix the position of the bearing. A slotted screwdriver or round nose pliers are best suited to replace bearings on a Zanussi washing machine.
It remains to knock out the bearing, for which they often use a chisel. The device is supplied with two platforms, narrow on one side, wide on the other. Start by removing the outer bearing using a medium sized hammer.
What problems can arise if bearings are not changed in time?
Bearing failure is always an unpleasant event, because its replacement is a rather complicated undertaking, but, nevertheless, it is necessary for execution. This is due to the fact that failure to perform this operation can lead to negative consequences of varying severity:
- the bearing seat will break, which will require the replacement of the entire drum;
- the electric motor will burn out, which will require its overhaul or replacement;
- if there is a belt drive, the belt installed between the engine and the drum shaft may break;
- other components that transmit the rotational motion of the electric motor shaft to the drum of the washing machine, available in the model structure (crosspiece, pulley, etc.), may be damaged;
- the integrity of the tank can be damaged, especially for models where this structural element is made of plastic, which, in turn, will lead to water leakage and, as a result, flooding of neighbors and damage to the electronic control system.
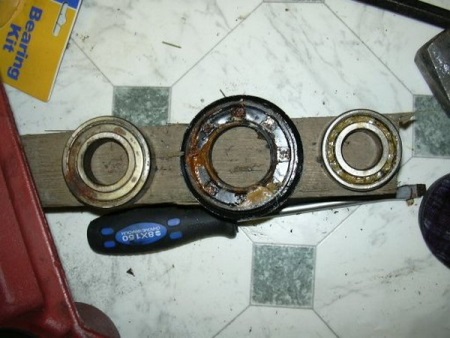
Preparing tools for work
To remove the bearing from the drum of the washing machine, special special tools are not required, except for a puller that gently picks up the bearing race and removes it from the shaft. In general, it is enough to have a set of simple tools that most men in the household have. Depending on the specific model and brand of the machine, you may need:
- screwdrivers;
- pliers;
- wrenches (17 and 19 mm)
- head wrenches ranging in size from 7 to 13 mm;
- rubber hammer;
- hexagon 6 mm;
- sealant and grease (for example, Silicon-Fett grease or Litol-24 grease);
- chisel;
- puller.
Do not rush to purchase a puller, make sure that the bearing does not need to be replaced, otherwise it’s okay if you damage its clip with a hammer. If you can't do without a puller, get a universal puller that fits different bearing sizes, it will come in handy in the future.


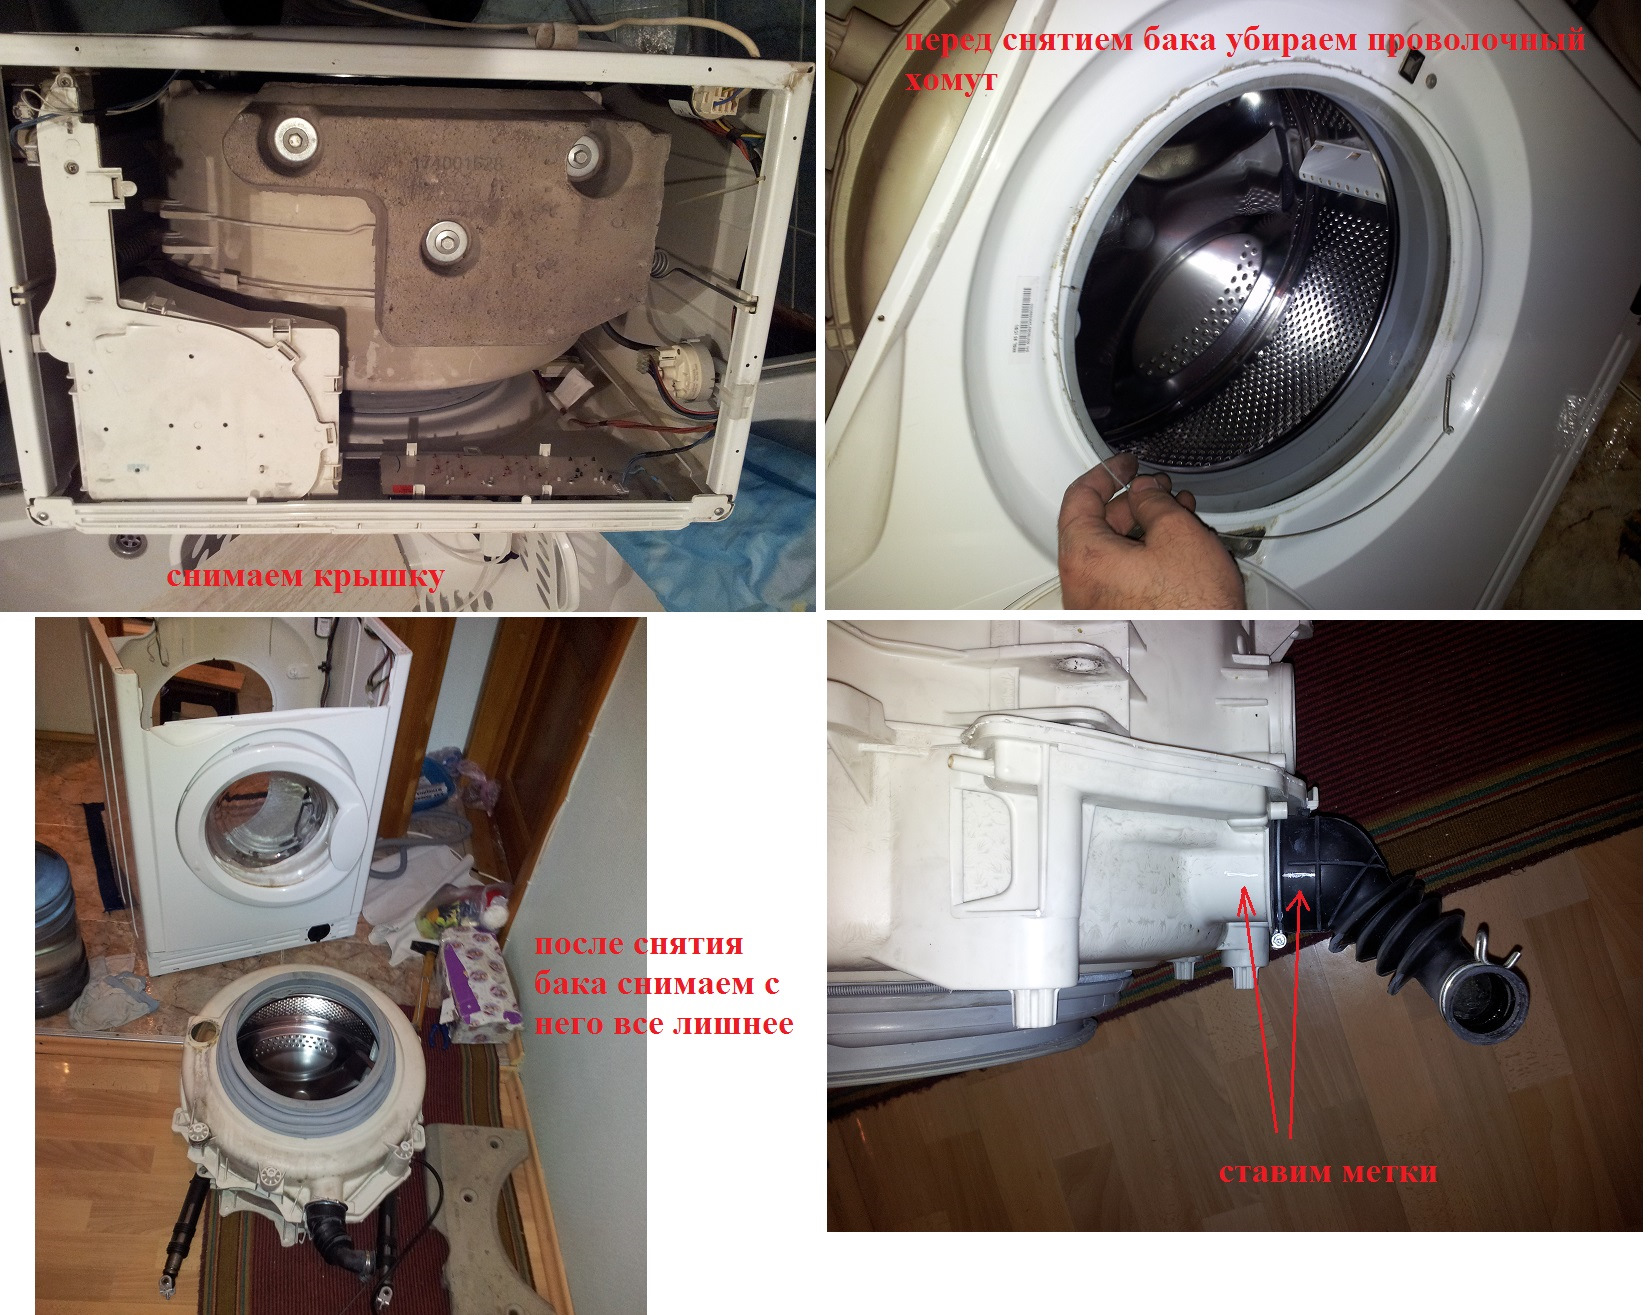
We take out the tank from the car: instructions
The work on the installation of the tank and the drum begins with the de-energization of the machine, we also do not forget to close the water supply valve to the machine. To remove the drum, you need to disassemble the body of the washing machine. For this you need:
- Park the machine so that it is easily accessible from all sides.
- Remove the top cover of the machine by unscrewing the two Phillips head screws from the rear.
- Pull out the powder and conditioner tray.
- Unscrew the bolt under the tray.
- Remove the lower front section of the machine body.
- Unscrew two more bolts underneath.
- Pull the clamp out of the hatch and remove the rubber seal from the body.
- Having wrung out the device blocking the hatch, disconnect the front part of the case.
- Now unscrew the back of the machine body
- Remove the belt.
- Find and disconnect the wires from the heating element.
- Disconnect the pipe from the pump to the tank.
- Remove counterweights.
- Unscrew the two bolts holding the engine, remove it.
- Remove the shock absorbers and springs holding the tank.
- Now you can get the tank.
It is not so easy to get the tank out of the car, we tried to list the main steps in this matter. For more details on how to remove the tank and drum, see the article How to disassemble the tank.
Photo of the process of replacing bearings with your own hands


We also recommend viewing:
- Do-it-yourself engine oil change
- DIY speed controller
- DIY engine repair
- DIY bumper
- DIY car painting
- DIY car polishing
- DIY headlight polishing
- Replacing thresholds with your own hands
- Do-it-yourself carburetor adjustment
- How to replace candles
- DIY trunk
- Do-it-yourself windshield replacement
- Do-it-yourself dry cleaning of the salon
- DIY body repair
- DIY rear view camera
- Do-it-yourself nozzle rinsing
- DIY trailer
- DIY clutch replacement
- DIY starter repair
- DIY automatic transmission repair
- DIY headlight adjustment
- DIY mini tractor
- DIY steering rack repair
- Do-it-yourself car soundproofing
- DIY vase tuning
- DIY generator repair
Preparing for replacement
So, you are convinced that your washing machine needs a bearing replacement, and you are sure that you can do this work yourself without involving a master. Where to begin?
Before proceeding with the repair, it is necessary to purchase a new set of bearings, including the oil seal. It is best to choose original spare parts from the manufacturer that match your model, even if they cost more than their counterparts.
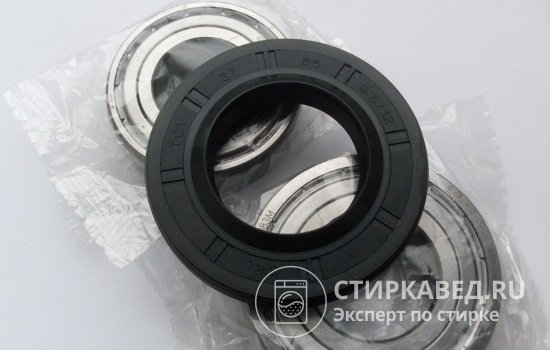 A new set of bearings must include a rubber seal
Also, for repairs you will need:
- flat and Phillips screwdrivers;
- chisel or impact screwdriver;
- hammer;
- pliers;
- nippers;
- socket wrenches;
- WD-40 tool;
- glue;
- sealant.
Before disassembling the body of the washing machine, you need to free up enough space for both work and storage of parts. Disconnect the washing machine from the power supply, disconnect the hoses, move the equipment away from the wall so that it is accessible from all sides. If possible, transfer it to a utility room (closet, garage) in case the repair drags on.
Self-repair pitfalls
Disassembling and assembling the device yourself, you can make a number of oversights that will lead to equipment malfunction in the future.
The craftsmen took the trouble to compile a list of the most common mistakes made by those who first decided to repair the car.
So the errors are:
- The wires are torn off at the sensor, which is responsible for blocking the hatch when the front part is removed.
- Break the rubber seal, trying to pull it out with force, forgetting to remove the clamps.
- Damage the tank pulley when removed from the axle.
- Break off tight fasteners, forgetting to pre-lubricate to facilitate bolt loosening.
- Tear off the wires at the water heating sensor.
- They can tear off the water inlet pipe in conjunction with the hose.
- By knocking out the components from the drum, they damage the latter. The repair ends with a complete drum change.
Before starting repair work, you need to really assess your own strength. If there is no self-confidence, then you should trust the master. He will perform all the necessary actions without prejudice to the rest of the technology. True, in this case, you will have to pay a certain amount. The price of the issue starts from 4500 rubles. It depends on the model of the device, the cost of components and the complexity of the work performed.
Repair of washing machines with a collapsible tank will cost less, with a non-collapsible element more expensive. You can save money if you purchase all the necessary parts yourself.
Universal Tips
If you decide to repair the unit yourself, then you must adhere to some tips that will be useful in the process:
- Washing machine tanks are collapsible and non-collapsible. With the first option, everything is clear - you will need to dismantle the mounts. In the second case, everything is more complicated, because you will need to cut the drum exactly according to the marks, without affecting the internal filling. After replacing the bearing and oil seal, such a tank will need to be connected with self-tapping screws and glued to restore tightness.
 If repair is necessary, the non-separable tank is sawn
- It happens that not only the bearing assembly becomes unusable, but the bushing on the drum. Sometimes a part can be restored by contacting a turner. If the bushing is deformed too much, then all that remains is to purchase a new one.
- It is worth noting that all non-original parts of poor quality quickly fail, so you should not save on the purchase of such elements. It is better to purchase spare parts from specialized service centers.
- Before proceeding with the repair of the washing machine, it is advisable to study in detail its instructions, which come with the complete set. If it has not survived, then the information can always be found on the Internet by the name of the model.
- Experts advise, when replacing the bearing, to check other elements of the washing machine, which could have been damaged by a faulty part. Sometimes there is a dense layer of scale on them, which is better to clean with special means.
Removing the bearing
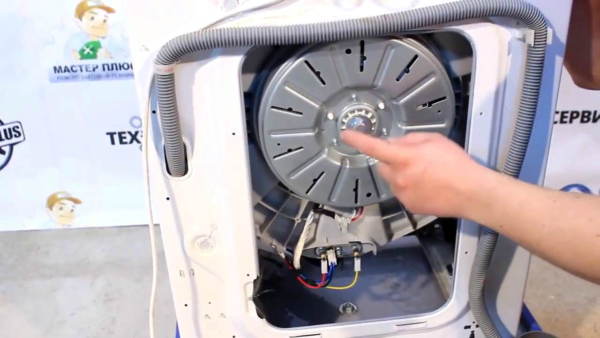
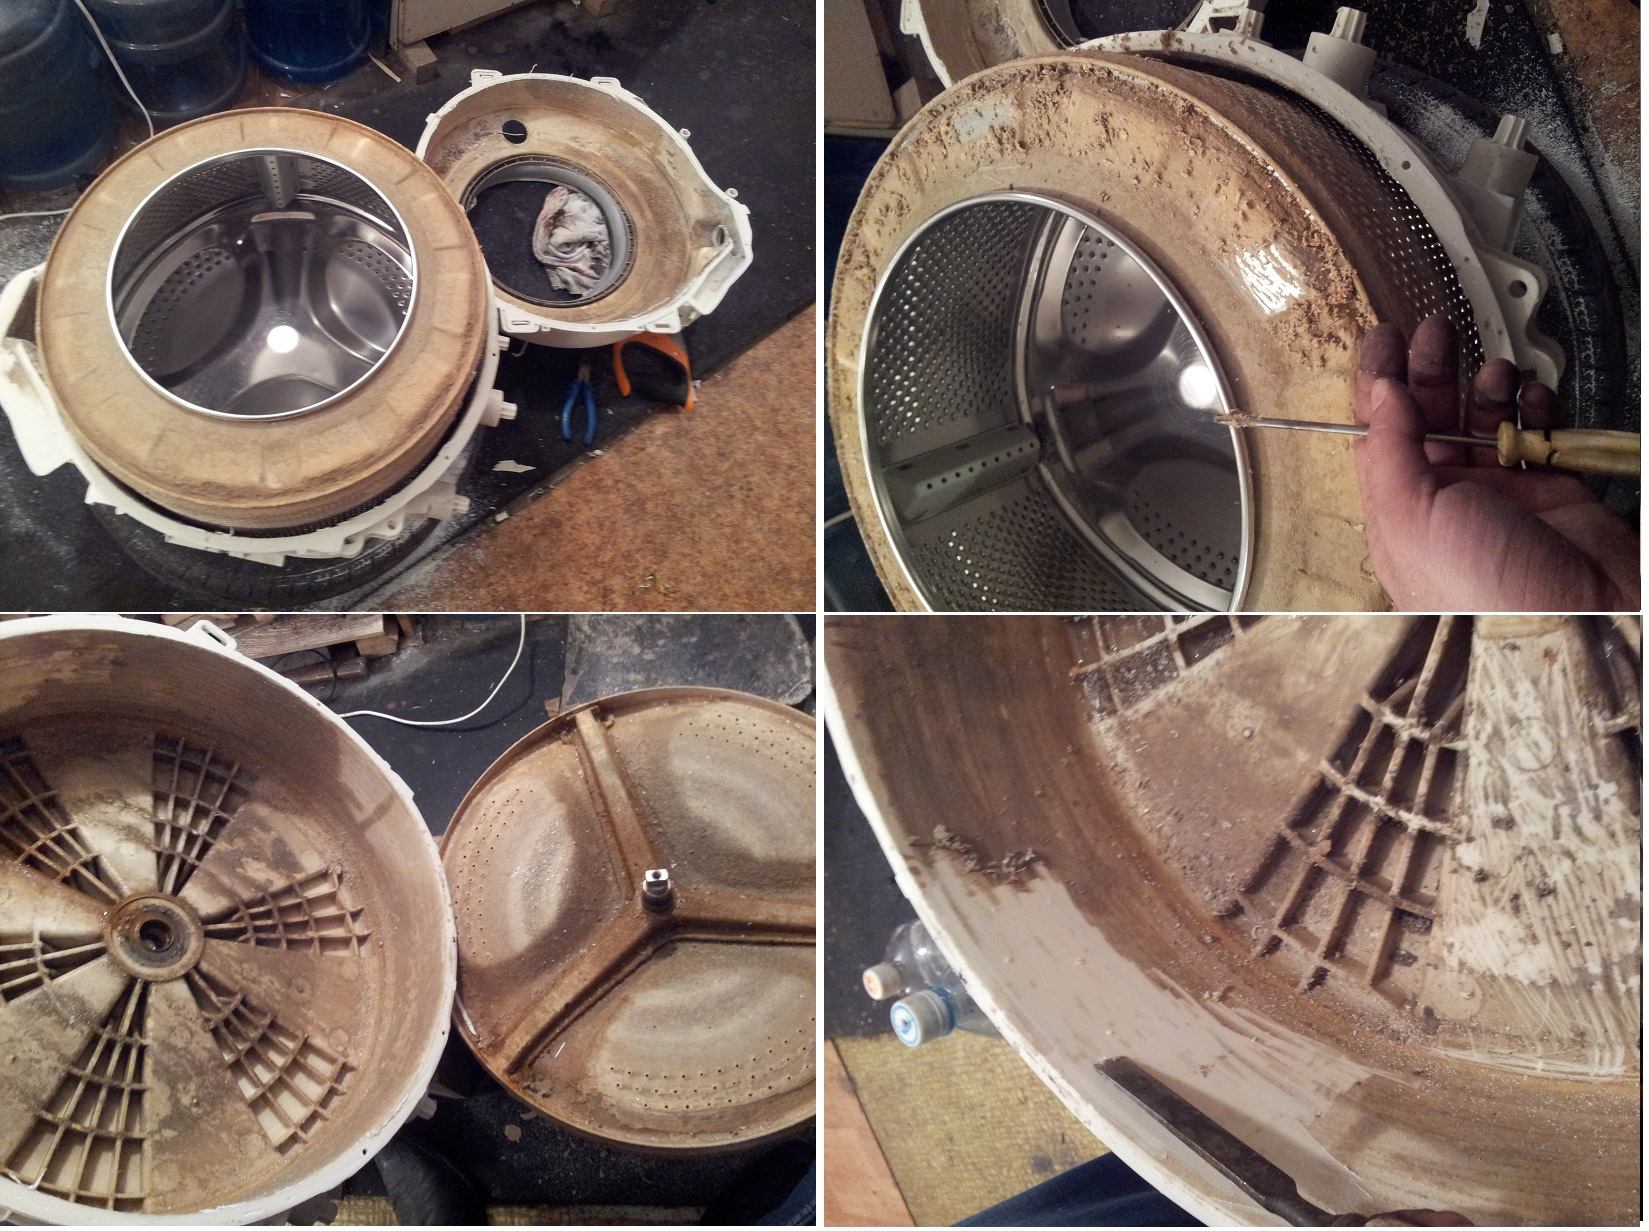
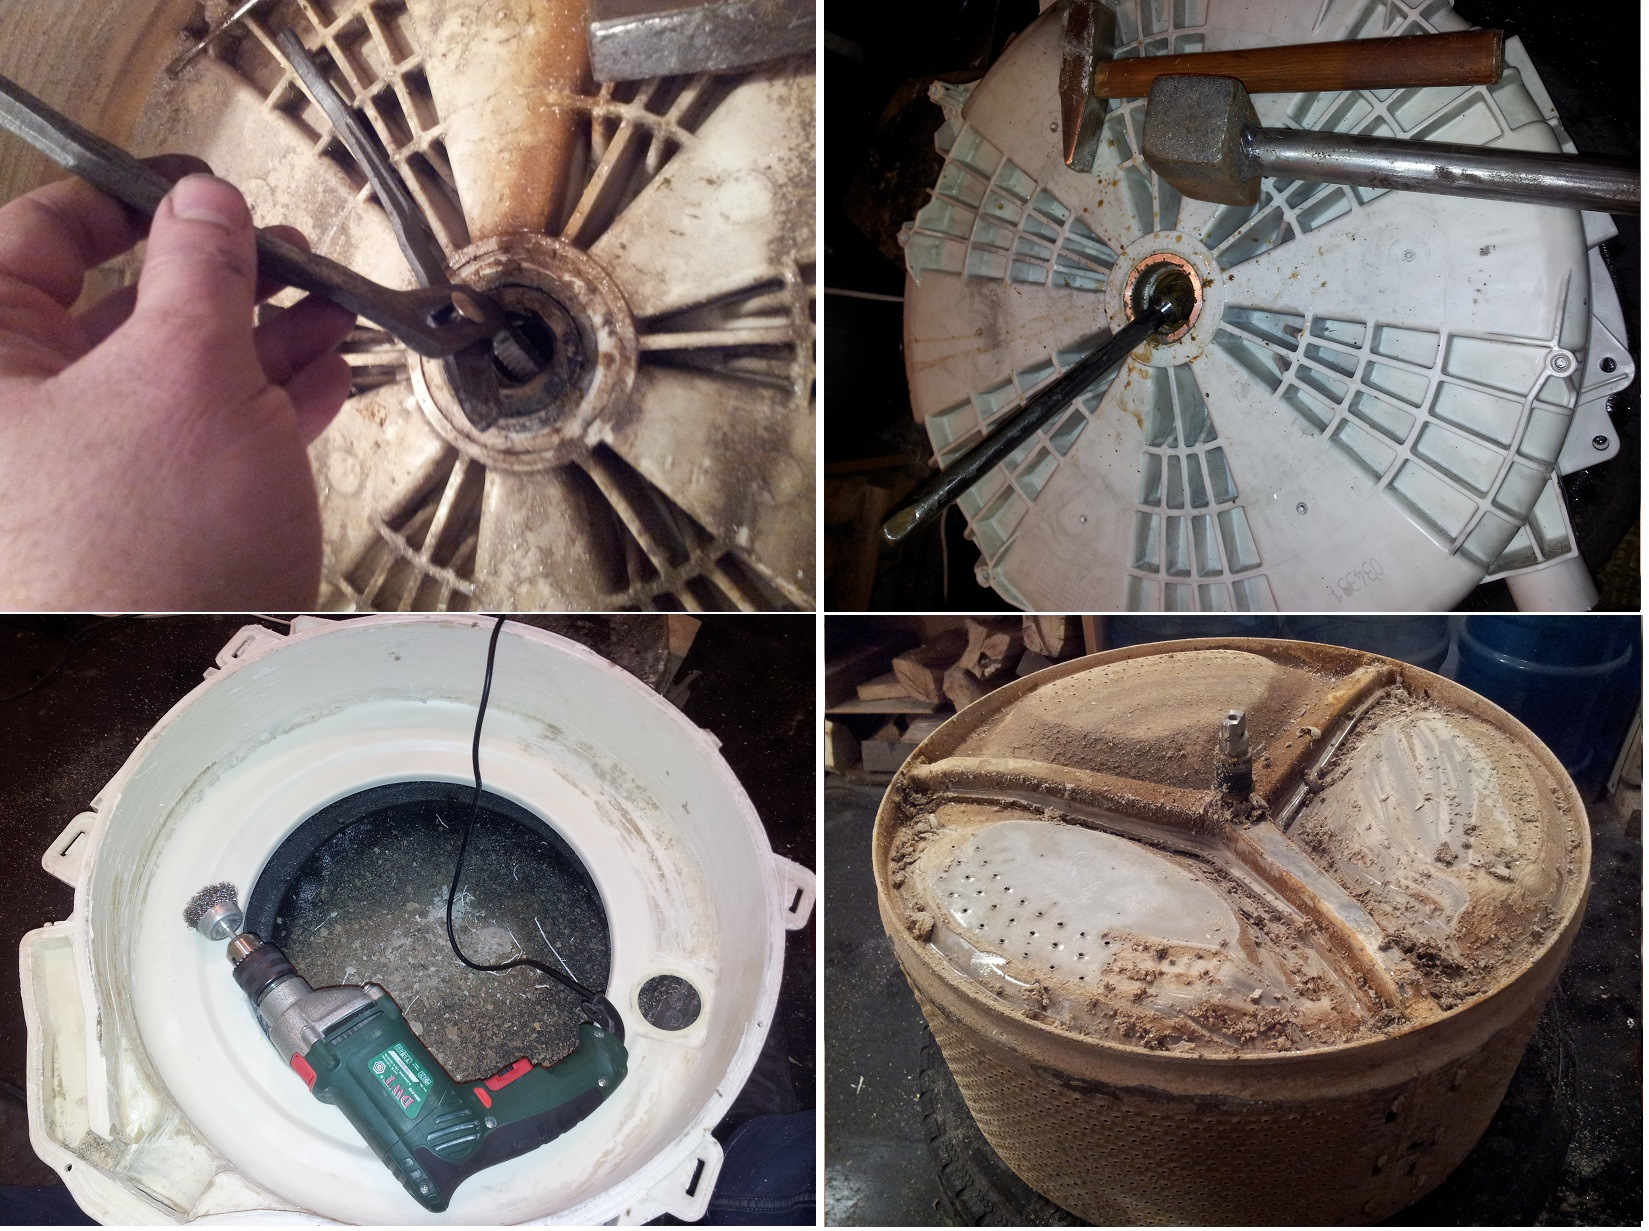
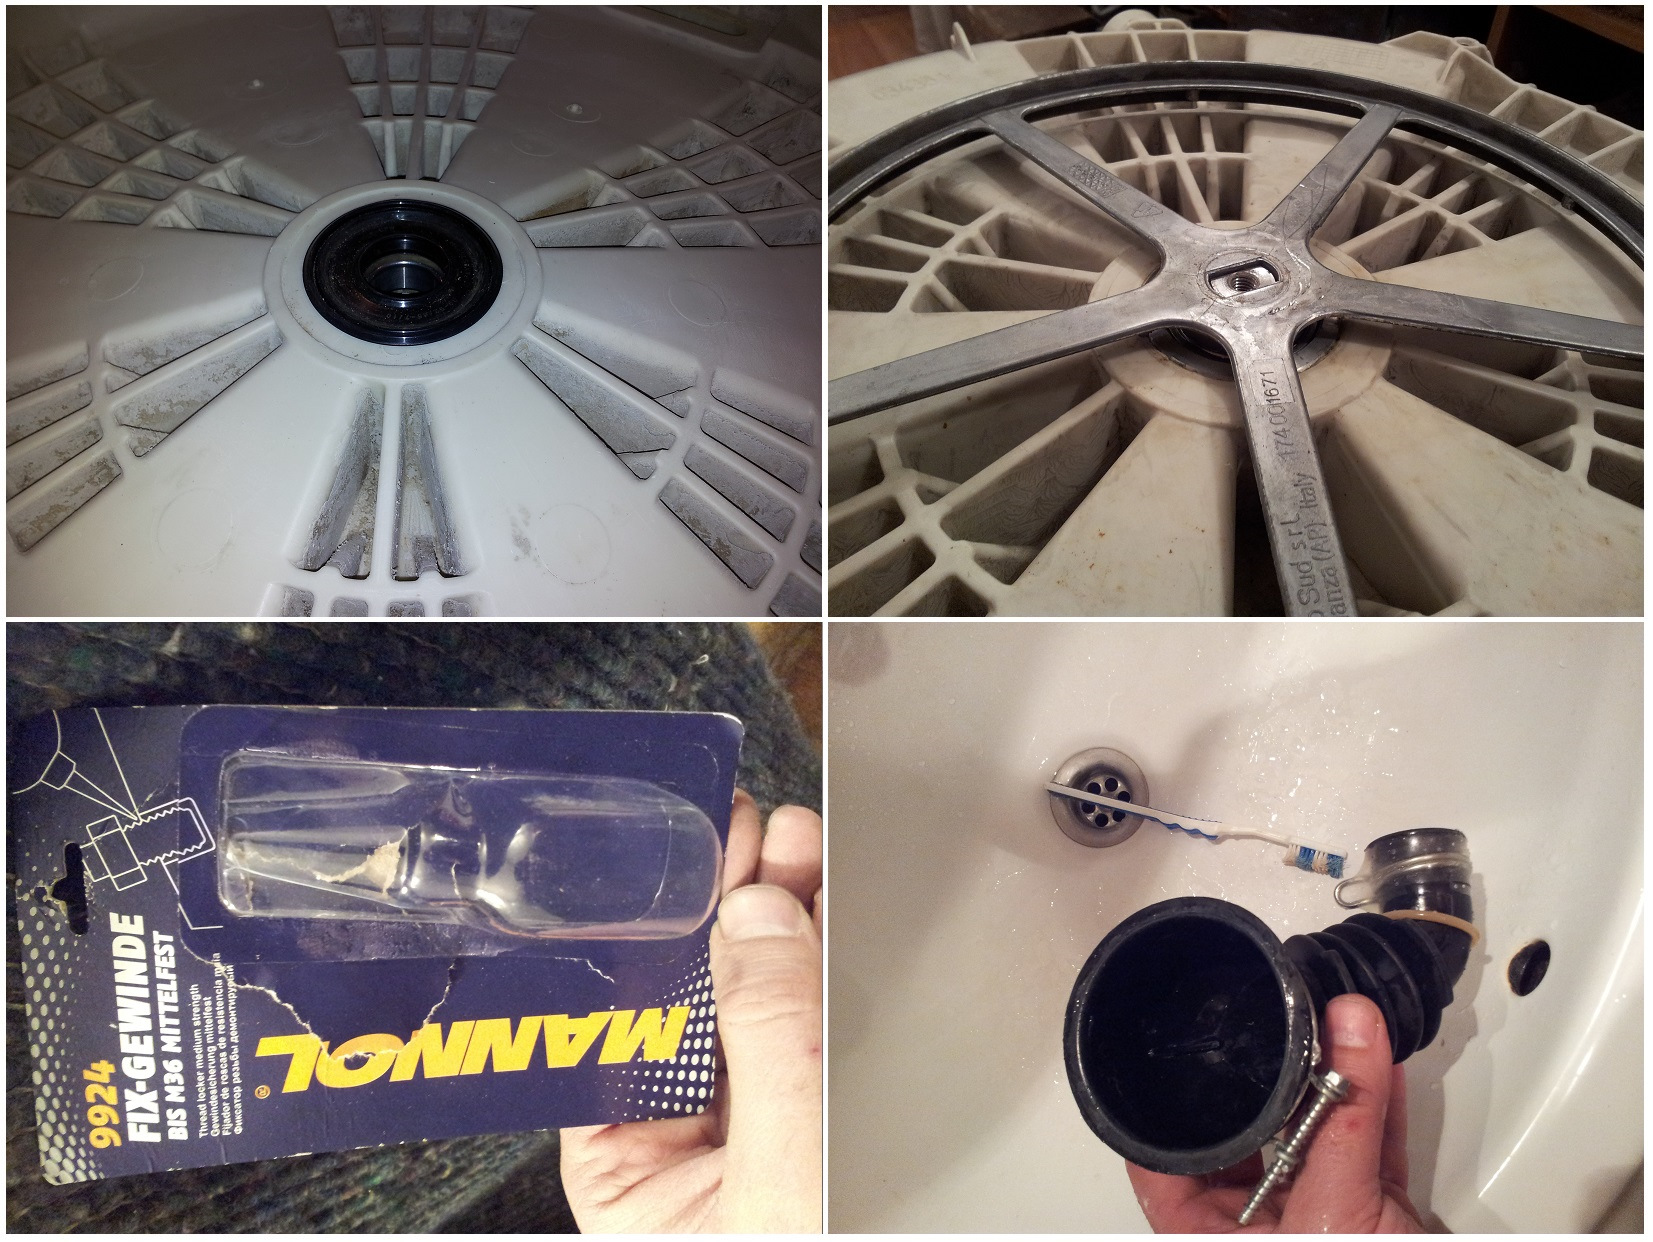
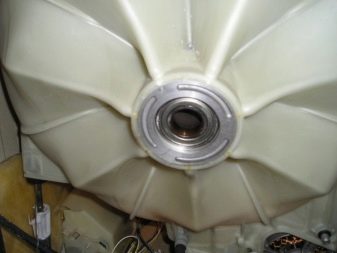
Having pulled out the tank with the drum outside, we proceed to disassemble it and directly remove the bearings. If grease has leaked onto the drum cover, this confirms the need to replace oil seals and bearings. So, the tank consists of two interconnected parts. The connection can be glued or bolted. The glue joint must be cut carefully. Bolting is easier in this regard. When the tank is disassembled into two parts, we perform the following steps:
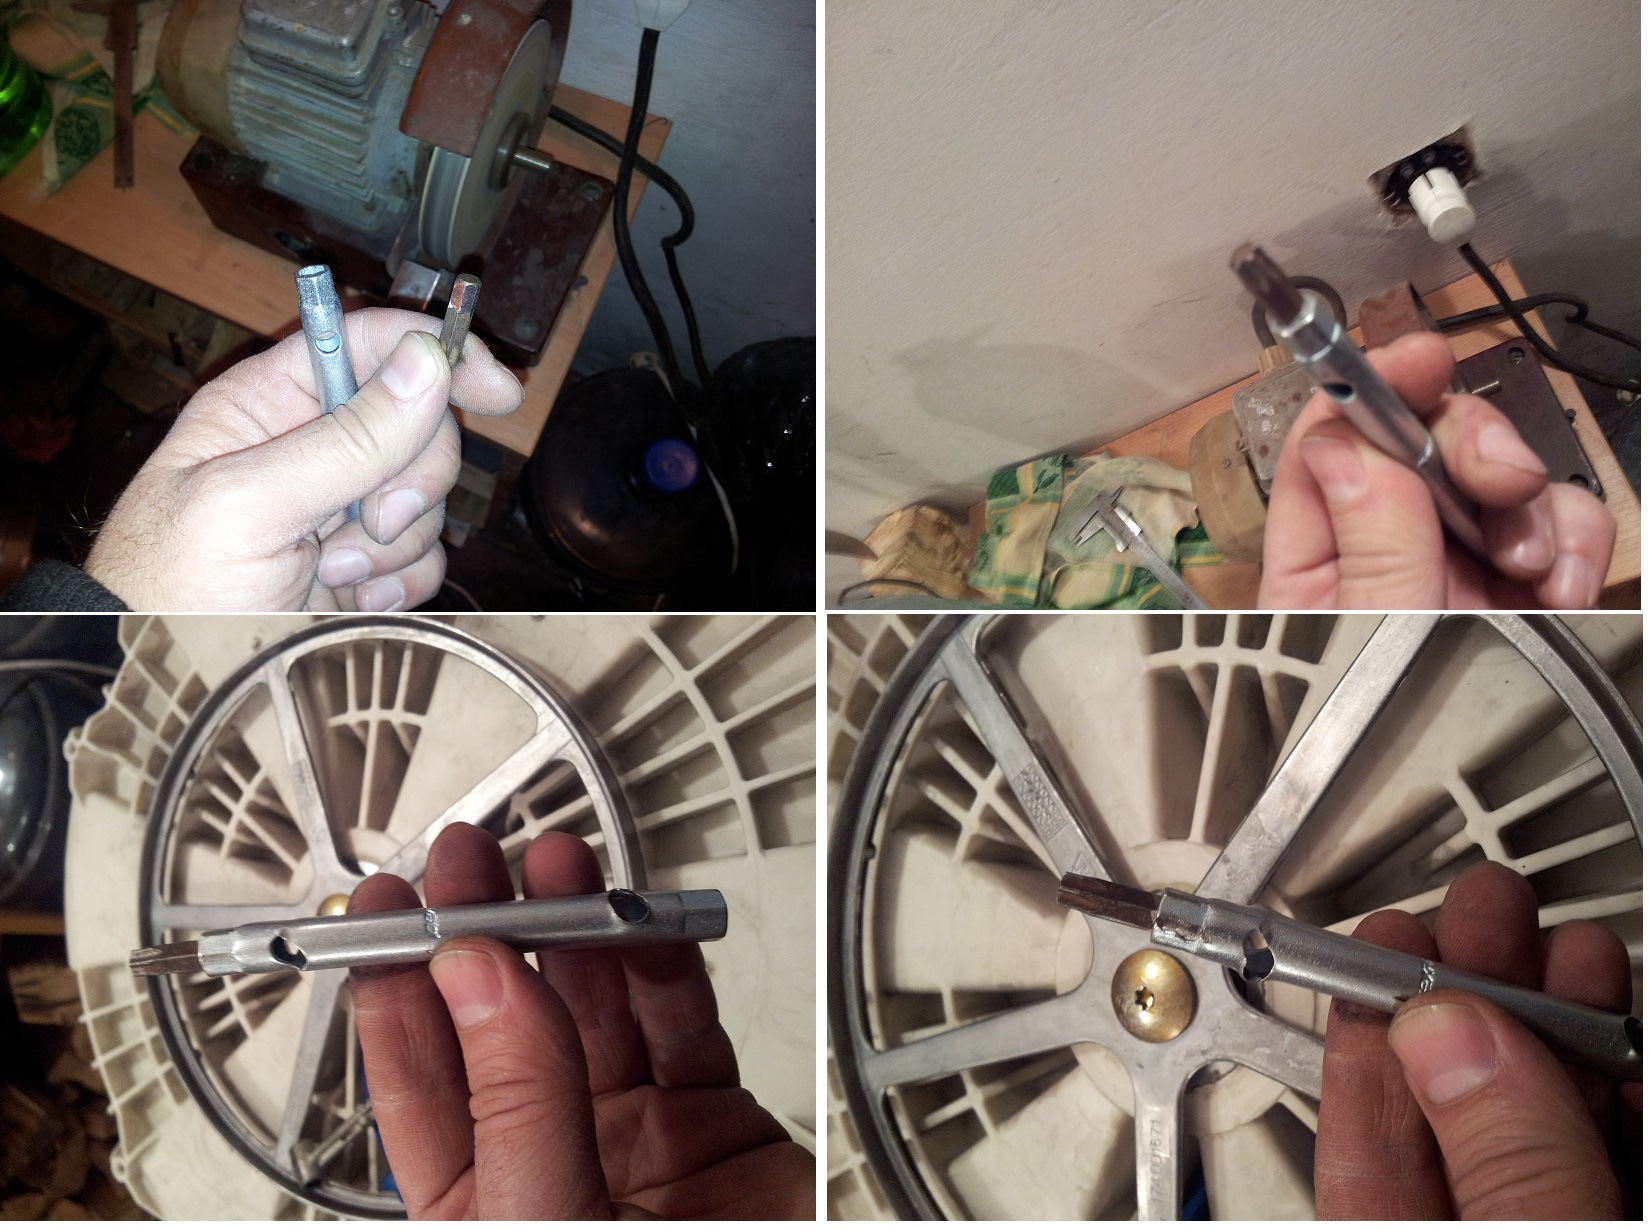
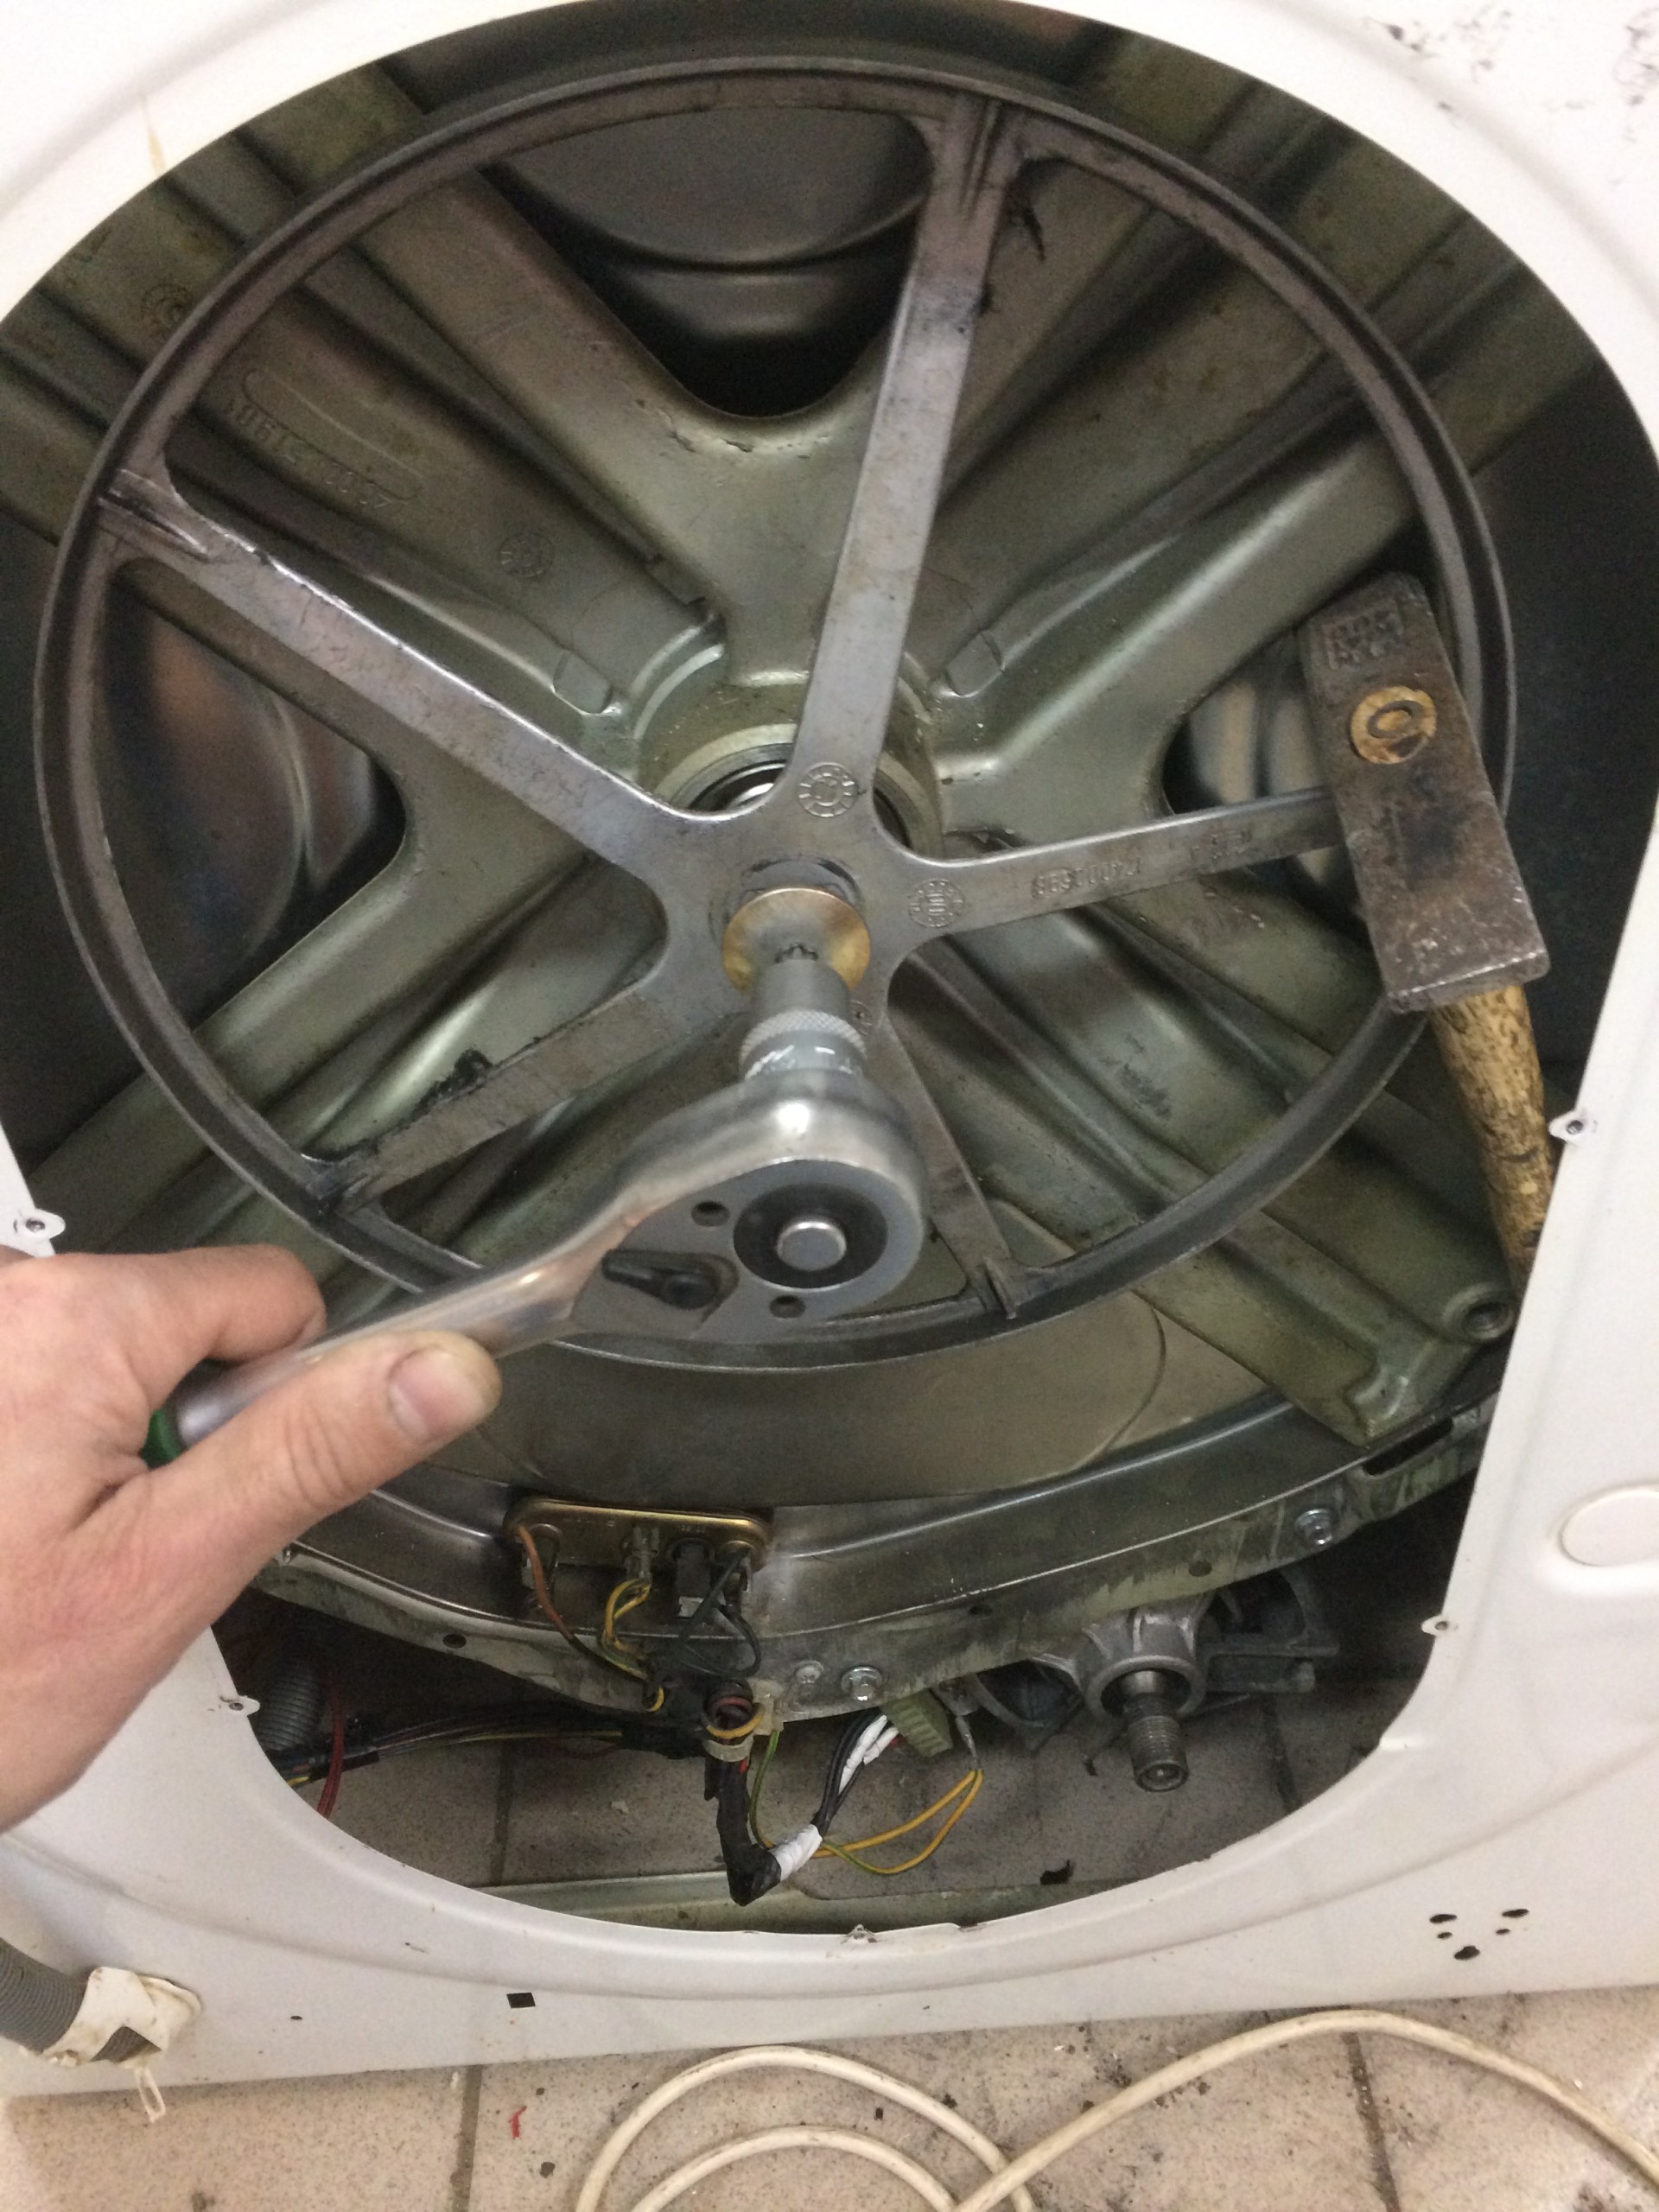
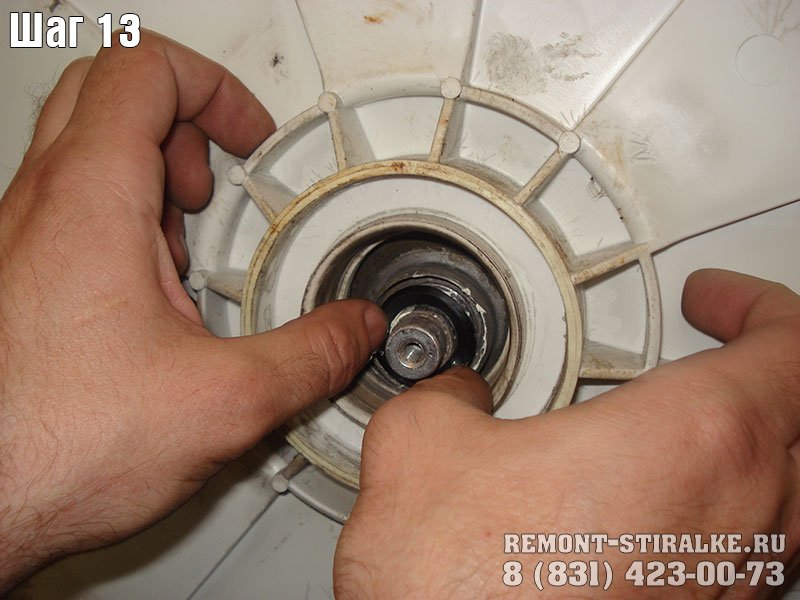
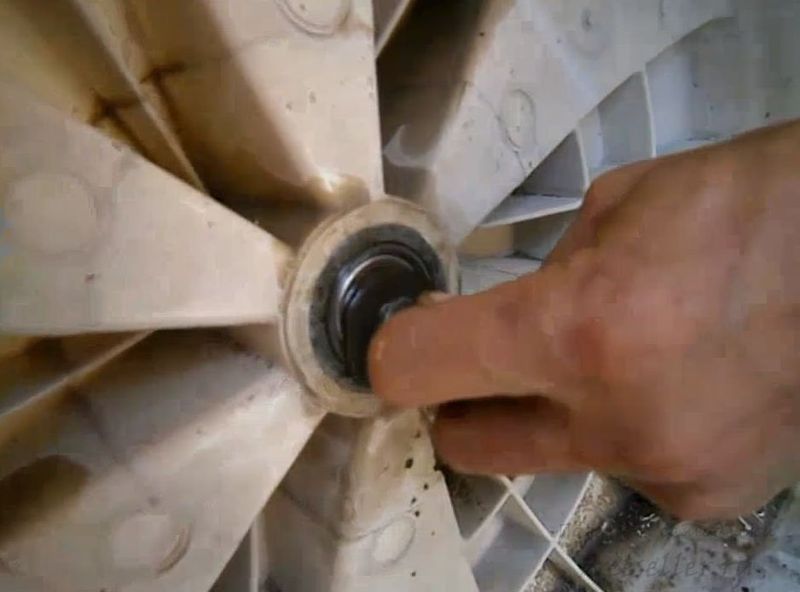
- We unscrew the pulley of the drum with a special key "asterisk" or with a chisel and a hammer.
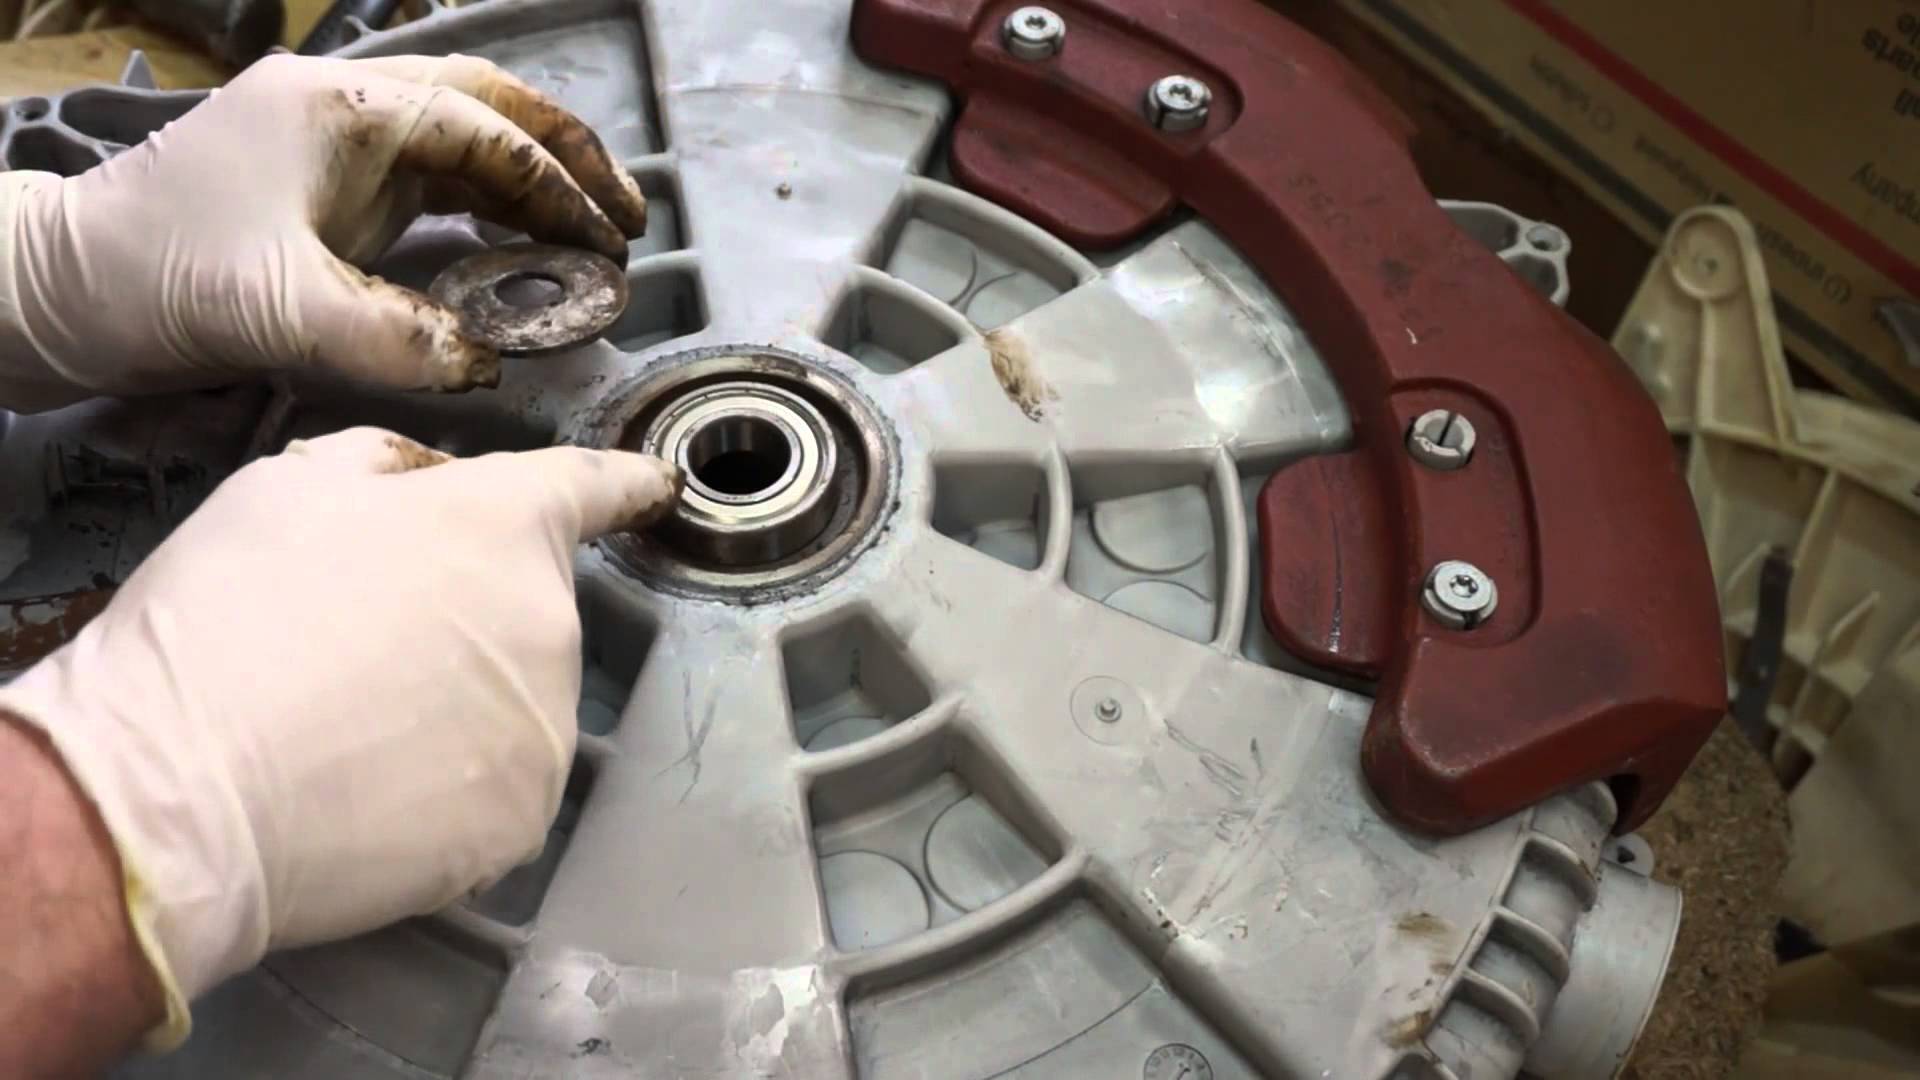
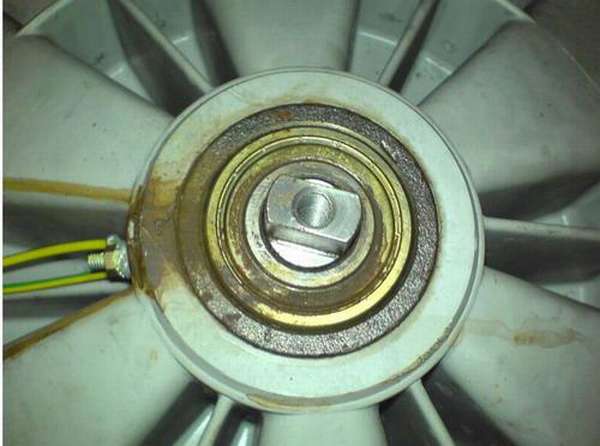
- With expanding movements, remove the pulley from the drum screw, under it is the bearing.
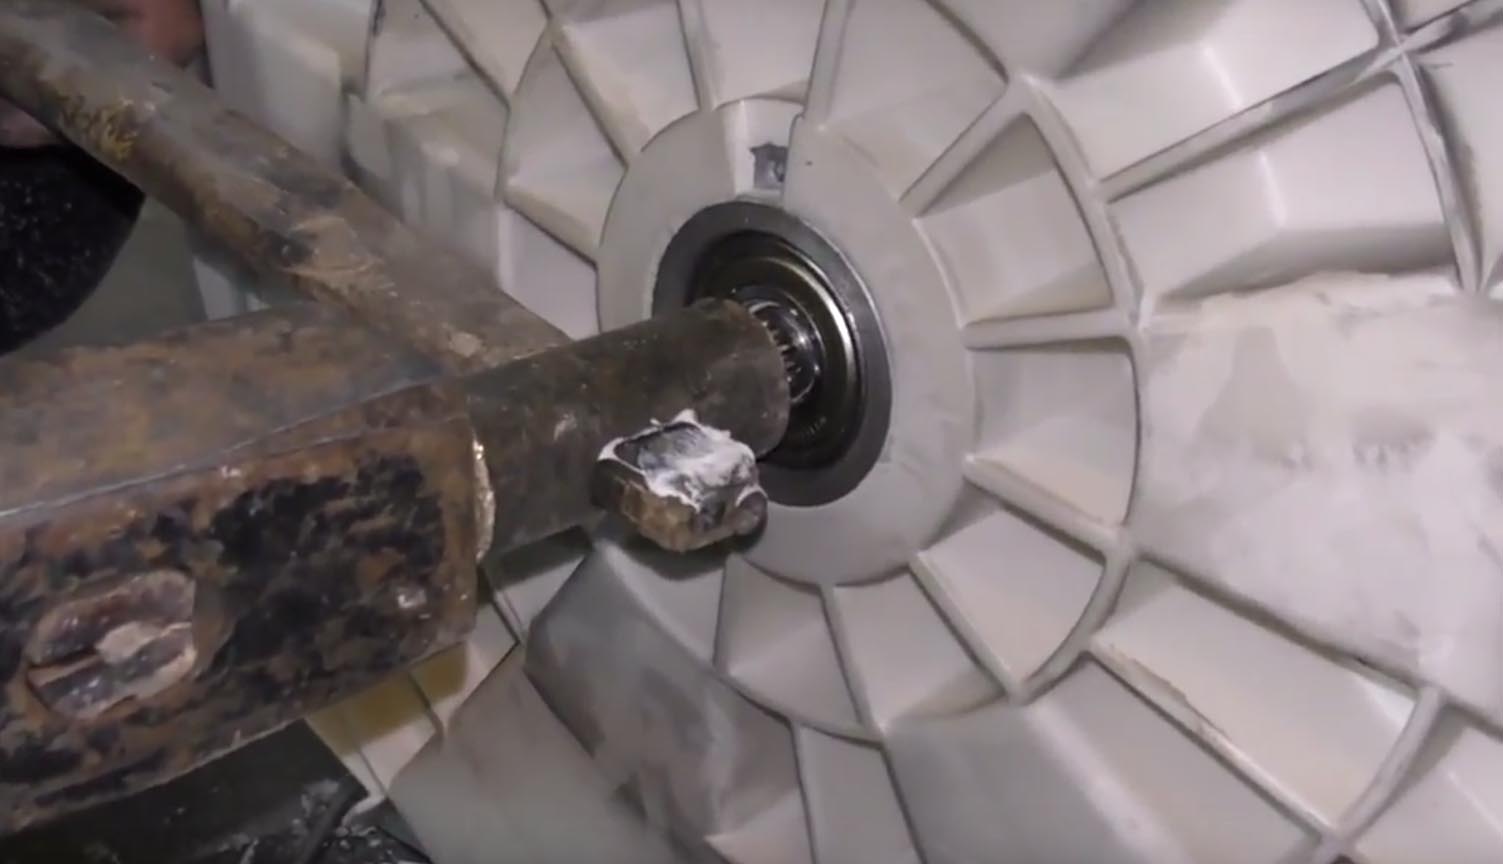
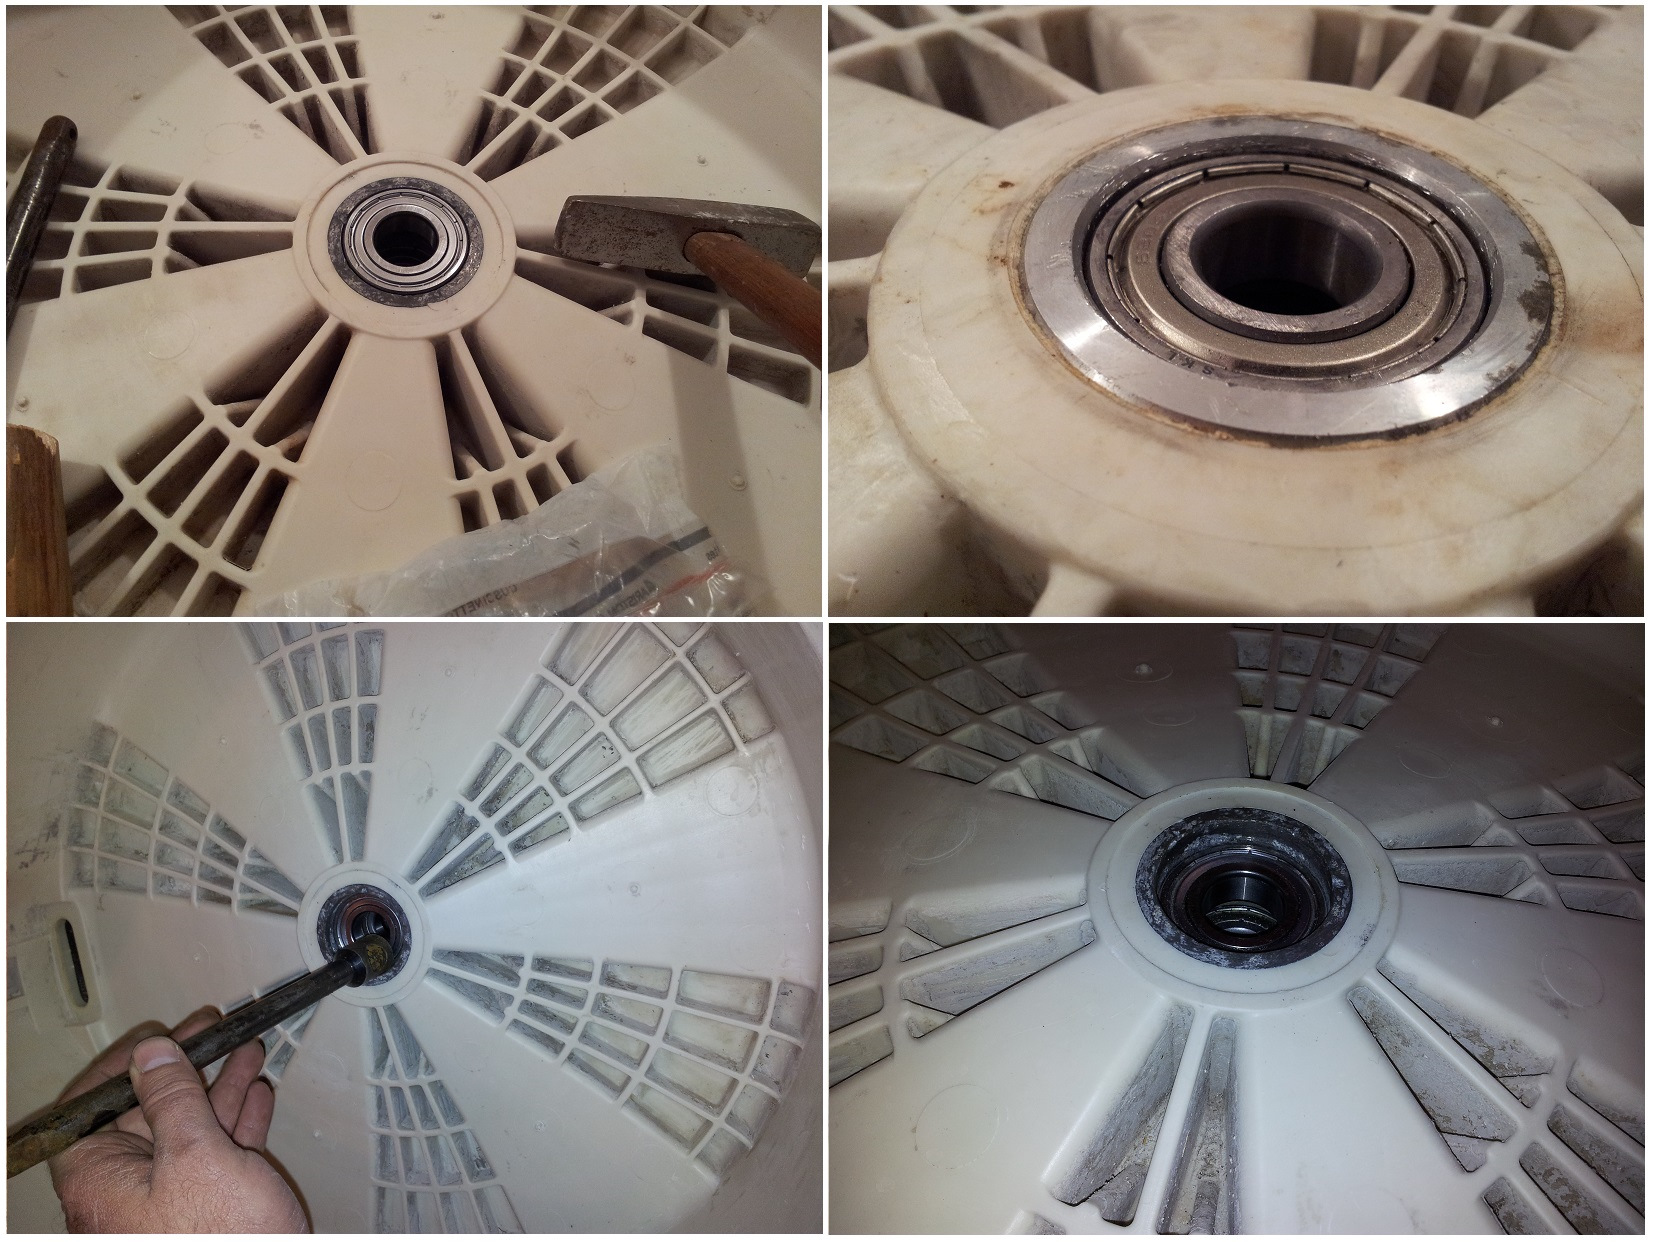
- We knock out the drum shaft inward, thereby separating the tank and the drum of the washing machine. You can first change the shaft to the old one so that the native shaft is not damaged by hammer blows. There are bearings on the inside and outside of the drum.
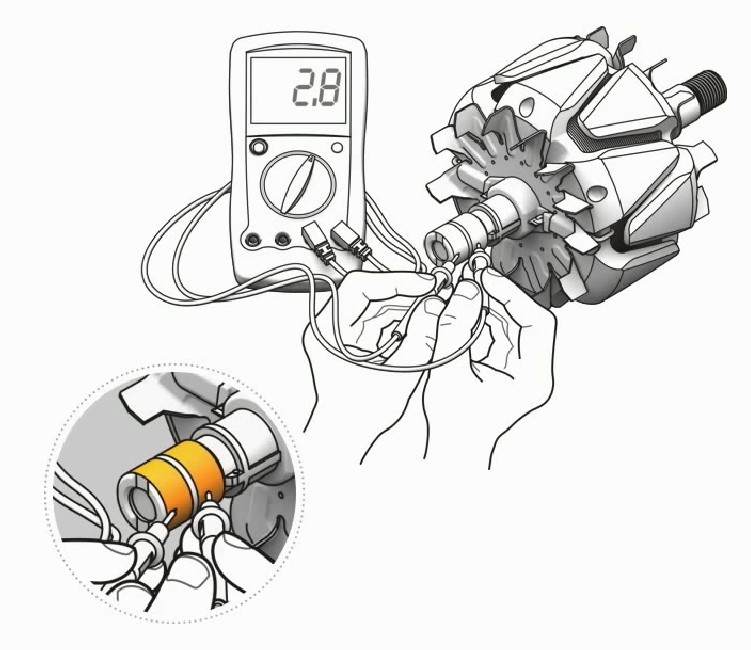
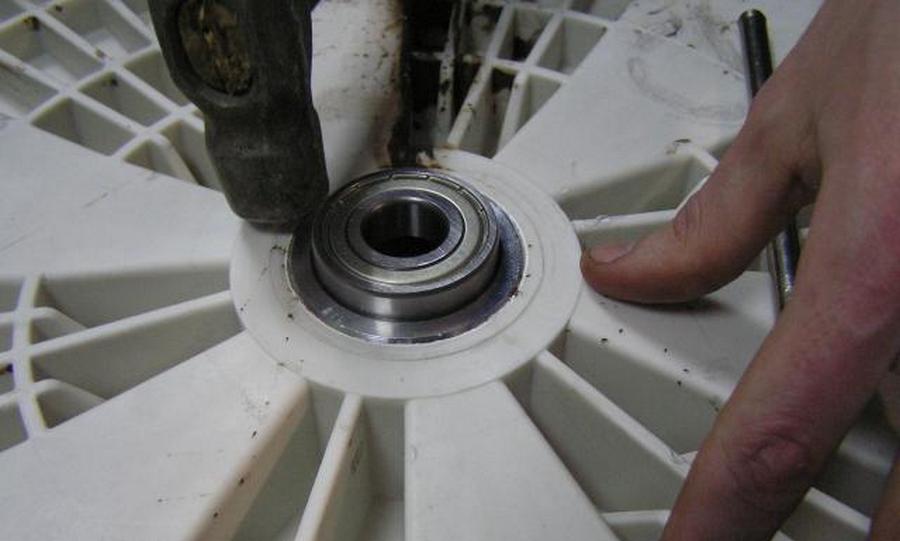
- By inserting a metal rod under the bearing race, you need to knock it out with a hammer in a circle. A special bearing puller can be used.
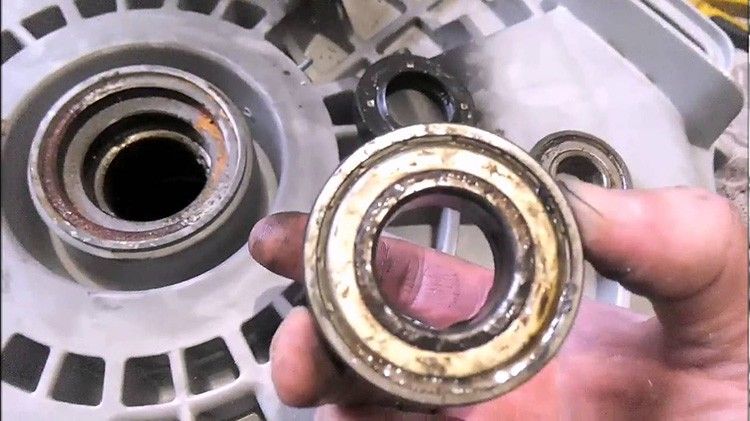
A bearing puller allows you to remove it quickly enough without damaging its race. This may be required in cases where the bearing is intact and the shaft on which it sits is damaged. The puller can be different in shape, especially since there are a huge number of them on sale.To remove the bearing from the drum of the machine, you need a puller whose legs are shaped so that when the bearing is pulled together, it would exert a load only on the inner bearing race; the load on the outer race should be minimal.
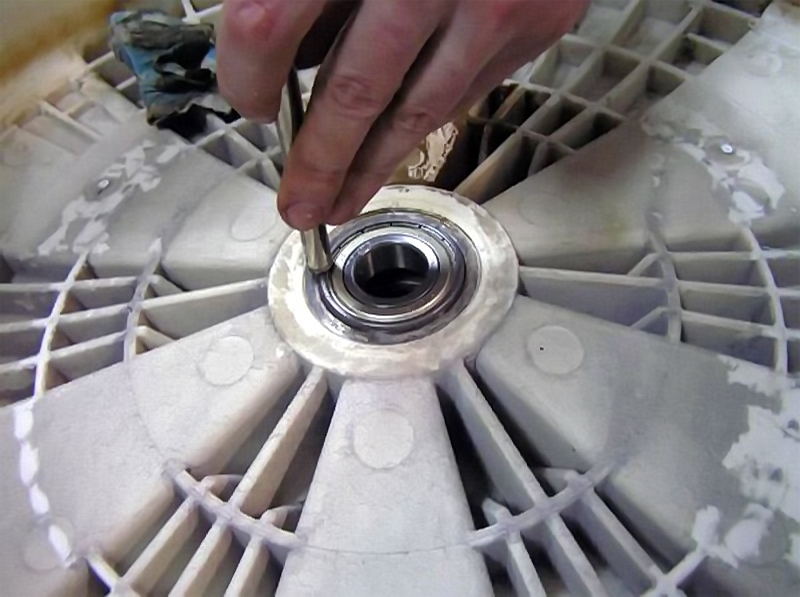
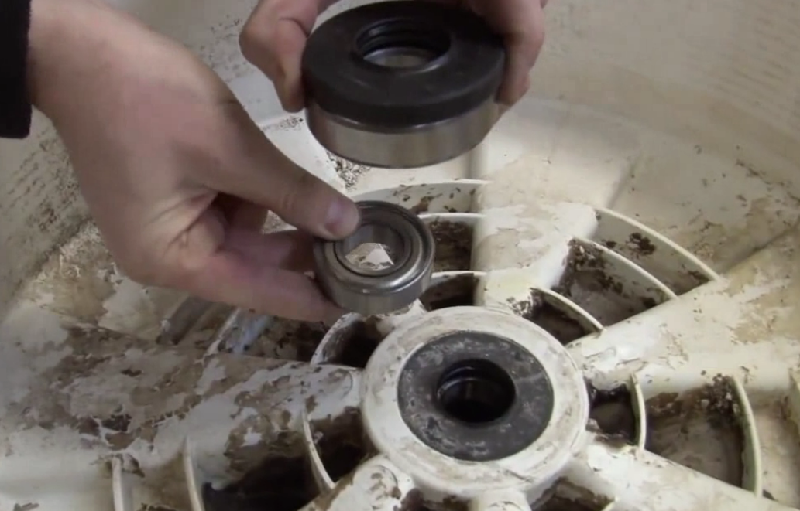
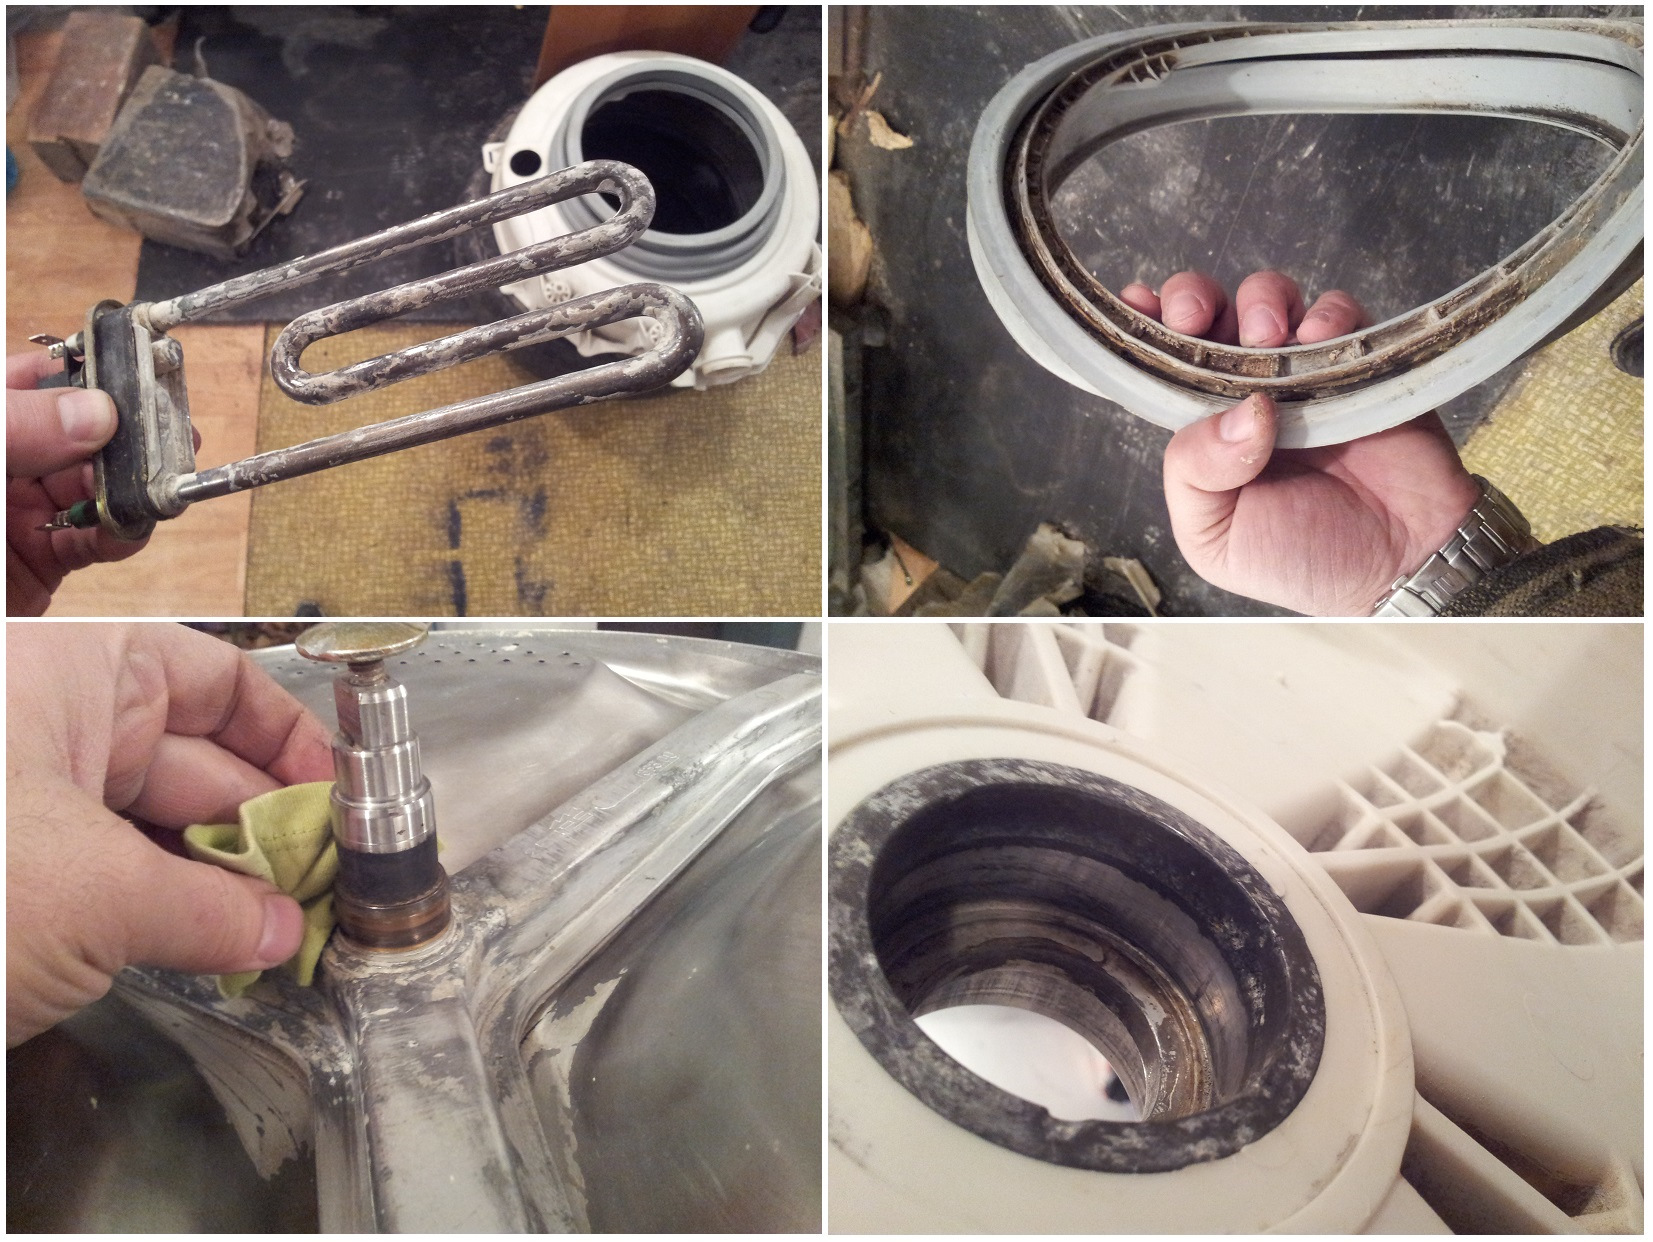
Usually, the small bearing is removed first, then the large one. The seals are removed in front of the bearings, it is reasonable to change them together with them. That's all, the bearings have been removed, now you can install new components and assemble the machine in the reverse order. When installing new oil seals and bearings, it is imperative to lubricate them to avoid water ingress. In addition, the lubricant will reduce friction between machine parts, which will extend the life of the machine.
Causes of bearing assembly failure
A bearing malfunction occurs when the washer is used incorrectly, natural wear of internal parts, and mechanical damage. If there is a breakdown, you need to establish a specific cause in order to carry out the appropriate repair or replacement.
Worn oil seal
The wear of the gland leads to water leakage during the wash process, which causes moisture to destroy the bearing. The oil seal is used to protect the bearings from direct contact with the liquid. The element is mounted on a single axle with bearings from the drum side. A bushing is located under the gland, which ensures the movement of the lip edges, which eliminates the penetration of water.
Violation of the rules for installing a washing machine
When installing the machine, certain rules must be followed. Before washing for the first time, unscrew the transit bolts, fix the unit on a flat surface and connect to the electricity and water supply in accordance with the attached instructions.
Regular tank overload
Overloading the drum of the washing machine with laundry on a constant basis leads to increased stress on the bearing. A high load will destroy the component.
We disassemble the washing machine tank
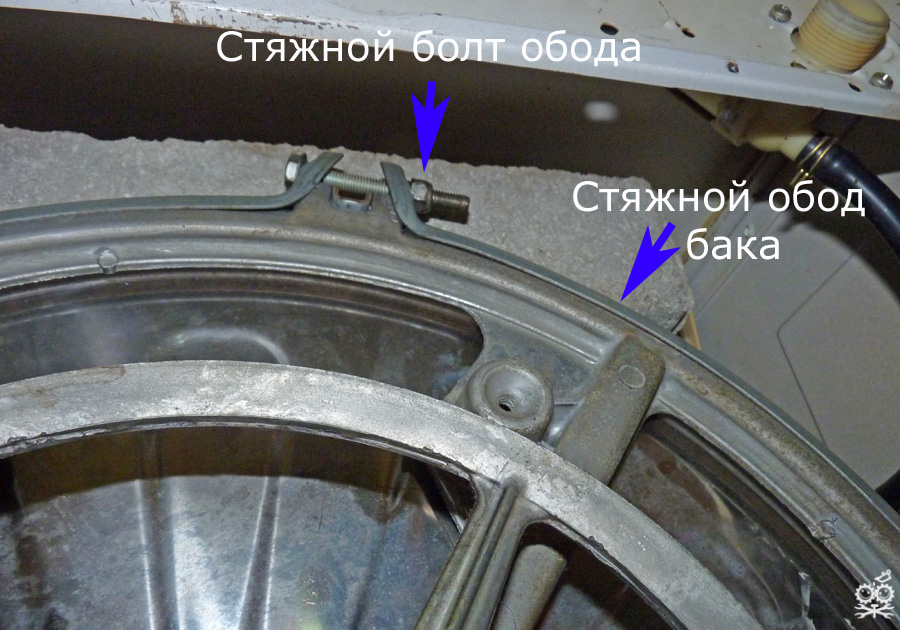
To get to the bearing, we need to split the tank into two halves and pull out the drum. Both halves of the tank are fastened either with special latches or with bolts that are located around the entire perimeter of the tank. Therefore, either detach the latches or loosen the bolts and detach the front half of the tank. You can clean the debris if you like before putting it back together.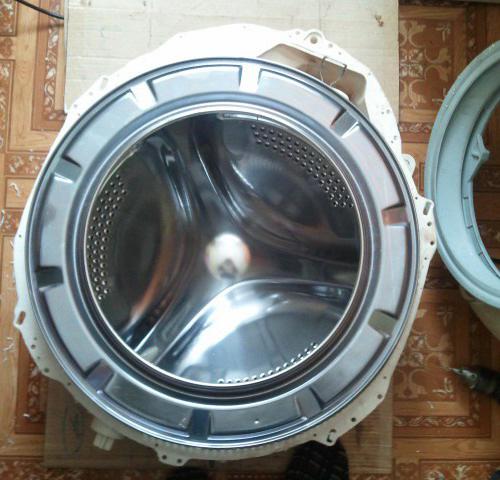
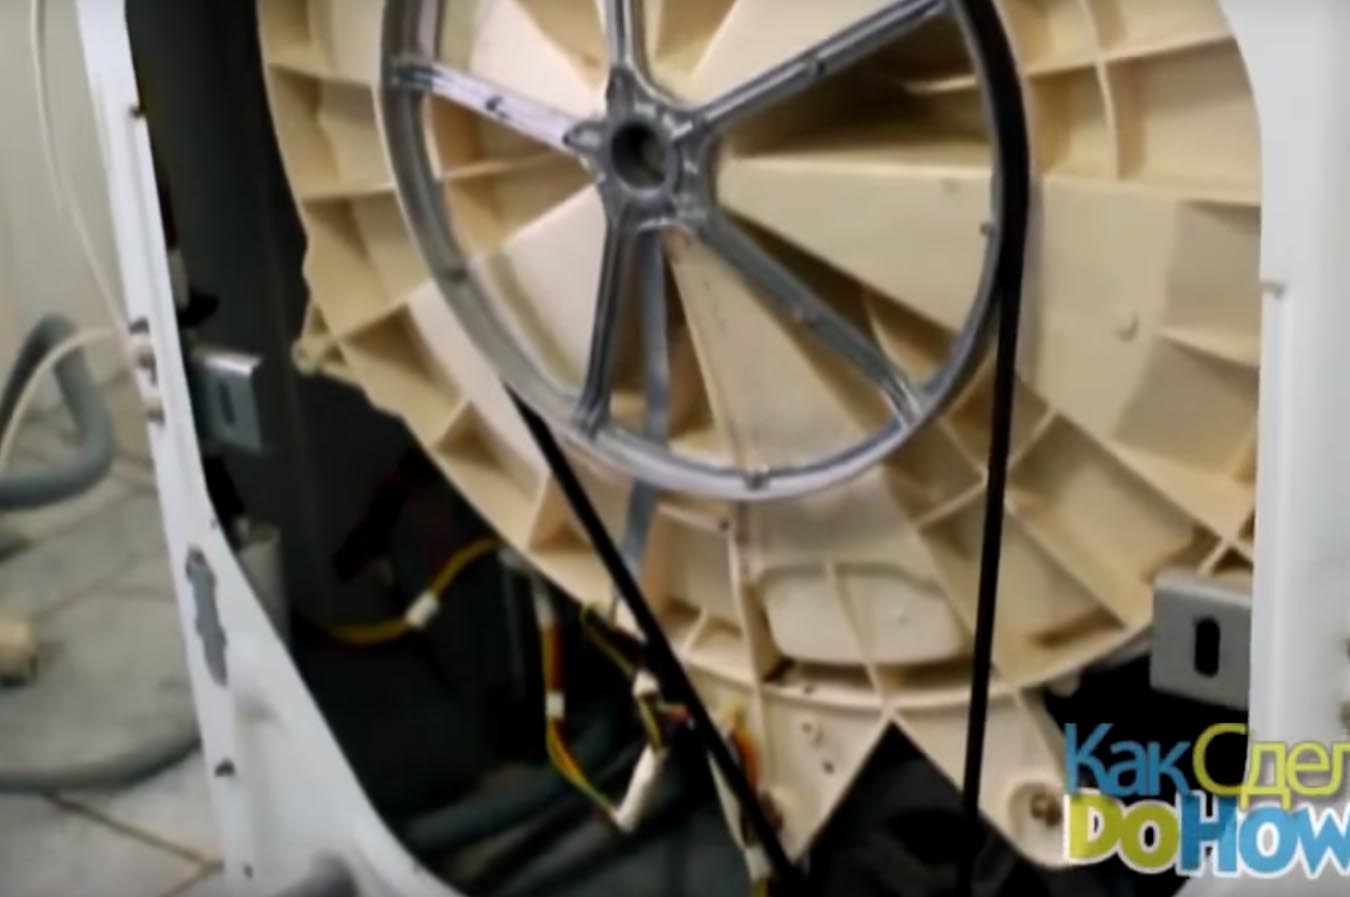
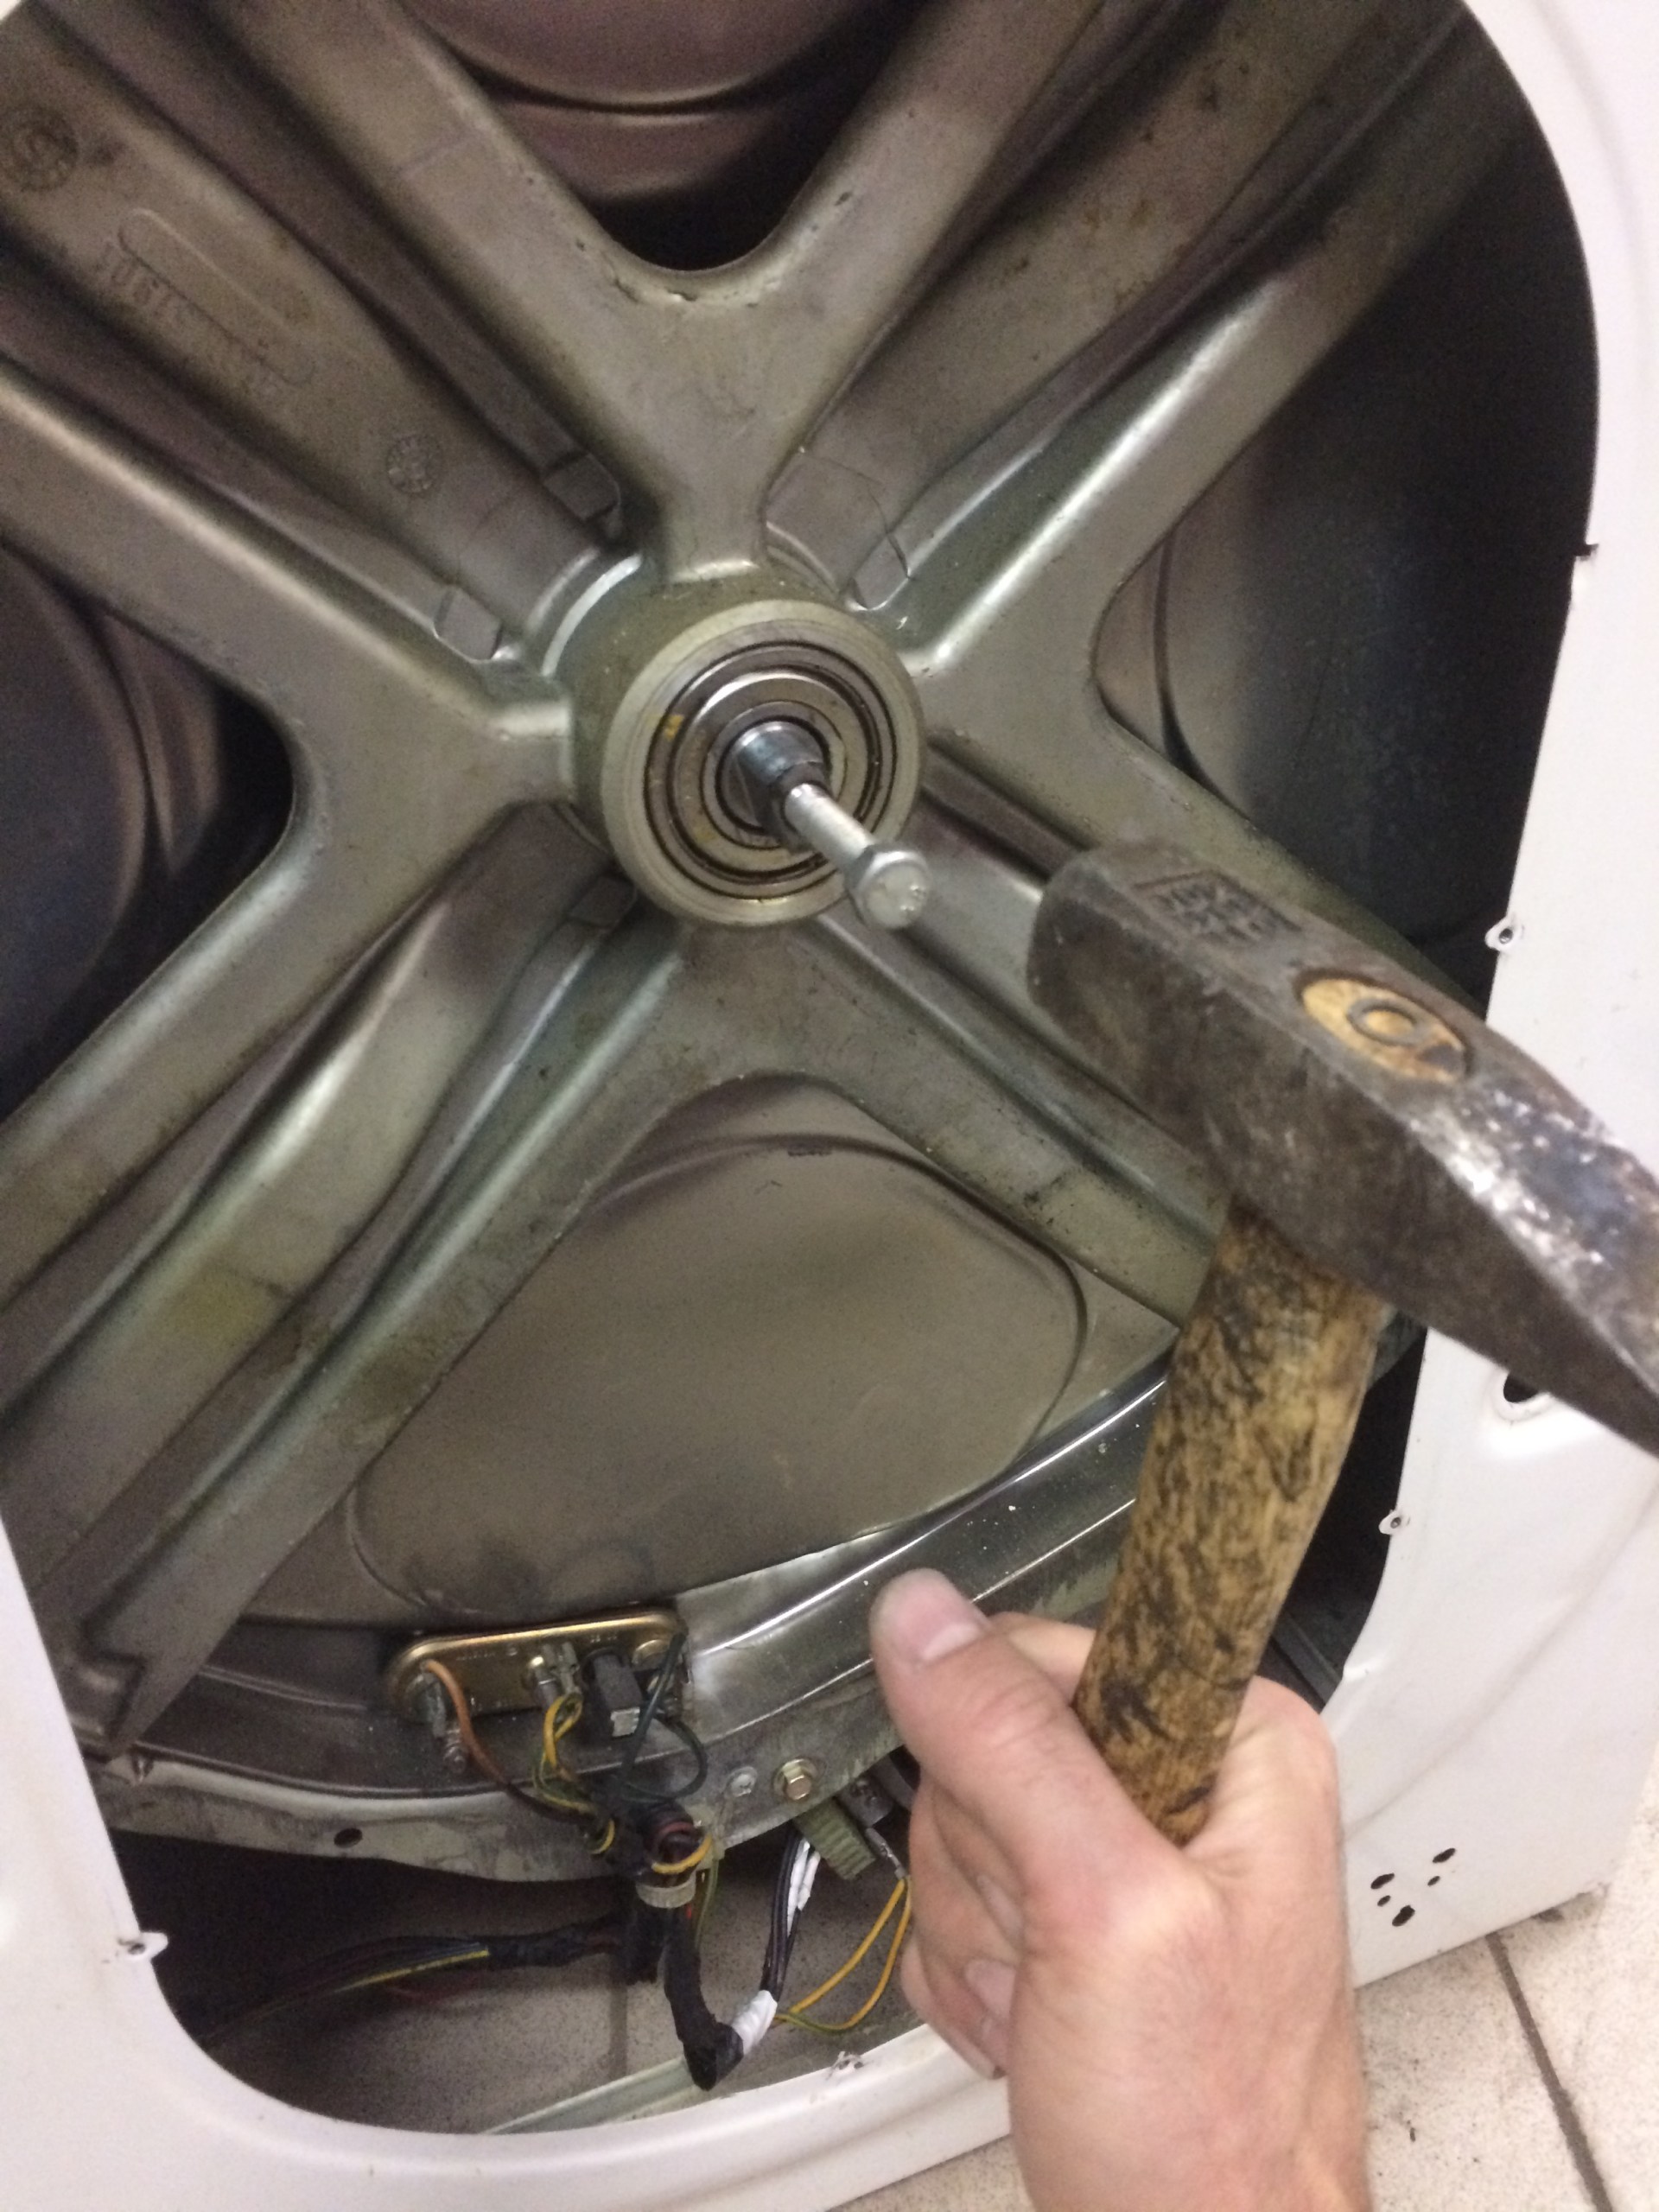
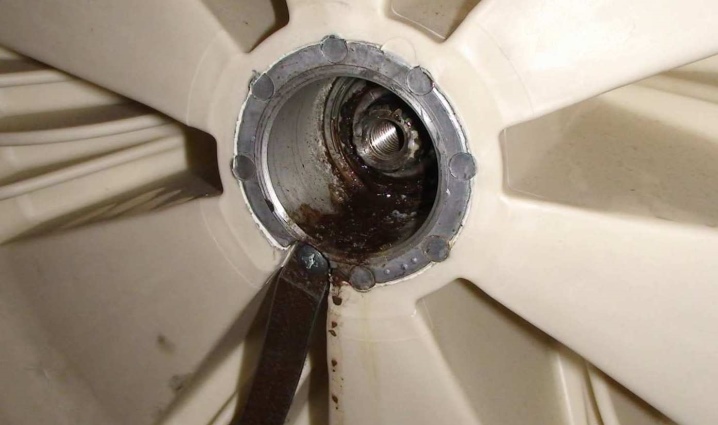
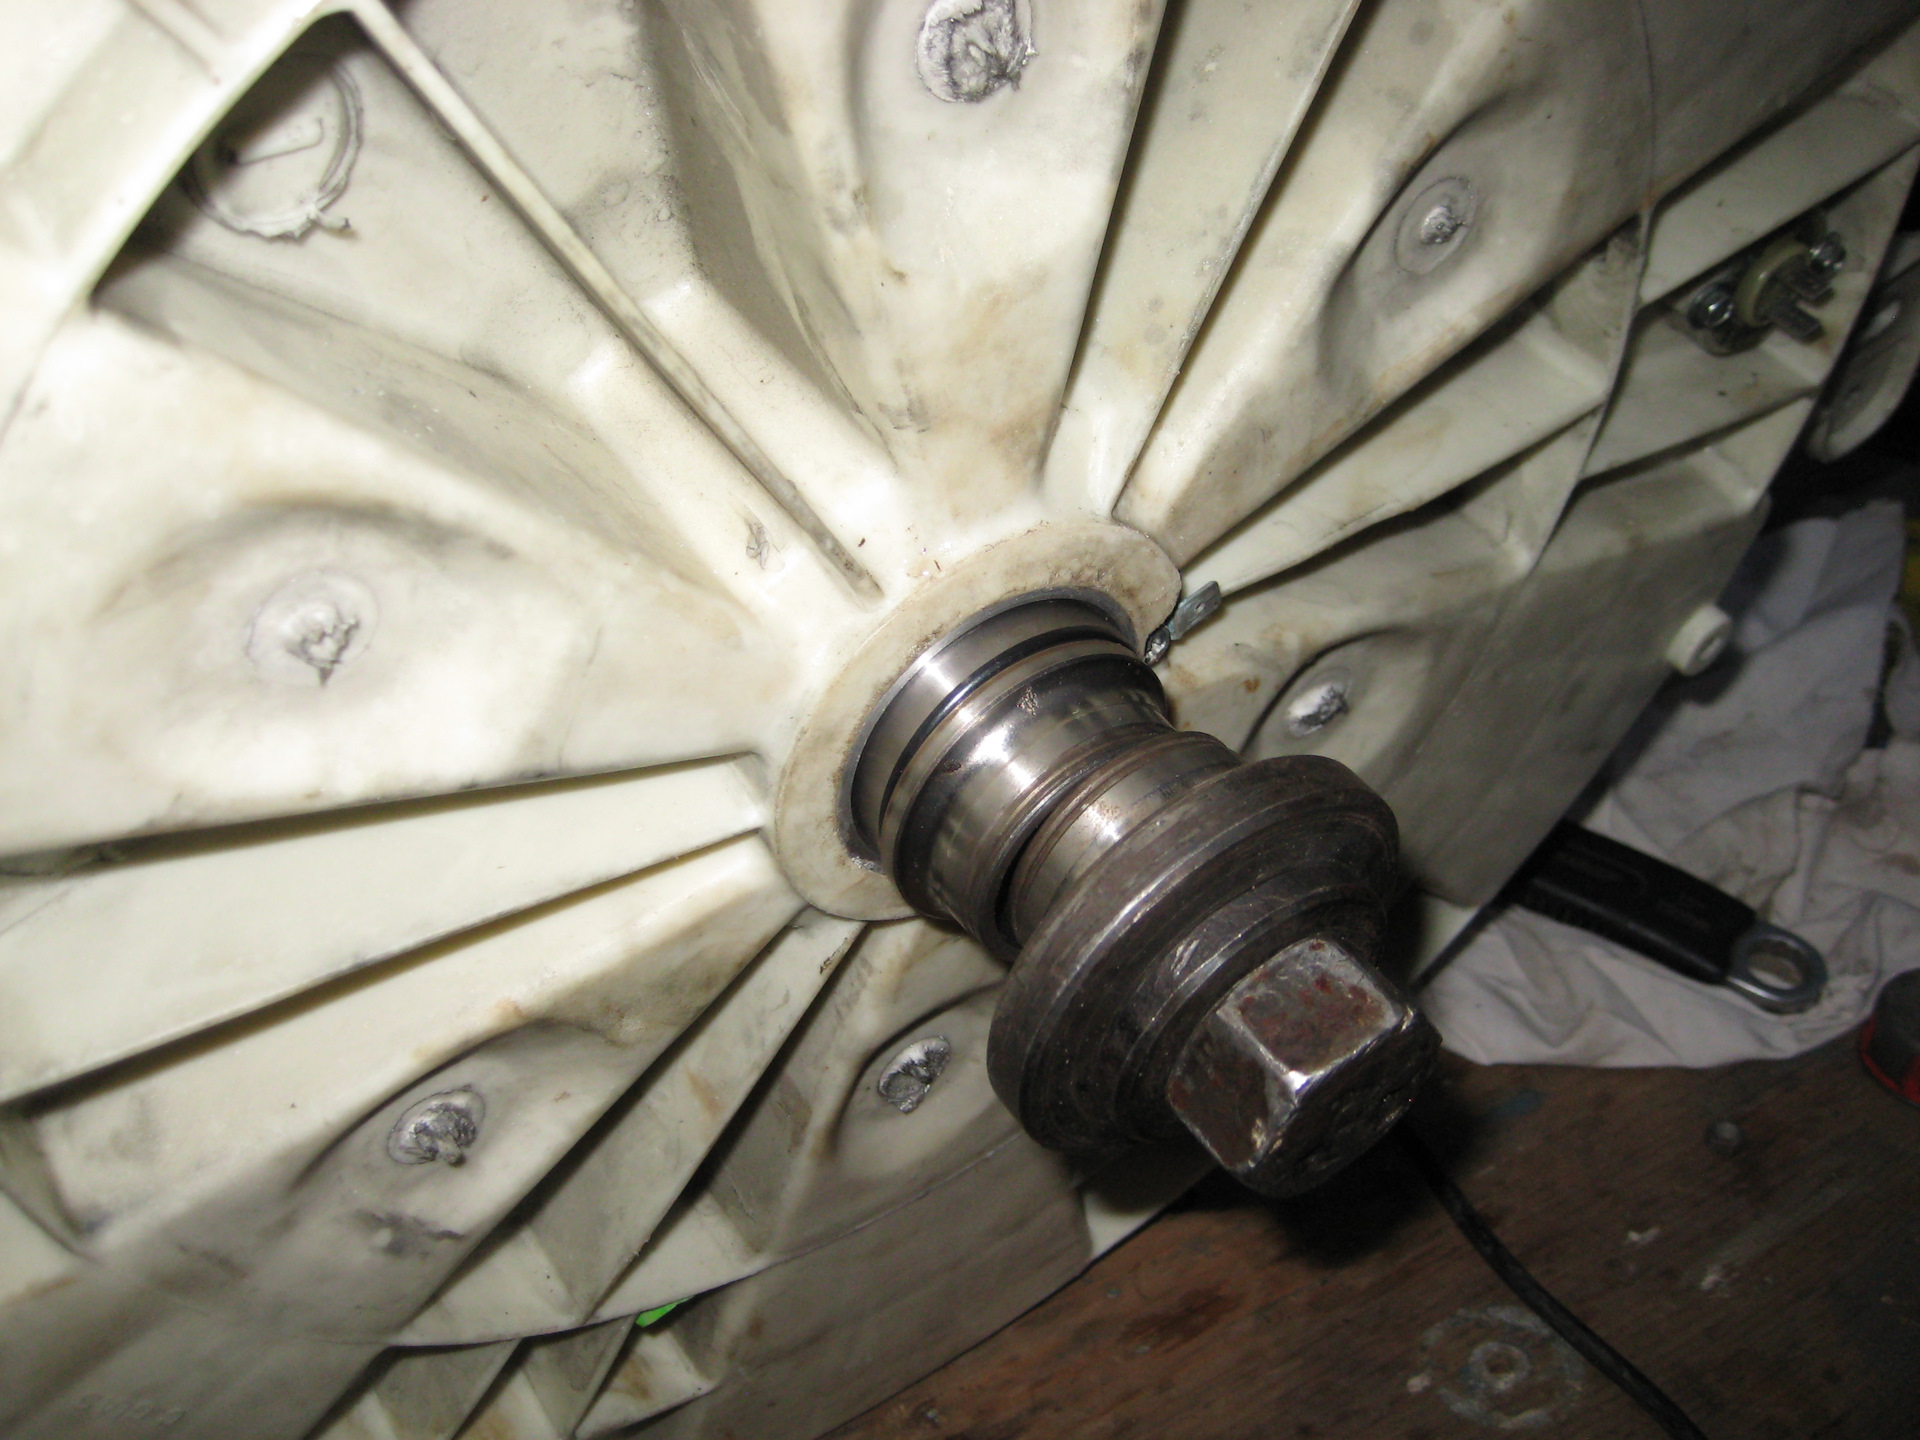
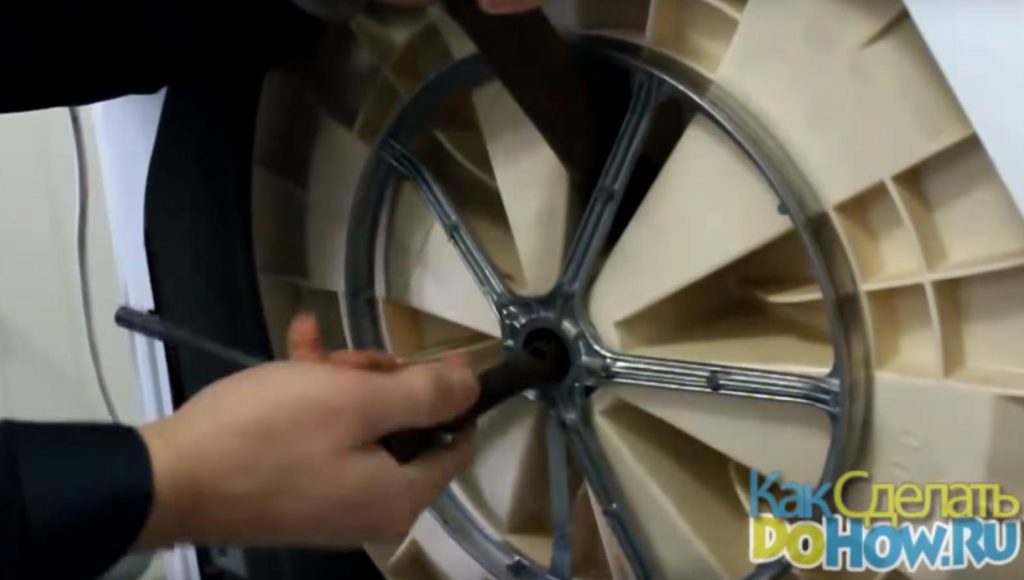
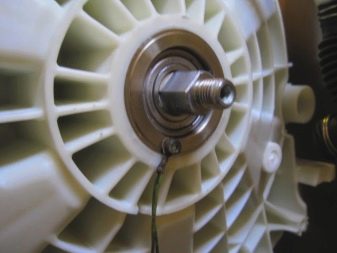
We proceed to detach the drum from the back of the tank, for this we need to remove the pulley. We unscrew one bolt with a wrench that holds the pulley on the drum axis, after which we remove it from the axis and remove it to the side. And the bolt that we unscrewed is screwed all the way back into the shaft so that when knocking out the drum, the shaft itself is not damaged.
Next, we knock on the shaft with a small hammer, trying to knock it out. If the shaft moves a little, then we continue in the same spirit. If the force is already large, but the shaft does not lend itself, then it is better to unscrew the standard bolt and replace it with any other that you will not mind throwing out, since with a lot of effort the bolt can be deformed. As soon as the shaft has sunk to the bolt head, unscrew the bolt and take out the drum from the back wall of the washing machine tank.
Inspect the bushing and shaft on the drum. If you delayed the repair, then they could wear out and then you will also have to change the crosspiece, which significantly affects the price of repair. In order to check the integrity of the shaft, wipe it well with a rag and see if there is any degradation on it. For more confidence, take new bearings and slide them onto the shaft. After that, check that there is not even the slightest play in the bearing. If there is a backlash, then you need to replace the crosspiece with the shaft.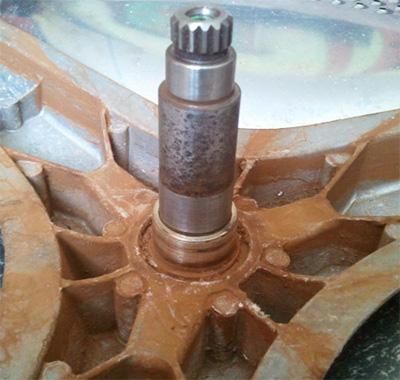
Also check the bushing, which is on the shaft and on which the oil seal is put on, it should also not have strong wear and transverse grooves. Under the condition of a large output, the oil seal will allow water to pass through and the new bearing will quickly fail.
Features of repair with vertical loading
If it is necessary to replace a faulty bearing in a top-loading machine, a number of design features must be taken into account. In these types of equipment, the drum has a support on 2 axle shafts and 2 shafts. The replacement process is much easier thanks to such a device.
First, replace the bearing from the side where the drive pulley is missing. For this purpose, the caliper is removed, which consists of bearings and an oil seal connected in one housing. To change the caliper from the side of the internal engine, begin with removing the belt and drum pulley. Next, they begin to remove the grounding blocks, after which the caliper itself is unscrewed.
The location of the oil seal and the shaft itself is cleaned of accumulated dirt, and then treated with lubricant
When installing a new bearing, it is important to ensure that the sealing material is not skewed. Otherwise, it will not be able to provide protection against fluid leakage, which will provoke the occurrence of another malfunction.
After installing the new oil seal and bearing, tighten the caliper securely, avoiding damage to the threaded connection. The subsequent assembly of the washing machine is carried out in the reverse order.

Share link:
Required tools
You won't be able to get to the bearing without special tools, because you must first disassemble the washing machine. In order not to damage the spare parts, you will not be able to arm yourself with only one screwdriver. For this purpose, you need a whole list:
- pliers;
- screwdrivers - slotted and Phillips;
- chisel;
- an ordinary hammer;
- waterproof sealant;
- a set of keys;
- rubber hammer (optional).
Do-it-yourself bearing change is a laborious and responsible process at every stage. In fact, you will have to completely disassemble the washing machine, and then assemble it. It is advisable to photograph each step, and record the sequence of actions. Only in this case it will be possible to carry out the replacement successfully.
Important! A waterproof bearing grease must be purchased with the tool kit. In the absence of it, you can use lithol.
Preparation process
If the bearing has collapsed, the washing machine will make a loud noise during the spinning of the laundry. The hum will only intensify after each wash. Because the sooner the bearing is replaced, the better. The shaft and the seat under it will also be damaged ahead of time if you operate the washing machine with a part that is out of order. The oil seal also wears out, which leads to the appearance of additional marks on the linen.
If the shaft has undergone abrasion, processing with the participation of additional equipment will be required. The crosspiece is bought if it turns out that restoration is impossible. It is quite difficult to find a part that would be absolutely suitable for a particular brand of washing machine. Usually you have to place an order, it takes from several weeks to a month to wait for delivery.
A complex of repair work for replacement is carried out using the following tools:
- A gun with sanitary silicone.
- Hammer and chisel, punch, knife.
- Round nose pliers and pliers, wire cutters, clamp removers.
- Socket set. Sizes 17, 13, 10, 8 are used.
- Phillips screwdriver.
- Slotted screwdriver. If everything is there, it will not be difficult to replace the bearing.
The grinder is also used, but only if complications arise. You cannot do without a special grease for oil seals together with a thread lock. The latter is available in blue. A tool like a flashlight will also come in handy. Without it, the replacement will not be as effective.
Do-it-yourself step-by-step replacement of worn out bearings
After disassembling the washing machine, you need to go directly to replacing the old bearings. The process of removing and installing components requires adherence to a number of nuances.
Preparatory work
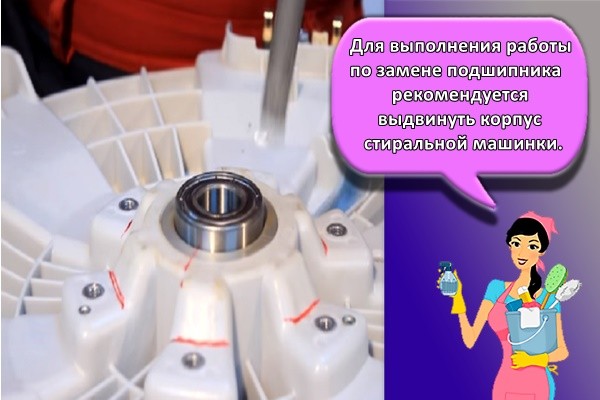
For bearing replacement work, it is recommended that you move the washing machine body further away from the walls so that you can move freely around the device. To perform a replacement, you should arm yourself with the necessary tools in advance and purchase new bearings. Component selection is easiest based on the characteristics of the worn parts.
Removing a damaged part
After dividing the tank into two halves, the area around the bearings must be cleaned of contamination and knocked out with a chisel or other suitable tool. In addition to the bearings, the oil seal has to be removed. The freed seat nest must be cleaned of dirt and lubricated with lithol.
Installing new bearings
Changing bearings, as well as removing old components, is done with a chisel and hammer. The bearing should be lubricated with grease and fixed securely in the seat.
Reassembling the washing machine
The assembly of the washing machine is carried out in the reverse order. First, the tank is installed in place, and then all the other removed parts. When assembling, you need to use photos and videos taken during the disassembly process in order to avoid mistakes. After final assembly, it is advisable to carry out a test wash to ensure that the equipment functions properly.
How to replace a bearing?
Having pulled out the tank, we determine its appearance. Washing machine tanks are split and non-split. The split tank consists of two halves connected by brackets or bolts. In this case, you just need to remove the fasteners. If the tank is solid, we cut it along the weld with a hacksaw for metal.
Next, we act in this order:
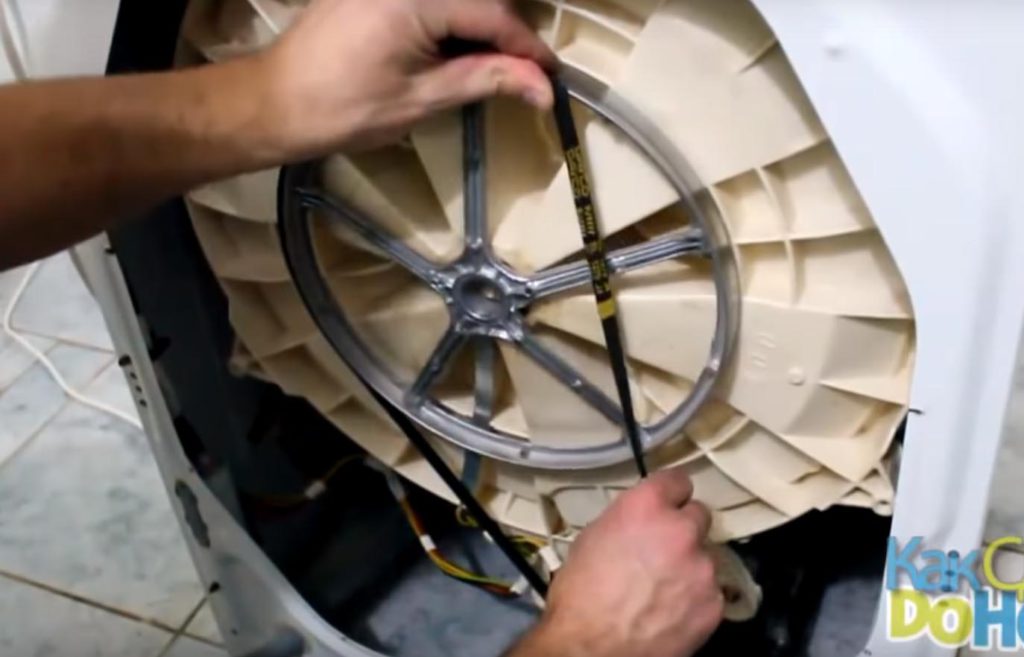
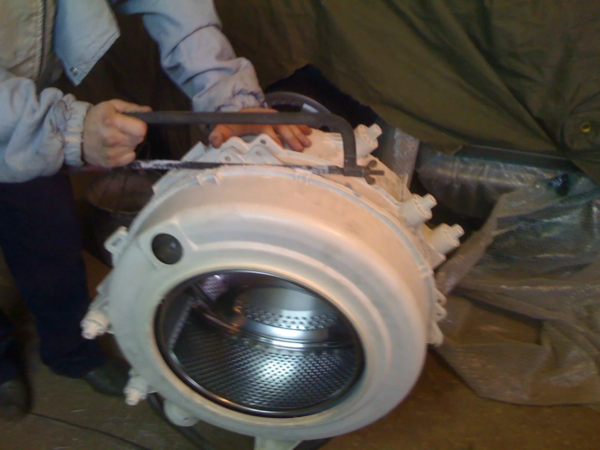
- We detach the pulley (wheel) of the drum. We do this using a suitable sized wrench or work with a hammer and chisel.
- We loosen the pulley and carefully remove it from the screw.
- Using the same tools, trying not to damage the shaft, we knock the drum out of the hatch.
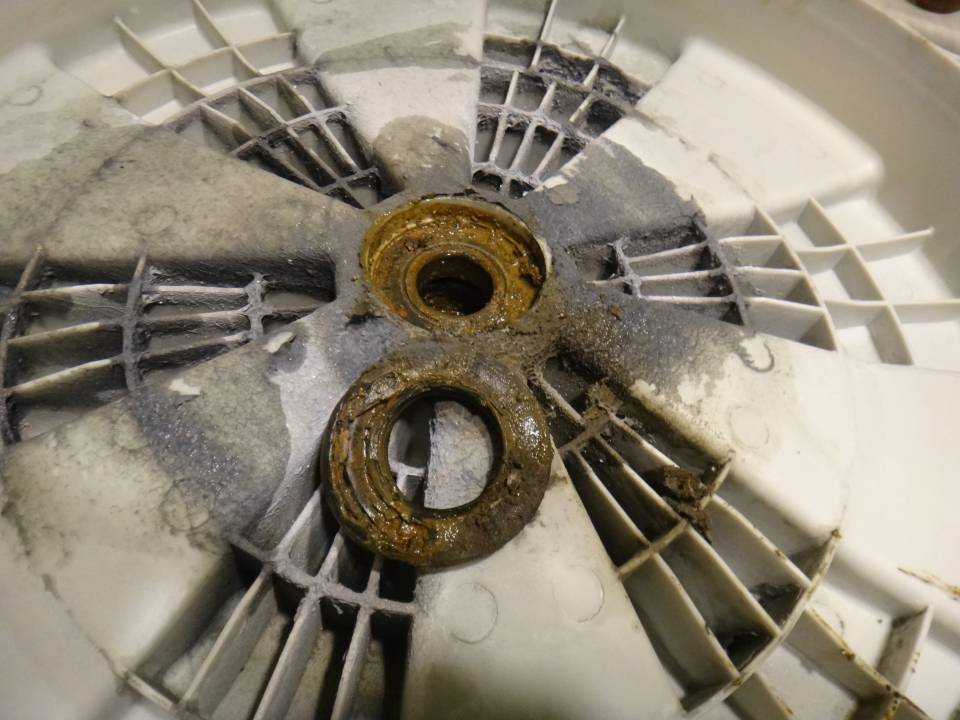
- We find bearings on the inner and outer parts of the drum. Moving in a circle, we knock out the worn out bearing from the seat.
- We clean the nest from dirt, treat it with a sealant or special grease.
- We drive a new bearing into the socket and replace the oil seals.
Visually, you can watch the whole process of replacing the bearing in the following video instructions for some brands of washing machines.
Subtleties when repairing washing machines from different manufacturers
Above, we examined the standard options for dismantling and replacing bearings and oil seals. However, each model of washing machine may have a slightly different removal and installation process, and we will briefly discuss this below.
"Indesite"
Since the analysis of such a device requires certain professional skills, it is better to immediately contact a specialist. Most often, the breakdown is associated with damage to the spider on the drum or jamming of the electronics.
 This washing machine is difficult to disassemble
"LG"
Most often, washing machines from this manufacturer are front-loaded, so dismantling must begin by unscrewing the side wall on the right side. Here you should be careful when breaking the electric motor, otherwise you can easily damage its elements.
Samsung
The difficulty in dismantling machine elements is that the bearing mounts are weak, so they can be easily damaged through carelessness. Work should be done carefully, without using physical force.
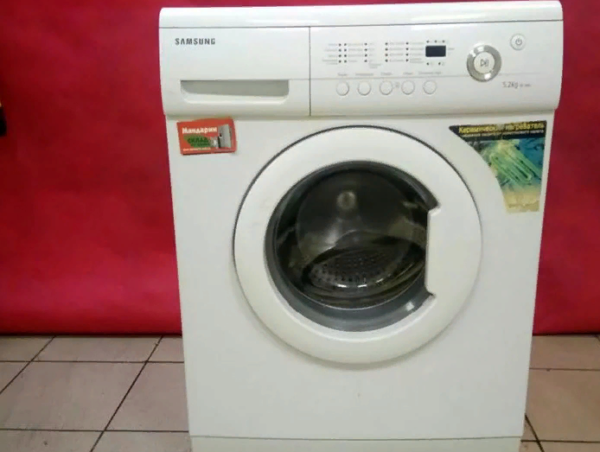 Most of the devices from this manufacturer are also front-loading.
Replacing a bearing on the drum of a front-loading washing machine
In this case, the process is complicated by the fact that you have to get the drum out of the device. We will consider the sequence of actions on the example of parsing a Samsung washing machine. This is a standard model, so it will be possible to replace bearings in devices from another manufacturer using the same principle.
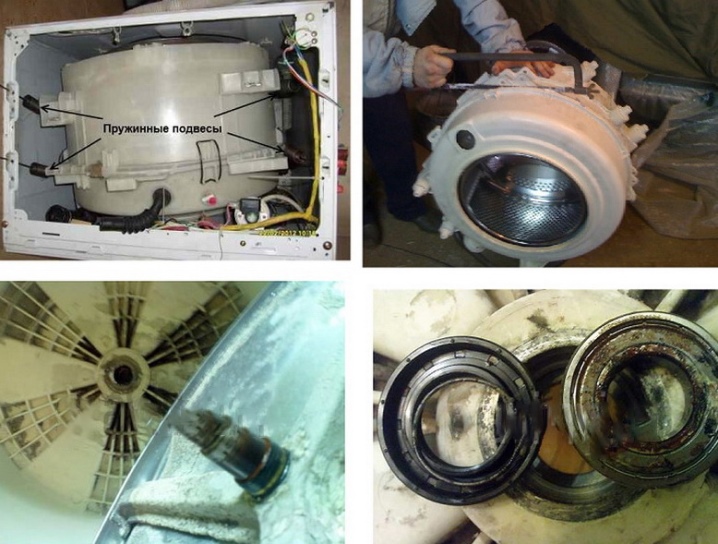
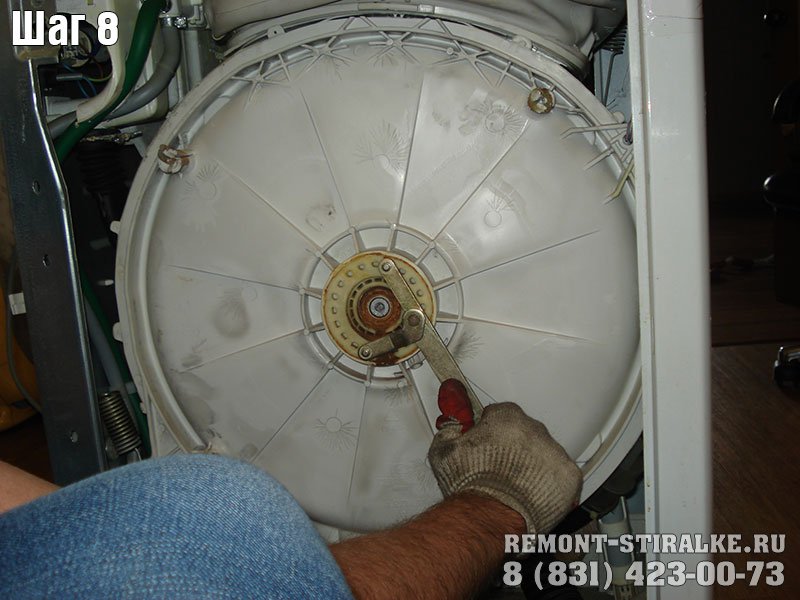
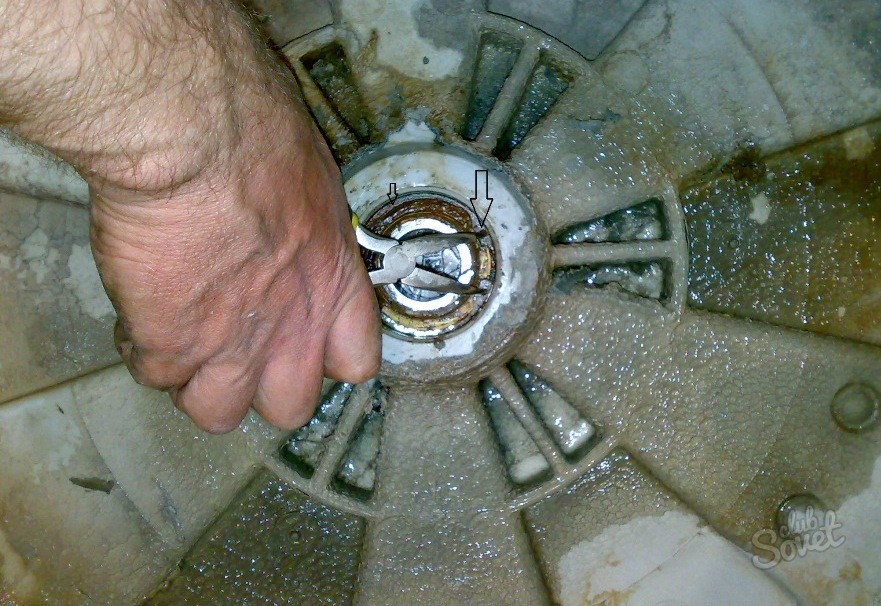
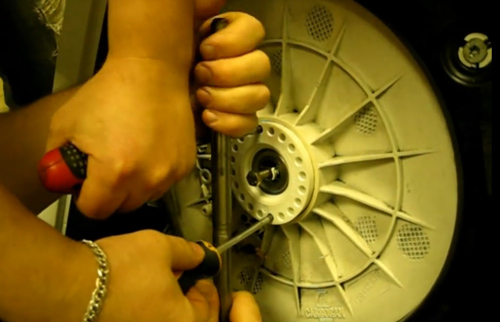
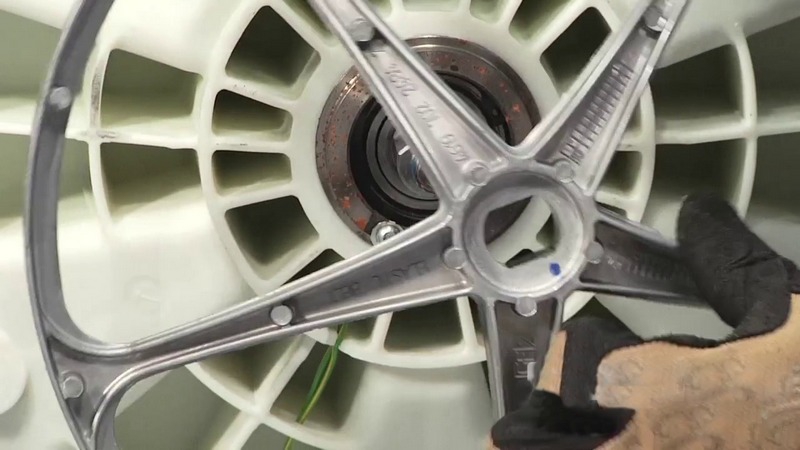
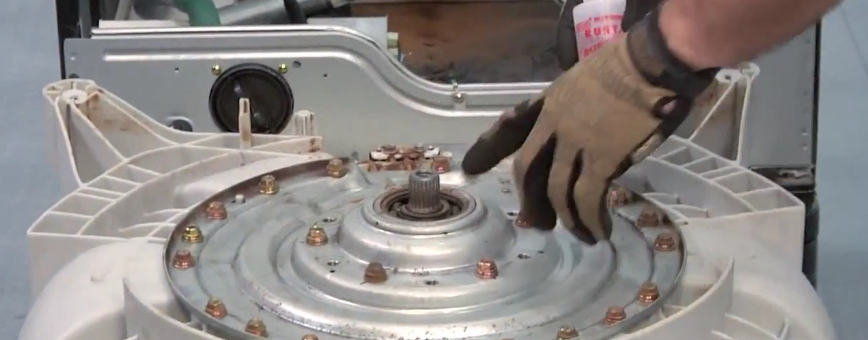

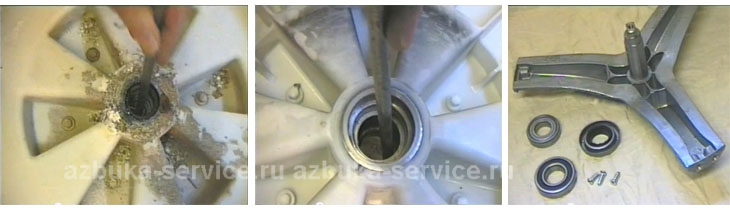
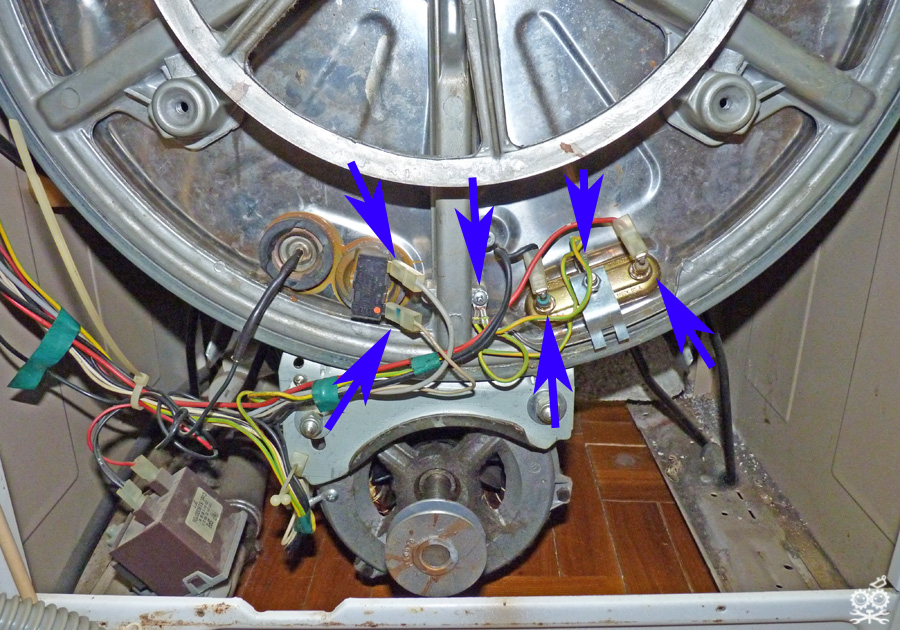
Table # 1.Bearing replacement instructions
Step, illustration
Process description
Step 1. It is necessary to determine the model of the washing machine
There is usually a special sticker on the back of the structure, where all the characteristics of the device are indicated. Using this information, new bearings and seals can be purchased without first disassembling the machine.
Step 2. Now you need to study the design of the device in order to start disassembling
Since the back panel is not unscrewed here, all work will be done from the front. However, this is not difficult to do.
Step 3. Unscrew the cover from above
Before starting work, you will need to disconnect all elements, including the powder tray.
Step 4. Next, you need to remove the dashboard
This should be done carefully, alternately unscrewing the screws.
The upper part of the panel is fixed with latches, they are also dismantled carefully. Carefully disconnect each wire from the socket and remember the location
If this causes difficulties, then it is better to draw a diagram or photograph.
Step 5. Now you need to detach the bottom panel of the washing machine
To do this, first unscrew all screws on the front panel.
Step 6. Then you need to get the tank out of the case
In this case, you will need to remove the belt, motor and shock absorbers, since these elements will interfere with further disassembly of the tank.
Step 7. It is necessary to unscrew the pulley to see the bearing and oil seal attachments.
The pulley will be easy to unscrew using a 16 key.
Step 8. Now you need to evaluate the appearance of the oil seal
Here it is already unusable, which requires replacement.
Step 9. Now you need to separate the oil seal and bearing
Both elements will need to be replaced. As in the foregoing case, the oil seal should be carefully lubricated, because the lubricating layer helps to relieve friction, which will significantly extend the life of the part. Don't skimp on lubricants.
At the same stage, it is necessary to replace the rubber seal if it becomes unusable. In this case, even if you are not going to change it, it is necessary to coat the junction with silicone sealant.
Step 10. Next, you need to collect all the elements one by one
It is necessary to return all elements and fasteners to their places.