Making a house without glue
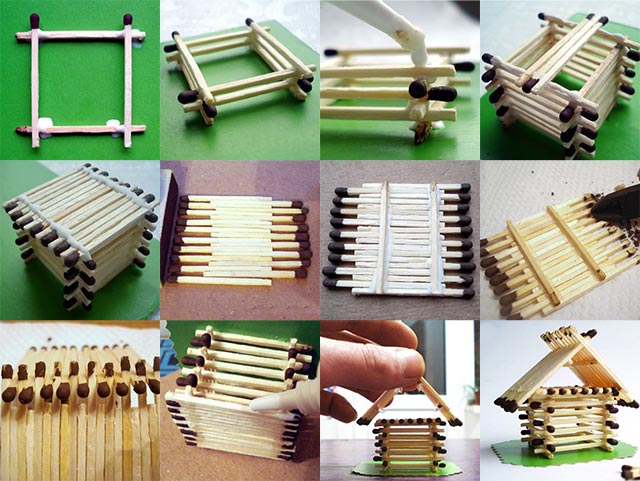
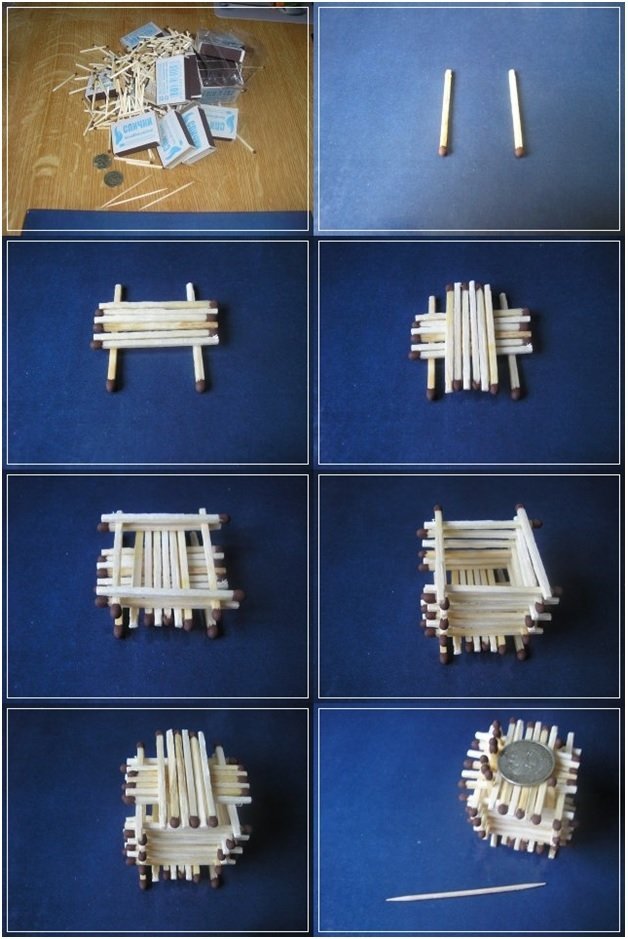
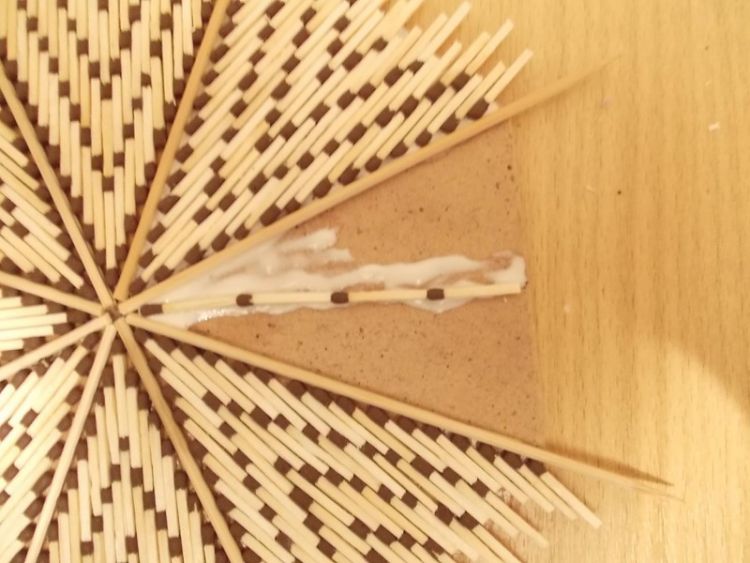
To get started, we place all the necessary materials on the table and start assembling. Two matches must be placed next to each other in parallel, but in such a way that the distance between them is slightly less than the length of the match itself.

On these two, a flooring of eight is made
It is very important that the matches lie flat and perpendicular to the base. To make the house more beautiful, we lay the flooring with the heads in one direction.
Then, on top of the first layer, another layer is laid, also of eight pieces. It must be perpendicular to the first layer
It is very important that the distance is equal, be careful when working

Putting up the walls
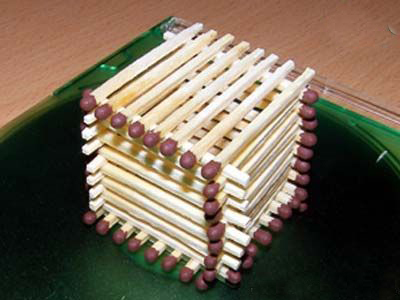
After that, a "well" of seven rows is made, and the heads of the matches from which the "well" is laid should be located in a circle. This is a very delicate and painstaking work that requires attention and concentration.


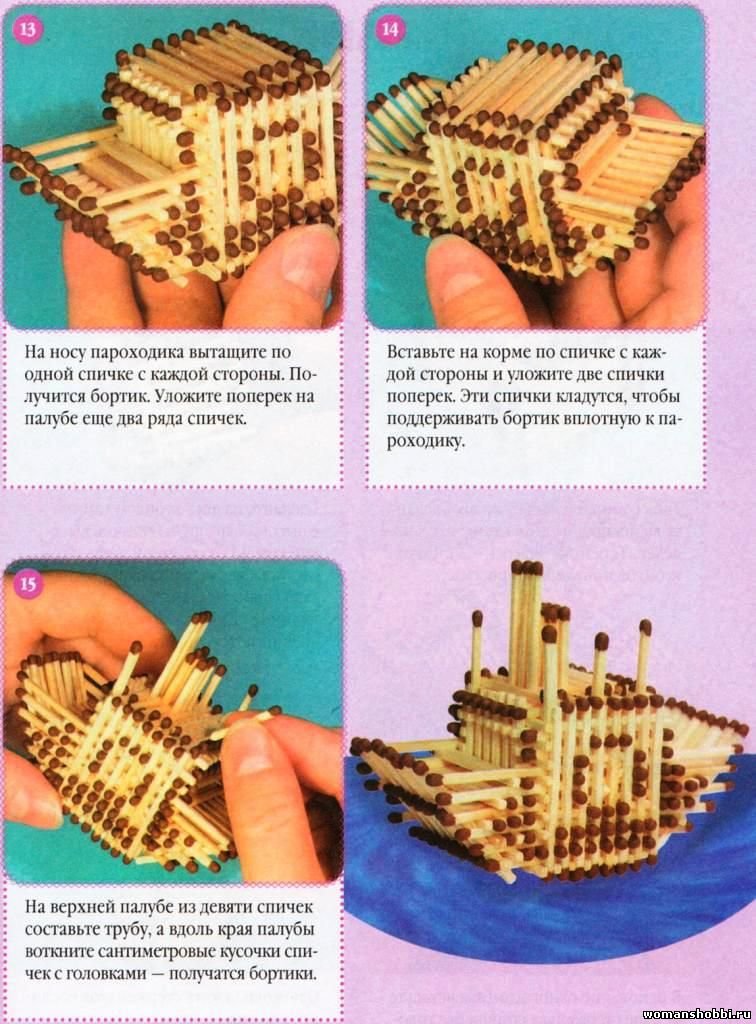
The upper deck is laid over the "well". Like the bottom one, it should be of eight pieces. It will be more beautiful if the direction of the heads of the upper layer is opposite to the lower one.
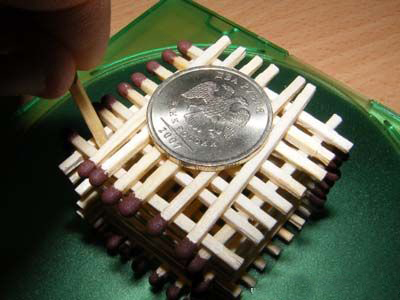
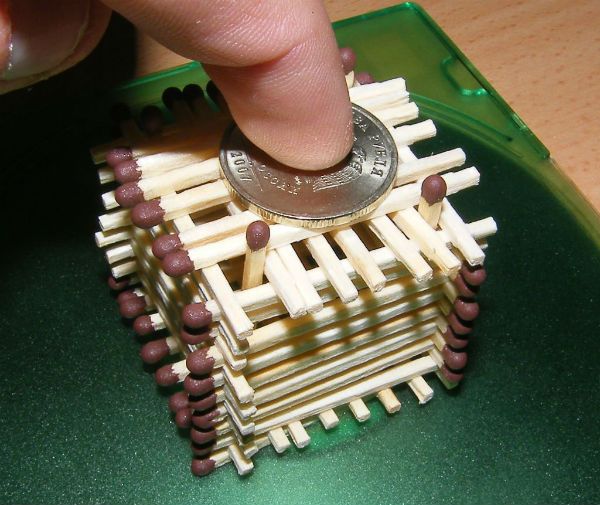
The second layer of the top is put first of six pieces. The two extreme ones are added a little later. Press the resulting structure with a coin from above. It is necessary so that the matches do not stick to your hands. Otherwise, the still unstable structure could collapse. Therefore, at this stage of work, you should hold the structure with your finger.

We strengthen the structure
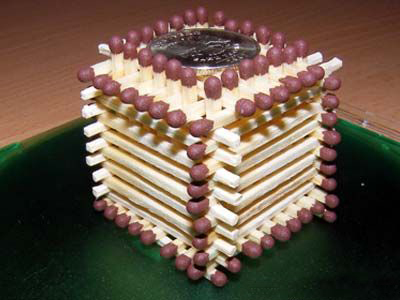
To secure the structure, it is necessary, carefully holding, to stick vertically four pieces with their heads up in four corners between the upper and lower layers. (That is why the top layer consists of six matches).

Do this carefully, carefully and make sure that the house does not jump off the base.

As a result, the base of the structure is slightly strengthened, which allows you to proceed to the main stage of assembly.

Next, you should carefully stick the matches along the walls around the perimeter.
After that, it is necessary to squeeze the walls on all sides and remove the coin. You won't need it anymore.


Then take the house in your hands and align on four sides.

For alignment, you need to press in the matches located around the perimeter, so that they touch the flooring heads. The resulting square will be the foundation. The structure is now sufficiently strengthened for further action.

At this stage, the resulting frame, with protruding ends of matches, will be more convenient to collect on your hands. So, the ends that were inserted around the perimeter will be the top, and the opposite side will be its base.

Making the walls doesn't seem difficult if the cube is straight. The walls are laid in two layers - vertical and horizontal. First, insert the matches vertically on one side.

The same manipulation is done with the three remaining sides. To make it beautiful, we insert matches with their heads in one direction. For example, up.

Further, the walls are laid horizontally. As with the construction of the "well", the heads should be laid in a circle and alternated with the ends. After installing all the matches of the four walls, it is worth pushing in the horizontal matches so that they are pressed against the opposite wall.

Making the roof
The house is almost ready. It remains only to build a roof. To do this, insert the required number of matches into the corner holes and pull the vertical ones halfway up. This can be done without fear, since the walls are sufficiently strengthened.

We put the matches, of which the roof will be, perpendicular to the flooring. We start from the edge and alternate the direction, first two pieces, then four, then six, and in the middle row, eight pieces.


Now you can start laying the tiles.Between those sticking out vertically, matches are inserted like a roof deck. They should be directed towards the middle. Next, you need to press the "tile" with the angular heads and press them with your fingers.

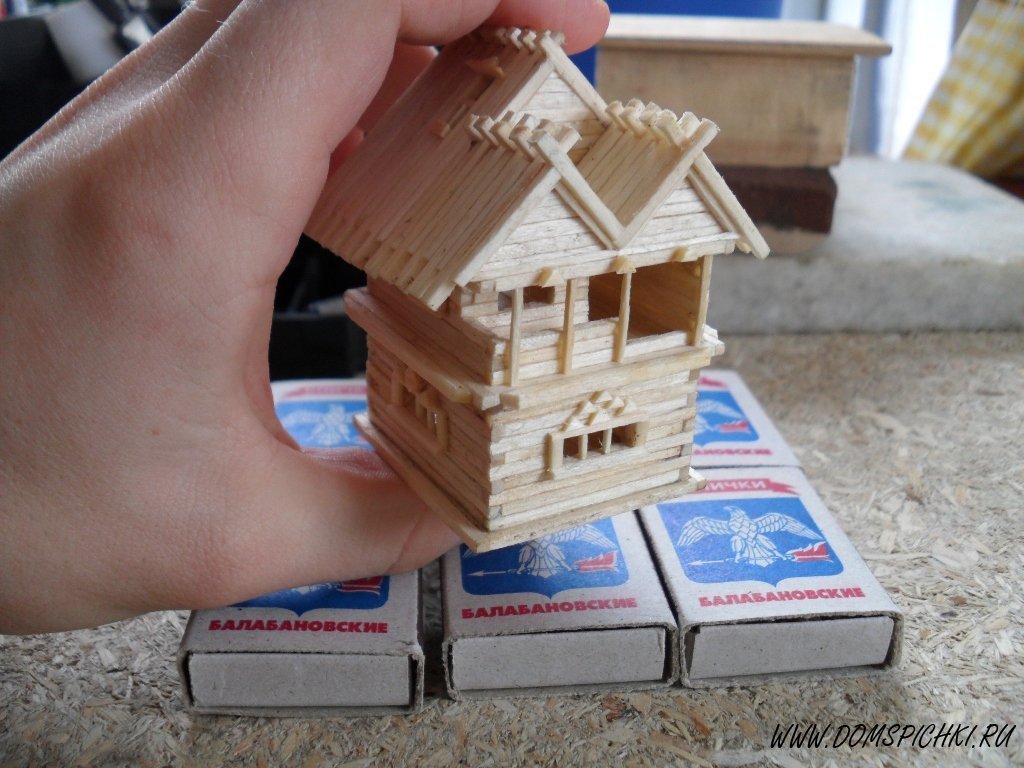
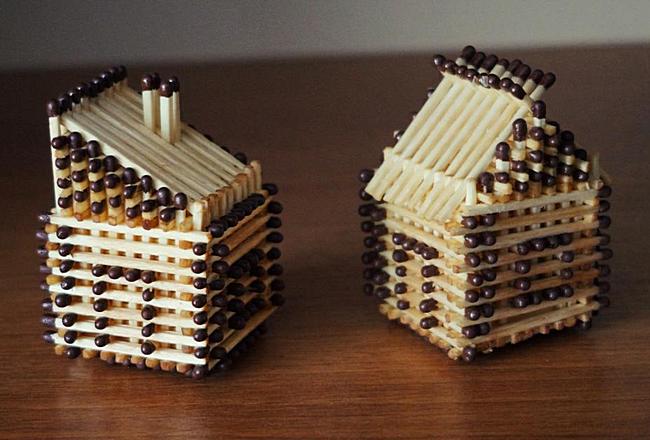
The resulting house can be decorated in various ways - build a pipe from several matches, make windows and doors from matches broken in half with their heads outward. If desired, the house can be painted or installed as an addition to a larger craft. A souvenir made by yourself will add coziness and bring a lot of joy to your loved ones.

Post Views: 2 455
- How to make a topiary
- How to make a flower from a ribbon
- How to make a rose from a ribbon
- Handmade mini topiary
Types of matches for crafts
To create original crafts, craftsmen use all types of matches that differ in shape, size and material structure. The following types of matches can be found in stores today:
- Classic type. They have a standard length of 5 cm and a slim diameter. It is easy to work with them, but the manufacture of some models of crafts is associated with a lack of part length.
- Oven matches. They have a standard product length of 8.5 cm. Designed for creating larger models of handicrafts.
- 2 types of matches for lighting fireplaces. The permissible length is 10 and 20 cm. Allows you to create large doll houses, models with a large number of small details (locks with spiers, a car).


How to make a church from matches
Making a church is not an easy task, but the end result is worth it. For such a craft, you will need about 2000 matches.
- Start construction with a single-layer square, you need to assemble it so that the matches are located in one direction.
- We collect the second square so that the parts with gray are only on top and on one side, all excess sulfur must be cleaned off.
- In the box that was made first, we build vertical walls with one more layer.
- We build another layer of walls, so that all the sticks are located in one direction.
- We collect the same square as the first, only we place the sticks in the other direction.
-
We put the cubes together. On average, we make another layer of walls, from those sides where it does not touch other squares.
-
- Connect the cubes by pushing wooden sticks into them. Smooth the back wall with a blade.
- Let's duplicate our construction.
- Create a standard square by brushing off the top of the gray.
- Straighten the cube by trimming the logs.
- Trim the area of one cube and on the plank.
- We insert 8 sticks into the prepared cube (with their help, it will be attached to the bar).
- We connect in a prepared place.
- We make the second leg and prepare the second square on the bar so that everything is well connected, push the inserted matches to another. There should be an arch under the middle square so that it holds well (you can add additional sticks).
- We repeat everything also for the second plank.
- Preparing the middle bar. We build 3 cubes.
- In the two outermost cubes, in the front we place the logs horizontally, and on the other sides we also place them only vertically and clean them, making the surface smooth.
- In the middle square we place the logs vertically on the sides and make them even, and in front and behind we lay horizontally.
- We connect our cubes.
- Using matches, we connect this structure with ready-made strips, placing it between them.
- We make stingrays by simply pushing the sticks from the inside.
- On the sides of the structure we make small turrets, placing matches 5 * 5, filling them with horizontal half matches. There are 4 turrets in total.
- Domes can be made with foil. You can also decorate the church by making crosses and do not forget about the doors and windows.


Your beautiful church is ready.
There is also a simpler option - a one-cube church. You can watch the instructions for it in the video:
House of matches with your own hands. Preparation of the workplace and all components
The process of preparing a workplace for making crafts should start with the choice of a flat and stable surface. The table should not wobble. It must be located only in places that are not subject to vibration and strong drafts. To avoid the negative effects of the glue, it is better to cover the surface with oilcloth or cover with a layer of plastic wrap. Next, you need to choose a flat work surface that can be moved without harm to the structure. This item can be a square piece of heavy cardboard, a diary or hardcover notebook, or any plastic packaging for CDs.
After all the preparations, all the necessary elements for assembly are laid out on the table:
- 7 boxes of matches;
- glue and container for it;
- a pointed match or toothpick;
- wet wipes or a piece of cotton cloth;
- medium diameter coin.
The manufacture of a match house does not have to be accompanied by gluing the surfaces. Due to the dense arrangement of the elements, the structure is stable and durable. This prevents the product from loosening, but for beginners it is preferable to use additional glue. Matches are easy and quick to stick together. If a decision is made to process every detail, then this must be done quickly so that the elements retain the desired position. It is more convenient to apply the solution with a toothpick or a specially sharpened match. If extra drops of glue appear on the surface, then they must be quickly wiped off with a corner of a damp cloth or a small piece of cloth. So the appearance of the match house will be more neat and presentable.
How to make match houses
House without the use of glue
Take a solid base, put 2 matches on it in parallel, and on top of them put 8 matches perpendicularly. This will be the future foundation. Make the same layer again along the perpendicular to the previous one. Next, seven rows of 4 matches are laid out with heads in a circle. This is the foundation.

Then lay out again eight pieces with heads already in the direction opposite to the foundation, lay six matches on top of them in the middle, put a coin on them
In the holes that have turned out between the last 2 rows, you need to carefully insert one match at a time. Gaps turned out along the walls, into which also insert one match at a time
All this must be done carefully, without breaking the structure. The perimeter is covered. Compress the design.

House with glue
First you need to make the floor. Make a lattice from matches on a sheet of cardboard using glue. The walls are laid out like this: two matches horizontally, two vertically, etc. So make all four walls by gluing matches. For the roof, the matches are glued in turn to the walls of the house at an angle, imitating a gable roof. This is the simplest house. Having received the skill, you can find a photo or video on the Internet, connect your imagination and perform complex options for the construction of houses and castles.

What can be made from matches
Some believe that only houses can be built from match material, but this is not the case.
- Fence. People who have not previously been involved in the manufacture of match structures can create a small fence. This craft is very simple and you don't have to spend a lot of materials to create it. To make a fence, 10-15 matches are glued together.
- Church. More experienced people can make a small church. On average, 1000-1200 matches are spent to create it.
- Furniture. Many people prefer to create miniature furniture from wooden sticks. The easiest way is to make a small table, sideboard or stool.

Illustrative example
On the Internet and in special literature, there are many examples of various crafts from matches. Some of them are varnished and are honorary examples of famous exhibitions.
There are easier options with which to start introducing your child to art. One of them is called "Caterpillar".

To make it you will need:
- matches - 20 pieces;
- chestnuts - 8 pieces;
- moss;
- colored paper or cardboard;
- PVA glue.

Making children's crafts from matches with their own hands occurs in the following sequence:
- We take a sheet of green cardboard and glue the moss on it. You should get a green meadow for the caterpillar.
- As you descend, lay out the chestnuts in a row.
- In each fruit we make holes for the legs and their connections.
- The largest fruit is the head, it has no legs.
- Lubricate the matches with glue and connect the chestnuts with them.
- Cut out sketches of eyes and mouth from colored paper, and then glue them on the "head".


For greater attractiveness, the finished "Caterpillar" can be varnished. The result is an interesting composition that can be used to decorate a nursery or take it to a school exhibition.

What safe glue to use for matchstick crafts
Different brands of glue are suitable for working with matches, however, to speed up the creative process, it is better to use quick-setting adhesives.
The most popular among the masters of match modeling today are the following types of glue:
PVA-MB (Russia) is a universal adhesive based on an aqueous polyvinyl acetate emulsion. Designed for gluing wood, so it copes with the task perfectly.


Another advantage of PVA-MB construction and household glue is its low price (a liter capacity of glue in any construction hypermarket costs less than 100 rubles);

Moment Stolyar (Russia) is a modern glue, which is essentially an improved version of PVA. The presence of special additives in the composition provides excellent adhesion and instant adhesion of the glued surfaces.
The glue is sold in convenient 250 ml plastic bottles with a convenient dispensing nozzle for spot application of glue, it costs about 150 rubles;
Moment Installation Instant Grip (Germany) - universal express glue for instant gluing of wood of any species. Bonds in seconds without requiring the bonding surfaces to be fixed.
After drying, like ordinary PVA glue, it becomes transparent. Sold in plastic bottles of 100 g and 200 g, it costs about 150-250 rubles.

Step-by-step instructions - how to assemble houses from matches with glue
To understand the principle of work and get your hands on it, first we recommend building a simple house of matches with any glue from the above.
The assembly process is not particularly difficult:
- On a sheet of cardboard, which will become the basis for the house, we lay two matches in parallel. In order for the "foundation" to be without distortions, sulfur should be removed from the first two matches. Then we glue the second row of matches in accordance with the picture:

- Using a similar technology, we continue to lay the "logs" row by row until the house reaches the desired height;
- One drop of PVA glue (or equivalent) is enough for each "knot". Before laying the next row, you need to let the previous one grab:

- When the walls grow to the desired height, we mount the ceiling;
- Apply two layers of glue to the finished "overlap" for structural strength:

- We are starting to manufacture a gable roof. It will be in two parts;
- For reliability, we tie each slope in two rows using glue and an additional match:

- We connect the two parts of the roof into a single structure and install it on the finished box of the house;
- Our first house made of glued matches is ready:
VIDEO INSTRUCTION
What else can you do with your own hands using matches
Many interesting models can be assembled from matches - it all depends on the imagination and desire of the author.
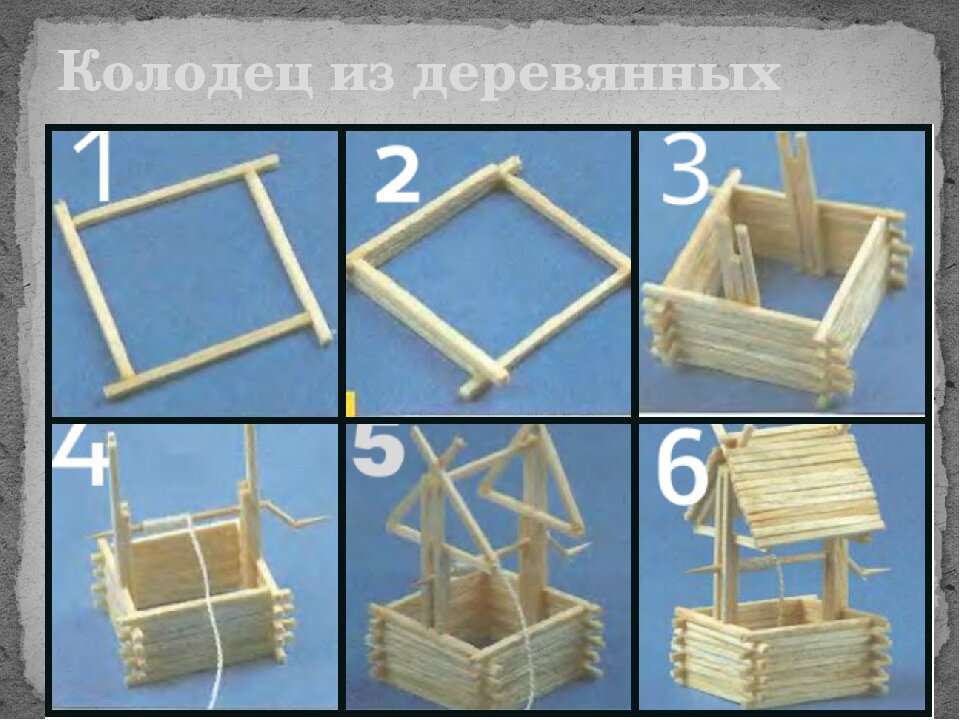
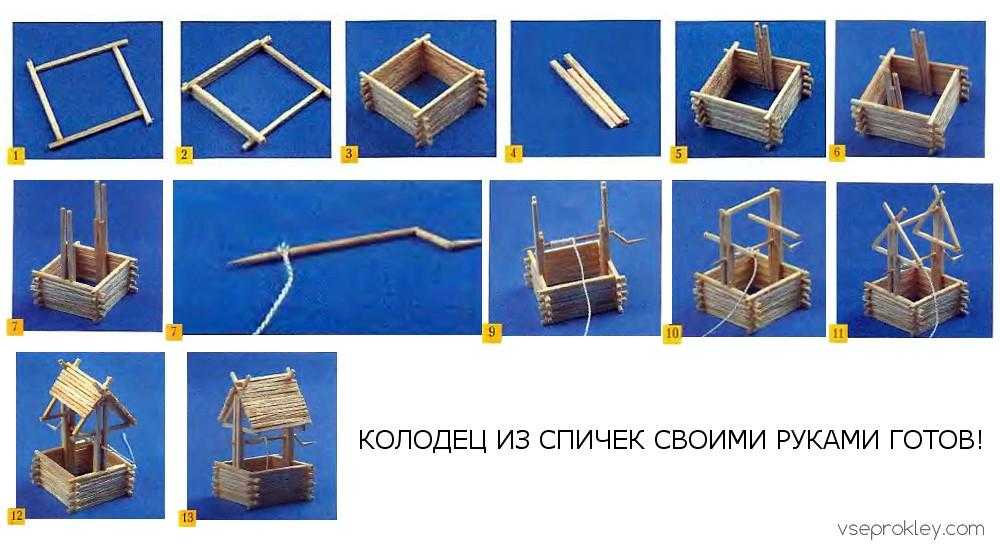
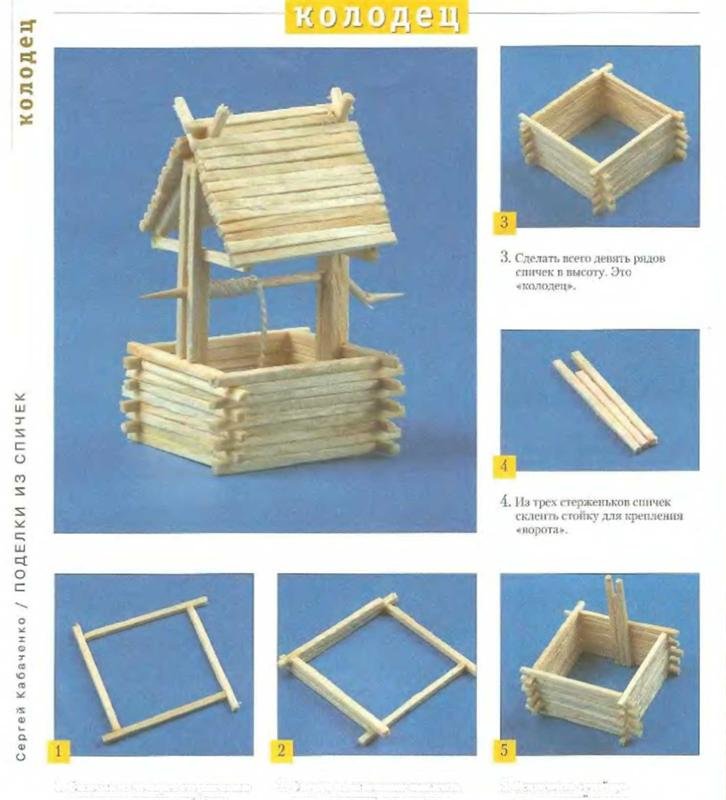
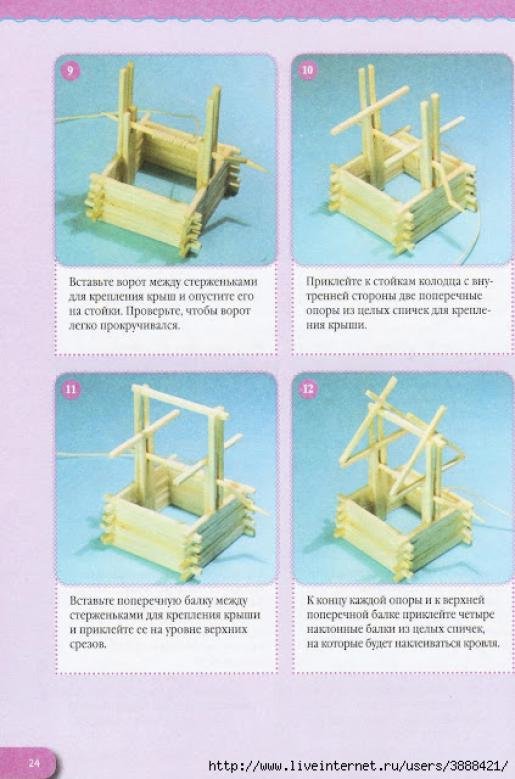
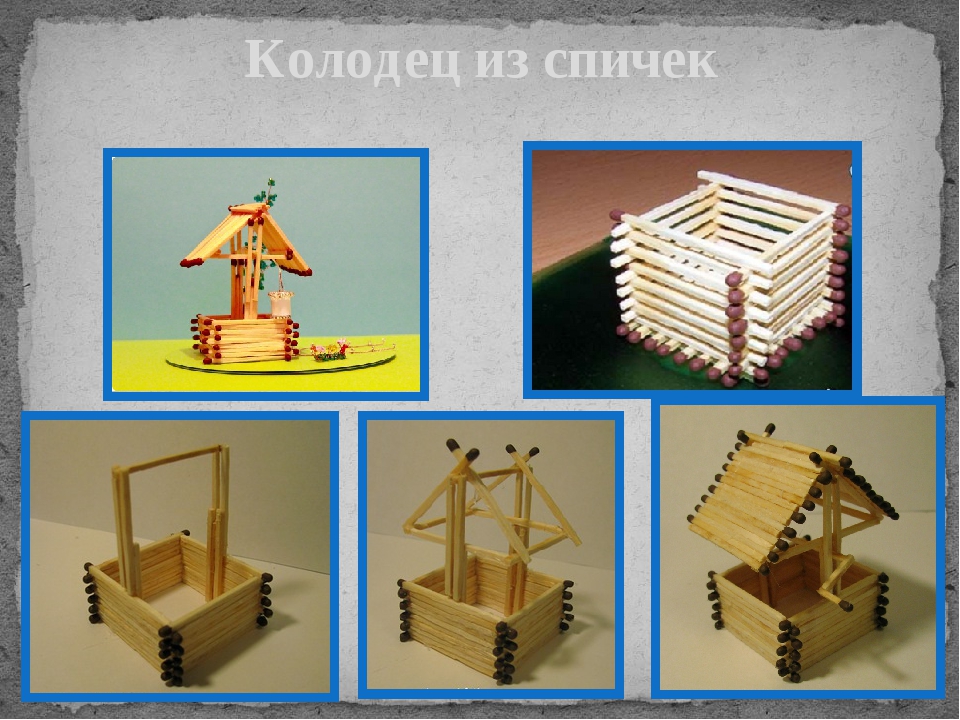
For beginners, we recommend trying to build such an interesting well:

This craft uses a different method of joining miniature logs.
Here's a quick guide:
From four matches we collect the base of the future well in accordance with the diagram
Please note that in this case, all 4 matches lie in the same plane;
Glue the following rows in the same way. There should be 10-12 of them in total;
Then we prepare supports for the future roof: from the inside we glue two matches tightly to each other to two opposite walls
We build up the supports, using two more matches for each of them;
Separately, we assemble the roof frame and install it on our ready-made supports;
We "sheathe" the roof, gluing matches with a solid shield.
Having received the first experience, you can proceed to more serious modeling - to make, for example, a church from matches with glue or a small mill.
VIDEO REVIEW
The most important thing is to coat all joints and connections well so that the structure does not fall apart. Excess glue must be periodically removed during work, not allowing it to harden.
A house of matches for beginners. Useful Tips
For beginners, the choice should be stopped on those crafts that are made with glue. This method facilitates the process and makes it easy to fold any shapes. Under such conditions, children will be able to fully participate in the game, and beginners will learn to work faster with small details of the structure.
For novice designers, during the first attempts to create crafts, a thin layer of rolled plasticine can be used as a surface. This will make it easier to install vertical elements and teach you how to better cope with each stage of building a structure. If you want to create a finished wooden model, it is recommended to cut the heads of the matches in advance using a sharp stationery knife or scissors.
From matches, you can build not only a house, but also build a church, a well, a fence and a gazebo. If you place all the products on a green background, you get a reduced copy of the personal plot. So you can create any buildings, objects, animals and even cars. In talented hands, any product made from ordinary materials can become a real work of art.
What else to make from matches
You can create many different masterpieces from matches: castles, wells, benches, fences, and much more. There are many step-by-step instructions on the Internet on how to do this.


You can create great beautiful furniture for our house, such as a chair.
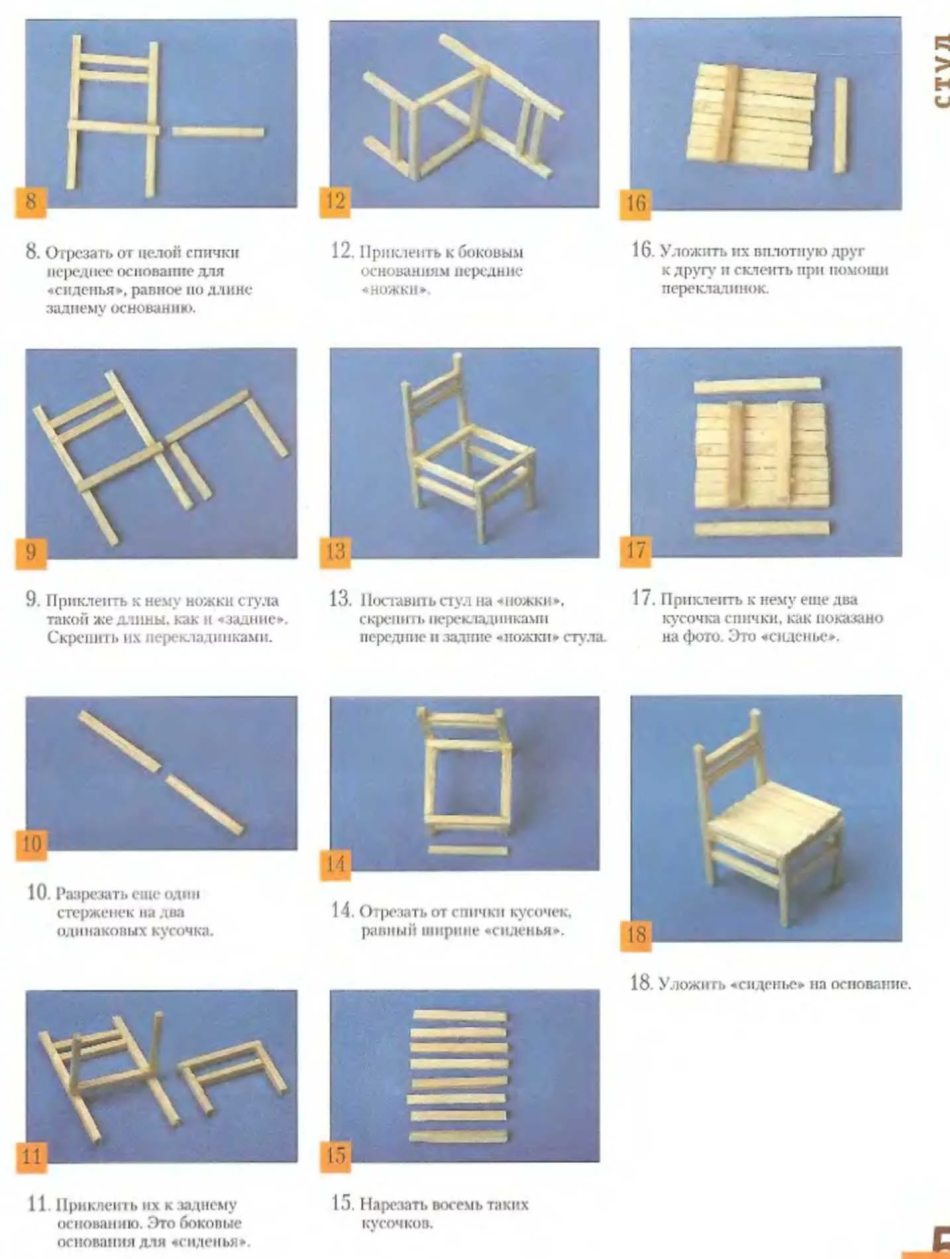
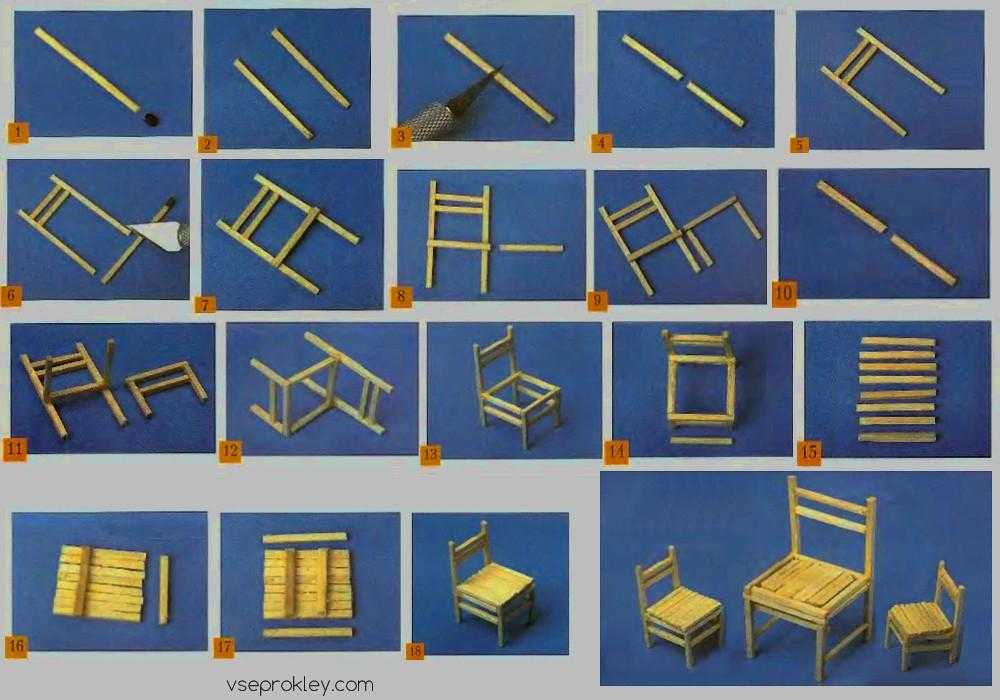
How to make a chair out of matches
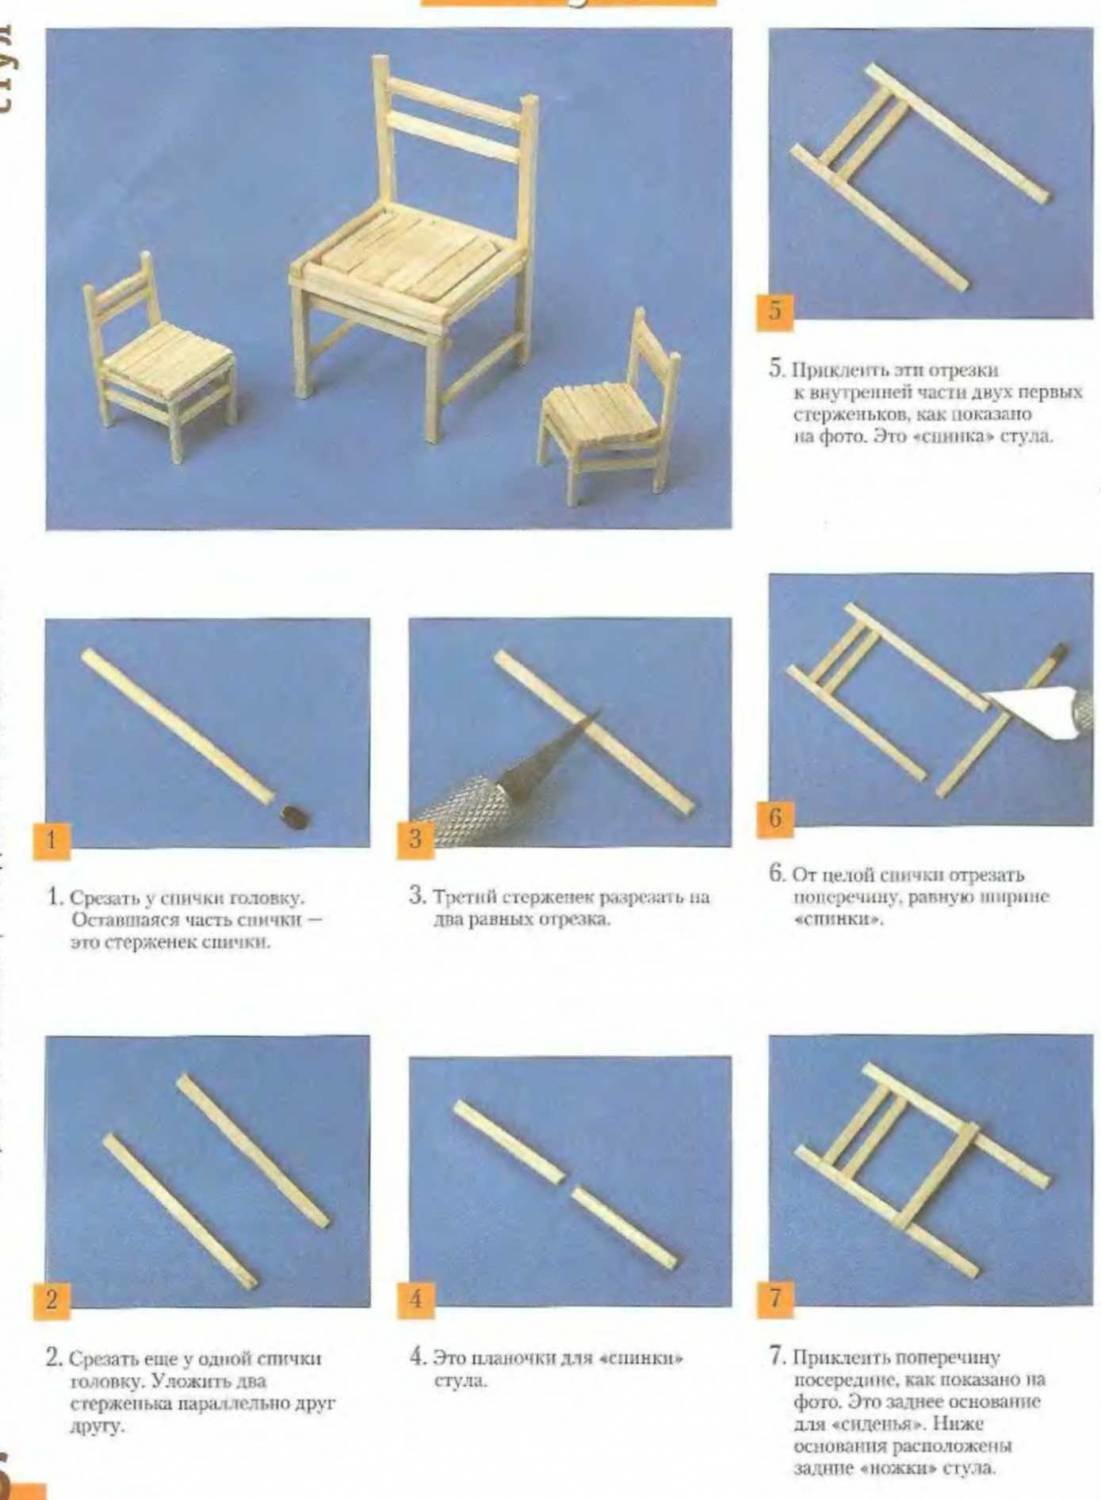
- Cut off the heads with sulfur.
- Take two sticks and place them in parallel.
- Take another stick without sulfur and cut it into two equal parts.
- Glue these two halves to two parallel halves. You will have a backrest for a highchair.
- Take a whole match and cut off the excess part so that the remainder is equal to the width of the back of the chair.
- Glue this piece down the center to make the back base. The back legs of the chair will be located below.
- Cut another base of the same and glue the legs for the chair to it, they should be the same length as the back ones.
- Divide another log without sulfur into two equal parts.
- Make a side base out of them, gluing it to the back, then glue it all with the front legs.
Cut 8 logs equal to the width of the seat.
Place them tightly together and glue the two crossbars together.
On both sides of the resulting seat, glue one more such log.
Place the finished seat on the highchair.
Our chair is ready.
The sun for children's crafts
Materials for work are similar to the previous method, but for the frame of a volumetric craft, you will need any small plastic ring.

The sun for a baby product can be created on a cardboard basis, or you can make it a lightweight and mobile option. To make a volumetric model, you will need to prepare two circles of a slightly larger diameter from yellow cardboard.

On the back of the plastic base, matches are glued, forming a sun.Next, cardboard parts are glued on top of the plastic circle so that they hide the junction of matches and plastic.
You can decorate the sun by adding a funny face to it.

How to make a house of matches without glue: step by step instructions
Before you start building a house without glue, you need to put a solid base (cardboard, plywood) on a flat horizontal surface. While the first steps of construction are being made, the structure is fragile and can crumble.
Assembling the model is simple:
- On the prepared surface, put 2 matches in parallel at a distance of 2 cm.
- We lay a flooring of eight matches on the matchsticks, while the heads should be directed in one direction. The distance between the parts corresponds to the width of the match.
- We do the second row in the same way, but lay it out perpendicular to the previous layer. It turns out a square lattice.
- Next, we put the sticks in a well, making sure that the tips with the gray go in different directions. You will need to make a log-well of 7 parts in height. If you build it higher, then the product cannot be made durable without glue.
- We make a flooring on top of the log house, placing the parts parallel to the first row.
- On top of the formed overlap, evenly stepping back from the edges, we lay 6 sticks.
- Insert 4 matches vertically into the free corner cells with a sulfur ball up. To prevent the structure from falling apart during the operation, put a coin on top and lightly press it with your finger to fix it.
- Now, along the perimeter, we insert a layer of matches into the “cells” formed during the assembly, with the heads up, so that the ends are in the lower part of the lattice. The product has become stronger. We will add a match later to the corners to increase strength.
- No coin needed yet. We remove it and take care of the house. To increase the strength, we press on the walls, ensuring a snug fit of the parts.
- Now we turn the product over. Next, lay 6 matchsticks on the foundation, press with a coin and strengthen the structure. We insert the elements around the perimeter in the same way as at the top of the product. The result is a beautiful cube with smooth walls.
- We form the attic. To do this, carefully, by the heads, we pull out the sticks around the entire perimeter, and between them we lay the parts in parallel, making sure that the direction of the sulfur balls alternates. The laid elements should resemble a hut.
- Next, you need to make the roof of the house. To do this, put the sticks on the finished "attic", forming the ridge of the roof from the sulfur balls. We fix the roof by pressing on the matches that were previously elongated.
- The pipe remains. For it, insert 4 sticks into the roof with their heads up.
- To make windows and doors near the house, you will need to break off part of the match with the head and lay out the elements of the entrance to the dwelling on the walls.
The proposed simple version of making crafts without glue can be used as part of a complex building. To do this, according to the described method, it is recommended to collect cubes without a roof, and then, fastening with matches, make original building structures.
Choosing glue
It's no secret that matches will have to be glued together with an adhesive solution. Therefore, it is necessary to select the appropriate glue in advance.
"Moment Joiner"
A common glue used when working with wood. When creating a mixture, plasticizers and other components are added, which make the solution more viscous and reliable.
PVA
To fix wooden materials together, you can use ordinary PVA glue. Its advantages include:
- low cost;
- moisture resistance;
- frost resistance;
- reliability;
- no shrinkage.
"Moment Montage"
Among the reliable adhesives for wood, "Moment Montage" is distinguished. This product does not deteriorate when exposed to low temperatures and dampness. The characteristics of the glue include transparency and gluing speed.

Building a village house
It will be easy to build a village house from such a cube. The craft will be a great start for beginners in this type of creativity.Analyzing the work done, one can come to the conclusion that part of the work has already been done - half of the house is ready. It remains to finalize and bring to mind.

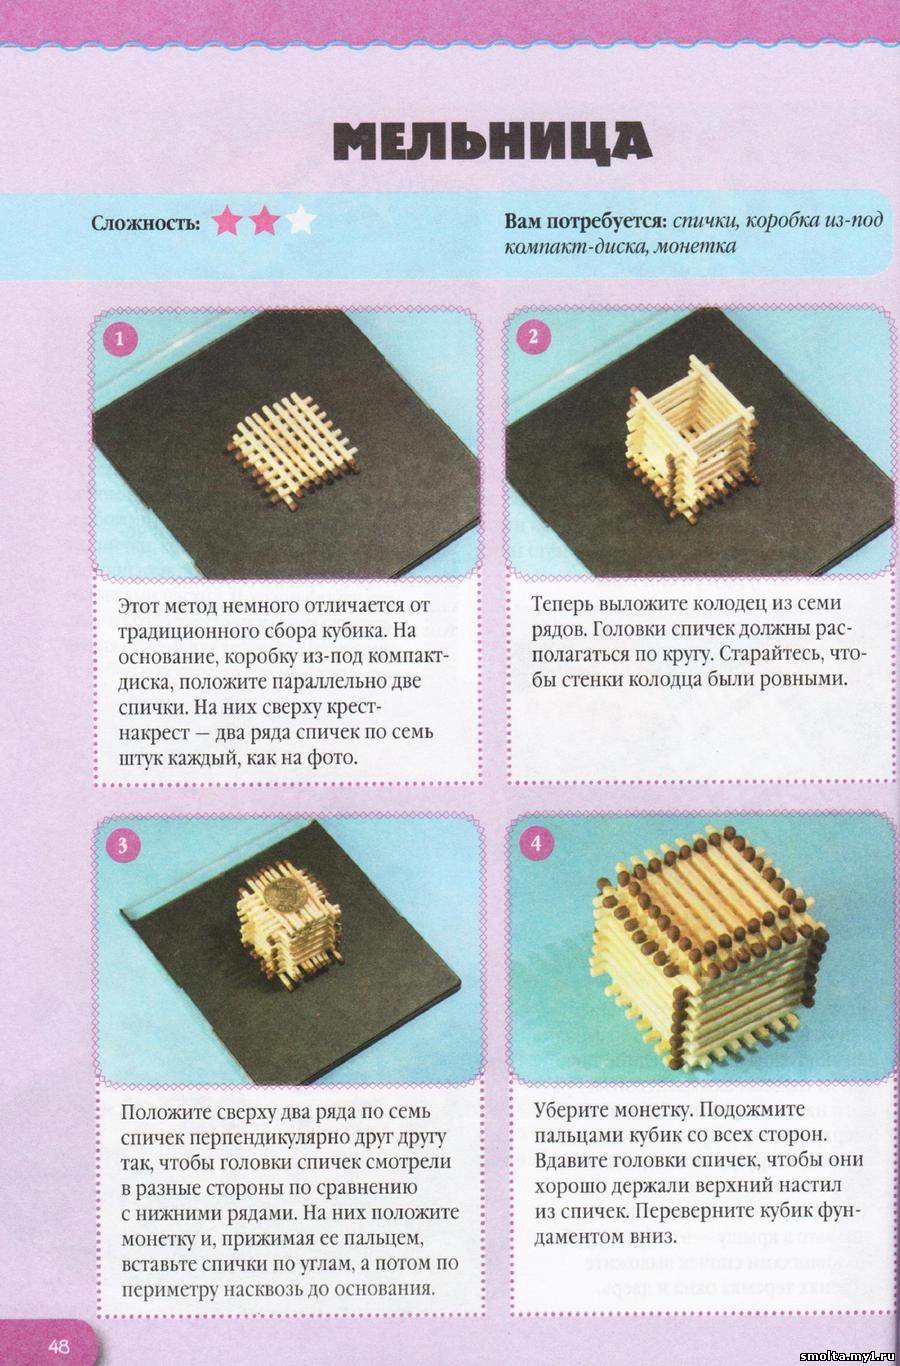
At this stage, an additional element is introduced - a coin. At a certain intermediate stage of construction, it will add stability to the house and prevent matches from falling apart.
- 6 matches are placed perpendicular to the upper level of the flooring.
- In each corner of the base of the well, you need to carefully insert one match (step 4 in the figure).

At this stage, a coin is needed. It is placed on top of the last flooring and pressed tightly, thereby preventing the cube from falling apart and the matches scattering in different directions.
Now vertical matches are inserted into each corner parallel to the walls of the house
It is important to ensure that both the top and the bottom of the matches fall into the same grooves (to facilitate the work, the direction of movement of the matches can be adjusted with a toothpick).

At first glance, it may seem that all this can be easily done without glue. However, an inexperienced master must be assured: at this stage, the structure is very fragile and can crumble with one wrong movement. It is for this reason that beginners are advised to use glue, otherwise it will be very offensive to lose the result of painstaking work.


- It is necessary to firmly squeeze the structure on each side (this will give it additional strength).
- The house is turned upside down.
- To further strengthen the walls, it is necessary to place more matches in the grooves. Their heads should look up.
- Another horizontal level of matches is added along the outer walls. Four new corners are fastened with matches according to the old principle.

- Along the outer perimeter of the house, you need to carefully raise the uppermost vertical level of matches by about ½ of their height.
- At this point, you can start folding the attic. This is done as shown in the photograph.

- All the components of the roof are placed on a watercress cross. The image will help you understand what it looks like.

- A pipe can be made from four matches.
- Windows and doors are easy to mark with match heads, which have been previously broken off to the length of half a match.
Your country house is ready!

How to make a house out of matches without glue
You can create a beautiful house from matches without using glue at all, it is very simple to do this. You will need matches, some kind of stand for your house and a 5-ruble coin.
- Place two matches parallel to each other.
- Take 8 more and lay on top of the already lying two, turn the heads with gray in one direction, so the house will look more aesthetically pleasing.
-
Next, again take 8 sticks and place them in parallel on the lying ones, also expanding the heads with gray to one side.
- Place the four sticks in a well, turning the heads with gray in different directions.
- We build a few more rows with a well (about 6).
- After building all the rows, take 8 matches and put them in the same way as the bottom row, parallel to it.
- On top we make the same flooring, only from six sticks.
- To make the structure stand more stable, place a coin on it.
- Place 4 logs vertically on the edges of the resulting square.
- We also place the logs around the entire perimeter, lowering them to the very bottom of the house so that the heads at the end are at the same level.
- We remove the coin very carefully, you can help yourself with tweezers.
- We squeeze the house with our fingers on all sides and level it, set the house with the foundation up.
- We make the walls of our house stronger. We put the outside vertically, new logs, pointing the heads with gray up.
- Further, to strengthen the walls, we continue to lay a new layer of logs outside, but already horizontally.
- Insert 4 matches on the sides of the structure.
- Raise the vertical logs in half.
- Now you need to build an attic.
- On top of the attic, we cover the roof of our roof.
- The only thing left is to make windows, doors and a chimney.To do this, break in half the matches, from the parts on which there is sulfur, we construct the remaining elements.
How to make a house from matches
Making a house from matches is a rather painstaking task, but nevertheless very interesting.
To make a house, prepare: matches, the surface on which you will build (for example, a piece of cardboard or plasticine), a toothpick and glue. Pour the glue into a plate for easier use.
Step-by-step instruction
-
For the base, you need to take two matches and put them parallel to each other at a distance of two centimeters.
- Spread the edges of the sticks with glue and lay on top of the next two sticks, so that you get a square.
-
We put wooden sticks in a similar way to the height of the house you need.
- The next step is to build the ceiling. Just lay the matches tightly over the glue-smeared walls.
- Reapply a layer of glue to the top level to make the house tighter.
- The roof for our house will be folded in two parts. Each part must be done separately. Glue short and long logs one by one, and for strength, fasten them with two more, on top of all folded ones.
- When you have made two parts of the roof, connect them together and place them on the house.
Another construction option can be viewed in this video:
Matchbox with glue

Consider the option of creating a house from matches using glue. Such a house is easy to assemble and is suitable if you or your child is taking on this kind of craft for the first time. Use the instructions so as not to miss a single moment:
- Decide what the match house will look like. If you are planning a cute, rustic option, leave the sulfur heads: they will give a fabulous look, they are easier to beat. If a house is planned in a modern style, it is better to cut off the heads. In addition, do not forget that for small parts, you can shorten matches to length with a clerical knife.
- Prepare the glue: pouring a portion of the glue onto a saucer is ideal. This will make the glue available any minute, making it easier to adjust the amount of adhesive. Glue the parts with a toothpick.
- Prepare matches: select even copies, without jags and irregularities.
Now that everything is ready, start creating the house. The next steps will be briefly described below.
Foundation and walls
Given that you are working with glue, it is not necessary to build a house on the same principle as a house made by stacking matches. The easiest way to create a foundation and walls is to alternately glue the matches to each other. The height of the elements is determined by you yourself. Make four walls and glue them together.
Window
The easiest option is to cut out windows on the finished walls with a clerical knife. Strengthen the dried wall well on a hard surface and cut a rectangle or square with slow, pressing movements. Glue the edges of the windows to secure the cuts.
Roof
The roof of the house can be made of cardboard or glued with matches. An excellent option would be to alternately fasten short and long logs.
The attached photos of the match houses will help you better consider how to properly fasten the mini-logs together.
Tips for getting ready for work
Before creating a house, preparatory work is carried out, consisting of three stages.
We calculate the number of matches
First, determine the amount of material that will be needed to create the structure. The number of consumable matchboxes depends on the size and characteristics of the house. For example, to make a miniature building, 3-4 boxes are enough. To build a bigger house, they buy at least ten boxes.
Choosing a foundation for stability
Before you start creating crafts, you will have to find a suitable workplace. It should be perfectly flat and stable.In this case, the base on which the fake will be made must be in a place without drafts.
The surface of the workplace is preliminarily covered with a protective oilcloth or film.
