Flowers and decorations
While the boys shoot homemade weapons and drift across the sea in their own hand-built ships, girls can start creating paper bouquets and decorations.
Origami rose
Flower making process:
- Give the landscape sheet the shape of a square.
- Fold it along two diagonals, unfold it, and then bend it horizontally.
- Bend the side triangles inward so that the parts of the line touch. You will get a double triangle.
- The lower corners of its base, both from the front and from the back, must be tucked towards the top.
- Connect the left and right parts of the figure together with one, and then with the other side.

- Bend the sides to the middle, slightly overlapping, and fix by inserting the left corner into the adjacent pocket. Repeat for the opposite side.
- At this stage, a bud with a small hole at the bottom has already been outlined. It can be expanded slightly using a toothpick. Then blow into the hole so that the bud expands and gains volume.
- Bend the petals outward and twist slightly.
- Insert a straw-stem into the hole.
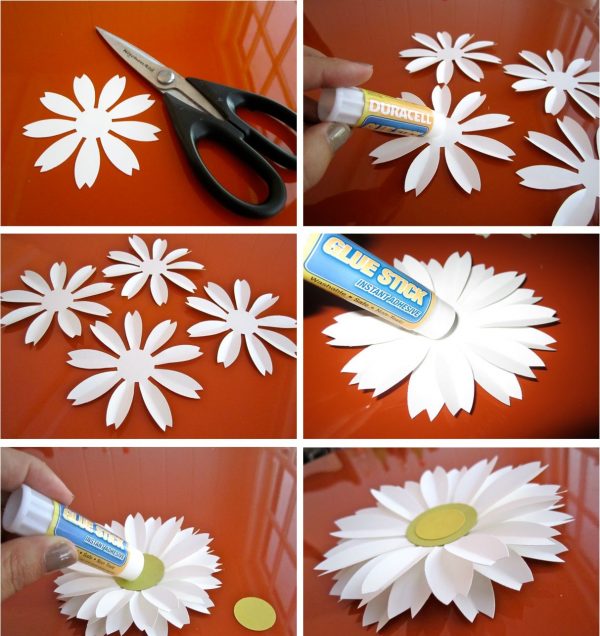
Chamomile from colored paper
To create chamomile, it is enough to take glue, as well as yellow and white paper. Now you need to follow a few simple steps that even the youngest needlewomen can handle:
- For one chamomile, cut 2 circles from yellow paper and 9 stripes from white paper.
- Form petals by gluing the ends of each strip.
- Glue them to the core circle. Attach the middle on the back side too.
- If desired, you can make stems and leaves from green paper, and then arrange a beautiful bouquet on cardboard.
Paper ball
There are many options for making bulky paper balls. Let's talk about one of them. This will require:
- corrugated paper;
- white cardboard;
- glue stick;
- scissors;
- felt-tip pens;
- compass or round object;
- needle with thread.
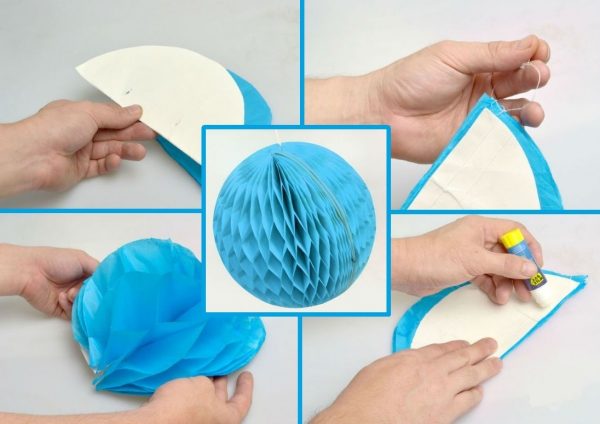
Step-by-step creation of the ball:
- Draw a circle on cardboard that will correspond to the size of the future ball, and cut it out.
- Divide the circle into two halves.
- Cut 40 rectangles from corrugated paper. The size of each piece should be such that one semicircle fits entirely on it.
- Take a sheet of cardboard and place it horizontally. Draw parallel vertical lines on it at the same distance from each other, alternating two colors (say, red and green).
- Put a corrugated rectangle on the lined cardboard. Glue the stripes along one of the marking colors.
- Place the next sheet of corrugated paper on top and press down so that it adheres firmly to the first layer.
- Apply glue on top again, only now in a different color of the markings.
- Connect all existing rectangles according to this principle, constantly alternating adhesive strips.
- Cut the entire glued stack in a semicircle using the cardboard stencil from point 2.
- One semicircle made of cardboard must be cut off at the base to make the letter C, and glue it on one side of the multilayer workpiece. The other semicircle must be glued to the other side unchanged.
- This is followed by loosely stitching the product from two corners. In one, you can leave a thread for further hanging the ball.
- The final stage is unrolling the craft and gluing the cardboard parts.
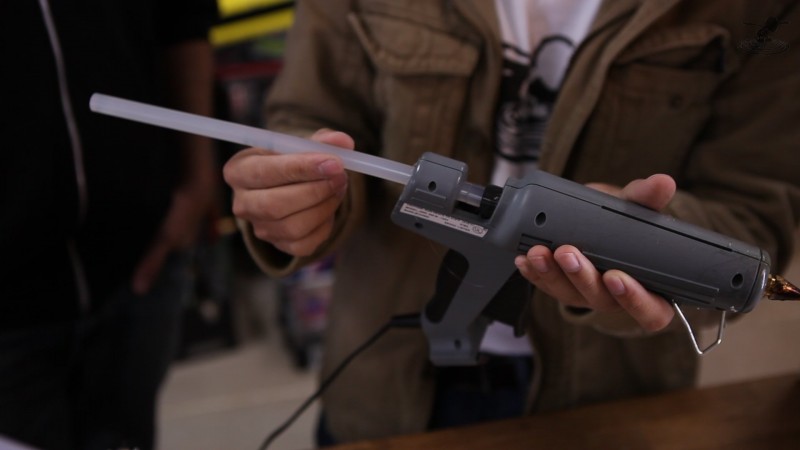
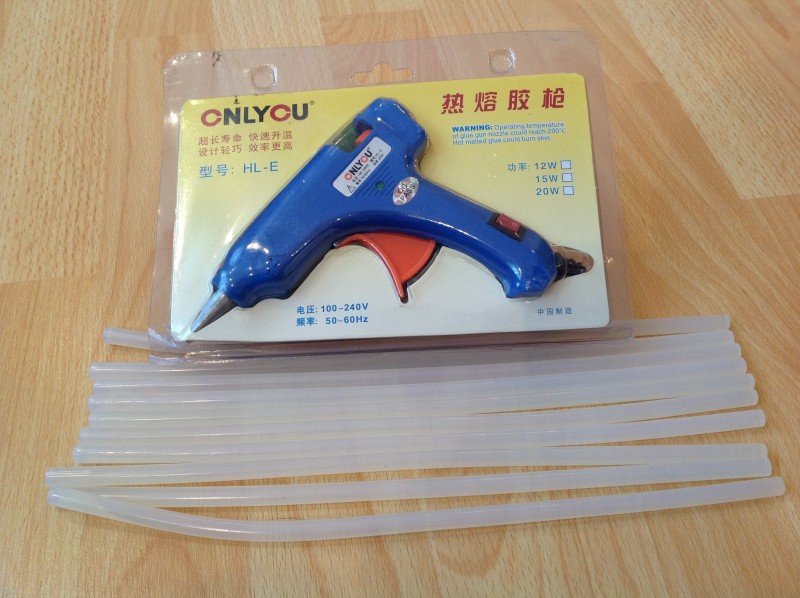
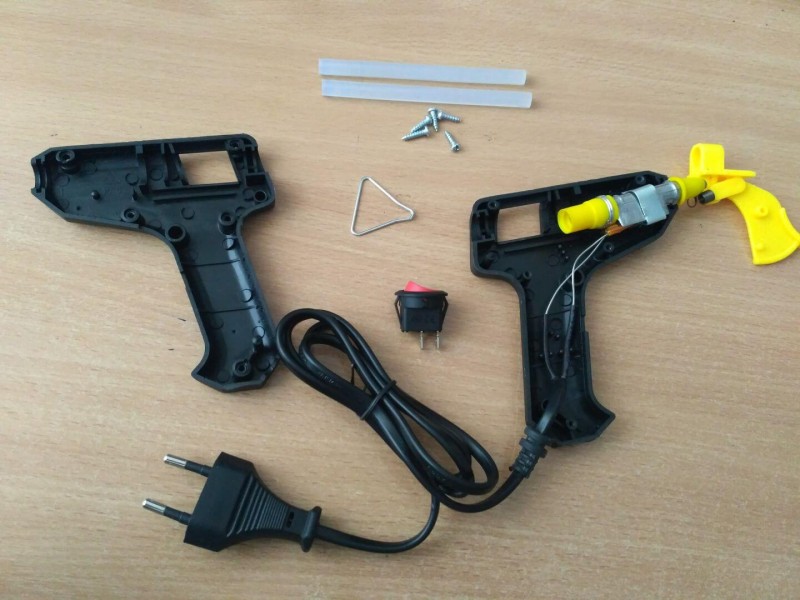
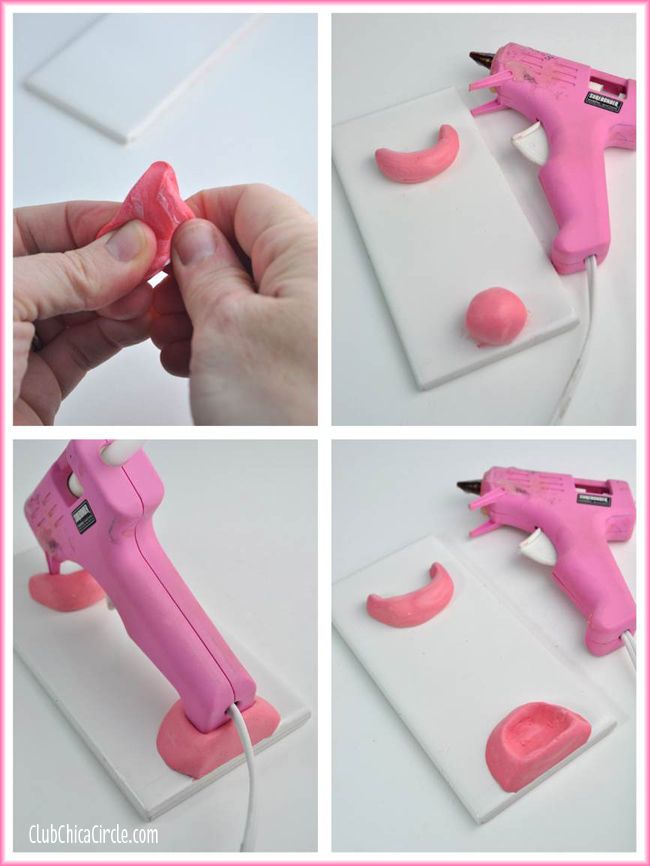
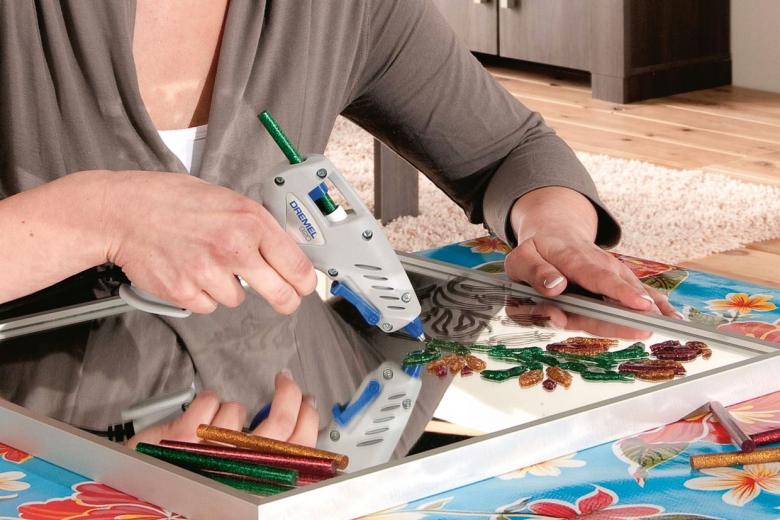
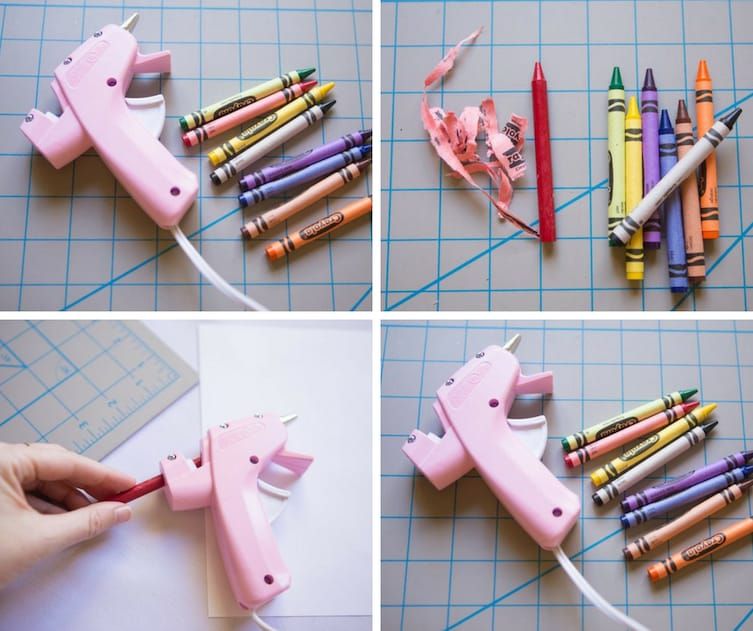
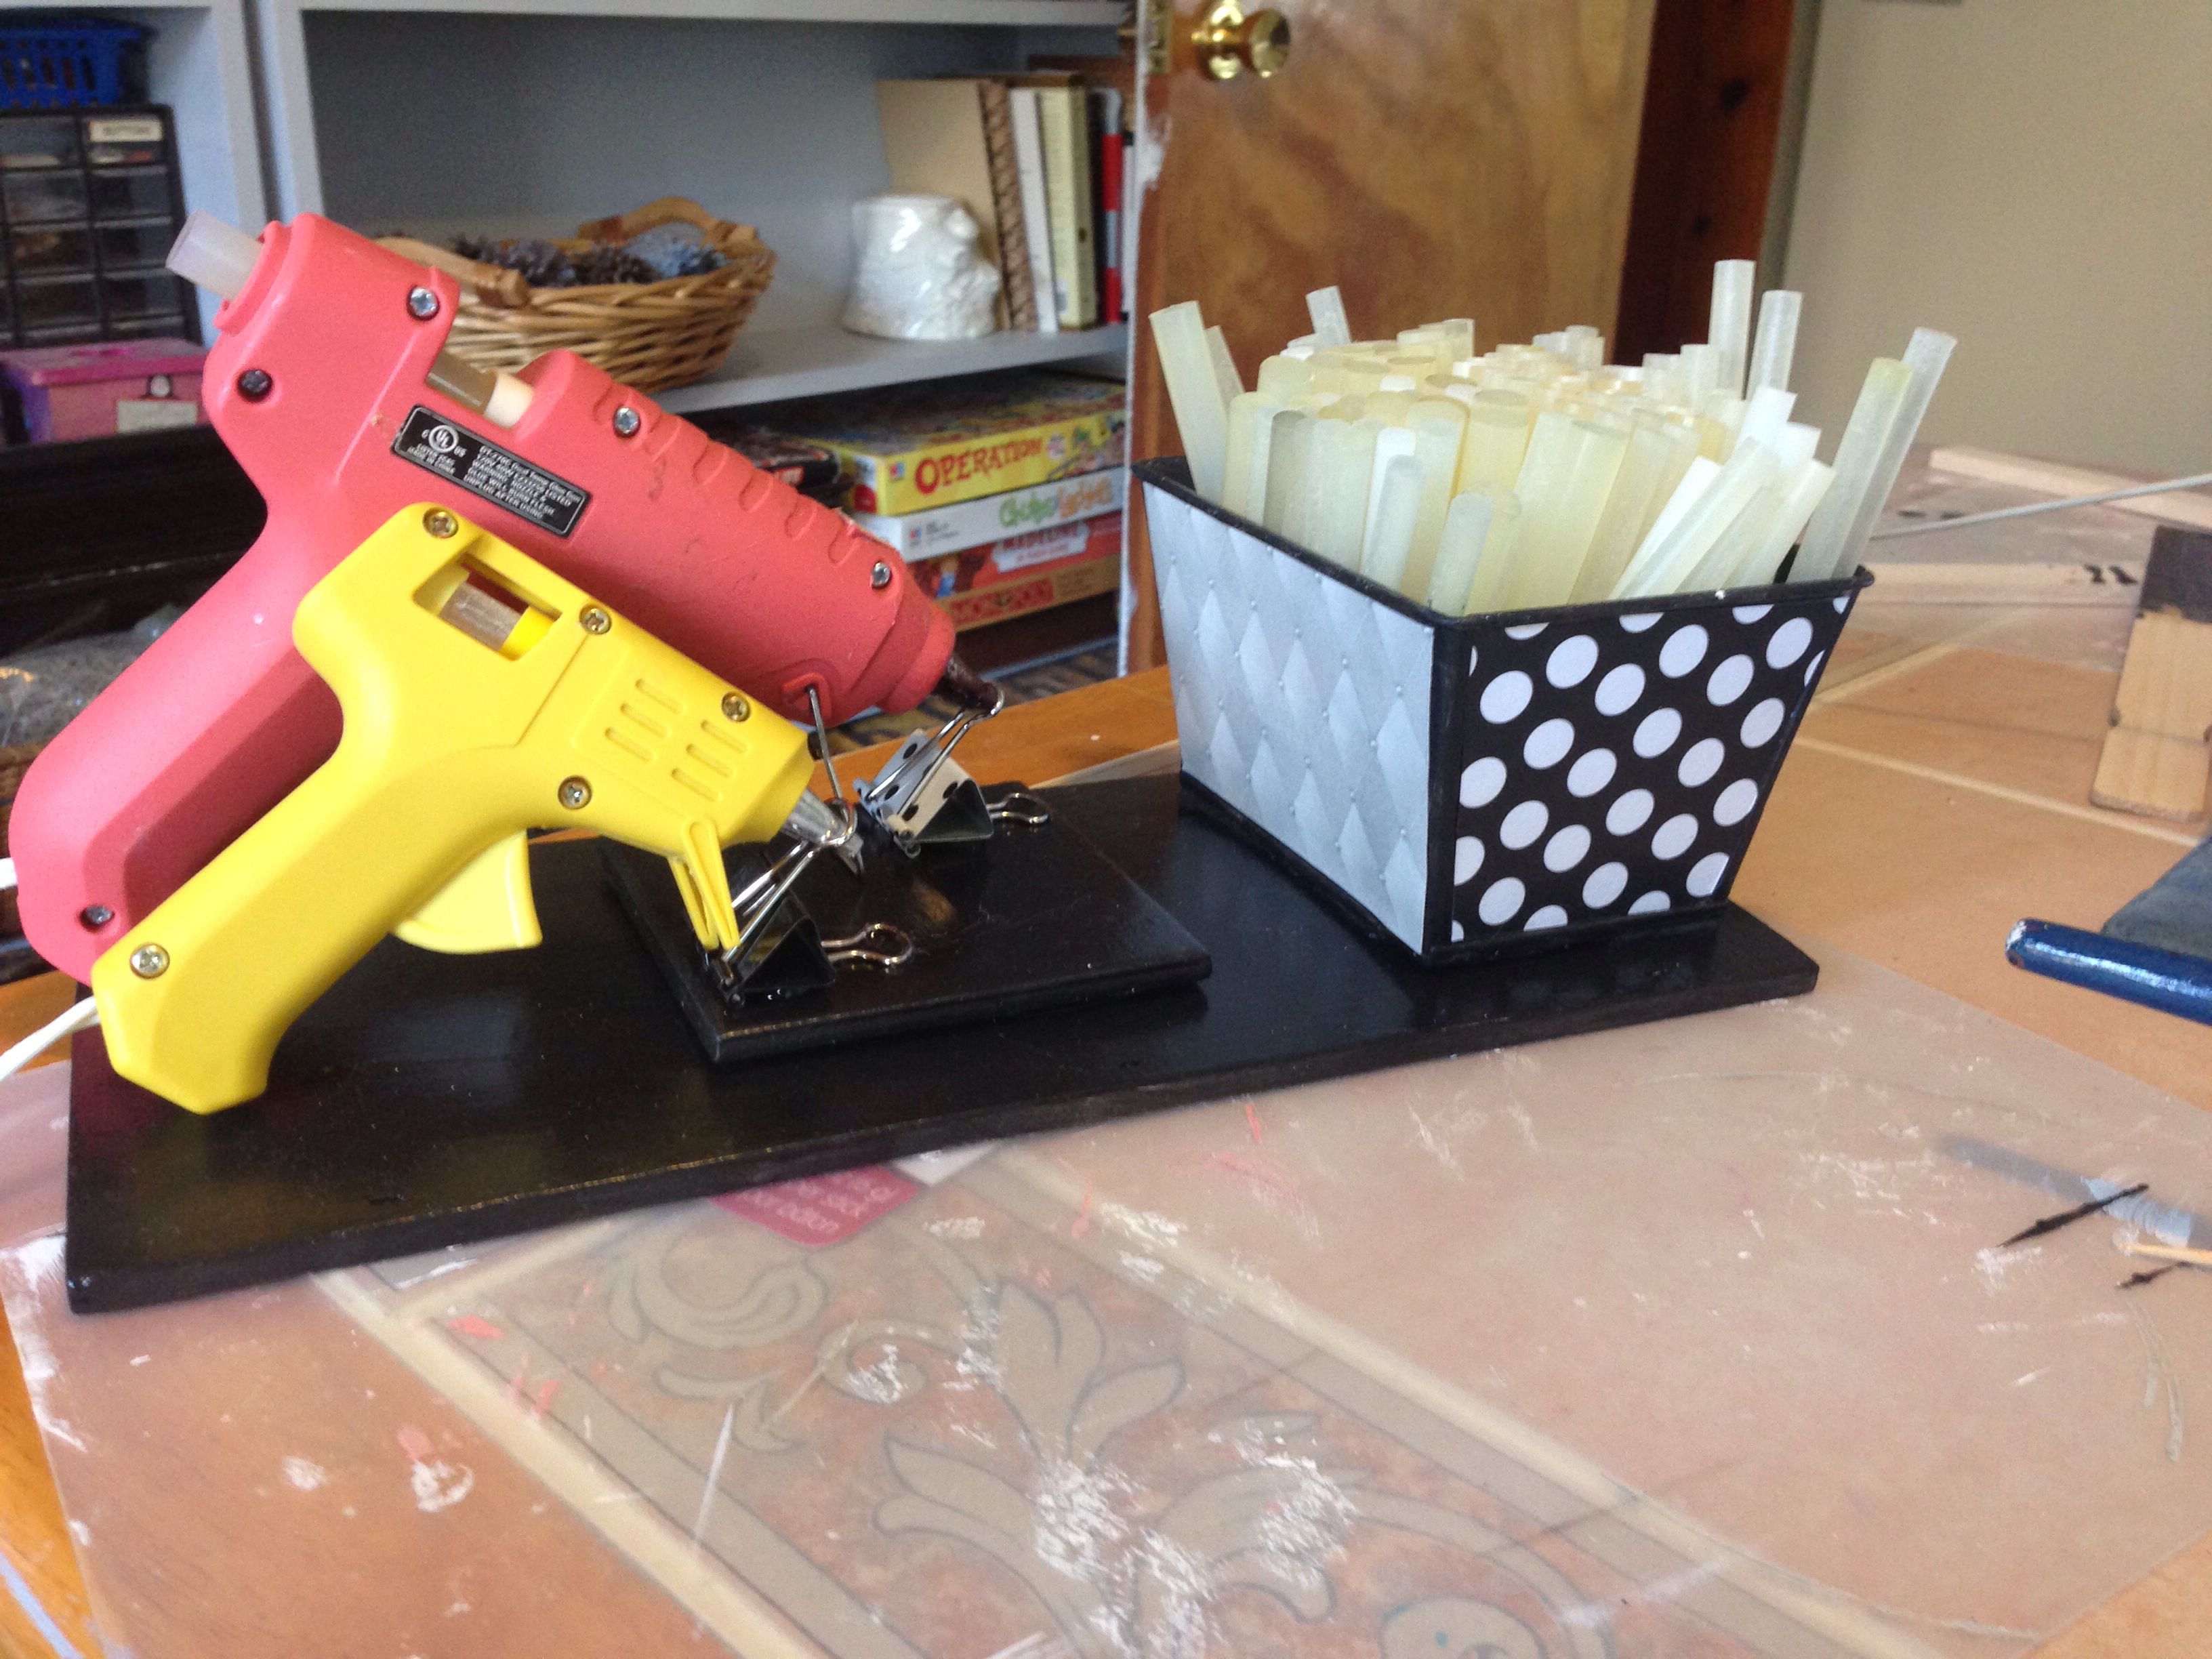
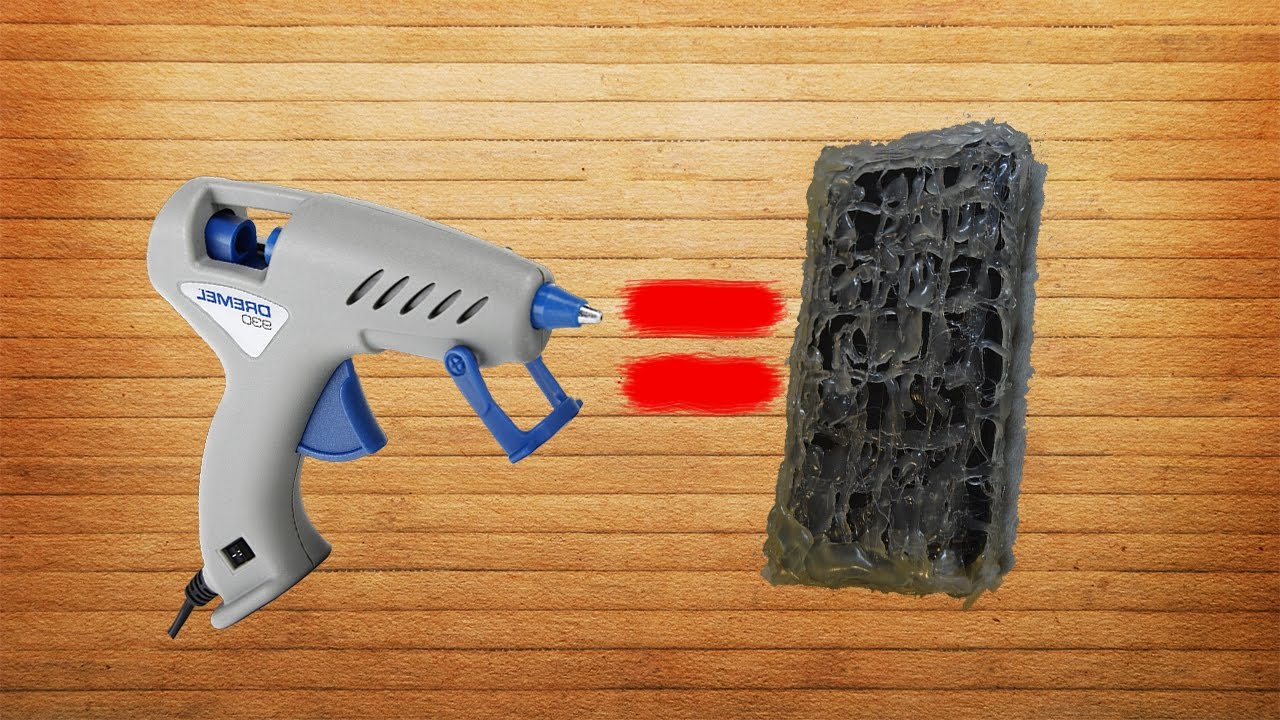
Crafts from glue. We use wax crayons.
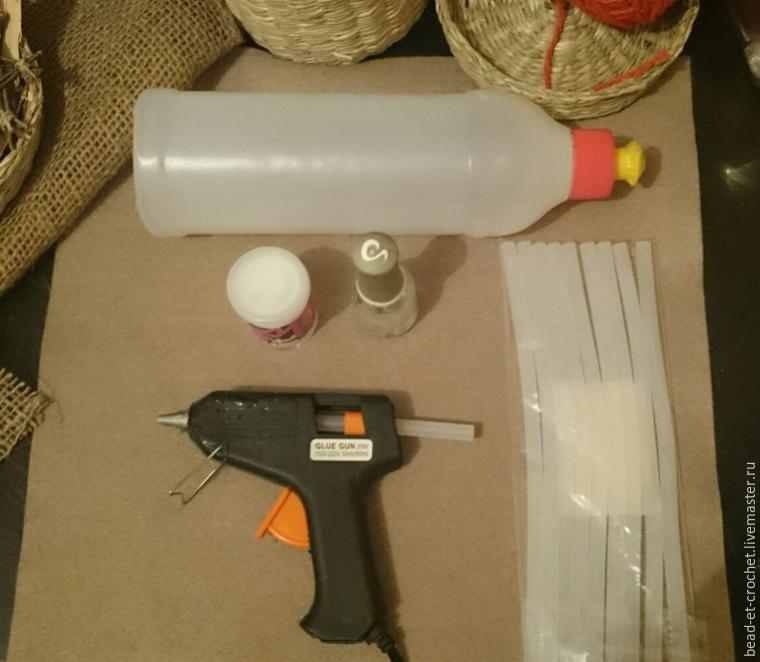
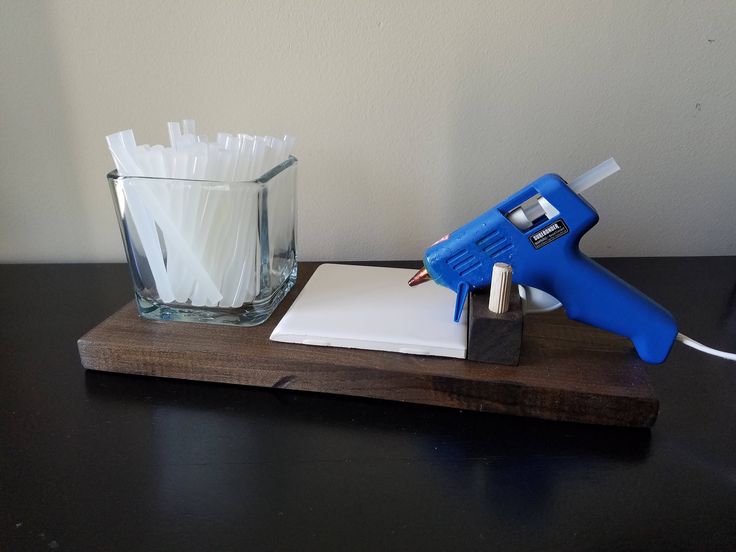
You will need:
- glue gun
- wax crayons
- cardboard.
* It is possible that after using wax crayons, your glue gun will deteriorate, so it is advisable to use an old or inexpensive gun.
* If children are working on a project, watch closely with the hot glue gun and hot melted crayons.
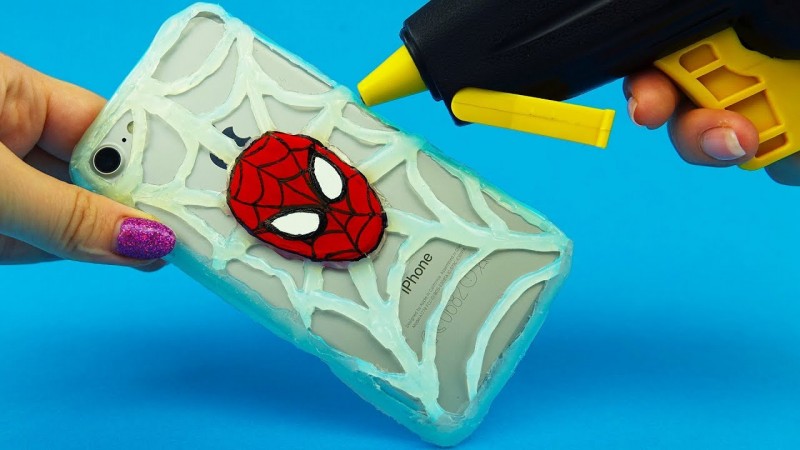
1. Remove the labels (pieces of paper) from the crayons.
2. Cover the work area with an old towel.
3. Heat the glue gun.
4. Carefully insert the crayon into the glue gun and gradually push it through. The trigger of the glue gun will not be able to push through them, so you have to do it with your hands.
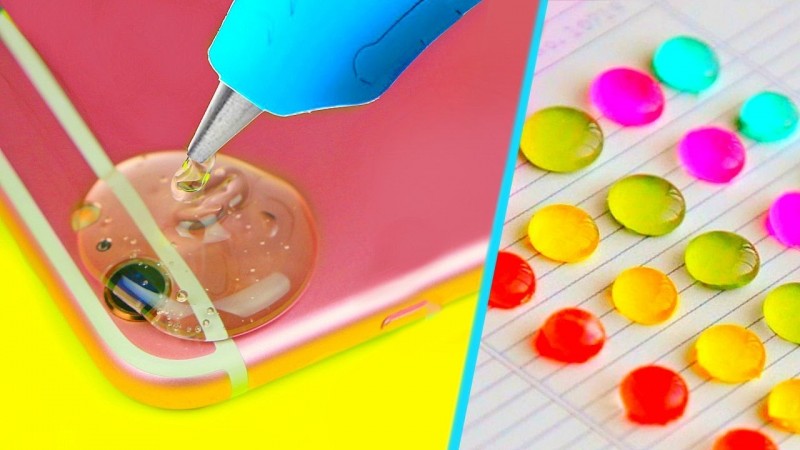
5. The wax will begin to melt and you can use the colored beads of wax to create bright blots.
Wax printing is another variation on how you can use wax crayons and a glue gun to create vibrant pictures.
Photo of hot glue craft ideas


We also recommend viewing:
- Do-it-yourself diaper cake
- DIY egg trays
- DIY crafts from birch bark
- What can be done from the constructor
- Crafts from baby food jars
- DIY matryoshka for kindergarten
- Beautiful appliques from colored paper
- Crafts from pumpkin and sunflower seeds
- What can be made from PVA glue
- DIY mushroom crafts
- Walnut shell crafts
- DIY paper angels
- The best DIY styrofoam crafts
- Balloon Figures
- How to make a paper frog
- Simple DIY straw crafts
- DIY volumetric paper applique
- Interesting DIY wood crafts
- DIY crafts from old things
- Interesting circle applique ideas
- Interesting crafts from plasticine for children
- The best DIY wine cork crafts
- Beautiful fabric applique
- Applique from colored paper Cockerel
- Crafts from toilet paper rolls
- Applique of geometric shapes for children
- What can be made from PVC pipes
- DIY original crafts from wood cuts
- Funny felt toys
- Developing soft felt books
- Beautiful crafts from socks with your own hands
- Original crafts for the cement garden
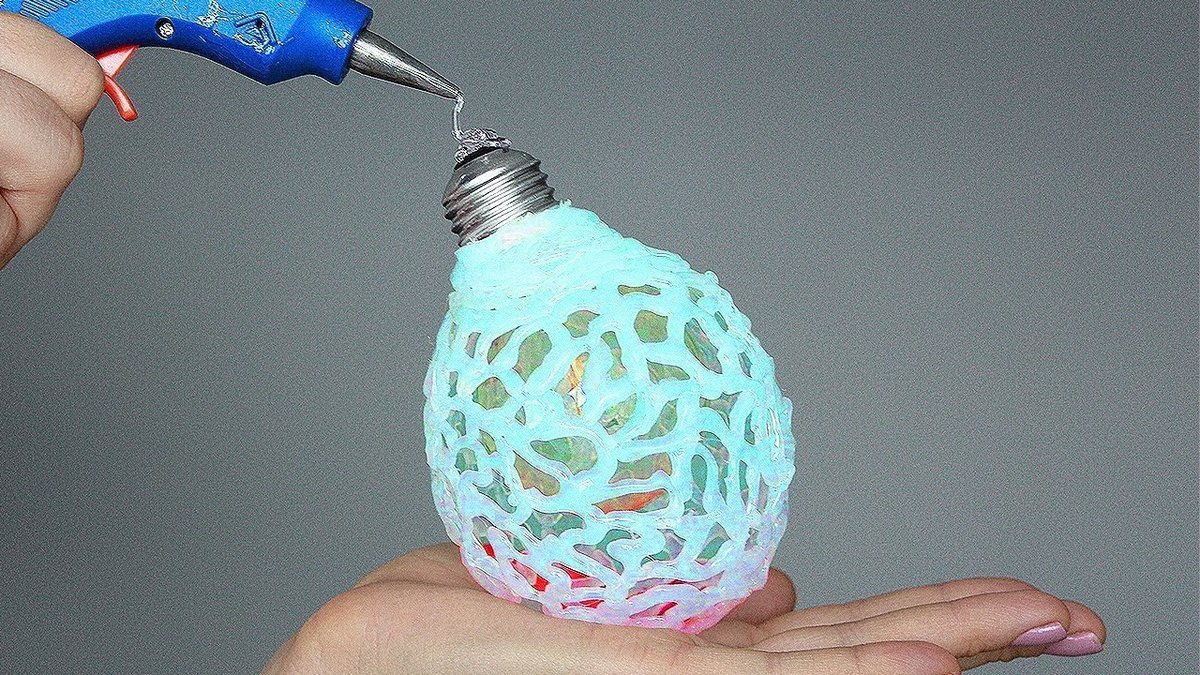
- DIY light bulb crafts
- Crafts from coffee beans with your own hands
- We sew a phone case from felt
- What can be made from dried roses
- What can be made from old tires
- DIY original valentines
- Amazing towel figures
- DIY felt crafts
- How to make DIY rattle toys
- DIY felt animals
- DIY felt letters
- DIY paper bunny craft
- DIY crafts from scraps of fabric
- Original crafts from tin cans
- Ideas for using old fur
- Epoxy resin jewelry
- Original crafts from pumpkin do it yourself
- DIY wallet for paper money and coins
- DIY felt flowers
Please repost
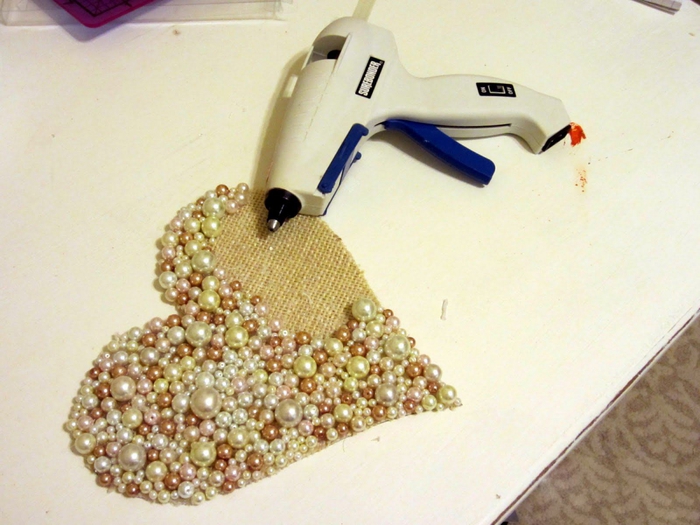
Decorative heart made of shells and hot melt glue
For such a craft from shells and glue, you should prepare:
- cardboard;
- shells of different sizes;
- burlap;
- tow;
- leg-split;
- glue gun;
- scissors.
The sequence of creating crafts from hot melt glue and shells:
- A heart blank is made of cardboard.
- In the upper part of the template, 2 holes are pierced, for which they will then hang the craft.
- Where the front part will be, sisal or tow is glued.
- After that, the same heart is cut out of the burlap, only a little larger and glued to the back of the cardboard heart.
- A small part of the twine is threaded into the holes for fastening, the top is tied with a knot.
- Shells are glued all over the front side with sisal.
- A starfish can be glued to the central part, and the voids can be filled with small shells.
- Fold over the edges of the heart with twine.
The wall decoration is ready.
Photo of glue crafts


We also recommend viewing:
- Felt crafts
- Plywood crafts
- Grain crafts
- DIY crafts
- Crafts from balls
- Crafts from colored paper
- Foil Crafts
- Crafts from candy wrappers
- Dough crafts
- Crafts from plates
- Crafts from cups
- Crafts from matches
- Crafts from corks
- Crafts from improvised means
- Pipe crafts
- Crafts from plastic bottles
- Crafts from socks
- Crafts from threads
- Metal crafts
- Crafts from pasta
- Craft tulips
- Crafts for March 8
- Crafts from toilet bushings
- Crafts from ribbons
- DIY coffee crafts
- Crafts from boxes
- Crafts from disks
- Clay crafts
- Crafts from waste material
- Craft mug
- Craft house
- Craft tie
- Beautiful crafts
- Decorative crafts
- Crafts from spoons
- DIY flowers
- Crafts from foamiran
- DIY paintings
- Quilling crafts
- DIY Easter crafts
- Egg Crafts
- Twine crafts
- Crafts from fabric
- Crafts from natural material
- Crafts from packages
- Crafts from stones
- Crafts from corrugated paper
- Crafts from newspaper tubes
- Cotton wool crafts
- Crafts from cotton swabs
- Crafts from cotton pads
- Crafts from bottles
- Crafts for home
- Knitted crafts
- Military crafts
- Unusual DIY crafts
- Bulk crafts
- Craft letter
- Craft bouquet
- Craft shirt
- Crafts for giving
- Crafts for the garden
- Crafts from cans
- Origami
- DIY paper and cardboard crafts
- Plaster crafts
- Wood crafts
- Crafts from cardboard
- Crafts from sticks
- Styrofoam crafts
- Crafts from napkins
- Crafts for the exhibition
- Leather crafts
- Coffee crafts
- Crafts from branches
- Crafts from egg trays
Tips & Tricks
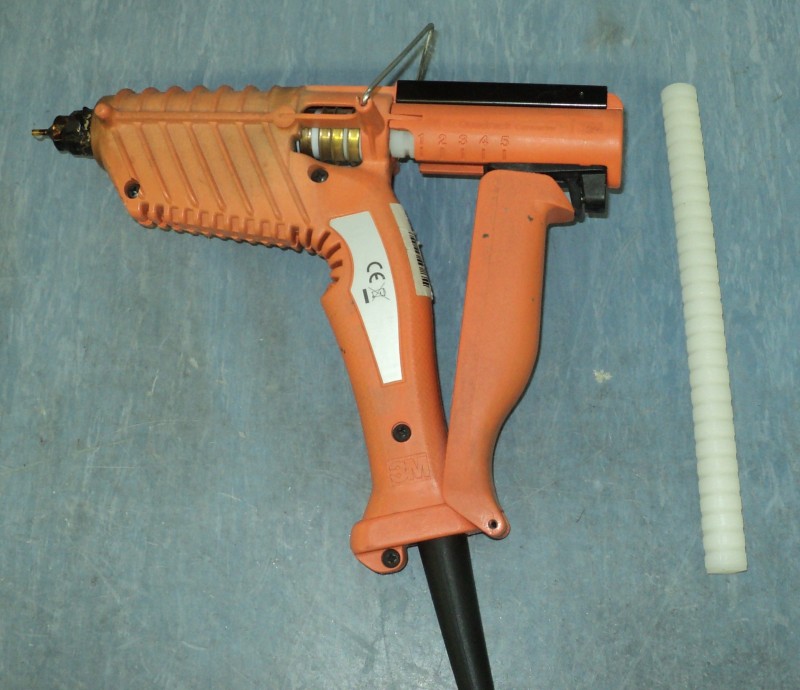
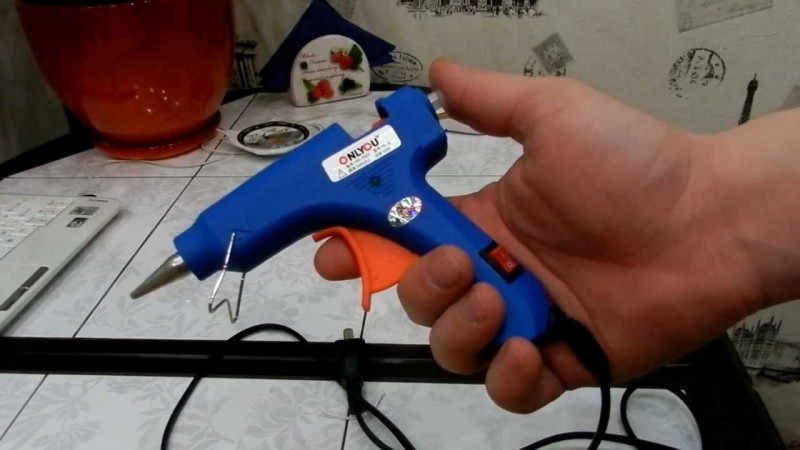
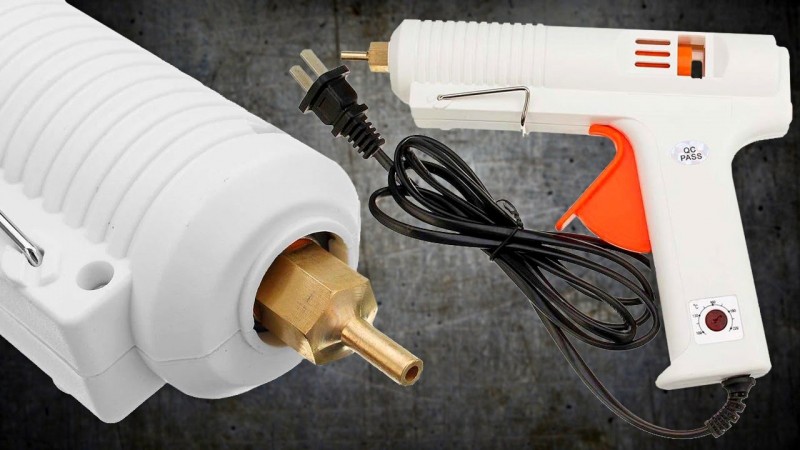
When choosing a glue gun, consider the purpose for which you intend to use it. If you need a tool for serious repair work, choose a gun with a powerful feed mechanism and a heating chamber.

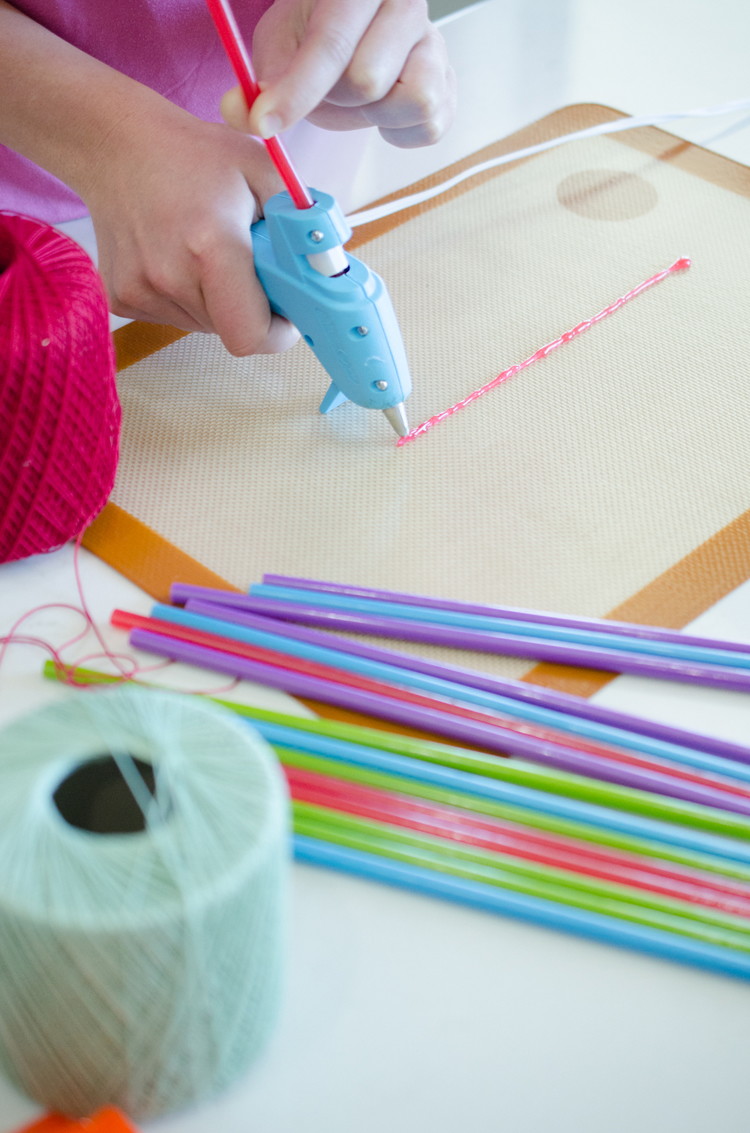
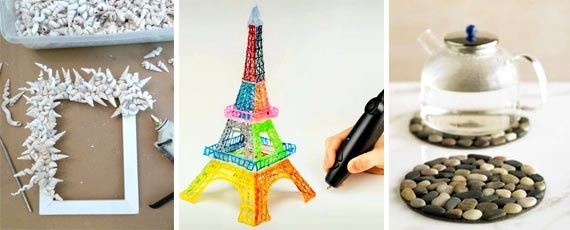
With the help of a pistol, paint and baking paper, you can make figures of any shape by applying hot melt glue to the contour drawn in advance on the paper. The paper is easily detached from the cured glue, so this way you can make various decorations for the room or Christmas tree decorations.
Be careful when working with the gun, do not touch the tip of the tool during operation and the melted glue to avoid burns. Gloves and special goggles should be used for greater safety. Check that the appliance is working properly and do not use it in contact with water.
Share link:
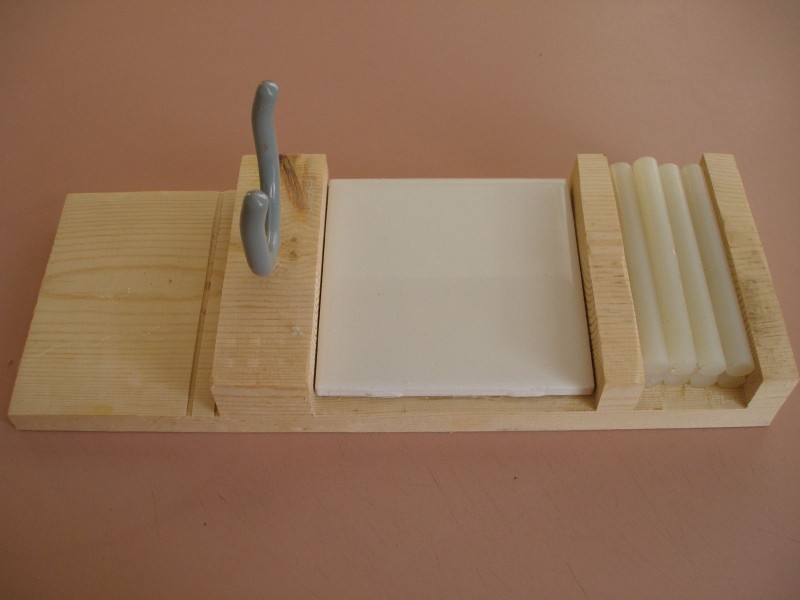
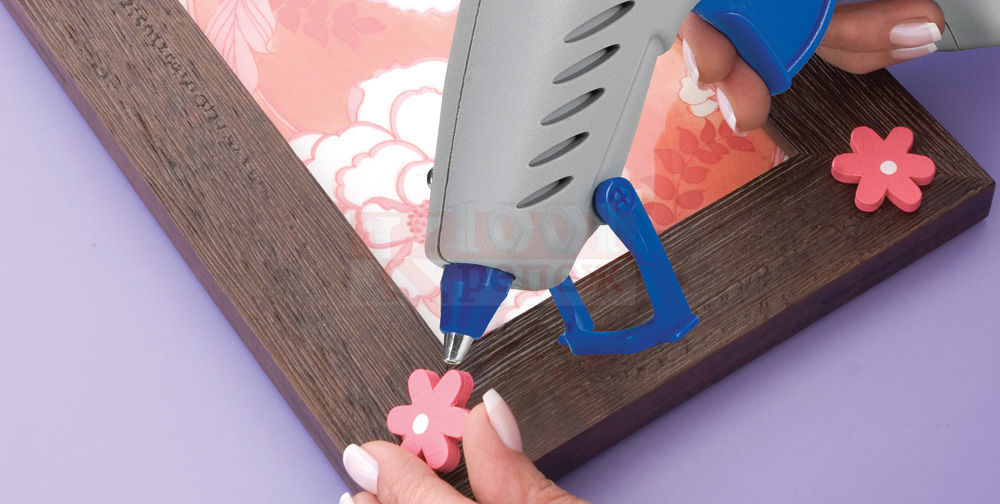
Rules for using a glue gun
The special stick used for the glue gun comes in different diameters. Before use, read the instructions and purchase rods of the required diameter. The rod stick is inserted into a special hole in the gun body. When connected to an outlet, a heating process takes place. The stick begins to melt and when you pull the trigger, it starts slowly dripping from the "nose".

It is very important not to forget about safety measures. A child should not use a glue gun on his own, without adult supervision
Main rules of use:
- Check the integrity of the device and the cord.
- The work surface should be as stable as possible.
- The place for doing crafts should be covered with something.
- Do not touch the metal parts of the gun with your hands.
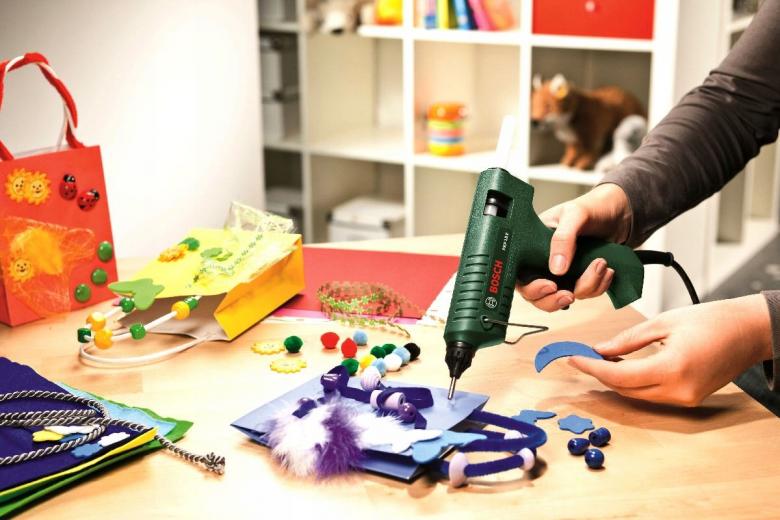
Glue, or as it is also called, a thermal gun, is used in a wide variety of areas: for construction and repair work, for creative crafts and the creation of a wide variety of decorative elements.
Let's take a look at some of the basic creative uses of the glue gun.

Creation of individual elements
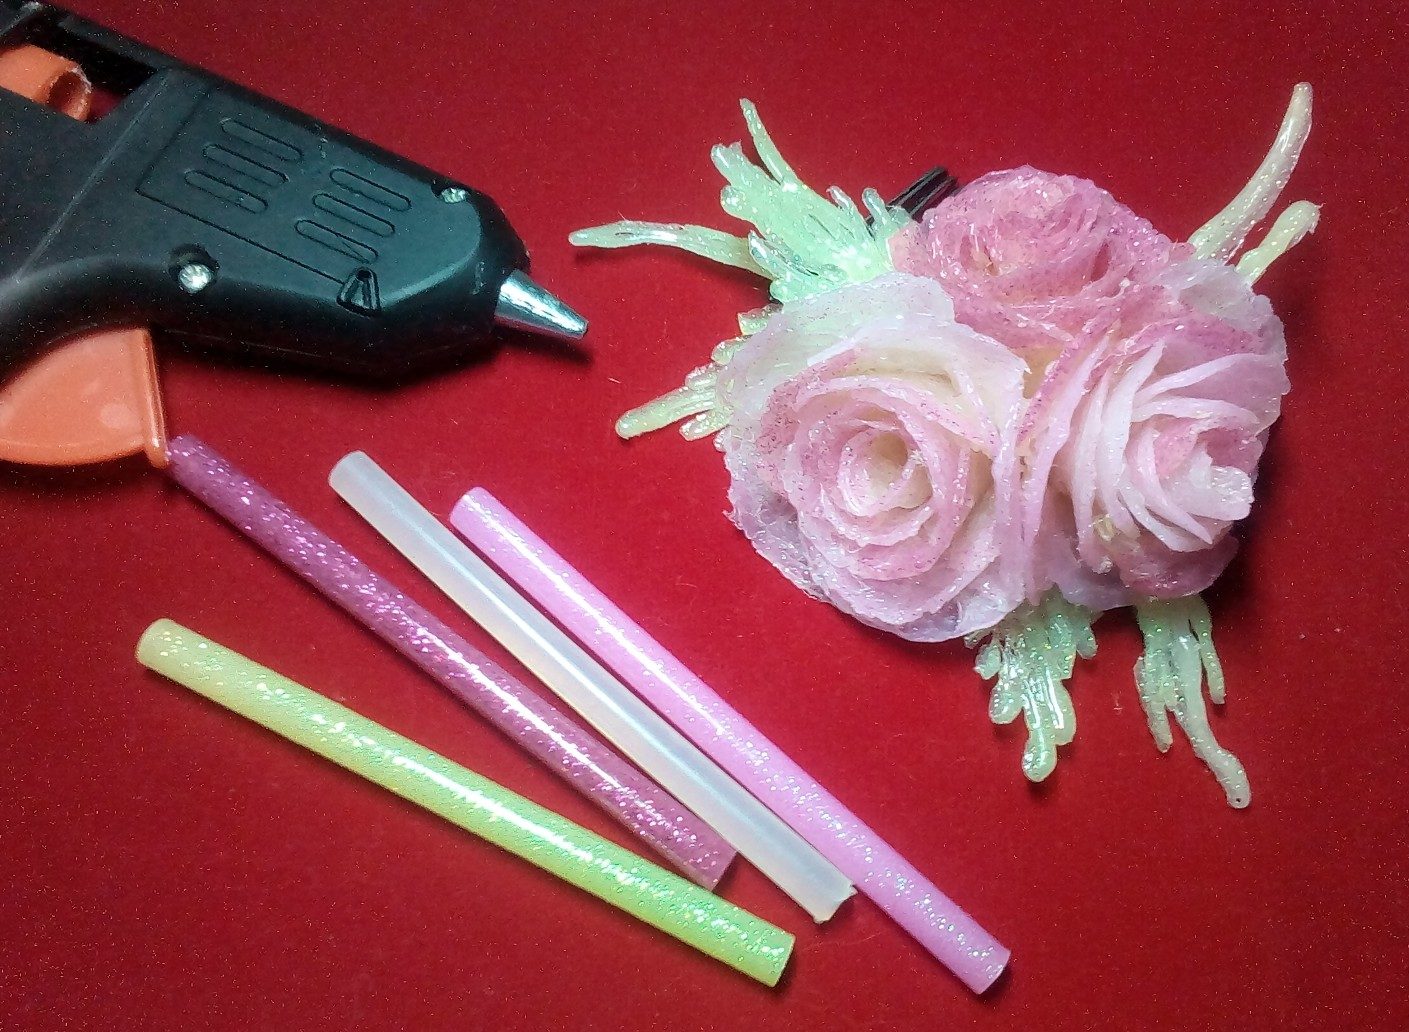
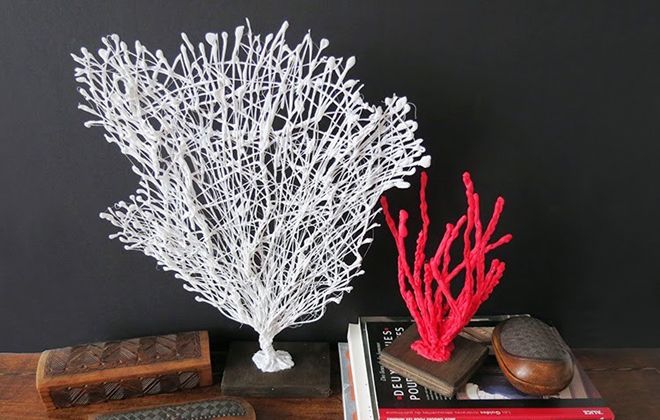
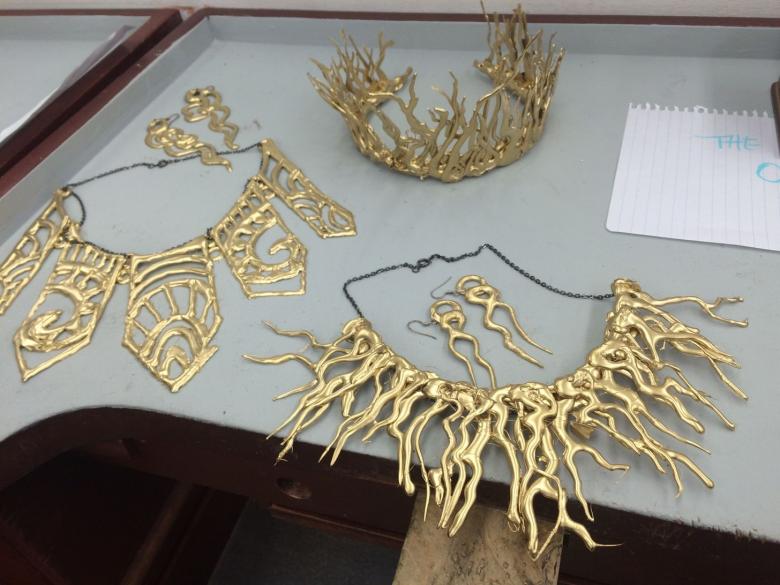
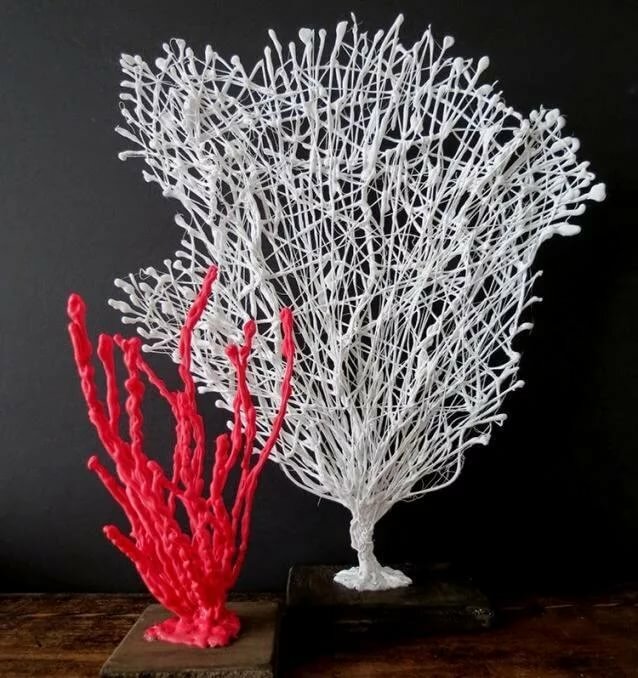
Using hot glue, you can independently create a wide variety of figures: these can be crafts in the form of animals, various flowers and plants, birds, snowflakes, etc.
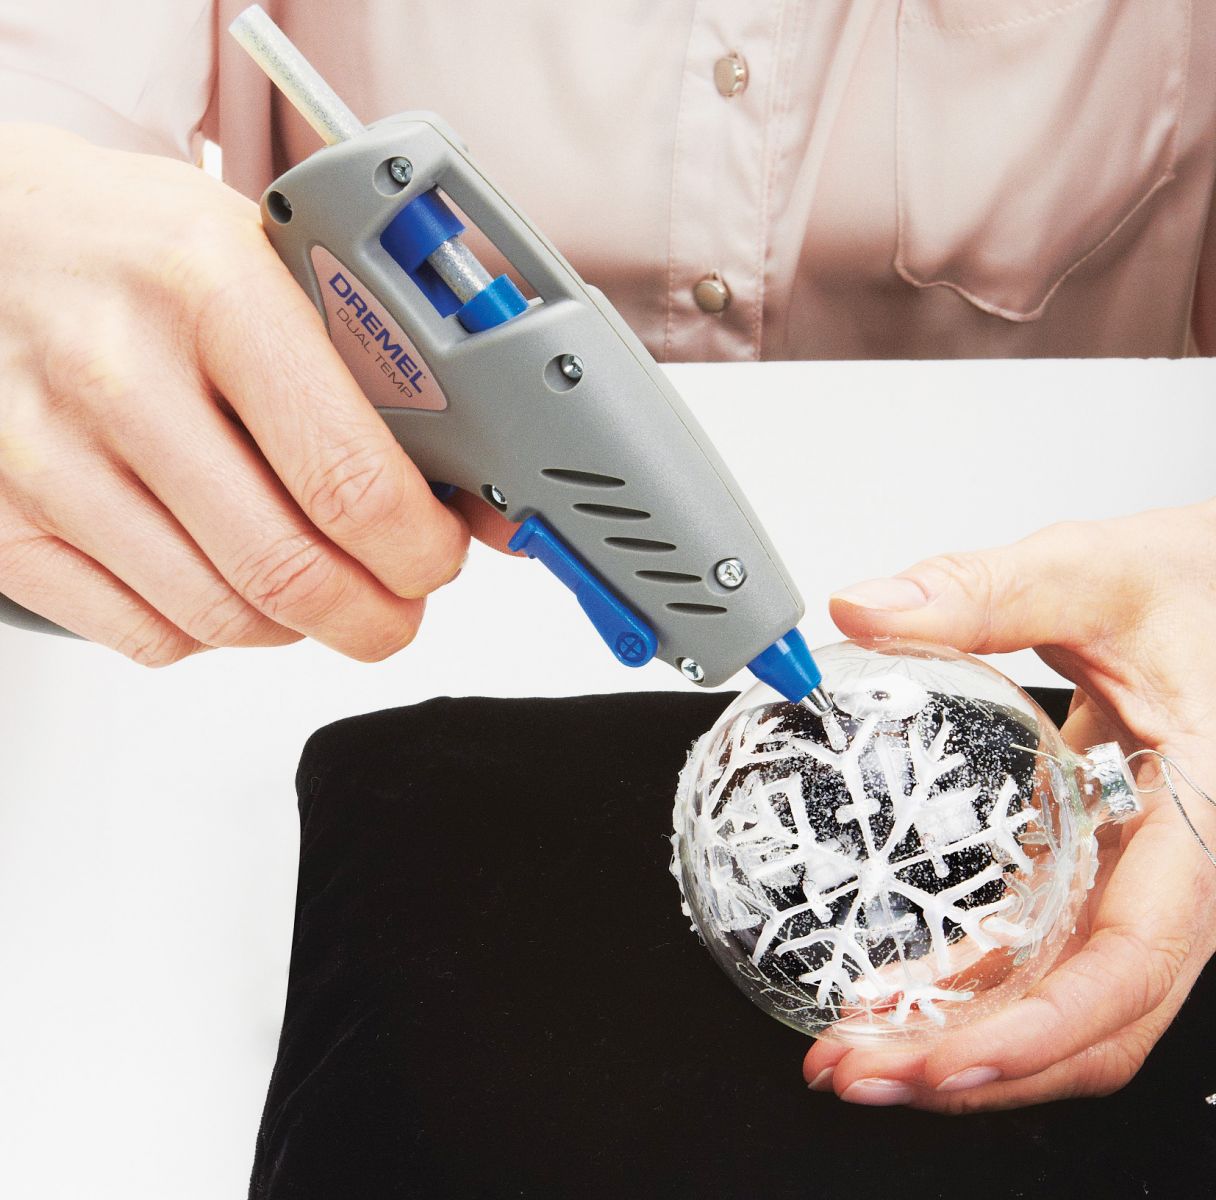
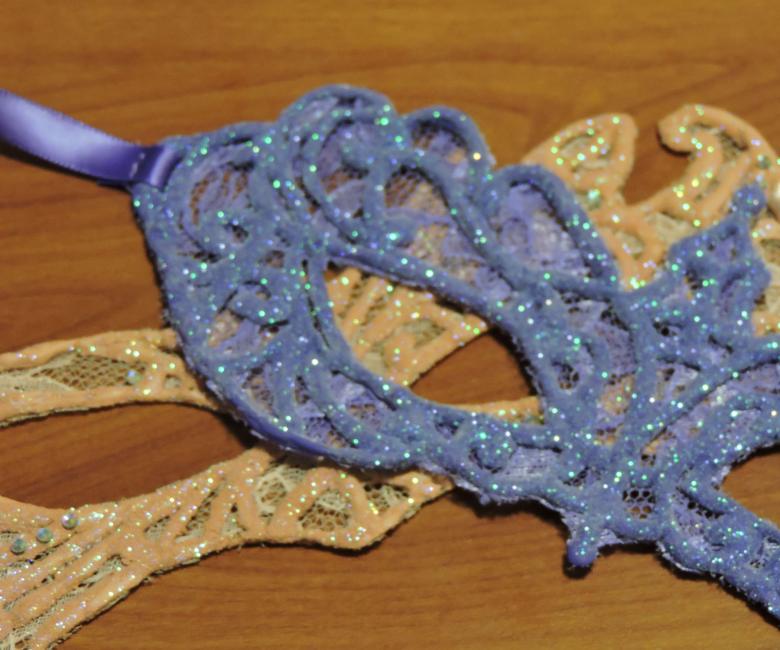
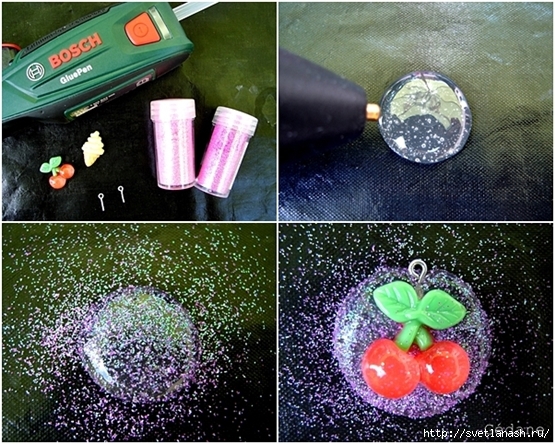
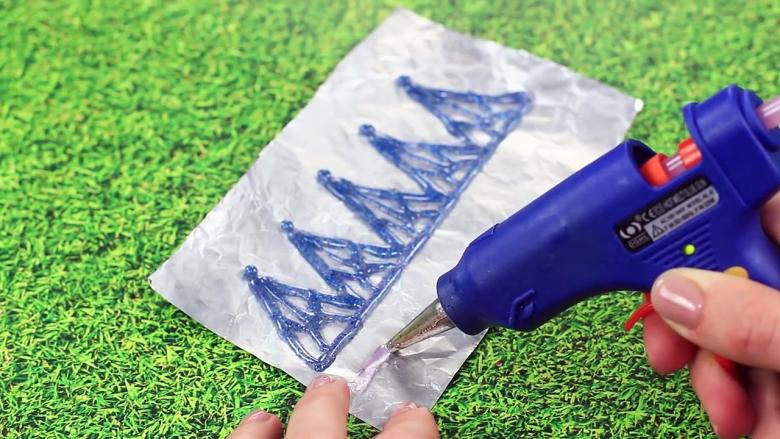
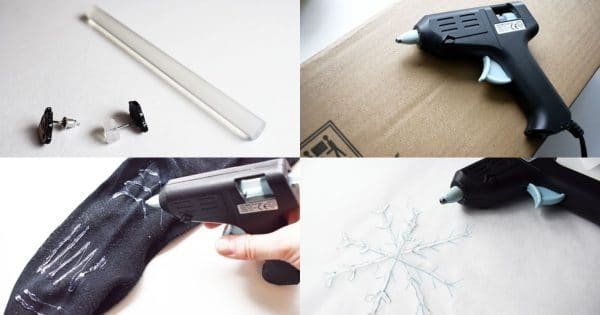
Snowflake
For joint creative activities with your child, you can start with something very light, for example, a snowflake.
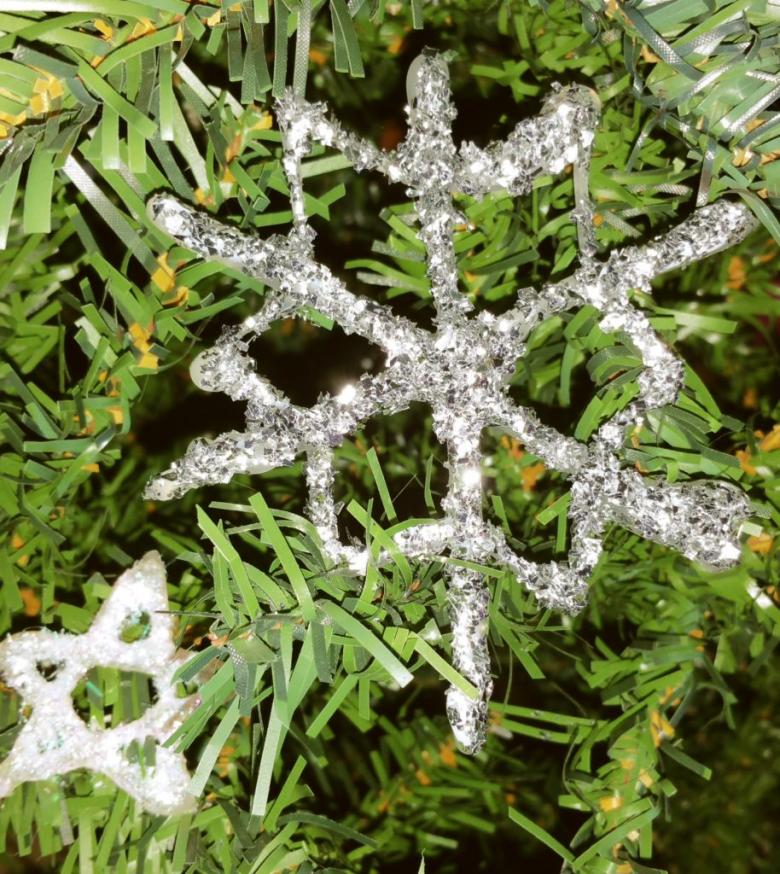
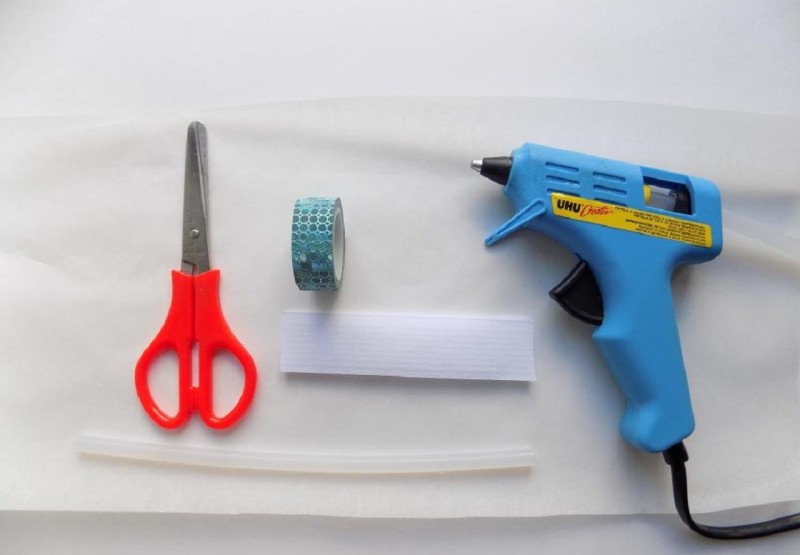
For manufacturing you will need:
- dry shine of any color;
- acrylic paints or nail polish;
- glue gun;
- wax paper or any cellophane.
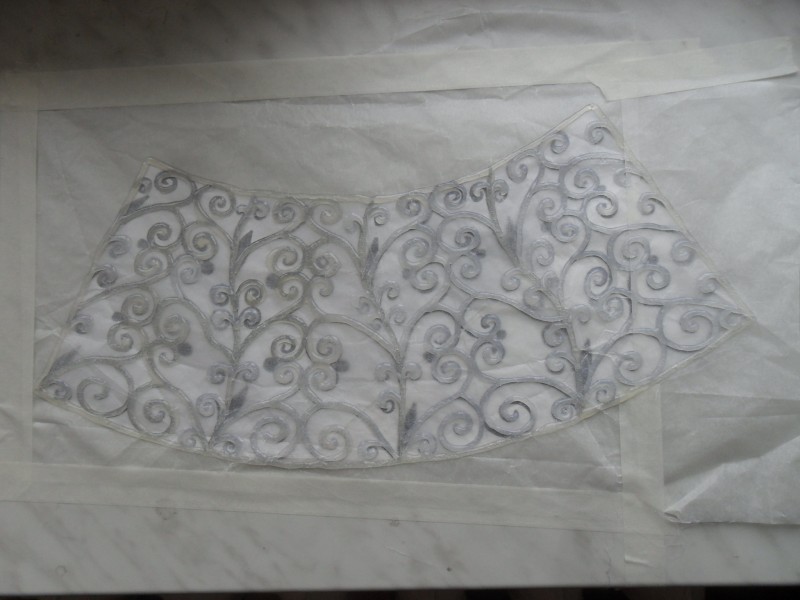
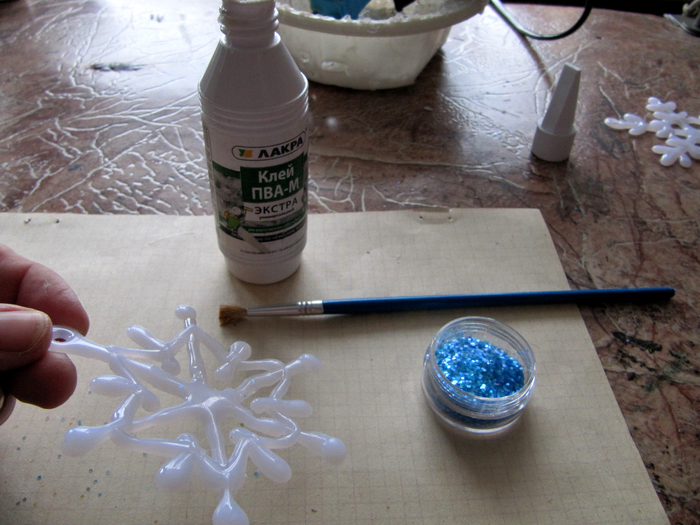
To facilitate the process, a silhouette of a future snowflake is drawn on paper. Next, the glue is carefully applied to the drawing.
Carefully, try not to go beyond the contours of the drawing. After the glue has completely dried, after 2-3 minutes, we begin the process of decorating the snowflake
This can be done with regular glitter, acrylic paints, or even nail polish. It all depends on the materials available, and of course your imagination.

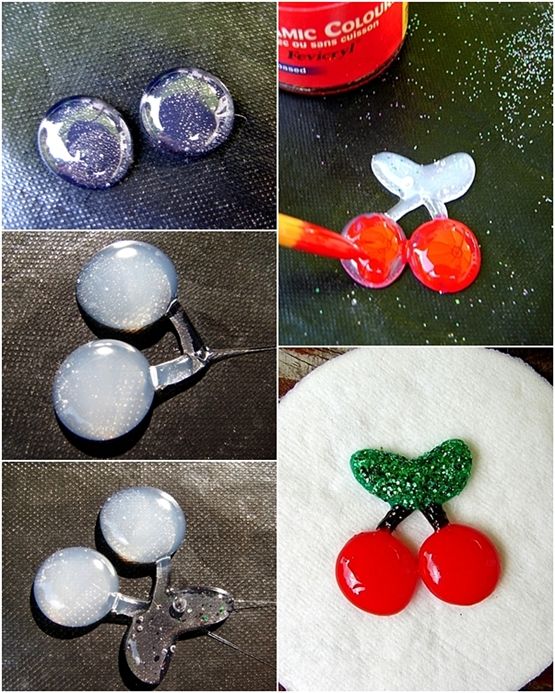
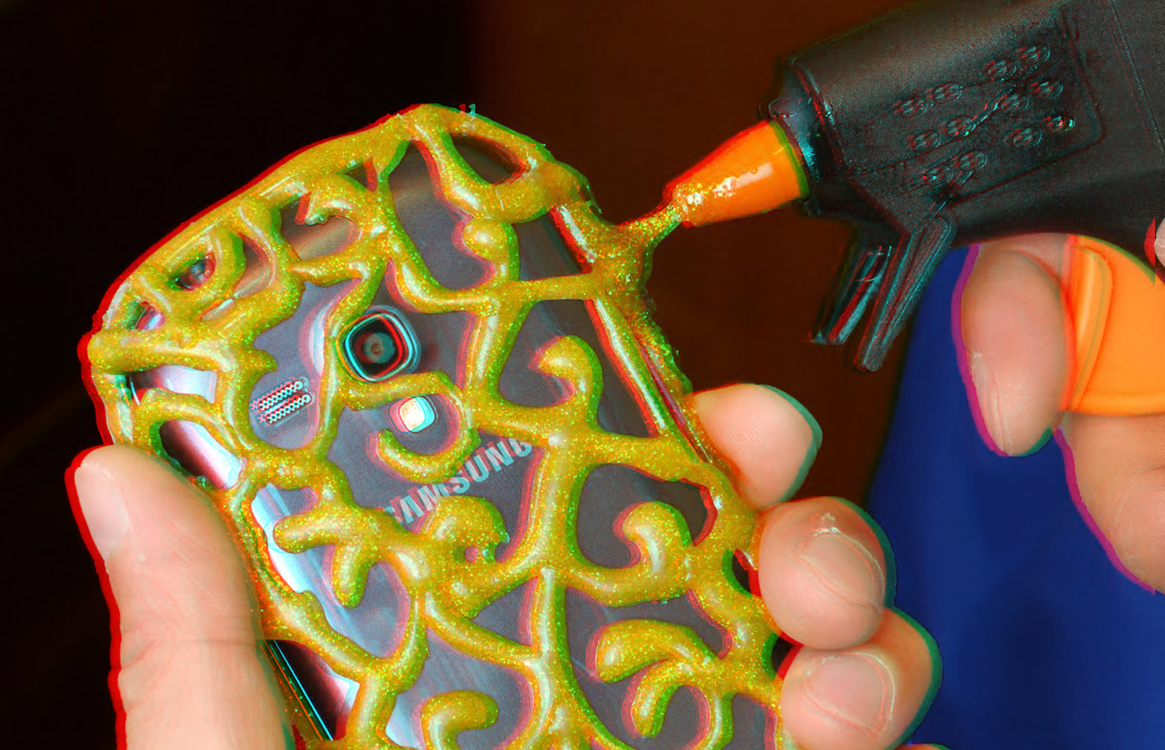
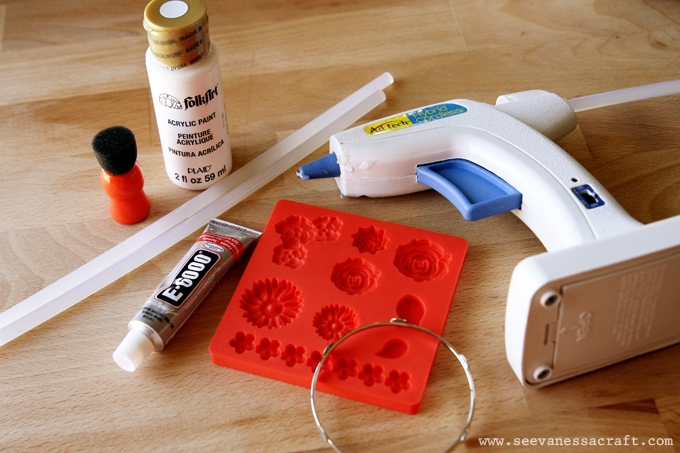
Figurine
To create a figurine, you need to prepare:
- glue gun;
- acrylic paint or nail polish;
- additional elements for the formation of a muzzle (a button - a nose, a heart - a decoration);
- magnet;
- mount for key fob.

The outline of the future figurine is applied to waxed paper or a bag. Further, with the help of hot glue, all voids are filled and contours are formed. Additional elements give "liveliness" and individuality to your craft. If you plan to make a magnet, then while the part is warm, you need to attach a magnet to it from behind. The spout can be made from a small button or formed from the same hot glue.
By the same principle, you can make an unusual individual badge by simply attaching a pin to the back of the figure.
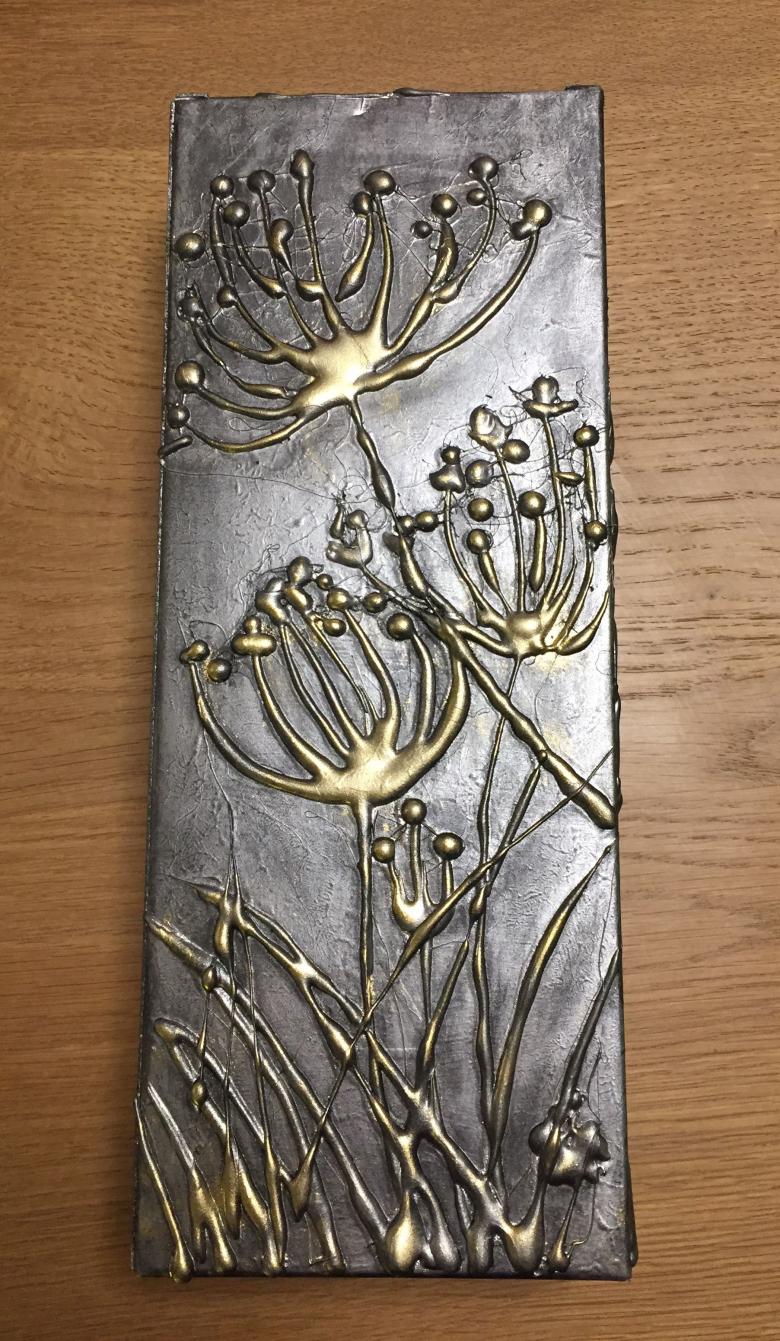
How to make a rolling pin with a pattern
With the help of such a rolling pin, you can work with clay, use it for crafts from salt dough, etc. On the blanks for future crafts, patterns from a rolling pin will be pressed.
Accessories for work:
- rolling pin;
- marker or felt-tip pen;
- glue gun.
The work is done as follows:
- Any pattern is drawn on a rolling pin with a felt-tip pen, but you don't need to draw too many lines.
- The gun is preheated and glue is applied to the lines (remember to spread newspaper or cardboard before doing this).
- When the glue has cooled, the rolling pin can be used for its intended purpose; after application, the pattern is easily removed and a new one is applied.
The craftswoman always has the opportunity to occupy something and interest children who are very fond of making gifts to parents, teachers and their friends. With a small family budget, a self-made gift will save money and at the same time become an exclusive item. In addition, making crafts with your own hands develops creative thinking, cognitive abilities, and fine motor skills of the child.
Animals
Invite your kid to make an owl, fish or butterfly out of plain paper. The child will be able to use the made animal figurines to decorate his own room, as well as to create cards and gifts for loved ones.
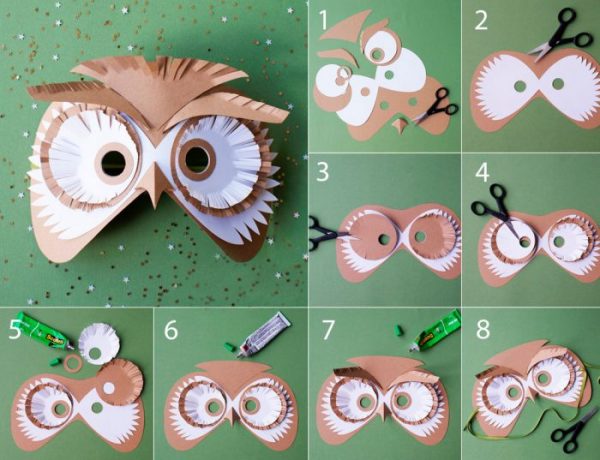
Owl made of colored paper
This version of the craft is perfect for classes with children of any age. To create an applique in the shape of an owl, you need to have at hand only 2 pieces of paper or cardboard (preferably in contrasting colors), scissors and glue. Progress:
- We make 3 curly blanks for the plumage of the bird.
- Cut out and fold the muzzle: glue a small beak into the corner of a large triangle.
- Let's start forming the peephole. To do this, prepare three circles of different diameters (the middle one is a light shade, the remaining two are dark), fold the eye out of them and fix it with glue. Do the same again.
- We fold the owl in this order: glue the plumage, then the eyes and only then the beak.
- You can additionally paint the bird or partially decorate it with sparkles.
Volumetric fish
To make bright paper fish, you need colored paper, glue, scissors, pencils. We start to create:
- Cut out a square and fold it diagonally.
- Cut off the corners, giving one of the sides a roundness.
- We open and make 6 cuts for the subsequent weaving of the fish tail.
- We put alternately cut strips on top of each other and glue them in the middle. You will get a lush tail, and the fish itself will acquire volume.
- If you fasten a pair of identical blanks, you get a 3D craft.
- It remains to draw or stick the eyes and decorate the fish at your discretion.
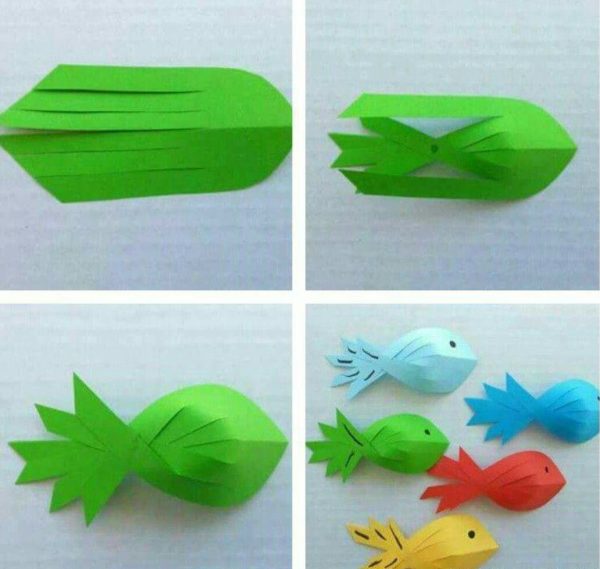
This applique will be a great decoration for a homemade postcard or a small gift box.
Paper butterfly
There are two different methods to create a paper butterfly. First option:
- Prepare a cardboard stencil: print a template with an image of an insect half on a printer, cut along the contour, transfer the drawing to a cardboard and cut out.
- Fold the piece of paper in half, circle the stencil with a pencil at the folded edge, then cut and unfold.
- The winged beauty is ready. It remains only to paint it: add patterns or make openwork elements with a clerical knife.
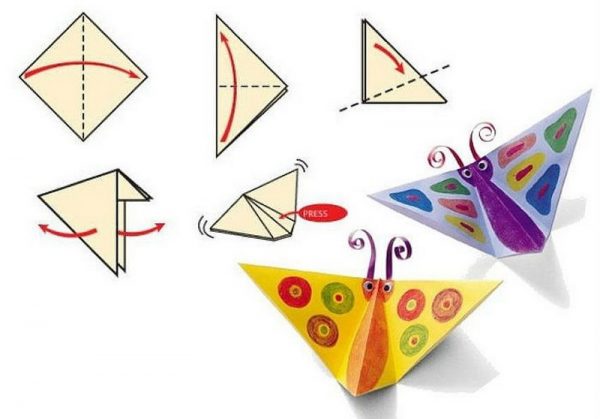
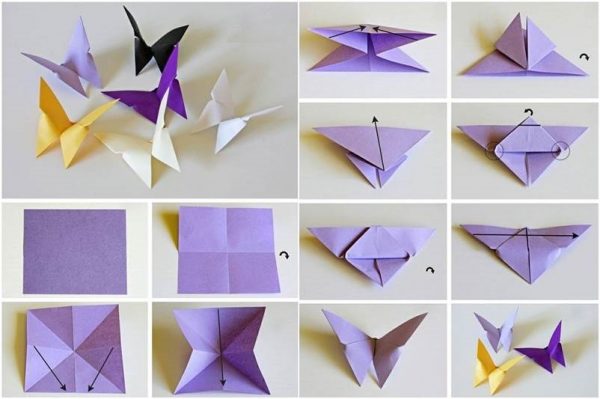
Second, more complex option:
- Prepare a square sheet and mark two diagonal folds.
- Fold the leaf in half horizontally, then bend the edges on both sides inward along the fold lines from the previous paragraph. Just as in the master class with a rose, a double triangle should form here.
- The lower corners of the front part must be folded up.
- Turn the workpiece over with the back side facing you and bend the top of the triangle so that the corner intersects the edge of the figure.
- Wrap the protruding corner and gently adjust the butterfly wings.
- Now you need to get creative and paint the figurine in bright colors.
 Origami butterfly making steps
Gingerbread man made of PVA: a simple craft from glue
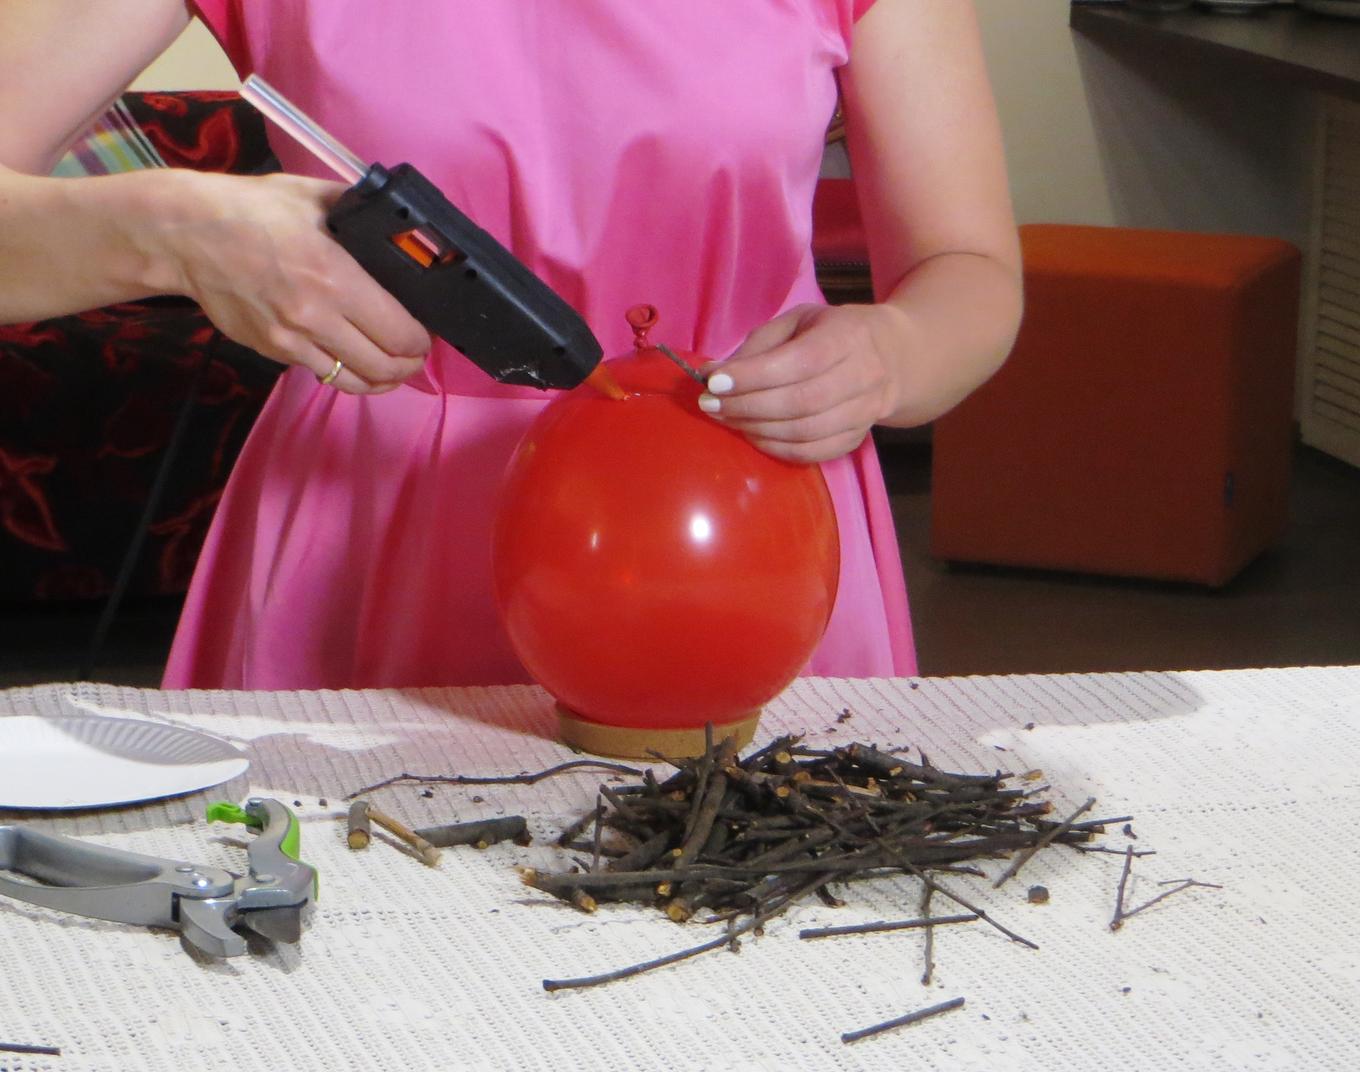
To create the shape of a kolobok, you can use a balloon as a round base, on which a layer of glue and paper is successively applied. To simplify the manufacturing process, we advise you to cut the paper into small pieces.


First, a layer of PVA is abundantly applied to the ball, on which pieces of paper are applied. The paper is securely glued, after which it is covered with a new layer of paper on top. Wait until the previous coat is completely dry before applying a new coat. For the strength of the product, at least 10-13 layers are necessary, and only after that the final layer of white paper is applied, which can be painted.

Crafts for girls made of beads and paper - a description of the technique, interesting ideas, photo examples
DIY crafts for boys - cool product ideas, photo examples, tips
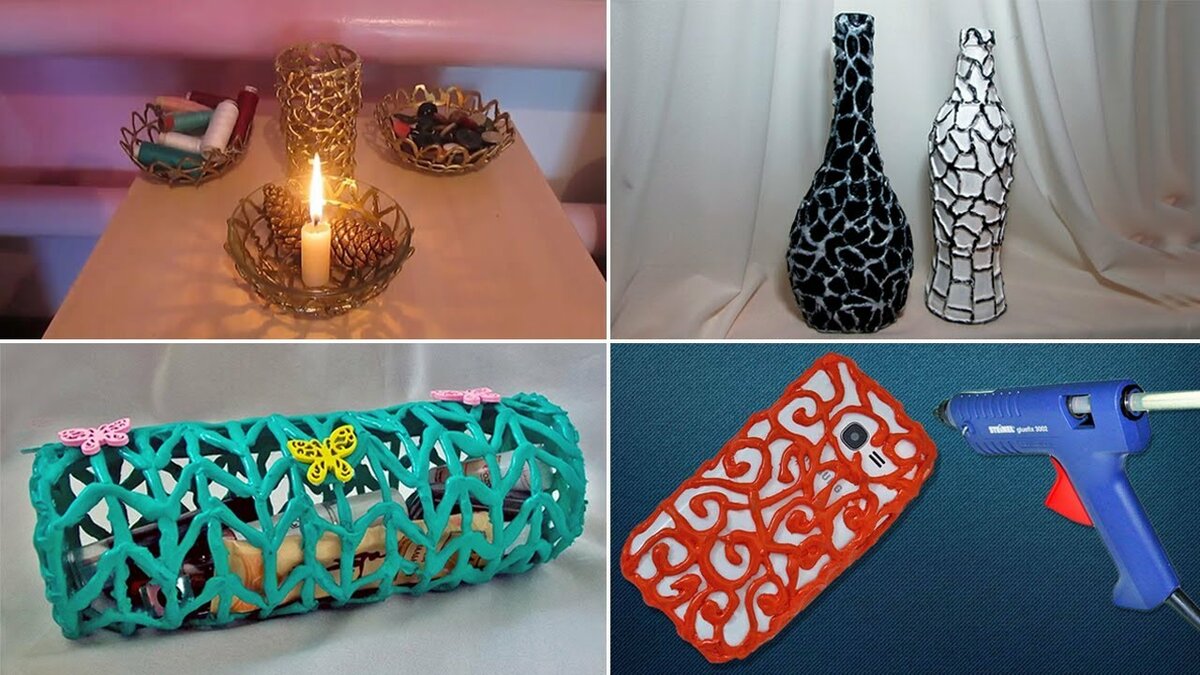
Hot glue crafts
The flight for imagination when working on crafts made from hot melt glue is practically unlimited. It can be decorations for home, interior, clothing items. A lot of things that are needed in the household and in everyday life. Fun with children and decorating their toys.
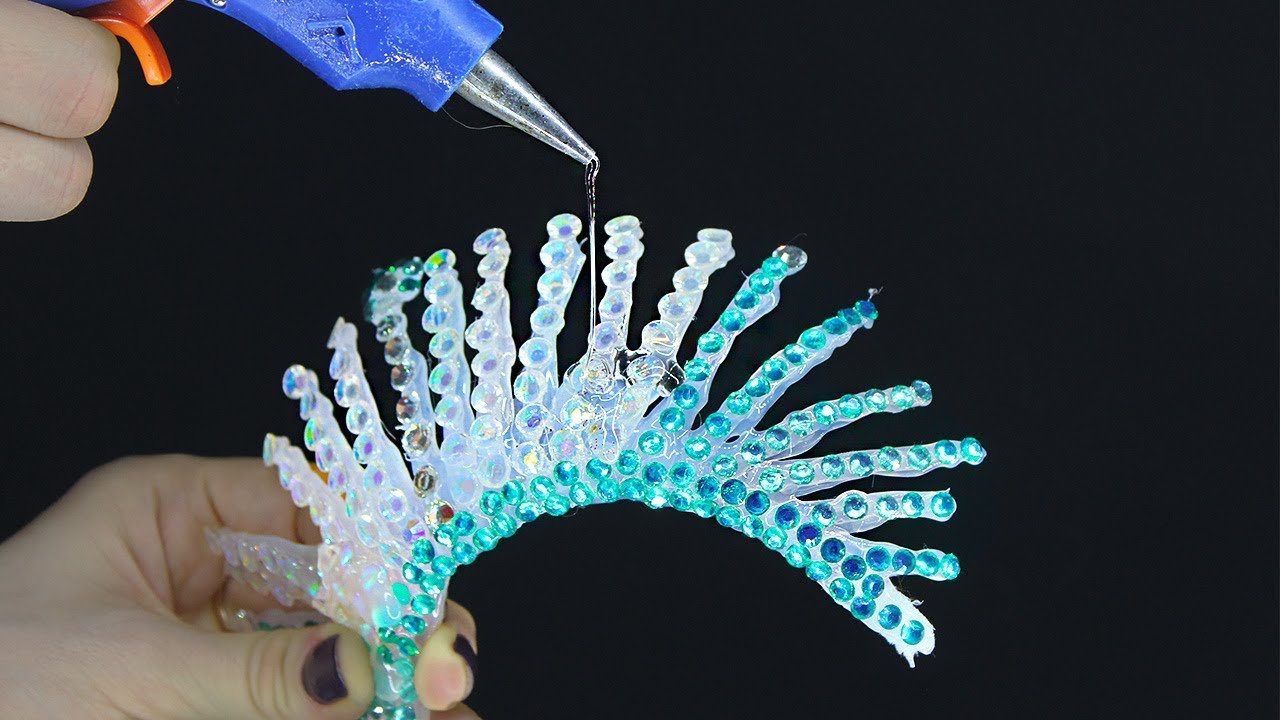
Figurines
Using a glue gun, you will be able to make a variety of silhouettes of animals, flowers, plants, birds. Water droplets or snowflakes.
Prepare in advance:
- Gun with glue stick (colorless or colored).
- A sturdy piece of cellophane or a bag.
For decoration:
- Brush
- PVA
- Sequins, rhinestones, ribbons, bows, etc.
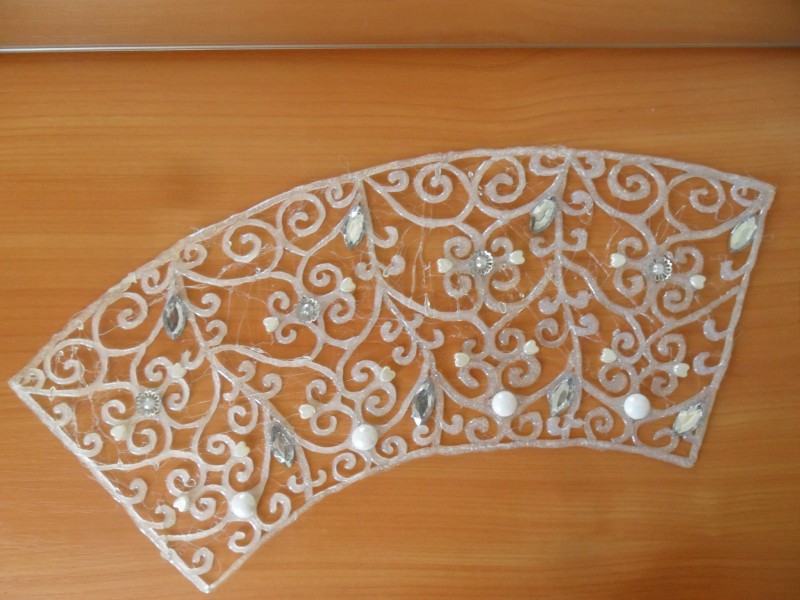
Draw the outline of the shape with glue, fill it inside the drawing. Wait until it is completely dry. Remove from the bag, rinse with running water. Cut off the places where the composition went beyond the boundaries of the craft with scissors.
For decoration, apply PVA glue to the figure. Attach rhinestones, ribbons, bows or sprinkle with sparkles on top.
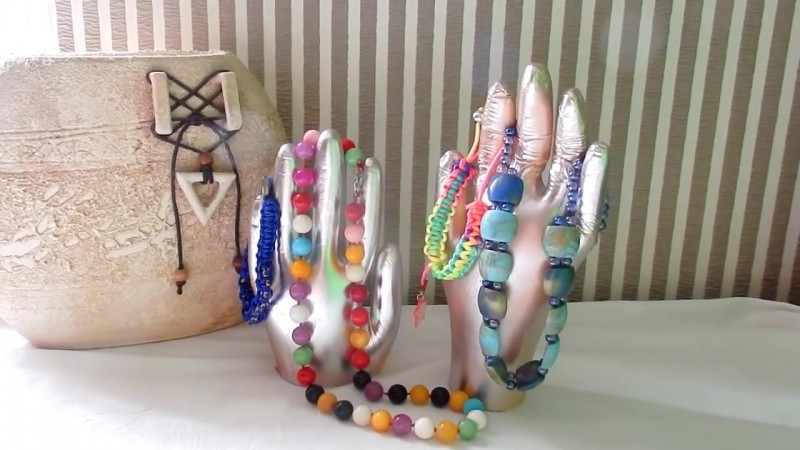
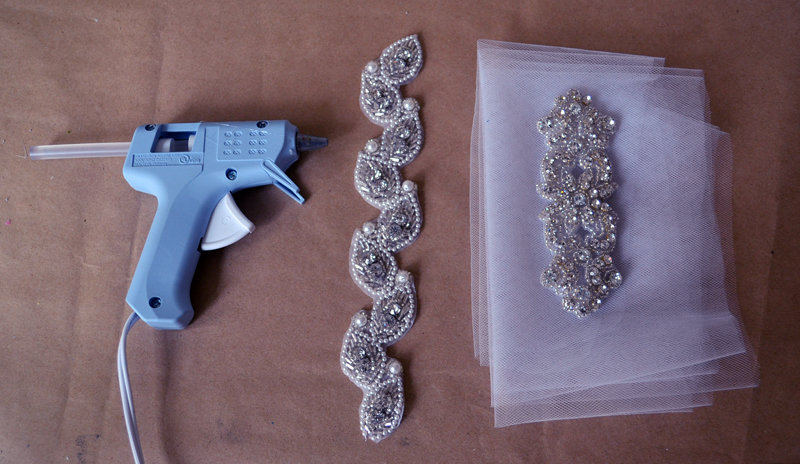
A bracelet
Another option for making hot glue crafts is an arm or leg bracelet. Little girls will be especially happy for them. Get your child involved in this activity. Let the girl design the bracelet jewelry herself. Such joint creativity will not only develop imagination and creative thinking. It will save on jewelry for the child.
Prepare an empty aluminum can for any drink (0.5 liter), a glue gun with glue sticks, decorations of your choice, a paintbrush, PVA glue.
Sequence of work:
- We heat up the glue;
- We coat the jar with horizontal lines;
- The more stripes, the wider your bracelet will be;
- We are waiting for the adhesive composition to dry completely;
- We remove it from the can and rinse it under running water;
- Cut off irregularities with scissors (if any);
- We glue decorations on PVA;
- You can paint it with colored paints.
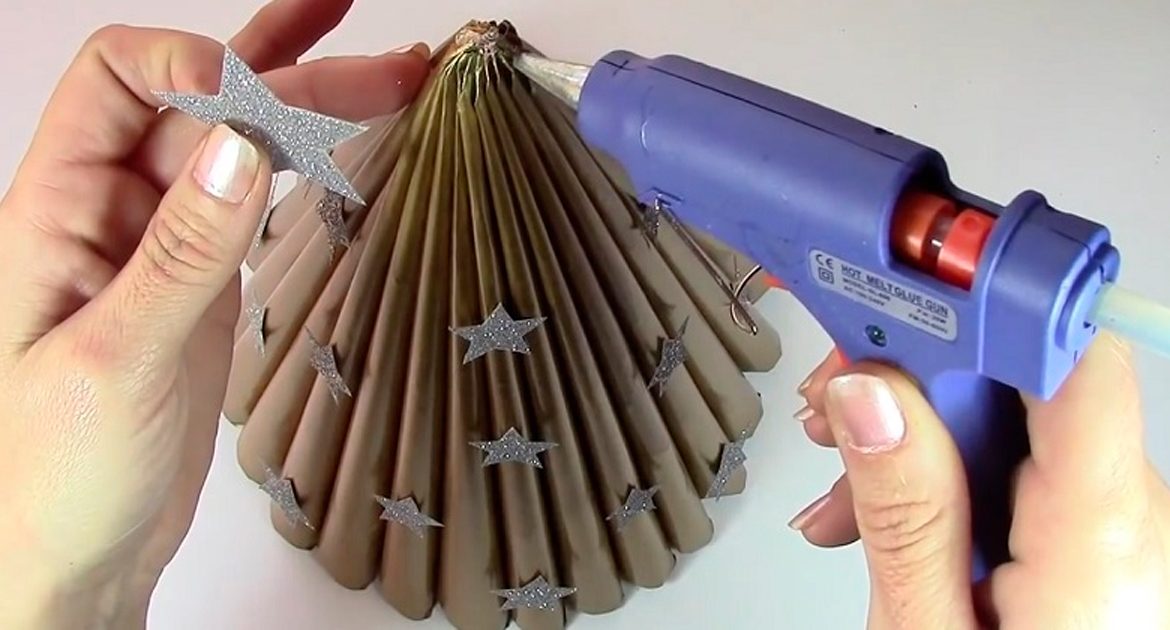
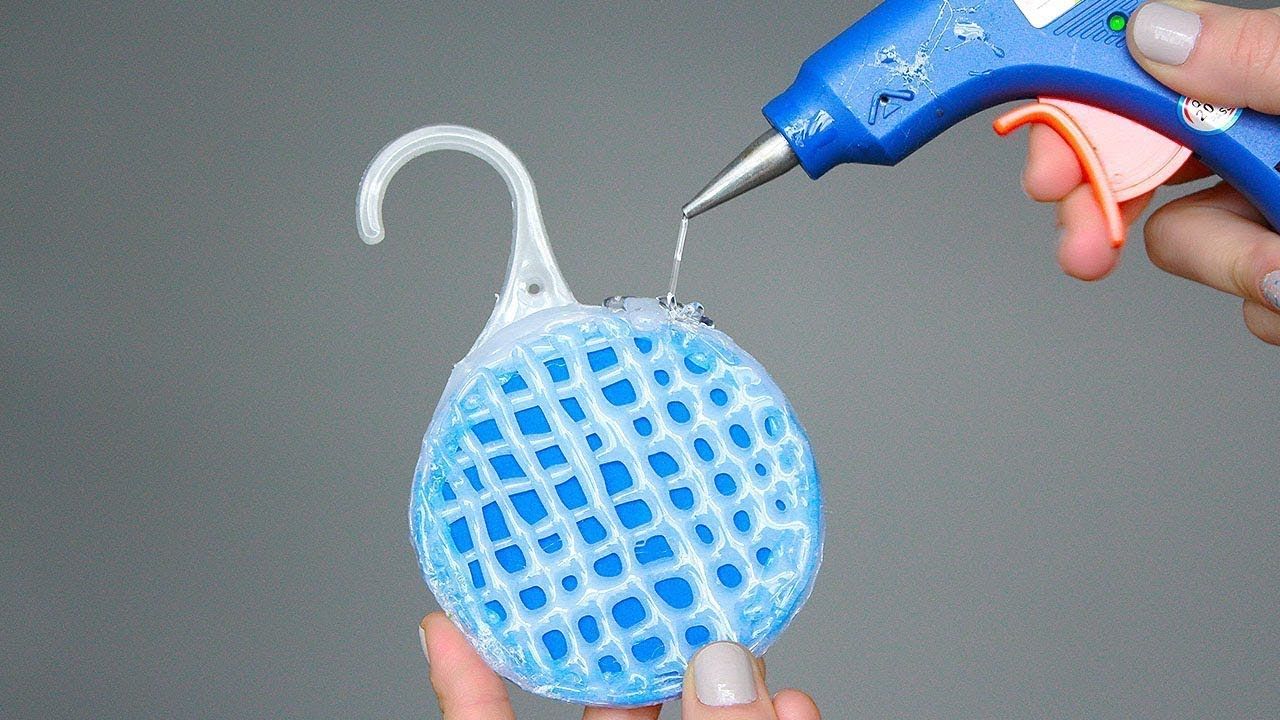
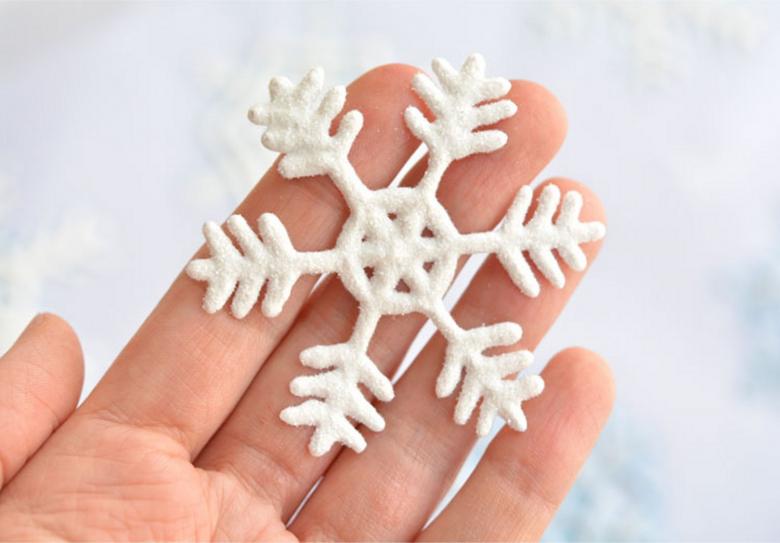
New Year decoration
Preparing for the New Year holidays is always a pleasant bustle. Everyone is in anticipation of a miracle
Creating a festive atmosphere for this miracle is an important and responsible business. Especially if children's eyes are looking at you in anticipation.
It is easy to make Christmas decorations from gun glue. However, they will look magical and original. The cured hot glue itself resembles ice. It may not even require additional decorations.
Would need:
- Glue gun.
- A4 paper (the number of sheets depends on the number of crafts).
- Dishwashing liquid.
- Vaseline oil.
- Hair fixation spray.
- PVA and brush.
- Decorative powder (gold or silver).
- Any other jewelry of your choice (sequins, beads, rhinestones, ribbons, bows).
Models of figures can be searched on the Internet and printed on a printer. You can attach a sheet of paper to a computer monitor, trace and cut along the contour. Or come up with something on your own.
Procedure:
- The sheet with the drawn stencil must be greased with dishwashing liquid or petroleum jelly. This is done so that in the future the craft can easily move away from the paper.
- Along the contour of the drawing, we apply an adhesive composition from a pistol.
- We fill in the voids inside the picture with it.
- We are waiting for the glue to dry completely.
- We remove the resulting beauty from a sheet of paper.
- If desired, coat with PVA glue, sprinkle sparkles on top, decorate.
- We fix everything with hairspray.
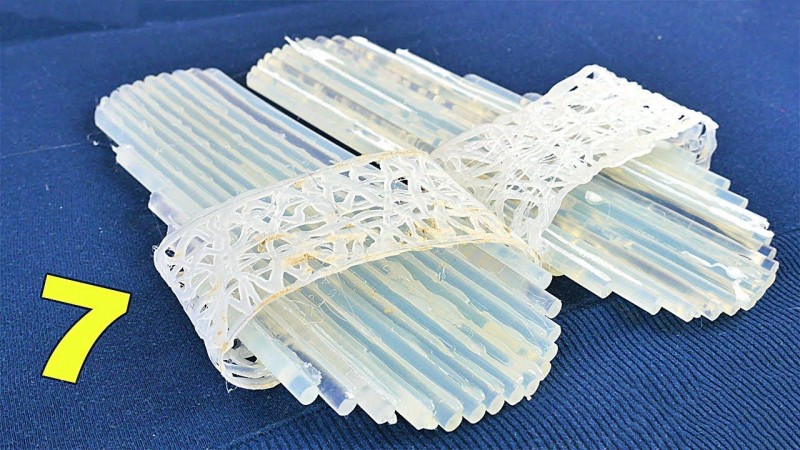
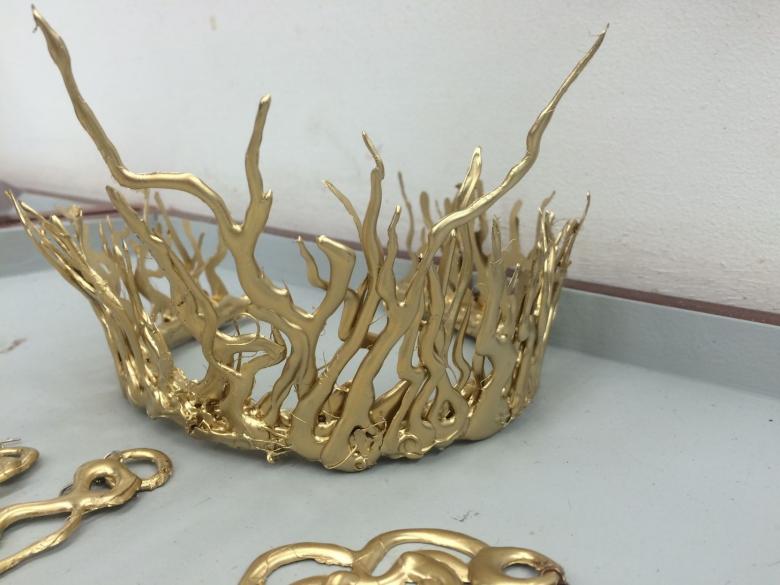
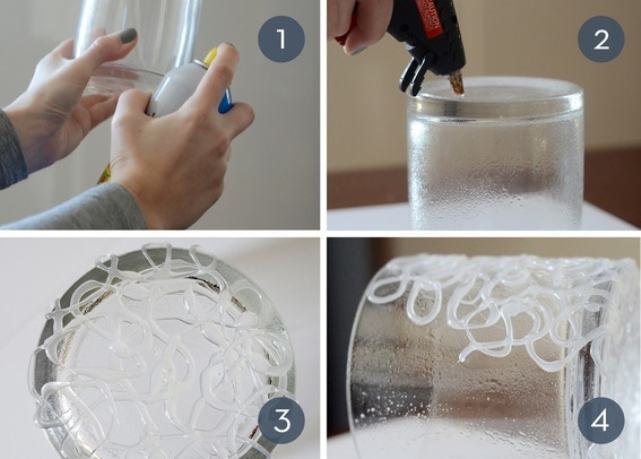
New Year's "ice" crown
Would need:
- Glass jar, 3 liter.
- Fatty cream or liquid paraffin.
- Glue gun.
- Decorations.
The bottom of the can is the base of the future crown. Apply glue horizontally to half of the base of the can. This is the base of the crown. Then we work with glue according to your idea. These can be sharp "pieces of ice" growing upward. Semicircular or oval projections on the top of the crown. You determine the height of the craft yourself. We are waiting for complete cooling. We remove the decoration from the can. Since it was pre-lubricated, it will be easy to remove the craft.
Connect the ends of the crown with an elastic band, colored ribbons, thick tinsel. We also glue them to the base of the crown with hot glue.
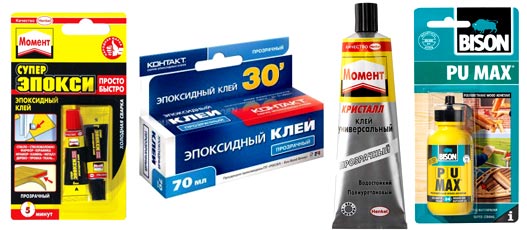
How to use DIY silicone glue
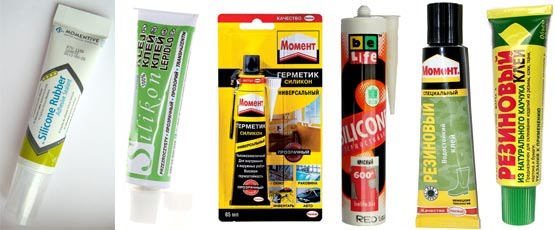
Silicone glue appeared on the domestic market recently, but quickly gained popularity. It is used for construction and finishing works, as well as in creativity and needlework.
Today manufacturers offer two types of formulations - neutral and acetic. To create crafts, neutral sealants are used that hold together almost any materials well.
To use the sealant, you will need a special gun, into which a tube with glue is installed. With a sharp knife, cut off the tip of the spout, then screw the dispenser to control the feed. The product is applied to a dry, cleaned surface.
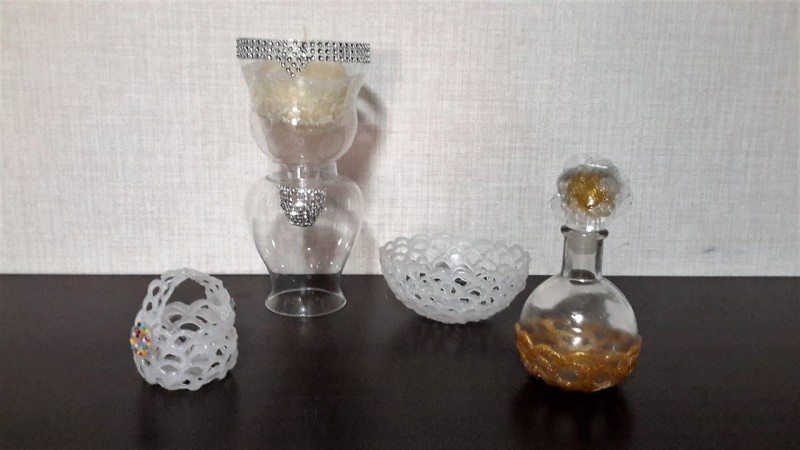
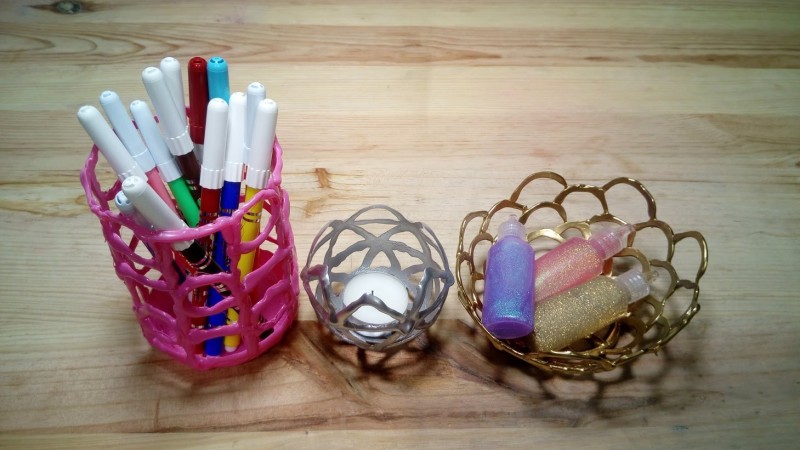
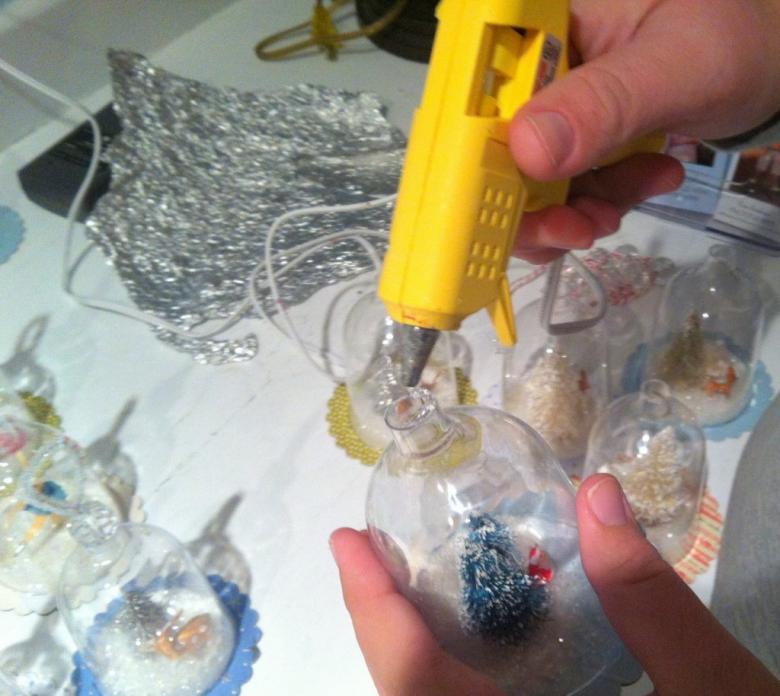
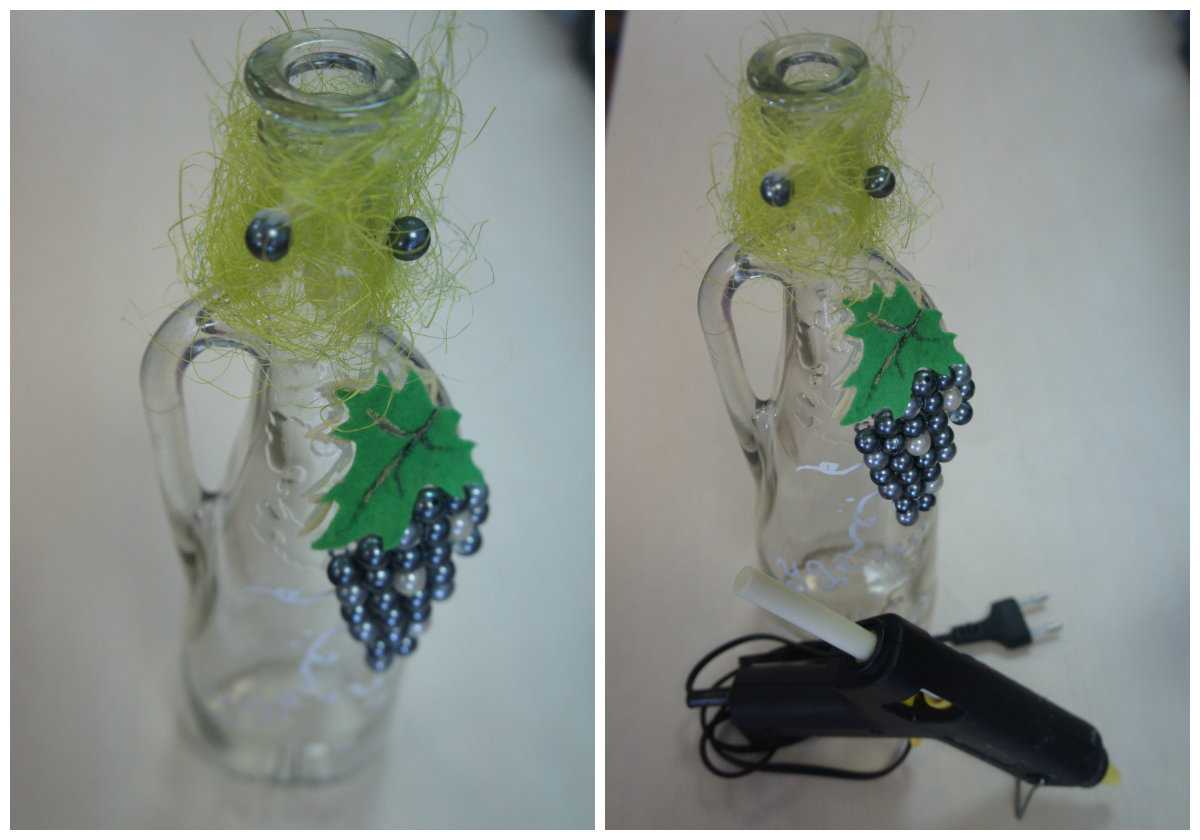
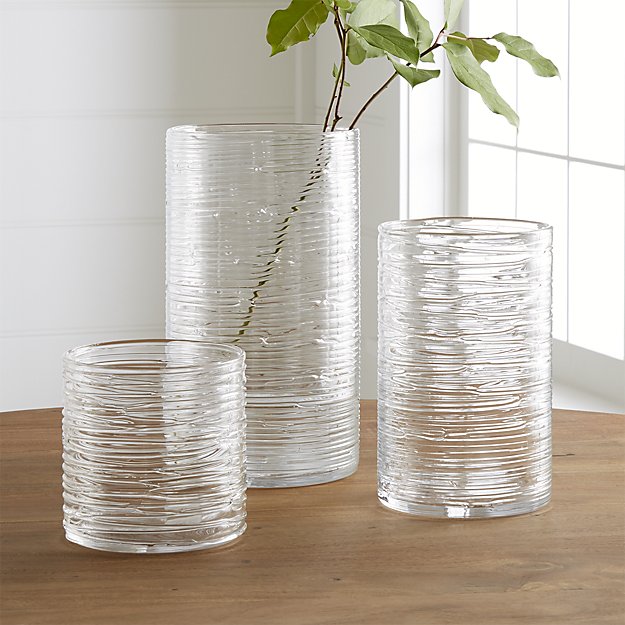
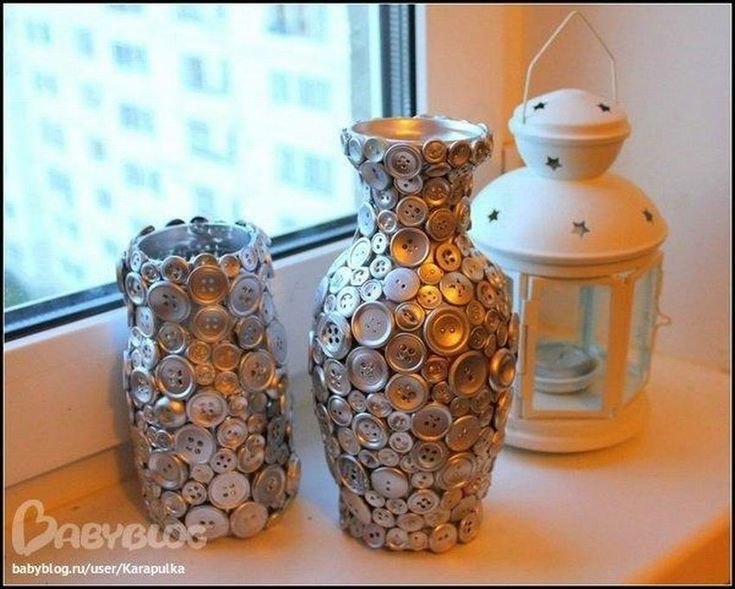
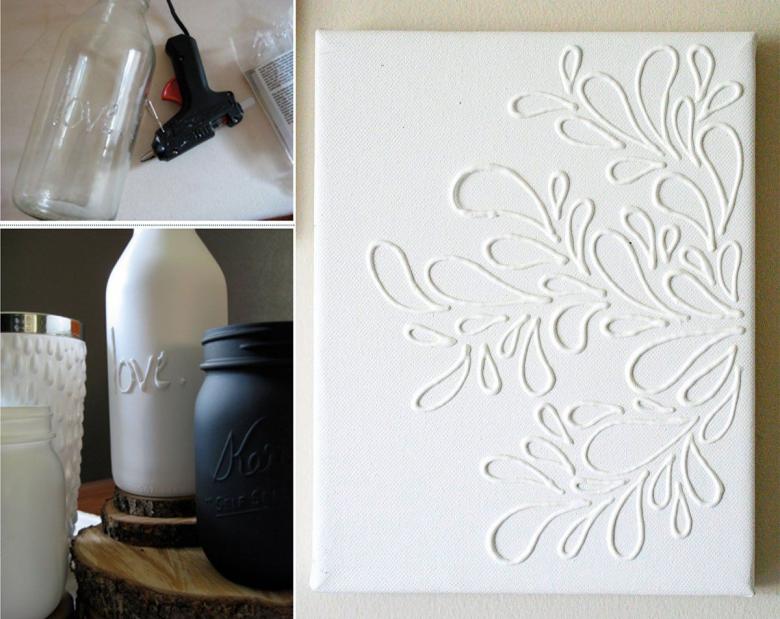
Decoration of a vase or candlestick
There are quite a few options for how to decorate a vase with hot glue, and we will consider some of them.
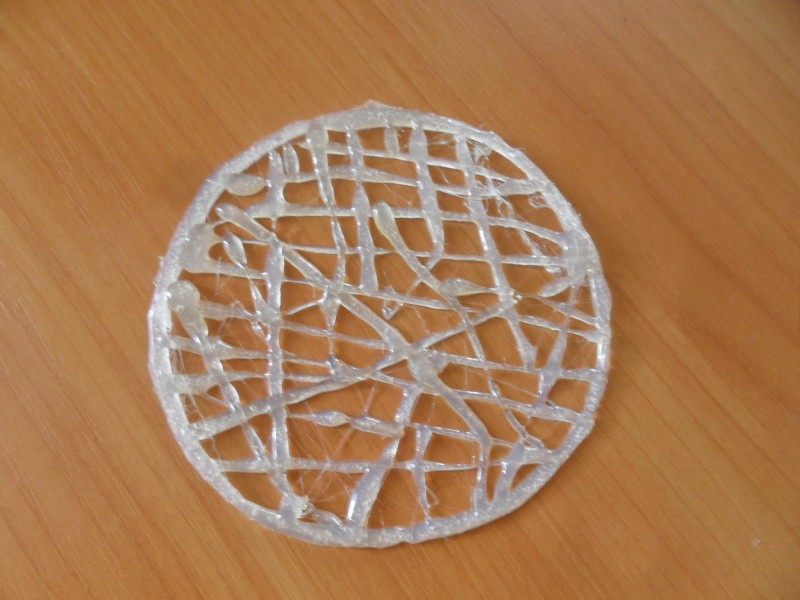
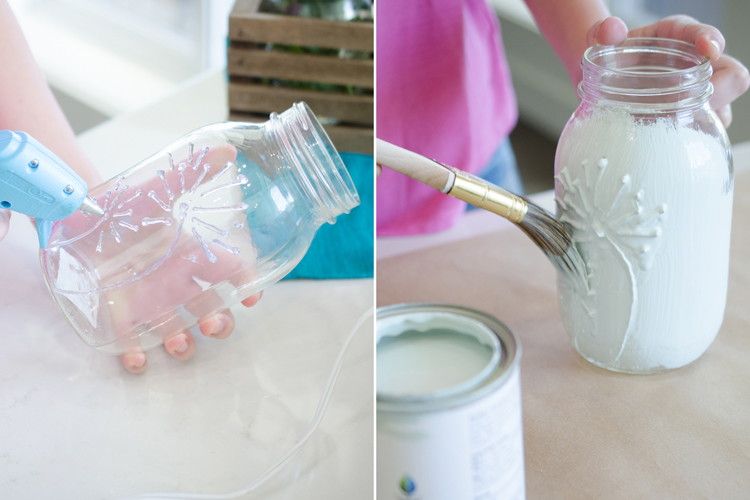
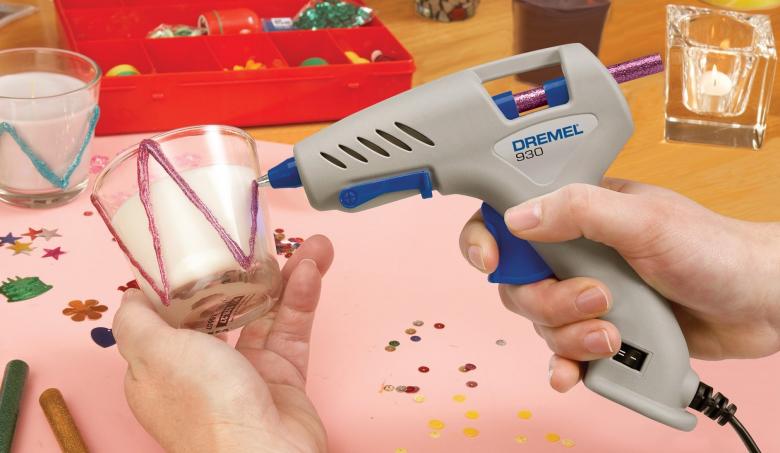
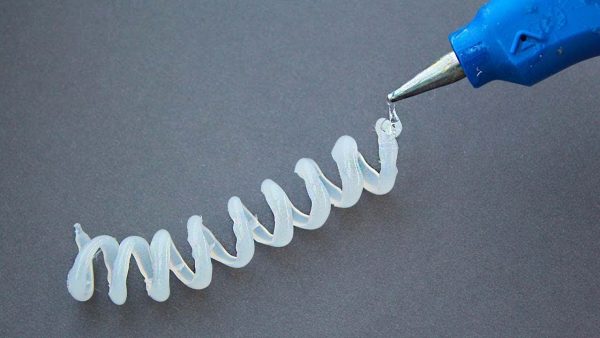
For example, one of the simplest decorations for an inexpensive glass vase without any drawings is simply drawing lines on the walls of the utensil. You need to twist the object and apply layers of glue evenly in a circle. For convenience, you can ask someone to help rotate the vase while you decorate it. And nothing is needed for this: the candlestick itself or any other object and a glue gun directly tucked in and plugged into the outlet. Below is a photo of the craft using a glue gun.
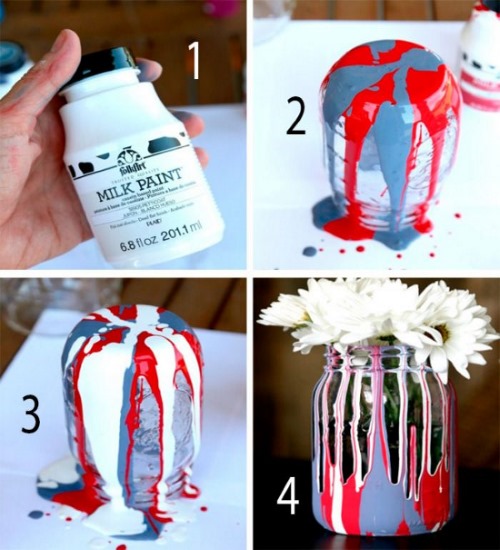
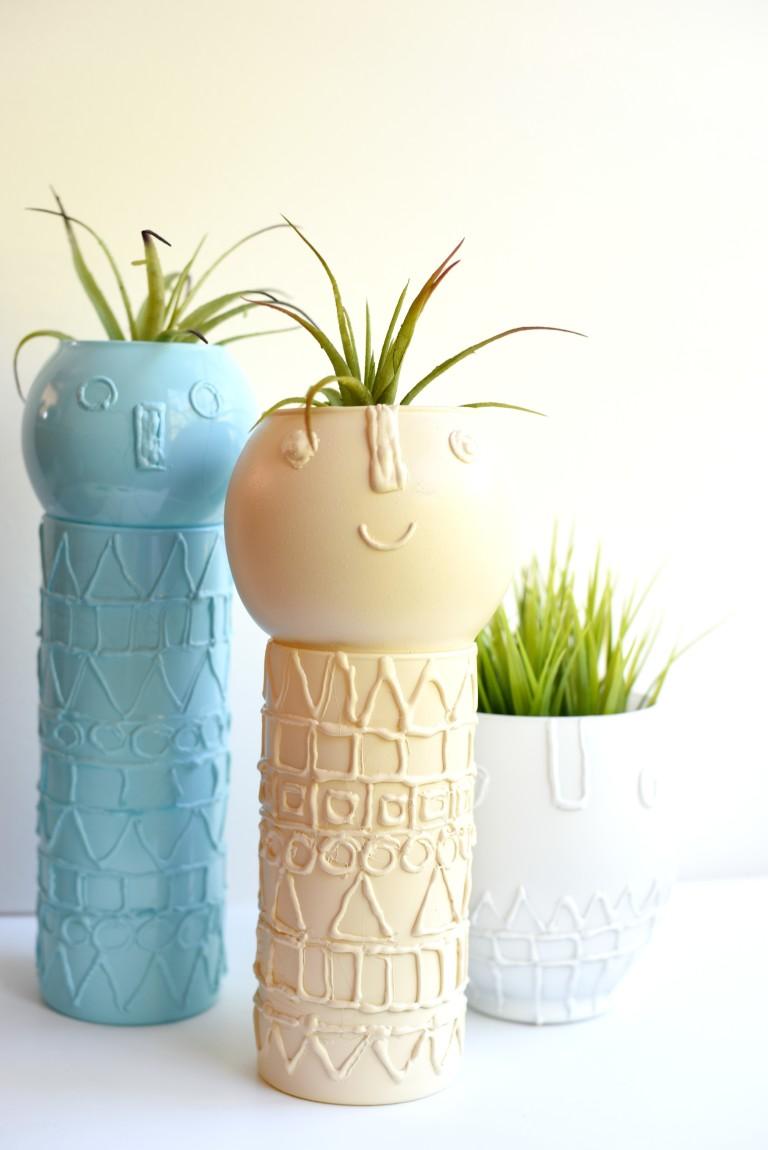
You can also make a nice holder for a glass, vase or candlestick. To do this, you need to stock up on the item itself that needs decor, filled with a glue gun, acrylic paint in a spray can or oil spray, but any vegetable will do. The vase must be washed and wiped dry, and then the outside should be covered with a thin layer of oil. Then patterns should be applied in a chaotic manner.It is worth making sure that the lines of the drawing are well intertwined and clearly traced. This is necessary so that you can easily remove the holder from the glass. You need to draw a pattern both on the sides and on the bottom. Now it is very carefully necessary to remove the frozen glue. The utensil item that has been used should be thoroughly washed again. Next, paint the holder in the desired color, wait for the paint to dry, and re-insert the glass, vase or candlestick into it. They can be removed if necessary.
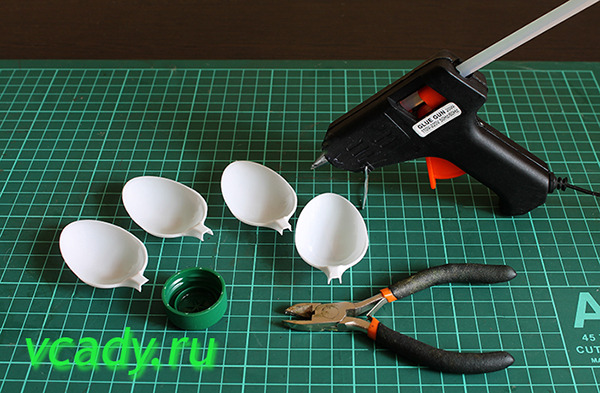
Consider another option for crafts using a glue gun in this topic. You will need a container that you need to decorate. Quite densely transparent hemispheres should be glued to its walls. You can additionally paint them in different colors, or you can leave them transparent. Both options will look stylish. A minimum of accessories for such a craft: a glass, a jar or a vase, half pearls and a hot glue gun.
A rug made of unnecessary things
To make a rug, you need a fabric, a needle and thread. First of all, you need to decide on the size of the future rug. This will help clarify how much material is needed to make it.
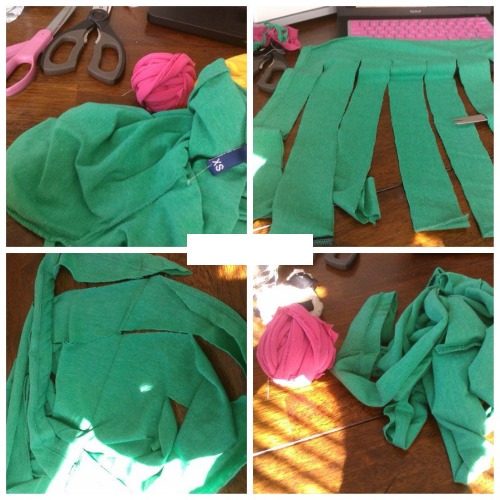
Steps for creating a rug:
- Old T-shirts and towels should be cut into strips that will be braided. The optimal strip width will be 10-15 cm. The wider the width, the thicker the rug will be.
- Start braiding a braid from the cut strips, weaving new pieces of fabric into it. As a result, you should get a long one-piece pigtail. This pigtail needs to be rolled in a circle into a large circle.

- Next, you need to take a needle with a strong thread and sew parts of this pancake together. The stronger the thread, the more durable the resulting carpet will be. Before sewing, parts of the pigtail can be secured together with pins. This will make the sewing process easier.
- Place the resulting rug on a towel and cut a circle out of the towel with a diameter corresponding to the rug. The towel is also sewn to the bottom of the rug for durability.
Using materials of different colors, you can create rugs that match the interior to a particular room.
Glass jar vases
You can make shiny vases, decoupage vases, multi-colored vases and other unusual vases:
To create a shiny vase, you will need double-sided tape and sequins.
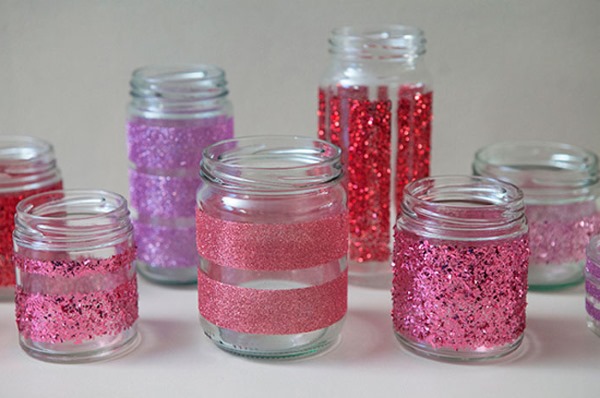
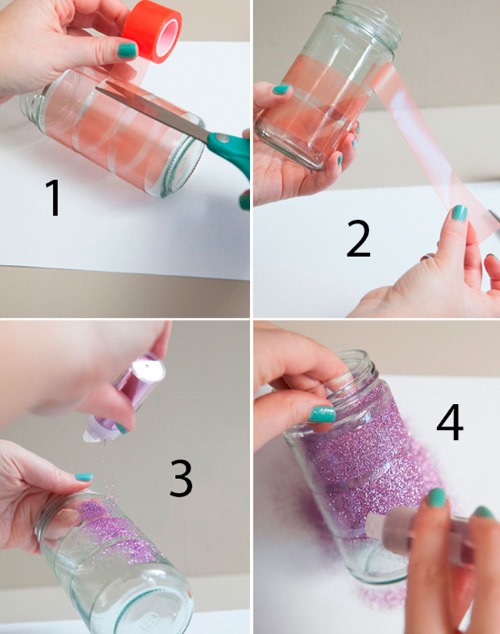
On the outside of the jar, you need to stick strips of adhesive tape, remove the upper protective layer from them and sprinkle with sparkles. For more extravagant personalities, it is possible to create a whole composition from double-sided tape and sequins on the outside of the can.
For a vase using decoupage technique you will need:
- jar;
- acetone;
- cotton pads;
- napkins with a pattern;
- sponge;
- acrylic paint;
- PVA glue;
- acrylic lacquer.
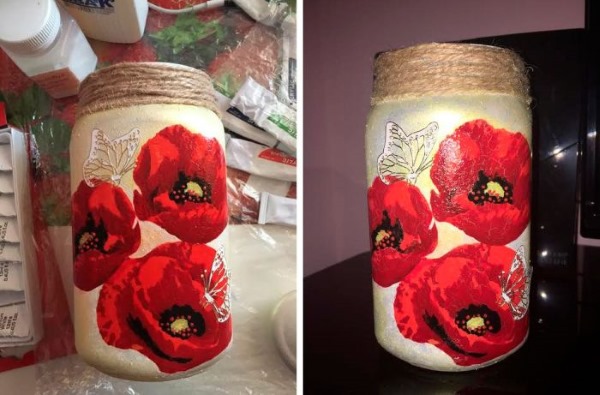
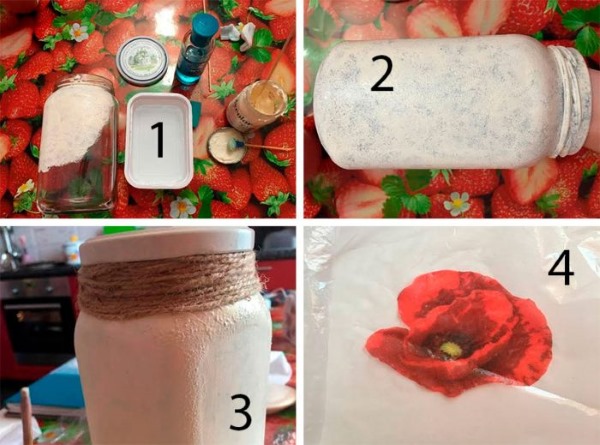
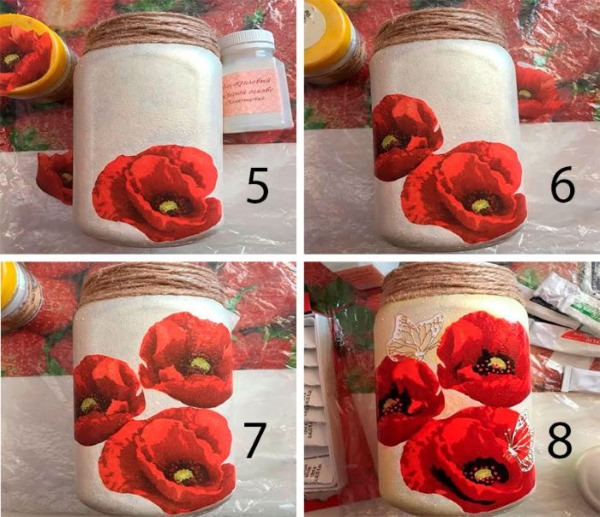
Using a cotton pad and acetone, it is necessary to degrease the surface of the can. After that, the jar must be covered with white paint and wait until it dries. Cut out a pattern from napkins and glue them to the jar. Cover the vase with acrylic varnish. The vase is ready.


For multi-colored vases, you will need acrylic paints, a can and a newspaper.

The jar must be placed upside down on a newspaper and sprinkled with paint on top. Next, you need to wait until it dries completely and you can use the new vase for its intended purpose.
For an unusual vase, you will need M8 nuts, metal glue and a sheet of paper. From the sheet you need to cut a circle with a diameter corresponding to the diameter of the neck of the can. This will be the template.

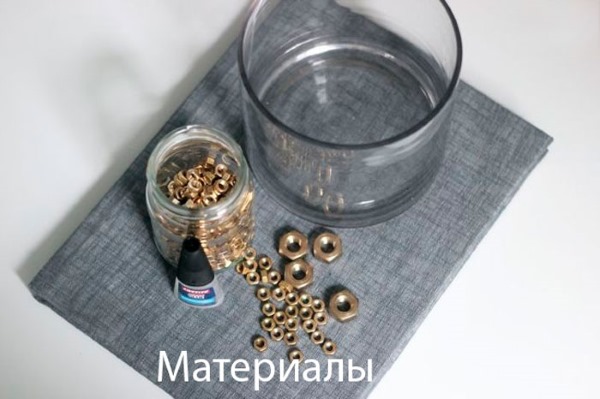
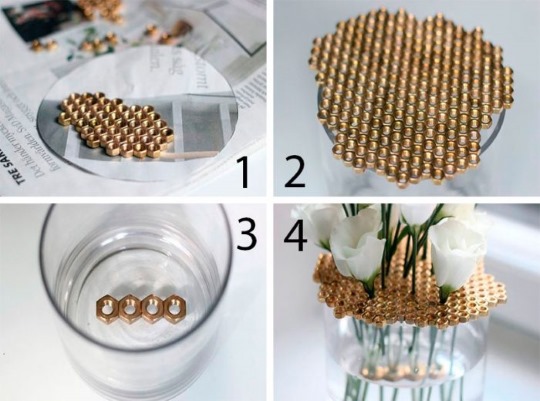
Further, with the help of glue, it is necessary to glue together the M8 nuts according to the template and add several pieces that go beyond the template. This is to ensure that the lid does not fall into the inside of the can. After that, the lid of the nuts must be glued to the neck of the can, and small flowers can be inserted into the holes of the nuts. The vase is ready.
Performing complex compositions with a glue gun
Working with a glue gun requires the utmost care and skill.A huge number of creative ideas can be emphasized from the surrounding things.
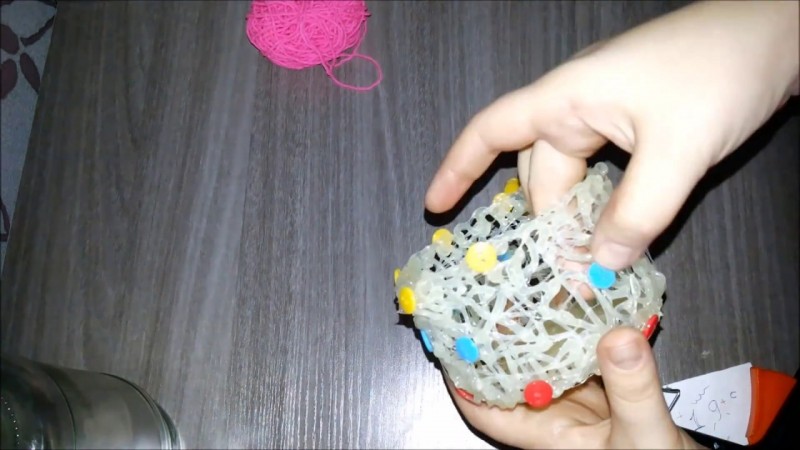
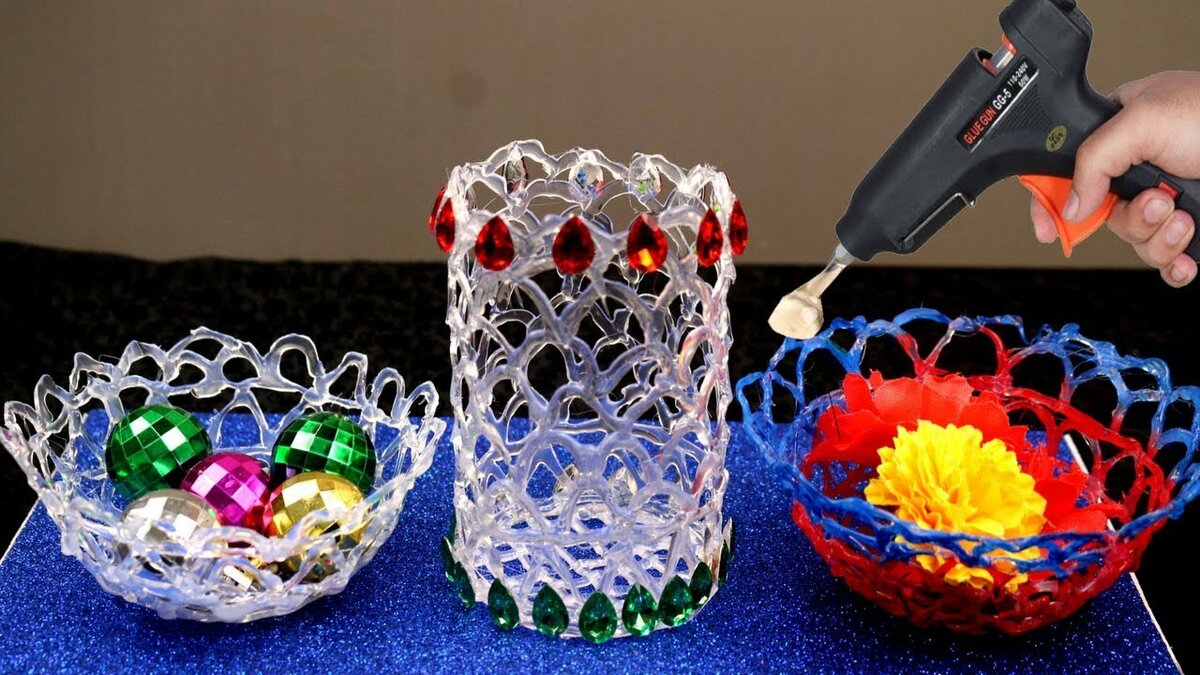
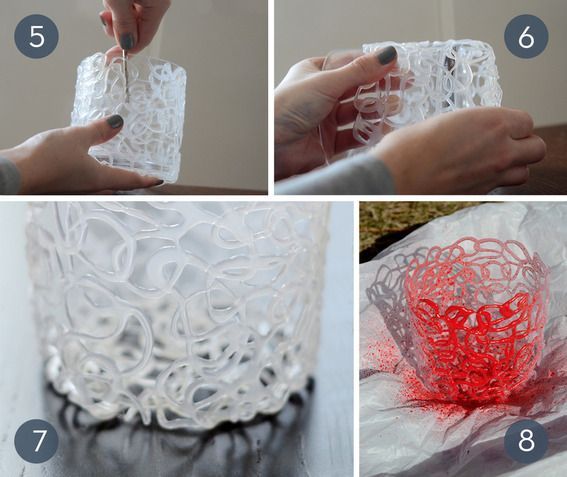
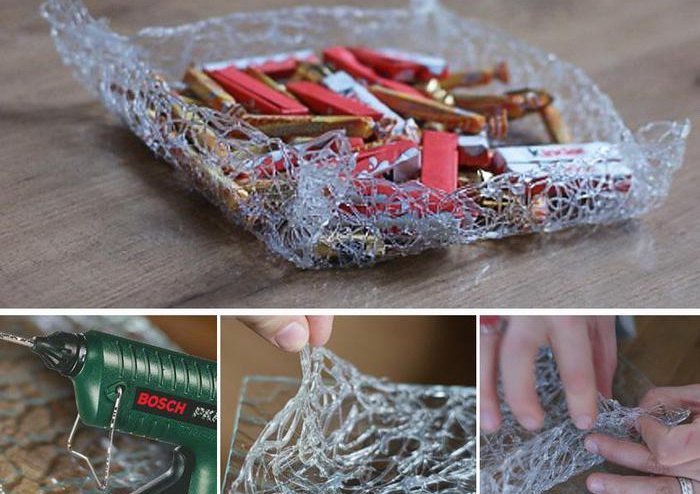
Vase - candy bowl
If you are already doing simple elements with confidence, then our master class will help you create a candy bowl with your own hands.

Prepare the following tools and materials:
- glue gun;
- paint (aerosol is best for this craft);
- base cup;
- cling film;
- oily hand cream.

Let's get started:
We wrap the prepared cup completely with cling film. And we treat it abundantly with cream. This procedure is necessary so that after drying, the glue can be removed without difficulty.
First of all, you need to make the most stable base for the future candy bowl. To do this, form the bottom with a uniform layer of hot glue. The drawing of the vase itself should start from the bottom and go up in beautiful patterns. Patterns can be absolutely any, it all depends only on your imagination.
After complete drying, the vase is removed from the base. The result is a beautiful, delicate vase. Now you need to decide on the color scheme and color the candy bowl.
It is most convenient to paint with spray paint. This vase can be used to store fruits, sweets.
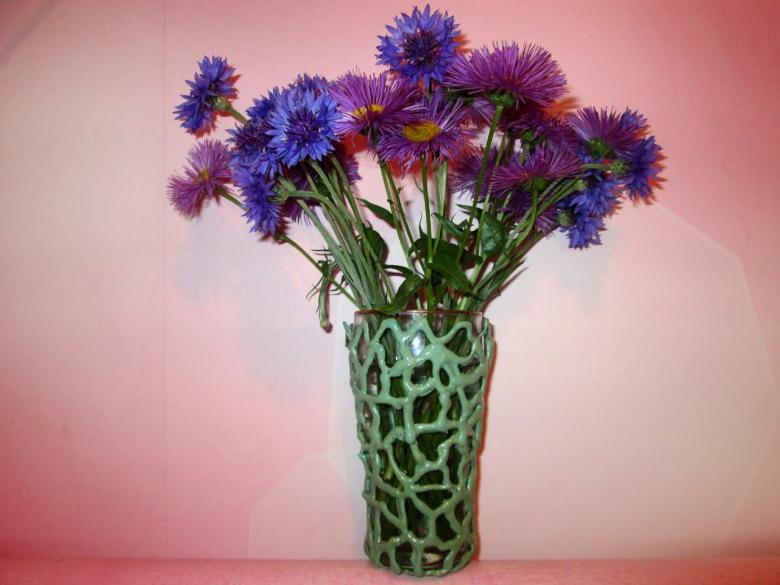
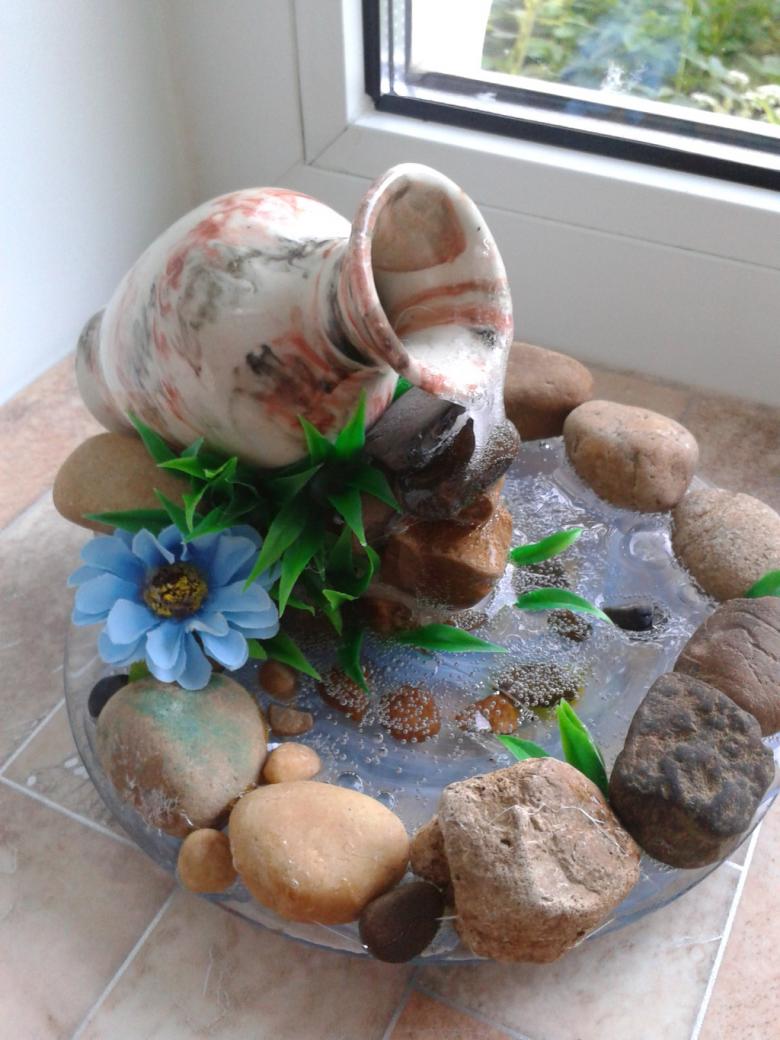
A vase for flowers
Using the same technology, you can make a vase for flowers, and decorate it, for example, with any pebbles, rhinestones, beads. Every detail in making such a vase is very important.
Connect all your imagination and imagination and make everyday things into a real work of art.
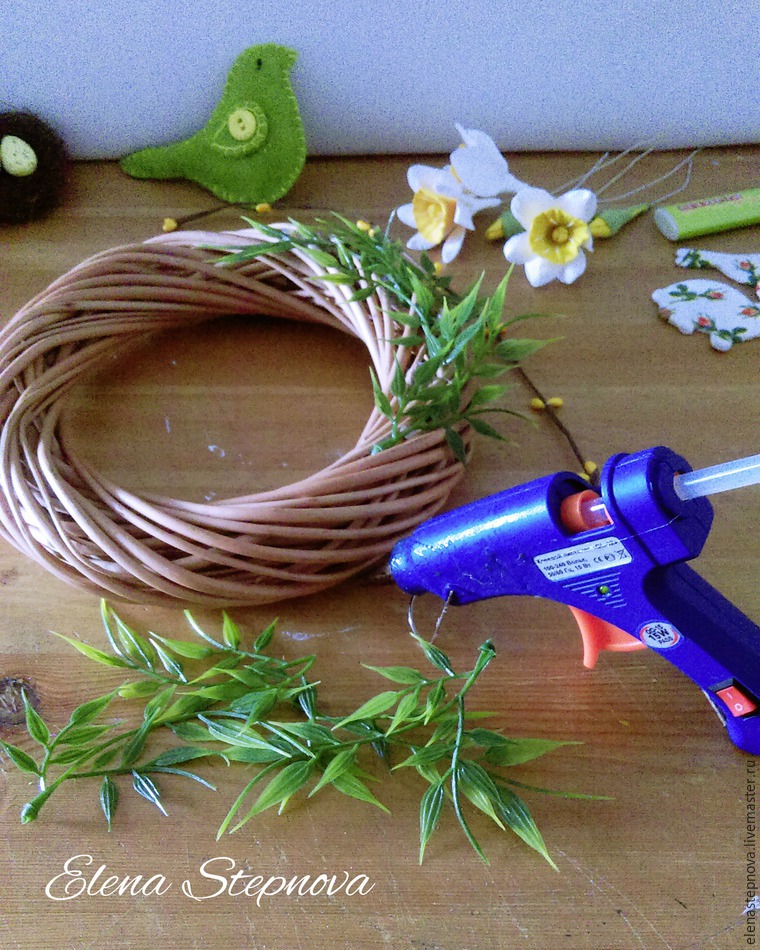
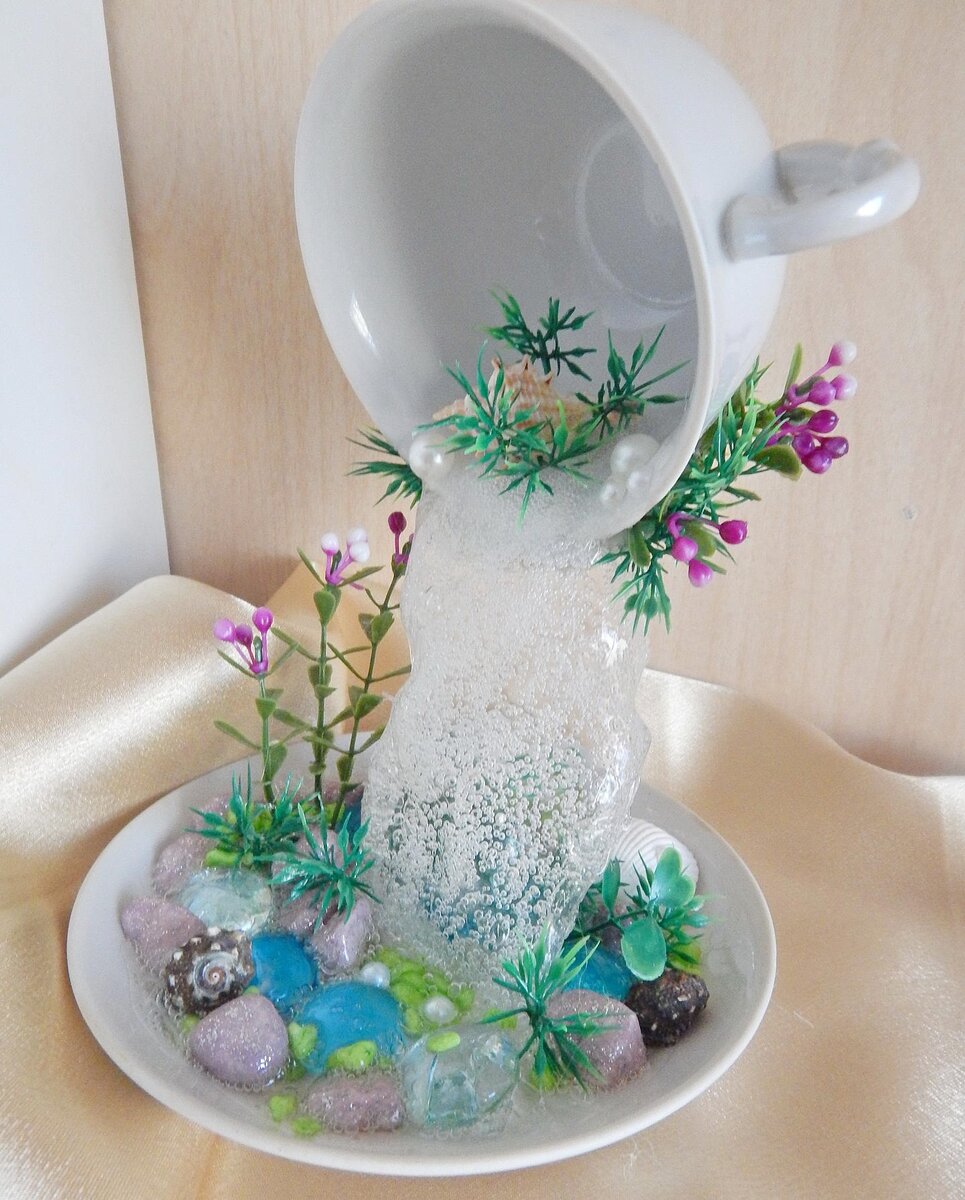
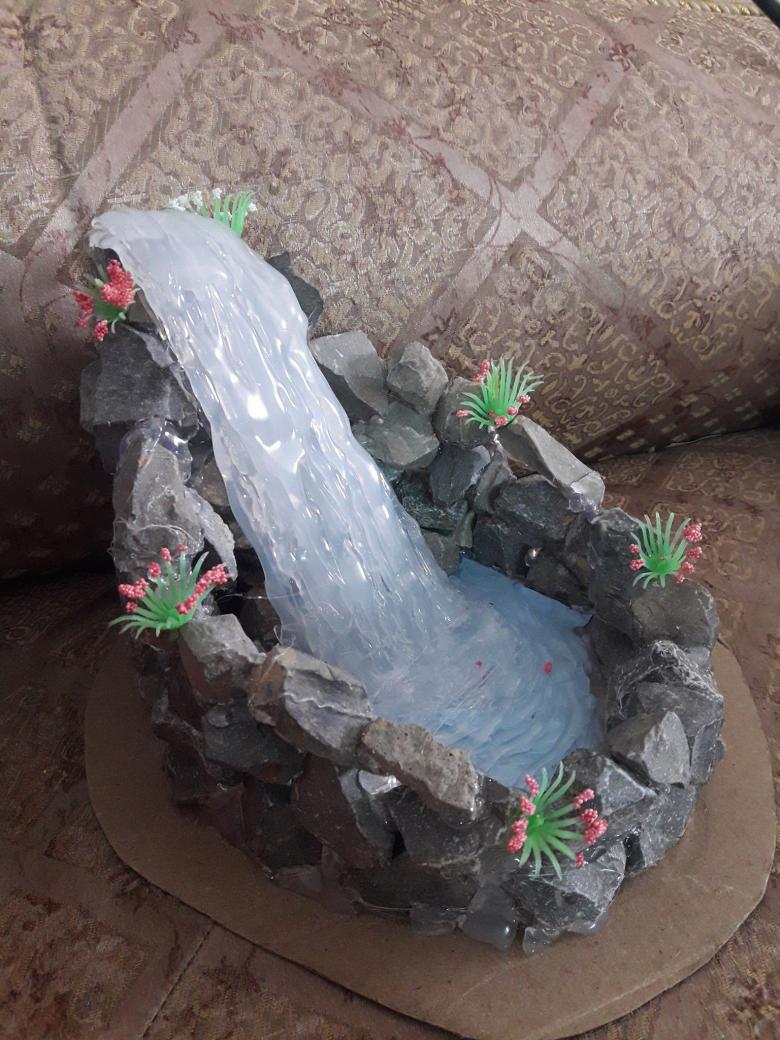
Decorative fountain
A very interesting idea for doing it yourself with a hot gun is a decorative fountain.
For work you will need:
- The stones are small in size, of various shapes.
- Hot glue.
- Round box (for base).
- Artificial grass or green felt.
The creation of the fountain will take place in several stages.

A round box must be covered with felt or glue the grass to it with a glue gun.
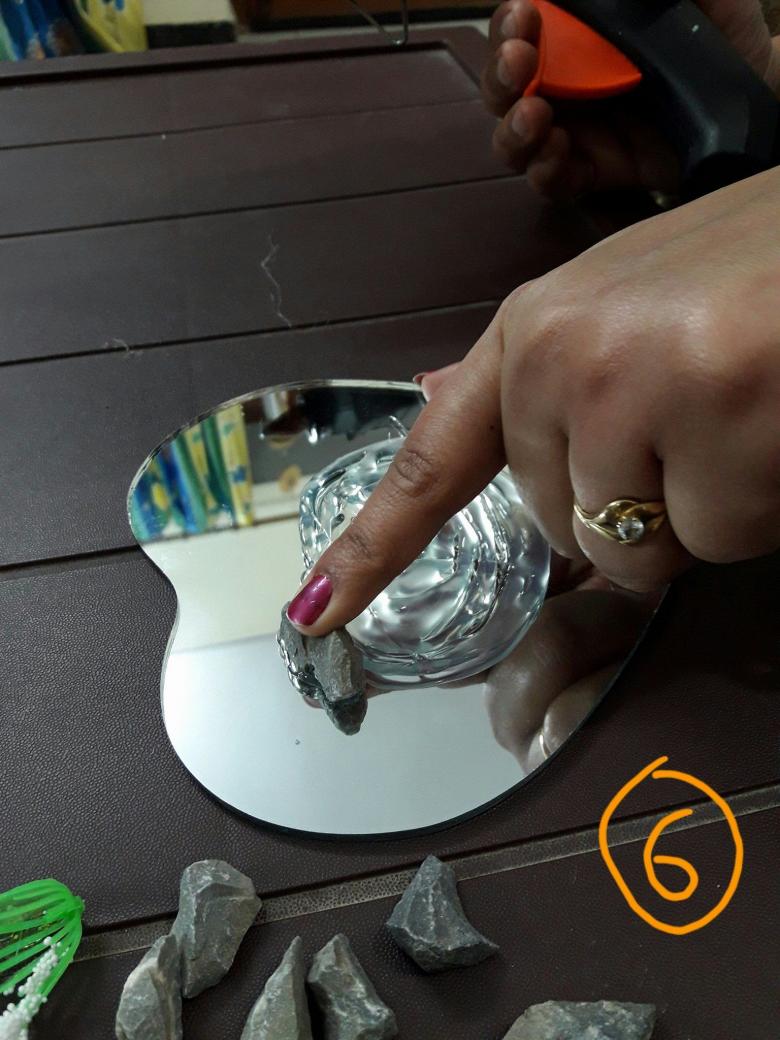
With the help of prepared stones, lay out a well, where water will drain. We fix the stones to the base using the same glue. Carefully, the main thing is to slowly form the wall from which the fountain will pour. This operation will take a lot of time, take your time
It is important that the craft does not fall apart

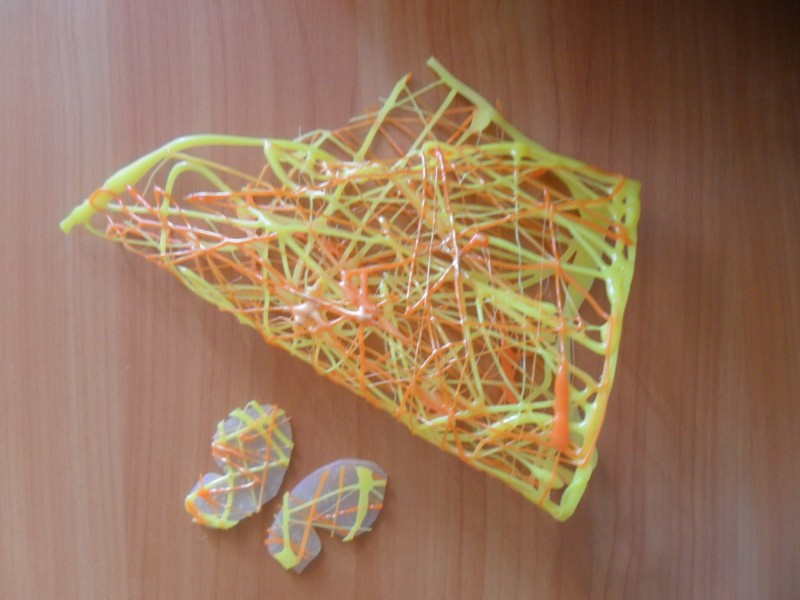
We proceed to the final stage - we form the water flow.
You need to guide the threads of glue from top to bottom, so that it looks the most natural. Do not forget, to complete the composition, below, in the well, with the help of glue, create a bubbling effect.

Even the most voluminous crafts created with the glue gun will not take you much time. And the result will be absolutely unique and unusual. The implementation of such decorative elements can be combined with some kind of holiday, making an excellent gift for loved ones.


Hot glue features
In the gun, hot melt glue is exposed to temperatures up to 200 degrees Celsius, melted and applied to the desired part. On the surface, the mortar dries in minutes, providing strong adhesion. Adhesion strength is achieved due to the fact that liquid glue penetrates into all the pores of the materials to be joined, and the seam is flawless.
The features of hot melt glue include the following factors:
- Drying speed. This takes a few minutes, and at higher temperatures, seconds.
- Seam strength. It can be compared to metal fasteners. With the efforts of an ordinary person, it will not be possible to break the glued parts.
- Price. The price of hot melt glue is low, which makes it affordable for almost any work.
- Resistance to the influence of all kinds of factors. The glue joint is indifferent to temperature extremes, the scorching sun, the effects of household chemicals or water. The glued items can serve for many years without the risk of seam rupture.
- Easy removal. If the parts need to be separated, there will be no glue traces - it is enough to heat the surfaces and remove the agent.
- Safe composition.No harmful substances are released during melting, therefore hot melt is used in children's crafts.
- The ability to replace the sealant. In its absence, cracks, chips or holes are sealed with hot melt glue.
Glue is produced for any need and can vary both in composition and in color, length, and diameter of the rods.
Hot glue crafts - examples
Hot glue is an inexpensive material for creating beautiful, original crafts.
During use, care should be taken not to burn yourself, therefore children should only use the material under the supervision of an adult
 Hot glue crafts - examples
It is easy to decorate tin boxes and jars with hot glue, create beautiful kitchen accessories, create Christmas tree decorations.
For these purposes, you will need:
- thermal gun,
- newspapers,
- jars,
- tubes for a pistol,
- pieces of lace,
- leg-split.
We wrap the coffee jar from below with a thin twine, attach beautiful lace. You can use this container under sugar or pepper.
 Seashell craft glue
The pistachio tin can be completely wrapped in twine. To do this, you need to drop a few drops of glue on the jar and wrap the twine, and so on several times until the jar is completely wrapped in the material. You can now store coffee or tea in such a jar.
VIDEO ON TOPIC
Another simple and beautiful craft is from an ordinary tin can. Use acrylic paint, hot glue and colored glass to create a luxurious handmade vase.
To do this, the jar must be thoroughly rinsed, painted and dried. Next, glue the glass (if not, then shells, pebbles or buttons). The hot composition will reliably hold any material, even dried pasta.
It can be used to decorate the lamp shade with homemade or artificial flowers.
What can you create with your own hands?
In addition, if your crafts are creative and unique, they can become additional income. For some crafts, you need to buy some materials, but for a huge amount you will only need improvised means, the main thing is the idea!

At home, you can make thousands of crafts, for which you only need imagination and materials at hand. From ordinary and seemingly unnecessary things, you can make works of art that will impress your friends and acquaintances.

Photos of interesting crafts probably amazed you more than once with their originality. They can be really useful in the household, or just be a cute trinket in your interior.

Homemade craft novelties are very popular with creative people of all ages. They help relieve stress and fatigue, creating crafts, you develop perseverance, ingenuity and, of course, your creativity.
On our site you can find a lot of ideas for beautiful crafts that you can do with your own hands, with photos and step-by-step instructions, they are not difficult to implement, you just have to want to!

DIY crafts, which we will consider, of varying complexity:
- the first level of difficulty - the craft is simple, perfect for beginners, does not require a lot of time, you can do it with children.
- the second level of difficulty - for this craft you will need more perseverance, attentiveness and accuracy.
- the third level of complexity - you need to spend quite a lot of time on this product, this is painstaking work.
