What tools are needed?

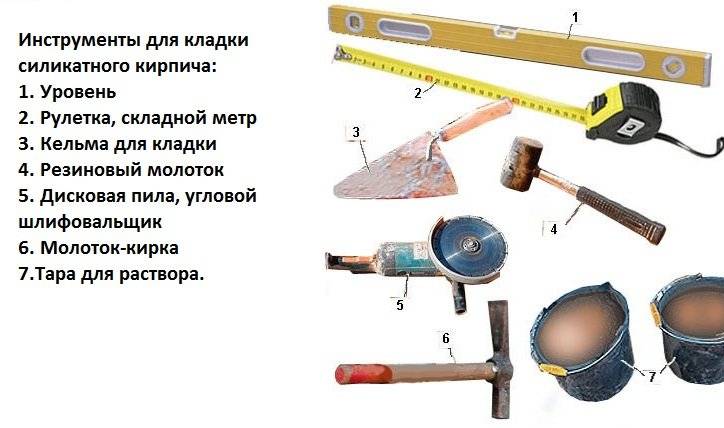
To build a heat source at home, you need to prepare a basic set of tools:
- hammer pickaxe;
- Master OK;
- rule;
- grinder, cutting wheels for stone, metal;
- measuring instruments - building level, ruler, square, plumb;
- carpentry tool to assemble the foundation formwork;
- wooden ordering;
- several containers and devices for mixing the solution, breaking the clay.
For construction, you will need brick, sand and clay mixture for mortar. The amount of material should be oriented to the scale of the work. You will also need stove accessories - a blower, furnace and cleaning doors, grate grates, a smoke damper, a hob.
Foundation
The stove has impressive dimensions, it weighs a lot, therefore it needs reliable support.
The work algorithm is as follows:
- Prepare the pit. Calculate the dimensions on the basis of the stove base. On each side, you need a margin of 15 cm.Depneep 50-70 cm.
- Pour in sand, sprinkle with water, tamp so that the thickness of the waterproofing becomes 15-20 cm. Add more sand, spill with water and level.
- Lay out the roofing material in 2 layers.
- Install the formwork, cover it with foil.
- Mix cement, sand and gravel 1: 3: 5. Use water to make a semi-liquid mixture.
- Pour cement mixed with gravel into the formwork, height 20 cm. Pierce this layer several times to release the air, tamp it.
- While the mortar is not frozen, install the fittings. Height above concrete 5-7 cm.
- Pour another layer 10-15 cm, when it grabs, lay the reinforcing mesh.
- Fill the entire formwork with mortar, level it.
- Lay the roofing material in 1 layer.

If a small stove is planned, then a guardianship base is allowed. Install it on the floor beams. Such a base is a frame made of timber or logs in 2 crowns. To strengthen the beams and the stability of the furnace, intermediate piles are driven into the center. A bottle is poured into the free space, felt soaked in liquid clay on top. Such a base can withstand a structure of up to 700 kg. If the weight is more, then a slab foundation is needed.
Advantages and disadvantages of the oven
Among the positive qualities of the heating device, the following are noted:
- The cheapness of the design. For the construction of the unit, a minimum of materials are required: red brick, clay and sand.
- Profitability. The efficiency of the simplest device exceeds 60%, and the efficiency of a complicated design is more than 80%.
- Works equally well on various types of solid fuels.
- Functionality (cooking, heating, warm sleeping place).
- The long operating time of the stove allows it to be heated once a day.
- Possesses therapeutic properties. Food is cooked in it without direct contact with fire and superheated gases. This maintains the optimum temperature for cooking. Due to the listed features, carcinogens with toxins in food are not formed. As for resting on the couch, six hours of sleep is enough to feel refreshed and collected in the morning.
- Safety of use. The flame burns deep in the oven. Sparks can appear only in severe frost.
- Durability. Service life exceeds 30 years.
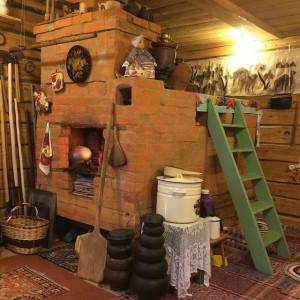
- The interior of the room with the Russian stove is original, unlike any other.
The disadvantages of a heating unit include the following:
- The ability to use only solid fuel that burns slowly. A rapidly burning one requires a lot of air, which is fraught with a fire hazard.
- The need for fuel procurement.
- Low heat dissipation.
- Not suitable for apartment buildings due to poor smoke flow. If there is only one channel, the combustion products will be removed from the furnace, which is heated stronger than the others, while other units will begin to smoke.
- It will take a day to completely heat the device when cold weather sets in.
- The slightest flaws made during the construction of the unit can manifest themselves during operation.
- Takes up a lot of space in the house.
- The need to get rid of waste.
- The air below does not warm up. However, today it is possible to create equipment with bottom heating.
Russian stove with stove and heating shield
When building a simple chimney, most of the heat generated by the stove is wasted. Hot gases and smoke go out directly into the street, while they could be used to heat the house. In the case of installing the stove, the situation improves, since part of the heat goes to warming it up and remains in the room.
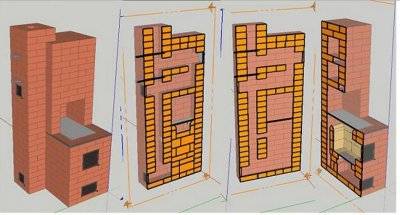
To increase the efficiency of heating, heating panels are built. By design, this is a brick wall located above the crucible and hob.
Its peculiarity is the smoke exit ducts laid inside. Due to their length, hot gases on the way to the chimney transfer most of their heat to the walls of the shield and continue to warm the air in the house for a long time.
Important! The channels of the shield must be equipped with dampers and provide for a direct exit of smoke to the outside. This is of great importance in the summer, when additional heating of the house is not required and creates uncomfortable conditions when using the oven for cooking.
Other oven options
 Russian stove with stove bench and stove
In addition to the classic version, there are other modifications.
Russian stove with stove bench and stove
This model is the most popular because it allows you to heat the room and cook food in the usual way. According to the scheme of a Russian stove with a stove bench and a stove, the well is first laid, then the door and the blower are mounted (3, 4 rows), the stove is installed on the 9th row. Everything else follows the template.
Mini Russian oven
Due to the fact that the crucible and the stove are adjacent, the dimensions of the furnace are significantly smaller - no more than 100 x 130 cm. The structure is the same in height as in the classical model, the overtube ends with a pipe that goes into the ceiling.
Russian stove with fireplace and stove bench
This model is very complex, and its laying will require not only knowledge, but also experience. The formation of fireplace channels begins already from the 2nd row. (they require 14 doors and a blower door), and ends on row 38.
Scheme of a Russian stove with a hob
In Russia, they cooked right in the oven, leaving the dishes to languish in a cooling crucible, sometimes for many hours. In modern models, a wood stove is often built in, making it possible to cook over an open fire. It is located directly above the doors of the combustion chamber.
The hob is most often made of cast iron - it is a heat-consuming and durable metal, which has the peculiarity of not giving off heat directly to the surrounding space, but keeping it in itself. This allows you to create comfortable conditions for cooking - no zones with overheated air form around the stove.
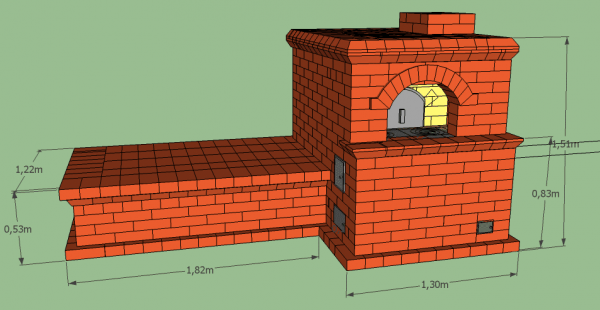
Photo 3. Scheme of a Russian stove with a stove bench and a cast iron stove. The dimensions of the finished device are also indicated.
Successful cooking will be ensured by special holes in the stove, which give an open flame direct access to the walls of the dishes. To increase or decrease the heating intensity, removable cast-iron circles are provided that change the diameter of the burner.
Attention! With all its positive properties, cast iron is a very brittle material
If you inadvertently sprinkle water on a hot hob, it will crack. Cast iron also cannot be repaired and welded, so a damaged plate will require a complete replacement.
Cast iron also cannot be repaired or welded, so a damaged plate will require a complete replacement.
DIY Russian mini oven
A large construction is not suitable for every home, so you can make a mini Russian stove with your own hands. You can do it with a flood and use it in the summer, when there is no need to heat the premises.
Russian mini stove
Thinking how to make a mini stove, you can stop at the classic version. The size of the base is 1x1.3 m.A mini-oven made of bricks is erected as follows:

- Organize a small foundation.
- Build a Redbrick Ward.
- Lay the walls under the baking sheet.
- Lay the wooden template to form the lower vault.
- Build walls with an arch for the combustion chamber.
- Pour sand into the vault.
- Proceed to the formation of the front wall, mouth, pole, overtube.
Do-it-yourself mini Russian stove of this type is laid out pretty quickly, does not require special skills.
Ordering of the Russian mini-oven "Housekeeper"
This is one of the variations of the mini brick oven. The housekeeper stove differs in that it has 2 combustion chambers of different sizes. The top of the structure is equipped with a vault and a slab. The construction of 1x1.5 m includes 33-34 brick rows.
The features of its construction are as follows:
- In the 1st row, correct dressing of the material is important for strength.
- On rows 2-5, the construction of blower channels is needed.
- In the 6th row, cover the chambers with grates.
- On the 7-9th row of the housekeeper, build the main firebox on wood, then start building under.
- On 10-12 rows, close the channels, install the stove and proceed to the walls of the furnace and the arch of the main chamber.
- Rows 15 and 16 complete the wall bundle.
- On the 17th row, lay a steel corner 3x3 cm.On it you will need to form a hail and go to the base of the chimney.
- Build a furnace arch on rows 16-18. Pour sand into the vault.
- Use double bricks to cover the next rows.
- When laying 20-25 rows, do not forget about the formation of ventilation ducts.
Ordering mini oven Emshanov
This is one of the variations of a wood-fired housekeeper. Its advantage is the uniform heating of the side walls. Such a stove is built by a housekeeper from M100 rubble ceramic bricks. Inside, two vertical symmetrical caps are laid out, corresponding to the height of the entire structure. The firebox is formed from ШБ-5 chamotte.
With hot water box
Such a modification of the Russian housekeeper stove is distinguished by a collection unit of flue gases. For this, coaxial stainless steel pipes with thick machines are used.
Such an insert has several values:
- flue gases will not seep into the room;
- the heat load on the chimney will decrease;
- when using low-quality firewood, soot will collect on the insert.
The space turns out to be small, therefore, for a water tank of 20-30 liters, you need to make a niche in the sidewall of the furnace wall. The cavity is laid out in 5-8 rows near the main firebox. The container is embedded in it.
It is important to build a separate channel for combustion products and fencing off the container with a partition so that its walls do not burn out. The tank can be replaced with a stainless steel coil
Stove with stove and stove bench, its dimensions
The main distinguishing feature of such a device is the large dimensions of the furnace. In order for an adult to fit on the beds, the length of the entire structure must exceed two, and the width is one and a half meters. The bed itself is located above the long-elongated crucible, which ensures a constant flow of heat.
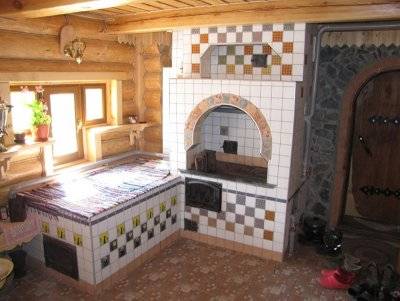
Previously, in traditional models, the beds were located under the ceiling, at a height of about 1.8 m, and climbed onto them along an attached ladder.
This ensured a longer preservation of heat - when the hut stood out in the morning, on the beds, due to the distance from the floor, the temperature was still quite high.
Nowadays, the couch is located at a convenient level of about one meter, because modern materials have better thermal insulation at home.
Reference.In previous years, a high crucible was traditionally built - in addition to heating functions, it was used as a home mini-bath, so it had to accommodate a person, which also influenced the height of the beds.
The scheme, which includes both a hob and a stove bench, remains the most common. For the construction of such a structure, lightweight schemes have been developed that even a not very experienced builder can handle. The disadvantage of such a stove will be the reduced efficiency of heating the room compared to other models.
The advantages of a Russian stove with a stove bench for a country house
A full-fledged Russian stove is multifunctional, it is used:

- for home heating;
- for cooking food;
- as a sleeping place;
- for the effective treatment of a number of diseases.
The heat transfer of the device reaches 75-80%, according to this indicator, the device can be compared only with gas boilers running on main fuel.
The heat generated by the Russian stove does not dry the air, does not burn oxygen and is evenly distributed throughout all rooms. Due to the high heat capacity of the materials, a comfortable temperature in the house lasts up to 12 hours after the last firewood was laid.
A sound and restful sleep on the stove bed gives strength and helps fight colds. With rheumatism, radiculitis and other diseases of the musculoskeletal system, the pain recedes almost immediately. The device not only feeds and heats, it also heals!
The device is easy to use. It can be heated both with firewood, wood waste, coal, and pressed materials in briquettes, the cost of which is usually low.
The service life of the device is practically unlimited. The Russian stove adds color to the interior of any home, even in a modern cottage it will become the center of attention and a place around which a company will gather for a pleasant pastime.
Important! The construction also has its drawbacks, these include the need to prepare raw materials for heating
Stove masonry mortar
The fineness and elasticity of the composition, the absence of cracks after drying are important. You can use a ready-made mixture from the store or make it yourself. This requires refined clay. It must be soaked in water, after a day, knead with sand - first, several variations of the solution are made for the sample, changing the proportions. Cakes are formed from each, 1 cm thick. After 2-3 days, they are examined - where there are fewer cracks, the composition is better.
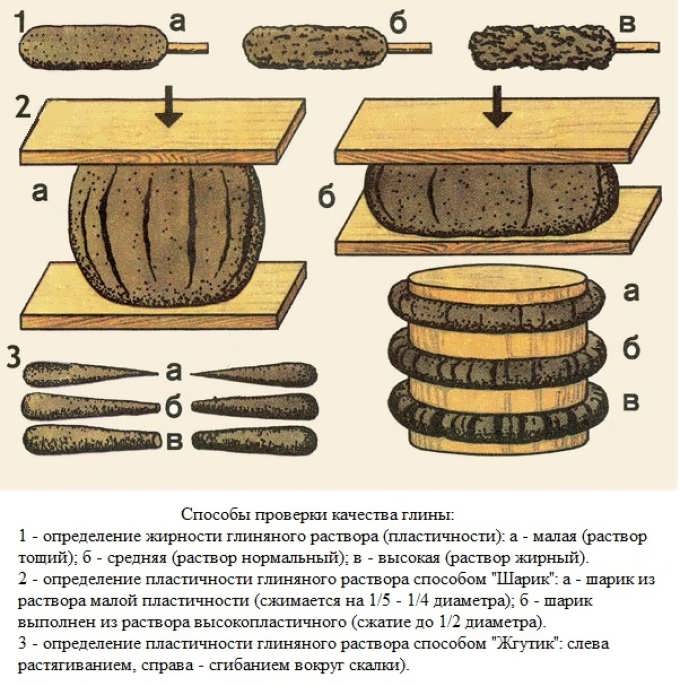
For homogeneity of clay, after soaking, it is rubbed through a mesh with cells of 0.5 cm. When preparing a solution for a furnace, it is better to replace ordinary sand with chamotte powder. Mix it with clay 1: 3 (4).
Masonry of the Russian stove
Before work, it is important to study the projects of Russian stoves. There are different options, because the masonry scheme may differ
The drawings cannot be changed - the specified order must be strictly observed.
For the safety of the structure, complete tightness is important. This is ensured by the following points:
- Use a quality stone. There should be no cracks.
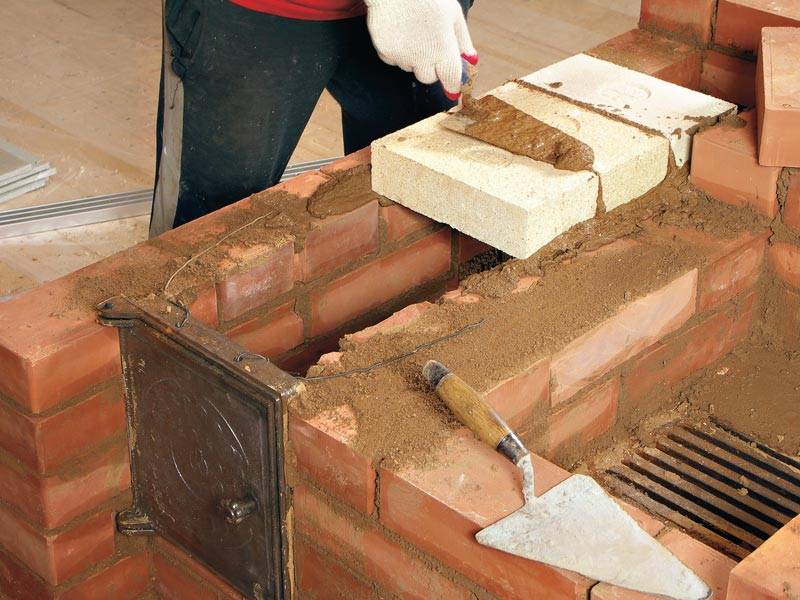
- The seams in the aisles are 0.5-0.8 cm thick.
- Do not coat the inner walls with clay - soot will deposit on them, therefore the thermal conductivity will decrease.
- Different sections differ in masonry thickness from ¼ of the brick thickness to its full length.
- If the brick is ceramic, then soaking is required so that moisture does not take away from the solution.
Do it yourself or order work
Does it make sense to take on such a difficult job on your own? How much does an experienced and reliable stove-maker cost? If 100% of the cost of materials, as is customary in general construction work, then it is still not that expensive.
By no means and by no means doubled against the material. You can find offers to fold the stove for 20,000 rubles, but this is an obvious nonsense.Let's try to figure it out for ourselves.
Russian stove with stove
The stove-maker works in mid-latitudes for six months, and always with an apprentice henchman. Considering their employment in 100% of the working time, the salary of the foreman at 25,000 rubles, and the assistant at 15,000 and the work time of 7 working days (this is a completely realistic period), we get that a simple stove will cost no less than 45,000 rubles, and a Russian stove with a stove and a water heater (see fig.) in 55,000-60,000 rubles.
But in a week it will be possible to heat it. Only one condition: the foreman must inform where, when and to whom he has already laid the stoves, and they must be examined personally. Good craftsmen are sure to stock up on referees, and if he twists and mumbles, it is better to turn to another.
The design of the Russian stove with a stove bench
Dimensions of a classic oven: width of about one and a half meters (two arshins); length - just over two meters (three arshins); the stove bench was placed at a height of approximately human height - approximately 180 centimeters (or two and a half arshins), the height of the hearth was approximately 45 cm, the height of the hearth was taken equal to the height of the table.
The stove was erected on a foundation of small fragments of bricks, stones, less often on a log foundation (oak, pine and other species). The structure was erected simultaneously with the house, but their foundations are by no means built in one piece, isolation is imperative. The kiln itself was built either from baked bricks or from raw bricks (in those families where income did not allow the use of red bricks for construction). The first "chimneys" (chimneys) were made of wood, then, due to the fire hazard of the material, the wood was replaced with stone and brick.
Furnace design: crucible - furnace, the place where the fuel is burned; a six and a base - an auxiliary table for dishes and a niche under it; under - the bottom of the firebox; hailo - a hole for the release of smoke into the hut; baking - space for storing firewood; mouth - a hole for laying firewood, closed by a flap.

How to fold a Russian stove with your own hands: ordering and step by step masonry
If you have not previously encountered bricklaying, and have only theoretical ideas about construction, you should not start creating a device.
For work you will need - a level, a plumb line, a trowel, a rule and a square with a tape measure.
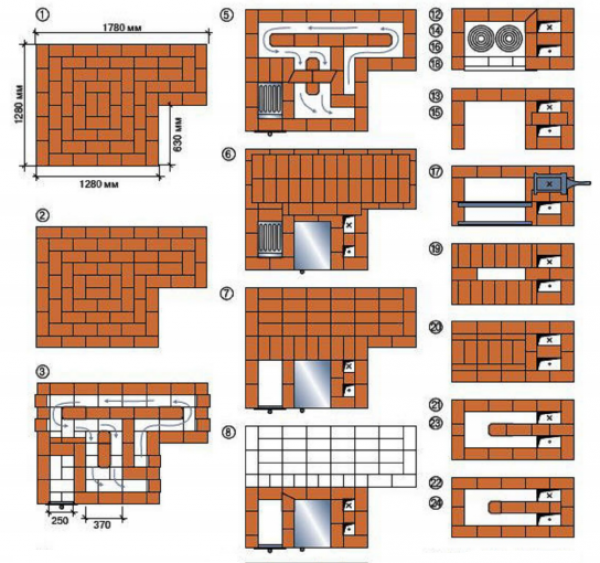
Photo 5. A variant of the ordering of a Russian stove with a stove bench and a stove for cooking. Contains 24 stages.
First, a layer of waterproofing is laid, the perimeter of the base of the device is laid out on it, all parameters are checked, the order is carried out according to the diagram drawn on paper.
Reference. Each brick needs to be held a little in a bucket of water for better adhesion to the mortar. During work, it is necessary to constantly check the observance of geometric proportions. You should not rush, if difficulties arise, you can attract a knowledgeable person, the opinion of an experienced stove-maker will always come in handy.
The first continuous row is laid out, chipped bricks are placed in the corners to ensure bandaging of the rows. This is followed by the inner walls, as well as the arch-shaped opening. A semicircular arch is formed from the 5th row, formwork is required here.
Further rows of sidewalls consist of brick halves. Rows 11 and 12 complete the base formation. Up to the 20th row there is a vault. 21 and subsequent rows are the basis of the bench. A door is installed in the 26th row, in the 32nd - a latch, above they indicate the place for docking with the chimney.
Ordinary laying of the stove
After preparing the foundation and familiarizing yourself with the drawings, you can move on.
It is important to strictly follow the order indicating the correct position of the bricks and the installation of oven fittings.
With stove and stove bench
If you plan to make a do-it-yourself oven with a stove, then the ordering is simple as follows: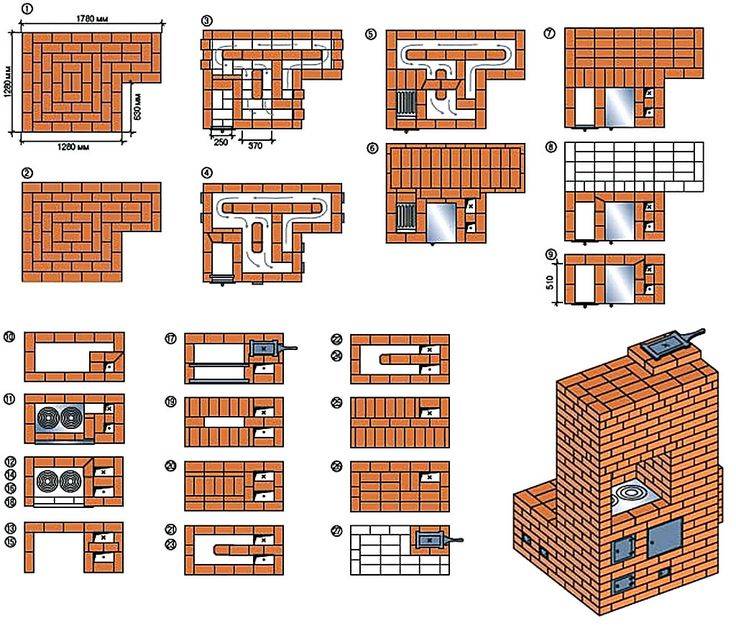
- Make a solid and even row.
- Lay out the inner compartments, arrange cleaning channels, ash pan chamber.
- Install the blower and cleaning chamber door. Fasten them with steel wire, put the ends in the seams.
- Close the vault, block the entrances to the channels, form the holes and arrange the ceiling of the hearth channel from the inside.
- Fix the grate in the large firebox. Carry out internal laying without mortar, it is better to use chamotte, cutting in half in thickness.Place the door on the small firebox.
- Install a hot water tank.
- Place the grate on the small one and the door on the large firebox. Pull off the right wall with a strip of steel. No mortar is needed at the back of the large firebox.
- Install and secure the small firebox door. Continue drawing out internal channels.
- This row is combined with the previous one.
- Lay out the bottom of the furnace, combine the furnace vaults. Lead the openings of the channels into the chamber, close the water tank.
- At the edge of the masonry, fix a 5x5 cm metal corner between the fireboxes. Cover the space of the large firebox behind the stove with a grate. You do not need to fix it.
- Form the chimney and the walls of the furnace. Install the damper on the left.
- Continue with the algorithm.
- Form the entrance to the chimney. It will be opened by a latch (vertical). Take out the walls of the furnace, make out the hole for the damper.
- Begin to narrow the masonry by blocking the vault of the chamber. Proceed with the conclusion of the chimney.
- Reinforce the walls with metal strips.
- Pull off the back wall with a piece of metal. Narrow the vault of the chamber further, prepare for laying the vault. Above the niche with the slab, lay a corner and a strip of metal - the basis for the masonry that creates the ceiling.
- Lay out the outer walls and vault of the crucible in a dome shape. You can install a template or weld an arch from metal strips.
- Reinforce the wall above the chamber entrance with a strip of metal to surround the crucible vault with walls.
- Add sand, compact.
- Proceed to the base of the bed. Lay a sand embankment, narrow the overtube in front.
- Narrow the overtube, place a panel with a circular hole to change the direction of the smoke.
- Install the cleanout door.
- Install a draft control valve.
- Continue to overlap the space.
- Work according to the algorithm.
- Combine the overtube and chimney on rows 27-29. Lay out the chimney before the cut begins to form. In the place where the chimney passes through the attic floor, use cement mortar.
When the pipe is brought out to the roof, make an otter - an expansion above the roof in the form of an overflow. Close the gaps between the roof and the chimney with waterproofing.
The Russian stove with a fireplace and a stove bench is multifunctional. It gives warmth, they cook food on it, they rest upstairs. Any things will instantly dry on it.
With a stove under the cauldron
Both the components and the masonry resemble a Russian stove with a fireplace and a stove bench. Refusal from the latter is beneficial by reducing the size and a stove on which a large cauldron will fit. The order is as follows:
- Make a flat and solid base.
- Place the ash chamber.
- Lock the cleanout doors.
- Place the grate.
- Form an underfloor chamber.
- Start lining the firebox.
- Start building the walls.
- Set up the corners.
- Align under.
- Form a hailo.
- Put on the stove.
- Build a furnace and cooking chamber.
- Close the flue duct.
- Form the roof of a large firebox.
- Build walls.
- Continue with the previous row.
- Tie the walls to the arches.
- Continue the row.
- Insulate the furnace.
- Take care of the general overlap.
- Continue with the algorithm.
- Position the latches.
- Install the cleanout doors.
- Continue with the previous row.
- Follow the algorithm.
- Close the channel.
- Form a chimney.
- Install the valves.

It remains to erect the pipe to the ceiling. Cover it with 2x1.5 bricks. For insulation of the floor, non-combustible material is used - metal, asbestos.
You can build a stove with a flood and a stove bench. In this case, the length of the combustion chamber is increased or an extension is built, inside which there will be smoke channels.
Are you planning the construction of a Russian stove for yourself?
Not really
The nuances of drying a laid out stove
The laid out oven should dry well.
There are several nuances:
- drying is needed even before the construction of the chimney;
- it is impossible to fully heat the stove right away - there is a risk of loss of tightness, the appearance of streaks;
- for at least 10 days, drying should be natural, with open doors and latches;
- the first times it is necessary to heat it carefully - use a little firewood, open the smoke dampers, and close the firebox;
- For 1-1.5 weeks, the stove is heated every day, starting with 3-4 kg of firewood and increasing their amount daily by 1-1.5 kg;
- a full-fledged firebox is allowed when, after 2 hours from the beginning of the firebox, there is no condensation at all on the metal elements.
Russian stove in the house: pros and cons

It is important to consider the advantages and disadvantages of the design
She has many advantages:
- the heat flow is characterized by a low density, and the area of the heating surface is very large, therefore the heat is always soft, the air does not dry out, and the effect is curative;
- a well-designed and built Russian stove provides warm rest on a couch, even when the temperature is low in the house;
- part of the heat flux is transferred to the foundation and adjacent soil layers, drying them out - the risk of swelling and subsequent deformation is reduced;
- with good warming up, the heat lasts for several days, therefore, after a long working day or several days of absence, the owner in the house will not freeze;
- food cooked on the stove has a special taste and aroma - even simple dishes become tastier;
- there are several fuel options - firewood, straw, peat, reeds, dung.
Such a structure is well suited for homes where people live permanently.
Its main disadvantages include:
- costs of materials - a fireplace and 2 Dutch stoves can be erected for the same amount;
- long heating - it takes 3-4 hours, and the room heats up to a maximum 2-2.5 times longer;
- a complex device, this applies to smoke channels, combustion chamber, vault scheme.
The size of the modern Russian stove has become more modest. Today, they prefer more compact designs with a stove, they often refuse stove benches. For clarity, before construction, you can make a layout out of boxes with your own hands. Previously, the structure did not warm up at the bottom. The flood solved the problem. The Russian stove with underflooding is attractive for its uniform heating, the possibility of partial kindling on not cold days.
Masonry of the Russian stove: technology and construction tips
In order to fold a simple Russian stove, you need from 1.5 to 2 thousand bricks. Bricks are stacked in rows. The standard oven includes rows 25-31 (excluding the chimney).
It is better to lay the first row of the oven with waterproof overheated bricks. The walls of the furnace are one brick thick, and the front part of the hob is half as small. In the opening of the furnace, usually, timber formwork is placed. When laying the vaults of the furnace and furnace, it is best to use wedge-shaped bricks. They can be easily made with your own hands, since manufacturing involves the processing of ordinary bricks.
Construction techniques
Guardianship
A wooden ward can hold a stove weighing up to 1,600 pounds (approximately 750 kg), i.e. small or medium without heat. It is carried out in the form of a log house in two belts, with backfilling with quarrystone and flooring from beams. The flooring is covered with felt, properly soaked in a liquid solution of fatty clay, and over it - with roofing iron.
Arches and vaults
Arches and vaults are laid out from an ODD number of bricks on formwork on wooden templates - circles. First, a full-size drawing of the arch in a section is made, then the castle bricks are hung on the wedge along it. You don't have to try to lay out a vault with a direct lock or a lockless one for a home-builder, this can not be done by any experienced bricklayer.
Next, a circle is prepared, taking into account the thickness of the formwork boards, and a vault without a lock is laid on them. Then you need to thickly grease the grooves of the locks with a solution and put the locks into the groove. The next stage - the locks in turn and in several passes are gradually hammered into the groove to the place. You can't get by with a mallet, you have to wield a log. But you can't beat what is foolishness; it is necessary to use the inertia of a heavy log, and not the force of a sharp blow.
The quality of the vault closure is monitored by squeezing the mortar sausages out of the seams: it should be more or less uniform over the entire surface. The thick solution flows slowly, so you need to take breaks between aisles. The result is a pre-stressed structure; only such a vault will last for many decades.
Material consumption
The classic Russian stove described above, depending on the size, requires approximately the same amount of materials:
- Small - 1500 bricks and 0.8 cubic meters m solution.
- Average - 2100 bricks and 1.1 cubic meters. m solution.
- Large - 2500 bricks and 1.35 cubic meters. m solution.
Possible difficulties
With self-construction and lack of experience, it is easy to make some mistakes:
- The use of low-quality materials - cheap bricks often have defects or crack when heated to high temperatures.
- If the brick is not soaked before building, it will draw moisture out of the solution, which will lead to uneven drying and deterioration of the strength and tightness of the masonry.
- The joints between the bricks are filled unevenly and not tightly enough - in the future this leads to a violation of the sealing.
To avoid these and other mistakes, it is better to consult an experienced specialist before starting work.
Correct operation
For the correct and safe use of the device, the following rules must be observed:
- Closely monitor the condition of the chimney, clean it from ash in time.
- Before each kindling, check the quality of the draft - this will help prevent the ingress of smoke into the room.
- If the oven has not been used for a long time, a thorough inspection is carried out for damage and cracks.
- The stove must not be heated in a state of alcoholic intoxication or when severely tired; it is not recommended to leave small children alone near the heating stove.
Accurate construction and compliance with all operating rules will ensure high-quality operation of the oven, efficient heating of the house, and the preparation of delicious traditional dishes.
