Varieties
begins with the selection of the type of pipe that is optimal for the specific conditions. The following varieties are on sale:
Single-circuit
The so-called mono-pipes consist of one layer of alloy steel alloy, the layer thickness of which is about 0.5 mm, and the working temperature is 500 degrees.
The scope of application of such pipes is limited, their installation is possible only indoors, since due to the lack of an insulating layer, a single-circuit chimney freezes in winter, contributes to the settling of condensate and soot on the inner walls.
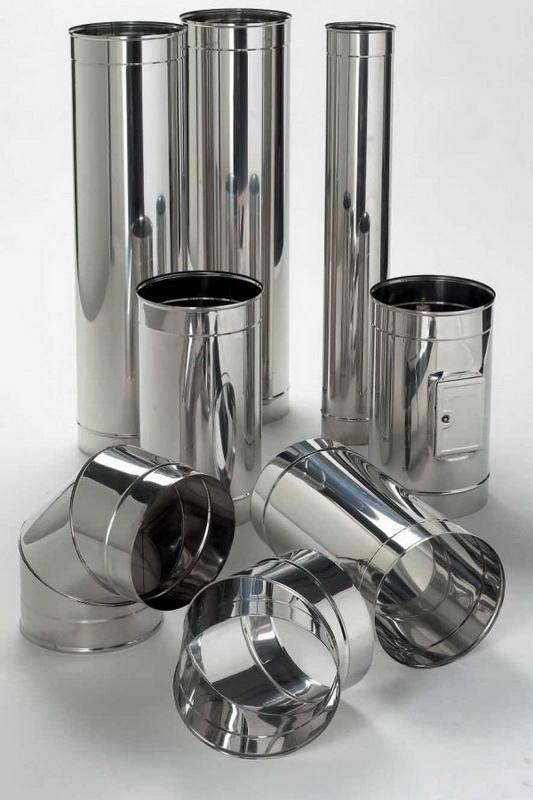 Alloy steel single-circuit chimneys
Sandwich pipes
In construction terminology, they are also known as thermal systems, two- or three-layer pipes with insulation inserted between layers of steel. The working temperature of a double-circuit pipe for a steel alloy chimney is up to 850 degrees.
For thermal insulation of such a chimney, mineral wool-based heaters are used, in particular, basalt fiber. They protect the sandwich pipes from condensation, and also trap heat inside, reducing fuel consumption.
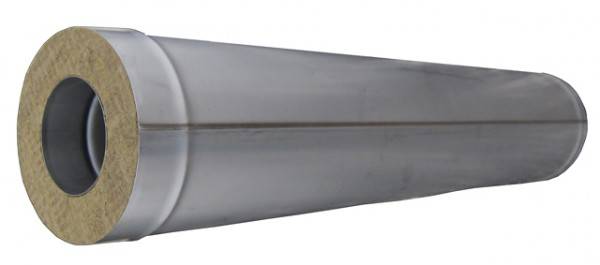 Chimney sandwich pipe
For most regions of Russia, professional builders recommend the use of double-circuit sandwich pipes. They are indispensable if external installation with an exit through the wall is planned according to the project.
However, remember that it is installed from stainless steel after the chimney is brought out to the street, and not immediately to the inlet pipe of the heater.
Installation of a stainless steel chimney
Details for assembling a stainless chimney are very diverse, so the configuration of the channel can be any without harm to the thrust force and the working process in the furnace. Quite often, a corrugated pipe and several elbows become an element of the chimney, helping to avoid a global reconstruction of the walls.
Flue duct assembly instructions
The stainless steel chimney is installed as follows:
- A sketch of the structure is created on paper, in which the intended configuration of the smoke channel is reflected. Then, the walls are marked, indicating exactly where the pipe will be attached. Based on the results of this work, the length of the structure is determined and all parts are found, including rotary elements for connecting pipe segments. At the same time, they do not forget about the chimney fragment that goes out onto the roof of the house. It should rise slightly above the level of the roof ridge.
- Before assembling the chimney, the joints of the pipes are lubricated with a hermetic compound. A special tool will make the articulation of the parts more reliable.
- Moving from the bottom up, one link of the chimney is connected to another. The elements are joined to each other so that the upper section is inserted into the lower one with a special latch. In the absence of this device, one element is inserted into the other by about one-half of the size of the outer diameter.
- Clamps are attached to all joints of the elements. The manufactured structure is fixed on the external or interior wall of the house every 1.5 or 2 meters. The elements that are carried through the wall and the inspection sections of the pipe are subject to compulsory fastening. On additional brackets, the smoke channel is fixed in the areas where the tees and elbows are located.
Video: connecting chimney elements
Stainless pipe installation rules
Installation of the structure should be carried out in accordance with the following rules:
- horizontal elements and elbows should not be installed in places where they will be in close contact with electrical wires and gas pipes;
- chimney elements must not be connected at the place where the structure passes through the wall;
- pipe fragments located horizontally cannot be made long (the permissible limit is 1 m);
- the direction of the chimney may be changed no more than three times;
- the diameter of the selected stainless steel pipe cannot be less than the size of the branch pipe coming from the furnace or fireplace;
- when passing a smoke channel through a wall, it is customary to leave at least a meter of free space around an uninsulated stainless steel pipe;
- the height of the smoke channel should be more than 5 meters, otherwise the products of fuel combustion will be difficult to pull out;
- it is customary to pass a stainless steel pipe through a non-combustible roofing material, creating a gap of 13-15 cm;
- a stainless steel chimney installed outdoors or in a cold building is supposed to be lined with thermal insulation materials;
- in the place where the smoke channel is taken out through the roof made of combustible materials, it is necessary to mount a device that extinguishes the sparks.
Important principles for installing a chimney
If you want to make the chimney work efficiently, it is worth listening to some recommendations. In many ways, they relate to the use of corrugated pipes. It can be installed both inside and outside the house, but the best place to place such a product is considered to be the transition from the furnace branch pipe to the main channel.
The advice of the masters does not bypass the shape of the hole for the pipe. It is better to make it rectangular or elliptical. The hole in the roof should be located where the flue gas duct could pass centrally between the ceiling beams and the structural elements of the roof.
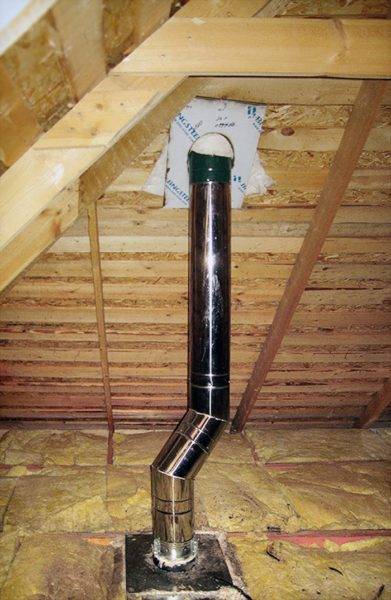 Most often, a rectangular hole is created under the chimney pipe, since it is easier to cut and seal
Installation of a chimney made of stainless steel implies mandatory waterproofing of the structure
This is important, because the upper section of the pipe, not protected from dampness, can be the culprit for moisture seepage onto the attic floor.
Video: installation of a chimney from a sandwich pipe
The smoke duct, made of stainless steel pipes, does its job well. The installation of this structure will seem simple, like an easy mathematical task, if you know the intricacies of the process and take into account the advice of the masters.
Chimney types
Based on the components used, these devices can be conditionally divided as follows:
- single;
- multilayer.
The materials used for their manufacture are particularly durable and highly corrosion resistant to acid condensate. A clean surface helps to completely remove moisture and soot from the smoke channel.
Single pipe designs are very often used. Such technical solutions are used to adapt old chimneys to new heating equipment. Pipes for them are made square, oval or round. For their production, stainless steel of the austenitic class is used. Enameled pipes are also produced, but they are not widely used, since they are sensitive to mechanical stress.
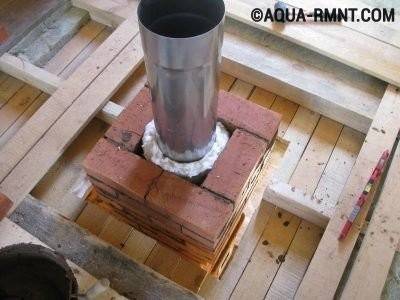
A single chimney needs additional protection
When installing a single chimney, one should be guided by the fire safety rule, which requires a distance of at least 1 m to the nearest wall made of combustible materials.
Two-layer designs have their own advantages. The insulating layer between the walls of such a chimney reduces the cooling of the inner pipe, resulting in less condensation. The inner pipe is made of high-quality steel, since the condensate is acidic and other material, including galvanized steel, will not be able to work for a long time in such conditions.

The two-layer chimney is already insulated
Such chimneys are placed at a distance of at least 20 cm from the walls of combustible materials. If this cannot be avoided, then the wall is sheathed with metal with a substrate. It is made from a refractory material such as asbestos sheet.
By the method of installation, chimneys are:
- Internal.Such a structure can be lifted from the oven vertically through the internal ceilings and the roofing pie. Its main disadvantage is that the condensate flows directly into the furnace, increasing its concentration in the flue gases. The result can be an unpleasant pungent odor in the room and accelerated wear of the chimney.
- Outside. With this design, the chimney is diverted from the stove horizontally through the wall. For this, two elbows are used, which can have a rotation angle of 30, 45, 60 or 90 degrees. In this case, the outer one looks like a tee, and at the bottom there is a container for collecting condensate. Installation of the vertical part of the chimney is carried out parallel to the wall, the pipe is attached to it with brackets and clamps.
Components
It is impossible to assemble a chimney without using fittings. They are intended for:
- execution of contours of engineering systems;
- changes in the direction of the pipeline;
- transition to another diameter;
- traction adjustment;
- collection of condensate;
- protecting the upper end from precipitation, leaves, debris and bird nesting.
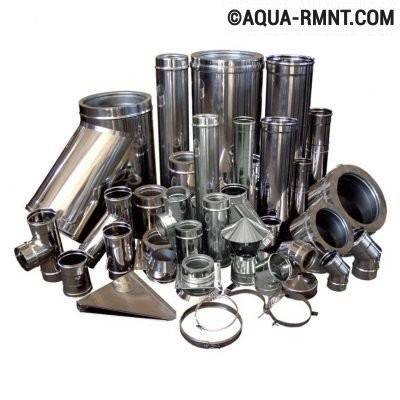
Additional elements for assembling a chimney from pipes must be used
Using these structural elements, you can assemble a chimney of any configuration with your own hands. The length of horizontal sections is not more than 1 m, otherwise the thrust will be greatly weakened.
Varieties of metal structures
Chimney accessories are available in two types:
- single-walled,
- three-layer sandwiches.
Single-wall metal pipes are made from galvanized steel or stainless steel. A chimney made of single-layer steel has one significant drawback - heat exchange with the external environment. As a result of this thermal interaction, a single-layer flue gas vent is susceptible to condensation and fire hazard.
Most often, single-circuit pipes are used:
- for chimney equipment in outbuildings, where heat loss is not of fundamental importance;
- for the implementation of the internal part of the chimney, if it is planned to be used as an additional source of heat;
- as a smoke channel in the construction of a combined chimney.
Sandwich chimneys are ready-made sections for assembly, consisting of two circuits: an inner pipe and an outer casing, the space between them is filled with mineral wool.
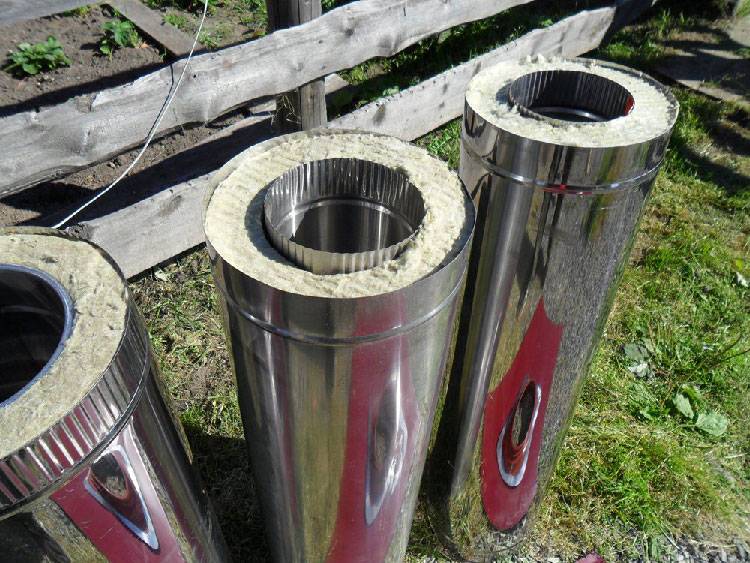
Material combinations are possible:
| Outer casing | Smoke channel |
| Cink Steel | Cink Steel |
| Cink Steel | stainless steel |
| stainless steel | stainless steel |
| stainless steel | ceramics |
Double-circuit pipes are more expensive than single-circuit ones, but the chimney assembled from them turns out to be self-sufficient and does not need any insulation or additional protection.
Professional advice
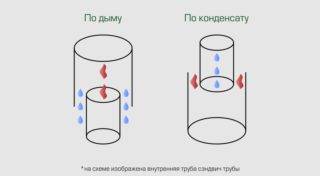
When installing a chimney, it is worth taking the advice of experts to make the perfect smoke outlet. The tube that goes from the outside is collected by condensate. If you follow the smoke procedure, condensation can seep into the sleeves. The insulation cannot be wetted, in this situation the pipes will be poorly insulated, and the outer sleeve can provoke a fire when the wall structures are heated. In addition, the freezing of liquids can cause the formation of holes on the tubes, and the acid inside the condensate substance provokes a burnout of the liner from the inside. Smoke outflow in open spaces is not dangerous, it can be eliminated if the joint parts are additionally lubricated with a sealant.
It is not recommended to reduce the diameter of the chimney opening, this can provoke a stoppage or decrease in draft. The chimney duct must be cleaned of soot twice a year, and the head part from ice, snow or condensation frozen on it.Sandwich pipes do not need additional insulation, except for the passage through the partition or wall. For this purpose, it is better to use refractory insulation and exclude the use of glass wool. The section in which the pipe runs through the wall must be insulated with ceramic or basalt wool, asbestos or foamed vermiculite. The use of asbestos does not cause problems; at the final stage, the product will not begin to dust and release hazardous substances.
When working with walls made of wood, it is necessary to remember the danger of fire, therefore it is much more difficult to install chimneys in such buildings when compared with brick ones. When the chimney is taken out through a wooden wall, it is necessary to strictly observe the distance from the pipe to the wall, it should not be thicker than 260 mm. Additionally, you need to take care of the heat-insulating part and treat the walls with fire retardants. When installing a chimney in such a structure, it will be necessary to isolate the surfaces of the walls near the monotube and the outlet from the heat generator. This insulation is created using combustible materials such as tiles, plaster, stone or metal sheets.
Installation of stainless steel pipes
A single-wall chimney can be installed both indoors with further lining with heat-resistant and fire-resistant material, and in an existing brick chimney (chimney sleeve).
Provided the use of double-walled chimneys made of stainless steel with thermal insulation "sandwich", installation can be carried out both inside and outside the room. ... This type of chimney is reliable and durable (fire safety, corrosion resistance, etc.). Due to its increased fire resistance, a stainless chimney pipe is usually installed in baths and wooden houses.
Installation of single-wall stainless steel pipes
One of the easiest ways to install chimney pipes is a "chimney sleeve" (see Repairing chimneys). The stainless steel pipe for the chimney is lowered into the existing brick chimney, after which it must be connected to the pipe of the heating unit - this is done to avoid the ingress of condensate on the brickwork, which is formed from the flue gases.
A chimney without a pipe absorbs condensate, as a result of which the chimney is destroyed.
Installation of a double-walled pipe with thermal insulation
The installation of a chimney with thermal insulation is considered more difficult. The chimney pipe made of stainless steel "sandwich" is a double pipe of a larger and smaller diameter, which is inserted into one another. The interlayer between the pipes is made of refractory material - basalt.
Thermally insulated double wall pipe
When installing pipes with thermal insulation, some nuances should be taken into account:
When joining the "sandwich" pipes, it is important that inside the "sandwich" the upper pipe goes into the lower one, and outside the "sandwich" the lower pipe goes into the upper one (fits). Not all manufacturers take this into account, therefore, before installation, it is necessary to take this point into account and, if necessary, pull out the inner pipe, turn it over and insert it back.
When joining, it is advisable to use a heat-resistant sealant.
The joints of the outer "sandwich" pipe must be secured with self-tapping screws .. Incorrect installation of a double-walled pipe with thermal insulation can lead to stains and streaks on the outer "sandwich" pipe
Improper installation of thermally insulated double-walled pipe can lead to stains and streaks on the outer sandwich pipe.
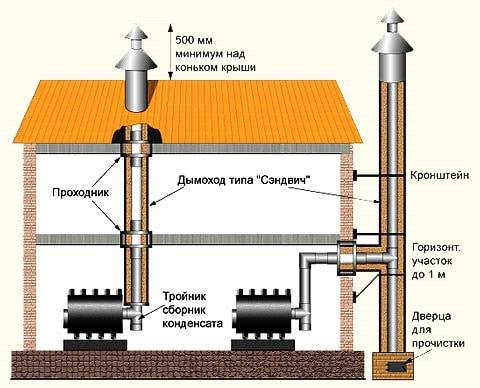
Chimney location options
Installation of pipes starts from the bottom (from the heating system upwards). Before installing the chimney, it is necessary to prepare the passage between the ceiling. A special reducer can be purchased from a store.It is needed to isolate the floor from overheating.
Prepared reducer
The inside of the reducer must also be protected from heat. This is done with basalt fiber foil mats.
Then you can start installing the pipes. The stainless steel pipe for the chimney is installed in such a way as to avoid joints in the transition pipe.
For ventilation and cooling, there must be a clearance between the via and the pipe. Next, you need to check the level and fix the protective elements of the adapter.
The pipe must also be additionally fixed to the wall. This can be done using brackets, which must be installed every 2 m.
To clean the flue duct, it is necessary to provide a removable part or a door, which is located at the bottom of the chimney.
The chimney is cleaned 2 times during the heating season.
Materials and tools for making a chimney
Before proceeding with the purchase of parts, fasteners and tools for performing this work, you need to decide on the design of the device and complete a draft design, an integral part of which is a material sheet, which lists all the necessary parts. By adding the cost of materials to this list, you will receive a cost estimate.
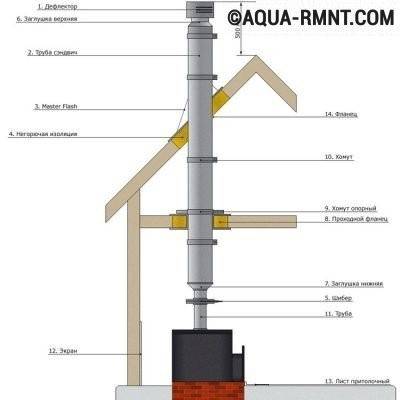
It is recommended to sketch the chimney before construction.
The device is mounted from the bottom up, that is, from the stove to the head, for which you will need:
- adapter from fittings from oven to pipe, depending on the design, a branch may be required;
- multilayer pipe;
- gate;
- refractory material for the ceiling passage device;
- plates of galvanized sheet, approximately 500x500 mm in size - to close the passage;
- materials for insulating the intersection of the roofing pie, for example, a probe for outside protection;
- chimney head;
- clamps for fixing connections at the rate of 1 pc. for each;
- brackets for attaching chimneys to walls (depending on its design);
- collector for dripping condensate;
- high temperature joint sealant;
- steel pipes at the rate of 1 pc. per meter of chimney;
- stainless wire for stretching;
- screws, nails.
The list of tools is small and may look like this:
- drill with drills for concrete and wood;
- jigsaw;
- screwdriver or wrench for installing fasteners;
- plastic inserts (dowels) for mounting brackets;
- hammer.
Depending on the design of the chimney, other tools may be needed, this will become clear when drawing up a draft design.
Location rules
 Rooftop location
When designing the installation of such systems for the removal of combustion products, take into account the norms provided for by technical standards:
- The roof channel outlet, located on a flat roof or 1.5 m from the ridge, must have a height of at least 0.5 m.
- The chimney, located at a distance of 1.5–3 m from the ridge, reaches its level.
- The edge of the pipe, located at a distance of more than 3 m from the ridge, is flush with a line that is 10 ° from the horizon of the ridge line.
- The minimum height of the chimney is 5 m, the maximum length of the horizontal section is 1 m.
- Channel wall thickness for solid fuel boilers - 1 mm, devices for
- liquid fuel - 0.8 mm, for gas appliances 0.5–0.6 mm is enough.
- Structural joints do not fall on the floor.
- The passage through the roof of the sandwich pipe has a gap of 13 cm, through the ceiling - 20 cm.
- The permissible number of turns of the flue ducts is 3. The diameter of the pipe is not less than that of the outlet pipe.
Installation features
During the installation of the chimney, it is recommended to follow a number of rules.
The basic rule is that all objects surrounding the pipe should be heated by no more than 50 ° C.Steel tends to heat up, therefore, when installing them, it is recommended to lay an additional layer of thermal insulation. This problem can be solved using ready-made sandwich systems.
The chimney must be at a safe distance from electrical wiring, gas pipes and trees.
Where the pipe passes through walls or roofs, there must be a thick layer of heat-resistant sealant between the pipe and the appropriate material. The same sealant is laid between the pipes at their joints.

When connecting, they are guided by another rule: one pipe must enter the other at a distance that is equal to the radius of the outer section of the pipes.
When assembling the structure, it should be borne in mind that the chimney should not have narrowing points, otherwise the aerodynamics of the pipe will suffer.
Horizontal sections should not be longer than 100cm.
At the bottom of the chimney, an inspection window is mounted - a removable nozzle. The upper part ends with a head with a spark arrestor and a cone.
Cons of a chimney made of steel
Besides the advantages, steel pipes have a number of disadvantages. Their main disadvantage is their rapid heat absorption. Steel heats up quickly, so they need to be insulated. If this is not done, the pipe may heat up the materials it comes into contact with and cause a fire. In addition, when it heats up, it loses the ability to extinguish the sparks that arise in the chimney.
Another disadvantage of steel pipes is a large amount of condensation. This feature of the material can vary in severity depending on the coating and type of construction. The least amount of condensate falls on straight pipes without horizontal branches.
Features of operation
Metal chimneys, possessing a lot of undoubted advantages, require increased attention both during assembly and during operation:
- They should not be located near other utilities, such as electrical wiring or plumbing.
- Before starting the installation work, the internal longitudinal seams of the pipes must be covered with a special sealant, since they are in conditions of a temperature drop, which gradually weakens the joint edges.
- When cleaning stainless steel pipes, it is better not to use traditional metal balls with a wire "hedgehog". Their influence deteriorates the mirrored inner surface, as a result of which it becomes difficult to drain the condensate into the accumulators. Better to choose a brush made of synthetic materials.
Features of the transition of a sandwich pipe in ceilings
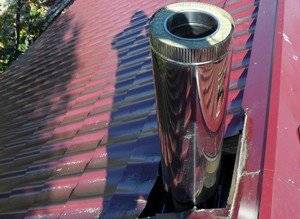
In terms of dimensions, such a structure should exceed the thickness of the overlap by at least 70 mm. It is these parameters that make it possible to provide high-quality protection of the floor from fire.
In this case, special attention should be paid to the quality of the box fastening.
It is important that the branch pipe installed in the box has no joints. Before directly installing the dividing box with your own hands, you need to correctly markup
It is possible to make a hole in the ceiling only if the dimensions of the box are known and the branch pipe is correctly located in it.
After the box with the branch pipe is installed, its high-quality insulation is performed. For this purpose, it is better to use basalt mats with a foil base. Also, a hole made in the ceiling is subject to insulation. For this, mineral wool or other heat-insulating material that is not subject to fire is used.
Features of the output of a sandwich pipe to the roof
To remove the chimney sandwich above the roof level, a special link is used, called "roof cutting" stove-makers. Such a structural element must be selected based on the slope of the roof structure. Only taking this parameter into account, all work on the removal of the chimney above the roof will take place without any problems. Doing such work with your own hands consists of the following stages:
- Using a marker, markings are made on the inside of the roof.
- A hole is arranged in the roof structure, corresponding to the diameter and thickness of the sandwich pipe.
- For insulation, a sheet of galvanized metal is fixed in the roof structure, in which
- a hole is cut in advance for the chimney through which it will go out.
- A groove is mounted on top, on top of which a sandwich pipe is assembled, the length of which must correspond to the calculated parameters.
- At the finishing stage, the edge of the chimney sandwich is protected from atmospheric precipitation by an umbrella-shaped tip.
As you can see, self-assembly of a chimney sandwich is not as easy as it might seem at first glance. But if you familiarize yourself with all the materials and videos, installation of sandwich pipes, all work can be done independently.
However, before deciding on experiments of this kind, you need to sensibly assess all your capabilities, and if there is no confidence in them, then it is better to entrust all the work to professionals.
