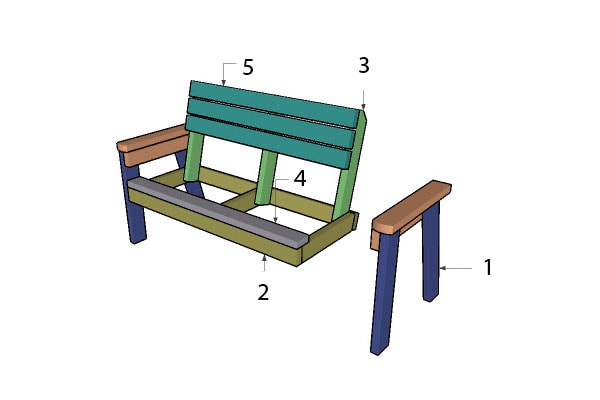
Model selection
The choice of a master is determined by the availability of available material, the purpose of the bench and the level of working skills.
For the most inept and unpretentious, the option with a log or a large section bar laid directly on the ground is suitable. The only thing that needs to be done is to level the surface and treat it with a protective compound.
Beginners should try their hand at extremely simple models made of calibrated beams and boards without a back and decorative elements.
Those who have a chainsaw and at the same time have the opportunity to get a barrel of a large diameter can be advised to "just remove all unnecessary", having received a product of the required shape.
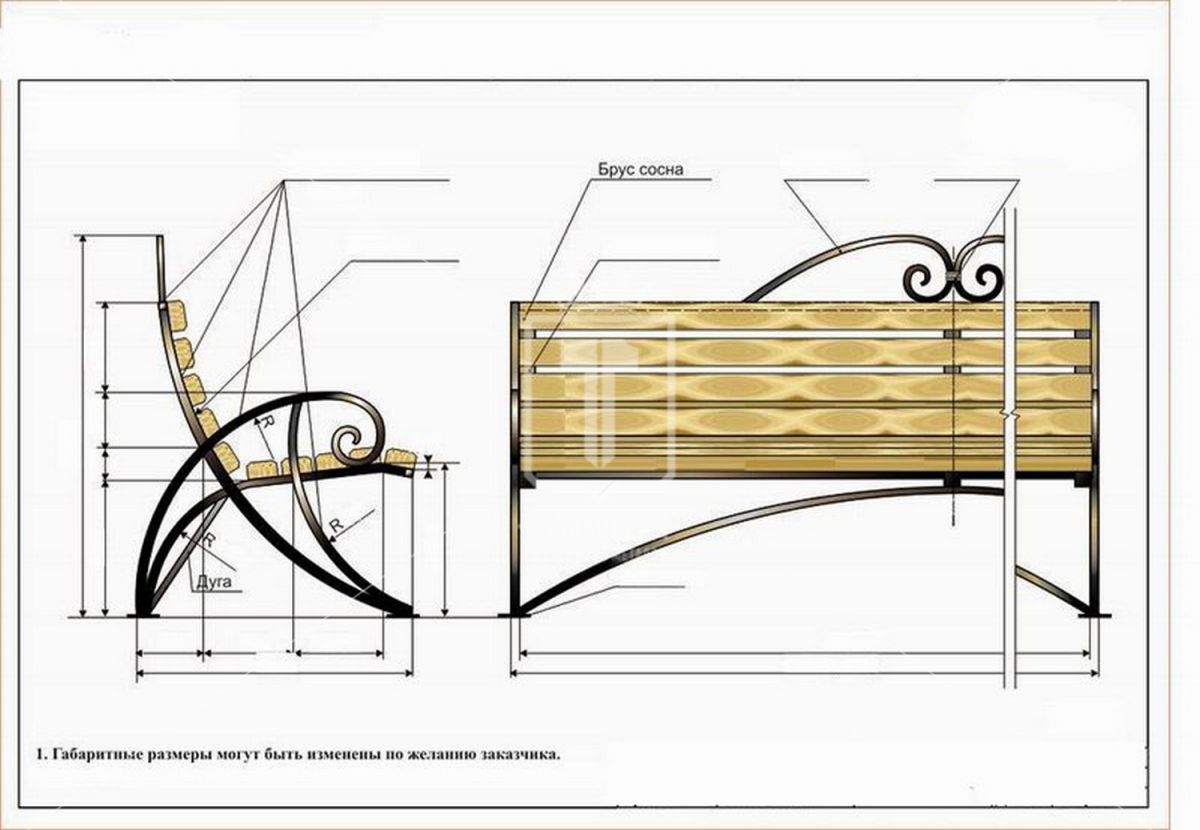
For those who have the ability to work with wood, a good set of tools and materials removes all restrictions, you can choose any model - from purely wooden to combined, for example, with cast or forged elements.
We select and process wood
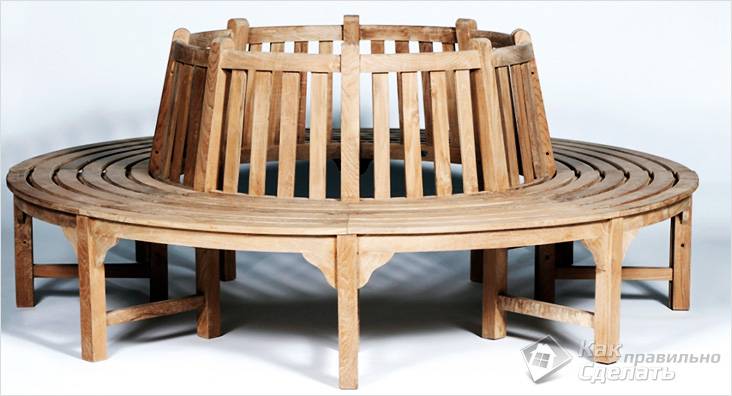 Bench around the tree
Since the bench that you are going to make will be located in the open air, it will be exposed to the biological effects of the environment. Therefore, you should choose the right wood species. Ideal for: oak, larch, pine, teak and other materials that are resistant to biological and mechanical stress. As a last resort, you can take any kind of wood left over after making something. But if it is not very resistant to moisture and fungi, you should carefully treat it with special impregnations.
All details of the future bench should be pre-sanded and treated with some antiseptic solution, wood impregnation or special oil
You should especially pay attention to the end sides of the boards (cross-section), since they absorb moisture most of all. This is especially true of the lower part of the bench legs.
They will come into contact with the soil, which will have a destructive effect on the wood. You can even put on some kind of bedding. After processing, the material must dry for at least 12-18 hours (depending on the type of impregnation and the type of wood).
How to make a country bench from an ordinary log
The assembly technology of a wooden sofa is quite simple. To make a seat, you need to saw the trunks of small trees along. This must be done exactly in the middle. If necessary, the saw can be moved closer to the edge of the tree trunk.
For the installation of the back of the sofa, you can choose logs with a smaller diameter. In this case, it is better to cut a cut closer to the edge. The backrest will be thinner and, accordingly, lighter than the seat.
The legs should be made from leftovers. You can connect all the elements using metal fasteners. This is done in the following order:
- Wooden parts are connected to each other using special metal pins. For this, holes are made in the boards. In this case, the diameter of the metal element should be slightly larger than the drilled eyelet.
- The pin is driven into the mounting hole half the size.
- Another element to be connected is placed on the free metal part. Then the wooden product is tightly hammered with an ax or hammer.
- To prevent damage to the soft wood, a piece of board is applied to the surface. And already they hit it with a metal tool.
The pins provide a durable fastening of the wooden elements. For reliability, you can put several metal fasteners in one place.
Do-it-yourself examples and technologies for creating country benches and benches
Bench and bench designs have some distinctive features. Building a bench is the easiest way to organize a seating area in your garden. The product has no back and, unlike the bench, has a simple outer design.
Setting up a bench is a quick and easy way to organize your garden lounge
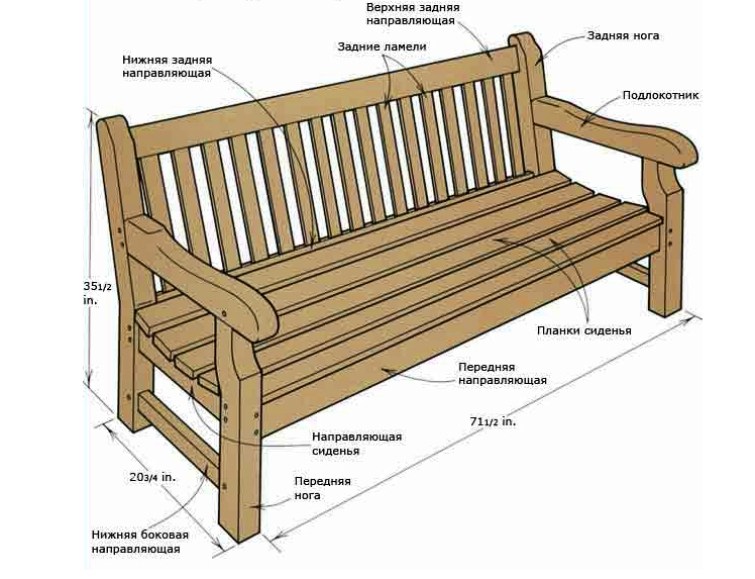
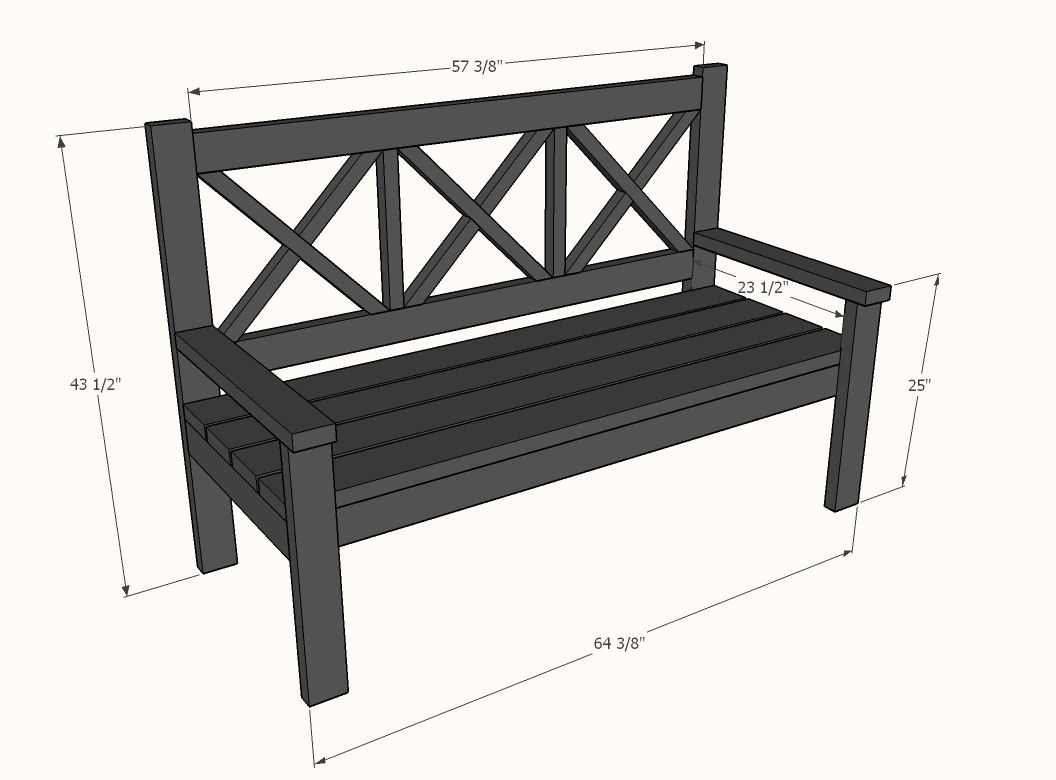
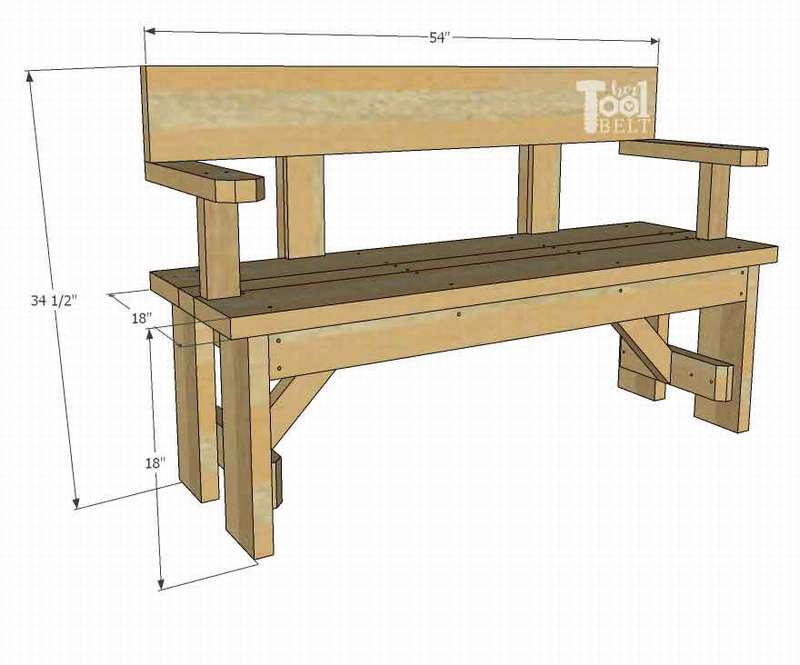
A do-it-yourself wooden bench with a back can have a more complex decorative design:
- non-standard shape;
- armrests;
- a structure decorated with carved and forged elements.
The simplest ideas for creating summer cottages
To liven up the design of a simple bench, you do not have to come up with a complex drawing and puzzle over creating additional accessories for the garden. It is enough to use two wooden boxes and a few planks.
An original wooden bench with a table designed for seating two people
In this case, the boxes will function as supports. After making the bench, you can fill them with earth and organize a small flower bed. A seat is made of boards, which is installed between the boxes. The material must be sanded well with sandpaper, remove all irregularities and burrs.
Helpful advice! From benches based on boxes, you can make a garden bench with a backrest with your own hands. It is enough to install the structure to the wall and nail several boards in the required place as a backrest on its plane.
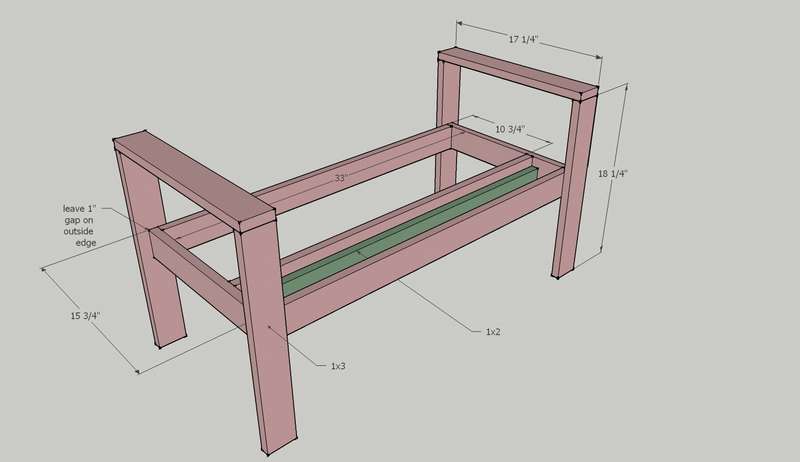
Rice. 1-1. Scheme of a bench with wooden boxes for flowers: 1 - design of a bench and calculation of materials: A - logs (2x4 boards 17 1/2 "long - 6 pcs., 2x4 boards 20 1/2" long - 4 pcs.); B - the bottom of the box (3/4 plywood 20 1/2 "x 20 1/2" - 2 pcs.); С - trims (boards 1x4, length 23 1/2 "- 16 pcs.); D - side lamellas (boards 1x6 25 "long - 32 pcs.); E - trims for top cladding (2x4 boards 45 "long - 8 pcs.); F - seat frame (2x4 boards 63 "long - 2 pcs., 2x4 boards 17 1/2" long - 2 pcs.); G - transverse planks (1х2 boards 17 1/2 "long - 5 pcs.); H - seat (1x4 boards 60 "long - 5 pcs.); 2 - side facing; 3 - installation of the walls of the flower box; 4 - mounting dimensions of the box walls; 5 - diagram of the device of the bottom of the box for flowers
Wood structures have a certain drawback. The material itself requires constant care, and in this case the tree also comes into contact with the soil, it is periodically necessary to water the plants. To make the bench more practical, wooden boxes can be replaced with concrete or stone pedestals. Concrete flower beds can be made independently or purchased at a store.
For the seat, use treated boards or half a round log. The choice of raw materials depends on the style of the garden or courtyard design. It is recommended to fix the seat with metal corners fixed to concrete using dowels, and to wood using through bolts or self-tapping screws.
Rice. 1-2. Scheme of a bench with wooden boxes for flowers: 6 - assembly dimensions of the seat frame; 7 - strengthening the structure of the bench; 8 - installation of the seat rails; 9, 10 - box installation
Vases with bonsai or ornamental shrubs can be used as supports.
The only, but very important requirement is that the container must be very strong. A hole is cut in the seat in the shape of a flowerpot in the place where the legs of the benches are usually located
The size of the hole should be large enough to create conditions for plant growth and maintenance, however, it should not exceed the size of the container. In fact, the plank seat is placed over the flowerpots and is fixed by the force of gravity and the weight of the seated.
Corner wooden bench with flower boxes installed on the veranda of a private house
Finding a suitable location for a bench
Why is the choice of location so important for placing a garden bench? If a personal plot needs a bench, then a lot of time will be spent in this place. Therefore, the view that will open in front of the seated and the surrounding atmosphere is very important.
Relevant and pertinent combinations:
Benches for summer cottages made of metal and wood, namely those that have a forging in the frame, will perfectly fit into gardens, where there are many trees with large crowns and fluffy shrubs.
Openwork romantic benches made of plastic or wood and metal are ideal for vineyards with young trees and flowering front gardens.
Neat benches in the style of minimalism will go well with a green hedge, look good near small artificial ponds and flowering flower beds.
Rough wooden benches in retro style will fit well into the atmosphere of exotic plants, unusual curved trunks or just massive old trees.
A shop decorated with decorative items such as pillows, soft armrests, a fabric seat and other details will find its ideal place on a veranda or in an outdoor gazebo. For such places, you should select a bench design in the same style as existing decor items.
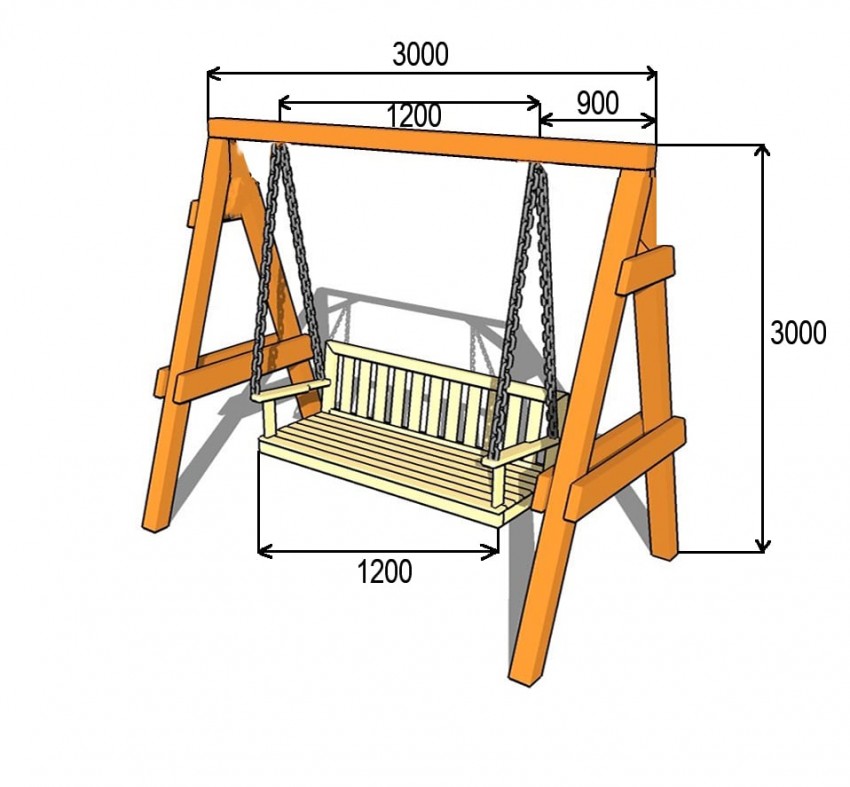
Under a large spreading tree, you can install a swing bench or place a classic bench with a back. You can also place items for sitting near the place where children while away their leisure time
It is important to take care that there is a shadow.
Benches from scrap materials
To create a designer bench, it is not at all necessary to purchase material, even if it is inexpensive. You can make an excellent bench from scrap materials. For example, old wooden chairs.
To create such an uncomplicated but very elegant bench, assemble a frame from a 50x30 mm bar, as long as you want your bench seat to be. For two people, 120 mm is enough. Attach the backs of the chairs to it as shown. Use long self-tapping screws for fasteners.
Next, fix the structure with a similar frame made of timber in the area of the middle of the legs of the chairs - the base.
Paint the structure created in this way in the color you need.
For the manufacture of the seat, you can use a sheet of plywood, fiberboard or wooden furniture board. Saw the seat slightly wider than the frame. If desired, it can be covered with batting or foam rubber and upholstery fabric or leather substitute. A furniture stapler is very useful for covering with material.
The bench is ready! All that remains is to find a suitable place for her and enjoy the result.
Another handy material for quickly creating a bench can be construction pallets.
If you have the right tools, it will not be difficult to assemble a bench of any design from them. The main thing is to carefully process the pallet boards with sandpaper and an antiseptic protective agent (this rule works for all wooden products planned for outdoor use). In addition, such a bench can be painted in your favorite color or covered with wood stain. You can decorate it with a simple jute rope and metal rivets, as well as pillows of various sizes and colors.
As you can see, a do-it-yourself garden bench is not only a place to sit. It is enough to show a little imagination and a place for rest with the whole family is ready. Made by you yourself, it will save you money and time looking for a suitable option, which sometimes you simply cannot find. If you do not have sufficient carpentry skills, create a bench from scrap materials, it does not require a lot of labor, but it looks no less aesthetically pleasing.
How to make a garden bench with your own hands from wood. Video instruction.
What to make of?
The seat and back of the bench are almost always made of wood. The metal is cold, rusts, which is why it requires an annual painting, and is gradually being washed away. Plastic is cheap, requires minimal maintenance at first, but is uncomfortable and does not last long outdoors and / or with intensive use by random people. We are talking here about the arrangement of private estates, therefore, we are most interested in a bench made of wood, as a harmless material that is most pleasant to the eye and to the touch.
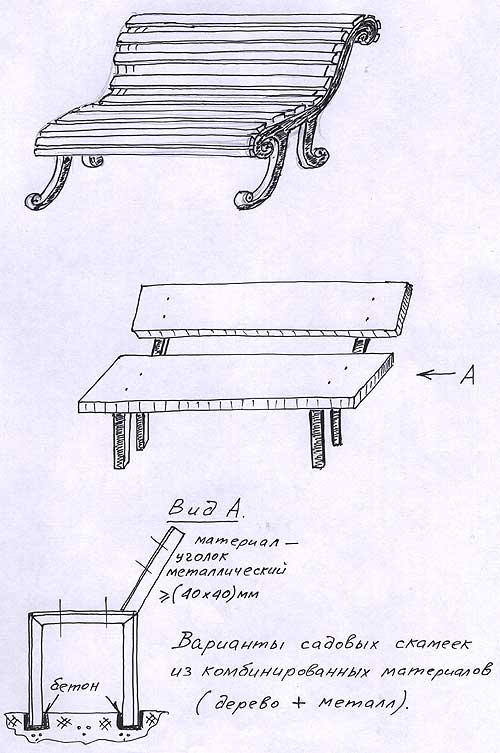
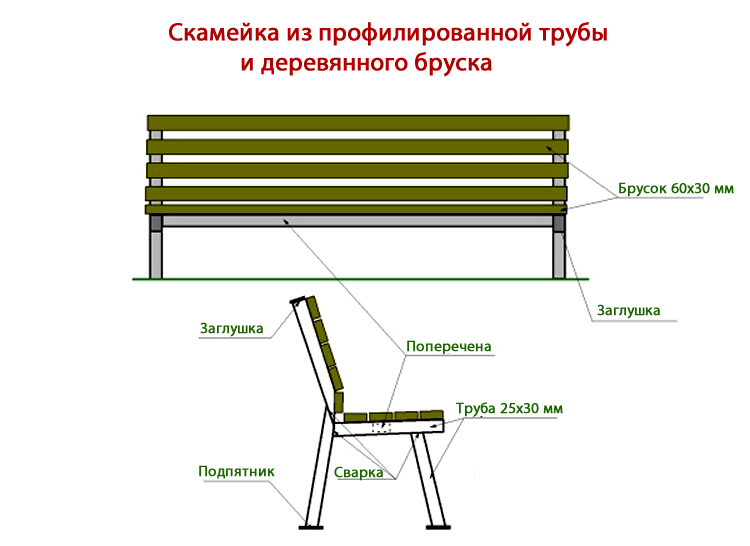
However, the supports / legs or the load-bearing frame of the bench may not be wooden. For example, profiled metal resists shocks and impacts better and in contact with the ground is more durable than wood, especially concreted metal. Therefore, for general use benches - street, yard - such a design is preferable, especially since a simple country bench on a steel base will be cheaper, if only due to the smaller volume of workpieces to be delivered to the assembly site.
Bench and stone
A very good garden bench is made on a stone base. For example, at pos. 1 fig. flagstone only adds naturalness to the wood and the masonry seams do not detract from it. The creators of the one in pos. 2, they simply poured the bottle into wire baskets, which at the same time serve as supports for the tray-table. A shop with flower girls at pos. 3 nothing prevents them from leaning on the mini-rock garden instead. If you also build a pergola over such a bench, you get a very cozy alcove, pos. 4.

Benches and benches on stone supports
Square shop
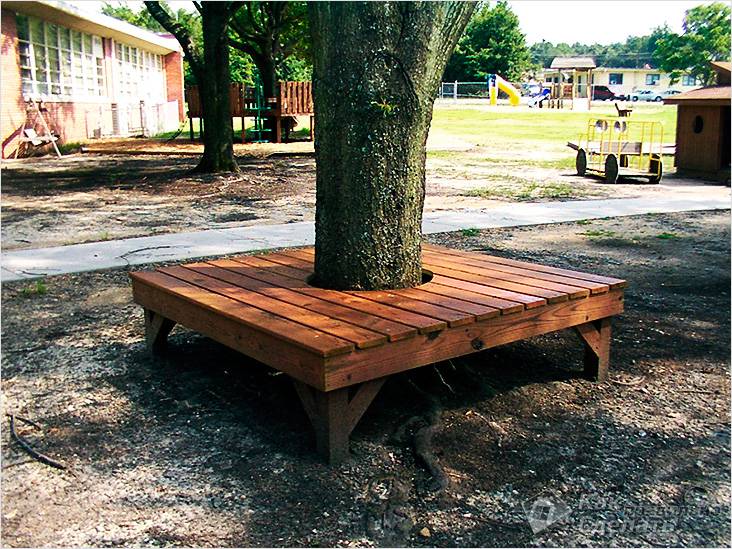 Square bench around the tree
In the preparation process, it is important to pay special attention to the selection of the necessary building material and tools. You will need:
Instruments:
Instruments:
- screwdriver (or drill);
- jigsaw, circular saw or ordinary hacksaw;
- sander or sandpaper.
Materials:
- impregnation for wood processing;
- 16 boards 10 × 5 cm: approx. 8 m (for support posts);
- 16 boards 10 x 2.5 cm: about 23 m;
- bolts or screws;
- paint or varnish for finishing the bench (optional).
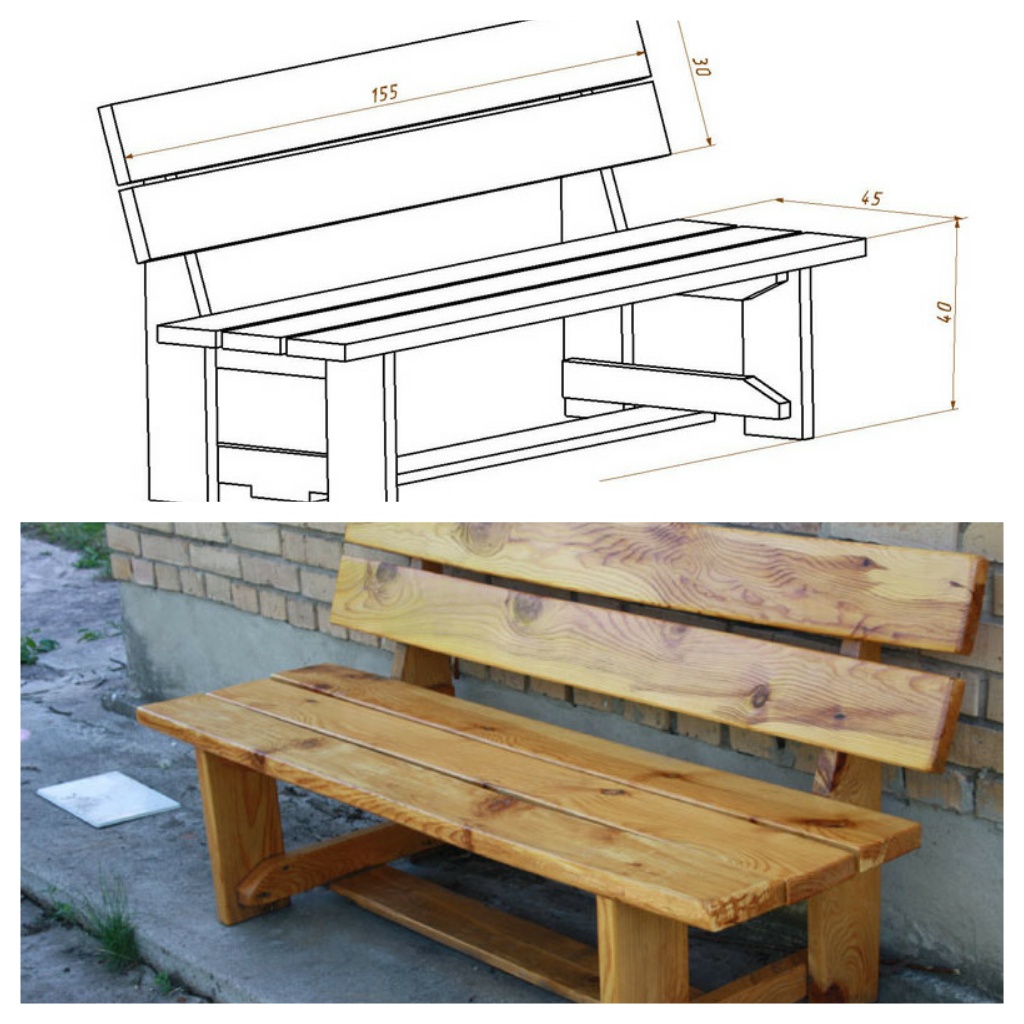
There are standard sizes for the bench:
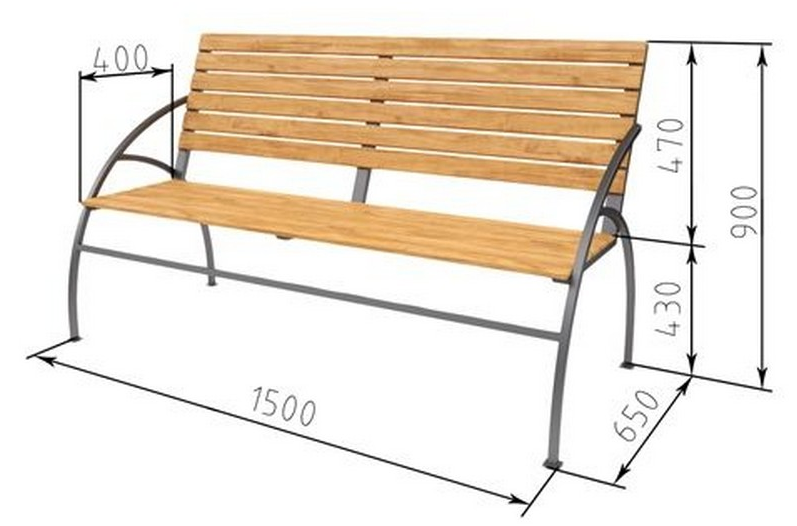
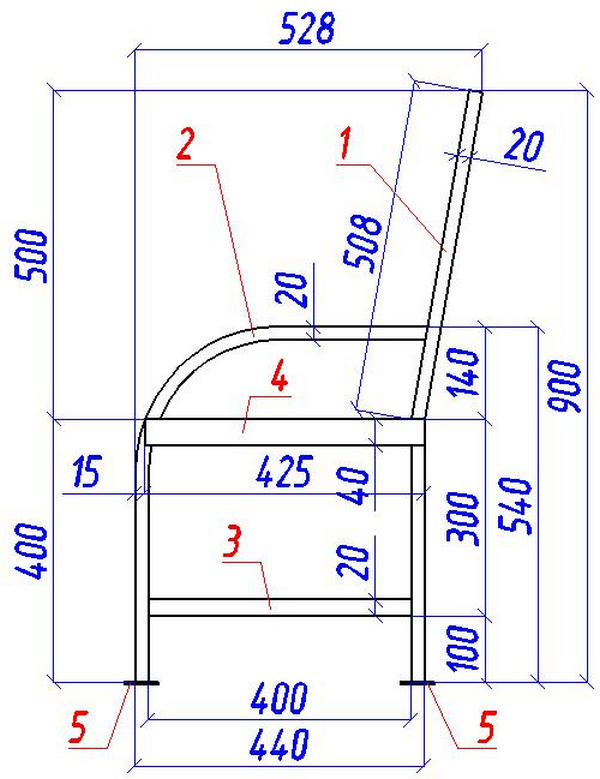
- Seat height - 40–45 cm (while the legs will rest comfortably in the ground);
- Seat surface width: 45-50 cm.
We make support posts, of which there will be four. Each of them will need 4 boards, 10 cm wide, 60 cm long, 50 cm and 2 pieces of 40 cm each. They need to be fastened with bolts or self-tapping screws, as shown in the diagram. If these base legs are not to your taste, you can use the benches described in the third version of this article - with a back. Install the support legs at the pre-marked points.
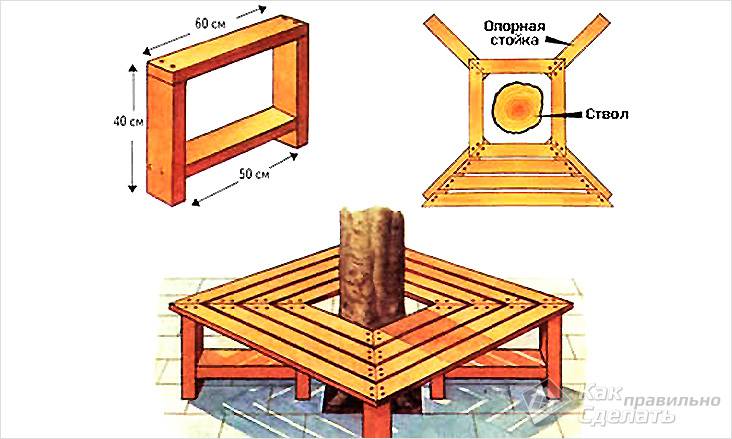 Diagram of a quadrangular bench
Next, you will need 4 boards for each section of the bench. If the thickness of the trunk is about 50 cm in diameter (155–160 cm in girth), and leave 15 cm for the indent from the crown, the length of one board of the inner square will be 100 cm. Make an oblique cut at an angle of 45 °.
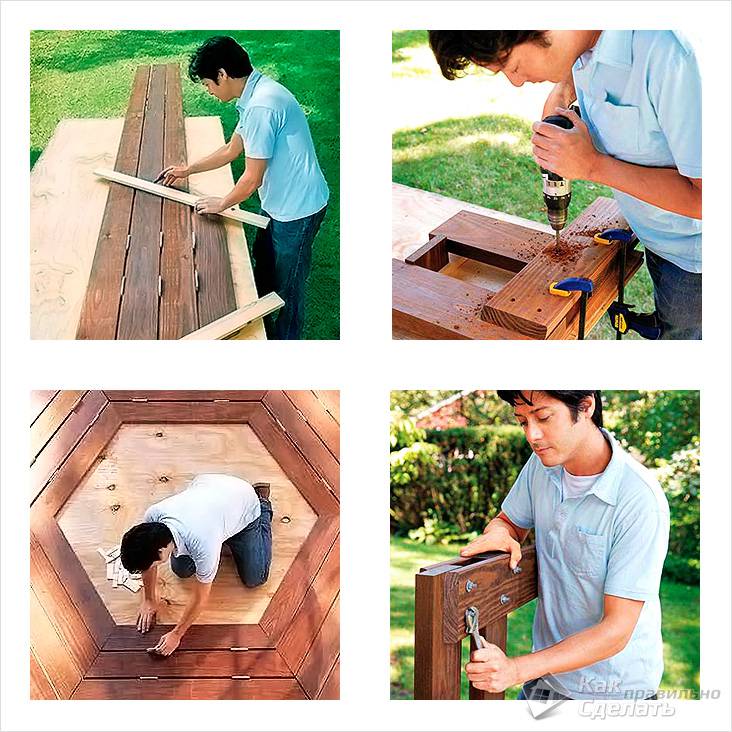 Manufacturing process
 Making a bench step by step
Secure the short boards with bolts or self-tapping screws to the support posts. Leaving a 2 cm gap, attach the following planks, having previously cut them off at the same angle. They can protrude slightly beyond the support legs, thereby covering the corners of the legs. It is imperative to leave a gap between the planks! Otherwise, the water will not be able to drain freely to the ground, which is why rot may appear at the joints. Thanks to the gaps, the bench will be easier to clean of sand and leaves. To even out the gaps between the planks, you can use spacers (small planks two centimeters thick, or something else).
The second plank should be 126.5 cm, the third 153.5 cm.The longest plank is 180 cm.If the perimeter is the same and there are five planks, then everything is just as simple: the first 1 m, and each next one is longer by 20 cm Only the planks should be thinner - 8 cm. Or 9 cm for centimeter gaps.
The final stage in the construction of the bench is the finishing of the product. If necessary, sand the roughness created during installation. Then the bench can be painted or varnished as desired.
DIY wood bench
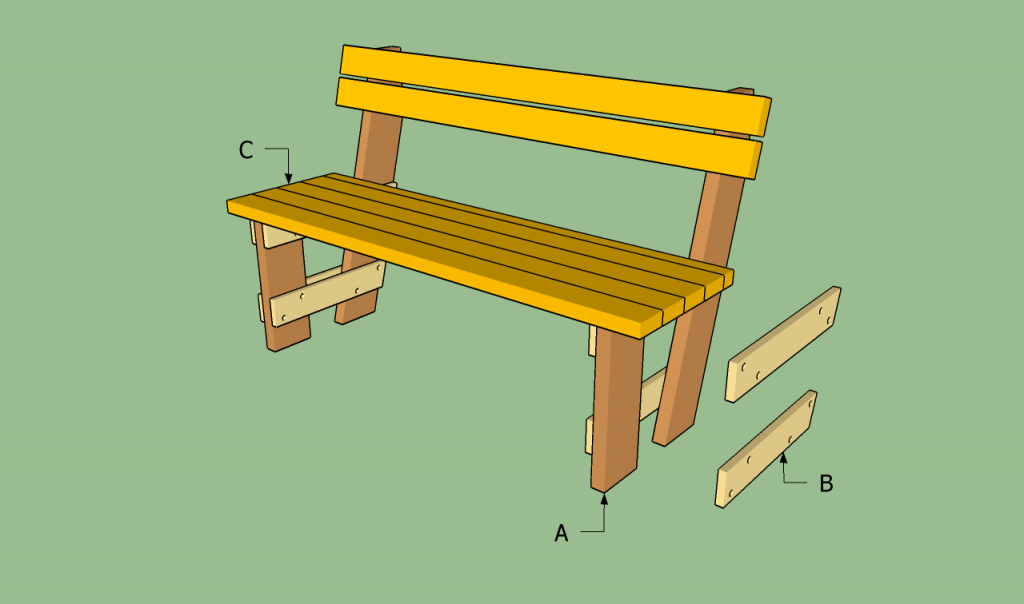
Let's start with a simple wooden bench.
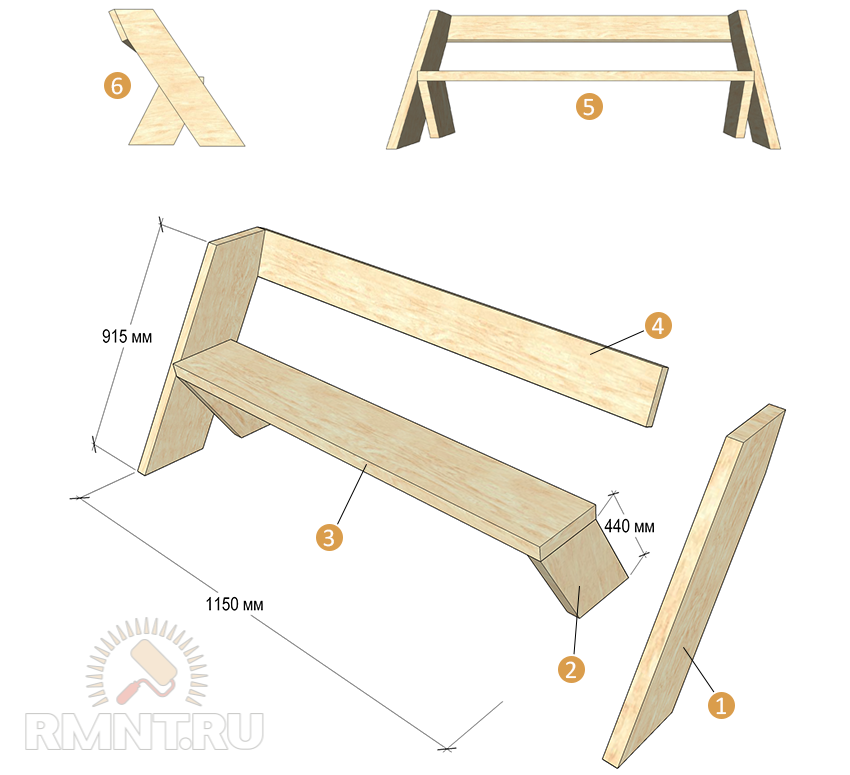
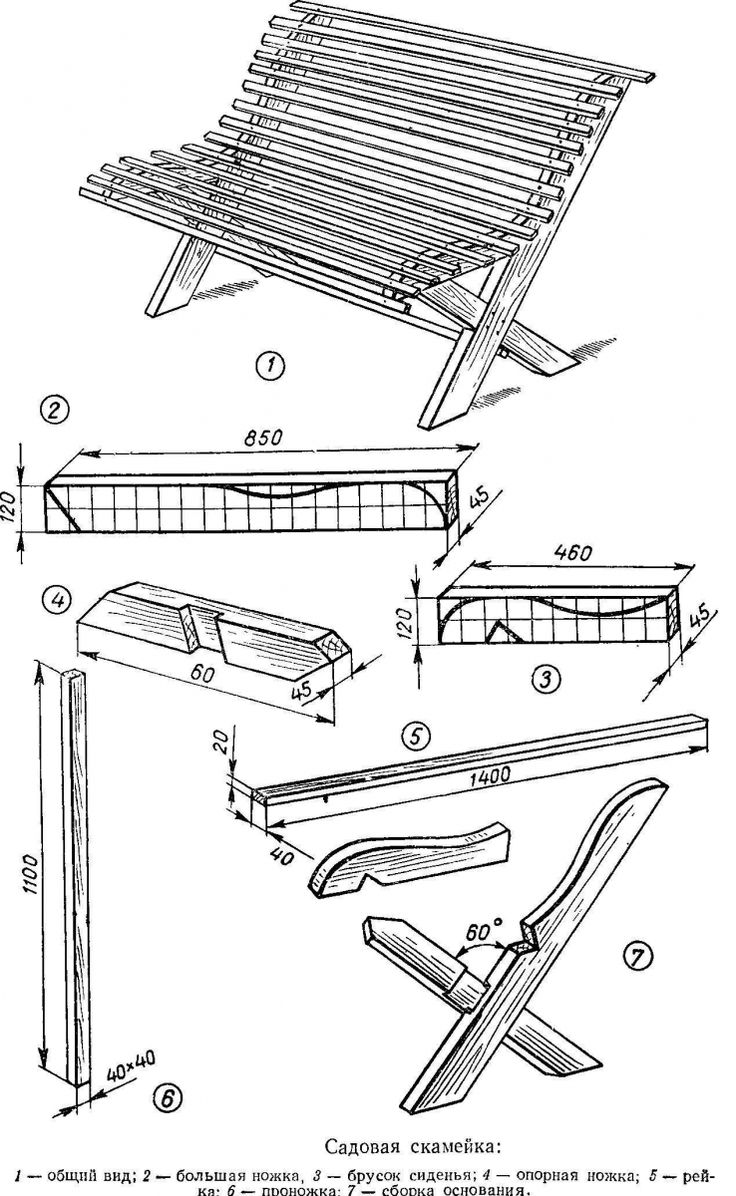
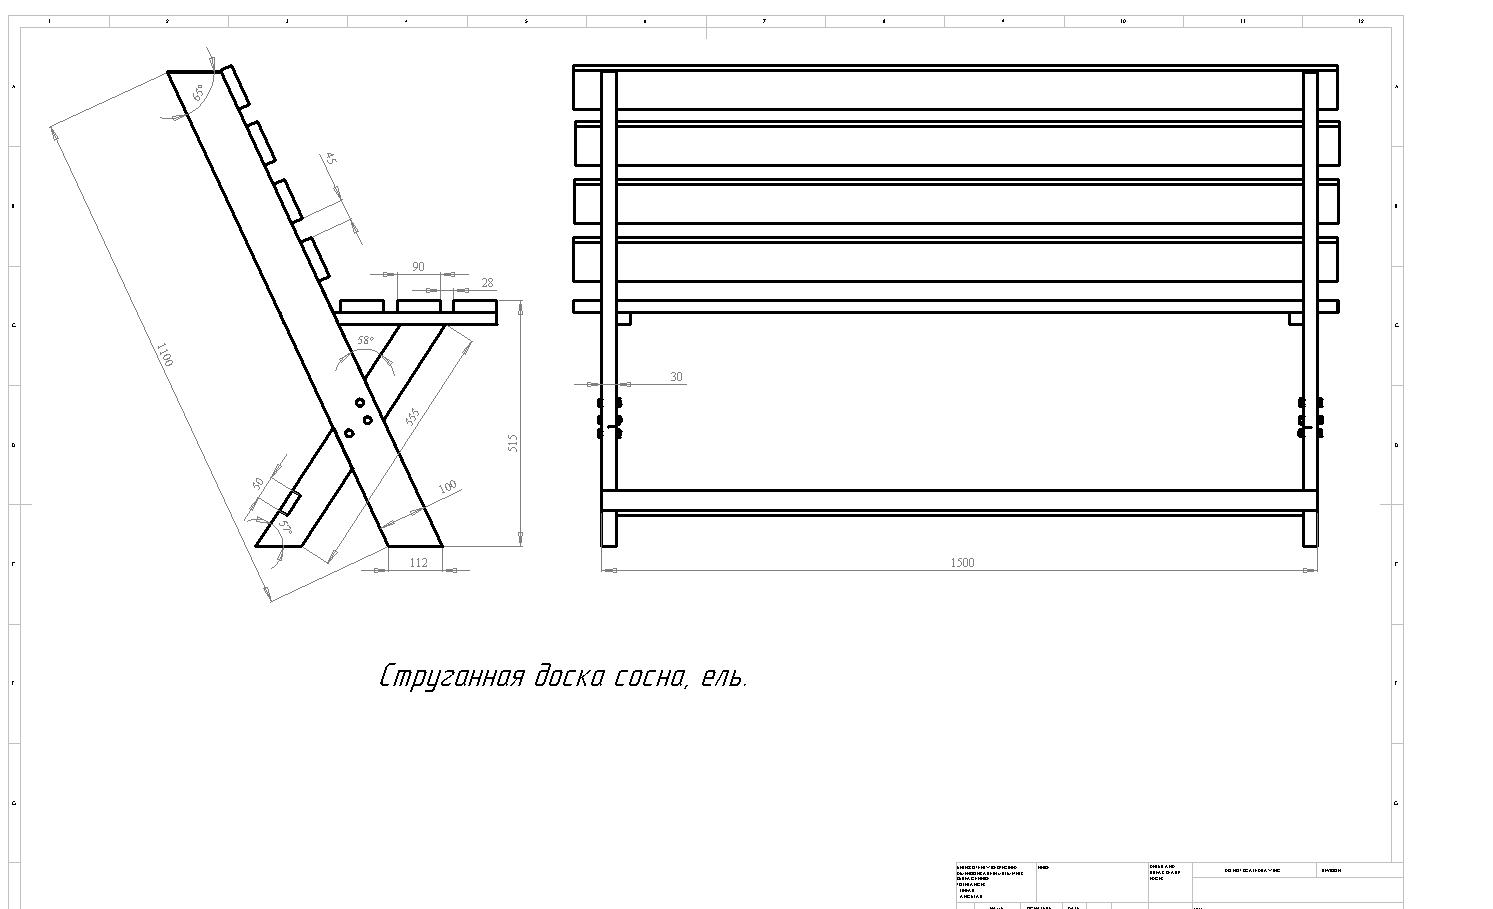
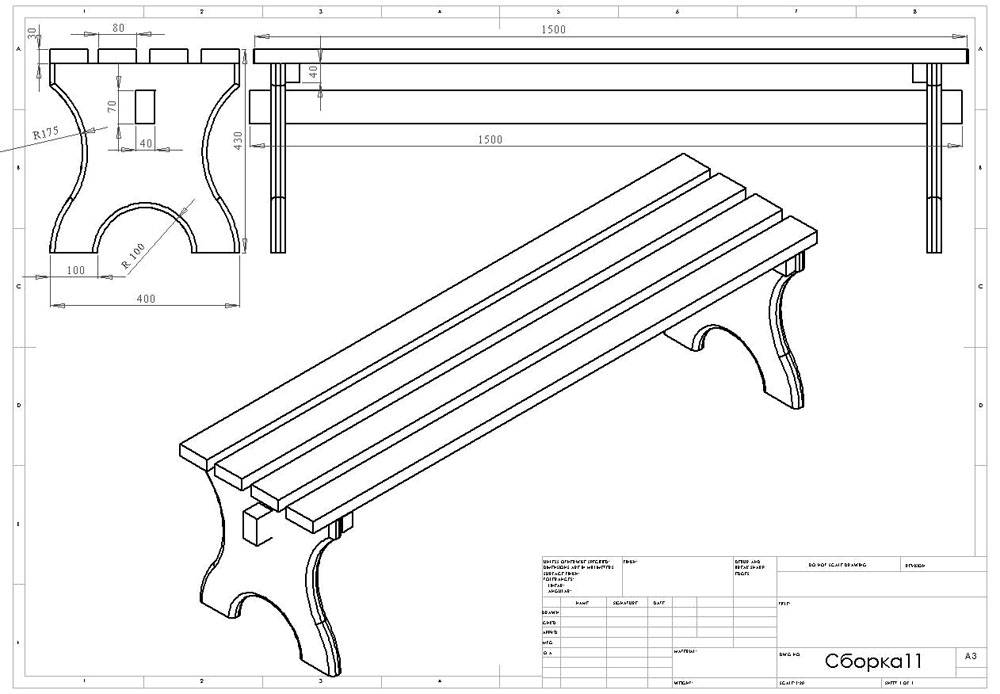
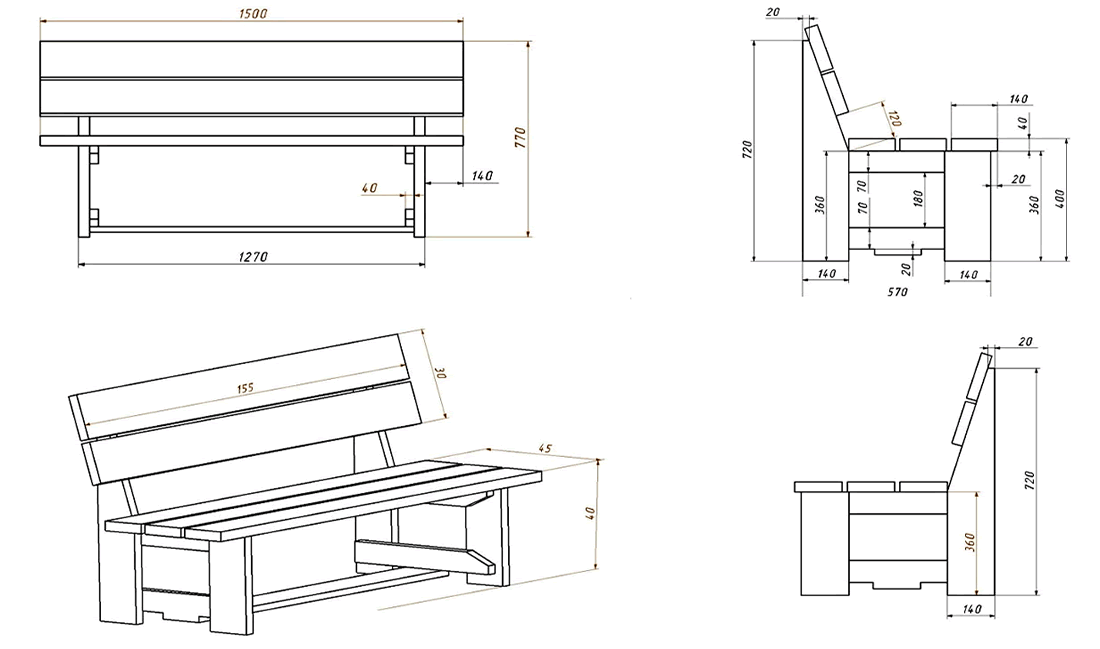
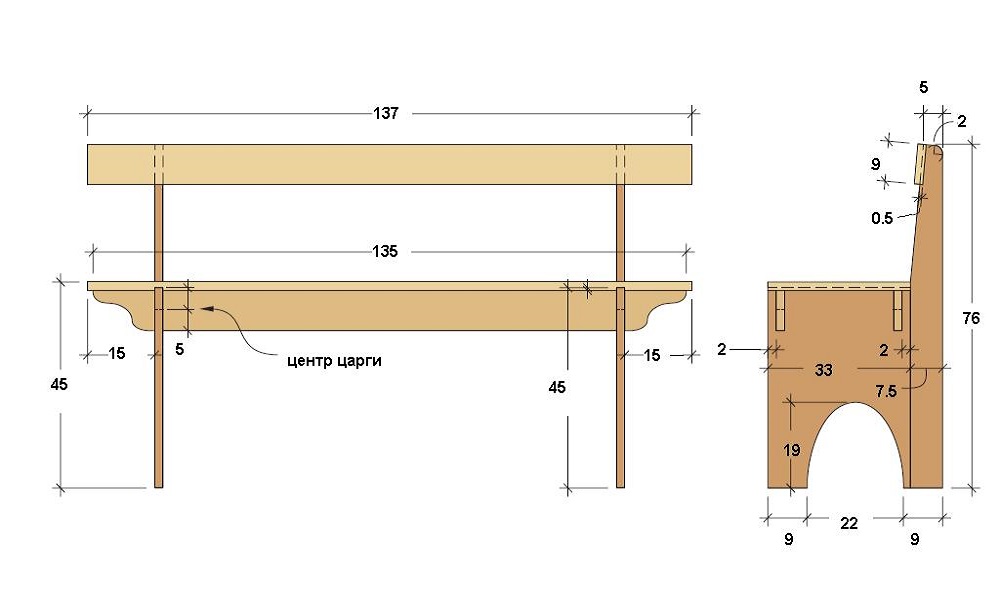
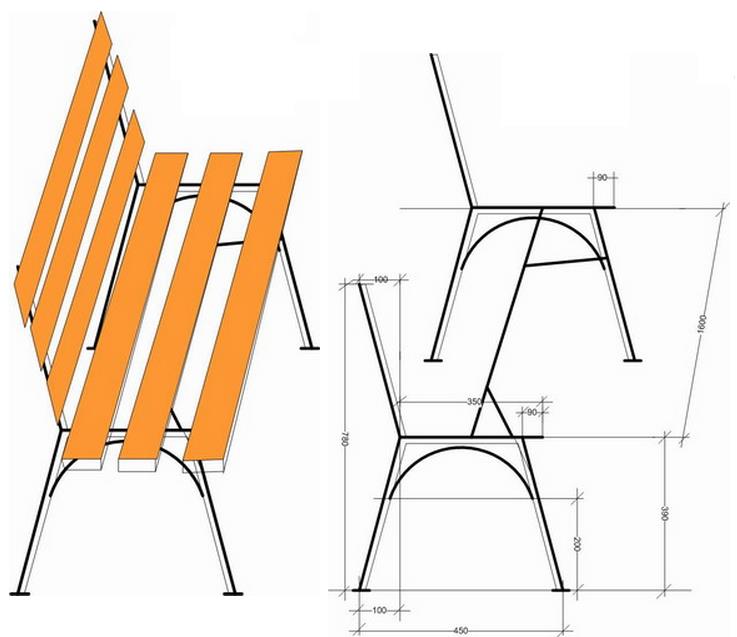
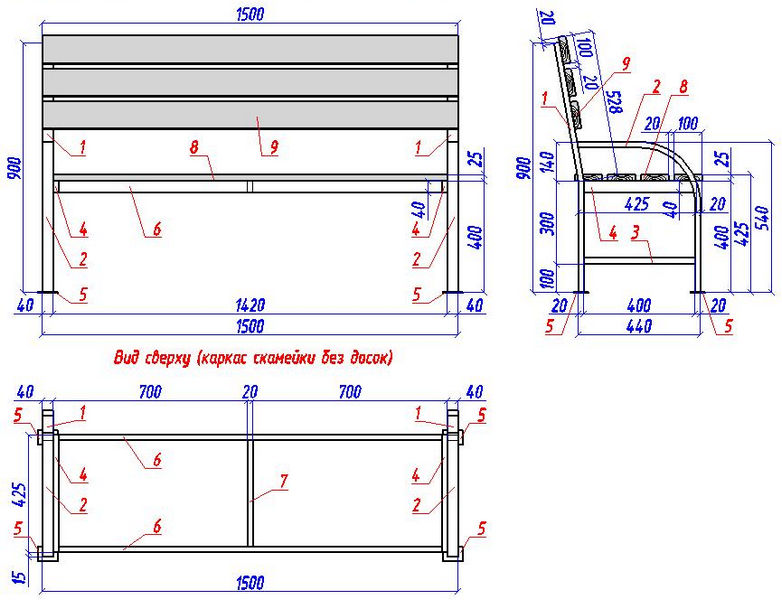
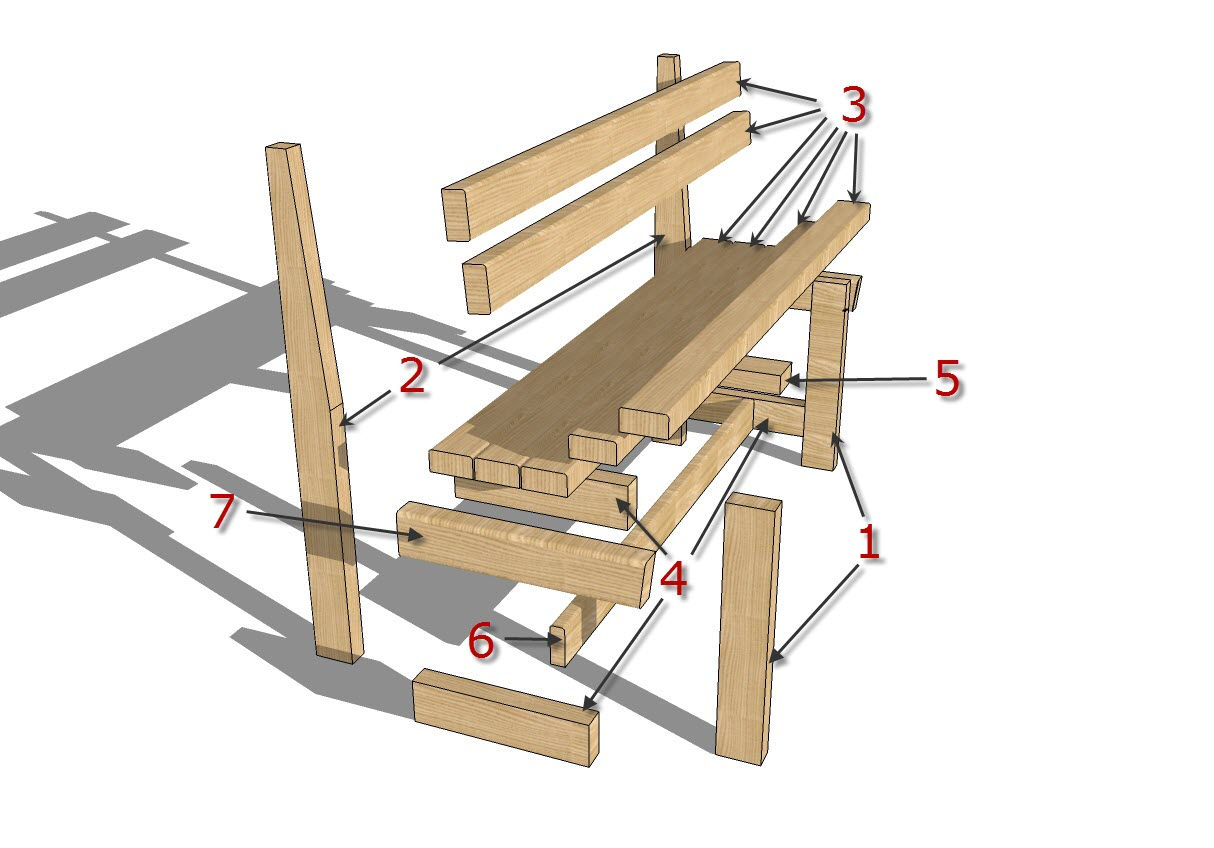
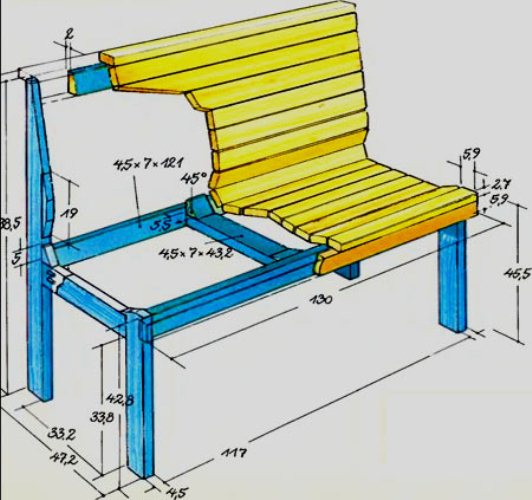
Below is an approximate drawing of a similar bench for a do-it-yourself dacha. The most difficult element is the slightly concave seat. The dimensions of the elements depend on the final dimensions of the bench. We offer the following sizes of individual elements:
- seat boards - 25x100x1200 mm (4 pcs.);
- legs - 100x100x440 mm (4 pcs.);
- front upper drawers - 25x100x1200 mm (2 pcs.);
- front lower drawers - 25x100x1200 mm (2 pcs.);
- seat board supports - 25x100x400 mm (6 pcs.).
Prepare all the necessary tools and materials and you can start. You will need:
- suitable boards and beams for making seat and bench legs;
- jigsaw;
- grinder;
- self-tapping screws;
- screwdriver;
- antiseptic for wood processing;
- stain;
- varnish.
Operating procedure:
- First of all, cut out all the necessary parts according to the list with a jigsaw.
- Sections must be sanded against splinters.
- When the parts are ready, treat them thoroughly with an antiseptic to protect the wood from decay and insects. This will prolong the life of the product.
- Start the assembly by attaching the seat supports to the upper side bars according to the diagram.
- Attach the seat boards to the resulting frame, deepening the caps of the screws.
- Finally, attach the legs, fixing them for strength with the lower drawers.
- An already assembled bench can be covered with a stain. This tool will help to give the wood a noble appearance of a more expensive material and emphasize its structure.
Such a do-it-yourself bench made of natural material will decorate any garden and will not create gaps in your wallet.
Bathroom Benches
Bench in the bathroom
An example of how to make a bathroom bench with a storage box for towels and other utensils using laminated pine shelving and pine boards.
The bench is easy to make and only takes an hour or so. The design does not require any special calculations. Basically, you just need to make a wooden box with legs. This bathroom bench takes up little space but provides ample storage space for toiletries such as towels, etc.
You can see the dimensions of the bench in the drawing. Of course, you can change them as you see fit.
Bathroom bench
See how to make a simple do-it-yourself bathroom bench - a simple, convenient and beautiful design, and all you need is a board, glue, bolts and paint. How much, calculate for yourself, the size of this bathroom bench is 60 cm wide and 30 cm deep. You can of course make any size that suits you.
Wooden bath bench
Here's how to make a simple bathroom bench out of wood. A convenient place to fold towels or just sit and relax.
The bench is compact enough to fit in any bathroom. It is very easy to make a shop, and most importantly, it is cheap.
Bench dimensions: 94 x 46 x 30 cm.
First, make a box and secure the shelves.
Attach the legs to the sides of the bench as shown in the diagram, making the outer edges flush.
Legs reinforce the sides. You may need to hammer in nails at an angle from the bottom corners of the shelf to the stop. Finally, install the top of the bench with glue and nails.
How to make a bench out of a bath
Do you have a bathtub that you temporarily use? Why not make a bench out of the bath. Perhaps someone will be interested in this idea, then you can look at step-by-step photos of how to make a soft bench for the bathroom.
In principle, everything is very simple, you probably immediately understood the idea.
- It is necessary to make a frame from the bars to the size of the bath and nail a sheet of plywood.
- Then apply some glue to the top of the bench.
- Place urethane foam on top of the glue and use a knife to cut the sheet to size.
- Then cover your garment with a cloth.
- Using a staple gun, attach the fabric to the wood around all four sides.
That's it, add some nice pillows and the bench is ready.
Adjustable baby bench
An example of a baby bench that can be adjusted as the child grows older. The requirements are simple, when the child is sitting, his feet should be on the ground.
When assembling this children's shop, you can use the following methods of connecting parts:
- Dovetail that provides a very strong grip for parts that join at a 90 degree angle.
- A mortise and tenon is another high-strength fastening technique. All top and side stands attach to the seat and leg (respectively) of the bench and the connection is virtually invisible.
No nails or screws were used to assemble the top and legs to which they are attached, only glue. The adjustable legs on the outside of the bench are held in place by simple bolts and wing nuts. Assembly instructions and video can be viewed on the website of the author of this project. Very informative.
Children's bench with shelf
This beautiful neat bench with a shelf will look great in a nursery. The sample was taken by the author from the catalog, slightly altered and this is what happened.
Looks stylish and expensive. Although in reality you only need a few blocks and a sheet of plywood.
Use the link below the gallery for full instructions on how to make this cute baby bench.
Children's bench transformer
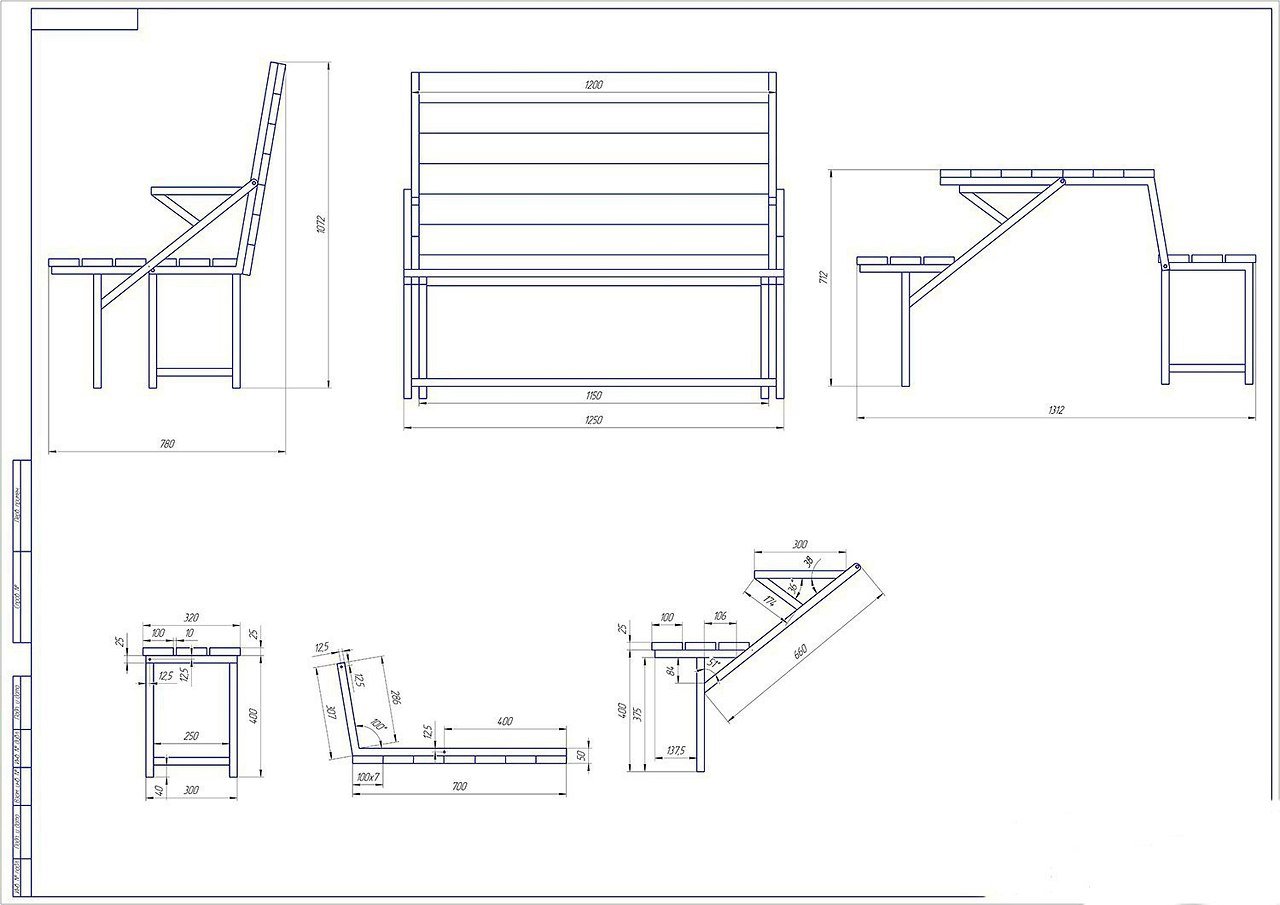
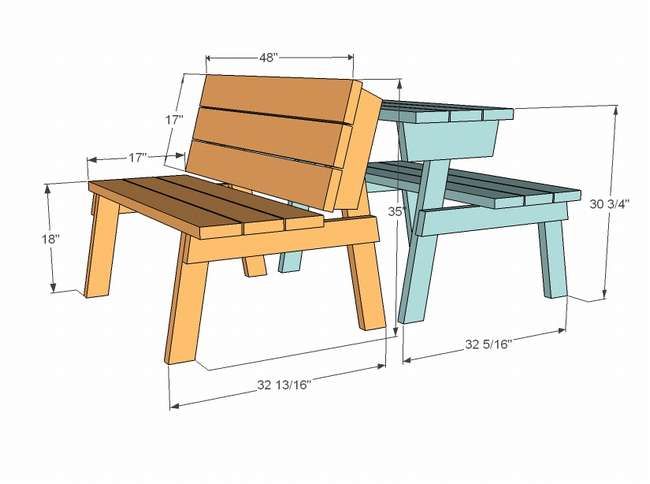
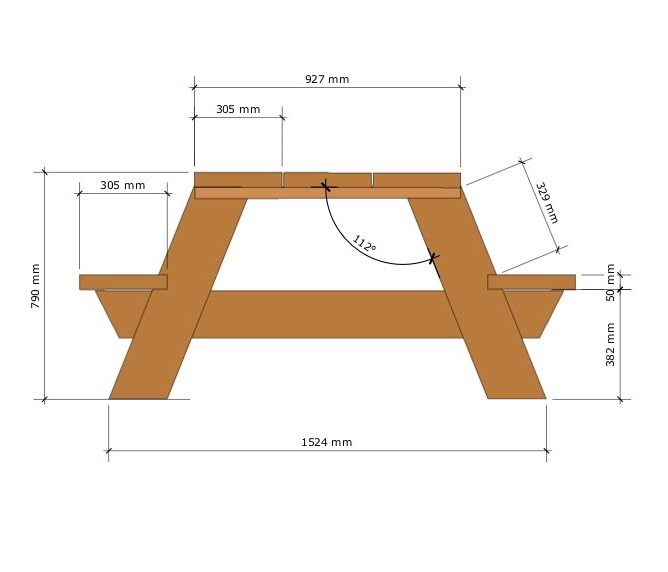
Small picnic bench for children, ideal for children between the ages of three and six. Doesn't take up much space as a bench. When necessary, the structure can be easily expanded into a table with two benches.
The length of the structure is 900 mm.
- In the position of the table, the width is 814 mm and 493 mm at the top of the table. 294 mm at the top of the rear seat.
- In the bench position, the full block is only 367 mm wide.
What do you need
Will the children's table with benches be used indoors or outdoors?
If outside, make sure wood, bolts, screws and glue are suitable.
Boards: In total you will need 7.5 meters of 45mm x 19mm boards
Advice. When buying, choose the longest boards to minimize waste. Shorter pieces can be cut from cut pieces.
Bench boards
- 1 PC. Sizes 135 mm x 19 mm to 824 mm.
- 1 PC. Sizes 135 mm x 19 mm to 748 mm.
- Worktop board 300 mm x 19 mm x 900 mm
Note: The material for the countertop can be any type suitable for the environment (indoor or outdoor?), Such as plywood, MDF, shelving board, etc.
You will also need
- Four bolts 8 mm long and 4 50 mm long. Also eight washers and four nylon lock nuts (or equivalent).
- Approximately 70 screws with a diameter of 38 mm.
- Good glue for wood.
Parts identification
front leg rear leg inner rear outer rear tabletop rail stopper front leg stopper leg extension (rear) leg extension bracket rear seat crossbar front seats crossbar front crossbar rear seat lower guide rear seat spacer
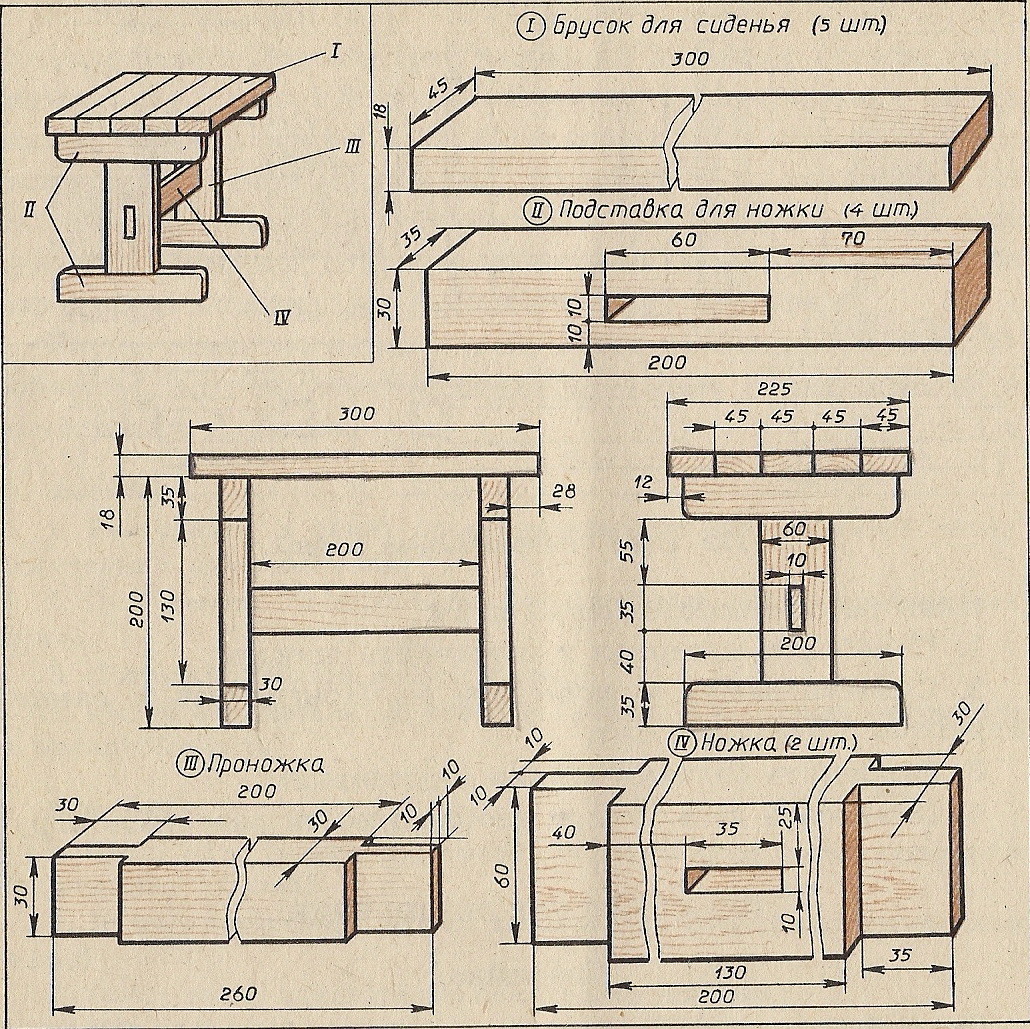
On the right and below you can see the drawings of the transformer bench, the dimensions and shapes of the parts.
Assembly instructions and other useful information about the children's table on the website of the author of this project. Link to the site under the gallery.
A little about technology
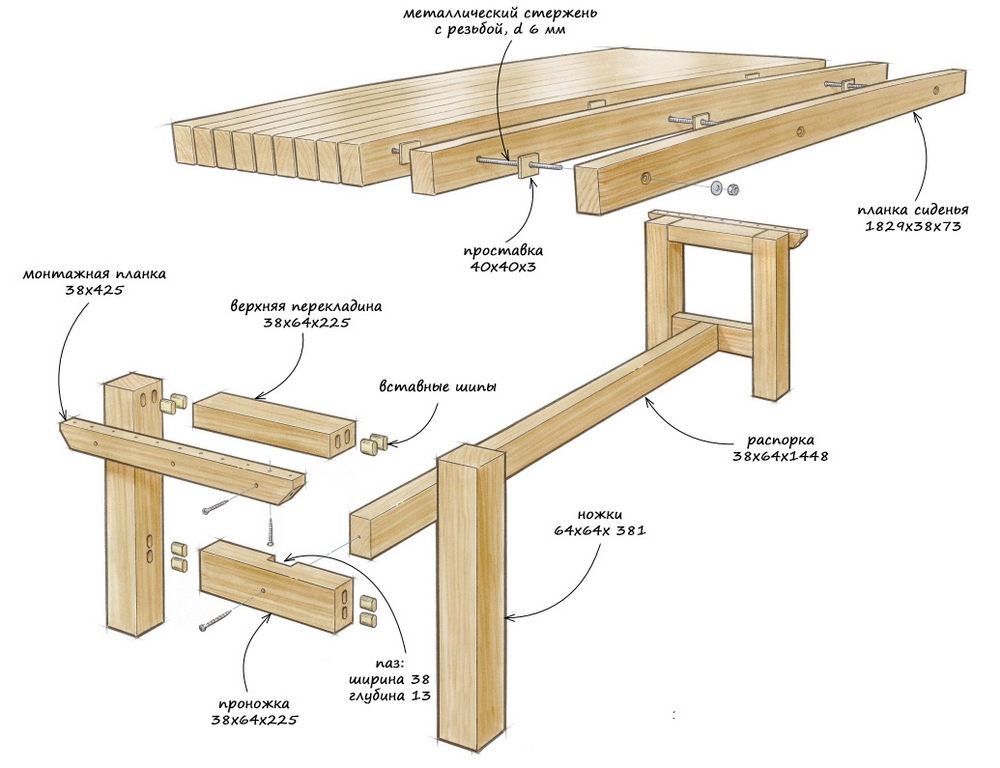
Bolted joints are often used in garden furniture. If it is one-piece and not articulated, it is better to hide the heads of the bolts with washers and nuts with them. The first for the sake of aesthetics, and the second so as not to be scratched.

Bolting wooden parts
For the hidden connection of wooden parts with bolts, in addition to a twist drill for wood, you will also need a feather drill, on the left in Fig. Use the pen to select the holes for the head and nut. After assembly, the rest of the threaded body of the bolt is cut off with a grinder and the connection is tightened again, because it weakens when pruned. Then the holes are filled with wood putty; you can very thickly mix sawdust on Express glue (liquid nails) or PVA for wood. Not on office PVA for paper!
As for the hinge joints, steel clips must be inserted into the bolt holes in both parts to be connected, their diameter must be taken into account when drilling.Without the clips, the bolt will quickly break the tree and the hinge will go haphazardly.
Bolt clips can be rolled from sheet metal or galvanized. In this case, twice a year, at the beginning and at the end of the season, 2-3 drops of engine oil are allowed in them. If it nevertheless rusted and grabbed, the brake fluid will help out, the same 2-3 drops. Rust sags from it and the hinge "lets go" almost instantly. After the "brake" it is again dribbled with oil.
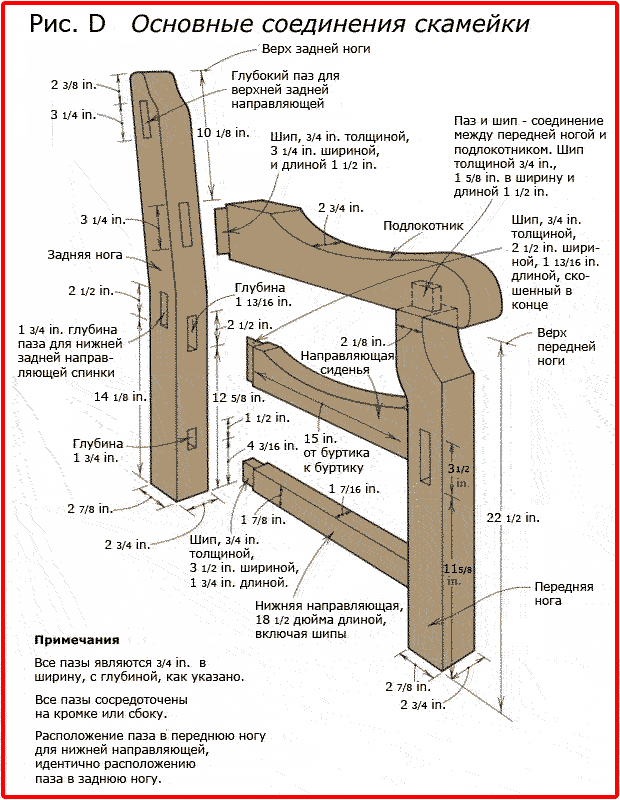
The manufacture of furniture for a summer residence also requires thorn-groove joints, on dowels and dowels (through round wooden bosses). In this case, firstly, the wooden fasteners are made from the same wood as the parts to be joined. For outdoor use, some degree of strength has to be sacrificed so that the temperature coefficients of expansion, moisture capacity, swelling and drying of the wood of the entire unit are the same. Otherwise, the connection will quickly loosen.
Dowel connection with wedging
Secondly, it is very, very desirable to make the joints of the "open sky furniture" with wedging, see fig. on right. Wedges are cut from hard, resistant wood: oak, walnut, boxwood, dogwood. Their thickness is 2-2.5 mm, but not narrower, tk. achievable wood-to-wood joining accuracy plus or minus 1 mm.
An important condition: the wedges must be oriented across the fibers of the part to be connected, otherwise, when landing, it may split and subsequently the connection will disintegrate. If parts are connected perpendicular (crosswise), then the wedges in the dowel (dowel) should be oriented at 90 degrees relative to each other
The rest of the production of garden furniture does not contain anything that would not be subject to the usual working ingenuity.
Appendix: how to measure on a grid
Let's look again at the drawing of the paired "romantic-philosophical" bench. How to calculate missing dimensions? First of all, we visually determine the type of oblique projection; in this case it is isometry, so both oblique axes are equal.
Then we take a more authentic part, for which the linear dimension is indicated; in this case, it is a tsarga with a length of 1350. According to the drawing, using the Pythagorean theorem, we determine its length in fractions of a grid step. By correlating it with the known linear size, we obtain the scale factor. If the projection is arbitrary, then you will need to calculate 2 scales for 2 parts, for each of the oblique axes.
Next, a rather painstaking work begins: the missing dimensions are determined from the drawing in fractions of the grid step and multiplied by the scale. For each pair of parts to be connected, we make a check on landings, taking into account that the accuracy for wood is 1 mm. If, for example, the spike turns out to be thicker than the groove mated to it, it is clear that it will not fit, you need to look for where the error crept in. If it is already more than 2 mm, it is also not good, it will dangle and the error will begin to accumulate in the calculations. And if the spike fits into the groove with a gap of 0-2 mm, everything is tip-top, it was calculated perfectly.

