Street flowers in pots as a decorative element of the landscape
Many people strive to have a house in the country. This is an opportunity to spend a weekend closer to nature, in silence and solitude, away from the bustle and crowded streets. An obligatory component of the personal plot is outdoor plants. Someone bought a building on an already green area and simply made adjustments or additions, but more often the arrangement is done from scratch.
 If it is not possible to break a real flower garden, then you can always create a greenhouse of flowers in pots.
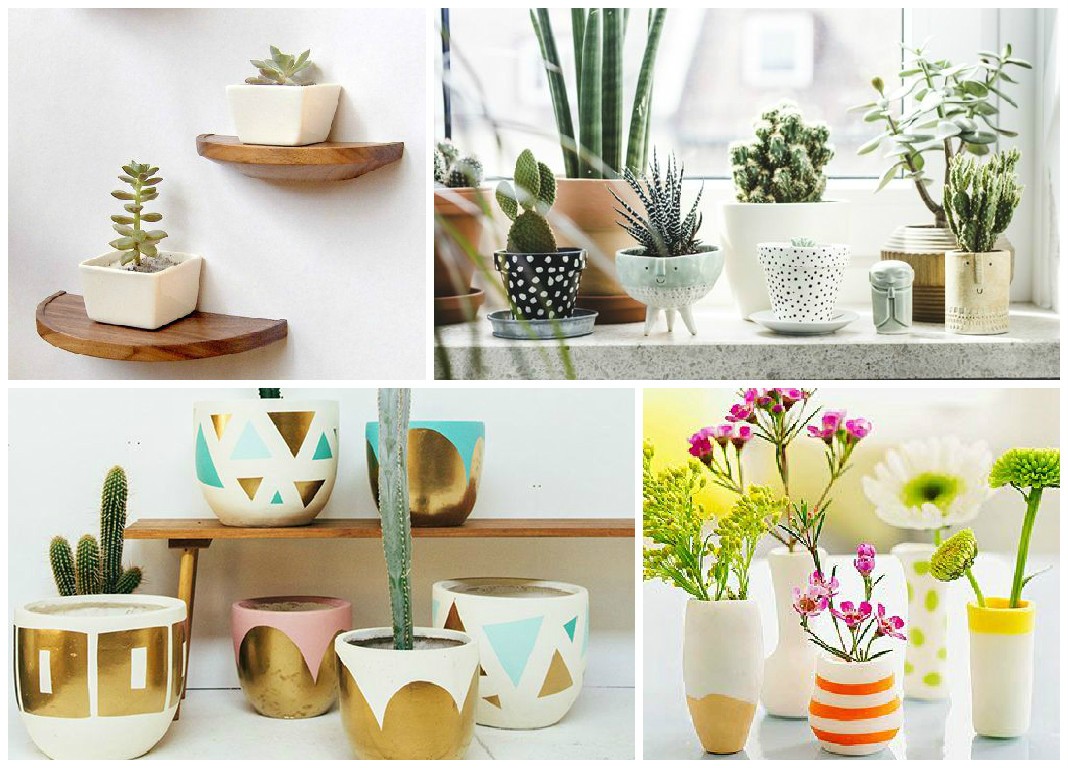
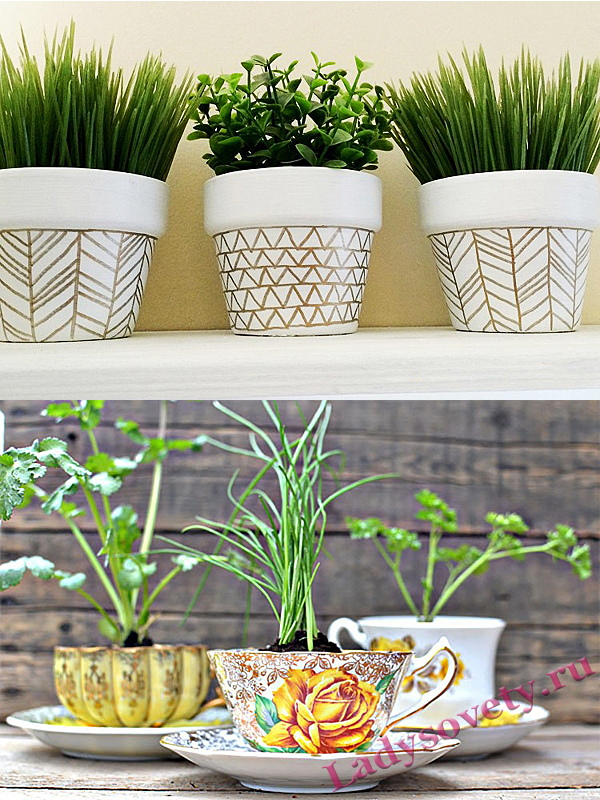
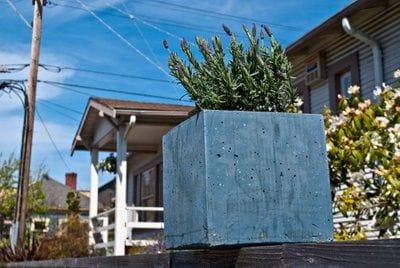
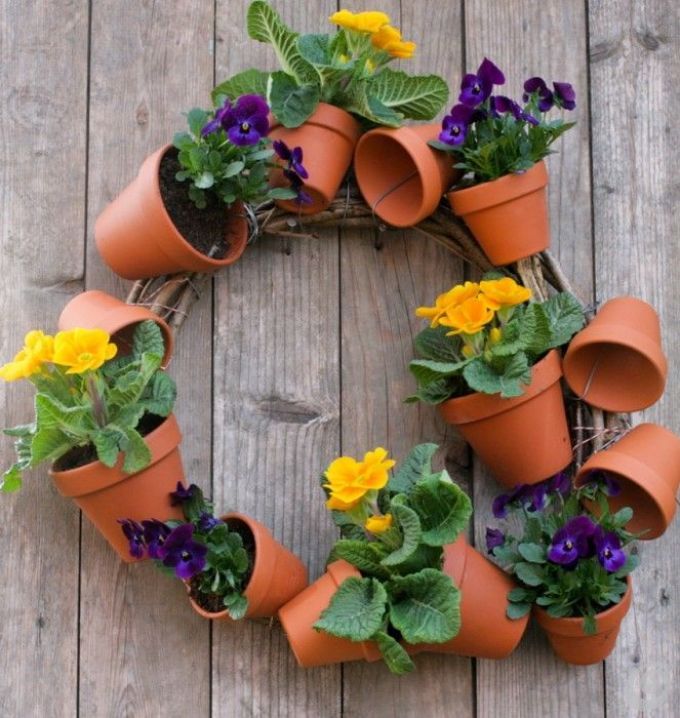
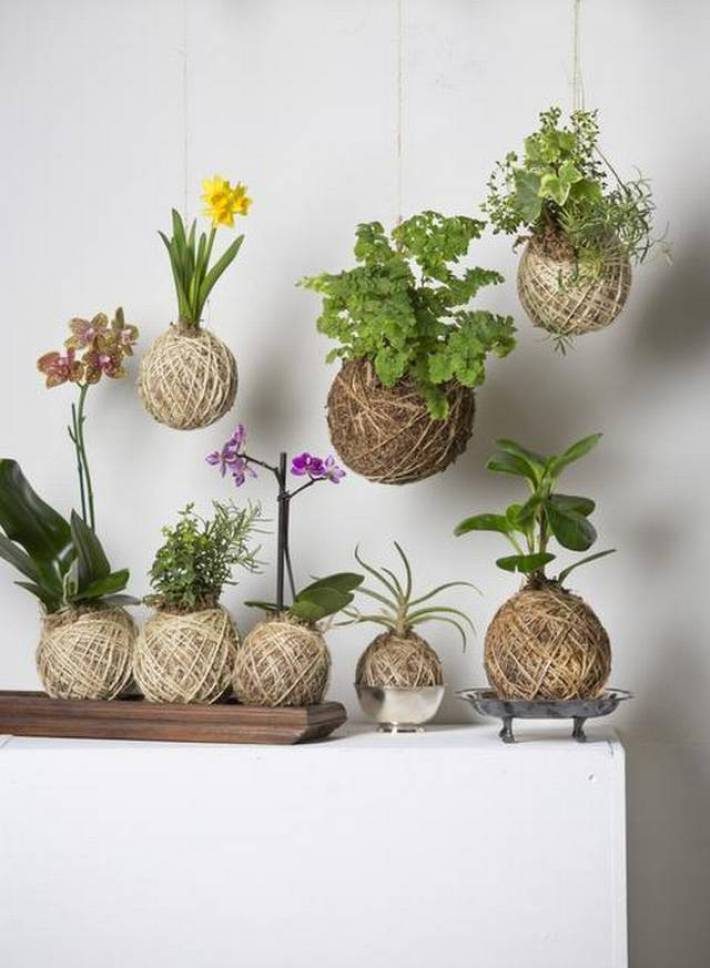
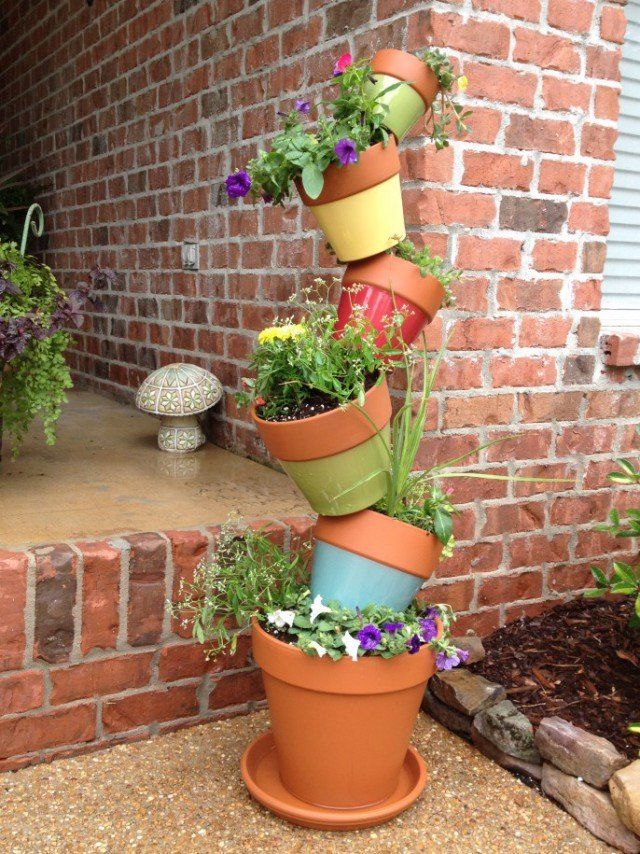
Not a single design development, created by a professional or an amateur, is complete without flower beds. They make the structure bright, interesting and bring living natural colors to the surroundings. Flowers are a simple, unique way to decorate the most humble landscape. Yes, and it is available to everyone: if the composition of the soil, lack of space, or any other reasons do not allow you to break a flower garden, you can create a real greenhouse of flowers in pots. On the street, it is appropriate to place them on the ground, along paths, benches, gazebos ... Or fix them on a fence, pergola, terrace and even on the wall of the house. The structure, entwined with flowering plants, looks truly fabulous.
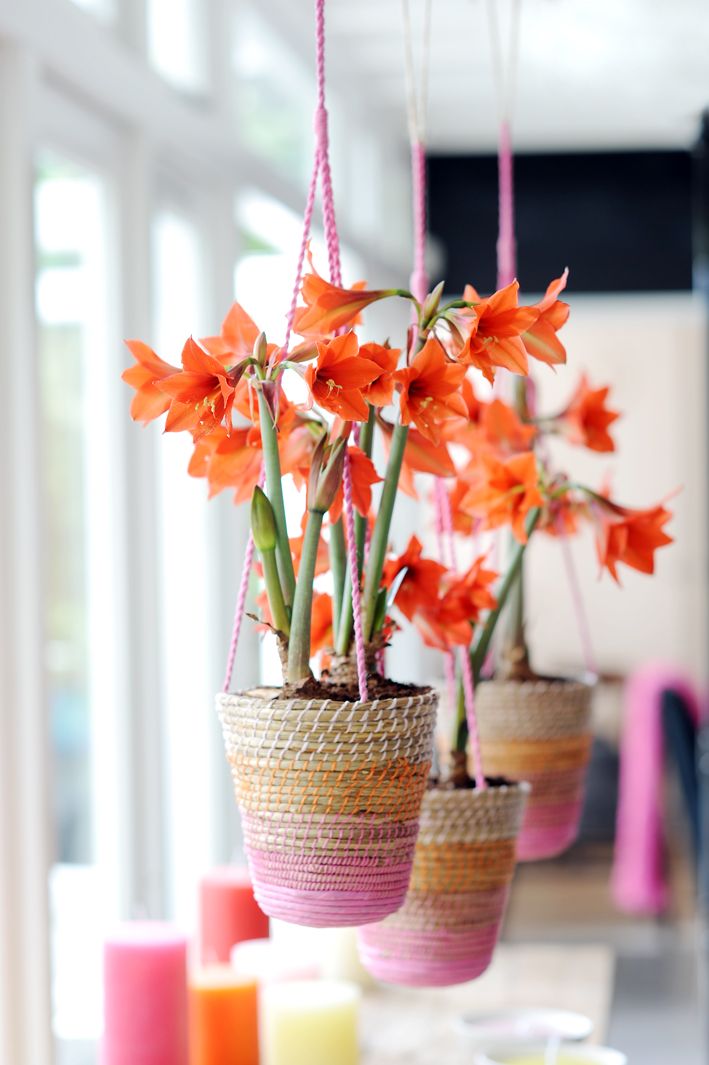
Even if there is no country house, you should not deprive yourself of the pleasure of being among the flowers in the summer. Plant pots can be fixed on the outside of the balcony, loggia and even on the window slope. In special stores, it is easy to find both the containers themselves and various devices for hanging and installation. It is available to purchase a pot with a ready-made flower, but you can go from a seed or sprout to a flowering avalanche.
 Flower pots can be used not only in a country house, but also in a city apartment.
The version of the finished plant seems easier only at first glance.
It is important to organize the adaptation correctly, otherwise the plant will lose its attractiveness. The second way is longer, but with proper care, the beginning of the growing season will give a lot of pleasure.
Eggshell
Egg shells are the most affordable of all decoration materials. The shell for decoration needs clean and dry, preferably from boiled eggs.

You will also need glue, acrylic-based paints for work. The shells can be used both natural and painted in any desired shade.

Here are step-by-step instructions for decorating a pot:
- Using glue, glue the shell with the convex part outward.
- Press the shell gently to the surface of the pot without damaging it.
- Large gaps between large pieces of shell are filled with smaller pieces.
- The finished product is coated with varnish for stronger bonding of the shells and for a pleasant shine.

Recent Entries
- Order in the basics for embroidery: and you can do it easily!
- Perfect storage and accounting of floss threads using the example of the Gamma palette
- Notebook "Threads of floss": what's inside, how to fill, what is it for
- Happiness handmade. Handicraft hits and bestsellers from EKSMO Publishing House. Season: Fall Winter 2019-2020
- The basics of dry and wet felting from wool for beginners
- “Gold collection of embroidery. Charming miniatures. 60 little masterpieces from Sony Line "
- 401 do-it-yourself mouse and rat: you will squeak with delight!
- Compositions and bouquets of dried flowers (herbs, flowers, cereals, leaves and fruits)
- Embroidered heart: decorating a pendant in the Shabby Chic style
- How to decorate a wall in a room with embroidery and posters
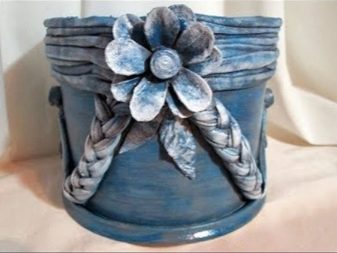
Method 10. Magic cords and ribbons
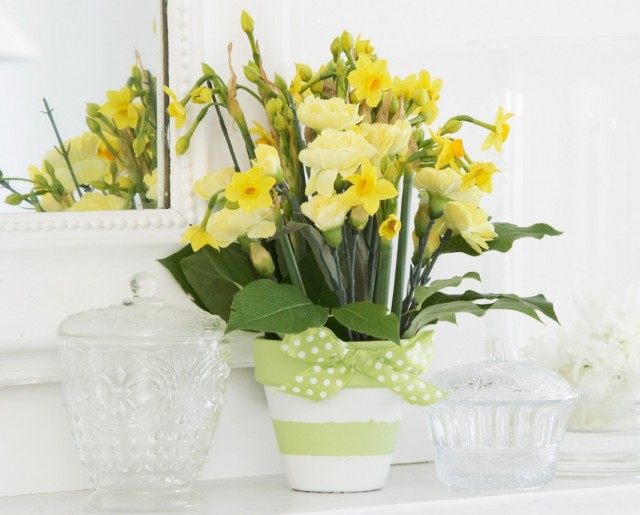 Decorating a flower pot with a ribbon. Catherine woram
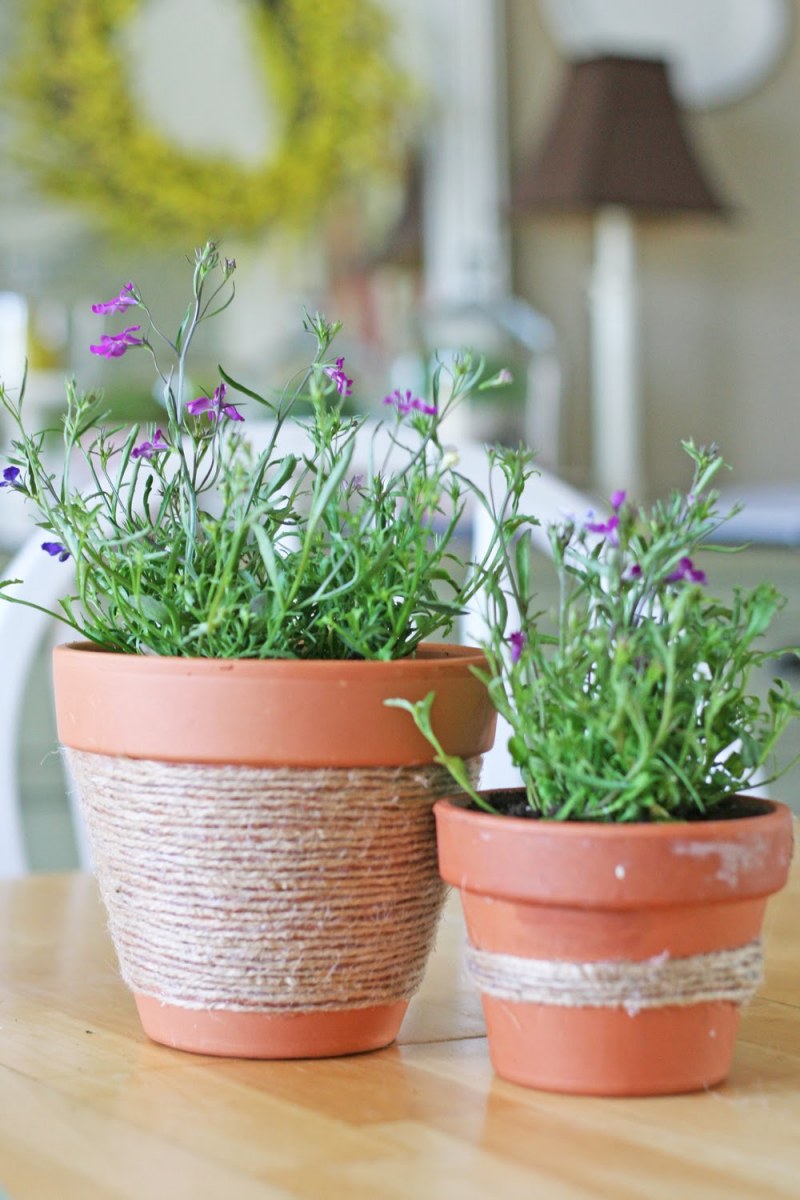
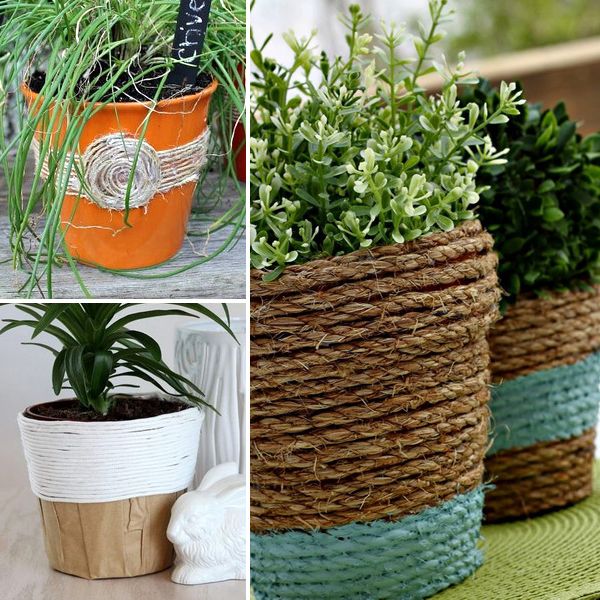
They are called magical not at all for their special talents, but for their amazing ease of use. Thanks to the ribbons tied to the pots, decorative cords, twines and other "bandages", you can change the look of the pots in less than a minute and give it expressiveness and fashionable brightness. This method of decoration is perfect for those who do not have too much time (or desire to do handmade and creative work). Just go to any fabric store and buy the one that suits your interior style or your favorite cord, twine or ribbons of different widths. By tying them on a pot, you will add graphicality and interesting accents to it. If you wish, you can always tie up a tag with the name of the plant or the schedule of watering and feeding, a small keychain or pendant, tie bows or combine different ribbons for greater showiness.
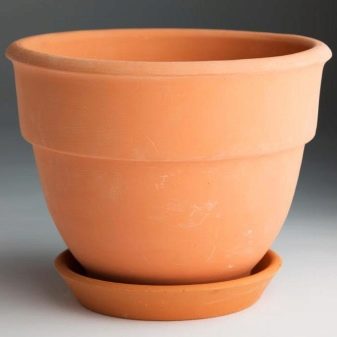
How to prepare a pot for decorating?
In addition to a positive attitude, contributing to the successful solution of the task, the owner of the converted containers should pay attention to their preliminary preparation. This procedure is not difficult, providing for the implementation of several basic steps:
- elimination of contamination, as well as decorative coatings and drawings (if any);
- washing and thorough drying of the selected containers;
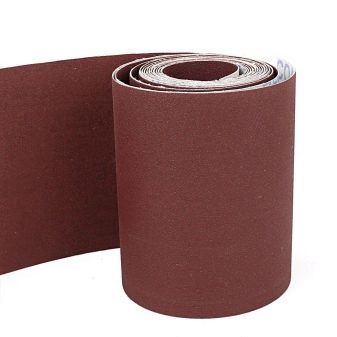
- surface treatment of products with sandpaper.
The latter action contributes to a better fixation of decorative materials, minimizing the likelihood of delamination, swelling and cracking.
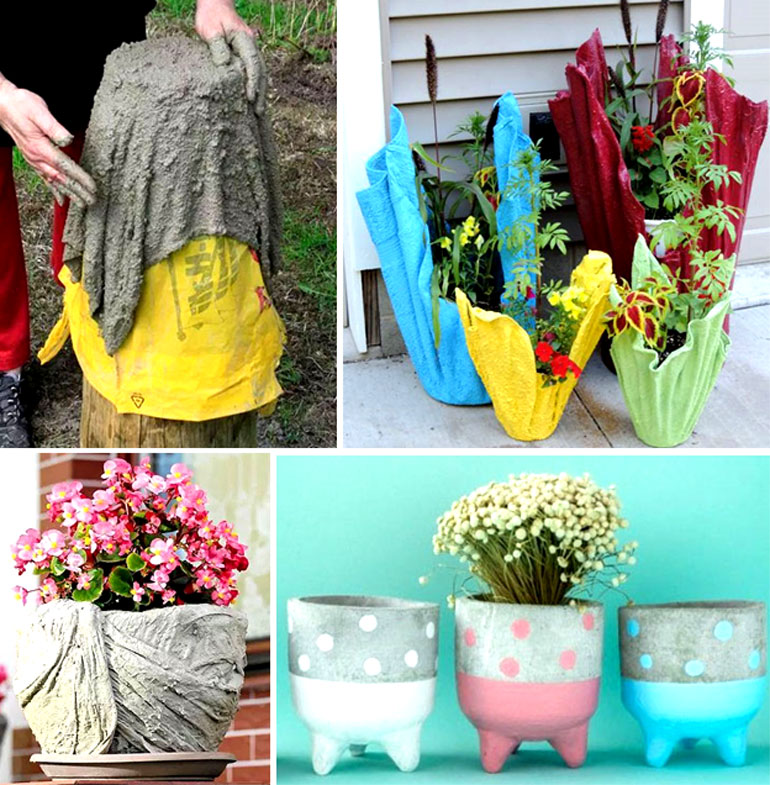
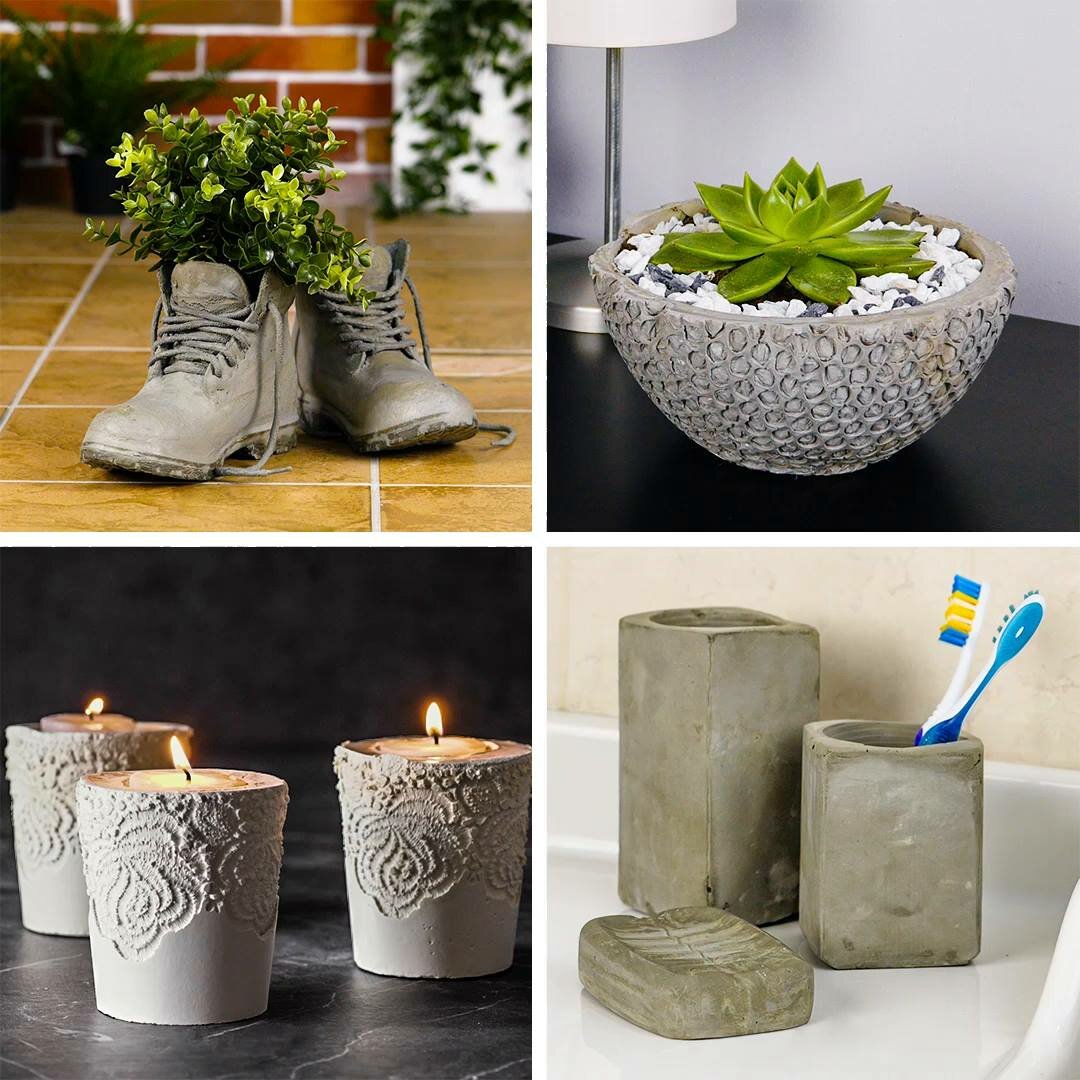
Master - class: from concrete or cement
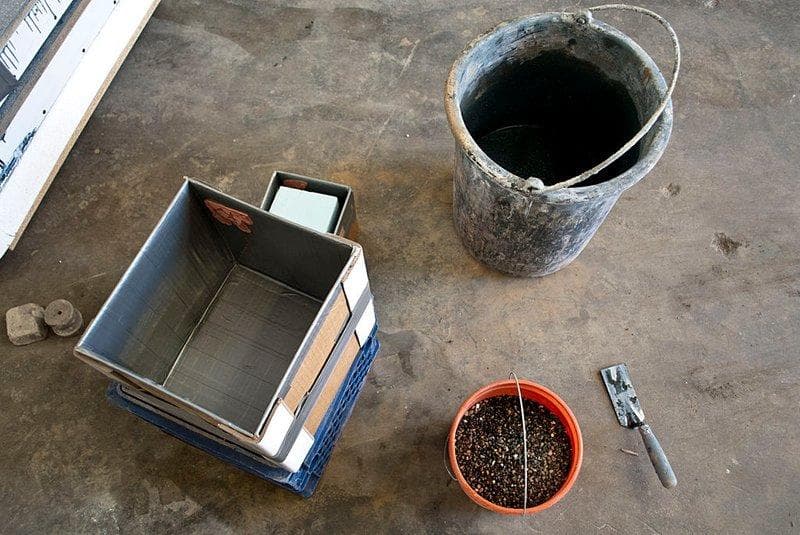
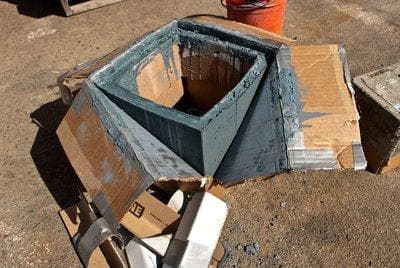
Let's find out how to make a pot of concrete and what is needed for this. An interesting composition is made of cardboard and electrical tape.
An important point is the waterproofing of the cardboard. When using concrete mix, the cardboard base may not withstand. To prevent such occurrences, adhesive tape is used.
Pasting with tape will help to achieve moisture resistance and create unique textures. Bonding the edging at the corners will strengthen the box and minimize deformation under pressure.
And here you can see how to make a fence for flower beds with your own hands
To make a cement flowerpot, you will need the following materials:
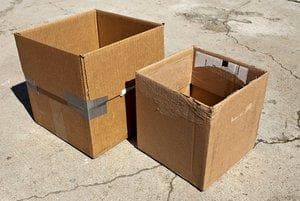
- two cardboard boxes;
- wide adhesive tape;
- cement mixture;
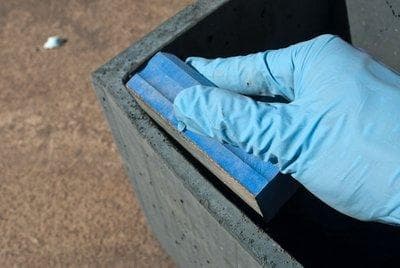
- rubber gloves;
- putty knife.
The manufacturing instruction includes the following steps:
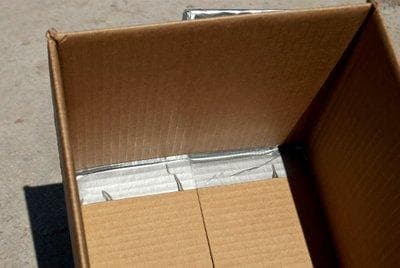
You need to take two boxes of different sizes.

On a large box, the flaps should be folded out and secured with tape.
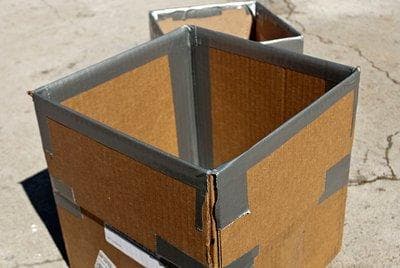
The inner edges of the box and especially the corners are pasted over.
The inner parts of the box are also covered with tape.
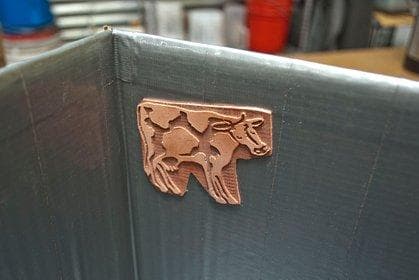
Any decoration can be added inside.
Add any decoration, such as leaves, rubber stamps, tile pieces, with a spray adhesive.
On a smaller box, the flaps should be retracted inward.
The tape is wrapped completely around the box.
Place the smaller box in the large box.
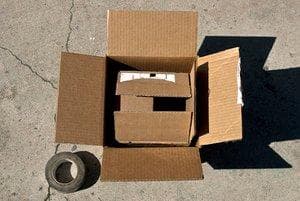
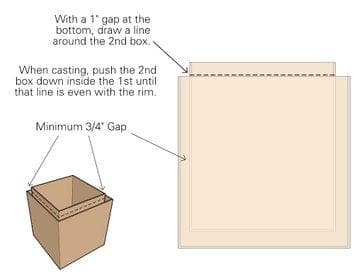
The small box must be lifted up to mark.
It is necessary to have several boxes in stock in order to replace in case of an error.
Also pay attention to the article on how to make a hedge on the site
Then the concrete should be prepared. The cement mixture must be mixed well according to the instructions. Water is mixed with dry mass to the required consistency.


Half of the cement mixture is added to the large box. Then a small box is laid out and pressed down with something heavy.
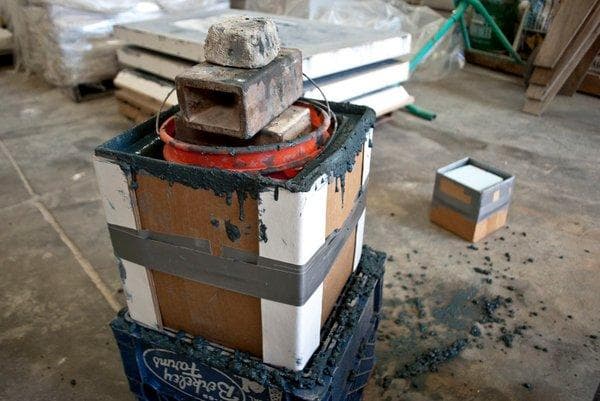
The concrete mix must be added until it reaches the top.
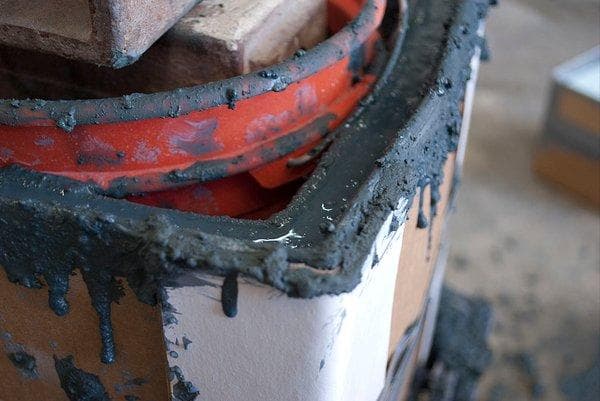
It is necessary to press on the sides of the box so that the air bubbles come out.
Leave the structure to harden for 4 days.
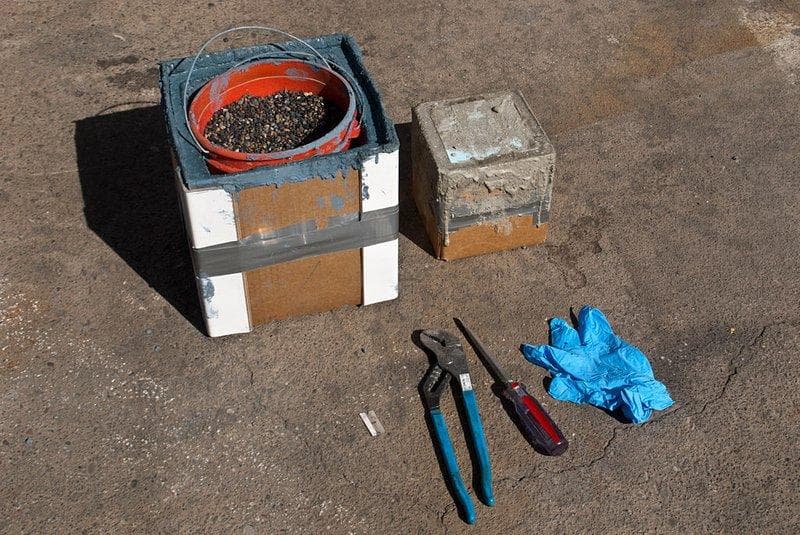
Then the composition needs to be disassembled
Caution should be exercised when performing these steps.
On a large box, you need to notch a corner. The same should be repeated at other corners.
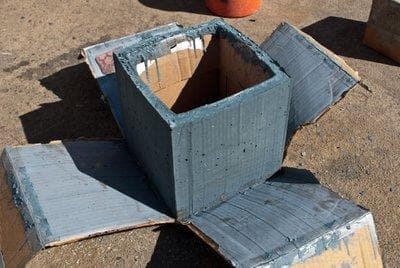
The small box needs to be pulled out of the concrete.
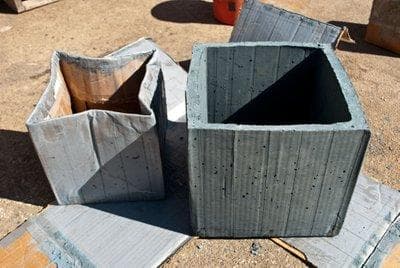
Grind any unevenness in the concrete with a polishing machine or a special brush.
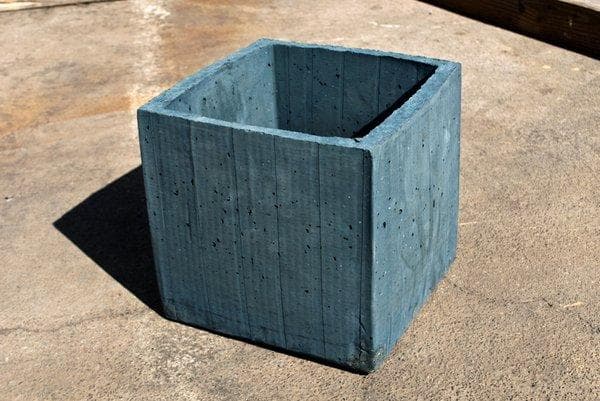
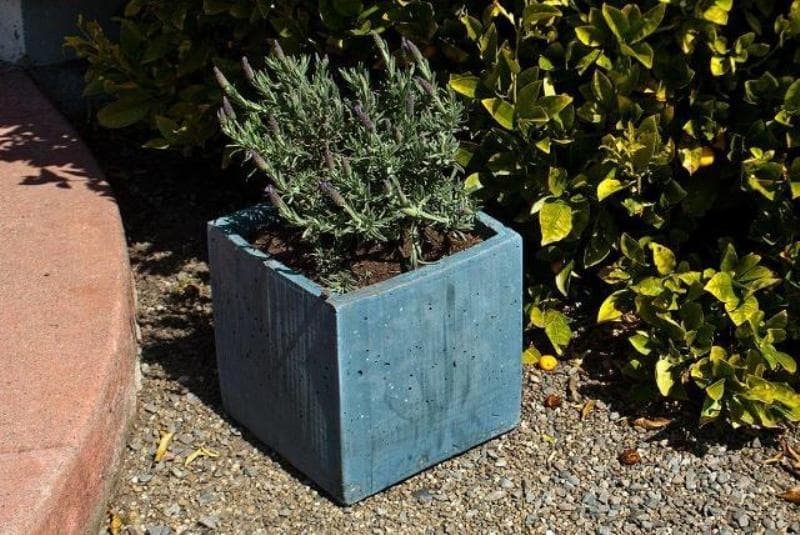
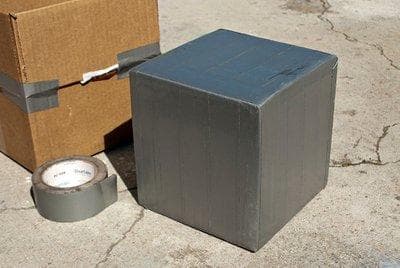
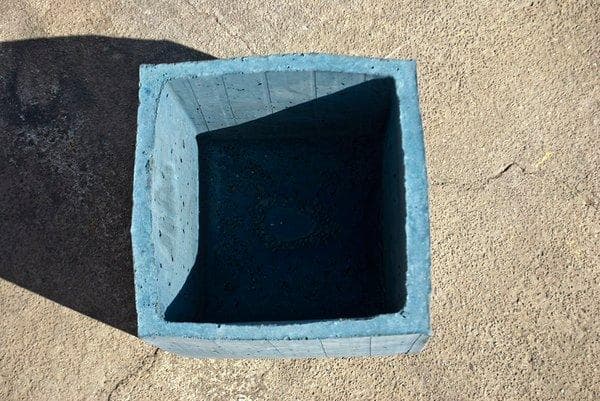
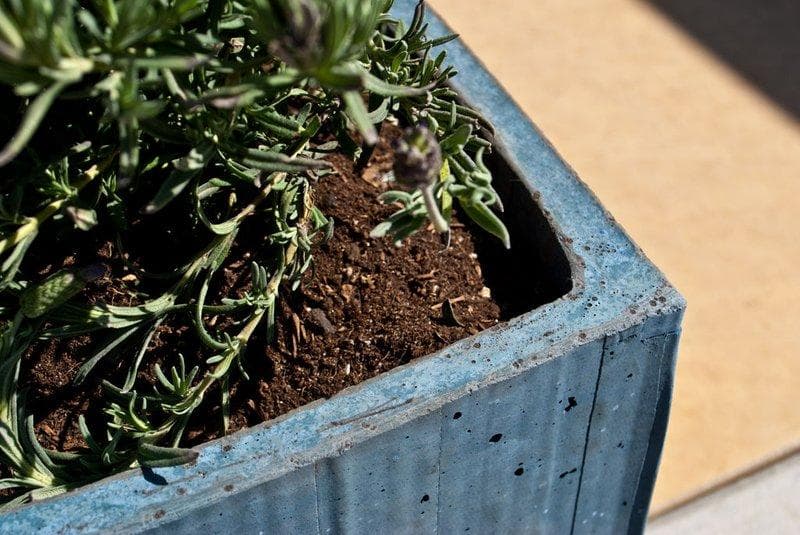
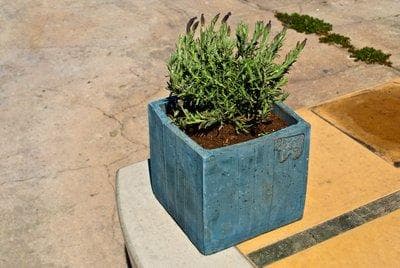
The result is a large and sturdy concrete flowerpot. It can be decorated with different paints or left as it is. Earth is laid inside the container, and plants are planted.
You can create interesting compositions with cardboard boxes. And, in addition, such a decor can be done with your own hands from almost free materials. Special adhesive tape will make the box more durable and reinforce the structure.
General rules
The creation of containers for flower pots, at first glance, is not difficult. After all, this is just a kind of container, consisting of a bottom and sides, which should hold and cover the pot. Moreover, it can be hung on a string, nailed to the wall, or simply put on the ground.
But without observing the elementary requirements, the pots can very quickly lose their visual appeal and litter the space intended for decoration.
The first rule is surface treatment to withstand temperature extremes and the effects of precipitation. It is also necessary to exclude the processes of decay, infection with parasites, using paints and varnishes intended for open air.

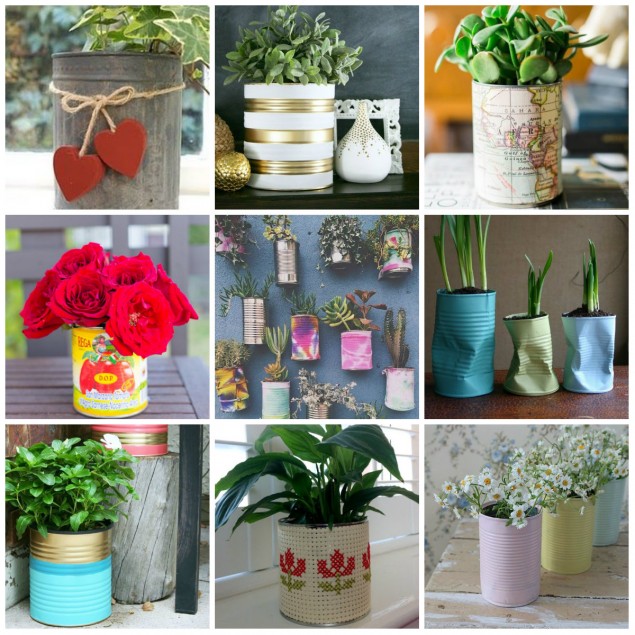
For zonal design, several pots are usually used in harmony with other elements of the exterior. Shown in the photo are various compositions from pots for decorating facades, walls and areas in the garden, made by a single solution. A trendy mix of styles very rarely works in landscape design.
In order for the flowers in containers to remain healthy, the location of the pots or compositions from them must provide an appropriate light and temperature regime. The pot must be firmly fixed in a decorative vessel, avoiding shaking harmful to plants.

Decorative containers are a kind of disguise for flower pots and, with the exception of mesh bottom models, they are not equipped with drainage. It is necessary to regularly drain the water accumulated in the pallets, as well as lay a layer of gravel or moss on the bottom to prevent root rotting due to stagnant moisture.

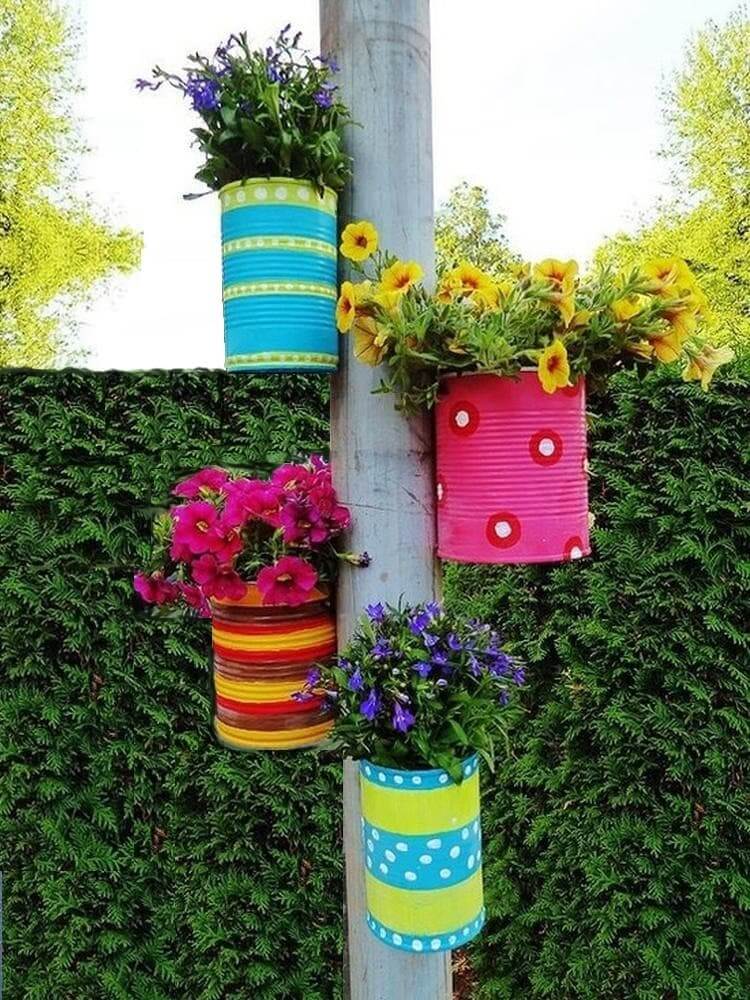
Cache-pot from bottles
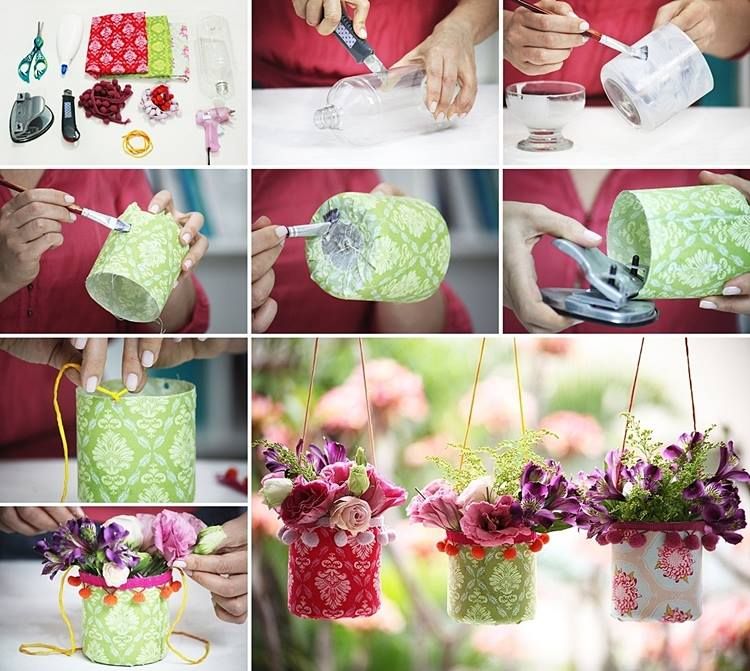
To create beautiful containers for flowers, old bottles are also suitable. Plastic bottles are especially good at this task. They can be decorated in various ways, they will last a long time and will decorate your garden. Let's take a look at a few ways to make your trash good for your garden.

You can take a plastic bottle and tape it from the bottom to half with twine. You will get an original wicker pot. If desired, you can even make jewelry for the top from the twine.
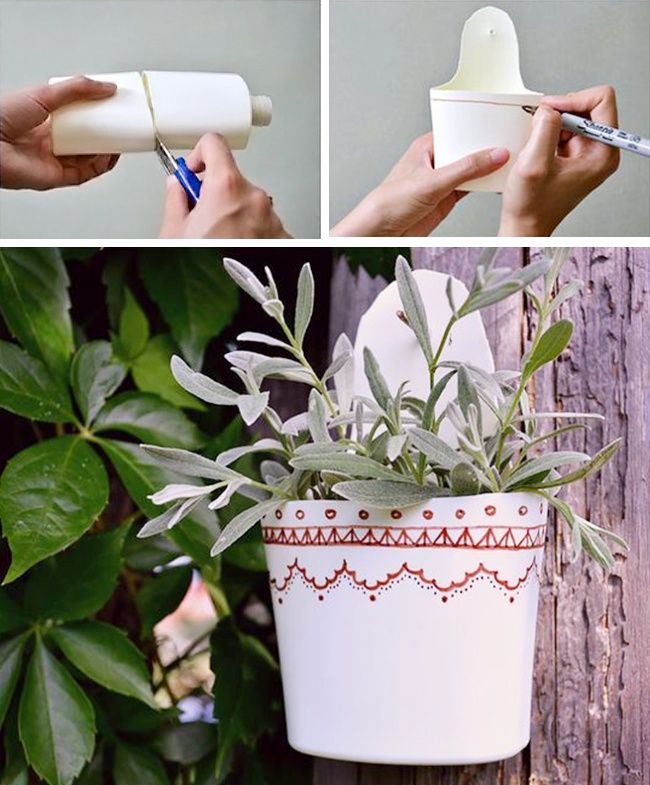
Another way is to hide the bottle in a piece of an old bag. Small, even cut branches are also suitable, which can be glued or tied with the same twine.

You can make beautiful parts from plastic containers in the same way. Flowers in containers can be planted in different ways.

Another way to decorate is to make raised patterns with a glue gun. It remains only to paint the top of the pot with acrylic paint.

You can also make pots from a glass bottle. To do this, lay or wind copper wire at the cut point, then heat it. The bottle is dipped in water and the desired part is simply removed.
Implementation of "offshore" projects ↑
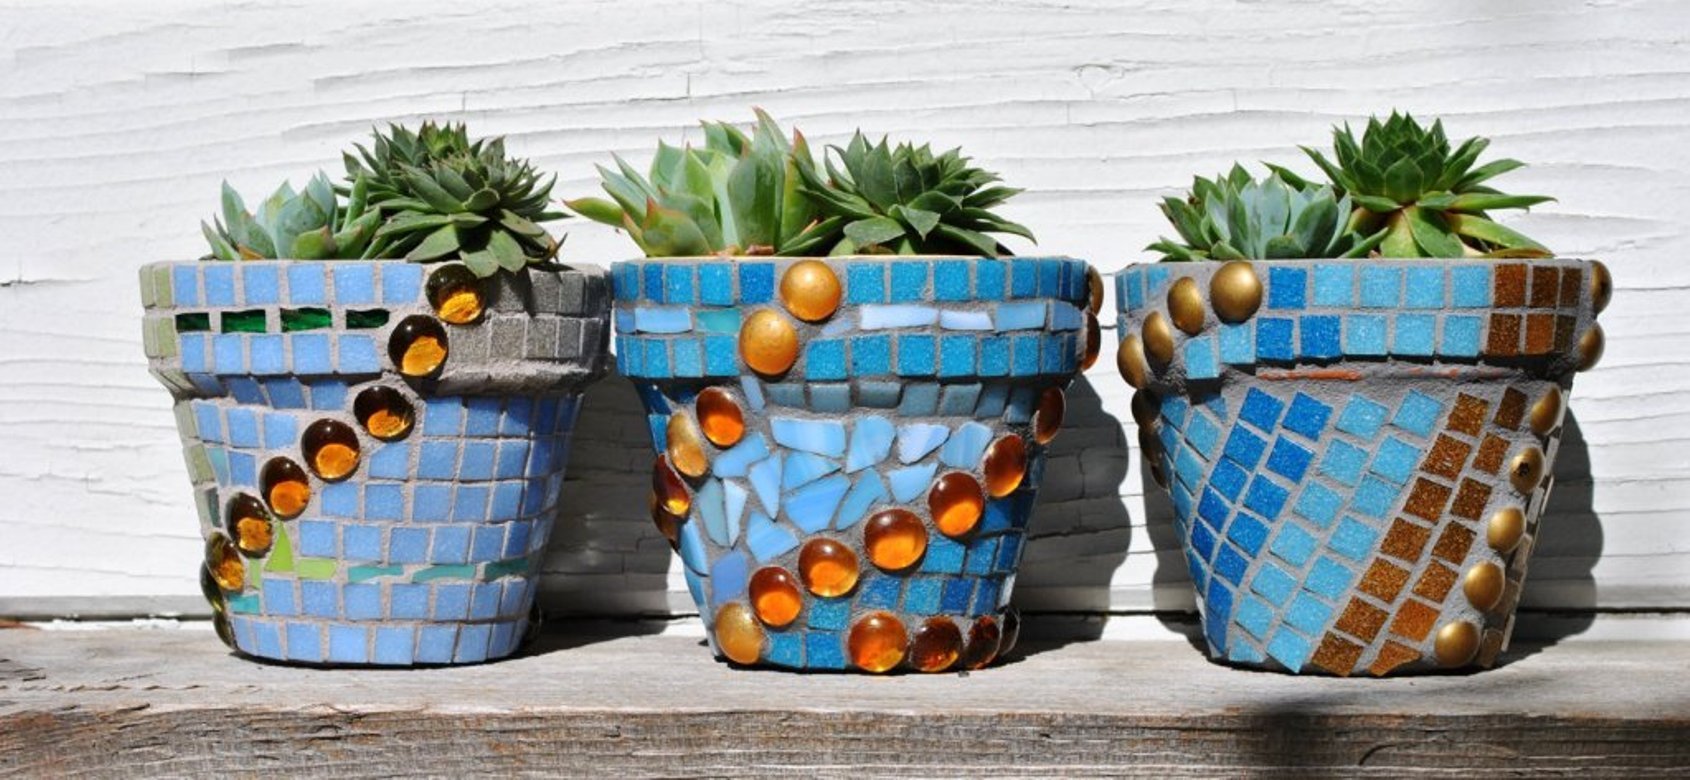
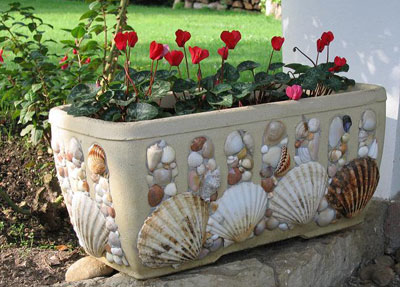
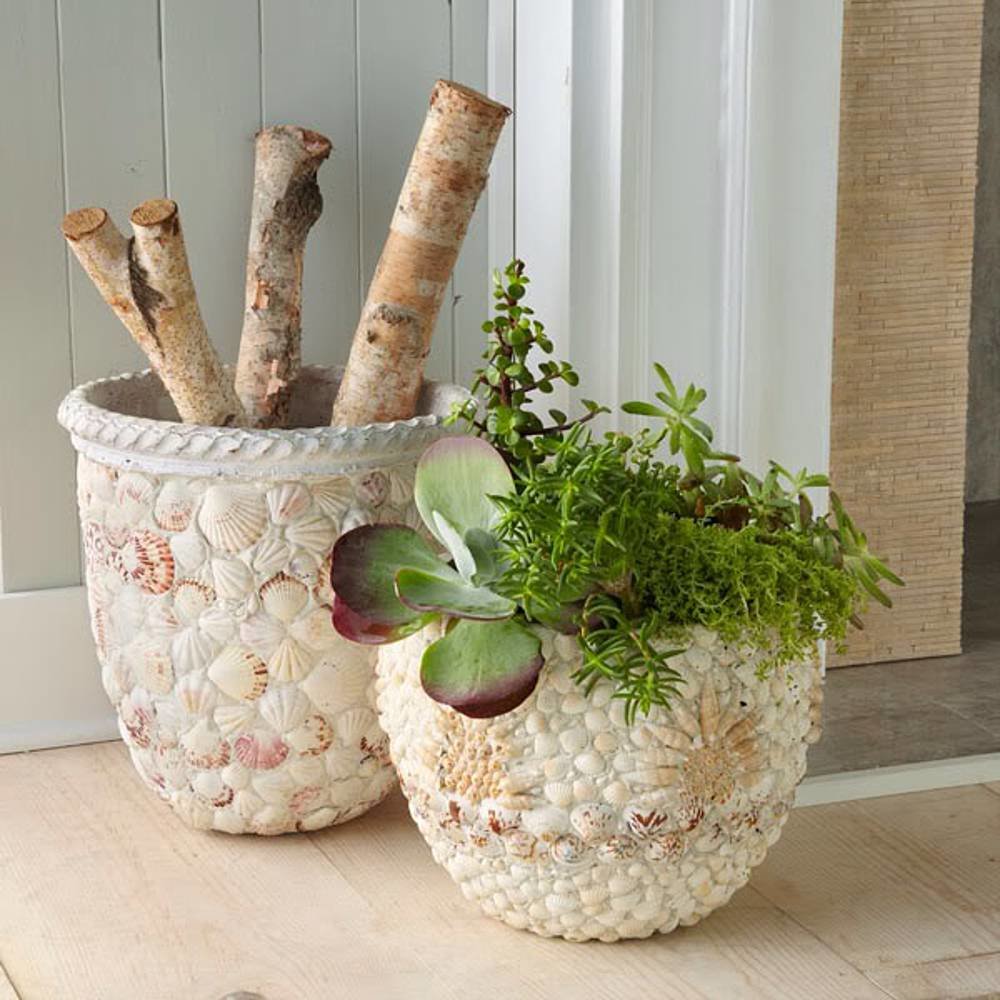
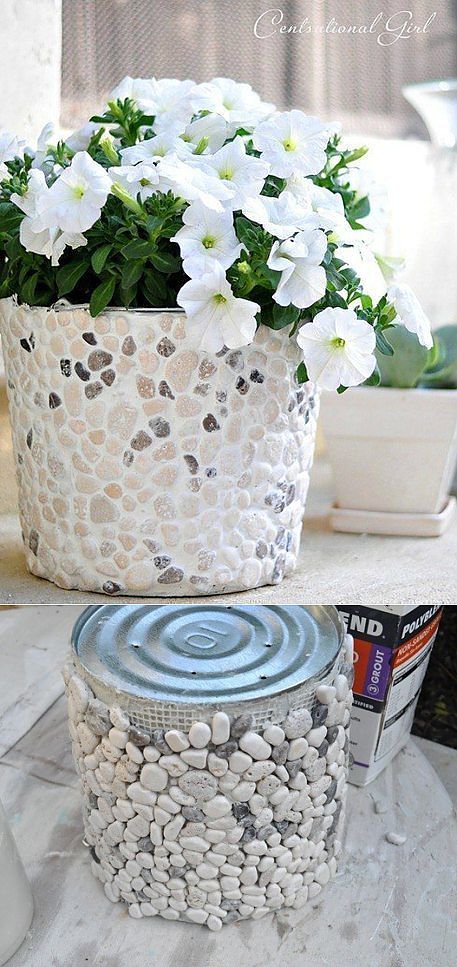
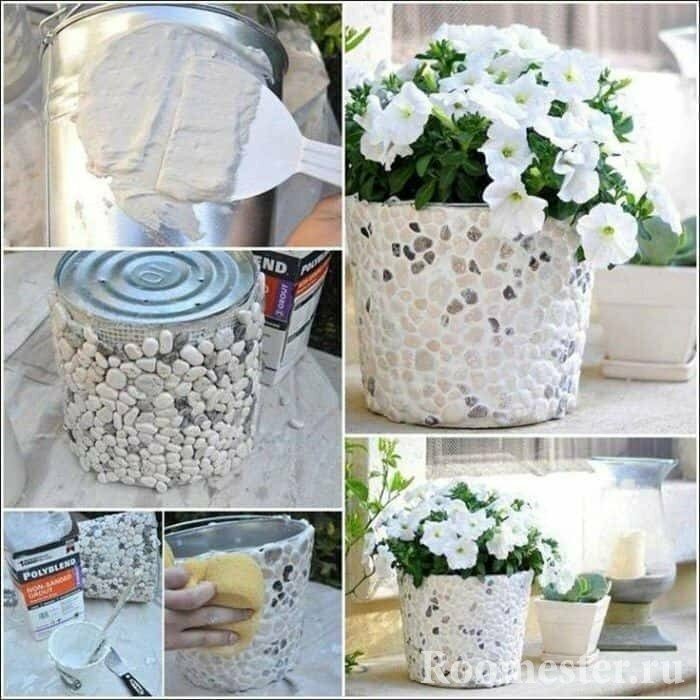
We will begin the description of our "ten" with the technologies of decorating flower pots with our own hands in the mainstream of the popular direction "waves-shore-beach". To realize this idea, we need shells and colored pebbles that filled our vase boxes after the last trip to the sea. You can sketch a potential plot on paper, or you can create while "laying out" auxiliary tinsel on the surface of the future "house" for flowers-bushes.
Shells + stones: the simplest program
With the help of "Moment", shell-stones are attached to a simple ceramic vessel - washed and degreased.Pieces of tiles, pieces of broken plates-cups can "keep them company." You just need to try to observe the shade range - here your personal taste will play a good service. After waiting for the fixing of the parts on the sides of the container, decide if there is a need to touch up individual places.
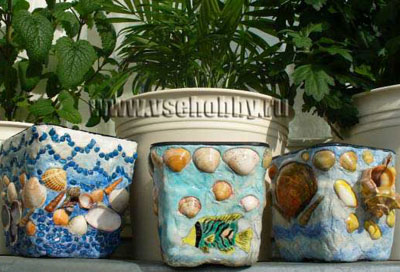 Seashell pots can look pretty exotic.

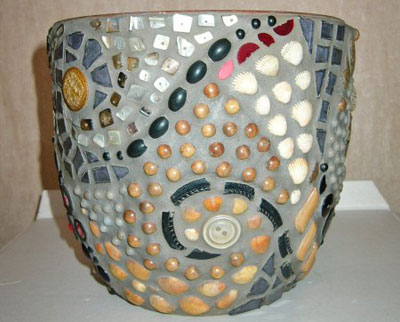
The next step is to fill in the voids between the elements of the drawing. This can be a mixture of cement with PVA (ratio 3: 1), diluted with water to the consistency of thick sour cream. If you want to give the "wave" a shade - drop it into the turquoise-aquamarine solution. Dip a brush into the resulting composition, paint over the empty space around the existing composition. As soon as it begins to harden, remove excess mass from the decorative part with a sponge or cloth. The thing is ready.
Another technique is also possible. A brush with glue is "carried out" between the shell-stones. Then, with a slightly tilted position of the bowl, the places greased with glue are sprinkled with a beautiful grainy sand (not essential, sea or river). Until it covers up with a dense layer all the gaps that remained around the fragments of the "picture" before. The nail polish will complete the work (as an option - "gripping" spray varnish), which should cover the entire workspace. A spectacular shine will appear.
Complicating plans
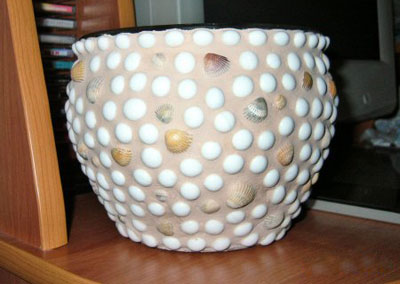
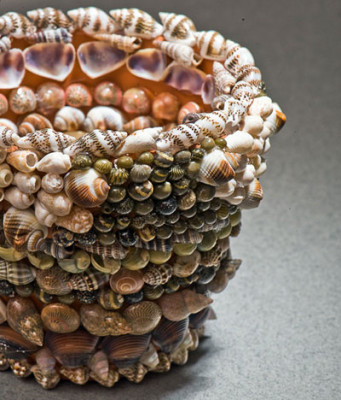
If you wish, you can decorate the empty sidewalls very tightly with the help of shells-pebbles-glass, gluing the area to be treated completely, leaving no empty spaces. A person with good drawing skills and the ability of a painter will be able to both an original drawing-composition and a complex ornament. In this case, the first stage ("planting" the arabesque elements on the adhesive base) will take longer, and the last (varnishing) may not be needed at all.
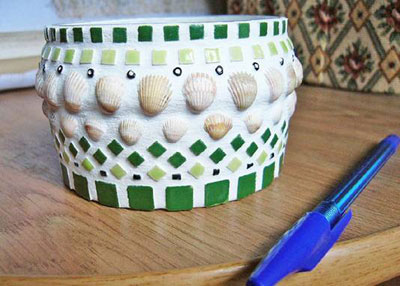 Examples of "solid" finishes in a nautical style can inspire you to create your own masterpieces

Interesting ideas
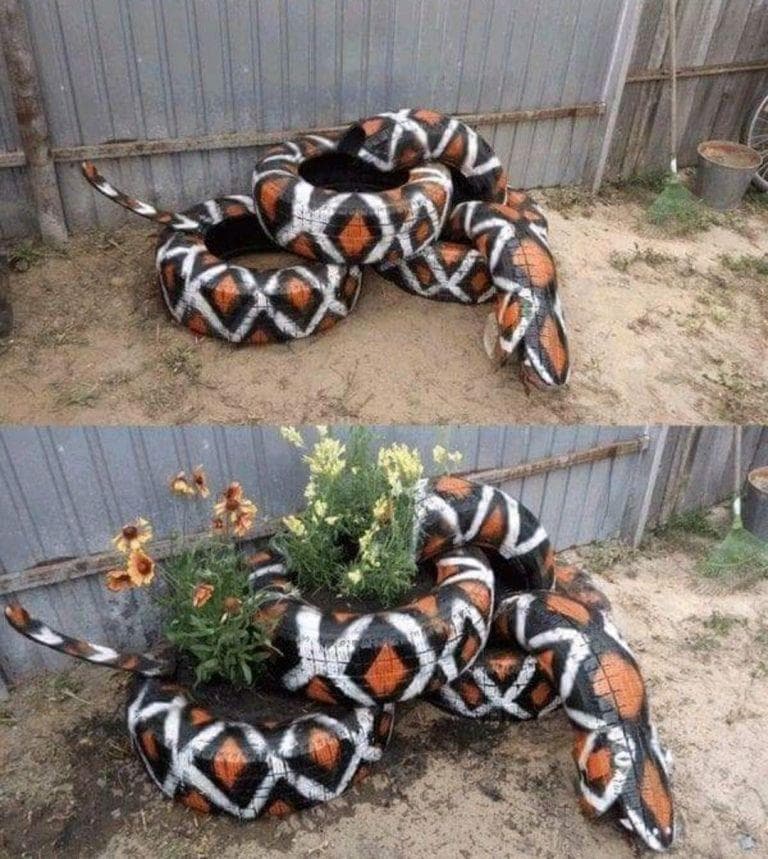
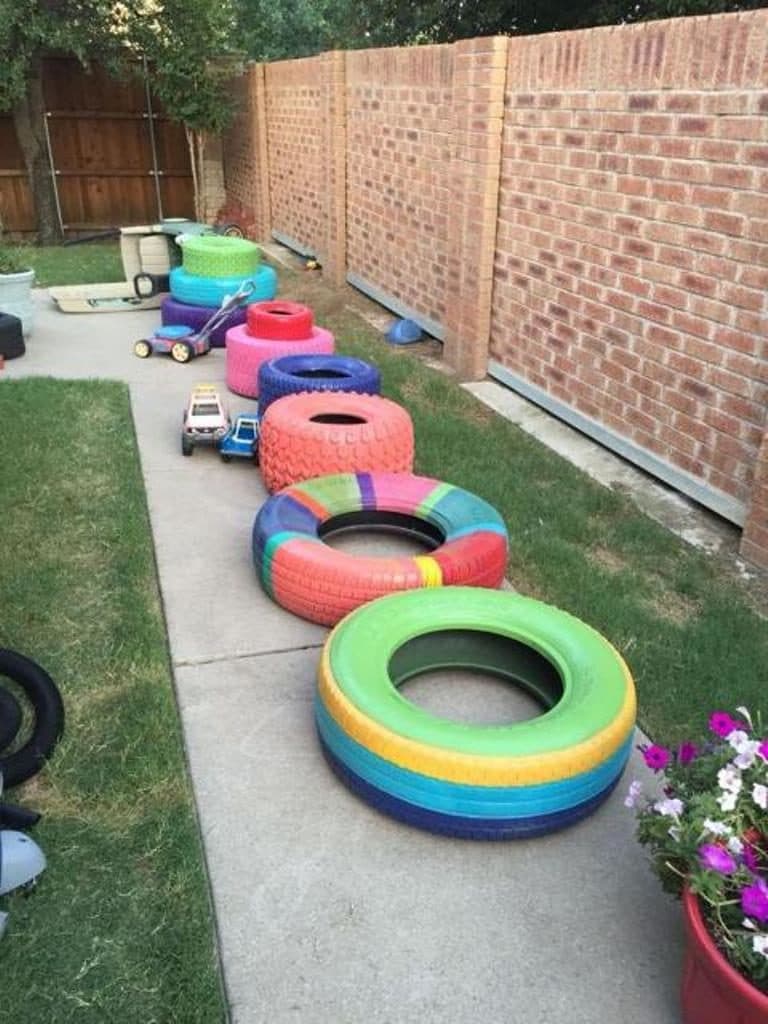
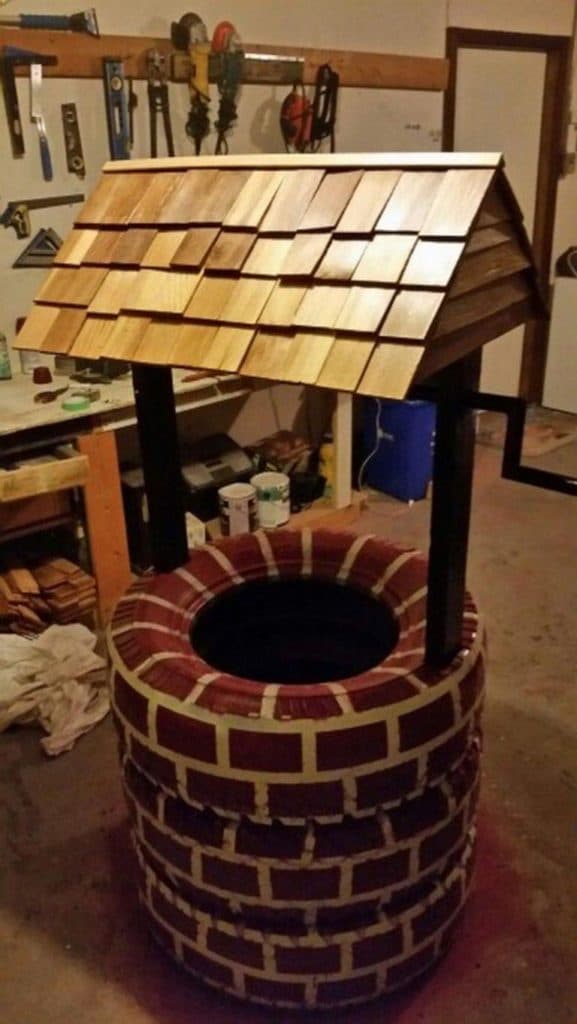
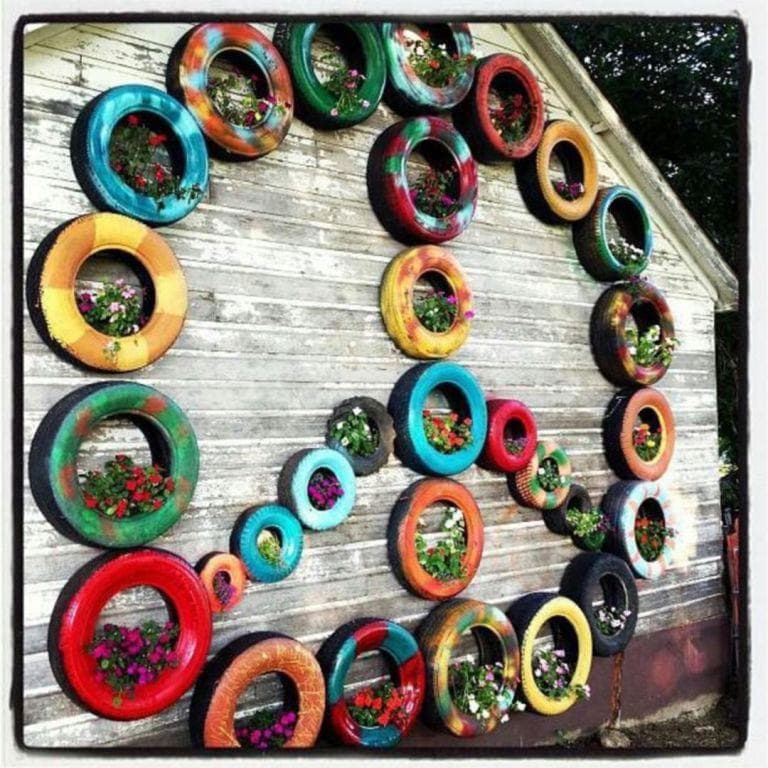
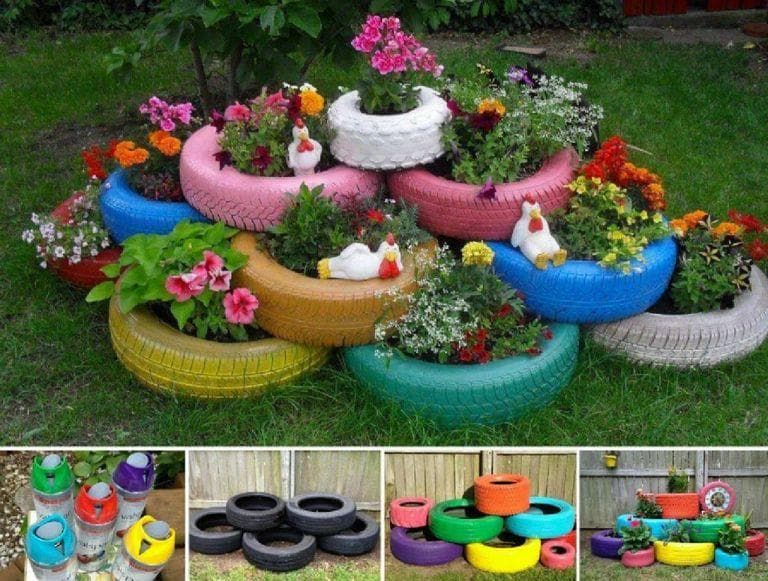
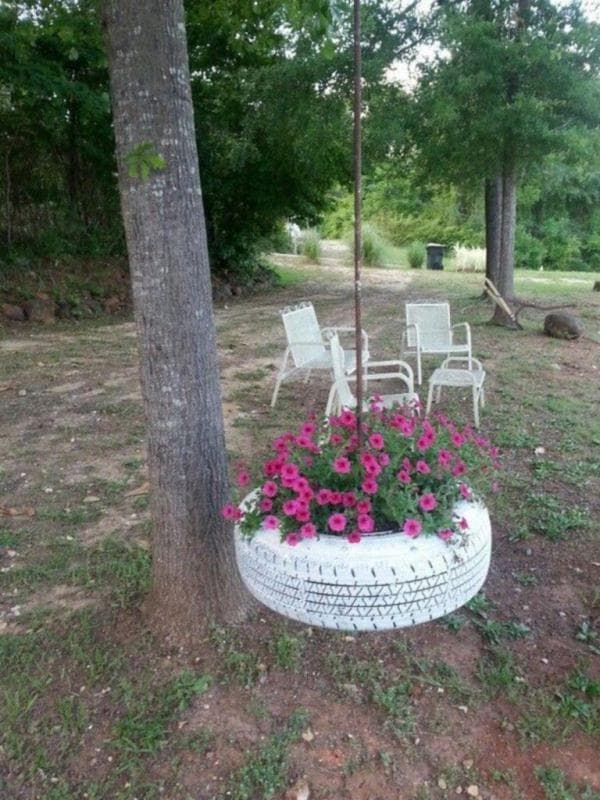
Consider original ideas from tires. Old tires should not be thrown away, because they can be used to make a lot of unique compositions. Tires can be painted in different colors or made into a swing.
The tires are first decorated, and then soil is poured into them and flowers are planted.
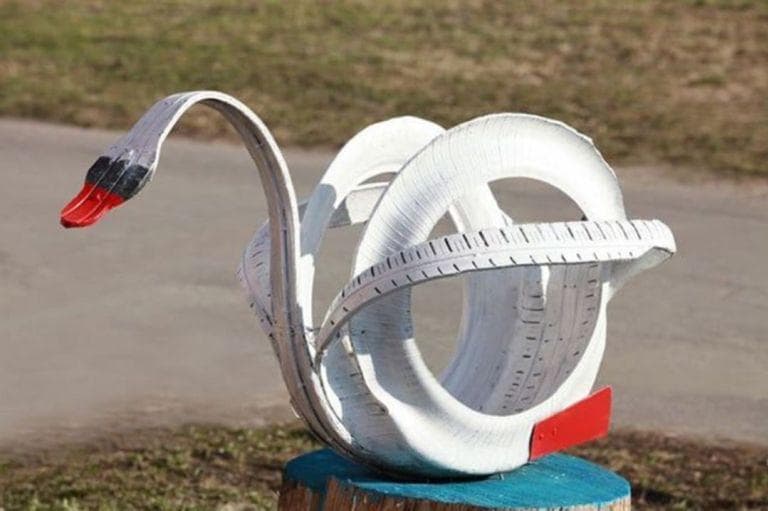
Composition of tires in the form of a large snake.
Original and bright tires will be an excellent element for a children's playground.
Interesting decor with a stylized well.
The original design of the wall of the house using multi-colored tires.
A beautiful composition in the form of an alpine slide.
Hanging composition in the garden.
You can make unusual shapes from old tires.
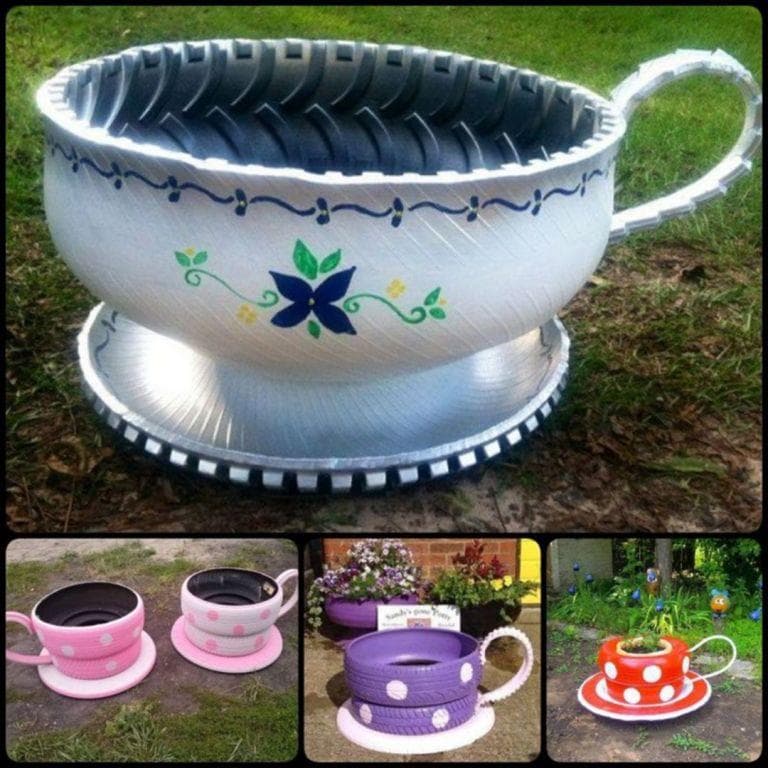
A swan is made from different tire elements.
We glue everything that is possible ... and it is impossible to imagine ↑
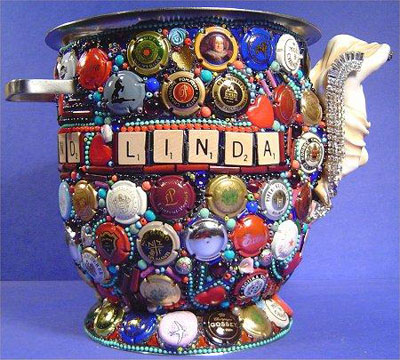
Many people did not even suspect that ordinary metal lids for drinks - deployed both with wavy "skirts" and with a colorful picture outward, could act as a decoration. To make sure that there are no restrictions in this type of creativity, it is possible to photograph exclusive "pots". They confirm the practicality of their "sculptors", in whose economy nothing really will be lost, but will be "put into action" ...
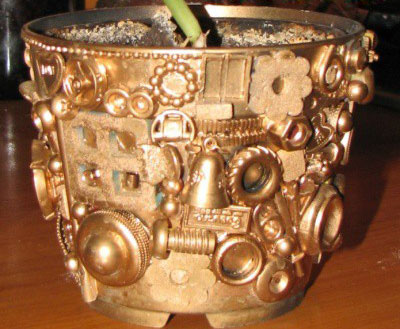
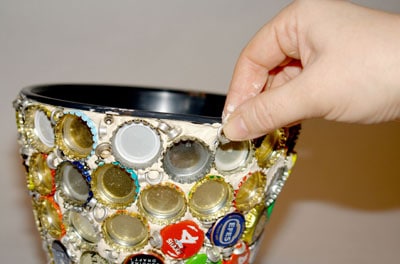 The screw-nut-cap-lid design will amaze everyone's imagination
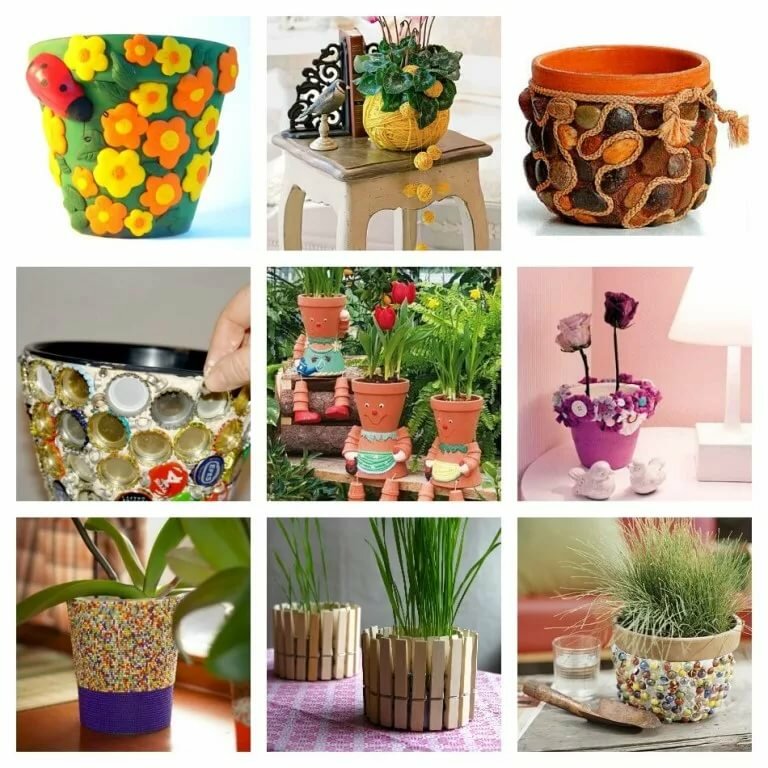
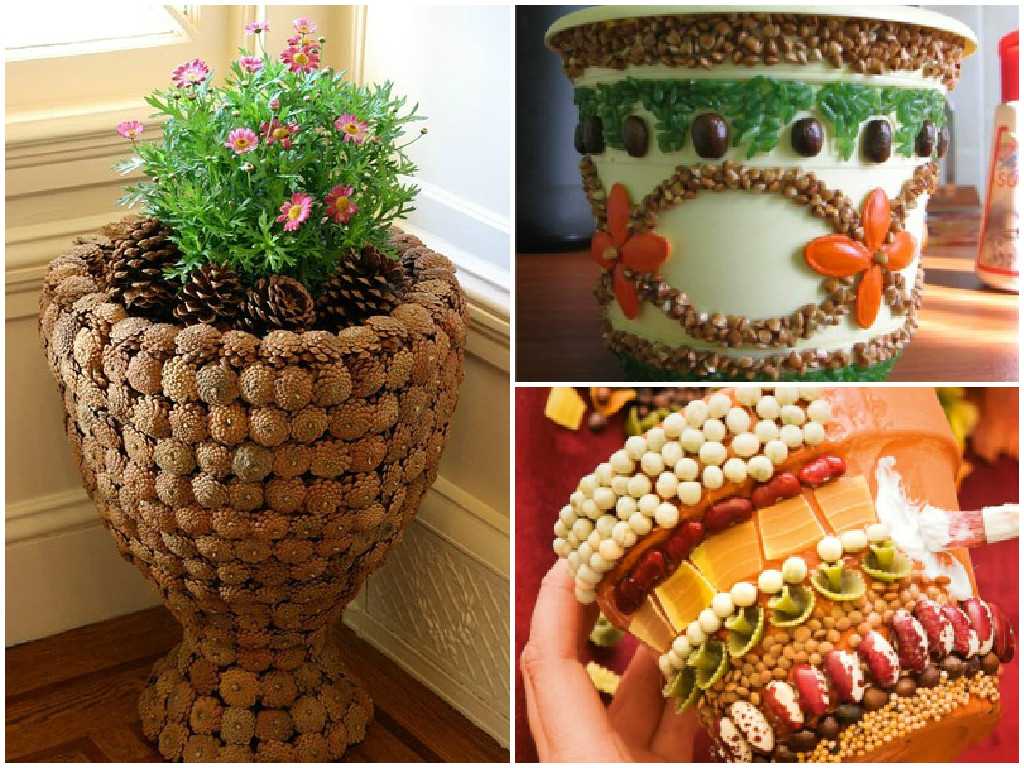
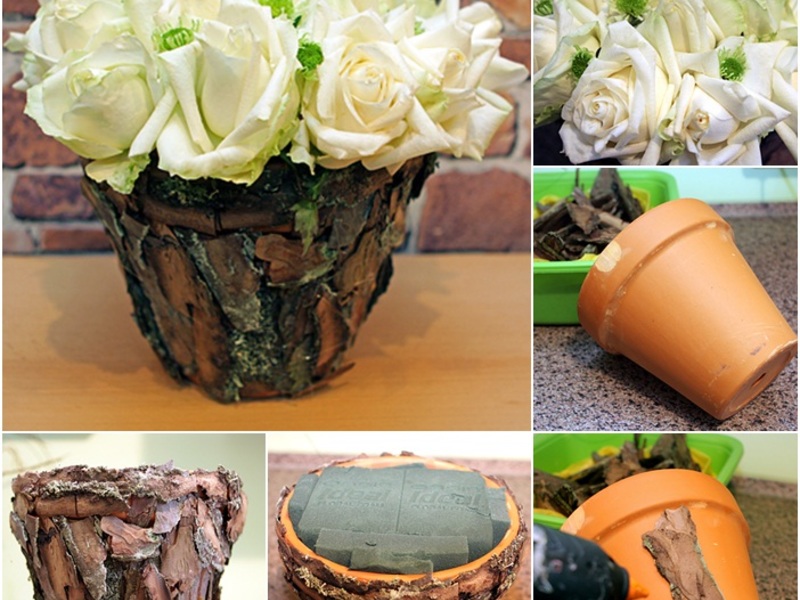
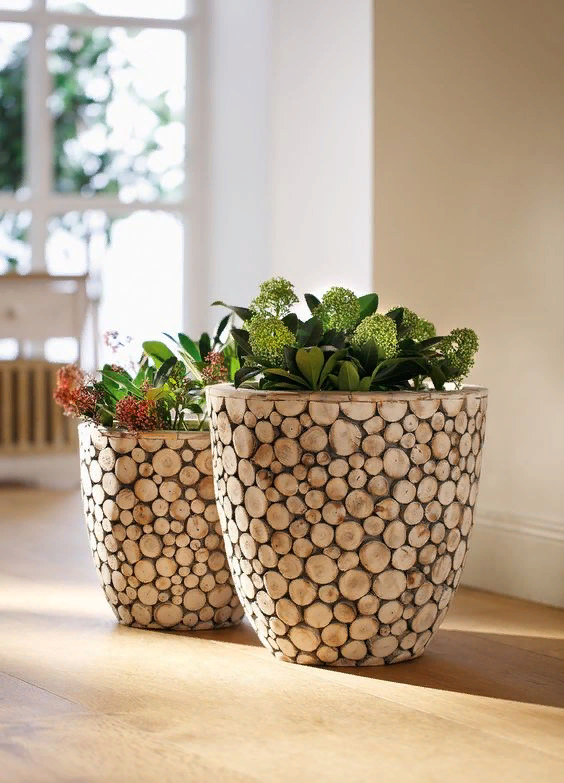
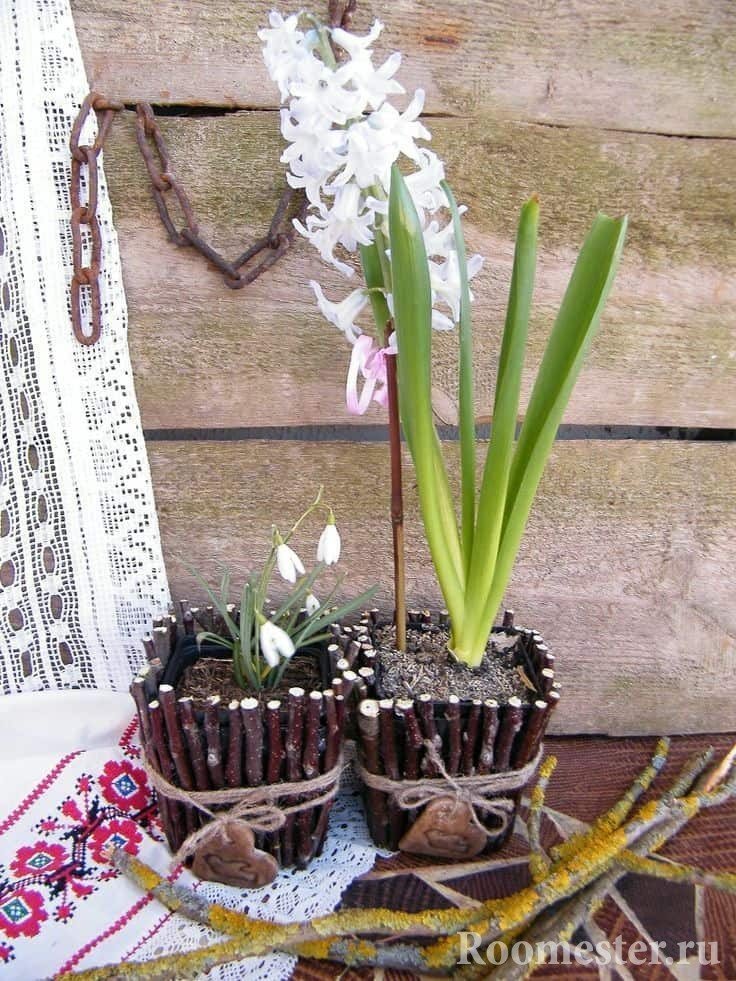
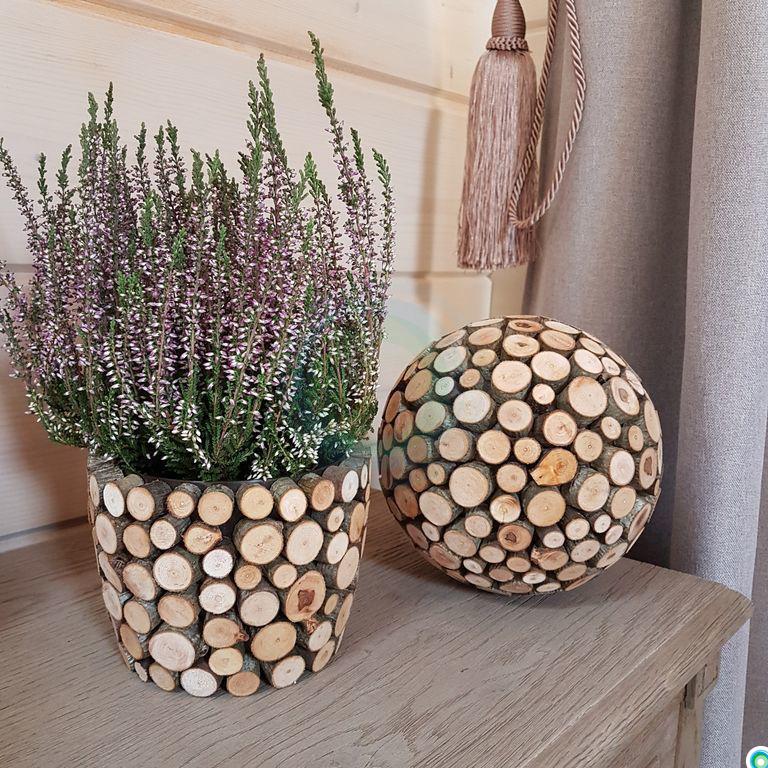
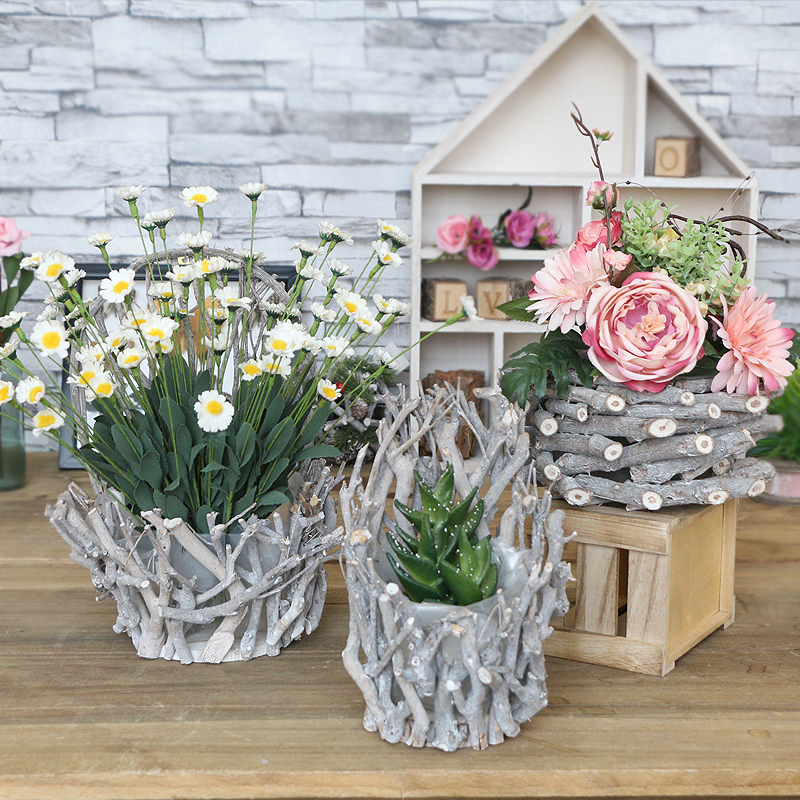
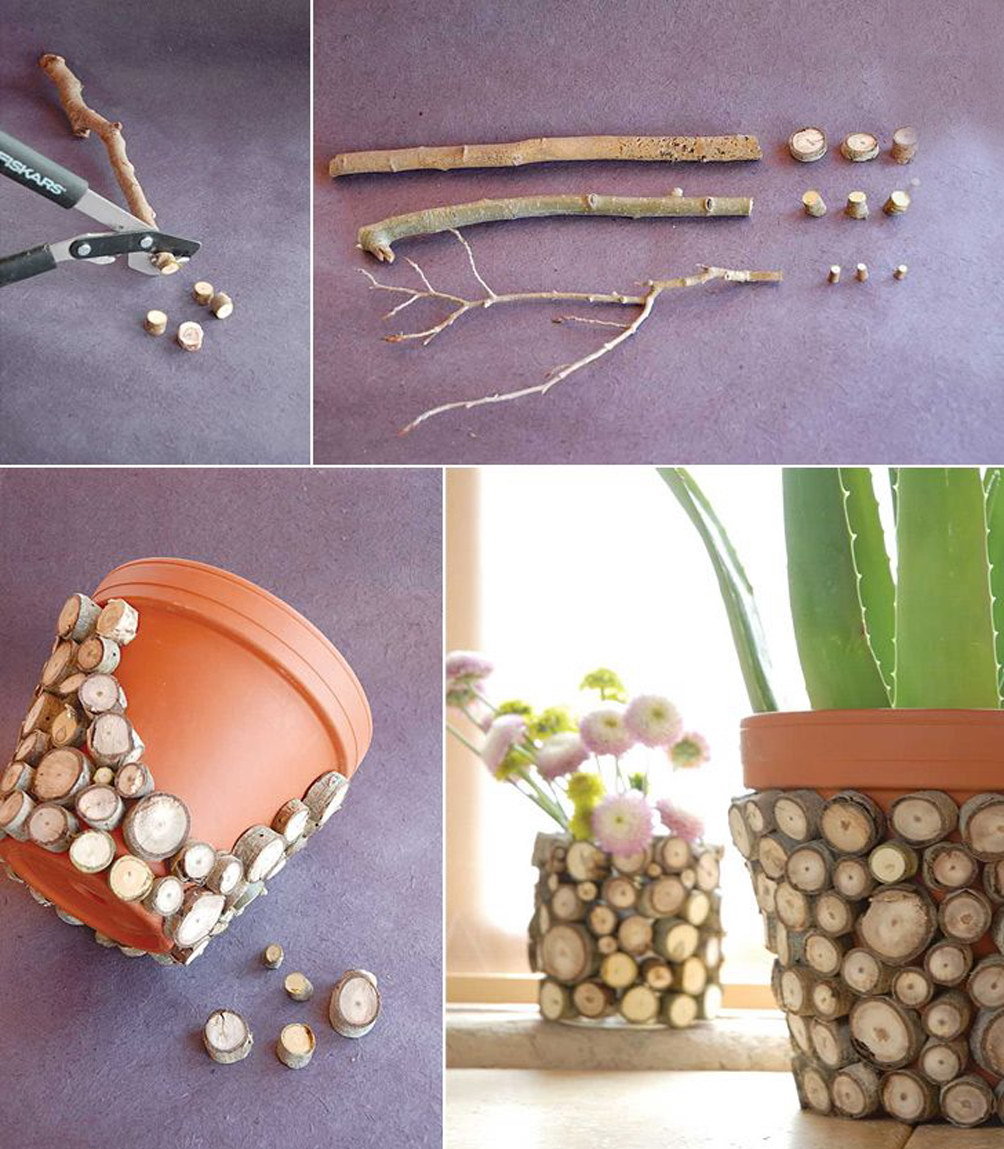
A huge resource of decor sources exists in nature. Twigs-shoots, sticks-sticks, seeds of cereals, cereals, legumes (buckwheat-wheat-beans-peas) can be involved in decorating pretty "huts". Each mentioned version of the artistic "cover" of the flowerpot has a chance to turn into a rather cute motley mini-rug that fits well into the interior of the apartment. There are hundreds of technical ways to implement plans with such a powerful arsenal of decorations.
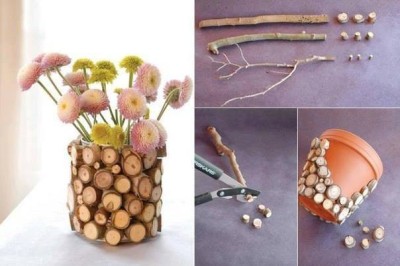 A curved twig and garden shears are a great pair for decorating a pot.
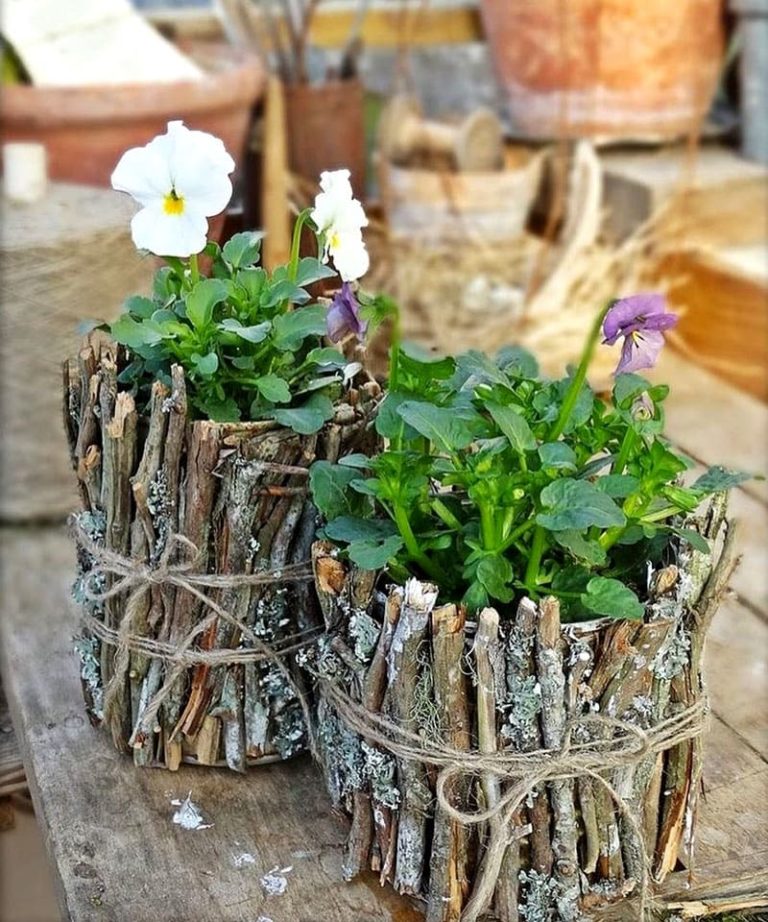
 You don't need to cut the twigs so short - the result will be no worse
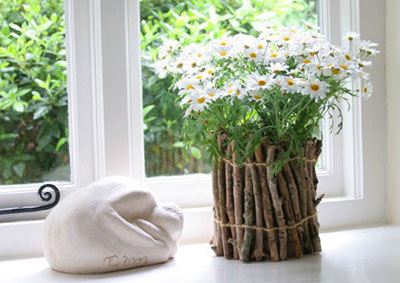
 Associations with village life can also be created with the help of "non-format" sticks-twigs
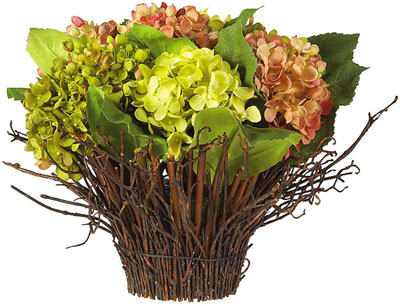
The design of a flower vase sometimes overshadows its contents with its appearance - plants planted in a container
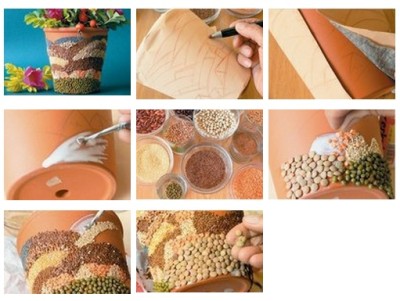 The technique of decorating flower buckets with plant seeds is available to many
Diy photo pots


We also recommend viewing:
- DIY pots
- DIY boat
- DIY dolls
- DIY beaded earrings
- DIY album
- DIY rugs
- DIY curtains
- DIY candy bouquet
- DIY beaded necklace
- DIY feeder
- How to sew an elastic band with your own hands
- DIY bracelets
- DIY felt toys
- DIY numbers
- DIY book
- DIY bows
- DIY butterflies
- Do-it-yourself bedspread
- DIY clock
- DIY casket
- DIY topiary
- DIY panel
- DIY notebook
- DIY pillow
- Do-it-yourself snake
- DIY ribbon flowers
- DIY beaded brooch
- DIY cardboard box
- DIY phone case
- DIY decor
- DIY toys
- DIY postcards
- DIY beaded beads
- DIY beaded bracelet
- DIY plywood house
- DIY frame
- DIY envelope
- DIY balls
- DIY organizer
- DIY mirror
- DIY laundry basket
- DIY wedding glasses
- DIY crafts from disks
- Decorate champagne with your own hands
- DIY slime
- Do-it-yourself housekeeper
- DIY scratching post
- DIY case
- DIY satin ribbon bows
- DIY paper garlands
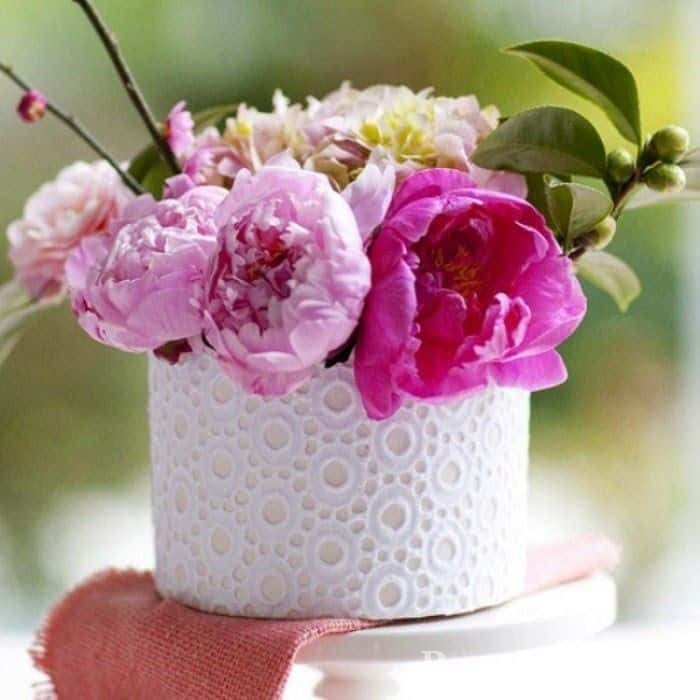
What is a planter for flowers: characteristics of a decorative element
The cache-pot (the photo clearly shows different versions of the product) is not a simple traditional pot. This is a flowerpot of an unusual shape, which has an interesting design. The planter can also act as a decorative shell for a flower pot. With the help of this design, you can hide all the unsightly places in the flowerpot and create decor in one stylistic direction. The planters do not contain drainage holes, so they can be placed in any part of the room without the fear of staining furniture or other interior elements.
Thanks to the pots, you can green any room in the apartment, kitchen or hallway, the main thing is to take into account the needs of the plants. The main purpose of the planter is to create a presentable appearance of the flower pot, in harmony with the design of the room.
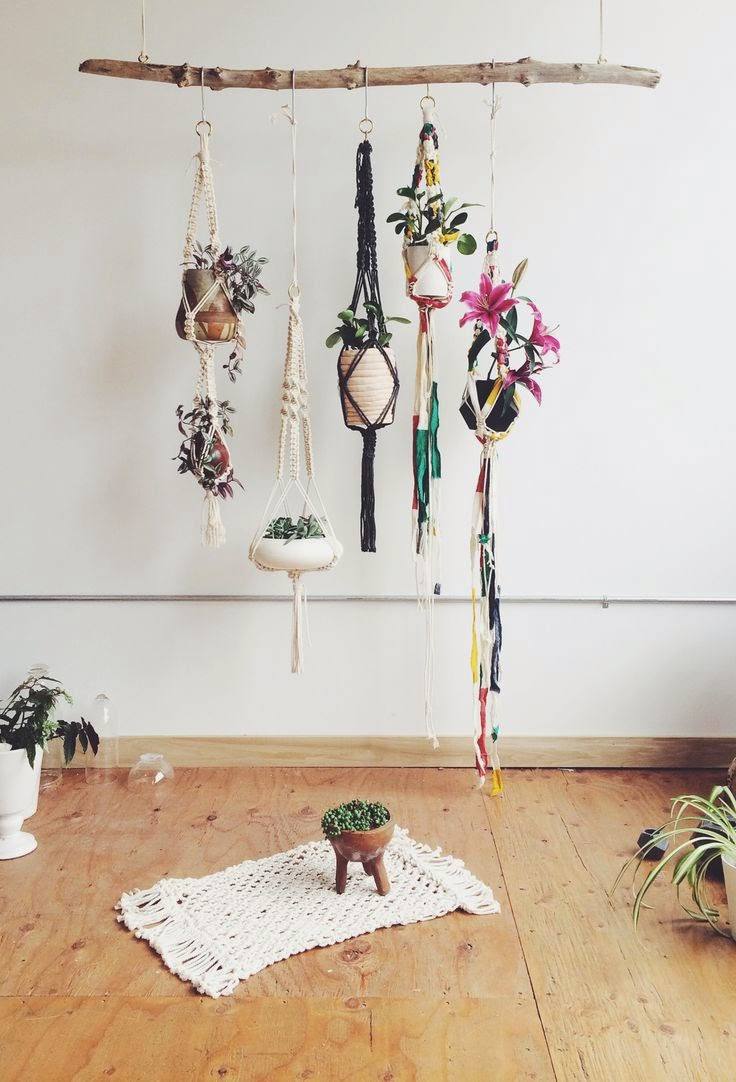
The use of pots allows you to compactly hang indoor plants. If the flowerpots are single, then special suspension hooks are used. For group copies, you can organize a shelf or a multi-tiered structure that is suspended from a rope.
Depending on the method of arrangement, there are different options for flower pots. Floor products are designed for large flowerpots with tall plants. They are placed in spacious rooms or in the garden. Table planters are used for traditional flowerpots, which are usually placed on a windowsill, table, counter or shelf.
 The planter can also act as a decorative shell for a flower pot.
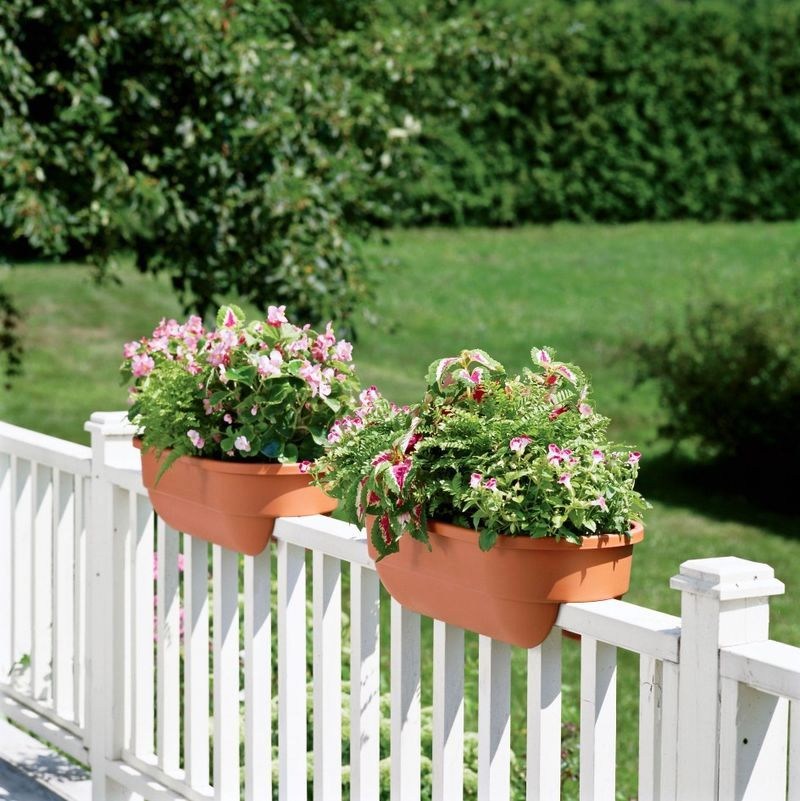
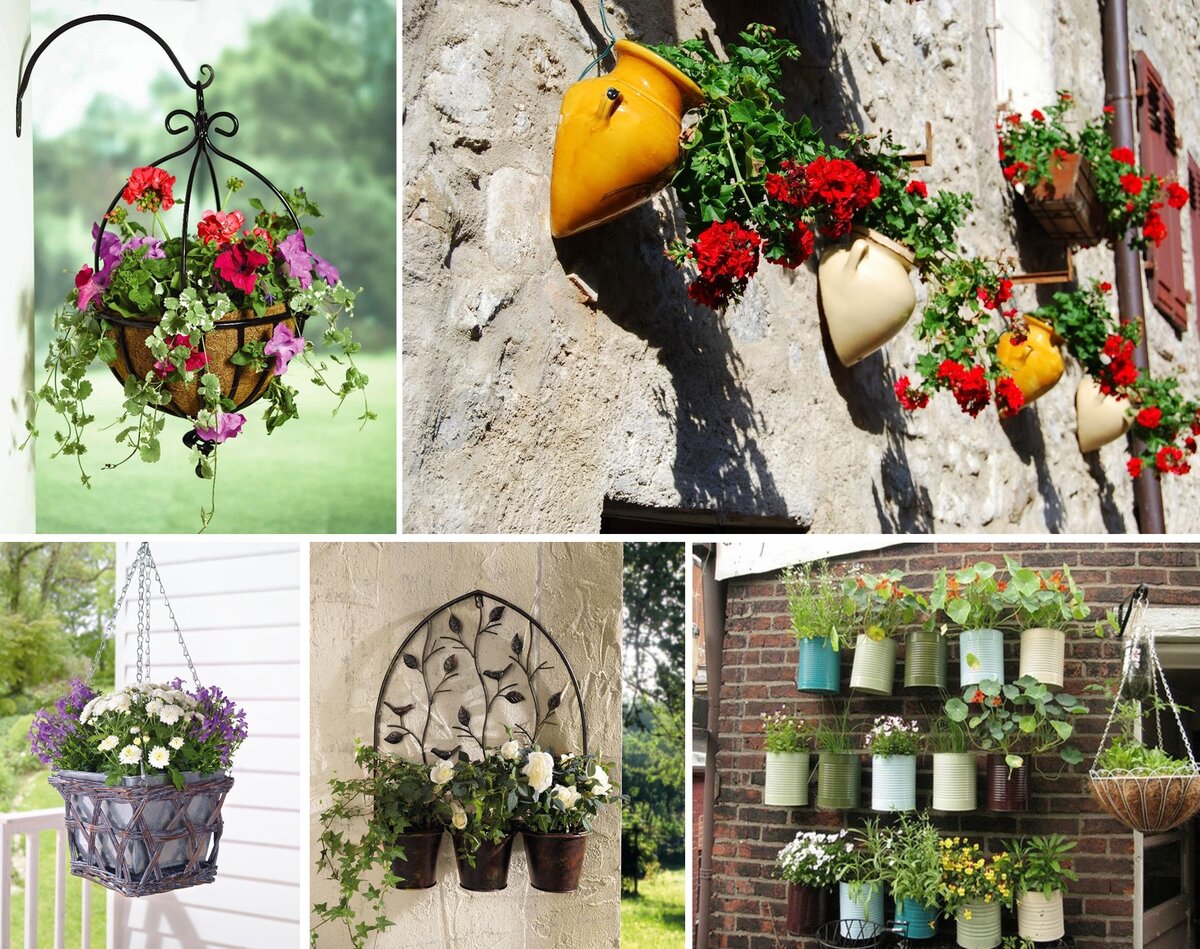
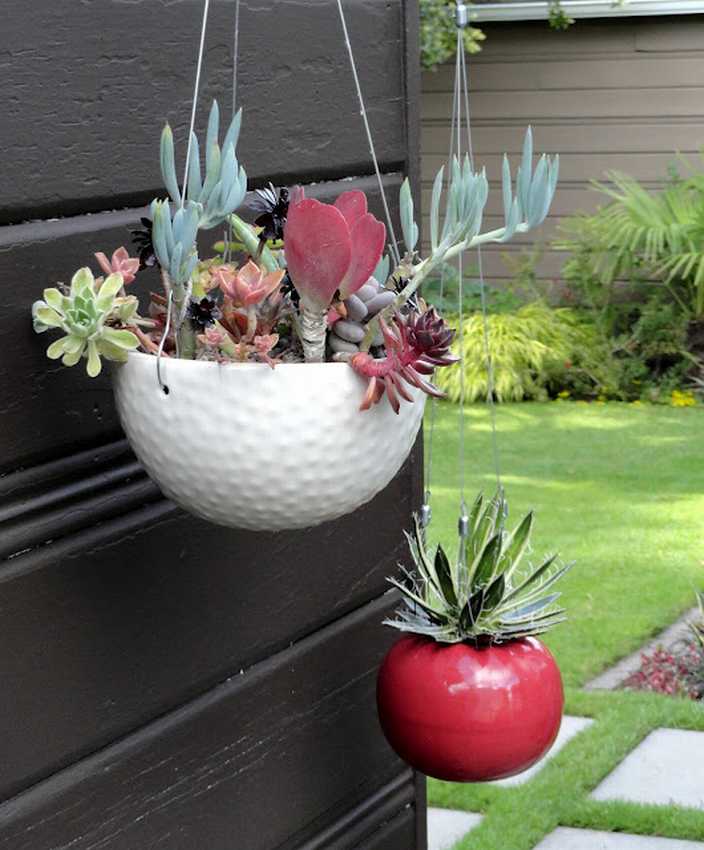
Hanging and wall-mounted flower pots have special hangers with hooks. They can be hung on cornices, strips, hooks. Such pots allow you to save space and rationally arrange a large number of plants that will not interfere with each other.
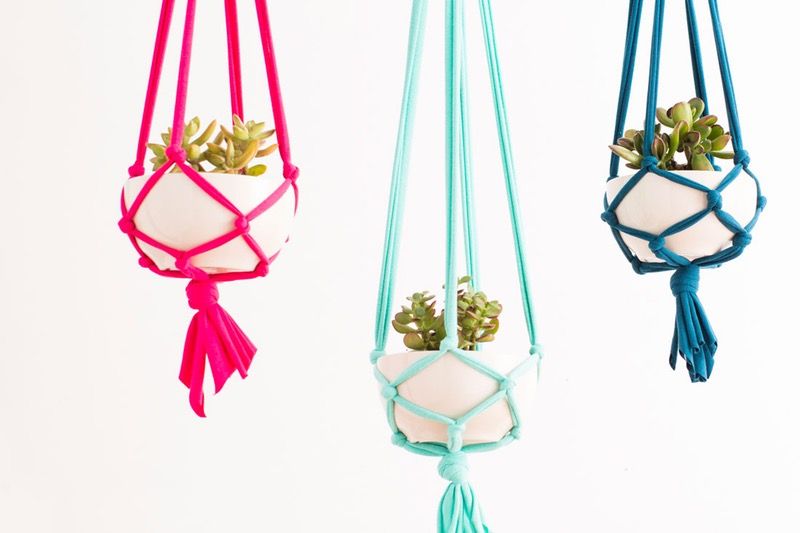
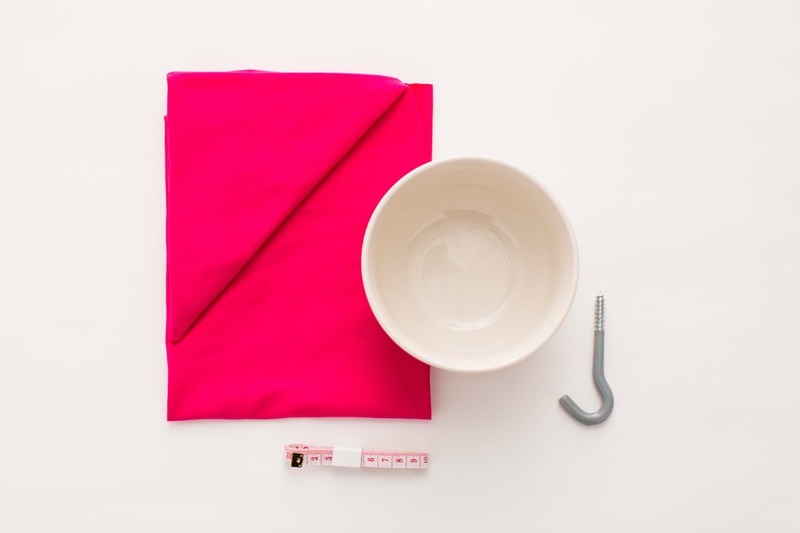
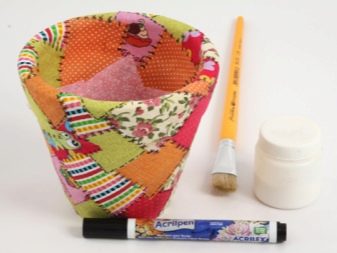
DIY hanging planter
If the flower pot suits you completely, then you can make a beautiful, bright planter. It looks great as an additional decor, and also allows you to place plants in the house in a more original way.
To work, you need the following:
- a small piece of fabric;
- scissors;
- metal hook;
- centimeter;
- ceramic pot or flower pot.
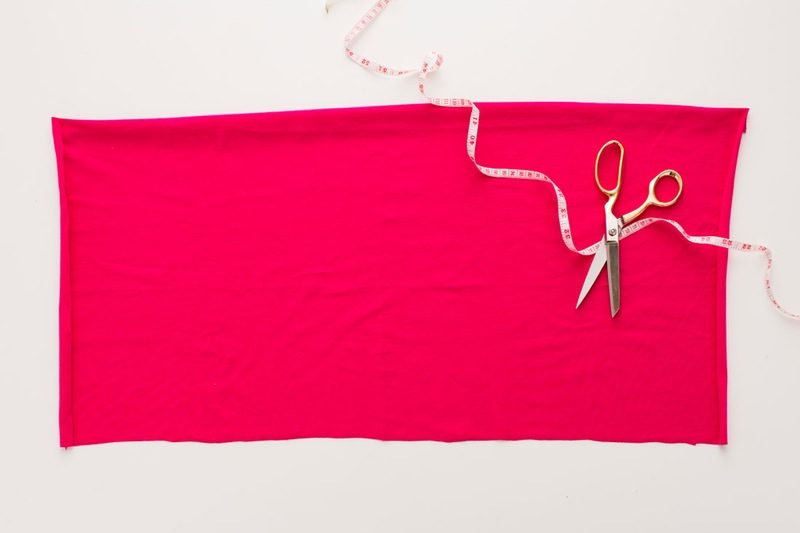
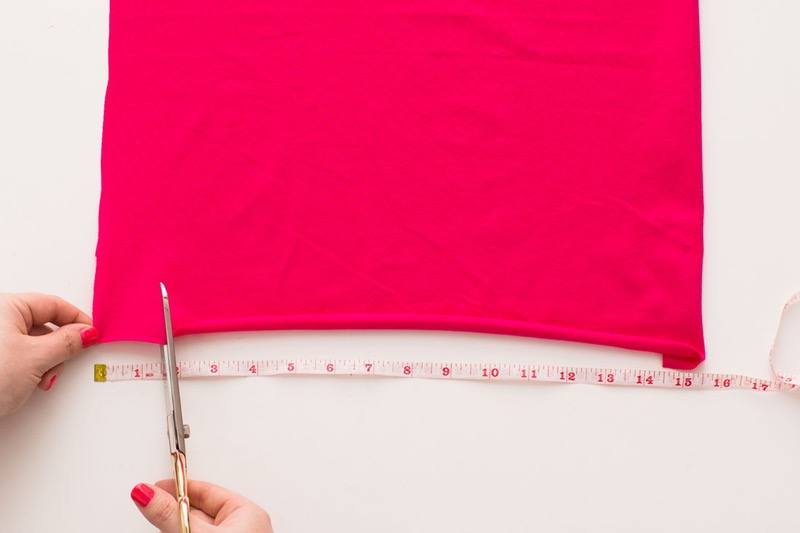
We put a piece of fabric on the work surface.Place a centimeter on the underside and thus cut the fabric into eight strips of the same width.
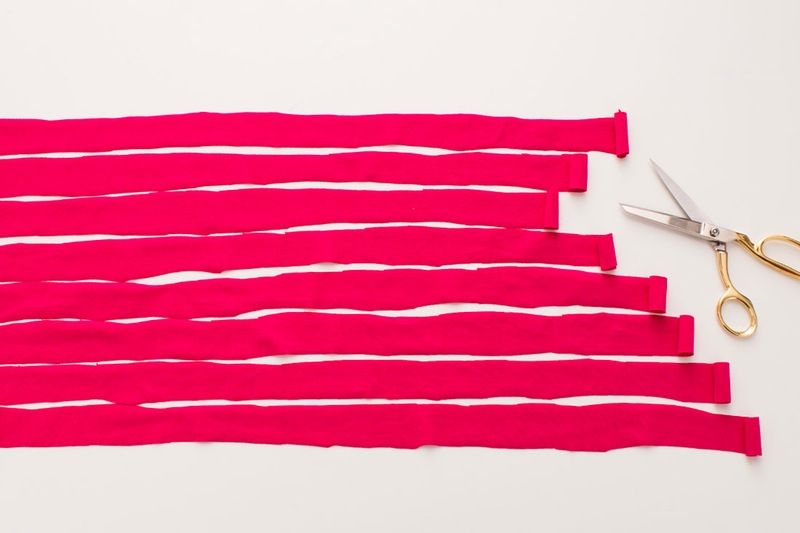
We roll each strip, as shown in the photo.
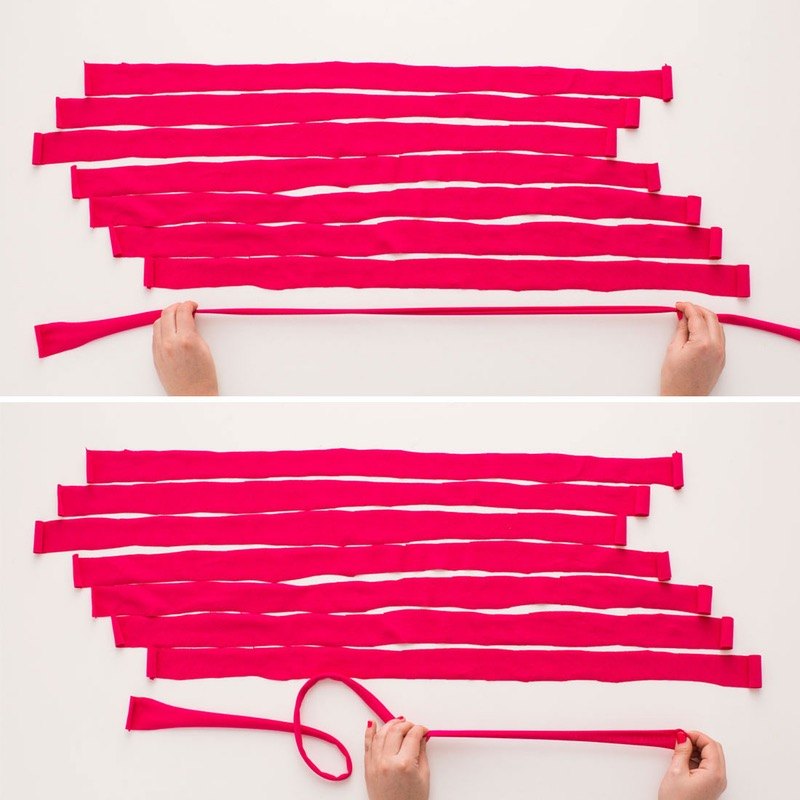

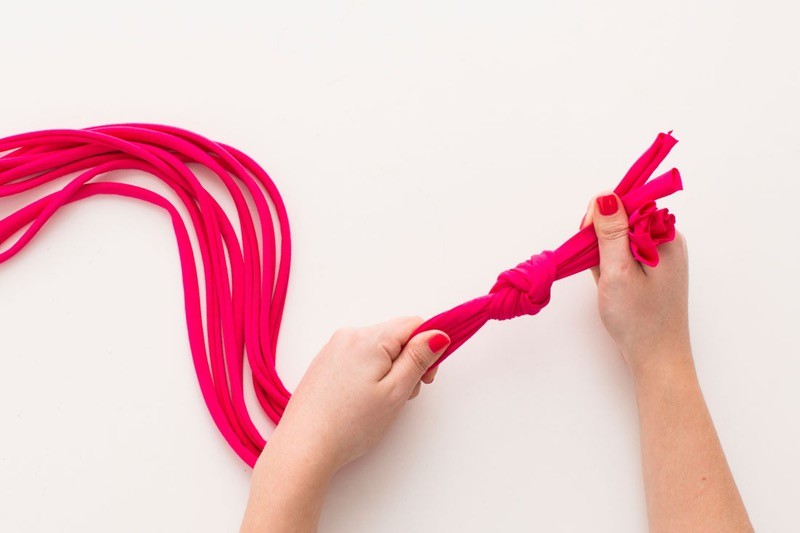
We tie all the blanks in one strong knot.
We divide all the blanks into four parts, two in each of them. Tie two blanks into knots with the same distance.

We again divide them into four parts and tie the knots, but in a checkerboard pattern.
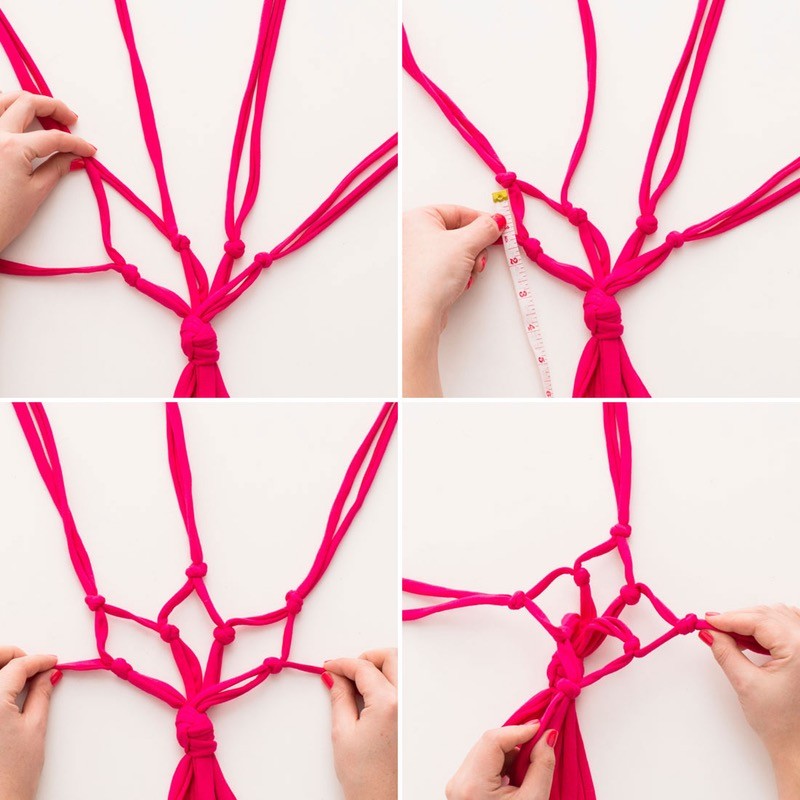
We repeat this step several times to get a planter of a suitable size.
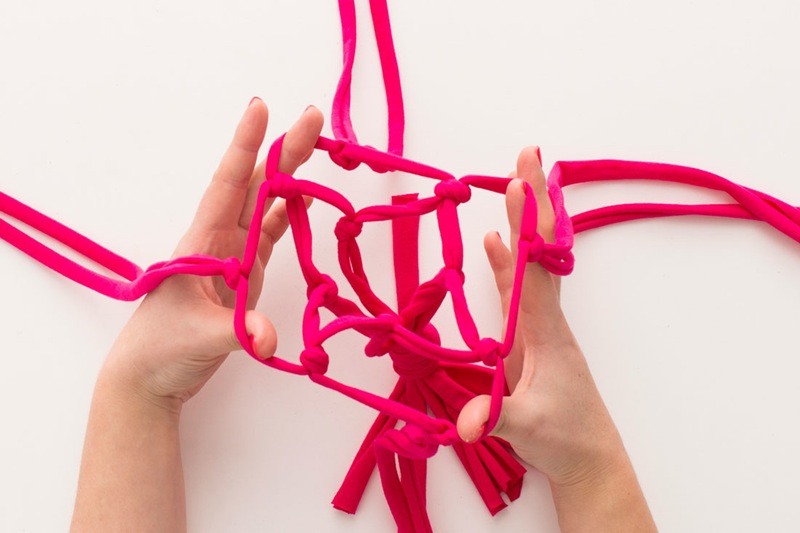
We put a ceramic pot or a flower pot in the blank. At a distance, we tie all the strips into a knot.
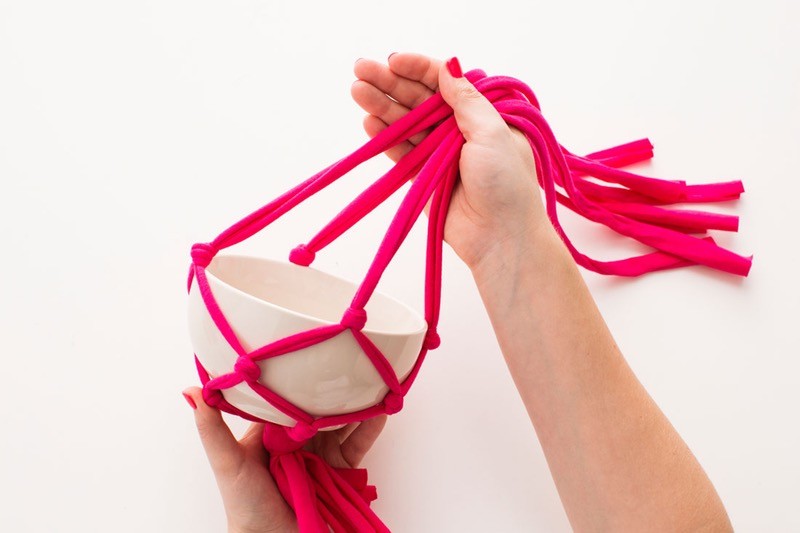
We hang the planter by a metal hook and place it in a suitable place.


In fact, these pots can look completely different. Nevertheless, each option is interesting and unusual in its own way.


Choice of base and image
As mentioned earlier, the pot can be of any material, but it is best if it is smooth and with a minimum of bends and roughness.
Unlike decoupage of a plastic pot, you will need more paints and glue to renew an earthen pot. The fact is that clay tends to absorb moisture, and therefore the consumption of materials will increase along with the drying time.
To make the selected items in the decoupage technique look really stylish and professional, you should take care of the material on which the drawing is performed.
Less expensive is the drawing, separated from the three-layer napkin. Its advantages:
- a large number of designs on various topics;
- low cost;
- subtlety.
They are good for beginners and are also found in every home. It should be noted that the drawing on napkins is a very fragile instrument, it tends to stretch and bubble. In addition, without surface treatment with white paint, the drawing of the napkin noticeably fades and fades, becoming inconspicuous.
Decoupage cards made on special paper, for example, rice, are considered another popular material. Product advantages:
- the brightness of the picture;
- subtlety;
- tensile strength;
- a huge number of thematic designs.
Such drawings and patterns look great on any surfaces, having a special stylistic focus. However, the cost of rice paper is quite high, and therefore the attitude of the masters to it is controversial.
Reduces the cost of decoupage cards by using plain paper. Its thickness is several times greater than the thickness of rice, but if the master wishes, it becomes a good material for decoupage. It should be noted that professionals in their field even use photographs on standard printed paper in their techniques, diligently cleaning and thinning the edges of the image.

Another possible material is beautiful pieces of fabric with printed or printed patterns. With patterns printed on fabric, the technique differs little from paper, while printed patterns open up more room for imagination. Thus, the volumetric embroidery can be painted over together with the pot in a single color, observing the transformation of a plastic pot into an object of art with a complex texture.
You can achieve an interesting texture and volume by performing decoupage with stockings. Today they are one of the most popular materials for decorating flower pots, vases and bottles. Kapron, impregnated with glue, can be put on or wrapped around the pot, creating luxurious folds, as if copied from the robes of the goddess Athena. In addition, interesting details for decoration are created from nylon. For example, to create a bouquet of roses, you just need to grip a nylon stocking with a needle and thread on one side.
Among the drawbacks of the fabric, a long drying of the product is noted, and as a result of this, the process of work is equal to several days. Each stage of painting here requires attention and complete readiness, but the result is worth the time.
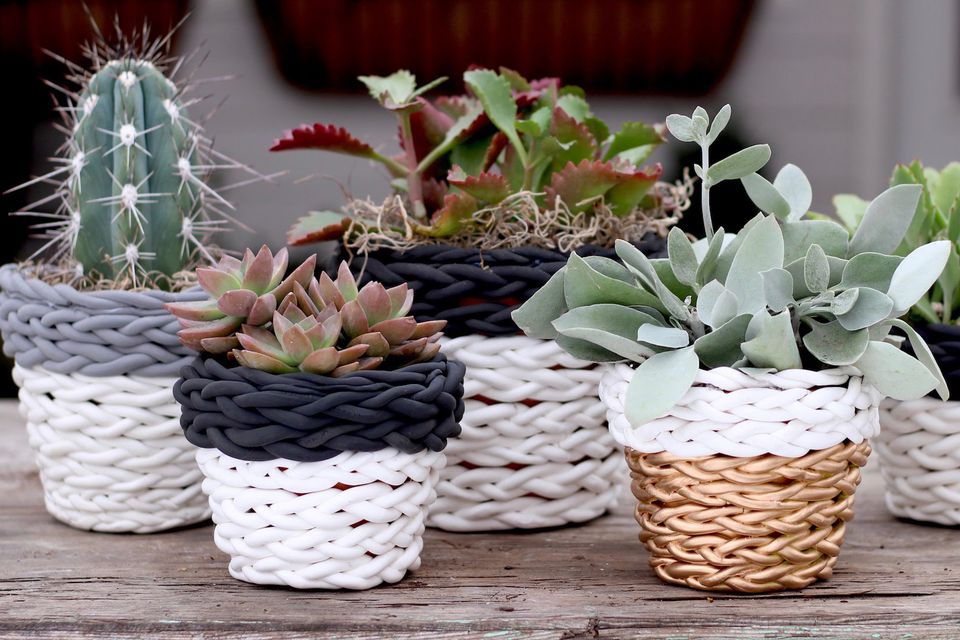
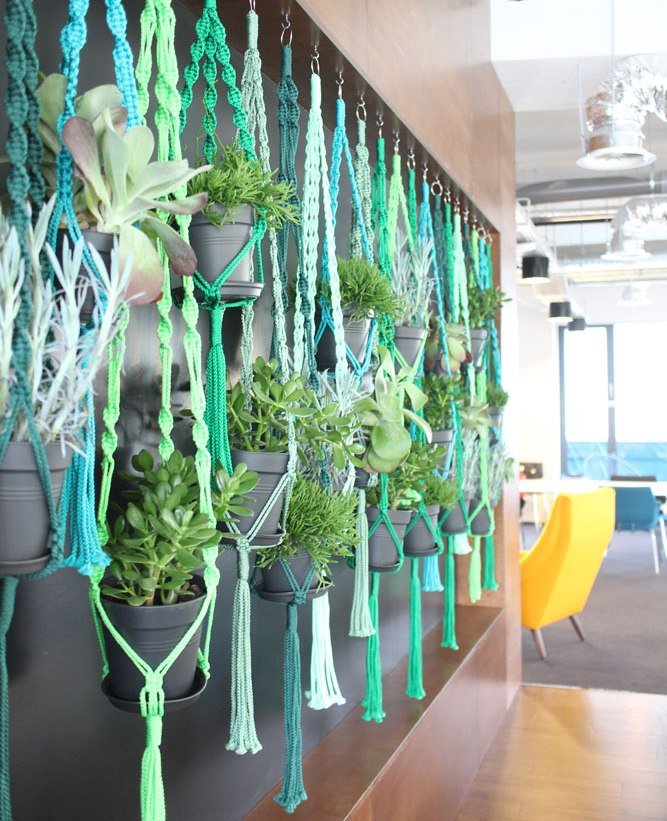
How to make a flowerpot out of a rope for flowers with your own hands
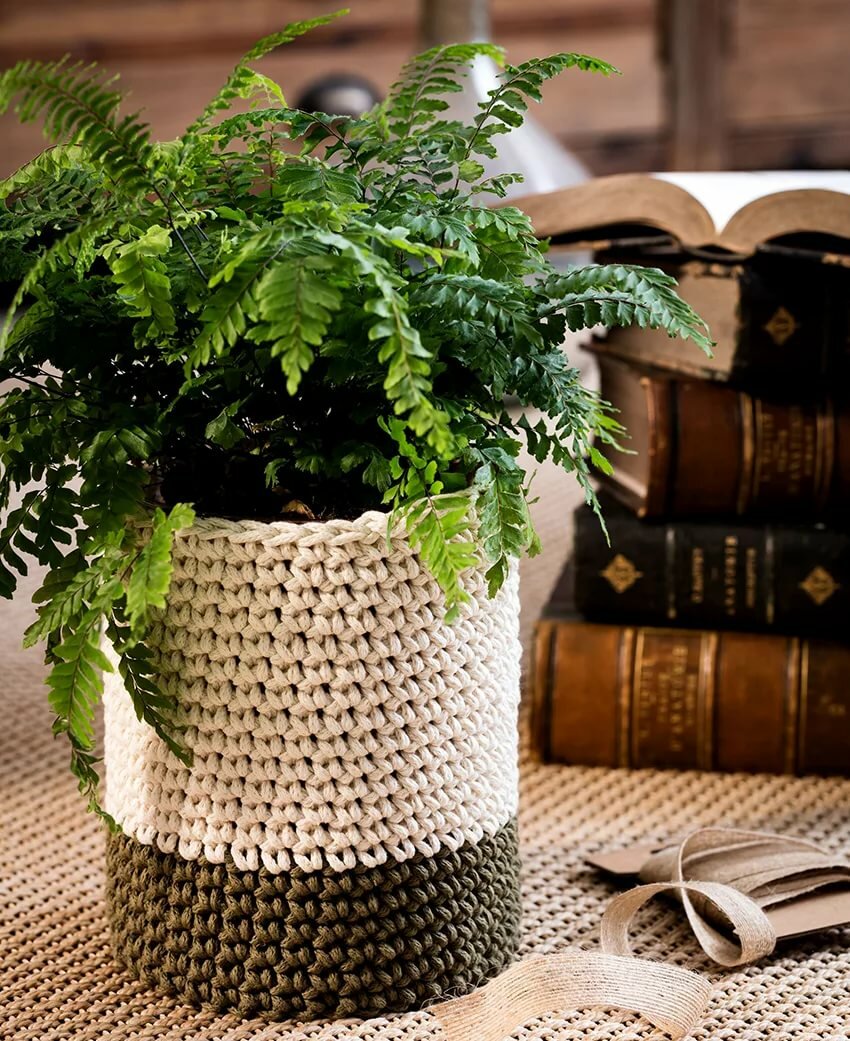
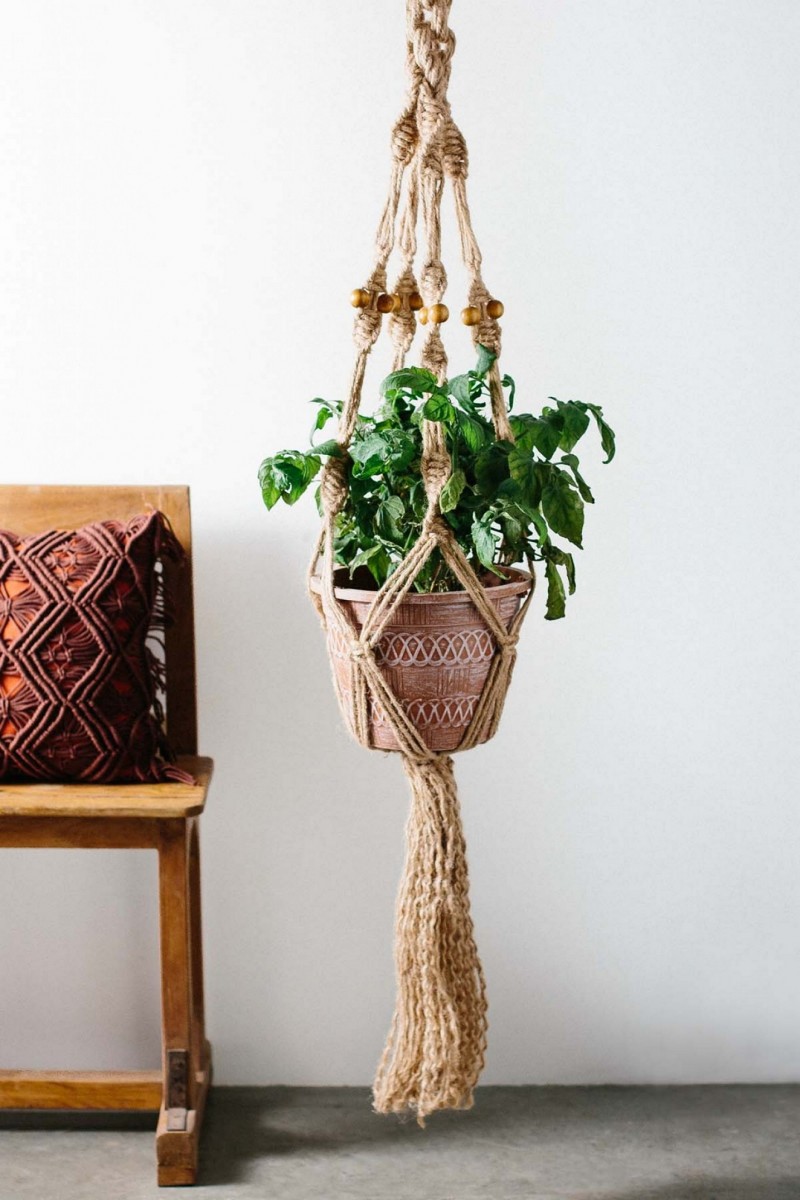
The largest number of vase options are made using the macrame technique. A planter for flowers can be created in a matter of minutes, which will allow you to get a simple arrangement. A more complex design will take several hours of painstaking manual work. If there is no weaving experience, it is better to start with a light scheme of macrame flower pots with your own hands.
 There are a lot of options on how to make a pots with your own hands from a rope.
To make a simple structure, you will need three cords 0.5 cm thick and 2.5 m long, a metal ring with a diameter of 2.5-3 cm, a hook, a colored rope and scissors. Each rope should be threaded through a metal ring so that it is in the middle of the segments. The result is six ropes, each 1.25 m long. Of all the elements, a knot is made at the ring itself. It should be tight enough. To do this, each rope must be pulled up separately.
On a note! To create a pots using the macrame technique, you can use a thin twine or clothesline.
For the convenience of further work, the ring is suspended on a hook or cabinet handle, which will free both hands. The ropes are grouped in pairs to form knots 45 cm below the ring. Next, ropes from adjacent pairs are connected with knots tying at a distance of 15 cm below the previous one. As a result of using such a scheme of macrame flower pots, a zigzag pattern is obtained between the ropes. If the flower pot is large, the previous step can be repeated.
Note! The knots should be tight and level.
You can make a very beautiful and original flower pot made of rope with your own hands. All ropes are gathered together and tied into a final tight knot at a distance of 13-15 cm from the last set of knots
The resulting pots can be decorated with colored threads by wrapping ropes in some places. A flowerpot with a flower is inserted into the finished pendant, and the composition is hung on the prepared place. A hand-made planter for petunias or other climbing flowering plants that can be planted in glass vases looks very organic
All ropes are gathered together and tied into a final tight knot at a distance of 13-15 cm from the last set of knots. The resulting pots can be decorated with colored threads by wrapping ropes in some places. A flowerpot with a flower is inserted into the finished pendant, and the composition is hung on the prepared place. A hand-made planter for petunias or other climbing flowering plants that can be planted in glass vases looks very organic.
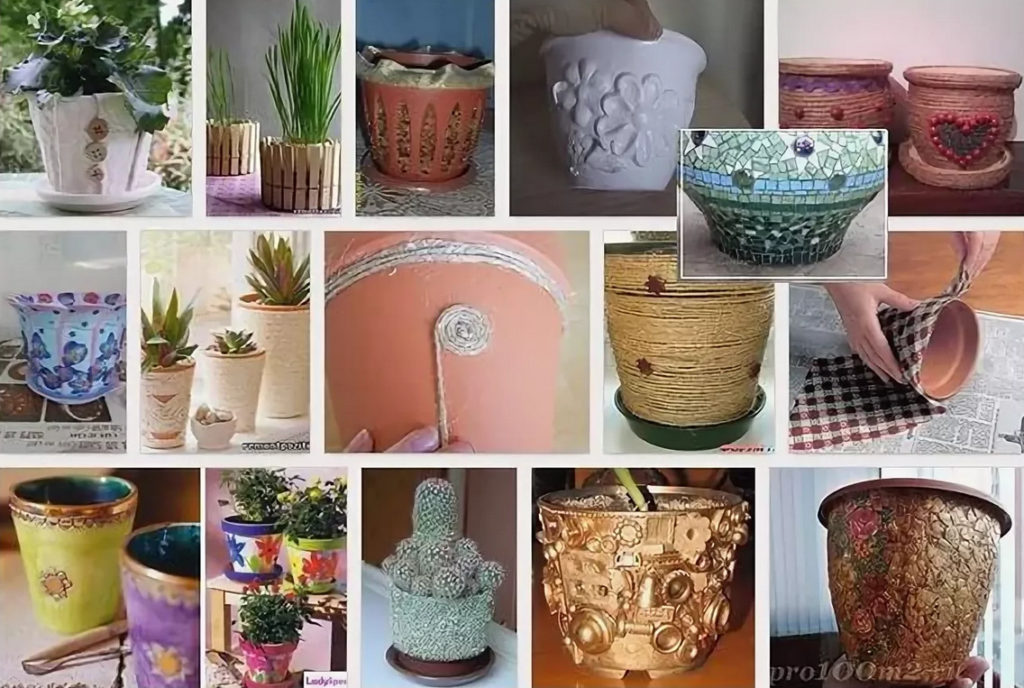
Eggshell as a decoration tool
Eggshells are quite popular, and most importantly, an affordable decoration tool. The shell can be used in a natural color or in the desired tone.
It is very important, before starting decorating the pots, remove the film from the shell, degrease it, rinse it, dry it well. Eggshell pot decor is quite simple in its technique
First, you need to prepare the foundation. The first step is to cover the area of the flowerpot with glue on which the material will be attached.

After, with the convex side outward, a fragment of the shell is attached. It must be attached tightly to the surface, but very carefully so as not to break it. You can correct the position of the parts with a needle or toothpick. After all the work done, the decorated surface is covered with PVA glue.
 The next step is painting. If the shell is already colored, then it can only be brightened. Another option is to completely paint the surface, which can be both the main background and the basis for further decoration. At the end of the robots, in order to fix the product, it is varnished.
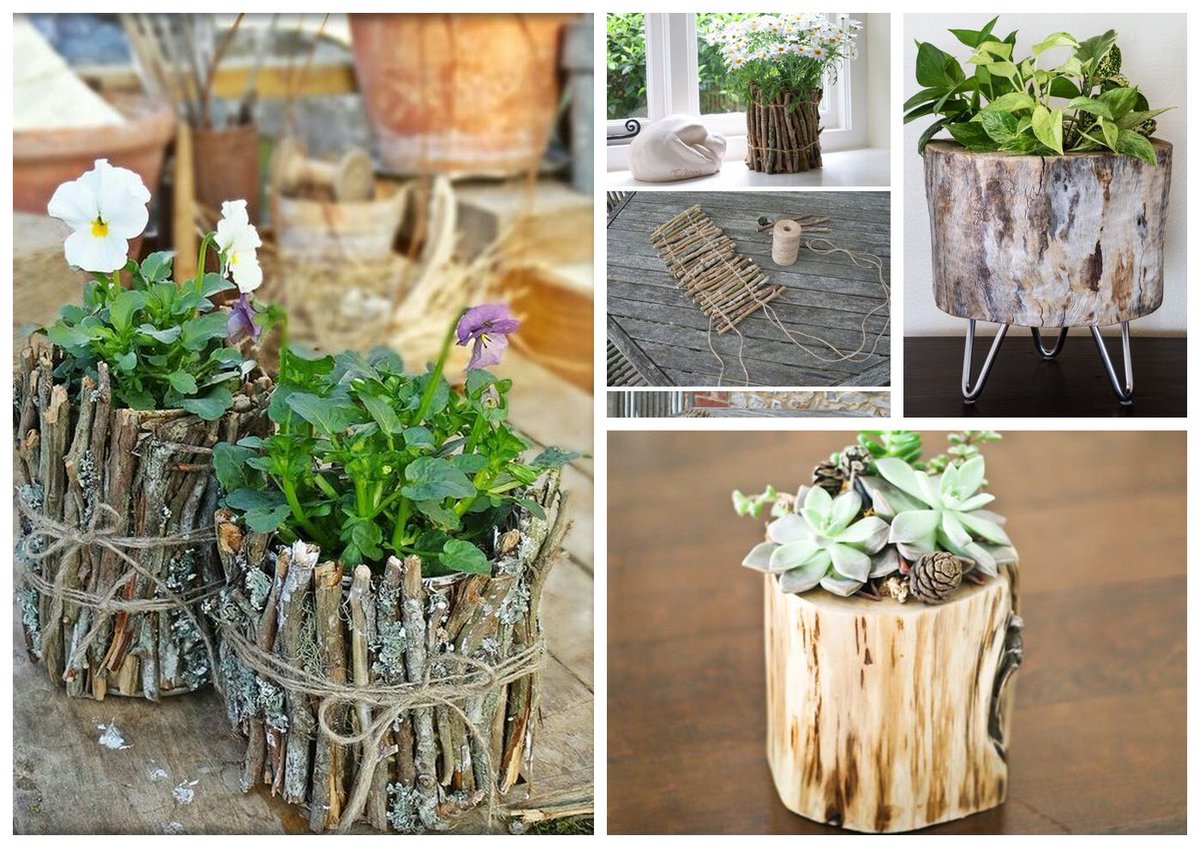
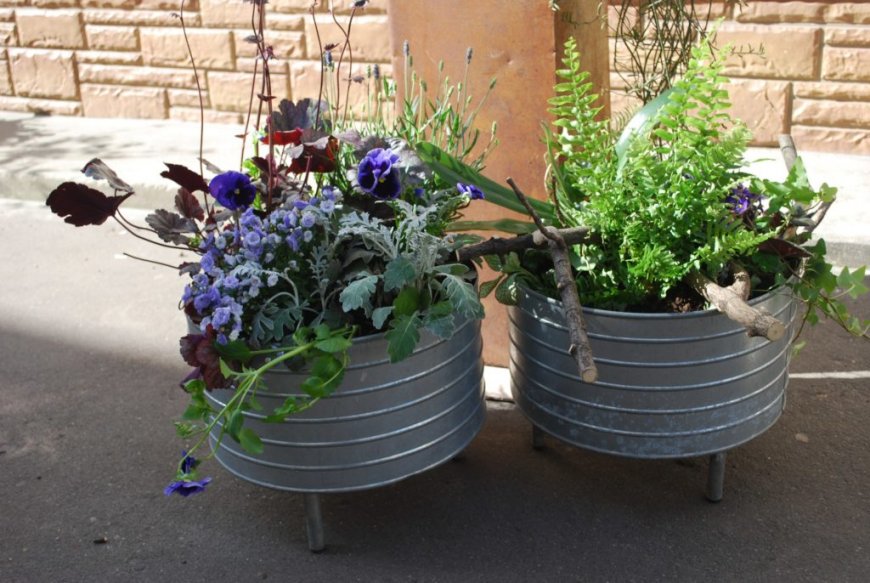
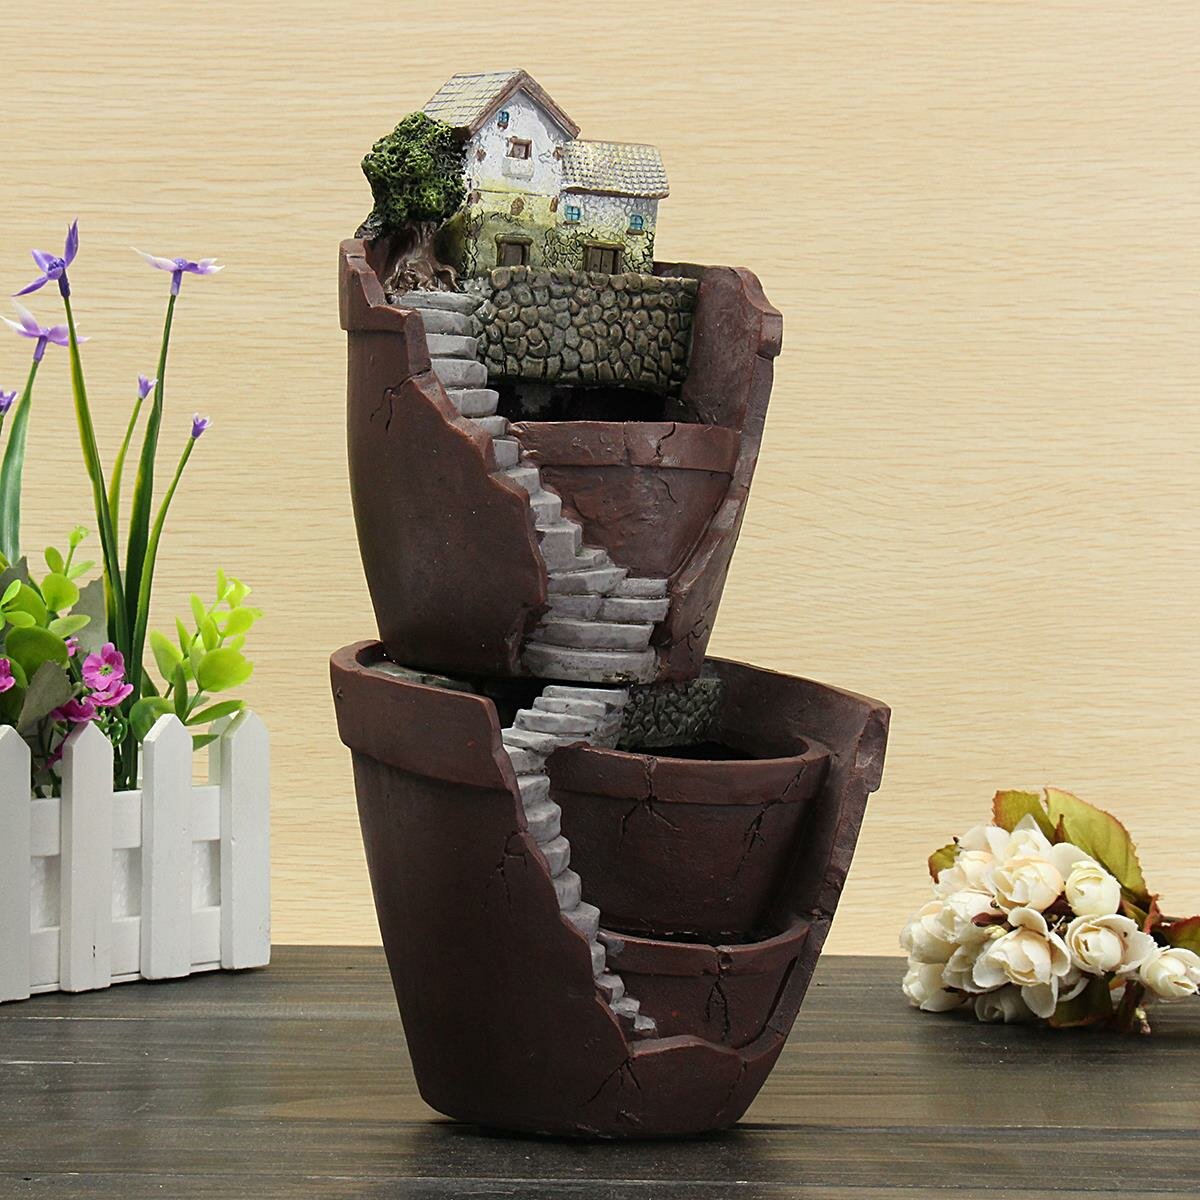
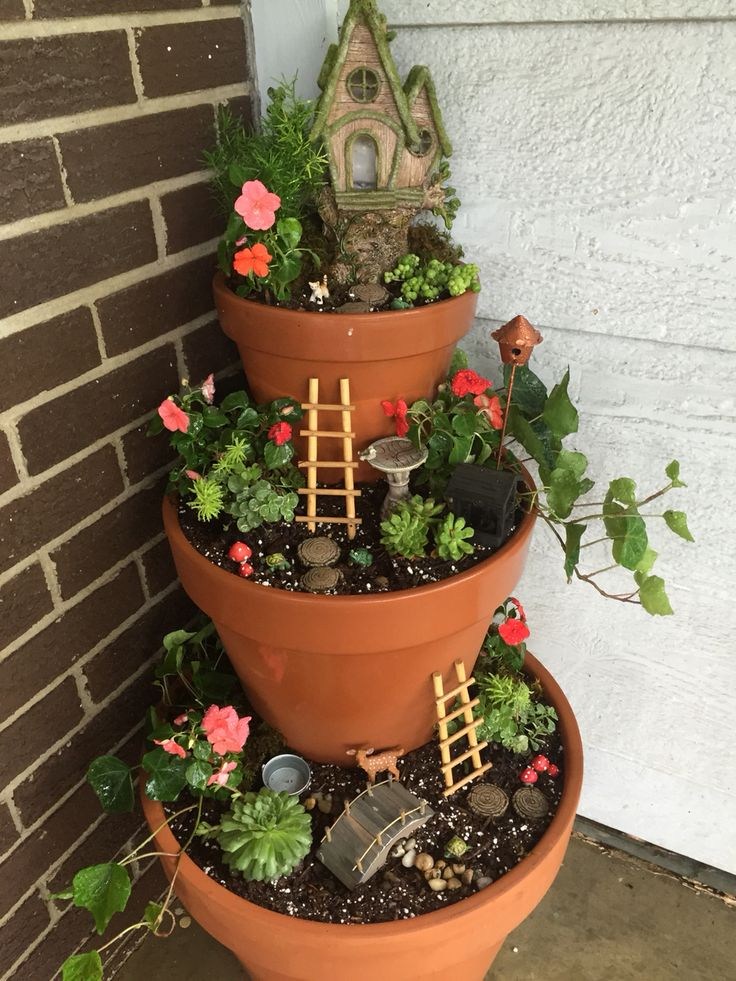
Ideas for the street, garden, veranda
Making outdoor pots with your own hands is a special pleasure.Firstly, in the open air, between trees or at a distance from the path, any minor design flaws will not be evident, which in no way could be allowed indoors.


Such pots can be made from natural materials:
- hollow out a recess in an old tree stump, a large log, a stump of a log
- from decorative dried pumpkin;
- from half a coconut shell,
- from large shells,
- from glued together small stones,
- weave from branches in the form of a small wattle fence.

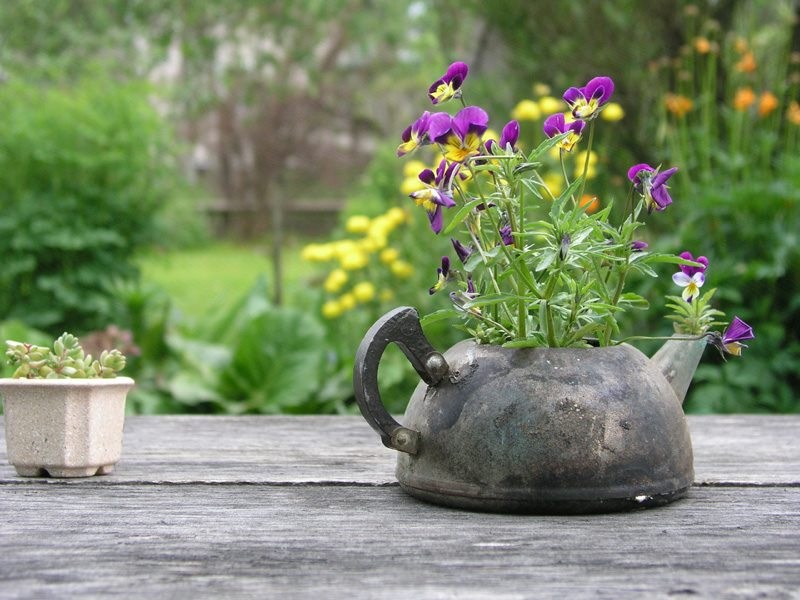
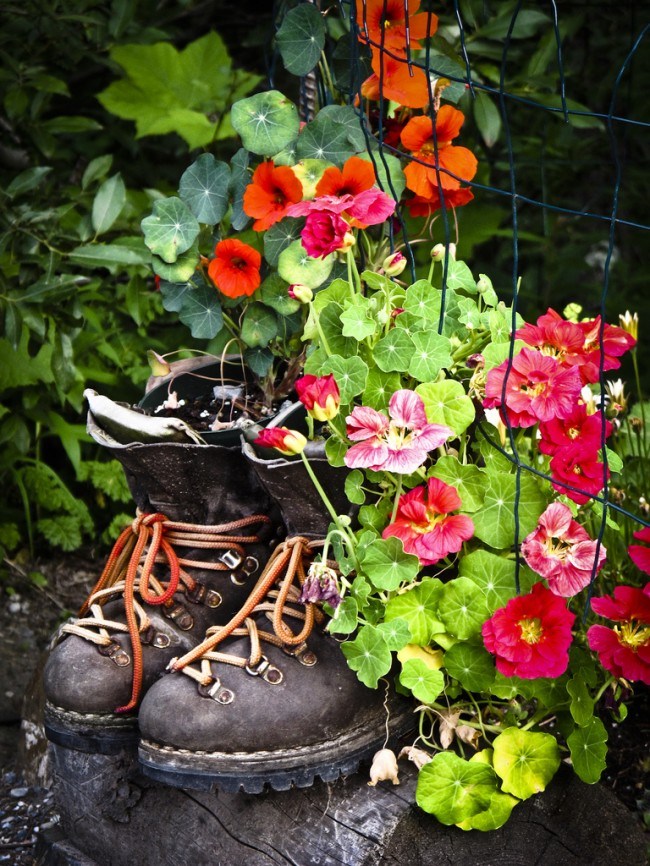
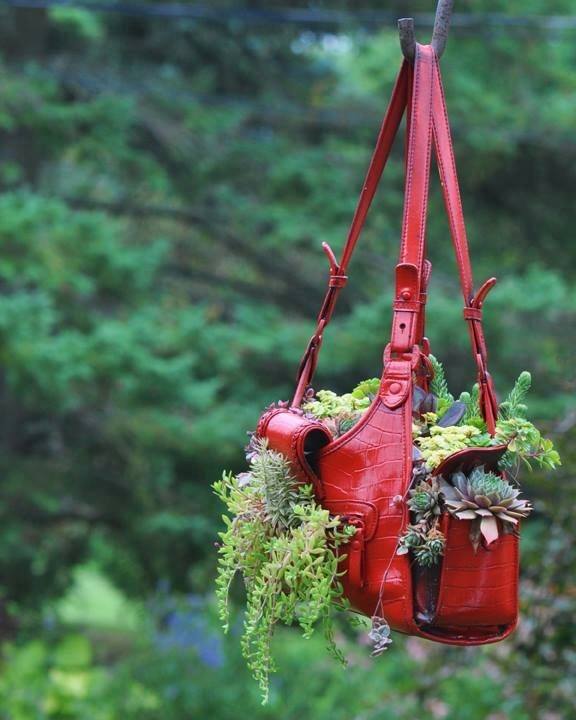
They often use old things. So, on the Internet, you can find many photos of pots made with your own hands from old shoes, suitcases, bags, pots, samovars, cracked or chipped porcelain dishes, hats nailed to the fence, even armchairs and sofas.

Remnants of construction waste are also suitable: cuttings from wide pipes, remnants of tiles. But this material usually needs decoration.

It's okay that street pots are short-lived and rarely overwinter without spoiling. You can implement fresh ideas in the new season.

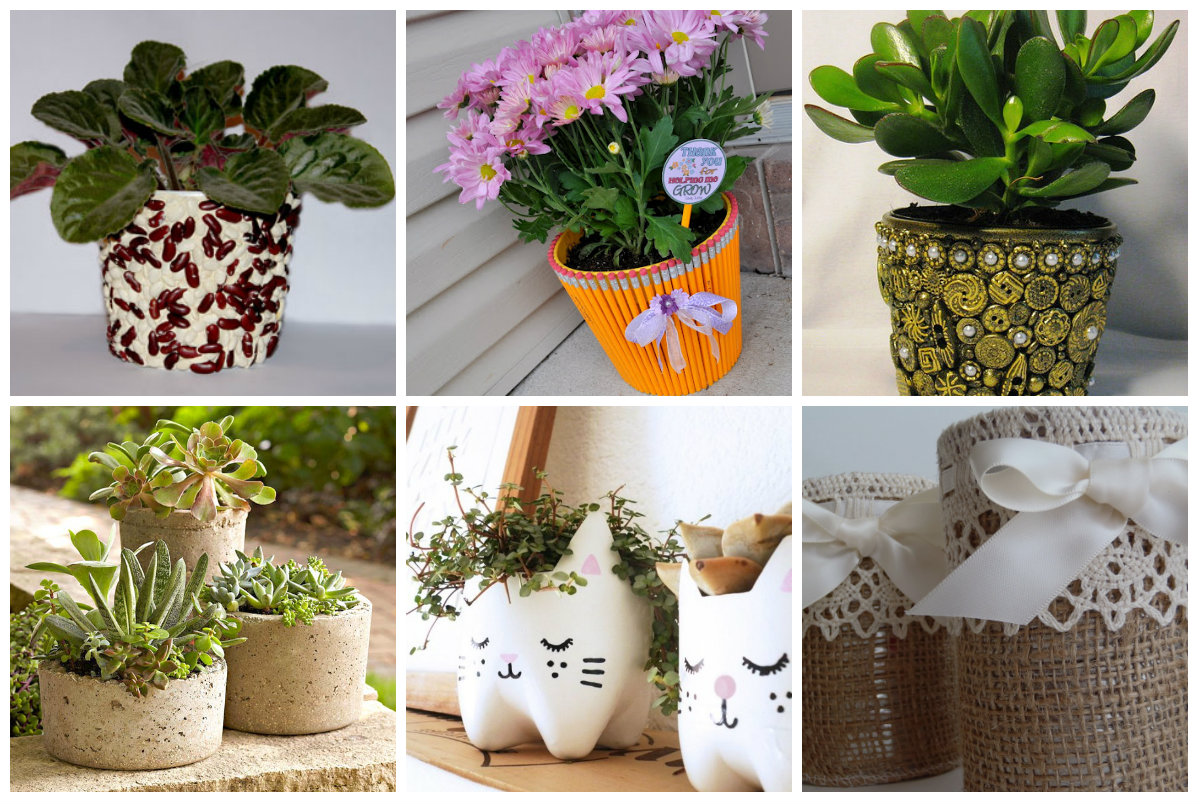
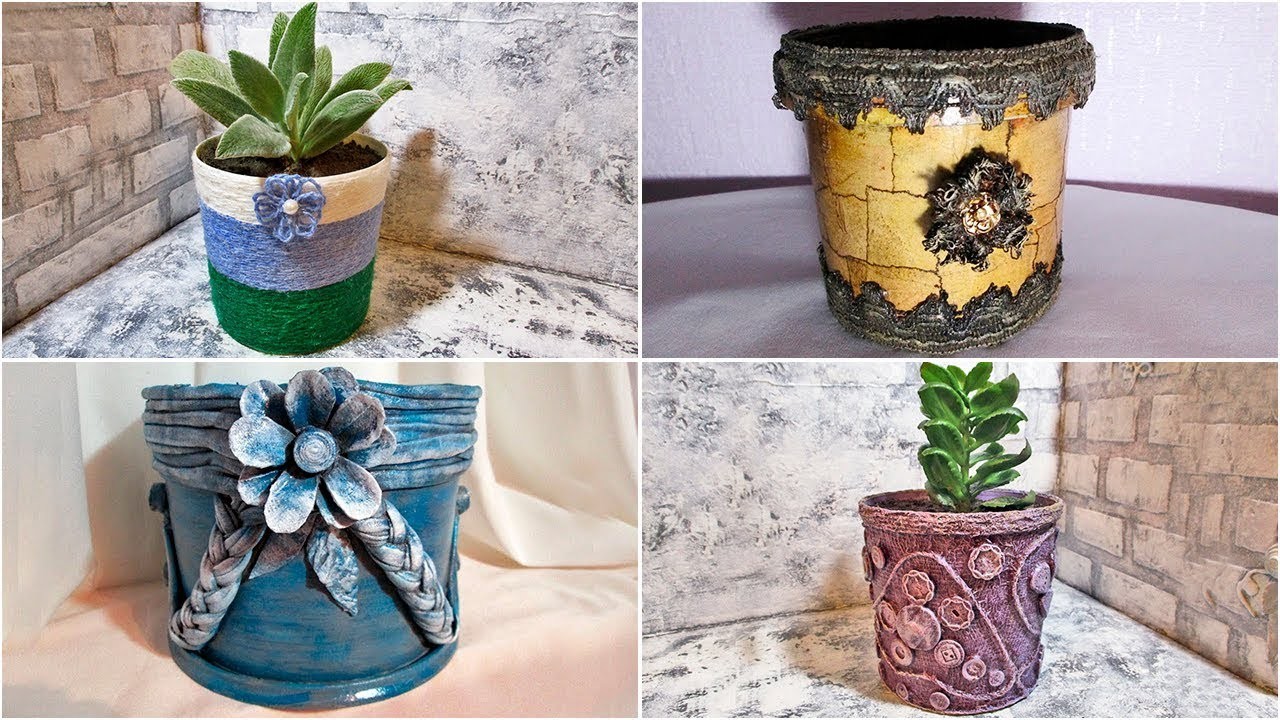
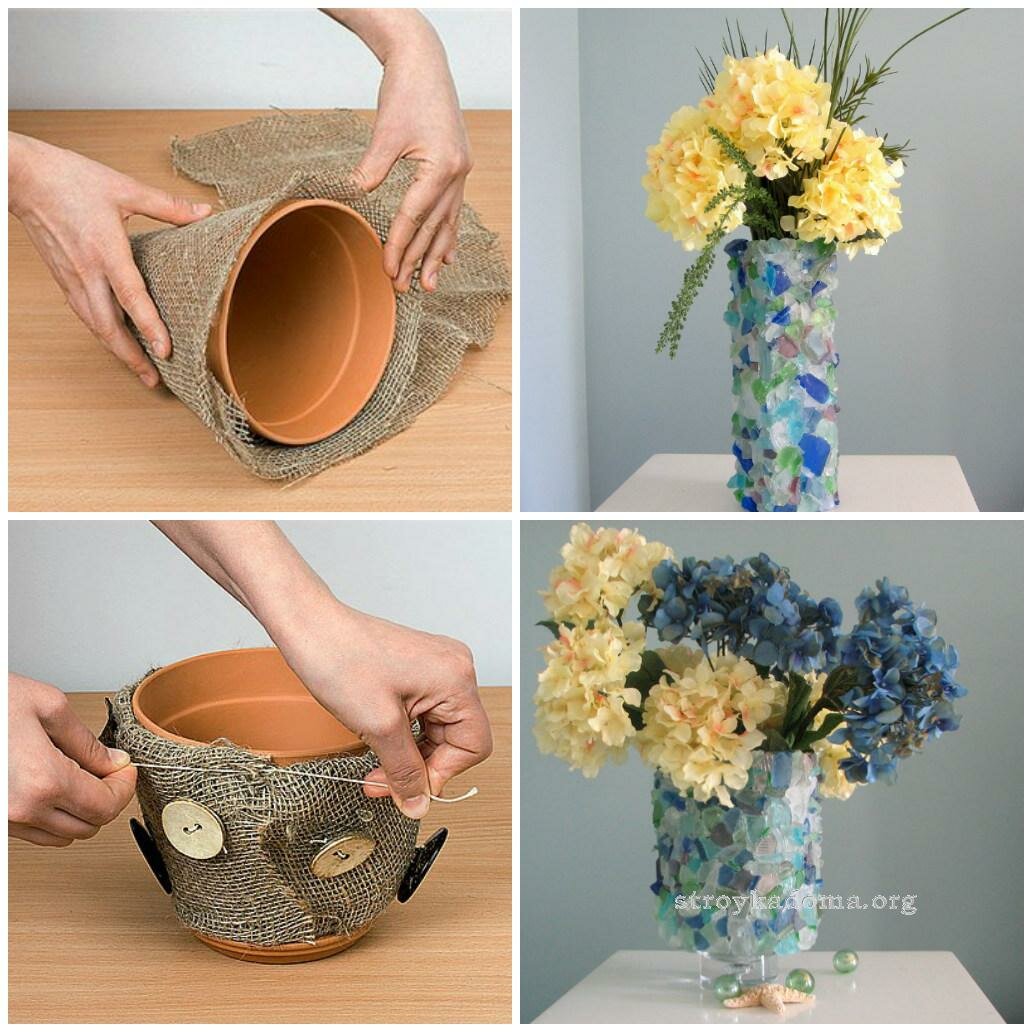
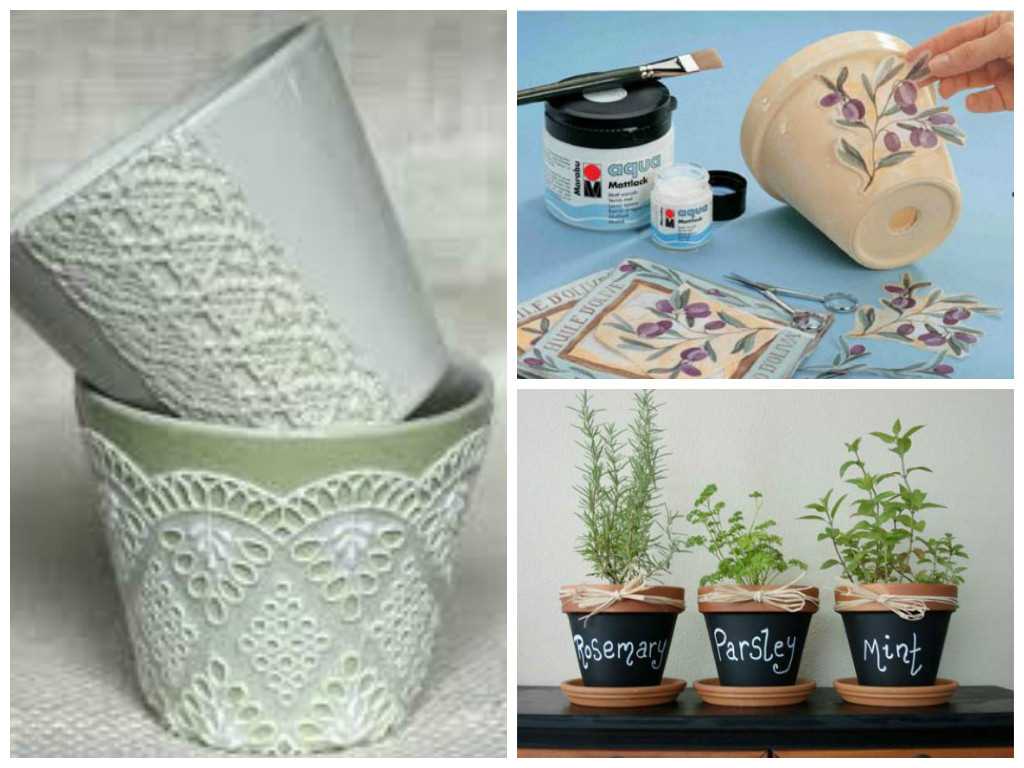
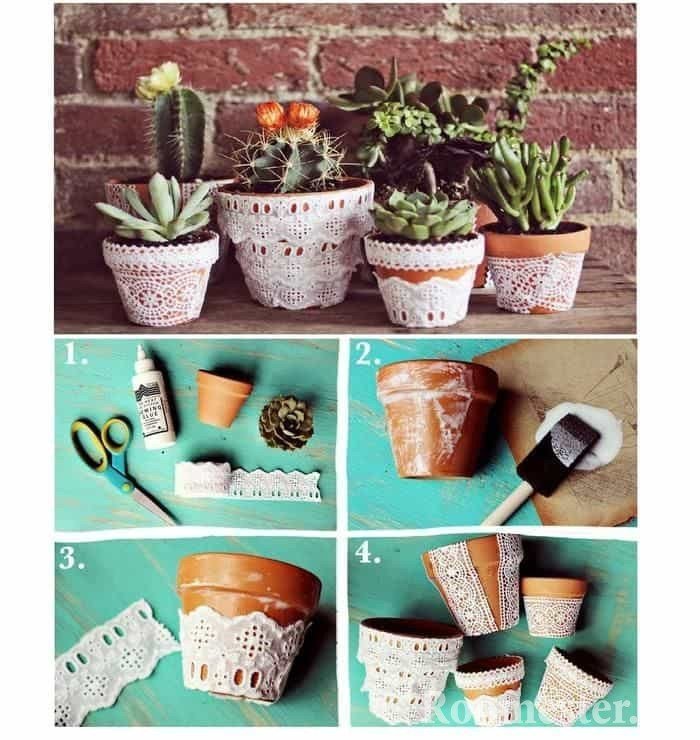
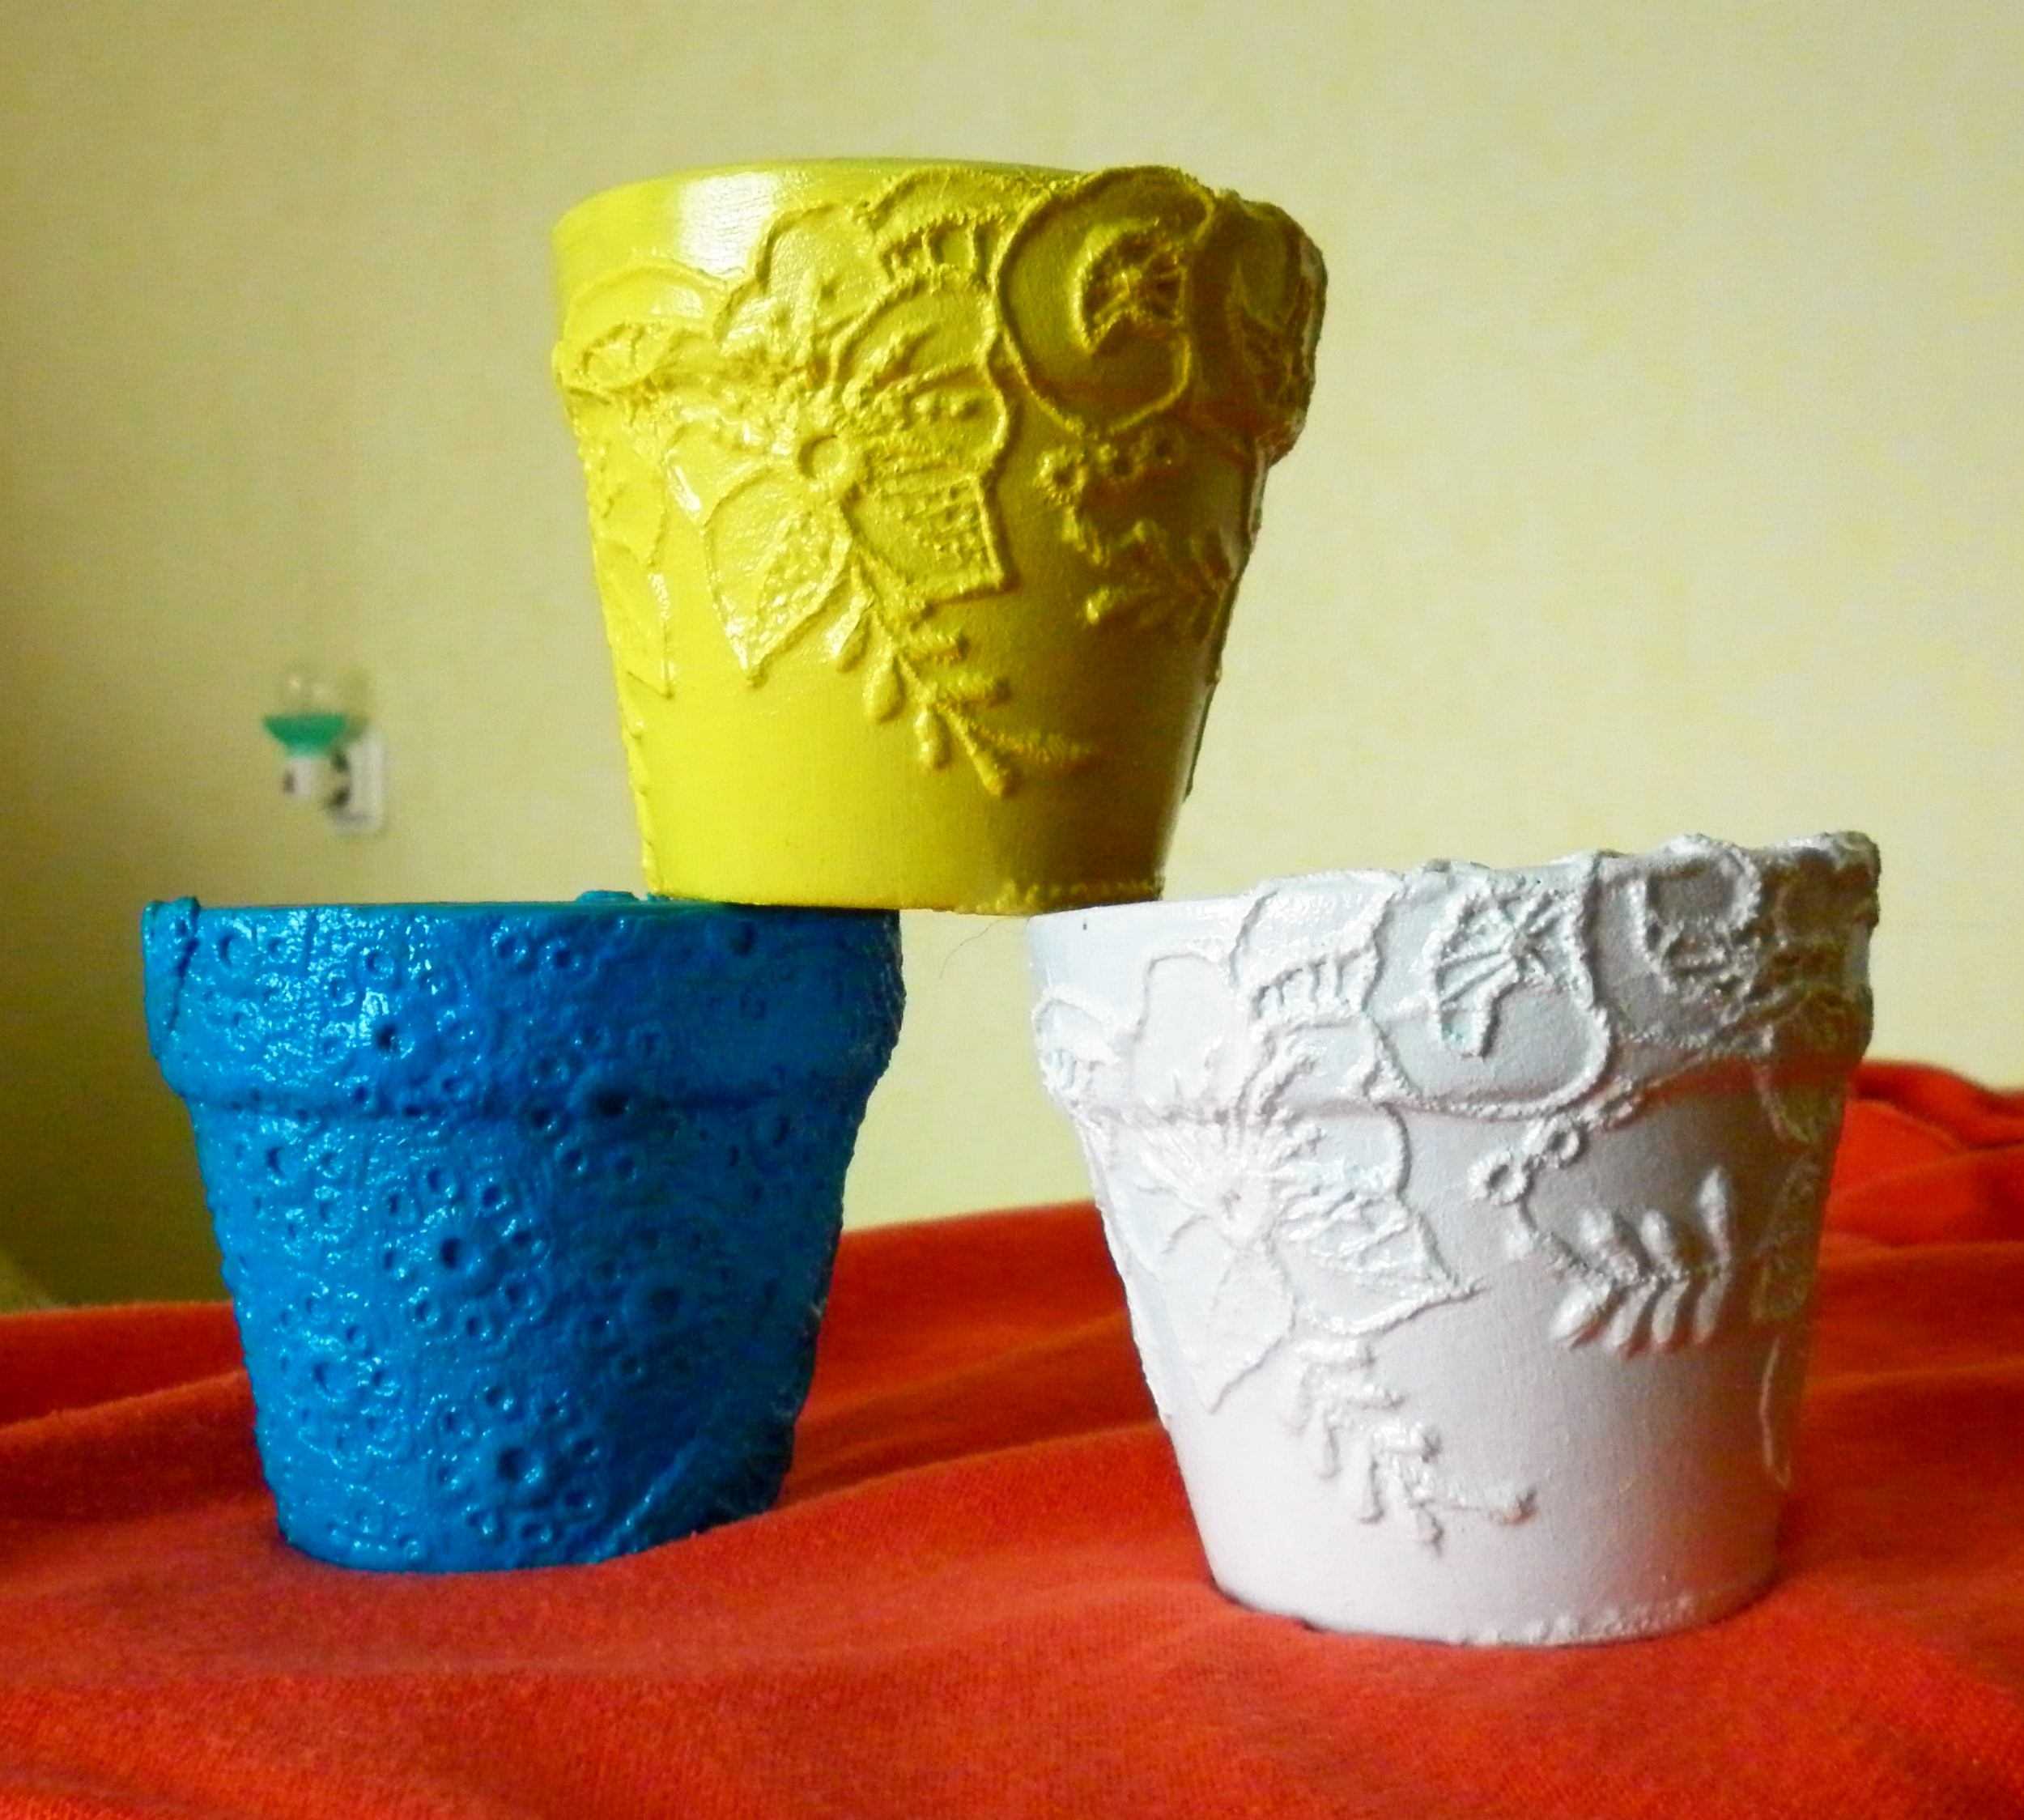
Unique decor using lace and burlap with your own hands
A very delicate and magical way of decorating flower pots with lace or lace with burlap.
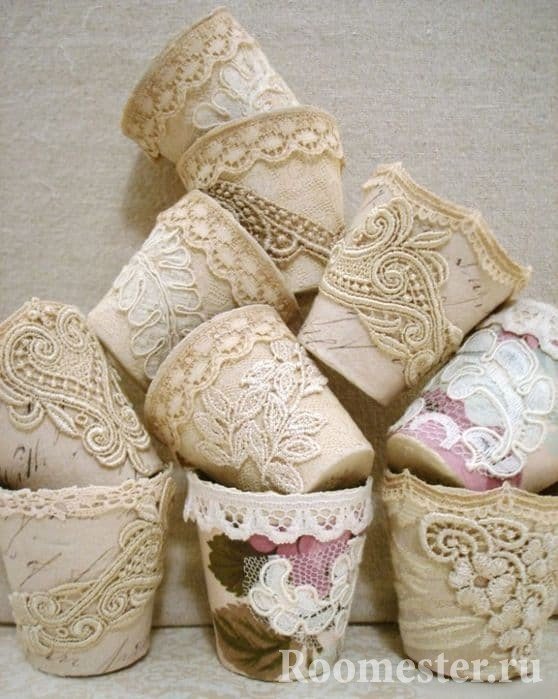 Working with lace is quite simple. In order to decorate the container, you need to apply PVA glue to the inside of the material and glue the fragment. In the same way, we glue a piece of burlap. The combination of these two materials turns out to be very interesting. You can also decorate with beads, beads, stones. In general, it all depends on your imagination. Additional elements must also be fixed with glue.
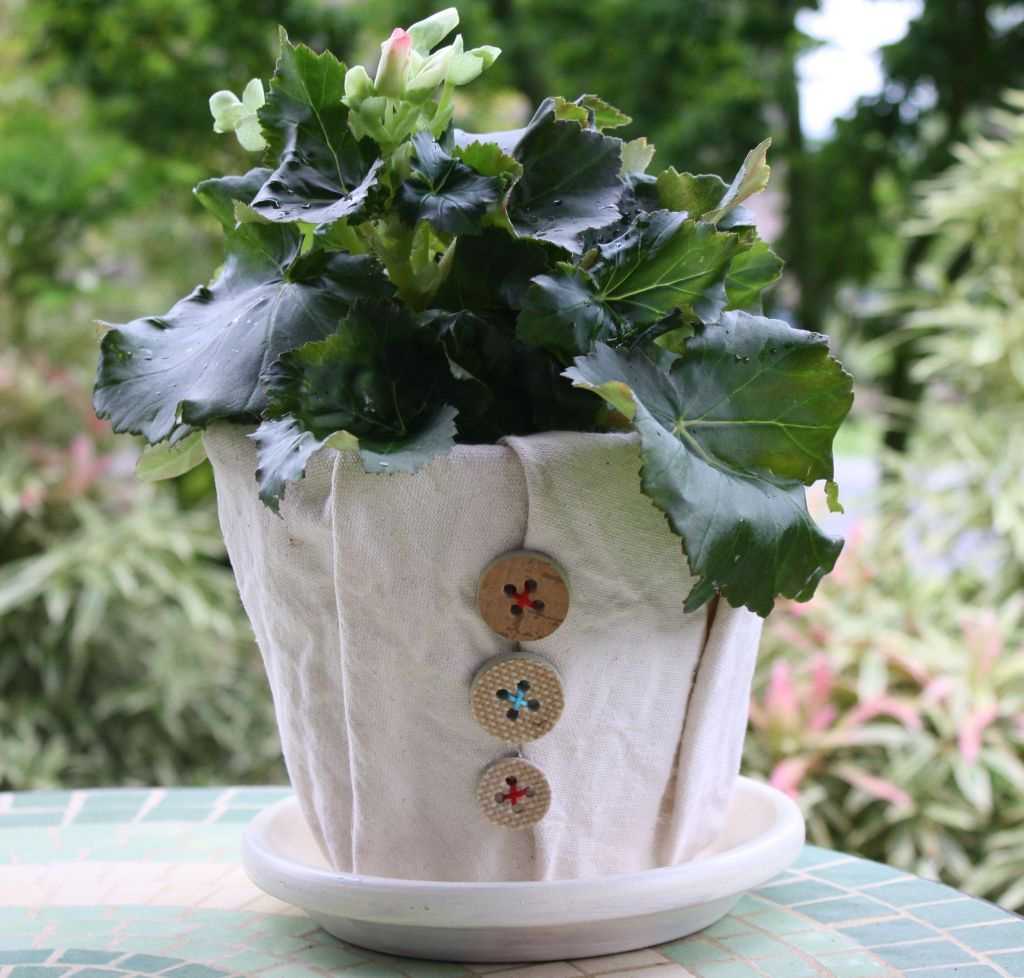
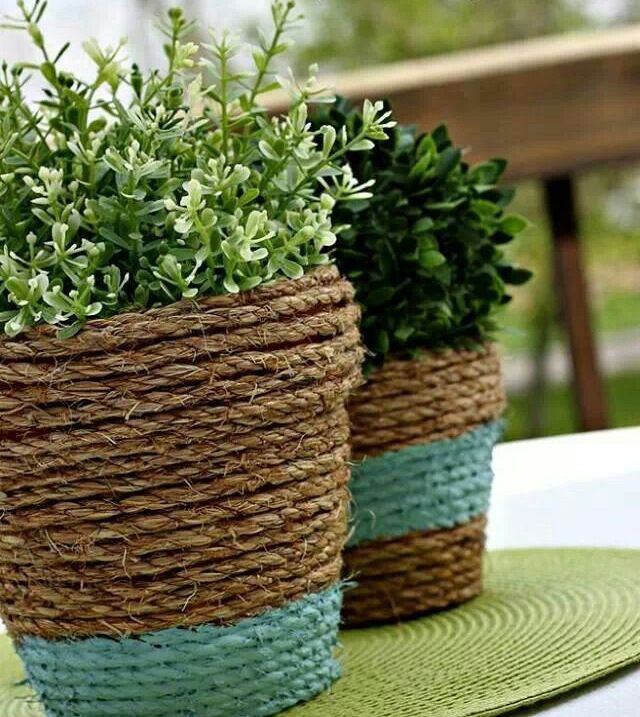
 Burlap can be used without lace, replacing it with rope. The pot will look very nice, completely placed in a small bag. In such cases, the sacking will be supported by a rope tied around the flowerpot.

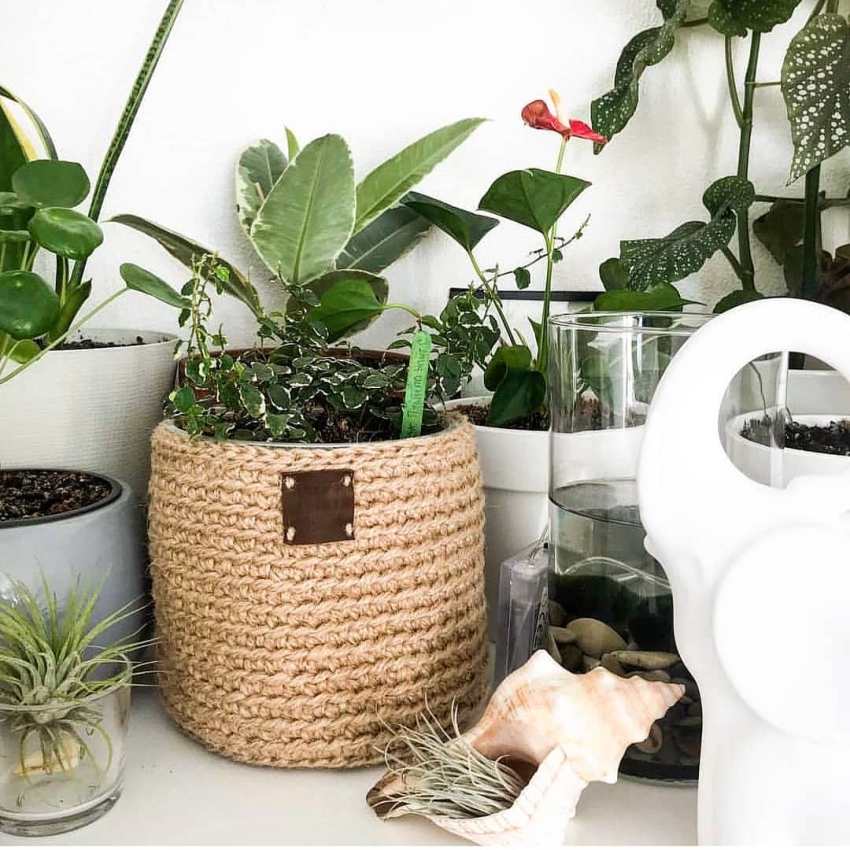
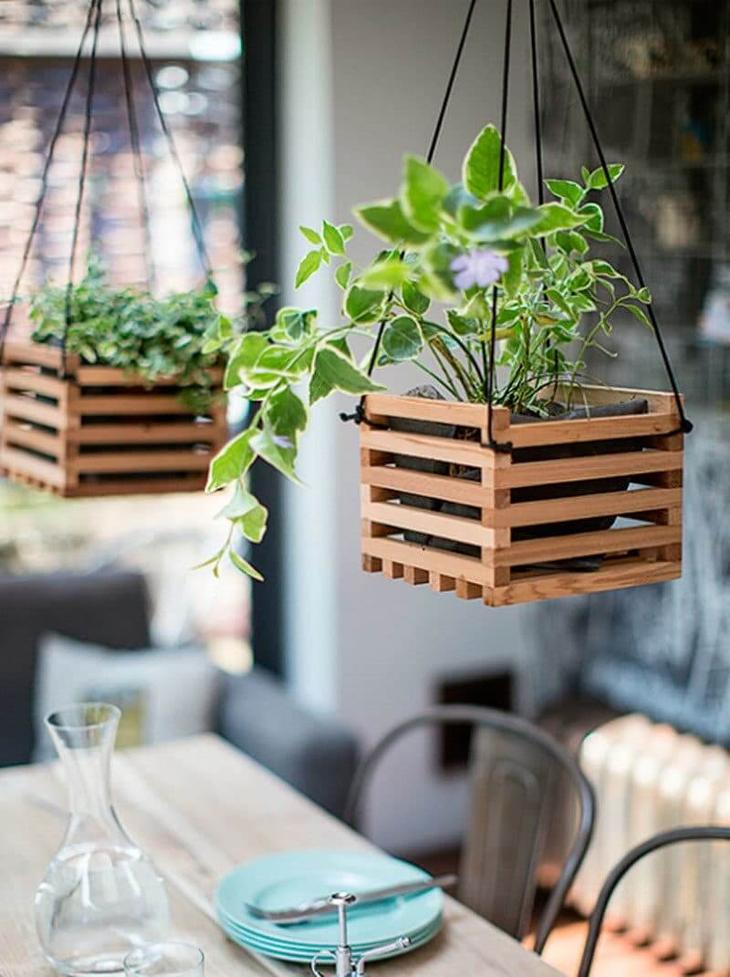
DIY hanging flower pots from straws
A handmade hanging planter made of straws fits perfectly into a modern interior with an innovative touch. For work, you need to prepare neon threads and straws.
 This hanging planter made of straws matches the interior with an innovative touch.
Before weaving a flowerpot with our own hands for flowers, a blank with a length of 100-150 cm is made from a rope, depending on the distance the flowerpot is located relative to the ceiling. All threads should be connected together and at one end, with an indent from the edge, tie a knot to make a tassel. The ropes must be fastened in pairs and laid out in the form of a cross into four sections. From each straw, you need to cut off a part of the product with a spring. Cut the elements into 2-3 pieces of the same length. For each thread (and there are eight of them) put on a straw, fixing in pairs at the end with a knot.
Spread out the ropes again in the shape of a cross. Only now a pair of threads is formed from two elements adjacent to the section. One straw is put on each thread with fixation of adjacent elements with a knot at the end. The process is repeated until the finished product reaches the required size. A flower pot is inserted inside the planter. Suspensions are created from the remaining long ends of the rope, which allows you to hang the composition on a hook or bar.
On a note! To make the pots made of straws look organically in the interior, it is recommended to make several such copies.
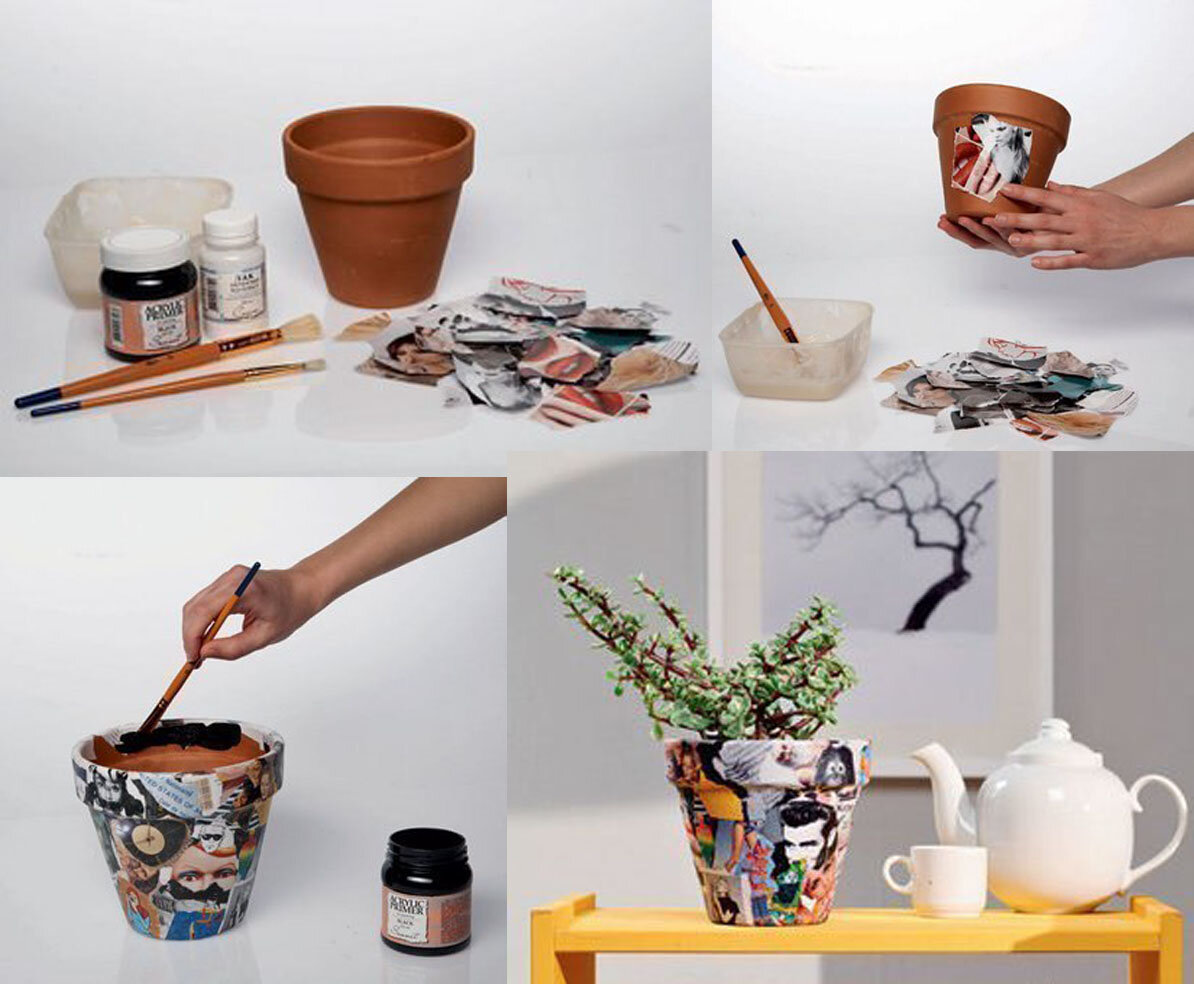
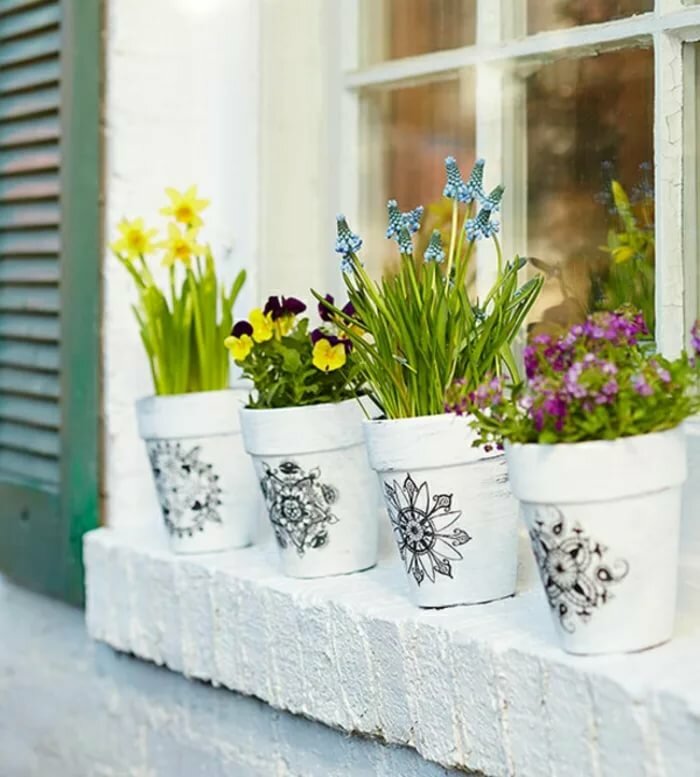
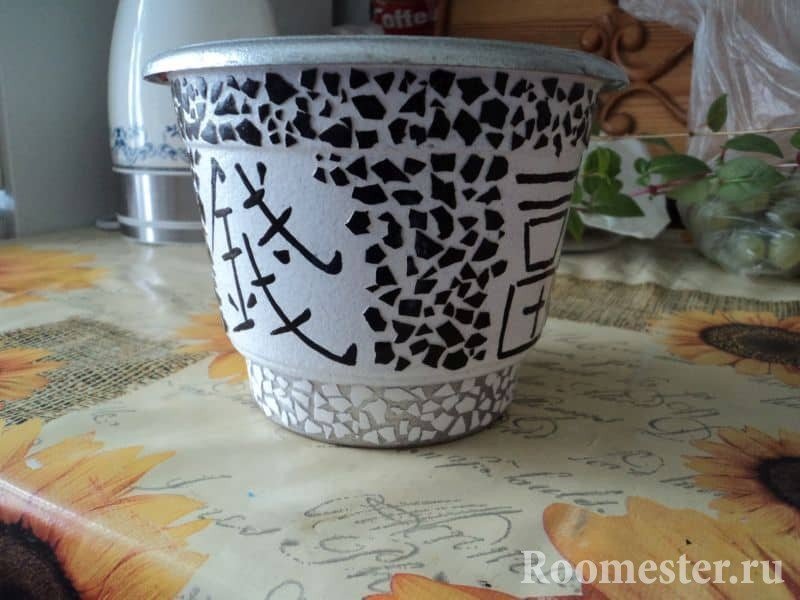
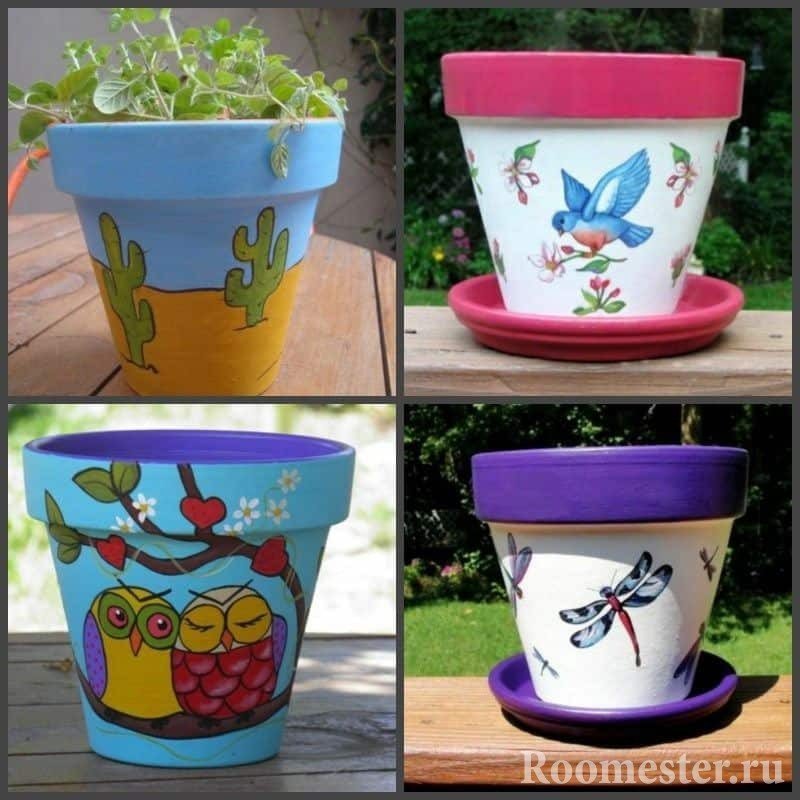
Flower pot decor with decals and drawings - master class
A drawing or inscription on a flower pot looks very mysterious, they bring a certain touch of magic. Decals and drawings on earthenware look very gorgeous, but you can also experiment on plastics and ceramics.
 Necessary:
- a pot (we have a clay pot, you can take it at your discretion);
- black and white acrylic paint;
- brush;
- glue;
- drawing (printed on a printer, you can use decals or stickers);
- paper towel;
- varnish;
- scissors.
Getting started: First, we take the pot. To decorate a semi-antique flower pot, use a brush to paint the surface unevenly with white paint. In order to give an uneven tonality, we paint about a third of the flowerpot gray. It happens as follows: in a separate container we mix black and white beauty, so that the shade turns out to be pale gray; take a paper towel and soak in gray beauty. With a napkin, lightly apply paint to the bottom of the flowerpot and leave it for a while, until it dries.
 While the flowerpot dries up, we prepare the drawing. Mirror image printed on photo paper must be cut out. After the drawing is cut out and the pot is dry, glue it to the surface (we dilute a little glue half with water). Lubricate the surface of the dishes and glue the drawing, pressing it down well. We leave for a while to dry.
 At the end of the time, take a sponge soaked in water, thoroughly moisten the image. After that, carefully roll up the top layer of paper so that only the drawing remains. Dry thoroughly. To protect the image or inscription, we cover the surface with varnish and that's it, the decor is complete.
"Magic" shell - to help the decorator ↑
A beneficial finishing tool - delicately refined, amenable to crushing and any correction - is the shell, peeled from boiled eggs. It can be either snow-white or dark cream. If desired, you can tint it by boiling it together with the onion peel or immersing it in a solution with paint - the plates easily absorb any color and hold it for a long time. Do not forget to remove the film from the peel, degrease and dry the delicate finishing component before starting the design manipulations!
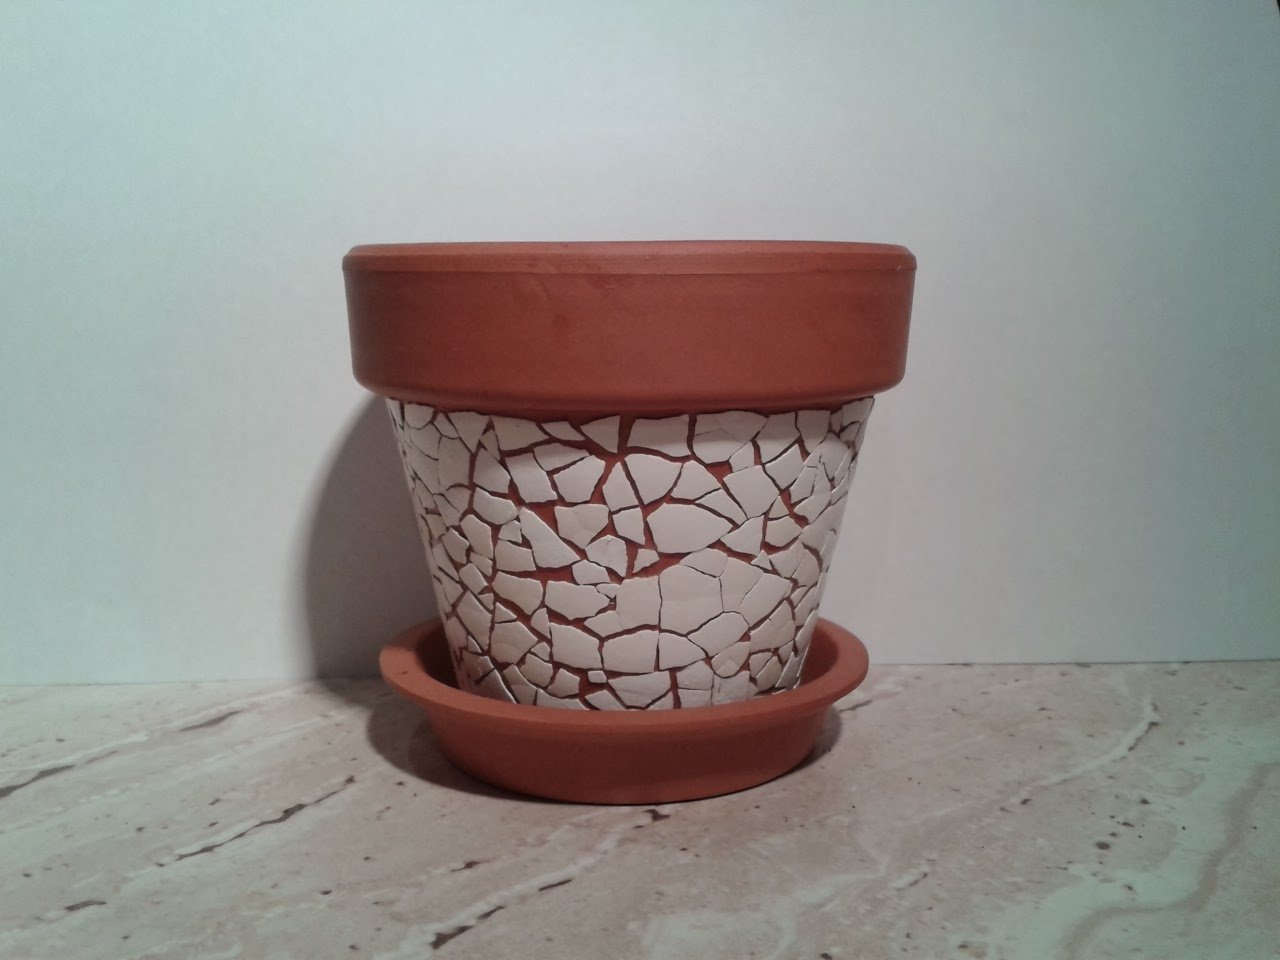
Plots of light egg "ripples" on a black-brown, burgundy, blue background (a kind of homemade "gzhel") are impressive. Dark "zebra" spots look very elegant on a white field. Acrylic paint creates the desired background on an empty vase easily. This design method successfully achieves the impression of a crackle - an elegant pattern built on the alternation of barely noticeable cobweb-like cracks, evoking associations with "aged" products.
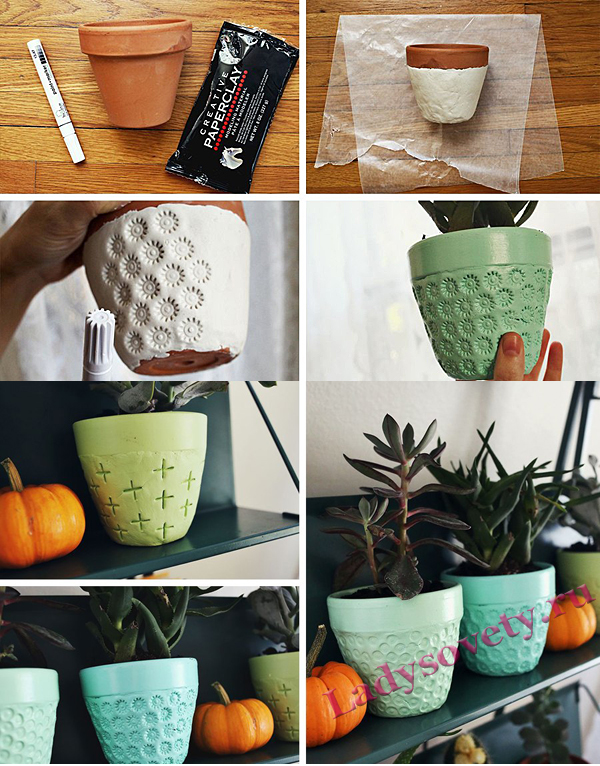
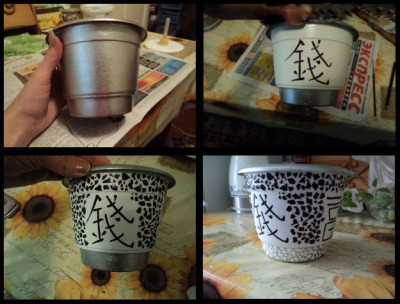 This is how the process of decorating an oriental-style pot with eggshell looks like
 Pots decorated with unpainted egg cells can be cute too
The sequence of application of the "shell" mesh fits in two main stages (see below).
Preparing the base
The area is covered with glue in the place to which the shell fragment will be applied, with its concave side facing the base background. It should be gently pressed with your fingers - so that it fits snugly to the surface. If you want to give the curls-patterns the intended outlines - work on the arrangement of the parts, armed with a thin awl, needle or toothpick. If the gaps seem large to you, place additional small scales between them. Then comes the turn of fixing with PVA glue.
We paint and paint
The technique of this phase can be heterogeneous. If the shell has already been painted earlier, it can only be slightly shaded, making it clearer, sharper - making it stand out against the light. Just lightly touch the convex parts with a paintbrush - so that they appear sharper, seem more expressive. For craquelure, decorating flower pots with your own hands will look a little more complicated. Solid coloring on the glued shell is possible. In the cracks, it is advisable to draw with a thin brush (on it - a different color). To strengthen the pattern, the surface is varnished.
Building materials vessels
Using various metal frames in the form of a bucket or other container, you can make blanks for pots from polymer gypsum or cement. The selected vessel must be circled with a metal wire, then remove the resulting mesh and cover it in several layers with strips of cloth dipped in a solution.
Then make a thickening by lubricating the resulting frame with plaster or cement.After drying, the surface must be sanded, preparing the product for painting and decoration.
For lovers of garden sculptures, polyurethane foam can become a favorite material. From it, using various templates, you can sculpt figures that are resistant to external influences.
