Varieties of mosquito nets
The mosquito netting has certain characteristics.
The first one is the cell size, which is in the range of 0.5 - 1.2 mm. With a decrease in the lumen of the cell, the protective capacity of the mesh increases - less dust penetrates into the room. But it should be borne in mind that a cloth with cells of the minimum size needs to be washed more often - as it gets dirty, its permeability to air and light quickly deteriorates. A canvas with a mesh of the maximum size is almost not an obstacle for dust. Therefore, the best option when choosing the degree of protection would be a mesh with a medium-sized cell - from 0.8 to 1 mm.
The second most important characteristic of the mesh fabric, tied to the size of the cell - the material of manufacture from which the canvas is made:
- cotton - with a high resistance to ultraviolet light and a retention capacity (pile on the threads), a cotton mesh is rarely used to protect against mosquitoes from the outside, since the lack of resistance to moisture and mold makes it fragile;
- polyester (nylon) - in the absence of any outstanding individual characteristics, a canvas made of a thread up to 0.8 mm thick, withstanding a weight of up to 4 kg, is strong enough, durable, cheap and therefore most common for external protection against mosquitoes;
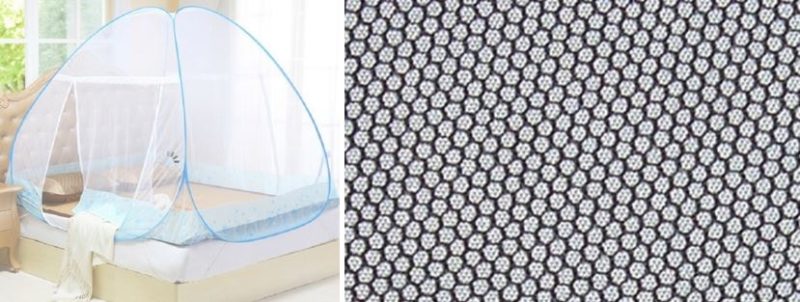
Fine mesh mosquito fabric: cotton on the left, polyester on the right.
- nylon - a polymer for the production of an anti-allergenic mesh of a complex fine-mesh weaving "anti-dust", which traps even flower pollen;
- steel thread - a cloth woven from steel wire is widespread due to its high strength, but the price of a material with a protective zinc coating or stainless steel is quite high;
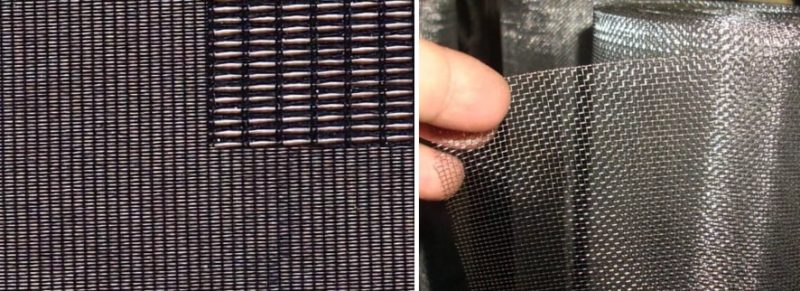
Mesh material: on the left - "anti-dust", on the right - "anti-cat" made of stainless steel
fiberglass (PVC coated fiberglass) is the best choice due to the high transparency and durability of the fabric, which is non-combustible and resistant to all atmospheric factors.
A significant factor when choosing a mesh is also its color, which affects light transmission, transparency and compliance with the interior. The most transparent for viewing is a gray canvas, but if the window is not panoramic, this factor can be compromised in favor of the aesthetics of the canvas and choose a mesh of a different color.

Colored mesh for mosquito protection
In the presence of pets in the house, the strength of the cellular canvas is of particular importance, which must withstand the effects of claws, teeth or the weight of pets. The meshes capable of withstanding these factors are grouped into an “anti-cat” group and are available in polyester, fiberglass and metal (steel woven and aluminum perforated).
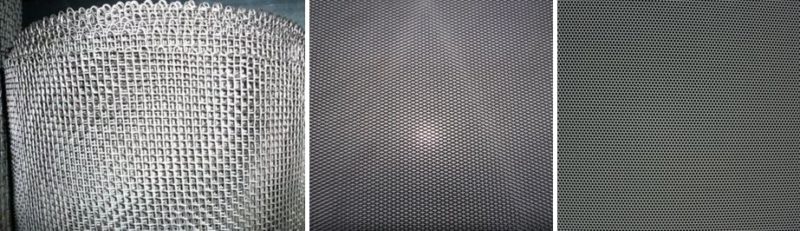
Types of metal meshes of the "anticoshka" class: 1 - woven steel, 2, 3 - aluminum perforated.
The durability of this class of honeycomb canvases allows them to be used for mosquito-proof devices installed both on large-format windows and on doorways.
Among the products offered by the modern market, mosquito blankets from such foreign manufacturers as the German Roto (Roto Frank AG), the Danish Velux (Velux Group), the Polish Fakro (Fakro Group) and the American Pfeiffer ( Phifer & Company).
Options and making a mosquito net yourself
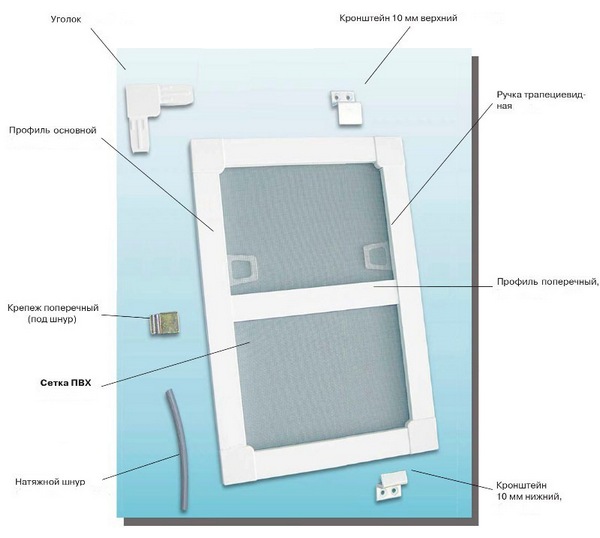
If you plan to make a mosquito net with your own hands, they often use ready-made solutions for self-assembly. The kit for the frame structure includes a set of fasteners, a cellular fabric, a seal, a profile, and handles.It is also important to make a structure with your own hands on the basis of a cable channel. For the economical arrangement of a window system in a private house, it is easy to make a frameless version of a mosquito.
Tools and materials
To assemble a mosquito net from a purchased kit, you will need the following tools:
- electric drill;
- screwdriver;
- hacksaw for metal;
- tape measure, assembly knife.

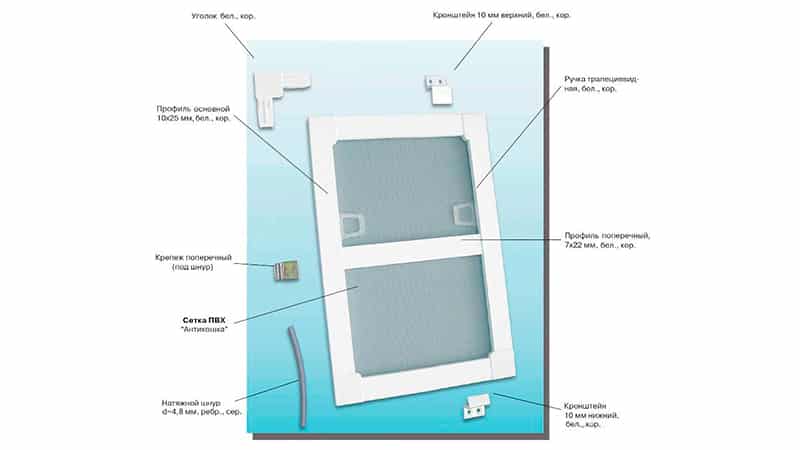
The ready-made set includes:
- frame profiles - 3 pcs. length 1.5 m;
- impost - transverse profile - 75 cm;
- bracket for impost - 2 pcs.;
- corners - 4 pcs.;
- mesh - 1.6x0.8 m;
- rubber cord - 4.6 m;
- handles - 2 pcs.;
- self-tapping screws.
The set is complemented by brackets of different lengths for fastening the product to the window frame.
Preparatory work
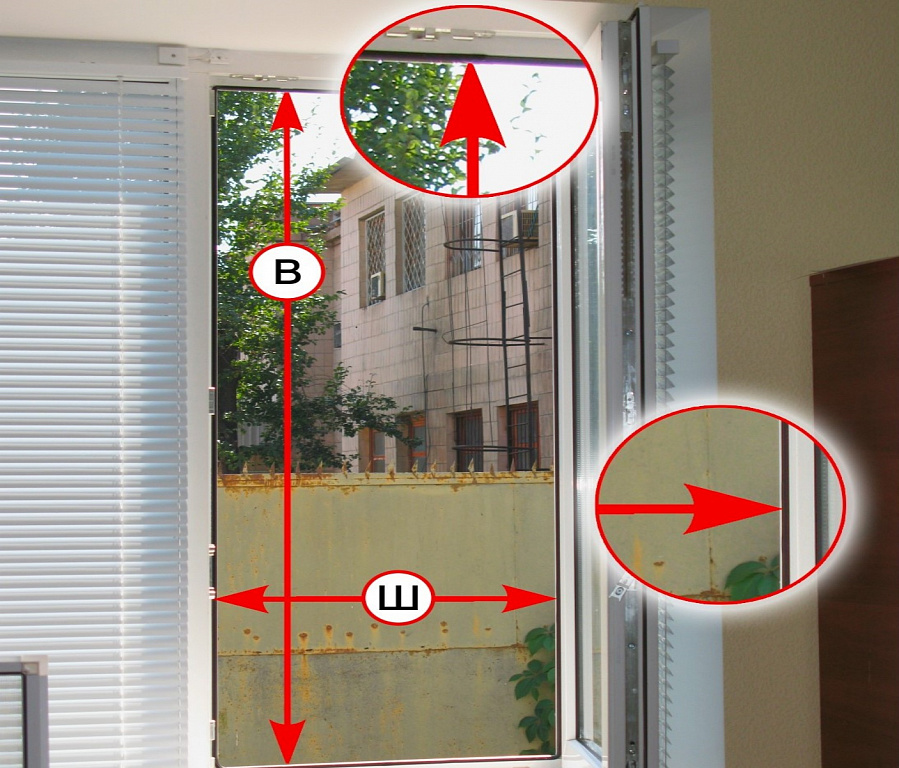
At the beginning, measurements are taken, given that the quality of a homemade anti-mosquito depends on the accuracy of the parameters of the window opening. If the light beam width is 445 mm at a height of 1250 mm, the correct frame dimensions are calculated as follows:
- 445-40 = 405 mm;
- 1250-20 = 1230 mm;
- the length of the impost corresponds to the width of the opening - 445-30 = 415 mm.
The measurement formula is universal, you can insert the current parameters of the light unit and calculate the dimensions of the planned frame for the mesh.
Stages of manufacturing and installation of frame sashes
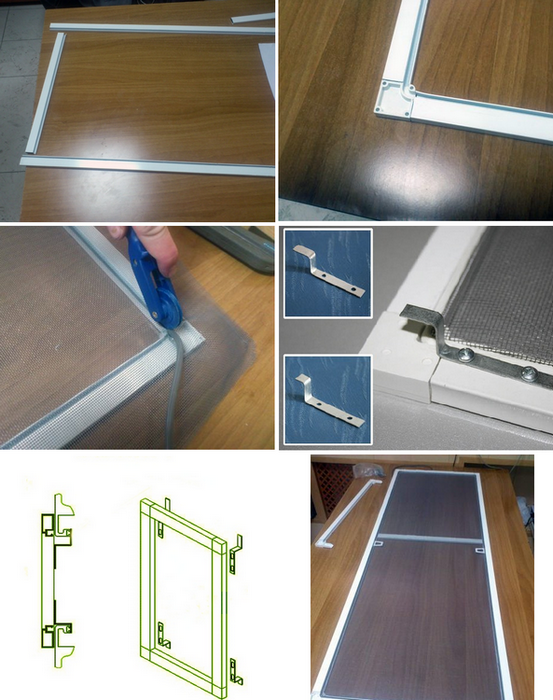
The measurement results are transferred to the profile and the workpieces are cut in the form of long and short profiles plus an intermediate element - impost. Next comes the stage of assembling the frame and fixing the cellular fabric with a sealant:
- collect a rectangular frame using connecting corners;
- fix the brackets and install the impost, aligning them in the center;
- the mesh is applied to the frame from the side where the groove is, and starting from the corner, it is pressed in together with the sealing cord;
- in the process of fixing the mesh into the frame, insert the handle into the groove and press it with a cord;
- then the web is stretched by pressing the seal along the perimeter of the structure. At the end, cut off the excess sealant and cellular fabric.
Further, the frame from the seamy side is equipped with brackets:
- in the lower and upper parts of the profile, points are marked for self-tapping screws;
- drill holes to a depth of 3 mm;
- carefully fix the brackets with self-tapping screws so as not to pinch the profile.
A self-made structure is pushed into the frame opening, first they are hooked with the upper brackets for the profile, then the lower elements are fixed.
Manufacturing and installation of frameless protection
When deciding how to make an inexpensive mosquito net on the window with your own hands, they often take on handy materials. It is not difficult to build a protective device against mosquitoes, midges and flies on the basis of a mesh cloth and a clothesline.


Tools and materials:
- nylon mesh;
- synthetic rope d4 mm;
- segment knife;
- roulette.

- The canvas is cut to fit the sash with a margin of 1 cm around the perimeter.
- Open the sash, carefully dismantle the standard seal. Then it should be rinsed and stored before the onset of the cold season.
- The groove is cleaned of dirt.
- The perimeter of the mesh is fixed in the groove together with the rope, starting from the upper corner of the profile.
Stretch the fabric evenly to eliminate wrinkles. This type of mosquito and fly barrier is easy to dismantle and put away for seasonal storage, and the window seal can be inserted back into the groove.
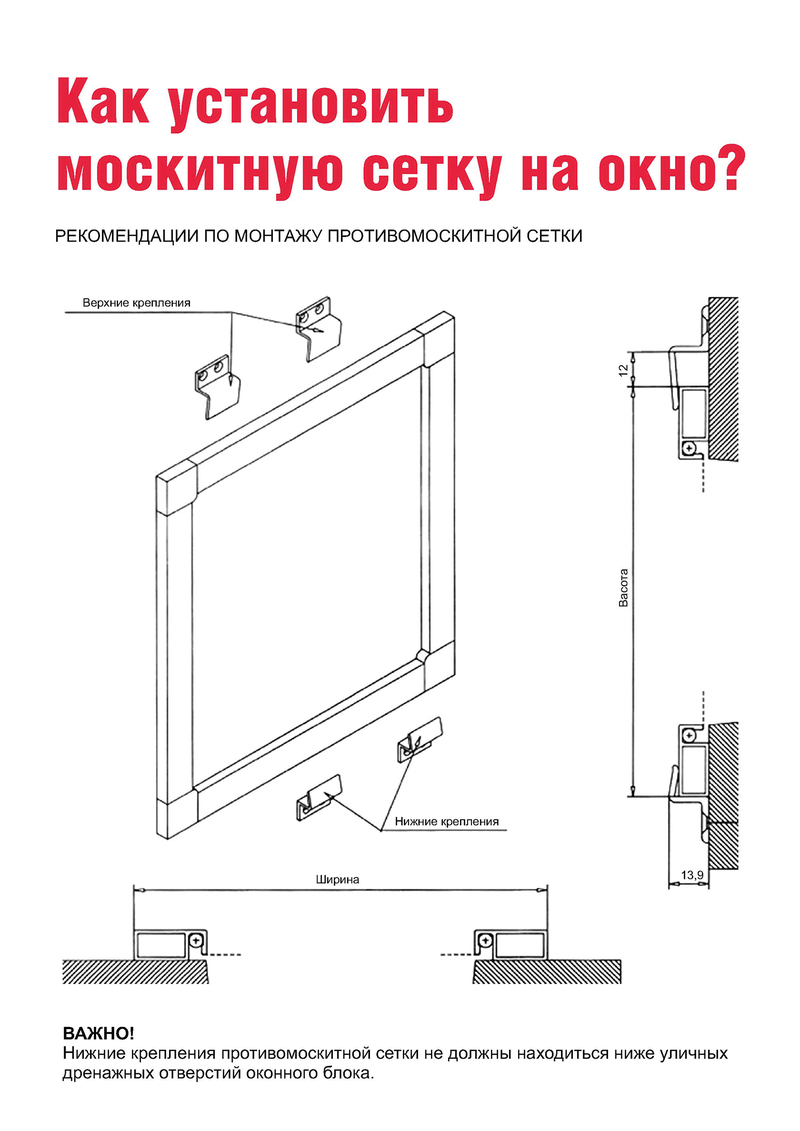
Frame mesh with fasteners
 Installing Mounts
The type of mesh fastening at the installation site depends on where you are going to mount it. To attach this fixture to a modern plastic window, for example, you will need a set of mounting brackets and a few self-tapping screws.
In the absence of ready-made fasteners in the kit, installation can be carried out in the following sequence:
- First of all, you need to try on the finished frame with the mesh at the installation site, which will allow you to mark the points of its attachment in the window opening.
- Then it will be possible to proceed to the installation of the center and corner brackets on the frame in accordance with the markings made earlier.
- After that, the installation of the counterparts of the fastening brackets is carried out, fixed at the designated points of the window opening using self-tapping screws of a suitable size. At the same time, a small gap (about 10 mm) will need to be left under the upper fasteners, making it easier to insert the frame edge into the window space.
 Preparing a mosquito for installation
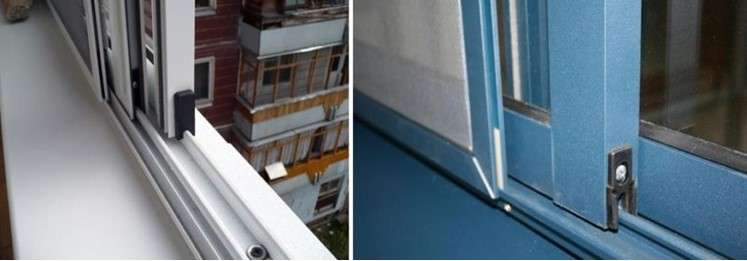
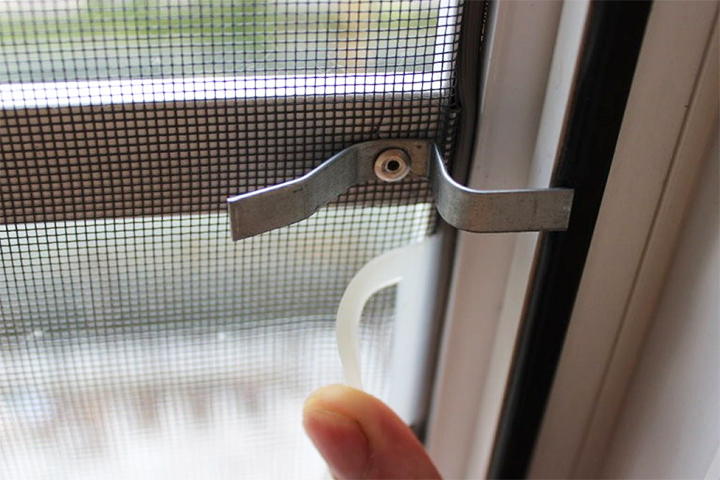
Installation of mosquito nets in balcony openings is carried out by simply hanging them on the hinges and installing special retaining fittings designed in the form of magnetic clamps. First, the locations of the hinges are marked and fastened with self-tapping screws, and then (after hanging the frame and fitting) fixing magnets are installed in the right places.
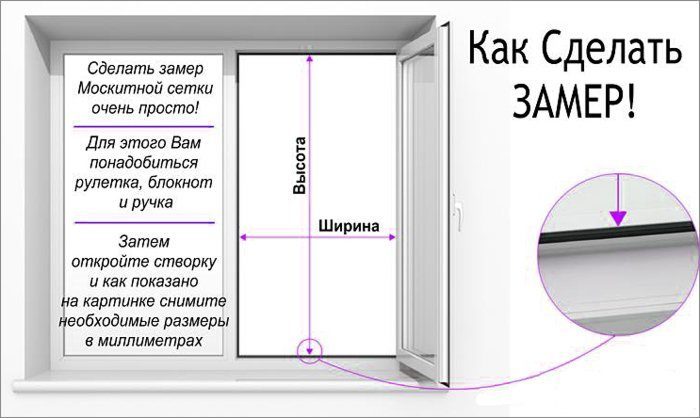
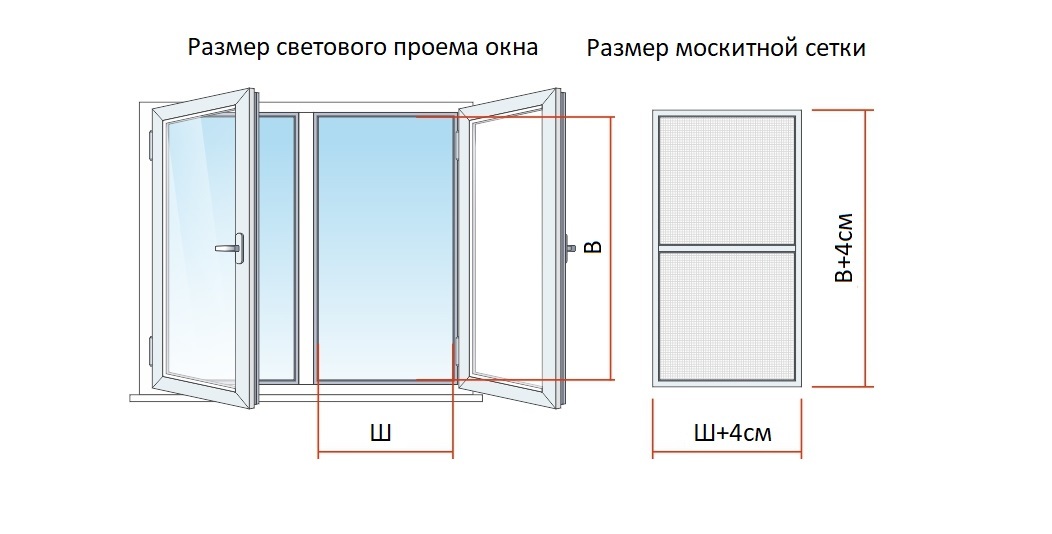
Often there are situations in which it becomes necessary to place an order for the manufacture of a new mosquito cloth (in case of wear or damage to the old frame, for example). In this case, you will need to make all the installation measurements yourself. To do this, you need to take off the dimensions of the open window opening (its width and height) and add 2 cm and 3 cm to the results obtained, respectively.
 Balcony mesh
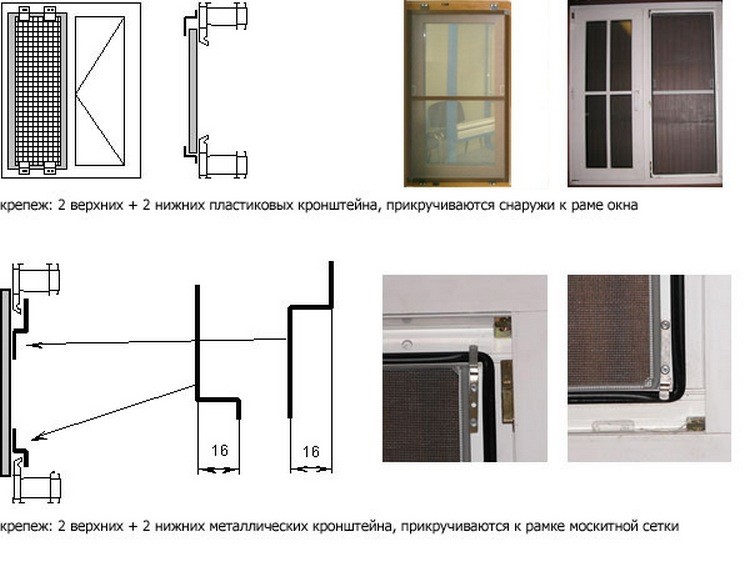
After completing the order, you should receive from the contractor a ready-made frame with a mosquito net, complete with a set of fasteners for it. This kit should include two pairs of fasteners to be installed on the top and bottom edges of the structure.
Be careful not to mix up the top and bottom sets of fasteners during installation, while note that the top rails are noticeably wider than the bottom rails.
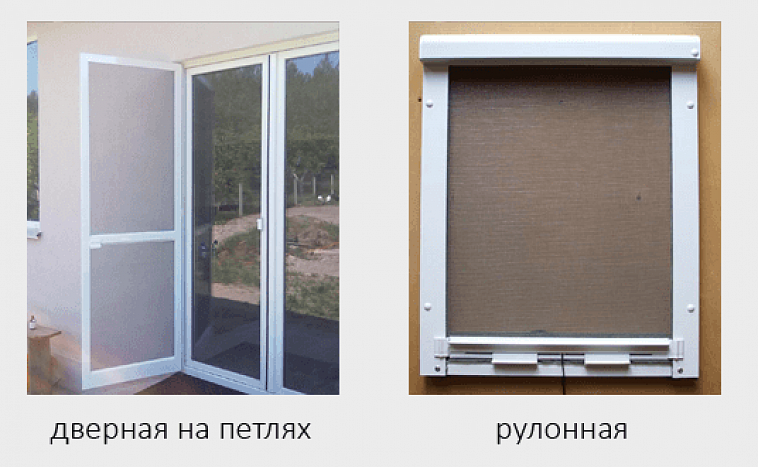
How to install a mosquito net on a balcony door
Here, the principle of operation is slightly different. Since the door is constantly opening, the mesh cannot be fixed permanently, it must also open. Two methods are used - displacement along the guides (sliding model) or opening (swing system).
In the first case, all that is needed is to mount the guides and install the grid in them.
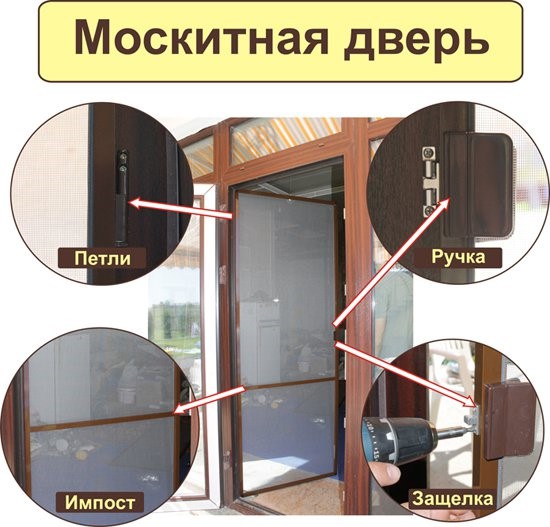
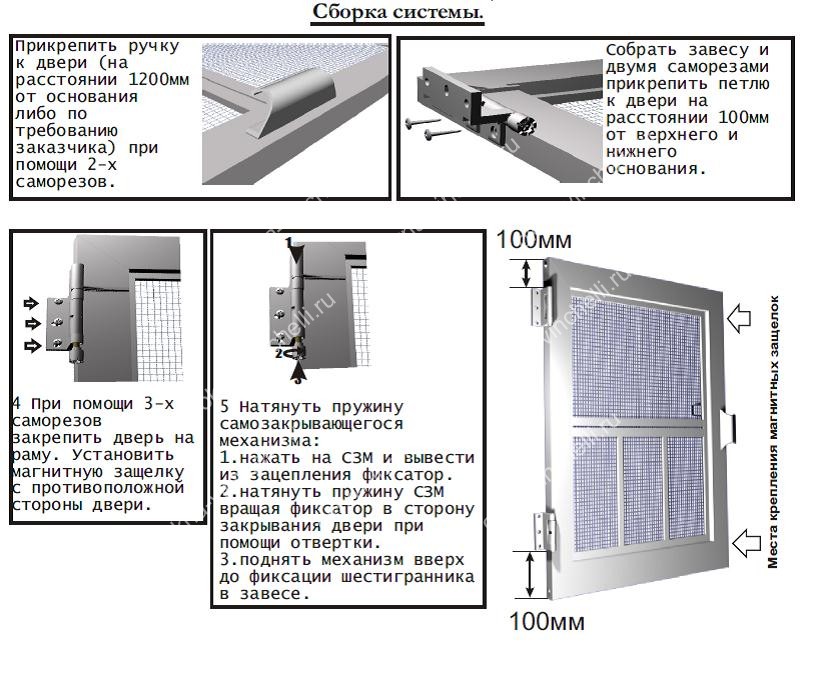
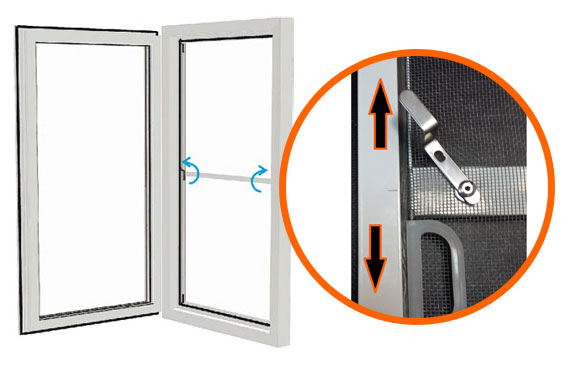
A more common option is with a swinging mosquito net, on the frame of which a crossbar (impost) is necessarily installed to strengthen the structure and increase its rigidity. Hinges are supplied with the door or purchased separately. They should be installed at a distance of at least 10 ... 15 cm from the lower or upper edge of the sash.
To fasten the loops, they are measured on the mesh frame, the place of their position is outlined. After that, with the attached hinge, the frame is attached to the doorway - they check whether the installation of the hinge in this particular place will interfere with the closing, if it will not be in the place of the door hinge. Further, the hinges are screwed to the frame and, in place, to the jamb of the balcony door. The process is shown in more detail in the video. For greater ease of use, a latch is attached in a similar way that holds the mesh in place in a closed state and / or a handle.
It is not difficult to install the handles on the mosquito net - usually self-tapping screws / screws / screws are sold with ready-made handles for attaching them to the frame and plugs or a cover that hides the fasteners.
Important: the opening of the swing leaf must be in the opposite direction to the opening of the door!
With regard to sliding translucent structures and, accordingly, sliding grids, the algorithm is a little more complicated.
Here it is important to determine exactly where the frame with the mesh fabric will be located - inside the room or outside. This is determined by how the sashes are displaced and where there is space for attaching additional rails.
The guides themselves are attached to the frame (for a window) and the floor / ceiling or frame (for a door) with screws or screws, and displacement stops are installed.The manufacturer's instructions describe the installation process in more detail, since the installation process differs from company to company.


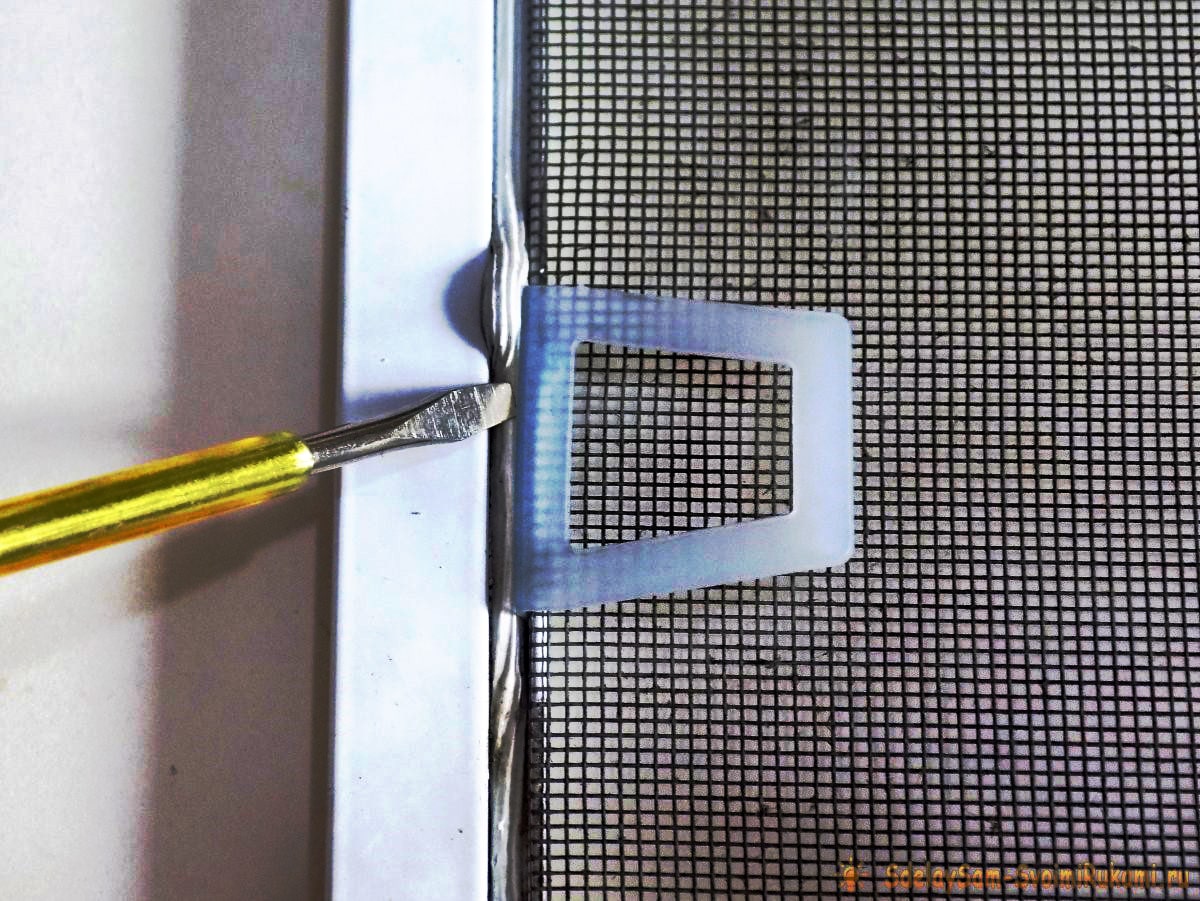
It is important to understand: the frame of a mosquito net for sliding systems is very different from the frame of conventional plug-in or overhead options, it has a groove (s) for guides

It is interesting that the profile, hollow inside, allows the mesh to be pulled onto the guide more than it will be during operation, therefore the distance between the guides differs from the height of the mesh only by the amount of the guide protrusion (in the illustration it is highlighted in red).
Types of fasteners, how to fasten
There are eight types of mosquito mounts.
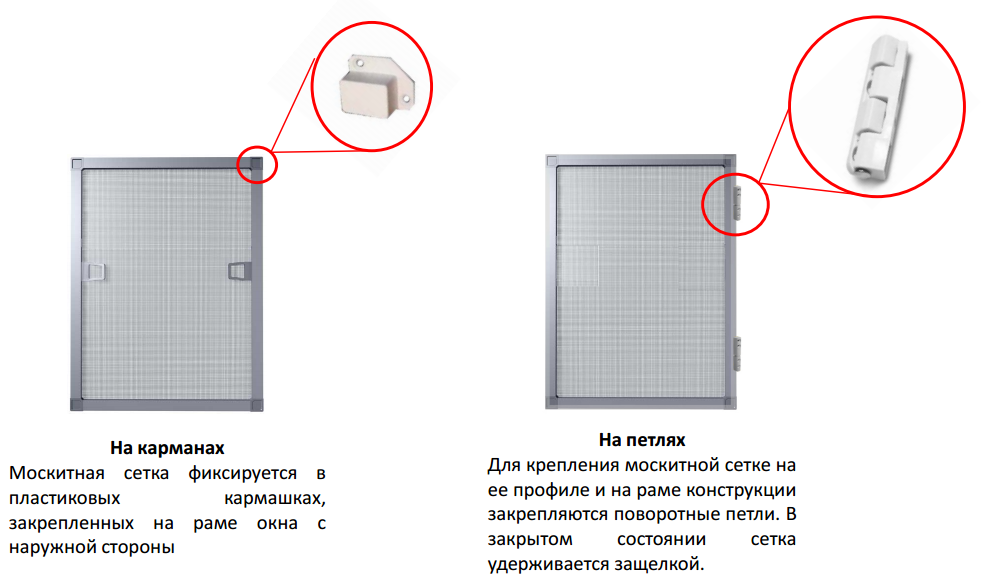
On hinges
Most often, products are attached to special lashes. The fastening process is carried out in several stages:
- installation of mesh fasteners on the window frame;
- marking the places where the second hinge elements will be attached;
- installation of a mosquito net;
- attaching the retainer.
Among the advantages of hinge fastening, the ease of installation and dismantling of the mesh is distinguished.
With ears
They are screwed to the window frame with small screws. These pockets should be attached to the corners of the frame. The installed ears are the main fastening in which the mosquito net is installed.
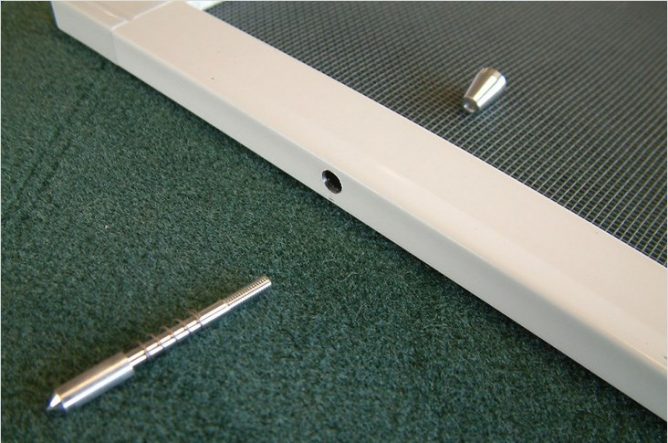
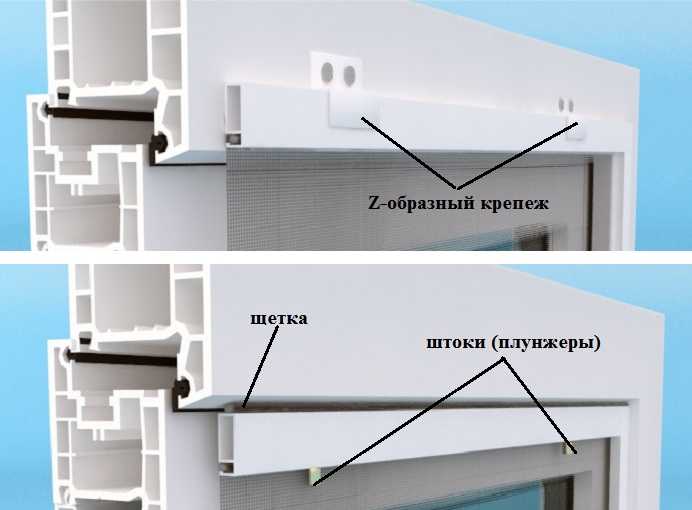
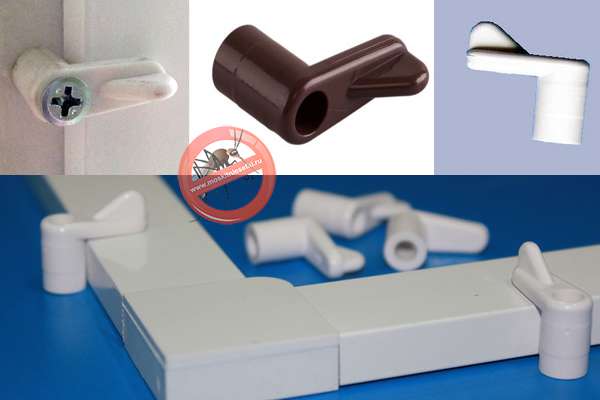
On plunger pins
The plunger mount is considered the most reliable and therefore it is used more often than other methods. To install the plunger pins, you will have to drill holes in the window frame with a drill. This must be done carefully so as not to damage anything. The pins are then screwed into the mosquito frame and window.

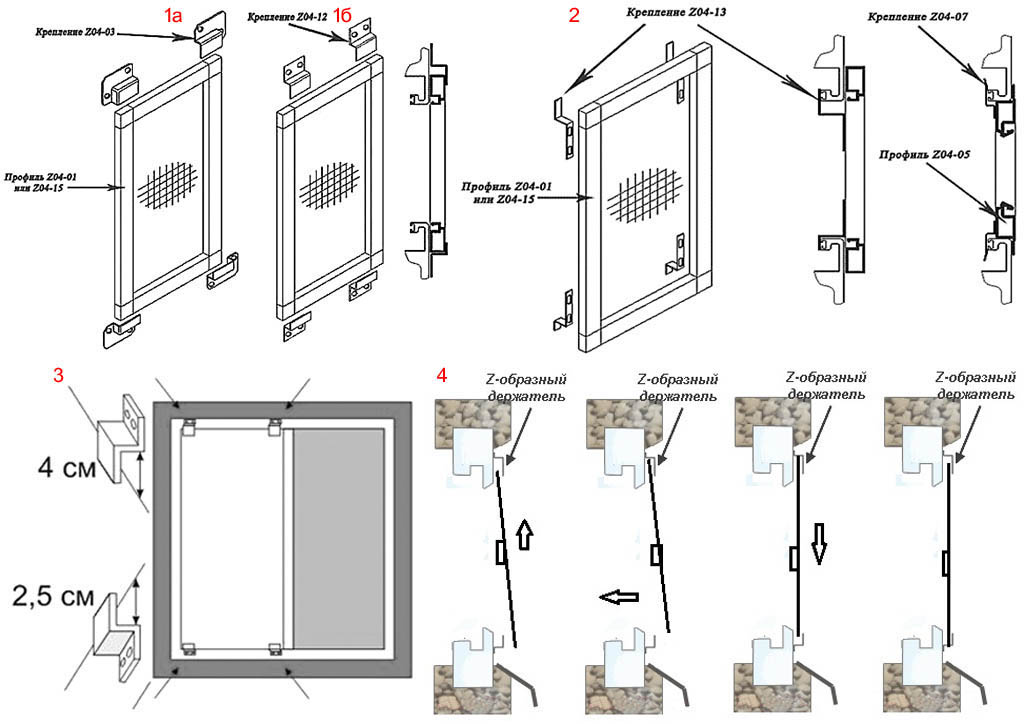
On z-fasteners
Flag mounts are used when the mesh frame is made of durable aluminum. Fastening plastic products with such self-tapping screws is contraindicated, since plastic quickly collapses under the pressure of such fasteners. Fastening with flag products is carried out in several stages:
- marking of places for the installation of fasteners;
- drilling holes;
- mounting the structure.
On scotch tape
Double-sided tape is used to briefly attach the mesh roll to the window frame.
First, the frame is washed from dirt, dried and degreased. After that, it is pasted over with double-sided tape, to which an insect net is attached. Double-sided tape loses its properties over several months and therefore must be periodically replaced with a new one.
Roll system
Roll systems are considered by many to be the most convenient to use. They are equipped with special guides with which you can lower and raise the roll. The installation of such a system is carried out as follows:
- installation of a block with a mesh in the upper part of the window frame;
- fixing the guides on the sides;
- installation of a latch at the bottom of the window.
Frame with horizontal guides
Some people use horizontal guides instead of vertical ones. In this case, the mesh will not open from top to bottom, but from left to right. It is installed in the same way as the roll system. The only difference is that the rails are installed at the top or bottom of the window frame.

Pleated
The pleated system gathers in an accordion in the vertical direction. In this case, the guides are installed at the top and bottom of the window. The mesh is fixed with special fasteners, with the help of which the mesh is held in a closed position.
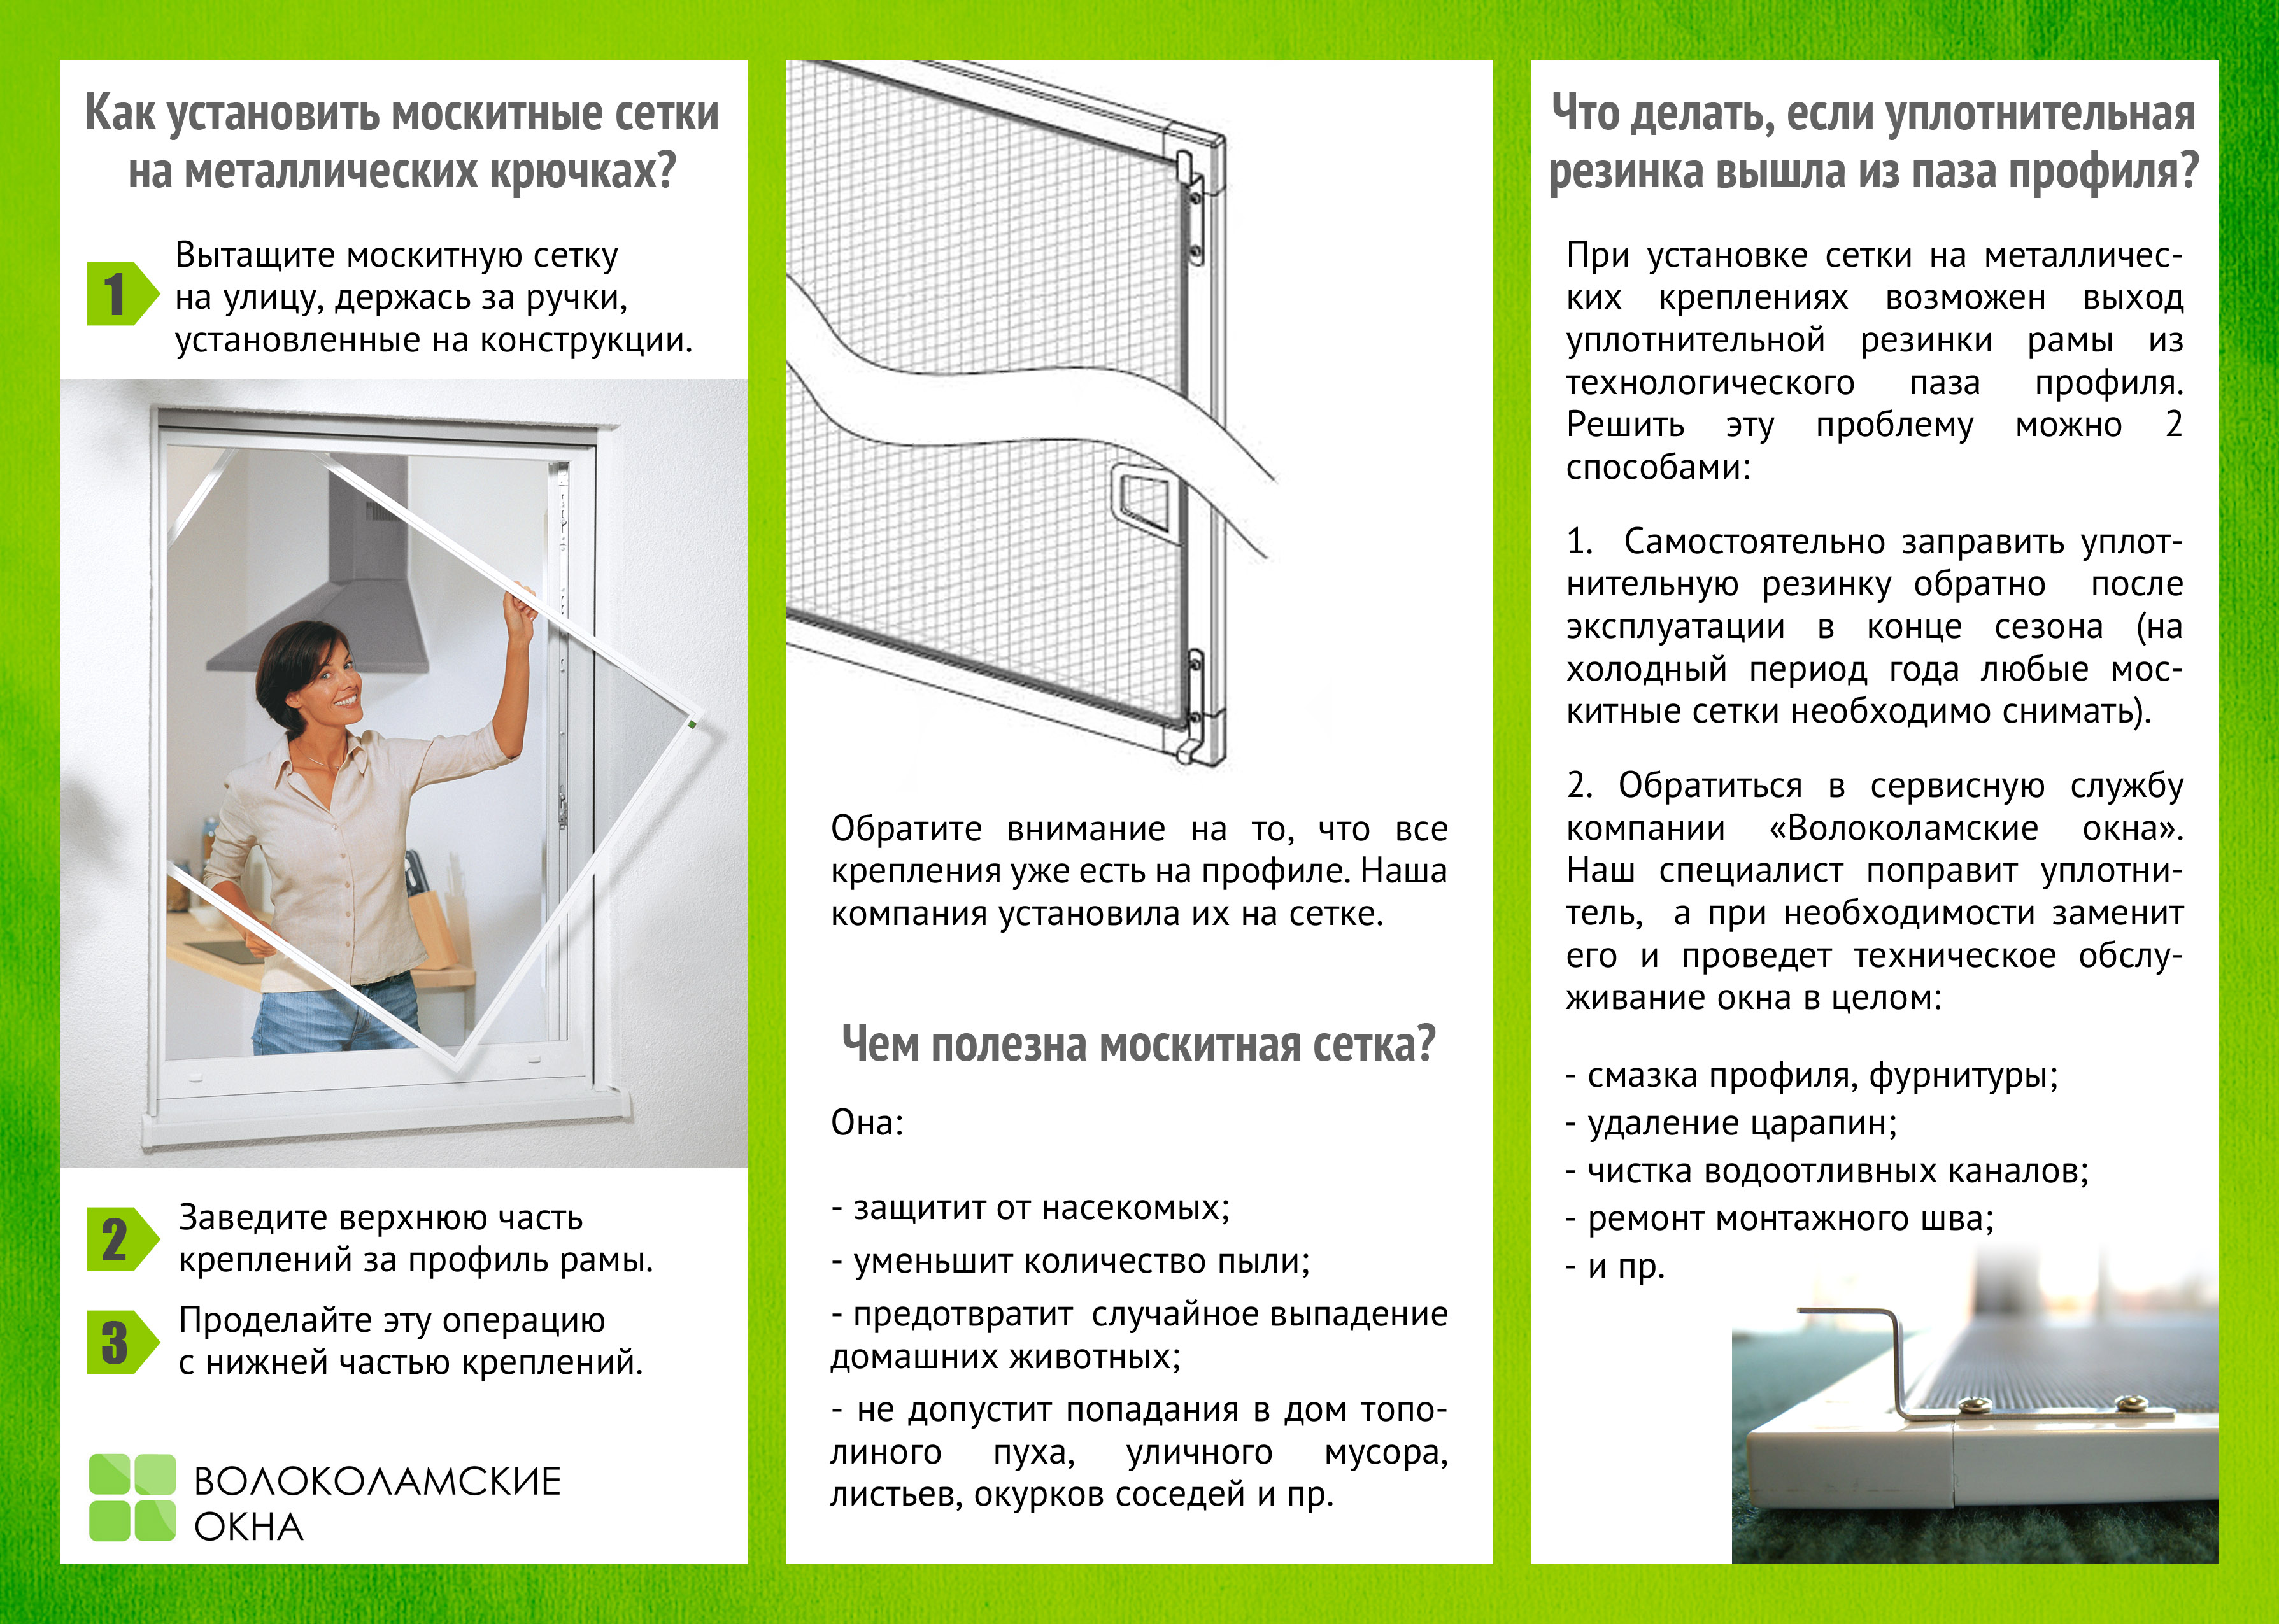
How to put a mesh on a plastic window
It is good if the mesh was ordered together with the window structure. But this is not always the case. The easiest way is to order the manufacture of mosquito protection in a company specializing in the installation of window systems. They will need measurements.
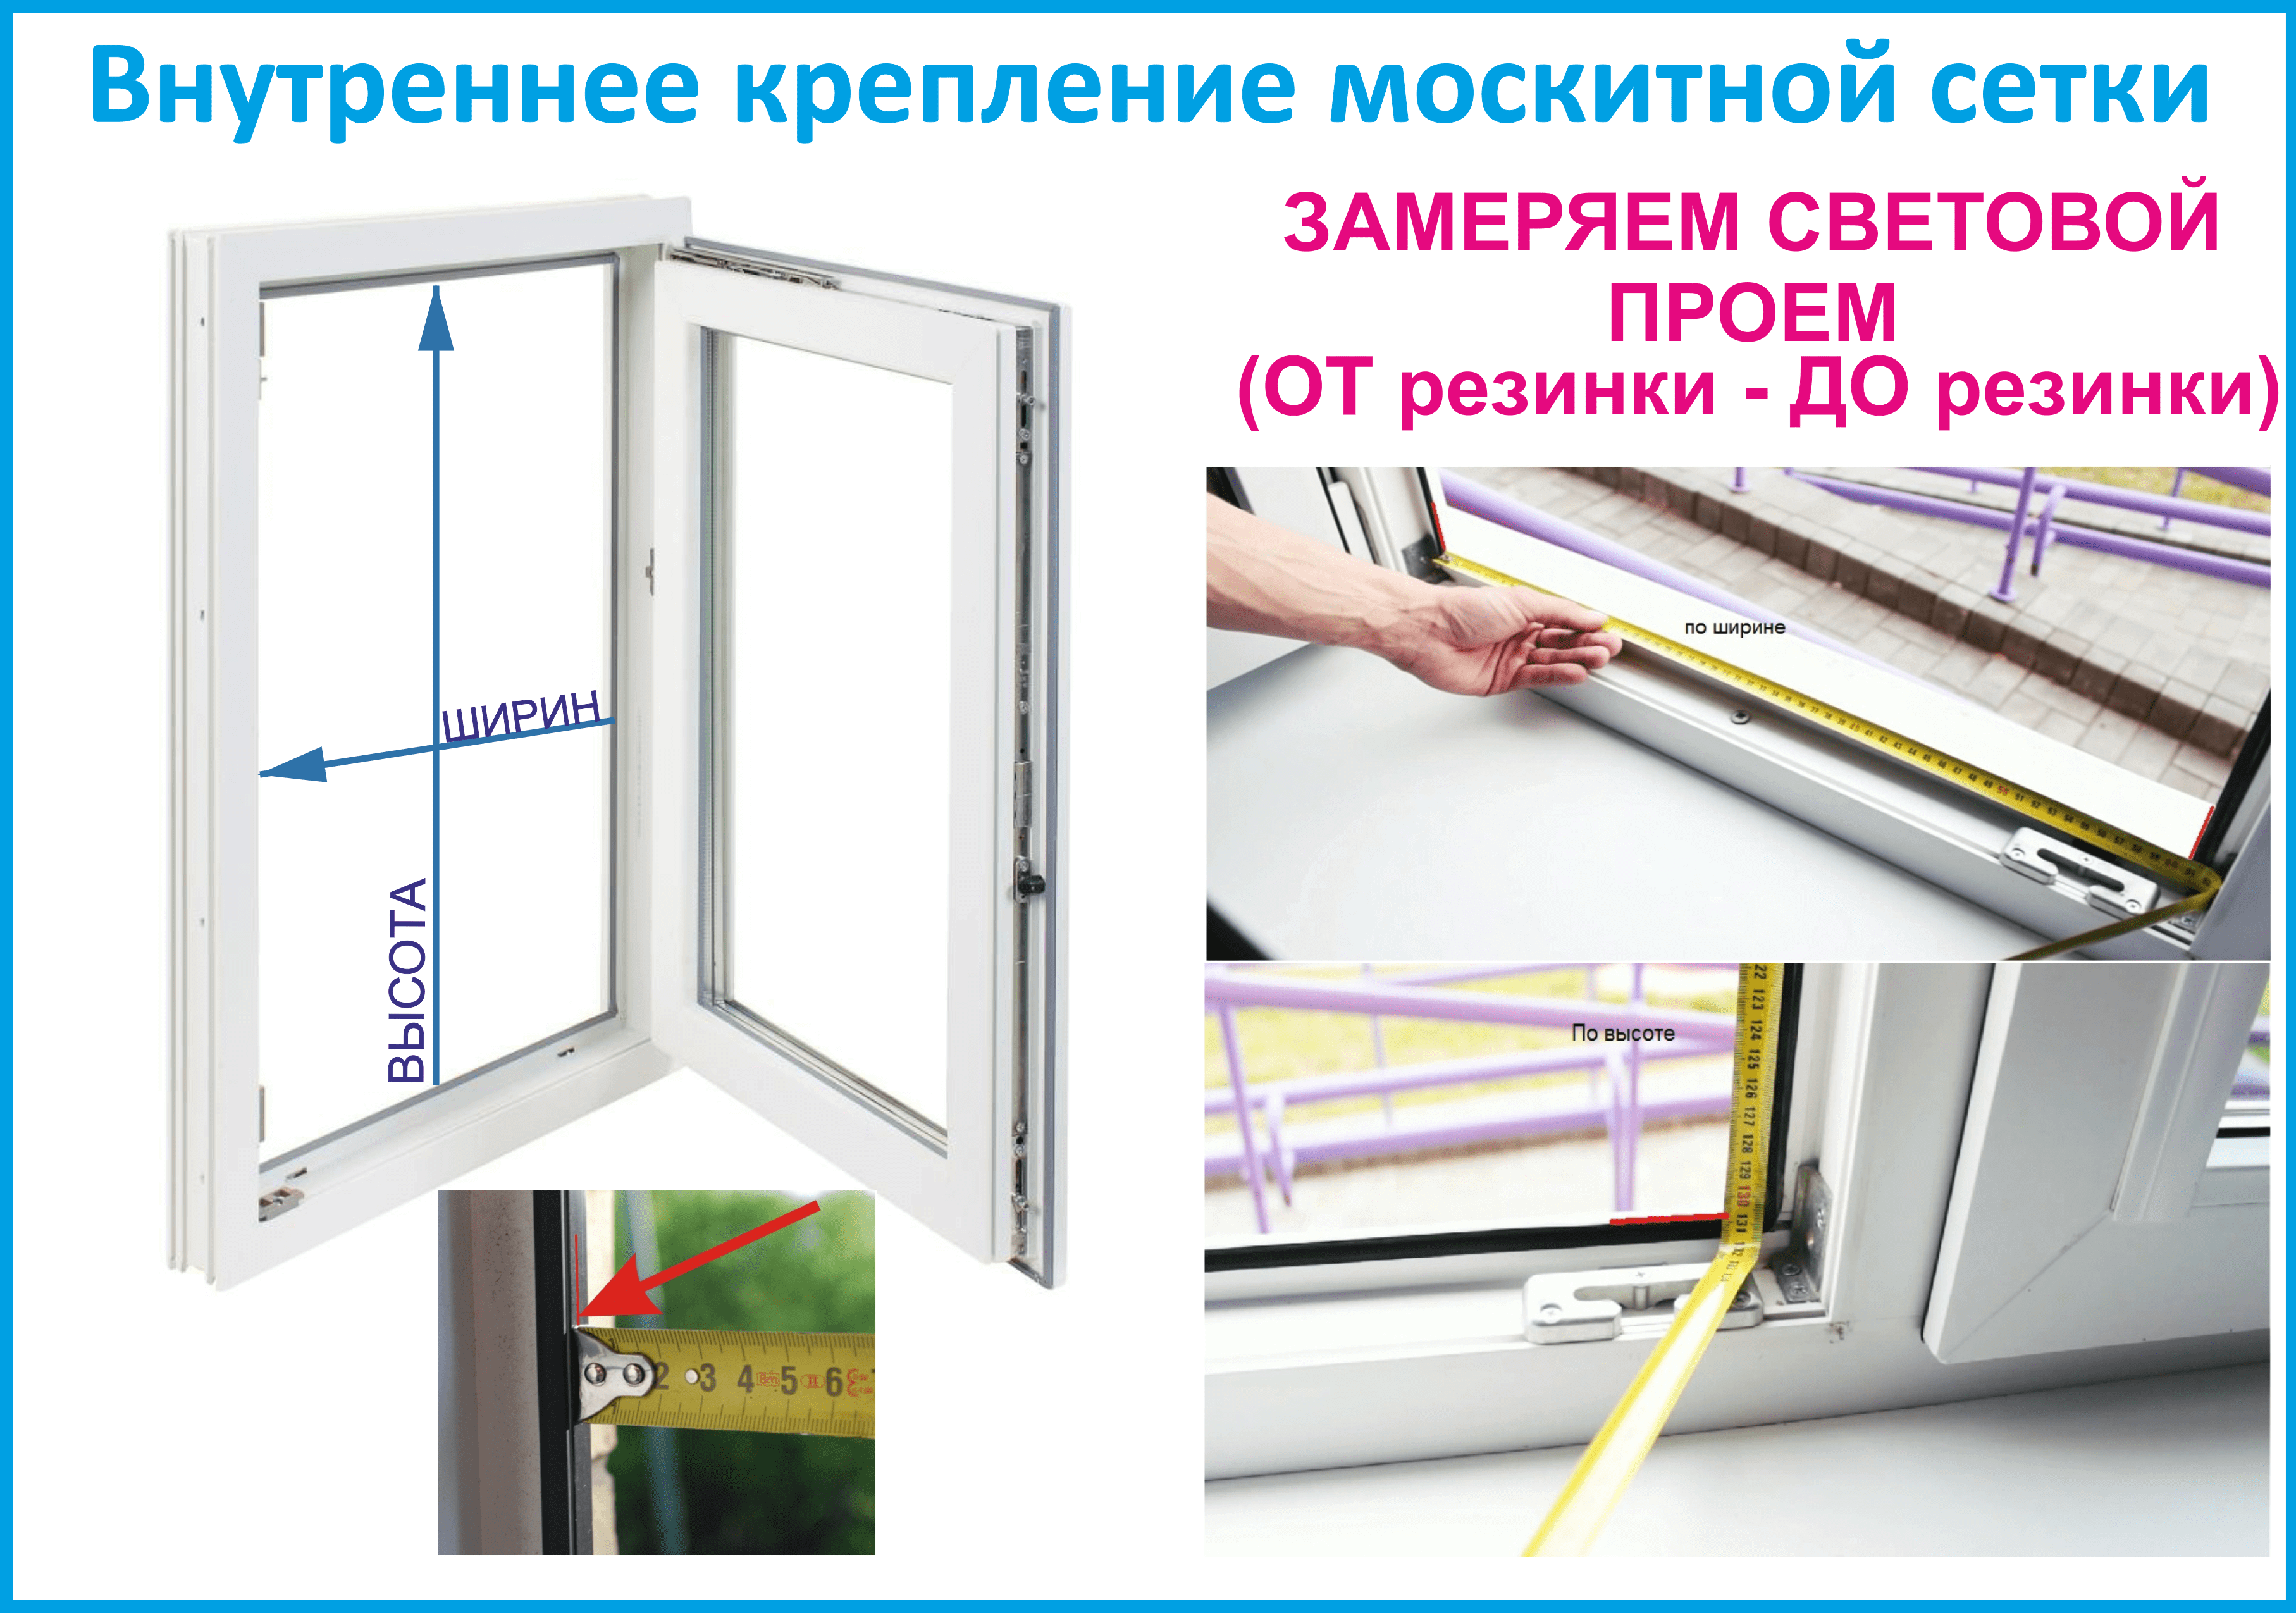
Take measurements
- Open the sash completely.
- We measure the width of the opening from one seal to another.
- Similarly, we measure the height of the opening.
In order not to be mistaken with the dimensions, we must measure in several places. There may be slight discrepancies. We write down the obtained values with an accuracy of millimeters.
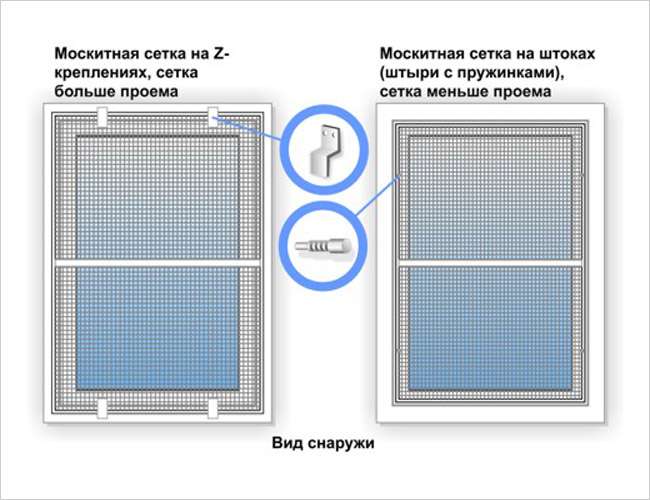
Choose a mounting method
An important point: the choice of fastening. Plungers are placed on the frames, they are also stocks or staples. The latter option is much more common. In this case, the mosquito is placed on the outside of the window. It is inserted into brackets shaped like the letter Z. A significant drawback is that the product can be easily removed from the street. Therefore, such fasteners are placed above the first or second floor. On the lower ones, meshes are installed on the plungers. They are also attached from the outside, but the rods that fix the product in place are located on the side of the room. Thus, it is impossible to remove the protection from the outside.
Movable mesh sashes on guide rails
Movable panels with anti-mosquito fabric are mounted to protect openings with sliding glazed frames. Modern plastic sliding systems complete the factory-made MS. Protective screens have rollers in the upper and lower cross bars of the mesh.
Step-by-step instructions for installing a movable mosquito net
If the sliding window system has been installed for a long time, you can make a movable frame with a mosquito blanket yourself. You need to do it like this:
- Sections of the cable channel without covers are glued to the window sill and ceiling close to the sliding system guides. For this it is better to use Liquid Nails glue.
- The mosquito net is made by hand or ordered in accordance with the measurements of the window opening. The frame can be made of wooden slats with a width equal to the groove of the cable channel;
- An anther tape is glued to vertical elements or fixed with a stapler (it is used in wardrobes and is on sale). The brush seal is needed in order to exclude the slightest gaps on the sides of the mesh;
- For ease of handling, handles are screwed to the vertical slats of the mesh;
- Gently bending the sides of the guides at the top and bottom, insert the mesh into the channels. The protection is installed and ready for use.
- In order not to deform the plastic box every time, you can install spring-loaded rollers that are mounted in the doors of sliding wardrobes.
How to install a frame mesh on a plastic window
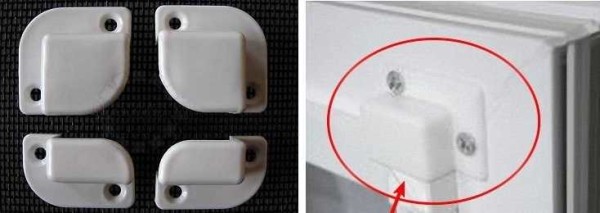
You have received a ready-made mesh. It comes with 4 small Z-brackets (brackets)
Please note that they have shelves of different sizes: two 4 cm and two 2.5 cm. Brackets with large shelves are installed at the top of the frame, with smaller ones at the bottom.
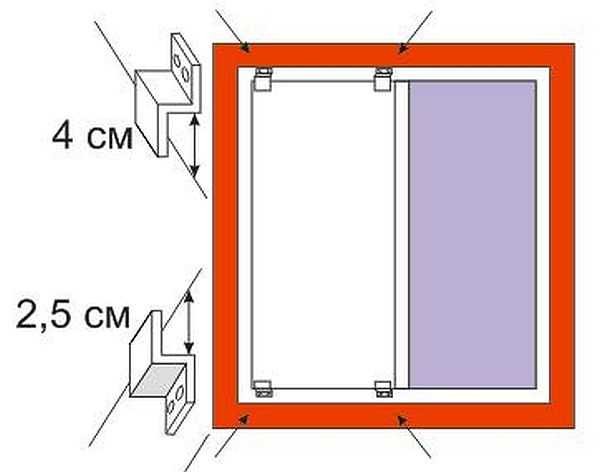
Z-shaped brackets have different shelf lengths
For attachment to the frame, for each stop bracket you will need 2 self-tapping screws with a screw, which are also called "seeds". You will need a marker with a thin lead or soft pencil. You will need a drill with a 2 mm drill bit and a screwdriver or screwdriver.


Outside the window frame, we draw a strip 3 cm below the edge.We stand on a small stepladder or on a chair, we take the frame with a net outside the window, we ourselves also protrude halfway. Attaching the bottom edge of the frame to the drawn line, mark its top.
You can do without manipulating the frame: you need to accurately measure its height, and set aside this value from the line drawn below. From the obtained point, we put another 1.8 cm upwards and here we draw a second line. We will align the fastener shelves along it.
We take brackets with long walls. We apply so that the ledge is on the line. With respect to the light clearance from the edges, you need to retreat about 10 cm. Mark the points where you will need to make holes. We carry out a similar operation with the "short" brackets from the bottom. To check, measure the distance between the marks at the top and bottom. It should be 1.8 cm longer than your frame. If everything is correct, we drill holes in the profile (drill 2 mm), install the brackets on the "seeds".Actually everything, we can assume that the mosquito net has been installed with our own hands.
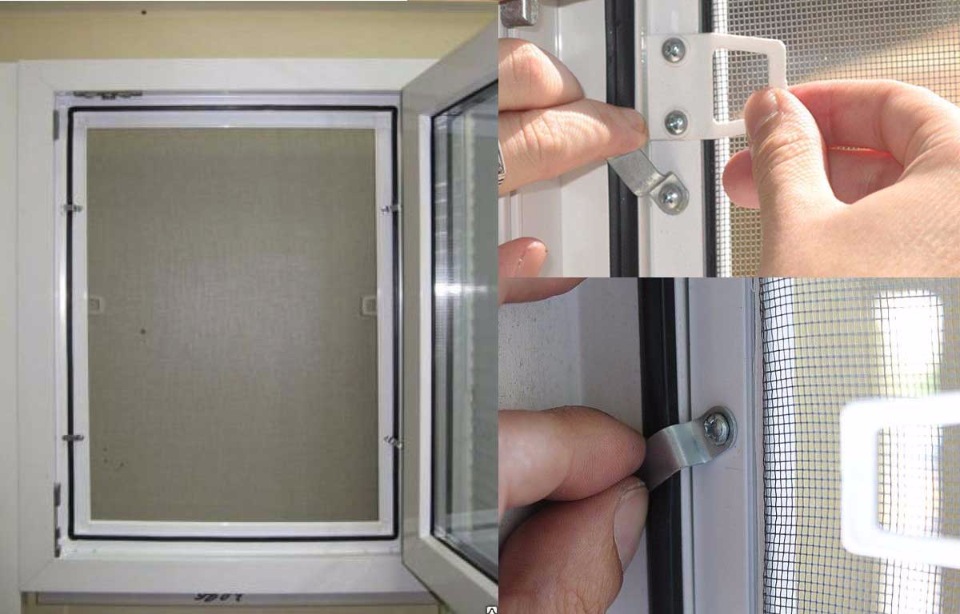
Installing a mosquito stack in a window
Now take the net by the handles, turning it a little sideways, bring it out into the street. Insert the upper edge into the upper brackets, align vertically, lift up to the stop, wind the edge behind the lower brackets and lower it. The mesh stands supported by brackets.
It is removed in the reverse order. Grab the handles, lift up to the stop, remove the lower edge from the brackets, feeding the mesh slightly away from you (a couple of centimeters, no more). Then, leading it down a little, pull it out of the upper brackets.
Installation on corners
There is one more type of fasteners, similar in principle of "work" with brackets - corners. When installing this type of clamps for a mosquito net, it is also necessary to accurately measure the width. To do this, you will have to find the center of the skylight, from which to set aside half the width of the mesh. The inner part of the corner should correspond to the width of the frame with a mesh with a small gap - 2-3 mm for freedom of fixation.
Mesh corners
That is, in the presence of this type of mounts, they fix the corners and should stand in width exactly at the corners. In height, during installation, we leave the same gap of 1.5-1.8 cm. It provides the ability to install the frame in the mountings, and is held due to the fact that the upper shelves are larger.
Installation of a roller shutter or pleated type mosquito net
When figuring out how to install a mosquito net, not a frame, but a roller shutter or pleated, it is necessary to refer to the manufacturer's instructions, since the process can vary greatly for structures of different types.
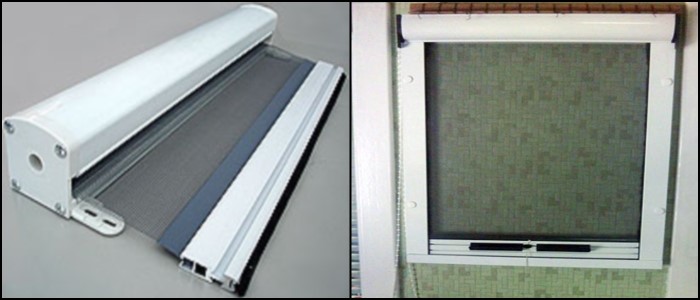
In fact, the roller shutter model consists of three main parts - an assembled roller shutter (in the photo on the left) and guides for it. A closed box with a roller, on which a mesh cloth is wound and where a braking mechanism is installed, is attached from the outside to the window frame using self-tapping screws. The height of the fastening is chosen so that the protective sheet completely overlaps the opening from above and below - that is, the length of the panel should be sufficient for the entire opening with a small margin.
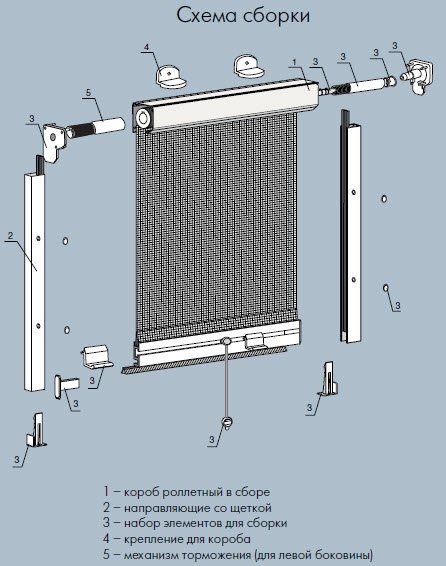
The guides are also attached with self-tapping screws, the heads of which are then hidden by protective inserts. Often, the kit also includes a lower support bar, against which the edge of the net rests when fully lowered. This option is convenient in that a gap does not form at the bottom.
For pleated nets, a similar scheme is used, only instead of a roller for winding the panel, there is a place where the mesh is folded. For products with the pleated fabric expanding in one direction (in the illustration on the left), this place is hidden by the box at the top or on the left / right (picture in the center). If the panel moves apart in both directions (figure on the right), then there is no fixed place, it all depends on the position of the side plates.

The box with the panel and the guides are attached to the window / door frame or wall using self-tapping screws according to the diagram in the installation instructions.
It is worth noting that installing a roller shutter or pleated type mosquito net with your own hands is more difficult than for frame and swing options, so it is better to place an order for the product immediately with the professional installation service.
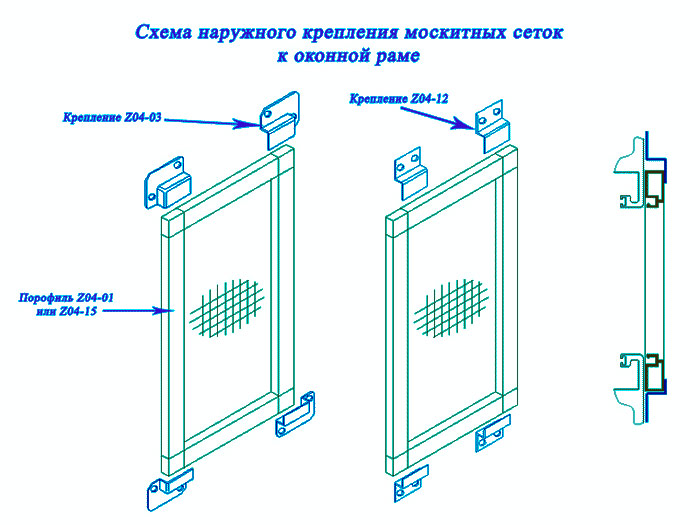
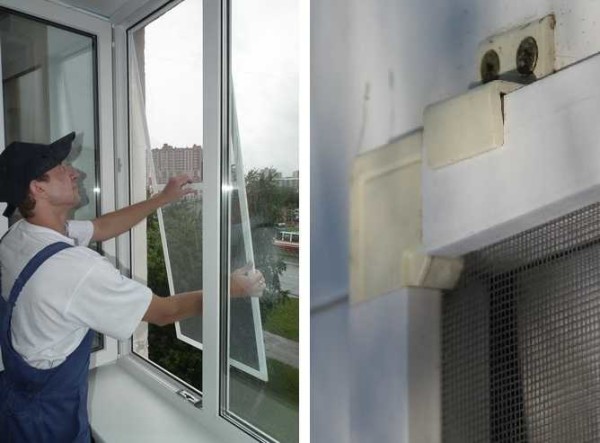
External mounts.

This method is the most dangerous, however, it is also the most proven. It involves protruding out of the window to fix the corners with screws. If desired, this work can be entrusted to the specialists of the company for the installation of window structures.
The installation of the mosquito net takes place in the following sequence:
- At a distance of 5 centimeters from each edge, the upper fasteners are screwed in with screws, the size of which should be limited to 2 cm due to the likelihood of their falling into the window frame when tightening.
- Having finished working with the upper ones, you need to continue installing the mosquito net with your own hands using the lower mounts.
Their fixation can be done in two ways:
- This method is optimal when accessing the window profile from the outside and is based on markup. Assumes two workers. One holds the product, the other marks the distance at which the fixing elements will be attached.
- Second way. After fixing the upper holders, measure the length of the mosquito net and add 2.7 cm to the obtained value. Measure the required length from the end of the upper fastener. Mark with a pencil. Screw on the lower fastening element according to the marked risk.


After a successful installation of the mosquito net, it will be possible not to be afraid of the penetration of insects into the apartment. This will allow you to fully enjoy the invigorating coolness that fresh air brings with it.
Views: 1,050
55 910
Did you like the material?
Share:
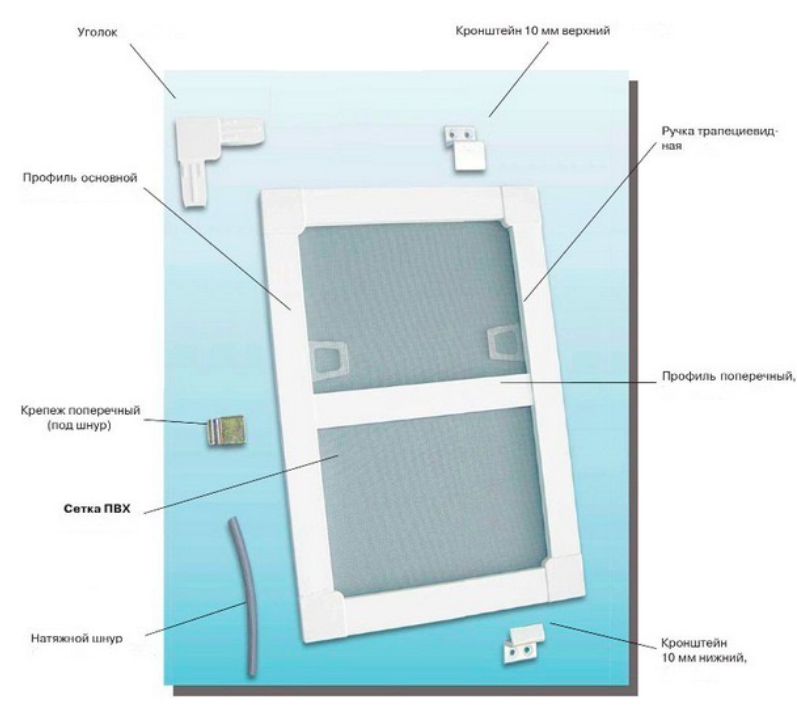
Mosquito net design
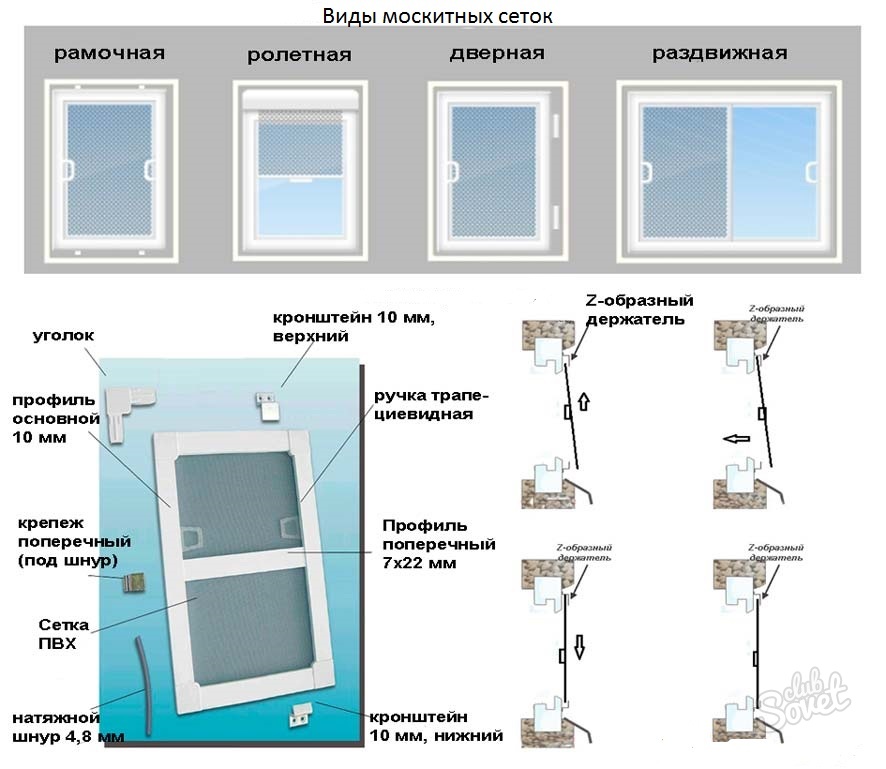
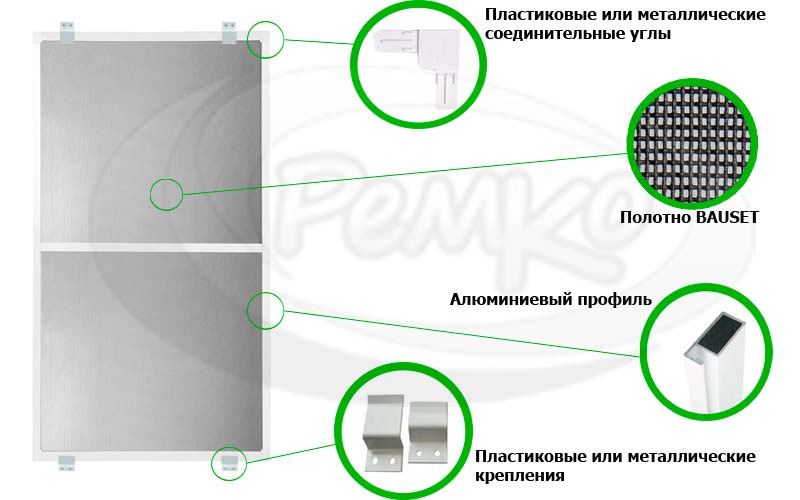
The design of a mosquito net usually includes:
- frame profile;
- impost profile;
- special connecting corners;
- fixing cord;
- corner profile;
- 4 plastic or metal holders (z-mounts).
Accessories for mosquito nets
By attaching a mosquito net to a balcony door, window in a room or on a balcony, you can completely forget about annoying insects. This will help you avoid using fumigators and other hazardous chemicals to control insects. In addition, the device protects against dirt, dust, the penetration of allergens into the house - plant particles, poplar fluff. It also ensures the safety of pets when the window is open.
Among the main advantages of this design:
- Ease of use. How to remove a mosquito net from a window? - you will not have such a question, since the nets are easily installed and just as easily removed if necessary - for washing, for example.
- You can wash the mesh with ordinary soap and a sponge.
- Aesthetics and attractive appearance - the installed mesh will not spoil even the pretentious design of the room.
- The mesh is provided with the smallest holes that can protect not only from insects, but also from rain drops. At the same time, the material does not block the view from the window in any way, does not interfere with the access of fresh air.
- The design is robust as it includes metal (aluminum) frame elements and fiberglass.
- The material is incredibly resistant to stretching, tearing, bending stress, and besides, it does not fade in the sun.
- Due to its small thickness, the mesh is compact, which means it can be stored anywhere.
Types of mosquito nets
Before proceeding with the independent manufacture of a protective addition to double-glazed windows, you should understand the varieties and design features of mosquito nets. Models are classified according to the type of attachment to the frame, canvas material and functionality.
Frame type grids
Frame structures, as one of the most popular types of mosquito devices for plastic windows, are distinguished by high performance characteristics. Products are most often made from PVC or aluminum profiles. Features of frame grids:
- the model is focused on standard double-glazed windows;
- installed both inside the light unit and outside;
- appreciated for ease of installation, ease of use, durability, resistance to climatic influences.
The anti-mosquito frame is used in the arrangement of window structures made of PVC, as well as aluminum and wood.
There are 3 types of frame structures:
- model with soft polymer handle. Fixation with rubber is provided, service life - within 2 years;
- with a solid plastic handle. The model is equipped with special fasteners for installation, the service life varies from 5 years;
- with a metal handle. Frame mosquito nets of this category are highly durable, fixed with rivets, and can reliably serve for 10 years or more.
The products are made to order according to the overall parameters of the equipped window unit.
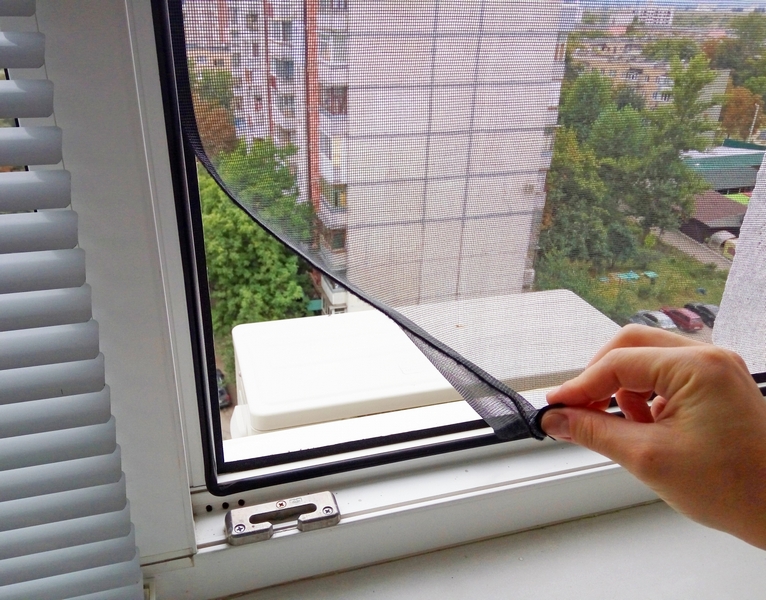
Frameless mesh
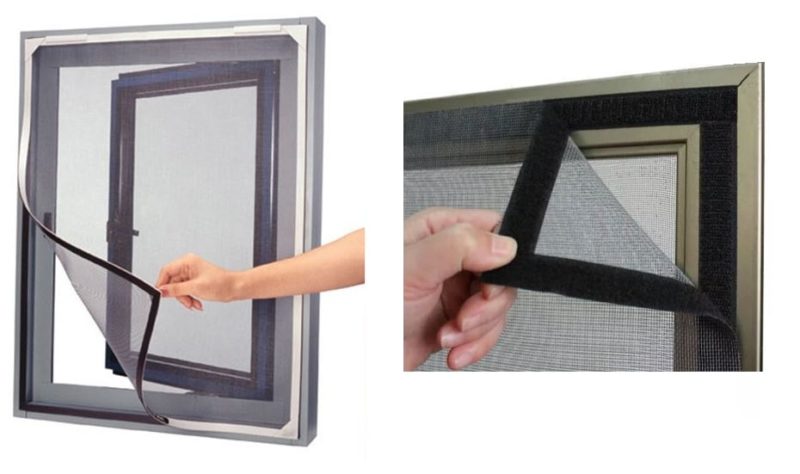
The popularity of flexible options for mosquito supplements to plastic windows is due to the ease of installation and operation. For example, a model with adhesive tape can be easily attached to the frame from the outside. The solution attracts with accessibility, simple and quick installation, undemanding maintenance.
Burdock versions of protective cloths are easy to dismantle, store in a compact form and, if necessary, install for reuse. Frameless nets with fixation on hooks, on a magnetic mount are also relevant.
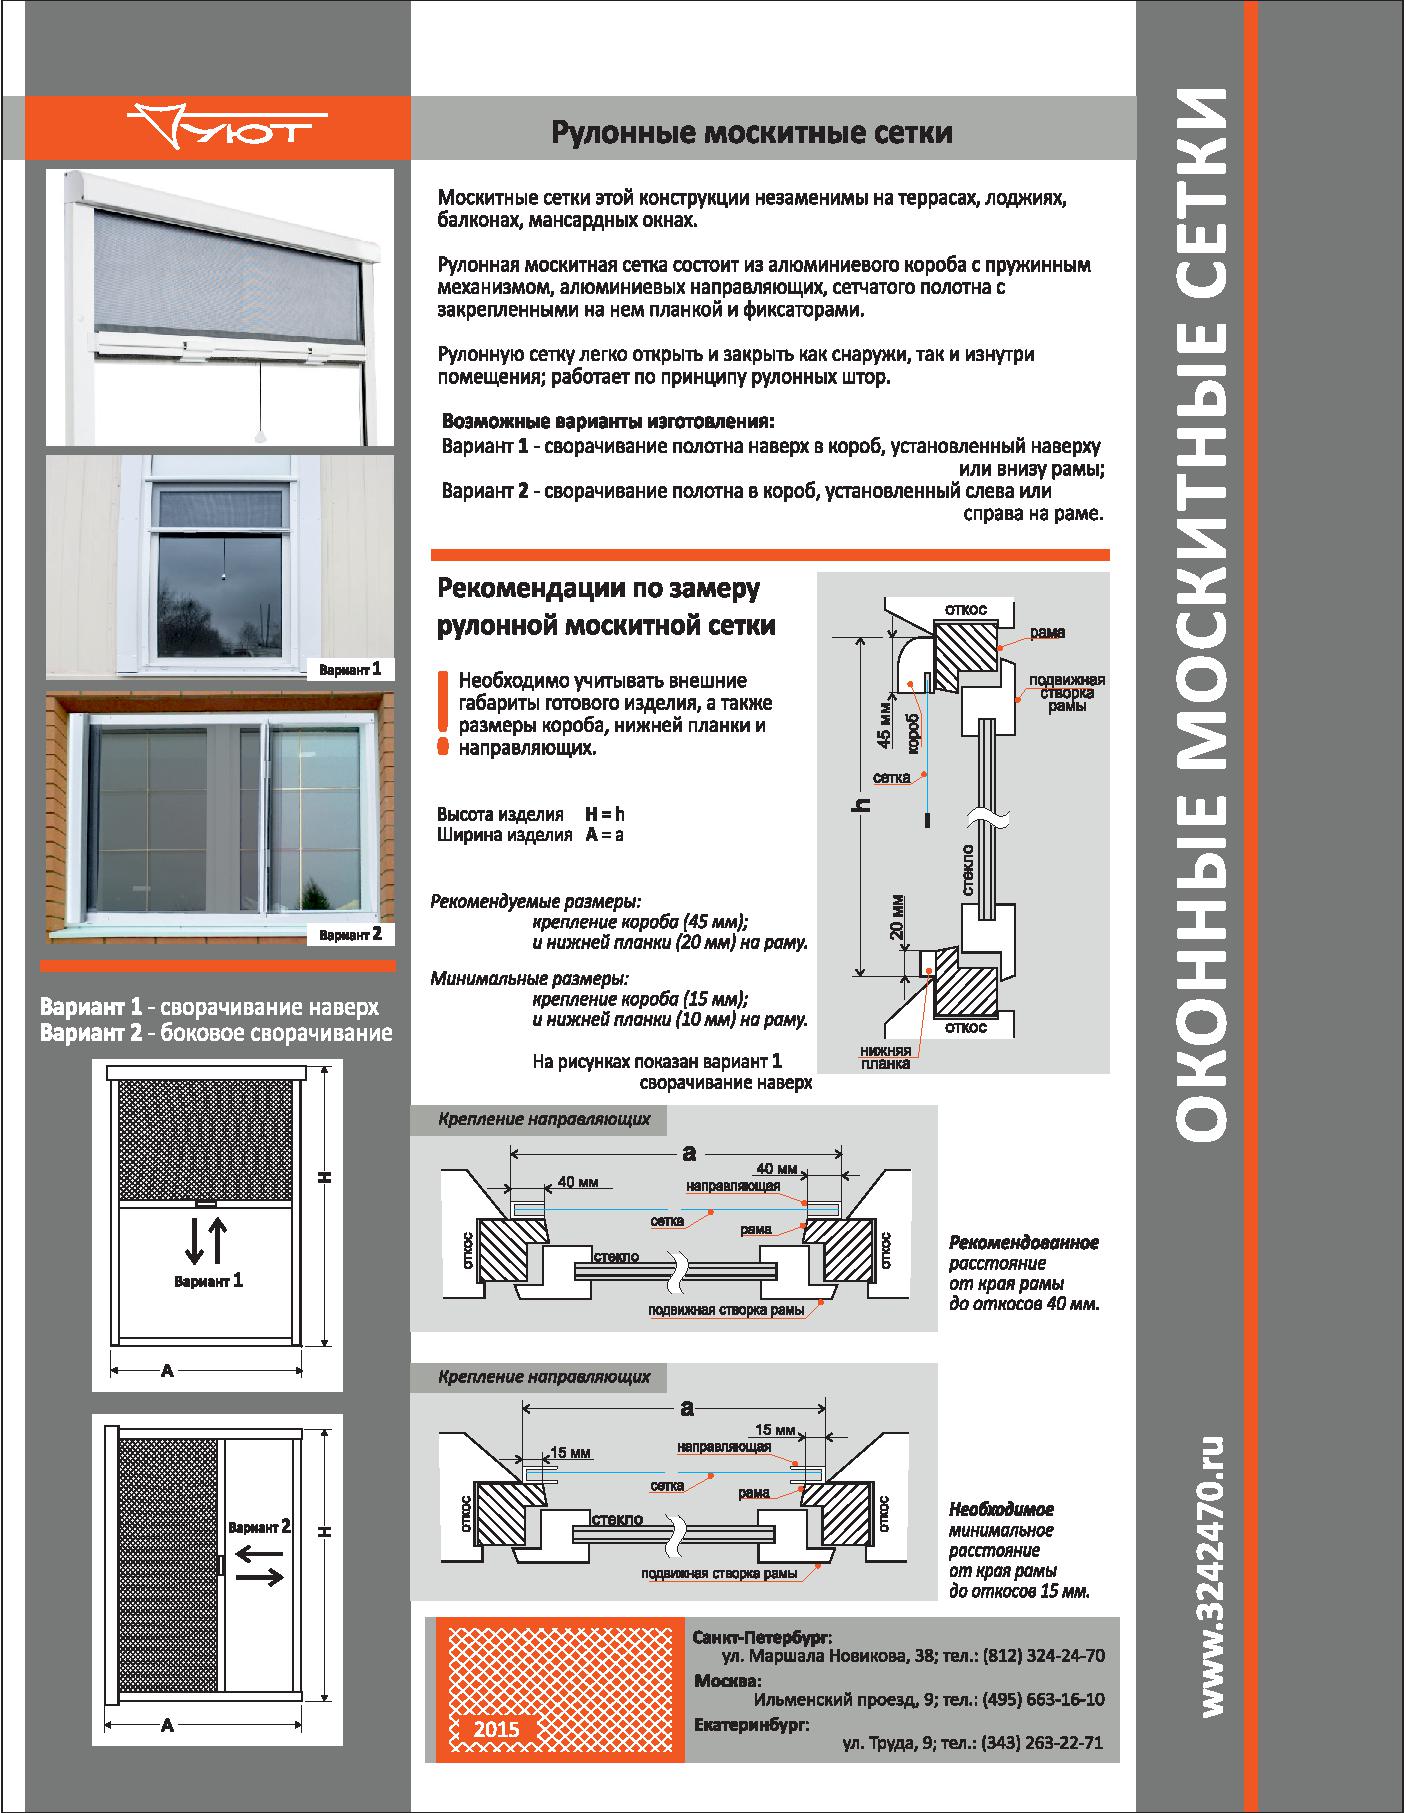
Roll
Anti-mosquito products in this category demonstrate high functionality and aesthetic qualities. The roll-up design resembles roller blinds. The box with the shaft is located on the upper line of the window system, the roll moves with the help of rollers and guides. The product provides for mounting on a frame or in a skylight.
The original design transforms the honeycomb sheet into an effective complement for oversized insulating glass units. If desired, you can easily pick up a model in horizontal or vertical variations. Rolled mosquitoes are presented in a relatively expensive segment. It should also be borne in mind that the structure is difficult to install on your own; specialist help is required.
Sliding mesh
Products are most often nylon fabric and aluminum profiles. Sliding mosquito nets are relevant in the arrangement of balcony windows, and are also actively used as a protective complement to the light blocks of country houses. The model is equipped with a system of guides and rollers, the blade moves in the lateral direction. The solution is not suitable for all windows, it is made to order.

Popular types of insert screens for plastic windows
The choice of mesh cloths to protect windows and doors from annoying mosquitoes is quite large. Of all the variety, the most popular models can be noted:
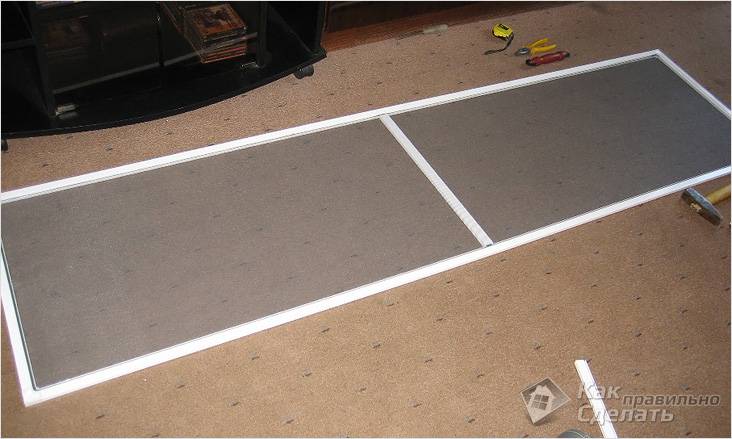
- frame construction. It is the most accessible and simple, it can be sliding or removable. If the area of the window opening is large, a mosquito net is installed with an additional reinforcing bar in the middle;
- mesh mounted on plungers directly into the window opening. Its advantage is a higher resistance to environmental factors. For example, strong gusts of wind;
- Velcro mesh. A popular model among those buyers who do not require constant protection from flying insects. Such protection can be removed at any time without assistance;
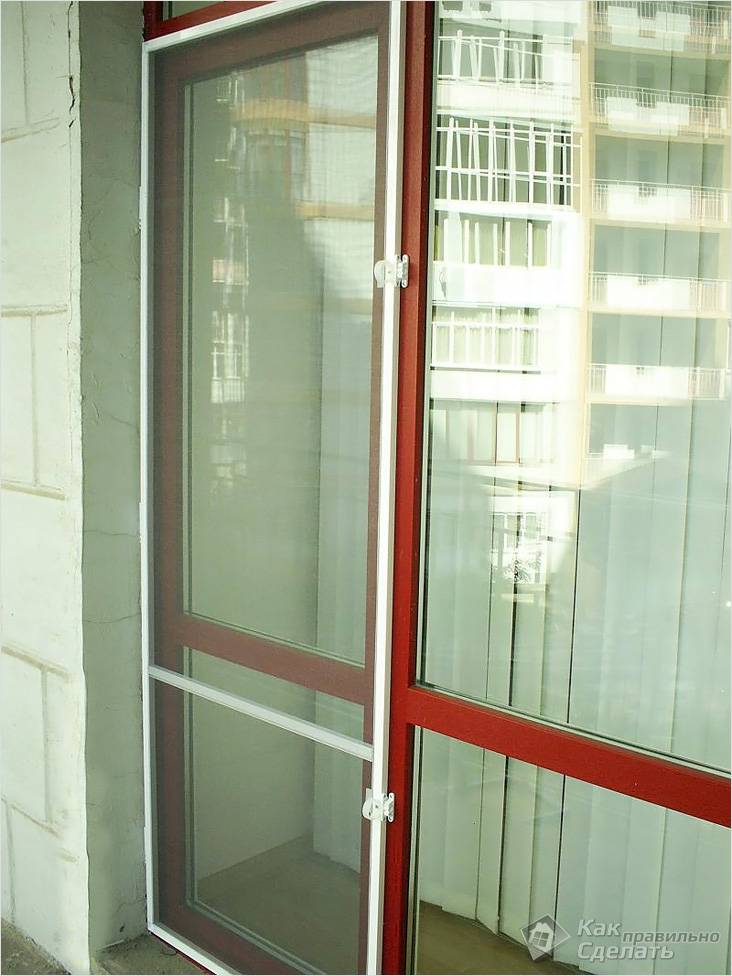
- mosquito net, mounted on hinges according to the type of door opening. The closed position of the structure is ensured by special magnets;
- roll-type mesh. According to the principle of operation, it resembles roller blinds. The canvas is unwound and collected back into a box installed above the window opening;
- pleated mosquito net. This is also a roll type of construction, but it is assembled in a horizontal plane (by analogy with an accordion). The advantages of such nets are a wide range of colors, the ability to decorate the canvas with decorative elements and patterns.
Mosquito-proof frame with flag clamps
Fastening mosquito nets with swivel clips (flags) is gaining popularity every day. The simplicity of design, reliability and quick installation of the mesh panel - all this attracts the owners of houses and apartments.

Flags are L-shaped rotating metal plates. They are attached with self-tapping screws to the frame of the protective frame. Clips are also made from durable polymer. With a mesh height of up to 1.4 m and a width of up to 0.6 m, two flags are screwed on the sides, and one clamp at the top and bottom.
Mounting the MC on Swivel Clips
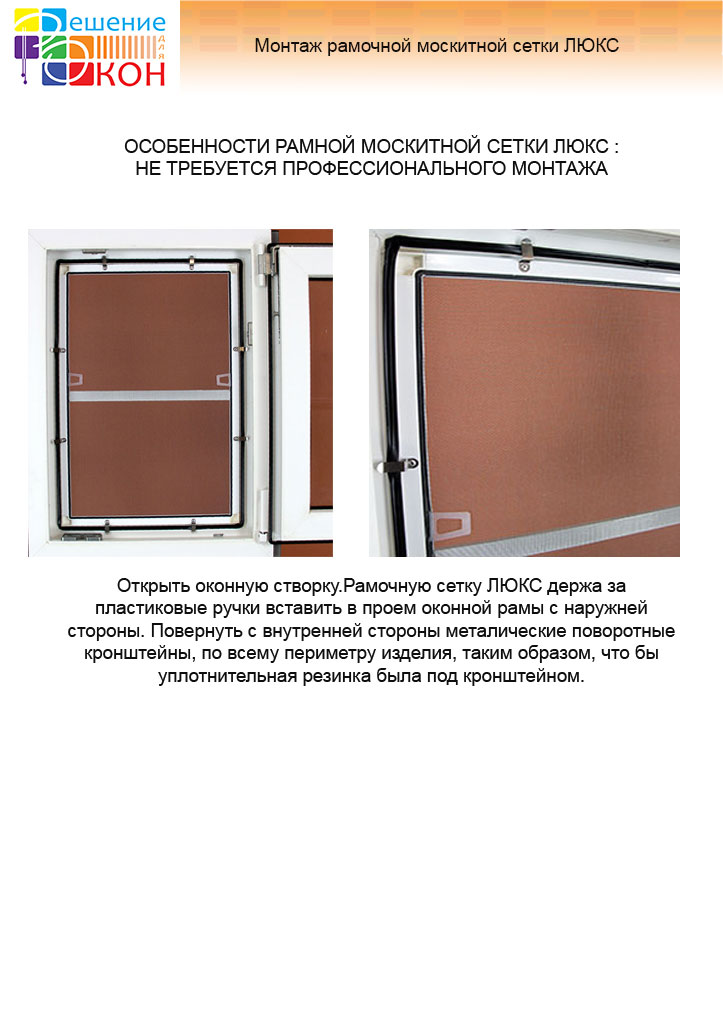
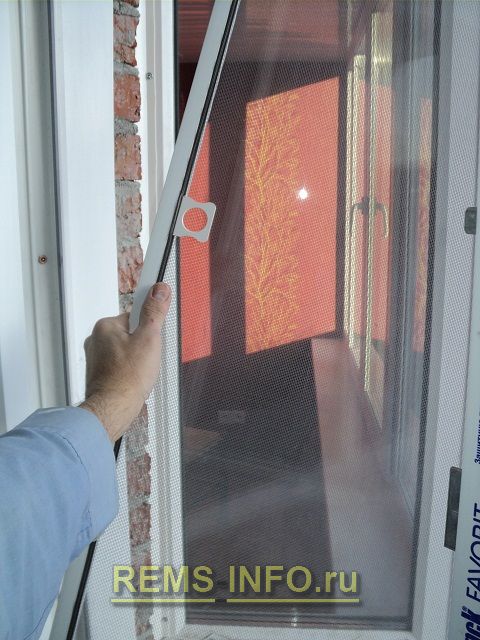
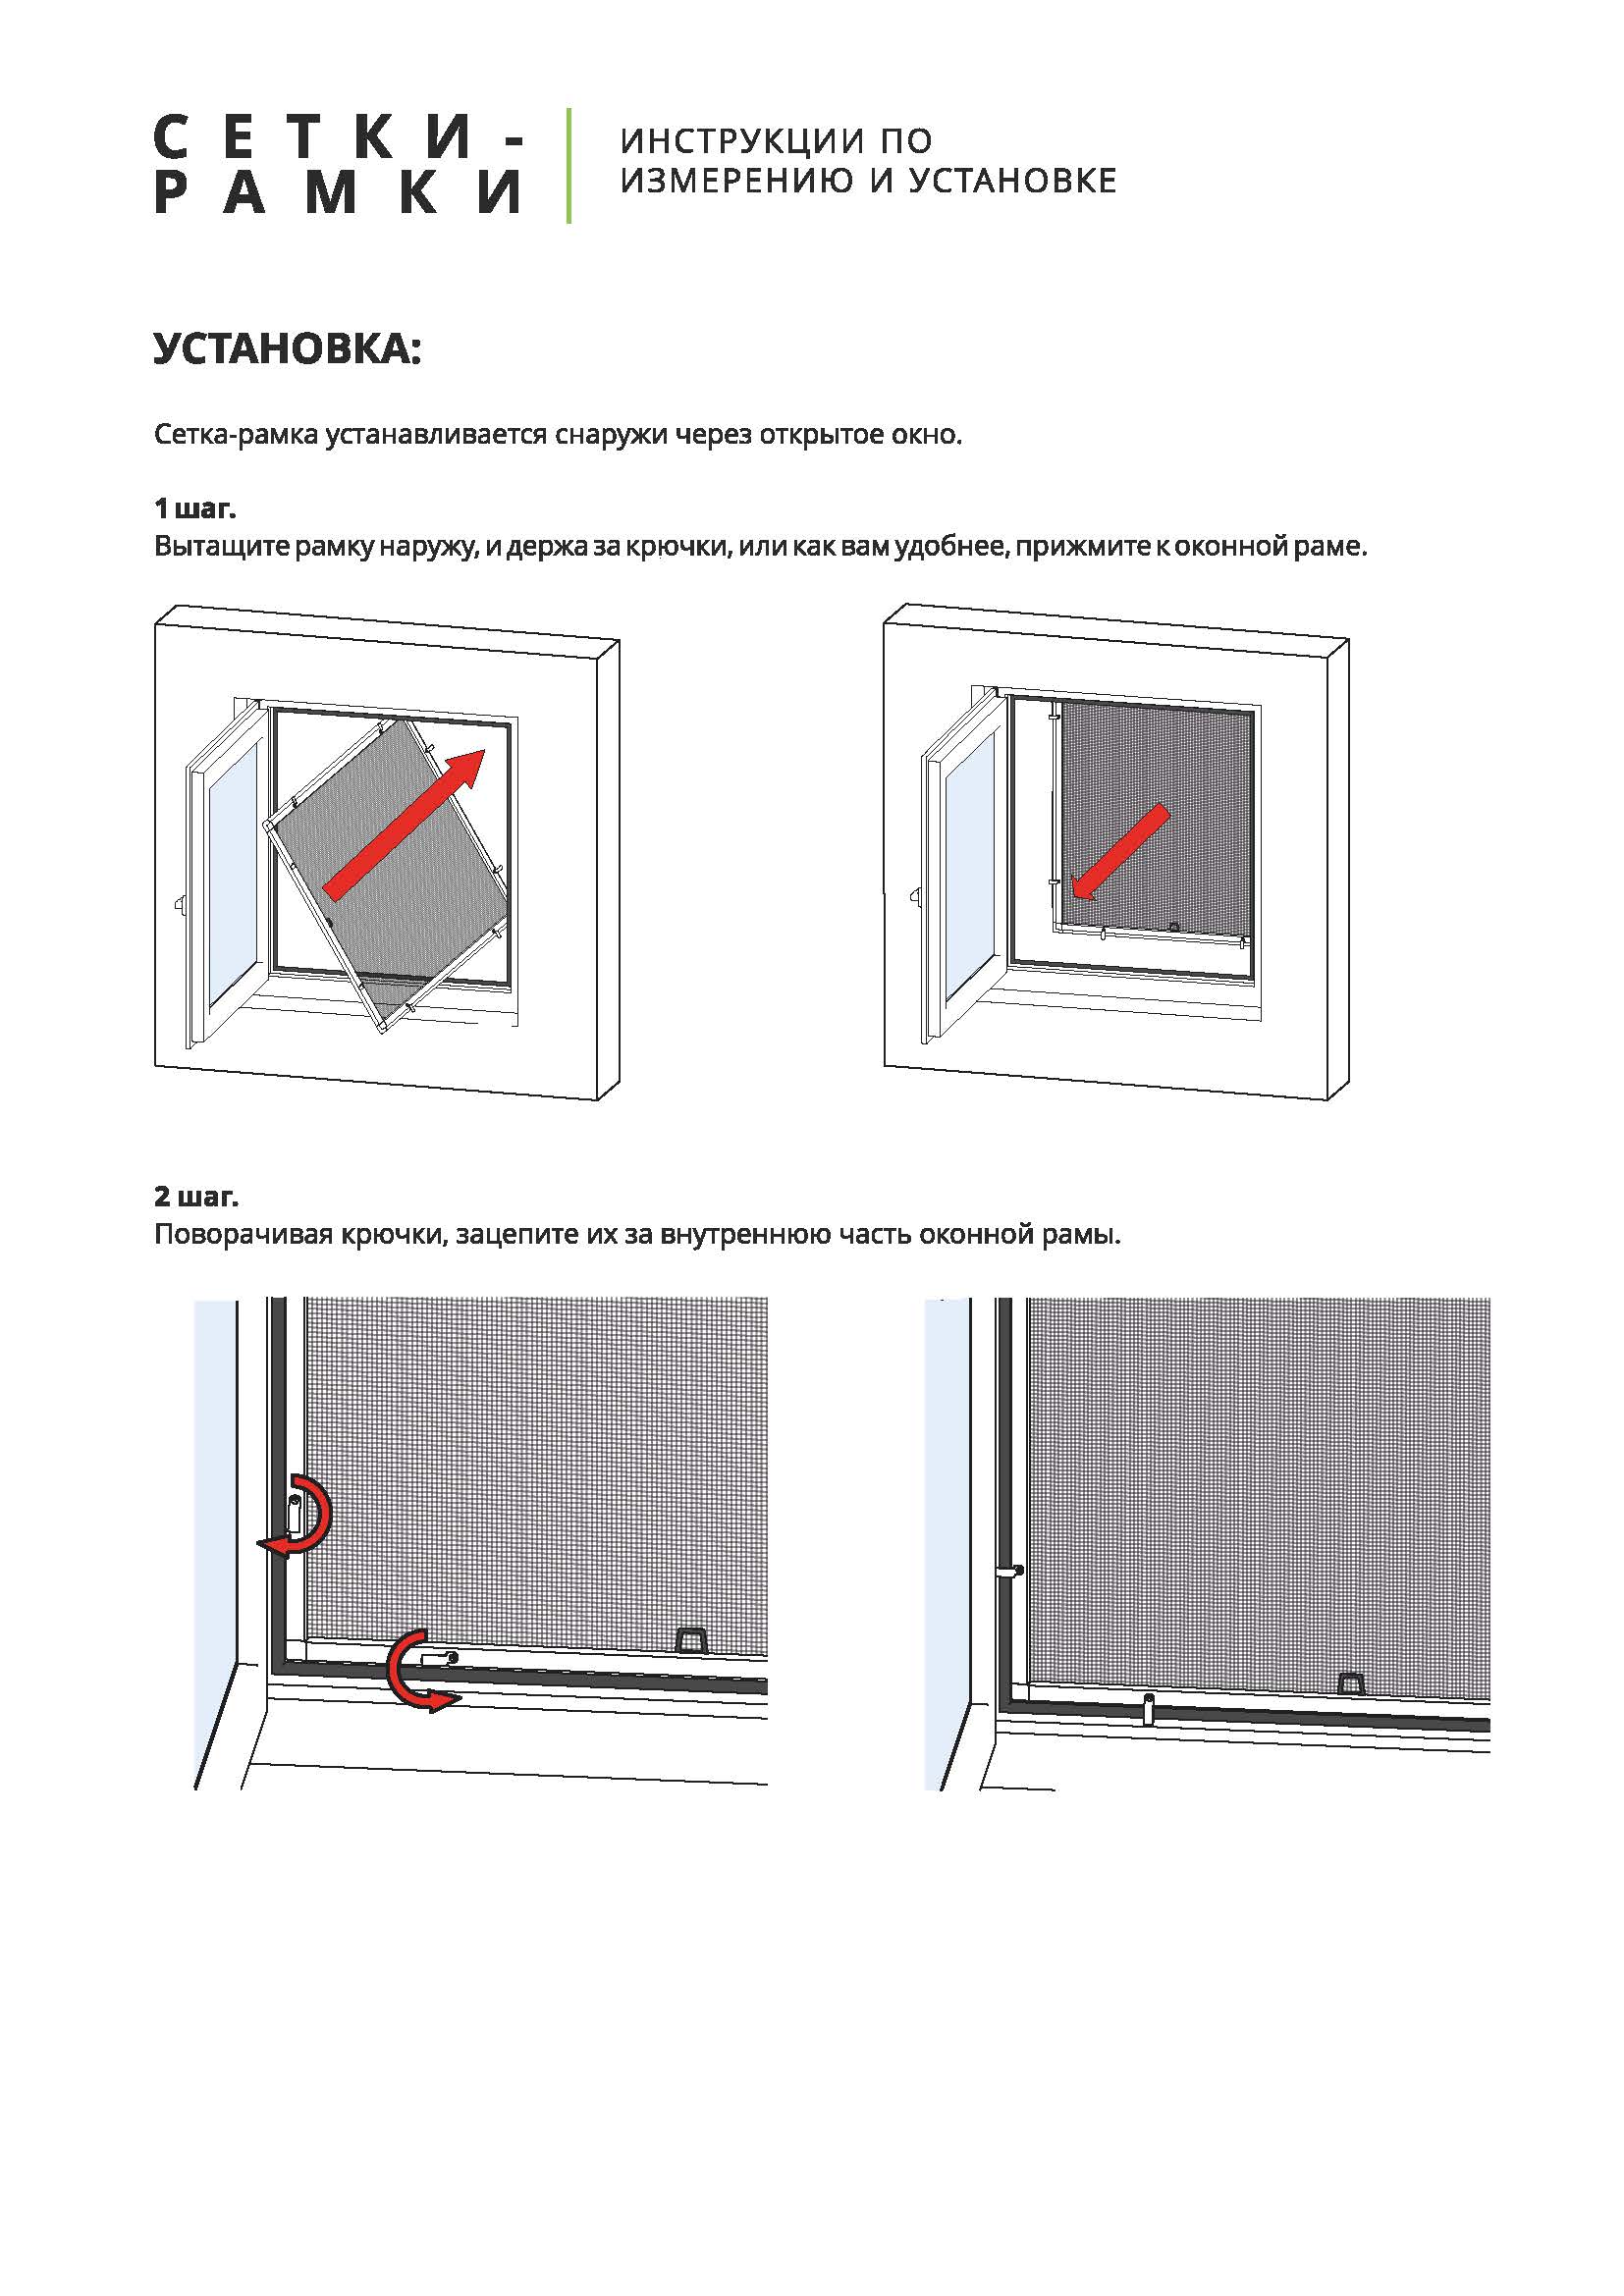
- The panel is exposed from the window to the outside, holding it by the handles. Then unfold with the right side and press tightly around the perimeter of the window opening.
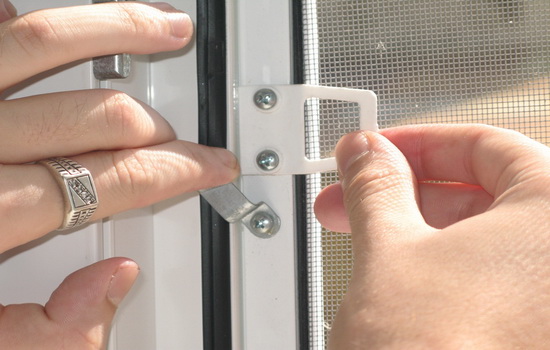
- Holding the panel by the handle with one hand, turn the plates inside the opening with the fingers of the other hand so that the flags clamp the rubber band.
- By turning the self-tapping screws on the clips with a screwdriver, they regulate the degree of pressure of the MC to the surface of the window opening.
- If bending of the frame elements is observed, the frame is removed and an additional plastic rail is inserted into its middle.
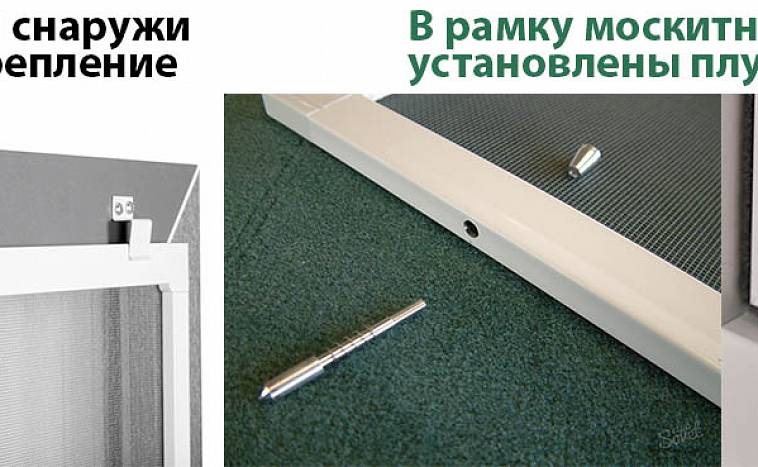
Installation of a mesh with a plunger fastening
The plunger is a metal rod of variable length. In the free state, the distance between its ends is maximum, since it is supported by a spring.


Plungers, there must be at least 4 of them, cut into the sides of the mesh frame so that the thinner ends of the fastening mechanism protrude beyond the edge of the supporting structure. The mesh is inserted into the window opening, where the mounting holes for the fasteners have already been prepared. Then the plungers, like a door bolt, firmly fix the mosquito net on the window.
Usually a mosquito with plunger locks is included in the plastic window kit. If it was decided to assemble a mosquito net with your own hands, several important points should be taken into account:
- before starting to do something, it is necessary to measure the window for the mosquito net, and the dimensions of the finished frame must match the dimensions of the opening;
- the standard number of plungers is 4, two for each side of the frame. If the mesh is large, you can increase the number of fasteners.
Such a mount will provide a long service life of the mosquito protection, protecting the residents of the house from street allergens and mosquito bites.