Installing a washing machine where it is best to install.
It is difficult to imagine a modern housewife who gets rid of laundry stains on the washboard. The automatic machine replaced women's hands and copes with the task much faster and more efficiently. You can safely connect the washing machine to the water supply yourself. For this technique, a specific, specially prepared area is allocated, which occupies a significant part of the living space.
Where to install the washing machine
Washing machine in the kitchen area
Installing a washing machine in the kitchen is common and relevant. such a spread is due to technical parameters that make it possible to simplify the connection without additional laying of water supply and drain pipes.
Besides:
- more space than in the bathroom;
- less damaging moisture;
- it is easier to connect to the power supply in the kitchen;
- the ability to arrange a separate area for electrical appliances, to make it easier to do everyday life and everything was "at hand";
- the surface of the washing machine can be effectively used, for example, equip a place on it for an electric kettle and a microwave oven;
- the washing process will not interfere with the reception of water procedures.
Washing machine in the kitchen under the countertop
In addition to the advantages, there are also disadvantages. Washing involves the use of a number of chemicals that are corrosive and can cause significant damage to the body. Therefore, all chemicals should be kept separate and away from food.
Installing a washing machine in the bathroom
Placing a washing machine in the bathroom is a classic option. Among the advantages of installing in this zone are:
- in the bathroom, the floor is often reinforced with waterproofing, which will avoid conflict with neighbors in the event of a water leak in the event of equipment breakdown;
- the close proximity to the bathtub allows you to soak the laundry if necessary and easily transfer it to the machine, or vice versa, take it out and wring it out by hand.
- Chemistry, the accumulation of laundry waiting to be washed, fit more harmoniously into the interior of the bathroom.
Washing machine in the bathroom
In the absence of free space, you can plan the installation under the sink or purchase a joint kit, machine + sink.
In any case, the place for installation is selected before the automatic assistant is purchased, and the model of the washing machine is already selected for the size of the installation site.
How to connect the washing machine to the water supply
 Next, we look at the possibility of connecting to the water supply. If you have access to any cold water tap, then you can install a straight-through tap for washing machines. The convenience of such a crane lies in the versatility of the solution. To do this, you can disassemble any connection (most often, for this, the flexible liner is unscrewed, a tap for the washing machine is installed and the liner is twisted back). One condition, on the straight-through crane on one side must be
 external thread, and on the other internal. As a rule, this method is most often used in a toilet (or a combined bathroom), when there is access to the flexible connection of the toilet bowl, or there is access to the flexible connection of the sink faucet. The thread diameter for the washing machine is the same and is 3/4 inch. The best way to seal the joint is with Tangit Unilock. This method has only one drawback - the price, but otherwise, such sealing should be preferred to all other methods. Winding thread
  it is necessary in the direction of the thread, but not turn to turn, but chaotically. The number of turns is indicated on the packaging for each pipe diameter.If you wind more, nothing terrible will happen, the thread consumption will simply increase, if less, the connection will leak. Then just disassemble, remove the old thread and wind a new one.
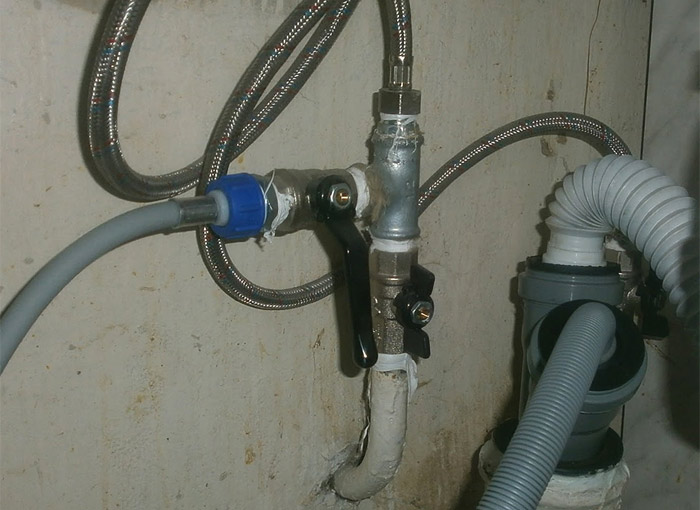
 What to do if there is no access to a suitable connection, the pipes are plastered, and there is only a bathroom faucet. Then a set of crane with an extension is bought (or an extension squeegee is selected to the existing crane) and installed, as it was done in the photo. Of course, this is not the most beautiful option, but what to do if during the repair you did not foresee the possibility of connecting a washing machine. Such a kit can cost more than two taps, then it makes sense to just install two taps. What a subtlety here. As a rule, the mixer is installed via eccentrics. They are not always of good quality. Installing the eccentric first, then the tap for the washing machine, then the mixer creates a very strong load on the eccentric (as shown in the figure), so I recommend following a different sequence: washing machine tap → eccentric → mixer. So, we figured out the connection.
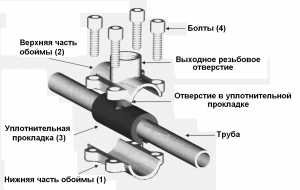 There is another method of connecting to the water supply system, which is suitable for both metal and for polypropylene pipes, which does not require skills in tapping or soldering polypropylene pipes and is suitable if you have open pipes. For this, a drainage system is used. It consists of two halves that are attached to the pipe. Then a hole is drilled in the pipe and a tap is installed on the drainage system. I can't say which way is better or worse, they are all good. Although the latter method makes sense to apply only as a last resort. If it is possible to make a threaded connection or solder a polypropylene pipe, it is better to do this than to use a drain.
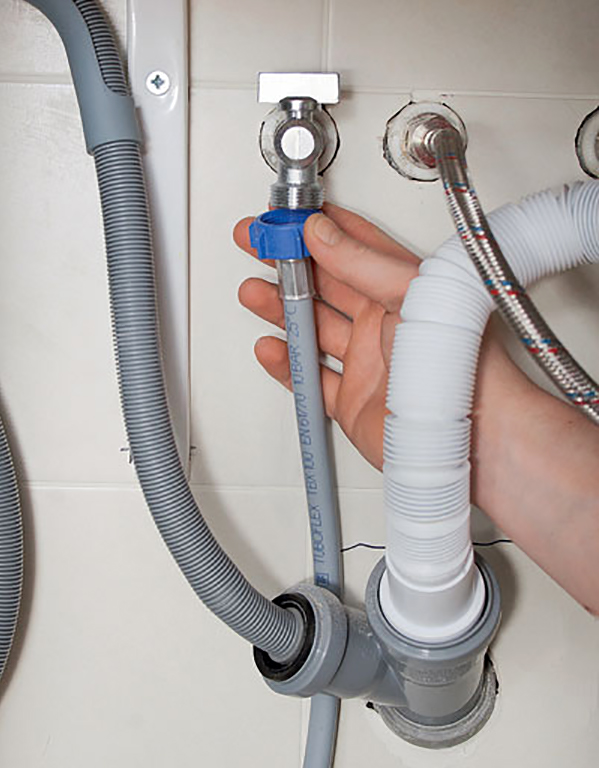
 Now it remains to screw the water supply hose to the tap. In this case, you do not need to use sealing materials such as FUM tape or thread - they will simply be useless. If you look closely, there is a rubber gasket on the fitting that acts as a sealant. In this case, a seal must be ensured between the valve flange and the inlet hose fitting flange. If you remove the gasket and wrap around the threads liberally with sealant, water will ooze between the flanges through the top of the nut, where there is no seal. With the water sorted out - go to the sewer.
Plumbing and sewerage connection
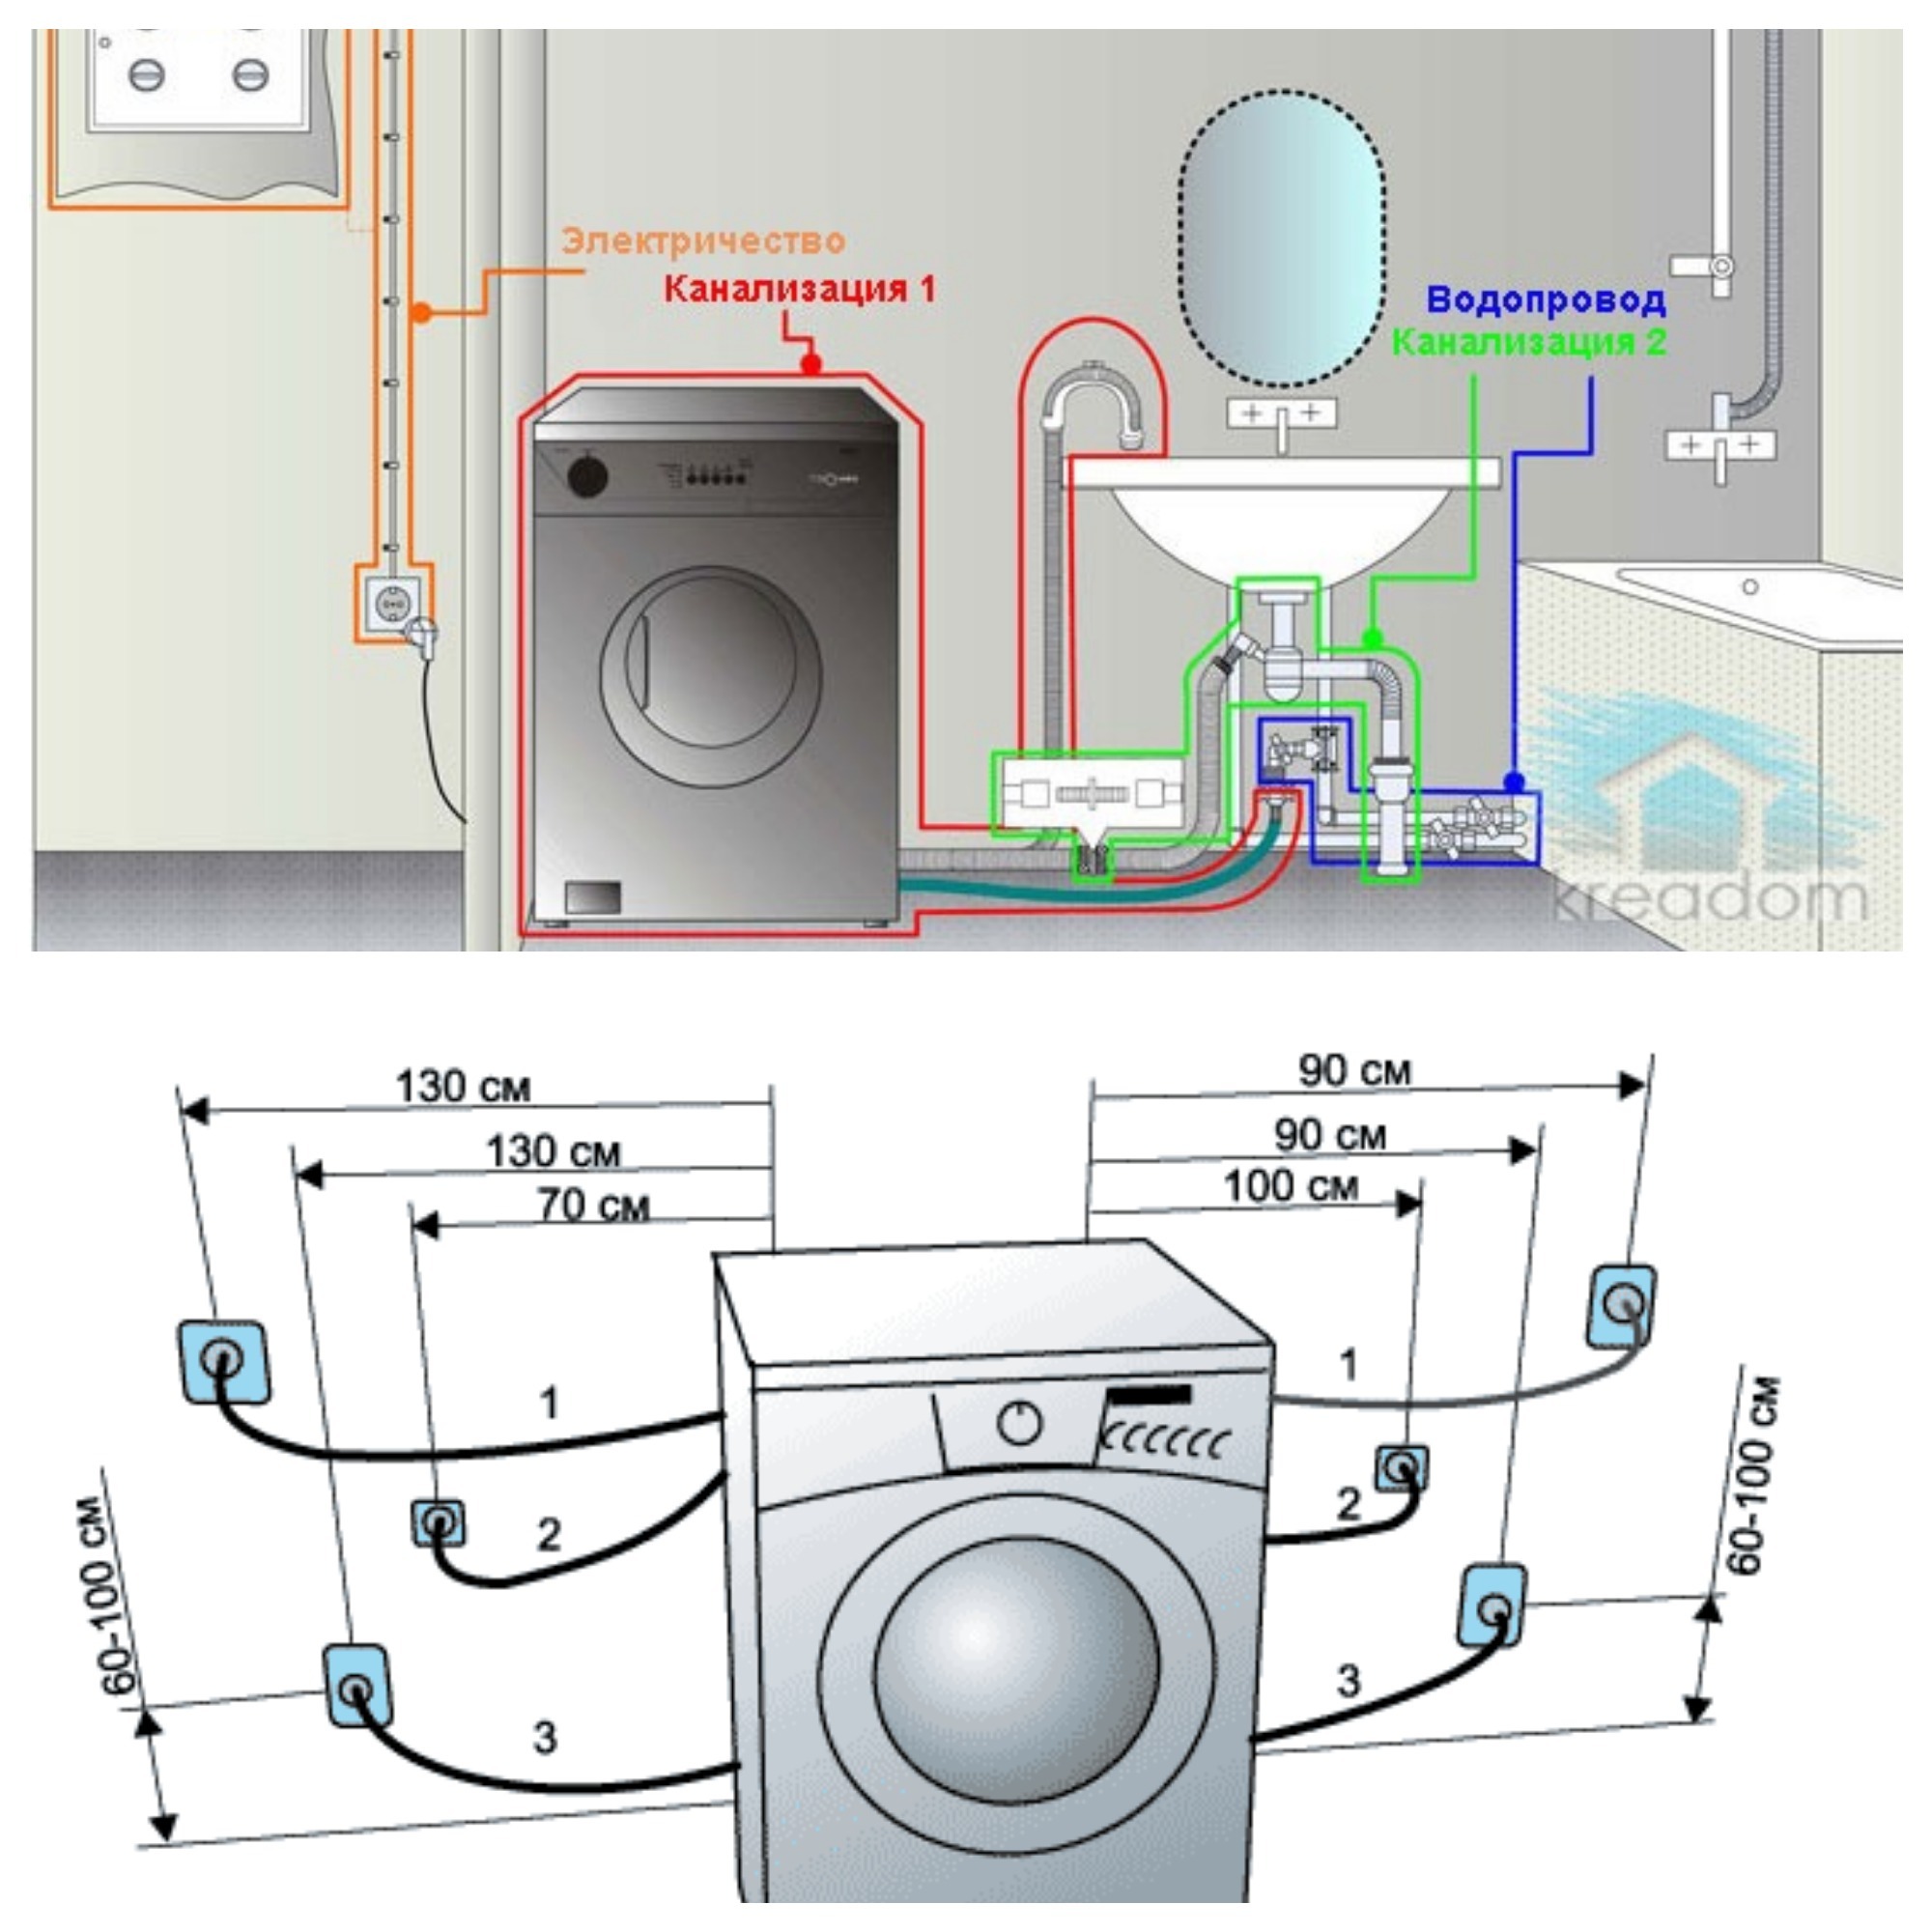
In a city apartment, the preferred option is to connect directly to the communications system - while water enters the machine through a branch of the water pipe, and leaves through the sewer drain.

How to supply water to the drum
An automatic machine can be connected to the water supply in two ways - directly by cutting an adapter into the pipe, or by connecting a hose to the mixer
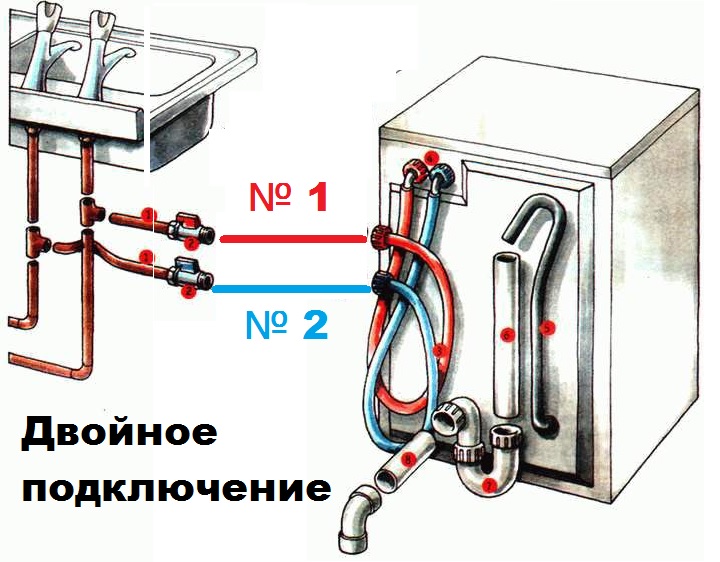
When connecting, pay attention to whether the device heats up the water - if so, it is enough to connect it to the cold water supply pipe, and if not, you will have to connect hoses to both pipes for hot and cold water. And the second point - if there are metal pipes in the house, call a plumber who will help to embed the adapter

How to connect a washing machine to a water supply from a plastic pipe:
Turn off the water in the apartment. Open the taps to drain the remaining water from the pipes.
Determine the section of pipe to cut. Use a grinder to cut it out.
Screw the connecting fittings onto the ends of the pipe, having previously wrapped them with FUM tape against the thread to ensure water tightness.
Screw in the tee, also using FUM tape
When buying it, pay attention to the location and pitch of the thread - if there is an external one on the fittings, then choose a tee with an internal one and vice versa. The same applies to the branch for connecting the hose.
Hoses are usually ½ ”female, so the tee must have an outside of the appropriate diameter.
Take the hose supplied with the machine and connect the end bent at an angle of 90⁰ to the device. Install the coarse debris filter into the hose in advance with the convex side towards the body.
Connect the other side to the tee by screwing it onto the thread and tightening it with a wrench.

Mixer connection
How to connect the washing machine to the water supply through the mixer:
- Buy a tee in the store with an additional tap for cold water and a main extension cord for hot water.
- Turn off the water in the apartment and drain the residues by opening the taps.
- Disconnect the mixer from the eccentric.
- Install a gasket corresponding to the diameter in each outlet of the tee - they are usually supplied in the kit.
- Wrap the external threads with FUM tape.
- Screw the tee so that the hose outlet is at the bottom. Then screw the extension onto the hot water pipe.
- Screw the faucet to the tee and extension. Do not overtighten the nuts to avoid damaging the gaskets.

The latter connection method is simple, but not without its drawbacks. The screwed-on hose does not look aesthetically pleasing, and the distance from the wall to the tap increases. In a small bathroom, a loosely screwed structure can easily hit.
How to organize the discharge of water into the sewer drain
During the washing process, the machine drains the water - for this, an outlet hose is provided. It can be lowered into a sink or sewer, but this method has disadvantages:
- the hose can break off the sides under the pressure of water;
- you cannot use the bathroom during washing.

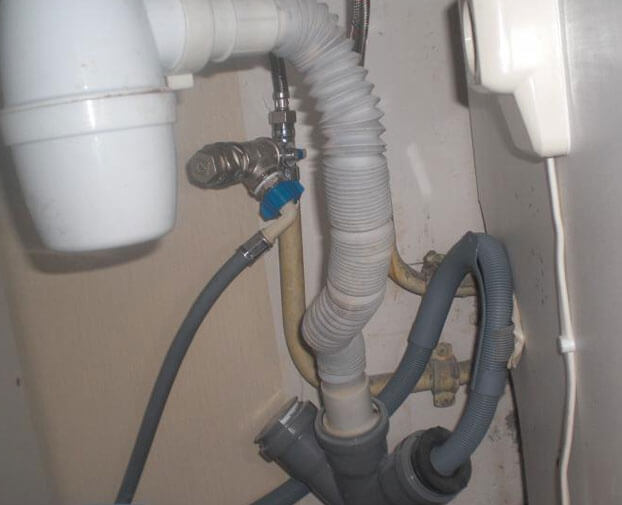
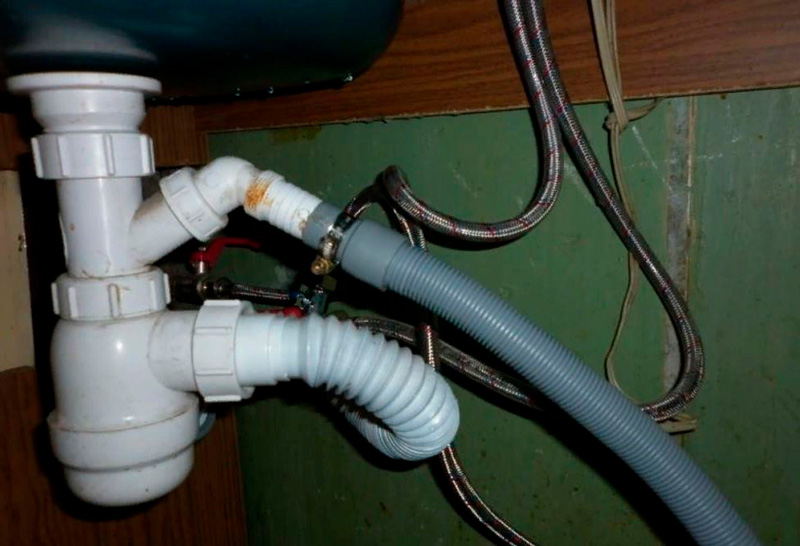
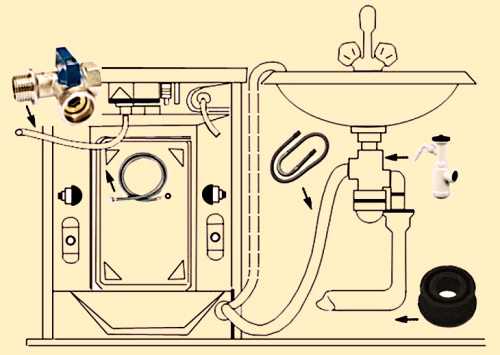
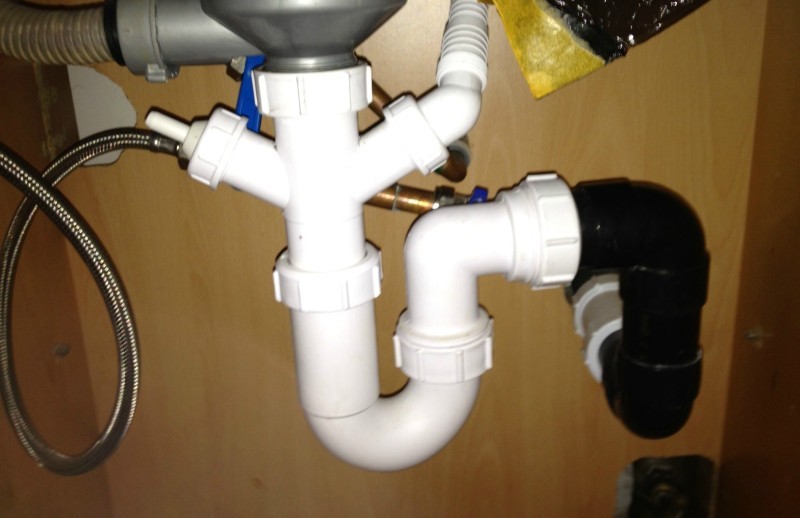
Therefore, most often the washing machine is connected through the sink siphon. For this, an element with a branch for the drain hose is purchased and changed. Siphon replacement instructions:
- Turn off the water in the apartment.
- Unscrew the side clamping nut leading to the pipe.
- Unscrew the top nut securing the siphon to the sink.
- Remove the gaskets and counterclockwise unscrew the nut holding the siphon.
- In the new kit, locate the drain grid with the bolt and the gasket under it. Install on top of the sink, pre-treated with silicone sealant.
- Locate the bottom of the drain with a rubber gasket and screw the bottom onto the drain cup bolt.
- Assemble the siphon from the remaining elements and screw it tightly to the bottom of the sink.
- Connect a corrugated pipe with a gasket to the drain socket.

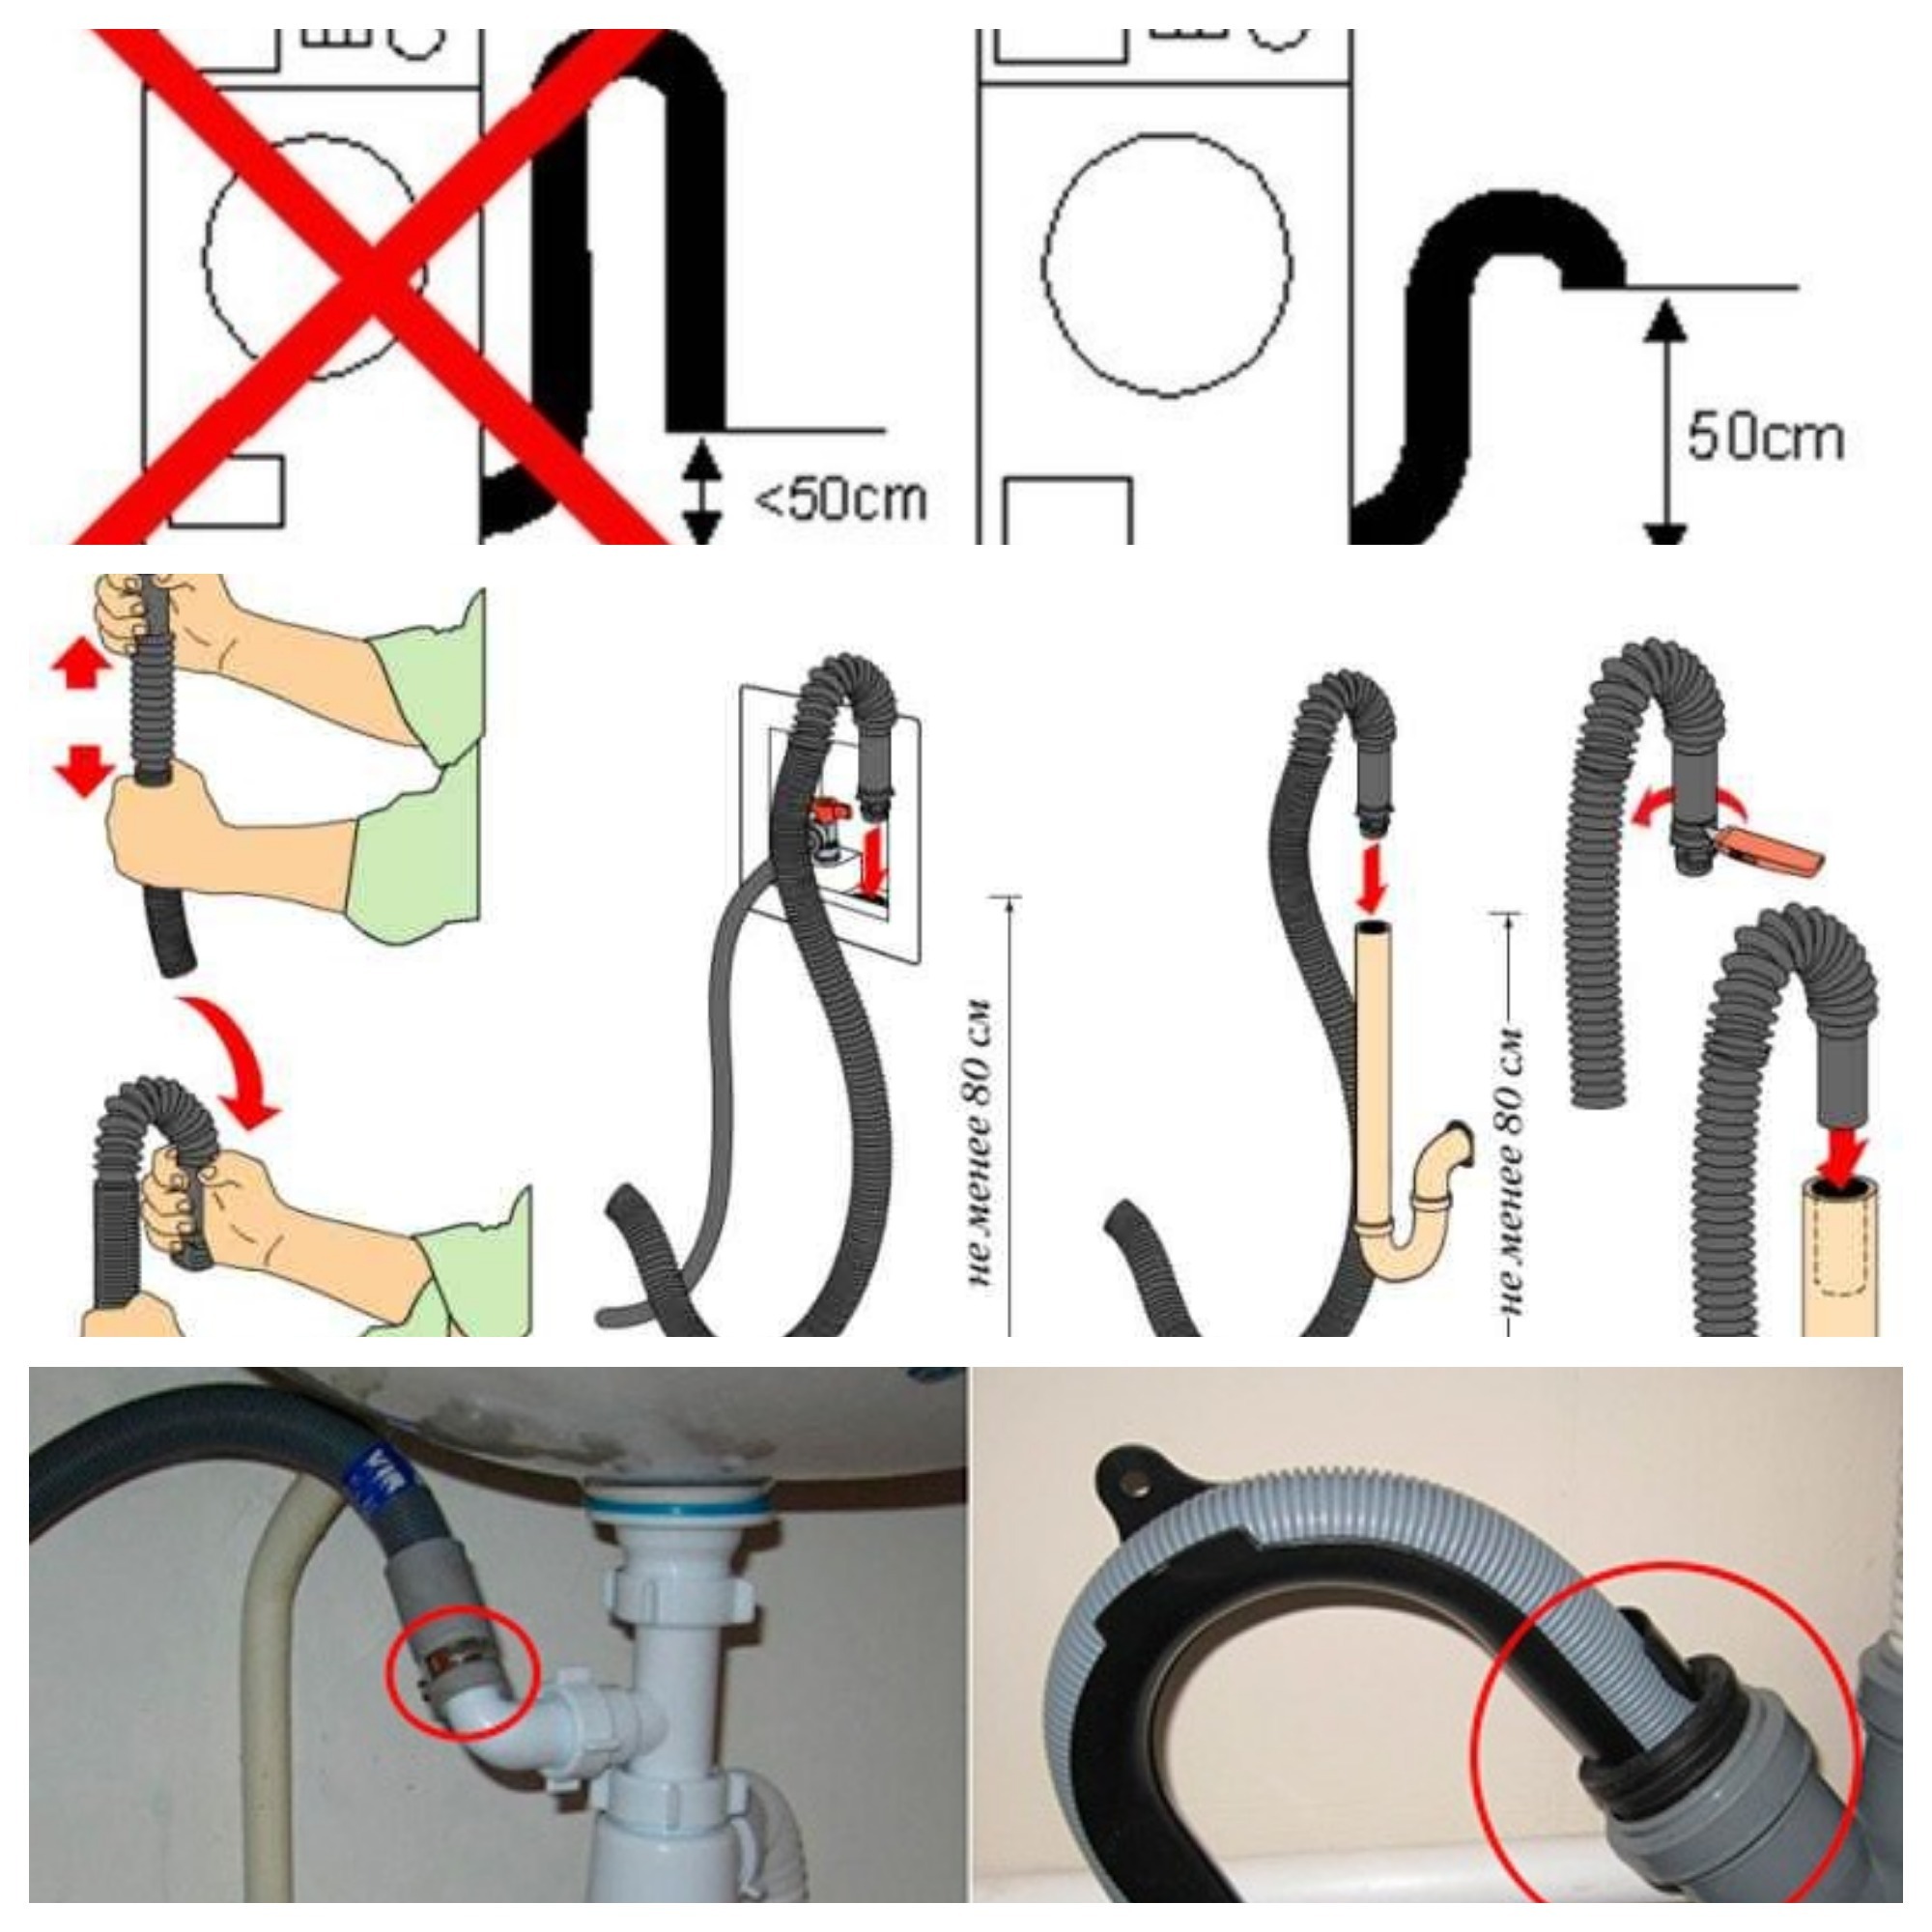
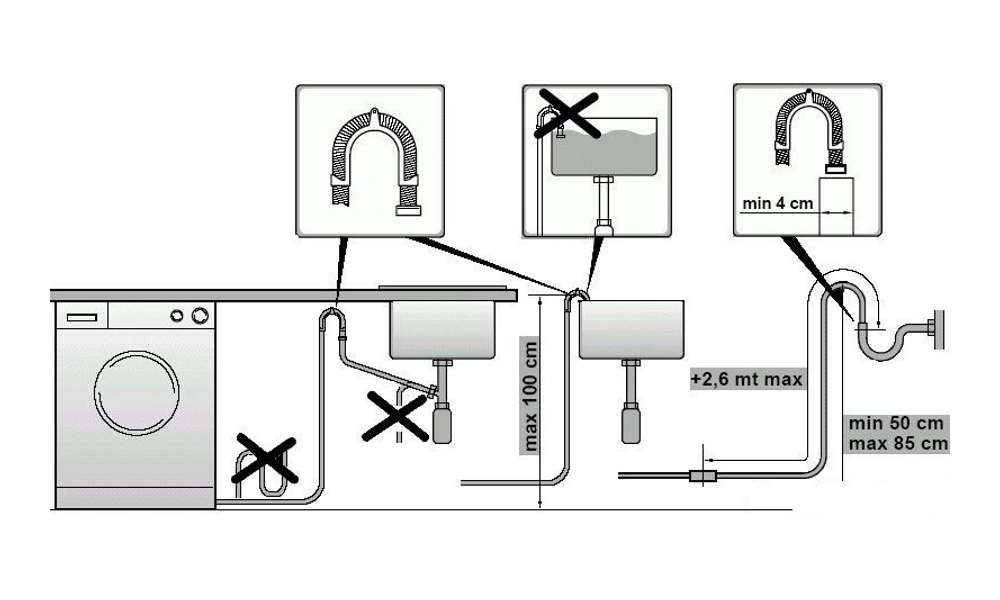
When the siphon is connected, connect the corrugated drain hose of the machine to the branch. Make sure that the distance from the floor to the highest point of the hose is at least 70 cm.
In the instructions on how to connect the washing machine with your own hands, the connection to the drain pipe plays an important role:
- Install an element with a branch on the drain pipe.
- Connect a non-return valve to the drain hose. This is necessary so that the water does not drain immediately after dialing.
- Install the other end of the non-return valve in the branch pipe.
- Seal the joints with transparent silicone sealant.

In the absence of a check valve, you will have to install the corrugated hose so that its end is at a height of about 70 cm above the floor. Otherwise, the water will automatically drain immediately after the pump pumps it.
Connecting a washing machine without running water
Connecting a washing machine in the country without running water is possible in three ways:
- adding water manually through the detergent drawer;
- installation / simulation of a pumping station;
- installation of a water tank 10 meters higher than the device.
The first method does not require special installation skills, but the washing process is quite laborious, so it will not be considered.
Video: How to connect an automatic machine without running water
Installing the tank above the car
In a two-story house, you can install a water tank on the second floor and connect it with a pipe system to the washing machine inlet hose. Disadvantages of the method:
- the need to manually carry about 100 liters of water to the second floor for each wash;
- the tank takes up a lot of space and must be at a high altitude.
Step-by-step instructions on how to connect a washing machine without running water:
- Buy a tank with a volume of at least the amount of water consumed per wash.
- Place it over an automatic washing machine.
- At the bottom of the tank, weld a control valve that will shut off the water, and attach a flexible hose to it.
- Pull the flexible hose from the tank to the machine's inlet hose and connect them with a fitting or threaded element.
- When the control valve is open, water will flow into the machine automatically.

Simulated pumping station
A pumping station costs 5-6 thousand rubles and requires professional installation. You can save money by installing an imitation station in your house. You will need:
- a container for water with a volume of 40 to 150 liters;
- drainage or other suburban pump;
- relay to turn on the pump;
- Union;
- FUM tape;
- adapters;
- tees.
How to connect a washing machine without running water, simulating the operation of a pumping station:
- Connect three hoses to the tee - to the machine, to the pump and to the pressure switch.
- Connect the elements after wrapping the joints with FUM tape and installing spacers if necessary. Use threaded connections - so you can turn off the pump at any time and use it for other purposes.
- The pressure switch has two electrical wires - connect one to the pump and leave the other free. You will plug it into the mains later.
- Lower the pump into the water tank, turn on the power and run a test wash. Do not forget to first level the machine and check the tightness of the connections.

The principle of operation of the "station":
- when the relay is closed, there is no water pressure;
- to create pressure, the pump is running;
- after opening the valve in the machine, which is responsible for filling the tank with water, the relay switches and the pump pumps water into the system;
- when the drum is full enough for one wash cycle, the valve closes, the relay switches back, giving a shutdown signal to the pump.

Economical option without relays
You can dispense with the relay, as this is an expensive unit. To connect the pump directly to the machine and make it turn on the device, follow the instructions:
- Lay the case horizontally and find a block with wires of different colors underneath.
- Find the wires responsible for the operation of the inlet valve (responsible for filling with water).
- Find the place where the water supply hose enters. An inlet valve is located inside the body at this point. Two wires go to it, usually white.
- Strip the insulation of each wire and solder the wires from the pump to them with an offset of about 1 cm.
- Carefully insulate the contact points with electrical tape.

Now, when the inlet valve is triggered, the pump will automatically supply water to the tank. The main thing is to make sure that the container is full and that the pump is completely submerged inside. The disadvantage of such a connection is the inability to disconnect the pump when it is necessary, for example, to water the garden.
Another option is to install reed switches instead of the relay - contacts sealed in glass flasks, which will react to a change in the magnetic field at the moment the inlet valve is opened and transmit a signal to the pump of the machine.

Electrical network
The connection of the washing machine regardless of the power supply must be carried out in accordance with the requirements of electrical safety. In most cases, the washing machine has a high power consumption of 1.5-2.5 kW. In addition, the machine is constantly in contact with water.

To connect properly, follow the instructions below:
- Take care of a separate power line.To implement this condition, you will need to place a separate line from the switchgear to the device. If this procedure is performed after completing the repair, use a special plastic box. They will not spoil the look.
- Use special protection against electricity. Like any other household appliance, the gasket must be connected with a protective device. You can use a switch for this. A residual current device (RCD) can be installed in the switchgear, which protects against possible voltage surges, as well as against electricity leakage.
- Use electrical circuits that will comply with operational and technical parameters. In particular, it is recommended to use wires with three wires and a cross section of 1.5 mm 2.

Connecting sockets is carried out according to the diagram. There must be a protective earth. The grounding conductor must be connected directly to the grounding bar, which is located on the shield.
When it comes to socket selection, from a safety point of view, a spring-loaded socket is the ideal solution. By following all of these instructions, you will not be able to use extension cords as this could heat the pins and damage the device. It is also not recommended to install the outlet in a damp room. Therefore, it may be better if the installation of the outlet of the washing machine is carried out in an adjacent room.
Placement of sockets and electrical appliances
According to GOST R 50571.11-96 (IEC 364-7-701-84), part 7, section 701, the bathroom is conditionally subdivided into zones that indicate the admissibility or inadmissibility of installing electrical devices in them. These zones can be seen in the figure.
Looking at the presented image, the user can clearly determine where the installation of electrical equipment is possible, and where it is strictly prohibited. So:
the zero zone includes places where there is water, it is a bath, a shower, a washbasin. It is strictly forbidden to use devices with a voltage of more than 12V, being in close proximity to water. It is also impossible that power supplies are located in this area;
zone 1 surrounds the previous zone, usually these are adjacent walls, it is not allowed to install sockets here, however, the site is suitable for placing a water heater;
the second zone is located at a distance of 0.6 m from the boundaries of zone 0
Here you can install a boiler, as well as luminaires with protection class 2;
zone 3 is conditionally safe, you can place electrical points here and further into the room, but you should pay attention that sockets and switches must be protected from moisture and steam.
Regulate the conduct of wiring in the bathroom and PUE - the rules for electrical installations. Clause 7.1.40 talks about the requirements for the laying of electrical wires. It is described here that both open laying of cables of the desired cross section and installation of hidden wiring are allowed. The permissible insulating temperature must exceed 170 ° C.
Clause 7.1.48 considers how it is considered possible to install plug sockets in a room with high humidity in general. According to the data, it is forbidden to install food points in public showers, and in apartments, houses and hotel rooms, sockets can be placed in the bathroom, but only in the third zone. It is imperative that the electrical points are connected through isolation transformers, an RCD device or difavtomats programmed for an operating current of no more than 30 mA.
Thus, according to GOST and PUE standards, the sockets must be connected through a residual current device, with an operating current of up to 30 mA, located exclusively in the third zone.As for the junction boxes, it is recommended to place them also in zone 3, or even better, completely outside the bathroom.
Please note that regulatory documents only describe the placement of electrical points according to the designated areas. There is no information regulating at what height the socket should be located
Therefore, when thinking over the layout of the power points, install them in such a way as to ensure convenient connection of devices to the network.
As mentioned above, it is permissible to mount sockets in the third zone, moreover, the products must be equipped with a protective shutter. An excellent option is the Legrand Plexo series of high quality wiring products.
How to connect a washing machine to the sewer
Features of draining the washing machine
 Here it is necessary to dwell on some feature of the washing machine. If you carefully read the instructions for any typewriter, you will see a picture like on the right side of this paragraph. Many people mistakenly think that at this height you need to install a plastic holder that comes with all washing machines. In fact, the task of the holder boils down to holding the drain hose if the drain is organized through a sink, toilet, bathtub or something similar, when the hose is not connected directly to the sewage system, but is placed over a container. When the water is drained, the hose twitches and may fall to the floor. So the holder is attached to the surface, the drain hose is filled into it and the design is more stable. Therefore, the picture in the instructions must be deciphered as follows: the end of the drain hose must be at the specified height. And why, now let's figure it out.
The washing machine does not have any valves blocking the drain. If the drain hose is placed on the floor, water will flow out of the washing machine by itself. Surely in childhood, all men (and most of the women) did the experiment of communicating vessels and poured water from a heavy container through a tube or hose. In this case, the main condition is that the level of water in the container from which it is drained must be higher than the level of the hose from which the water is poured. Now we return to the washing machines. If the end of the drain hose is below the water level in the drum (although there is a mount at the back where the drain hose is attached and you cannot remove this mount), then there is a possibility that water from the drum for some reason may spill out. Moreover, in some machines the washing cycle is organized in a strange way. They pour water into the drum, then for some reason (don't ask me why, all questions to the manufacturers) turn on the drain pump, lower the water level in the drum by 2 cm and only then start washing. When the end of the drain hose is low, although the pump has turned off, water continues to flow out of the machine and in the end either the machine constantly pumps water into the drum, or washes semi-dry laundry, or shows an error: “The water tap is turned off or check the water pressure in the water supply ". If the outlet of the sewer for the hose is located low and such an error periodically occurs, although the water normally enters the machine (but does not "linger" in it), then most likely you have exactly this problem and you can solve it only by lengthening the pipe and lifting the end of the drain hose above. As it is done in the photo, that is, just build up the pipe. By the way, it is not necessary to put on the holder at the same time, this, again, can lead to overflow by gravity. In fact, such problems arise when the drain hose enters the drain from above. If it comes from the side, then most often this problem does not exist. In general, a balanced and competent approach is needed here.
Connecting the washing machine to the sewer
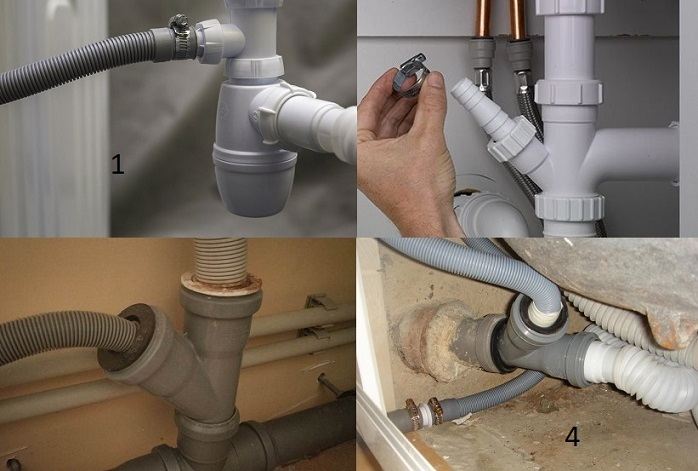
There are actually two ways to connect.As a rule, the drain from the bathroom or sink is made with a corrugated pipe. The diameter of the sewer pipe in this case is either 40 or 50 mm. Therefore, you will either need a tee, preferably using an oblique. In the sewage system, it is generally desirable to use smooth corners.
Once again, I draw your attention to the fact that you do not need to use the holder if you are connecting the drain to the sewer. The second method is applicable if you have a sink on the siphon (more often this is done in the kitchen, but in the bathroom you can also have a sink with such a siphon) there is a separate output, just for such a case
But I do not recommend connecting in this way. Imagine a situation that your siphon is clogged. Then all the water will go not to the sewer, but to the sink. One wash cycle consumes at least 30 liters of water. The sink will fit at most 10 liters, and the rest of the water will be on the floor.
Now you need to take the adapter sleeve of the correct size. Either it's 50/25 or 40/25
Please note that the coupling must be sunk into the tee or pipe until it stops. It is a mistake to think that if the clutch has risen and does not climb further, then this can be done.
Especially when the clutch is rubber and the rubber is hard enough. It may not crash, but it's better not to risk it. Then heat the sleeve with hot water to soften it. It remains only to shove the drain hose into the coupling. It is not necessary to push half a meter of the hose into it. As a rule, the drain hose has its own rubber sleeve at the end, and this part should be placed in the sewer. If there is no coupling on the hose, then we recessed no more than 5 cm.Well, we also figured out the sewage system, you can proceed to installing the washing machine.
Best wishes, Me!
Detailed description of the installation process
After all the preparatory work, you can immediately start installing the device. To do this, you must have a building level. The uniformity of the installation is checked on the top cover of the machine. The maximum permissible deflection angle is 2 °. The horizontal position is very easy to adjust: for this you need to adjust the legs of the device.

When the machine is leveled, your feet should be firmly secured. To do this, tighten the lock nut counterclockwise with a wrench. If you want the procedure for installing your washing machine to be carried out in a technologically correct way, you must follow the following instructions:
- The unit will be securely installed, the feet are securely in place, and the floor is level.
- Use fasteners to secure the supporting structures.
- Shake the machine diagonally to check if the installation is correct. If there is no hesitation, the work is done at "5+". Otherwise, correction is required.
Communications for large consumers
The washing machine and boiler belong to the category of powerful consumers of electrical energy, therefore, to install them in the bathroom, it is necessary to equip separate lines, protected by automatic machines. You cannot use the same outlet for both the washing machine and the water heater. It is necessary to provide a separate power point for each device, which has an additional panel with an automatic device.
What wire is needed to connect equipment? We select the cable cross-section, focusing on the power of the electrical appliance. It is advisable to weld or solder the wires. The connection is made in a sealed junction box, completely protected from moisture.
The junction box is installed outside the bathroom, but if this is not possible, mount it indoors, choosing a shield with an IP68 protection class. The water heater must be connected using an electrical panel device with a two-pole circuit breaker equipped with an RCD.
What filter element should I supply?
It is often difficult to determine which cleaner to choose from among the variety on offer. Let's figure out what the different options for filter elements are.
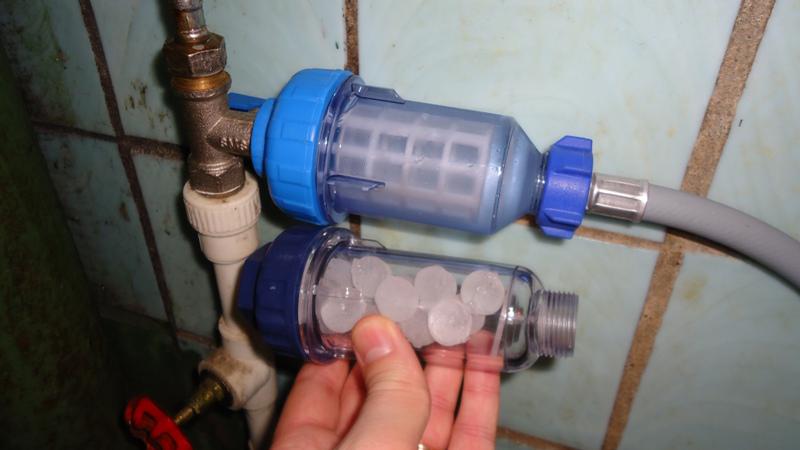
- Main filters are provided not specifically for SMA, but for installation on water pipes at the entrance to the apartment. Their principle of action is to completely purify water when it enters the apartment. The element removes grains of sand, rust impurities, while maintaining the chemical composition of the water.
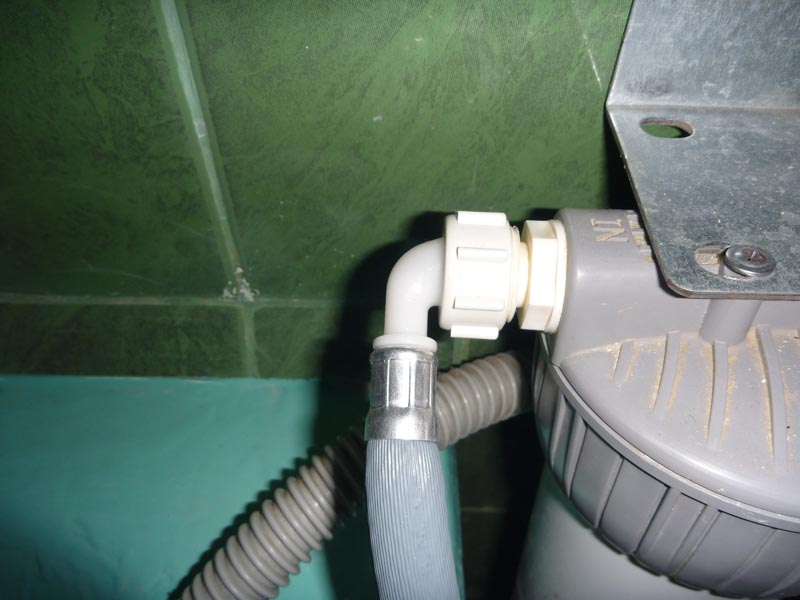
- The coarse cleaning device for the washing machine should be mounted in front of the machine, it allows you to remove large objects from the water. It is necessary to frequently clean and rinse the element due to its rapid clogging.
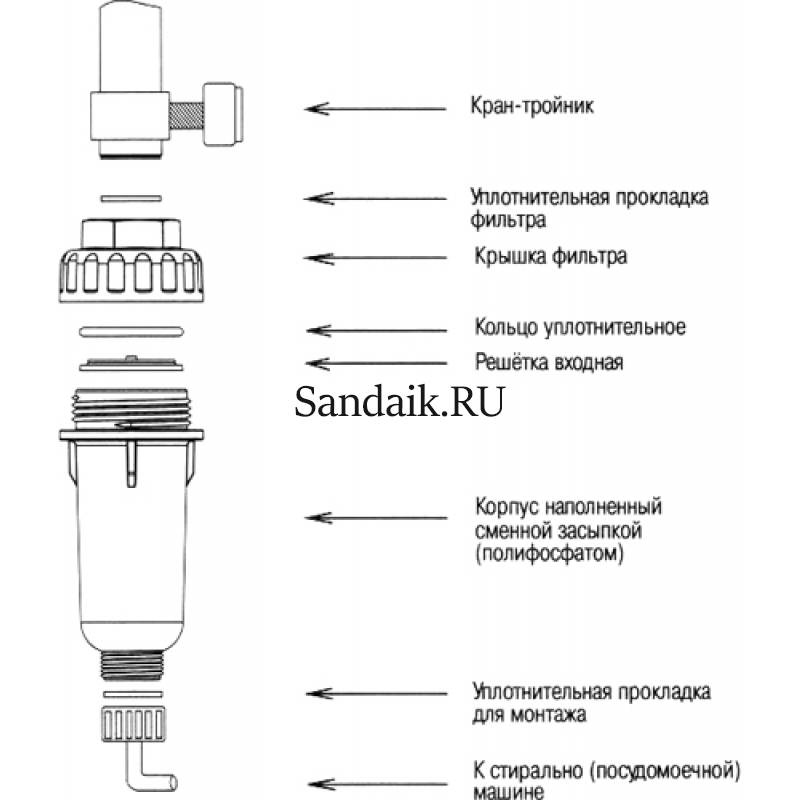
- A polyphosphate filter element is used to soften the incoming water. After cleaning with sodium polyphosphate, the liquid will not be drinkable, therefore the device can only be used for processing water for technical purposes.
- The magnetic filter is designed to soften water. It is installed directly on the inlet hose. Manufacturers claim that the magnetic field has a beneficial effect on the liquid. However, this influence does not have any scientific validity, therefore, the opinions of experts on the account of such a filter vary greatly.
The range of filter elements offered for sale is quite wide, and it is up to you to choose which filter to connect. The available variety allows you to find the right cleaning device for your case, which will prolong the performance of the CMA.
Manufacturers rating
Among the filtering devices that are on the market today, it is possible to note several of the most popular models.
Geyser 1P overview
Main filtering device manufactured by the Geyser company. Designed to purify water that enters the house, it is mounted on a cold water pipe near the entrance. Provides cleaning from rust, plaque, grains of sand, and other debris. So, clean water will flow not only into the washing machine, but also into the dishwasher and boiler.
The working element is a polypropylene cartridge that cannot be cleaned. It needs to be changed from time to time. The cartridge body is pressure resistant up to 30 atmospheres. This is a compelling argument in favor of choosing this device for purchase.
Aquaphor and his Styron
Polyphosphate filter device manufactured by Aquaphor. Water purified with its help must not be drunk. The device prevents rust from forming, removes existing scale, softens water. One portion of the filler is enough for 300 washes.
Atlantic
Washing machine filters produced by the French company Group Atlantic are polyphosphate devices. These devices are distinguished by their average cost and effective water purification.
Aquashield Pro
This is a magnetic filter device manufactured by NPI "Generation". The operation of the device is based on the action of a magnetic field on water. Water treatment is carried out without any chemicals. The filter housing is made of plastic. The device is equipped with a microcircuit and a processor, as well as control keys. Through them it is possible to change the wave frequency in the range of 50 kilohertz.
2 emitter wires are connected to the body. They need to be wrapped around the pipe (direct the wires in different directions). The filter itself is installed on the pipe. It works at a voltage of 220 volts, consumes 5 kilowatts of electricity per month (maximum).
Aquaflow
Water treatment is carried out with high frequency electrical impulses. An electric field is generated across the pipeline channel. It charges foreign particles in the water. As a result, large particles are formed, which are subsequently destroyed by fine cleaning technology. The device is able to purify water from some microbes.
Checking work
After all connections have been made, it is necessary to perform a test run of the washing machine. All operations are carried out, but without loading the laundry.
First, the washing mode is turned on, you need to make sure that the tank is filled with water, the heating elements are working, while there are no leaks anywhere in the places where the water supply is cut, the hose is connected to the water supply and to the machine.
Then the spinning starts, the presence-absence of leaks in the places where water is discharged into the sewer is monitored. If leaks are found, it is necessary to seal and seal the connections as much as possible. If everything is ok, you can start washing according to the instructions.
It is quite possible to install and connect a washing machine on your own, sometimes everything necessary for such a connection is already provided in the communication system, if the water supply and sewerage system are old, the task becomes more complicated, requires additional tools and consumables.
Electrical connection - the simplest step in the presence of a grounded outlet and the most difficult in the absence of one. In this case, if you do not have sufficient qualifications, it is better to invite an electrician
It is important to remove the transport parts, place the machine horizontally and carry out tests before using it.
For a complete understanding of the topic, watch the video on the correct connection of the washing machine taps to the sewer drain and the water supply, as well as on the inclusion of this technique in the home electrical network:
Taking into account the tips outlined in this article, we are sure that installing and connecting the washing machine yourself will not be difficult for you.
Improving pump performance - making the machine automatic
If you have no desire to stand over the washer and manually turn on the pump, it is worth automating the process of starting it. This is done like this:
- Tilt the washing unit forward slightly.
- Find the inlet valve and the wiring leading to it at the bottom of the car. Finding the device you want is easy. It is located near the hose through which water is supplied to the unit.
- Strip both wiring.
- In the technical window on the back of the machine, push the wires from the pump. Solder them to the stripped intake valve wiring.
- Be sure to isolate the completed connection.
Automation of the process of starting a pump for a washing machine
Now you do not need to "guard" the washing machine. Launch it and go about your business. The pump will turn on itself as needed, and then turn off. This system functions simply. The inlet valve automatically opens when the unit requires water for washing.
At the same time, the pumping device you installed is also turned on. It forms the required water pressure. After taking the required volume of water, its level indicator, mounted in the unit, turns off the valve. Together with it, the pump stops. Congratulations. You have at your disposal a full-fledged automatic machine that functions in a house without running water.
Four reasons to put a "washing machine" in the kitchen
Here are some common reasons that housewives are forced to put a washing machine next to an oven and refrigerator:
- Installation of a shower cabin. Typically, a shower stall is large and does not fit well into a small bathtub. This can usually be done only if you move all the cabinets and the washing machine from there.
- Large washing machine. For small bathrooms, compact models are usually chosen, but if there are many people in the family or there is a small child, a machine with a small load may not cope. Therefore, the owners of the apartment buy a large car and move it into the kitchen.
- Custom bathroom. After redevelopment, a typical bathroom may lose some of its area, and there is no room for a washing machine.
- Personal preferences. People who are accustomed to using a “washing machine” in the kitchen or simply prefer to save time on household chores often choose this option, even if the space in the bathroom does not limit them.
The kitchen has everything you need to connect a washing machine (plumbing, sewerage, electricity), so it won't be much more difficult to install it there than in the bathroom.

An example of the location of a washing machine in a small kitchen
If you are not used to washing clothes in the kitchen, but the layout of the bathroom leaves no choice, do not worry: this arrangement has its advantages, and for many housewives it is even more convenient. Access to the kitchen is always open, the approach to the washing machine is freer (due to the larger area) and you can follow the wash while washing dishes or preparing dinner.
If you already know that you will put the car in the kitchen, you can immediately buy the accessories for connecting it:
-
- A tee for a sewer pipe (or a special siphon with a branch);
- Tee or fitting for the water intake hose.
We will consider different options for connecting the water intake hose below.


