Content [show]
The content of the article:
- Onions are the richest source of vitamins
- What is onion
- What to plant and how to grow?
- What do onions like?
- Soil types and how to make it suitable for growing onions
- Preparing the soil for planting onions
- Preparing the soil for planting onions in spring
- Onion planting methods
- When is the best time to plant onions?
- The key to a good harvest
What do you know about onions? Well, besides the fact that almost no hot dish is complete without it. And among cold appetizers, onions can truly be considered the king. It is stewed, fried, pickled, served raw. The most delicious roast with it, it should be in soups and borscht, without it salads are considered orphaned. Everything is edible in onions - the onion itself and the green sprouts from it. There are dozens of varieties and species that differ in taste, it can be white or red, green, golden, always with a pungent odor, from which tears do not spontaneously roll. In one form or another, onions are always needed, without its aroma, dishes from meat, fish, vegetables are unthinkable.
Onions are the richest source of vitamins
 If the green part of this unique plant is not stored for long and is served exclusively fresh, then the onion can be stored for almost six months, retaining all its healing properties. What is this valuable product so rich in? First of all, vitamin C, which a person needs to maintain immunity. A unique property of onions, known to mankind for 4000 years, is its antiseptic capabilities. This plant is a natural antibiotic. Not for nothing, during infectious epidemics, it was recommended to keep onion slices in rooms - the first simple protection against airborne viruses.
In winter, eating raw onions is imperative to reduce your risk of colds and flu. It is used to make tinctures, compresses, mixtures, squeeze juice and grind. There are hundreds of medicinal recipes and uses besides standard food intake.
In cooking, onions are completely versatile - they can be used as a seasoning, addition, as well as a main dish. It is fried in rings, made into marmalades, marinated in vinegar and just eaten raw.
Agree, with such a huge selection of uses, onions are a very valuable plant.
What is a bow?
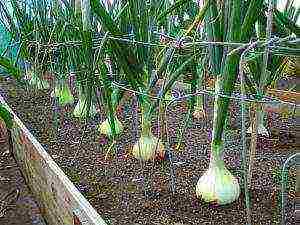
We most often deal with common onions, which grow like a turnip - a golden onion under the ground and green shoots. As already mentioned, everything is perfect in such an onion - the bulb itself, juicy and aromatic, as well as the green "feathers" shoots that we eat raw. Onions keep well in winter and remain juicy throughout the storage period. It can be white or deep purple depending on the variety. When it comes to the yield of onions, we are talking about the number of bulbs harvested. It is this part that determines the yield.
If we talk about such a variety as leek, then the ground part is the most valuable in it.
 What do gardeners like to grow on their plots besides the usual onion?
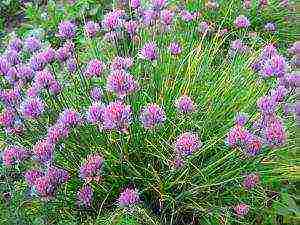
- Schnitt
- Shallot
- Batun
- Leek
These are the most common types of this plant, which are easy enough to grow in your backyard.
What to plant and how to grow?
Given the huge variety of this crop, you first need to decide what you will grow. This can be only one species, for example, the usual onion, for winter harvesting, or it will be an onion that interests you exclusively in its ground green part. This article will help you understand the basic principles of growing the most common crop - onions, which are very important for the consumer.
What do onions like?
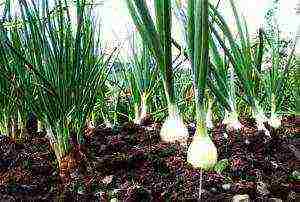 What does a plant like a regular onion love? To grow a large and juicy bulb, the correct shape and without defects, you must adhere to the rules that will be discussed in this review. First of all, you need to choose the right site for landing. This should be a well-lit and ventilated area. The land must be fertile. The fact is that this plant has an extremely meager root system, so the earth must be enriched with minerals and necessary elements throughout the entire volume. Onions will not grow in poor soil.
Soil types and how to make it suitable for growing onions
Black soil is ideal for onions. But even it will need to be fertilized. Peat bogs and loams are also suitable, but subject to systematic proper care. Sandstones are not suitable for this purpose. If the loam is not fertilized, then the onions grown on it will not be tasty and will not be able to be stored for a long time.
The soil should be moderately moist. Excess water will not benefit this plant, but drought will be dangerous. Therefore, the open sun is so necessary so that excess moisture evaporates naturally.
Preparing the soil for planting onions
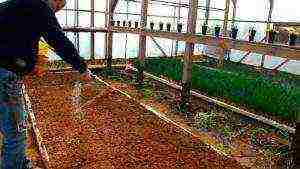 The key to a good harvest is the correct preparation of the soil for planting. The soil is prepared in two stages - in winter after harvest and in spring before planting. In the fall, when the crop is harvested, it is necessary to remove all unnecessary things from the ground, for example, plant residues. After that, the soil is dug deeply, on a full bayonet of a shovel, with a turnover of the layer. For the winter, the ground is not leveled so that frosts destroy all pathogenic microbes from the surface of the soil. In autumn, organic fertilizers must be laid in the soil. This method is important as it takes time for organics to soak into the mail. Spring melting of snow contributes to this process.
A feature of onion cultivation is the fact that an excess of fertilizers is as dangerous as their lack. To avoid such a mistake, it is recommended to saturate the soil with fertilizers in two stages - in autumn and spring. In the fall, you can lay humus and part of the phosphorus-potassium fertilizers, and in the spring you can report them with the addition of nitrogen. The phased application of fertilizers guarantees their even distribution in the ground, which, as already mentioned, is an important point.
During the winter, a natural process of assimilation of nutrients will take place, as well as all organisms that can cause soil diseases will be destroyed.
Preparing the soil for planting onions in spring
In the spring, it is necessary to start the second part - the ground must be carefully harrowed and leveled in early spring, as soon as the snow melts.The soil after the autumn processing is coarse and unsuitable for planting. Early spring cultivation is necessary so that unnecessary moisture evaporates from the soil surface. In addition, it is necessary to add fertilizer residues and carefully break up all large lumps so that the soil is even.
Depending on the type of soil, it is either loosened (sandy loam soils) or dug up (medium-loamy, loamy). When digging, additional oxygen gets into the ground, which is necessary for the development of the plant.
Fertilizers are applied before digging and loosening, but after drying the earth. All this is done in advance before planting the seed.
Onion planting methods
 Onions are planted either with seeds or cunning. Depending on this, the soil is prepared. Seeds require absolutely uniform soil, without lumps, loose and saturated with fertilizers. The seeds will not be able to break through if the soil is poorly and poorly loosened.
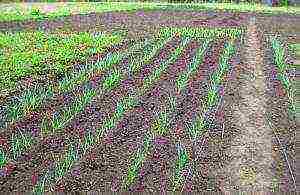
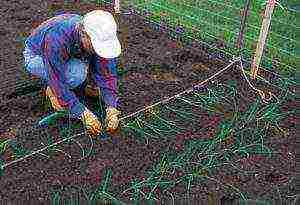
When planting the bulbs, the soil must also be loose enough so that the bulb can be lowered to a sufficient depth. Planted in rows, the distance between which should be at least 30 centimeters to a depth of 6-10 centimeters.
For seeds, you also need to prepare beds with the same conditions, the planting depth is at least 5 centimeters.
Planting crops efficiently is possible if you follow these guidelines.
When is the best time to plant onions?
The ideal time for onions is late April or early May. The first to be planted are small bulbs. It will better survive possible frosts and will not give premature seed arrows. If you plant the sevok later, then it will not have time to properly develop the root system. Then seeds of various varieties are planted in May.
The key to a good harvest
The main secret of a good harvest of onions is the correct preparation of the soil for planting onions in spring and autumn, because it is the composition of the soil that will determine the taste and shelf life. But care is also extremely important - during the growth of the plant, about two to three weeks after planting, it is recommended to apply organic fertilizers, for example, chicken droppings at the rate of one to twelve. They also make an ammonia solution - add 30 grams of ammonium nitrate to a bucket of water. When the bulb begins to form, fertilizing is also done - about 30 grams of superphosphates per ten-liter bucket of water.
It is also necessary to regularly loosen the soil between the beds - this will relieve excess moisture and saturate the soil with oxygen.
After the onion has risen, thinning must be done. If you want to grow large bulbs - weed without mercy, for a good harvest you need a place.
Despite the fact that onions love good and fertile soil, it is still quite possible to grow them. It is enough to follow some rules:
 choose the right site for planting onions. It should be smooth, well-dried and light-colored.
- decide on the type of soil. Onions will not grow in sand. To determine your soil type, soften a handful of soil in water and try to roll a ball out of it. Sandy soil will crumble, clay and loam will roll into a ball. Choose fertilizer depending on the type of soil.
- onions love fertile soil, but fertilizers should be applied evenly and without excess.
- the soil for planting onions must be well harrowed and leveled. The more evenly the soil is cultivated, the better the seeds will grow in it.
- thin the onions twice during the growth period and loosen the soil in the beds regularly.
We hope that our tips will help you grow a wonderful harvest of such a valuable product as onions. Good luck!
 Onions are popular vegetable crops. It is added to salads, soups, meat and fish dishes. Therefore, in almost every summer cottage and personal plot you can see beds with plantings this vegetable. But to get a good harvest, you need to know how to properly plant and care for onions.
Planting onions
The crop can be grown in three ways:
 From seeds in one year... This method of growing vegetables is suitable for areas with a warm climate.
- From seed in two years... In a two-year culture, the plant is grown in areas with short summers.
- Seedling method... This method is suitable for sweet and semi-spicy varieties of vegetables.
But before you start planting onions in open ground, you should prepare a site for it. The beds are recommended to be made in organic-rich, dry, sunny, open areas with neutral soil. If the soil is acidic, then it is preliminarily lime.
You can plant onions after tomatoes, green manure, peas, beans, cabbage crops, potatoes. After other types of onions, cucumbers, carrots and garlic, onions can be planted only after three years.
When planting in spring seed soil for planting is prepared in the fall:
 Rotted manure or humus is added to the soil, and the bed is dug to a depth of fifteen to twenty centimeters. It is not recommended to add fresh manure, otherwise only greens will grow.
- The acidic soil is mixed with limestone, ground chalk, wood ash or dolomite flour.
- In the spring, before sowing seeds or planting seedlings, mineral fertilizers are introduced into the soil - potassium chloride, urea, superphosphate.
Growing onions from seeds
 Semi-sweet and sweet varieties in warm climates can be grown from seeds in one year. The planting material is pre-processed, for which the seeds are placed in gauze, moistened and kept for swelling during the day.
A bed prepared for planting seeds is watered copper sulfate solution (for 10 liters of water - 1 tablespoon), after which seeds are placed into it to a depth of one and a half centimeters. The distance between the rows should be about thirteen centimeters, and between the seeds - one and a half centimeters. Crops are watered with water from a watering can with a shower head and covered with foil.
Crop care consists in timely moistening of the soil and daily airing of the plantings. When the seedlings appear, the shelter is removed. Seedlings must be thinned out so that there is a distance of two to three centimeters between the plants. The plantings are watered, and the soil around them is mulched with humus. This mulch will feed the plants, retain moisture and prevent weeds from growing. Once again, the seedlings must be thinned out three weeks after germination. The distance between them should be at least six to eight centimeters.
Growing seedlings
 In early or mid-April, pretreated onion seeds are sown thickly in soil-filled seedbeds. The planting material is placed at a depth of one centimeter, moisten from a spray bottle and cover with foil. After the shoots appear, the shelter is removed. Seedling care consists only in timely soil moisture.
In open ground, seedlings are planted at the age of fifty to sixty days. It is recommended to shorten the roots on the onions by one third of the length before planting in the garden.
Planting sevka
In regions with a short summer, in the first year, onion sets are grown on the beds, which are stored at home in winter and planted in the next spring on the beds for growing. Before planting, the onions must be sorted out, warmed up for seven days in the sun and held for ten minutes in a solution of copper sulfate.
Sevok is planted in the beds in May according to the following scheme:
- The distance between the rows should be thirty centimeters.
- The distance between the onions is eight to ten centimeters.
- Sevok should be planted to a depth of five centimeters.
When growing sets in the fall, you can get turnips, and in the summer - greens. To do this, the distance between the landings is five centimeters. During the summer, the onions are torn out through one and used as greenery.
Planting onions in the fall
 To get a crop already in July, the seed should be planted in the beds from the fifth to the twentieth of October.Before winter, only cold-resistant vegetable varieties are planted, which include variety Stuttgarten, Strigunovsky, Danilovksky and Arzamas varieties.
A bed for winter plantings should be done in sunny, elevated areas. Snow should melt on them before everyone else and water should not stagnate.
The soil for planting the sevka should be still warm. However, before frost, onions should not be planted, since the sevok can dry out.
The planting material is pre-sorted out and warmed up. Sevok is placed in the ground to a depth of five centimeters, in seven centimeters increments. The distance between the rows is about fifteen centimeters. The beds are covered with straw or spruce branches. As soon as the snow begins to melt in the spring, the shelter is removed.
Autumn planting sevka has its advantages:
- After harvesting, another crop can be planted on the garden bed.
- The onion fly is not afraid of autumn plantings, since they have time to get stronger by its appearance.
- At home, the sevok dries quickly and is difficult to preserve until spring.
Onion care
 When growing onions in open ground, it should be provided with timely watering, dressing and treatments from pests and diseases.
Onions should be watered once a week, using five to ten liters of water per square meter of planting. However, if it rains regularly in summer, then watering may not be necessary. Otherwise, in waterlogged soil, the onions will begin to rot. Learn about the condition of the soil can be green. If it becomes pale, then there is an excess of moisture in the soil. The bluish-white feathers indicate that the soil is dry. In July, the bulbs begin to ripen and watering is reduced.
When growing onions during the season, three additional fertilizing with organic fertilizers is carried out. You can use a solution of mullein, urea or bird droppings for this (for 10 liters of water - one glass of organic matter). One square meter of the garden bed is watered with three liters of solution. The first feeding is carried out after the greens appear. After two weeks, the plantings are fertilized a second time. The third time the plants are fed when the bulbs are about the size of a walnut.
When the greens of the onions reach a size of about fifteen centimeters, it is recommended to treat the plants with copper sulfate, which is good protection against many fungal diseases... To do this, the feathers are sprayed with a solution prepared from ten liters of water and a teaspoon of the drug.
Harvesting and storing onions
 From about mid-August, when the bulbs grow to the required volume, the feathers lodge and new leaves stop forming, you can start harvesting. This should be done in warm, dry weather. If you skip the onion harvesting time, then it may start to grow again... These vegetables are not stored for a long time.
The collected bulbs are evenly laid out on the garden bed. When the onions are dry, they are freed from the ground and additionally dried in a dry room or in the sun. Dried vegetables should be examined carefully. Bulbs left without husks and spoiled are not suitable for long-term storage. Before you put vegetables in storage, you need to cut off the leaves. Only a neck about six centimeters long should remain. To increase the shelf life of the bulbs, the roots are cauterized.
It is recommended to store onion heads in a dry room with an air temperature slightly above 0 degrees. Since air must flow to the bulbs, they are stacked in stockings, baskets, nets or boxes. During storage, vegetables are regularly sorted out, removing bulbs that have begun to grow or rot.
You can store the crop in the apartment. In this case, you do not need to trim dry leaves on the plant. The container with vegetables is placed away from the batteries. The optimum air temperature should be from +18 to +20 degrees.
It is not recommended to store it along with other vegetables that need high humidity.
Onion pests and diseases
When growing onions in open ground, the following pests are most dangerous for the plant:
 Onion moth. To prevent the appearance of these pests, weeds should be removed in a timely manner, crop rotation, agricultural technology should be observed and plant residues should be destroyed.
- Onion fly. To prevent this pest from settling on onions, the vegetable is recommended plant in the same bed with carrots, the smell of which the onion fly is afraid.
- Tobacco thrips. Pests are destroyed by Karbofos or Aktellik.
- Caterpillars of the scoop. You can get rid of the caterpillars by treating the plantings with a solution of Gomelin or Bitoxibacillin.
Unfavorable growing conditions and mistakes in care can lead to damage to the onion with various diseases:
 Fusarium is a disease that often appears on plants affected by onion flies. With fusarium, tissues die off at the bottom of the onions, and rot appears, after which the tips of the greens turn yellow. To avoid the appearance of this disease, the set is warmed up before planting at a temperature of forty degrees for ten hours.
- Downy mildew - the disease can be recognized by a gray bloom on the leaves. Affected vegetables do not form seeds and do not store well. To avoid the appearance of powdery mildew, the sets are warmed up before planting. It is also necessary to ensure that the plantings are not thickened.
- Gray rot - the disease occurs in rainy and damp weather. Diseased plants must be removed. For the purpose of prevention, the planting material is treated with a solution of copper sulfate.
- White rot - acidic soil and excess nitrogen in the soil contribute to the appearance of the disease. Therefore, before planting vegetables, the acidic soil is limed, and fresh manure is not used to feed the onions. Diseased plants should be removed.
- Mosaic is a viral disease in which the plant lags behind in growth, the seeds are almost not formed, the inflorescences become small, and the leaves turn yellow. Affected instances must be removed.
- Neck rot is a disease that can only be detected after harvest. It manifests itself as mold on the outer scales of the bulbs. Neck rot develops under unfavorable conditions for growing plants. To avoid its appearance, the seedlings before planting and the harvested bulbs are warmed up at a temperature of forty-five degrees. Most often, late varieties are affected by this disease.
Viral diseases of the plant are not cured, therefore, preventive measures must be used. To do this, it is recommended to observe crop rotation, not to make thickened plantings, regularly remove weeds and follow all agricultural techniques. Before planting, the onion sets can be warmed up and treated with copper sulfate.
Fungal diseases can be cured special fungicidal preparations. However, it is not recommended to use them, as the bulbs are capable of accumulating poisons.
Onions are an unpretentious plant that even a novice gardener can grow in his area. The popularity of this vegetable is due to the content of substances useful for the human body in it. Eating onions improves digestion and induces the secretion of gastric juice. In addition, the vegetable has a bactericidal, sedative and diuretic effect.
>
We plant onions in late autumn
- What are the advantages of planting onions in winter.
- Onion varieties for autumn planting.
- Where is it better to plant a winter road.
- Pre-planting seed preparation.
- When planting onions for the winter.
- Planting winter onions.
- How to protect a garden bed from frost.
- Spring onion care.
- What problems can arise when growing winter onions
Onions can be grown not only in a summer culture, but also planted before winter. Although less popular, it allows for an early harvest of onions.
Advantages and disadvantages of winter onions
Benefits of planting onions in winter.
- Before winter, the smallest set is planted, the diameter of which is less than 1 cm, it is called wild oat. Such sets are not stored in winter and dries out.When planting in autumn, a double economy is obtained: the sowing is not only preserved, but also yields a harvest.
- Possibility of getting early greenery in spring.
- Getting a turnip harvest 3-4 weeks earlier.
- Small bulbs used for winter planting do not shoot arrows, while samples (large sets) always shoot arrows.
- Less damaged by pests than an annual.
- In the initial period of growth, it does not require watering, since after winter there is still enough moisture in the soil.
- The bulbs are larger and more juicy due to the fact that their root system is more powerful.
The autumn planting of onions also has disadvantages:
- Not all sevok will sprout in the spring.
- If the planting time is mistaken, the yield will decrease.
- The productivity of the winter road is somewhat lower than the summer road.
- Winter onions are stored worse than spring ones.
In general, the technology has many more advantages than disadvantages. After harvesting the winter onion, it is used first of all, then the problem with safety is removed.
What kind of onion is planted before winter
All varieties of yellow and most varieties of red onions can be grown in winter culture. White onions are less suitable for winter planting. It is better to use varieties that are regionalized for the given region. If the variety is not zoned, there may be large attacks, or the onion will not come up at all.
Varieties that grow very well in winter culture are:
- Zodiac
- Viking
- Ellan
- Sturon
- Carmen.
Most of them are salad varieties, unsuitable for winter storage. They are used for canning and processing until the main crop ripens.
Best predecessors
When growing winter onions, crop rotation must be observed in the same way as for summer plantings. For all types of onions, green crops and cabbage plants are the best predecessors. Good predecessors are:
- tomatoes,
- melons (pumpkin, zucchini, cucumbers) in the southern regions - watermelons and melons;
- siderates (oil radish, mustard).
Onions should not be planted before winter after any root crops. After bulbous plants, including garlic and bulbous flowers, turnip cannot be planted.
Place for the autumn planting of onion sets
For planting onions before winter, choose a dry and sunny place. On waterlogged soil, the onions get wet, and in the shade, small bulbs are tied. The culture loves to be under the rays of the sun all daylight hours, then the yield will be higher. When shaded, the leaves grow intensively and the setting of bulbs is delayed. In deep shade, the bulb may not set at all.
The bed should be located where in the spring the snow melts first and the water does not stagnate. With stagnant water on the site, the garden bed is made with a slope of 1 °, this is enough for melt water and precipitation to flow down.
With a close occurrence of groundwater, drainage is made of sand with a thickness of at least 3 cm.
Soil preparation for sowing
The site for planting onions should be with light, well-warmed soil. With a close standing of groundwater, winter onions are planted in high ridges (30-40 cm). Quickly compacting soils are dug up on 1-1.5 bayonets of shovels, light and sandy soils are dug shallow; with deep digging, the seedlings can go into deep layers and not rise in the spring.
The culture needs fertile soils with a neutral or slightly alkaline reaction (pH 6-7.3). Acidic soils are limy. Onions tolerate lime well, so it is added when preparing the soil for planting. To achieve a quick effect, fluff or ash is used.
For winter onions, and for other bulbous crops, fresh manure is not applied. It is also advisable not to use semi-rotten manure. From such fertilization, the onion wears out in winter, and the one that sprouts in the spring will give a large amount of powerful juicy greens, but will not tie the turnip.
The soil is prepared 2 weeks before planting. If you plant a sevok right after digging, it will go deeply and in the spring it may not rise. The earth must settle and settle. When digging, organic matter is introduced (except for fresh manure) a bucket of 1 m2, 20 g of superphosphate and 15-20 g of potash fertilizers.The plant tolerates chlorine well, so you can use potassium chloride. An excellent fertilizer is wood ash (0.5 bucket per 1 m2). When using it, potash fertilizers are not applied, and if necessary, liming the dose of lime is reduced. No nitrogen fertilizers are used in the fall, since they are washed out into the lower soil layers by melt water and are inaccessible to plants in spring.
On heavy, clayey, quickly compacting soils, sand is added 1-2 buckets per m2 to loosen them, depending on the density. On sandy soils, clay is added to retain moisture.
Preparation of planting material
For planting winter onions, a set is used, the diameter of which is not more than 1 cm. At home, such seed material is not stored and dries quickly, and when planting gives good large bulbs. A larger set is not suitable, because when grown in a winter crop in the spring, it goes into the arrow and sets small onions. He devotes all his strength to the formation of seeds, inside he has a rod that prevents the tying of a turnip.
In order to select the planting material, a hole with a diameter of 1 cm is made in a cardboard box and the onions are sieved. The seed that went through the hole can be planted before winter.
2 weeks before planting, onions are soaked in warm water (temperature 45-50 ° C) for 3-4 hours. Heat treatment kills pests hibernating in the bottom of the eggs. Warming up should not be neglected, otherwise you may not get a harvest.
Immediately after warming up, seed dressing is done. Additional processing of onions from pests is not carried out, since all the eggs have already died. The main crop pest, the onion fly, appears at the beginning of summer. By this time, the winter road will get stronger, thicken, and the pest will not be able to get into the bulb.
For etching, you can use the preparations Tiram, Fitosporin M, Maxim, soaking oatmeal in them for 30 minutes. Copper preparations are not used for processing, they help well with downy mildew (peronosporosis), but they do not protect against root rot.
A good preventive effect is given by soaking in a saturated pink solution of potassium permanganate. Seed material is kept in solution for 45-60 minutes, then dried well.
Dates of planting onions in the fall
Winter onions are usually planted at the same time as winter garlic, in the middle lane this is mid-October. But, if garlic is planted in frozen ground, it will not freeze, and it will still rise in the spring. But the onion must take root, if it does not have time to give roots, then it will freeze in winter. Oatmeal takes 14-18 days to root. In this case, they are guided by the weather, planting onions 2-3 weeks before frost. Onions in the ground can tolerate frosts down to -5-6 ° C, but if the wild oat is poorly rooted, it freezes over. In the spring, such plants have weak pale leaves; if severely damaged, they quickly die.
It is important to ensure that the onions do not sprout, otherwise, stuck in the frost, they will die. With a prolonged warm autumn, onions are planted when the temperature drops below 6 ° C and does not rise above 5-7 days. In the pre-winter period, the soil has not yet frozen, and, at the same time, the seedlings will have time to take root, but will not germinate.
Planting winter onions
The planting scheme for wild oats depends on the purpose of the onion. When growing on a turnip, the distance between the bulbs is 10 cm, between the rows - 20-25 cm.When growing on a feather, a compacted planting is used: the distance between the sets is 2-3 cm, the width of the row spacing is 8-10 cm.
Before planting, rows are made 5-6 cm deep, on the bottom of which a layer of sand 1-2 cm thick is poured. This is micro drainage. There should not be a lot of moisture around the bulb in late autumn and early spring, the sand just protects the seedlings from getting wet.
The oatmeal is planted to a depth of 3-4 cm and sprinkled with sand, and the grooves are covered with earth on top. Do not plant winter onions too deeply or too shallowly.With a deep planting in the spring, it will not be able to germinate, with a shallow planting, when the soil settles, the onion will be on the surface and freeze out in winter.
The soil should be slightly damp. If the autumn is damp, then after drawing the rows, the garden bed is allowed to air for 30-40 minutes, and then drainage is poured. In dry autumn, the rows are spilled with water.
Preparing the beds for winter
2 weeks after planting the onion, the beds are mulched with fallen leaves, hay, spruce branches, peat. Previously, you do not need to cover the plantings, otherwise the seedlings will be too warm and, with a dry autumn, it will germinate, and with a damp fall, it will get wet.
If the winters in the region are cold, but with little snow, then the mulch layer is increased. When covering the beds with light material, so that it is not blown away by the wind, branches are placed on top. It is impossible to cover a bed covered with fallen leaves with foil. It does not allow air to pass through, condensation always forms under it, and in winter the seedlings will either freeze or rot.
If the winter is warm in the region, then the garden does not need to be mulched. In such situations, they are always guided by the weather in a specific area. For winter onions, the main thing is that the ground does not freeze before rooting.
Spring onion care
As soon as the snow has melted, the mulch is immediately removed, otherwise the sevok can rot. The winter road rises very early, like garlic. As soon as the sun warms up, shoots appear. The culture is not afraid of frosts down to -4-5 ° C, but if the nights are cold, the plants are covered with lutarsil or film. In the morning, the covering material is removed.
When plants are damaged by night frost, the tips of the leaves turn white, and the stem and leaves themselves acquire a whitish-yellow tint. In this case, they urgently give top dressing with potassium or calcium nitrate (fertilizers containing nitrogen), they help the onion to survive a stressful situation and contribute to the regrowth of new leaves. Urea cannot be fed at subzero night temperatures, since it contains pure nitrogen, and it, without the presence of other elements, reduces the frost resistance of plants.
In the first half of the growing season, the winter onion needs nitrogen, therefore, when the threat of frost has passed, top dressing is done with infusion of weeds, humates, or urea. After the formation of 5-6 leaves, potassium-phosphorus fertilization is given (1 tablespoon of each fertilizer per 10 liters of water), or the onion is fed with ash infusion. But if the soil is fertile, feeding is not carried out.
You cannot feed the winter road with manure. The nitrogen contained in the manure is needed by the onion only during the period of feather growth, then it will prevent the formation of bulbs. But since manure decomposes slowly, the maximum amount of nitrogen enters the soil when the plant sets the bulb. As a result, the onion either continues to grow feathers, or, in rainy weather, rots.
The winter road is undemanding to watering. After winter, there is a sufficient amount of moisture in the soil, therefore, watering is not carried out in the first 20-30 days after germination. Then, in hot and dry weather, water the plants 1-2 times a week, depending on the air temperature. All watering (and liquid dressing) is carried out strictly at the root. The soil between the rows must be loosened. Onions are very sensitive to a lack of oxygen in the root zone, and if a crust forms on the soil, the bulb suffocates and rot.
If the onion is grown for a turnip, it is undesirable to cut off its feather. When the leaves are removed, the plants grow new ones to the detriment of the bulb. When the leaves are removed too much, the turnip turns out to be very small, and it may not even tie up at all.
After 35-50 days, depending on the variety, watering is stopped, and in wet weather, the soil is raked off the turnip so that the bulb can breathe. From this time on, the ripening of the bulb begins and excess moisture harms the plants.
When the feather is lodged, the onion is ready for harvesting. The winter road ripens, depending on the region, in early-mid July.
Growing failures
Main reasons.
- Incorrect planting depth. Onions either do not sprout or freeze.
- Planting too late. The wild oat freezes.
- Waterlogged soil in spring. The onions rot.
- Use of unusable planting material. The sevok dried up even before planting and the embryo died.
If all the rules of cultivation are followed, failures are minimized.
Problems in growing winter onions
Winter bows have the same problems as summer ones, but they are more acute.
Firstly, the winter road is more demanding on fertilizers than the summer road. Immediately after germination, it experiences an acute nitrogen deficiency (like winter garlic). Summer onions need much less nitrogen.
Secondly, whitening of the tips of the leaves is often observed in onions planted before winter. This also happens with the summer man, but less so.
The main reasons for the whitening of the tips of the leaves.
| № | Signs | Causes | Necessary measures | Notes (edit) |
| 1 | The tips turn white and dry out. The plant itself turns greenish yellow | Freeze damaged onion | Top dressing with a complex fertilizer containing nitrogen | Pure nitrogen (urea, manure) cannot be fed, since the frost resistance of plants decreases |
| 2 | The tips turn white, and the leaves themselves acquire a yellowish tint. | Lack of nitrogen in the first half of the growing season | Top dressing with any nitrogen fertilizer | Fresh and semi-rotten manure cannot be used. |
| 3 | In the middle and at the end of the growing season, the tips of the leaves turn white, and they themselves slightly curl | Lack of potassium | Top dressing with any potash fertilizer | Fertilizers containing chlorine can be used |
| 4 | Only the tips of the leaves have turned white, and the feather itself is green | Lack of copper | Feeding with micronutrient fertilizers containing copper | |
| 5 | The tips of the leaves turned white not only on the winter road, but also on summer onions and garlic | On the site is acidic soil | Deoxidize. For a growing culture, an infusion of ash is used. Water each plant (1 glass of infusion per plant) | It is better not to use lime on a vegetative culture. |
The technology of growing winter onions has been known for a long time. But, nevertheless, it has not yet received wide distribution.
Save article to:
Dear visitors of the "Dacha Plot", tireless gardeners, gardeners and flower growers. We offer you to pass the aptitude test and find out whether you can trust the shovel and let you into the garden with it.
Test - "What kind of summer resident I am"
Share this article with your friends:
Growing onions: advice from gardeners
Onions have been known to mankind for a very long time, and many dishes without it would simply lose their exquisite and unique taste.
Having appeared more than 4 thousand years ago in Ancient Egypt, this tasty and healthy vegetable remains a favorite among the crops grown on its own plot by gardeners today.
But we hasten to note that the cultivation of turnip onions from sets can be carried out not only for our own needs, but also in order to make a profit. What does the process of growing onions look like, and what are the features of its agricultural technology?
Process features
The onion business, like growing it for your own needs, requires certain knowledge.
If we talk about growing this crop as a business, then many gardeners come to this decision because it attracts not only the fertility of the plant, but also small initial cash investments in such a small business, as well as the year-round need of consumers for onions. If you understand all the nuances of the growing process, you can easily turn it from an ordinary truck gardening into a good business. What are the features of such a process that should be taken into account by both ordinary summer residents and those who seriously decide, after reading our article, to start their own small business?
It should be borne in mind that it is important for onions to choose a loose and nutritious soil. It is best to prefer a normally lit area for planting it.
This should not be neglected, since experts say that it is the length of natural daylight hours that is of great importance for the proper growth and full development of this vegetable crop.
Also, do not forget about moderate soil moisture. Watering the plant should be carried out during the period of intensive growth, after which the onion does not need water.
Pay attention to the groundwater - they should be located in an area far from the surface. During the cultivation process, you need to regularly weed the beds so that they do not overgrow with weeds.
If you are planning a business or growing onions for yourself, take care of planting it after such predecessors as tomatoes, potatoes, cabbage, cucumbers. It is not recommended to plant this vegetable crop where onions used to grow, as well as garlic or carrots.
Consider the fact that onions react negatively to soils with an increased level of acidity, on which it may become ill with downy mildew or poor absorption of nutrients. Our video will tell you about the features of the process in more detail.
The key advantage of growing onions as a business is their growth in almost any climatic zone. Also, when organizing their business, gardeners are convinced that caring for this vegetable does not require too much effort.
Growing technique
Today, such methods of growing onions are known - sowing seeds in the ground, seedling method, sowing seedlings and vegetative way (it is also called multi-bud onion).
If we talk about the regions of our country, it is worth noting that residents of the southern regions of Russia prefer to grow turnip seeds by sowing seeds, and in the middle lane they use the seedling method or plant sets on a turnip.
The vegetative method is most often used only by residents of the northern regions of our country.
What does the technology of growing everyone's favorite vegetable look like, which will be useful to those who decide to go into business? The first step is to decide on the choice of a good quality onion variety and prepare the soil for planting.
During the autumn preparation of the land, it is necessary not only to get rid of weeds, but also to feed it with superphosphate, and also to dig it up. In early spring, cultivation technology involves pre-planting soil fertilization.
To do this, you need humus, which is brought in at the rate of about 6 kg per square meter. After that, the beds are dug up and formed.
Complex fertilizing is also scattered on them - nitroammophoska and wood ash have proven themselves perfectly. The soil is still spilled with a solution of copper sulfate, after which it is covered with a film before planting the seedlings.
Our video will tell you in more detail about the technique of growing onions.
Onion cultivation traditionally takes place in several stages - in the first year it is customary to sow seeds, which are called nigella, in the second year they plant onion sets obtained from it.
And already in the third year, in order to get seeds, you can plant adult bulbs. Most often, our gardeners prefer to grow onions from seed sets, which today can be grown independently from seeds or purchased in specialized stores.
This is the agricultural technique of everyone's favorite vegetable, which takes pride of place in our diet.
Sowing black onions
It is customary to call nigella seeds of onions, from which a set is then obtained - a small-sized bulb for growing them in a two-year-old plant. The technology of its sowing is not as complicated as it might seem to inexperienced gardeners at first glance.
To begin with, you should select large bulbs, which are placed in the ground in early spring. Planting before winter is also possible, while mulch is also formed on the beds for protection.
In the summer, umbrellas with small black seeds appear from such bulbs.
It is strongly recommended to plant dill and calendula on the onion garden, while the former will be able to prevent the appearance of pests, and the latter will not let the plants get sick with nematodes. To prevent the appearance of a dangerous onion fly, carrots can be grown next to nigella.
What is the agricultural technique of the chernushka? All weeds and their roots must be removed before sowing. The best predecessors for nigella are cucumbers, peas, cabbage, potatoes, beans.
If, in the process of growing them, the land received a sufficient amount of manure, then when sowing nigella, you can do without making - both compost and humus.
If the soil for sowing turns out to be sufficiently moist, then nigella may not be germinated before planting. The technology of sowing nigella allows you to plant it both in rows and randomly.
Seeds should not be buried too deep in the ground - it is enough for them to be placed 2 cm from the surface.
Proper watering of the beds must be carried out before seedlings emerge.
If you are dealing with a clayey or floating type of soil, then the crust that appears on the surface must be loosened without fail in order to allow the sprouts to hatch normally. For the first time, it is necessary to thin out seedlings after emergence.
It is advised to leave a distance of at least 2 cm between the seedlings. Then, during the second thinning, it should be increased to 6 cm. All watering should be stopped about 20 days before harvesting nigella.
Experts advise cultivating such onion varieties as Belovezhsky, Yantarny, Spassky, Strigunovsky, Stuttgarten, Myachkovsky, Bessonovsky through nigella. Our video will best tell you about growing nigella.
How to grow from sevka
Growing onions from sets, which are obtained from nigella, is nowadays the most popular method among gardeners in all regions of Russia.
But most of all, this method is suitable for residents of the northern regions, where, due to the peculiarities of the climate, the bulbs do not have the opportunity to ripen normally.
That is why growing onions from seeds is so urgent and practically the only possible for them. This onion has almost 100% germination.
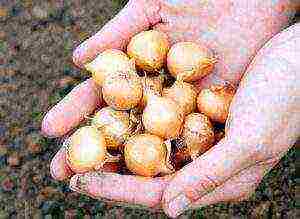
Before planting, it, like the nigella, should be sorted out. It is best to plant bulbs up to 2.5 cm in size. The sevok that you have grown yourself does not need to be preheated.
If you bought it in a store, be sure to place it in a cardboard box on a battery before planting, the warm-up time is at least 8 hours. Also, the sowing must be soaked in a complex mineral fertilizer - such as nitroammofoska.
It should be dissolved in 10 liters of water. Processing time is up to 10 hours. Growth stimulants, such as Epin, Zircon, Humisol, have also proven themselves well.
It is also recommended to disinfect Sevok, and a solution of copper sulfate will help you with this at the rate of 1 teaspoon of the product per 10 liters of water.
So that the bow does not go into the arrow, it is necessary to plant it at a time when the ambient temperature rises to +10 degrees. There are some features of sevka agricultural technology.
In the northern regions of the country, it is advised to plant it at the end of May, and in the middle lane this time falls in the middle of the month. Sowing should be carried out in rows, the distance between which is left somewhere 20 cm.
And between the bulbs themselves, you need to leave up to 10 cm. Be sure to dip the root of the bulbs in wood ash. After planting, the bulb should ideally be at a depth of about 6 cm. After planting, the soil should be sprinkled with peat.
The first shoots should be expected after a week. This is, in brief, the agricultural technique of sevka, a video about the planting of which you can watch here.
Care
Caring for onions that you grow either for yourself or in order to start a business and receive a stable income includes several important steps. At least twice a week, you need to provide your beds with sufficient moisture.
Regular watering should be reduced only after a period of intensive crop growth. And a couple of weeks before harvesting, they should be stopped altogether. Also, the earth must be loosened, and do it as often as possible.
In order for the bulbs to have the opportunity to grow well, after they become medium in size, it is recommended to shake off the soil from them. Proper care also includes weeding. It is on the beds overgrown with weeds that conditions favorable for the development of fungal infections are created.
And the onion may well grow too thick a neck, and then it will not be easy to dry it.
Planting care also involves feeding with organic and other fertilizers. For the first time, it is carried out two weeks after planting the seedlings. Of organic fertilizers, poultry manure, mullein, ammonium nitrate have proven themselves well.
The first two products should be used at the rate of 1 liter per 10 liters of water, and nitrate take about 30 grams. The second time, with proper care, fertilizers are applied after 2-3 weeks.
To do this, it is best to take chicken manure or mullein, to which superphosphate and potassium dressing are added - about 30 grams of each product.
A third fertilization is needed when the bulbs are at their maximum size. To do this, it is advised to use the Breadwinner fertilizer with 1 tablespoon of superphosphate dissolved in 10 liters of water.
Another important step in the care is the treatment with a solution of copper sulfate - 1 teaspoon of the product, 1 tablespoon of liquid soap per 10 liters of water. This is the best prevention of the development of fungus in onion plants.
Processing is carried out at the rate of half a liter of solution per square meter. A mixture of tobacco dust and wood ash is also well suited for this purpose.
Source
How to plant onions correctly so that large bulbs grow
Onions are a vegetable that almost every summer resident grows. In cooking, these sweet or spicy fruits are simply indispensable, because in some recipes, onions are the main ingredient.
Before planting seeds in a summer cottage and collecting a good harvest, you need to know what kind of soil the onion loves, what temperature is suitable for planting seedlings in open ground and how to properly plant an onion crop in order to enjoy high yields at the end of the season.
Let's consider each stage separately, let's start, perhaps, with the soil and its autumn preparation.
Preparing the soil for spring planting
Before doing land work, you need to choose a place for planting small bulbs.
As many gardeners know, bulbs love warmth and light, in the shade the plant will quickly wither and the fruits will be small, so when choosing a site, give preference to the beds in the middle of the garden, next to which there are no trees and no buildings. Found such a place? Great, now you need to check if the soil in the garden is suitable for growing onions. To do this, it is better to use a litmus paper. She will determine the type of soil in no time. It will be very good if your land is sandy or sandy. It is in it that the onion develops a powerful root system and is able to ripen faster before harvesting.
In the fall, the onion bed should be fertilized with ripe manure or ash. There are many nutrients in these components, therefore, it is advisable to apply humus for 1 square meter of 6 kg of fertilizer.
Dig the entire bed to a depth of 20 cm, remembering to remove weeds and other debris that will come across during digging.
After fertilization, level the topsoil with a rake and leave alone until spring.
Attention! The preparation of the garden is an important point, it is from this operation that the yield of fruits depends.
In the spring, as soon as the snow melts and it will be possible to go out into the garden, it is recommended to re-dig the area under the onion so that the nutrients are evenly distributed over the top layer of the earth.
Now it remains to prepare the onions for planting, wait for the optimal temperature for heating the soil, plant the crops in open ground and take care of the plant to obtain a juicy, large harvest.
Preparation of planting material
Do not rush to plant onions in the spring, because in order for the germination rate of the seed to be almost 100%, you need to sort out and process the onions with special solutions that will protect the crop from diseases and pests.
So, first sort out the low-quality planting material, removing all damaged, dry and diseased specimens. Distribute a good set in different piles in diameter.
This will allow you to grow your turnips evenly.
After sorting, hold each group for about three days at a temperature of 35 degrees, if this is not possible, then simply ignite the onion for about 4 hours at 40 degrees in the oven.
Processing onions before planting, thus, activates metabolic processes and improves germination.
After drying, transfer the seedlings to the diluted fertilizer for 1/3 days, then dip the seedlings in a weak manganese solution for 5-10 minutes, rinse the onions under running water and you can safely plant the onions on an unprotected surface.
How to properly plant onions on a turnip
You have already done the basic procedures, prepared the seedlings and dug up the garden. Now is the time to plant the onion in open ground.
In order for the planting process to be successful and soon juicy green feathers appeared on the beds, you need to choose a time when the soil warms up to 12 degrees and will be able to accept "tenants".
Usually, spring planting falls in the third decade of April or the first decade of May. For farming, it is better to choose cloudy, dry weather and you need to start from the land.
You already know how to prepare a bed for seeding, all that remains is to make holes or grooves and plant the planting material. In the first and second options, it is important to follow these rules:
- the distance from sevka to sevka should be at least 15 cm;
- the distance between rows should not exceed 30 cm;
- the planting depth of the seedling is 7-10 cm.
After planting, be sure to water the beds with settled water at room temperature.
If you have planted the seedlings too close, then after a while, thin out the rows, otherwise the plant will not have enough nutrients during the growing season, the growth of the bulbs will noticeably deteriorate and it is likely that the root system of the turnips will become entangled with each other.
Planting onions in July
If you want to harvest the onions twice in the summer, we recommend planting a second set in July. However, this option is only suitable for southern cities, where the summer season ends in mid or late September.
In order for the onion to grow, you need to use only early ripening varieties, which will just finish ripening by the end of August. How to plant onions in July? The same as in May.
The soaked seed is sown in the prepared recesses and after the leaves appear, the usual care of the plant begins.
Sowing with seeds
It is known that onions are a perennial plant, so you can get a turnip only in the second or third year. However, some gardeners buy sets and grow onions in one season.
Other summer residents grow onions by planting seeds in the ground, this process delays the harvest, but you can grow high-quality seedlings, which next year will bring large fruits of onion heads.
Seeds are also recommended to be processed before planting, and how to do this correctly - we will now find out.
First, soak the seeds in warm water for a day. Soaking the onions in a convenient container before planting will help you sort out empty seeds. It is they who will end up on the surface of the bowl, and the good ones will settle to the bottom of the dish.
After 24 hours, drain the water from the container along with the floating seeds, they will definitely not be useful to us, because they will not be useful. Transfer the rest of the planting material to gauze or cotton cloth, remove in the shade until crumbly.
Then process the seeds with a manganese solution and dry them again. The onion seeds are ready for planting.
Attention! If there is no manganese, and you do not know what to soak the onion in before planting, use copper sulfate, after dissolving the crystals in water.
For sowing seeds, make grooves in the garden bed, 2-4 cm deep.Leave the row spacing from 10 to 30 cm.
Then pour plenty of hot water over the indentations for antibacterial soil treatment and sow the seeds 1 to 3 cm apart. Water the bed again with water at room temperature, cover it with foil. After the appearance of the first leaves, the need for shelter will disappear.
Outdoor onion care
How to properly care for this plant is known mainly to experienced gardeners, but we want to remind you once again what care is. First of all, the onion needs moisture, so water it once a week with plenty of settled water.
If the summer is dry, then increase watering up to two times in 7 days. In general, make sure that the ground is always slightly moistened and then problems with growing onions will not begin.
After each "water" procedure, loosen the top layer of the soil, so as not to violate air permeability. Do not forget to remove weeds and process the onions with copper sulfate to prevent infection with fungal and viral diseases.
For the entire growing season, feed the plant three times with organic or mineral fertilizers.
Attention! In July, watering is gradually reduced so that the onions have time to ripen before harvesting.
Chinese way of growing bulbs
Planting onions in the Chinese way has become popular only because of the high yield of fruits, whose sizes can break all records. First of all, prepare the beds, or rather the ridges.
Raise each ridge by 15-20 cm, leave a distance of at least 30 cm between the rows.
Now prepare the material for planting, for this, spread the set on a baking sheet in one layer and heat it in the oven for 12 hours at 40 degrees.
Then remove the husk from the set, cut off the dry neck and soak the material in warm water for a day. What to soak onions before planting for better germination? In water with slurry. Such a solution will saturate the seedlings with nitrogen, and the plant will grow better. Then you can plant the onions in the ground.
To know when to plant onions using the Chinese method, you need to distribute the onions into fractions before processing the seedlings. The first group, which has not reached a diameter of 10 mm, is best planted before winter.
The second is 15 mm, ideal for planting in spring, namely in early April. The third is 20 mm, it is advisable to plant in early May, the rest of the sets are suitable only for forcing onions on a feather.
Sevok has been prepared, let's now see how to plant onions in the Chinese way, and how to properly care for the seedlings so that there are large bulbs.
Stick the onions 2-3 cm into the moistened grooves, sprinkle with earth and lightly tamp the top layer with your hands. Water the ridge liberally. Loosen the ground by re-circulating air.
It is advisable to carry out the procedure early in the morning, while the sun does not bake as much as during the day.
During cultivation, turnips will need simple maintenance, which consists of watering weekly, removing weeds, loosening the soil, and applying fertilizers.
It is also worth noting that three weeks before harvesting (usually in July), gradually stop watering, free the turnip from the ground by half, and leave only the root system in the ground a week before harvesting.
Have you tried the Chinese way of growing bulbs?
- Yes, I liked 0%, 0 0 - 0% of all
- Yes, I didn't like 0%, 0 0 - 0% of all
- No, but I plan 0%, 0 0 - 0% of all
- No, not interesting 0%, 0 0 - 0% of all
How to plant winter onions?
Winter varieties mean planting a plant for the winter.
Therefore, let's find out how to prepare the soil, what fertilizers are best to apply before planting an onion crop, is it possible to plant seedlings a week before frost, how to care for a plant before mulching and, in general, when to plant onions in order to harvest green feathers in early spring, and in summer to get juicy turnip.
The plant should be planted one month before frost.
This framework was not set for nothing, because if the sevok does not acquire a root system before the arrival of cold weather, the plant will die, and if green feathers make their way through the soil ahead of time, this can lead to early shooting.
Therefore, it is so important to know the exact date of planting, given your climate. In areas with short summers, planting is best done in mid or late August. In the southern regions, onions can be planted in the fall, but no later than mid-October.
In order not to disrupt the crop rotation, choose a non-shaded garden bed on the sunny side, where vegetables such as zucchini, tomatoes, cucumbers, peas, potatoes or legumes previously grew.
Dig up the selected place with 6 kg humus and 20 g superphosphate per 1 sq. m.
Form grooves on each bed, 5-8 cm deep, the distance between which should not be less than 25 cm.
Before planting the seedlings, sort through, sift out the spoiled material, divide the rest into piles by diameter, for sowing before winter, an onion with a diameter of no more than a centimeter is ideal, the rest of the material is subject to spring cultivation.
Process the sevok in rose water with the addition of a potassium permanganate crystal or use boric acid. Keep the planting material in the prepared solutions for about 2 hours, then rinse them with water.
Next, dip it into a growth stimulator and plant it in the grooves, leaving a distance of 10-15 cm between the onions. Sprinkle the onion with earth and pour plenty of water.
In addition to sevka, you can also plant seeds.
To do this, fill the planting material with water for a couple of hours, then remove the seeds floating on the surface, they are empty and will not give a crop, dip the settled seed into a growth accelerator, transfer it to gauze or cotton material. Dry until friable and plant them in grooves to a depth of no more than 3.5 cm, leave a distance between sowing 5-10 cm.
Attention! Before winter, the material planted on time develops immunity to onion flies and to shooting.
Until late autumn, take care of the plant, water, loosen the soil, remove weeds, and in the middle of autumn mulch the topsoil.
As a mulch, you can use: cut grass, spruce needles, compost, sawdust, nettles, bark, wood chips or other materials that you have at home.
By the way, rotting straw is also well suited for mulching, it slows down the growth of the plant, but it is better to lay it on the garden bed after strengthening the root system.
Now you shouldn't have any questions about how to plant onions in the fall or spring, because our detailed instructions will help you choose the right place for the garden, sets or seeds for planting, and take proper care of the plant. Considering our recommendations, your efforts will not be in vain, and at the end of the season, you will rejoice in the harvest you have received.
Onions: three ways to grow, after which you can plant, plant and care for onions in the open field
Onions are popular vegetable crops. It is added to salads, soups, meat and fish dishes.
Therefore, in almost every summer cottage and personal plot you can see beds with plantings this vegetable.
But in order to get a good harvest, you need to know how to properly plant and care for onions.
The crop can be grown in three ways:
- From seeds in one year... This method of growing vegetables is suitable for areas with a warm climate.
- From seed in two years... In a two-year culture, the plant is grown in areas with short summers.
- Seedling method... This method is suitable for sweet and semi-spicy varieties of vegetables.
But before you start planting onions in open ground, you should prepare a site for it. The beds are recommended to be made in organic-rich, dry, sunny, open areas with neutral soil. If the soil is acidic, then it is preliminarily lime.
You can plant onions after tomatoes, green manure, peas, beans, cabbage crops, potatoes.After other types of onions, cucumbers, carrots and garlic, onions can be planted only after three years.
When planting in spring seed soil for planting is prepared in autumn:
- Rotted manure or humus is added to the soil, and the bed is dug to a depth of fifteen to twenty centimeters. It is not recommended to add fresh manure, otherwise only greens will grow.
- The acidic soil is mixed with limestone, ground chalk, wood ash or dolomite flour.
- In the spring, before sowing seeds or planting seedlings, mineral fertilizers are introduced into the soil - potassium chloride, urea, superphosphate.
Growing onions from seeds
Semi-sweet and sweet varieties in warm climates can be grown from seeds in one year. The planting material is pre-processed, for which the seeds are placed in gauze, moistened and kept for swelling for a day.
A bed prepared for planting seeds is watered copper sulfate solution (for 10 liters of water - 1 tablespoon), after which seeds are placed into it to a depth of one and a half centimeters. The distance between the rows should be about thirteen centimeters, and between the seeds - one and a half centimeters. Crops are watered with water from a watering can with a shower head and covered with foil.
Crop care consists in timely moistening of the soil and daily airing of the plantings. When the seedlings appear, the shelter is removed. Seedlings must be thinned out so that there is a distance of two to three centimeters between the plants.
The plantings are watered, and the soil around them is mulched with humus. This mulch will feed the plants, retain moisture and prevent weeds from growing. Once again, the seedlings must be thinned out three weeks after germination.
The distance between them should be at least six to eight centimeters.
Growing seedlings
In early or mid-April, pre-treated onion seeds are sown thickly in soil-filled seedbeds.
The planting material is placed at a depth of one centimeter, moisten from a spray bottle and cover with foil. After the shoots appear, the shelter is removed.
Seedling care consists only in timely soil moisture.
In open ground, seedlings are planted at the age of fifty to sixty days. Before planting in the garden, the roots on the onions are recommended to be shortened by one third of the length.
Planting sevka
In regions with a short summer, in the first year, onion sets are grown on the beds, which are stored at home in winter and planted in the next spring on the beds for growing. Before planting, the onions must be sorted out, warmed up for seven days in the sun and held for ten minutes in a solution of copper sulfate.
Sevok is planted in the beds in May according to the following scheme:
- The distance between the rows should be thirty centimeters.
- The distance between the onions is from eight to ten centimeters.
- Sevok should be planted to a depth of five centimeters.
When growing sets in the fall, you can get turnips, and in the summer - greens. For this, the distance between the landings is five centimeters. During the summer, the onions are torn out through one and used as greenery.
Planting onions in the fall
To get the harvest already in July, the seed should be planted in the beds from the fifth to the twentieth of October. Before winter, only cold-resistant vegetable varieties are planted, which include variety Stuttgarten, Strigunovsky, Danilovksky and Arzamas varieties.
A bed for winter plantings should be done in sunny, elevated areas. Snow should melt on them before everyone else and water should not stagnate.
The soil for planting the sevka should still be warm. However, before frost, onions should not be planted, since the sevok can dry out.
The planting material is pre-sorted out and warmed up. Sevok is placed in the ground to a depth of five centimeters, in seven centimeters increments.
The distance between the rows is about fifteen centimeters.The beds are covered with straw or spruce branches.
As soon as the snow begins to melt in the spring, the shelter is removed.
Autumn planting sevka has its advantages:
- After harvesting, another crop can be planted on the garden bed.
- The onion fly is not afraid of autumn plantings, since they have time to get stronger by its appearance.
- At home, the sevok dries quickly and is difficult to preserve until spring.
Onion care
When growing onions in open ground, it should be provided with timely watering, dressing and treatments from pests and diseases.
Onions should be watered once a week, using five to ten liters of water per square meter of planting. However, if it rains regularly in summer, then watering may not be necessary.
Otherwise, in waterlogged soil, the onions will begin to rot. Learn about the condition of the soil can be green. If it becomes pale, then there is an excess of moisture in the soil. The bluish-white feathers indicate that the soil is dry.
In July, the bulbs begin to ripen and watering is reduced.
When growing onions during the season, three additional fertilizing with organic fertilizers is carried out. You can use a solution of mullein, urea or bird droppings for this (for 10 liters of water - one glass of organic matter).
One square meter of the garden bed is watered with three liters of solution. The first feeding is carried out after the greens appear. After two weeks, the plantings are fertilized a second time.
The third time the plants are fed when the bulbs are about the size of a walnut.
When the greens of the onions reach a size of about fifteen centimeters, it is recommended to treat the plants with copper sulfate, which is good protection against many fungal diseases... To do this, the feathers are sprayed with a solution prepared from ten liters of water and a teaspoon of the drug.
Harvesting and storing onions
From about mid-August, when the bulbs grow to the required volume, the feathers lodge and new leaves stop forming, you can start harvesting. This should be done in warm, dry weather. If you skip the onion harvesting time, then it may start to grow again... These vegetables are not stored for a long time.
The collected bulbs are evenly laid out on the garden bed. When the onions are dry, they are freed from the ground and additionally dried in a dry room or in the sun. Dried vegetables should be examined carefully.
Bulbs left without husks and spoiled are not suitable for long-term storage. Before you put vegetables in storage, you need to cut off the leaves. Only a neck about six centimeters long should remain.
To increase the shelf life of the bulbs, the roots are cauterized.
It is recommended to store onion heads in a dry room with an air temperature slightly above 0 degrees. Since air must flow to the bulbs, they are stacked in stockings, baskets, nets or boxes. During storage, vegetables are regularly sorted out, removing bulbs that have begun to grow or rot.
You can store the crop in the apartment. In this case, you do not need to trim dry leaves on the plant. The container with vegetables is placed away from the batteries. The optimum air temperature should be from +18 to +20 degrees.
It is not recommended to store it along with other vegetables that need high humidity.
Onion pests and diseases
When growing onions in open ground, the following pests are most dangerous for the plant:
- Onion moth. To prevent the appearance of these pests, weeds should be removed in a timely manner, crop rotation, agricultural technology should be observed and plant residues should be destroyed.
- Onion fly. To prevent this pest from settling on onions, the vegetable is recommended plant in the same bed with carrots, the smell of which the onion fly is afraid.
- Tobacco thrips. Pests are destroyed by Karbofos or Aktellik.
- Caterpillars of the scoop. You can get rid of caterpillars by treating the plantings with a solution of Gomelin or Bitoxibacillin.
Unfavorable growing conditions and mistakes in care can lead to damage to the onion with various diseases:
- Fusarium is a disease that often appears on plants affected by onion flies. With fusarium, tissues die off at the bottom of the onions, and rot appears, after which the tips of the greens turn yellow. To avoid the appearance of this disease, the set is warmed up before planting at a temperature of forty degrees for ten hours.
- Downy mildew - the disease can be recognized by a gray bloom on the leaves. Affected vegetables do not form seeds and do not store well. To avoid the appearance of powdery mildew, the sets are warmed up before planting. It is also necessary to ensure that the plantings are not thickened.
- Gray rot - the disease occurs in rainy and damp weather. Diseased plants must be removed. For the purpose of prevention, the planting material is treated with a solution of copper sulfate.
- White rot - acidic soil and excess nitrogen in the soil contribute to the appearance of the disease. Therefore, before planting vegetables, the acidic soil is limed, and fresh manure is not used to feed the onions. Diseased plants should be removed.
- Mosaic is a viral disease in which the plant lags behind in growth, the seeds are almost not formed, the inflorescences become small, and the leaves turn yellow. Affected instances must be removed.
- Neck rot is a disease that can only be detected after harvest. It manifests itself as mold on the outer scales of the bulbs. Neck rot develops under unfavorable conditions for growing plants. To avoid its appearance, the seedlings before planting and the harvested bulbs are warmed up at a temperature of forty-five degrees. Most often, late varieties are affected by this disease.
Viral diseases of the plant are not cured, therefore, preventive measures must be used.
To do this, it is recommended to observe crop rotation, not to make thickened plantings, regularly remove weeds and follow all agricultural techniques.
Before planting, the onion sets can be warmed up and treated with copper sulfate.
Fungal diseases can be cured special fungicidal preparations. However, it is not recommended to use them, as the bulbs are capable of accumulating poisons.
Onions are an unpretentious plant that even a novice gardener can grow in his area.
The popularity of this vegetable is due to the content of substances useful for the human body in it. Eating onions improves digestion and induces the secretion of gastric juice.
In addition, the vegetable has a bactericidal, sedative and diuretic effect.
How to plant onion sets - advice from experienced gardeners +
Choosing a landing site and forming a bed
Usually, onion sets are planted in the spring, when the weather is already warm and the soil has warmed up enough - approximately the beginning - mid-May (depending on the weather and the region). In the meantime, you have time to prepare the garden.
In the second half of April, it is worth going out to the garden and, after looking around, determine the most illuminated area, which will be sunny most of the day without shade from neighboring trees, fences or buildings.
And it is better if this place is on a hill, and not in a lowland, where rain and melt waters often stagnate even on sandy soils. Further, on one of the fine days, when the earth dries up a little and stops sticking, you can start studying the soil.
It is enough to dig a few times to approximately determine the type of soil:
- lump is heavy and sticks strongly to the shovel - clay soil (by adding 2-3 buckets of coarse sand and peat, you can improve soil drainage and make it suitable for onions)
- if the earth is easily knocked off by a shovel - most likely sandy loam soil or loam (both options are quite acceptable for cultivation);
- but when the soil simply crumbles, without forming lumps and lumps, then it is sandstone (compost or humus must be added, because such organic matter not only provides planting with nutrients, but also helps to retain moisture in the ground).
The acidity of the soil can also be determined without special means and preparations.
Look around what weeds are growing on the site, you noticed - horsetail, horse sorrel, plantain - these are acidic soils, and for the successful cultivation of onions, chalk or lime should be added to the allocated area (about 1-2 kg per 1 square meter of land).
If nettle, clover, woodlice, wheatgrass are more common, then these are slightly acidic soils, but the common bindweed, shepherd's purse, adonis or euphorbia speak of neutral acidity.
Even novice gardeners are aware of the need for soil fertility.
But organics recommended in specialized articles: fresh manure, rotted mullein, and even the contents of compost heaps - garden beginners are often puzzled: "Where to get all this and how to work with it?" Therefore, let's do it easier: if you doubt the fertility of the soil - before planting onion sets and digging up a garden bed, prepare fertilizers yourself.
Chopped (without roots and seeds) weeds are suitable as organic matter - the same nettle, dandelion, tansy or shepherd's purse.
You can also buy a ready-made concentrate of natural peat-based fertilizer - Humate, which, according to the instructions, is also scattered before digging.
And as a mineral supplement, get nitroammofoska - a complex preparation containing both the necessary nitrogen, and potassium, and phosphates.
It is impossible to introduce simultaneously means that reduce the acidity of the soil (wood ash, chalk, lime) and organic matter, since their interaction leads to a decrease in nitrogen in the soil, which is so necessary for growing crops. It is better to carry out these events in two stages - in autumn and spring.
Having dug up the area chosen under the onion, you need to form a garden bed. Its size depends on the planting method and the number of sets.
Following the advice of experienced gardeners, it makes sense to organize mixed plantings, alternating rows of onions with carrots, beets or berry plantings.
And such cultivation is really useful: in addition to saving space on the site, the plants will protect each other from pests and prevent the spread of diseases.
And for a novice gardener, this is an opportunity to try your hand and grow several crops at once without unnecessary "labor feats" and care.
Therefore, we prepare the bed, observing the recommended sowing rates: the distance between the rows is about 20-15 cm, and between the bulbs - at least 7-10, depending on the size of the seed.
Preparation of planting material
Growing onions from seed sets is undoubtedly the most convenient, efficient and fastest way to harvest. It is quite simple to purchase planting material - sets are sold of various varieties, sizes, shapes.
At the same time, the expected yield of turnip bulbs may differ in weight, taste, expected shelf life and their use.
And if everyone has their own taste preferences, then the size is worth mentioning: qualified gardeners prefer to buy a smaller set, because in this case the number of bulbs in the unit of weight or volume sold will be greater.
But on the other hand, under unfavorable conditions or inadequate care, it is difficult to grow full-fledged, large bulbs from such "small fry", especially if there is not enough experience. Therefore, we recommend for beginners to plant larger sevok so as not to be disappointed in gardening business at the first attempts.
Before planting an onion, it is necessary to carry out a number of measures aimed at enhancing its vitality and preventing diseases.
- Sevok is heated in hot water (t 35-40 ° C) with the addition of a pink solution of potassium permanganate or any suitable fungicide (antifungal drugs sold in flower or gardening shops). This will not only kill possible infections, but also reduce the likelihood of "shooting" the bow in the future.
- Now it is dipped in a salty solution for 1.5-2 hours (a glass of salt per liter of water) so that the pests cannot “feast on” the future harvest.
- When everything is done, the set must be rinsed. Then, if the bulbs have underdeveloped or too dry roots, they are kept in a rooting stimulator (you can buy a ready-made preparation in the store or make it yourself: for 1 liter of water + 2 tablespoons of honey + 2 tablespoons of aloe juice).
The seed prepared in this way is already sufficiently saturated with moisture, disinfected and ready for the beginning of the growing season. You can start planting according to seeding rates and in pre-marked rows.
Care, watering and feeding before harvesting
In about a week, the first green shoots will appear on the garden bed, and soon the even rows of the onion will need care. You just have to regularly pull out weeds and, in dry weather, water the garden.
As top dressing, if you did not manage to "get hold of" the infusion of mullein or bird droppings, you can use the same that you introduced into the soil before planting.
Crushed greens (cut grass, tops, cut young twigs, weeds, even with seeds) are poured into any container, filled to the brim with water and left to ferment for 5-7 days.
After that, the infusion is filtered and added during watering at the rate of 1 liter per bucket of water. If there is no time to mess around with grass, then you can use organic Humate powder as fertilizer according to the instructions.
That's all the simple care.
Two weeks before the expected harvest (when the green part of the onion turned yellow and began to lie down), all watering is stopped, and the drying soil is carefully raked off with a hoe or hands so that the bulbs ripen in the sun.
In order not to miss the moment of cleaning, you need to check the condition of the turnip - pull out one and look at its roots - they should begin to dry out.
But if new white roots have appeared, this means that the plant is entering the next growing season, which cannot be allowed, because the taste of the onion is lost and its keeping quality decreases.
The harvested crop is transferred to the shade under a canopy, where there is good air circulation. There, the bulbs remain until the greens, roots are completely dry and dense yellowish scales are formed. When the onions are dry, they are stored in the basement or pantry.
- Evgeny