Content [show]
There are many ways of planting potatoes: under straw in a vegetable garden without hassle, a method that has been invented and successfully used by supporters of natural farming. No less original options for planting in bags, a pit, a barrel.
The classic way: how to plant
Consider the classic method of growing potatoes under straw, which is used by most summer residents.
Especially pensioners liked the method of growing for hay - planting and harvesting require less physical effort.
 The less labor-intensive the cultivation method, the more people choose it.
Let's decide where to start and how the process goes step by step.
Preparing the soil for the winter
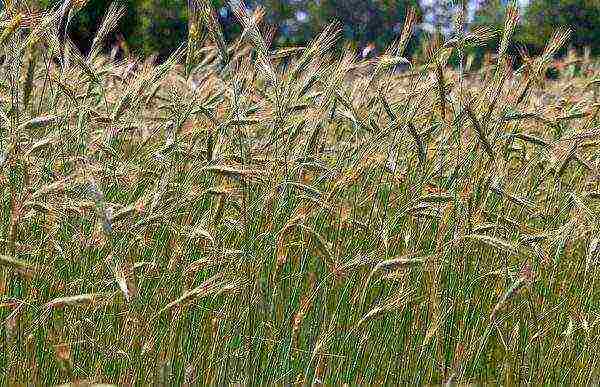
We begin to prepare the ground in the fall... Sow rye by removing vegetables and clearing the area of plant waste. Harrow the seeds with a rake. Winter rye will sprout quickly. It does not need to be removed for the winter, as it will continue to grow in the spring.
It is estimated that before sowing potatoes, rye in a 10 x 10 m plot grows about 200 kg of green mass. Pros you get by sowing rye in autumn:
- the percentage of pests and pathogens of vegetable crops is reduced in the ground;
- the amount of weed is reduced;
- green mass embedded in the ground, serves as an excellent fertilizer.
No later than 2 weeks before planting the potatoes, you need to cut the overgrown rye and dig it into the ground to fully prepare the soil.
 Planting rye ensures soil crop rotation
How to properly prepare planting material
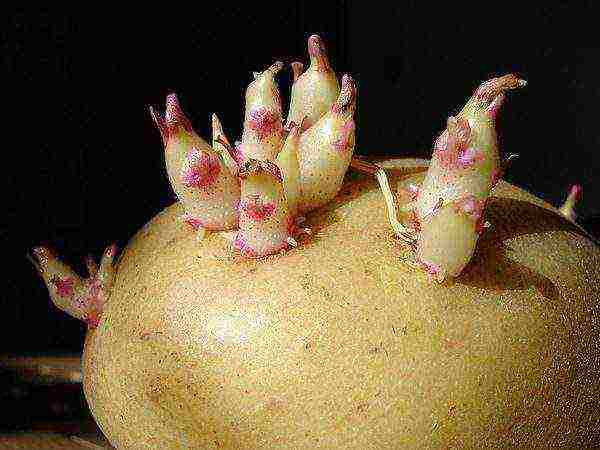
March is coming - the time to prepare seed potatoes. Inspection is the first thing to do. Discard potatoes showing signs of infection. Leave healthy seeds about the size of a chicken egg.
Prepare a solution of pink potassium permanganate. Hold the tubers in it (15-20 minutes), dry, put in boxes. If there is sawdust, then on wet sawdust.
Three weeks boxes should stand in a bright room... The optimum air temperature for germination is from 5 to 15 ° C. During this time, the tubers should turn green and be covered with strong sprouts. Sprouts that do not exceed 12 cm in length are considered good.
Preparing hay and straw
You can use hay, dry lawn grass. In general, it contains more nutrients.
Used straw that has not been quail last season can be used successfully. Before storage, it is well dried, and covered for the winter. Weeds sprout by the 10th of May.
There is a benefit from weeds - you can wait until they grow up a little and put them on mulch.
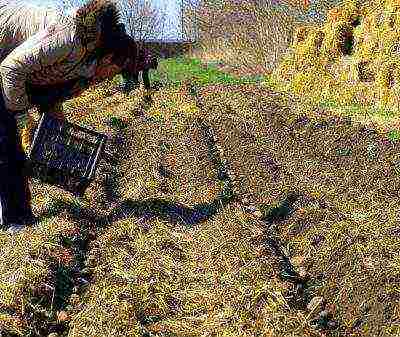
Planting potatoes
Loosen the top layer of the earth, embedding rye in the ground. Outline the rows. Maintain a row spacing of 60 cm.
- Make shallow grooves (8 cm) in the ground for storing potatoes.
- Arrange the tubers in them, observing a step of 30 cm.
- Cover the grooves with a layer of straw (20 cm).
- For spring tillage, you will need a Fokin flat cutter or a hand cultivator.
If the weather is dry, before placing the potatoes furrows can be watered.
Disadvantages of the method
There are few disadvantages, but they are, you need to know them:
- potatoes turn green if the mulch layer is thin;
- for growing potatoes a large field needs a lot of straw;
- rodents can start.
Alternative method of growing under straw
Sprinkle the tubers with earth - this is the main thing that distinguishes the alternative method from the classical method.
With an alternative method of planting under straw, the stage of soil preparation, loosening (digging) is skipped. Tubers are germinated and pickled in a solution of potassium permanganate.
In the area allocated for potatoes, holes are formed (8 cm). The step is 30 cm, the distance between the rows is 60 cm. Potatoes are laid out in them, sprinkled with earth and the entire area is covered with a layer of straw (25 cm).
Lay out the tubers carefully, without damaging the sprouts. Make sure they look up.
Minimum straw to plant
Fitting into a ridge will reduce material consumption by several times. Ridges are formed first. The height of the ridge is 10 cm, the width is 20 cm. The holes are made in the ridge. The tubers are covered with a layer of earth and straw, which is placed between the ridges.
 The advantage of this method in avoiding greening of the tuber
Less straw is needed with this planting method, but the tubers do not turn green, moisture in the ground remains, weeds germinate more slowly and in smaller quantities.
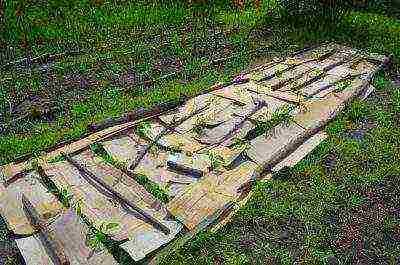
How to grow with cardboard and straw
Household cardboard, boxes for household appliances are made of it, suitable for planting potatoes. They need to cover the entire area of the ridge. Make cruciform cuts on cardboard before laying on the ground.
You will need a clerical knife. Holes place at intervals of 30 cm both in a row and between rows. The process of planting potatoes consists in carefully placing the tubers in the holes and covering the “cardboard” ridge with straw.
Features of harvesting
It is difficult to enjoy harvesting traditionally planted potatoes. It requires physical effort. Using any of the methods of growing under hay, you can turn the work into a holiday.
Instead of a shovel, a rake is needed, with which it is quite easy to rake the old mulch from the ridge. All that remains is to harvest the crop. The tubers lie almost on the surface.
From one nest you can get at least 12 potatoes... The tubers are clean, large, rarely affected by diseases and therefore are well stored in winter.
Pros and cons of planting under straw
The method provides significant savings in time for care, since there is no need for hilling, loosening, weeding.
Consider other positive aspects, those that will convince you to use the method of planting under straw:
- There is no need to dig deep into the ground, this preserves its fertility and reduces the time and effort spent on preparing the site for planting.
- The need for watering decreases, since mulch retains moisture well, interferes with its evaporation.
- The population of the Colorado potato beetle is noted to be declining. The culture under the hay suffers from the Colorado potato beetle less often and to a lesser extent.
- Wet hay melts, decomposes, releases nutrients necessary for the growth and formation of tubers.
If grown under hay, soil fertility increases.Under the rotten straw, the earth is loose and damp, it is good for earthworms to live and reproduce in it. In the process of their vital activity, they improve the structure of the soil: they loosen, fertilize.
It is necessary to evaluate the cons - the costs of this technology... The main disadvantage is the volume that a gardener needs to have at hand throughout the season.
It is clear what the lack of it can lead to. A large percentage will turn green.
Such potatoes are not eaten, they are used only as seed. Rodents living in the straw can spoil part of the crop. The fight against them must be included in the care of the plantation.
Straw planting options
Hay used for planting back in the old days... The climate and soil are different everywhere, so there are several ways of planting according to our method:
- classic planting method with soil cultivation;
- off-road landing;
- ridge landing;
- relatively new method using cardboard.
Using the method in the garden without the hassle
It is necessary to use straw in the garden to grow potatoes. Moreover, it can be replaced with hay, grass cut from the lawn, and even grown weeds.
There is a correct experience of using dry reed stalks for growing on ridges, which shows:
- The use of hay gives an increase in the fertile layer. This is facilitated by cellulose (fiber). She - nutrition for soil microorganismsthat process it, while carbon is released - a source of energy and life for plants and all living things that are in the upper fertile layer.
- To provide a family with potatoes, it is not necessary to plant a field. Several ridges on a 3 x 3 m plot are capable of providing potatoes for a family of 3-4 people.
- According to statistics, one bucket of seed variety planted under straw yields up to 10 buckets.
Plus technology - next year you can plant melons, carrots, beets or cabbage in this place. Crop rotation will be respected... When planting potatoes, the soil will receive an additional supply of nutrients.
Another benefit for the garden from planting for hay is that the costs of buying and delivering humus are reduced. The fertile layer will increase due to the rotted straw.
Technology description: under straw
The essence of the planting technology for hay is to replace the soil with which the tubers are covered with the traditional method, with a mulch layer of any dry grass.
Throwing a ridge of potatoes will take several times. The first time - in the spring when planting, several times - during the summer. This is necessary for two reasons: the hay overheats and the layer becomes thinner, the potatoes grow and require additional cover.
This is how the potato bush fully develops. Large tubers are formed on it. This is possible because mulch:
- overcooking, provides the plant with the nutrients necessary for growth;
- retains moisture;
- inhibits the growth of weeds;
- protects tubers from sun rays and overheating.
If you are not sure of success, you can try the method for hay, which has received a second life, on a small ridge. If the result is convincing, the area of the experiment for the next season can be increased.
There are many ways to grow potatoes on the site. But, what is characteristic, the traditional methods require considerable efforts from summer residents: before planting, the site must be dug up and fed without fail, the planted potatoes must be constantly watered, weeded, moreover, the Colorado potato beetle will not be long in coming - soon it will begin to devour the foliage of plants. In a word, you have to constantly work, and it is not a fact that this will bring really good results.
Potatoes in a straw
But there is an easier way to significantly simplify the care process - you can grow potatoes in straw. It is about this technology that will be discussed in today's article.
Potato field
The main advantages of the method
What modern folk craftsmen do not grow potatoes in - in pots, in bags and piles, in the form of combs, etc. But it is straw and hay (in other words, mulch) that have gained increasing popularity in recent years, since they have significant advantages over the traditional method of cultivating culture.
Straw is an excellent material for growing potatoes
- Straw is an environmentally friendly natural material, which, subject to a certain proportion - 5: 1 - can replace manure.
- Thanks to the use of straw, planting, care and collection of potatoes is greatly simplified. This is explained by the fact that the tubers do not need to be cleaned from the ground, and it is much easier to collect them than with ordinary digging.
- The straw will play the role of a mulch layer that will protect the crop from pests (in particular, from the Colorado potato beetle) and weeds.
- Digging as such during cultivation is not required at all, as well as any other work with a shovel.
- With the onset of autumn, you will get not only a clean, but also a well-fertilized area (rotted straw will serve as top dressing).
- Harvesting can be done with bare hands, it does not require much effort.
- It is not necessary to loosen and huddle the site - instead, it is enough to add the right amount of straw.
- Finally, from one planted bucket of potatoes in the fall, you can get from ten buckets of fruit.
Harvesting is quick and easy
As you can see, this growing technology is definitely worth learning, because it is simpler than other known methods.
The classic way
In this case, work begins immediately after the autumn harvest. We are talking about preparatory activities.
Stage one. Preparing the soil for the winter
Selected potato planting site
In the classical method, the selected area does not need to be dug up and cleaned, even if it is “virgin soil” covered with wheat grass and turf. Just turn the grass over with a shovel so that the roots end up on top, and the grass itself is closer to the ground. During the winter period, the green mass will crush and fertilize the soil for subsequent planting.
Soil preparation
Note! Even in the fall, it is recommended to plant the selected area with green manure plants. They not only displace weeds, but also enrich the soil with phosphorus, nitrogen and useful microelements.
The best predecessors of potatoes include:
- mustard;
- alfalfa;
- phacelia;
- oats;
- rye.
White mustard - siderat
Sowing mustard as siderata
You can choose two crops at once (for example, phacelia and oats) and sow them in August in the area where the potatoes will be planted.
Phacelia is one of the best green manure
In the spring there will be no weeds, and the site itself will turn out to be well fertilized. Be sure to remove weeds before sowing green manure plants, and you should not forget about digging up the soil either.
Stage two. We prepare the planting material
Use potatoes the size of a chicken egg. As for the landing dates, they depend on the specific region, although the national average is the second half of May. To harvest earlier, you can germinate seed tubers in April.
Sprouted potatoes
Step 1. Take a wooden box with low sides.
Step 2. Place the potatoes in a drawer so that they touch each other.
Seed potatoes
Step 3. Place them in a well-lit room with natural ventilation. It is important that the temperature there is in the range of 10-15 ° C.
Step 4... After some time, when strong shoots are formed on the tubers, the potatoes will be ready for transplanting into open soil.
Sprouting potatoes
Note! If you wish, you can shift the harvest time by planting some of the tubers without germinating in another area.
Stage three. Preparing the straw
Harvesting straw
Very often, fresh or dried grass is used instead of straw.The results of such experiments are not bad, but nevertheless, it is better to give preference to hay / straw, since the grass fertilizes the soil less and does not provide adequate protection.
It is not at all necessary to use fresh, high-quality straw - it may well be old. Moreover, the used straw can be used for the next planting. To this end, after harvesting the potatoes, dry what is left of it (not rotted) and place in a dry place until next year.
Stage four. Planting potatoes
The planting procedure should look something like this.
Table. Planting potatoes
Actually, that's all. Weed plants will not break through such a layer of straw, moisture evaporation will be excluded, and the formation of fruits will begin under ideal conditions for potatoes.
Stage five. Further care
When the shoots grow to 15-20 centimeters, create a small straw mound around them. This simple action will replace the hilling procedure, because the tubers will form in the straw above the ground. Try to keep the tubers out of direct sunlight, otherwise they will simply turn green.
Also, do not forget about soil moisture - it must be permanent and uniform. Only then will the tubers turn out to be beautiful and of the correct shape. Continue adding straw as it develops.
As you grow, you can add hay
Potatoes can crack if they don't rain for a long time. If so, this is clear evidence of moisture deficiency. When watering, try not to hit the stems and foliage - direct the stream exclusively to the root. If everything is done correctly, then you can taste the young potatoes 12 weeks after planting. This time is often enough for the tubers to develop to a decent size.
As for harvesting, the optimal time for this comes when the tops begin to wilt.
Flowering potato bush
Harvest the harvest
Disadvantages of the method
Of course, there were some drawbacks here, so in fairness we will consider them.
- If the potato plot is large, it may be difficult to find enough straw.
- Where the mulch layer is thin, the potatoes may turn green.
- Rodents can start in the straw and gnaw the tubers, while slugs can settle in the hay.
Nevertheless, the advantages are so obvious that they more than cover all these disadvantages.
Growing potatoes in hay allows you to get a rich harvest
Alternative way: a combination of natural and traditional agricultural technology
Here, it is also advisable to sprout potatoes so that harvesting can begin earlier. The area chosen for planting does not need to be dug up first.
Step 1. Using a hoe, mark the potato furrows on the pre-rake-leveled area.
Step 2. With a shovel or the same hoe, make holes six to seven centimeters deep with the same pitch as in the previous method.
We make holes for planting potatoes
Step 3. Lay out the potatoes. Sprinkle a thin layer of soil over the holes.
Put the potatoes sprouted up
Sprinkle the holes with soil
Step 4. Cover the entire area with a 25- or 30-centimeter layer of straw. This completes the landing procedure.
We fill the field with straw
Note! Plant sprouted tubers very carefully so as not to damage the sprouts. In addition, the sprouts should point upwards after planting.
As many summer residents note, in such conditions, potatoes are not susceptible to attacks by the Colorado potato beetle. There is either very little of the latter or none at all. If there are few larvae and beetles, then you can collect it by hand, without resorting to the use of fungicides.
Comparison of potato planting methods
Using a minimum amount of straw
If there is really very little straw, then when digging holes you can form a ridge 20 centimeters wide and 10 centimeters high in parallel.
Potatoes in straw - photo
Thanks to this comb, the tubers:
- will not remain on the surface even after a heavy shower;
- will not turn green if there is not enough straw.
Moreover, in this case, you will need much less mulch.
Then, after sprinkling the holes, pour dry straw between the ridges. Tellingly, the layer of mulch can be minimal - it will suppress weeds and retain moisture anyway. Yes, the most powerful weeds can still break through, but there will be few of them, so you can easily get rid of them. Subsequently, feed the straw, gradually thickening the layer. In principle, there is nothing else to do here until autumn.
Growing straw
Cardboard and straw
Another curious way to grow.
First, prepare:
- thick cardboard (it is advisable to use boxes from household appliances);
- straw;
- knife;
- actually, potatoes.
Cardboard stacked
Place seed potatoes in each of these holes
The potato sprouted
You can cover the cardboard with hay
Planting potatoes
The essence of the method is as follows: the cardboard is laid on the selected plot of land with an overlap (there should be no gaps that a weed plant can penetrate). With the help of a knife, X-shaped cuts are made on the cardboard, the distance between which should be 25-30 centimeters in all directions. The tubers are laid in cuts, after which the entire area is still covered with a layer of straw.
Features of harvesting
Collecting potatoes grown in one of the ways described above is a pleasure. Even dense clay soil, which has been under mulch for a whole season, becomes loose and pliable.
Potatoes by planting under straw
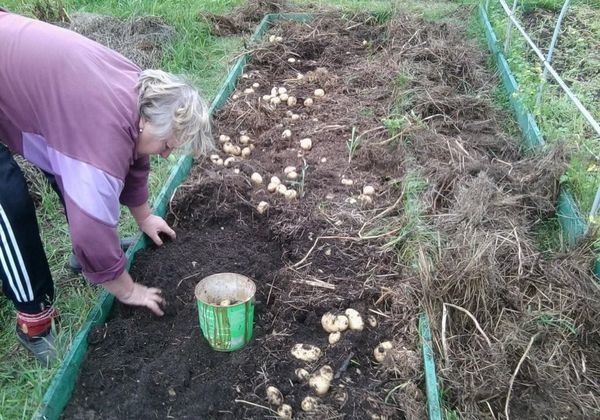
First, carefully remove the straw with a rake, then proceed directly to collecting potatoes in buckets / bags. Many tubers will be semi-buried, but you can easily reach them with your hands, which means you do not need a shovel or pitchfork. As practice shows, each bush brings from 12 to 17 potatoes, the weight of which ranges from 50-300 grams. The fruits themselves are delicious, smooth and, most importantly, environmentally friendly, so you can sell them profitably, because city dwellers especially appreciate large and unsprayed potatoes.
As a result, we note that the tubers remaining in the soil can not be dug out, but covered with mulch back - this way they will remain until next spring. Dig them up in the spring to keep them from rotting.
Potatoes under straw - the best result
Video - Potatoes in a straw
The dream of any gardener: to get a large crop of potatoes without chemical fertilizers, compost, manure.
It is also desirable in this case: neither dig, nor weed, nor huddle, nor rush with a jar, collecting the Colorado potato beetle, or not poison with chemistry, saving from the invasion of beetles.
Story! But really. And you can even grow a bucket of clean, select potatoes from a single bush. We will talk about this further, namely: how to prepare the soil in the fall, what kind of straw is needed. Disadvantages of the classic and what are the alternative methods of planting tubers.
…
How is this possible?
There is no traditional way of growing potatoes under straw, where land plays a secondary role. Outdoor potatoes are easier to care for. But even this method of agricultural technology has its advantages and disadvantages.
Pros:
- There is no need to dig deep and shake out all the weeds.
- You can start growing potatoes even in a deserted area where nothing has been planted for a long time.
- Straw is an excellent mulch layer. Weeds cannot break through the thick layer of straw. So you won't have to weed.
- No need to spud. It will only be necessary to add hay / straw.
- Hay-grown potatoes are rarely attacked by the Colorado potato beetle.
- The method is good for arid regions. Watering is required only if drought and high temperatures persist for a long time.
- There is no need to dig the crop. You need to move the layer and pull slightly on the bush.
- The land under such agricultural technology is not depleted.Potatoes get all their nutrients from decomposed hay. On the contrary, the soil will be enriched with nutrients.
- You can easily collect 10 buckets from one bucket of planted potatoes.
Minuses:
 Straw is a magnet for mice and other rodents. If they breed under it, then most of the crop can be lost. To scare off rodents, elderberry, black root, wormwood, mint, tansy, chamomile, and wild rosemary are grown on the site with potatoes. You can also lay out dried and chopped peels of orange and lemon when planting potatoes. Their scent will scare away rodents.
 - Potatoes grown under straw have a slightly different flavor that needs getting used to. Not everyone likes him.
- Straw is a breeding ground for slugs. They feel at ease here. It is not advisable to plant cabbage near the potato site.
- Large quantities of straw and hay are needed to grow crops. If there is no way to procure them yourself, then you will have to buy. And this is a financially costly event.
The classic way
Work on the future harvest begins in the fall. So. let's move on to the main stages:
Preparing the soil
Work begins in the fall. The scheme works in the case of a well-groomed area, and in the case of cultivation of "virgin lands". We stick a shovel bayonet shallowly and turn the grass with the roots up. The green part of the grass is in contact with the ground. In winter, it will crush and serve as a fertilizer for the soil.
Recommended plant the site with green manure plants. They displace weeds from the site and enrich the soil with phosphorus, nitrogen and other microelements.
Suitable precursors for potatoes are:
- mustard;
- oats;
- rye;
- alfalfa;
- phacelia.
Material preparation
For growing potatoes, it is preferable to use not fresh straw, but last year's, caked... Freshly cut grass will not work. It gives little nutrients to potatoes. Straw that has not rotted during the season can be reused. You just need to dry it well.
Planting potatoes
-
 In the spring, before planting potatoes, the soil is moistened.
 - Then it is laid out in rows, observing the distance between the holes of 25-30 cm.
- The gap between the rows should be 70 cm.
- Around the potato you can scatter a choice of: crushed eggshells (disinfecting effect), wood ash (from wireworm, a source of potassium), crushed orange and lemon peels (scares away rodents).
- Then you need to cover the potatoes 25-30 cm with a layer of straw / hay.
- The layer should be thinner between the holes.
Note! Weed plants will not break through such a layer of straw, moisture evaporation will be excluded, and the formation of fruits will begin under ideal conditions for potatoes.
From the video you will learn how to plant potatoes under the straw:
Flaws
- Large volume of straw that either needs to be purchased or harvested.
- If you put it in a thin layer or it turns out that some holes are under a thin layer of straw, then the potatoes in them will turn green. Accordingly, it will be unfit for food.
- Rodents can start in the straw. There are slugs in the hay.
Alternative method
This method involves lower costs for straw. Soil and straw resources are used immediately.
- Potatoes are germinated in advance to achieve an earlier ripening.
- Furrows are marked.
- With a shovel or hoe, holes are marked with a depth of 6-7 cm.
- The distance between the holes is 30 cm.
- Next, you need to put the potatoes in the holes and sprinkle with soil.
Then there are two options:
- Sprinkle the wells immediately with a layer of 25-30 cm of straw.
- After the potatoes rise and grow to a height of 5-10 cm, cover it with a layer of loose straw 15-20 cm thick (if desired and possible, you can first mulch it with loose humus with a layer of 5-10 cm). The sprouts that come out of the ground quickly break through the straw. After that, you can again scoop up more straw from the row spacing to protect the tubers from light.
How to grow with cardboard?
If there is an opportunity to find or get cardboard from household appliances, then you can try another interesting way of growing potatoes.
Main components and tools for work:
 sprouted potatoes;
 - potato;
- knife;
- straw.
Step-by-step actions:
- The cardboard must be laid on a piece of land, leaving no gaps (overlap).
- Secure it or press down with something heavy around the edges.
- Next, mark the X-shaped cuts on the cardboard.
- The spaces between the marks should be 30 cm.
- The next stage also has two cultivation options.
- 1 way without straw:
Under each cut in the cardboard, you need to make a hole about 15 cm deep. Place the potatoes in them. Sprinkle with earth. The mulching layer will be cardboard. Watering potatoes strictly in the holes. The cardboard does not allow weeds to germinate and does not allow moisture to quickly evaporate.
- Method 2 with straw:
The potatoes are placed in the x-shaped holes directly on the ground. You need to put the potatoes so that at least one potato sprout looks out. Then you need to cover the cardboard sheets with a 20 cm layer of straw. As soon as the sprouts break through the layer, the holes need to be once again covered on top with a 15 cm layer of straw (hay).
If there was no rain before planting the potatoes and is not expected in the near future, then you need to shed the soil in advance.
On a note. Harvesting for pleasure can be done in the first and second ways. To do this, you need to remove the straw and cardboard, pull slightly on the tops and collect clean, large potatoes.
- 1 way without straw:
Which is better - hay or dry cereal stalks?
- Hay is dry grass in its pure form. In its composition, it may contain weeds and their seeds. In a humid environment, they germinate. But when rotting, hay can act as an additional source of soil enrichment with nutrients.
- Straw - dry stalks of cereals. Does not contain weeds. But there are almost no nutrients in it either. Rotting will not produce organic fertilizer.
- Hay protects potatoes better from sunlight. If there is no hay, then the straw should be stacked in a thicker layer.
- Cardboard decomposes in one year. When choosing a method of growing potatoes under cardboard, cardboard stocks need to be constantly replenished.
- Hay and straw rot in about 2 years.
- Straw and hay are lightweight covering material. It can be carried away in strong winds. It will be necessary to replenish the losses.
Many gardeners are wary of everything new and do not want to hear about any new methods of growing potatoes. Then you can take note of the idea itself - to mulch the soil with straw. In arid regions and in hot summers, this will keep moisture in the soil for a long time. Also, the soil will be looser and enriched with nutrients.
In small areas for potatoes, you do not need to dig beds. You can do without land at all. There are alternative planting methods that have been tested by time and summer residents - under hay, straw or cardboard.
Pros and cons of growing potatoes under hay and straw
There is an alternative way of growing potatoes - under mulch, without digging the site. Compared to the traditional one, it has advantages:
- saving time;
- facilitated planting and harvesting process;
- slow growth of weeds;
- plantings are protected from the Colorado potato beetle;
- moisture holds well;
- environmental friendliness of the shelter.
There are also disadvantages:
- covering material costs;
- availability of tubers for pests (rodents, slugs).
With tubers planted under mulch, the yield is no less than with the traditional method of planting
To protect the site, gardeners install scarers and use chemicals (Slizneed, Thunderstorm, Ferramol).
From the folk methods of dealing with slugs - sprinkling between rows of crushed eggshells. It is recommended to plant potatoes as far away from the cabbage as possible.
What is better to choose for sheltering the beds
You can mulch potatoes with different materials, the costs for them will be approximately the same.A hay / straw cover layer protects the planting from environmental influences throughout the season.
Comparative characteristics of hay and straw - table
You need more straw than hay to get the same layer of cover.
You can grow herbs for mowing on your own:
- Divide the plot into two parts.
- In the first year, plant a mixture of oats, vetch and peas on one half, and potatoes on the other in the usual way.
- Dig up the tubers, leave the crops before winter. There is no need to dig up the soil.
- In the spring, plant potatoes on a plot with lodged straw without digging: make shallow holes, lay the tubers and sprinkle with a layer of earth 4–5 cm.
- Where they harvested last year, plant a mixture of vetch, peas and oats for harvesting next year's straw.
Thanks to such a crop rotation, the yield increases noticeably - with less time spent on processing the site.
Crops of vetch, oats and peas left before winter will be an excellent fertilizer for potatoes next year.
Tuber preparation
Before planting potatoes for digging, fertilizers are applied to the soil. For those who prefer organic matter, you can prepare humus in the fall: turn over the layer of grass so that the roots are on the surface. During the winter, she will crush and fertilize the soil.
The potatoes are taken out of storage, sorted out, diseased and damaged tubers are removed, heated for 3 days at a temperature of + 22 ° C and laid out in the light, periodically turning over. You can plant it when strong shoots are formed.
Before planting, potatoes must be germinated and greened in the sun.
How to plant potatoes for mulch
Traditionally, planting dates depend on the climate of the region: when the soil warms up to + 10 ° C. Under the hay / straw, a footprint of 10 cm is not needed - the tubers are placed on moist, slightly loosened soil.
Planting under hay or straw
- Spread the tubers sprouted upwards on the plot with an interval of 30 cm and a distance between rows - 70 cm.
- Cover with hay or straw in a layer of 45-50 cm.
- When the seedlings grow up to 15–20 cm, form a hill of covering material instead of hilling and add further as the tops are pulled out.
- In case of prolonged drought, water the area.
- The crop can be harvested in 3 months from the moment of planting. For ground planting of tubers, you do not need to dig up the soil
Tubers on the surface of the soil are more illuminated by the sun, so you need a shelter of hay at least 50 cm, otherwise they will turn green.
Video: harvesting potatoes grown under hay
Planting in the ground followed by mulching
How to plant potatoes in the ground under hay / straw:
- For planting in the ground, dig holes or grooves with a depth of 6-7 cm. So the tubers will be protected from rodents.
- Lay the potatoes sprouts up, sprinkle with soil.
- Pour straw 25-30 cm high.
- As necessary, thicken the covering layer, restoring damage.
- In hot periods, the planting is watered.
- For harvesting, rake the mulch with a rake or pitchfork and take out the tubers. Tubers are planted in furrows or holes with sprouts up, and sprinkled on top with a layer of hay / straw
The remaining straw can be used next year.
Cardboard as a replacement for mulch
When growing potatoes, enterprising gardeners have learned to use cardboard:
- in the fall, they cover the plot, cover it with soil and water it. During the winter, paper decomposes, weeds turn into organic matter, and the soil is enriched with fertilizers;
- in the spring, the cardboard is laid overlapping on the ground, without the formation of cracks. On the sheets, cuts are made every 30 cm, in which the tubers are placed. Pour straw on top with a layer of 20 cm, then add it as the potatoes grow. Cardboard is laid overlapping on the ground, without the formation of cracks
Harvesting is not labor-intensive: you need to rake out the cardboard and collect the tubers. You can even do without a pitchfork and a shovel. Depending on weather conditions, about 15 tubers weighing from 50 to 300 g are formed on each bush.
The advantage of this method of growing potatoes is that the soil becomes loose and fertilized.The disadvantage is the time and effort required to work with cardboard.
Growing potatoes in a bucket - is it a worthy alternative?
An experiment once conducted on growing potatoes in a bucket under the hay was successful - the crop was harvested, albeit very small, at one time. But such landings are also practiced.
How to do:
- Drainage, soil with a layer of 5–7 cm, humus or compost are poured into the bucket.
- 1-2 tubers are laid.
- A layer of straw is poured about 10 cm.
- As they grow, the tops are sprinkled with mulch - until the bucket is full.
- During the growing season, the planting is periodically watered. With vertical-straw cultivation, the yield will be modest - due to the lack of fertilized soil
The yield of potatoes grown in a bucket will be slightly higher, but not in straw, but in soil. For those who save space on the site or do not have it at all, this is a convenient way of landing.
Comparison of the crop of potatoes under mulch and grown in the ground - video
The experience of many gardeners shows that a high yield of potatoes can be achieved in a slightly non-standard way, growing tubers under hay / straw. This is a simple and effective solution for those who do not want to spend the whole summer in the garden pulling out weeds and hilling the beds.