Content
- 1 Gloxinia. Appearance
- 2 Gloxinia. Home care
- 3 Gloxinia. Reproduction
- 4 Problems in growing synningia
- 5 Problems with growing gloxinia and their solution
- 6 Lighting conditions for growing and caring for gloxinia
- 7 Microclimate for the care and cultivation of gloxinia
- 8 Planting and caring for gloxinia tuber
- 9 Watering regime for caring for gloxinia at home
- 10 Top dressing when caring for gloxinia
- 11 Gloxinia care during rest
- 12 Description of gloxinia
- 13 Gloxinia care at home
- 14 Growing periods
- 15 Planting gloxinia
- 16 Reproduction of gloxinia by vegetative methods
- 17 How to grow gloxinia from seeds
- 18 Gloxinia diseases and pests
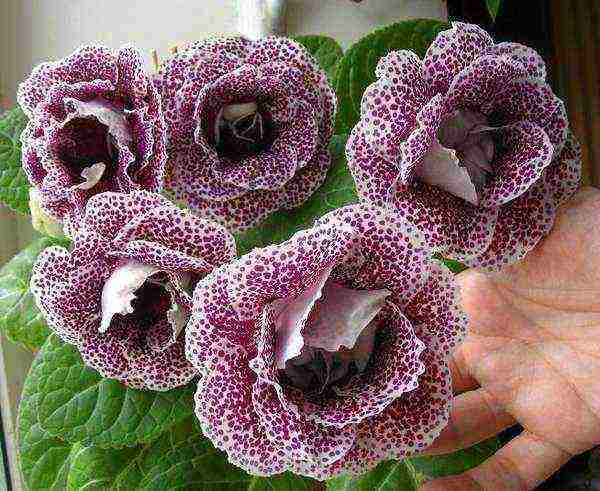
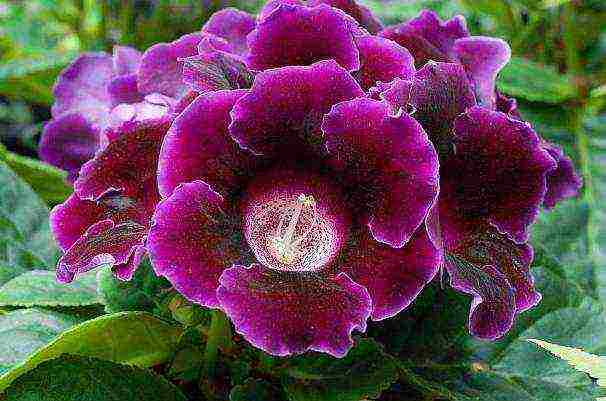
- 19 Varieties of indoor gloxinia with photos and descriptions
- 20 Getting to know the flower
- 21 We create all the conditions
- 22 How to care for gloxinia in the fall-winter period
- 23 Bloom
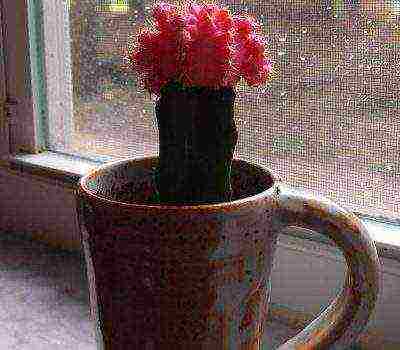
 Gloxinia is an elegantly flowering indoor plant that is popular among flower growers. It won love with its amazing beauty, which gracefully fits into every interior. This flower conquers everyone with its amazing and unique brightness and sophistication.
Gloxinia. Appearance
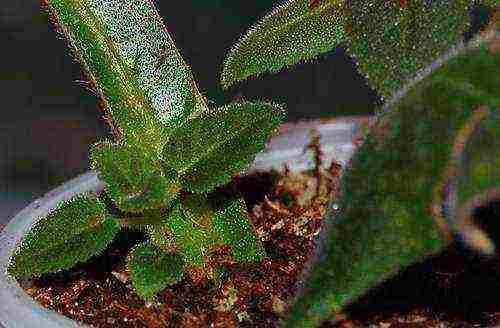
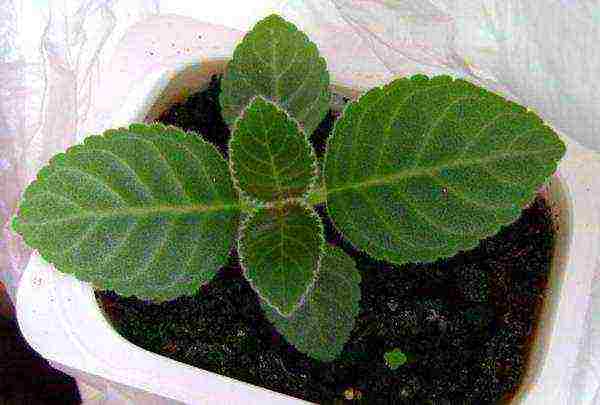
 An indoor plant is a perennial plant that has tuberous rhizome... Gloxinia stem is short with large juicy oval-shaped leaves and juicy green color. The flowers are bell-shaped, large enough, arranged on long stalks. Their structure can be double, semi-double and even with wavy petals. The flowers have a different uniform color, as well as with different color transitions. Gloxinia, or, as it is called in another way, synningia, has a fairly large variety of varieties that differ in the size of the flowers and their color, in the height of the stem, in the color of the leaves. The most popular varieties of a home flower:
- Gloxinia Avanti differs from other varieties with its large flowers of bright colors, blooming together. The leaves of this synningia are dense and relatively small.
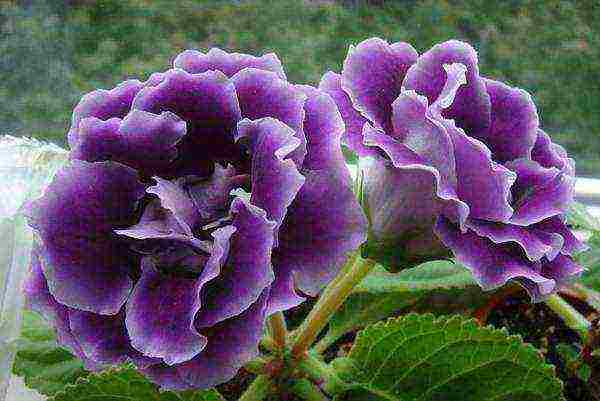
- Gloxinia Hollywood is widely known for its large, uniformly purple flowers.
- Gloxinia Brocada is just the perfect gift for a florist. Sinningia of this variety has a low stem and beautiful double flowers. In order for the plant to delight the grower after its acquisition with its lush flowering, you need to know how to care for gloxinia at home.
How does flower care take place?
Gloxinia. Home care
Like all indoor plants, sinningia has certain care requirements that growers follow.
Lighting and temperature
 Gloxinia, a photo of which you can admire below, loves space and diffused, but bright light, which should last for at least 14 hours (for this, you can additionally turn on the fluorescent lamp at night). To find out if there is enough light for our beauty, you need to pay attention to her leaves: if they are located horizontally, then there is enough, and if they stretch upward (towards the light), then there is a lack of it.But we must remember that the direct rays of the sun falling on a houseplant can destroy it.
Gloxinia is afraid of drafts, therefore, when placing a home flower on the windowsill, you cannot open the windows often. Sinningia does not need to be sprayed, because this home flower will not tolerate moisture on the leaves. But at the same time, a houseplant needs high humidity, this can be achieved by leaving a container of water on the windowsill next to a pot with gloxinia.
During the growth and flowering period for sinnengia room temperature is needed, only in winter, when the house plant is at rest, it is necessary to provide a temperature of about 10 ° C. If you look at the leaves, you can identify the plant's problems (if any). Signs with which gloxinia show their temperature preference:
- if the leaves are omitted, then the houseplant is cold;
- if the leaves are raised up, then this is overheating of the home flower.
Therefore, if you find a problem, you need to fix it.
Sinningia blooms in May-June. When this period ends in a houseplant, it is necessary to remove the stems, leaves, leaving only the lower 2 or 4. Then stepchildren will appear in the bosoms of this domestic pet, it will be necessary to leave only a couple of persistent ones, and the rest should be removed.
Watering gloxinia
It is necessary to moisturize the synning with water slightly warmer than room temperature. During the growing season of the plant, watering should be carried out in a saucer or from above, but at the same time, so that drops of water did not fall on the leaves and flowers... Water only when the topsoil is dry. By the end of summer, it is required to water less often so that by the middle of autumn the sinningia enters a state of dormancy.
Feeding Gloxinia
The main rule for growing this plant is that an excess of fertilizers will do more harm than a lack of them. Gloxinia is fertilized once every 10 days with a specialized complex.
In preparing a home flower for a state of dormancy, the plant should not be fed. If you do not carry out top dressing at all, then the flowering will be short and shallow, and the colors will take on a pale appearance.
After a dormant period, a houseplant can be fertilized with special mixtures for rapid growth, during the flowering period, synningia fertilized to improve the quality of flowers.
Gloxinia transplant
 Care should be taken more carefully after a period of rest, usually at the end of winter. An indoor plant must be transplanted once a year. It is better to purchase soil in special stores or prepare it yourself from leafy soil, humus, in a ratio of 2: 1, respectively. When transplanting, you need to take a container for a home flower larger than the previous one, lay drainage there, as well as a layer of soil mixture, and then shift the earthen ball with gloxinia, sprinkle with soil, tamp. It is necessary to transplant the synningia carefully so that the tubers are only half in the ground.
Gloxinia. Reproduction
An indoor plant can be propagated in various ways, of which there are quite a few. But the choice of method primarily depends on the type of sinningia. Therefore, when purchasing a houseplant, it is necessary to recognize its variety, so that later you can reproduce it qualitatively. Breeding methods for indoor gloxinia:
Seed propagation.
In special stalls you can buy any kind of room gloxinia. It is better to choose seeds in granules for self-planting. The packaging will indicate the timing of their germination, but, as a rule, it is from 4 to 6 months. And if sowing is carried out in winter, then even more - up to 10 months.
For sowing gloxinia seeds, you can use ready-made greenhouses or make them yourself. To do this, you need to take a deep container with a lid, you need to put there and wet the peat tablets, distributing the granules over them. To ensure ventilation of the seeds, you need to make a couple of holes in the lid. Then put the finished greenhouse in a warm, well-lit room.The temperature of this room should be approximately 23 ° C. Moisten the soil only as needed. After the emergence of seedlings, you need to wait until they get stronger so that they can be planted in a permanent container.
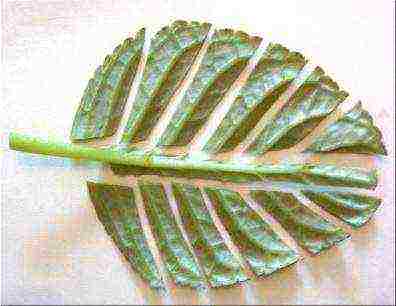
Leaf propagation.
For self-propagation of gloxinia with a leaf, you need to take the smallest leaf and cut it along the thickest veins, cut the petiole, leaving no more than 2 cm.For these manipulations, it is better to take a tool with a sharp blade so that the leaf does not rot. This prepared material should be planted in a container with moist soil, covered with foil until the first leaves appear.
Tuber propagation.
This type of reproduction is quite painful for the plant, so it is extremely rare. A healthy tuber is chosen; if rot is found on the tuber, it must be cut off. Then cut them up and treat them with charcoal for disinfection. Each of the pieces of tubers should have a shoot. Then these tubers are planted in a container with moist soil.
Reproduction by peduncles.
After completing the flowering period, the plant must cut off the peduncle and place it in a container with water for the roots to appear. Then plant it in moistened soil too and cover with foil.
Reproduction by stepchildren.
Place the scion in water for roots to emerge, then plant in the ground.
Propagation by cuttings
This is the most elementary and fairly popular breeding method for home synningia. During the period of bud formation, you need to take a leafy cutting, about 4 cm no more. If the leaf is withered, then to restore it, it must be lowered into water, then put into boiled water with a temperature of up to 25 ° C. Then, as in the previous methods, place it in loose, moist soil. A month later, the appearance of a tuber is already possible.
Problems in growing synningia
Having considered the home care of gloxinia, reproduction, it must be remembered that, like any houseplant, it can kill various diseases.
Diseases and pests of synningia
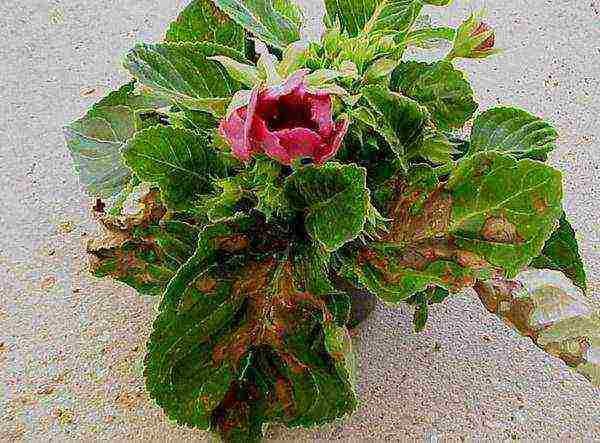
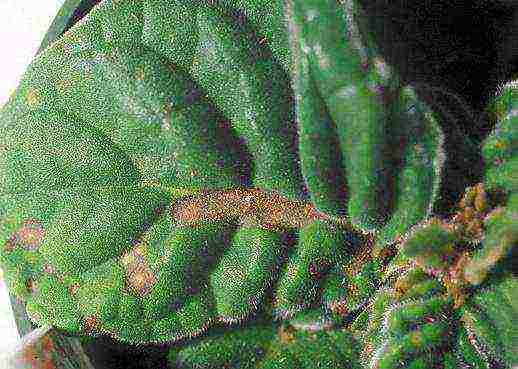
 Gray rot is the most famous disease that occurs on synningia due to inadequate care. Signs of its appearance are brown spots on the leaves of a houseplant. During treatment, it is necessary to remove damaged leaf fragments and treat with a fungicide.
Root rot... It is also quite common in indoor sinning. Symptoms of this disease appear on the roots of a house flower, they turn brown and the stem can rot at its base. The reason for the appearance on gloxinia is excessive watering or the water that moistened the soil was cold enough.
Powdery mildew, black leg, late blight - these diseases are also detrimental to synningia. To do this, as a prophylaxis for a houseplant, phytosporin should be treated with drugs. If the disease has already manifested itself, then the home flower should be treated with a drug - foundationol.
Cyclamen pliers... Unfortunately, these mites are difficult to detect on gloxinia. But, if there is deformation and thickening of the leaves turned down, dried tops of the shoots, wilted buds, then these are all clear signs of their presence on a houseplant.
Thrips. They can be found on gloxinia by light dots, spots that have appeared on its leaves. If not removed, they will dry out. In order not to destroy the houseplant, it is necessary to transplant, replacing the soil and treating the home flower with insecticides.
To avoid damage or death of gloxinia as a result of damage by pests or diseases, it is necessary to carefully examine the flower for damage and timely recognize the cause of their appearance.
Problems with growing gloxinia and their solution
The following phenomena also happen:
-
 If the leaves turn yellow and fall off, then too frequent watering or a lack of nitrogen is possible.
 - If the leaves curl up, there is a lack of humidity in the room. This problem can be solved by placing a container of water next to the house plant.
- If the leaves curl up and small pedicels form and the flowers hide under the leaves, then the room humidity is very high.
- When deep notches appear on the edge of the leaves, you need to fertilize with 2% boric solution.
- If during the growing season the leaves begin to darken and become lethargic, it means that the tuberous rhizome begins to rot from excessively abundant watering.
- If the leaves of the plant begin to wither in the fall, this is just preparation for the dormant period, you should not worry about this.
- If gloxinia does not bloom, then the reason for this may be a lack of light, a low room temperature, an excess of nitrogen.
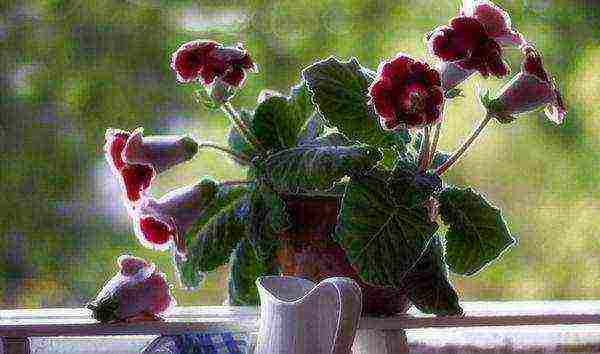
Sinningia can be safely called a rather unpretentious home flower. Caring for gloxinia at home is quite simple, but there are some features that flower growers need to observe. And with due attention, flowering gloxinia will scent on the windowsill of any living space.
Gloxinia care at home
 The velvety leaves and large bell flowers of gloxinia are loved by many growers. And with the current abundance of varieties and hybrids, it is doubly offensive when, due to mistakes or lack of care at home, gloxinia blooms little and irregularly, and sometimes just dies.
How to succeed in growing as a home plant? How to care for gloxinia at home so that the culture stably pleases the grower with powerful foliage and lush caps of bright colors?
Lighting conditions for growing and caring for gloxinia
Like all members of the family, home gloxinia loves an abundance of light, but direct sunlight does not have the best effect on the condition of the plant. Quite dense pubescent moldings can wither, flowers wither much ahead of time. Therefore, caring for gloxinia, they choose a place for it according to the season and climatic zone.
 For example, in spring the flower grows beautifully and picks up color on the south window, but on summer days and at the peak of flowering, it will need shading here. In the heat, it is optimal to put the pots with gloxinia on the eastern or even western windows, where the maximum intensity of the sun appears only in the evening or morning hours.
At the same time, we must not forget that a lack of light when caring for gloxinia threatens:
- stretching internodes;
- loss of foliage decorativeness;
- a decrease in the quality of flowering or a complete rejection of the formation of buds;
- pallor of foliage and blooming flowers.
To make the plant comfortable in the created conditions, it is provided with a day of light lasting 12-14 hours.
It is especially important to observe this rule during the period when the tuber has just rooted and leaves appear above the surface of the substrate. Special lamps for illumination will help in this.
Microclimate for the care and cultivation of gloxinia
 Tuber rooting takes place at a temperature of 24–25 ° C. When gloxinia forms the first leaves, the temperature is lowered to 22 ° C during the day.
Night air can be up to 4–5 ° C cooler. If the room is hotter, and the plant lacks light, which often happens when the buds are set at the end of winter, even with proper care, gloxinia stretches out, losing some of its decorative effect, flowers and leaves on long petioles become smaller.
The lower temperature limit for gloxinia is 18 ° C. In colder air, the plant slows down the growing season, and if you do not adjust the care of gloxinia at home in time, it can die. A prolonged increase in temperature above 28 ° C is just as detrimental to the plant during the growing season and flowering.
In addition to the temperature regime in the room, gloxinia is important for air humidity in the range of 60-80%. Discomfort associated with excessive dryness of the air is indicated by folded down, slightly tucked leaf plates.
 How to care for gloxinia if the room is heated and the air humidity is much lower than the recommended values? The pubescent leaves of the plant do not tolerate spraying, often used to humidify the air. Therefore, in this case, it is better to put the pots of plants on wet expanded clay or use household humidifiers.
If irrigation of the crown is necessary, it is better to do it in the bathroom at night, so that in a closed dark room the leaves dry out and the gloxinia gets completely dry on the window.
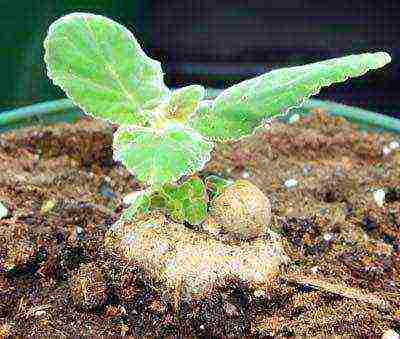
Planting and caring for gloxinia tuber
Depending on the storage conditions, the gloxinia tuber starts to grow from February to March. At this time, it is important:
- get it out of last year's substrate, clean it from the remnants of old roots and soil;
- hold for half an hour with a slightly pink solution of potassium permanganate or treat with any available systemic fungicide;
- immerse in a solution of heteroauxin or other growth stimulant for 12-24 hours so that the growth point in the depression is not exposed to the drug.
 Most often, it is at the planting stage and during the subsequent, as in the photo, caring for gloxinia at home, the greatest risk of losing tubers appears. This happens due to their decay. Therefore, in the pot, drainage must be done with a thickness of at least 3-4 cm, and the tuber itself is sprinkled with soil no more than a centimeter.
The gloxinia pot is chosen depending on the size of the tuber. For a young specimen, a container with a diameter of 7-9 cm is suitable, and a long-blooming tuber is planted in a pot up to 15 cm wide.
As a substrate, you can recommend a mixture of two parts of leafy soil, the same amount of peat and one share of washed sand. It is useful to sterilize the soil, as well as add a natural antiseptic to it, for example, a little crushed coal or sphagnum.
The planted tuber is covered with a film or bag and placed in a warm place in a well-lit place. In such a shelter, the plant remains for several days, during which, in addition to regular airing, special care for gloxinia at home is not required.
Watering regime for caring for gloxinia at home
Watering when caring for gloxinia and growing it from a tuber is best done through a pan or along the very edge of the pot.
It is extremely dangerous if moisture gets on the core of the tuber, or on young, fragile foliage. The sun can cause permanent burns, and the cool air combined with water leads to pockets of rot.
 Water for irrigation should be separated and 2-3 ° C warmer than indoor air. When moisture is absorbed into the soil, after half an hour, its remnants are removed from the pan under the pot.
The interval between watering is selected in such a way that during the passing time the clod of soil is almost dried out. At the same time, with a cold snap or a long period of rains, it is much less common to moisturize the substrate when caring for a gloxinia flower at home.
Top dressing when caring for gloxinia
Rapid foliage growth and lush bloom are impossible without additional support. Gloxinia is alternately fed with organic and mineral fertilizers every two weeks. It is best to carry out this procedure in the evening or during the day, as well as in cloudy weather, so that the sun does not damage the growth zone and foliage of the plant.
 Before the appearance of buds, in addition to organic matter, the plant needs nitrogen, which stimulates the growth of green mass. But after the formation of buds, the ingress of nitrogen into the soil is limited and they switch to phosphorus-potassium fertilizing. They enhance flowering, and trace elements help maintain a high decorative effect of plants.
When the mass flowering is completed, as part of the regular care of gloxinia, after two weeks, fertilize twice with a potassium-phosphorus agent. This measure will help the tuber prepare for hibernation.
Gloxinia care during rest
 The end of the growing season of gloxinia falls in mid-autumn.
When the aerial part dies off, the tuber gradually goes into a state of "hibernation", ceasing to develop and consume moisture. At this time, it is important to first reduce and then completely stop watering.
For the entire rest period, as in the photo, gloxinia care at home is changing. First of all, it is important to ensure safe storage of the tuber. This is done in one of two ways:
- the pot is transferred to a cool room, where the air is no warmer than 10–15 ° C, and is sometimes humidified to prevent the tubers from drying out;
- after the foliage dies off, the tubers are removed from the soil, cleaned and sprinkled with sand or sawdust and placed in the cold.
In the second case, the storage temperature of gloxinia tubers is 5–8 ° C, and the substrate in which they are located must be dry or barely damp, otherwise the appearance of rot and mold cannot be avoided. This storage method is convenient in that the planting material does not take up much space, and caring for gloxinia is reduced to examining dormant tubers.
Gloxinia growing and caring videos
Some plants get their names from the names of the people who studied and described them. Why are there plants, because even America was named after the famous navigator (although it was discovered by Columbus). This is how gloxinia got one name - gloxinia (Latin Gloxinia), after the name of a scientist who studied botany in Alsace - Benjamin Peter Gloxin, and another - sinningia (Latin Sinningia) - on behalf of Wilhelm Sinning, the man who laid the foundation for selection and hybridization this flower.
It is to him that we are grateful for the appearance of homemade gloxinia and its many varieties (however, the second name did not acquire widespread use, did not take root).
Gloxinia is native to America (its southern and central parts), where 25 species of this perennial herb, or even a shrub, are found. Its habitat is tropical deciduous forests or river floodplains.
Gloxinia description
Gloxinia is from the Gesneriaceae family. This perennial tuberous plant has a short, dense stem, oval, fleecy leaves of a dark green color, located horizontally. It throws out an elongated peduncle with many buds. The flower is bell-shaped.
The color is very diverse: white, all shades of pink and red, blue and blue, purple and lilac. Often, shades are mixed in one flower. Petals are simple and double. All this diversity can be seen in many gloxinia hybrids. Modern varieties are bred on the basis of only two species - the royal gloxinia, and also the beautiful gloxinia.
Gloxinia care at home
Gloxinia during flowering How to breed gloxinia Gloxinia from a leaf photo
The only thing you have to worry about right away is the extension of daylight hours. The lighting requirements are simple - bright diffused light for 12-14 hours. If you place it on the windowsill, then during the day you need to shade the flowerpot, and with the onset of dusk, turn on the fluorescent lamp above the plant. Gloxinia leaves will immediately show you whether there is enough illumination for the flower - if the leaves are located horizontally, then yes, if you stretch up to the light, then no.
The choice of a permanent location is also important:
- you need enough space.
- not at the intersection of air flows in the apartment.
With regard to air humidity, then, given the tropical origin of gloxinia, it should be high. In this case, the leaves and flowers deteriorate from the ingress of moisture drops, so we increase the humidity by spraying water around the flowerpot, or put the pot on a tray of water on bottle corks or expanded clay (the main thing is that the water does not reach the bottom of the pot). Here you can create compositions to your taste: from floating flowers to rockeries.
Watering should be done in such a way that neither leaves nor flowers get wet.... It is possible to water through the pallet.Let's first check the soil in the flowerpot - the top layer must definitely dry out, then pour it with warm, settled water (a couple of degrees warmer than room water - well, I like it like gloxinia). From the end of summer to October, we take long breaks in watering - after all, the plant is going to rest.
We were lucky with the temperature regime - no special conditions during the growing season. During the dormant period - about 10˚ C. If the temperature is critical, then gloxinia will tell you: the leaves curl up - very hot, down - cold.
Watching the beautiful gloxinia with her bouquet of "gramophones", I just want to help her, feed her. Of course, this should be done regularly - once every 10-15 days. Just remember that an excess of fertilizer is more destructive for gloxinia than a lack of it. Use a complex fertilizer for flowering plants during the entire flowering period and stop feeding before dormancy.
Young gloxinia do not need rest, since they may not wake up in the spring, therefore, feeding is carried out all winter, forcing the gloxinia to bloom and not giving the opportunity to fall asleep.
Sometimes, more often in summer, deep notches appear on the edges of gloxinia leaves - this is how gloxinia signals a lack of boron. It's easy to help here. Need foliar feeding with 0.02% borax solution.
Growing periods
May-June is the period of the first flowering of gloxinia.... Sometimes this period lasts all summer, but when there is a clear break, cut off the spent peduncles and upper leaves. Only 2-4 lower leaves remain on the plant. It is useful to apply nitrogenous fertilizers, as stepchildren will begin to appear in the sinuses. Pinch, leaving only the strongest ones.
After a while, the gloxinia will bloom again - it's time to feed again with complex fertilizers for flowering plants. But when the flowering has clearly come to an end, we reduce watering, the flower withers, dries up - it goes into hibernation. We cut off all the tops, leaving a couple of centimeters above the surface, and put the pot in the cellar, under the bath, any cool place where it will not interfere with us, but we will not forget to water it once a month.
There is another way of wintering.... It is necessary to shake the tubers out of the soil, place them together with the mixture of the substrate in half with vermiculite in a plastic bag with a lock and store in the lower drawer of the refrigerator. So in general, you can not remember about gloxinia until spring.
Tiny plants that have emerged from seeds are not sent into hibernation, but are watered little by little all winter.
Planting gloxinia
How to plant gloxinia photo
When the dormant period comes to an end, you need to plant or transplant gloxinia. It should be remembered that gloxinia tubers grow more in width than in depth, so choose a pot wider, not deeper. Suitable substrate for begonias or violets.
You can make a soil mixture yourself:
- leaf land - 2 parts;
- sod land - 1 part;
- humus - 1 part;
- sand - 1 part.
Before planting, it is recommended to sterilize the soil (in a water bath with a closed lid for about 1.5 hours).
Landing rules are usual:
- form expanded clay drainage at the bottom of the pot
- pour in the substrate
- plant a tuber or a lump of earth with a tuber, sprinkle with a substrate from the sides and top.
- The tuber is buried in the soil only half of its height - this is important.
- Watering around - it's done!
Reproduction of gloxinia by vegetative methods
Most growers prefer vegetative propagation methods, considering them simpler and more reliable. You can propagate:
- sheet;
- part of the sheet;
- leafy cuttings;
- peduncle;
- stepchildren;
- tubers.
Reproduction of gloxinia leaf
How to propagate gloxinia with a photo sheet
- For reproduction by a leaf, the smallest leaf is taken, put in water until the roots appear.
- You can dip it into the root and put it in a pot under a jar.
- The greenhouse is cleaned after the appearance of young leaves.
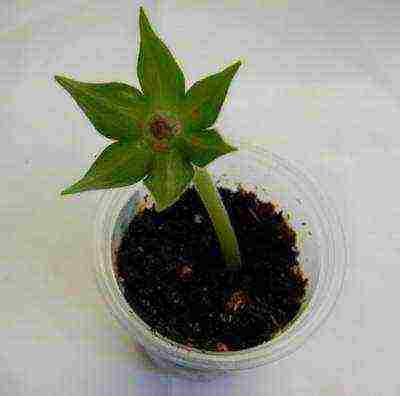
Reproduction by part of a leaf
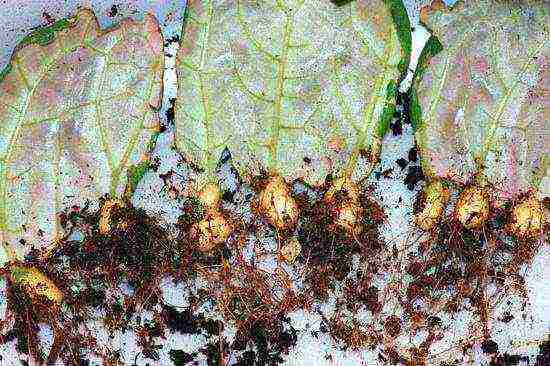
How to propagate gloxinia with sheets Gloxinia photo reproduction by a leaf
- Part of a large leaf is obtained by cutting a good, healthy leaf with a very sharp knife.
- We place this planting material in a greenhouse (under a film or a jar) in moist soil.
- We place the greenhouse in a warm, bright place and do not disturb it for a month.
- After this period, we accustom the plants to the environment, very carefully, opening the greenhouse at first for a short time, and then increasing the time.
Reproduction of gloxinia by a leaf: you can cut even this way
- From each part of the leaf, planted in the substrate, a whole colony of children usually grows, which must be carefully planted.
- To prevent the planting material from becoming infected with any of the fungi, periodically water the seedlings with a very weak solution of potassium permanganate.
- Young seedlings are prone to black leg disease, so use sterile soil.
Reproduction of gloxinia part of the leaf photo of young shoots
Amazing gloxinia is like a violet: as soon as any part of the plant gets into the ground, rooting takes place. It is enough just to moisten the ground and protect the plant from drafts. Greenhouse conditions increase the chances of survival by up to 100%.
Reproduction by petiole, leaf cuttings
Reproduction of gloxinia by leaf cuttings photo
- During the budding period, a leaf on a long petiole (about 4 cm) is cut off from gloxinia.
- A leaf stalk can be placed in water, it will willingly take root in water if it is boiled, and the temperature is about 24 ° C.
- Do not forget about good lighting that the plant needs to actively form new shoots.
- After a month, gloxinia from the petiole will begin to form tubers.
Reproduction by peduncles and stepchildren
Reproduction of gloxinia peduncles photo
For planting and rooting, peduncles are used, which have already fulfilled their function, and strong stepsons, who turned out to be superfluous when pinched. We do with them in the same way as with the leaves.
Reproduction of gloxinia tubers
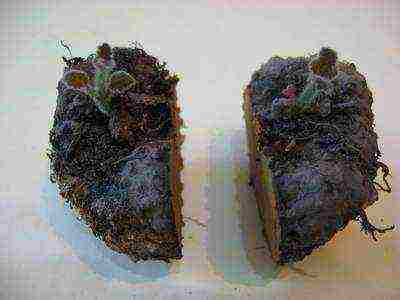
Reproduction of gloxinia by dividing a tuber photo
The most painful of vegetative methods is tuber propagation.
- The tuber must be cut into pieces in the usual way - there should be a kidney on each section.
- Carry out the "operation" with a disinfected instrument and treat the sections with crushed charcoal.
- Plant the tubers as usual, but very carefully monitor the soil moisture - do not overflow or dry out.
The vegetative method is good when you propagate your plants, or took planting material from friends and acquaintances with gloxinia, already accustomed to home conditions. Plants brought from nurseries - donated or bought - often turn out to be a lottery. It may or may not take root. Therefore, experienced growers advise not to be lazy and grow gloxinia from seeds. Such a plant initially gets used to the conditions of your apartment.
How to grow gloxinia from seeds
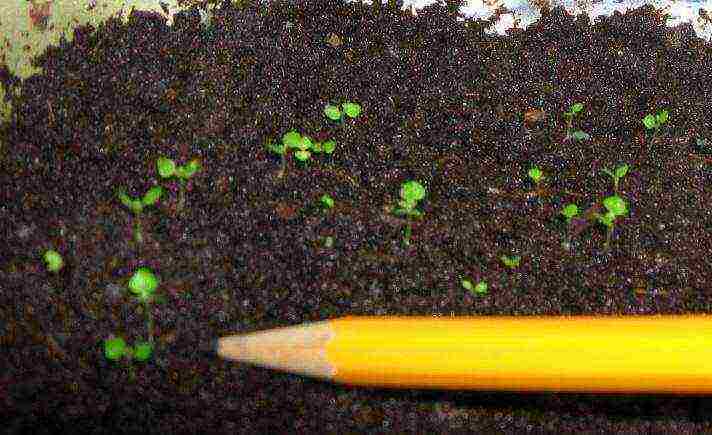
Growing gloxinia from seeds
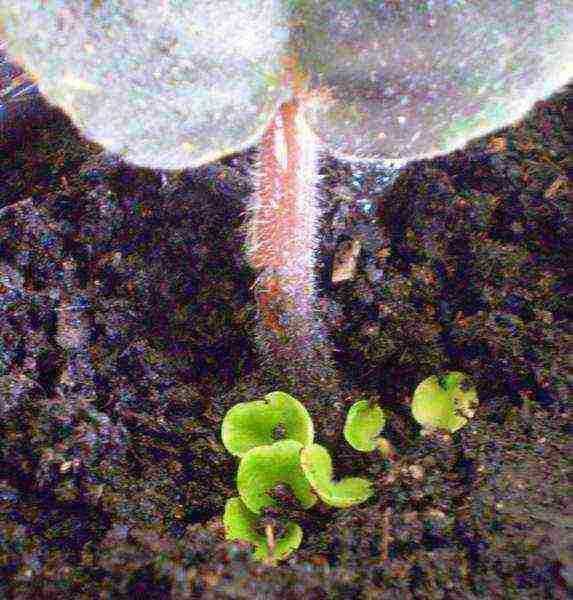
Gloxinia seeds are microscopic, so they are sold in granular form.
- In March, we will prepare a greenhouse - a container with a lid, where ventilation holes are made.
- Soak the peat tablets, put them on the bottom of the container, and put a gloxinia seed on top of each.
- You can also sow in a substrate for begonias in a common container, but then there will be a need for picking, decide for yourself what to do.
- Choose a warm (23 ° C) and lighted place for the container. We moisten the peat for two weeks and wait for the appearance of a thin sprout.
Gloxinia from seeds at home photo seedlings
- When two true leaves appear, we transplant them into individual containers along with a peat tablet (or carefully dive the seedlings with a clod of earth, using a teaspoon or other small object).
- Later, when the plant gets stronger, we will transplant it into a pot, we will feed it a little bit with fertilizers for green plants. True, if you overdo it, then the plant may not bloom.
- Six months later, gloxinia grown from seeds will throw out the buds. Unfortunately, they must be removed - the procedure is necessary for the proper development of the plant.
Gloxinia diseases and pests
Gray rot - flowers and leaves are covered with brown spots. It is necessary to carefully remove all damaged areas and treat the flower with a fungicide.
Root rot - the plant rots from the root and dies. This is a consequence of regular overflow or watering with cold water.
For the prophylactic treatment of gloxinia from these diseases, phytosporin can be used. It will also help prevent powdery mildew, late blight, black leg and fungal diseases. Use foundationol to treat these diseases.
Gloxinia infected with a virus photo
Viruses - diseases that are rapidly destroying healthy plants. The leaves are covered with dead spots, which grow rapidly and affect an ever larger area. If you notice signs of viral diseases on gloxinia, you should urgently get rid of the diseased specimens and disinfect all healthy plants with fungicides.

Necrotic virus on gloxinia photo
Viral diseases are very dangerous, you do not need to feel sorry for one plant, otherwise absolutely everything will die. After the diseased plants are thrown away, wet cleaning with disinfectants and mandatory treatment of the remaining plants with fungicides are needed.
Of the pests, spider mites and cyclamen mites, as well as thrips, can be dangerous
The defeat of gloxinia with a cyclamen tick photo
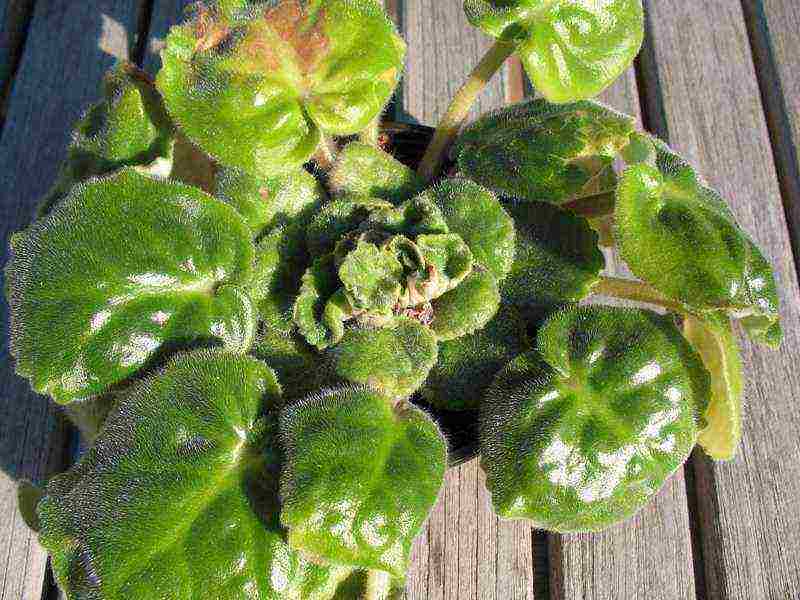
Signal that gloxinia is infected with a cyclamen tick, there will be a deformation of the plant: the stems are twisted, the leaves are wrapped, the buds wither, the shoots dry up. This is how we learn about this pests, because we will not be able to see it: even a large accumulation of mites looks like a layer of dust on the back of a leaf.
If there are no damaged parts left on the gloxinia, then there is a chance to save the plant if you carefully remove all infected leaves and keep the flower completely in hot water (45 ° C) for a quarter of an hour. After such a procedure, gloxinia is set aside in a shady place for a couple of days to rest.
Fighting ticks with insecticides is difficult:
- ticks are not insects;
- quickly get used to a certain type of insecticide and must be changed regularly;
- processing should be carried out at intervals of 10 days;
- it is necessary to choose an insecticide that affects the eggs of ticks, because they remain viable for more than one year.
The use of chemicals in residential premises is strictly prohibited.
With a spider mite, a similar situation. The mite sucks out the juices of the plant, leaving white dots on the leaf plate. Later, they turn into brown spots, and then cobwebs appear.
From folk ways the easiest way is to apply the treatment with tobacco dust or garlic infusion (0.5 kg of garlic is insisted for 5 days in three liters of warm water). Such treatments are carried out several times in a row.
The defeat of gloxinia with thrips photo
Thrips infestation is also seen on leaves.: Dry spots and streaks appear, and the healthy part of the leaf turns silvery. Thrips are hiding in the ground, so they cannot cope with them without replacing the substrate; it is also necessary to add insecticide treatment to tubers, window sills, windows.
A hopeless case is nematode infestation - the plant will have to be thrown away so that it does not turn out to be a source of disease for neighboring plants.
Consequences of improper care:
- the leaves turned dark blue, lethargic - a lot of fertilizers;
- leaves curl - draft, cold air, excess nitrogen fertilizers, or dry and hot air;
- the leaf has a short petiole, again the leaf is curled, the flowers hide under the leaves - high humidity;
- leaves turn yellow and fall off - overflow or insufficient amount of nitrogenous fertilizers;
- the edges of the foliage are dry - sunburn;
- gloxinia does not bloom - an excess of nitrogen, which helps the growth of greenery, but slows down flowering, another reason may be poor lighting or low temperature;
- the buds do not open for a long time - a cold draft;
- gloxinia does not give an increase - soil depletion or low temperature;
- the flower stopped developing, a reddish tint appeared - a lack of phosphorus.
If you follow the simple rules for caring for gloxinia, you will admire the beautiful flowers for up to six months. Gloxinia is a very peculiar flower, sometimes unnecessary care efforts lead to the opposite result, so sometimes you can forget about care and just enjoy the beauty.
Varieties of indoor gloxinia with photos and descriptions
If we talk about the classification of gloxinia, then they are divided into several groups according to individual characteristics.
To size:
- microminiature - up to 5 cm,
- miniature - 5 - 12 cm,
- compact - 12 - 25 cm,
- standard - above 25 m;
By the type of flower petals:
- simple inflorescences,
- terry;
By color of flowers:
- uniform color,
- calico (according to the main tone, a small pattern of specks of the same size, but of a different color),
- brindle (on a petal of one color there are spots of another, or maybe a strip along the edge).
At the same time, breeders are experimenting with breeding new hybrids, since gloxinia is easily re-pollinated and is fertile ground for such work.
Here are examples of some interesting varieties.
Terry varieties:
Gloxinia avanti terry flowering photo How to grow and propagate gloxinia
Avanti - a whole group of compact gloxinia is distinguished by friendly flowering, very bright and varied colors, both a one-color composition and a mix of different colors look beautiful.
Gloxinia Hollywood photo Growing at home
Hollywood - standard gloxinia (about 30 cm) stands out in one color range - from light purple to bluish black, a very effective flower.
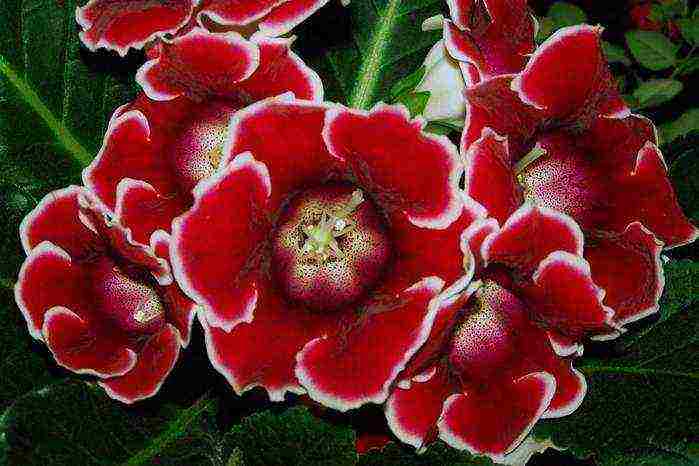
Gloxinia brocado photo Care and cultivation at home
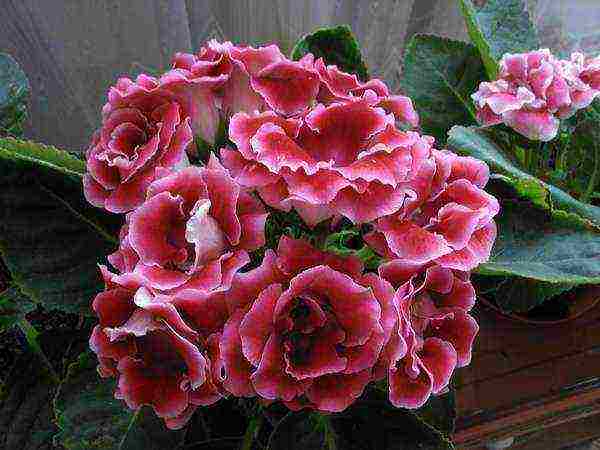
Brocada - a representative of Japanese selection, flowers of blue and red colors with a clear edging along the edge of the petal. It attracts flower growers with a long flowering period and the simultaneous flowering of a whole cap of flowers, which seem simply huge against the background of medium-sized leaves.
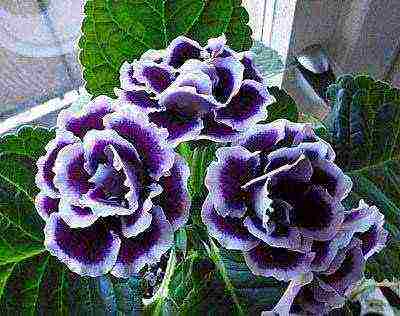
Gloxinia Madame Butterfly Care and Reproduction
Madame Butterfly - lilac-purple flowers of increased doubleness, a very beautiful bunch.
Gloxinia Madame Margaret photo Planting and care What to do after flowering
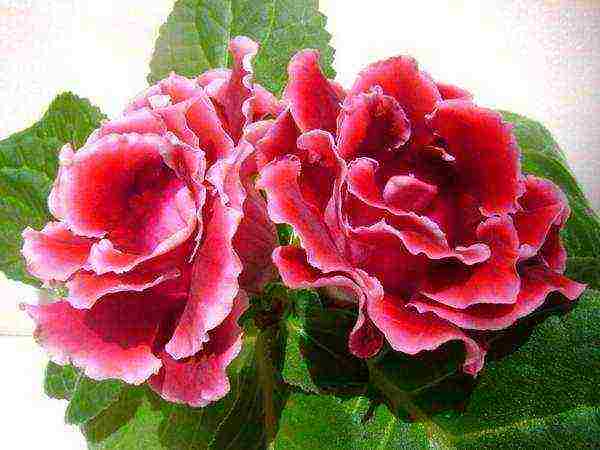
Madame Margaret - pink-crimson inflorescences, large.
Gloxinia Gregor Mendel photo How to grow and propagate How to root Gloxinia photo
Gregory Mendel - solid flowers are more like a rose - light red with a white border;
Gloxinia Sambalina photo Popular varieties with names and photos
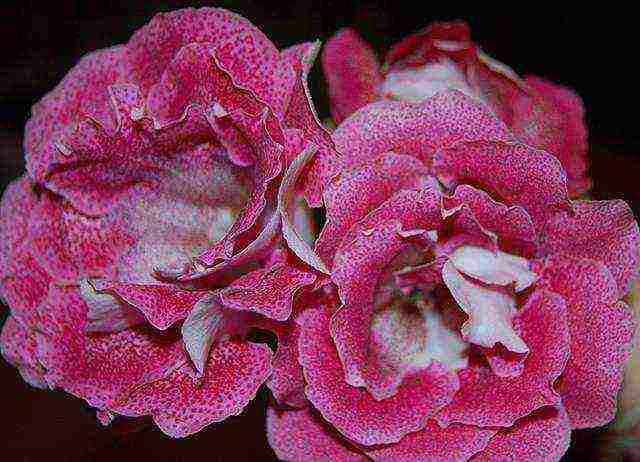
Sambalina - brindle color, pink spots and stains on a light background, very gentle;
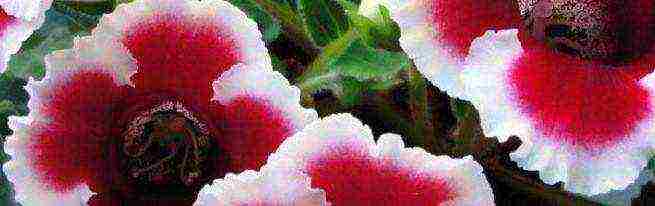
Gloxinia winter cherry Indoor flowers Gloxinia cultivation and care
Winter cherry - snow-white gloxinia with large red spots, like cherries in the snow;

Gloxinia Madonna photo Growing gloxinia at home
Madonna - rare color of gloxinia - white, compact bush.
Gloxinia with simple inflorescences:

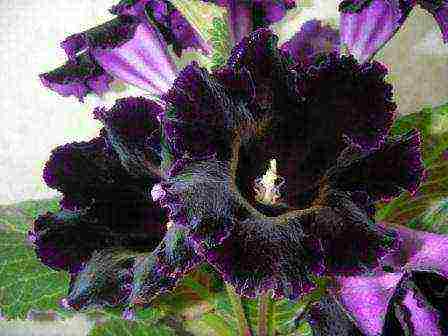
Gloxinia Kaiser Wilhelm photo Reproduction of gloxinia leaf photo step by step recipe
Kaiser Wilhelm and Kaiser Friedrich - varieties with black-purple and deep burgundy flowers with a snow-white edge of the petals. Differs in lush flowering and unpretentious care;
Gloxinia speckled photo How gloxinia reproduces
Speckled - surprisingly high gloxinia (maybe 60 cm). She even has colored leaves - the lower part of a reddish hue, cuttings with small specks, and flower petals are presented in any of the shades of white-red or lilac-purple gamut;
Gloxinia Tiny photo of Gloxinia photos pictures of varieties names
Tiny - I don't even know what its decorative effect may be, because the whole flower is about an inch, and on the peduncles there is one small lilac flower.
Unpretentious varieties
The variety of hybrids is countless, only a few examples are given here, however, in the modern world, I believe, another classification of gloxinia should be introduced: capricious and not. So, we focus on several varieties that do not require additional efforts:
- Prince Albert;
- Kaiser Wilhelm;
- Kaiser Friedrich;
- Chintz Pink;
- Tigrina red;
- Anja Egens ...
It is not difficult to grow gloxinia at home: it is important to simply follow the rules of care and give the plant everything it needs. Then beautiful flowers will certainly decorate your home!
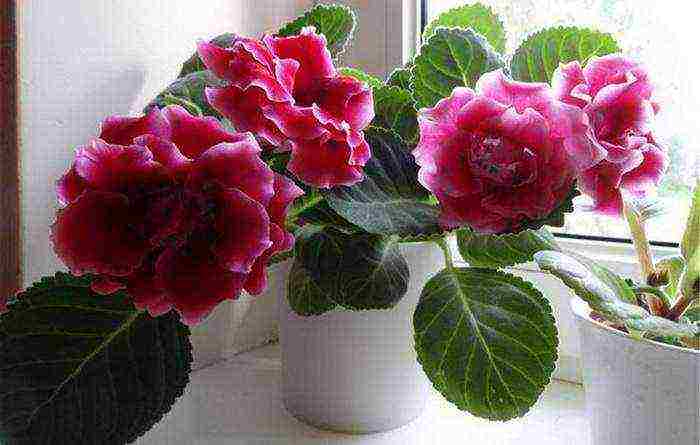
Love to grow beautiful, showy flowers? Then gloxinia is definitely for you. Caring for her at home is not very difficult. You only need to know a few nuances. But the look of her flowers is just gorgeous. This plant is as if created to decorate a home interior.
Getting to know the flower
Gloxinia, she is syningia, belongs to the Gesneriaceae family. The homeland of cultivated varieties grown everywhere is the Andes, the upper Amazon. Here they grow on rocky slopes, sometimes on very steep ones, clinging to them with roots.
What is interesting about the gloxinia flower? Caring for it assumes a dormant period when only the tuber hibernates. This is due to the climate of the places where the Gesneriaceae grow. Humid and warm in summer, dry to moderately cool in winter.
Video about growing and caring for gloxinia
There have been cases when people bought young shiningia plants. They bloomed beautifully, delighting the owners with their appearance, but died out in the fall, preparing for a dry winter, as it should be. However, the owners of exotic flowers, due to lack of information about the physiology of the Gesneriaceae, believed that the plant was dying. And the remnants of the roots - the tubers were thrown away. Imagine the disappointment when it turned out that it was just a hibernation. In order to avoid such mistakes, let us study carefully the home farming techniques of gloxinia.
We create all the conditions
Lighting
It is best grown on windows facing west or southwest. For northern windows, sometimes additional lighting is required, for example, with soft fluorescent lamps, especially in winter. For the southern ones, you will need a slight darkening. Frosted glass works best here.

Gloxinia photo
You can also apply tinted films to windows, such as those used by car enthusiasts. Just pick one that transmits light, just slightly diffuses, and does not suit the twilight in the room. The fact is that the wild relatives of Gloxinia love sparse tropical forests, preferring to avoid both open space, where everything is roasted under the southern sun, and the twilight of the Amazonian Selva.
Watering
Our flowering tuber loves moderation in everything. So irrigation cannot be organized according to the principle: there is never too much water. Watering is necessary based on temperature conditions. In summer, in hot, dry weather, we water more often and more abundantly. In winter, watering is significantly reduced. It is also designed not only to maintain the soil hydrobalance, but also to match the natural conditions. Where cultural gloxinia come from, much more rain falls in hot summers than during a pronounced dormant period in winter. Again, when watering the flowers, make sure that the next watering is done when the topsoil in the pot dries slightly. The plant can tolerate relative dryness, for this it has a reserve of moisture in the tuber. But waterlogging is fraught with the development of putrefactive processes in the tuber and the lower part of the stem.

In the photo gloxinia
Water with water warmer than the ambient temperature. This ensures its better absorption by the root capillaries. Also, make sure the water has a low hardness. Its Ph is preferred to be neutral.If you use tap water, then you need to defend it for some time.
Gloxinia is also demanding on the humidity of the premises. Especially in summer. Spray it every week with a spray bottle.
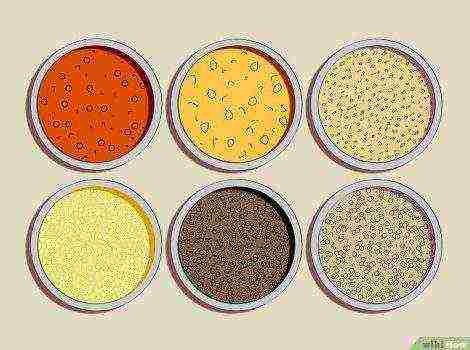
All about the soil
The classic soil composition recommended for shiningia is as follows:
- 2 parts of leaf humus;
- 2 hours meadow chernozem;
- 1 tsp peat;
- 1 tsp of gray river sand.

In the photo, the primer for gloxinia
This composition provides the lightness and nutritional value of the soil. Do not forget to sterilize the soil before planting our tubers there. The sand must be calcined by sprinkling it in a small layer on a sheet in the oven. The soil can be steamed. To do this, pour it into an enamel bucket, fill it with a liter of water, close it with a lid, and put it on low heat. Thus, almost all possible pathogenic microflora, brought by us from fields and forests, perishes.
However, with such a severe heat treatment, most of the useful soil microflora also perishes. The substrate practically becomes lifeless, which is why the applied fertilizers will be absorbed little. For these purposes, we enrich the soil with mixtures of effective microorganisms. These drugs can be bought in a variety of flower shops or ordered. Such organisms colonize your substrate, thereby recreating the natural microflora, but without harmful microbes. This method is costly in terms of time and effort, but extremely effective.
An interesting idea to mix soil with hydroponics. This is very convenient for maintaining a stable soil moisture, helps its greater aeration, assimilation of nutrients. The hydrogel works like a sponge. During watering, it absorbs moisture, swelling. And then, as the surrounding soil dries up, it gradually gives off what it has absorbed. Thus, the roots do not suffer from stressful conditions caused by either strong moisture or excessive drying. It is better to use a hydrogel in German, French or Russian. It is sold as a dry concentrate in the form of fine granules. Take it in large volumes, it is profitable.
One kilogram of dry hydrogel can absorb 300 liters of water.
We dilute it with water, wait a few hours, when it is well saturated. Can be immediately filled with liquid fertilizer complexes. You will end up with jelly-like little pieces. We mix them with soil at the rate of one to two, no more. That's it, our modern substrate is ready. Now you can not be afraid that you will forget to water the plants in time, as the soil will contain an additional source of moisture. Drying with insufficient moisture, the hydrogel shrinks to its original size. But then it immediately recovers, absorbing moisture when it comes in again.

In the photo is a gloxinia flower
How to care for gloxinia in the fall-winter period
Let's start from the end, that is, with preparation for wintering, because this is the most crucial moment in caring for our ward.
The monsoon nature of the natural growing conditions suggests that the plant needs a dormant period every year. It sheds its leaves in the fall, most of the roots die off. Only the tuber remains, due to which the gloxinia survives the winter calm.
Gloxinia care in the fall after active vegetation is as follows:
- Gradually reduce watering to zero. If you are using a hydrogel in your substrate, you can stop watering right away. The remaining moisture will be absorbed from the hydroponics by the roots until its supply is completely depleted.
- We stop feeding at the same time as watering - from mid-September.
- Don't use hydroponics - cut back on watering gradually, you still don't have a cactus.
- The wintering plant is either not removed from the pot, or stored in the lower vegetable compartment of the refrigerator.
The first option is simpler, but not possible in all apartments. Cool, dark closets or insulated cellars that remain relatively cool in winter are best suited for this.Optimal wintering conditions: cool 5-15 ° C, light humidity, darkness.

In the photo gloxinia on the windowsill
The living conditions dictate the following actions to take care of gloxinia:
- From mid-September, we reduce watering, exclude feeding;
- After the leaves dry out, cut it off with a sharp knife, leave it about a centimeter from the ground;
- After two weeks, we take it out of the soil, clean it of lumps of soil, remnants of roots. Put in a bag with slightly damp sand;
- All this, without closing tightly, is placed on the lower shelf of the refrigerator;
- From time to time we take out a bag of tubers, check for festering, moisten as needed. We store in this way until spring.
- Found putrefactive processes, carefully cut to healthy tissue. The cut site must be disinfected, preferably with crushed charcoal. We let it dry slightly, after which we again send it to winter.
- Our tubers wake up in the spring from late February to mid-April.

Gloxinia photo
Care after waking up from winter sleep
So, the beginning of the growing season. When shoots have appeared, remove, clean from sand, rinse the tubers under running water. You can make them a short-term bath from a weak solution of potassium permanganate. Especially if there was rotting or rotting in winter or you are planting a purchased tuber for the first time, then such a dressing is required. Use drugs containing fludioxonil.
We prepare the above described substrate. We pour expanded clay, soil. We fill half of the pot. We put the tuber in the center. We fall asleep so that the place where the sprouts came from looks out above the surface. This will prevent decay. Subsequently, we add earth so that the tuber is completely hidden under the ground.
Water often, but in moderation. After two to three weeks from planting, we begin to feed. Gloxinia differs little from other flowers in terms of preference for fertilizers. It responds well to nitrogen compounds with growth.
Basic feeding:
- Before flowering, we give mainly nitrogen, alternating with small doses of potash and phosphorus compounds.
- Shortly before and during flowering, we increase the dose of phosphorus, decreasing the nitrogen. Phosphorus contributes to the good development of peduncles.
- After the first flowering, we focus on potash fertilizers. They help the tuber to ripen better, to stock up on nutrients.

Fertilizer photos
In addition to the main ones, we give complex microelements. It is better to fertilize more often using a weaker concentration of fertilizers. About twice a month. Do not water dry soil. This can cause root burns. So we fertilize after watering.
We monitor the temperature regime. In summer, gloxinia loves warmth, But it does not tolerate heat and stuffiness well. Loves airing, but is intolerant of drafts. The most optimal temperature for the spring-summer growth of Siningia is +25 degrees.
House air is often too dry for flowers in summer. It can also depress flowers. We spray them in the evening or when the sun goes to the other side of the house. We use warm, about forty degrees, water. It is advisable that the spray gun sprays moisture like fog, and not pour out in small streams.
If you follow these rules, shiningia will delight you with healthy green leaves and lush flowers. However, sometimes it happens that the leaves begin to turn pale, turn yellow. This is chlorosis - a lack of chlorophyll. Its reasons may be different. It can be caused by insufficient supply of micronutrients to the roots or have an infectious cause. We get rid of it by spraying and watering the plant with a 2% solution of ferrous sulfate. Much less often plants are affected by fungal diseases and parasites. They are easily treated with fungicides and insecticides. It is worth noting that the preventive treatment of the substrate by sterilization and the tubers by soaking in potassium permanganate practically negates the possibility of such an infection.

In the photo, gloxinia on the window
Follow the above guidelines and your gloxinia bush will bloom soon.
Bloom
Flowers are the main decorative value. From the beginning of growth, green shoots develop from overwintered tubers until mid-May, and a peduncle is laid. Usually flowering is long, long lasting. But it happens that by the end of June, gloxinia has faded. What to do to get the plant to bloom again. Indeed, before the rest period is even more than three months.
After the flowers wither, cut the stem slightly above the first pair of leaves. We give additional top dressing, increasing the dose of nitrogen fertilizers. This is to stimulate the growth of a new peduncle. After a while, several small shoots begin to grow from the cut site at once. We leave a couple of the strongest ones. They open their buds shortly thereafter. The onset of the second flowering is shorter than that of the first. But the flowers are smaller, less bright.
Gloxinia care video
It often happens that after the first flowering, lateral shoots are formed near the ground. Then we completely cut off the old stem, letting the most powerful grow out of the stepsons. It will bloom very soon.
And there are varieties of gloxinia that bloom twice without any pruning. As well as those that are generally not capable of re-flowering, no matter how you stimulate them to do so. And care for gloxinia after flowering consists in timely watering, spraying, continuation of fertilizing, but already excluding nitrogen fertilizers. Now she is already accumulating strength for winter sleep.
Rate the article:
(3 votes, average: 2 out of 5)