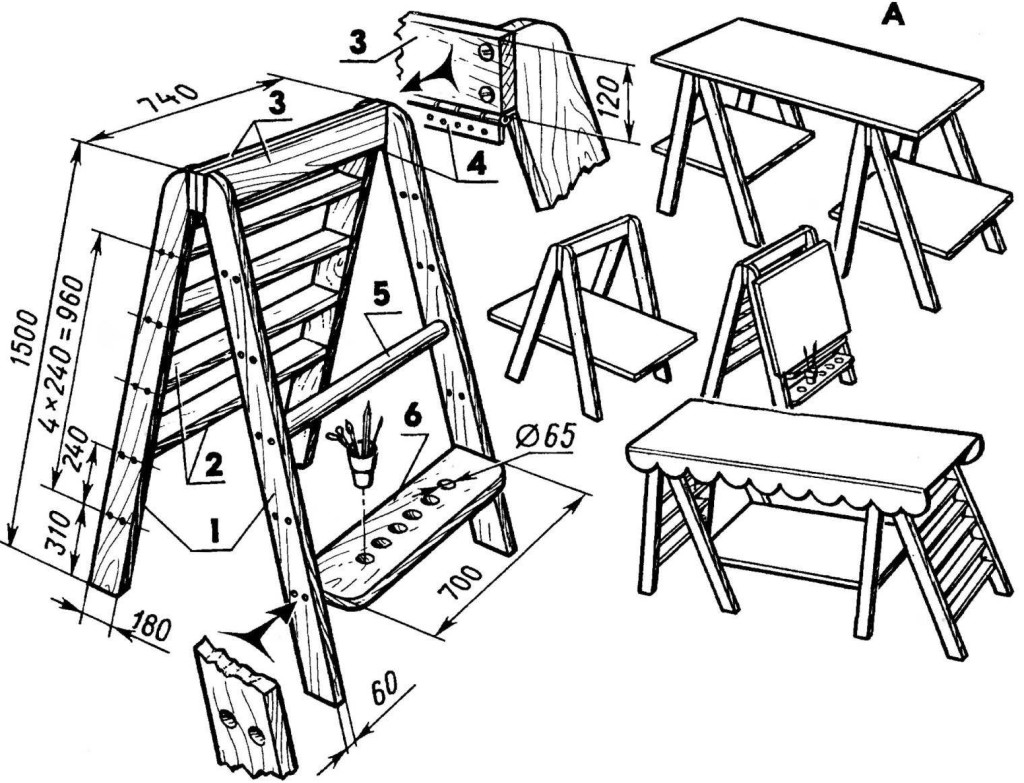
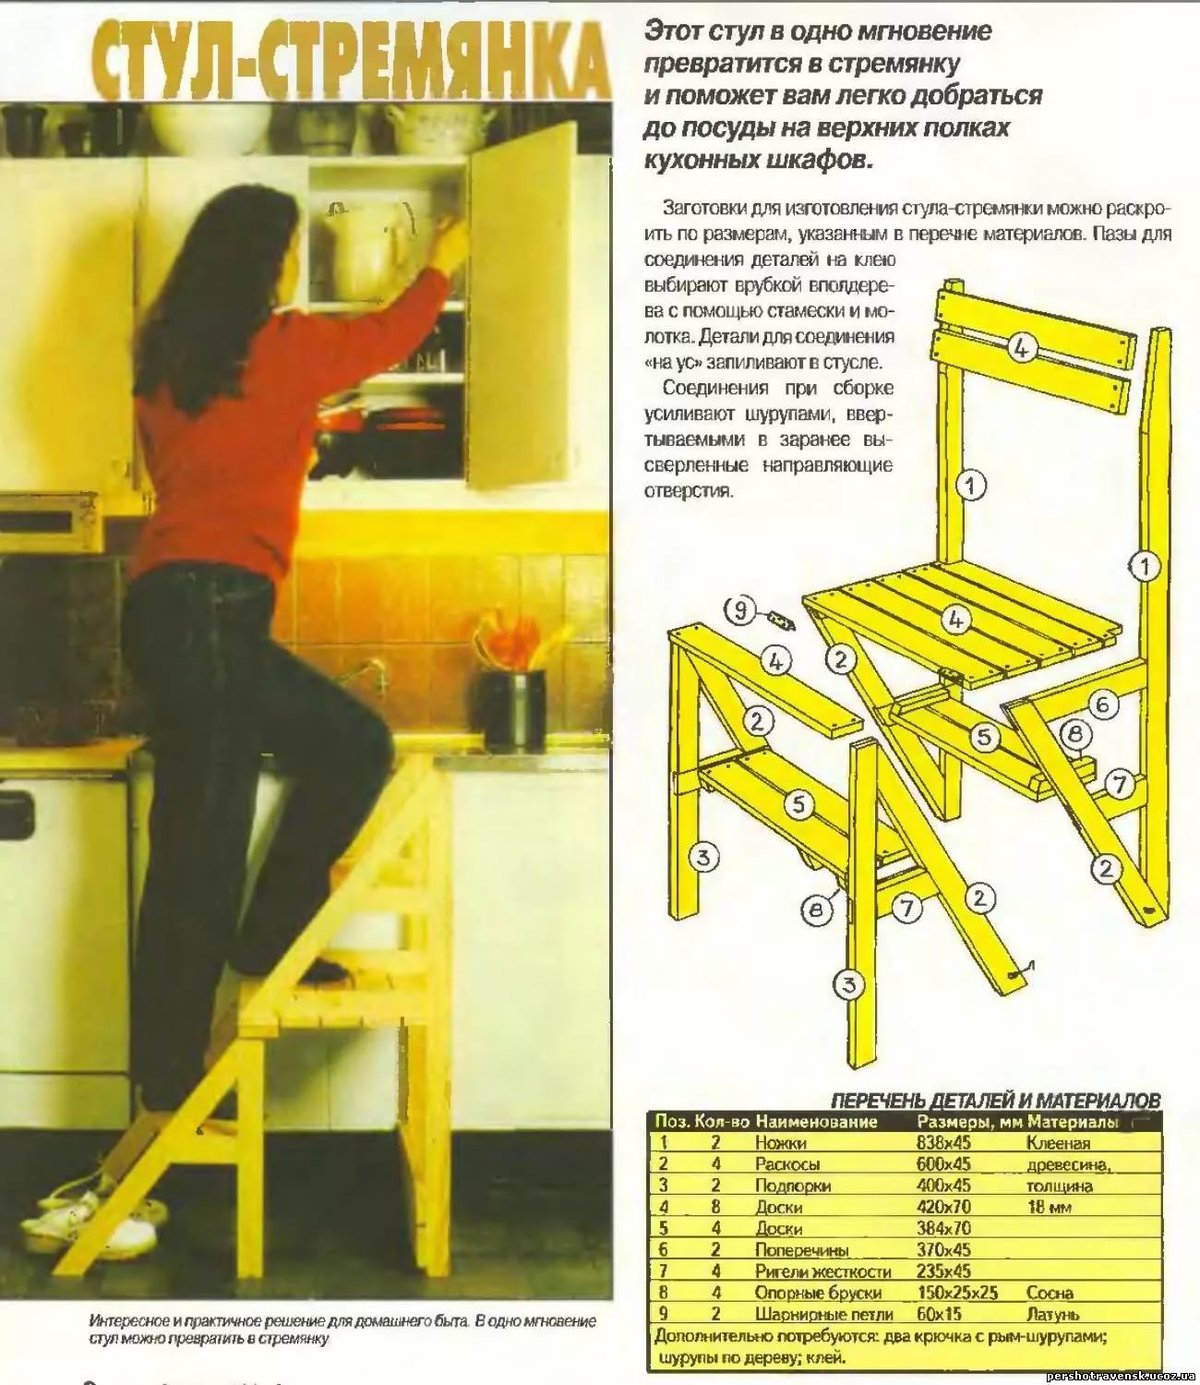
How to make a stepladder from a high stool
The assembly of a high step stool is carried out in three stages:
- Chair making.
- Making steps.
- Assembling the whole structure.
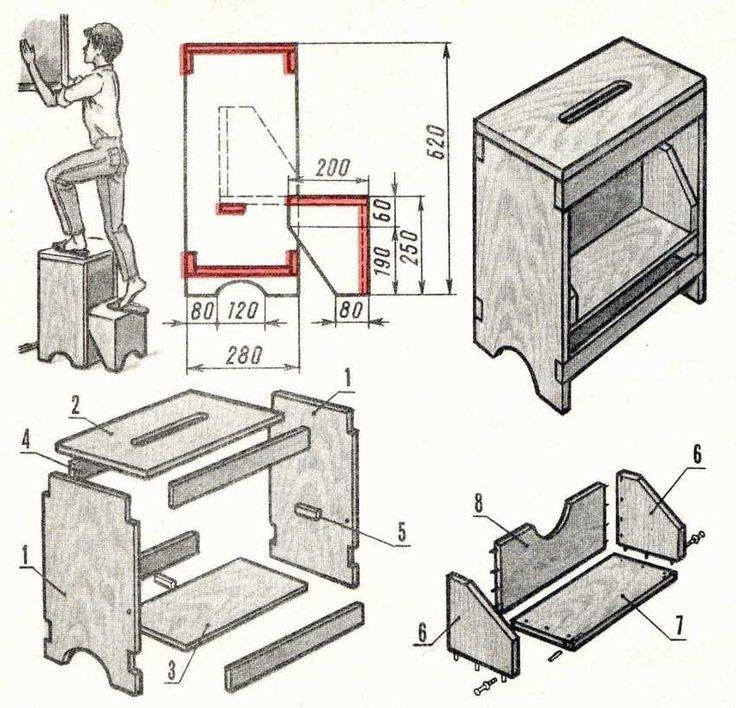
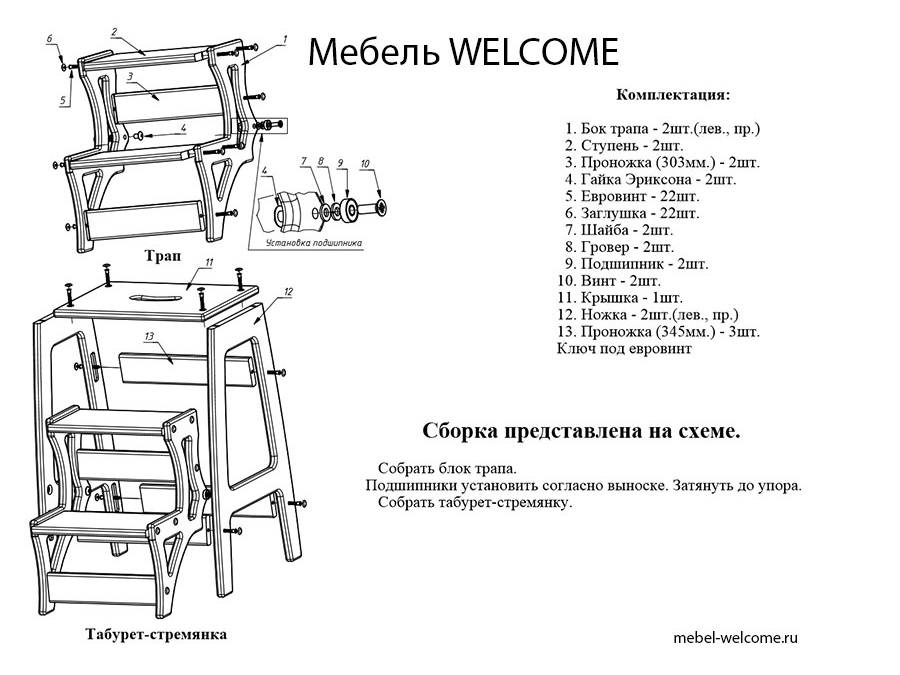
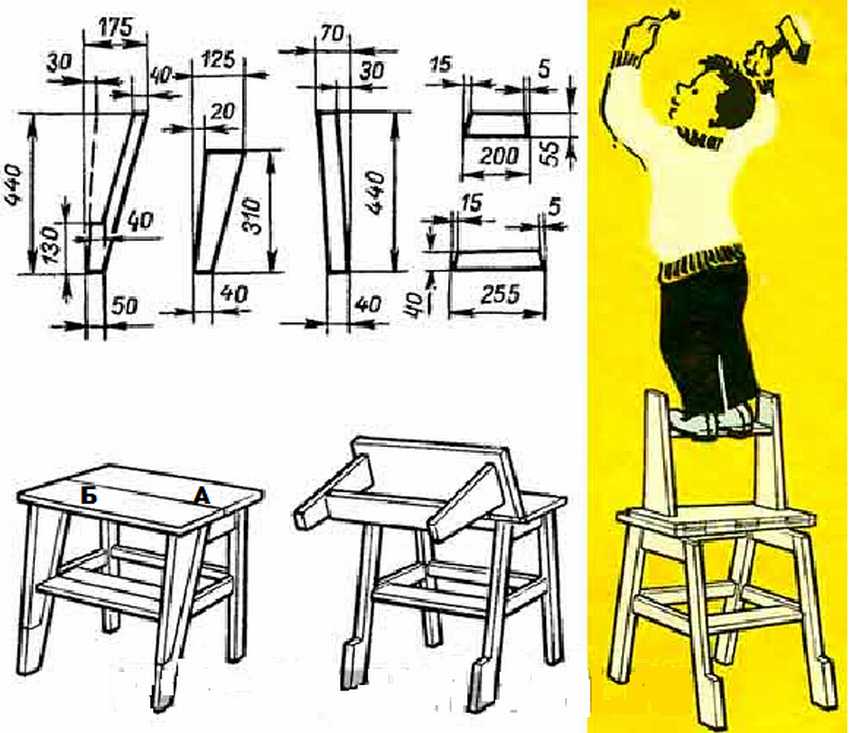
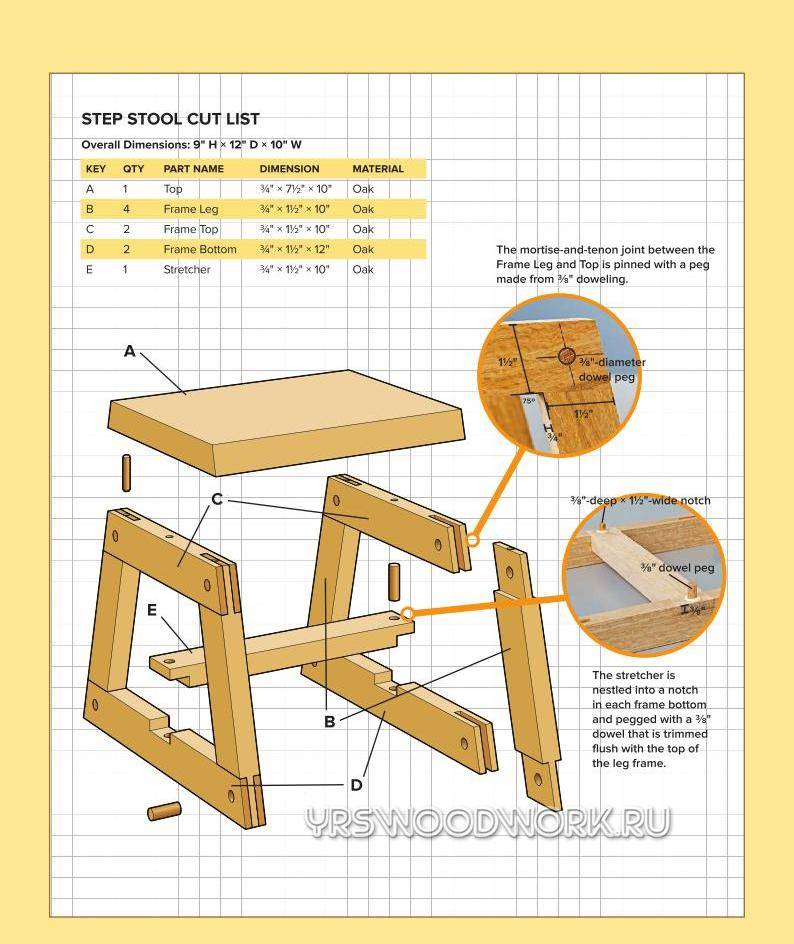
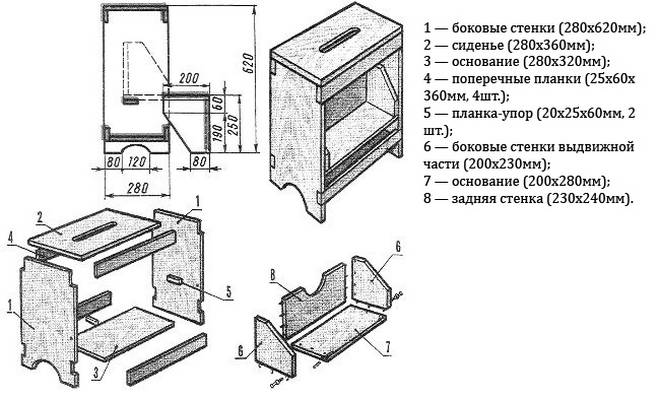
The chair is assembled from:
- four large legs (72.5 × 10 cm, 1.9 cm thick);
- two lower bars (10 × 42 cm, 1.9 cm thick);
- two upper bars (18 x 3.8 cm, 1.9 cm thick);
- drawers: two for the upper part of the structure (34.5 × 12.5 cm, 1.9 cm thick) and one for the bottom (34.5 × 10.5 cm, 1.9 cm thick);
- two plywood overlays for the side parts (30.5 × 25 cm);
- top step (44.5 × 27 cm, 1.9 cm thick).
The steps are assembled from pre-cut blanks:
- medium legs 10x47x1.9 cm in size - 4 pieces;
- crossbar measuring 10x40x1.9 cm - 2 pieces;
- small legs 21.5x10x1.9 cm - 2 pieces;
- drawers for the front part 22x9x1.9 cm - 3 pieces;
- drawers for the back 30 × 10.5 × 1.9 cm - 1 piece;
- steps 18 cm wide, 29.8 cm long - 2 pieces.
The work is carried out in stages, while each part is cut out according to previously prepared measurements, its surface should be smooth:
- To stabilize the structure, the legs should be fixed parallel at an angle of 10 °.
- The cover plate and crossbars from the ends should not diverge.
- When using dowels to assemble the stool structure, it is necessary to cut out the required number of grooves for them.
- The drawers are cut from the ends at an angle of 80 °.
- To ensure that the bottom step fits well with the front legs, two 3.8 × 3.8 cm squares should be cut under it.
- At the junction of the large legs with the upper crossbars, screws are used; in a similar way, the upper step and drawers are fastened.
- The assembly of the middle legs is carried out with dowels with the subsequent fastening of the crossbar.
- Previously made structures are connected to the rear and front side arms.
- The crossbar is screwed to the small legs, the front side bar and the steps are attached.
It remains to fix both blanks into a single structure using a guide. If the trial assembly turned out to be suitable, then you can safely disassemble the product and assemble it already with gluing all the elements. The most tight fit of the parts is achieved with the help of clamps.
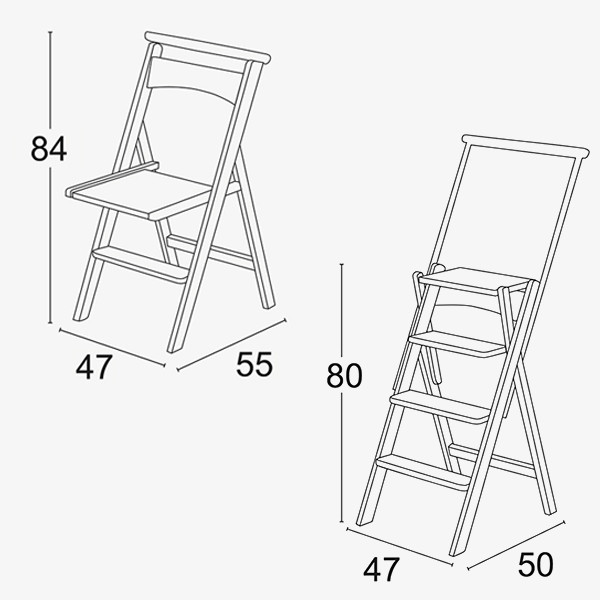
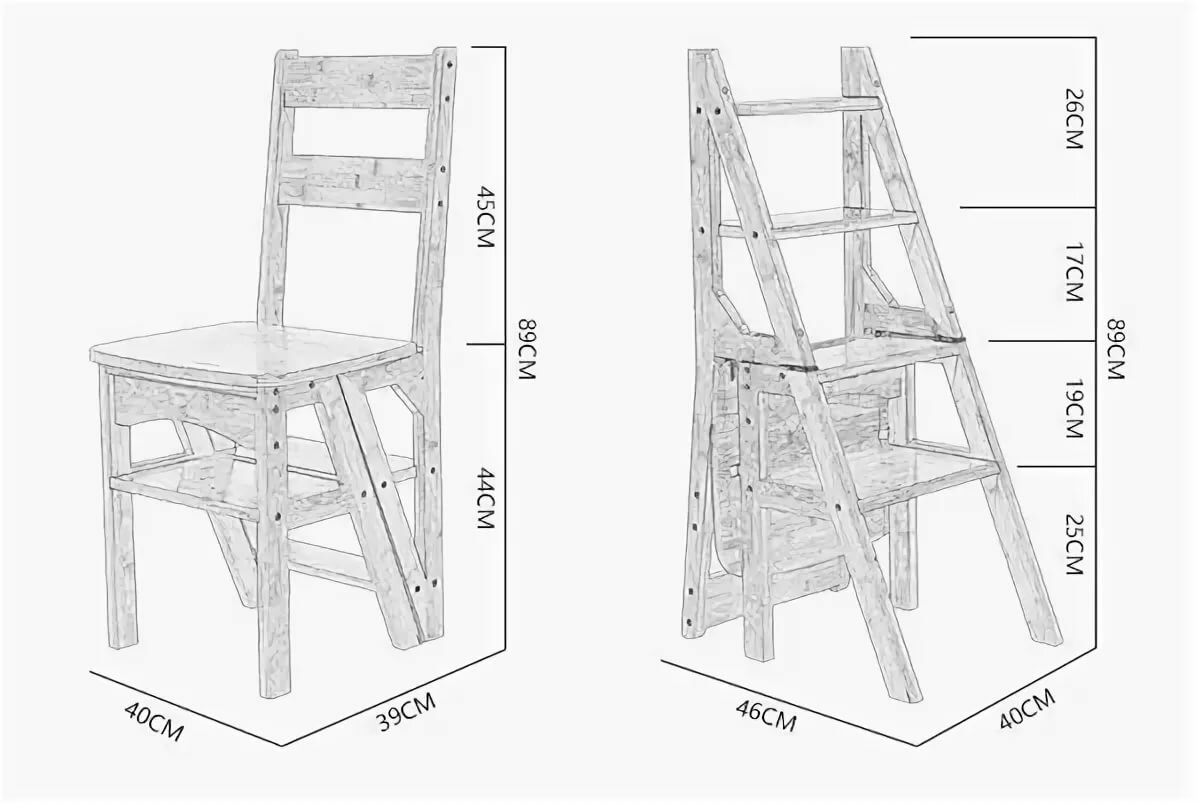
Varieties of ladder chairs
The opportunity to make a chair that turns into a step-ladder with your own hands is available to many. Every person who owns a plane and basic carpentry skills can make such a transformer. First of all, you should decide on the model of the transformer and find suitable drawings. Then you need to stock up on the necessary materials and tools. The transformer, which turns from a chair into a step-ladder, has several design options:
-
Chair-transformer. It turns into a step-ladder when unfolded, and when assembled it is difficult to distinguish it from an ordinary small stool.
Chair-transformer.
- Stepladder stool. It has an unusual appearance - the steps are pulled out in a spiral from under the seat.
- Chair ladder. It can be made without a back, like a stool, or with a back. It has an original design - due to the retractable solid steps, it makes it possible to make a compact transforming chair.
-
The ladder is obtained from a pull-out module of a high bar stool, when folded, the ladder block is located under the seat.
High stepladder stool.
Most often, wood is used for the manufacture of transforming chairs. Sometimes plywood is used. To make a transformer, you need the following tool:
- dowels or dowels;
- jigsaw;
- saw on wood;
- drill with a set of different drills;
- electric planer or manual analogue;
- clamps;
- piano hinges (for transformer and ladder stool);
- screws, screws, glue;
- sandpaper;
- covering for wood protection and chair decoration;
- two sets of guides for retractable steps (option - high stool);
- assembly diagram.
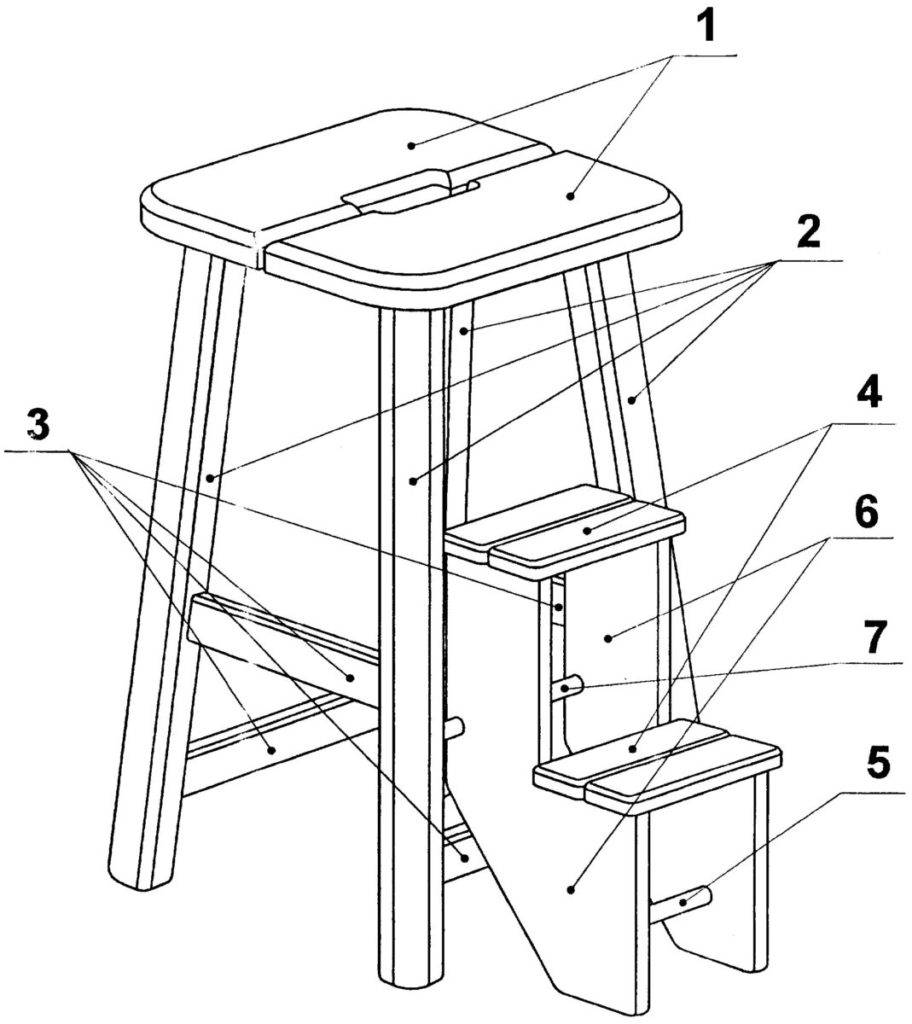
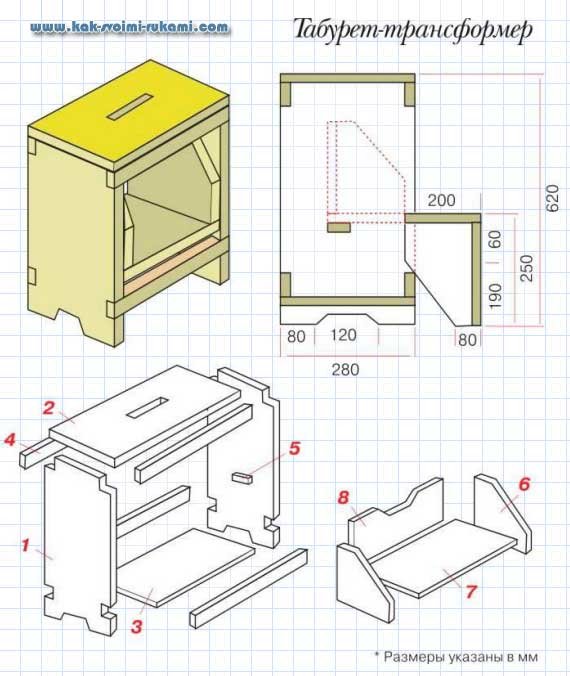
 Parts for collecting the step-stool.
How to do it?
Simple
Making a simple stepladder chair looks like this. It is necessary to cut and saw off all the necessary parts. Now you need to start making the seat.
- It is necessary to take 2 wide boards and attach them tightly to each other. If desired, they can be glued. To make the product more durable, you need to attach two bars on the back side.
- The support legs should be connected. They can be attached using self-tapping screws: fix 2 transverse bars to the guides, 1 of them should be strengthened diagonally.
- To make the sidewalls (legs) of the chair, you need to cut off the inner contour of the sidewall using a drill or jigsaw.
- Next, you should make a ladder: put it at an angle and fix the steps parallel to the ground.
- Like the sidewalls, you need to make a backrest for the chair.
- Next, you need to take the middle step, which was located in the chamfer, and fasten it with self-tapping screws.
Now all the necessary elements can be collected. It is necessary to attach the guides of the support post and the ladder bowstrings to the seat. Make and attach a step and seat. When the ladder and the support leg are connected, you need to fix the slats with the first end under the seat, and the other between the support legs.
Using a piano eyelet, you need to fasten together 2 parts of the stepladder chair. The structure must be primed and painted over with varnish in 3 layers. If you wish, you can paint or paint the stepladder chair.
Convertible chair
Transformer chairs can consist of 3 steps, and if the product is folded, it will look like a regular chair. First you need to draw a drawing pattern for the blanks. Then prepare the following elements:
- front sidewalls (2 x 29 x 42 centimeters) - 2 pieces;
- rear sidewalls (2 x 32.6 x 86 centimeters) - 2 pieces;
- backrest strips (2 x 7 x 42 centimeters) - 3 pieces;
- rear seat (2 x 16.7 x 41 centimeters);
- front seat (2 x 10 x 41 centimeters);
- steps (2 x 13 x 37 centimeters) - 3 pieces;
- strips (2 x 3 x 9.6 centimeters) - 6 pieces.
Manufacturing.
- It is necessary to thoroughly polish all the elements of the future product. Using a router, you should process the pointed ends.
- The backrest for the highchair can be made from planks. And then, using self-tapping screws, attach it to the sidewalls.
- Using the grooves, you need to connect the steps and the seat to the sidewalls. When it is necessary to assemble the structure, all joints must be greased with glue and reinforced with screws. They need to be screwed into the prepared pilot holes.
- You need to take a piano loop and connect 2 parts of the product.
There is another model of a transforming chair - this is a ladder chair. For this design, the following elements must be prepared:
- seat (29 x 37 centimeters);
- walls that will be located on the sides (29 x 63 centimeters);
- bases (29 x 33 centimeters and 21 x 29 centimeters) - 2 pieces;
- cross bars (2.6 x 7 x 37 centimeters) - 4 pieces;
- support strips (2 x 2.6 x 7 centimeters) - 2 pieces;
- side walls (21 x 24 centimeters);
- the wall behind the module (24 x 26 centimeters).
Manufacturing.
- It is necessary to determine a drawing of the future product, prepare a drawing tool and all the elements that will be applied to wooden blanks for cutting out parts of the upcoming structure.
- It is necessary to grind every detail well, and also remove all sharp edges and corners.
- Now you can assemble the product. Fasten the side parts in pairs using self-tapping screws, attach the crossbars.
- It is necessary to take a piano loop and connect the stool and steps with it.
Tree species
As for the choice of wood species, it all depends on your financial capabilities, the general interior of the room and personal wishes.
Attention: when choosing wood, be sure to pay attention to its appearance. The lumber should be free of blue spots, traces of bugs, cracks and other visible defects
Also, when choosing a natural tree, it should be borne in mind that all its species are divided into:
- durable: acacia, yew, pistachio tree;
- soft: pine, juniper, linden, alder, aspen;
- hard: oak, beech, walnut.
Help: with hard grades, problems may arise when sawing at home.
There are many types of wood that are often used in the manufacture of furniture. The most popular and common ones are:
- Pine. This is the cheapest option. The lumber is easy to cut, has a pleasant light texture and has an unobtrusive smell of pine needles.
- Birch. It has a unique and unrepeatable texture. Of course, this lumber is not as strong and durable as oak, but its cost is several times less.
Birch can be easily processed with various hand or power tools, it gives off a pleasant aroma and pleases with a beautiful and light shade.
- Nut. Black walnut is especially prized. It has an incredible texture and texture and the highest technical qualities.
This lumber belongs to the elite and, most often, furniture from it is made in classic motives. The advantages of the walnut include the fact that no scratches, chips and cracks remain on its surface.
-
- Beech. It also belongs to the hardy breeds. Furniture made of it will serve its owners for more than a dozen years. The only drawback of beech is the absorption of excess moisture. Therefore, when working with this lumber, it is recommended to treat it with antiseptics.
- Oak. It is one of the most durable and high performance trees. Oak furniture looks aristocratic and elegant in interiors. This material does not deform over time, does not crack, and does not dry out. It is also resistant to increased moisture and has an incredibly beautiful texture.
In addition to the above tree species, you can make a stepladder chair from: ash, linden, rowan, pear, cherry.
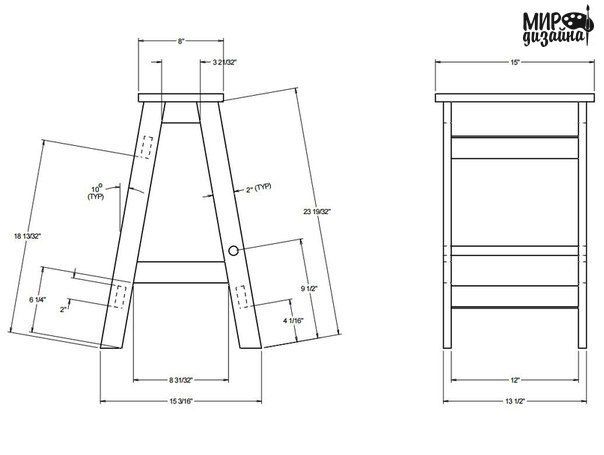
We build the classic version of the step-ladder chair
In order to make a do-it-yourself transformer step-ladder chair exactly according to the drawings, you will need a minimum set of power tools:
- Jigsaw with a set of saws for wood;
- Manual electric milling cutter with end mills 25 mm and 30 mm;
- Drilling machine or drill with a device for accurate vertical drilling;
- Polisher with wood attachment;
- Screwdriver;
- A set of carpentry clamps.
Since this design, in addition to the functions of a staircase, will also be used as a piece of furniture, it is best to choose a scheme with elements of carving and decor.
For the most part, a stepladder chair will be used as a piece of furniture, so it makes sense to make it as beautiful and attractive as possible. In this case, decorative elements are practically not used, windows are made on the sidewalls - selections in order to make the structure lighter and give it a more elegant look.
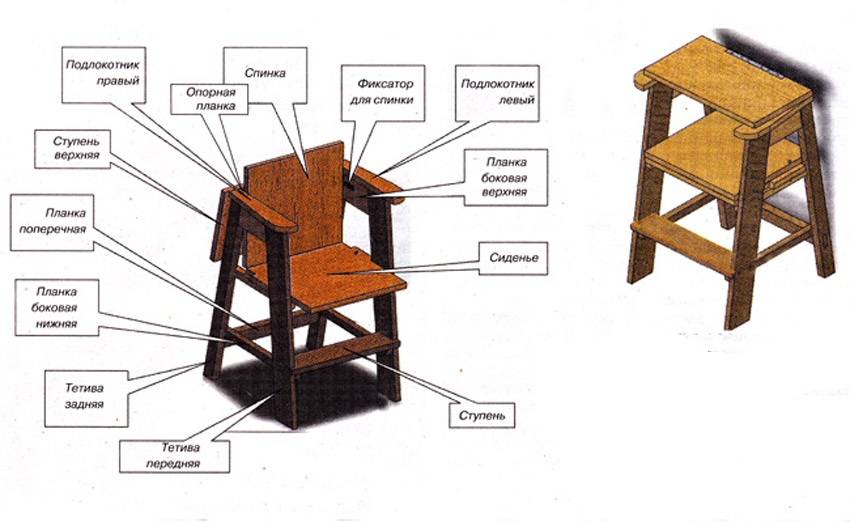
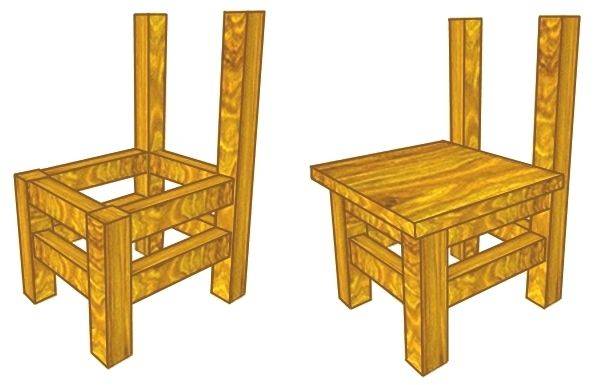
Structurally, each part of the stepladder chair consists of two sides, between which four transverse steps are glued in. One of the steps serves as a seat, the rest are used only for climbing stairs.
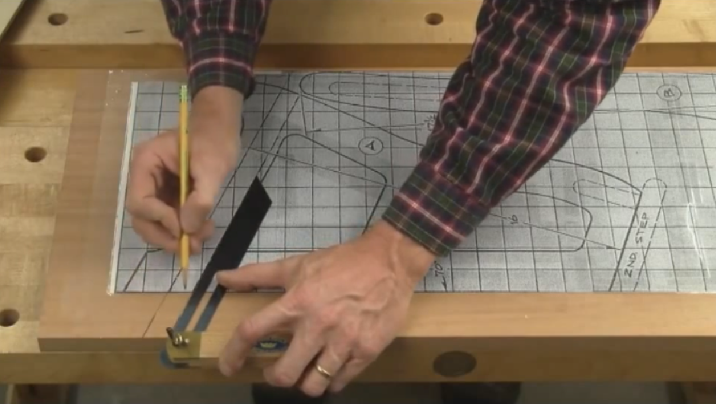
Initially, you will need to transfer the contours of the side posts of the step-ladder chair to the boards. This can be done in two ways. In the first case, the contours are transferred by drawing lines using carbon paper. The second method allows you to do the work much faster - you can simply print out the outlines of the details of the future step-ladder chair and stick the paper on a wooden blank.
At the first stage, you need to make longitudinal grooves or cuts on each sidewall of the large and small parts of the stepladder chair, as in the photo.The grooves must be made for two reasons, firstly, they will be necessary for further processing of the workpieces. Secondly, step boards will be inserted into the grooves. If you fix the steps only with self-tapping screws, the rigidity of the step-chair will be very small, and the whole structure will quickly fall apart under the weight of a person.

Next, you need to make several through holes with a drill and a milling cutter, best of all at the corner points of the inner contours. This must be done in order to be able to cut out samples along the openwork thread with a jigsaw.

Following the inner contours, cut out the outer lines of the sidewalls in the same way. After all four sidewalls have been cut, two for most of the stepladder chair and two blanks - for the smaller one, you will need to calibrate the dimensions, as in the video

To do this, the two side workpieces are folded in pairs and cut on a router. This makes it possible to make both elements of the step-stool absolutely identical in shape and size. At the same time we remove chamfers, burrs, process the surface with a grinding and polishing attachment.
Steps for a stepladder chair are best made of oak planks, 15-20 mm thick. For the large swivel part of the chair, you will need to make three steps, all three in different sizes. For a smaller stationary part, you will need to cut two steps, and also of different sizes. Cut-to-size step blanks are neatly glued to the sidewalls. To do this, you need to coat the gluing points with carpentry or epoxy glue and insert the blanks into the grooves. In order to maintain the geometry of the stepladder, the gluing is best done with fixing in carpentry clamps.
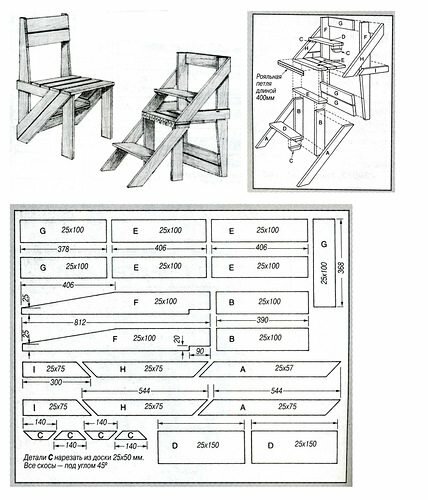


After the glue has dried, it is imperative that the steps of the stepladder be reinforced with carpentry screws. At this stage, we have two small structures, one looks like a short chair, the other looks like a stool. To make a full-fledged folding step ladder out of them, you need to connect the two parts with a furniture or piano loop.
Attention! So that during use the vertical load on the stepladder chair does not deform or tear off the hinge attachment, special thrust pins are used in the design.

The last element of the chair is the backrest. It must be done and a stepladder must be installed on the chair. Otherwise, the front ladder supports will be unstable and fail quickly enough.
The stepladder chair is almost ready for use, you need to make the exterior finish with wood stain or varnish.

The result is a nice design that you can not hide, but, on the contrary, can be installed in the kitchen or in the hallway, where there is always work for such devices.
Useful tips for making your own ladder
It is not difficult to assemble a stepladder according to a finished drawing with dimensions - even a novice master can handle it. But, there are nuances, which it is better to find out in advance, so as not to encounter problems in the process of work:
- When marking the "legs" of the ladder, in order to determine the location of the steps, it is also necessary to mark the points for their attachment.
- On the side of the ladder, closer to the top step, it is a good idea to attach two or three hooks. They come in handy to hang a paint bucket, a tool bag, a harvest basket. You can also fix a hollow piece of plastic or iron pipe at the top, inside which you can lay a screwdriver, pencils and other small things that are inconvenient to hold in your hands, but it is also difficult to go down for which every time.
-
To prevent the legs of the ladder from moving apart when a person is at the top, a limiter must be attached approximately in the middle of the sidewalls. A belt, thick rope or chain can be used as it, which will not allow the ladder to open further than its length.
You need to take care of your own safety!
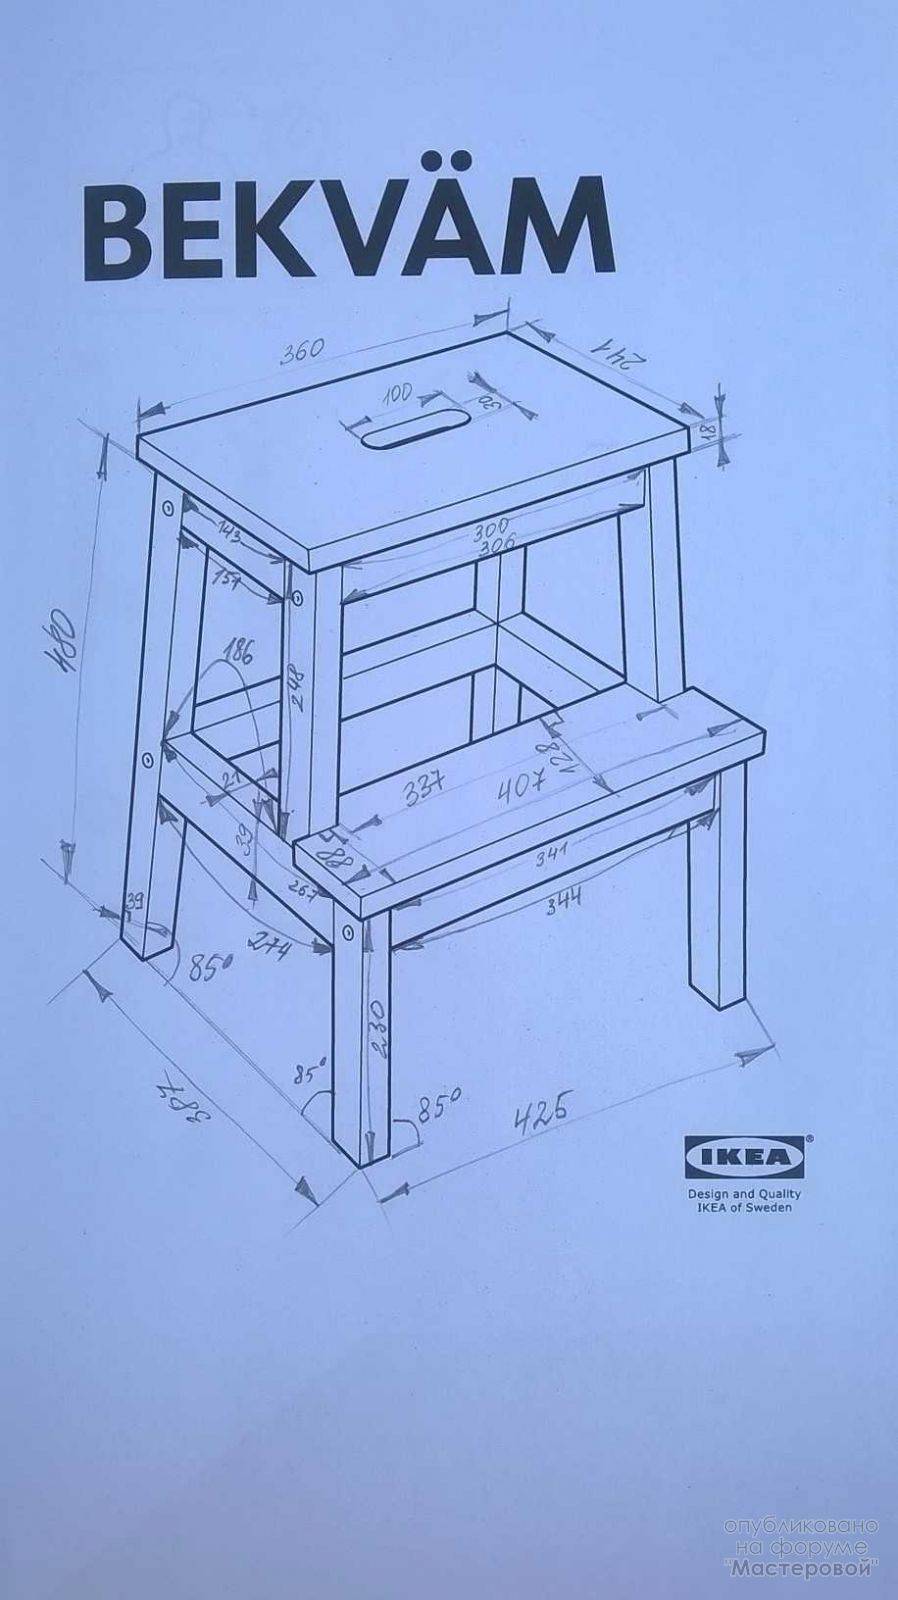
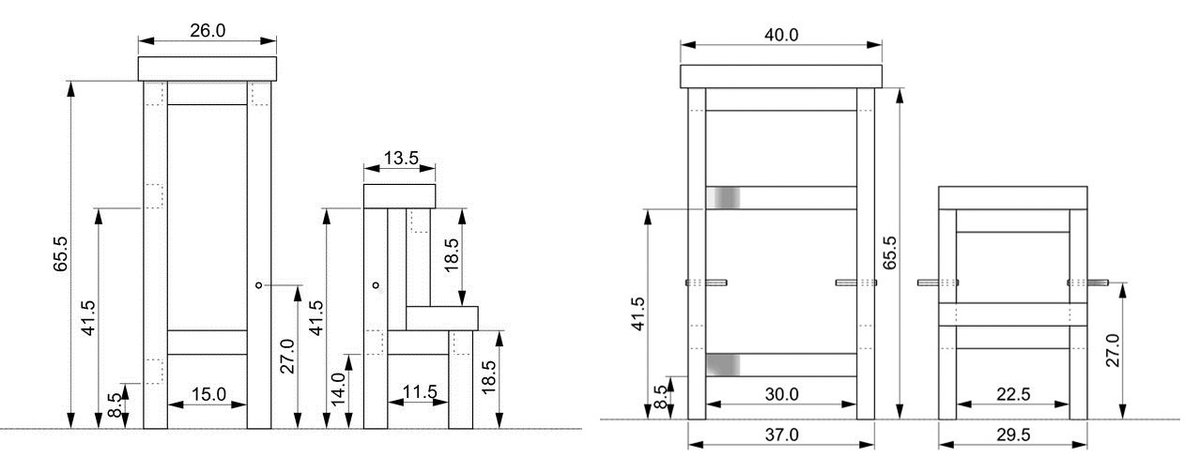
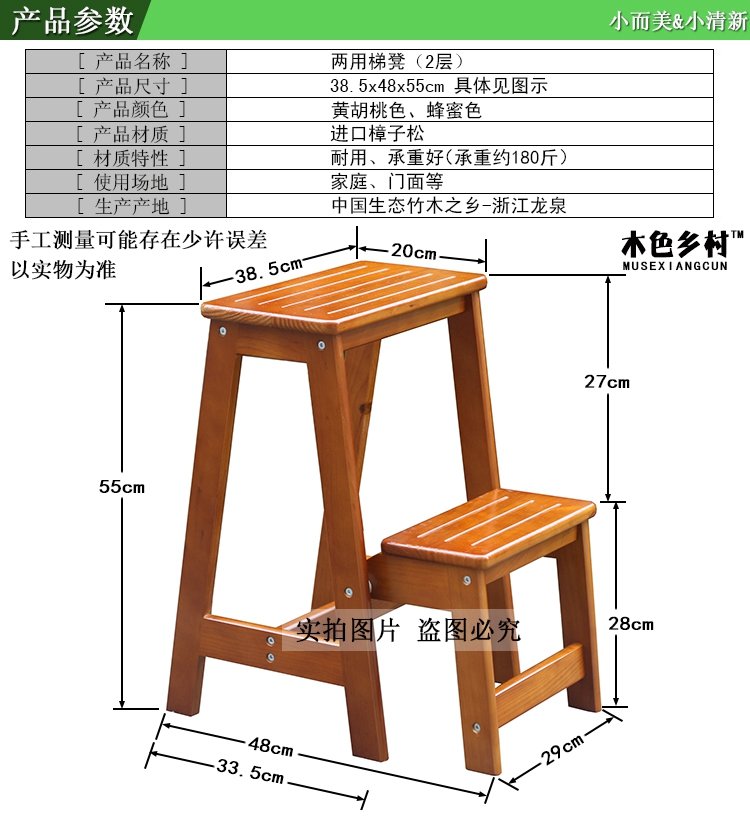
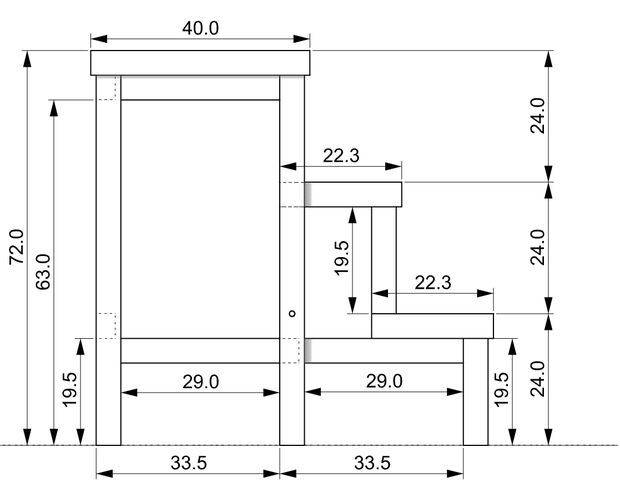
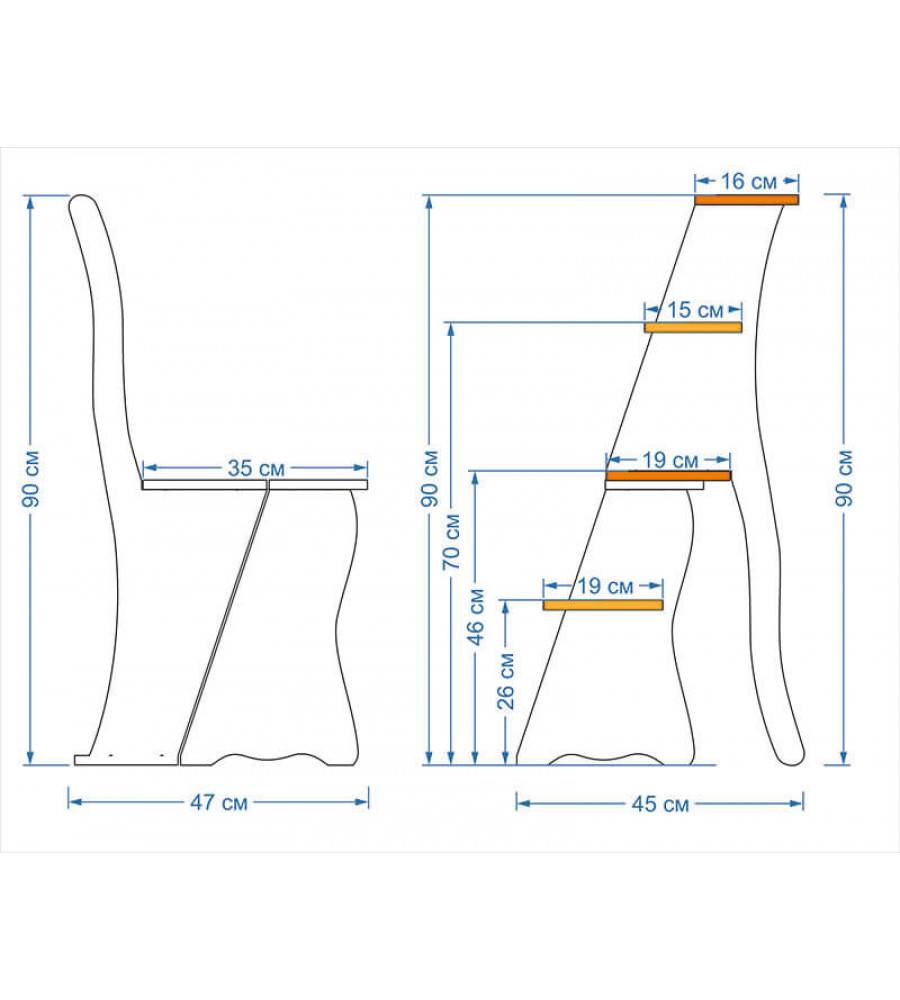
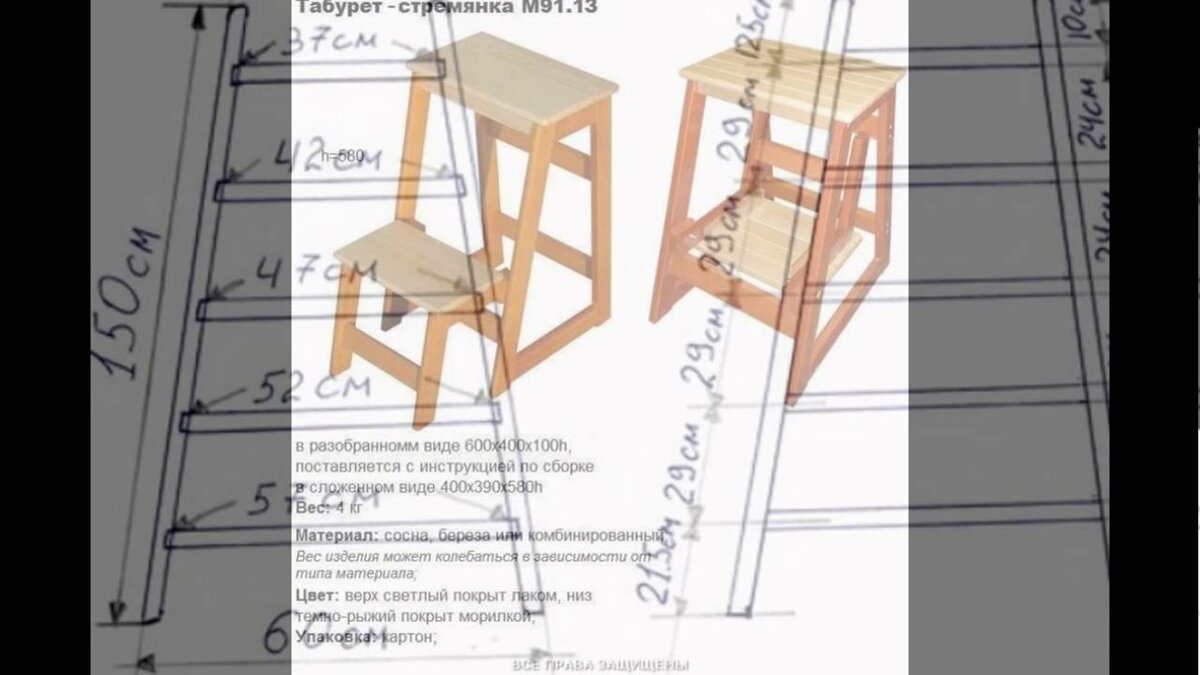
Table 2. Stepladder options
| View, illustration | Description |
|---|---|
|
Mini chair |
A variant of a miniature stepladder, the height of which is usually 70-90 centimeters. This design can be used both standing and sitting. A stool-ladder can have two, three or five steps, at the top there is a working platform, which is also a seat. |
|
Rack platform |
Such a stepladder has a fixed platform on top, quite spacious for a person to work on top for a long time. Typically, these ladders have a height of about 1.3 meters and are used during finishing repairs. It is impractical to store such a ladder at home, since it is not compact. |
|
Parting unilateral |
This ladder has steps on one side only, with a support bar on the other for added rigidity. This is a fairly lightweight, compact ladder that is convenient to use in everyday life. But, it should be borne in mind that the design is not very stable. |
|
Parting double-sided |
This is a more stable and convenient option due to the fact that the steps are located on both sides of the structure. The advantage of a double-sided step-ladder is that two people can be on it at the same time. Also, the second side with steps can be used to place the tool or hang the necessary items (for example, when gluing wallpaper). |
|
Rolling stepladder |
This is a more massive structure, for easier movement of which fixing wheels are installed on the legs. This model resembles a split one-way ladder, but usually a rolling one has a great height. To move the ladder, you need to raise the wheel locks, and when the structure is in place, the locks are lowered again to immobilize the ladder. |
The specified options and recommendations should be enough to understand the technology for making a simple wooden step-ladder, as well as to determine its dimensions and other operating parameters. Then you can proceed directly to the assembly of the stairs.

Video - DIY folding step ladder
This is interesting: Stove stoves for the house, for a summer residence, a stove with your own hands, an economical stove - we tell in detail
Description of the stages of work
It is important to pay attention to the safety of the feeding chairs: Avoid the formation of sharp corners, cracks, cracks, cracks, cracks, cracks, gaps between structural elements, as well as irregularities and other defects. To give the top beam an attractive appearance, it can be rounded. The carved bar is designed with all possible patterns in every way, but no sharp corners
The carved bar is designed with all possible patterns in every way, but no sharp corners
To give the top beam an attractive appearance, it can be rounded. The carved bar is designed with every imaginable pattern in every way, but no sharp corners.
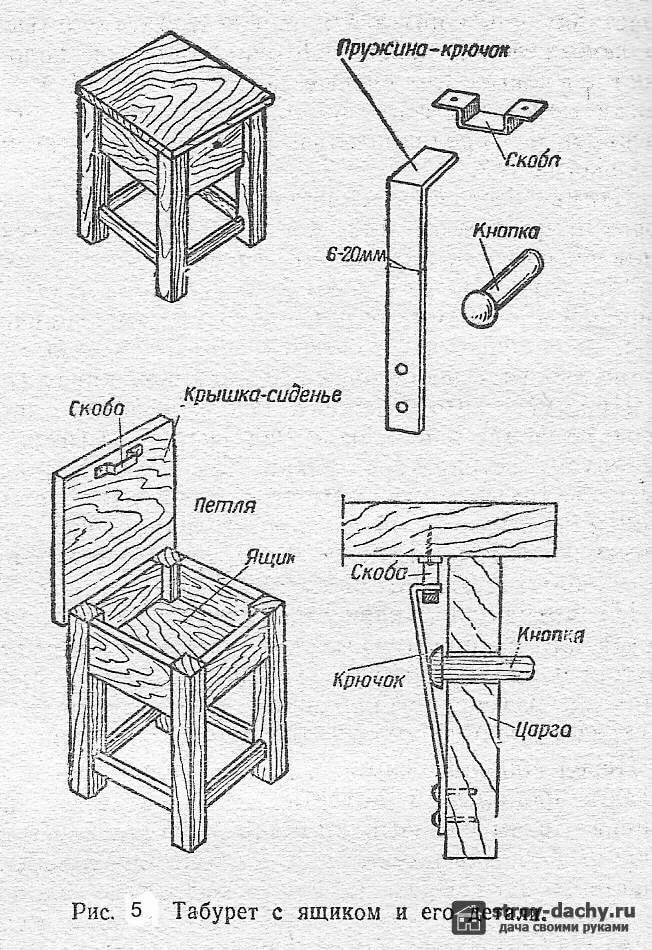
In this case, the parts are secured with wooden skewers and glue, but other methods such as nails, furniture scales or self-tapping screws can be used.
Through pins (6-35 mm diameter) can be used for additional bolt fastening.
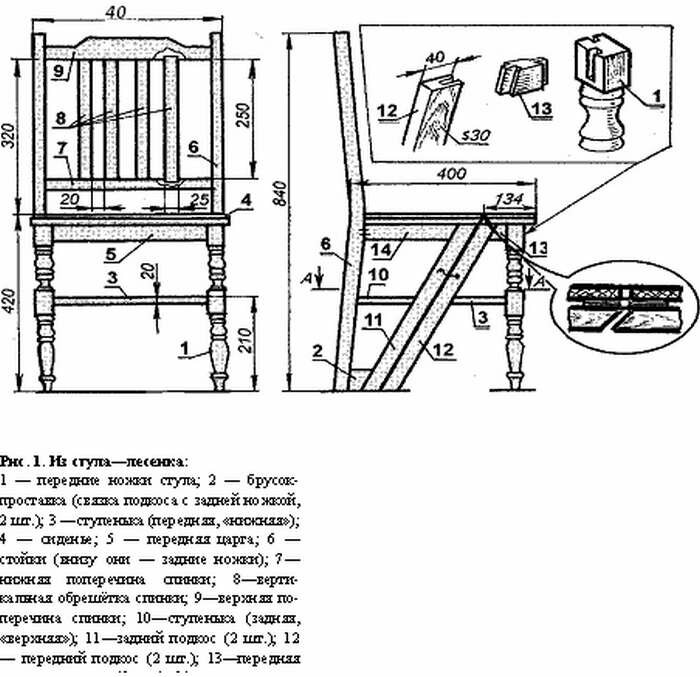
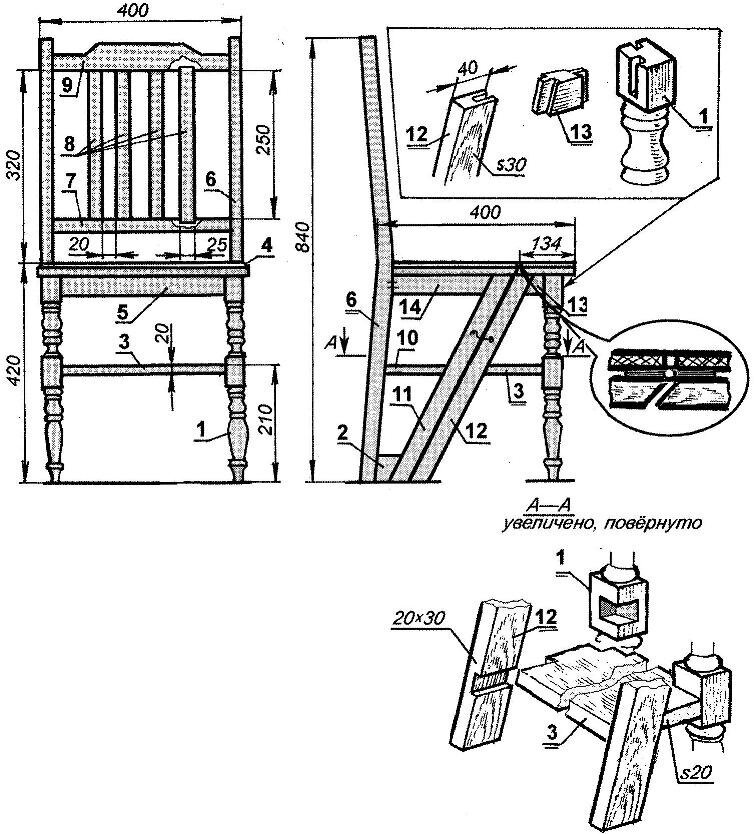
Assembly of chairs:
Step 2: Attach the front legs, remaining cross members and trunks to the structure.
 Step 3: Attach the top, cut and middle crossbars to the rear legs (attached at the same height as the seat).
Step 4: Use the special tool, the connecting screw, to make sure all parts are glued together as securely as possible. It is designed in such a way that the parts are close to each other.
Step 5: When all the bottom rails and legs are firmly connected, attach the two-pane seat to the base of the chair. For added reliability and durability, after the adhesive dries, secure the panels with pre-drilled pins.If the seat boards protrude partly from the floor, the protruding ends should be removed with a chisel.
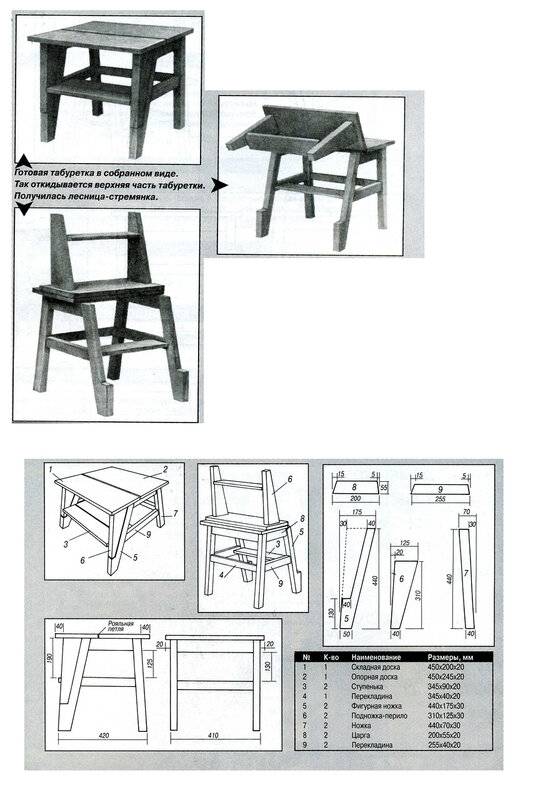
Stages of assembling parts of transformers with your own hands
Before proceeding with the fastening of all elements, it is recommended to make a preliminary assembly in order to make sure that all parts of the product fit perfectly together. After that, it is necessary to carry out the final assembly using wood glue, dowels, screws, screws and dowels. Each type of transformer has its own installation features. Let's consider them in more detail.


 Elements of a classic stepladder chair.
The transformer chair is assembled in the following order:
- The finished, carefully polished parts of the back and high sides of the chair are fixed with self-tapping screws.
- The seat and steps are attached to the grooves of the small sidewalls. The joints are additionally fixed with glue and screws.
- The resulting parts of the chair are held together with a piano loop.
 Assembly diagram of a transforming chair.
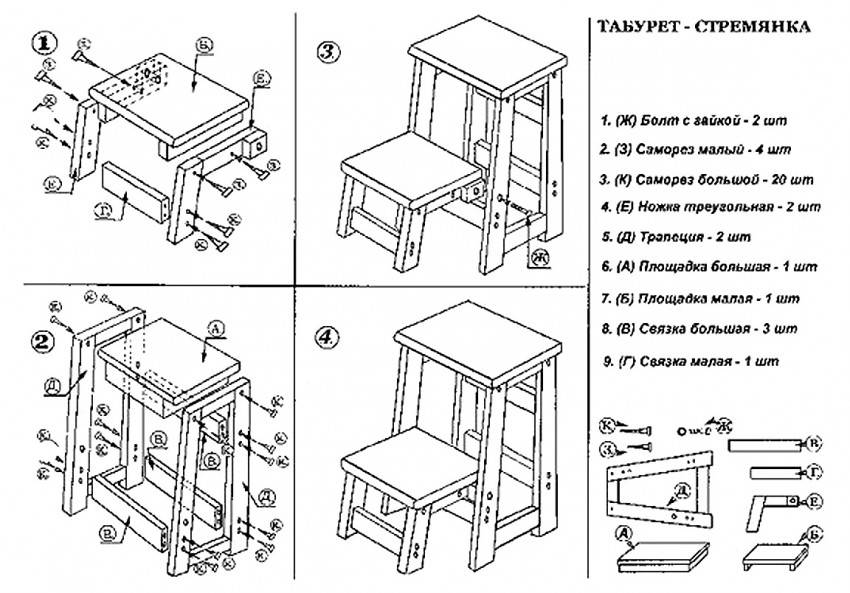
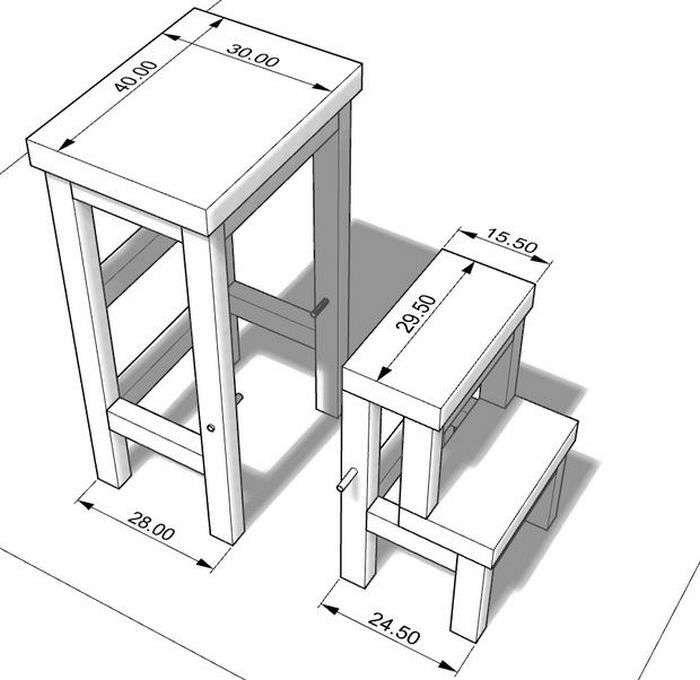
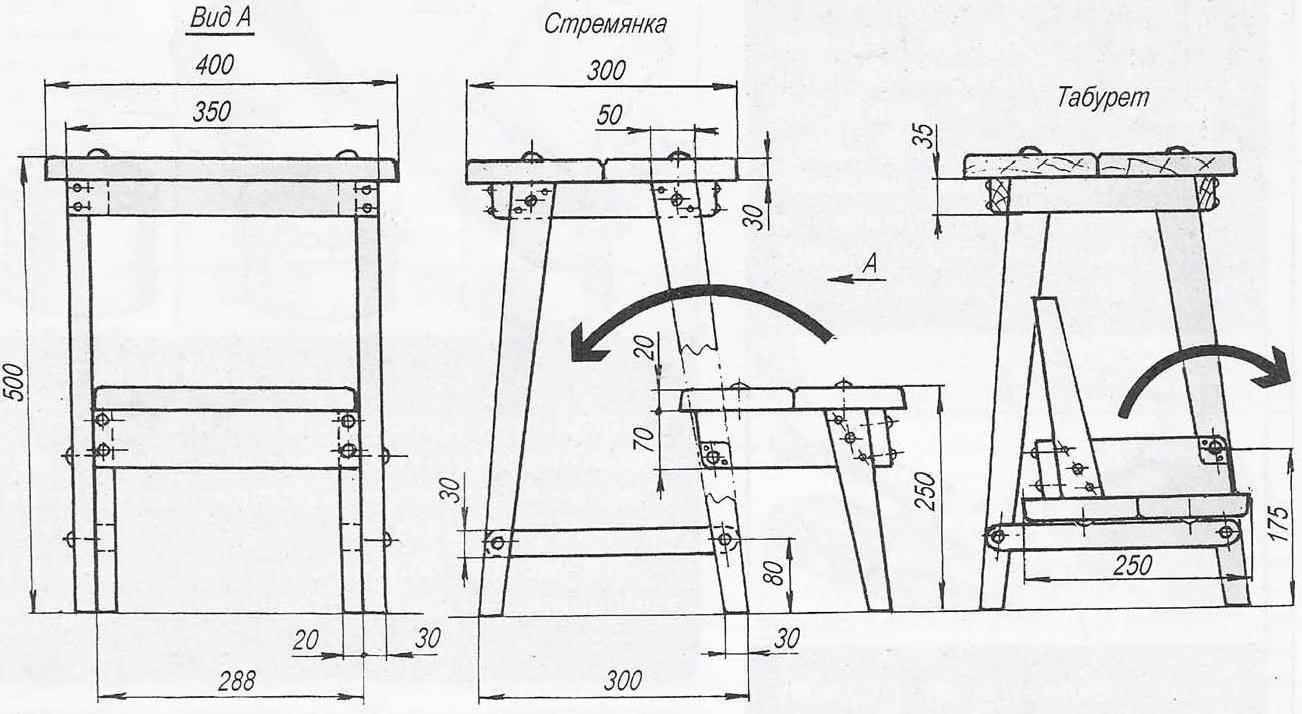
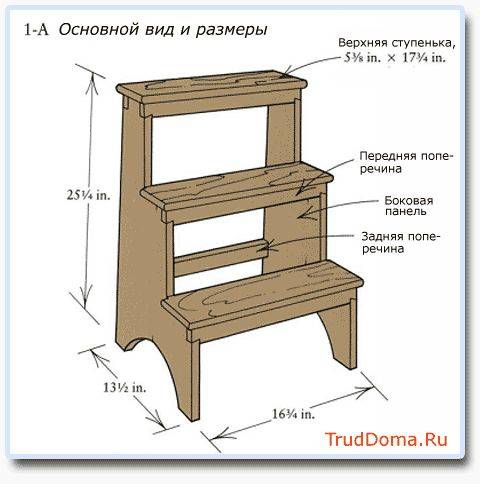
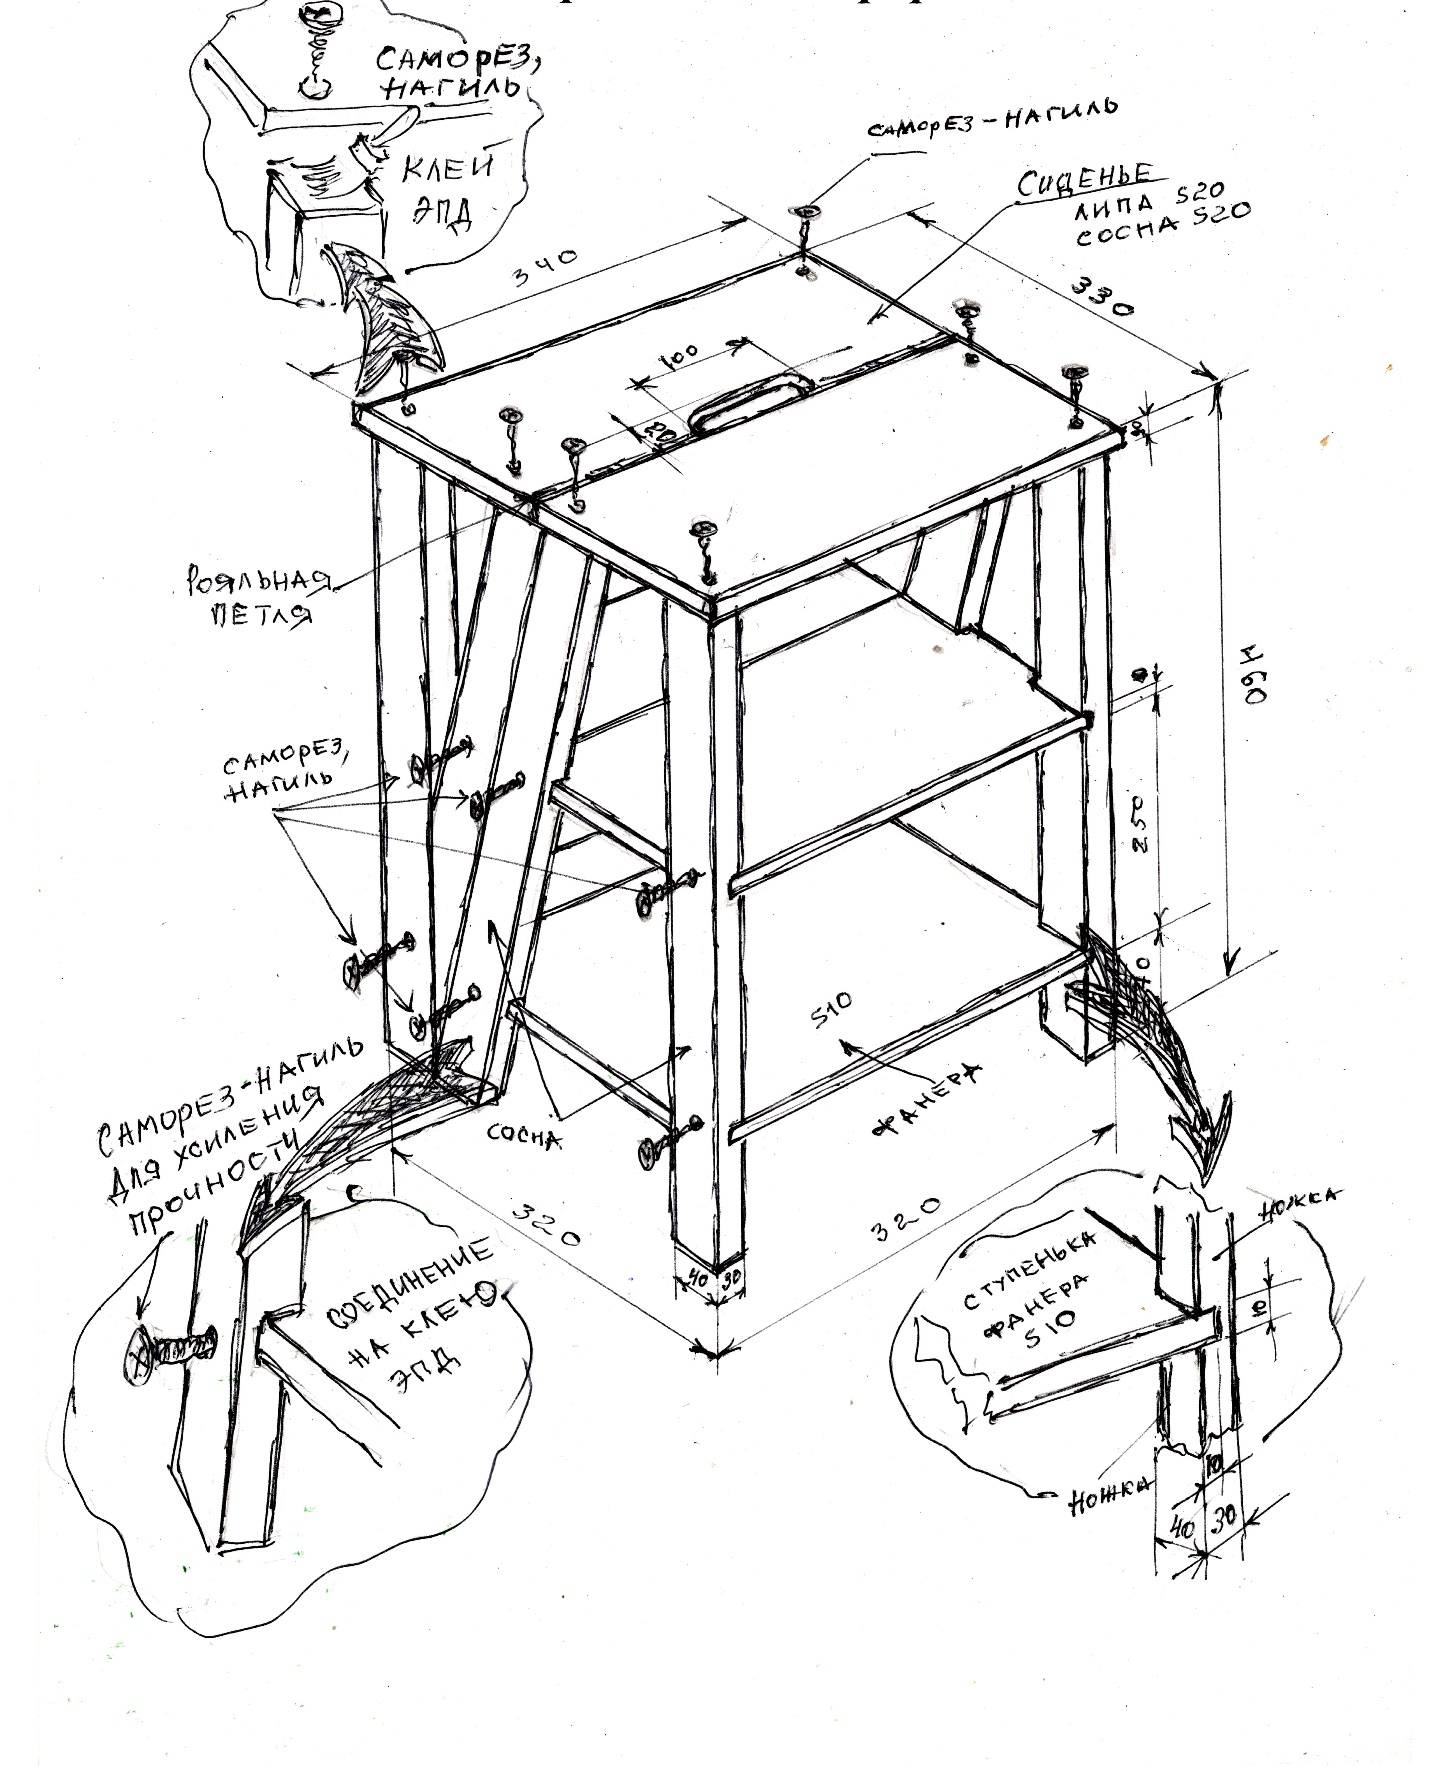
Stages of assembling a step-ladder stool with your own hands:
- For better stability, the ends of the stool legs should be sawn off at a 10-degree slope.
- With the help of dowels, it is necessary to connect the middle legs and the ends of the drawers. The rungs are trimmed at an angle of 80 degrees.
- The high legs of the chair are connected to the upper drawers with screws.
- Fasten the drawers with the upper tread with screws.
- Reinforce the middle legs with a dowel with a dowel and fasten to the front and rear drawers.
- Use screws to fasten the small legs to the crossbar, then to the front side bar and install the step.
 Stepladder stool assembly diagram.
DIY transformer ladder:
- The side ends of the chair are attached in pairs to the crossbeams using self-tapping screws.
- The steps are attached to the stool with a piano loop.
Steps for assembling a stepladder stool with a screw module:
- Mill the inner corners of the middle and bottom treads. Drill 38 mm holes in opposite corners. Secure the leg.
- Using self-tapping screws and wood glue, assemble the remaining blanks of the product.
Step-by-step assembly of a stepladder stool with a screw module.