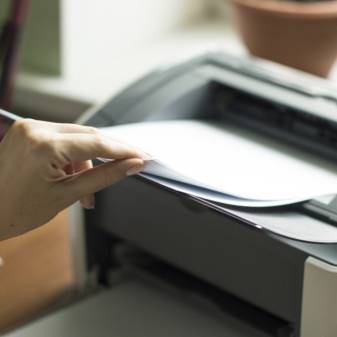
When to clean and prevent the laptop
The need to perform preventive maintenance and comprehensive cleaning of the laptop arises when signs of incorrect functioning of the cooler and other elements appear. Often, users find the following symptoms:
- increased noise of a running fan;
- strong heating of the case;
- constant freezes and reboots when launching productive programs.
Cleaning the cooler and internal boards is the main preventive measure. This procedure reduces the risk of breakage of the heating components.
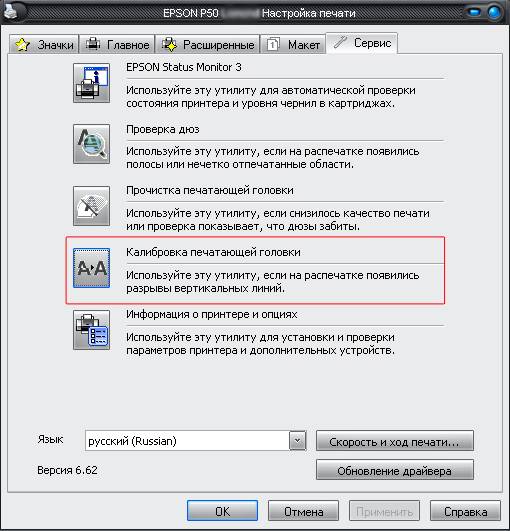
Using the Auto Nozzle Check and Cleaning Utility
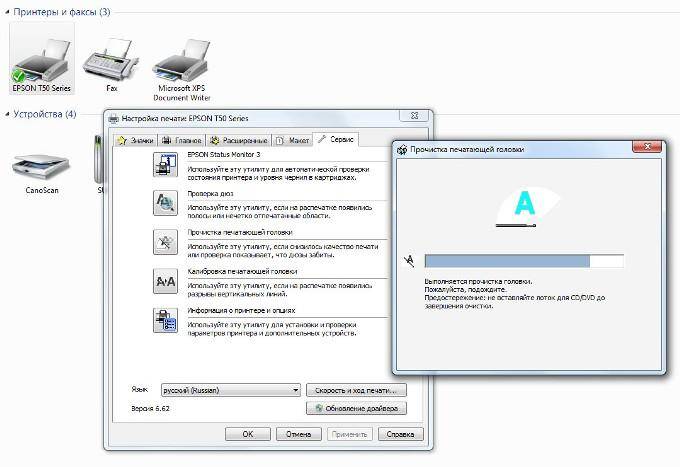
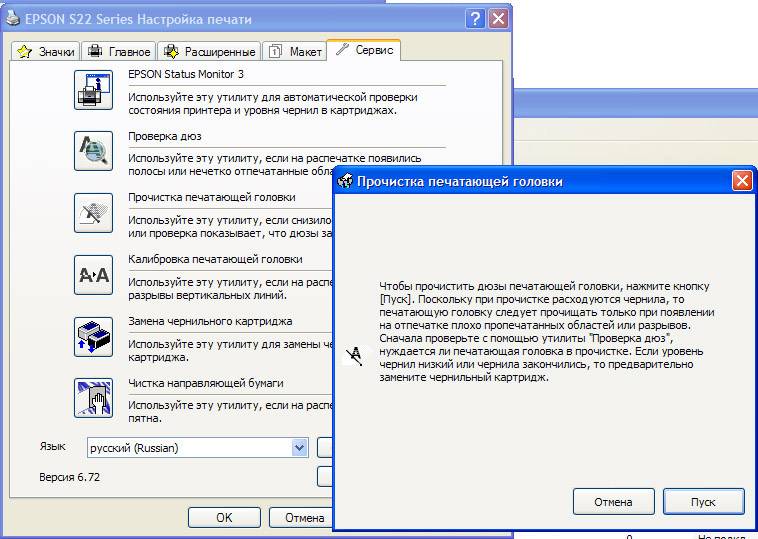
Epson recommends using the Auto Nozzle Check and Cleaning utility to automatically check the nozzles.
Refer to the relevant sections.
For Windows
Follow these steps to clean the print head using the Auto Head Cleaning utility.
| Make sure the printer is on and the ink out light is not blinking. |
| Make sure A4 or Letter size paper is loaded in the feeder. |
| Open the printer software. |
| Go to the tab Service and click the button Auto Nozzle Check and Cleaning. |
| Follow the instructions on the screen. While the printer is performing the cleaning operation, the power light will blink. |
Warning: |
|
Below is an example of a nozzle check pattern:

Note: |
|
|
|
|
|
|
|
|
For Mac OS 8.6 - 9.x
Follow these steps to clean the print head using the Auto Head Cleaning utility.
| Make sure the printer is on and the ink out light is off. |
| Make sure A4 or Letter size paper is loaded in the feeder. |
| Open the Print or Page Setup dialog box. |
| Click the Utility button, then the Auto Nozzle Check and Cleaning. |
| Follow the instructions on the screen. The power light blinks while the printer is performing a cleaning operation. |
Warning: |
|
Below is an example of a nozzle check pattern:
Note: |
|
|
|
|
|
|
|
|
For Mac OS X
Follow these steps to clean the print head using the Auto Head Cleaning utility.
| Make sure the printer is on and the ink out light is not blinking. |
| Make sure A4 or Letter size paper is loaded in the feeder. |
| Open the EPSON Printer Utility dialog box. |
| Select your printer, and in the Printer List window, click OK. |
| In the Utility dialog box, click the Auto Nozzle Check and Cleaning. |
| Follow the instructions on the screen. The power light blinks while the printer is performing a cleaning operation. |
Warning: |
|
Below is an example of a nozzle check pattern:
Note: |
|
|
|
|
|
|
|
|
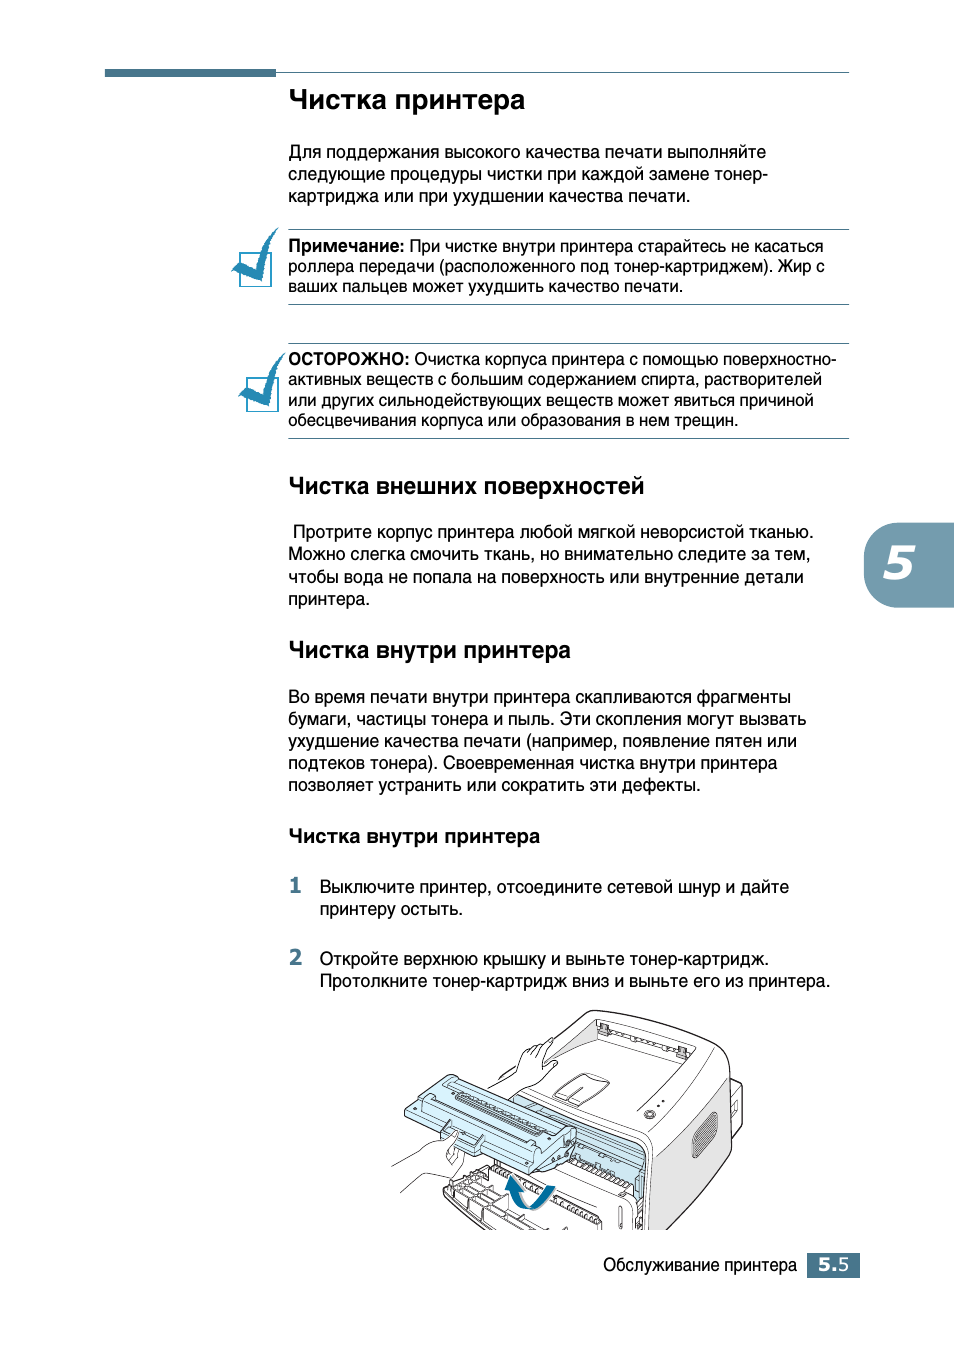
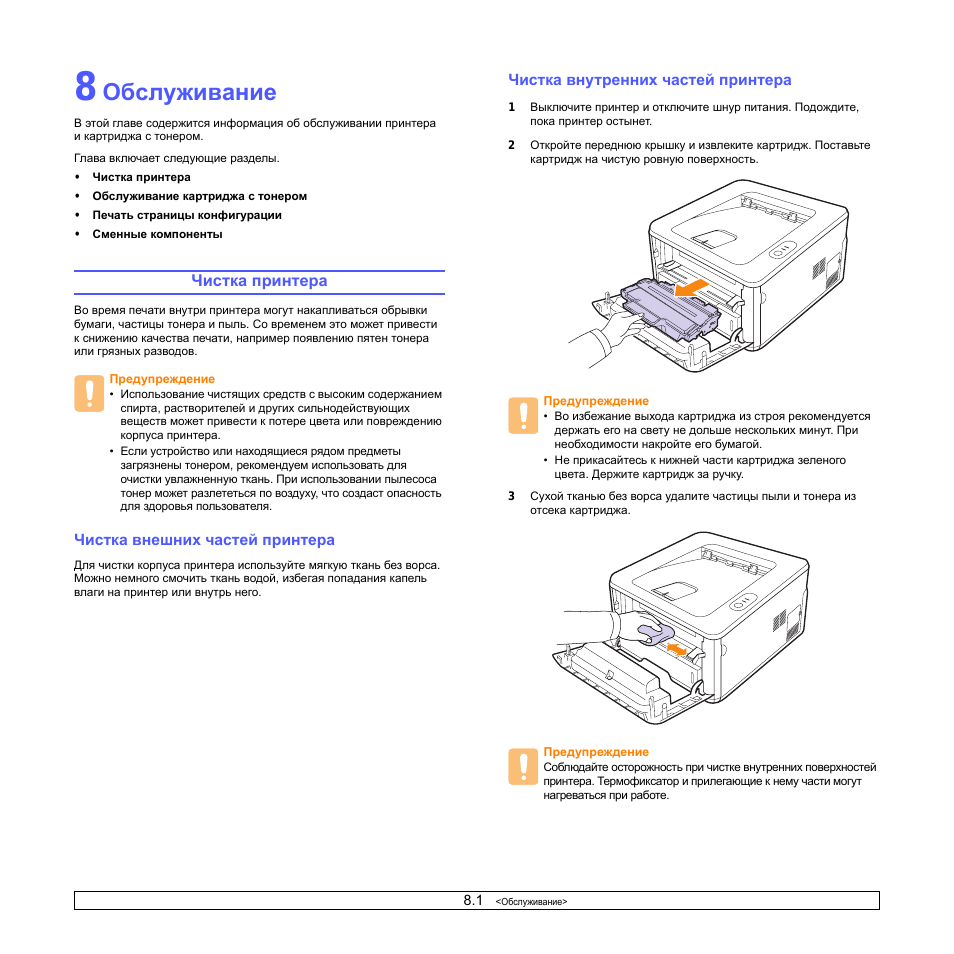
How to wash inside
If the system does not work better after cleaning the case, you need to clean the inside of the device.
After the case is removed, you need to carefully remove the microcircuit and wipe it gently with a cotton swab.
Soak a cotton pad with alcohol and wipe the inner surface of the mouse.
Then they take out the wheel and wipe it from all sides. You can dip the part in warm water with the addition of alcohol
The place where the wheel is fixed should also be wiped.
Wipe all sensors with a cotton swab
Particular attention is paid to the places where the buttons are located.
Only after all these actions are the parts returned to their place and the body is assembled.
Causes and signs of contamination
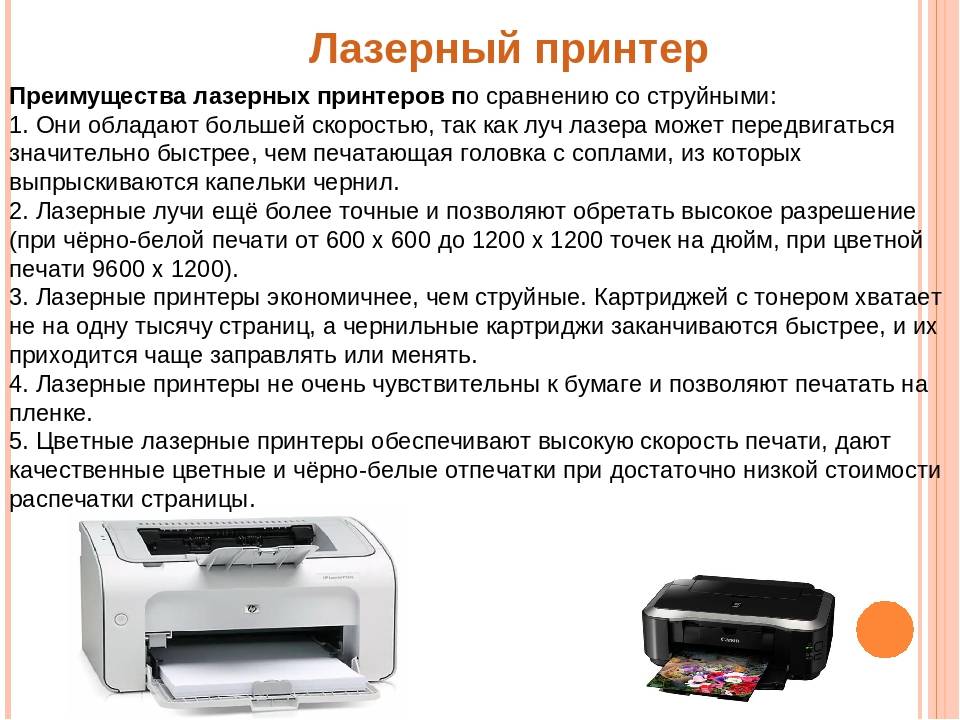
Laser and inkjet devices have various signs and causes of contamination.
Jet
Inkjet printers are already considered obsolete devices and therefore are not used as often. The main disadvantage of such printers is that they break down quickly. The most common problem with inkjet models is the appearance of dark streaks when printing. They appear due to dirt on the printer. The main reason for contamination of the machine is considered to be the use of unsuitable ink. Therefore, before using ink, make sure that it is compatible with the inkjet machine.
Laser
Most often, laser models are used for printing, which differ from inkjet models in better print quality and durability. However, even such devices sometimes have problems with paper stains. Dark streaks and smudges appear on the paper when the machine is not in use for a long time. This causes ink to dry out and quickly clog the print head. It can also become clogged if you do not clean it for a long time.
Liquid application
You can use a purchased or self-prepared solution in two ways.
Without ultrasonic bath:
- Place the print head in warm (40-50 degrees) water for 5 minutes.
- Pour flushing liquid into another container.
- Immerse the cartridge head in this solution for 10 minutes, lowering it about 1 cm into the solution.
- Remove the element and draw out about 1 ml of ink using a syringe and a filling station.
- Wipe off dirt and ink from the print head with a tissue.
- Install in the printer and run regular cleaning.
- If the procedure does not lead to a satisfactory result, it is repeated 2-3 times.
Using an ultrasound bath:
- Pour rinsing solution into a container.
- For 2-3 minutes, immerse the cartridge head in it, lowering it 1 cm into the liquid.
- Fill the ultrasonic bath with water and place the element in it for only 5 seconds!
- After you have taken out the cartridge, draw out 1 ml of paint from it with a syringe.
- Clean any dirt from the print head.
- Return the cartridge to the printer, run a regular cleaning.
- If the result is unsatisfactory, repeat the procedure 2-3 more times.
Flushing fluid is a solution that helps to effectively clean the print head of the printer after a long period of inactivity of the device, when replacing ink in a cartridge. You can not only buy it, but also make it yourself.
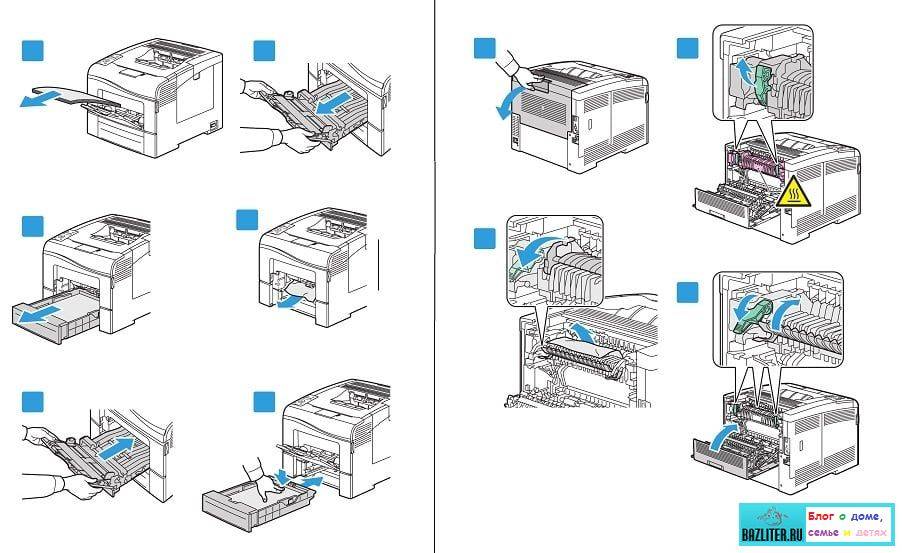
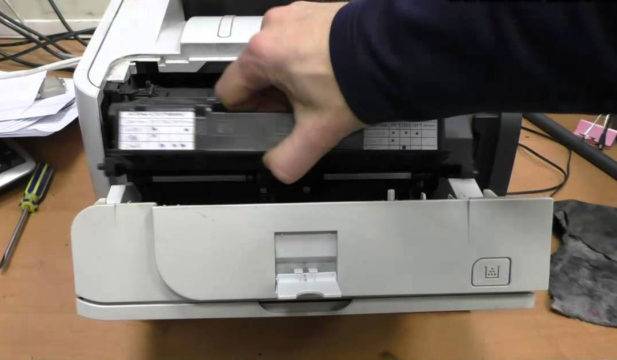
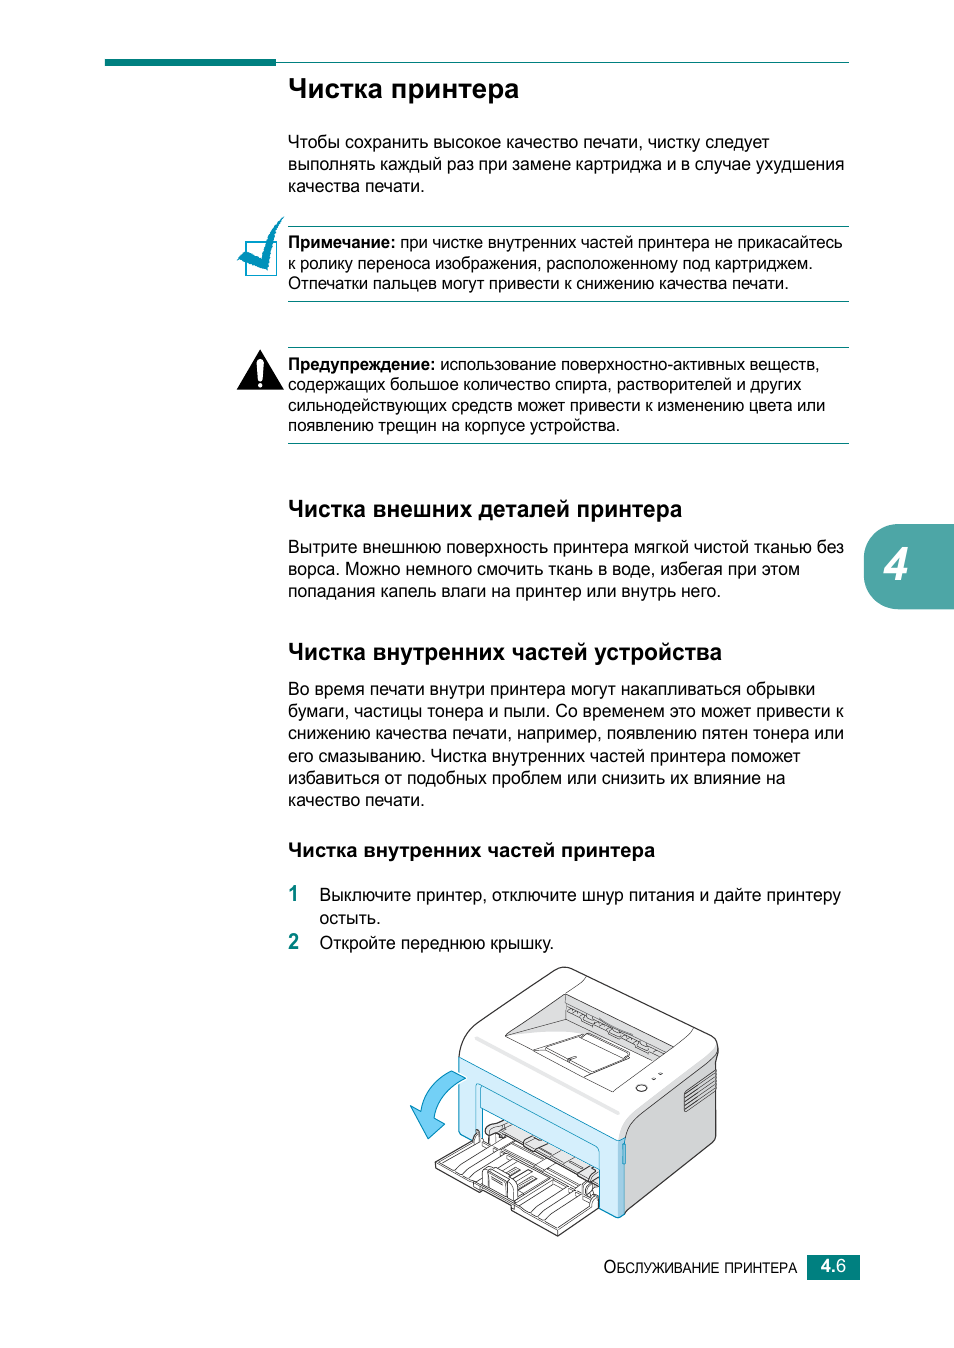
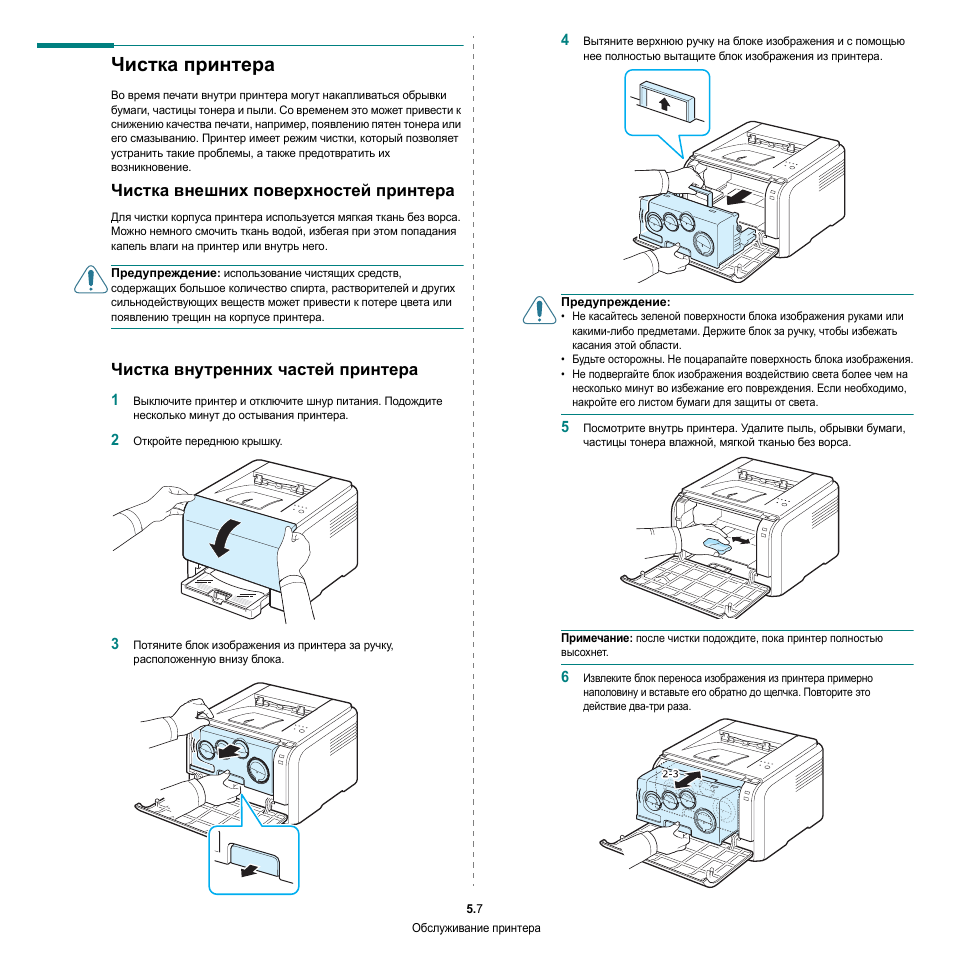
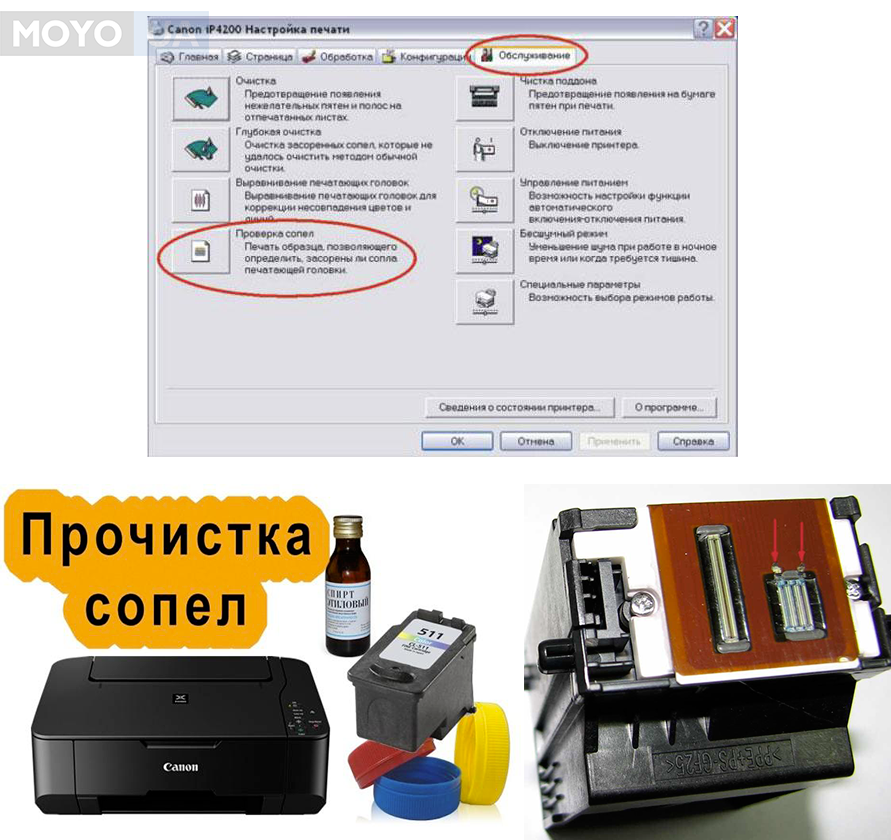
We clean the Canon printer manually
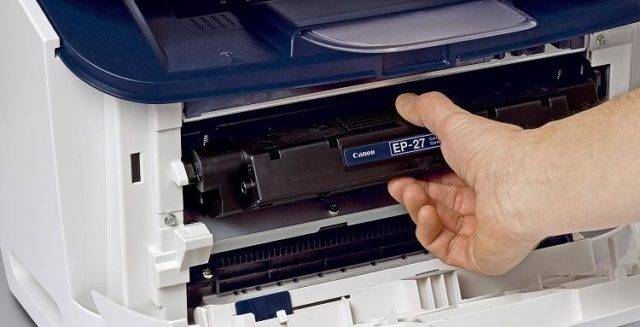
Manual cleaning for the interior of the printer is used if the hardware has been found to be ineffective. There are also printer models that do not provide a hardware method.
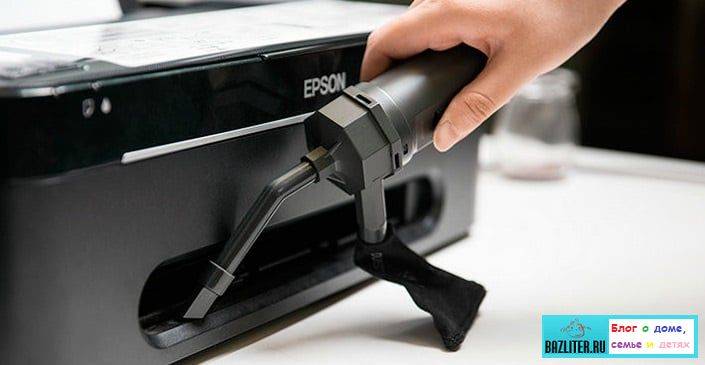
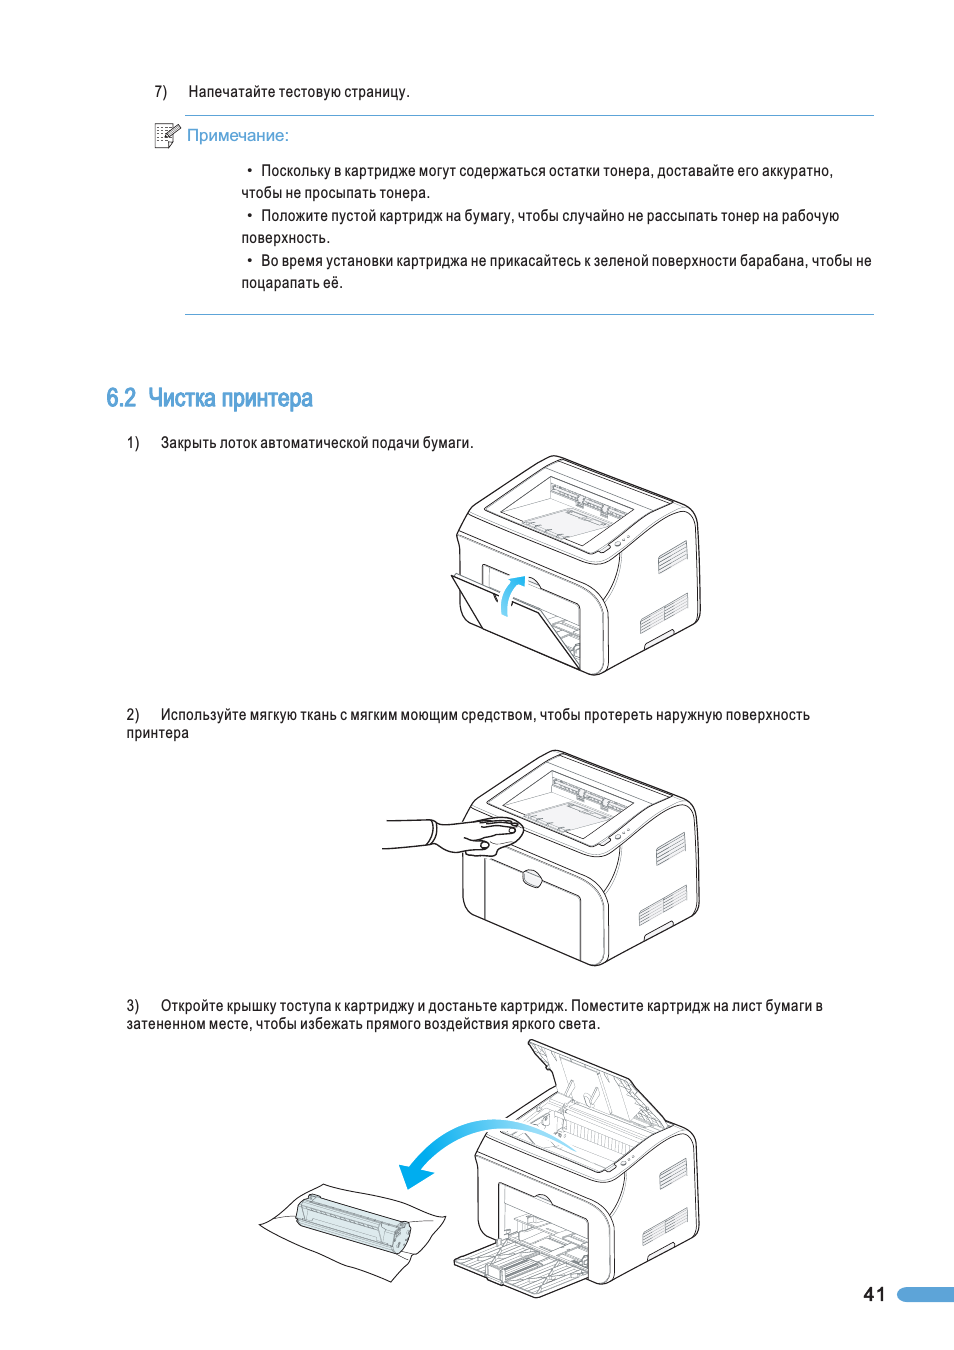
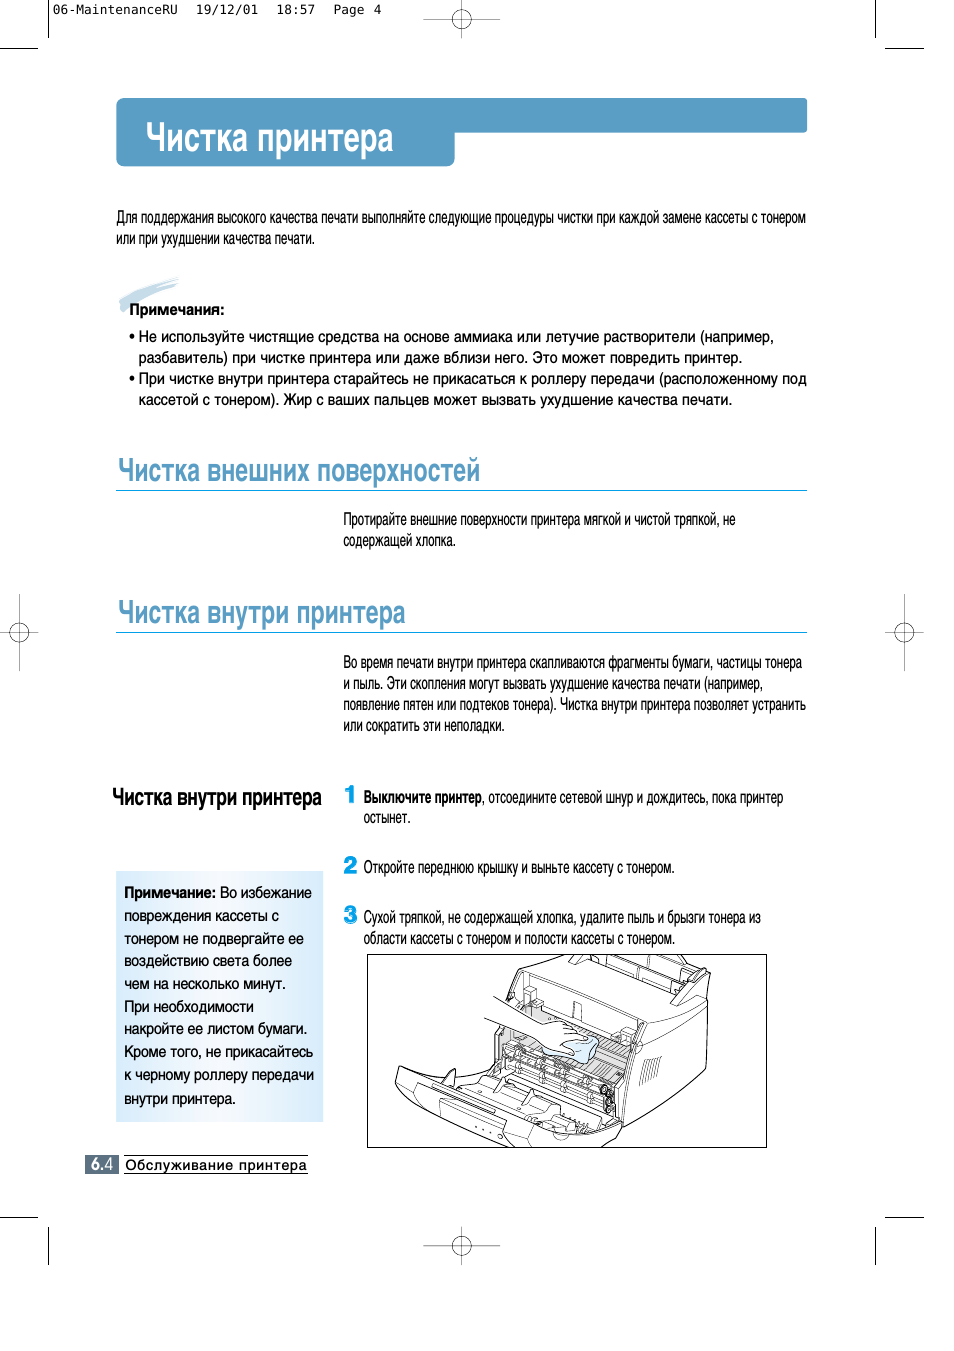
External surfaces
Clean the body of the inkjet printer with a dry, soft cloth. Unplug the printer before cleaning. Do not use rough paper napkins. This can damage surfaces. Also, you can not use chemicals, even with strong pollution.
Attention!
Gasoline or acetone can permanently damage the device.
Use a soft cloth to wipe dust and dirt from all exterior parts of the printer. It is slightly moistened in water, and then gently wiped dry with a clean printer.
Scanner cover and feed rollers
The built-in scanner consists of a cover and an inner side. If these items are dirty, the print quality will deteriorate. Clean the scanner with a dry cloth
It is important that there are no lint on it, because they can remain on glass surfaces.
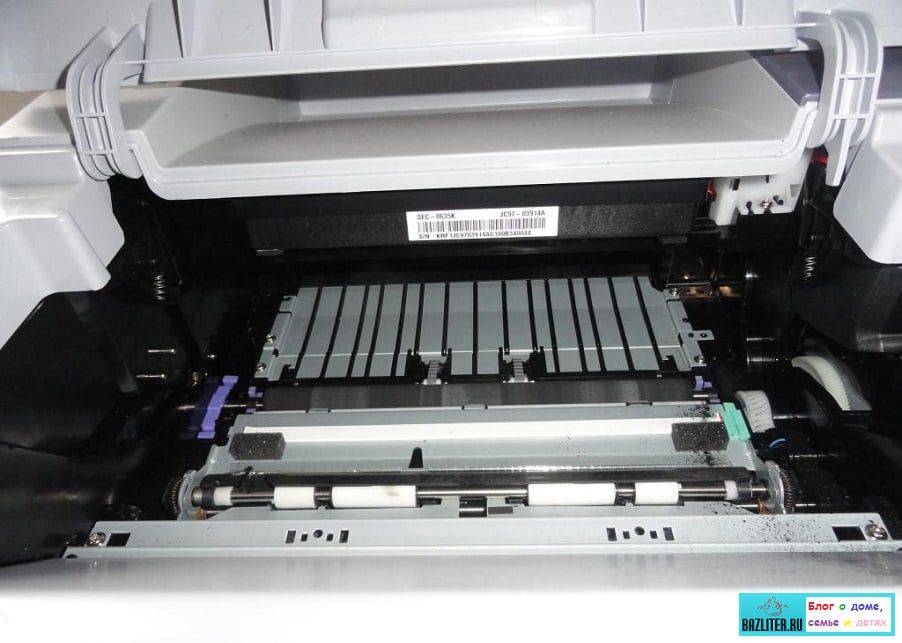
Rollers feed the paper into the printer. If they are dirty, it can get stuck in the feeding process. The cleaning of the rollers is done as follows:
- connect the device to the network;
- remove all sheets of paper from the tray;
- gently clamp the Stop button;
- the alarm system will start flashing;
- you need to wait for it to flash seven times;
- after that the “Stop” button is released and the rollers rotate until the end of the rotation.
As soon as the rollers stop turning, the first cleaning step is complete.Now the procedure must be repeated using paper sheets:
- a small pack is placed in a tray;
- clamp the "Stop" button;
- wait for the alarm system to flash seven times;
- release the Stop button;
- waiting for the paper to be ejected completely.
Sometimes the rollers are wiped with a cotton swab slightly moistened with water. Both rollers are accessible from the back of the printer. You cannot touch them with your fingers.
How to clean the pallet
Dirt that accumulates in the pallet causes stains to appear on the printouts. The pallet is cleaned as follows:
- connect the printer to the network;
- Remove all paper from the rear tray
- A4 sheet is folded in half (in width) and straightened;
- put a straightened sheet in the back tray (with the open side facing you);
- open the tray to start the test;
- press the "Stop" button;
- hold it until the signal lamp flashes eight times;
- release the Stop button;
- wait for the paper to come out of the printer.
After the leaf comes out, pay attention to the place of its fold. If ink stains are present, repeat the procedure again.
If it turns out to be ineffective, you need to wipe the pallet by hand with a slightly damp swab or rag. Be sure to unplug the printer before handling.
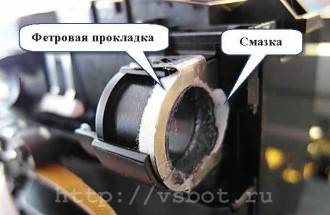
How to lubricate the carriage guide
 So, the user uses original consumables and does not rape the printer with bad ink, refillable cartridges and CISS.
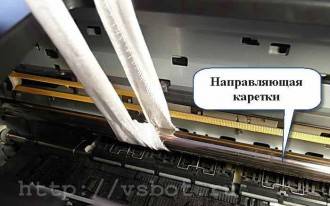
The first thing to do to make the life of the printer easier is to clean the guide from time to time along which the carriage with printheads moves.
Dirt can form from:
- grease on the guide,
- dust contained in the ambient air (including paper),
- ink that shouldn't hit the guide, but still gets there.
Moisten a narrow strip of cotton cloth with ethyl alcohol to remove old grease and dirt. It is better not to use synthetic fabric, it absorbs worse and cleans worse. It would be good to wrap the strip around the guide so that the upper surface of the guide is also cleaned (there should be at least 1.5 turns of the fabric strip).
After the strip is wrapped around the guide, you must alternately pull one or the other end of it. And so it is necessary to walk along the entire length.
Then apply a few drops of industrial or silicone oil to the guide.
In many cases, the rail can be cleaned and lubricated without removing the top cover of the unit. If the design of the printer makes it difficult to use the cloth strip, you can simply wipe the entire available surface of the guide with a piece of cloth.
We remind you that maintenance must be done with the printer turned off!
 Service manuals for printers indicate the type of lubricant to use.
And it would be nice to use it! But in many cases it is difficult to find it.
If the carriage has bronze bushings, then in its cavity there is usually a felt pad that contains grease (oil). She gives it away little by little, so there is often no need to lubricate the guide. If there are no bronze bushings, then the plastic of the carriage is in contact with the guide and this pair needs much less lubrication. However, plastics have a shorter lifespan than metal.
Felt pads can also be located on the side of the carriage in the form of rings containing lubricant.
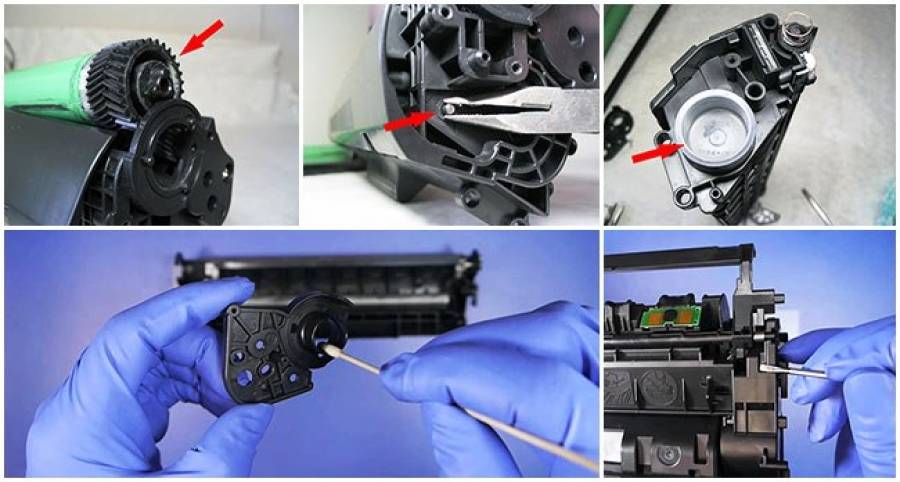
Methods for cleaning cartridges
There are two ways to clean a Canon printer cartridge:
- cold;
- hot.
Cold cleaning
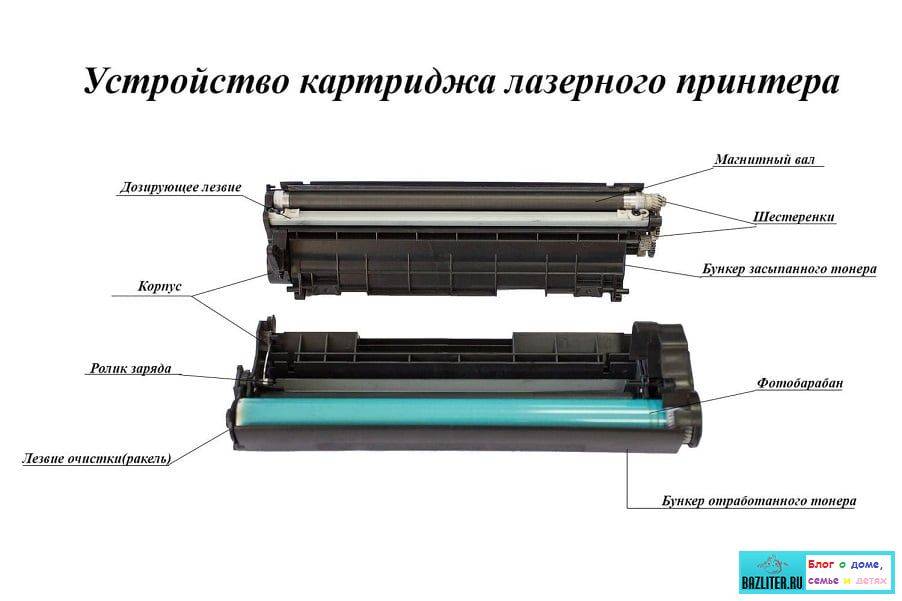
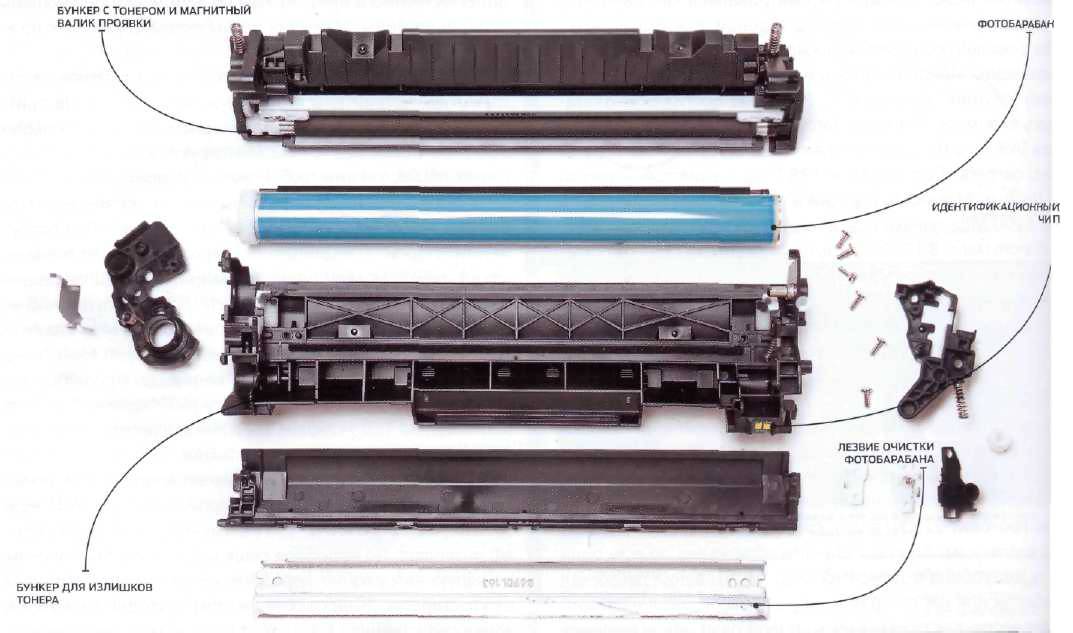

For the cold cleaning method, you will need rubber gloves, a disposable syringe, soft rags, a pipette, and water. You will also need a glass cleaner containing isopropyl alcohol or ethylene glycol (for example, "Mister Muscle" or "Shine").
Take out the cartridge from the Canon printer and place it on a prepared cloth (so that the nozzles are pointing up). Apply a cleaning agent to the nozzles with a holding time of 10-12 minutes. After that, all nozzles must be blotted with a soft cloth and wiped dry with a soft, lint-free cloth.
If surface cleaning does not work, it will take longer and more cleaning agent. The container is filled with liquid by 3 mm, then the nozzles of the cartridge are immersed in it and kept for 3-4 hours. After exposure, the cartridge must be removed and wiped dry. If the cleaning is successful, it will leave a trace of wet ink on the fabric. They are gradually taken out.
There is another dry cleaning method using a rubber plug. Sometimes it is included with the printer. It is necessary to pull back the plunger of the syringe and fill it with air. After that, a plug is put on the needle and all the air from the syringe is squeezed into it. High pressure releases dried ink out. At the end of cleaning, wipe the cartridge, refill and print a test sheet.
Hot method application
The algorithm of actions for the hot cleaning method looks like this. A little hot water is poured into the container and the nozzles of the cartridge to be cleaned are placed in it. The change of water is done without waiting for it to cool down. The water will constantly stain until all the ink is flushed out of the nozzles.
After the first cleaning, the detergent is mixed with water in a 1: 1 ratio and poured into a container. The cartridge is kept in the solution for 2 hours, after which it must be rinsed with hot water and wiped dry.
Helpful advice!
You can make the solution yourself. You will need some ammonia, distilled water, and glycerin. Isopropyl alcohol will also be needed. Water is thoroughly mixed with all components in a 1: 1 ratio and filtered through a strainer.
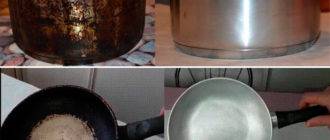
The main causes of pollution
The kitchen is a potential source of pollution. Fat, food debris, temperature changes from the hob, oven, fumes - these factors negatively affect the furniture. Even fingerprints on the gloss are visible to the naked eye. The use of gas burners also leaves a greasy soot on cabinet furniture. Therefore, it is impossible to do without cleaning, caring for materials.
Elevated temperature
It is impossible to cook breakfast, a serious meal for a large family without using the hob. This means that there will be a potential source of high temperature with a likely impact on the materials of cabinet furniture.
Evaporation of food
It is impossible to boil soup, borscht, fry potatoes, and avoid food vaporization, contact of drops and tiny particles with furniture. Subsequently, together with other contaminants, this forms a stable, gloss-breaking, foreign layer on the surfaces of cabinets and countertops.

Finger touch
The most common source of pollution. A thin layer of grease remaining on the pads of the fingers leaves characteristic marks on surfaces, especially glossy ones.
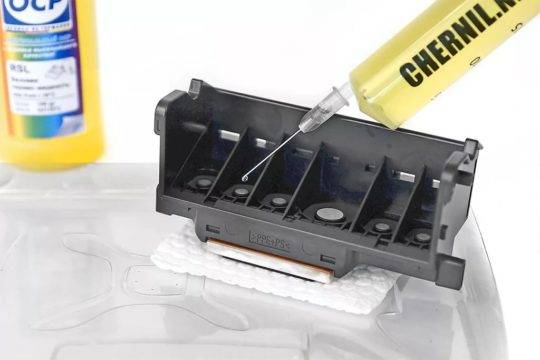
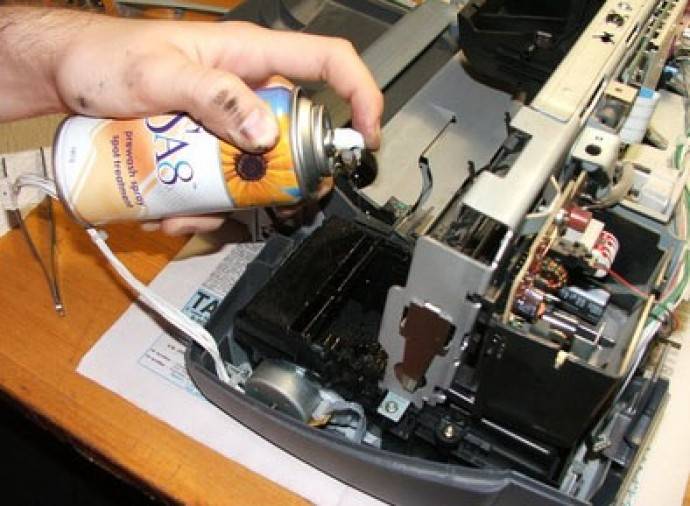
Flushing the head on the cartridge
If the printer has a cartridge with a built-in head, remove the container from the device, turn the nozzles upwards and apply a few drops of the product to them. After 10 minutes, remove the excess cleaner with a napkin and check if the dye passes onto the napkin. If it was not possible to rinse the nozzles in this way, they must be soaked in a container with detergent. You need to soak at least 2-3 hours.
After soaking, the entire surface is wiped dry with a napkin, especially the contacts. The cartridge is inserted into the printer and the nozzle check test starts. If the cleaning quality is poor, try blowing the nozzles through the air intake:
- Cut the needle from the syringe in half and put it on the syringe.
- Put on a soft elastic band on the needle. This will ensure that the syringe fits snugly against the sides of the ink tank.
- The needle is inserted into the air intake hole of the cartridge, and the elastic is put on tightly against the walls.
- The air from the syringe is gently squeezed inward. There should be a piece of gauze or napkin under the bottom of the ink tank, onto which ink will flow under pressure.
- Colored ink tanks with three holes at the top are blown in the same way.
Dust is the main enemy of an inkjet printer
It is the dust that can cause jamming of many of its mechanical parts, as a result of which the printer can fail very quickly. For example, the carriage drive motor could burn out due to excessive dirt on the carriage guide shaft. Surely, many of the users of inkjet printers remember this picture, when at the next attempt to print a document, instead of the usual quiet operation of the printer, you suddenly hear an eerie cracking sound when moving the print head along the guide shaft of the carriage. In this case, the printer generates an error message, the print area is greatly displaced to the side, and, as a rule, the print quality deteriorates greatly, sometimes it is even completely impossible to make out what the printer is printing. All these symptoms clearly indicate that his printer has a very dirty carriage guide shaft. And it is dirty precisely because there is always a large amount of dust around the printer, which easily adheres to the guide shaft. The shaft, in turn, must be constantly lubricated. And the dust, coking on the shaft, forms a very dense and viscous coating, which greatly increases the coefficient of sliding friction of the carriage bearing on the guide shaft. All this leads to the fact that the carriage is no longer able to move normally along the shaft, and it simply starts to slow down strongly along the way, which in general, if this is not noticed in time, can lead to printer failure.
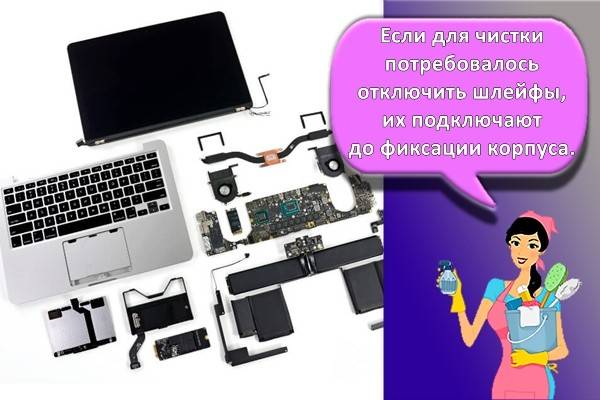
The procedure for complete disassembly of laptops from different manufacturers
Laptops from different manufacturers differ in design features. To avoid mistakes when parsing portable devices, you should follow the instructions for a specific laptop model.
Acer
To clean Acer notebooks, you will need to completely disassemble the case. First you need to disconnect the battery by switching the latches to the appropriate position. Further parsing is done by the following parsing:
- unscrew all the screws on the bottom cover;
- disconnect the wi-fi module wires and RAM slots;
- remove the hard drive and disk drive;
- raise the keyboard by disconnecting several latches in the upper part and sliding the latch, after which the panel is removed from the outside;
- turn off all visible loops;
- dismantle the motherboard to gain access to the cooling system.
HP
The disassembly process for HP notebook computers begins as standard by removing the battery and unscrewing the screws on the chassis. Then the hard drive, RAM strips, wi-fi module and keyboard are sequentially disconnected. To carry out cleaning, it remains to turn off the motherboard and fan.
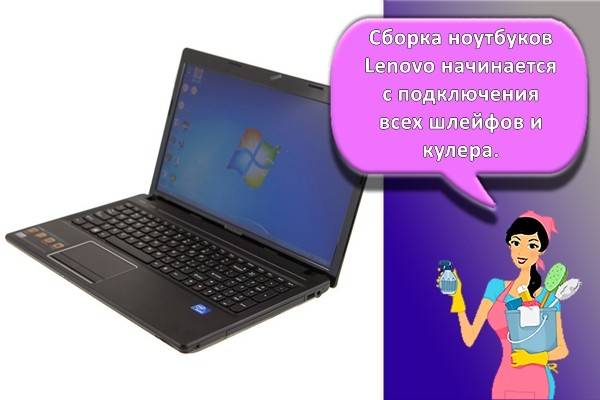
Lenovo
Modern Lenovo models are easier to disassemble than equipment from other manufacturers. It is enough to remove the battery, unscrew the bottom cover and take out the hard drive, after which the cooling system will be visible. To get the cooler, you need to unscrew the fixing bolts and disconnect the loop.
Toshiba
Disassembling Toshiba notebooks begins with removing the front panel located above the keyboard. Then, use a screwdriver to lift the keyboard and disconnect the motherboard cable. The battery and hard drive are removed from the reverse side, the cover is unscrewed, after which the cooler can be cleaned.
Dell
Dell laptops are disassembled sequentially from two sides. The battery and bottom cover are removed first, followed by the keyboard and top cover. Having gained access to the motherboard, the fixing bolts are unscrewed and the cooler is cleaned.
MSI
MSI brand devices are easiest to disassemble due to their special design. It is enough to remove the battery and unscrew the back cover, after which access to the cooling elements will be opened. After pulling out the cooler and pipes, you can start cleaning.
Asus
To spin the Asus laptop, you only need to remove the bottom of the case, remove the hard drive and the motherboard. To perform basic cleaning, the listed actions are sufficient.
Prophylaxis
It is recommended that you regularly check the entire printer and clean the head at the same time as a preventive measure. Keep your devices free of dust or dirt, jammed paper, debris, or any other foreign matter. If found, they must be removed immediately.
If your printer has a continuous ink supply system, regularly check the condition of the hoses that move ink from the container to the head. They must be free of blockages, air blockages, kinks or mechanical damage. The amount of ink should be kept above the average mark
This precaution will prevent air from being sucked into the CISS. It is not recommended to idle the printer for a long time without printing.
Ink can dry out quickly, especially if it is of poor quality. Do a preventive print on multiple sheets every couple of days.
With regular program cleaning, physical cleaning will not be necessary for a long time. And so that the paint does not dry out, you need to print a color page at least once a week.
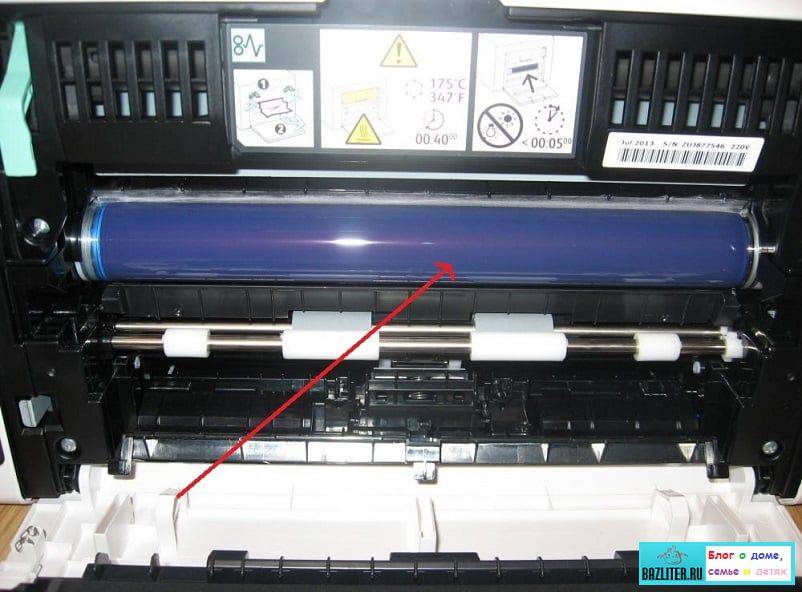
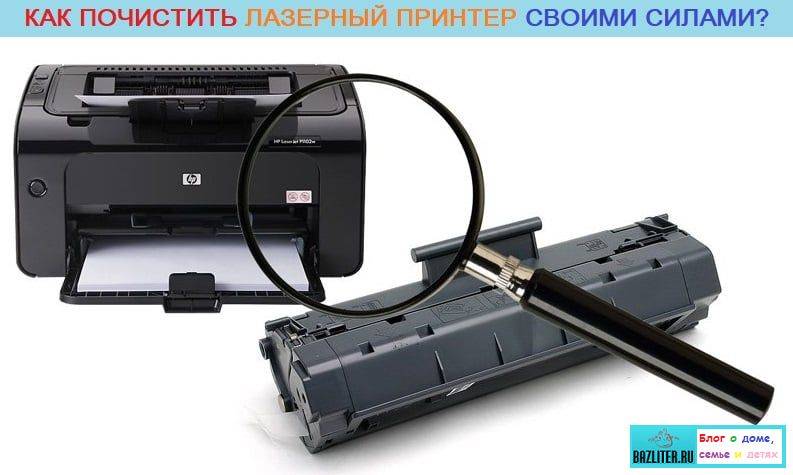
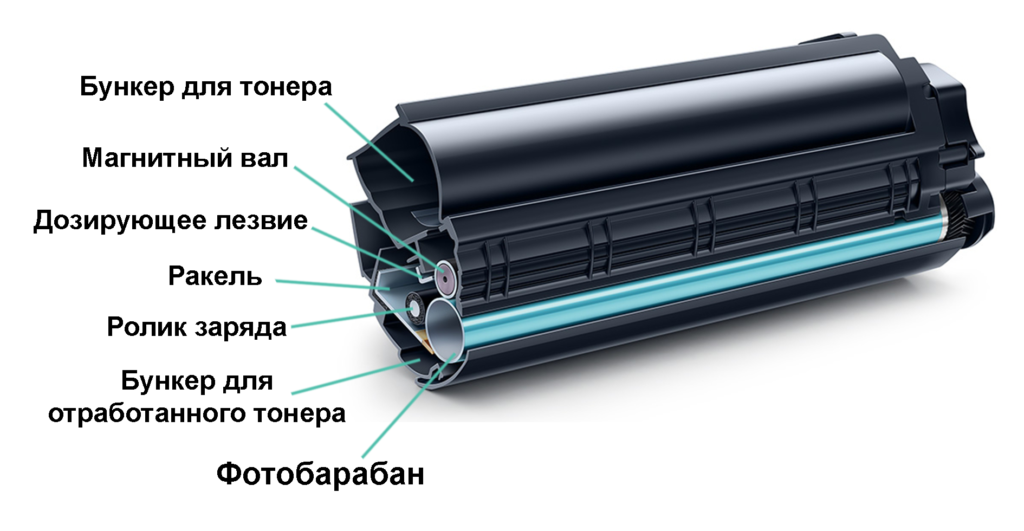
Do I need to clean laser printers
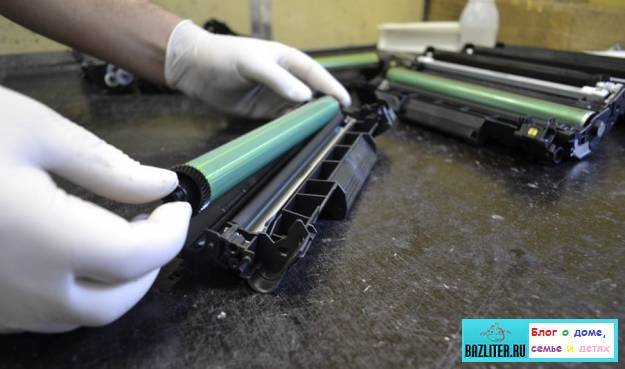
It is very difficult to clean a laser printer yourself. It can have problems with both the cartridges and the photosensitive camera (or drum). Internal damage can result from staples or staples hitting them. The photosensitive drum cannot be repaired: it can only be replaced with a new one.
To avoid damage to the drum, do not shake the cartridge. Many users do this if it runs out of toner. By shaking the cartridge continuously, toner becomes coated on the surface of the photosensitive drum. It cannot be removed without damaging the device. Also, you cannot reuse the powder that has already been used up and poured into the waste tray.
Do not disassemble laser printer cartridges yourself. It is carried out using special equipment in special conditions. Toner is a finely dispersed powder that has carcinogenic properties. When buying a laser printer, you need to remember this.
When handled with care, a laser printer will last for many years. The same can be said about other Canon devices. Some problems are eliminated on their own, but if this fails, it is better to turn to a professional in time so as not to lose valuable household appliances. Before attempting to repair the device, you should read the instructions for its use.
Flushing the Print Head
There are several methods of head flushing that should be familiar with.
Hardware
Some people prefer to restore the operation of the printing device using a hardware method.
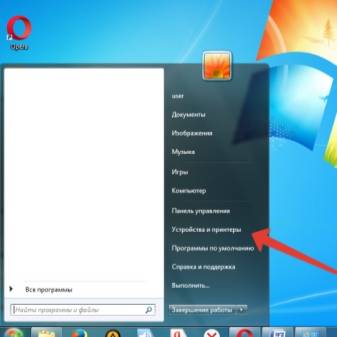
Using the tools of the operating system
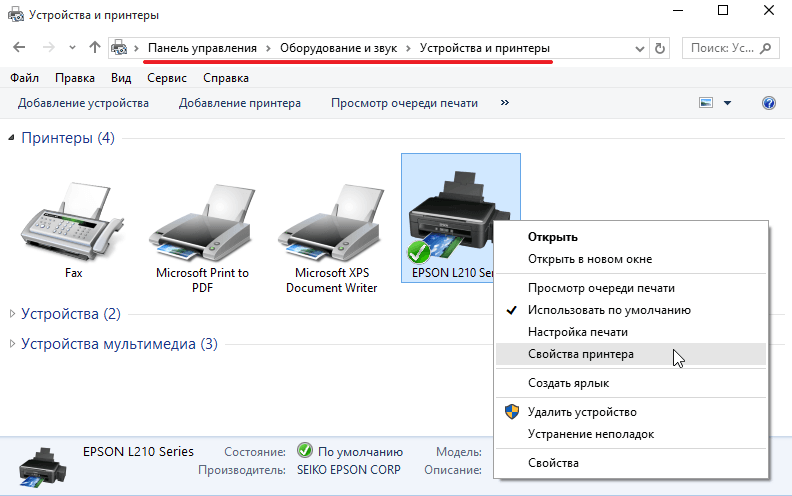
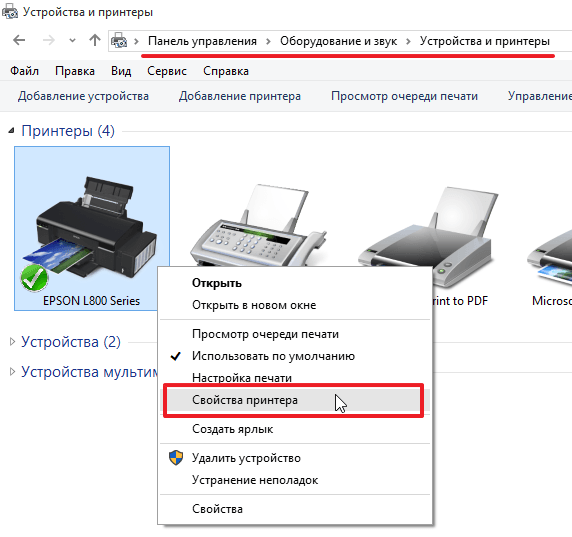
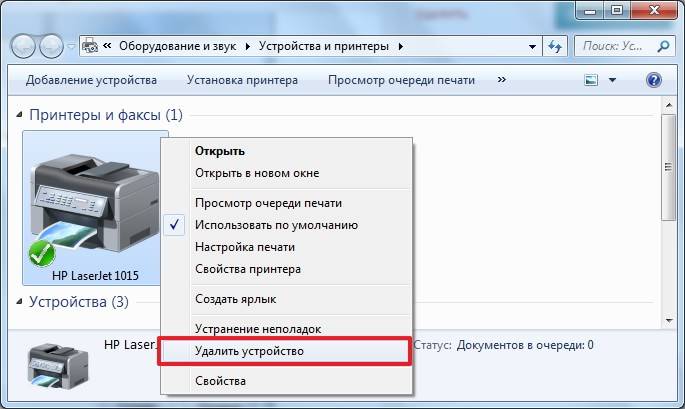
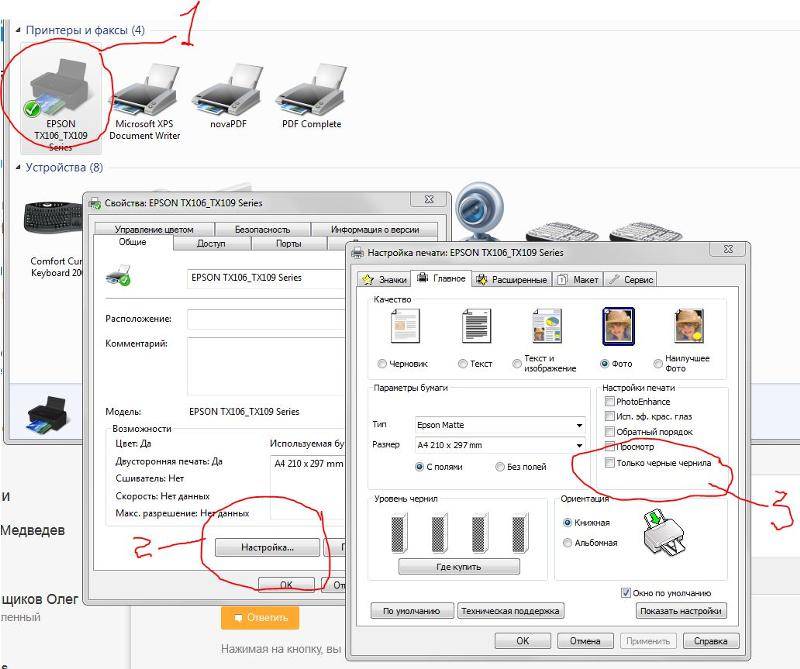
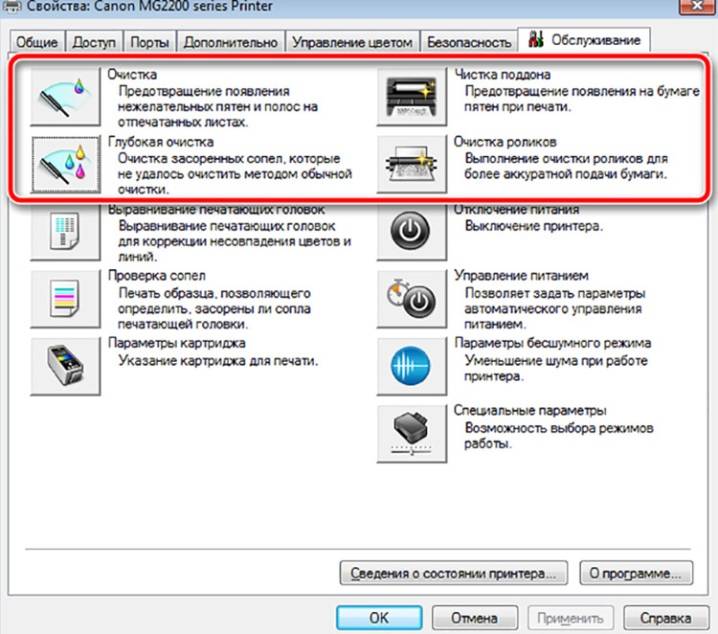
Built-in OS tools allow you to normalize the performance of printers. To do this, you will have to follow these steps:
- connect the device to a personal computer and install all the necessary drivers;
- make sure the cartridge has enough ink to print;
- load several A4 sheets into the tray;
- through the "Start" menu enter the "Devices and Printers" submenu;
- select the required printer, right-click on it and open "Properties";
- go to the subsection "Equipment" and select deep cleaning of the device;
- wait for the procedure to complete and try to print a page with text;
- if the sheet is again covered with dark spots during printing, cleaning is repeated.
Using additional printer functions
Some modern models are equipped with built-in additional cleaning functions. To use them, you will have to install special software that came on the disk with the printer.
Manual
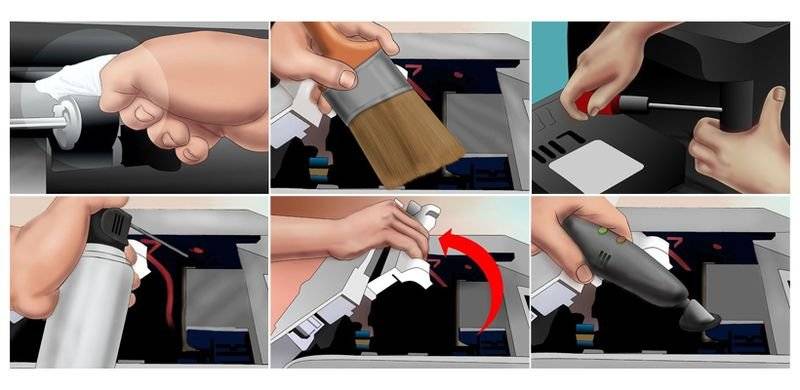
Sometimes hardware cleaning does not help to get rid of dirt and you have to deal with manual cleaning.
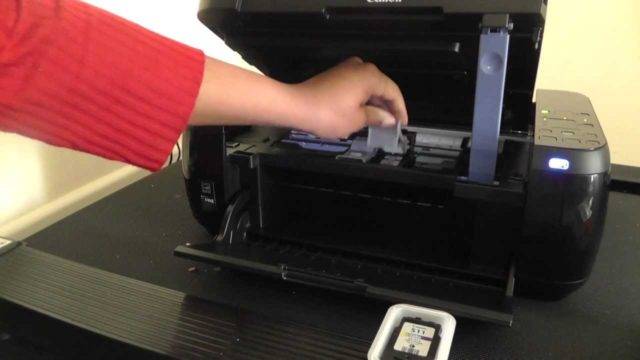
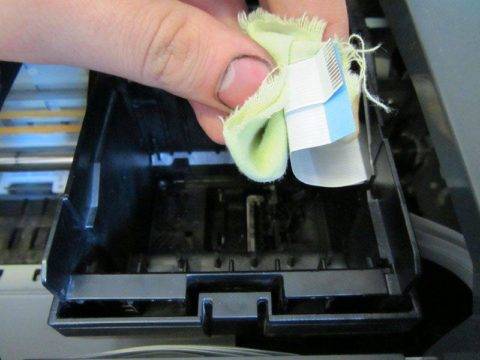
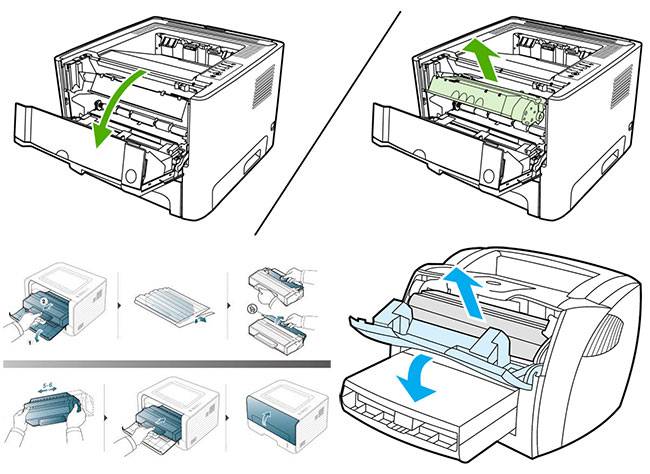
How to remove the head
Before proceeding with cleaning, you will have to manually remove the printhead head. To do this, open the top cover and remove the carriage from the parking area.
The print head is attached using special clips that must be disconnected in advance. On the right is a locking lever that rises up
The head can then be carefully removed from the printer.
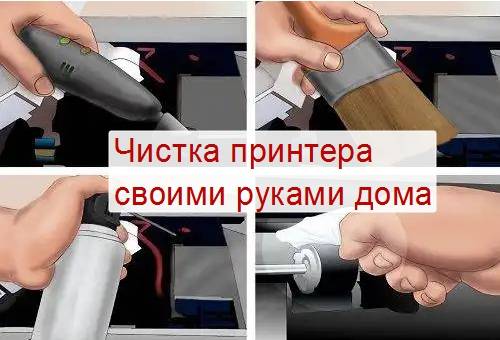
Tool
There are several tools to help you clean ink and other debris from your device.
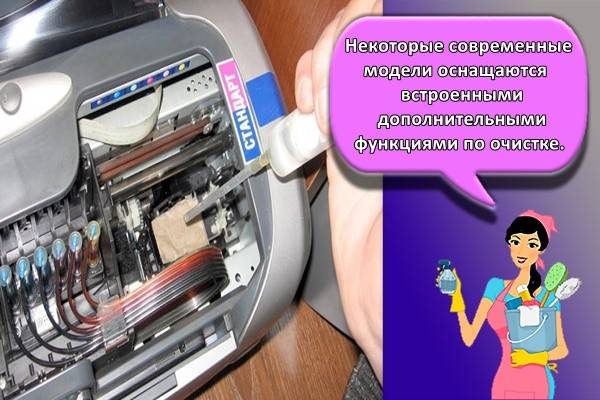
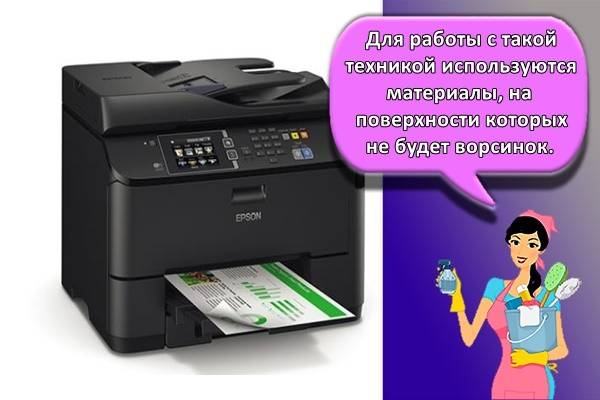
Lint-free material
Many people think that fluffy rags should be used to clean the printer cartridge and other parts of the machine, but this is not the case. To work with such a technique, materials are used, on the surface of which there will be no lint. Fluffy rags are not suitable for printers, as the fluff will begin to stick to the surface to be wiped. Therefore, when cleaning, use coffee filters or ordinary thick paper.
Syringes with needles
Some experts recommend using medical syringes to flush heads. They should not be too voluminous, the standard 2-3 milliliters will be enough. Syringes are used to draw up cleaning fluid and inject it into the soiled head.

To get the liquid inside, you will have to put a needle on the syringe. At the same time, experts advise using special ink needles. You can put them on the syringe using an adapter.
Plastic container with low sides
If the part will be washed with a damp cloth or damp paper, you will need a container for the detergent liquid. It is necessary to use a plastic container with low sides, as it is the most convenient. Concave lids, small food containers and trays are often used as such containers.
Distilled water
Some people do not want to use special chemicals for cleaning printers and use more gentle products instead. One of them is distilled water. It is contraindicated to use plain water and alcohol, as such liquids can damage the print head.
Cleaning agent
There are special products for cleaning dirty printers.
Service Tools
Effective remedies for removing dirt from printers include the following:
- CL06-4. It is an effective cleaning fluid specially used for printing machines. The advantages of this tool include the fact that it can be used to clean laser and inkjet models.
- PCS-100MDP. An indispensable tool in the fight against traces of dried ink. The liquid contains trace elements that corrode any dried dirt.

It is very easy to use cleaning products to remove dirt with your own hands. To do this, just take a piece of paper or a cloth and moisten it in liquid. Then the soiled cartridge and head are gently wiped with the moistened material.
What is needed
The laptop can be prevented by yourself, without the involvement of the service center staff. For cleaning at home, you will need to prepare a set of tools and materials, and then follow the step-by-step instructions.
Screwdrivers in different sizes for small parts
The laptop case and internal parts are screwed with screws of various sizes.To unscrew the device, you will need to use several screwdrivers, the easiest way is to prepare a set of tools.
Brushes
The laptop should be cleaned with different brushes. It is better to handle parts with a scratched surface with soft brushes. For a thorough cleaning of the rest of the elements, you can use brushes with stiff bristles.
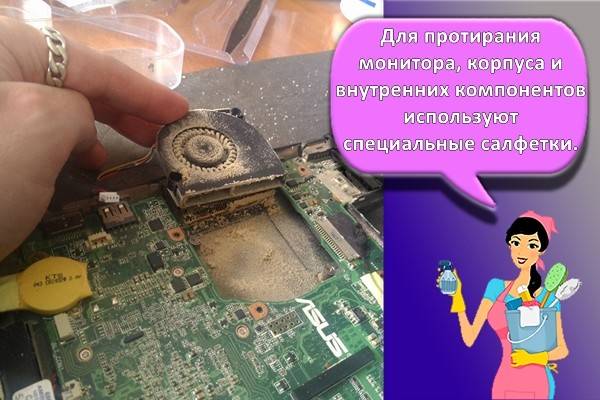
Napkins
Use special wipes to wipe the monitor, case and internal components. Treating parts with simple damp wipes can cause breakage due to alcohol impregnation.
Possibly a plastic card
Often in the course of preventive maintenance, it becomes necessary to remove the old layer of thermal paste on the internal chips. To evenly distribute the new layer on the surface, it is most convenient to use a plastic card.
It is important to take an unnecessary card, as it can be damaged by interaction with thermal grease.
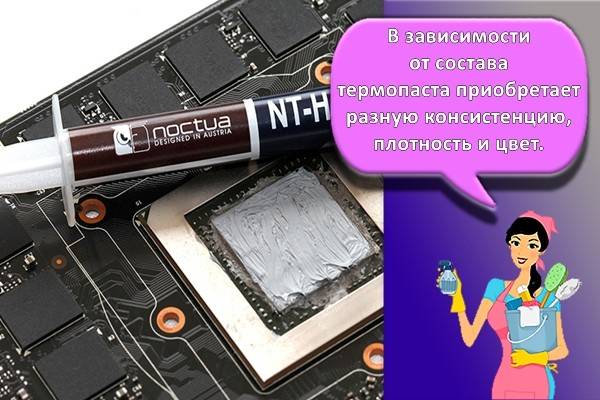
Thermal paste
Thermal paste is a creamy substance with a conductive property. The paste is used as an interlayer in the cooling system of elements and removes heat from powerful transistors.
Budgetary
Cheap types of thermal paste are made on the basis of powdery zinc oxide and polydimethylsiloxane liquid. It is advisable to use budget thermal grease in the case of prophylaxis of inexpensive devices or in cases when a small amount of a substance is required to be applied to the chips.
Expensive
The composition of expensive types of thermal paste contains metals with high thermal conductivity characteristics. In particular, these are particles of silver, gold, copper or tungsten. Expensive thermal grease is required for high-performance laptops.
How to choose
Depending on the composition, the thermal paste acquires a different consistency, density and color. There are a number of factors to consider when choosing the right variety, including the following:
- Thermal conductivity is the main parameter of any thermal paste. The higher the indicator, the more efficient the use of the substance will be.
- Thermal resistance, which is the reciprocal of thermal conductivity. Low-resistance paste is better at dissipating heat away from internal parts.
- Plasticity, on which the uniformity of application to the surface depends. Thermal paste should smooth out well and create a thin layer without porosity.
- Resistance to temperature extremes to prevent early drying out. When using a laptop, the paste is constantly exposed to different temperatures, and a sufficient wear period is 1 year or more.
Excellent lighting
To avoid damaging parts, bright lighting is required to provide good visibility. Work should be carried out in a prepared work area where a desk lamp can be attached.
Attentiveness and accuracy
The cleaning process requires care, since there are a large number of fragile elements on boards and microcircuits. Careless movements can cause malfunctions.
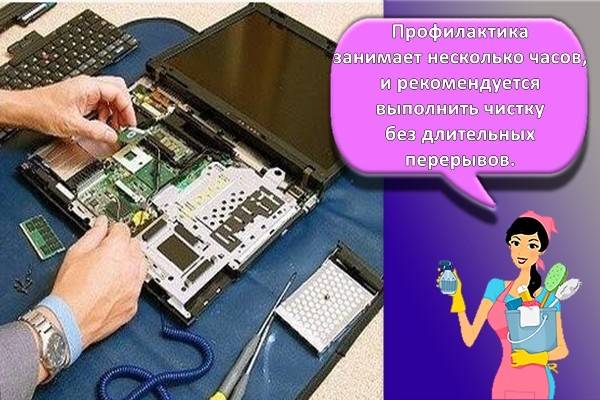
Time
Comprehensive maintenance takes several hours and it is recommended to clean without long interruptions. Leaving your laptop disassembled can result in the loss of small internal components. In addition, the likelihood of dirt getting on the surface of the microcircuits increases.
Cleaning with the program
Inkjet printers can be automatically cleaned without manual intervention through preinstalled programs. There are 2 ways: through PC settings or special software that is on the installation disc. First way:
- Click "Start", then "Control Panel".
- Open the "Devices and Printers" section.
- In the window that appears, find the printer model that is connected to the PC. Press RMB, select "Print settings".
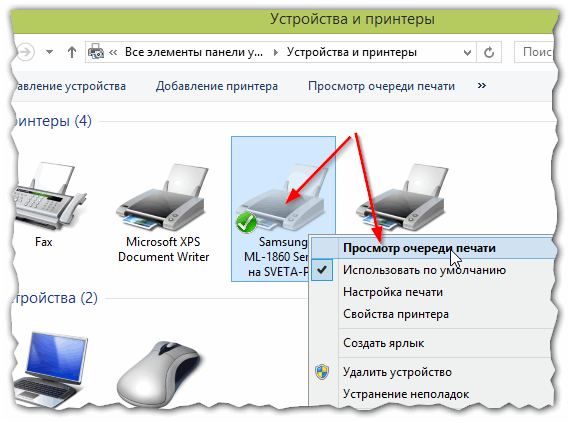
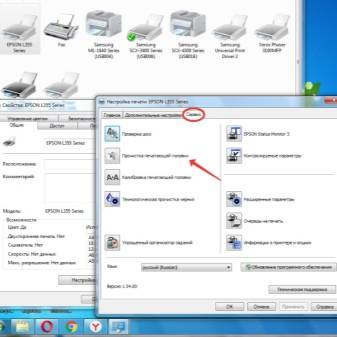
Second way:
- go to the "Service" section (switch buttons in the upper bar of the window);
- select the operation "Nozzle check", carefully read the requirements and click "Print".
The printer must have paper or it will not be able to run the test. The device will print several patterns to test different colors: black, pink, yellow, blue. The screen will display the reference version: no stripes, gaps, with correct color display.

An alternative is to open the special printer program and find the "Cleaning" section in it. The program can offer cleaning of different elements: nozzles, heads, rollers. It is advisable to run everything.
You can enable software cleaning 2 times in a row. If after the second attempt the situation is not completely corrected, exit 2: either start cleaning manually, or give the printer a rest for 24 hours, and then turn on the software cleaning again.
Inkjet cartridges and laser imaging drums are very sensitive. These elements are easily damaged if not cleaned properly. Therefore, those who are not confident in their abilities are advised to entrust the device to professionals. The cost of the service is 800–1200 rubles, depending on the company.
For information on how to clean the nozzles of an inkjet printer, see the following video.
The order of assembling laptops from different manufacturers
The assembly of devices of different models, by analogy with disassembly, is performed with some peculiarities. To return all parts to their original position and not damage internal components, there are a number of steps you need to take step by step.
Acer
Having started assembling the Acer laptop, first return the motherboard with the cooling system to its original place and fix the elements with screws. Then they put on the upper part of the case, connect the cables and insert the keyboard. The laptop is turned over and the hard drive, disk drive, RAM and wireless module are installed. Having secured all the elements, screw the bottom cover.
HP
When assembling HP laptops, a fan, a motherboard, a keyboard, a wi-fi module, memory slots and a hard drive are sequentially attached. After fixing all the parts in their original places, it remains to screw the case and connect the battery.
Lenovo
Assembling Lenovo laptops begins with connecting all the cables and a cooler. Then return the hard drive, secure the bottom of the case, and install the battery.
Toshiba
After finishing the internal cleaning of the Toshiba laptop, first screw the bottom cover and install the battery and hard drive into the connector. From the front side, connect the motherboard and cables, insert the keyboard until it clicks into place. Put on the upper part of the case from above and fix all the screws.
Dell
The first step in assembling the device from the manufacturer Dell is to install the motherboard - the element is put in its original position and bolted. Then the keyboard, the front of the case, the bottom cover and the battery are installed.
MSI
Collecting MSI brand laptops takes a minimum amount of time. Since the main components of the cooling system are located directly under the bottom cover, you just need to put the case back in place, fix it with screws and install the battery.
Asus
In Asus laptops, when assembling, the motherboard is first replaced, and then the hard drive and bottom cover. If it was necessary to disconnect the loops for cleaning, they are connected before fixing the case.