Before you hang or remove a chandelier on a stretch ceiling, you need to know a number of nuances of carrying out such work, non-compliance with which can lead to trouble.
Do not forget that all actions must be performed with the electricity turned off.
It is also important to decide on the choice of lamp, mounting method. Let's consider the main questions that may arise during the installation and dismantling of a chandelier on a stretch ceiling.

The main aspects to consider when installing a chandelier
For safety, important points must be taken into account:
- use high quality materials and devices that meet safety standards;
- de-energize the room;
- put on gloves;
- work with insulated cables;
- check the operation of the device after completing all actions;
- do not drill near the switch, as there is a high probability of touching the wires.
Before electrical work, it is imperative to carry out preparatory measures:
- selection of a site for installation (when the luminaire is mounted on a new one, conduct wiring there);
- check of electrical wiring (if necessary, replacement or repair);
installation of fasteners.
For fastening are used:
- hook - the simplest type of fastener, intended only for pendant lights;
- standard universal strip - used in 90% of cases of fixing chandeliers, usually included in the package;
- cross-shaped bar - required for round, oval, square, rectangular lamps;
- "I-beam" - for large-sized items.

A competent choice of a lamp is also important:
- Do not purchase a disc-shaped chandelier made of thin metal. Its body heats up quickly, which is bad for stretch ceilings. If you decide to buy a disc-shaped product, it should be made of thick material, reflect light well.
- There should be no shades and incandescent lamps inside the luminaire. They will heat the ceiling, which will stain any material.
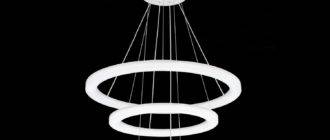
- It is best to choose chandeliers with LED or energy saving lamps. They do not heat up the surface.
- There should be no sharp elements on the luminaire so as not to spoil the surface of the canvas.
- For convenience, choose a chandelier with a large bowl, elongated and simple suspension.
After familiarizing yourself with the safety rules, having completed the preparation, you can proceed to the installation work.
Methods for mounting a chandelier on a stretch ceiling
There are 3 types of attachment. Each method has its own characteristics.
Method 1: hook
The fasteners must be screwed into the concrete base.
This eliminates the need for additional devices. The chandelier is securely fastened.
When the lamp is hung in the old place, the hook is already installed. It remains to verify its reliability. In the absence of fasteners, it is recommended to hang the anchor hook. Before installation, you need to measure its length. It is located just above the stretch ceilings. When done correctly, the chandelier bowl is flat against the ceiling.
Further actions:
- Stick a plastic thermal ring on the ceiling so that a hook passes through it, and it is well glued around the circumference.
- After drying, cut a hole for the fasteners inside the ring.
- Connect the cables, lift and fix the protective cap in the required position.
- Remove the shades and fix the luminaire to the ceiling.
- Check the performance, install the shades.
Method 2: plank
Place a wooden plate on the concrete ceiling. For its manufacture, you need to use 2 slats 30 cm long, 10-12 mm wide. The height is selected so that the bar does not protrude above the surface.

Phased installation:
- Fix the plate firmly with anchors, dowels, self-tapping screws.When the fasteners are located far from the stretch ceiling, use a steel hanger.
- After stretching the canvas, make a mark where the fasteners are located.
- Stick the thermal ring in the marked area.
- Cut a hole inside the circle, pull wires through it.
- Remove all irregularities on the bar, sandpaper in the corners.
- Fix it with self-tapping screws within the hole in the plastic ring.
- Connect the luminaire and screw on the decorative elements.
Method 3: cruciform plate
Attach a special support. This is a timber beam with a thickness of 10-12 mm.
Step by step installation:
- Make a hole in the middle for wiring.
- Fix galvanized plates in the corners of the bar. The structure is attached to them with self-tapping screws or dowels. The legs of the platform are flush with the canvas.
- After stretching the ceiling, fix the cruciform plate.
- Glue the thermal ring around the hole. Make a hole in it and bring out the wires.
- Connect the cable to the device.
- Attach the chandelier to the cruciform plate in the same way as on a regular one. There will simply be more decorative nuts. The luminaire must adhere well to the surface without distortion or indentation.
For devices weighing 10 kg or more, you need to use "I-beam". Installation is identical to the cruciform plate, but the fasteners are installed before stretching the ceilings.
Electrical wiring connection
Step-by-step actions:
- completely turn off the electricity in the room;
- lead out the wires through the hole;
- for convenience and free control by hands, hang a chandelier;
- remove the protective sheath from the power cable, measure the required core size for placement in the terminal box;
- clean the ends of the wires by 0.6 cm, fix in the terminal box: the color of the cable matches the shade of the terminal;
- close the box lid;
- assemble the lighting fixture.
All twisted cables are placed in a plastic crimp. This will protect against overheating and short circuits.
Final work
After installation, inspect the ceiling for scratches, tears and other damage. If the installation of the tension web was carried out by a non-professional and there are defects, the following recommendations will help to hide the shortcomings:
- Carefully cut off the material remaining in the thermal ring, leaving 2-3 cm from the edge. This will prevent slipping and deformation.
- Thermal stickers will help to hide various kinds of damage on the canvas. In addition, they will add zest to the design.
- So that the cables do not come into contact with the inner zone of the ceiling, they must be placed in a corrugation.
What situations can arise in the process of work
When carrying out work, problems sometimes arise, especially if they are performed by a non-professional.
How to troubleshoot errors:
- The length of the fasteners was shorter than necessary. The hook can be extended with a chain. It will serve as a kind of extension cord.
- You need to extend the cables. They need to be placed in a plastic corrugation, so they will not reach the inner area of the ceilings. Attach the corrugation to the concrete base.
- If you want to move the chandelier to another place, this must be done before stretching the ceiling. Then you can't do without damage.
- Household wiring is different from chandelier cables. It is necessary to use terminal blocks that prevent short-circuiting of non-contact materials.
Dismantling the chandelier
The dismantling method depends on the type of attachment.
Hook
The process is simple, everyone can handle it:
- Remove the protective cap.
- Put your hand into the hole and find the hook.
- Remove the chandelier from it.
- Pull out the luminaire together with the cables.
- Disconnect the wires one at a time.
Cruciform bar
Step-by-step actions:
- Remove all decor and fragile details.
- Remove the cap secured with a set screw or nut. A hole will appear in the canvas through which the mount is visible.
- Dismantle the hangers attached to the concrete with self-tapping screws.
- Pull the strip with the chandelier through the hole.
- Disconnect the wires, insulate the ends.
Helpful dismantling tips
The following recommendations will help to facilitate the dismantling process:
- When removing the plate (spotlight), first unscrew the bolts on which it is held. Only then are further actions taken.
- Disposable fasteners are often used for mounting. They do not need to be removed, they have a rather long service life. And if you dismantle, you will have to buy new ones.
- Before starting work, you need to measure the voltage with a phase indicator.
You can dismantle and mount the chandelier on your own, without resorting to outside help. The most important thing is to follow the phased actions given in the recommendations. However, if you have doubts about your own abilities, it is better to invite an electrician who will do everything quickly, efficiently and professionally. Moreover, the cost for services of this nature is acceptable, and a guarantee is given for the work performed. If suddenly something fails, the breakdown will be eliminated free of charge.