Home care
For full-fledged growth, abundant flowering, Streptocarpus must be provided with proper care. It boils down to the following rules:
Illumination
Streptocarpus prefers bright, but diffused light. The best place in the room for growing it is the window sills of windows facing west or east. If the flower pot is placed on the southern windowsill, then the plant will need to be shaded, since direct sunlight can burn the foliage. It is not recommended to grow Streptocarpus in the northern part of the room, since a lack of light will negatively affect the condition of the plant.
Temperature
From spring to early autumn, the most favorable air temperature will be in the range of + 20 ... + 25 ° С. Below and above this indicator, the temperature is undesirable for the plant. In October, the air temperature in the room where Streptocarpus is grown drops to + 15 ° C. If it is not possible to lower the temperature, then the flower pot, which begins the rest period, is transferred to another cool place.
Watering
In spring and summer, Streptocarpus is regularly watered with water. Watering should be moderate. During this period, it is necessary to ensure that the soil does not dry out excessively, but also does not become waterlogged.
In October, the number of irrigations decreases, and in winter, they become much less. Nevertheless, it is nevertheless necessary to prevent severe drying out of the soil, and also there should be no stagnation of water in it. Water the plant only with settled water at room temperature.
Spraying
If the tips of the leaves begin to dry out in the plant, this is the first sign that the room has a low percentage of humidity. In this case, it is necessary to carefully cut off the dried parts of the leaves with a sharp knife, and spray the plant with warm water from a spray bottle.
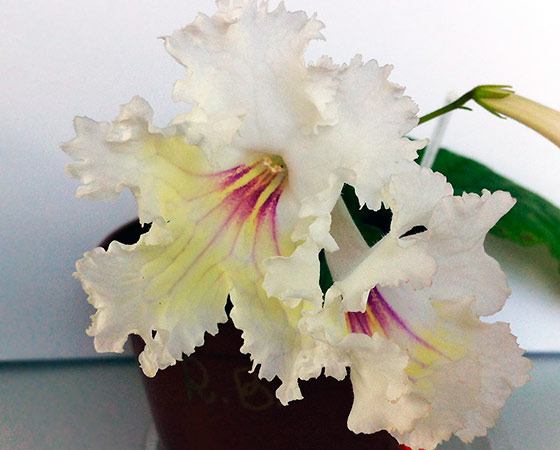
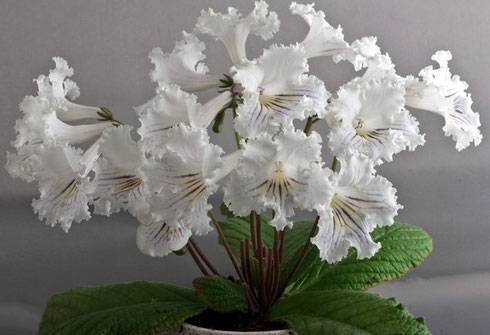 Streptocarpus flower
Top dressing
Streptocarpus positively perceives feeding, which is recommended to be carried out during the entire growing season. Every month 3-4 times the flower is fed with complex mineral fertilizers.
Diseases and pests
With stagnation of water in a pot, overflow Streptocarpus can be affected by rot. In order to prevent the plant from dying, the bush is pulled out of the pot, the affected areas are removed, the root system is washed with a solution of potassium permanganate, after which the bush is transplanted into a new substrate.
Of the harmful insects, the danger to the plant is the spider mite, thrips, mealybug, scale insect, whitefly. In case of pest damage, the plant is urgently treated with an appropriate insecticide solution.
Transfer
Young specimens of Streptocarpus need an annual transplant, adults - after 3-4 years. It is better to transplant in early spring. A shallow but wide pot is filled with fresh soil mixture, consisting of humus, sand, deciduous, and turf soil in a ratio of 1: 1: 2: 3. To reduce the moisture content of the soil mixture, it is recommended to add a little crushed charcoal to it. When transplanting young bushes, the soil mixture is prepared without sod land.
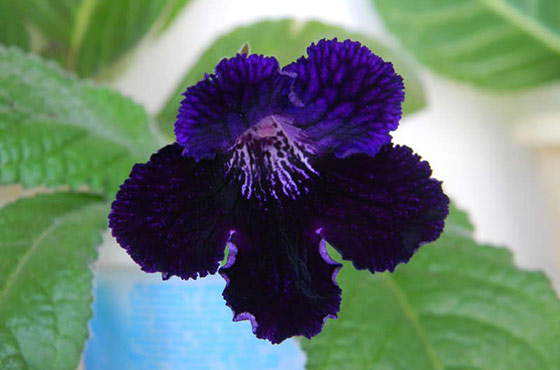
 Streptocarpus Blue Harlequin
The easiest way to reproduce is to divide the bush.
The most suitable reproduction for streptocarpus at home is by dividing the bush. As the name implies, division is not a full-fledged reproduction, but, rather, the planting of one large bush in several flowerpots.
This method is applicable mainly to large, overgrown plants.The division itself is an integral part of streptocarpus care and is carried out at least once every 2-3 years. Failure to follow this rule often leads to two types of consequences:
- streptocarpus grows excessively and begins to fade in a small flowerpot due to lack of nutrients;
- the growing streptocarpus is repeatedly transplanted into a larger flowerpot. Soon, this leads to the fact that the plant stops blooming, since the peduncles can no longer break through the curtains of leaves.
Breeding time
For a streptocarpus flower, reproduction in the spring and summer is preferable.
This is a time of high activity of metabolic processes, which is very important for rooting and regeneration of root segments damaged during transplantation.
This rule is not so strict for indoor streptocarpus, whose biorhythms are often not tied to the change of seasons. In this case, the division can be done at any convenient time.
The dormant state occurs in plants with a decrease in daylight hours in the autumn-winter period. During this period, any manipulations associated with seeding, dividing or fertilizing are contraindicated. All a flower needs at such a time is infrequent watering. The fact that a state of dormancy has come can be understood by the long absence of flowering.
Division technology
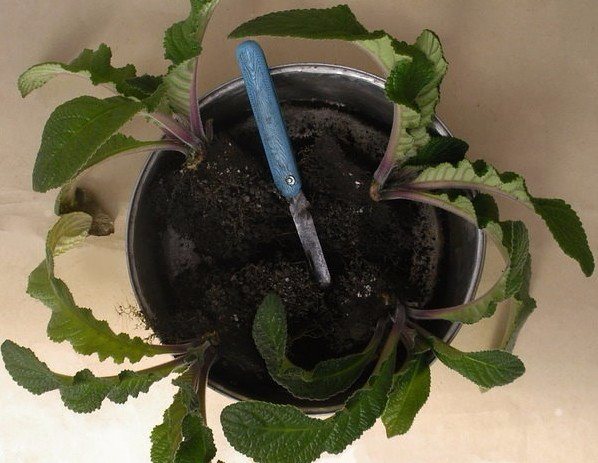
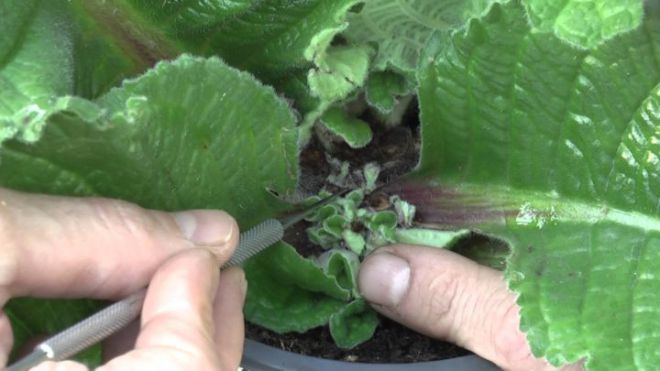
Dividing a bush is a process that will take some time, so it is better to immediately stock up on a couple of hours, especially if this is your first time. The division technology includes three stages:
- Identifying strong points of growth. You can determine the growth point by a combination of several closely spaced leaves of leaves that come out of one head of the bush. The leaves should be strong, looking outward from the center - our bush will divide into such segments.
-
The division itself. Before dividing, the bush must be removed from the pot and as much as possible to rid the roots of adhering soil, trying not to damage them.
Two strong points of growth are clearly visible in the photo, and you need to divide the plant along them. To do this, you need to carefully dissect the head of the bush between the right and left parts and separate the parts from each other.
-
Clarification of the bush. At this stage, you need to get rid of old leaves and thickening weak growth points. Old yellowed leaves that appear after flowering are usually not a problem. They are easily separated from the plant, but the main thing is that the need to remove them does not raise doubts among the grower. But it turns out that young leaves can also harm the bush as a whole. Weak points of growth mean smaller leaves that appear randomly, sometimes from the place where the peduncle should be.
Such leaves grow, as it were, inside the bush and towards each other, thickening it and making it more vulnerable to fungal infection, for example. They also prevent the peduncles from breaking through.
Important! Weak or old leaves with the remains of peduncles should be removed together with the neck and its roots.
How to choose a container and plant delenki
It all depends on the size of the plant: the larger it is, the more space it will need. The plant should have enough soil, and the root system should be freely located in the container. Basically, disposable containers with a volume of 0.25–0.35 liters are used for seating the divisions.
First, the container is filled with the substrate to about half, after which the root of the plant is lowered there and evenly added to it from all sides. At the end, the soil is lightly tamped, but not hard - just to fix the aerial part of the flower.
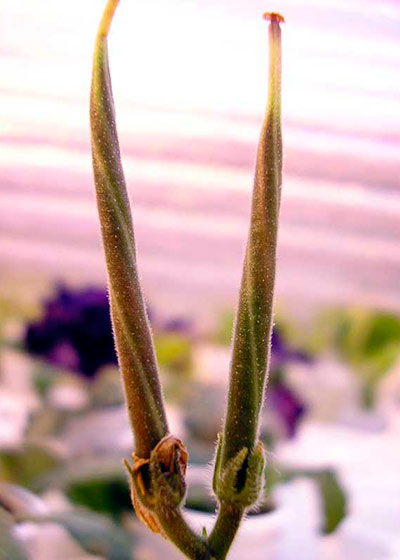
Planting seeds
If you have never grown streptocarpus from seed before, keep in mind that each seed is so small that it is impossible to see it without a magnifying glass. It can be said that there is "seed dust" inside the pods, not seeds.
Nevertheless, each such speck of dust turns into a full-fledged plant over time.But in bags from the store there may be seeds in granules, it is more convenient to work with them.
For growing a flower from seed, it is best to use a plastic container with a lid. Make sure to make several holes in the lid to allow air to reach the seeds.
Before planting the seeds, sprinkle a layer of perlite or vermiculite on the bottom of the container and moisten it.
Then put a layer of substrate on top of this layer. It is best to use tablets such as Jiffy to get the substrate. They contain all the necessary nutrients for the rapid germination of seeds and the growth of seedlings. It is more convenient to use large tablets with a diameter of 5 centimeters.
In such tablets, a fine-grained substrate is compressed with a small addition of coconut fiber. Pour the tablet with warm boiled water, without removing it from the mesh, and wait until it swells.
After that, squeeze out excess water, cut the mesh and evenly distribute the substrate over the perlite layer.
After that, you can slightly compact the substrate with a regular tablespoon. When squeezing the tablet, you do not need to be too zealous, as the planting substrate must remain sufficiently moist. However, you can also use regular primer.

Streptocarpus seeds germinate only when exposed to light. This means that you need to sow them on the surface of the substrate and do not sprinkle them with earth on top. It is more convenient to sprinkle the seeds from a sheet of paper.
Try to spread them evenly over the entire surface. After that, all that remains is to close the container with a lid and put it in a warm and well-lit place. Usually a window sill is chosen for this.
Home care and cultivation
Next, read on how to grow a plant and how to properly care for it.
Soil and fertilizers
Streptocarpus needs a loose, moisture-permeable soil with good aeration. You can use ready-made soil for violets by adding perlite and peat to it, or prepare it yourself according to one of the recipes by mixing:
- 2 parts of deciduous land and 1 part of peat and a stove;
- equal parts of peat, perlite, sphagnum moss;
- equal proportions of deciduous humus, bark, peat and sand;
- peat and vermukite in equal proportions.
Add crushed charcoal to the self-prepared soil mixture to prevent root rot.
Important! Any soil - purchased or prepared on your own - must be well calcined in order to get rid of any infections and microorganisms that may be in it.
In the spring-autumn period, it is necessary to apply liquid complex fertilizers for indoor flowering plants every 7-10 days. Fertilizers are suitable for young plants, consisting of equal parts of phosphorus and nitrogen, for adults - of phosphorus and potassium.
You can use folk remedies as fertilizers, for example 1 tbsp. a spoonful of sugar, dissolved in 0.5 l. water (add 1 time per month) or 1 teaspoon of castor oil per 1 liter. water (use when buds are tied), or purchased ready-made ("New Ideal", "Fialochka", "Kemira-Lux"). In winter, the plant does not need to be fertilized. To avoid scalding the root system, fertilizer should only be applied to wet soil.
Watering
Water for irrigation should be soft, settled or thawed, at room temperature.
If streptocarpus is not watered for a long time, its flowers will wilt, and the leaves will lose their elasticity. At the same time, the flower does not tolerate excessive moisture, this leads to rotting of the roots. Water the plant sparingly, as the middle layer of the soil in the flowerpot dries out.
There are several ways to water a flower:
- into the pallet;
- along the edge of the pot;
- with a wick.
Important! During watering, it is necessary to exclude the possibility of water getting on the leaves.
Humidity
Low air humidity has a negative effect on flower development. The most optimal indicators of the room humidity level are 50-70%.Containers with water placed near the plant and regular spraying help to maintain them.
You only need to spray the area around the plant, avoiding drops of water on parts of the plant that are above the ground, otherwise stains on the leaves, diseases and rotting may occur.
Temperature
The flower feels comfortable in summer at an air temperature of + 20-25 degrees, if it rises, it is necessary to increase the humidity of the air. In the cold season, you need to maintain a temperature of + 15-18 degrees for ordinary varieties and + 18-20 degrees for hybrid ones (you can find out more about flower varieties here). The minimum allowable temperature indicator is 15 degrees Celsius.
It is necessary to protect the plant from drafts that are destructive for it, not to take the flower outside - it is comfortable for it in room conditions.
Pruning
Regular pruning, which involves removing old leaves, which takes away the strength and nutrients from the plant, is carried out in order to obtain more flower stalks.
Lighting
Streptocarpus are light-loving plants that are suitable for both natural and artificial lighting. The most suitable place for a flower is the window sill of the east or west window; on the south window, the plant must be shaded, protecting it from overheating. In winter, with a short daylight hours, only a southern window and additional lighting are suitable for streptocarpus.
Diseases and their treatment
Reproduction of streptocarpus takes place in a greenhouse, which is necessary to create optimal conditions for germination. But this can provoke the reproduction of harmful bacteria that destroy the plant already at the cutting stage. Streptocarpus is susceptible to fungal diseases with improper care - powdery mildew, gray rot. You should also protect the plant from spider mites, whiteflies and thrips.
- Thrips. The first sign that a plant is sick is that its leaves begin to dry quickly. It is very difficult to stop this process. Treatment: application of an insecticide. For faster treatment, increase the humidity and decrease the room temperature.
- Spider mite. The name speaks for itself, with a disease, a cobweb appears on the leaves and flower stalks dry out. The method of struggle is the same as for thrips.
- Late blight or virus. Symptoms of the disease are the presence of dark mosaic spots. This disease cannot be treated, so the only thing that can be done is to throw out the diseased plant.
- Powdery mildew. The disease is manifested by the formation of white dust or flour on the plant. Control measures:
- removal of the affected parts;
- replacement of the topsoil;
- treatment of plants and soil with antifungal agents.
- Gray rot. The disease is manifested by the formation of brown spots on the stems and leaves. Treatment consists in removing the affected parts and treating the plant and soil with fungicides. It is imperative that when fighting a fungus, it is necessary to reconsider the conditions for keeping streptocarpus. For the prevention of diseases, cuttings can be sprayed with bactericides once a week.
You can find out about common diseases and pests of streptocarpus, methods of their treatment, as well as see photos of plants here.
Streptocarpus are about 130 wild-growing varieties and more than a thousand luxuriously flowering, ornamental varieties bred by breeders.
Reproduction of streptocarpus is a long and complex process. It is necessary to choose the right breeding method. Cutting is a more reliable method of propagation, and with the seed method, you can get unpredictable colors. Observing all the rules and conditions for growing, you can achieve the appearance of this flowering plant in the house.
Reproduction methods of streptocarpus
Streptocarpus is propagated by dividing the bush, leaf and children. You can also grow it from seeds. Vegetative propagation is a faster way to get young specimens of this plant.At the same time, there are almost no problems with them, and also - the germination of parts of an adult specimen does not require special attention and increased care during the formation of the root system.
Vegetative propagation
Reproduction of streptocarpus by dividing the bush is a method suitable for adult specimens. First, the flower is well watered, removed from the container and carefully cleaned from the roots of the substrate. The root system is divided, trying not to injure even its small processes. During subsequent planting, do not deepen the root collar. You can cover the pots of separated plants with a transparent jar to help the shrubs take root better. After 2-3 months, the plants will release buds.

Flower Poultry farm: medicinal properties, care and reproduction at home The poultry farm, which got to temperate latitudes from a tropical climate, has about 150 varieties. Some of them…
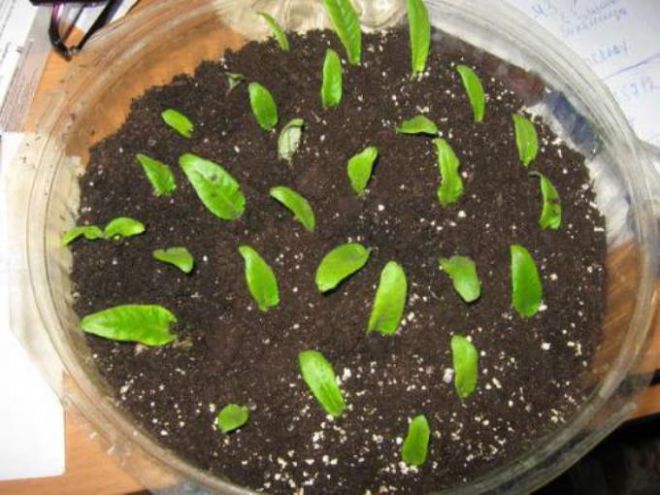
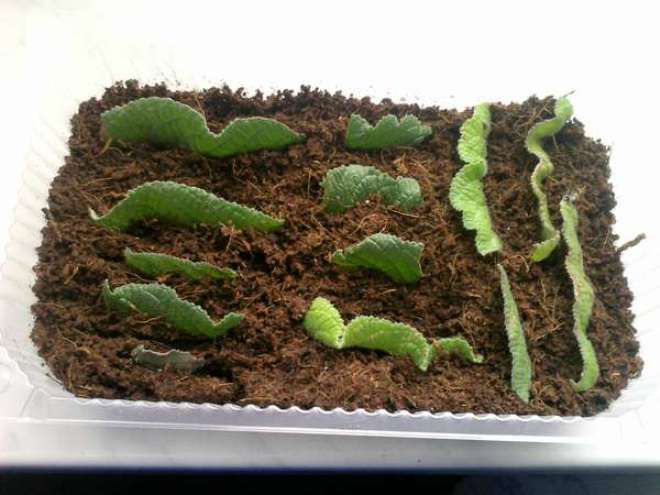
Leaf propagation is a relatively simple method. The leaf plate is cut off together with the petiole and placed in water until roots are formed. Then such a sprouted leaf can be immediately planted in a moistened substrate, covered with a jar or a transparent plastic glass. It is possible to root parts of the leaf plate - it is cut crosswise, the cut sites are sprinkled with crushed activated carbon, planted in a light moist soil mixture at an angle of 45˚ and the container is tightened with a film - for a greenhouse effect. There is another way of propagation of streptocarpus with a leaf, it is called the "toaster method":
- a central vein is cut from the sheet;
- the cut is dried and sprinkled with crushed activated carbon;
- pieces of leaf are planted in a nutritious substrate with a cut down, deepening by 5 mm;
- after 5-7 weeks there will be "kids", they are seated after another 4 months.
Streptocarpus babies are distributed in separate small containers, since with a large pot the plant will form a green mass, and flowering will not come soon. The flower is gradually transferred from a small container to a larger one until the streptocarpus reaches adult size. During transplantation, fertilizers are applied - nitrogen and potassium, in a reduced concentration relative to that recommended by the manufacturer.
Attention! When young specimens release buds for the first time, it is better to cut them off so that the plant can get stronger.
Growing from seeds
Growing streptocarpus from seeds for a long time, while independently collected seeds of hybrids do not give plants with varietal characteristics characteristic of the mother plant. Seeds are germinated in seedling containers, which are filled with a light and fertile substrate in half with perlite. It is not necessary to deepen - they simply moisten them from above by spraying water with a spray bottle. Landings are tightened with a film or covered with glass and kept at a temperature of + 22 .... + 25˚ C. Lighting should be bright, but diffused. Seedlings will appear in 10 days, when they have grown stronger, they are seated in separate containers and the same care is continued. Flowering will come about 10 months later.
Streptocarpus flower - care and reproduction
If growing streptocarpus is no longer a problem for you, you can move on to such a question as its reproduction. It is fashionable to propagate a plant in several ways:
- seeds;
- sheet;
- dividing the bush.
The easiest way is to divide the streptocarpus bush. To begin with, the plant is watered abundantly, then removed from the pot and, using a sharp knife or hands, divide the bush. Each part should have more than three leaves and a thickened spine.
After dividing the cuts, it is important to dry a little and sprinkle with charcoal. Then small bushes are planted in new pots, covered with foil
A plant propagated in this way, subject to the rules of cultivation and care, is capable of blooming after three months.
Streptocarpus from seeds at home
Planting streptocarpus seeds requires more time and patience, but the result is also worth it - you get a large number of young bushes.In addition, flowers propagated in this way may differ from the mother flower, have other specific qualities. For some this is a plus, but for others it is a big minus. You can plant flower seeds at any time throughout the year, but January is considered the most favorable month for this breeding method.
How to plant streptocarpus with seeds?
For planting seeds, you will need plastic boxes, ideal for medium sized food trays. A drainage layer is laid at the bottom of the boxes, then special soil is poured. How to sow streptocarpus at home? It couldn't be easier. We just pour the seeds into the soil, you don't need to sprinkle them with earth.
Then the boxes are covered with glass or oilcloth, thereby creating greenhouse conditions that protect from cold and draft
It is important to open the box periodically to remove moisture and ventilate it. The seeds sprout all together two weeks after planting.
We haven't removed the film yet for another ten days. It is important to do this gradually, opening a few hours each day and lengthening the time to allow the small plants to get used to the conditions. Streptocarpus grown in this way, subject to proper cultivation and care, are able to bloom in 10-12 months.
Reproduction of streptocarpus leaf
Reproduction of streptocarpus with a leaf fragment is another popular and effective way to get healthy plants. To do this, we take an adult leaf of a plant, on which there are many veins, but in no case is it old. Before planting, we cut the sheet into several parts, completely remove the central vein with a knife or scissors.
How to plant a streptocarpus leaf?
The rules for planting streptocarpus are simple - we make a furrow in a pot with soil and place a fragment of a leaf with the side that was attached to the central vein. We place it in the soil about 0.5 cm, carefully tamp the ground around it. After a while, streptocarpus babies will begin to appear - the more veins the leaf had, the more babies you will receive.
Streptocarpus baby turned yellow and does not grow
If you find that the baby Streptocarpus has changed color, has become lighter, dimmer and has stopped growing, most likely, you will not be able to save her. The reason for this may be both improper care (too abundant watering, lack of lighting), and damage to various kinds of diseases, for example, rot.
Home care for streptocarpus
How to care for streptocarpus at home
Streptocarpus care is about the same as for Saintpaulia. Place it in a bright place out of direct sunlight and drafts. A plant needs good lighting to grow leaves, because it is from their sinuses that flower stalks with flowers appear. The optimal temperature in the summer will be 20-25 ºC, in the winter - 15-18 ºC - this is what usually happens in our homes.
Watering the streptocarpus after the top layer of the soil has dried is carried out with soft, settled water at room temperature. Waterlogging of the soil entails rotting of the roots and the death of the flower, and the ingress of water into the leaf outlet causes its decay, therefore, water should be poured under the leaves, or even better, into the pan. From time to time, bottom watering of the plant can be carried out by immersing the pot with streptocarpus in a container with water until the soil is completely saturated with moisture.
As for the humidity of the air, the difficulty is that it must be high, but you cannot spray the leaves or wash them with a sponge. You will have to spray the air around the flower or keep the plant next to wet moss or pebbles.
Fertilizing streptocarpus
The plant needs fertilizers during a period of active growth, that is, from spring to autumn. During the flowering period, the need for feeding occurs every week. Streptocarpus ceases to be fed only in winter, during the dormant period.Preference is given to liquid complex fertilizers for flowering plants such as Kemira-Lux, Master or Etisso, but it should be remembered that the concentration of the solution should be 20% weaker than that indicated by the manufacturer. Timely remove the old lower leaves that no longer give flower stalks, since they only waste the strength and nutrients from the plant.
Streptocarpus transplant
This procedure is carried out annually closer to spring, preferably in February, before the start of active growth. The root system of the streptocarpus, although more powerful than that of the violet, is also superficial, therefore, the dishes are rather wide than deep. Each subsequent pot should be 2-3 cm larger than the previous one in diameter. The soil needs nutritious, but loose and light, like a store mix for violets, to which it is good to add perlite or vermiculite.
Place in the pot a drainage layer about 2 cm thick made of expanded clay or pieces of polystyrene so that excess moisture flows freely without stagnating in the roots of the plant. Then a layer of substrate is placed in the pot, onto which streptocarpus is transferred along with an earthen lump, and then you need to add the substrate and lightly ram it until there are no voids in the pot.
Growing streptocarpus from seeds
If you are attracted to the breeder's path, you can try growing Streptocarpus from seed. This type of plant reproduction is called generative. Streptocarpus seeds are sown from above on a moist earthen substrate, consisting in equal parts of perlite, crushed peat and vermiculite. First, to facilitate the process, mix the seeds with fine dry sand
After sowing, the seeds are carefully sprayed with water from a spray bottle and, covering the container with crops with glass or polyethylene to form a greenhouse effect, place it in a warm (21-25 ºC) bright place
Seedlings will appear within two weeks. When condensation appears, ventilate the greenhouse, and when the seedlings grow a second true leaf, dive them into a nutritious substrate - three parts of peat, two parts of crushed moss and leafy earth and one part of vermiculite and perlite. You can use a store-bought earthen mixture for Saintpaulias.
Streptocarpus pests and diseases
Pests will annoy your flower only if you violate the rules of streptocarpus agricultural technology. For example, if the room is too hot and dry, thrips may show interest in your plant, and, starting the occupation from the bottom of the plant, they gradually master the entire streptocarpus, which will begin to dry before our eyes. We'll have to resort to insecticides, but the first step is to establish the correct microclimate so that history does not repeat itself in a month or two.
With the same violations of the conditions of care, streptocarpus and scale insects are affected, leaving brown plaques on both sides of the leaves. They are destroyed with actellik. With excessive soil moisture, streptocarpus attacks aphids, and there will be little insecticide treatment, you will also have to change the soil.
Of the diseases for streptocarpus, the most terrible are fungal lesions, from which there is usually no salvation. But if the conditions for growing a plant are fulfilled by you, then it is not afraid of either pests or diseases.