Phalaenopsis orchid transplant
Experts point out two reasons why your plant should be transplanted immediately:
- The root system of the orchid does not fit in the pot and displaces the substrate;
- The plant has a damaged root system.
Root defects occur after improper care of Phalaenopsis, for example, insufficient watering, stagnant water in the pot, improperly selected earthen mixture, lack of drainage.
Choosing a soil and a pot
The optimal container for an orchid is a transparent pot, so you can timely detect diseases of the root system and provide the necessary amount of light to the roots.
The composition of the earthen mixture for Phalaenopsis should include:
- Tree bark;
- Charcoal;
- Sphagnum moss;
- Perlite.
As for the proportions, they are selected in accordance with the conditions of the plant. As a rule, the air is dry in most of the apartments. In such a situation, at least a third of the moss should be included in the substrate. If the percentage of humidity in the room is high, the moss is added in minimal quantities.
It is often difficult for beginners to independently prepare high-quality soil for an orchid. In this case, you can purchase a ready-made earthen mixture in a specialized store.
Preparing an orchid for transplant
Remove the plant from the container and remove the old soil from the roots.
Wash the root system a little with water and cut off dried and rotten parts.
If the roots of the orchid are in serious condition and it is necessary to remove most of them, pay special attention to the further care of the plant.
Orchid transplant procedure
Pour drainage into the pot.
Fill the container one third with earth.
Place the root system of the plant in the pot and carefully cover it with earth so that the substrate is both outside and inside the roots.
Gently press down the roots with your hands and add the required amount of soil.
Please note that the aerial roots of Phalaenopsis are not covered with soil.
Also, you can not cover the leaves and the growth point of the houseplant with an earthen mixture.
Tip: If you have to cut off most of the roots, secure them with wooden sticks in the pot to prevent the plant from falling out or getting damaged.
Post-transplant care
If you are lucky and your plant was healthy and beautiful before transplanting, there will be no problems associated with replacing the pot and soil. Watering such an orchid is necessary as usual. As soon as you see the plant growing, you can start the feeding process every second watering.
If your plant was very sore before transplanting and you removed a lot of roots, it is important to create an optimal moisture level for the orchid. To do this, place the container with Phalaenopsis in a plastic bag (always transparent) and ventilate it once every few days.
Phalaenopsis transplant after acquisition
As a rule, Phalaenopsis orchids are not transplanted immediately after purchase in the store, but simply admire the amazing flowers.
However, there are a few cases where a transplant cannot be avoided.
- The potted plant cannot stand on its own and falls.
- There is little earthy mixture in the pot, the roots of the orchid cannot find support.
- Any problematic situations with the root system of the plant.
- You just want to plant the plant in a new pot.
Features of watering zygopetalum orchids
Orchids of the genus Zygopetalum belong to the group of moisture-loving and do not tolerate complete drying of the soil. But waterlogged substrates are no less dangerous for them than for other orchids.
Therefore, when organizing irrigation, it is important to take into account the following conditions:
- during periods of active growth of young pseudobulbs and flowering, do not allow the substrate to dry out by more than two-thirds of the pot volume;
- if the substrate contains many moisture-consuming components or has poor air permeability, watering should be careful;
- water that flows from the pot into the pan must be immediately removed;
- during the period of artificial dormancy, while the faded pseudobulb matures, watering is carried out less frequently than usual, after the substrate has dried almost to the entire depth;
- at high air temperatures, the orchid is watered often and abundantly, at low temperatures, rarely and scarcely.
Lack of water leads to the fact that the parenchyma of the roots of the zygopetalum dies off, the pseudobulbs wrinkle, and the leaves turn yellow and dry out. Chronic excessive moisture leads to decay of the root system.
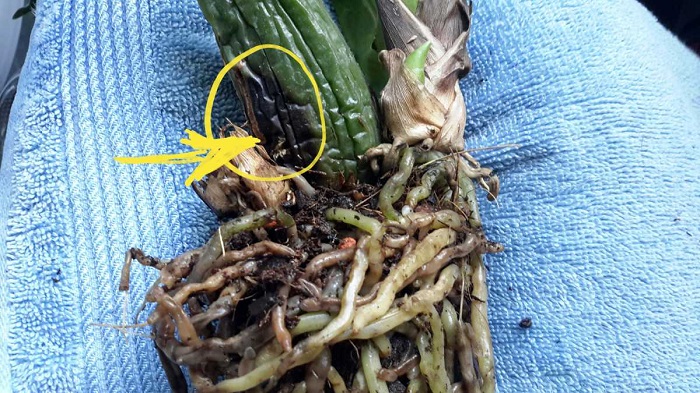 Zygopetalums that have not been transplanted for more than 2-3 years should be watered carefully, since the old substrate becomes compacted and less breathable during this time. Excess moisture in such a soil causes not only rotting of the roots, but also the development of infections on pseudobulbs.
3. Varieties:
3.1. Schefflera "Gerda" - Schefflera arboricola "Gerda"
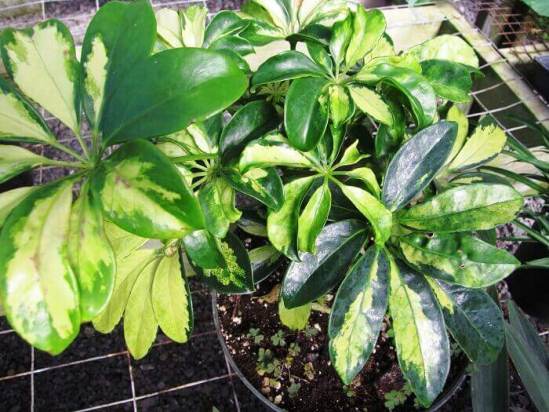
A beautiful variety of tree-like shefflers with variegated, glossy leaves, painted in the center of the leaf blade in a greenish, yellow or white color, and at the edges of the leaves in a green tint. The plant can reach a height of 2.5 - 3 m, so it needs periodic corrective pruning.

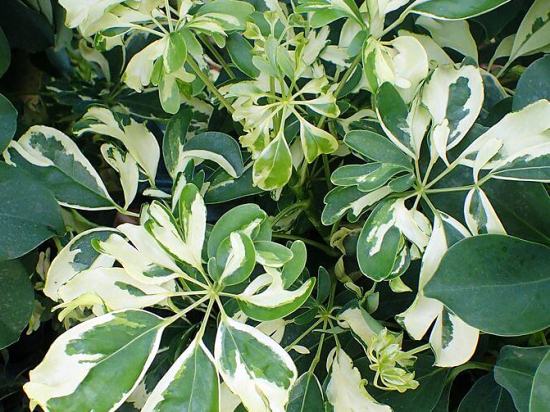
3.2. Schefflera tree-like "Janine" - Schefflera arboricola "Janine"
Low, tree-like variegated shefflera, forming a very lush bush. The leaves are divided into 5 - 7 glossy, oblong - oval, whole-edged segments - fingers, colored in shades of green, white or yellowish. The main distinguishing feature of this variety is that many segments are of a solid white, greenish or yellow color.
3.3. Schefflera "Nora"
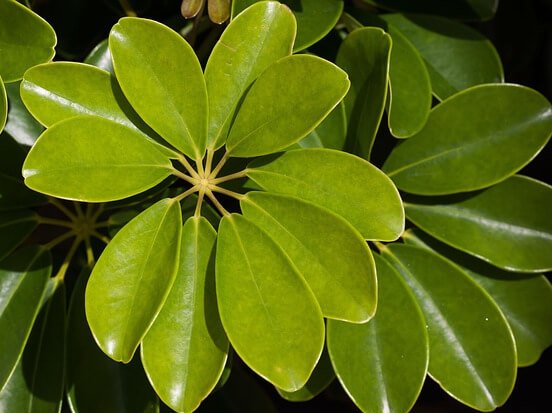
An airy variety of tree-like shefflers, distinguished by its compact size. Leaves are monochromatic - green, glossy, divided into 5 - 7 very thin, oval fingers. Sometimes on sale you can find plants of this variety with beautifully braided trunks.
3.4. Schefflera "Melanie"
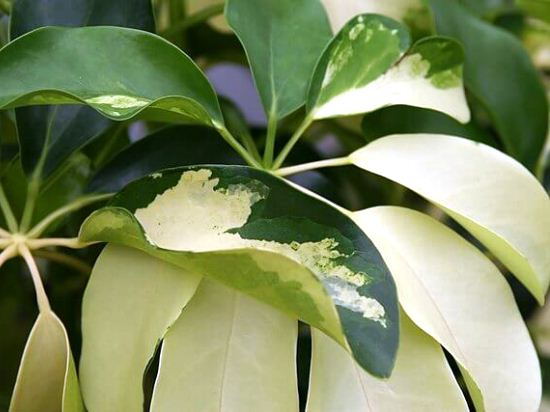
Variegated variant of tree-like shefflera about 50 cm high with very attractive complex, finger-like leaves. The main shade of the leaves is light green or yellowish, the standard green may be present only on some fingers or along the edges of the leaf plates in the form of a thin strip.
3.6. Schefflera "Louisiana" - Schefflera "Louisiana"
A variety of tree shefflers. Tall plants - they can reach a height of 70 to 150 cm. Stems are erect, abundantly branching, woody with age and are covered with light brown bark. Leaves are compound, palmate, green, glossy. The fingers are oblong - lanceolate, thin, giving the entire appearance of the plant an openwork appearance.
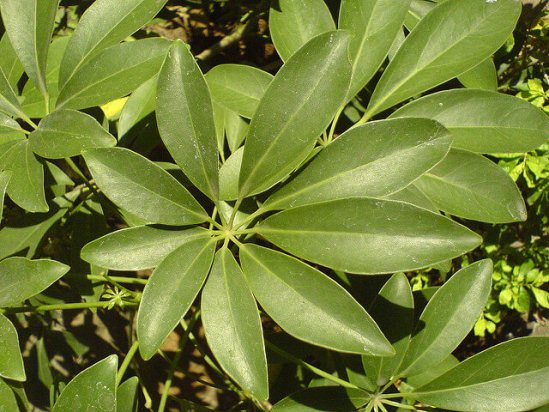
3.7. Schefflera radiant or star-leaved - Schefflera actinophylla
In its natural environment, this species often grows like an epiphyte on other trees, although it reaches impressive sizes - up to 12 m in height. It has erect, branched shoots, woody with age and covered with a smooth greenish-brown bark. Leaves are compound - they consist of 7 - 16 fingers, with drooping long, dark green, glossy toes, reaching a diameter of 60 cm. The edges of the leaf plates are often slightly corrugated. In nature, this species has a gorgeous flowering - large inflorescences with many small pinkish flowers are formed on the tops of the shoots.
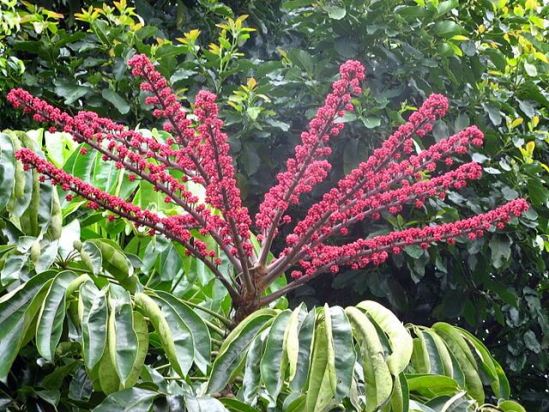
3.8. Schefflera "Amate"
A variety of finger shefflera, a tall plant that easily reaches 2 m in height even in indoor conditions. Leaves are compound, composed of dark green, glossy, relatively wide toes.It differs in that even adult plants do not expose the lower part of the trunk, in addition, leaf fall does not occur even in low light conditions.
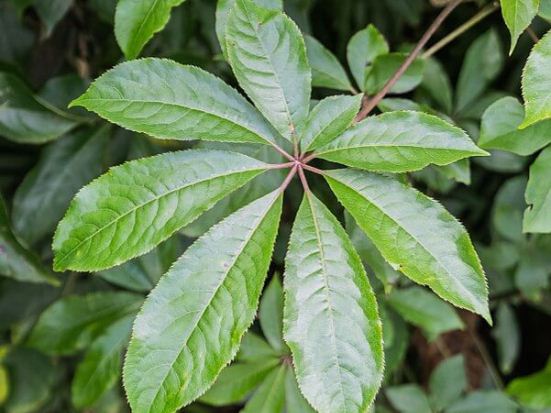
3.9. Schefflera "Gold Capella"
Variegated version of the tree sheffler. Evergreen perennial plants up to 3 m high with dark green finger-like leaves. Stems are thick, erect, with age, covered with smooth greenish bark. Plants with intertwined stems are often on sale. A striking varietal feature is the presence of yellow spots of various shapes and sizes on the leaves of plants.
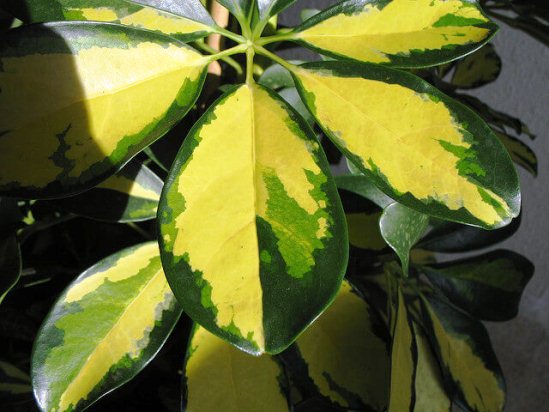
3.10. Schefflera "Charlotte"
Arboreal shefflera with bright, variegated leaves. The main color of leaf plates - fingers is white or greenish - yellow, and only in some places the leaves are painted in dark green.
You may also be interested in:
Dracaena
Ficus
Chlorophytum
Fatsia
1. Seven Secrets of Success:
| 1. Growing temperature: throughout the year, a fairly cool content at a temperature of 16 - 18 degrees Celsius is suitable for shefflers. |
| 2. Lighting: brightly lit location shaded from direct sun. |
| 3. Watering and air humidity: in spring and summer dry the soil 2 - 3 centimeters deep before each subsequent watering, in winter, just protect the earth from completely drying out if the plant is in a cool place. The air humidity is high enough. |
| 4. Pruning: Regularly pruning and pinching the tips of young shoots to form a compact and dense plant. |
| 5. Soil: a well-drained and nutritious substrate that easily permits moisture and air to the roots of the flower. |
| 6. Top dressing: from spring to autumn, they are monthly fed with mineral fertilizers for decorative leafy plants. |
| 7. Reproduction: by rooting stem and leaf cuttings, rarely by seeds. |
Botanical name: Schefflera.
Scheffler's home - family.
Homeland of the plant. Australia and Oceania.
What it looks like. The genus consists of about 900 evergreen shrubs, vines or short trees. Most indoor plants are shrubs with erect stems. With age, the stems become lignified and covered with light brown bark.
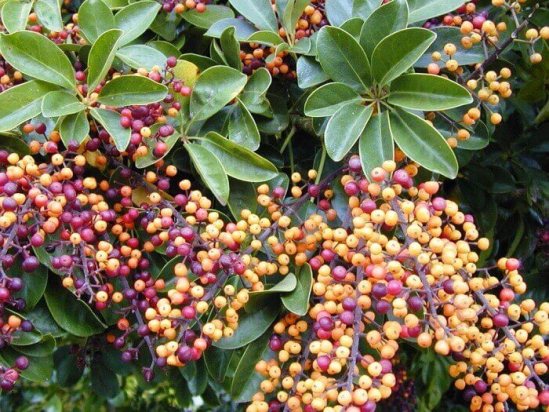
The complex leaves of the shefflera have very long petioles and are arranged alternately on the stems. Leaves consist of oblong-oval segments arranged in a circle, the number of segments varies from 5 to 14. In green-leaved species, the leaves are monochromatic, variegated varieties are distinguished by the presence of white or yellow spots on the leaves.
In nature, shefflera throws out peduncles bearing many small, often reddish flowers. After flowering, the plant forms rounded berries.

Height. In its natural environment, the sheffler flower takes on impressive dimensions and can reach 14 m in height. In indoor conditions, plants are pruned or low varieties are grown.
The size of the plants at home is also influenced by the volume of the pot - in cramped containers, plant development slows down.
1. Seven Secrets of Success:
| 1. Growing temperature: in summer - a very cool content at a temperature of 16 to 20 ° С, in winter - an even colder dormant period at 4 - 10 ° С. |
| 2. Lighting: direct sunlight in the evening and morning, in autumn and winter maximum light. |
| 3. Watering and air humidity: between waterings, dry the soil to a depth of 3-4 cm in spring and summer, in winter it is worth keeping watering to a minimum. Air humidity is high. |
| 4. Pruning: peduncles with wilting buds are twisted with rotational movements. |
| 5. Substrate: well-drained, nutritious and acidic substrate. |
| 6. Top dressing: in spring and summer with fertilizers with a high phosphorus content. |
| 7. Reproduction: by division during transplantation, by seeds. |
Botanical name. Alstroemeria.
Origin. South America.
Description of alstroemeria.The genus contains about 50 species of perennial herbaceous flowering plants. The root system is represented by tubers, which serve to store moisture and nutrients.
Leaves are oblong-lanceolate, green, with almost parallel veins, glossy. An interesting feature is that often the leaf blades are inverted and the underside of the leaf becomes the top. In the upper part, the stems are divided into several thin shoots, on which buds are formed. each stem is capable of carrying up to 10 - 20 flowers at its top.
Alstroemeria flowers are so interesting and varied that they are often compared to orchids - shades include orange, pink, purple, red, yellow, white, or salmon. You can always find alstroemeria or Peruvian lily to match your decor.
Often the petals have yellow spots or all kinds of specks and specks.
Flowers have no aroma, the buds open sequentially from the base of the peduncle to its top.
The original name of the plant was "Peruvian lily" or "Inca lily", but then the Swedish botanist Carl Linnaeus named these flowers after his friend - also botanist Klaus Alstroemer.
Height. The height of home alstroemeria varies greatly between varieties and can range from 30 to 90 cm.
The size of the plant is strongly influenced by the growing conditions. In room culture, dwarf, miniature plant varieties are predominantly kept.
Home care
Care when growing this orchid is close to the basic principles for most members of the family, but a novice florist has a huge number of questions about growing at home. In order not to destroy the flower, you need to familiarize yourself with the basic rules of content.
Location
It depends on how well the place for the zygopetalum is chosen whether it will bloom, so it is important to take into account its basic needs. This plant does not require as much free space as most domestic crops, so it will thrive even in close quarters.
When choosing a location, it must be remembered that most varieties and hybrids of zygopetalum during flowering exude an aroma that can cause headaches and dizziness with prolonged contact, therefore, the pot should not be placed in the bedroom or near the workplace.
Lighting
The main parameter to consider when caring for this orchid is lighting. For normal growth, it needs high-intensity diffused light, but direct sunlight is unacceptable, since they can cause burns on both foliage and flowers. In addition, flowering in the shade will last 1.5 times longer.
An indicator of sufficient lighting is the color of the foliage. Under normal illumination, it remains green, with a deficit of light, it becomes darker, and with an excess, it brightens. Eastern or western window sills are considered ideal accommodation options.
Separately, you should pay attention to lighting in winter and supplement the zygopetalum with phytolamps, since shortening daylight hours can prevent the plant from blooming or destroy already formed buds
Temperature
Normal flower development is possible at temperatures between 14-28 ° C. This orchid responds perfectly to daily temperature fluctuations that are observed in its natural habitat, therefore, in the warmer months, it is transferred to the garden or to an open balcony. The main thing at this time is not to forget about shading. When the night temperature drops below 8-9 ° C, the pot must be returned to the room.
Basically, it develops better at medium and low temperatures than in hot conditions.
Air humidity
As a tropical orchid, zygopetalum requires high humidity for indoor cultivation.Ideal values range from 75-100%, but unlike most orchids, lower moisture levels are not critical. Nevertheless, it is undesirable to allow too dry air, especially with operating radiators, in the care.
It is very difficult to ensure ideal performance at home. Plant care may include occasional spraying of the foliage with a fine spray bottle. If the pot is taken out into the open air, then this can be done a couple of times a week. When growing in a room, you will have to spray it once a day, preferably in the morning. The most caring care owners use mechanical or ultrasonic humidifiers that work for a couple of hours a day in the immediate vicinity of the orchid.
Watering
The best time to water is morning. You can understand that the time has come to moisturize the substrate by the following signs:
- By the weight of the pot. When the plant needs soil moisture, the pot becomes much lighter.
- As a wooden stick. A stick protruding above the substrate is specially installed inside the pot, which brightens as it dries.
- By the state of the aerial roots. Moistened roots are green, and those in need of watering are grayish.
Ideal watering is carried out by placing the pot for 20-25 minutes in a container with warm softened water. After that, the plant is taken out, and excess moisture flows out through the drainage. At high temperatures, more frequent watering will be required, while at low temperatures, stagnant water can lead to root rot.
Fertilizer
Top dressing is necessary for zygopetalum in those periods when active growth is noticeable. At low temperature indicators and the absence of growth, fertilizer is not applied.
The frequency of feeding is once every 2-3 weeks. Before flowering, at the time of budding, phosphorus-potassium complexes are used, and after the flowers wither, nitrogenous compounds are used. Their concentration must be made two to three times weaker than indicated in the instructions. Orchid fertilizers can be applied at half dosage.
Does a bush lily exist?
Lilies, according to the botanical description, are bulbous herbaceous perennials with leafy stems. The aboveground part of them, like that of other herbaceous plants, dies off at the end of the growing season. With the beginning of the next growing season, green stems re-develop from the awakening lily bulbs.
It is customary to refer to shrubs as non-herbaceous or arboreal perennials, in which the aboveground part remains alive during the dormant period. At the end of the dormant period, new shoots in the shrubs are formed from the aerial part. Such processes can be observed on the example of rose hips, gooseberries.
Considering these and other features of bulbous herbaceous and woody perennials, it is safe to say that a lily is not a shrub from a scientific point of view. Therefore, for this reason, bush lilies, as an independent species, cannot exist.
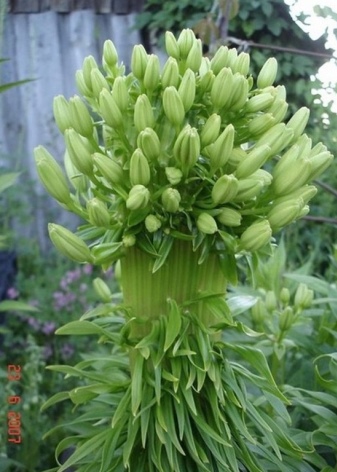
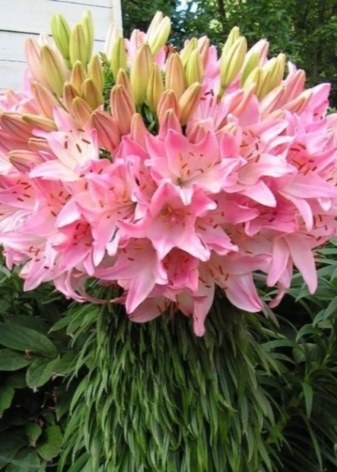
At the same time, many amateur gardeners often use the expression "bush lilies" to refer to plants with a very unusual appearance. Such lilies are strikingly different from other representatives of their kind in their larger size, unnaturally thickened, embossed and dense stem. However, their most striking feature is the unusually large number of flowers and buds. So, on one peduncle there can be from 40 to 100 or more of them.
Visually, the flower "caps" of such lilies resemble a very lush volumetric bush, which partly explains the origin of the unofficial name of the plants - "bush". Their flowers and buds are often impressively large in size.
The reason for such transformations is fasciation, an unusual phenomenon in which the stems and peduncles of a plant grow together with each other.As a result, one main stem is formed - thickened and slightly flattened.

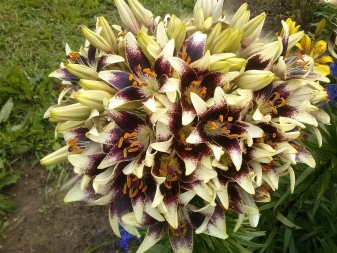
Scientists identify several main reasons for this phenomenon. It is believed that fasciation can occur as a result of mechanical damage to the bulb or growth point (growth cone) during the growing season of plants.
Other reasons include:
- damage by pests or pathogens of viral and bacterial infections;
- the genetic predisposition of the plant (defects and disorders at the genetic level);
- the influence of solar radiation.
Also, according to the researchers, violations of the conditions for growing lilies (high humidity, excessive feeding, improper illumination, inappropriate temperature conditions) can provoke the emergence of fasciations.
It should be noted that not all varieties of lilies are susceptible to fasciation. It can develop in healthy plants completely unexpectedly, for no apparent reason. At the same time, it cannot be purposefully invoked.
Rules for feeding ludisia and selection of fertilizers
The feeding regime for ludisias should be regular, but it is extremely important to make them with the right fertilizers. You need to be guided by the following rules:
- You cannot use universal formulations for any indoor plants. The concentration of active ingredients in them is too high. Moreover, fertilizers intended for agricultural needs should be avoided - nitrate, urea, superphosphate, etc.
- Do not use dry granulates. Only liquid fertilizers with a special mark "For orchids" are applied under ludisia.
- You cannot fertilize the orchid on dry soil. Fertilizers can only be applied after watering.
- You cannot fertilize ludisia over the leaves. For this kind of orchid, only root feeding is acceptable. Their leaves have a special "velvety" structure, and spraying a fertilizer solution over them leads to the appearance of stains and a loss of decorative effect.
- The concentration of working solutions should be made 2 times lower than those recommended by the manufacturer. Ludisias love feeding, but they cannot assimilate a large amount of salts at the same time. If the solution is concentrated, after a while the soil will become salty and will have to be changed.
In practice, the following fertilizers have proven themselves well for feeding ludisias:
| Name | Description | Preparation of working solution | Frequency and timing of use |
| "Azotovit for orchids" | Liquid microbiological fertilizer that does not cause salting of the substrate. Contains soil nitrogen-fixing bacteria that heal and enrich the soil and roots of terrestrial orchids. | Dilute 5 ml in 1 liter of water | After every third watering. Used from March to June. |
| "Compo Sana for Orchids" | Sulfur-containing complex multicomponent fertilizer that helps the orchid to resist fungal and bacterial infections. Promotes the growth of strong, brightly colored leaves and shoots, the formation of multi-flowered peduncles. | Dilute 7 ml in 2 liters of water | Once every 3-4 weeks at any time, excluding the flowering period. |
| "Phosphatovite for orchids" | Microbiological liquid concentrate containing beneficial soil flora. Improves the condition of the substrate, suppresses pathogenic microorganisms, increases the absorption of phosphorus from mineral fertilizers, promotes the healing of roots and abundant flowering of ludisia. | Dilute 5 ml in 1 liter of water | After every third watering. It is used during the period of active growth and tillering of shoots. |
| "REASIL for orchids" | Complex fertilizer containing a high percentage of potassium. It helps to strengthen the immunity of the orchid, to recover from abundant flowering, and to improve the condition of the roots. | Dilute 1 ml in 2 liters of water | Once every 2-3 weeks within 2 months after flowering. |
Also useful are periodic watering of ludisia with potassium humate, a solution of the drug "Gumi-Omi" or "FlorHumate for orchids".
Top dressing of Ludizia begins at an early age and is carried out throughout the life of the plant.They are temporarily stopped only for the time of flowering, immediately after the dissolution of the first bud.
Diseases and pests
Frequent enemies of the plant are harmful insects:
- Scabbard, the presence of which can be determined by the characteristic brown tubercles on the leaves of the shefflera, as well as a sticky coating.
- A spider mite appears on internodes and leaves of a shrub in the form of small cobwebs.
- Thrips attack the leaves from the back side and lead to their death. Thrips can be detected by the black dots.
To destroy parasites, you should treat the problem areas with soapy water or an alcohol-treated cotton swab. But if the attack is massive, insecticides cannot be dispensed with. You can use Aktara solution or products similar in composition.
Some diseases are also inherent in the tree, which is manifested by the presence of certain signs:
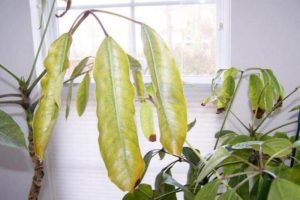 Leaves turn yellow. One of the main causes of yellow foliage is insufficient air humidity. Also, the flower turns yellow in the presence of pests that feed on its juices.
Why do leaves fall? In this situation, the plant does not have enough light, or the soil inside the pot is too waterlogged.
Leaves turn black. This sign indicates an excess of water and root decay. To save the bush, take the following measures:
- remove the plant from the old pot and remove rotten roots and diseased leaves;
- treat healthy roots with special preparations - Epin or Zircon solution;
- sprinkle the roots with Phytosporin or activated carbon and plant them in a new container with fresh soil;
- water the tree and cover with plastic;
- periodically ventilate the plant, and after a week remove the "greenhouse".
Leaves wither. There may be several reasons:
- incorrect location of the pot;
- dry air;
- abundant or vice versa rare watering;
- non-observance of the temperature regime;
- frequent feeding;
- the presence of drafts;
- parasite attack.
Thus, if the shefflera loses its decorative effect and the above signs are observed in it, reconsider the conditions in which it is kept.


