Procurement of planting material
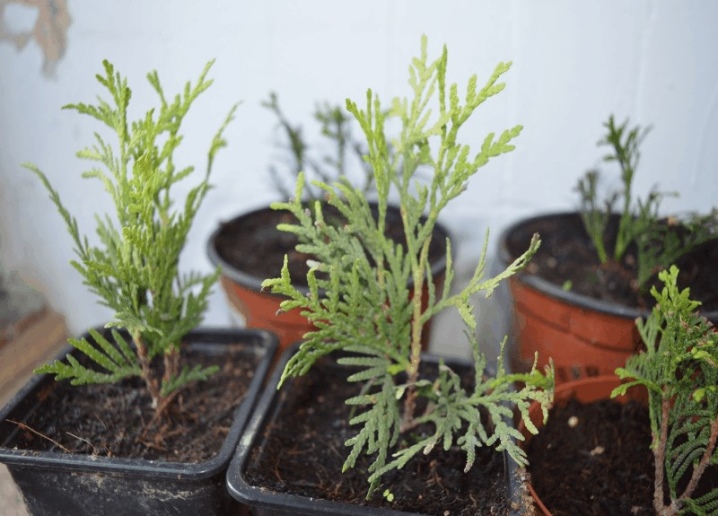
Juniper grown from cuttings can grow both healthy and fluffy, and crooked, weakened. This largely depends on how the planting material was collected. In order for the plant to fully meet all your expectations, you should adhere to the following recommendations.
As a mother plant, it is best to take a plant at the age of 5-8 years, since at an older age, the ability of conifers to root formation is significantly reduced.
The parent plant must be healthy, with a dense crown of bright color.
For creeping varieties, the cut location does not matter.
In this case, it is important to choose a well-developed, spreading branch that is exposed to sunlight. This is especially true for bright varieties.
In cone-shaped, columnar and pyramidal varieties, it is necessary to cut the central shoots of 1-3 orders of magnitude from above
If you take cuttings from a side branch, you risk getting a juniper actively growing to the sides.
It is important that the branch intended for grafting has a living apical bud and a full-fledged growth cone, otherwise the seedlings will begin to bush strongly.
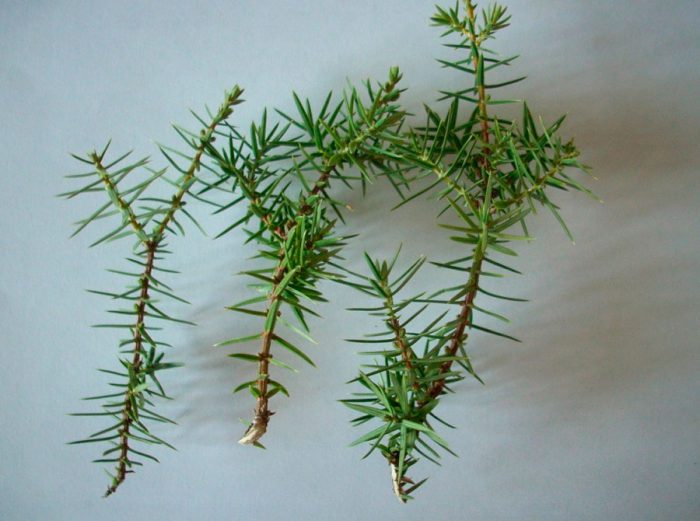
Experienced gardeners recommend using shoots on which slight lignification has already begun, since too young cuttings and too old branches give a low percentage of rooting.
Procurement of material should be done in cloudy weather or early in the morning. This will significantly reduce the evaporation of moisture from the cut area.
Do not touch overly thin branches, as they will use up the entire supply of nutrients long before the roots begin to grow. It is best to take one-year cuttings with a length of 20-30 cm.


It would be more correct not to cut off the branches, but to pluck them with a quick downward movement. If the tongue is too long, then it will have to be trimmed.
If the material is harvested from a large and thick shoot, you will need a garden pruner or a knife with a sharp blade, while the cut must necessarily capture 1.5-2 cm of the lignified fragment.
After the planting material is collected, it is necessary to rid the lower part of the cutting of the needles by 3-4 cm. It is best to do this with your hands, since in this case, when tearing off, wounds are formed that will contribute to faster root formation.
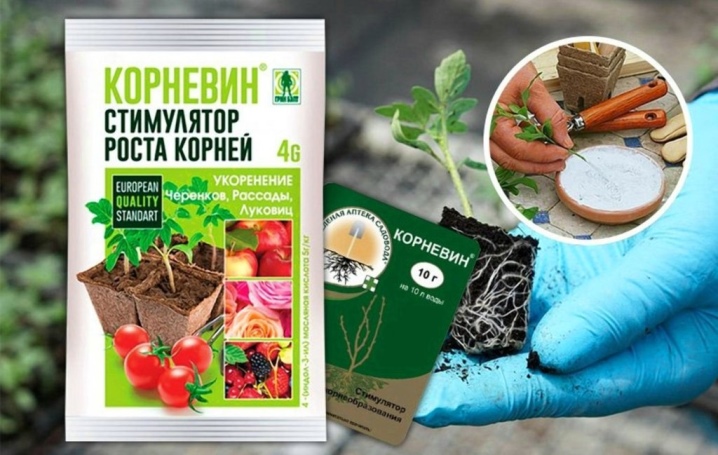
Immediately before placing in the substrate, the cut sites are sprinkled with "Kornevin", "Heteroauxin" or other stimulants based on succinic acid. But it is not necessary to keep the branches in solutions with an activator - with prolonged exposure to moisture, the bark begins to flake off and the plant rots. For the same reason, it is better to carry out further rooting not in a jar of water, but in a container with a nutritious soil mixture.
How to dilute by cuttings?
Cutting is one of the most effective breeding methods for clematis, which is successfully used by both experienced and novice growers. This method involves breeding plants using green and lignified cuttings.
Breeding with green cuttings
Reproduction of these garden vines by green cuttings is considered the most effective method, providing almost 95% survival rate of planting material. Cuttings are harvested from late May to early June - at a time when plants begin to actively form buds.
It is also allowed to harvest planting material in cloudy weather.Compliance with these recommendations will prevent dehydration of the cut cuttings.
Before harvesting, it is necessary to determine the strongest and most well-developed shoot on the mother bush and cut it off above the first or second leaf (counting from the surface of the earth). For cutting cuttings, only the central (middle) part of the shoot should be used. The top of the shoot is not used for harvesting planting material.
The cut shoot is divided into several parts with a sharp, clean knife or pruner, observing the following conditions:
- on each part there should be at least one well-developed bud (the best option is 2 buds and 2 not very large leaves);
- the upper cut (straight) is performed above the kidney at a distance of 2-3 centimeters;
- the lower cut (oblique) is performed under the kidney at a distance of 3-6 centimeters.
Leaves should not be completely removed from cuttings, but excess foliage should be cut off. It is advisable to shorten very large leaves with scissors in half. This measure will preserve the strength of the cuttings required for rooting and protect it from dehydration.
Prepared cuttings are rooted in cups, boxes or containers filled with breathable and light soil mixture. A mixture made from sand and deciduous humus, taken in a ratio of 1: 2, respectively, is optimal.
Before planting, the cuttings are strongly recommended to be kept in a solution of a root stimulator ("Kornevin") for about 10-11 hours. You can bypass this procedure by simply dipping the bottom of the cutting into the root stimulating powder just before planting. Cuttings are planted at an angle, burying them in the ground to the lower node.
Above the container with the planted cuttings, it is necessary to build an impromptu greenhouse. It can be equipped with cut plastic bottles or plastic wrap fixed to a frame support.
It is allowed to root the planting material in water. For this, the cuttings are placed in a transparent container with a wide neck. Next, water is poured into the container - so that it covers only the lower part of the cuttings, not reaching the buds and leaves. After that, the container is wrapped in paper (light cloth) and placed in a room with soft and diffused light.
Caring for established cuttings is pretty simple. It consists in daily spraying and maintaining a stable indoor temperature at 25-26 ° C. The average time for root formation is usually 30-50 days.
Breeding with lignified cuttings
Gardeners use this method of breeding clematis less often, since it is characterized by low productivity. Experienced growers claim that lignified planting material takes root worse, therefore it is usually used when it is not possible to prepare green cuttings.
For harvesting planting material, mature lignified branches are used, which are cut into pieces. Each piece (stalk) should have 2 to 4 knots. The top cut should be straight, the bottom cut oblique.
Further, the harvested planting material is placed in a container with a solution of a root formation stimulator for 15-20 hours. After processing, the cuttings are planted in boxes with a loose soil mixture consisting of peat and sand (2: 1). The cuttings are planted at an angle, deepening their lower node into the ground by about 1 centimeter. After disembarkation, the boxes are covered with a plastic cap or a cut plastic container.
As in the previous case, the engraft cuttings are provided with proper care, maintaining high humidity in the greenhouse and a constant air temperature at 25-26 ° C. In this case, the greenhouses should be located in a room with diffused light. The rooting time in this case can reach 2 or more months.
Until spring, the cuttings should be in greenhouses. For the winter, they are tightened with an opaque film and put away in a cool place.With the arrival of warm spring weather, the rooted planting material is grown first in greenhouses, and then on ridges in the open field.
Timing
Propagation of all varieties of hydrangea by cuttings can be performed all year round, while it is important to observe certain dates, which directly depend on the characteristics of the planting material. Many experienced flower growers prefer to propagate this beauty at the end of May, in June and July.
This is due to the fact that summer cuttings provide a high engraftment and rooting result. If you carry out this procedure in the fall, then you need to use a material on which there are bud ovaries. Such cuttings adapt best to a new planting site and more roots are formed on them, in addition, on cut pagons, the ovary of flowers can ripen, giving a good color.
In the spring
According to many experienced gardeners, the most suitable time for cutting hydrangeas is spring. It should start around March, until the sap begins to move around the plant. For spring cuttings, you need to use lignified stems, which usually grow on last year's shrubs.
The peculiarity of such cuttings is that branches are cut off for it and kept in water for 5 days, then they are divided into several parts, leaving 3-5 buds on each of them. The resulting planting material is placed in a previously prepared container with moist and loose soil. Rooting in this case occurs on average in a month and a half. During rooting, the cuttings must be properly cared for, for this they must be constantly watered, sprayed with water and periodically ventilated.
Summer
Summer grafting is also considered widespread and traditional. In summer, the plant fills the buds, which has a beneficial effect on reproduction. For grafting, the period from mid-June to July 15 is usually chosen. This is due to the fact that the hydrangea preserves the buds at such a time, and its shoots do not yet have time to become coarse. Unlike spring cuttings, in this case, you cannot cut off shoots from old shrubs. They must first be rejuvenated and be sure to wait for the formation of young growth.
For summer cuttings, it is recommended to choose lateral cuttings and not to use weakened stems growing in the shaded lower part of the shrub for propagation. Their vitality is low and will bring minimal results.
In autumn
Reproduction of hydrangeas in the fall is considered affordable and effective. Thanks to this technique, several young seedlings can be obtained from the parent plant at the same time. For autumn cuttings, woody stems should be used. As for the timing, the optimal time for breeding is September, it is best to start breeding after September 15th.
It is advisable to choose annual shoots from which cuttings up to 10 cm long are cut. The leaves growing from below are also removed. You only need to leave the top two leaves and a couple of buds. Cuttings cut in the fall are recommended to be planted both in ordinary fertile soil and in prepared soil consisting of peat and sand.
The best time for grafting
Algorithm of actions in spring
To successfully organize the propagation of weigela by cuttings in the spring, find green ones. The fact is that those covered with the first bark take root for about 5 years. Spring reproduction should be carried out in late April or early May, it all depends on the natural area in which you are.
- Cut a ten-centimeter stalk with two small leaves at a right angle;
- Soak it for half a day, use a solution of a liter of dechlorinated water and half a glass of heteroauxin;
- Prepare in advance and a substrate of peat, sand in a 1: 1 ratio, as well as a medium-sized pot;
- Bury the cutting in half, cover its roots with river sand and humus. Pull the film over the pot with the handle.If you have a full-fledged greenhouse, put it there.
Give the plant two waterings and ventilate it regularly. In such conditions, the cutting should last about 45 days. The weigela stalk will be ready for transplantation into the open ground of the personal plot only after 1.5 years of growth. Of course, the pot will be cramped for him. Therefore, be prepared to transplant the future bush into a large and deep enough container.

Summer and autumn cuttings
Summer-autumn cuttings are also used. It, in fact, is not inferior to the autumn look, so the choice depends only on individual conditions.
Usually summer cuttings (and autumn, as its continuation) are carried out from the second half of July. The signal to the beginning will be the end of the flowering of the weigela, and grafting will have to be postponed if the foliage begins to change its usual dark green color.
- Eliminate the leaves at the bottom of the cutting and choose a temporary spot in partial shade for it;
- On top of the soil in which you have already planted the plant in a 10 centimeter hole, pour about 40 millimeters of sand. The bush will be ready for planting on permanent soil in the middle of next April. At the same time, weigela will be covered with flowers for the first time;
- When rooting, pinch all new shoots. It is impossible for the plant to spend all its energy on increasing the length if you want a beautiful dense Weigela bush;
- Water once a day and constantly monitor the moisture content of the earth;
- Cover the bush for the winter and at the beginning of the first frost.
With proper care and regular care, the weigela bush will live for at least three decades. Every year it will delight you with its flowering or even act as a hedge. Such long-lasting beauty is worth trying!
Rooting features
Juniper cuttings are rooted in a nutrient substrate - the earth should be light, aerated, with a neutral or slightly acidic reaction. It is best to use a mixture of peat, turf and river sand with the addition of perlite and vermiculite. It is not recommended to add ash, shells or lime, as they give an alkaline reaction to the soil.
If you are going to root a couple of cuttings, then you can use a flower pot. Expanded clay, crushed stone, large pebbles or any other drainage are certainly poured at the bottom, then the prepared soil mixture is covered with a layer of 15-20 cm and sprinkled with sand. If the number of seedlings is large, it is better to plant the blanks in large boxes or greenhouses.
Planting cuttings for rooting has its own characteristics - just sticking into the ground is not enough here. Step-by-step landing instructions include several stages.
- Using a wooden peg, a hole is formed in the prepared ground at an angle of 50-55 degrees. If you plan to plant several shoots, then the distance between the holes should be about 7-10 cm.
- The cuttings are laid at an angle, deepening them by 3-5 cm.
- The earth around the processes must be properly compacted, so that no voids remain.
- Seedlings should be watered through a spray bottle or through a sieve so that the soil is thoroughly moistened.
- It is better to plant the cuttings in a greenhouse - for this they are covered with plastic wrap or a bottle.

On average, seedlings are ready to move to a permanent location in 3-4 months. However, this time frame may shift for different varieties. Root formation often stops in the summer and continues in the fall.
During the period of root formation, it is necessary to keep the soil moist. If the seedling remains indoors until the next season, it is necessary to treat it with fungicidal solutions once a quarter to prevent disease. Lighting should be diffused, but bright - light contributes to the formation of phytohormones responsible for root growth.
After the roots reach 1.5-2 m, it is necessary to harden the juniper little by little. To do this, open and ventilate the greenhouse every day.
Rooting methods
You can root cuttings of clematis in water or soil, let us dwell on the description of each method in more detail.
In water
Most breeders give preference to rooting clematis cuttings in water. This method works no matter what time of year you decide to breed them. You will need a container with a wide mouth, it is filled with filtered water so that it covers only the lower kidney. The leaves on the handle must be cut into 2⁄3 plates, immediately after that the shoots are placed in a bath and wrapped in thick light paper. The root system is formed within a month, all this time the material must be in a darkened place so that direct sunlight does not fall on it.
To prevent decay, you can add activated carbon to the liquid and crushed tablet. As soon as the roots grow up to 4–5 cm, the cuttings must be transplanted for further growing in containers with a nutrient substrate.
In the substrate
An alternative option would be to plant branches directly into the ground. To propagate cuttings in this way, you should prepare containers and soil mixture in advance. It is better to take plastic planting containers - in this case, before planting in a permanent place, it will be possible to simply cut the walls of the vessel and remove the plant along with the earthy clod without damaging the roots.
The substrate is made up of garden soil, river sand and peat, taken in a 2x1x1 ratio, it will be useful to add a little wood ash to disinfect the soil. The substrate is poured into a container and the cuttings are planted at an angle of 30–40 degrees, deepening no more than 2.5–3 cm; a distance of 7–9 cm should be left between the shoots. The planting material must be placed in a warm, lighted place. Watering is carried out every 4–5 days. The hotter it is in the room, the more watering will be required for future clematis. However, do not get carried away with irrigation - excess moisture leads to rapid decay of the root system, it is best to moisten the ground through a spray bottle so that the top layer of the substrate does not wash out.
Regardless of the method of grafting you choose, rooting will go more actively if the container (with water or soil) is placed in a small greenhouse. You can make it from improvised means, for example, you can cover the stalk with a cut off part of a plastic bottle or plastic wrap. A warm and humid microclimate is formed inside the shelter, which contributes to the rooting of the shoots as much as possible.
After the first roots appear, the greenhouse can be removed.
To speed up the process, you can use solutions of root stimulants. The most effective are "Kornevin", "Kornerost", "Root Super", as well as "Heteroauxin". The preparations are diluted with water in accordance with the instructions, water the container with the appendix.
Reproduction of juniper
How can you multiply
Seedlings of this plant can be purchased quite easily, and therefore there is no particular need to use various methods of reproduction of a juniper. But if you still want to grow a juniper with your own hands, then you need to remember that creeping forms can be propagated by layering, and tree and bush forms can be propagated by green cuttings and seeds.
Reproduction of juniper by seeds
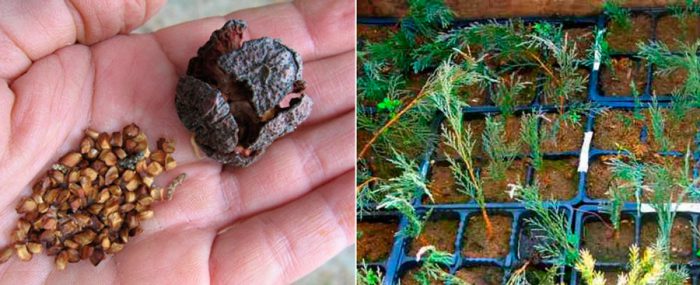
Before sowing the seeds of a given plant, they need to be prepared. To do this, they must be stratified, and this requires cold. In a box filled with earth mixture, you need to sow seeds, then this container is taken out into the street and placed under a snowdrift. The seeds should stay there for 4–5 months. The prepared seeds are sown in open ground in May. If desired, in May, you can sow unprepared seeds, but in this case you need to know that the first shoots will appear only next year. In some species of such a plant, the seeds have a rather dense shell in this regard, before they are planted, they must be scarified.So, to accelerate germination, the seeds are exposed to acid or the shell is mechanically damaged. So, the most often used method is when the seeds are placed between two boards, upholstered with sandpaper from the inside. Then they must be rubbed. After the seeds are stratified, they are sown into the ground, while the planting depth should be from 2 to 3 centimeters. It is quite easy to care for the sown seeds. It is necessary to sprinkle the surface of the bed with a layer of mulch, water if necessary, during the first 14 days you need to protect the bed from direct sunlight. You should also systematically loosen the surface of the beds and pull out weeds. At the age of three, it will be possible to transplant a seedling to a permanent place, transferring it along with an earthen lump.
Reproduction of juniper cuttings
Decorative forms do not propagate by seeds; cuttings are used for this. They should be prepared in the spring, while cuttings are cut from young shoots that have become lignified. The length of the cutting should be from 5 to 7 centimeters, while it must have 1 or 2 internodes, as well as a heel. To do this, the stalk should not be cut, but it is torn off by hand in such a way that a piece of bark from the parent plant remains at its end. Immediately, the cutting should be treated with a root growth stimulating agent. Then the prepared material for planting is planted according to the 7x7 scheme in an earth mixture consisting of sand and peat (humus), taken in a ratio of 1: 1, while the surface must be sprinkled with coarse sand (layer thickness from 3 to 4 centimeters). After planting, each cutting separately must be covered with a glass jar. It is necessary to deepen the cutting by 15–20 mm, in this regard, rooting will occur in the sandy layer. By the onset of the autumn period, the cuttings will take root, however, transplantation to a permanent place can only be carried out after 2 years.
Reproduction by layering
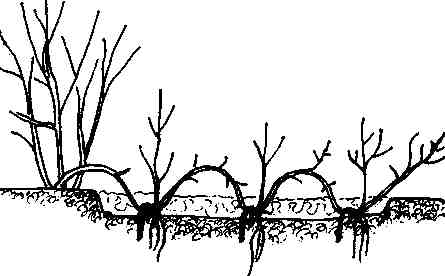
If the juniper is creeping, then layering can be used for its reproduction. At the same time, the plant can be propagated in this way during the entire period of active growth. For layering, you need to choose young, barely ripe branches, as they very quickly give roots. First you need to loosen the surface of the soil around the plant, mix it with loose peat and river sand, and then moisten it. To a height of 20 centimeters from the base, the layers must be freed from the needles, then this part should be bent to the soil surface and fixed with pins. After 6-12 months, the cuttings will give roots, but during this time it should be watered systematically, and also spud. After young shoots grow on the layer, they will need to be disconnected from the parent plant and planted in a permanent place.
Reproduction of juniper in a vegetative way. Part 2