How to propagate a plant indoors?
Reproduction of ficus Benjamin at home is not the most difficult task due to its endurance and vitality. But in order to successfully grow a new plant, you need to know a number of important rules. Let's figure out how to propagate Benjamin's ficus and look at techniques such as grafting and propagating ficus using air layers.
Cuttings
The most common way of reproduction is vegetative. For its implementation, it is necessary to correctly select the branches of the plant: apical or stem petioles.
Apical shoots
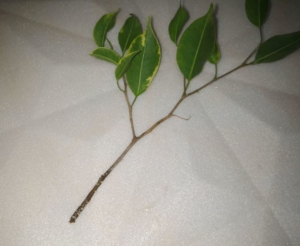
Do not use scissors or blunt knives for pruning, as the wood of the stem can be crushed or damaged, which will slow down the growth of the shoot.
- Before pruning, you need to make sure that the original plant is not infected and not very old. The best option is to take semi-lignified branches, about 15 cm long with at least 3-6 leaves.
- The petiole is cut obliquely with a sharp knife, while milky juice is released, it must be soaked with a soft cloth and dried, then it can be placed in water, the leaves should not come into contact with water.
- If the cuttings are very lignified, before placing them in water to form roots, it is necessary to cut the petiole from the bottom in the middle and secure with a toothpick.
- There is no need to expose the cut petioles to direct sunlight, keep in a dry room, add water as it evaporates.
- After a while, root processes begin to appear. After the roots are formed, somewhere in 2-2.5 weeks, the shoots can be planted in the soil substrate.
Stem petioles
Method for isolating petioles from stems:
- The stiff sprout is divided into parts. Each of them should have 2-4 sheets.
- The upper cut is made above the bud in the leaf axil, and the lower one is cut obliquely, the part between the nodes is taken.
- After washing from the milky juice and air drying, the cutting is placed in the ground to the base of the leaf, while the leaf itself is rolled into a tube and tied with tape or threads.
- The petioles are planted in the ground and covered with polyethylene and the necessary substrate moisture is maintained.
With this type of reproduction, roots are formed more slowly, after about 1-1.5 months.
Layers
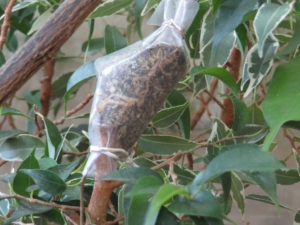
The flower can also be propagated by air layers.
- On the shoot, you need to cut off the bark without damaging the wood of the plant.
- The bare stem is wrapped in moss, can be greased with a preparation to accelerate root growth, and everything is fixed with plastic wrap.
- When the roots begin to break through the moss, the film is removed, and the petiole below the formed roots is removed from the plant.
- Such a petiole takes root in the same way as the previous ones.
Leaves
Reproduction of ficus by a leaf is not difficult.
For propagation by a leaf, it is necessary to select healthy and strong petioles, which are taken from the upper branches of the ficus. You don't have to take the phrase literally - from a sheet
It is necessary to choose petioles, for example, with one leaf, the stepson will not grow if there is no stem bud.
The lower cut of the cutting is also cut at an angle, but in this case it is important to make it along the internode.
The prepared shoots are buried in the soil up to the leaf petiole. The sheet is usually rolled into a tube and fixed, for example, with tape.
Rooting conditions are the same as for other types of ficus propagation. Roots appear in about a month.
Is it propagated by seeds?
Surprisingly, Benjamin's ficus can multiply by seeds. The most favorable time for seed germination is from mid-February to early April, in general, you can sow in July, other periods are not very favorable.
It is better to use fresh seeds and use a magnifying glass or a stick when planting, as the seeds are very small.
The soil for planting must be prepared:
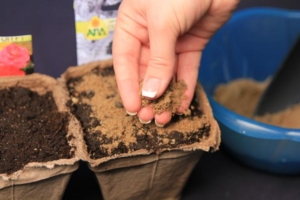
- you can mix earth with sand;
- pour into a container, not reaching the edges of 3-5 cm;
- spill well and tamp lightly.
Landing:
- Seeds are spread over the soil, scattered or picking up the seeds with a stick, and planted in rows.
- Sprinkle the top with soil to the top of the container and cover with glass or polyethylene. If a species that grows in the dark is used, then the container is additionally covered with paper on top. Seedlings appear at different times from 10 weeks to 6-8 weeks, depending on the variety and the freshness of the seeds.
- To grow good shoots, you need to ventilate the crops every 3-4 days.
- After the seeds germinate, they should be transferred to a bright place so that the sprouts do not stretch out and frail processes do not form.
The shoots appear and germinate slowly, the first true leaf appears in 1.5 months, after germination.
Plant transplant
You need to replant a young plant annually. An adult chefler is transplanted every two years. A young bush is transplanted by transferring the plant from one pot to another.
Important! When removing a plant, the first thing to do is to examine the root system. When signs of disease are detected, diseased roots are removed
A layer of drainage is poured into a new flowerpot at the bottom
Carefully place the plant there and cover it with nutritious soil. For transplanting, it is worth choosing a slightly acidic (pH not higher than 6), light soil
The procedure is completed by intensive watering.
When transplanting a mature plant, it is carefully removed from the pot. Then the root system is cleared of the earth. The roots are carefully examined for the presence of rot. At the end, the flower is planted in a new pot. It should be four centimeters larger than the previous one. A layer of expanded clay should be poured onto the bottom.
Important! If the plant can be easily removed from the pot, then it needs a transplant.
Reproduction of adenium
The succulent plant is propagated by spring sowing of seeds and vegetatively - by grafting and apical cuttings.
The grafting method is used by grafting valuable decorative varieties with double flowers on seedlings of natural species. However, when propagating adenium in a vegetative way, it should be remembered that caudex is formed only in plants obtained from seeds.
The inoculum is soaked for several hours in a warm solution of a growth stimulant, for example, zircon or another. In the meantime, prepare the substrate, making it up from coco-soil, charcoal and vermiculite.
The seeds are laid out in shallow holes and moistened with a spray bottle. Sprinkle on top with a thin layer of substrate and put the container with the sowing in a very warm place with a temperature of more than 30 degrees above zero. Seedlings will appear in a week, but if the temperature is lower, for example, from 20 to 25 degrees Celsius, the seeds hatch longer, moreover, there is a risk of rotting seedlings.
When the first pair of true leaves is formed, young succulents are accustomed to the growing conditions of adult adeniums, and with the appearance of the third and fourth leaves, the seedlings dive into small independent pots.

Step by step instructions: how to propagate and plant?
There are many types of ficuses, but they all reproduce equally easily, which makes the procedure easier for florists at home.

There are four options in total
- Sheet.
- Seeds.
- Cuttings.
- Layers.
Each method has specific features.
How does leaf propagate?
The new leaf plant is grown from the highest quality large leaves.
- Two cuts are performed: main and oblique, so that the roots develop faster.
- We wash the leaf with water or soak it to remove unnecessary juice, otherwise the process of root formation will be delayed.
Reference! In order for the leaf to turn into a plant faster, it is better to treat the cut with a special stimulant for the formation of roots. - Before planting, we prepare the pot and the soil: we put the drainage on the bottom, we lay the soil, adding a little sand and an additive: the mineral wilmeculite. The container must have a hole to drain excess water.
- We carefully twist the sheet and tie it with a thread, deepening it shallowly into the soil.
After 3 or 4 weeks, the shoot will take root in the soil, while the air temperature should be at least 27 degrees.
You can learn how to propagate a ficus with a leaf in this video:
Seeds
This is the most difficult method of propagation, the necessary seeds must be purchased at the store.
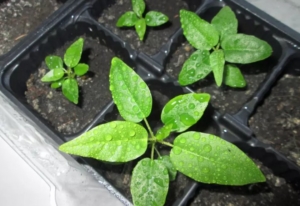
- Before sowing, the seeds must be treated with the "Fungicide" composition to get rid of fungus and spores, as well as a growth stimulant.
- For soil, it is better to use a mixture of peat and peat moss, or a mixture of humus and sand in a two to one ratio. Before planting seeds, the soil must be disinfected with steam for sterilization.
- It is better to choose a container for planting a flat one, it is easily closed with a film and it will be easier to track the germination of seeds in it. We put the soil in a bowl, lightly press and spray, it is not necessary to water it.
- We spread the seeds on wet soil at a short distance from each other so that there is no lack of lighting.
- We maintain the temperature at 23-24 degrees, avoiding direct sunlight. We cover the container with a film, which we regularly open for airing. It is possible to use glass instead of a film, it is more convenient when the seeds germinate and it will be necessary to accustom them to room air and temperature.
- Spray the soil during germination so that it is slightly moist. First, the seeds will take root, then they will germinate and they will have shoots. When there are three or more leaves, they can be transplanted into a common container for further development at a short distance from each other.
Here you can learn about growing ficus from seeds:
Cuttings
This is the easiest method, which is suitable for plants over two years old; this method can injure a young plant. The future stalk is cut from the top of the plant to a length of ten to fifteen centimeters.
Attention! If the seedling is large, you can use lateral shoots, but there must be at least three leaves on the handle.
Too many leaves are undesirable, four to five leaves are enough, excess leaves must be carefully removed.
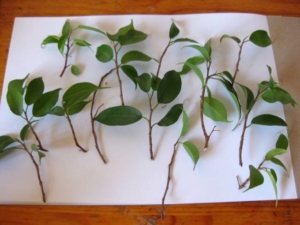
- We make the cut at an angle to make it easier for the shoot to absorb moisture.
- After cutting it, you need to rinse it from the juice with warm water, let it dry and make a cross-shaped serif at the bottom for a faster appearance of roots.
- We place the stalk in a container with water in a warm place for 3-4 weeks, after the appearance of roots and young leaves, the plant is ready for transplantation.
- Next, we plant it in the soil of peat and sand, spray the leaves, and water the plant itself.
- We cover in the first week with a plastic cap to maintain the temperature above 24 degrees, then carefully accustom it to room conditions.
Watch a video on how to root ficus cuttings in water, and then plant in pots:
Next is a video plot on how to root cuttings in the ground:
Layers
- We select a shoot with a length of at least 50 cm and cut off the leaf, then with a sharp blade we make a light incision without damaging the bark of the plant.
- We remove the juice with cotton wool, put a match or a toothpick into the incision for oxygen access.
- We wrap the place of the incision with a layer of moss, which we fix with cling film, while leaving the access of oxygen.
Reference! After 15-25 days, roots will appear and develop, after which the seedling can be cut from the mother plant and transplanted into the ground.
Video about reproduction by layering:
general information
Sheflera is a member of the Araliev family, which includes about 200 plant species. Its name was derived from the surname of Jacob Christian Scheffler, a German scientist who lived in the 18th century and made a great contribution to the development of botany.
In its natural environment, the flower can be found in the tropical forests of Southeast Asia and Australia, as well as on some islands in the Pacific Ocean. Wild varieties are shrubs, vines or trees up to 2.5 meters in height.
Low forms with variegated leaves are grown as garden plants. At home, the cheflerr began to be kept not so long ago. This exotic tree is considered a relaxer and is capable of absorbing all the negative energy accumulated in the house, as well as increasing the humidity of the air and enriching it with oxygen.
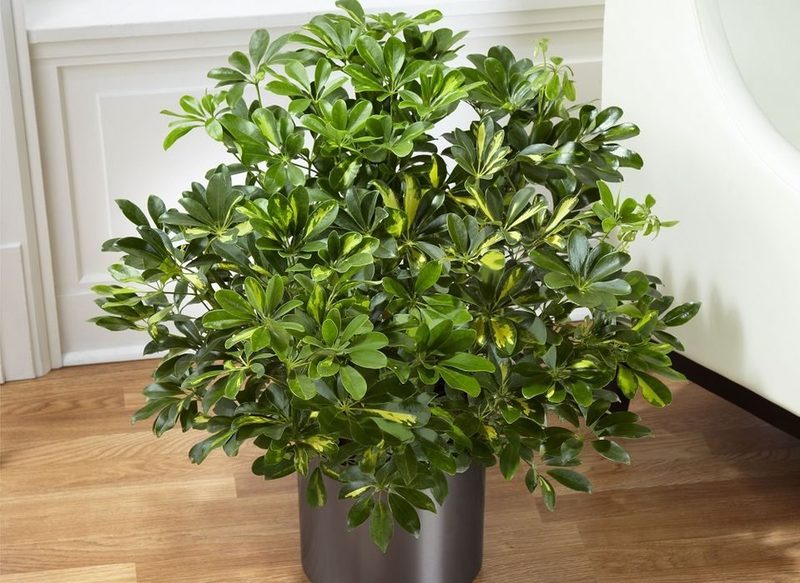
The decorative sheffler is called the umbrella tree because of its finger-dissected leaves, consisting of 4-12 lobes and collected in rosette umbrellas. A glossy sheet plate can be monochromatic - painted in a dark green color, or motley - with white and yellow spots, stripes, stains. Adult specimens are similar to small palms and are able to bring an exotic atmosphere into the house.
The plant has racemose, elongated inflorescences, some breeders even compare them with tentacles. But few people manage to admire the flowering of shefflera, since it occurs only in the natural environment or in a botanical garden. But the plant owes its decorative qualities to the foliage, which always remains green and does not crumble all year round.
Shefler is referred to as unpretentious indoor crops, so its cultivation does not cause problems even for novice growers. However, it should be remembered that the flower releases substances that irritate the mucous membranes and skin. Therefore, you should be careful and keep children and animals away from the sheffler.
Transplanting adult plants
Schefflera stretches out rather quickly and can add 30 centimeters in height every year, so it needs frequent transplants. However, if you transfer it to new pots only once every 2-3 years, nothing terrible will happen, the flower will simply grow more slowly.
The plant loves space very much, so it can be transplanted into voluminous and large pots for growth. The procedure is carried out in spring or autumn according to the following plan:
- Drainage material is distributed along the bottom of the new container.
- Pour the soil mixture and distribute it evenly over the pot.
- The plant is removed from the old pots along with an earthen lump and transferred to a new one by transfer.
- Sprinkle with earth, compact and watered well.
The flower will not need special care after this procedure. It is carried out as usual:
- watering once every 2-3 days - at 20-24 degrees of heat, once a week - at 16-19 degrees;
- in spring and autumn, the introduction of organic fertilizers and dressings with the content of potassium, nitrogen, phosphorus.
Schefflera is perfect for novice growers to develop skills in caring for indoor plants. This unpretentious bush will teach you how to plant, grow and plant new specimens, how to properly dilute fertilizer, as well as various watering options. This knowledge will allow you to prepare for growing more capricious decorative flowers.
Reproduction of adenium at home
Adenium can be propagated by seeds and cuttings.
Adenium from seeds
The seeds can be planted one at a time in peat cups, or even soaked on gauze until they germinate, and then carefully planted in a nutrient mixture.
Young seedlings grow actively and respond well to watering and adequate lighting. The air temperature should not fall below 14 ° С or rise above 30 ° С.
When the plants become crowded in temporary cups, they are carefully transplanted along with a clod of earth to a permanent place, shortening the central root to stimulate the development of lateral roots.
How to grow adenium from seeds video:
The advantage of growing adenium from seed is that mature plants will have caudex, a characteristic thickening at the bottom of the central trunk of the tree. Saplings obtained by cuttings do not have such thickening.
In most varieties of adenium, natural branching begins at the age of 5-6 years. To increase branching, pinching of the apical bud is used.
In young plants, pinching (removal of the central bud) will not give a result - as a rule, the first one wakes up, before cutting, the bud and then growth goes into one stem. With age, the dominance of the apical kidney weakens.
In adult adeniums, when pinching, 2-3 buds, located in front of the cut, wake up. If the pinching is carried out during the dormant period of the plant, then one bud will wake up. The wider the cut, the more branches will develop.
The pinching is carried out during the period of active growth. If the plant is cultivated in the temperate zone, then the optimal time for pinching is March / July.
Pruning
Pruning is carried out in the case of:
when the plant has ceased to bloom, that is, with the aim of enhancing development;
to form the required shape.
Anti-aging pruning removes old non-leafy branches. Ideally, such pruning is combined with a transplant and is carried out every two years.
To stimulate the flowering of grafts, the scion is heavily pruned - after pruning, about 3 cm of the scion remains.
On grafted plants, it is necessary to remove excess shoots growing on the rootstock, otherwise the scion stops developing.
Root pruning. Over time, adenium develops a very massive root system with thickened secondary roots. When transplanting, it becomes necessary to cut these roots in order to simplify planting.
For the control and prevention of diseases - parts of the plant with signs of the disease are removed.
Pruning rules
Before pruning, you need to wash the plant with warm water.
When pruning, the cut is 1 cm from the caudex.
Pruning is recommended at a temperature not higher than 250C, at the beginning of active growth. The optimal time for pruning is March - April.
Pruning of the roots of adenium is carried out when the plant is transplanted. The root is trimmed at the edge of the caudex connection.
When cutting diseased parts of the plant, after each cut, it is necessary to disinfect the cutting tool (in order to avoid the spread of the disease); a part of the plant with signs of disease is removed to a healthy tissue.
A large amount of juice will be released from each cut. The discharge will stop naturally within one to two days.
Adenium juice is poisonous... It is unacceptable for the juice to get into the eyes or inside the body.
If after pruning a lot of dormant buds have woken up and many unnaturally thin shoots have grown, then it is necessary to pluck out their main part.
The minimum height of caudex trimming is 9-10cm above the soil level.
Required tools and materials:
- disposable gloves;
- manual secateurs;
- soap;
- alcohol;
- warm water.
1) Put on disposable gloves before starting work.
2) It is enough to pinch some stems with your fingers, crushing the growth point.
3) Visually compare the thickness of the stems. Cut the thinnest stems. There should be no hemp left after trimming. This pruning stimulates the development of the entire plant.
4) Use your fingers to check all parts of the plant for firmness. Remove soft, leafless, crooked stems rubbing against each other. It is also necessary to remove stems growing inward, damaged or tangled. Make sure the remaining branches don't rub against each other. It is also advisable to prune very thick branches to stimulate the development of the whole plant. Disinfection of cutting tools in alcohol after cutting diseased plant parts is required.
5) Cut off the remaining stems, giving the plant the desired shape. At the same time, we make a cut just above the knot. Flowers will emerge from the buds under the cut.
6) Take off your gloves and throw them in the trash can, wash your hands with soap and water.
Fuchsia propagation
Now about how fuchsia reproduces. For cultivation of a culture, two methods are used: by seeds, cuttings (vegetatively).
Fuchsia - growing and care at home
The first option is pretty troublesome.It is used mainly by breeders, and the plant practically does not retain the varietal qualities of the parent bush. In this case, you need to pollinate the seed yourself, prevent self-pollination of the flower, pollination of fuchsia by insects. You can also purchase seed from the store.
How to propagate fuchsia at home with seeds
- In February, achenes are sown in a light, nutritious soil mixture. They are laid out on top of a wet soil, previously treated with a solution of potassium permanganate, slightly pressed against it.
- Cover the containers with foil. They are placed in a warm, bright place. However, you should not allow direct sunlight, there should be diffused light. The required temperature is +22 degrees, for a cold-resistant variety, +18 degrees is enough.
- Shelters are removed 1-2 times a day to ventilate the seedlings. Spray the soil with water periodically.
- When the seedlings hatch (after 2-3 weeks), raise the film more often, then remove it completely. After two or three leaves appear, the seedlings dive into different pots. After 1-2 months, they are seated in more spacious containers.
- Young shoots are sprayed once every two weeks, fertilized with mineral compounds.
Note! By propagating fuchsia in this way, you can grow a young seedling in 5 months. And the bush will bloom only after a year
Fuchsia: propagation by cuttings at home
According to experienced flower growers, fuchsias can be cut almost all year round. However, the best time for this, of course, is spring.
Step-by-step instructions for cutting fuchsia in water:
- In the spring (March, you can start in February), before propagating fuchsia, healthy young petioles 10-20 cm long are selected. They are cut from the shoots growing on the apical branches. They must have 2-3 internodes.
- With a sharp knife, make an oblique cut (angle of 45 degrees) under the lower leaves. Then they are removed. Leave the top leaves, cutting off the leaf plates in half.
- In the same way, the top of the appendix is cut off. You can use old shoots, but then the rooting process will take longer.
- The process is allowed to dry for 10-15 minutes. A trim, its lower part is powdered with Kornevin (you can take Epin, Zircon, Sodium Humate, Heteroauxin).
- The petioles are placed in a glass jar filled with settled water. Cover the top with a plastic bag or a transparent plastic glass, half a plastic bottle.
- After 5-14 days, roots should appear. There is no need to wait for them to become long. Now the cuttings must be planted in separate small pots (their diameter, height - 9 cm). It is necessary to disinfect the earth in advance with a solution of potassium permanganate.
- Prepare the soil well in advance. It is necessary to mix in equal parts leaf, turf soil, sand, humus. Another composition is also used: peat, perlite, vermiculite (10%), sphagnum moss (a little). You can buy ready-made primer in the store.
How to root fuchsia cuttings directly into the soil
- For the processes, take transparent plastic cups (volume 100-200 ml).
- Make holes in the bottom of the container (2-3 pcs.).
- Small expanded clay is poured onto the bottom with a layer of 1.5 cm. Fill the top with earth.
- Cuttings are prepared in the same way as for a container with water.
- Now you need to make depressions in the ground, plant shoots, sprinkle, press a little, water, cover with a bag or a plastic cup. Place the seedlings in a bright, cool place. Remove the film daily, ventilate. Roots can be expected to appear in 2 weeks.
Fuchsia cuttings in summer
Propagation by cuttings at home
It is believed that rooting fuchsia shoots is quite difficult in the summer. And the heat is to blame. After all, culture prefers coolness, humidity. Petioles placed in water can simply rot. Therefore, before cutting fuchsia in the summer, you need to bring the plant into a room equipped with an air conditioner or a split system, where you can carry out the whole process.It is best to leave a jar with a handle here so that it takes root.
How to root fuchsia using a leaf
This is one of the options for flower reproduction. A healthy large leaf is cut off along with the petiole. Buried in perlite. It should be wet. They create greenhouse conditions, spray them daily, maintain the temperature. A miniature outlet should form. When she gets stronger, she is transplanted into a separate pot.
Pruning features
Sheflera grows very quickly, so she needs regular pruning. If you do not do it, the plant will grow to the ceiling... This procedure not only gives the plant shape, but also protects against pests.
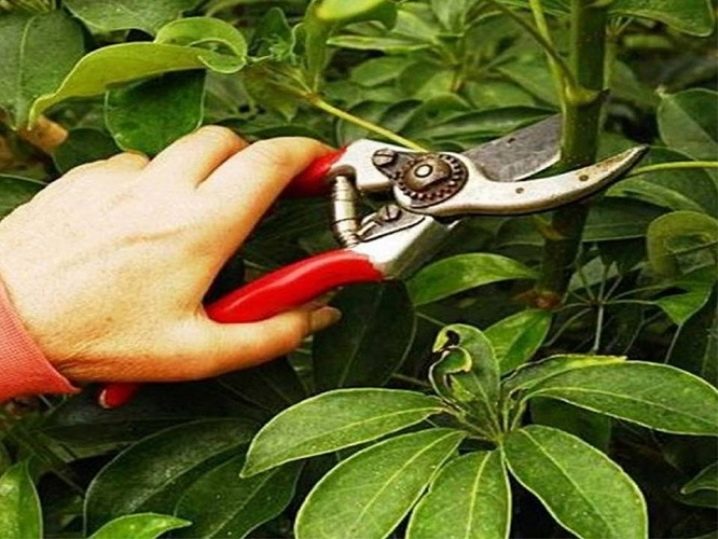
If pruning is done correctly, new branches will soon appear on the plant.
There are two types of trimming:
- formation of crowns;
- removal of weak and yellow leaves.
For lush branching and a thick crown of the tree, it is necessary to cut off the top. Pruning is desirable in the spring, as soon as the plant wakes up after hibernation.
Cropping has several functions:
- Gives the flower the desired shape.
- It has a beneficial effect on the growth of new branches and leaves.
- Serves as a planting material.
- Removes weak and diseased branches.
Important! When a bush has lost all its leaves, it can be saved by doing low pruning.


