Propagation by cuttings
This method is quite simple and effective. For this reason, it is used by flower growers more often than others.

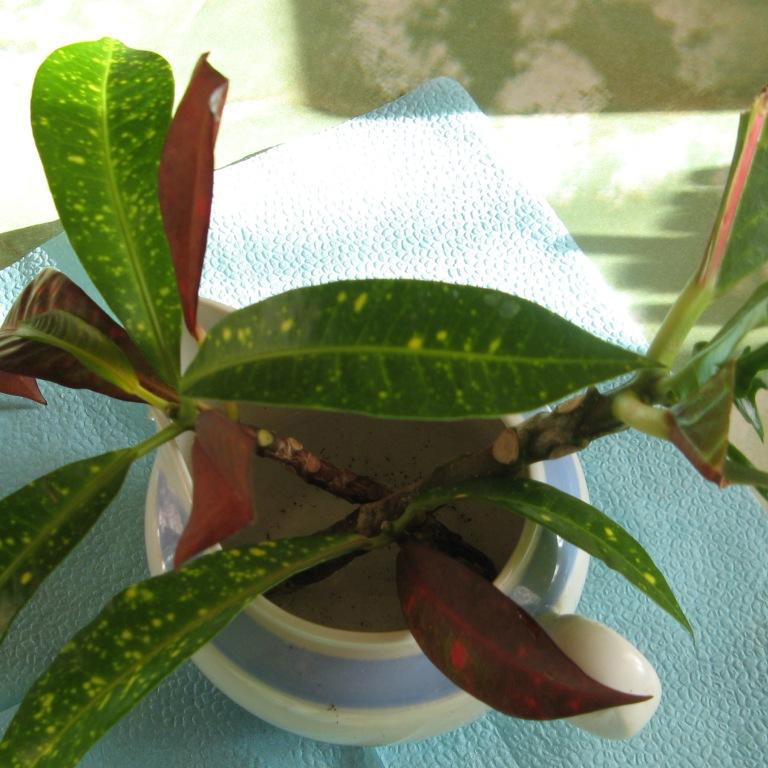
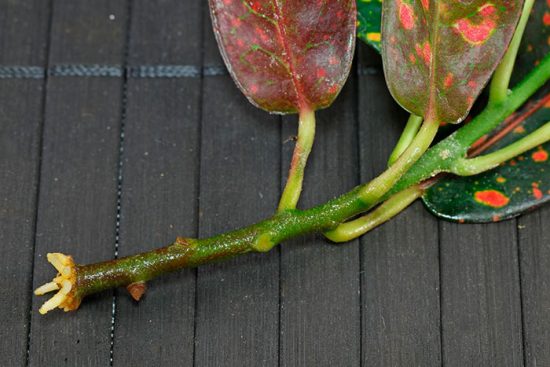
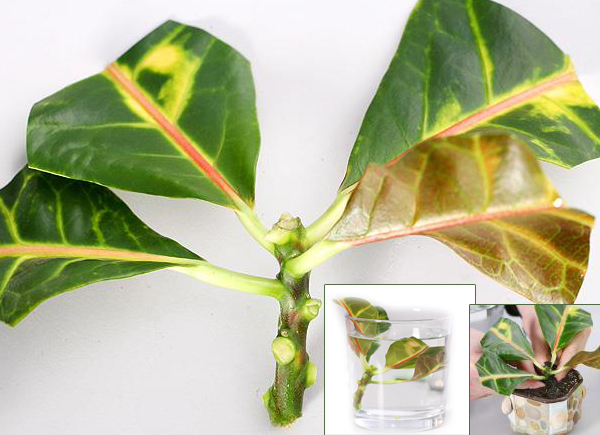
What the finished cuttings look like
The process of obtaining new croton seedlings itself consists of several stages:
- Preparation of cuttings. To obtain good planting material, it is possible to use the apical parts of the plant, young and lignified shoots. The length of the cutting should not exceed 10 cm and have at least one bud and one leaf.
- Cut processing. The cut site must be rinsed with water or wiped off with a napkin. It is better to treat the cut itself with ash for disinfection.
- Air exposure. After processing the cut, the cuttings should be laid out on a napkin or cloth and left for 2-3 hours at room temperature.
- Landing. You can place the cuttings directly into the ground, but it is also allowed to place them in water to form roots. When landing in the ground, a shelter is required, which should be periodically opened for ventilation.
- Picking. After 25-30 days, a root system should form. At this stage, you should plant the seedlings in separate pots.
Note! For successful rooting, the temperature in the greenhouse should not fall below 22 ° C, and the humidity should not fall below 70%. Before planting, the cuttings can be treated with a preparation to stimulate the development of the root system.
If it was decided to place them in water for the formation of roots, the cuttings themselves do not need to be processed. The drug is added directly to the prepared container with water
Before planting, the cuttings can be treated with a preparation to stimulate the development of the root system. If it was decided to place them in water for the formation of roots, the cuttings themselves need not be processed. The drug is added directly to the prepared container with water.
Apical cuttings
Quite often, croton tops are used to obtain planting material. When preparing a cutting from this part of the plant, it should be borne in mind that after the cut, two leaves and one bud should remain on it. The lower leaves should be removed.
The rooting process for apical cuttings is otherwise the same as that used for material from other parts of the plant.
Care features
Despite its remarkable ability to "keep out" the owners, Tradescantia still needs minimal attention and easy care. Monitor the condition of the topsoil, water abundantly in hot weather, drain excess water from the trays, and provide moderate watering in winter.
Do not overdo it with top dressing - Tradescantia is oppressed by the excessive amount of nutrients in the soil, which negatively affects its decorative effect. Apply complex fertilizers at half the rate specified in the recommendations. To maintain the density of the leaves and the beautiful shape of the bushes, young plants are pinched.
If the rules of care are violated, the plants can get sick. Lack of light will lead to "baldness" of the stems, they will begin to stretch, and the leaves will become small and rare. If the air is too dry, the tips of the leaves dry out.
Possible difficulties
When growing croton in a house, you can face the following difficulties:
- stagnant water. For this, the soil in the pot is poured over the drainage. Also, before each watering, the soil in the pot should dry out;
- for planting and transplanting, you need to use slightly acidic soil. Specialized soil can be purchased in a flower pot. You can also prepare the soil with your own hands. To do this, you need to mix rotted manure, leaf and sod land, as well as peat with sand in equal proportions;
- fertilizers should be applied to the soil in summer and spring.This is done once a week after watering. In autumn and winter, fertilizing is applied once a month.
Croton propagation by cuttings: everything in order
In order to propagate Croton by cuttings, it is not enough to prepare the tool and auxiliary materials such as garden shears / pruning shears, glass jar / plastic wrap to create a mini greenhouse, nutrient substrate. You need to know exactly from which parts you can cut the cuttings and at what time.
His Majesty the stalk, or the one on which a lot depends
Here is the good news: cuttings can be cut at any time when you decide to start growing a flower. The only exception is January-February, during these months the plant is sleeping, so the roots of croton will give weak, or even nothing will work out at all.

But as for cuttings, it is most suitable for them:
- apical shoot with an active bud;
- stem shoot with a single leaf;
- the stiff part of the shoot, even without a bud.
In short, any part of it is suitable for croton breeding. The main thing is to cut the cuttings correctly. Each of them should be:
- at least 6-12 cm in length;
- not less than 7-8 mm thick;
- have at least 1 leaf, for the apical shoot it is necessary to leave a pair (for faster survival).
It is necessary to inspect the plant and highlight those shoots that can be put on cuttings. A striking advantage of this breeding method is a large amount of planting material, therefore, even more croton bushes on your windowsill!
Having decided on grafting and subsequent reproduction of croton, having examined the existing uterine bush, it is necessary:
Flower bed design. TOP 10 simple and effective techniques
determine the shoots from which you can cut the tops for cuttings, as well as stem, from which you can make several cuttings at once;
carefully cut the cuttings, laying them out on paper and not confusing where the top is, where the bottom is (for those who do not have a top);
dip in warm water for a couple of minutes so that milky juice comes out
It is important to remember that the cut on the shoot of the flower can be sprinkled with wood ash and the emission of sap will stop;
keep the cuttings in the air, leaving 1-2 leaves on each, removing the rest. What are the leaves of the cuttings for? They will allow you to fully feed the cut line, taking root faster;

- after the cuttings have sunk in the sun (it should not be direct sunlight!), the lower part should be dipped in Kornevin, Zircon. The preparations will not only stimulate root growth, but also saturate the cutting with nutrients and elements necessary in the first day of survival;
- root the stalk in a prepared substrate (one that is bought in a store is suitable) or in water. In the first case, to ensure the required humidity, the container with cuttings can be covered with a PET bottle, a jar, or a greenhouse made of plastic wrap can be built. Be sure to ventilate! In the second, you need to monitor the temperature of the water in the container with cuttings. The positive result - strong, numerous and healthy roots - can be obtained by providing water at 24–30 ° C. And no secrets!
If everything is done correctly, the roots of the cuttings will appear on the 21-30th day. Let them grow stronger for a month and then plant the cuttings in a permanent place of growth.
Types and varieties of croton
In indoor culture variegated croton is grown, a distinctive feature of which is the ability to change the color and shape of the leaves, depending on the conditions of existence. It was this quality that made the appearance the basis for experiments in breeding, which culminated in the breeding of many varieties, hybrid forms and varieties.
In the photo: Croton variegated (variegatum)
Variegated croton (variegatum)
grows in nature in Pakistan and China, sometimes reaching a height of three meters. Leaves are short-petiolate. The color of the leaves is green with brown.This species has several forms, differing in the outline of the leaves: appendage, lobed, flat-leaved and painted, which served as the basis for breeding many wonderful varieties:
- Mrs. Aiston - grows as a large tree or bush with brightly colored maroon leaves with bright pink spots, although there is a variety with golden leaves with almost black fragments and a variety in yellow-pink tones;
- Petra - in nature it grows up to four meters in height, branches well, the shape of the leaves is oval, lobed or pointed, the color is dark green with a bright yellow edging and the same color with contrasting veins and specks;
- Black Prince - its wide-oval flat leaves of black-green color with many yellow, red and orange spots look very exotic;
- Disraeli has a lobed leaf shape, painted green with yellow veins and specks in the upper part, and a brick-brown shade in the lower part;
- The excellence is distinguished primarily by the shape of the leaves, reminiscent of oak, the color in the lower part of the leaf is red-burgundy, in the upper part it is yellow-green.
The following varieties of variegated croton are also of interest: mollukskaya, "minus", genoin, oval-leaved, tortoiseshell, curly and spiral. But whatever variety you buy, you can believe that it will become the most visible decoration of your interior.
Croton (Codiaeum) - care, photos, species Laurus - care, photos, species
After this article, they usually read
Add a comment
Care
In growing a plant, the codiaum is variegated, home care will require a number of requirements.
Lighting
All forms and varieties of "Joseph's cloak" need bright, mostly diffused, lighting.
West or east facing windows are considered the best for codiaums.
Shading is mandatory on the southern windows - otherwise there will be burns, and on the northern windows - additional lighting so that the motley color does not disappear.
Temperature
Croton needs a warm habitat, without drafts and abrupt transitions from heat to cold, with an even annual temperature variation.
Optimal ranges are 20-22 degrees in summer and 18-20 degrees in winter.
In any case, the temperature should not drop below 16 degrees. In cold soil, the plant rots.
The soil
"Cloak of Joseph" feels good in loose, fertile soil with a neutral or slightly acidic reaction.
Soils for palms and ficuses are suitable from ready-made soil mixtures.
You can also mix equal amounts of turf, leaf (or peat) soil and washed river sand.
A few more recipes suitable for croton:
- Garden soil, peat and sand in a ratio of 3: 1: 1;
- Sod land with small amounts of sphagnum and sand;
- Sod, leafy soil and sand in a ratio of 2: 1: 1.
Before filling the planting tank with soil substrate, a drainage layer of expanded clay, brick scraps and pieces of charcoal is poured onto its bottom, in order to prevent stagnation of water and decay of the root system.
Transfer
When transplanting a grown plant, the pot is chosen a little, 2-3 cm, larger in diameter than the previous one.
Too spacious "apartment" Croton will not like it.
Transplanting variegated croton, they try to load it without destroying the earthen lump.
The frequency of transplants depends on the age of the croton and the intensity of its growth.
As a rule, young specimens require an annual change of "home".
With age, the interval between transplants will be 2-3 years or more.
Codiaum purchased in a store is recommended to be transplanted into a "home" container with a drainage layer and fresh soil mixture, freeing its roots from the transport substrate.
Humidity
Croton is a true child of the tropics and needs year-round high humidity: ideally, it should be 70-80%.
Such a plant must be sprayed with soft water - regularly, every day, especially since it has practically no rest period.
A monthly shower is also useful, as well as placing the container on a pallet with damp pebbles.
Watering
Water for regular abundant watering of "Joseph's cloak" needs soft, well-settled, not cold.
When dosing, it is important to follow the principle: "pour, but do not pour". Ideally, the soil does not dry out more than 2 cm, and the water does not stagnate in the pan
Ideally, the soil does not dry out more than 2 cm, and the water does not stagnate in the pan.
Those growers who understand the language of plants well are guided by the barely noticeable lowering of the codiaum leaves: as soon as it happens, watering is needed, and quite generous.
Top dressing
From April to August, Croton should receive weekly fertilizing with fertilizers for variegated or decorative leafy plants. Good results are also obtained by alternating organic and mineral dressings.
In the autumn-winter period, the frequency of fertilization (after irrigation, on wet soil) is reduced to once a month.
Bloom
In the summer, under favorable conditions, crotons can bloom with nondescript shaggy bunches of balls.
Flowering, pollination, ripening of codiaum seeds are the subject of interest of breeders who develop new varieties of it.
In the usual practice of home floriculture, the buds that form are removed so that the codiaum does not waste energy on the development of flowers.
The very intention of croton to bloom suggests that the plant is good, it wants to live and reproduce here.
Reproduction
In room culture, codiaeum is propagated vegetatively: by cuttings and layering.
Propagation by cuttings: The best will be apical cuttings 10-15 cm long, with at least two pairs of leaves, cut with a sharp knife in January-April.
The cut points are sprinkled with crushed charcoal. The milky juice is washed off, the lower cut of the cutting is treated with a root stimulator and placed in the soil with a temperature of 25-26 degrees.
Cover with plastic wrap, ventilate regularly, moisten the substrate, spray the stalk.
The standard rooting time is a month.
Propagation by air layering: With this method of propagation, a sufficiently long branch is chosen, bend it to the surface of the soil, sprinkle it with it and fix it.
After the dug-in branch takes root and gives new shoots, it is separated from the original plant.
Which way to choose
Cuttings or leaf
Most often, croton propagation is carried out by cuttings. Not only the apical shoots take root well, but also cuttings with one leaf or a dormant bud. Croton propagation by leaves without a bud will not occur.
The best time for pinching is the first months of spring, when the shoots are actively growing. It is necessary to cut off a fragment on which there is a bud and an adult leaf plate. You need to pinch the top within 6-10 cm, then the future croton will have a strong trunk and rhizomes. In order for a piece of the stem to take root in the future, it must be cut off from a healthy shoot.
We offer step-by-step instructions for the preparation of planting material:
- Dry the cut points with a napkin.
- Cut large leaf plates that take nutrients from the cuttings by half.
- If the lower leaves also interfere with rooting, remove them.
- We keep the cuttings in the air for a couple of hours.
- We place the planting material in a glass of water.
It is very important that the temperature of the liquid is 24–30 ° C. If it cools, the roots will develop slowly, and eventually the seedling may die.
The planting material should be under the scattered rays of the sun all day long.

When roots appear on the handle, you can transplant into the ground. It is enough that the shoots are 2-3 cm long, then they will not be damaged during transplantation, and the plant will quickly grow. If you have correctly selected the composition of the soil mixture, then in a couple of weeks Croton will acclimate and quickly take root.
Video "How to propagate croton by cuttings"
Video on how to propagate codiaum (croton) by cuttings at home.
Air layering
When the trunk or twigs remain without leaves, then croton propagation is performed by air layers. This method is interesting, but very laborious. Summer months are most suitable for this procedure. Let's consider two methods of such reproduction.
The bag method consists in cutting off the bark in a circle at a distance of 10-15 cm from the top of the shoot to make a ring 1 cm wide. This place will be a launching pad for new roots.
The cut site is treated with a special rooting agent and lined with peat. From above, like a bag, a film is applied, which is tied from above and below so that a gap remains, through which peat is moistened for 60 days until roots of 5 cm long appear from it.After that, you can cut the stalk and transplant it into a pot.
You can also propagate croton using the buried shoots method. To do this, the branch on which the bark has formed is pressed to the surface and sprinkled with earth. Then the lower edge of the branch is cut. The juice that has come out must be wiped off, since it is poisonous. The incision is treated with a special tool to root it. The shoot is separated from the maternal branch after rooting and transplanted into a flowerpot.

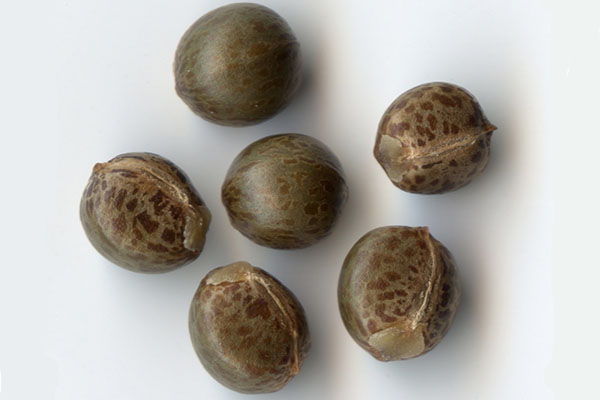
Seeds
Like other plants, croton can multiply by seed. But this method is rarely used. If a florist decides on such an experiment, then he needs to know the following:
- it is a long process;
- plants that have appeared in this way very rarely retain the characteristics of the variety.
They should be planted in February. First, the seeds are poured with warm water. After 15 hours, they are soaked for a couple of hours in a solution of phytohormones. Next, prepare the soil mixture and fill the containers with it. The prepared seeds are buried 1 cm into the ground, make a small greenhouse, covered with a jar or film.

The seeds are germinated at + 24 ° C. Seedlings are watered through the pallet. After 30 days, the first sprouts will hatch. They require attention, as they are weak and develop very slowly. When a couple of leaves appear on them, they can be dived. For seedlings, care is the same as for adult plants.
At the final stage, the seedlings are planted in separate flowerpots.
We told how to propagate a home croton. Some methods were simple, others can only be done by experienced flower growers. Which way to choose is up to you.
Croton care at home
How to care for croton
Croton loves bright light, but he can take baths from direct sunlight only in the morning or before sunset, so in the summer the sill of the northern window is suitable for him, and in the winter, when the sun is shining, but does not warm, the southern one. If you have the opportunity to take croton out in the summer to fresh air and bright diffused light, do not neglect it. The most comfortable temperature for croton in summer is 20-22 ºC, in winter it is not lower than 16 ºC.
In the photo: Handsome Croton
Watering croton is necessary so that the earthen lump is always slightly moist, but at the same time, so that moisture does not stagnate in the roots and does not cause the danger of their decay. Water for irrigation should not be cold, and most importantly, it needs to be filtered or at least defended. The humidity of the air for croton is of great importance, so you will have to regularly spray or wipe the leaves with a damp washcloth, and in the summer season, once a month, arrange for him a warm shower, but so that the water does not flow into the pot.
How not to ruin zamiokulkas - advice from experienced florists
Croton is fertilized with a solution of complex mineral fertilizers on a pre-moistened soil from April to November twice a month, in winter once a month is enough. To form a beautiful crown in croton, pruning (for an adult plant) and pinching (for young crotons) are used.Plants that have reached 15 cm in height are pinched, and then each time the shoots grow 20 cm. In adult plants, after pruning, the cuts are treated with sulfur or charcoal powder.
It is advisable to remove flower buds or young peduncles that have appeared, because flowering, which has no decorative value, exhausts the croton, and this affects the health and beauty of its leaves.
In the photo: Growing croton in a pot
Croton transplant
Young crotons are transplanted twice a year, mature crotons once every two years, and each subsequent pot should be 2 cm larger in diameter than the previous one. When your croton takes up a container with a diameter of 25 cm, this will be its last transplant, but subsequently you will have to remove the top layer of soil from the pot every year and replace it with fresh substrate. The soil for croton should be of approximately the following composition: sod, peat, leafy soil and river sand in equal parts.
When transplanting, it is advisable not to shake the earthen lump of croton, but simply transfer it from the old pot to a new container with a drainage layer about a quarter of the pot's volume.
Croton in winter
When the cold season comes, the croton is moved from the northern window sill to the southern one, watering is reduced, but they continue to adhere to the same principle: the earthen lump should be slightly damp. Water procedures are also continued - spraying and rubbing the leaves with a damp sponge, but this is not done as often as in the warm season, and it is better to forget about the shower until summer. You need to feed the plant no more than once a month, but some professionals are sure that in winter Croton does not need feeding at all.
In the photo: Yellow leaves of croton


