Almond propagation
Varietal almonds can only be propagated by layering, grafting and shoots, and species almonds can also be propagated by seeds. Some gardeners grow rootstocks on their own, and then they are grafted with varietal cuttings.
Growing almonds from seeds
Seeds are sown in open ground, and this can be done in spring or autumn. It should be noted that before you start sowing in the spring, the seeds should be prepared, for this they are placed in the refrigerator on a vegetable shelf for four months. Make grooves in the soil, the depth of which should be from 8 to 10 centimeters, while keeping a distance of 10 to 12 centimeters between the seeds. The gap between the grooves should be 50 centimeters. The almond seedlings that appear need care, which consists in timely watering, weeding and loosening the soil surface. In summer, when the seedling reaches half a meter in height, and the thickness of its stem is 10 mm, all its branches that grow up to 10 centimeters from the root collar must be cut into a ring. Then the plants are transplanted to a permanent place. As soon as they get sick, it will be possible to start grafting varietal cuttings on them.
Almond grafting
Rootstocks of any of the species of this plant are suitable for grafting, but it is recommended to take those of them that are highly frost-resistant. Almonds grow well on rootstocks of cherry plum, bird cherry, blackthorn or plum. A suitable graft must be straight, have well-developed stems with eyes that must be fully formed. All foliage should be removed from the cutting with a pruner, only short centimeter-long petioles should be left.
This shrub can be propagated by grafting only at a time when sap flow is observed, namely: in spring or in August. The rootstock, which should grow in open ground, should be gently wiped with a damp cloth, thereby removing dust and dirt from it. Then, slightly above the root collar, a T-shaped incision must be made using an eyepiece knife. And then gently turn the incised bark to the sides. From the scion, a scute should be cut, which is a strip of bark with a bud and a thin layer of wood. It should be noted that the flap must fit entirely into the T-cut you made earlier, so you do not need to make it too long. When the flap is inserted, press down on the edges of the bark that were previously unfolded. To fix the shield, you can use an eyepiece tape, tape or plaster, while it is enough to make just a few turns around the stem. At the same time, remember that the kidney with the remainder of the petiole should not be closed.
If the vaccination was carried out in the spring, then after half a month the petiole from the kidney, which should still be green, should fall off by itself, while the eyepiece tape should be slightly loosened. In the event that the grafting was carried out in August, then the tape should not be removed until the next autumn period, while in late autumn the grafted seedling must be covered with soil (the grafting site must be covered with earth). With the onset of the spring period, it is necessary to remove the soil so that the root collar is free, and the fixing tape is also removed.
Cuttings
Planting material for cuttings should be prepared from mid to late June. For this, semi-lignified apical cuttings are cut, on which there should be 2 nodes, their length varies from 15 to 20 centimeters. Then the cuttings must be immersed in a growth stimulating agent for 16 hours.They should be rooted in a cold greenhouse. For planting, a soil mixture consisting of peat and sand (2: 1) is used. Cuttings will take root completely after 20-30 days. According to statistics, 85-100 percent of cuttings take root. When roots appear, the cuttings will need to be transplanted into a training bed for growing.
How to propagate by growth
In order to provoke active growth of the growth around the shrub, a strong pruning should be done. The separated offspring must have a fully formed root system, and this will only happen in the second year. The offspring transplanted to a permanent place must be looked after in the same way as a one-year-old seedling.
How to propagate by layering
It is necessary to bend flexible stems to the soil surface, fix them with metal studs, and then sprinkle with earth. During that time, while the root system is forming at the cuttings, they should be provided with timely watering, weeding and loosening of the soil surface. It will be possible to separate the layers and put it in a permanent place only after 12 months. During this time, the root system should be fully formed.
Reproduction methods
Cuttings
Propagation of indoor hydrangea by cuttings is the simplest and most effective method of all. That is why this breeding method is most popular among flower growers. The optimal time for grafting is January or February. If you root the cutting during this period, then next fall it will form a multi-stem bush, consisting of three or four stems. If the cutting is planted for rooting in March or April, then a single-stem bush will form.
For harvesting cuttings, it is recommended to use root shoots. The length of the segment should be 70–80 mm, and there can be up to 3 internodes on it. Remove all leaf plates from the bottom of the line. And the leaves in the upper part are shortened by ½ part if they are large, and by 1/3 - if small.
The lower part of the segment is treated with a root growth stimulating agent. Then it is planted for rooting in a mixture of sand and peat. In order for rooting to be successful, the cutting is placed in a well-lit place, the air humidity should be from 75 to 80%, and the temperature should be from 18 to 20 degrees. To maintain the required microclimate, cover the section from above with a transparent cap (for example, a glass jar). Remember to open your shelter for a while every day. Make sure that the soil mixture is always slightly damp. The cut should give roots after 20-30 days. After that, it is planted in a permanent pot, reaching from 70 to 90 mm in diameter.
HORTENSIA! REPRODUCTION BY SHEARS! Planting and rooting the cuttings
Growing from seeds
Hydrangea, if desired, can be grown from seeds, and they should be sown in the last days of February. Take a bowl and fill it with a soil mixture of the following composition: peat, sand, humus, turf and leafy soil (1: 1: 2: 2: 2). Level the surface of the soil mixture, moisten it and evenly distribute the hydrangea seeds, which are small in size, over it. It is not necessary to sprinkle the seeds on top with the substrate. Cover the crops with foil or glass on top. Remember that crops need daily ventilation, and also timely moistening from a spray bottle (the substrate should not dry out).
After the appearance of seedlings, the shelter must be removed completely. A dive into a deeper box is carried out only after a pair of true leaf plates have formed in the bushes. The substrate in this case is used the same as for sowing. The grown seedlings are transplanted into pots up to 70 mm in diameter.
Reproduction by dividing the bush
The hydrangea is most quickly and easily propagated by dividing the bush. However, in this case, you need to act very carefully, and you will also need a certain skill.During the spring transplant, divide the bush into several parts. It should be borne in mind that each section should have a growth point and well-developed roots. Carry out the shortening of the stems and roots of the cuttings, after which they are planted in individual containers, while the surface of the substrate is covered with a layer of peat. If you divide the bush in the spring, then in the fall all its parts will root well.
Description of the plant
The international name for this flower is primrose (lat.Primula). The genus of primroses (Primulaceae), to which the primrose belongs, is one of several belonging to the Primroses family. There are at least 390 species in it, most of which grow in temperate climates. All these are herbaceous crops, among which there are both annuals and perennials.
Common primrose (Primula vulgaris) is the most common garden primrose. Plant height is 10-30 cm. It is characterized by the presence of a rosette of leaves near the ground, with a short stem in the center.
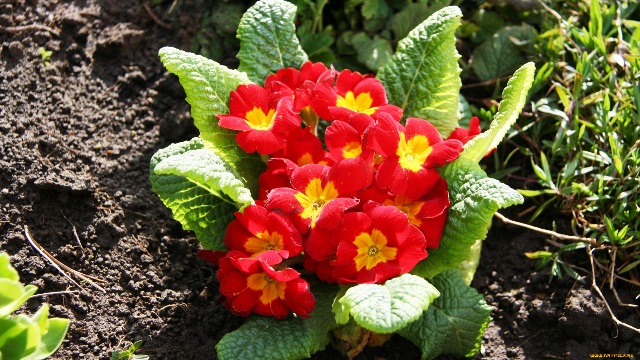
Botanical description of the genus Primula:
- distribution area: zones with a temperate climate of western and southern Europe;
- grows in its natural environment under bushes in deciduous forests, in clearings, roadsides, near railway tracks, in open pastures; in areas rich in humus, sometimes on stony loams;
- flowering: February - March;
- flowers: pale yellow with green veins; 2–4 cm in diameter, grow on thin stems;
- fruit: seed capsule;
- pollinators: insects;
- leaf rosette: root;
- leaves: 5–25 cm long, 2–6 cm wide, wrinkled, gradually tapering towards the stem, with a serrated edge.
Outdoor primrose care
How to grow
Growing and grooming is usually not a big problem. But how should you care for a primrose in the garden?
- The earth must be kept moist and loosened. Watering should be done weekly, and then loosen the soil. If there is a need, they still dig it up. When the weather conditions change to hot and dry climates, watering should be done twice a week. Distribute 3 liters of liquid for each square meter.
-
Perennial garden primrose often needs to be fertilized - once every week. This period begins with the appearance of leaf plates, and ends when the plant fades. The following solution is used: ½ the dosage of complex fertilizing of mineral origin, which is described in the instructions. However, when the land contains a lot of nitrogen, many leaves will grow and there will be little to no bloom.
To prevent such a situation, it is necessary to fertilize in turn with potash fertilizers, and then phosphorus.
How to transplant
The transplant should be carried out every 4-5 years, while dividing the shrub. The fact is that this representative of the flora is rapidly expanding across the territory.
Seedling picking
Seedling picking is a very important and necessary stage for the successful cultivation of healthy and strong primroses. The root system of primroses is fibrous and, unlike plants with a rod system (lumbago, catchments, etc.), easily tolerates a transplant and even prefers to be disturbed sometimes, because this stimulates its development. For seedlings of primroses, a 2-3-time pick is desirable. In the process, the air exchange of the roots is renewed, the base of the stem is deepened, from which new roots begin to grow, which contributes to the best and fastest development of the plant in general. As a rule, primrose seedlings begin to dive at the stage of 2-3 true leaves:
Seedlings of Siebold primroses, ready for the first pick
But if the crops are too thickened, then the first pick can be carried out even at the stage of cotyledon leaves, otherwise there may be seedlings falling out. Here, for example, too thick crops of primrose auricle:
It is convenient to pick seedlings with cotyledon leaves with a toothpick.We cut off the tip of a toothpick so that it is more convenient to make planting holes in the ground with it.
Gently take the seedling with tweezers only by the cotyledon leaves and plant it in the hole using a sharpened toothpick.
We plant the auricula seedling, deepening it to the base of the cotyledon leaves:
The same seedlings of auricula in 2-3 weeks:
As you can see, even seedlings with only cotyledon leaves easily tolerated the pick. And yet, the first pick should be carried out at the stage of 2-3 true leaves. This is more convenient: the seedlings are already large and easier to handle. In the photo: seedlings of primrose auricula with two or three true leaves.
Seedlings of polyanthus primroses with two or three true leaves, ready for the first pick:
These photos clearly show that the seedlings of primroses are stretched out and bare at the base, young roots are in the air. It is during this period that plants need the first pick, after which their growth and development will improve.
The photo shows the correct planting-picking of a polyanthus primrose seedling: young roots and a previously bare stem are in fresh soil, which is richer in organic matter and fertilizers in composition than the seed mixture for seeds, but it still contains a mixture of perlite and vermiculite, albeit in smaller ratio. This is necessary for the gradual adaptation of a young plant to new growing conditions. The seedling will quickly get used to a new place and will develop quickly and actively grow roots and leaves. At first, it is also advisable to place the sown seedlings in a mini-greenhouse. However, if the air humidity in the room is sufficient, then the seedlings will take root even without greenhouse conditions.
I will add that properly cut seedlings do not need any fertilizers and stimulant treatments. They have enough of those nutrients that are contained in the new soil mixture, in which they will grow until the next pick. The next soil mixture for picking should be even richer in composition so that young primroses can actively develop.
Grown seedlings of primroses that need the next second pick
And in this photo - the seedlings of primroses, which were dived twice, grew up and are already ready for the third dive into separate pots or for planting in open ground.
Seedlings of primroses are planted in open ground when the threat of recurrent frosts has passed. Although primroses belong to winter-hardy plants, young seedlings grown at home can suffer greatly from the cold and slow down their development in the open field. Therefore, provide shelter for young primroses in case of threat of cold nights below 0 ° C.
In the future, the seedlings will quickly get used to the garden, over the summer they will grow up, by the fall they will fully adapt, and they will no longer be afraid of the first frosts. Under a layer of snow, young primroses hibernate well without any shelter. Only for the purpose of retaining snow, the best and most reliable shelter from any frost, several branches of spruce branches can be put on top of the plants. I will only add that it is better not to cover auricle primroses with anything, since they are distinguished by increased winter hardiness. In the photo - seedlings of primroses auricula, planted in spring, and the same primroses a year later:
Seedlings of primrose auricula in early spring, immediately after the snow melts and at the end of May:
Seedlings of polyanthus primroses of February / March sowing often bloom in early autumn of the same season and leave before winter with strong young plants.
These same polyanthus primroses in the spring of the next season:
I hope that my recommendations for growing primroses from seeds will be useful not only for beginners, but also for those who already have their own experience. If you have any questions, write comments to the article, I will definitely answer.
Reproduction of primrose
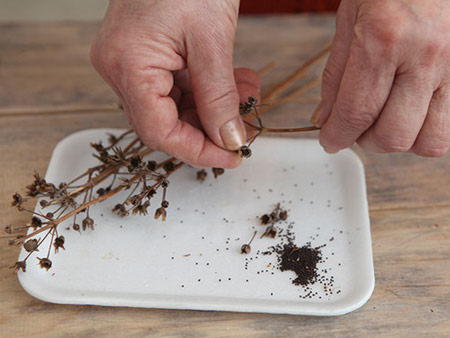
The choice of the optimal breeding method depends on the variety and type of primrose.
Seed propagation
The vast majority of candelabra primroses are biennial plants, therefore, for their reproduction, as a rule, no special actions are taken. It is enough not to remove dry inflorescences, on which seeds appear, which are sown on their own in the garden, filling the free space.
Some varieties of primroses, for example, Tibetan and akaulis, are able to displace other plants in the garden with the help of self-seeding. To avoid this, experts recommend removing the inflorescences immediately after flowering and preventing the seeds from ripening.
In general, the process of seed reproduction of primroses is quite troublesome and laborious. Given that the germination of planting material is rapidly declining, it is necessary to sow seeds immediately after harvest
To maximize primrose germination, it is important to stratify the seeds and grow them in cool conditions. That is why many gardeners prefer that the primrose reproduce naturally, and the next year they transplant young bushes to a permanent place in the garden.
If you still decide to try to grow primrose from seeds, it is better to start this in November or December.
In order to maintain maximum seed germination, it is necessary to grow plants under the following conditions:
- Temperature within +17 degrees;
- High air humidity;
- A bright place.
If all the conditions are met, the first shoots appear after ten days. Then the humidity and air temperature can be slightly reduced. In the second half of March, young bushes can be transplanted into separate pots, and a few weeks later - into open ground.
Seed-grown primroses grow much slower and require more maintenance. This should be taken into account when starting seed propagation of primrose.
Axillary shoots rooting method
This method is suitable for primroses that have one rosette of leaves or a poorly developed root system.
To obtain young plants you need:
- At the base of the root collar, separate the leaf with the petiole, bud and part of the shoot;
- The sheet plates must be cut in half;
- The resulting cutting must be planted in a substrate consisting of equal parts of leafy soil and sand.
The conditions for rooting cuttings are as follows:
- The air temperature is approximately +17 degrees;
- Bright light, but shade from direct sunlight;
- The soil must be kept moderately moist.
When three young leaves appear on the sprouts, they can be planted in flowerpots up to 9 cm in diameter. Plants are transplanted into open ground with the onset of comfortable weather conditions.
Breeding gentian in the garden
This plant cannot be classified as unpretentious and caring for it will not be as simple as for many other perennials in the garden.
Difficulties with breeding gentian are associated with the peculiarities of its biology. The fact is that the gentian gives flowers on the shoots of the third year. The annual shoot has rather small, light-colored leaves. When buying a bush, a gardener can observe several shoots on a common root: annual and already overwintered, and even a couple of shoot rudiments that have not developed into shoots, but have remained white centimeter sticks. Usually the shoot even dives underground and emerges a few centimeters away. In the second year, the leaves grow larger and darker, and by the end of summer a plump apical bud is laid, which, if successful, will give a flower 5–7 cm long with an intense blue color.
Location. The gentian is a herbaceous plant intended for open ground, but has its own preferences, for example, depending on the natural habitats in the gentian culture, it grows better in the sun or in the shade. The alpine slide in the garden has its drawbacks. Stony soil usually dries out too quickly.Therefore, not the southern sunny areas will be more suitable for them, but the western exposure, where the soil does not warm up so much. German florist Jürgen Petere advises not to plant spring and autumn flowering varieties under the scorching rays of the midday sun and in dry ground, which often happens on rocky hills in gardens. The ideal place is partial shade. Plant low-growing cereals for gentians - in this combination, they are found naturally in alpine meadows. For autumn flowering gentians, air humidity plays an important role, so it is better to plant them along the edge of a pond or near a small fountain.
The soil. Prefers garden soil, loose. The optimal composition of the soil for growing gentian depends on the species: autumn flowering usually prefer an acidic substrate (Chinese decorated and semi-divided), and slightly acidic soil is required for stemless gentian. Gravel should be poured into the planting holes, and coarse sour sand between the expanding cushions. All other gentian species found in horticultural crops are tolerant to soil acidity. Yellow gentian and spring gentian require loose, rich, moist soils. The stemless gentian develops better on stony, clay-humus soil. Water them regularly. Seven-partite in nature is found on the rocky slopes of the mountains. When planting gentian in subsoil horizons, drainage from gravel is desirable, which should ensure a good outflow of excess water. The hole itself is made about three times the size of the coma of the transplanted plant. For spring gentian, lumpy, moderately moist soils with peat and sand are ideal.
Watering. Despite the fact that gentian is undemanding for watering, the soil should not dry out, but at the same time, watering should not be overused.
It is especially important to observe this rule before and during flowering. During prolonged rains, it is necessary to loosen the soil around the plant so that the moisture does not stagnate, but goes into the ground
Species that are demanding on the acidity of the soil do not tolerate hard water well. For them, you need to defend water or take rain or thawed water from the freezer. If these options are not available, you can soften your tap water by adding peat, wood ash, or citric acid.
Top dressing. When caring for a gentian after planting, it must be borne in mind that this culture does not need additional feeding and responds more negatively to an excess of fertilizers than to a lack of them. The only exceptions are some varieties that require minerals and organic matter. You can find out about the features of species and varieties by reading the instructions after buying a plant in a store.
Top dressing should be combined with watering so that the fertilizer is well absorbed into the soil.
Frost resistance. This culture is relatively cold-hardy, since many species grow naturally in harsh conditions and are highly frost-resistant. Such plants can even bloom at low temperatures. But some species still need light shelter, especially if the winters are cold and with little snow.
Pruning. In the fall or early spring, a strong pruning of the bushes is carried out. Leave shoots with 2-3 pairs of buds. With weak pruning, many small inflorescences are formed on the bush.
How to care for primrose at home
Primrose breeding is not as difficult as it might seem at first glance. After reading the basic recommendations of experts on creating optimal conditions for a flower, you can grow a healthy plant and even propagate it.
Lighting
Perennial primrose is distinguished by a wide variety of varieties, which allows you to get aesthetic pleasure from the contemplation of beautiful flowers during the entire spring-autumn period.Almost all varieties suitable for growing in garden conditions are unpretentious, so a section of the garden where other plants do not want to grow may be suitable for primrose. When caring for a primrose, it should be remembered that this flower prefers diffused lighting, direct sunlight is harmful to it. Planting a plant requires adherence to a number of simple rules. Primrose varieties that prefer direct sunlight are very few in number, so when choosing a place to grow these bright flowers, you should focus on shaded areas and partial shade flower beds.

Primroses are unpretentious in care, but it is preferable to choose places with diffused lighting for them.
Temperature
In summer, the plant is best kept on an open balcony or garden. After the end of the flowering season and with the onset of cold weather, the home primrose becomes a full-fledged indoor flower. Primrose is great for outdoor cultivation as it prefers a cool temperature. For example, house flowers are best kept at 16-20 ° C, and during flowering, they are generally recommended to be transferred to the northern windowsill. Naturally, the plant will grow well at normal room temperature, but in this case, you should not hope for long flowering. Sometimes, primrose pots are even placed between the frames of old windows to ensure optimal conditions for it.
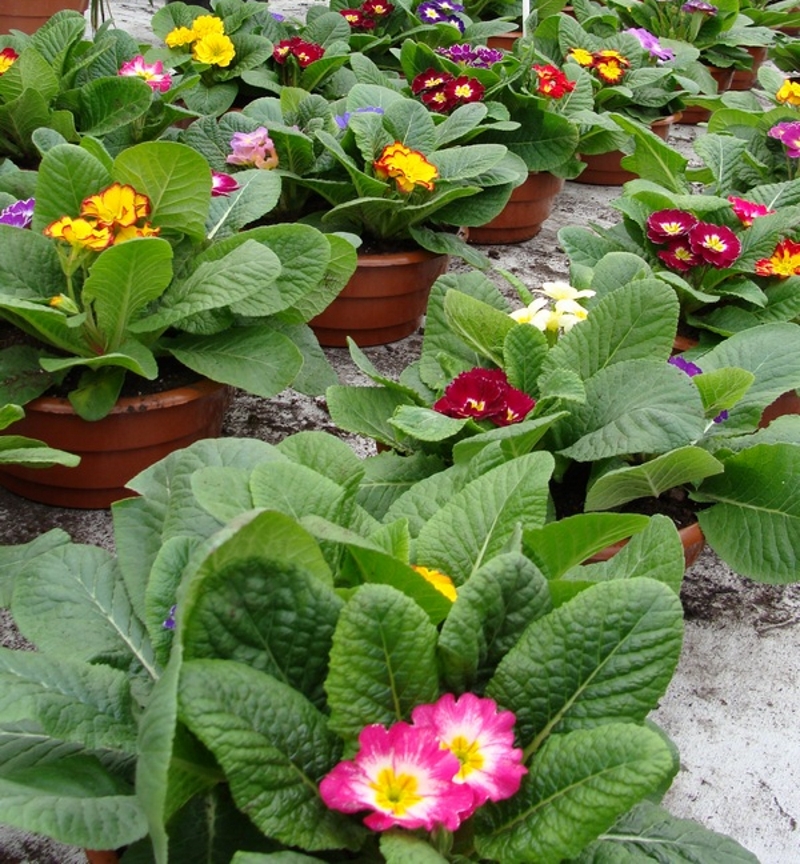
In the summer, indoor primroses are best taken out into the open air.
Humidity
The flower signals a lack of moisture by drying out the edges of the leaves. The atmosphere around the primrose should be humid, from time to time the leaves should be sprayed with warm and soft water.
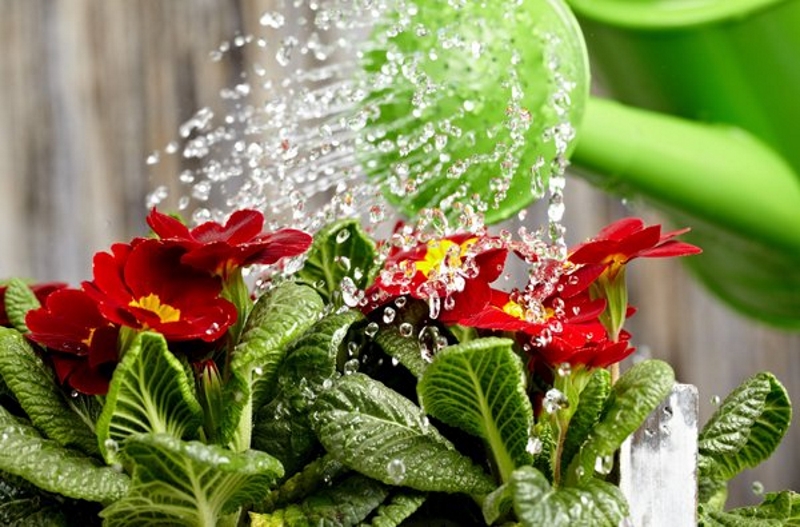
Primrose - moisture-loving flowers
How to water primrose
During the dormant period, when the flower does not bloom, it is watered moderately, avoiding excess moisture that can destroy the primrose roots. During flowering, primrose requires abundant watering, so as soon as the soil on the surface of the flowerpot begins to dry out, moisten it with settled warm water. Watering should be carried out directly under the root, otherwise the delicate leaves may rot.
Top dressing
Home care implies the obligatory feeding of the plant. Most flower growers do not recommend feeding the plant with too rich fertilizer, it is better to dilute it strongly. It is preferable to apply the top dressing itself in a complex manner, starting from the moment the buds appear. It is not worth fertilizing the plant until the first signs of flowering, since it will refuse to bloom and will give all its strength to the leaf. During the period of active flowering, primrose should be fed every 14 days.
Bloom
As already noted, during flowering, primroses require a cool temperature, high air humidity and abundant watering. Also, do not forget about top dressing, which will help somewhat prolong flowering and give the plant the necessary components for the formation of colorful buds.
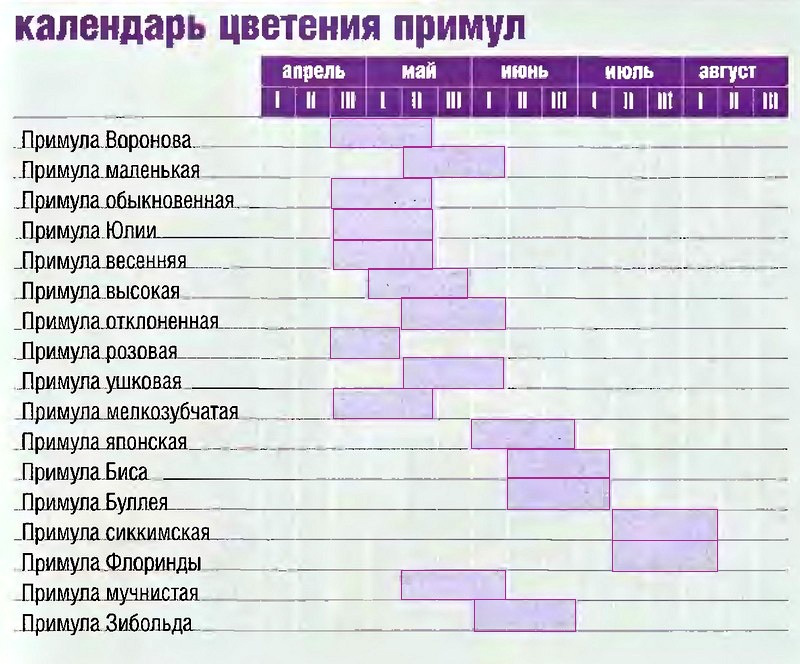
Flowering calendar of primroses
How to speed up the flowering of primrose
To accelerate flowering and stimulate plant growth, it is sprayed with special agents. A 0.01% gibberellin solution is perfect. Such preparations should be used at the stage when primrose buds are just beginning to form.

You can speed up the flowering of primroses using 0.01% gibberellin solution
Primrose care after flowering
After the flowering period, the plant should be cut off, the faded buds should be removed from the bush and the primrose should be prepared for wintering. It is recommended to reduce watering and moistening; feeding should be carried out no more than once a month.


