Spring planting
In spring, purchased bulbs are most often planted, because at this time they appear on the shelves in a wide variety. When purchasing, it is recommended to carefully examine the planting material for rust and rot spots, signs of mold and diseases. It is best to choose large, healthy bulbs that have slightly hatched sprouts.
If the purchase took place in early spring, the bulbs must be kept intact until planting. To do this, they are placed in a polyethylene bag filled with sawdust, peat or sand and placed in a refrigerator. Even small-sized bulbs can be saved this way.
It happens that, through an oversight, poor-quality planting material is purchased.
The bulbs may have long shoots or be nearly dry.
Before planting in open ground, flower growers advise cutting plastic bottles, twisting drainage holes, filling with soil for seedlings and placing problem tubers there.
When to plant in open soil?
The land becomes suitable for planting lilies in May, after it dries well and warms up. To protect tubers from possible climatic troubles, they can be planted deeper, bulbs with long shoots are planted sideways, sprinkling the shoot with earth.
If there is a threat of frost on the soil, it is recommended to water the planted plants abundantly with clean water or with an ampoule of epin. Such a measure will weaken the creeping frost - wet soil will take a hit.
How to plant?
The planting technology is not much different from the autumn one, the plants are planted according to the same scheme at the same depth.
ATTENTION! When planting tall varieties, it is immediately necessary to put a peg for support, so as not to damage the root system later.
If mice live on the site in the summer, it is recommended to hide the bulbs in a metal mesh or special baskets for tubers.
During planting, organic fertilizers are applied (mullein infusion, wood ash), you can use ammonium or calcium nitrate and nitroammophos.
The planted bulbs are watered abundantly with water.
As you can see, there are no particular difficulties in planting lilies.
Any florist can handle this procedure. The most important thing is to read and remember all the tips given in our article. Who owns the information - owns the lilies!
Planting in autumn
How to grow lilies outdoors? Planting garden lilies and outdoor care in the fall include several sub-items:
Timing
When to plant lily bulbs in the fall, it is determined depending on the flowering time. If the lily bloomed in June, it is transplanted in August, the July lily - in September. That is, from the moment of flowering to planting, it should take about 6-7 weeks for the plant to gain strength and go into a state of dormancy.
At the same time, it is not scary if the June bulbs were planted in September - they will quite survive the movement. The timing of planting lilies in the fall is quite democratic.
Bulb processing
How to treat lily bulbs before planting? The procedure will help disinfect the bulbs and prevent their diseases. Clean, healthy tubers are kept in a high concentration potassium permanganate solution (it should be colored burgundy).
You can use funds such as Karbofos, Fundazol.
After holding the bulbs in the solution for about 30-40 minutes, they are dried in the shade, spread out on paper or cloth. Some growers soak the planting material in growth stimulants such as Zircon or Epin before planting. Succinic acid is no less popular. It is best to leave it in such a solution overnight for at least 9-10 hours.
Seat selection
When planting lilies in open ground, it is very important to choose the right place for them, because they will grow there for a long time - from 4 to 6 years. The degree of illumination depends on the species: tubular and oriental adore the abundance of the sun, withstanding only weak partial shade
The degree of illumination depends on the species: tubular and oriental adore the abundance of the sun, withstanding only weak partial shade.
Light-loving also includes drooping, long-flowered, red, Chalcedonian, monochromatic, Asian, pleasant, dwarf and Daurian.
And the beautiful, gorgeous, calloused, brindle, reddish, double-row and Japanese can live in shaded places, only illuminated in the morning or evening.
In the area set aside for planting lilies, there should be no strong moisture, especially those lying close to the surface of groundwater and stagnant water. Otherwise, the bulbs will simply rot.
ATTENTION! Special requirements are imposed on the earth - it should not be dense and heavy, which is typical for clay soil.
In addition, a large amount of organic matter in the ground will cause an increased build-up of foliage and stems, which is also undesirable. Therefore, it is recommended to limit the content of humus.
Lilies thrive on fertile, light soil with good breathability. If the soil on the site does not meet the requirements of the plants, it is improved by the introduction of loosening additives (sand, peat, humus) and mineral fertilizers.
The optimal soil response depends on the type of lily. So, regale, curly, martagon, bulbous, Tibetan, umbrella, monochrome and white varieties need a slightly alkaline soil. And tiger, David, Henry, drooping, oriental, Asian, Wilmott grow only in slightly acidic soil.
Landing pattern and depth
Next, we will tell you to what depth to plant lilies in the fall and at what distance from other flowers.
A distance of 9-16 cm is made between the bulbs so that they can develop normally.
The minimum gap between rows (lines) is 23-26 cm.
The planting depth depends not only on the size of the tuber, but also on its ability to form stem roots.
ATTENTION! Approximate orientation for all types - the depth is equal to 3 bulb diameters.
Tall varieties and plants that produce near-stem roots sink even deeper.
Do not be afraid to plant lilies deeper than they should - this will help protect the flowers from spring frosts and winter colds, and will provide normal humidity in summer. In addition, deep planting stimulates more formation of babies and roots.
Step-by-step instructions on how to properly plant lilies in the fall in the ground:
- Buy bulbs - buy or dig them up.
- Carry out preparatory inspection and processing.
- Choose a landing site.
- Prepare the soil: dig it up with the necessary additives.
- Form holes or beds, make holes for the bulbs to the required depth.
- Place a protective cushion of wood ash mixed with sand in each hole.
- Place the bulbs in them with the bottom down, straighten all the roots.
- Sprinkle soil over the plantings. Many growers replace it with sand. This helps protect against disease and provide a constant flow of air.
- From above, the ground can be mulched using sawdust or peat.
You can see tips for growing lilies outdoors in this video:
How to protect tubers from mold and harmful bacteria?
There are a number of effective preventive measures to protect planting material from mold and harmful bacteria:
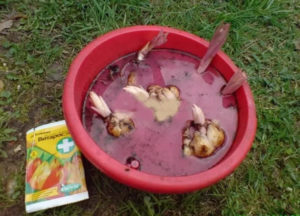 To avoid mold and harmful parasites, be sure to soak the lily bulbs before planting.
- rinse the bulbs with clean water, and then place for 25-30 minutes in a weak solution of manganese - 5, 10 g of the substance in a bucket of water;
- leave in the solution of the fungicide "Fundazol" (according to the instructions).
The bulbs can be germinated before planting. The best way to do this is by using plastic bottles.Cut out the top half to create a container. Acts as a mini greenhouse for shoots.
If you need to transport or store the bulbs for several days, put them in a container, cover them with damp moss, loose soil, sand or sawdust.
A little advice for lovers of Asian hybrids; for storage in winter, they are placed in plastic bags in peat pots, which are placed in a refrigerator at a temperature of 1-3 C◦.
Fight against diseases, pests
Plants planted in spring also face various hazards.
They can be exposed to wet rot in early spring. It is noticeable by large yellow spots, stains that affect leaves, peduncles. In order to prevent infection of the entire flower, the water supply is reduced, nitrogen fertilization is excluded.
Rust appears as small, bright, reddish spots on greenery. Dried leaves should be removed immediately. As a treatment, fungicides, Bordeaux liquid are used. The carrier of this disease is the bulb, so the seed must be selected carefully.
A common disease of lilies is gray mold (botrytis). Infection can be seen by numerous brown spots that quickly spread throughout the plant. The most common reasons for their appearance are excess moisture, sudden temperature changes. Prevention - frequent loosening of the soil, the use of substances containing copper.
The yellowness of the tops of the stems is due to the appearance of root rot, which has affected the root system of the bulbs. The plant must be pulled out, infected roots removed, and disinfected.
Representatives of the fauna are also pests of lilies. They can be spider mites, click beetles, beetle larvae, squeaky beetles, aphids. Squeak beetle, red lily beetle eat young inflorescences, leaves
They are removed by hand, the rest are carefully destroyed with chemicals.
Do not disdain bulbous and mice. As a mesh fence, gardeners use crocus, daffodils, snowdrops. Any gardener who creates the necessary conditions, observes simple rules, will be able to take pride in beautiful, lush fragrant clouds in his flower garden every summer.
The main stages of spring planting of lilies in open ground
Correct planting of lily bulbs outdoors in spring includes several important steps that must be followed. Let's consider them in more detail.
Preparing the bulbs for planting
Preparing garden lily bulbs is a very important step before spring planting. Thanks to simple manipulations, they will be completely ready for germination in the ground.
As a treatment, the bulbs can be disinfected and soaked in a solution of a fungicide, for example, Fitosporin-M (according to the instructions) or a dark solution of potassium permanganate (potassium permanganate) for 30 minutes. Such preparation will eliminate pathogens and unfavorable microorganisms from the surface of the planting material.
Or, before spring planting, it can be treated in a solution of a growth stimulant drug, for example, Zircon, Epin-Extra. Soaking rules are very simple - you need to follow the instructions on the package.
Seat selection
Where is the best place to plant these flowers? The most suitable place for planting lily bulbs in the open field is a warm area that is protected from the wind, but at the same time the air does not stagnate on it (otherwise, the bulbs may rot) and there is normal air circulation.
When choosing a place to plant lilies, do not forget about suitable lighting. However, the correct lighting depends on the variety: different varieties and species have different requirements for sunlight. For example, tubular lilies, Asiatic lilies, LA hybrids need good sunlight and light partial shade is allowed. But marchons and oriental hybrids need shading so that the scorching rays of the sun do not burn them.
Also, when choosing a place, you can take into account the neighborhood and combination with other flower crops in the flower bed.If you want to beautifully plant lilies in your garden, you can do it in a flower bed next to the following flowers - alissum, peonies, delphinium, astilba. Also, a successful combination when planting with juniper, fern. Not everyone likes the composition of lilies with phlox due to excessive brightness, but this option has many fans.
Selection and preparation of soil for planting
Ideal soil for growing lilies in the garden - fertile, loose, neutral, well-drained. If the bulbs are planted in dense, heavy, clayey soil, they will not be able to develop normally, they can easily rot. But in an excessively light and sandy soil, they are likely to experience a lack of moisture and nutrients.
But not every garden plot meets these requirements, so if your soil is not quite suitable in your country house, it is recommended to prepare it ideally in a month or at least 2-3 weeks. As a soil preparation on the site, it is worth carrying out the following activities (depending on the problem):
- This flower culture loves fertile soils, therefore, when digging in spring, it is recommended to add compost or humus (1 bucket per square meter);
- Also, as a fertilizer, you can use a mixture of mineral fertilizers - 100 grams of superphosphate and 50 grams of potassium sulfate per 1 sq. M.
- Or use a mineral complex fertilizer containing nitrogen, potassium and phosphorus, for example, Nitroammofosk.
- If the soil on your site is heavy, dense, clayey, it is worth digging it up with the addition of clean river sand and peat (one bucket of each substance per 1 square meter), and then loosen it thoroughly and level it with a rake.
- If the soil is sandy, then peat should be added (1 bucket per 1 sq.m.)
- With a low acidity of the soil, it is required to add wood ash (1 glass per square meter) or dolomite flour (200 grams per 1 square meter).
- Before planting, it is necessary to clear the area - remove debris, stones, rhizomes of weeds.
Preparing the land in a summer cottage or a plot of a private house will improve the quality of the soil and make the soil most suitable for flowers. This will make the soil more suitable for lilies.
Direct planting of lilies
The scheme of spring planting of lily bulbs in a flowerbed in open ground is very simple:
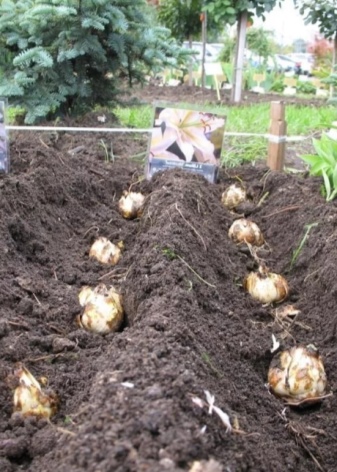
First of all, you need to make the landing holes. The optimal distance between the pits is 30-40 centimeters. But the depth of the holes for planting will depend on the height of the lily bulb - you need to multiply the height by 3 (for example, with a bulb height of 3 centimeters, you need to plant it to a depth of 9 centimeters).
- Carefully place the lily bulb on the sand, bottom side down, it should be level.
- After that, you also need to carefully cover the hole with earth.
- Water abundantly for proper rooting.
- If after watering the soil settles a little, then it is necessary to fill it up to the previous level.
Further care
No special care is required after sowing lilies. Everything is extremely simple. Watering is carried out if the autumn is dry. The pests are not yet infect, since the shoots have not yet appeared. No processing is carried out. It is transferred to the spring season. You can water through plastic bottles.
Before the onset of stable frosts, the soil is insulated with needles, dry leaves, branches. In addition, mulching will protect future sprouts from snails and slugs. These measures are taken if a frosty winter with little snow is expected. If the weather is moderate, it is not worth covering additionally. Enough 10 cm of snow cover to protect from freezing temperatures.
Correct planting technology, good flower care will preserve the bulbs and help their further growth in the spring. Growing lilies and caring for bushes is not so difficult, the main thing is to take into account all the nuances described above.
Useful articles from the "Floral" section:
Useful articles for the gardener:
- When to sow cucumbers for seedlings in 2020: planting dates
- Reproduction of roses by cuttings at home: methods, cultivation
- Transplanting strawberries to a new place: in spring, summer, autumn, breeding methods, timing
- Turnip
- Pruning grapes in the fall: how to prune correctly, schemes
- When to harvest walnuts: timing, storage
- Mushroom picker calendar 2020: when to collect, auspicious days
- Autumn work in the garden and garden: what needs to be done
- Do I need to dig a garden before winter: timing, what fertilizers to apply
- Apricot compote for the winter: delicious and simple recipes
Pests, diseases and prevention
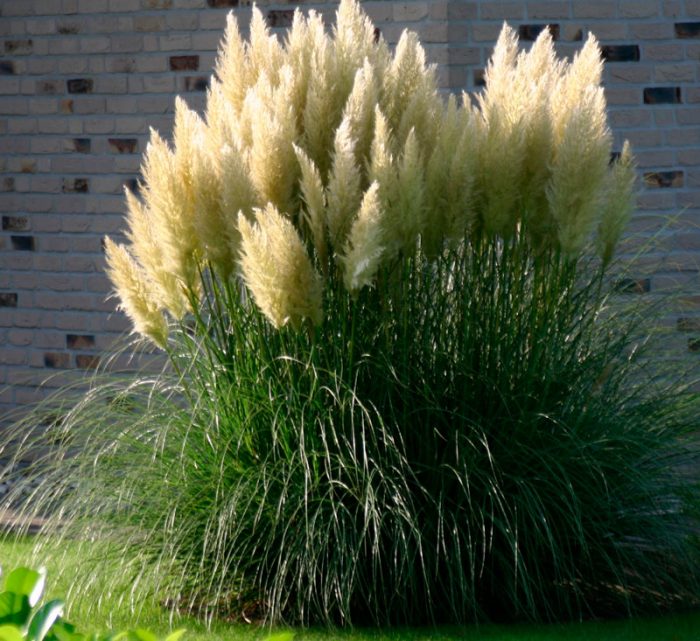
Cortaderia is highly resistant to various pests and diseases. But still, aphids can rarely settle on it, and it can also be affected by powdery mildew. Most often, problems arise with bushes growing in open ground.
In a plant affected by powdery mildew, foliage wilting is observed, and its color becomes paler. In this case, the bush should be sprayed with a solution of the fungicidal preparation as soon as possible.
Also in the summer, the ubiquitous spider mite can settle on a perennial. Because of him, the foliage of the plant loses its former attractiveness. In order to prevent the appearance of such a pest, 2 times a year, the bushes should be sprayed with a solution of a pesticide suitable for fighting ticks. Use an insecticide to get rid of aphids.
If you do not provide the cortaderia with proper care, it can develop mottling. As a rule, its occurrence is associated with poor lighting: too bright or, on the contrary, very poor. This herb feels best in diffused sunlight.
Lily from seeds: cultivation and features
Planting by seeds is one of the safest flower propagation options, but it takes longer. It will take at least four years to grow flowering lilies.
Seed material can be bought in the store or collected on your own on healthy flowers.
It is important to know how quickly the seeds germinate, since germinating seedlings soon appear in the first year, and in slow autumn a small onion forms
How and when to plant lily seeds
Seeds are sown directly in open ground or in a pot at home. Pre-sowing increases germination.
Seeds that take a long time to sprout are planted in late autumn so that they overwinter. The planting site is fertilized with humus, before the onset of frost, the soil is mulched with a thick layer of foliage or hay. Mulch will keep the seeds from freezing.
In late February or early March, flower seeds are laid for seedlings. A drainage layer (expanded clay) is poured into the container, peat or humus is added, then fertile soil.
Seedlings are shown in three weeks at temperatures from 19 ° C to 25 ° C. With the appearance of two leaves, a pick is carried out. By September, the crops dive a second time and are carried away to a dark room, where the temperature does not exceed 8 ° C.

In the spring, the formed small bulbs are planted in the garden in the garden
Transplanting and dividing bulbs
In August (at the end) or the first decade of September, bulbous perennials are transplanted: tulips, lilies, daffodils, so that they take root before winter.
- The procedure is performed every four years.
- The divided bulbs are laid in the soil prepared in advance: fertilized with organic matter and minerals.
- Then the planting material is buried by 6 cm (this will save from frost).
There are known types of lilies that need to be divided annually (Asian hybrids). The plants are carefully dug out without damaging the roots. Brown and rusty-stained scales are gently cleaned. Small onions are separated with a knife. Then they are disinfected in potassium permanganate and wet planted in the ground.
Note! Dividing not only multiplies flowers, rejuvenates and heals the plant, the procedure is necessary for normal growth and development
What if the bulb has sprouted?
In the fall, such a nuisance can happen if the bulbs are not planted in a dormant state, but prepared for distillation.
This happens when buying from dubious non-specialized outlets, where dishonest sellers pass off low-quality goods as good ones.
ATTENTION! In addition, any bulb can germinate in the presence of two components - heat and moisture.
If it is a very warm autumn and it rains periodically, the lily can become entangled in the seasons and sprout. Can sprouted lilies be planted in autumn?
There are several ways to plant lilies in the fall with sprouts:
- dig up the bulbs and wait until the sprouts are 1 to 2 inches high. Then, very gently, with rotary movements, pull the shoots out of the tuber. Plant the bulb back and carefully cover it for the winter, because it will be very weak and may not tolerate frost;
- more time consuming and troublesome. Dig a bulb with shoots and plant at home, growing as a houseplant all winter;
- dig up the onion and disassemble it into individual scales. Plant them in a greenhouse for germination. Then, instead of one big questionable bulb, you will get many small lilies that will bloom in a couple of years;
- just cover the sprouted tubers well, using coniferous spruce branches, sawdust, peat and covering material, in the hope that the sprouts will go into a dormant state and wait for spring safely.
What to do if the bulb has sprouted
Often, flower growers are faced with the problem of germination of planting material and the acquisition of bulbs with already existing sprouts.
The main way to solve this issue is to remove the shoot in a timely manner, detailed instructions are given below:
- Wait a while for the existing sprout to reach a length of about 20 cm.
- With gentle and smooth movements, begin to rotate the process in different directions, gradually pulling it up.
- With the correct manipulation, the sprout will be completely removed from the bulb and will not leave its parts in it.
- Once the sprout has been completely removed, the bulb can be planted as usual.
However, the implementation of this procedure requires a certain skill and dexterity, otherwise there is a risk of causing dangerous damage and subsequent death of the bulb.
For this reason, in the absence of proper experience or self-confidence, it is best to refuse to remove the sprout and use the following algorithm of actions:
Initially, it is also necessary to wait for the shoot to grow slightly.
Plant the bulbs in a pot of considerable depth and filled with suitable soil for growing lilies.
Place the pot in a bright enough place and care for it appropriately.
At the end of May, carefully remove the lily from the pot and move it to the garden for outdoor planting. It is necessary to transplant the grown lily very carefully, since it does not tolerate damage to the root processes
It is necessary to transplant the grown lily very carefully, since it does not tolerate damage to the root processes. The hole prepared for planting a flower should be deep enough to accommodate the overgrown and formed root system.
A hole prepared for planting a flower should be deep enough to accommodate an overgrown and formed root system.
1 The nuances of the process
Immediately it should be noted that relatively recently, lilies began to be planted in the spring, because earlier, they were planted in the fall. If we talk about the usual cycle of this flower, then it is more logical to plant it in the autumn period, but if we consider the thermophilic varieties, then it is more correct to plant it in the spring.
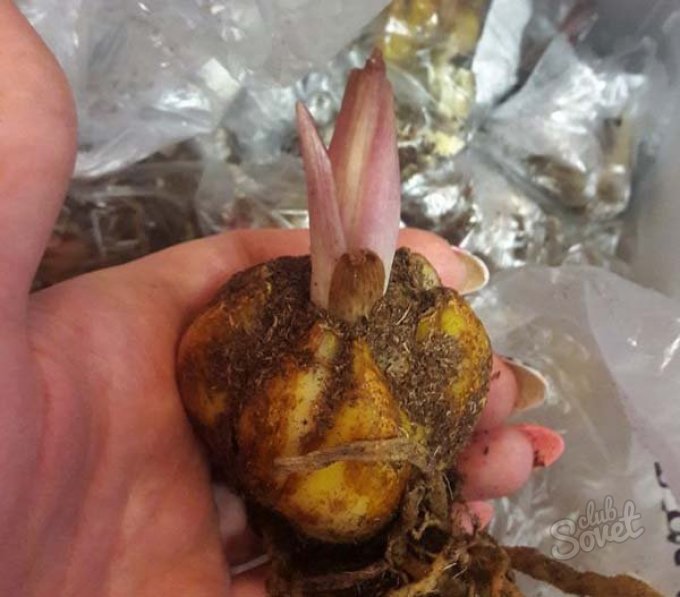
There is another reason why today lilies are planted in spring, the fact is that it is more economical to buy tubers in winter than in autumn.Do not forget that in the spring you can buy lily tubers at sales, which arrange for the sale of the remaining tubers from the fall.
Before buying a lily bulb, it is imperative to conduct a thorough visual inspection of it, it should not have:
- All kinds of deformations
- Cracks
- Another kind of damage
- Stains
After you have examined the goods well, you buy them and immediately after that you will need to process them without fail. The best option would be to treat them with antifungal drugs, and also dry them a little so that they are not excessively wet.
You also need to know how to store bulbs. There are certain rules that must be followed by those who decide to store tubers at home for a long period of time:
- In a cool place, the best option is a cellar or a refrigerator if you live in multi-storey buildings.
- You cannot just put them on the shelf in the refrigerator; you must first take a plastic bag and fill it with peat. With moss or coconut fiber, put the bulbs there, tie a bag and make several holes so that the air gets inside the "homemade greenhouse". Air circulation is very important.
- Do not forget that the bulbs must be placed upside down in the prepared "platform", because it happens that the sprout begins to break through during injury, and if the bulb turns upside down, then the probability of sprout deformation is quite high.
- It is better not to store lilies next to fruits, because fruits secrete a substance that adversely affects lilies and can even kill them (such as ethylene).
- If you store lilies at home for a long time, then do not forget to slightly moisten the material in which the bulbs are located once every couple of weeks.
- Do not forget to check the bulbs periodically - so that they do not deteriorate, do not pick up "rot".
- In the event that you find that a sprout has appeared on at least one of the bulbs, it must be planted. The fact is that the process of development of the sprout cannot be stopped in any way, but if you do not plant a lily in the open ground, this sprout will simply deplete the bulb and it will die.
- If it's too cold outside, and the lilies have sprouted, then you can plant them at home, in an ordinary pot.
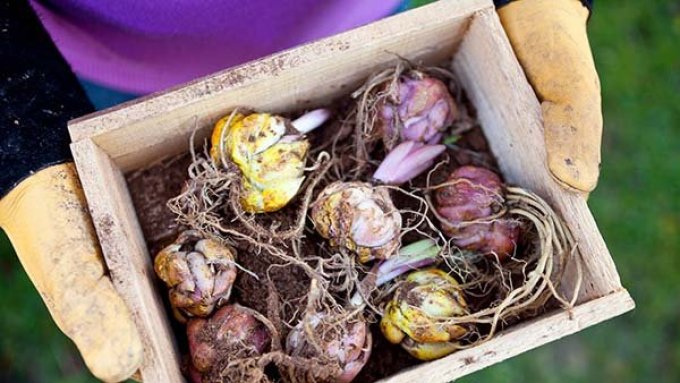
An excellent option would be to plant an onion with a sprout in a plastic bottle that was cut in advance. Thus, you can easily observe what happens to the sprouts of the bulb, how they develop, etc.
If you decide to plant a lily with a sprout in a pot, then the best option:
- To begin with, pour a low layer of earth into the pot
- After that, there is sand on top (preferably fine, river) - the thickness of the soybean is similar to the first.
- Before planting the bulb, it must be disinfected. This process takes about half an hour, that is, this time the bulb must be held in a disinfectant.
The choice of planting material
The most common way of propagation of lilies is by bulbs.
It is necessary to pay attention to their type when purchasing. Lilies are as follows:
- annuals - the bulb loses all its properties at the end of the season, gives a new (daughter);
- perennial - the bulb is replenished with new scales every season, they almost double in five seasons; in addition, they become overgrown with tiny baby onions - they will have to grow for at least two years before getting flowers.
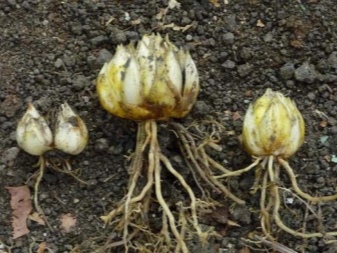

When choosing, it is important to pay attention to the size, density and appearance of the bulb. It should be proportionally heavy and firm. When pressed, the surface should not slip
Cuts, cracks, foul odor, oozing fluid, and any questionable surface stains should be an excuse to not purchase. A good condition of the bottom with living roots is the key to the health of the future plant.Particular attention should be paid to the sprout, if the bulbs are purchased in advance, any signs of germination should be absent, otherwise it will not be possible to meet the deadline and you will have to grow the flower at home
When pressed, the surface should not miss. Cuts, cracks, foul odor, oozing fluid, and any questionable surface stains should be an excuse to not purchase. A good condition of the bottom with living roots is the key to the health of the future plant. Particular attention should be paid to the sprout, if the bulbs are purchased in advance, any signs of germination should be absent, otherwise it will not be possible to meet the deadline and you will have to grow the flower at home.
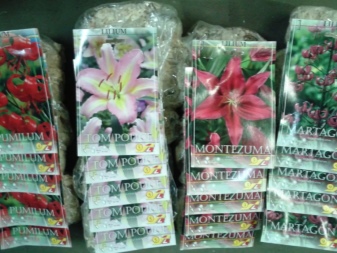
For spring planting, you need to purchase bulbs in late summer or early autumn. It is better to spend some effort in storage during the winter period than to buy low-quality material. Sometimes in the spring, unscrupulous suppliers can slip the bulbs after forcing - if they are planted in the same season, then the flowers will no longer be obtained.
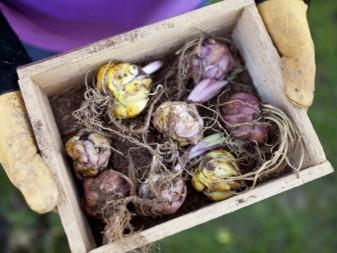
It is no secret that the size and proportions of the flower will depend on the quality of the planting material. The best option is to prepare it yourself. The preparation of the bulbs takes place in several stages, namely:
- first, the nest, that is, the mother's bulb and babies, must be carefully removed; usually the babies separate well themselves, but if this does not happen, it is better to leave them on an adult bulb - to ripen;
- then all the bulbs are cleaned of the earth, old dead scales, roots are removed and allowed to dry (but not under the sun);
- the finished planting material is laid out, signed - ventilated bags or boxes are suitable for this (it is preferable to lay out so that the bulbs do not touch); they are stored in a cool, dark place with sufficient moisture to prevent them from drying out; this process must be monitored and decayed must be removed in time;
- before planting, the prepared material is taken out, inspected for damage - be sure to treat them with a weak solution of manganese or fungicides; do not neglect this procedure - this way you can prevent some diseases.

Bulbs with sprouts are suitable for spring planting. It is impossible to save them until autumn. Often this happens due to non-observance of the terms or conditions of storage of the seed. If there are more than two months left until May, and the sprouts are already quite large, it is easier to plant the bulbs in pots or containers. For planting at home, containers should have fairly high sides. Sprouted lilies are planted later, so that the delicate sprouts are guaranteed not to be damaged by natural troubles
They are removed with all possible care from the containers and lowered into suitable holes.
Site and soil requirements
The difficult point in breeding lilies is the observance of certain conditions of keeping for different species. They have different requirements for relief, lighting, protection from wind and ground.
Lighting
Lilies should not be planted in low or humid locations. It is more comfortable for them to grow on hills, where snow melts faster and moisture does not linger.
Most garden lilies prefer open areas where the sun can easily penetrate.
Only oriental varieties and martagon hybrids feel good in the shade. Asian varieties are unpretentious to lighting - they can delight with their flowering anywhere in the summer cottage area.
For planting lilies, you need to choose places that are protected from a strong through wind, since their petals and stems are not stable.

The soil
In one place, lilies can grow for about 5 years, so it is better to prepare the soil for planting thoroughly and in advance. Lilies cannot tolerate poor, heavy, clayey and stony soils.
For most hybrid varieties, the soil should be loose and mixed with sand, as it is an important component of their growth.If coniferous trees grow on the site or in its vicinity, then you can add their fallen needles to the mixture, as it increases the acidity of the soil
The addition of peat is encouraged.
For tubular and specific varieties of lilies, acidic soil, on the contrary, is undesirable. A neutral soil with the addition of ash is suitable for them.
Leopard varieties and candidums love slightly alkaline soil with a small admixture of lime.
Long-flowered, tiger and Canadian species prefer slightly acidic soils.
If the composition of the soil on the site is in doubt, then it is better to mix it with ash and a small amount of sand for planting lilies. Such a composition will be safe.


