Orchid structure
In general, the structure of the orchis practically does not differ from many indoor plants. Orchids also consist of:
- Leaves;
- Roots;
- Flowers;
- Stem (trunk).

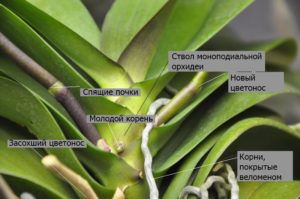 But there are certain features that are characteristic only of tropical epiphytes. They are classified into two types of growth: monopodial and sympodial:
- Monopodial type - the entire long life cycle grows in a vector upward direction. In this case, the growth of leaves occurs at the top of the stem over and over again. And each new sheet is larger than the previous one;
- Sympodial is quite different. The rhizome, called the rhizome, gives another shoot, which, while ripening, never grows again. The rhizome will constantly give out shoots that, having reached their full development, stop in it and never grow again. That is, the growth vector is directed sideways and up.
The stem of different types of orchids has different sizes. For some, like Vanilla, for example, it is very long. Wand has an average, and Phalaenopsis is very short.
The leaves also differ depending on the species and fully illustrate the place of growth. If the orchid or its genetic material grew in the arid regions of the planet, then the leaf plate will be:
- Dense;
- Fleshy;
-
Succulent.
The leaves are thick enough to illustrate growth in full sun. Thin and wrinkled - preferring shade.
The root system performs a variety of functions:
- Attachment;
- Nutrition;
- Photosynthesis;
- Accumulation of nutrients;
- And moisture absorption.
It is thanks to the roots that the epiphytic orchid leads an airy lifestyle and is not a parasite.
Monopodial orchids have one growth point - the apical one. Sympodials have several, they are formed from new shoots, which eventually turn into pseudobulbs.
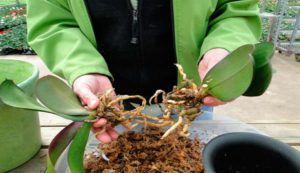 Reproduction of orchids occurs by dividing large parts of the plant:
- Apical cuttings;
- Side shoots;
- Layers;
- Pseudobulbs;
- And seeds.
Important! For reproduction, a growing point is required, which the leaf does not have.
How to save an orchid:
Without leaves
An orchid that has thrown off its leaves for a number of reasons looks very sad. But she is still alive and can be restored.
If the plant has just been brought from the store, you need to remove it from the planter, gently shake the substrate off the roots and place it in a bowl of water for 30 minutes.
During this period of time, the living roots will absorb moisture, swell a little and will greatly differ in appearance and size from those roots that have died. Dead roots are removed with a knife, the sections are powdered with coal powder.
The remains of the stem should also be carefully cleaned up to living tissues, and the damage should be powdered with charcoal or cinnamon. After that, the flower is placed in a transparent pot with a substrate, covered with a synthetic film, arranging ventilation every two days.
On the remainder of the stem, near the roots, there are almost always the rudiments of shoots, which, under the conditions, germinate within 30 days. The process of resuscitation of an orchid, which has only roots and a growth point, can last up to six months.
Such orchids cannot be fed and moved from one place to another. They are watered once a month by immersing the pots in a basin of water for 35 minutes. After drinking the substrate with moisture, it is left in the bath for 10 minutes to drain off excess water, after which it is installed in a permanent place.
If all the roots are rotten?
If you really intend to become the owner of this extraordinary flower, then when purchasing a seedling, control the condition of the roots. It often happens that they are poorly developed and not suitable for planting, so you have to build up the roots.
If this work is ignored, then the offshoot will not be able to take root and will inevitably die. Therefore, knowledge of how you can grow roots in an orchid baby is of great importance.
Be sure to carefully monitor the condition of the orchid roots.
You've probably already noticed that the roots of orchids often begin to rot. This problem exists for many novice florists who are not burdened with experience.
There are many reasons for this phenomenon, but the following are considered the main ones:
- excessively frequent watering;
- lack of sunlight;
- changing the properties of the substrate and its composition;
- hypothermia of the roots;
- planting a flower in a pot that is too small;
- various diseases.
Each separately taken of the above cause can cause rotting of the roots. If effective measures are not taken in a timely manner, then the resuscitation of the roots will be more difficult or completely impossible, which will certainly lead to the death of the flower. Therefore, if such a problem is identified, it is urgently necessary to eliminate it.
If nothing is left of the roots of the orchid, then you need to reanimate the roots. Often such a problem arises for beginners, who, due to lack of relevant experience, do not notice in time that the plant is sick, and its roots have begun to rot.
Several options are known for how to grow a root in an orchid, but they all require a preparatory stage, which is the same for all options and consists of the following actions:
- we take a knife, wash it and treat it with alcohol;
- we clean the roots from rot and soil;
- in order to exclude further dying off of the roots, dust the places of the cuts with a powder of a fungicidal preparation.
This completes the preparation and you need to start building up the roots. There are a number of options for growing roots, and all of them are not difficult. However, in order to effectively restore the roots, it is necessary to stimulate them. This technique is performed with special growth stimulants. The most commonly used stimulants are:
- Etamon;
- Ribav Extra;
- Radifarm;
- "Zircon".
In a solution of these drugs, you need to soak the roots of the plant. To prepare one liter of solution, you will need one ampoule of Etamon, two drops of Ribav Extra, one drop of Radifarm and four drops of Zircon.
Orchid growers have the best reviews about Ribav Extra.
Attention! This is a very common way of growing roots in orchids, in which there is a rapid regeneration of the roots.
If you intend to grow roots in an orchid, then you cannot ignore the issue of lighting. The difficulty lies in the fact that each type of orchid has its own lighting requirements. Ideal approaches to this issue have not been found, but there are recommendations that should be followed.
The right choice of the place for the orchid is important here. For the summer, it is better to place it on windows facing southeast or east. This way you can provide your orchid with the optimal amount of light without overheating in the sun. In winter, it is better to place the flower on the windowsill of windows facing the southwest side.
How to get a sprout
Planting an orchid baby at home is not difficult at all. It is necessary to wait for the moment. After the orchid has given a shoot on the peduncle, it will not be difficult to transplant it into a separate bowl. The shoot can be located in the middle or at the base of the roots of the flower. When the growth points die off, stem babies begin to form in their place. On the trunk, new shoots will begin to grow and develop after the death of an adult plant. For a young growth to appear, certain rules must be followed:
- After the flowering of the phalaenopsis ends, the peduncle should be cut off by 2-3 cm. It should be shortened just above the upper bud.
- It is necessary to ensure the correct temperature regime: during the day - + 28 ... + 30 ° С, at night - up to +15 ° С.
- The illumination as well as the humidity of the room should be good enough.
- For a flower, it is better to choose a small flowerpot that will freely pass water as well as air.
- Watering is sharply reduced by 2-3 weeks.
Compliance with these conditions, as well as a properly organized water regime, will provide the plant with lateral shoots.
Before "waking up" the buds on the stems, they are cleaned of scales, then this composition is carefully applied. It is better to stimulate the plant in the spring during the period of awakening and growth. Orchids should form at least 3-4 roots 5 cm long. Only then can they begin to reproduce.
It is not recommended to take a shoot that has formed on the stem, because it will not take its own root. And it is quite difficult to separate it at root placement. In order for the flower sprout to take root well in a separate planter, it is necessary to properly separate the orchid baby from the mother plant.
You will need:
- Rubber gloves.
- Sharp scissors, knife or secateurs.
- Ready soil.
- A pot for a scion.
- Powdered activated carbon or cinnamon.
- Alcohol (it is used to process the instrument).
Orchid baby separation procedure:
Cut off the appendix with a knife
Leave the peduncle at least 1 cm.
Carefully separate the baby from the orchid.
Let the scion dry for 30 minutes.
Sprinkle the cut area on the plant with charcoal or cinnamon.
Then sprinkle the cut made on the handle with the same composition.
Conditions for breeding at home
Orchids are divided into epiphytes and lithophytes. Some grow on trees, others take root between rock stones. This must be taken into account when propagating an orchid at home using the vegetation method. If the soil is incorrectly selected, some type of plant may not survive due to disturbed growth and nutrition conditions.
Breeding orchids at home is possible only in a vegetative way, since the seeds are very small - they are germinated in laboratories, taking into account all the nuances of the microclimate and nutrition. You can buy seeds, but most likely they will not germinate and time will be wasted.
In order for the reproduction process of an orchid to be successful, the following factors must be taken into account:
Vegetation time. The division of the bush is carried out in the spring, when the movement of juices in the tissues is most active.
Disinfection of sections. Do not forget that the orchid is a tropical plant. Her immunity in the middle lane is in a depressed state due to climatic features, so any infection can quickly develop and destroy the plant.
The bush must be healthy, so they begin to engage in home breeding of orchids when there is a positive experience of caring for this type of crops. If orchids refuse to bloom, then it is necessary to analyze what they lack and introduce appropriate measures in the care process.
Flower age. You can plant and divide the bush no earlier than 3-4 years. Young orchids do not tolerate division well and often die due to lack of nutrients
It is also important that the babies grow up to three months of age - only then can they be separated without fear.
The way of feeding this variety. Some orchids can grow in soil and form roots. Others feed from the bark of trees, and absorb moisture with aerial roots. Such varieties should not be planted in the soil.
Care after breeding - the orchid must be protected from drafts, create conditions for its successful rooting.
A few words about the tools for transplanting and reproducing epiphytes. Beforehand, how to propagate an orchid at home, carefully prepare the tools. Knives for separating tissues should be very sharp so as not to damage the stem, where the paths of movement of juices are located. If the knife is dull, compression will occur, and some part of the plant will not receive nutrients.
For disinfection, you need to prepare activated or charcoal - they are sprinkled with plant slices before planting. You can also use cinnamon powder.
Important! Each type of orchid has its own agrotechnical rules that must be followed, otherwise the plant will not take root.
Particular attention should be paid to indoor air humidity - from 50 to 80%.Some orchid hobbyists specifically buy digital household humidifiers to control moisture in the air.
Demanding on moisture is the cost of the "tropicans", because in tropical forests it is always humid - tree crowns help to preserve water in the middle layer of vegetation.
Knudson culture medium
Growing orchids in the most common way - from seeds - was considered impossible for a long time until Professor Lewis Knudson invented a special nutrient mixture in 1922.
The seeds are placed in a sterile vessel with a nutrient medium and, subject to a certain temperature regime, after a while, you can get friendly shoots of seeds of magnificent capricious flowers. The composition of the nutrient medium is prepared on the basis of distilled water:
- Calcium nitrate - 1 g / l;
- Ammonium sulfate - 0.5 g / l;
- Potassium phosphate - 0.25 g / l;
- Magnesium sulfate - 0.25 g / l;
- Ferrous sulfate - 0.025 g / l;
- Manganese sulfate - 0.0075 g / l;
- Agar - 15 g / l;
- Sucrose - 20 g / l.
How to propagate an orchid at home
To propagate an orchid at home is not only possible, but even necessary, because over time, an adult flower will grow so much that it will have to be transplanted into a larger pot. In the process, you will definitely have cuttings or parts of a bush that can be transplanted into separate containers.
There are several ways to get a youthful culture. Each of them has its own characteristics, so let's look at the details of each method in more detail.
Vegetative propagation
This method is considered the simplest, and is used for almost all indoor plants, including orchids.
The pot with the plant, which is used as a source of planting material, must be watered. This will make it easier for you to extract the flower from the soil. We carefully remove the plant from the container so as not to accidentally damage its roots. Next, we clean the root system of soil residues and cut it into pieces (Figure 1).
Each of them should have at least three false bulbs. All sections must be treated with crushed charcoal (preferably wood) and the resulting seedlings must be planted in separate pots. It is not recommended to use seedlings with fewer pseudobulbs, as in this case there will be a risk of too long rooting of seedlings.
Figure 1. Method of dividing a bush
This method is great for those who are going to transplant an orchid or for flowers whose pseudobulbs have begun to crawl out of the substrate.
Cuttings
The grafting method is more complex and is only suitable for certain varieties (Vanda, Epidendrum).
To get a new plant, you need to cut cuttings 10-15 cm long, using side shoots, faded flower branches or elongated stems for this (Figure 2). Slices are performed with a disinfected knife, and the edges of the cuttings must be processed with crushed coal, and not only on the cuttings, but also on the mother plant.
Figure 2. Growing a plant from cuttings
The cuttings are immersed in a pot with a nutritious substrate and in the future they are looked after in the same way as for an adult plant.
Peduncle
The varieties described above can also be propagated by wilted peduncles. But you should wait until the buds completely wilt, so that the breeding of a new plant does not become stress for the mother culture (Figure 3).
Reproduction by peduncles is carried out as follows:
- A cut is made at the base of the shoot and divided into several cuttings so that there is one node with a bud on each growth.
- All prepared sprouts are treated with a fungicide and laid out on the surface of wet moss, immersing a bud into it.
- Cover the pots with cuttings with foil and leave them under cover until a rosette is formed.
Figure 3. Growing an orchid from a peduncle
During the holding time of the cuttings under the film, they must be regularly sprayed, avoiding waterlogging, in order to prevent root decay.If you do not have moss, you can simply root the cuttings in water, but in any case, the container should be covered with a film so that a stable temperature and humidity regime is maintained under the shelter.
Children
Some varieties throw out side shoots (babies). These are already full-fledged small plants that can be used for seeding in separate containers (Figure 4).
Young shoots are formed only if the room temperature is high and the soil contains enough nitrogen fertilizers. If you notice such a shoot on your orchid, it is enough to spray the flower and wait until the roots appear on the baby. After that, it can be separated, treated with charcoal and planted in a separate pot with a nutritious substrate.
Seeds
This breeding method takes a lot of time and is rare at home. The unpopularity of the method is also explained by the fact that it is difficult to achieve seed germination at home. The fact is that they do not have their own nutrient tissue, and they receive useful substances from the root sponge, so the necessary nutrient medium must be created on your own.
Figure 4. Reproduction of a flower by "children"
Seed germination will take about 9 months, and small sprouts will turn into full-fledged plants only after three years, and the first flowering will come at least after another 4 years, although sometimes this process takes about 10 years.
If you do decide to germinate the seeds yourself, you should fill the pots with chopped moss mixed with leafy soil and moisten the mixture thoroughly. Then the seeds are laid out on the surface and sterile conditions are set for them, while maintaining high humidity and temperature at the level of + 22 + 25 degrees. When the sprouts are released on the first leaf, they are dived, and when 4 full-fledged leaves grow, they are transplanted into pots.
Seed propagation
Reproduction of orchids by seeds at home, as we said earlier, is impractical for several reasons, but if you aim to achieve results in this way, you need to follow these steps.
- Since in nature, seed growth is stimulated by the root sponge or mycorrhizal fungus root, which supplies them with the necessary nutrients, an alternative must be found at home. As a rule, rapid success can only be achieved in a sterile laboratory.
- The seed should germinate from 3 to 9 months, and only then a full-fledged sprout is obtained. A seedling that will be suitable for planting in the ground will grow only after 1.5-3 years, and bloom in 2-4 years.
- Then the substrate is prepared on the basis of crushed moss, mixed with leafy soil, and all this is abundantly moistened. The seeds are sown in rows over the soil. As mentioned earlier, planting conditions must be sterile. The air temperature is maintained at 22-25 degrees, and sufficient humidity at 50% is equally important. Seeds will have to be sprayed with soft filtered water at room temperature as often as possible.
- When the shoots and the first leaf appear, the plants dive (i.e. transplant the seedlings into separate plastic cups) with soil from the same parts of sphagnum and peat. The next pick is done when the second leaf appears: crushed fern roots are simultaneously mixed into the soil. After the formation of 4 leaves, the seedlings are placed in permanent pots.
Rooting technology
Soil mix, soil composition
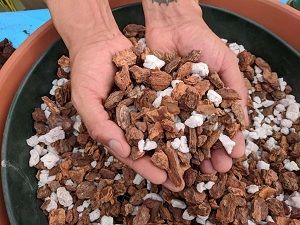 When choosing a soil mixture for growing orchids from the root, one should proceed from the fact that it should not differ from the soil in which adult specimens grow. When planting, you do not need to use ordinary soil, it is unsuitable for good growth and flower development.
You should purchase soil specially prepared for the cultivation of orchids. Only then will your flower grow in conditions as close as possible to comfortable ones.
The soil mixture must meet all the requirements, it must contain small pieces of pine bark, peat and coconut fiber.
Preparation
The parts of the root intended for planting should be planted in pots filled with a special soil mixture. One spine is placed in each individual pot. Rooting problems usually do not arise. The planted cuttings do not require abundant watering. Until new roots and leaves appear, it is better to limit yourself to two spraying a day.
Important! When you see the appearance of new roots or leaves, this will mean that the rooting process is proceeding normally and everything is in order with the young plant. You do not need to perform any additional actions.
After a certain time, these babies will turn into fragrant flowers.
Care rules
So, we already understood that growing a sympodial orchid from the root is not a big deal, you just need to perform all the actions consistently and accurately. Now we need to understand what activities need to be performed for better survival.
There is nothing supernatural here either. After making sure that the flower has taken root and rooted, you need to create care for it, like for an adult plant. First of all, this concerns the light, irrigation and temperature regimes.
The length of daylight hours should be about 8-12 hours, and the temperature in the room where the flower grows is set in the range of 16-24 degrees above zero.
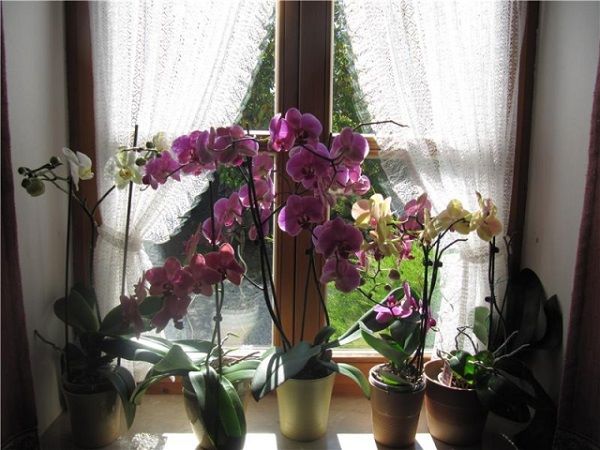
Daylight hours should be at least 8 hours.
Watering the plant should be done especially carefully. Orchids do not tolerate waterlogging, because of it their roots begin to rot. However, a dried up substrate will also inevitably lead to a negative result.
The condition of the soil in a pot requires constant monitoring, and it is best to pour water heated to 30 degrees into a pan and allow the flower to take as much water from it as it needs for normal life.
You should also not forget about dressing, thanks to which the flower can grow and develop normally, as well as bloom profusely.
How long will it take for a new sprout to appear?
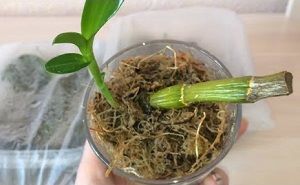 With all the above steps done properly, some of the root will become a normal plant and will start flowering before the end of the season.
The root system is often divided like this at the time of transplantation, if the roots in the pots barely fit and the emerging pseudobulbs begin to stick out from the substrate.
An old pseudobulb that has faded can be separated and planted separately. To do this, it is placed on the surface of the substrate, without deepening. After a short period of time, young shoots with their roots will hatch from the buds at the base of the pseudobulb. They are separated and placed in pots.
Orchid species such as oncidiums and cymbidiums reproduce in a similar way easier than others.
Processing rotten scions
The plant begins to rot from heavy watering and from bacteria that were brought in with an untreated tool. It is possible to determine that the plant has rotted visually: the plant is covered with black spots, the bottom - with mold, there is a smell of rot. In this case, the plant cannot be saved. If it has just begun to rot, a brown speck appears on the rhizome. In this case, it is necessary to perform such actions.
- Pull the sprout out of the soil, fill it in advance so that the soil becomes soft and the plant can be easily pulled out.
- Disinfect the knife and clean the rhizome from rot and infected roots, cut off any leaves on which you see the fungus.
- Pour the fungicide solution into the container and leave the plant in it for half an hour. Treat the leaves with crushed activated carbon.
- After that, plant the sprout in new soil, completely treat the pot with an antibacterial agent, the drainage also needs to be treated. To do this, you can simply boil it.
- Water the sprout with potassium permanganate solution for about three months.The color of the solution should be pale pink.
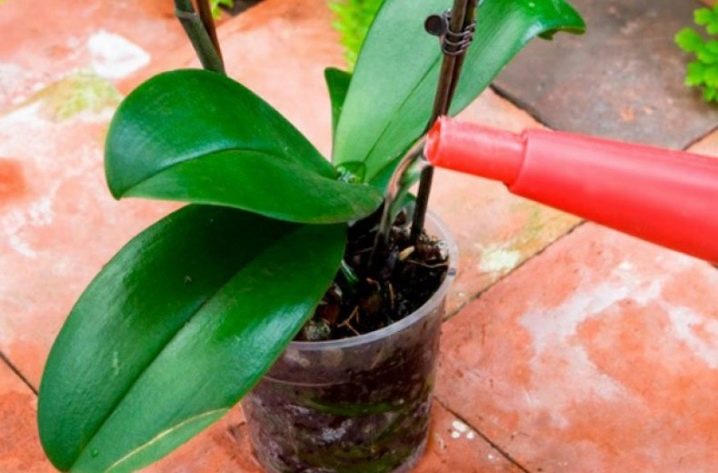
Orchids can be propagated by branches of arrows
On the plant, children are constantly formed, arrows, which are released by the stem. It can also be used to cut an orchid. Such shoots must be properly cut and prepared, with the help of them it is easiest to grow a plant. The disadvantage of this breeding is that the plant will not have all the maternal qualities of an orchid. This method is not suitable for those gardeners who breed rare and pure varieties.
An important point when choosing a cutting is the ability to distinguish vegetative from generative. Skilled gardeners do this very professionally, they can always tell one species from another. Inexperienced gardeners always get only about 15% of the result, since for this reason only a certain number of cuttings take root. You can do vegetative propagation using the arrows in this way.
- Cut the arrow off as close to the mother stem as possible.
- Treat all damaged sections of the cuttings on the handle and on the orchid itself with activated charcoal.
- Fill a plastic bottle or pot with a special mixture: sphagnum moss, pine bark, fern roots in a ratio of 1: 3: 1. There must be a drainage hole in the container.
- Sprinkle the area of the substrate with sprinkling and plant arrows there.
- Maintain the air temperature in the room from +23 to +25 degrees.
- Moisturize periodically to keep it dry.
- Pick off dry leaves that will gradually wither.
- Wait until the sprout reaches a size of 5 cm, and then you can transplant it into the ground.
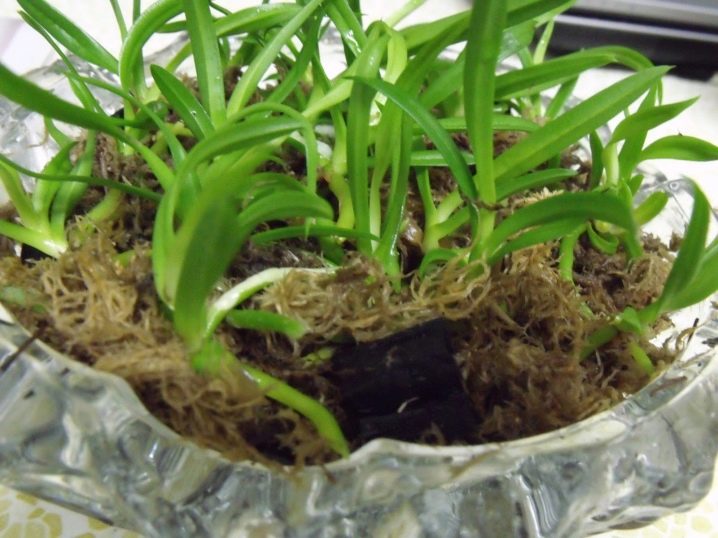
Cuttings
How to properly propagate an orchid by cuttings?
Stem
For sympoidal orchid species, the method of obtaining cuttings from pseudobulbs is suitable.
Basic rules for cutting
Cut in such a way that there are one or two buds on each piece.
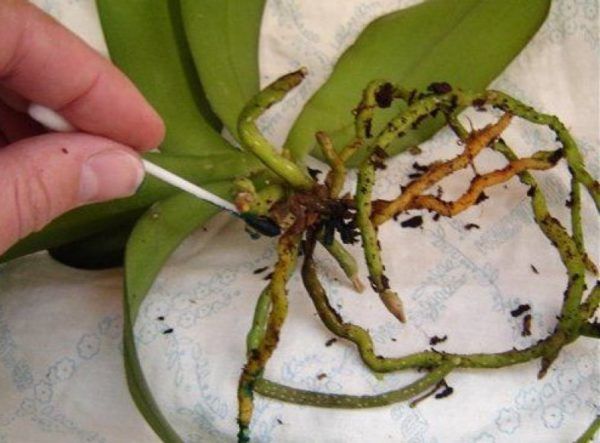
Orchid slices must be treated with greenery or iodine.
All cuts should be powdered with crushed coal. Iodine and brilliant green are not used.
Attention! The wounds on the mother plant are treated in the same way as the cuttings.
Planting in a substrate
The substrate must be prepared in advance. Place the cuttings in moist moss, spray with a biostimulant and be patient. In about a month, the most promising buds will wake up and delight the owner with green sprouts.
Using a mini greenhouse for rooting
You can't just plant cuttings and forget about the greenhouse for a month. Ventilation for a few minutes is required every day. It is necessary to provide light and warmth, and temperature differences between day and night in the range of 4-7 degrees have a beneficial effect on growth.
Peduncle
Material selection
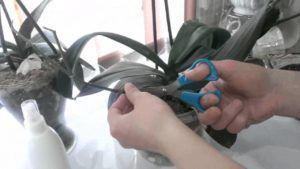 How does the cultivation of an orchid with a peduncle take place? Choose a strong, healthy plant with well-developed peduncles. The branch should be:
- Tolstoy;
- Intense green.
They begin immediately after the end of flowering, when the flowers begin to wither, and the apical bud is still fresh. The peduncle is cut in such a way that there are one or two buds on each cutting. Be sure to powder the sections with crushed charcoal, it can be activated. When the baby grows up, carefully cut it off the peduncle.
Important! The lower the bud was on the mother plant, the more likely it is to get a strong sprout from it.
Germination medium
In order for the kidney to "wake up" and develop a viable process from it, it is necessary to maintain optimal conditions for a long time:
- Bright diffused light;
- Warm humid air about 25C;
- Greenhouse conditions with high humidity.
To do this, it is good to organize a greenhouse with wet sphagnum moss, which needs to be aired every day. This will help prevent decay.
Planting in a nutrient medium
The cuttings are placed in the greenhouse in the "lying" position, that is, horizontally. The greenhouse must be prepared in advance.
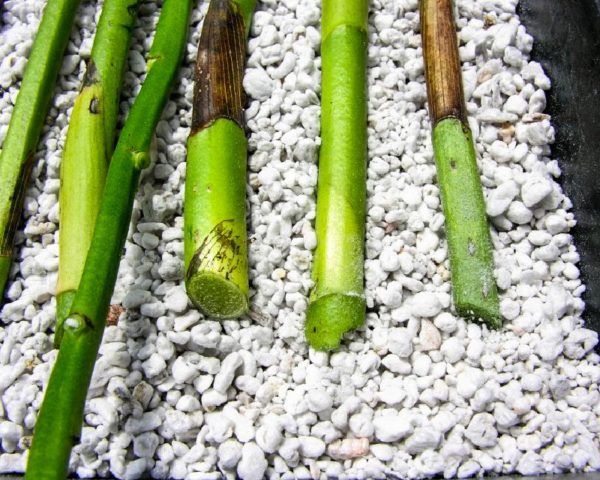
The cuttings are laid evenly so that there is a distance between them.
Prepared cuttings are laid in even rows so that there is a distance between them and as large a surface as possible is illuminated.
Necessary conditions for plant propagation
Often the need to propagate phalaenopsis arises when the plant has become old and needs to be rejuvenated. This case is not an emergency, you can wait for the right moment and calmly begin to reproduce the flower. To obtain a successful result, you must comply with a number of conditions:
- First of all, it must be an adult, healthy, well-developed orchid. A diseased plant simply does not have the strength to produce offspring. It is better to start the reproduction process in the phase when the phalaenopsis finishes its flowering. It was at this time that the flower is as ready as possible for procreation.
- A native of tropical forests, Phalaenopsis needs about 80% humidity. If the indicator is significantly lower or higher than the specified value, the chances of success in obtaining new copies of the flower will be less. Although the orchid may well live with you in dry or too humid air.
- Reproduction will be successful if the indoor temperature is maintained at 28-30 ° C. Higher numbers will also not interfere with the process. In a cool environment, it will take more time for new specimens to take root, or even fail altogether.
About soil and pots
Reproduction of orchids by peduncle cuttings, rosettes, pseudobulbs begins with the compilation of the soil. For beginners, it is recommended to simply buy a substrate in the store, at the same time to study its components. This may include:
- pine bark of a large fraction;
- sphagnum, which, when wet, absorbs and retains moisture;
- charcoal - disinfectant;
- coconut chips.
Orchids can grow on one bark, which is pre-calcined in the oven to destroy pathogenic microflora. In order for the orchid to receive the necessary nutrients and moisture, it is enough to periodically spray the bark. The plant receives trace elements in a finished form through specific mushrooms.
To make it easier to observe the development of orchids, beginners are advised to buy transparent cups for planting plants until a certain care algorithm is developed. The life of a plant depends on the condition of its roots. If, due to high humidity, rot starts on them, the orchid loses its ability to feed and dies.
To eliminate the risk of overflow, several large stones are placed on the bottom, then a layer of expanded clay, bark, and the gaps between them are filled with sphagnum. Excess liquid will flow down, without stagnating in the area of the roots, so that the plant can receive oxygen. In the case of root decay, this process can be seen through the transparent walls of the glass. For aesthetics, plastic containers are placed next to clay pots.
Video: 4 ways to propagate orchids
How to properly prepare a plant?
Any plant must be well prepared before reproduction, otherwise the consequences will be dire. Orchid in this regard is far from an exception. The preparation itself takes place in two stages. Since this plant does not tolerate division well, the safest way would be to reproduce with the help of air babies (side shoots).
To begin with, the age of the peduncle should be from 1 to 1.5 years. The upper part should be cut off after the last petals have been shed, thereby leaving the lower part, on which the sleeping bud is located.
The first stage of preparation:
- It is necessary to reduce watering to once every 10 days.
- The orchid, together with the pot, is transferred to a darkened room, in which the night temperature fluctuates from +16 to +18 ° C, and the daytime temperature from +22 to + 24 ° C.
- Daily taking out the flower pot in the sun for 50 - 60 minutes a day.
- The awakening of the kidney occurs due to high temperature and poor watering.
Second phase:
- It is necessary to move the orchid to a warm room with a temperature of +20 to +25 ° C.Otherwise, the formation of side shoots will be stopped.
- Protect the orchid pot from direct sunlight. It should be in the shade.
- Watering is carried out 2 to 5 times a week. The development of children will be slowed down with a lack of moisture, and an overabundance is fraught with fungus.
- Water settling should take 2 - 3 days. Before watering the plant, it will need to be heated to +30 - + 34 ° C.
- Feeding should be done with fertilizers with a high nitrogen content.
- Spraying of the top is required 2 - 3 times a day. The water should contain special complexes for feeding orchids.


