How to take care after the procedure?
Special care measures are not required after transplanting an orchid. It is enough to place the plant in a warm, moderately bright place and shade the upper part from too intense sunlight.
Watering
The timing of the first watering of the orchid after the procedure depends on the drying of the plant:
- After drying the orchid immediately after planting overnight, the pot is placed in a bathtub and watered from a shower head. The water temperature is 35-40 degrees. After this procedure, the substrate is well compacted.
- After short-term drying during transplanting in the cold season, the first watering is carried out in 3-4 days.
- With short-term drying in summer, if the air temperature is kept at 25-30 degrees, watering is carried out in 1-2 days.
- Further watering is corrected, focusing on the state of the substrate. The best way is to immerse the pot in a container of water for 10-15 minutes.
What to do if it starts to fade?
The unpredictable nature of the orchid often leads to the fact that even if all the recommendations for transplanting are followed, certain problems may arise. A sign of mistakes made during the procedure is the wilting of the leaves of the plant.
The reasons for this phenomenon:
- penetration of infection through slices on the roots;
- choice of a too dense substrate;
- excess or lack of moisture;
- premature feeding;
- overheating of the root system;
- loose fit.
Having established the cause of the orchid malaise, it is necessary to start resuscitation measures:
- When overheated, the plant is moved to cool and allowed to rest. You can not immediately water the flower until it cools down. Then they are placed in a container with water at room temperature for an hour. The leaves are sprayed to create the required level of moisture, after which they are wiped with a napkin. After a day, the orchid is placed in a lighted place, excluding direct sunlight on the leaves.
- When signs of waterlogging appear, watering is stopped. Several additional holes are made in the pot to improve aeration of the roots. In a plastic container, this can be easily done with a hot nail. Root decay requires replanting with the removal of all damaged parts.
- Mechanical damage to the roots does not require special action. The plant is placed in a shaded and cool place for 2-3 hours, then immersed in warm boiled water with the addition of succinic acid (1 tablet per 1 liter of water) for an hour and returned to its original place.
- The loss of leaf elasticity due to lack of moisture is compensated for by regulating irrigation. If water is poured directly into the pot, it rolls off without being absorbed into the substrate. In this case, the central part remains dry. The lack of moisture is evidenced by the color of the roots - they are grayish, thin. In order for the orchid to recover, the pot is immersed in warm (35 degrees) water with the addition of succinic acid for 20-30 minutes. Watering with sugar syrup (1 tablespoon per liter of water) helps to restore the growth of vegetative mass.
- If a too dense substrate was used during transplantation, rotting of the root system occurs. Replacing the mixture and pruning the affected parts helps to normalize the condition of the plant.
Advice! If it is not possible to identify and eliminate the cause of the wilting of the leaves, you should seek help from an experienced florist.
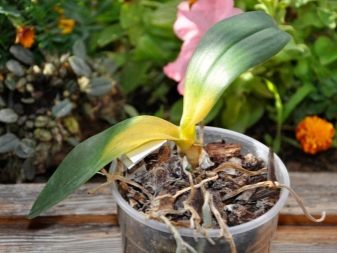
Do I need to replant the Orchid after purchase?
People, when purchasing this plant for the first time, want to transplant it into a more beautiful pot so that it looks more beautiful in the interior of the house.Here the answer to the question of whether it is necessary to transplant an orchid from a store pot will not be unambiguous.
It is worth recalling that the best time for transplanting is still the spring time, and therefore it is necessary to better see through a transparent pot what the root system of the plant looks like. If there are no black or dry parts on it, and the soil is not covered with mold, the flower is left until spring. Since the best time is the beginning of April. It is getting warm, the day is lengthening, there will be a lot of diffused sunlight and fresh air in the room.
If the root system does not cause concern, then the transplant is postponed until spring.
But if the plant remains in the purchased peat, do not forget that it is moisture-consuming and dries out slowly, therefore, it is necessary to water the flower once a month in winter, and once a week in summer. And make sure that excess moisture does not accumulate in the pan.
IMPORTANT! If the flower feels comfortable in the purchased land and its root system develops, it must be left until spring so as not to injure it again.
Signs of the need for a procedure
- darkened roots - this sign suggests that not all is well with the root system of the flower and most of the roots have died. Therefore, a transplant is carried out with a complete replacement of the soil and the removal of rotten parts of the root system. After the dead roots are cut off, the cut must be sprinkled with cinnamon or crushed coal;
- the flower is swinging in the pot - this says that the main part of the roots has died and the flower needs to grow a new root system;
- the base color of the pseudobulb is a healthy shade of the base of the pseudobulb green. Or if it is under the ground, then yellowish. If the color is brown or black, then the flower needs to be re-rooted;
- it is worth removing sphagnum from the roots - this is an obligatory part of the procedure that is performed during transplantation. Moss is necessary when growing roots in a child, later it can cause rotting of the base of the orchid rosette;
- a stop in development - this is due to the fact that the roots no longer have access to food, which he uses, taking it out of the soil. Simply put, there are many roots, but there is practically no soil and the flower needs to acquire a large capacity and transplant.
An orchid is a rather delicate flower that requires constant attention and care. But everything will pay off when the second flowering begins, which will come only thanks to the grower.
If she looks healthy?
The purchased plant is carefully examined for mechanical damage and various pests. If it looks quite healthy, then the transplant can be carried out as planned, which will coincide in time with the end of flowering (but not in winter) or in March-April, when spring promotes better root mass growth in the orchid.
A healthy orchid is transplanted after flowering ends.
Potential harm
Such a procedure is harmless, since after the flower is at home, factors may be discovered that require an urgent transplant, otherwise the flower will die. A completely healthy flower is quarantined for a couple of weeks and only then transferred to a permanent place with other indoor plants.
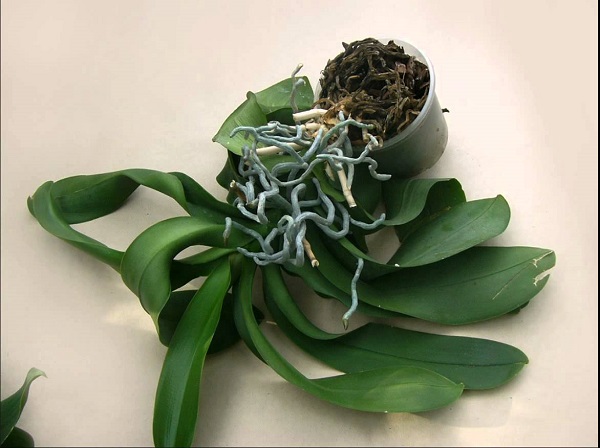
The habit of the root system to the substrate
For some time after transplanting, the root system of the orchid gets used to the new habitat. At this time, some of the old roots may die, it is easy to determine by their color, since dying, they become empty and acquire a brown tint.
Repeated transplantation is not necessary so as not to destroy the flower. Young green roots should grow in place of the old rhizomes.
How to properly prune an orchid
When the plant has already faded, it needs to be cut off - to remove the dried parts of the leaves, stem, roots.
Pruning is recommended in the fall, but there may be other options, depending on the type of orchid.
Before you start pruning, you need to make sure that there are no flowers or buds on it. Then you need to take a garden pruner or scissors, or a knife. The blades need to be disinfected - with alcohol or bleach.
Having determined the place of pruning, the stems on which the flowers were located are first removed. Then the main stem is cut off - to a height of half a centimeter from the root.
How to transplant an orchid. Video
1. Seven Secrets of Success:
| 1. Growing temperature: The temperature of the content will depend rather not on the season, but on the stage of development of the plant. During the formation of the pseudobulb, dendrobium is kept at a temperature swing - warm during the day and cool at night. After the pseudobulbs are formed, the orchid is placed in a stably warm place with a temperature of about 8 degrees Celsius. Plants will also need daily temperature changes to form buds. During the dormant period, which occurs immediately after flowering, they create a coolness around the pot within 15 - 16 degrees Celsius. |
| 2. Lighting: brightly lit location with a lot of reflected sunlight. For the formation of buds, a long daylight hours of about 14 hours daily is very important. |
| 3. Watering and air humidity: The frequency of watering will depend on the temperature of the content and the stage of flower development. Between waterings, the top layer of the substrate is usually dried a few centimeters in depth. The flower is very sensitive to water quality - use only soft water at room temperature for irrigation. Air humidity is high. |
| 4. Features: varieties of dendrobium are suitable for growing for novice growers, which can be kept throughout the year at normal room temperature. |
| 5. Soil: the flower is grown in a coarse fiber mixture for an orchid that is perfectly permeable to moisture and air, which may consist of sphagnum moss, pieces of pine bark, pine needles, fern fibers, coconut fiber. The soil should have a slightly acidic pH. |
| 6. Top dressing: during the period of growth and during flowering, fertilizers for orchids are regularly applied - 2 times a month. During the dormant period, the plants are not fed. |
| 7. Reproduction: propagated by division during spring transplantation, by stem cuttings, much less often by sowing seeds. |
Botanical name: Dendrobium.
Family
Dendrobium orchid - origin. The homeland of plants are India, Asia, Australia, New Zealand, the Pacific Islands.
Description. The genus Dendrobium includes about 900 species of deciduous or evergreen orchids. The species are extremely diverse, they can behave in nature like epiphytes and lithophytes.
Pseudobulbs of plants are thick, succulent, as if they consist of separate segments.
Leaves are belt-shaped or oblong-ovate, leathery, alternate. Inflorescences - clusters are located in the leaf axils along the pseudobulbs, are very numerous and sometimes almost hide the foliage.
Flowers from tiny to large enough - up to 10 cm in diameter, of a wide variety of shades - yellow, orange, red, pink, green, blue, purple, white, except perhaps black.
There are two-color varieties, and often flowering dendrobiums have a pleasant aroma.
Despite the fact that this orchid has been known since the 18th century, real popularity came to it only in 1967, when it was first successfully propagated in laboratory conditions and varieties suitable for growing at home appeared.
Height. Depends on the species and can range from 15 to 75 cm, some orchids can reach up to 1 m in height.
Orchid transplant rules at home
For a successful orchid transplant, it is important to choose the right time, dishes and appropriate soil. Only if all these parameters comply with the recommendations of specialists, the flower will quickly recover from the stress transferred and continue its development.
When is it better?
The most appropriate period for transplanting is early spring, when the plant wakes up and enters a phase of intensive development and rest after flowering. During this period, the orchid most persistently endures the change of conditions and comes out of stress with the least losses. Additionally, it is worth determining the best time for a transplant.
You can define it by the following criteria:
- filling the entire volume of the pot with roots, their close interlacing;
- wilting of the top of the orchid;
- signs of root damage or decay;
- detection of pests in the substrate;
- the appearance of a large number of roots above the surface of the substrate;
- loss of potted plant resistance;
- no flowering for more than 3 months;
- the appearance of roots in the drainage hole;
- the formation of children on the plant.
Important! An urgent transplant is required if a green bloom or algae appears on the walls of the pot. This is a sign of a violation of air circulation in the flowerpot, and without replacing the substrate, the plant may soon die.
Periodicity
The frequency of transplanting an orchid depends on the condition of the plant itself and the substrate in which it is grown. On average, the procedure is carried out every 2-3 years.
Sometimes the terms are shifted both upward and downward:
- if the plant has grown, and the volume of the pot is small for it, the transplant can be carried out earlier;
- when the time has come, but the roots are located in the pot freely, and the plant feels normal, the procedure is postponed.
Advice! Do not rush to transplant after the first flowering of the plant if the roots and leaves look healthy.
What kind of pot do you need?
Standard flower pots are not suitable for growing orchids. The containers for planting this culture must be selected taking into account the characteristics of the root system.
Primary requirements:
- Transparent walls. The roots of the plant are actively involved in the processes of photosynthesis, they need access to sunlight.
- Many holes in the walls and at the bottom. The roots should be slightly moistened, but well ventilated. Otherwise, moisture will stagnate inside the container, and the process of decay will begin.
- Smoothness of the inner surface. Experienced flower growers advise choosing plastic pots, since the roots grow in ceramic and are subsequently injured when removed.
- The diameter of the container is selected so that 2 cm remains between the roots and the walls. The height is selected so that the roots fit completely without protruding above the surface.
Important! Experts do not advise beginners to use the popular Korona planters for planting. At home, with insufficient moisture, orchid roots in them quickly dry out.
Improper spraying under these conditions leads to overdrying of the interior, where moisture does not penetrate.
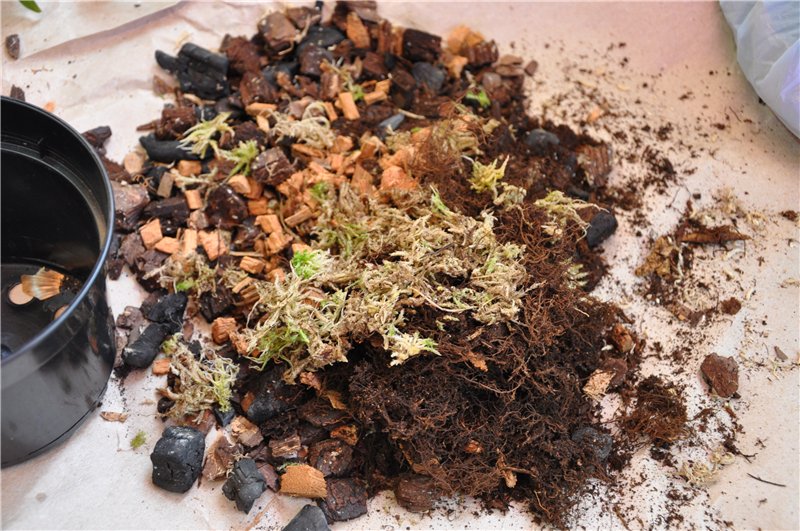
Substrate
The most suitable substrate for growing orchids is the bark of conifers. It is this material that serves as the basis for fixing the root system of plants in their natural environment. Shredded bark is the main component for growing orchids at home. You can buy it in the store or collect it yourself from a dead tree.
The bark from live trees is not good because it contains a lot of resin. When dry, it will break the moisture capacity of the substrate, and the roots will dry out.
Before adding to the substrate, the bark is disinfected in one of the following ways:
- boil for 20-30 minutes;
- calcined in the oven for 10-15 minutes at a temperature of 200 degrees;
- treated with steam for half an hour.
The planting mixture is prepared according to one of the following recipes:
- bark (5 hours), charcoal (1 hour), moss (0.5 hours);
- charcoal (1 hour), moss (2 hours), pine chips (5 hours);
- high-moor peat (1 hour), bark (1 hour), humus (3 hours), charcoal (1 hour).
For your information! Specialized shops offer a wide selection of ready-to-use orchid planting mixes. Applying them in apartments with dry air, it is necessary to increase the hygroscopicity by adding perlite.If the house is cool and humid, use Styrofoam.
Can a blooming flower be transplanted?
Transplanting an orchid during flowering is highly undesirable and can provoke a shedding of buds. But there are circumstances in which this procedure is a necessary measure and it cannot be postponed until the end of flowering.
Florists call the following reasons for an emergency transplant:
- infection with fungi or spider mites;
- the plant is flooded, and the roots have begun to rot;
- the leaves dry up and turn yellow.
Follow-up care
In order for the transplanted plant to recover faster and adapt to new conditions, it must be provided with careful and competent care. After transplanting, the orchid pot is placed in a place where gentle conditions are maintained. Exotic plants affected by an unsuccessful transplant need special attention. Orchids, which were urgently transplanted due to illness or pest damage, require no less care. Gentle conditions after transplantation provide for the provision of such requirements as:
- lack of bright light (shading);
- stable room temperature;
- optimum air humidity.
If the leaves of the transplanted orchid wither, this may indicate that the plant is painfully undergoing stress. This is especially true for orchids, which have been damaged during transplantation. Also, wilting of leaves can be caused by plant disease or the consequences of pest activity, which was originally the reason for the transplant. In a shaded place with dim light, the transplanted plant is kept for about 10 days
During this time, the orchid should be taken care of with the utmost care and care.

The temperature in the room where the transplanted plant is located must be stable at 22 ° C. In no case should temperature extremes be allowed, which can negatively affect the recovery of the orchid. It is also not recommended to move the pot from one place to another at this time. When planting a plant in a wet substrate, watering is postponed for 2-4 days. A layer of sphagnum laid on top of the substrate will retain the desired moisture.
As it dries, the moss can be moistened by spraying
It is important to ensure that moisture does not accumulate either in the sphagnum layer or in the substrate. Experienced flower growers say that after transplanting the orchid it is better not to water it again than to fill it with water.
You can return to the usual watering regime 3-4 weeks after transplanting, when the plant is fully restored.
For information on how to transplant an orchid, see the next video.
Home transplant
Inexperienced hobby growers are advised to plant orchids in transparent plastic pots. They make it easier to monitor the condition of the roots and the need to water the plants.
Pot selection
Interestingly, they live best in containers made of plastic. Glass pots are poorly ventilated and can heat up quickly. Ceramic orchid root pots are traumatic. When removing a flower from a clay container, you can find roots adhered to the walls.
An ideal orchid pot should be well ventilated and prevent overheating of the roots. Drainage holes are required, since the orchid does not tolerate root locking.
To remove excess moisture, the bottom of the pot is laid out with a 5–7 cm drainage layer. For this, use small pebbles, sand, crushed polystyrene.
Soil selection
Regular orchid soil is not suitable.
Note! Ready-made planting mixture can be purchased at a specialized store or prepared by yourself. The composition of the substrate for orchids is dominated by 2 ingredients: bark and sphagnum moss
A quality orchid mix consists of:
- crushed pine (spruce, oak) bark;
- peat moss (sphagnum);
- peat;
- charcoal;
- fern roots, its leafy humus;
- shredded foam
You can prepare pine bark for orchids with your own hands:
- Peel off the pine bark from the fallen tree. Wet, with signs of rot in this case will not work.
- The harvested bark is cleaned of foreign particles, crushed. The optimal fraction is 1.5–2 cm. For large plants, the size of the pieces can be doubled.
- Disinfect the bark with an insecticidal solution. This is necessary so as not to transfer pathogens of fungal diseases or pest larvae from the dead tree. The bark is poured with a solution diluted according to the instructions and heated.
- Next, the bark is boiled over low heat for an hour under slight pressure so that it does not float. For boiling, you can use a galvanized bucket.
- The cooked bark is left to cool completely, after which the water is drained.
- The resulting raw material is left to dry.
Orchid in a close pot
Step-by-step transplant sequence
Since you will have to transplant an orchid at home every 2-3 years, it is worth acquiring suitable equipment, purchasing the preparations necessary for disinfecting and treating plants. To work with the roots, you need medium-sized sharp scissors or pruning shears. The tool must be sharp, before use it must be disinfected, and after work - cleaned of plant particles.
For disinfecting the plant, you can use bio and chemical preparations, a solution of potassium permanganate (potassium permanganate) and activated carbon tablets.
Since one of the key tasks is to transplant the orchid at home and not damage the roots, the soft planting container is removed with scissors.
Note! You can also free the plant if you carefully squeeze the container, pouring the soil. Gradually, the roots will bare, they can be removed one by one from the holes
Orchid planting is carried out as follows:
- The root system is cleaned of old soil under running water, and an inspection is carried out.
- Dried, rotten and darkened roots are removed with a sharp garden tool.
- If there are traces of parasite activity on the root part, the root is immersed in settled water for 3-4 hours before planting. After the orchid is laid out on a napkin for drying for 6-8 hours.
- In order to prevent the spread of possible pests, infections, the plant is treated with antifungal and insecticidal drugs.
- Places of cuts on the roots are treated with antibacterial agents.
- The prepared flower is placed in the center of the pot, gradually filling up the soil so that there are no voids between the roots, the pot is shaken from time to time, but not rammed.
- It is not necessary to cover the upper part of the rhizome with a substrate; the root system must have access to air.
After planting, the plant must be well cared for.
The transplant process at home
An important question that novice growers ask: is it possible to transplant a blooming orchid? The phalaenopsis orchid does not have a clear dormant period. She constantly has a growth process: either leaves grow, or flowering occurs.
The most favorable time for transplanting is spring. But sometimes there are circumstances, for example, a plant disease, in which an urgent transplant is required, regardless of whether the orchid is blooming or not. Can an orchid be transplanted during flowering? You can, if you do not violate the root system.
Watering
In order to meet all the necessary moisture conditions, you need to understand the following:
- if you transplant a flower without damaging and cleaning the roots, without changing the soil, just in a new pot, the orchid practically does not notice this change, does not stop blooming. You can continue watering, according to the needs of the plant, according to the old scheme;
- when a transplant is done with pruning damaged roots, changing soil, a special irrigation regime is required.
Immediately after transplanting, you can water the flower if the new soil requires it.If the soil is old and was initially wet, you should not be zealous with watering, it is better to wait 4-5 days for it to dry well. If you transplant a plant in the summer, then the first watering should be done after 24 hours, if you transplant an orchid in winter, after 2-4 days.

Watering
Choice of capacity
The further health of this plant depends on the correct choice of a pot for an orchid. Air and lighting must flow to the root system of this flower, this should be taken into account first of all. The roots should not grow on the walls of the container.
Note! The best option is a clear plastic or glass pot. They are matte and colored, simple plastic or decorative glass
What should be the correct pot for an orchid:
- there should be a large number of drainage holes at the bottom of the pot. Excess irrigation water will flow through them, as well as ventilation of the roots. If there are few holes in the pot you like, you can drill them yourself;
- for transplanting an orchid, you should choose a pot that is a couple of centimeters larger than the previous one. There should be 3-5 cm of drainage at the bottom of the pot;
- you should not choose too large containers, since all the power of the plant will be directed to the root system in order to fill the entire pot. Such an orchid will bloom extremely rarely. And also in large containers, the substrate will dry out longer, which can lead to rotting of the roots.
Important! If the orchid grows in a transparent pot, direct sunlight should not fall on it, otherwise a greenhouse effect will be created, and the root system will begin to die off.
Transplant soil
Orchid is a tropical plant that parasitizes trees. It will not grow in normal soil. For a flower to grow properly, an appropriate substrate is required. The stores sell special mixtures that include bark. Additional ingredients such as moss, charcoal and fern roots can also be added.
The main indicator of the correct soil for an orchid is its looseness. It must be well ventilated. The bark should not be too large, but not too small. A fine substrate will not allow air to pass through well and dry out for a long time, which can damage the roots of the plant.
Soil for orchids
You can prepare the soil for the flower yourself. This requires:
- Collect pine bark from fallen trees.
- Rinse it well with running water.
- Chop into 1.5-6 cm pieces using a pruner.
- Boil for a few minutes. This is necessary for disinfection.
- After boiling, rinse again and boil again.
- Dry it, but not completely.
Note! You can add sphagnum moss, which is sold in flower shops, to pine bark. Thus, a healthy soil is obtained for transplanting an orchid, in which it will bear fruit and often bloom.
Step-by-step instruction
- To begin with, accessories are prepared: a new plastic pot, scissors or pruning shears, charcoal, cinnamon, fungicide (will cope with dark spots or traces of decay, if any).
- Further watering is carried out. It is much easier to get an orchid out of moist soil.
- The flower is now being extracted.
- The old substrate is carefully removed from the roots.
- Sick, dry, dead roots are removed.
- Then the stem is examined. If dark spots are found, then this area must be cut off until a healthy green part is visible.
- All damaged areas must be treated with charcoal, in severe cases, with a large number of them, a fungicide is used.
- After that, the plant is not disturbed for several hours.
- The final stage is the transplant itself.
- Drainage holes are made in the transparent pot.
- The flower is positioned so that it is in the center of the container, and the roots around the walls.
- Next comes the filling with soil mixture.
From the video you will learn how to transplant an orchid:
When is the time to transplant orchids?
When an orchid transplant is necessary, how can even an inexperienced grower determine this moment? There are standards here that indicate that the time for transplanting an orchid begins 2 years after the last transshipment. But here you should not rely only on theory. It is necessary to determine when an orchid transplant is needed in a practical way. And there are several criteria here. So, the time for transplanting an orchid comes when:
- the root mass does not fit in the pot;
- multiple aerial roots begin to form;
- pale and yellow spots appear on the leaves;
- there is no flowering for more than 3 months in a row;
- deciduous mass is 2 or more times the size of the pot.
The best time to transplant an orchid is the dormant period after flowering. It is best to carry out this procedure in the fall or early spring. But this is not a very important parameter, since orchids are not sensitive to root pruning.
Below are the answers of the agronomist to some of the most frequently asked questions of inexperienced growers.
Is it possible to transplant an orchid during flowering?
Many people ask if it is possible to transplant an orchid during its flowering period, which can last more than 10 months in a row. Will this event not affect the splendor of flowering and possible dropping of buds? Transplanting a flowering orchid is quite possible. This does not affect the quality of subsequent flowering, and in some cases can significantly prolong it. But before transplanting, it is necessary to shorten all existing peduncles by 2 cm. This will allow for rapid growth of new root mass and increase the number of lateral peduncles.
When is an orchid transplant needed after purchase?
You can determine when an orchid transplant is needed after buying a flowering plant in a specialized store by the state of the horse system. Orchids are usually sprayed with active flowering stimulants to form an attractive appearance in nurseries. This drains the root system. The roots may appear shriveled and pale. If this is observed, then an orchid transplant is necessary immediately after purchasing the plant in the store.
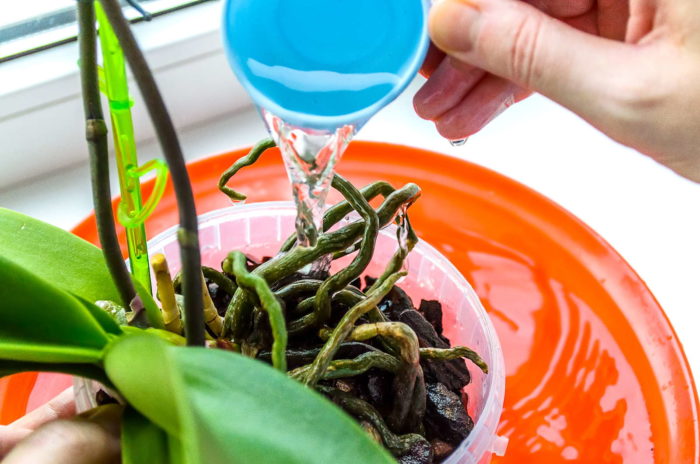
Do I need to water the orchid after transplanting?
After transplanting, watering the orchid is not just necessary, it is extremely necessary so that the new soil absorbs the maximum amount of moisture. Typically a dried fiber primer is commercially available. It is a dry substrate that contains a minimum amount of moisture. Therefore, immediately after transplanting the orchid, it is necessary to put it in a container filled with soft water with the addition of a small amount of trace elements for 20 - 30 minutes.
Does the phalaenopsis orchid transplant have significant differences, is any kind of care needed?
Phalaenopsis orchid transplant has no significant differences. This is done according to a typical step-by-step scheme. The only remark is that this type of transplant is required less often than, for example, dendrobium.
Care after transplanting a phalaenopsis orchid is reduced to placing the pot in a place where direct sunlight does not penetrate. Some lowering of the ambient temperature is beneficial. If the plant does not bloom, then daily spraying with water from a spray bottle is necessary.
What are the features of a dendrobium orchid transplant?
The main feature of the dendrobium orchid transplant is the timing of this event. If phalaenopsis can be transplanted 1 time in 3 years and at the same time get a magnificent long flowering, then dendrobium transplantation is carried out much more often. This usually needs to be done at least once a year. Sometimes it is necessary to transplant dedrobium 2 times a year. This is due to the fact that the plant very quickly builds up the root mass and stops flowering due to the fact that it becomes cramped in the container.
How is orchid babies transplanted?
The reproduction of these amazing plants at home is discussed in detail in another material.Therefore, we will briefly describe how the transplant of orchid babies is carried out. The procedure is standard here. A container is being prepared, the root system is not trimmed, but evenly distributed over the volume of the pot. The correct choice of the first planting container for an orchid baby: you need a pot that is equal in diameter to the spread of the leaves of the plant.
Orchid care after transplant
Special care for orchids after transplanting is not required. It is necessary to lightly shade the plants for 7 - 10 days, especially their upper part. The first watering is carried out immediately after transplanting a home orchid. However, for these purposes, it is necessary to take pre-boiled and cooled water with the addition of a small amount of micronutrients: potassium, magnesium and nitrogen. The pot is immersed in this solution for 25 to 30 minutes. This is necessary to saturate the soil with water and nutrients. The next watering is carried out no earlier than 14 days after transplanting. The next feeding will be required after 21 days.
You can watch the transplant of orchids on the video, on a special page there is a video material and a short description.