Content
There are so many reasons why wheatgrass juice is called the nectar of the Gods ...
Perhaps you have already heard about the benefits of sprouted wheat more than once, haven't you?
But how to properly grow wheat germ at home?
It’s quite simple.
Today I invite you to get acquainted with our online guide - how to germinate wheat at home ... This post will tell you everything "inside and out" ...
Honestly, I had to sprout sprouts more than once. However, all the time we did not always manage to do it correctly, especially at first. They began to grow moldy with us and everything disappeared.
Therefore, I suggest that you, together with me, try to properly germinate wheat for consumption.
If you are new to healthy eating and are not entirely familiar with the health benefits of wheatgrass and their juice, be sure to pay attention to our article - 50 Reasons to Drink Wheatgrass Juice Every Day ...
In short, one thing can be said ... These mega beneficial wheatgrass can even prevent colon and stomach cancers.
In general, the history of sprouting and eating wheat began long ago, after one of the simplest experiments. It all began in the 1930s as a result of the experiments of the agrochemist Charles Schnabel, who fed sick chickens with wheat seedlings.
After eating wheat grass, the birds recovered. Moreover, Schnabel noted that they began to lay more eggs than their initially healthy neighbors. Impressed by the experiment, Charles Schnabel introduced wheatgrass into his family's diet.
When the experiment was repeated the next year, the result was reproduced, Schnabel noted a doubled egg production in chickens that consumed wheat germ as an addition to food.
After much research, wheat germ has been credited with a wide variety of properties, including protection against cancer and aging, as well as treatment for tuberculosis.
How to germinate wheat at home correctly
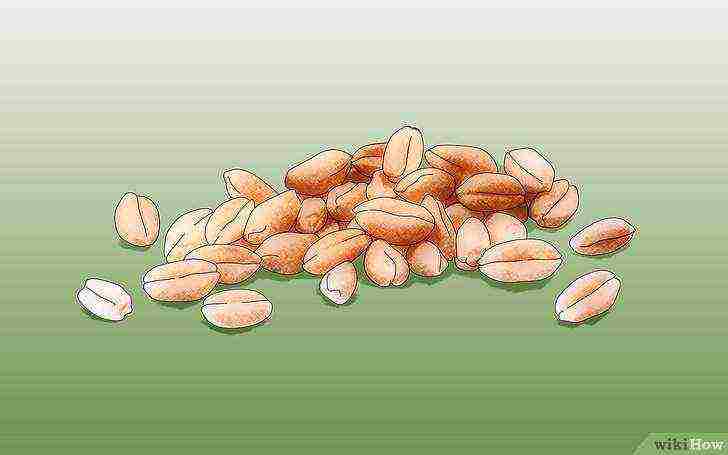
In general, you need to start by choosing a grain of wheat. You can order wheat grains in any online store.
But I made everything easier ...
Just took a house in the village. If you don't have such an option, go to the nearest farmers' market and buy them.
Be sure to make sure that they are not pickled from rodents. This is often done by farmers to preserve their crops throughout the winter.
Step # 1: pre-germinate the sprouts
So, we have already selected a grain of wheat ...
Pure, home grown and pesticide free. This is the type of wheat I recommend for sprouting for maximum health benefits. It is these grains that will give you a little sweetness and a pleasant taste.
This wheatgrass juice of yours will contain many vitamins and minerals that will improve your health.
So, let's begin …
- Pre-germination is important to achieve a good harvest.
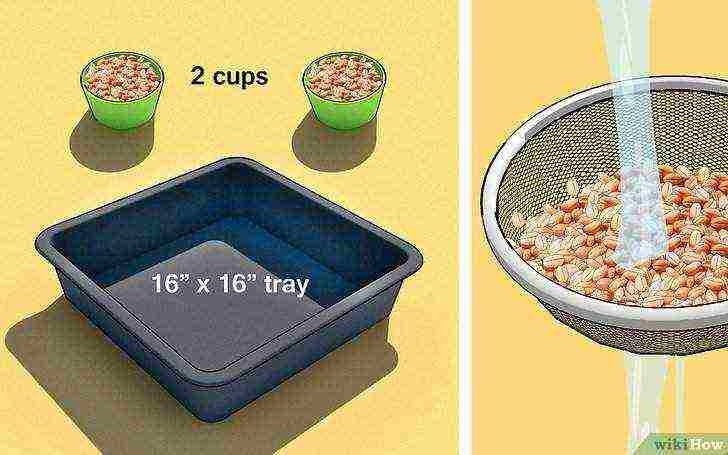
- Pick up a glass of wheat seeds. Or just fill the bottom in your planting mold with a single thicker layer.
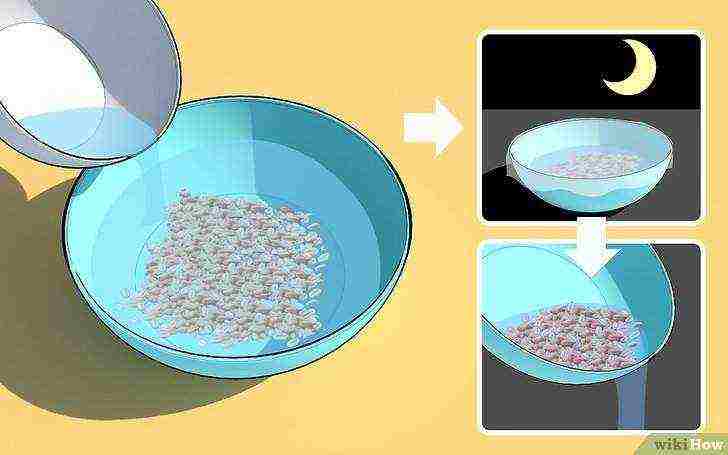
- Rinse the seeds in clean water, strain, and then soak the seeds in filtered water in any container.
- Soak for 8-10 hours.
- After 8-10 hours, drain the water and then soak them again as in step 2 above and soak them in the water for another 8 hours.
- After the second soak for 8-10 hours, drain the water.
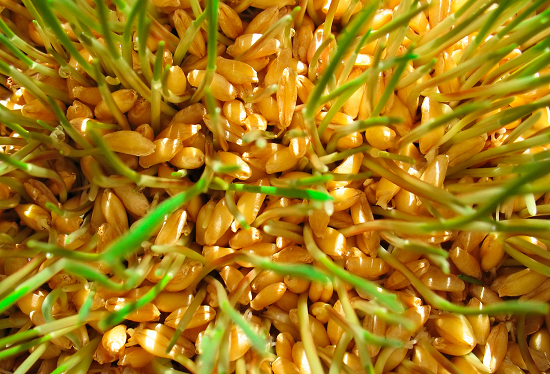
- Check the grains. They should put out small roots.
These sprouted seeds can even be eaten. Many adherents of a healthy diet eat them like that.
But, if you need a super healthy juice, move on to step two ...
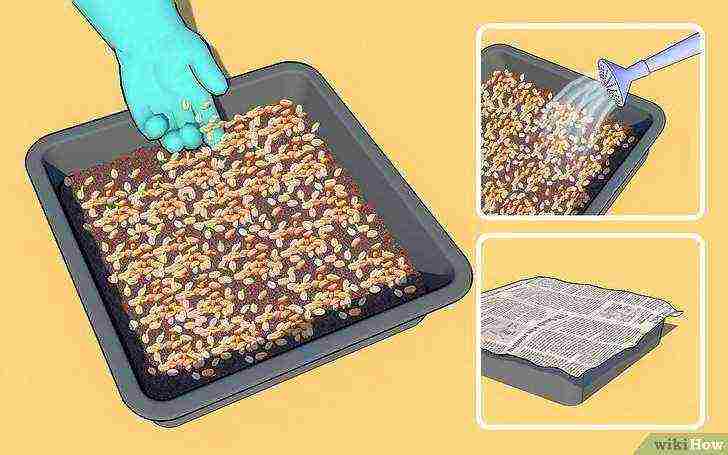
Step # 2: Prepare the Wheatgrass Planting Tray
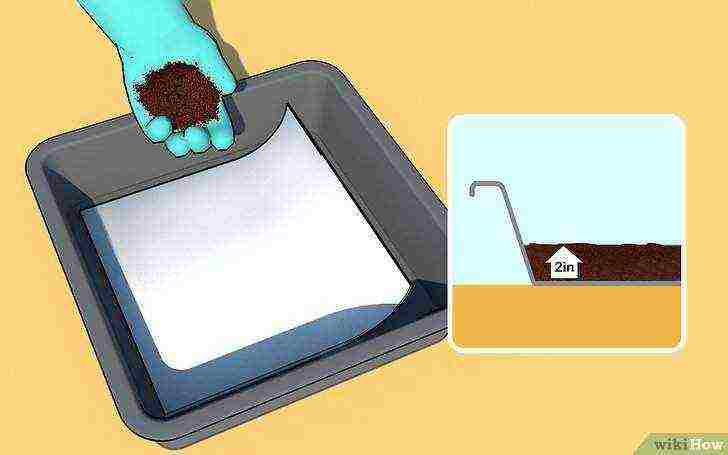
- If your tray has holes in the bottom of the tray, cover the bottom with a paper towel to prevent wheat roots from sprouting through the bottom.
- Fill the tray with pre-moistened soil or compost in a small layer. Make sure your soil is free of artificial fertilizers or chemicals. Always use organic supplements.
Step # 3: planting wheat grains
- Spread the sprouted kernels evenly and tightly in a single layer on damp soil in the tray. Squeeze the seeds gently into the soil or stir a little.
- Place the tray out of direct sunlight or just closer to daylight. It could be somewhere near a window and good ventilation. Remember, wheatgrass doesn't like hot, direct sunlight.
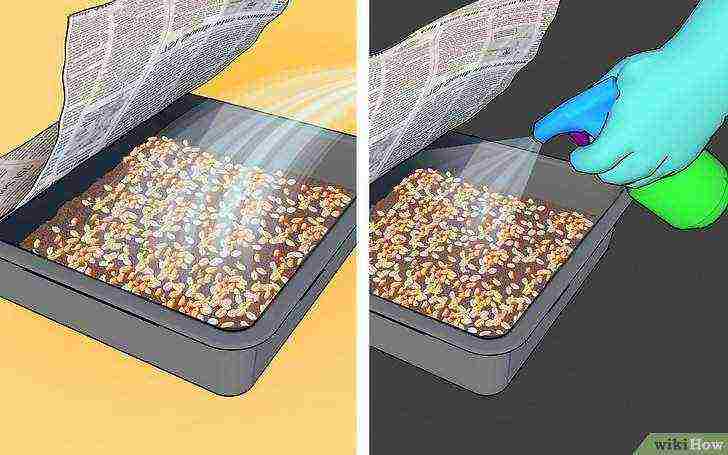
Step # 4: watering and tracking the sprouts
Young shoots should be watered at least twice a day to keep them slightly moist. If the soil becomes dry, young shoots can die. And of course, they don't like overflows either.
Therefore, we suggest that you use a simple spray (sprinkler) if you are afraid to overflow.
When the shoots become higher than 2 - 3 cm, it will take about five days for this, reduce the number of watering to once a day, for example, in the morning. But always make sure that the soil does not dry out. Once again, avoid over-watering.
Mold growth can sometimes occur. This is especially true in humid and hot climates.
But don't be discouraged, there are some good solutions:
- Try soaking your seeds overnight instead of just 8-10 hours as suggested above. This will allow the grains to absorb more moisture, they will grow even more, which will allow them to germinate better and reduce germination time.
- Arrange the seeds in the tray tightly, but in one layer. Try to prevent them from overlapping so that there is enough air for each sprout to breathe. This will definitely reduce mold.
- Do not over-spray the wheatgrass, use a spray bottle as we mentioned above.
- Finally, you can even try the following procedure. After your sprouts have taken root, substitute another tray or some form without holes for the wheatgrass, a tray with holes, so to speak, as a reservoir. Thus, instead of watering from above, the shoots will take the right amount of water for them. But this can also be mistaken.
But we failed several times, all the time the sprouts died from mold. But we still want to achieve the result we need and try all the same this elixir of youth and health.
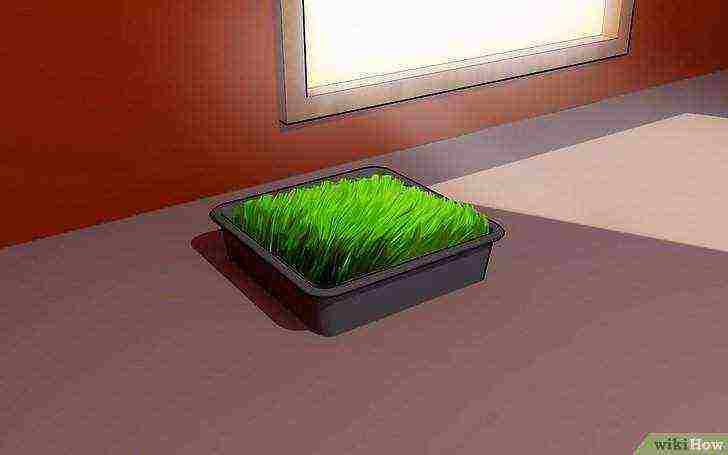
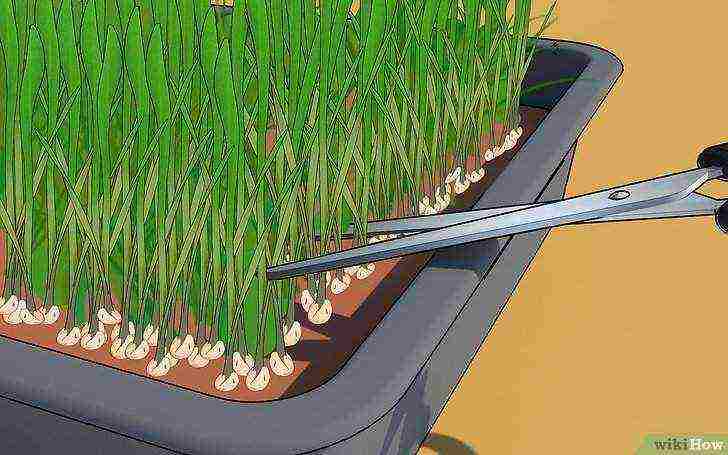
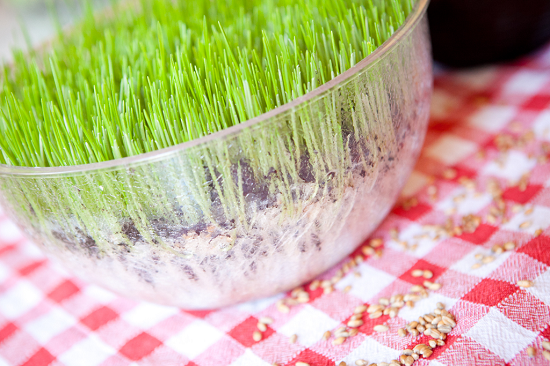
Step # 5: collecting grown sprouts at home
When the wheat germ grows up to 15 - 20t cm, they are ready for harvest. Use scissors and cut the greens just above the grains.
If there is mold, avoid it and cut a little higher. You should cut off enough greens to make about 30 ml of juice to provide you with energy throughout the day.
Note:
You can keep watering the cut greens for a second or even a third crop, although they won't grow as high. But you get extra grams of the healthiest juice.
Otherwise, empty the tray and get a fresh, fresh crop.
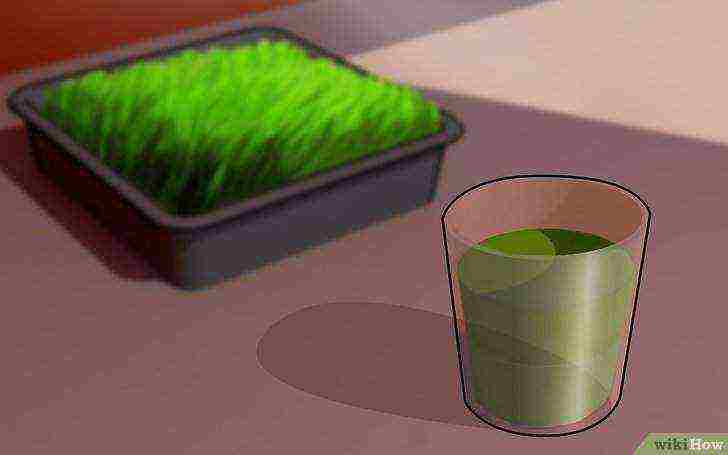
Step # 6: Juice Wheatgrass and Enjoy
To make wheatgrass juice, you need a special juicer. You can refer to our guide to choosing the right juicer for the whole family and your healthy diet.
I can warn you right away that centrifugal juicers will not allow you to get juice from wheatgrass. It can even clog it up a lot, as they are highly fibrous.
Experts do not recommend taking more than one serving per day (that's about 30 grams). Wheatgrass juice is so powerful that it can help you cure the worst diseases.
How to grow wheat at home video
If you do not understand everything, I suggest you watch an interesting video. This is a very informative and enjoyable video to watch, made by the "gummy fox", as she calls herself ... 🙂 Cool? ...
Watch her YouTube channel ...
Finally
Now that you have a real plan of action, you can easily repeat these steps. As you have seen, sprouting wheat at home is not difficult at all. This is not rocket science.
And if you are also a flower lover, for example, then sprouting wheat for food, I think, will not be difficult for you.
If you are not yet ripe for wheat germination, take a look at our list of benefits again in the article I wrote about at the beginning. Yes, science does not stand still and soon we can learn a lot more about the juice from wheatgrass.
There is even evidence that 30 ml. wheatgrass juice the content of vitamins and minerals are equivalent 1 kg of fresh vegetables! Super! ...
How do you germinate wheatgrass and what else do you know about the benefits of this juice? Drop me a line in the comments below! I always love reading other people's stories.
If the article became useful to you, share it with others.
4 methods: Soaking and germinating the seeds Planting the seeds Collecting the wheatgrass Juicing the wheatgrass
Wheatgrass is packed with essential vitamins and nutrients that keep your body and mind healthy. A small amount of wheatgrass juice every morning is considered a very healthy way to start the day, but it can be very expensive. If you want to make wheatgrass a part of your diet, try growing them at home rather than buying them as juice. In this article, you will find information on how to grow wheatgrass from seeds and use them when ripe.
Method 1 Soaking and germinating seeds
-
Purchase Wheatgrass Seeds. They are also called hard winter wheat seeds. Buy a pack of seeds online or at a health food store. Look for organic seeds from a reputable grower to be sure they haven't been treated with pesticides and will grow into healthy, vibrant grass.
-
 Prepare the seeds for soaking.
Before proceeding with soaking and germination, the seeds must be measured and washed.
- Measure out enough seeds to spread in a thin layer on the tray you use to grow your herb. For a 40 x 40 cm tray, you will need about two cups of seeds.
- Rinse the seeds in cool, clean water using a very small colander or strainer. Drain the water thoroughly and place the seeds in a bowl.
-
 Soak the seeds.
Soaking initiates germination. By the end of the process, the seeds should have germinated small roots.
- Pour the seeds in a bowl with cold, preferably filtered, water. The amount of water should be three times the number of seeds. Cover the bowl with a lid or plastic wrap and place on the counter for 10 hours or overnight.
- Drain the water from the seeds and pour in even colder, filtered water; again, the amount of water should be about three times the amount of seeds. Let it soak for another 10 hours.
- Repeat the process one more time for a total of three water changes.
- By the end of the last soak, the seeds should have germinated roots. This means they are ready to land. Drain and set aside the seeds while you prepare to plant.
Method 2 Planting Seeds
-
 Prepare a seed tray.
Line the tray with paper towels to prevent sprout roots from sprouting through the holes in the bottom of the tray. Line the bottom of the tray with a 5 cm layer of organic compost or soil.
- If possible, use paper towels that have not been treated with chemicals or dyes. Recycled, chemical-free paper towels are available at health food stores.
- Use pre-moistened compost or soil that is free of pesticides and other chemicals. To get the most out of your wheatgrass, it's important to use organic soil.
-
 Plant the seeds.
Spread the seeds evenly over the entire surface of the compost or soil. Squeeze the seeds lightly into the soil, but do not completely bury them.
- It's okay if the seeds touch, the main thing is that they do not concentrate in any one place. They need space to grow.
- Water the tray lightly and make sure all seeds get moisture.
- Cover the tray with a few dampened newspaper to protect the seedlings.
-
 Maintain moisture.
The seeds should not dry out for the first few days after planting.
- Pick up newspapers and water the tray thoroughly in the morning. The soil should be moist, but not saturated with water through and through.
- Before going to bed, lightly dampen the seedlings with a spray bottle to prevent the seeds from drying out overnight. Spray moisture on newspapers as well.
- Remove the newspapers after 4 days. Continue watering the sprouted grass once a day.
-
Keep the grass in partial sunlight. Direct sunlight can damage it, so place the tray in a shady place.
Method 3 Harvesting Wheatgrass
-
 Wait for the wheatgrass to separate.
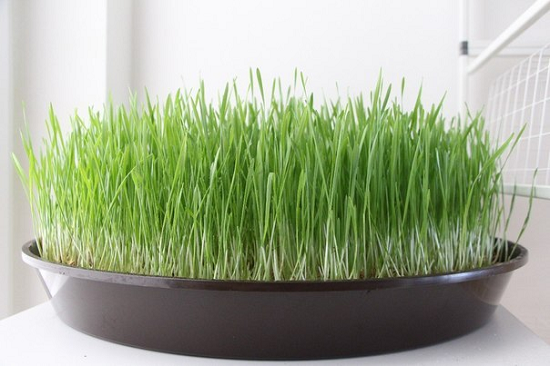
As soon as the shoots ripen, the second one begins to grow from the first blade of grass. This means the grass can be harvested.
- The grass should be about 15 cm high.
- As a rule, you can harvest on the 9-10th day of growth.
-
 Cut off the wheat germ above the root.
Cut the grass just above the root with scissors and place in a bowl. Juice can be squeezed out of the collected grass.
- The harvested wheatgrass can be stored in the refrigerator for about a week, but it is best to harvest it immediately before consumption, since then it not only has very good taste, but also the greatest health benefits.
- Keep watering the wheatgrass for another crop. Collect the grass as soon as it is ripe.
- Sometimes a third crop may sprout, but it is usually not as tender and sweet as the first. Empty the tray and prepare it for the next batch of seedlings.
-
 Start the process again.
It takes a lot of grass to squeeze the juice out of wheatgrass. If you plan on making wheatgrass juice part of your daily diet, you will need more than one tray of seedlings.
- Time to grow and harvest so that you have a new batch of soaked seeds coming up while the previous one starts to grow. If you already have two or three batches at different stages of growth, then you have enough wheatgrass to enjoy juice every day.
- Wheatgrass has a beautiful, bright green color and will add natural beauty to your kitchen. Try growing wheatgrass in a decorative tray surrounded by other plants to enjoy beauty and health at the same time.
Method 4 Making juice from wheatgrass
-

Rinse the wheat germ. Since you've grown wheatgrass from organic seeds in organic soil, they won't need to be over-cleaned. Rinse lightly to remove debris and dust that may have gotten on them from the air.
-
 Place the wheat germ in the juicer.
Wheatgrass juicers are designed to make the most of this fibrous plant.
- Do not use conventional juicers, as the grass can clog and break them.
- If you don't have a juicer, you can use a blender. After grinding the wheat germ thoroughly, strain it with a sieve.
-
Enjoy wheatgrass juice. You will need some juice to experience the powerful combination of vitamins and minerals.
Tips
- Wheatgrass is believed to detoxify the body.
- If the wheatgrass tray becomes moldy, use a fan to improve air circulation in the room. Harvest by cutting the grass above the mold level; it is not tainted.
Article Information
Categories: Doors and Windows
In other languages:
English: Grow Wheatgrass at Home, Deutsch: Weizengras selber anpflanzen, Italiano: Coltivare Erba di Grano a Casa, Português: Cultivar Grama de Trigo em Casa, Español: cultivar pasto de trigo en casa, Français: cultiver de l'herbe de blé à la maison, Bahasa Indonesia: Menanam Rumput Gandum di Rumah, العربية: زراعة عشبة القمح في المنزل, 日本語: ウ ィ ー ト グ ラ ス を 家庭 で 栽培 すบ้าน, Tiếng Việt: Trồng cỏ lúa mì tại nhà
- Edit
- Write a letter of thanks to the authors
This page has been viewed 147,463 times.
Was this helpful?
How to grow wheat at home. The benefits of wheat germ and tips for growing.
In recent years, a healthy lifestyle has become a real trend. And such a product as wheat germ is considered one of the most important components in the diet of a person who is fond of healthy eating.
What you need to get started
Before you grow wheat at home, you need to prepare everything you need for such a process. So, here's what you'll need:
- Wheat grains. They must be of good quality and not treated with any chemicals. Winter crops are best suited for germination.
- Germination tray. It should be plastic or glass, but not metal. If choosing a plastic tray, check that it is made from food grade raw materials. Can wheat be grown in something other than a tray? You can, for this purpose, simple glass jars are also suitable. When germinating, it is best to cover the jars with gauze.
- A humidifier - you will need it if you decide to seriously start sprouting wheat at home and are going to do it all the time. For household purposes, some inexpensive model is suitable.
- Fresh clean water at room temperature.
Choosing grains for wheat germination
Before growing wheat germ, you need to choose the raw material itself. Here we would like to give you some tips:
- Wheat that is specially made for sprouting can be found in grocery stores or health food stores. It has the appropriate marking, and you can be sure that if you follow all the rules, you will get a high-quality result. However, if you want to save money, you can buy wheat from farmers when there is such an opportunity.
- It is highly desirable that the raw materials are not treated with any chemicals. Unfortunately, it is simply impossible to check this with the naked eye. If you buy special environmentally friendly grains, you can rest assured that they certainly meet all the stated requirements.
- It will not be easy to check the wheat purchased on the market. But you can at least appreciate its appearance. So, pay attention to the size and integrity of the seeds. If possible, they should be the same, not chipped, not wrinkled, dry, smooth, without mold. If the appearance worries you, immediately ask the question: is it possible to grow such wheat, and will there be any benefit from it? Choose only the product that does not arouse your suspicions and looks healthy and of high quality.
- It so happens that even beautiful-looking grains do not germinate and begin to rot even when they swell in water. If you notice mold, don't germinate the wheat, just throw it away.
Different varieties of culture swell and germinate in different ways. They may also require different temperatures or humidity. But there is one rule that should be observed when germinating wheat at home: it is better to underexpose grains in water than overexpose them.
How to grow wheat
Having chosen and bought wheat grains, the first thing to do is to soak them in water. Moreover, it is important to first measure the required amount of raw materials. For a large tray or tray measuring 40 x 40 cm, you will need about a couple of glasses. There should be enough grains so that they cover the bottom with a thin layer.
After measuring the seeds, pour them into a colander or sieve and rinse with clean cool water. Then put them in a bowl and soak. Wheat should be soaked in clean, if possible, filtered water at room temperature. Its volume should be 3 times the volume of seeds.
Fill the grains, cover them with a foil or a lid and leave them on the table for 10 hours. After this time, drain the water and collect fresh, slightly cooler than the previous one, and also filtered. Its amount should also be 3 times the number of seeds. Leave the wheat again for 10 hours. Then do the same procedure a third time.
The result of such soaking should be the appearance of small roots on the seeds.
Rinse the wheat and prepare a tray for it. If there are holes in the bottom of the tray, place paper towels on the bottom to prevent roots from growing through the container. Then take organic compost or soil and cover it in a layer of 5 cm. Note that you need to grow wheat at home without fertilization, otherwise, instead of benefit, it can only bring harm. By the way, the paper towels that you put in the tray should also be clean, without paint and fragrances.
You can grow wheat without land. To do this, you need to take a tray without holes and a piece of gauze. Lay the cheesecloth folded in several layers on the bottom, spread the seeds on top and cover with several more layers of cheesecloth. Pour the grains onto the prepared compost and spread in an even layer.
Then press lightly to the ground, but do not dig in whole. Water the wheat with clean water, being careful to moisturize all areas. If you grow grains on gauze, it must also be thoroughly moistened, but not completely filled in, so that mold does not appear. Then cover the seed tray with wet newspaper or cloth.
Check the wheat every day and make sure it doesn't dry out. Water the compost regularly for several days. Again, do not overfill the tray with water. We also spray the newspapers lying on top from the spray bottle. After 4 days, remove the newspapers and water the sprouts once a day. The question of where to grow wheat is also important. It is better to do this in a place where the direct rays of the sun do not fall, but not too dark. It should be warm and there should be diffused light.
Helpful hints
To know how to properly grow wheat at home, you should heed some tips:
- Where you place the wheat tray, the air temperature should be 22-24 ° C. In such a place, you need to maintain a high humidity, and if the air in the room is too dry, it is better to use a humidifier.
- Do not pour too much water into the container. In such conditions, the seeds will not germinate, but only burst and become moldy.
- If you do not maintain constant moisture, wheat, on the contrary, will dry out and will not germinate. Therefore, it is necessary to regularly moisten the soil, newspapers or gauze that lie on top.
- It is also not necessary to sprinkle the grains in a too thick layer, because the lower seeds will simply suffocate, and there will be no benefit from them.
- As a rule, subject to the technology, high-quality raw materials germinate in a day.Moreover, almost all seeds should germinate. Wheat should be eaten immediately, and its sprouts should not become longer than 3 mm - in this case, they will be very harmful to the body. It is advisable to discard those seeds that have not sprouted, since they may be affected by some kind of disease.
- If the wheat has not sprouted within 2 days, you just need to throw it out, because either the raw materials turned out to be of poor quality, or you made some mistakes during germination.
Why is germinated wheat useful?
Wheat itself, even in an unsprouted form, is a rich source of useful components. In dry grains, such components are in an inactive phase, but at the time when a sprout emerges from the seed, the grain tries to give it everything that is needed for active development. Thus, the wheat seed mobilizes all the nutrients hidden in it.
Sprouted wheat is useful not only for its contents, but also because the contents are balanced, it is absorbed by the body almost completely. That is why crop sprouts are considered a valuable biologically active food supplement, which, moreover, has an absolutely natural origin.
If we talk about the composition of sprouted wheat, then it contains the following components:
- fatty acid;
- maltose;
- alimentary fiber;
- 20 different amino acids;
- minerals;
- vitamins: C, E, PP, vitamins of group B.
The highest concentration of these substances is present in the product when its shoots reach 1-2 mm in length. Sprouted wheat is believed to contain components that are involved in the construction of nucleic acids, which, in turn, underlie our genes. This leads to the fact that after consuming the product, reserves appear in the human body for the recovery and treatment of many, including serious diseases.
If we talk about what effect sprouted wheat has on the body, then the following should be highlighted:
- The product improves the functioning of many organs and systems of the body. It tones the body, boosts immunity and allows a person to easily cope with infections. Wheat normalizes metabolism, gives vigor and energy.
- It is especially useful after illness, when the body is exhausted and does not have enough strength to recover. For people with reduced immunity, this product is also important in the diet. You can also use sprouts as a preventive measure, for example, during the SARS season and during flu epidemics.
- Such food has a positive effect on the work of the nervous system, relieving depression and stress.
- Sprouted wheat is also useful for men. Long-term use is believed to help cope with sexual dysfunction.
- Magnesium, which is contained in the sprouts of the culture, perfectly reduces blood pressure, and also removes cholesterol from the blood.
- Insoluble fiber in fiber is beneficial for the functioning of the gastrointestinal tract. Sprouted wheat helps to fight constipation, removes toxins, toxins and radionuclides. Soluble fiber also has a beneficial effect on the gastrointestinal tract, absorbing bile acids and improving the intestinal microflora.
- The normalization of metabolism, which is promoted by the use of sprouted wheat, helps with obesity. The product itself is very low in calories, but it saturates well, quickly and for a long time relieves hunger. For those who are overweight and decide to eat wheat germ, it is advisable to exclude bread from the diet.
- Wheatgrass is considered an excellent cancer prevention tool. In some cases, such a product helped to cope with already existing neoplasms: cysts, fibroids, fibromas, polyps.
- Sprouted grains are recommended for use in case of visual impairment, the presence of various inflammations in the body, diabetes mellitus.Wheatgrass helps to restore even very poor eyesight if you eat them regularly and for a long time. As for diabetes mellitus, such food greatly facilitates the course of the disease and has a beneficial effect on the functioning of the thyroid gland.
Sprouted wheat has a rejuvenating effect on the body, improves complexion, skin condition, hair, nails and teeth. It charges the body with energy, gives strength and activity.
Contraindications to the use of wheat sprouts
Despite all the naturalness and benefits of wheat, it also has a number of contraindications:
- It should not be eaten by those with kidney problems or serious gastrointestinal problems.
- Those who are prone to frequent bowel disorders also need to be very careful when introducing such a product into their diet.
- Sprouted wheat, like any other, contains gluten. For most people, it does not represent anything bad, but there are those who do not tolerate such a component.
- A reaction to the consumption of sprouted wheat can be a digestive upset, but, as a rule, after some time the body gets used to it and this symptom disappears on its own.
How to eat wheat germ
Wheatgrass Juice
Wheat for juicing is germinated long enough until the sprouts reach a length of 10-12 cm. Then they can be cut and squeezed out.
To do this, proceed as follows:
- First, the sprouts are washed with cool water.
- Then they put it in a special juicer designed specifically for such purposes. A simple juicer will not work in this case, because the blades of grass can clog it, and it will fail. Special devices for making juice from wheatgrass are made in such a way that you can get the maximum amount of liquid.
- If you do not have such a juicer, then grind the stems with a blender, and then strain through a very fine sieve or cheesecloth.
Used materials
The concept of "living food" is becoming more and more popular, and fermented foods are making their way even into mainstream food culture. In many restaurants around the world, you can find salads and snacks with plant sprouts. Today you will learn how to sprout wheat at home and become practically the chef of a trendy restaurant.
What goes around comes around
Sprouting wheat at home begins with the selection of suitable grains. To do this, go to the nearest supermarket, or better to the market, and buy some ordinary durum wheat. Where to buy a product makes a huge difference.
So, in a supermarket you will not always be able to touch, touch and properly consider the grains offered for purchase, but at the same time it is in the store that you can find special seeds for germination with the appropriate label. As for the market, here you can buy a product at almost a bargain price and at the same time choose exactly those grains that you like, that is, they will be whole, unharmed and covered with a natural shell.
The integrity of the grains, their heat treatment and the amount of impurities also play an important role. Usually, for planting wheat in personal plots or for sowing fields, grains are treated with special chemicals. For home use, such raw materials will be unsuitable and will not sprout.
Plant the grains in a jar
So, the grains have been chosen, we turn to the consideration of the main question - how to properly germinate wheat at home. In fact, this process is simple, and most importantly, fast. The first sprouts can be obtained after 24 hours. First, prepare some wheat so that it is enough for one time, a glass jar and cheesecloth.
Let's start the growing process:
- First, we sift the wheat in the wind, and then manually select from the total mass all small specks, pebbles, seeds from other crops and spoiled grains.
- We wash the sorted and prepared seeds in a one-time solution of potassium permanganate, and then in several more waters.
- We pour the grain into a glass jar, filling it by about a third of its volume, and fill it with settled running or spring water. The water level in the jar is important: it should cover the wheat by 2 centimeters.
- Cover the jar with a lid with holes or gauze, folded in several layers, and leave at room temperature for about 10 hours.
- After the specified time, without removing the gauze, drain the first water and rinse the grains again.
- Then we turn the jar into a bowl at an angle equal to 45 degrees, while the neck of the container should be at the bottom of the plate.
- Pour distilled or tap settled water into the plate itself, thus creating optimal conditions for wheat growth.
- After the seeds swell and the first small sprouts appear, we rinse them again, replace the gauze with a lid, and place the jar in the refrigerator on the upper shelf.
- Wheat sprouts can be stored for 3-5 days, and the grain should be washed before each meal.
The live energy of fresh wheat germ stimulates the body to activate the processes of purification and self-healing. At the same time, the digestive system receives special benefit, which at this time gets rid of the food that has been cooked.
If you pamper yourself with sprouted wheat porridge every morning, by the way, you can add honey to it, after a while you will notice how your body has rejuvenated: many cosmetic defects will disappear, it will become easier to breathe, and flexibility and elasticity of the joints will appear. In addition, doctors say that such food helps to strengthen the immune system.
We grow vitamins in the window
Usually, sprouted wheat grains are recommended to be eaten immediately, without waiting for the appearance of large sprouts. It is believed that at the initial stage, the seeds contain the highest concentration of nutrients. However, nutritionists say that green shoots themselves will be no less suitable for food. They can be used to make a salad or whip up a vitamin cocktail in a blender, and some healthy food lovers add green sprouts to cold soups and cereals.
How to grow wheat to green sprouts at home? Follow these guidelines:
- To begin with, we perform all the actions described above with a jar, only at the very end we do not put the seedlings in the refrigerator, but transplant them into the soil.
- To do this, we prepare a special container in advance, preferably with a ventilated bottom.
- We cover the bottom of the container with paper napkins, and cover the top with a layer of earth, about 5 centimeters thick, and moisten.
- Now we alternately press the wheat germ into the soil and sprinkle with water from a spray bottle.
- We cover all this with a napkin and leave the pot to languish in a warm room for about 4 days, periodically remembering to moisten the soil.
- After a while, remove the top layer of napkins and move the container to the window, just not under the direct rays of the sun, and wait for the harvest.
- The first shoots can be cut after 9-10 days, leaving a little space above the root so that the wheat continues to grow.
Sprouts obtained in this way can be stored in the refrigerator for 7 days. This will result in almost continuous production.
Read also:
- How to germinate grains?
- How to sprout oats at home
- Sprouted wheat: use, benefits, properties
To grow wheat, you do not need to have the special skills of an amateur gardener, you just need to be patient. It is better to eat "live grains" in the morning on an empty stomach, while chewing them well. And the dish will turn out to be tastier and healthier if you add honey or fresh fruit to the wheat.