Content
- 1 Preparation of thuja cuttings for reproduction in spring
- 2 Rooting and planting thuja cuttings for propagation
- 3 Thuja seedlings care for vegetative propagation
- 4 Cutting processing
- 5 Primary landing
- 6 Open ground transplant
- 7 How to choose branches for grafting?
- 8 Can cuttings be grown in water?
- 9 Growing cuttings in the substrate
- 10 Growing cuttings in sphagnum
- 11 Benefits of the vegetative method
Representatives of the cypress family are often used to decorate summer cottages and adjoining territories. The unpretentious frost-resistant thuja is a vivid example of this. This perennial is especially loved by summer residents, with its help you can create green corridors, living fences, and delimit the territory on the site. For such work, sometimes dozens of seedlings are required, which is why the reproduction of thuja becomes an urgent issue for summer residents.

Reproduction of this ephedra involves three methods: seed, cuttings, grown trees (ready-made seedlings).
↑ to the content ↑ Thuja propagation by seeds
The option with seeds is very long, labor-intensive, since at least 5 years will have passed by the time the bush is planted in the ground. In addition, thuja can lose its varietal characteristics during development, and the only advantage of such a situation will be the adaptation of the plant to the local climate. However, if you are interested in the process itself, then you will need a soil mixture (sand, coniferous, deciduous soil), high-quality seeds. It is important that the seed material has previously undergone stratification - overwintered under a layer of snow.
With the arrival of spring, thuja seeds are placed in containers with nutrient soil, and they are covered with soil mixed with sawdust of coniferous crops. Reproduction of thuja seeds at home entails traditional concerns: protecting seedlings from the scorching rays of the sun, timely watering, getting rid of weeds, feeding. After 5 or even 6 years, young thuja can be planted on the site.
↑ to the content ↑ Propagation of thuja by cuttings
Cutting propagation is the most convenient, effective way. A big plus of this method is the preservation of the varietal qualities of the tree, as well as the ability to get full-fledged small trees in two or three years. Of the minuses, it is worth noting the reduced endurance and a small percentage of the survival rate of the bushes. For this situation, this is normal, if you do everything according to the rules, then a positive result will not be long in coming.
Consider the reproduction of thuja at home by cuttings. What season should you choose for this - spring or autumn?
↑ to the content ↑ Thuja propagation by cuttings in spring
Most often, novice gardeners are worried about the question of reproduction of thuja in the spring, how best to do it. With spring rooting, all processes are faster, as the movement of juices in the shoots is activated. Procurement of planting material is practically no different from the above method. For the selection of cuttings, healthy branches from the top of the thuja, which are no more than 3 years old, are also used.

Reproduction of thuja in the spring is best done in April, with manual separation of the branch, the "heel" should be preserved. If for some reason you missed April, then you can have time to "catch" the repeated period of shoot growth - this is June. It should be borne in mind that June cuttings "sleep through" summer, autumn, winter, and take root only by spring.
The best way for spring propagation is the substrate method and active hydration. Water or the diaper method will not work here due to insufficient moisture during the activation of the root system.The process itself is very similar to autumn cuttings, but sometimes the soil mixture is replaced with clean sand.
Thuja - propagation by cuttings in spring, stages:
- We put the selected shoots in water with "Kornevin" for 24 hours.
- We take boxes or other containers with a large number of holes in the bottom, lay a layer of medium-sized rubble.
- Pour clean sand on top, which can be ignited or doused with boiling water. You can also use the potting mix mentioned above.
- We spill the sand with a solution of potassium permanganate, it should be pink, but not too dark.
- When the sand or substrate has cooled down, we immerse the thuja twigs there to a depth of 1-1.5 cm, slightly trample them with our hands.
- Since it is still cool in spring, containers with cuttings should be placed where conditions are similar to those in greenhouses. At the same time, the air temperature should not be below + 17 ° C, above + 23 ° C.
This place should be shaded, seedlings should be irrigated daily from a spray bottle. If the spring is hot, then spraying should be done twice a day. At the same time, make sure that moisture does not get on the green leaf plates - the process of decay may begin. After two months, it will become clear which cuttings have taken root, by this time the risk of drying out the planting material is significantly reduced.
↑ to the content ↑ Thuja - propagation by cuttings in autumn
But there is also an opinion that it is the autumn harvesting of branches for planting that is more expedient, since in the fall the sap flow slows down, respectively, the number of seedlings dying from a lack of moisture decreases. It should be borne in mind that the rooting process will take longer. Let's look at the reproduction of thuja in the spring
To collect twigs, it is better to choose a not sunny day in October, when the foliage has already fallen from the trees (in the Kuban it may be the beginning of November). It is best to pinch off the shoots from the top; it is best to choose those branches that are already 3 or 4 years old.

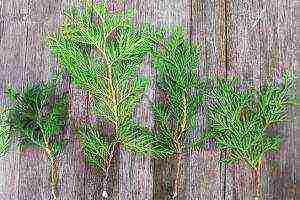
Select only lignified branches that do not exceed 50 cm in length. At the end of the "correct" shoot, a tree "heel" should be preserved at the end - a part of the bark, thanks to which new roots will develop. The longer this "heel" is, the better the rooting process will be. Remove about 3-4 cm of leaf plates from the end of the shoot and proceed to the next step.
↑ to the content ↑ Propagation of thuja by cuttings in a jar of water
Water is the easiest, most affordable way to revitalize thuja roots. To do this, take a small container, fill it with water, set the branches so that the water covers the ends by about 2 cm. Do not place more than 3 or 5 cuttings. Make sure that the green parts of the shoots do not come into contact with water - this contributes to further decay of the planting material. After that, choose a bright, slightly cool place for the container.
Seedling care is a timely replacement of water (when it becomes cloudy). At this time, the cuttings are removed from the jar, the roots are wrapped in a clean, damp cloth. New water should be disinfected with a pair of potassium permanganate crystals.

↑ to the content ↑ Rooting of thuja cuttings in the substrate, sphagnum
Thuja propagation by cuttings in autumn is possible in different ways, for example, using a substrate. This method is more advantageous than the option with water, which does not contain any nutrients, but with the substrate, the rooting process will be much more productive.
To make the seedlings healthier, more hardy, prepare:
- Drawers or other forms with holes (for soil aeration). Lay fine gravel (drainage) on the bottom, mix equal shares of deciduous humus, sand, peat.
- Heat the resulting soil mixture in the oven. If you have potassium permanganate at home, then make a dark solution and additionally shed soil for reliability.
- Place the cuttings in water with a previously diluted biostimulating drug Kornevin for 10-12 hours.
- Fill the containers with the substrate, make grooves for the cuttings.Deepen the seedlings themselves by 1.5-2 cm, sprinkle with sand on top (which can also be pre-calcined), lightly tamp.
- Next, the box should be covered with plastic wrap, placed in a bright place, while the air temperature should be + 18..22 ° C. When condensation appears on the walls of the mini-greenhouse, slightly open the film on one side (for ventilation).
When rooting on a substrate, it is important not to overdo it with watering and to prevent the soil from drying out. Moistening is best done by irrigation with a spray gun, since the weight of the water can crush the soil, expose the "heel".
There is another interesting way in which the autumn reproduction of thuja is carried out using sphagnum (peat moss). This method implies, as it were, swaddling the shoots with a kind of cocoon, this method is called so - rooting of thuja cuttings in swaddling clothes.
In addition to sphagnum, you will need plastic wrap, a clean cloth, and Kornevin.
Process:
- As described above, we place the thuja shoots in water with a root formation stimulator (for 10-12 hours).
- Fill the sphagnum with boiled water for about 3 hours so that it swells and is saturated with moisture.
- We lay out a wide strip of fabric on the table, visually divide its width in half, evenly lay out wet sphagnum along the entire length of the upper strip. The lower free part of the width of the diaper is needed in order to cover the cuttings and moss, and then we carefully fold this strip into a roll.
- At a short distance from each other we lay thuja twigs, surrounding the "heels" with sphagnum.
- We cover the cuttings with the lower part of the strip, so that the green tops are free, we roll up the roll.
- We place the resulting sack inside a plastic bag, hang it in a well-lit place (but not in the direct rays of the sun).
Such reproduction of thuja by cuttings is considered the easiest, thanks to the moss, the required moisture level is maintained for a long time. Lack of moisture can be determined by the absence of condensation on the inner walls of the bag - if it is dry, then moisten the diaper with a spray bottle.
↑ back to content ↑ Growing thuja
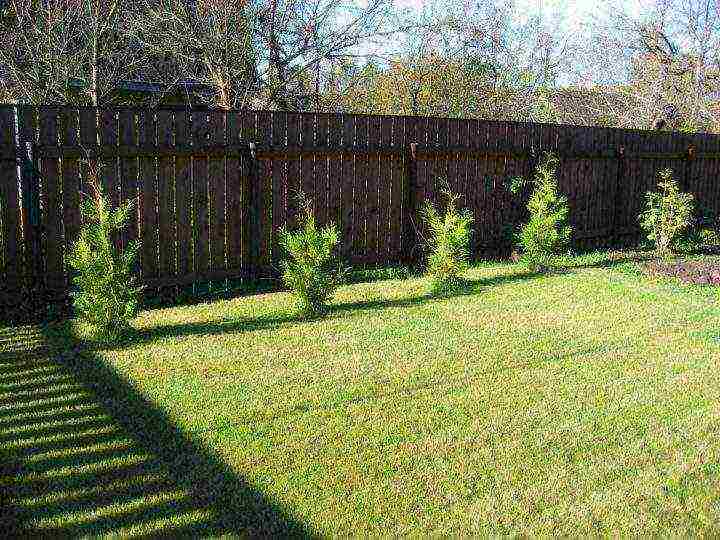
Cuttings of spring or autumn harvesting require rearing. For this, special beds are formed, which is called a school. They will stay there for 2 or 3 years, after which they will be transplanted to a permanent place of residence. Autumn cuttings are planted in the school next year, and spring cuttings in September of this year.
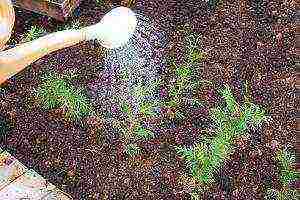
The place for young thujas should be shaded, the soil should be peaty (you can add 1 bucket per 1 m²), cuttings are planted at a distance of 25-30 cm from each other, watered. At this stage, the seedlings will already gain strength, you just have to take care of them properly - water and destroy the weeds in a timely manner.
Reproduction of thuja is an interesting and productive process, since you can get dozens of "babies" from one tree. After 2-3 years, these will be full-fledged small trees, with the help of which you can plant greenery on your site, give it individuality.
 Popular coniferous crops in nature are more often propagated by seeds or vegetatively. But in nurseries and among gardeners, thuja propagation by cuttings in spring is more common, allowing:
- save time and effort for germinating seed and bringing it to the state of a strong viable seedling;
- preserve all the varietal characteristics of the parent plant, which would have been necessarily lost with the seed method.
If a summer resident is engaged in self-cultivation of seedlings for the first time, it is important for him to know how thuja reproduces.
Preparation of thuja cuttings for reproduction in spring
 Harvesting cuttings from conifers, their adaptation and planting have significant differences from the well-known technology for working with deciduous species.
The optimal time for harvesting planting material is the end of March and all of April.Shrubs that have awakened from winter dormancy begin to grow, therefore, pieces of shoots cut from them receive a natural stimulus for growth and root formation.
In spring, for reproduction of thuja, cuttings from strong, well-developed shrubs are cut off tops at least 10–12 cm long. The diameter of the future seedling should not be less than 5–8 mm. One-year-old shoots of lateral branches taken as cuttings form roots much faster and more willingly than those cut from the top.
How to proceed further? How to propagate thuja by cuttings at home? In this case, it is enough to immerse the planting material of many deciduous crops in a container with water. After a while, the cutting will develop roots, with which it will go into the ground for further growth. In conifers, the process of root formation is somewhat difficult, so the cuttings need a little help:
- Fresh cuttings at the base are cut obliquely.
- Close to the cut, carefully pry up and remove the bark.
- Above the shoot, several thin longitudinal cuts are made.
- The needles are removed, leaving only at the ends of the shoots.
 You need to perform these operations fairly quickly so that the cuttings do not fade.
Thanks to the incisions made, it will be easier for the future roots to overcome the bark, and removing the needles will help to avoid decay after planting.
In this form, pieces of shoots are placed in a solution of a root formation stimulator. In a jar of water, cuttings for propagation of thuja should stay from 12 to 24 hours. During this time, the seaming of the roots awakens, which increases the likelihood and accelerates the rooting.
Rooting and planting thuja cuttings for propagation
 While the planting material is waiting for its turn, containers and soil are prepared for planting. Containers should have drainage holes to drain excess moisture. It is convenient to take washed and disinfected sand mixed with peat as a substrate for thuja propagation by cuttings. You can neutralize harmful microflora and insect larvae using:
- abundant watering with a solution of potassium permanganate or phytosporin;
- boiling water abundantly spilled on the soil layer;
- by calcining in the oven.
The cuttings are planted at a distance of at least three centimeters from each other. When planting in multiple rows, leave 8-10 cm between rows. The same distance should be to the edge of the container or pot.
The tightness is dangerous for seedlings, the roots of which are at risk of intertwining and breaking off during transplantation into open ground.
Shallow, up to 15 mm holes are made at an inclination of 45 degrees. When all the cuttings of the thuja for its reproduction in the spring have found their place, the soil around them is slightly compacted, and then the plantings are watered.
Thuja seedlings care for vegetative propagation
Until strong roots form on the cuttings of the thuja, they need protection from the weather:
- direct sunlight;
- wind;
- rain;
- probable frosts in the spring.
 The best hiding place for the first two months is a small greenhouse or greenhouse. During this time, the seedlings are provided with daily watering, which is extremely necessary in dry, sunny, warm weather.
On especially hot days, it is useful to spray rooted cuttings for thuja propagation with warm water, using the smallest sprinkling. The film on the greenhouse is changed to a thin fabric or non-woven material.
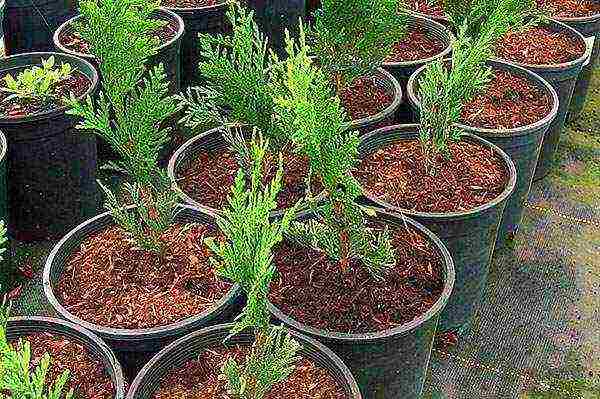
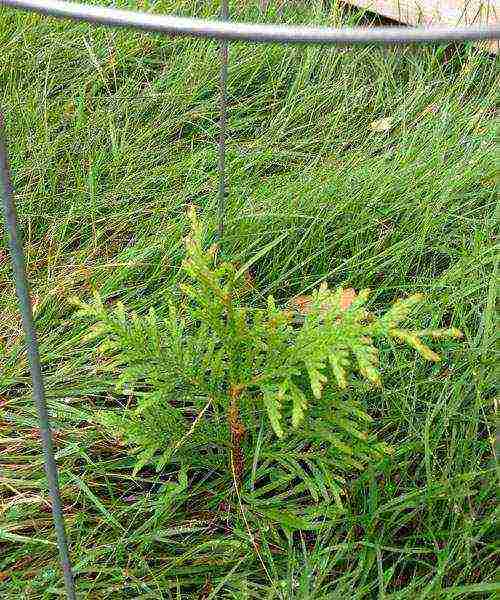
Over the summer, properly planted and well-cared plants develop their own roots. Therefore, young thuja can be safely transferred to a place where the shrubs will fully form in 2-3 years, or to separate pots for growing in a container.
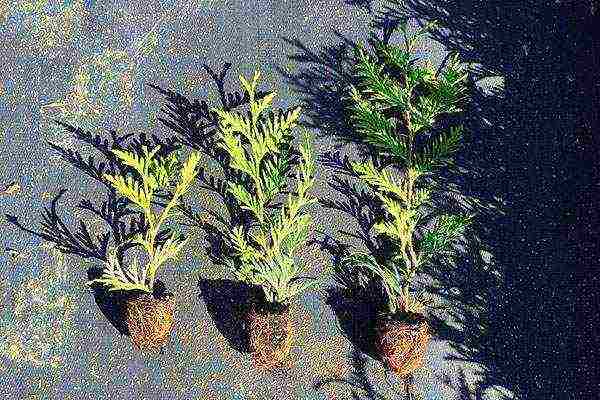
 The roots of ornamental conifers are rather fragile. You need to work with them carefully, trying not to damage. It is more convenient if, during transplantation, the seedling retains a small earthen clod, which will protect the rhizomes and accelerate acclimatization.
A video about thuja propagation by cuttings at home will help beginners understand the intricacies of the process and avoid mistakes that will delay the appearance of new evergreen shrubs on the site for a year.After transplanting into the ground, thuja receive the same care as their adult counterparts. But it is necessary to monitor the cleanliness of the soil under the plants especially carefully, otherwise the weeds can "strangle" small shrubs.
Wick rooting of thuja cuttings - video
Thuja is an evergreen tree from the cypress family, which is very often used to decorate parks and home gardens.
Breeding thuja is a difficult task that requires a lot of time and diligence.
You can grow thuja from a seed, but at home it is best to grow thuja vegetatively, that is, cuttings from a twig.
Seed propagation is used much less often, since only 10% out of 100 are able to preserve the characteristics of the variety in young plants. In addition, shrubs derived from seed develop more slowly than plants obtained by cuttings.
Cutting processing
 To breed thuja with cuttings, you will need the following materials:
- thuja twigs;
- pots or boxes;
- cans of water;
- priming;
- pebbles;
- sand;
- fertilizers;
- sackcloth;
- polyethylene;
- wire.
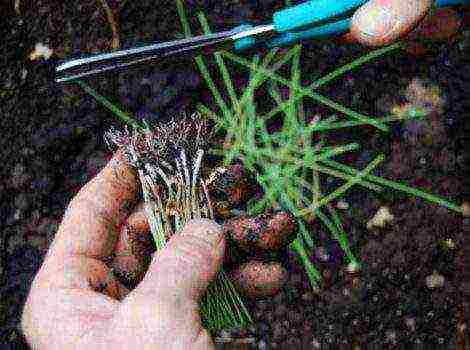
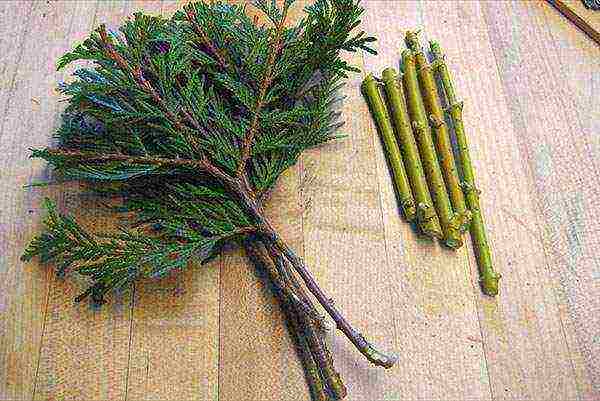
It is necessary to cut cuttings from thuja in the spring, in March or April, after the winter cold. The location of the shoot that you will cut is also important.
The lateral branches of the thuja (which grow horizontally) at the age of 7 years root much better than the branches from the top, which practically do not take root.
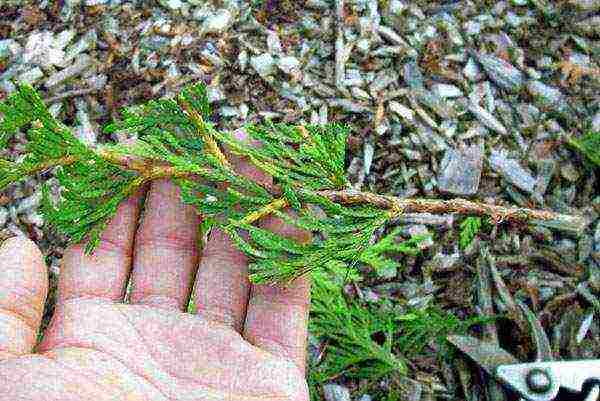
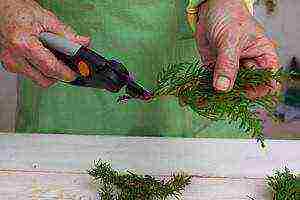
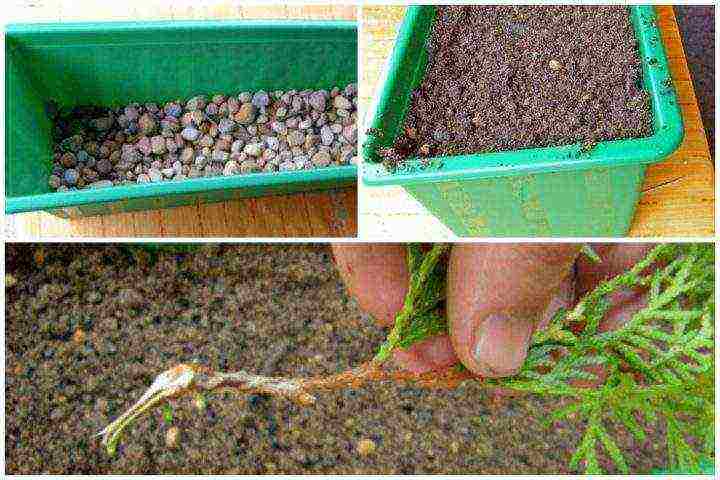
The branches to be cut should be at least 12 centimeters long, and their diameter should be up to one centimeter. Next, you need to make a cut at an angle of 45 degrees, several cuts - to speed up the formation of roots - and scrape off the bark at the base of each cut.
The needles must be left only at the end of the twig, and the rest must be removed. The resulting cuttings must be placed in a jar with water or a mixture of root stimulants so that they do not dry out. Cuttings in this way must be kept for 12 hours before planting in the ground.
Expert advice: young side shoots often do not exceed 15 centimeters in length, so they can be used for cuttings without dividing into several parts.
Primary landing
 Thuja is a very whimsical plant, and ordinary soil does not suit it.
In order for the planting of cuttings to be successful and the plants to take root, the soil must be high in coarse sand, peat and turf.
At the bottom of the pot, in which the cuttings will be planted, small pebbles are placed, which are sprinkled with a thin layer of river sand.
The soil needs to be compacted a little, but not too much, so as not to get hard, non-breathable soil. For young roots, it is the soft soil that is favorable.
Specialist's note: thuja loves humidity, therefore, before starting cuttings, the humidity in the room in which the seedlings will be located must be increased to 75%.
You also need to take care of a sufficient amount of light. In addition, it is also not necessary to completely fill the pot with soil, leave 5 centimeters empty.
Depressions are made with wooden sticks in the ground. Try to place the holes at a distance of at least 3 centimeters from each other and leave at least 10 centimeters between the rows and indents from the edges of the pot.
Before planting the cutting, after taking it out of the water, shake it with a branch to get rid of excess moisture. Gently lower the stalk into the hole at an angle of 40-45 degrees, immerse it in the ground two to three centimeters and sprinkle it with earth on top, tamping it around the leg, and then water it properly.
 Next, you need wire and polyethylene. The wire is needed to support the plastic bags that cover the pot to create a greenhouse atmosphere.
It bends in the form of an elongated horseshoe and sticks into the ground with sharp antennae. Instead of wire, you can also use old hangers that are no longer needed in the household.
It is better to choose transparent bags and polyethylene so that young shoots have enough light. The resulting greenhouse must be covered with burlap.
You need to water the seedlings daily so that the earth does not dry out and the cuttings can take root. But at the same time, try not to flood the plants. And so that the process of decay does not begin in a warm and humid room, it must also be ventilated every day.
Perhaps you will also be interested in the article about representatives
thuja folded
.
Read an informative article about the thuja of the eastern Aurea Nana here.
Open ground transplant
 In autumn, when the cuttings not only successfully took root, but also gave in growth, the greenhouses must be opened, the plants must be covered with spruce branches, sawdust or leaves, and so leave the young thuja for the winter.
With the arrival of spring, the shelters are removed and standard spring care is carried out: all weeds are removed, and the thuja are fertilized.
You can also carry out potassium permanganate - pour a manganese solution with a saturated raspberry color to get rid of pests. Then you can start transplanting - by this time, a year should have passed since the start of breeding.
Loamy fertile soils are perfect for thuja's permanent residence. During the first wintering, thuja should be wrapped in spruce branches or leaves. In such a simple way, you can grow a thuja from a cutting, and it does not matter what you choose: a spherical variety of thuja or the most common one - western.
Watch a video in which a specialist explains in detail how to properly reproduce thuja by cuttings:
Rate the article:
(1 vote, average: 5 out of 5)

Thuja propagation by cuttings in autumn or spring is considered the most convenient and effective way. The main advantage of this method is the ability to preserve the varietal qualities of the plant and obtain small full-fledged trees in just 2 or 3 years. Of course, growing thuja from cuttings also has its drawbacks. This plant cannot be called hardy, therefore the survival rate of seedlings is not too high. But other methods of breeding thuja also have their drawbacks.
How to choose branches for grafting?
To grow thuja from a twig, you need to select the right material. It should be remembered that it is best to use cuttings from actively growing young thujas at the age of 4-9 years, since over the years the ability of cut branches to form a root system decreases. It is interesting that twigs from cultivated specimens take root better at home.
You can cut the plant at different times of the year. If this is done in the spring, then you need to start immediately after the snow melts, but even before the buds awaken, that is, if we take the climatic conditions of the Middle Lane, then this is approximately the end of March or mid-April. Summer cuttings are also possible, but in June this is rarely done, usually experts recommend postponing the procedure until August, when woody shoots can already be germinated. When cuttings are cut in spring, the roots are formed rather quickly, within three months. But during autumn work until the end of the year, only characteristic growths may appear, and rooting will occur only the next year.
It is believed that thuja twigs are best harvested in the fall, since at this time of the year the movement of juices slows down and therefore there will be less number of seedlings dying from moisture deficiency. But on the other hand, rooting will be slower.
Preparing for landing
For collecting twigs, October is usually chosen. It is best to do this when the foliage has already fallen from deciduous trees. In addition, experts say that it is advisable to harvest branches not on a sunny, but on a cloudy day. It is recommended to carefully pinch off the shoots from the top. It is best to take those branches that have already turned 3-4 years old, but a layman by sight is unlikely to distinguish them. So in this case, it is better to select those that seem strong and healthy enough.
Experts believe that even for indoor thujas, the weather for the selection of cuttings is of fundamental importance. It is best to cut the branches in cloudy weather. In this case, lateral shoots are usually chosen, if we are talking about a pyramidal thuja, but if the tree is spherical, then this does not matter.
For further breeding, only lignified branches should be used, their length should be no more than 50 cm. But you should not take branches that are too small, since their rooting will take quite a long time. When choosing, you need to pay attention to the top of the future cutting. It should be green, and there may be yellowish areas underneath.
It is necessary to carefully examine such an escape. At its end, the so-called "tree heel" should be preserved - this is a piece of bark, which becomes the basis for the development of new roots. The larger and longer it looks, the better for rooted plants. Before proceeding to the next step, you need to remove the leaf plates at a height of about 3-4 cm from the end of the shoot.
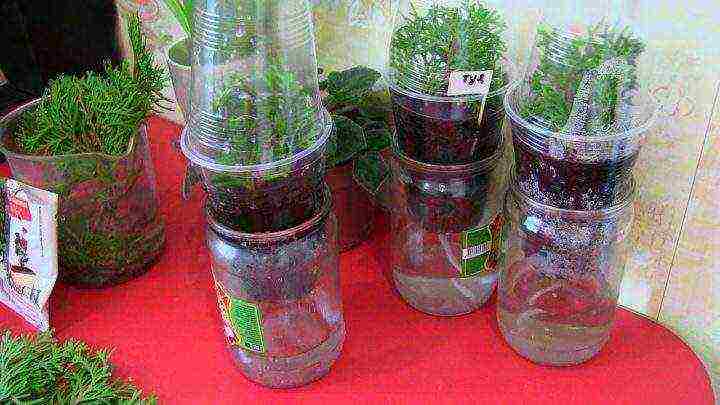
Can cuttings be grown in water?
Some gardeners believe that the easiest answer to the question of how to propagate thuja is to grow them in a jar of water. They claim that this is the fastest way to revitalize the plant's roots.
Before growing thuja by grafting, you need to prepare planting material. To do this, you need to cut off the long tail of the woody "heel" with a sharp knife, on which the bark is still preserved. Only the relatively small lower parts of the shoot are cleaned with pruning shears - up to 3.5-5 cm so that there are no random needles left on it, then the end of the branch is lowered into water and into the root-forming powder.
Growing thuja cuttings in water and using a wick structure
To do this, you need to take a small container, fill it with water, then set the shoots so that the water covers their ends by about 2 cm. There should not be more than 3-5 cuttings in a jar or other container, so that they are not too crowded.
With such cultivation, in no case should the rooted cuttings begin to rot. Therefore, it is necessary to control that their green parts do not come into contact with water. This is exactly what causes the planting material to rot. To make the plant feel comfortable, the container must be rearranged in a bright place, where it will be cool, but not cold.
The most important thing in caring for such seedlings is to change their water in a timely manner, without waiting until it becomes cloudy. At this time, the cuttings must be removed from the container, and the roots must be wrapped with a clean, damp cloth. The water is pre-disinfected; this requires only a couple of crystals of potassium permanganate.
At the same time, you need to make a vertical hole in the ground with a peg. Its depth should be about 30-40 mm. The holes are made as many as there are cuttings. The distance between them should be at least 60-80 mm. As soon as the cuttings have roots, they can be transplanted into a prepared container.
Growing cuttings in the substrate
You can grow thuja cuttings in different ways. One of the easiest options is to use substrates. The fact is that the above-described method using water has one significant drawback - in its pure form, the liquid does not contain any nutrients, unlike the substrate.
Before rooting thuja, you need to prepare boxes for seedlings and make sure that holes are made in them for aerating the soil. There must be a drainage hole and a layer of fine gravel at the bottom. As a soil, either ready-made store-bought formulations or a home-made mixture of deciduous humus and peat are used, and all components are taken in equal proportions. The resulting soil must be disinfected, and for this it is necessary to calcine it in the oven.If there is potassium permanganate in the house, a fairly strong dark solution can be made (the color indicates a high content of the active substance in the water).
Pre-cuttings must be placed in water for 10-12 hours. The biostimulating drug "Kornevin" is added to the liquid before this. If a person is interested in how to grow thuja in this way, he must prepare in advance everything necessary, including sufficiently spacious, but not too large containers, which are filled with a substrate. The indentations for the cuttings are made according to the above scheme. The seedlings are deepened by 1.5-2 cm and sprinkled with sand on top. It also needs to be pre-calcined.
Then the containers with seedlings are covered with plastic wrap and left where it will be light enough, but without direct sunlight. The air temperature should be within + 18 ... + 22 ° C. When condensation appears on the film, it can be opened for ventilation. It is very important not to overdo it with watering, but the soil should not be allowed to dry out either. Moistening is carried out exclusively from a spray bottle, since a more powerful jet of water can press down on the soil and expose the "heel" necessary for the development of a full-fledged seedling.
Growing cuttings in sphagnum
Cuttings can also be grown in a sphagnum environment, that is, peat moss. In this case, the procedure involves the formation of a kind of cocoon from clean cloth and moist moss, therefore this method is sometimes called reproduction in diapers.
At the initial stage, cultivation by cuttings in sphagnum resembles cultivation in ordinary soil. In the same way, the branches must be properly prepared and held in water with a root formation stimulant for about 10-12 hours. But sphagnum needs additional processing. It needs to be poured with boiled water for about 3 hours so that it is properly saturated with moisture. A fairly wide piece of fabric is laid out on the table, mentally this width is divided in half, wet moss is placed along the entire length on one of the halves. The second strip remains free so that later you can cover the moss and cuttings with it.
Tui in the second year after disembarkation
Thuja twigs are laid out on sphagnum at a certain distance from each other so that their heels are surrounded by moss. Then the cuttings are covered with the bottom of the strip so that the green tops are free. After that, the fabric is rolled up. A bundle comes out, which must be laid inside a plastic bag. Then it is hung in a well-lit place, but so that direct sunlight does not fall on it.
It is even easier to grow stewed cuttings in sphagnum than in soil, since the moss allows you to maintain the desired moisture level for a long time. If, nevertheless, there is not enough moisture, this can be easily determined by the fact that condensation will not collect on the inner walls of the bag and they will become dry. In this case, humidification from a spray bottle is necessary.
Benefits of the vegetative method
Although propagation by seed allows for more hardy specimens, growing from cuttings has many advantages. Firstly, this is the only way to preserve the specific appearance of the plant. When propagated by seeds, this is not always possible.
Secondly, the seeds of thuja, like the seeds of other conifers, need stratification, that is, a procedure in which natural conditions are imitated for them in order to ensure germination. In this case, it is a procedure in which cold and humidity are created at the same time. As a result, you can get quite hardy trees. But this process takes a very long time. To get seedlings suitable for planting, you will need to wait an average of 6 years. Propagation by cuttings can significantly reduce this time. With this method of growing, you can get a plant suitable for planting in open ground in literally 2-3 years.