Content
- 1 Before you start growing mushrooms
- 2 Premises
- 3 Substrate
- 4 Mycelium
- 5 Champignon plantation care
- 6 Where can you grow mushrooms
- 7 Substrate (soil mixture) for growing mushrooms at home
- 8 Planting mycelium (mycelium)
- 9 How to care for mushrooms
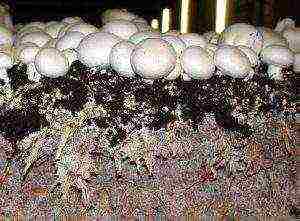
- 10 How to collect champignons
- 11 How to choose a place to grow
- 12 The basis for growing oyster mushrooms
- 13 Mycelium selection
- 14 Purchasing quality mycelium
- 15 The main stages of breeding oyster mushrooms
- 16 Oyster mushroom diseases and pests. How to prevent and control
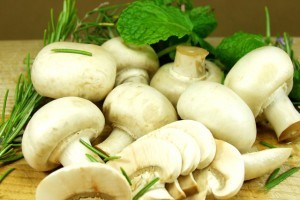
It will be about tasty, healthy, unpretentious mushrooms, how to grow oyster mushrooms at home, about all stages of this process. After all, we all eat mushrooms with pleasure, we love to wander through the forest, collecting them, but if there are suitable conditions, interest, a great desire, then it is quite possible to grow mushrooms ourselves. It is worth noting the amazing adaptability of oyster mushrooms: they can grow on stumps, on tyrsa (sawdust), even on paper. They don't need soil. They are characterized by fast fruiting - 1-1.5 months.
Choosing a room and preparing a substrate

To grow oyster mushrooms, it is necessary to equip a non-residential place in advance. For these purposes, basements, garages (in which there are no cars), cellars, sheds or rooms specially equipped for these purposes are excellent. Before starting any preparatory work, it is necessary to decontaminate the place where we will grow oyster mushrooms.
A lime solution (4%) will do this well. Floor, walls, ceiling - all available surfaces must be thoroughly disinfected, and then the room must be closed for a couple of days. After the specified time has elapsed, you need to open the doors wide open and thoroughly ventilate this place until the smell of lime completely disappears.
The technology of growing oyster mushrooms at home implies the choice of the material most suitable for these purposes. The substrate creates optimal conditions for growth: it can be wood chips, corn stalks, buckwheat or sunflower husks, and cereal stalks. Large fragments of the substrate on which we will grow oyster mushrooms should be finely chopped.

Any material you choose needs processing - pasteurization:
- Fill the substrate with warm water, not hotter +23 .. + 25 ° С, holding time - 20-30 minutes. At the same time, stir the mixture in a container, as if washing it from dirt.
- We drain the dirty water, squeeze out the material and re-fill it with hot water (+80 .. + 90 ° С) and press it down with a heavy object (under oppression). We leave the substrate like this for 6-7 hours, after which we drain the water and finally squeeze it out.
- To increase the productivity of the material and subsequent fruiting, it is necessary to saturate the substrate with active elements. Superphosphate, gypsum, limestone and urea are taken in a proportion of 0.5%: 2%: 2%: 0.5%.
- During the "fertilization" of the substrate with additives, its moisture content should be about 70% - this will allow the chemical elements to stay inside the mixture, not to leak out with water.
After the room is prepared and disinfected, and the substrate is pasteurized, it is the turn of laying the mycelium into the mixture. You can buy oyster mushroom mycelium in the mycological laboratory. You can choose the best quality product from the wide selection of commercial varieties of mushrooms. Specialized online stores are also at your service.
Pre-calculate the volumes - for sowing a 10-kilogram block, you will need 200-250 g of oyster mushroom mycelium (if it is of imported origin) or 100 g more if the raw material is domestic.
↑ to the table of contents ↑ How to grow oyster mushrooms at home step by step
The mycelium is added to the substrate at the rate of 300-500 g per 10 kg of the mixture. In this case, it is necessary to ensure that the temperature of the material at the time of adding the mycelium does not exceed + 30 ° C (so as not to ruin the raw material).
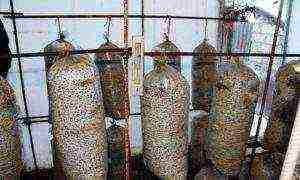
This is followed by the preparation of bags for laying the mixture and oyster mushroom mycelium. For these purposes, it is very convenient to use dense plastic bags and bags. Sizes 40 × 60 cm and 50 × 100 cm are the most optimal. We lay out the resulting composition in bags and carefully twist them, while there should be no air inside.

We make holes in the blocks with a knife. The incisions should be located arbitrarily - at a distance of 10-15 cm from one another. After the performed manipulations, the bags are stacked on top of each other (2-4 pieces each) or suspended on special hooks pre-installed in the ceiling or walls. There should be a distance between the bags to ensure comfortable air circulation.
Also, for growing oyster mushrooms, it is very convenient to use special wooden stakes on a stable basis - blocks with a substrate are simply strung on them in several pieces.
Growing oyster mushrooms at home in bags involves maintaining a certain temperature and light conditions. Thus, for full germination, mushrooms require a temperature level of about +18 .. + 24 ° С along with high humidity (90-95%).

Sometimes, for additional humidification, buckets of water are placed between the rows of bags, and the necessary air exchange is maintained with the help of fans. Ventilation is important in this case - the excessive release of carbon dioxide inhibits the growth of oyster mushrooms. No light is needed during the incubation period. Make sure that flies do not enter the room at all stages of growing and fruiting.
Growing oyster mushrooms at home includes an incubation period of approximately 14-17 days.
In the first days, the temperature inside the blocks rises, make sure that it does not exceed the level of + 30 ° С. If the temperature is about to reach a critical point, direct the running fan towards the bags. As mentioned above, such an indicator (elevated temperature) is detrimental to the mycelium. At the end of the incubation period, the blocks are covered with a white bloom - this is the beginning of germination of oyster mushrooms.
Growing at this stage involves maintaining certain conditions indoors:
- humidity of air - at least 80%, and preferably up to 90-95%;
- air temperature at the level of +12 .. + 17 ° С;
- the required 8-hour lighting is 100-170 lux (as on a cloudy day), ordinary day lamps will do;
- frequent ventilation.
It is possible to maintain humidity by sprinkling the walls and floor with a spray bottle, but the water should not get onto the blocks. This fruiting period lasts about 2 weeks; by the end of the term, the caps of the oyster mushrooms become quite large.
It's harvest time. In this case, you do not need to cut off the myceliums with a knife, but carefully twist them out of the bag with the substrate. After the first removal of the oyster mushroom, you should thoroughly ventilate the room and wait for the second round of fruiting.
The first harvest is the largest, the second is slightly smaller, the third is less than the second - that is, the yield waves follow each other in decreasing order.
The rest period between the "waves" is 8-10 days, and the "waves" themselves can be 4 or even 6.
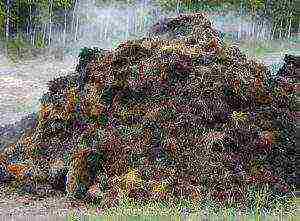
The substrate, which has already served its term, becomes an excellent fertilizer for summer cottages.
↑ to the content ↑ How to grow oyster mushrooms at home on stumps
An excellent option for owners of summer cottages is the method of growing oyster mushrooms on stumps - this method does not require excessive efforts. For these purposes, it is better to choose freshly cut hemp, but you can also prepare it in advance. They should be placed in shaded areas where there is no access to sunlight, for example, under spreading tree crowns or under vineyards.
Stumps need to be soaked in water and kept for about 3-4 days, older specimens - a week. Then, using a drill (20-25 mm), you need to drill 8-10 holes 7-10 cm deep. These recesses are then filled with oyster mushroom mycelium, the top is covered with clay or clogged with moss.

The stumps must be constantly wet, for this they can be covered with cling film and placed in the basement for a month and a half. When the stumps are overgrown with mycelium (in appearance something like a white film), they can be taken out into the air, placed in shady places.
Studying the possibilities and options for ways to grow oyster mushroom at home, it should be recognized that this method does not require excessive efforts, it is ideal for the owners of summer cottages.
Important information - a prerequisite is the use of respirators and protective masks when working with mycelium, as well as during fruiting! If it enters the respiratory tract, fungal spores can seriously harm your health.
This will require commitment and patience from you. Mushroom growing is truly a fun and rewarding activity. The topic of how to grow oyster mushrooms at home finds more and more fans among summer residents and enthusiastic gardeners. In addition to the presence of this tasty and rich product on the dinner table, the cultivation of oyster mushrooms is an interesting and profitable business. Try and grow oyster mushroom at home - a rich harvest for six months will undoubtedly please you.
Growing mushrooms in a private household, in dachas and even in apartments is becoming fashionable today. Firstly, in the store, mushroom products are not sold at a low price. Secondly, the homemade mushroom, grown without the use of unknown chemicals, is environmentally friendly and safe for consumption. Thirdly, mushroom growing can be made a profitable business, or at least a good source of additional income. Fourthly, it is a very interesting and exciting hobby. Take a substrate, put mycelium in it, create conditions. And it starts to grow like mushrooms.
Growing champignons at home for beginners
Before you start growing mushrooms
You need to think well and weigh your desire and capabilities on two scales. If they are at about the same level, it is worth the risk. Information for beginners: growing mushrooms at home is a more laborious process than growing oyster mushrooms. But less long-term and more effective than growing porcini mushrooms.
It will take certain costs for the purchase of materials, arrangement of the premises, as well as patience and certain skills. Provided that you already have a suitable room and you only need to create favorable conditions in it.
Premises
It should be moderately cool, such as a cellar or basement. If neither one nor the other is not present, it is difficult to advise anything. Perhaps a garage or greenhouse will do (during the cold season). In spring and early summer, before the onset of extreme heat, mushrooms can be grown without a room at all. The main thing is that the air temperature is not higher than + 20 ° С. Indoors, in the case of year-round cultivation, the temperature should be constantly maintained in the range of + 12 ° С ... 18 ° С, and the humidity should be in the range of 65-85%.
Premises for growing mushrooms
Substrate
The most important item on the list of prerequisites for the successful cultivation of mushrooms is the substrate (or, as it is also called for its composition, compost).The following composition is generally recognized as a fruitful compost option.
- Horse or cow dung (or pork or bird droppings, which can be taken, but not desirable).
- Straw.
- Urea.
- Superphosphate.
- Gypsum.
- A piece of chalk.
- Alabaster flour.
Substrate for growing mushrooms
Table. The proportions of the components for making compost from mullein or horse manure.
Table. The proportions of the components for the composting of poultry manure.
By the way! To cover a one square meter area with mushroom compost, you need compost made from 40 kg of straw base (the rest of the components, according to proportions).
Video - How to disinfect mushroom substrate
How to prepare compost
It is better to carry out this procedure in the air or, in extreme cases, in a regularly ventilated area. As the compost matures in a heap, where the straw is layered with manure and watered with water, the heat can rise to + 70˚C. There is an intensive release of carbon dioxide, water and ammonia vapors into the atmosphere. Of course, a person should not breathe this mixture for a long time.
It is good to place the compost place in the sun (the higher the temperature inside this “puff cake”, the faster and better the compost will ripen). But it is worth providing shelter from rains, since heavy rain can wash out all the useful components necessary for the growth of future mushrooms from the compost.
Compost pit for preparing the substrate
Advice! If it is not possible to protect the compost heap with a canopy from atmospheric precipitation, cover it with roofing material or a thick film before the rain. Be sure to lift the film from the sides, leaving the sides open.
The straw for the substrate must be fresh, dry, free from mold and other defects. Before starting laying, the straw is soaked in a large tank of water for a day. If there is no such reservoir, spread the straw on polyethylene and water it abundantly several times a day, preventing it from drying out.
Laying the compost heap
Straw and manure prepared in this way begin to be laid in layers.
The first layer is straw. Then - manure or droppings.
Each layer of straw is sprinkled with ammonium nitrate, urea in the proportions indicated in the table.
Each layer of straw is watered abundantly with water.
In total, there should be at least 3-4 layers of straw and, accordingly, the same amount of manure.
You need to finish the laying with straw.
Water once again to keep the moisture content of the compost heap constant.
The heap must be at least one meter high. The length and width are arbitrary.
Preparing compost for cultivation
champignons
For a week, the multi-layered structure is basking in the sun. Then comes the moment of the first shaking up. The procedure is carried out with a pitchfork. Shaking up a compost heap is not easy. But they cannot be neglected, since for the speedy composting inside it is necessary to provide oxygen access.
During the first shaking, plaster of Paris is added. It will improve the structure of the compost.
The second shaking is carried out without waiting for the next week, 3-4 days after the first. This time superphosphate and chalk are added.
Important! If the pile is slightly dry in the sun, it is watered abundantly with water. It is impossible to dry out the compost, its formation will stop.
The third and fourth shaking is carried out in four consecutive days. After three weeks, the compost heap will lose its strong ammonia smell and will turn into a pleasant chocolate color. The straw in the compost will become soft and tear with your fingers.
Ready-made compost for growing mushrooms
High-quality compost substrate, completely ready to use, does not stick to the palm, bounces in the fist when squeezed, leaves a wet, but not dirty mark on the skin.
Advice! If you overmoisten the pile, and moisture literally flows out of the compost during compression, it should be decomposed to dry (but not dry, but only reduce the humidity to 60%), adding half the rate of chalk.
The finished substrate is filled with racks, boxes or other containers where mushrooms will be grown. The temperature of the substrate must be lowered before the introduction of the mycelium.
Germination composting process
Preparation of the substrate for further planting of the mycelium
If you plan to grow mushrooms in a room specially designated for this enterprise, for example, on the earthen floor of the cellar, the compost is poured directly onto the floor, in a layer of 70 cm, forming beds with an area of ½ m² or 75x75 cm.
- If in the basement you have equipped racks on which future mushroom crops will grow neatly, they must be equipped with bumpers, and then you can put the compost directly on the racks, with a layer of 45 cm.
- If cultivation is supposed to be in boxes that can be stacked in the same basement or cellar (no more than two meters stack height), because the mushrooms do not need light for development, the compost is poured into boxes. Backfill layer - 25 centimeters
- If you grow mushrooms in an open or greenhouse ground, the compost is rammed directly onto the surface of the ground, 25-30 cm high. The beginning of the laying is early spring, when the ground thaws. Sheds are made over the open ridge to protect from precipitation and sunlight that is too intense for shade-loving mushrooms.
- The compost is well compacted by hand, the surface is carefully leveled.
Racks for champignons
Mycelium
After the preparatory work, the most important moment comes - planting the mycelium. Mushroom mycelium can be planted at a soil temperature of no higher than + 28 ° C at a depth of 5 cm.Check the temperature with a thermometer. This is important because exceeding even two degrees will kill the mycelium.
The planting material for growing champignons, like other cultivated mushrooms, is a sterile mycelium, which is grown in special laboratories. Champignons for cultivation in culture are selected in two varieties:
- double-sided white;
- double-cornered brown.
Champignon mycelium
There are no significant differences in their taste and nutritional value. The only difference is in the color of the mushroom, according to the name, white or brown. Sell mycelium or mycelium in bags or jars. Packing is usually 1-2 kg. The mycelium of both varieties is grown in two ways - on manure and on cereals.
The first, dung mycelium, will be needed for planting 500 g per m² of area. Grain - not less than 100 g.
Planting mycelium
The dung mycelium is a fairly monolithic lump, which, before planting, must be divided by hand into small pieces, half a matchbox in size.
- The mycelium prepared in this way is laid out on a large tray in one layer. In the ground, a part of the upper layer is lifted with a wedge-shaped peg so that a piece of mycelium can be laid there.
- Planting is staggered with a cell distance of 20 cm.
- Part of the mycelium is covered with a substrate, no more than 3 cm thick.
Compost overgrown with mushroom mycelium
Grain mycelium is a common grain on which the spores of the fungus are planted. It is sown in the same way as you would sow any cereal.
- The top layer of compost, 3 cm wide, is removed from the ridge or box.
- On the surface, "mushroom grains" are randomly scattered.
- The compost is poured back and slightly pressed down so that there is no void between it and the grains.
Grain mushroom mycelium
By the way! Wild mushroom mycelium is also suitable for growing homemade champignons. If you find a place where mushrooms grow, take a closer look at the soil. A land riddled with a web of whitish-gray mushroom spores is a good starting point for your mushroom plantation.
Champignon plantation care
After you have landed, the room temperature is kept high.This is a prerequisite - the germination of mycelium will not begin at below + 24 ° C and above + 26 ° C. At this time, at the initial phase of mycelium growth, do not expect immediate "shoots". Champignons are not vegetables. They grow deeper into the soil, gaining ground and forming the future harvest. At low temperatures, growth is insufficient, at high temperatures - weak formation of the fruiting body.
Rules for harvesting champignons at home
The moisture content of the compost must be constantly maintained in the range of 55-60%. As soon as it dries up, the mycelium "freezes" and stops growing. The compost is moistened superficially, from the sprayer, so that the water does not flood the mycelium, otherwise it will become moldy and die
It will take 12 days to grow deep into the mycelium. After that, the temperature in the room will definitely decrease. Either the heating is turned off, or the transoms and ventilation openings are opened - all methods are good to reduce the temperature to + 18 ° С… 20 ° С.
By this time, it is necessary to prepare the soil for backfill. The mycelium will grow upwards not on compost, but from nutrient soil of the following composition:
- sod land;
- loam;
- sandy loam;
- fine-structured peat soil.
Any of the listed structural types will work. The main thing is that the soil is not heavy. To add "airiness" and ensure the penetration of air to the spores of the fungus, the soil is sieved on a coarse sieve.
Agricultural practices and terms of their implementation when growing mushrooms
Before backfilling, the soil is moderately moistened. And cover them with a layer of compost 3-4 cm.
Further, caring for the mushrooms is simple.
Maintaining the temperature within the specified limits. - + 16 ° С ... 18 ° С, plus - minus two more permissible degrees.
Maintaining humidity in the range of 65-85% (air) and not higher than 60% - of the earth layer.
Daily intensive ventilation of the room to remove accumulated carbon dioxide.
You can collect the first homemade mushrooms from your own plantation already on the 35-40th day. One fruiting cycle lasts about two months.
Agricultural practices and terms of their implementation when growing mushrooms (continued)
Despite all the seeming difficulties and conventions, the cultivation process, starting from the moment the compost is prepared, takes no more than four months. For two months of fruiting, the crop can be harvested 6-7 times. From 5 to 10 kg of mushrooms are collected from a meter of a square ridge. The next crop ripens after 5 days.
Harvesting champignons
Important! Mushrooms must be collected at a stage when the film between the stem and the cap is not damaged and connects them tightly. Opened mushrooms with darkened (for white varieties) plates and damaged film, the remnants of which can only be seen on the stem, it is better not to eat
Champignons are not cut with a knife when they are collected. The mushrooms are twisted with a gentle movement of the hand. The holes formed after collection are sprinkled with soil and slightly moistened.
Video - Growing champignons at home (part 1)
Video - Growing champignons at home (part 2)
Video - Harvesting champignons
Cultivation of champignons as a business first developed in Europe, and a little later appeared in Russia.
Cultivation of champignon mushrooms can be done not only for commercial purposes, but also for yourself.
Knowing the principles of their cultivation, you can earn good money, quickly develop your own business and harvest a good harvest.
For growing mushrooms, not only production conditions, but also home conditions are suitable. You can plant mushroom mycelium (mycelium) in the country, in the garden, garden, garage or barn.
This article will tell you how to do this correctly.
Where can you grow mushrooms
 Growing mushrooms at home can be done in several ways. Each of them has its own characteristics and specifics:
- In the garden or in the garden. Cultivation of mushrooms in the open field, of course, will not give a high yield, but it is quite suitable for providing a family with mushrooms. This option involves sowing mushroom mycelium in compost. To do this, organic waste from the compost pit is laid in an even layer on the site selected for sowing mycelium. The mycelium itself is planted in early spring. Subsequent care for it consists in regular watering of the compost. The width of the beds with compost, prepared for planting the mushroom mycelium, should be up to 1.5 m. In order for the mushrooms to grow well, it is recommended to moisten the soil under them as it dries;
- In the basement... A good option would be to breed champignons in the basement. This room has a suitable microclimate, because the temperature and humidity level in it will change insignificantly (which is especially important for obtaining a high yield of mushrooms). However, this method also has its drawbacks. In particular, the basement must be well ventilated. The walls and ceiling in such a room must be concrete;
Recommendation! Before laying the mycelium in the basement, cover all surfaces (walls, floor, ceiling) with a layer of lime (this will help to avoid contamination of the mycelium with harmful bacteria).
- In the garage. The garage is another suitable place for growing a good harvest of champignons. It is equipped with durable hinged shelves. Compost is laid out on them in an even layer, into which they are then sown mushroom spores... Some artisans plant mushroom mycelium on the garage floor. (Read about how to build a garage from foam blocks in this article);
- In the greenhouse. Cultivation of mushrooms in a greenhouse is carried out according to the same principle as in the open field. The only difference is the need to create arcs under the greenhouse film and stretch the film itself;
- In bags. The method of growing mushrooms in bags received good reviews. One of the most convenient ways to pack mushroom mycelium is to place it in a plastic container. This does not require large material costs and specialized equipment. First, the substrate for planting the mushroom mycelium is prepared and kept for several days until it is completely burned out (decomposition of the mixture components). The prepared soil mixture is placed in bags and well rammed. Then spores of fungi are sown in it;
- Houses. You can get a large harvest of champignons at home if you choose the right place for planting mycelium. Breeding champignons inside the house is considered one of the suitable options. Champignons, like any other mushrooms, love shade and a lot of moisture. Instead of plastic bags, containers with a large number of holes over the entire surface can be used for laying the substrate and sowing spores. In them, the mycelium will develop well due to good ventilation and maintaining high humidity.
Substrate (soil mixture) for growing mushrooms at home
 The substrate for growing mushrooms is an artificially created soil mixture saturated with nutrients.
The preparation of the substrate (soil mixture) for growing mushrooms is the most crucial stage in all the work.
Most suitable for such mushrooms is a composition in which compost (prepared from straw with the addition of wheat seed) and horse manure are present.
If there is no horse manure, it is replaced with cow or bird droppings (and the last component is used with caution, since champignons do not tolerate it well).
It is recommended to prepare the substrate either in a room with good ventilation or outdoors.
The technology for creating a nutrient mixture for growing mushrooms is as follows:
- For 1 sq.m. of the area of the selected area, approximately 30 kg of straw is taken (less is impossible, since the process of its decomposition will proceed poorly) and 15 kg of manure (horse or cow).Straw for composting is chosen fresh, without signs of mold. For 2-4 days, it is recommended to moisten the straw with water (water it with a hose, or place it in a large container with water)
- Prepared straw and manure are placed alternately so as to form 3-4 layers of each component. Each layer of straw is additionally moistened with water and sprinkled with a thin layer (1 cm) of fertilizer (ammonium nitrate). The finished substrate should be about 1.2 m in length, and at least 1.5 m in height with width
- 7 days after the formation of the substrate, it is necessary to add 7 kg of gypsum, which helps to improve the structure of the mixture and mix all the layers of the substrate with a pitchfork
- 4 days after the first interruption (mixing), do the second. If the substrate is not wet enough, it is well watered with water, and 5 kg of crushed chalk and 2 kg of superphosphate fertilizer are added to it
- The third time, stirring is carried out 4 days after the second. The same time interval is maintained before the 4th mixing of the components
- Typically, the mushroom substrate is considered ready 3-4 weeks after formation. Its maturity is evidenced by the absence of ammonia odor, strong softening of the straw and the dark brown color of the mixture.
- If the mixture is oversaturated with moisture, it is recommended to scatter and dry it for 1-2 days, adding 1 kg of chalk to it. In general, it takes 20-22 days to prepare a high-quality substrate.
- The finished compost is stacked on racks or in special boxes at the rate of 100 kg per 1 sq. M. area.
If it is not possible to prepare a substrate for growing mushrooms at home, you can buy it ready-made in a special store.
In addition, at home you can make a soil mixture for growing mushrooms from other ingredients.
Ingredients such as straw, wheat, rye, nitrogen fertilizers, crushed corn cobs, rabbit (or bird) manure, household waste mix well with each other and are composted.
There are no exact proportions for the preparation of the substrate, everything will depend on the area of the room in which they plan to grow the mushrooms.
The only thing that must be done is to stir the mixture during the ripening (burnout) period every 3-4 days. The finished composition should not have a strong ammonia smell.
Planting mycelium (mycelium)
Sowing the mycelium (mycelium) of mushrooms is carried out in different ways, depending on the place chosen for planting.
For example, in bags for laying mycelium, special holes are made over the entire surface area. About 15 kg of compost is poured into the bags, and then the mycelium is planted.
Advice! When sowing mycelium, keep an eye on the temperature in the room (it should not exceed 25 ºC) and the humidity level (should be about 70%).
In order for the harvest of mushrooms to be large and good, only high-quality mycelium is selected for sowing. In mushroom growing, two types of mycelium are known:
- Compost, characterized by low productivity and low susceptibility to negative external influences. The consumption of the compost mycelium is 500 g per 1 sq. M.
- Grain - it is packed in plastic bags, consumption is 400 g per sq.m.
The mycelium is buried into the substrate by 5-7 cm, after which it is covered with a layer of substrate (about 10 cm thick) and the spores of the fungus are placed again.
Planting is recommended to be carried out in a checkerboard pattern, leaving about 20 cm between adjacent sections of the substrate. A week after planting, the mycelium will grow and its cobweb-like threads will already become noticeable in the substrate.
During this period, it is very important to maintain the optimum humidity level in the room where the mushrooms are grown. On the surface of the substrate, mycelium appears 2-3 weeks after planting.
About 5 days before this time, you need to prepare the casing layer. It can be crafted from chalk (1 part) and peat (9 parts).
If the mushrooms are grown in a room that is too damp, it is advisable to prepare the casing layer from a mixture of sand (1 part) and loam (2 parts).
It is introduced on top of a layer of substrate with sprouted mycelium, keeping to a thickness of 3-5 cm (about 4 buckets per 1 sq.m. of substrate area).
4 days after applying the casing layer, it is necessary to slightly adjust the temperature in the room where the mushrooms grow. A good harvest of mushrooms will be obtained if they grow at a temperature of 14-17 ºC.
How to care for mushrooms
 Caring for the planted champignons requires regular watering of the substrate and maintaining optimal humidity and temperature in the room.
It is recommended to water the substrate at least 10 days after laying the casing layer. For watering, it is recommended to use a watering can of small height, supplying water from it in small droplets.
In general, this procedure must be performed carefully and carefully, since water should remain in the upper, covering layer of the substrate, and in no case should it penetrate into the compost (otherwise the mycelium will rot and quickly disappear).
The humidity in the room where the mushrooms grow should be kept at the level of 75-80%. To achieve such indicators, special shelves are equipped there and several basins of water are installed on them.
For mushrooms, a high concentration of carbon dioxide will be destructive, so the room must be ventilated at least once a day.
At home, you can grow not only mushrooms, but also other plants.
How to grow a lemon from a seed?
You will find out the answer to this question by reading this article.
And here is an article about growing dill on a windowsill.
How to collect mushrooms
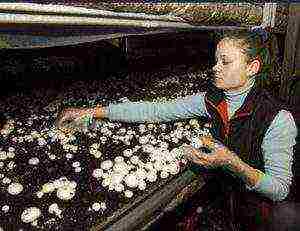 Active fruiting of mushrooms can last from 2 to 4 months, and the whole process is uneven.
The active growth of mushrooms continues for 3-4 days (the first harvest will appear 30-35 days after sowing the mycelium), then a week of calm, and after it the yield peak again.
Most of the total harvest can be harvested in the first three waves of active growth of mushrooms (there can be up to seven such waves in total).
You can determine the maturity of the mushrooms by the film connecting the stem of the fruit and its cap (it should darken, but not yet be torn).
Ripe champignons are harvested very carefully so as not to damage the rudiments of fruit bodies located nearby. To do this, you need to grab the leg of the mushroom with your fingers and, carefully turning the fruit, remove it from the substrate.
This should also be done very carefully so as not to damage the mycelium, on which the further mushroom harvest depends.
When the entire crop of mushrooms is harvested, the spent compost is removed, and the room must be treated with a solution of bleach (4%) to kill microbes.
You can learn more about the features of growing champignons at home from this video:
Rate the article
Every year more and more people want to grow various crops at home. Thus, vegetables, fruits, herbs receive quality care and are considered completely organic. The use of chemicals and fertilizers is kept to a minimum.
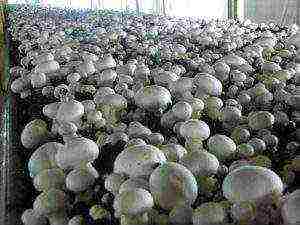
Mushroom growing is also popular now and this activity does not require large expenses, and the room can even be the smallest to get a large number of mushrooms.
The leader among home cultivation can be considered the Royal oyster mushroom. But you need to find out how to grow oyster mushrooms at home. After all, there is a special technology that should be followed.
How to choose a place to grow
It is very important to decide on the room where the oyster mushrooms will be grown. For effective cultivation of mushrooms, including oyster mushrooms or champignons, high-quality air circulation is needed.
Another key indicator is humidity, which should be at 50% or more. Often, experts grow oyster mushrooms in a basement, shed, or in an ordinary greenhouse.Here, mushroom blocks will not interfere with anyone, and the harvest will grow calmly.

However, for growing such unpretentious mushrooms as oyster mushrooms, any room that has the following conditions can be suitable:
- high air humidity - about 70%;
- be sure to observe complete darkness for the first 20 days;
- the use of artificial light - as soon as the oyster mushrooms in bags form the first rudiments, you need to use additional lighting, about 8 hours a day;
- compliance with the temperature regime. Indicators should be at the level of +20 - 30 degrees;
- high-quality ventilation. Airing is very important for the quality of the mushroom harvest.
The most common mistake when growing oyster mushrooms on your own is poor choice of where to grow. If the technology for growing oyster mushrooms is violated, then the harvest may not be at all.
Basis for growing oyster mushrooms
Before starting to grow oyster mushrooms at home, you need to thoroughly study all the requirements for the substrate, because it is that nutrient medium for mushrooms, and the yield will depend on it. It is important not to make mistakes so that the cultivation of oyster mushrooms is crowned with success.
It is worth saying that there is another method of growing oyster mushroom - when a special base is not needed, and the mushrooms grow on stumps or trees. But about this you need to find out more detailed information and use the secrets of specialists.
Mycelium selection
Growing oyster mushrooms at home for a beginner is already considered quite difficult, you do not need to make common mistakes and not buy mycelium from your hands. It is better to go to specialized stores where you can choose the best option. Beginners can choose mycelium that has been used industrially for about 1 year.
And there is a certain secret in this, because the industrial technology of growing mushrooms does not imply the use of mycelium for more than 1 year. But, during this period, the mixture does not fully develop its resource, and continues to bear fruit well. Such mycelium usually gives a large and high-quality harvest, and the price for it is much lower.

First, you need to select the correct amount of mycelium for growing. If you buy a mycelium for a summer cottage where the mushrooms will grow well, keep in mind that with 1 kg of mycelium, about 3 kg of mushrooms are obtained. But how many mushrooms grow remains to be seen.
Purchasing quality mycelium
When buying mycelium in a store, you need to use the following selection rules that will help not only a beginner, but also an experienced mushroom grower:
- if you are not sure of the quality of the purchased mycelium, you need to take several small batches from different manufacturers or stores;
- at the time of purchase, you need to study the data on the variety and strain, productivity, resistance to various diseases and pests. And also be sure to familiarize yourself with the timing of saving the crop;
- familiarize yourself with the conditions under which the mycelium is preserved. The optimum temperature should be +20 ° C. Be careful not to be sold overheated material;
- mycelium should not have a pronounced ammonia smell, should not be covered with black or green spots. This will mean that it is of poor quality. A healthy mycelium color that is ideal for growing is a bright orange.
The main stages of breeding oyster mushrooms
If you disassemble the process step by step, it includes the following stages:
- Preparation and processing of the substrate. A substrate can be called a nutrient medium for germination of fungi, in other words, it is soil. Sunflower husks, straw, buckwheat husks can be used as raw materials. The main condition for cooking is the use of pure material. The substrate must be pre-crushed. This is necessary in order to avoid the ingress of microorganisms and foreign particles into it, which can affect the harvest. For this, the substrate is treated with steam.The process itself is that the substrate (about 10 kg) is placed in a special container and heated. It takes about 2 hours to cook the substrate. Then you need to drain the water and cool the substrate to a temperature of 25 ° C.
The most popular processing of the substrate today can be considered xerothermal technology. The essence of this process is that the substrate is heated with steam to 100 ° C and kept for a certain amount of time (1.5 hours if it is straw). After the end of the process, the substrate is moistened with water. - Formation of mushroom blocks. Mushroom blocks look like large polyethylene bags 350x800 mm in size, which are filled with a substrate. To form them, it is necessary to place the substrate and mycelium in layers in pre-steamed bags, alternating them constantly with each other. The top layer should be a substrate. After the bags are filled, they need to be tied. Next, you need to make small holes (1-2 mm) in the bag, leaving a distance of 10 cm between them.
- Correct seedling care. After the mushroom blocks have been formed, the incubation period begins (the period when oyster mushrooms ripen). At this stage, it is important to create the best conditions for the mushrooms. It is important to monitor the temperature regime in the bags (the optimum temperature will be + 20 ° C). In addition, the room must be regularly ventilated. The incubation period lasts 2-3 weeks, after which the mycelium, which has grown to be transferred to another room, in order for the growing process to take place.
- Fruiting. Mushrooms begin to bear fruit on the 7-10th day, after the mycelium has been transferred to a new room. At this time, the first rudiments of fungi begin to appear. This stage also requires an increase in air humidity up to 100%. For this, the floor and walls of the room must be sprayed with water. Airing during this period should be carried out even more often. Also, mushrooms need lighting for up to 10 hours a day. Such lighting can be purchased at a specialized store or you can use ordinary fluorescent lamps.
- Harvesting. It is generally accepted that the correct harvest is the twisting of oyster mushrooms from the substrate. This is due to the fact that during pruning with a knife, various microorganisms can enter the mycelium, which will affect further growth.
It should also be remembered that you need to harvest in whole groups, so the oyster mushroom will not lose its qualities and will last longer.
In one room, you can carry out 4-5 rotations (continuous cultivation) per year. Important! After the harvest has been collected, the room must be thoroughly washed with water, disinfected and thoroughly ventilated.
Oyster mushroom diseases and pests. How to prevent and control
There are times when mushrooms get sick during the fruiting period. There are many reasons. If disinfection was carried out in the room, diseases should not affect the crop. As a rule, bacteria enter along with wet and rotten straw. This causes various fungal diseases of the substrate.

Important! To prevent disease, the substrate must be thermally treated before the mycelium is planted. To do this, place it in a large container and pour boiling water over it, then cook for 2 hours, then squeeze and dry.
You can often find such a disease as dark rot. If you see this, you need to remove all diseased plants along with the substrate. Very often oyster mushrooms are attacked by mushroom flies, less often by ticks. Parasites are also born in the mycelium due to excessive humidity and lack of ventilation. The disease appears as light spots.
Such mushrooms need to be removed and the room disinfected. You can do this with the help of smoke, which can be bought in the store, it is left for a day in a closed room, after which you need to do high-quality ventilation.
If at least one of the myceliums is infected, you need to throw away the entire bag, and this reduces the amount of harvest.
Based on the foregoing, one can understand that it is very simple to grow oyster mushrooms at home, but quite laborious. Equipment, quality materials, lighting and a special room are needed. But proper care makes it possible to collect up to 9 kg of mushrooms.
For more information on growing, see here:


