Content
- 1 Growing pea seedlings
- 2 Plant care
- 3 Reviews about growing peas at home
- 4 The basics of growing peas
- 5 Planting peas
- 6 Plant care
- 7 Plant diseases
- 8 Growing peas at home
- 9 Green peas: growing secrets
- 10 Peas: how to grow by seeds
- 11 Tricks of growing peas on a windowsill
- 12 Care of planted peas
- 13 Peas: how to grow greens
- 14 How to grow peas outdoors
- 15 We grow peas at home
Peas are a wonderful plant that can be successfully grown not only in the open field, but also at home. To provide peas with a favorable environment and get a high-quality result, you need to familiarize yourself with the basic rules for growing seedlings of this crop and further agricultural technology.
Growing pea seedlings
For growing peas at home, it is better to choose sugar varieties. These include:
- Ambrosia,
- Zhegalova 112,
- Sugar Oregon
- Children's sugar,
- Oscar.
Preparing beans for sowing
To get healthy seedlings, it is necessary to carry out procedures such as:
- calibration,
- soak,
- germination of seed.
For all pre-sowing activities and irrigation, only warm soft water is suitable - melt, rain, boiled or settled for at least a day.
Calibration
Go through the beans and remove from them those that have obvious defects (darkening, holes, etc.). Place the remaining specimens in a salt solution (for its preparation, dilute 1 tablespoon of salt in 1 liter of water) and mix. The spoiled beans will float, the good ones will sink to the bottom.
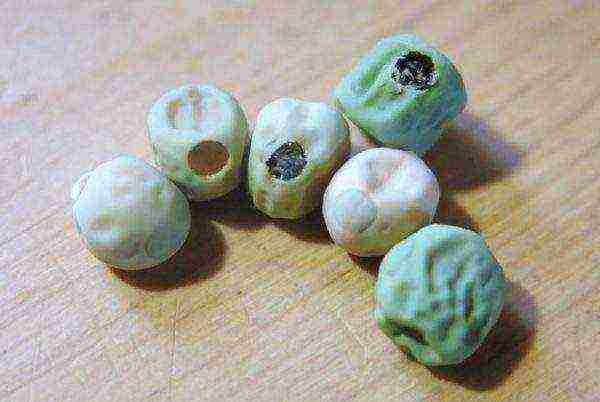
As a result of calibration, all beans with defects should be removed from the seed
Soak
The procedure for soaking the beans is very simple:
- Rinse the beans, lightly dry and soak in hot pink potassium permanganate solution for 20 minutes, then rinse. If you want to spend less time, you can use a boric acid solution (dilute 0.2 g of powder in 1 liter of water), soaking in it lasts 5-7 minutes. After this procedure, the beans also need to be rinsed with clean water.
- Place the beans in warm water for 4 hours.
- After this time, take them out and dry them.
To prepare the beans for germination, they must first be soaked.
Video: Soaking the Beans
During soaking, it is advisable to change the water at least 1 time after half the time.
Germination
To germinate peas, follow these steps:
- Take a piece of cloth, moisten it well (there should be no excess liquid) and put the beans on it. Cover the top with another damp piece of cloth.
- Remove the workpiece in a warm place (for convenience, you can put it on a plate). Keep the fabric damp at all times.

Sprouted peas sprout 3-5 days earlier than non-sprouted
Pea beans usually take 3-6 days to germinate.
Sowing pea beans for seedlings
As a rule, beans are sown in one common box, at the bottom of which it is desirable to make drainage holes. It is not recommended to immediately plant the beans in large individual pots. The fact is that when using them, there is a risk of excess moisture accumulation in the soil. This will negatively affect the further development of the bean, since it will not be able to receive the required amount of oxygen. You can sow peas in small (50-100 ml) pots, but then they will need to pick them in a larger container, since there is not enough space for the roots.
It is also worth preparing and disinfecting the soil in advance (usually 2 weeks before sowing) in order to destroy the pests living in it and protect the seedlings from fungal diseases. Many gardeners prefer to use the calcination method: to do this, cover the baking sheet with paper, spread moistened soil on it and place it in an oven preheated to 70–90 ° C for 30 minutes. Be sure to rinse your reusable seedling containers well with bleach solution as harmful bacteria and fungal spores can linger in the debris.
Sowing beans is done in holes or grooves
Sowing procedure:
- Fill the box with soil, no more than 3-5 cm to the edge. The soil from your site is quite suitable for peas, especially taken from the beds where pumpkins, cucumbers, tomatoes or cabbage grew. To make the soil looser, for 2 parts of the land you need to take 1 part of humus, straw or sawdust, peat, sand or vermiculite are also suitable.
- Moisten the soil and make holes in it 2 cm deep. The distance between them should be 1–3 cm. If you want to sow several rows, keep a distance of 5–10 cm between them. You can also make several grooves by placing them on the same distance from each other (beans should be sown at a distance of 1.5–3 cm from each other).
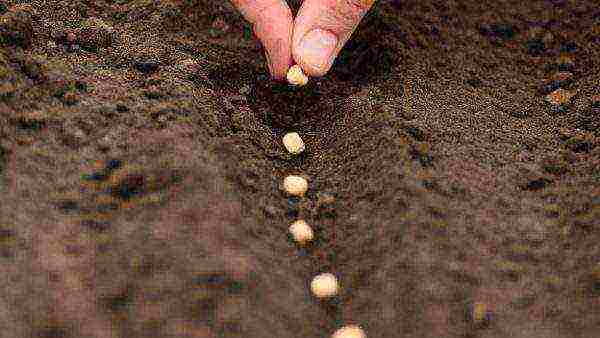
- Place 1 pea in each hole, trying to place it sprout down.
- Lightly cover the holes with earth, without compacting, and cover the box with plastic.
As a rule, sprouts appear after 9-15 days, after which the film can be removed. During this time, crops require timely watering and 1-2 airings for 15-20 minutes every day. When shoots appear, the peas must be fed with minerals. To this end, pour the sprouts with a superphosphate solution (20–30 g per 10 L of water).
Picking
After the sprouts get stronger and form 2 true leaves, it is necessary to make a pick. You can dive peas in separate containers (for this purpose, containers with a volume of 300-500 ml are suitable) or in a common box, but the sprouts should be at a great distance from each other.
Follow these steps:
- Prepare containers according to the same rules as the seedling box. Fill them with the same soil.
- Moisten the soil and make holes 5 cm deep. If you want to plant the peas in separate containers, then the hole must be made in the center. In the case of planting in a common box, the holes should be located at a distance of 20-25 cm from each other.
- Carefully remove the sprout from the box, being careful not to damage the roots, and plant in the hole.
- Sprinkle gently with earth without compacting.
The first 2-3 days after picking, the sprouts should be slightly shaded, and then put back in a sunny place.
Plant care
After you complete the preparation of the seedlings, you just have to timely follow the simple rules for caring for the plants. Peas begin to bloom 25-30 days after sowing (some varieties - after 55 days), bear fruit - a month after flowering, and if the variety is sugar, you can harvest in 10-15 days. The culture is self-pollinated and does not need additional pollination measures.
Peas are one of the most cold-resistant plants, so you can put boxes with plantings in the open air at a temperature of + 16 ° C + 18 ° C. But also keep in mind that temperatures above + 25 ° C negatively affect the development and productivity of the plant, therefore it is not recommended to sow peas in June and July.
Lighting
Peas are a plant of long daylight hours, therefore, for normal growth, it needs lighting for at least 12 hours a day. If you cannot provide the peas with the necessary amount of sunlight (for example, you want to grow them in winter or the windows of your house face north), then you will have to use a fluorescent lamp. It should be placed at a distance of 50 cm from the boxes with plants.
Watering peas
Until the peas have bloomed, it is enough to water them as needed (1-2 times a week), making sure that the soil does not dry out. When the peas bloom and begin to form fruits, they will need to be watered 3-4 times a week. Be sure to loosen the soil after each watering to provide oxygen to the roots and prevent crusting.
Support
When the sprouts reach 10-15 cm in height, then they must be supported. A mesh with large cells is well suited for this. If possible, you can make a small trellis by setting pegs (40-50 cm) along the edges of the dish and pulling the threads in 3-5 rows.

For proper growth, peas must be supported
Top dressing of peas
The second and the next two pea dressings should be done when the plant enters the flowering phase. For this purpose, use the following solution:
- superphosphate (10-15 g),
- potassium salt (10-15 g),
- water (10 l).
As a rule, fertilizers are applied once every 2 weeks.
Harvesting
The crop must be harvested every 1–2 days, as unremoved shoulder blades can slow down the ripening of the next. As a rule, the blades on the bottom of the bush are the first to ripen. They should be removed carefully, holding the plant itself. With proper care, fruiting of peas at home can last up to 2 months, and from one bush you can collect 0.4–0.5 kg of the crop.
Reviews about growing peas at home
As you can see, it is not difficult to grow peas at home, and you will quite cope with this task, even if you are starting it for the first time. Follow all instructions regarding growing seedlings and agricultural techniques, and you will be able to get a fresh crop at any time of the year.
Rate the article:
(0 votes, average: 0 out of 5)
So how do peas grow? It seems that this is such a widespread plant, but indeed, many novice gardeners do not know the answer to this question. How does this vegetable familiar from childhood grow? Let's try to figure it out.
The basics of growing peas
Probably everyone loves peas. Of course, you won't please everyone with pea porridge, but canned green peas are just a delight, without which a festive salad cannot do. And the kids? How they love fresh green peas. For a few small people, eating a small plantation will not be a big and long-term labor. So how do you grow peas on your backyard?
Peas belong to the legume family. It is an annual self-pollinating green creature. A climbing plant, the height of which can exceed 200 cm. There are tendrils along its stem that help the peas to cling to the support. Thousands of years ago, it was used for food.
Pea cultivation includes sugar and fodder species
Pea cultivation includes sugar and fodder species. The sugar variety is used for canning, tastes better and has larger grains (depending on the variety, of course). Forage varieties are intended for animal feeding, are grown in large areas and are more unpretentious in care. They have a less pronounced sweet taste (small peas).
The cultivation of legumes is very valuable for their ability to grow as green manures. Its roots can store nitrogen in the environment and enrich the soil with it. Therefore, after planting peas, almost all crops grow well.
The described species is cold-resistant, because the seeds can begin to germinate already at 4-6 degrees of heat. And even if there are frosts down to -4 degrees, it will not hurt young plants. Thanks to this, seeds can be sown in early spring, starting from April 15-20. Moreover, if you have early ripening varieties, you can plant them several times, until the beginning of July.
Polka dots love a lot of light, so when choosing a garden, shaded places will not work.It is very undemanding to the soil, but you will harvest more and larger crops from loose, enriched land. The bed should also not be oversaturated with fertilizers, otherwise all substances will provoke rapid growth of tops, and the pods will be rare and small.
Video about the benefits and secrets of growing
It is good if the soil contains a lot of potash and phosphorus fertilizers, and the acidity of the soil is low.
From autumn, a portion of rotted manure, compost can be introduced into the garden bed, into the ground on the site, and then by spring all the substances necessary for rich fruiting will be ready in the soil.
Planting peas
It is possible to sow in the ground, both dry and germinated seeds. The main thing is to provide abundant watering for small plants during the germination period. If you are sowing non-germinated seeds, then it is advisable to do this a few days earlier than soaked seeds.
To soak the seeds, they are wrapped in a damp cloth, placed on a saucer and poured a little with water. The water is changed every day. At the first pecking, you can plant sprouts in the ground.
To soak the seeds, they are wrapped in a damp cloth, placed on a saucer and poured a little with water.
Do not forget to spill the grooves abundantly so that the swollen grains get into the same humid environment. This moisture level must be maintained throughout the growth period of the small pea. Otherwise, the sprouts that have hatched may simply dry out.
There is a method of seed preparation, in which viable seeds are determined and at the same time diseased seeds are removed. To do this, add 30 g of salt to 1 liter of water and immerse the seeds there. The floating grains are removed, the ones that have settled to the bottom are washed from salt, dried to their initial state and planted.
Planting is carried out in grooves with a depth of 4-5 cm. If the soils are heavy, then you can plant them not so deeply - 2-3 cm. The distance between grooves is 30 cm, in a row 6-8 cm. You can also plant seeds according to a two-line scheme. To do this, make two grooves at a distance of 15-20 cm, and then make a gap of 50 cm for easy collection of pods.
Video plot on how to plant sprouted peas in open ground
Plant care
The pea cultivation technology will not present any particular difficulties. Like all garden crops, it is necessary to water, loosen, fertilize and harvest on time.
It is important, when the first sprouts appear, to cover the bed from the birds. This can be done with either mesh or thin acrylic.
After abundant (9-10 liters per 1 sq. M.) Watering, the soil must be loosened to ensure sufficient air access. And to reduce moisture evaporation, the soil between the grooves must be mulched. Peas will respond well to hilling, which is best done after watering.
For young seedlings, it is imperative to use props, otherwise the stems may break and get tangled. To do this, immediately after planting or when the first shoots appear, you need to install retaining elements. Which one you put on depends on the availability of material and invention. There is an option in which a peg is driven in at the edges of the furrow. A net is attached to these stakes, it is possible with a rare lattice (10x10 cm). You can also often place sticks along the dotted grooves. The main thing is that the antennae of the plants have something to cling to.
Pea cultivation technology will not cause any particular difficulties
Flowering, depending on the variety, occurs 30-50 days after germination. And after about a month, you can start harvesting the fruits. Moreover, the collection of ripe pods will stimulate the growth of new peas. In this case, you can collect gifts in 2-3 days. Fees vary for different food preparation:
- fresh use;
- conservation;
- freezing.
If you want to get ripe seeds, then you need to wait for the ripening of the lower pods. The field of this plant is completely cut off at the root and placed for ripening in a non-sunny ventilated room.So you can get seeds for the next year, but remember that germination lasts only for 2-3 years.
After harvesting, the tops can be used for composting, and the roots will serve as an excellent fertilizer for subsequent crops. The soil for the next year will have a good structure, saturated with the necessary substances. But remember that legumes can be planted on the same bed only after 5 years, otherwise there is a risk of developing diseases.
Video clip how to put supports
You can use legumes as green manure. To do this, dry seeds are sown in the second half of summer in a garden bed with already harvested crops. It is not necessary to maintain planting along the lines, the main thing is to embed dry seeds in the ground so that the birds do not peck.
After the emergence of seedlings, the growth of the pods is not needed, they can be immediately dug up and embedded in the ground. Young plants will enrich the soil with the necessary microelements and serve as a good fertilizer for subsequent crops.
Plant diseases
Lambda-based chemicals can be used to combat
The most common disease for this species, according to gardeners, is the leafworm or pea moth. It is a small caterpillar that hibernates in the soil.
The butterfly flies out just in the period of abundant flowering, and lays eggs on the stems and leaves of plants. Caterpillars appear and eat the peas. Thus, your rich harvest can be reduced to zero.
To combat, you can use chemicals based on lambda - cyhalothrin. Only the use of this remedy should be carried out before the formation of the fruit. Otherwise, the chemical can enter food through the crop. The difficulty lies in the fact that at the stage of processing the butterflies have not yet laid eggs, and spraying will not give the desired result.
From folk remedies, you can use double spraying with infusions of dandelion leaves or onion peels. Infusions of tomato tops or garlic can also be effective. The tops need about 3 kg per bucket of water, and garlic - 20 g. The chopped components are poured with water and insisted for a day. After the plants are sprayed.
Moreover, both types of infusion (tomato and garlic) help in the fight against such a pest as the pea aphid.
Also, peas are often subject to diseases such as powdery mildew. It starts from excessive moisture and thickening of crops. From such a disease, you can spray the plantings with an infusion of sow thistle - a bucket of water is needed for 300 g of leaves.
After that, the garden is treated twice with a week break.
Video about the tricks of growing and the secrets of peas
To combat the main common diseases, it is recommended to maintain a break in planting for at least 5 years in one place. It is also necessary to remove plant residues well after harvest or to bury them thoroughly. And it is better to burn stems damaged by diseases.
It is advisable to observe the sowing time so that the fruits can form before the beginning of abundant humidification of the air or the numerous emergence of insects.
Growing peas at home
Not everyone has the opportunity to have a dacha or spend the whole summer there. How to grow sweet peas at home, in boxes on balconies and loggias?
First you need to decide on the cultivation variety. Sugar, they have a sweet taste, so they are more common. Peeling varieties are more unpretentious in care.
The technology of cultivating peas at home is not very different from the garden one. You need to prepare fertile soil for planting and containers or wooden boxes in which the homemade beans will grow.
It is good if there is something loosening in the ground - straw, sawdust or humus. This will provide better air access to the roots of future seedlings.
As with garden seeds, home seedlings can be soaked or sown dry. The soil should be well moistened and watering should be done frequently and abundantly.
The technology of cultivating peas at home does not differ much from the garden one.
It is best to plant the seedlings at home in a warm room first. And then, with the onset of warm days, you can plant a seating on a balcony or loggia, for a more comfortable growth. At home, you need to plant seeds closer to each other due to a lack of planting space. The distance between the seeds is 1-2 cm, between the rows - 3-5 cm. Planting the plantings to a depth of 2-3 cm.
After the seedlings germinate, we transplant the seedlings to a loggia or balcony, with a distance between rows of 20 cm and in a row of 5-8 cm. Young crops need to be watered abundantly.
When the peas reach a height of about 20 cm, you need to install a net or sticks, for which the antennae will cling and prevent the stems from breaking.
Timely watering, loosening and a sunny location are the rules that will ensure you harvest without even leaving your home. The use of dressings will increase the likelihood of satisfactory fruiting. These are, first of all, potassium-phosphorus fertilizers and fertilizers containing copper, which help to protect your green creatures from diseases.
Sowing and Care Video
Fruiting occurs in about 30 days from the beginning of flowering. Ripe pods should be harvested frequently, almost every day. It is better to do this in the morning. And at home, you can remove half a kilo of ripe beans from one stem.
So, planting peas, both in summer cottages and on balconies or loggias, is a rather easy process. As in caring for any crops, the main thing is to know the rules of cultivation and follow them.
Rate the article:
(2 votes, average: 5 out of 5)
Peas, a delicious product most beloved by children and adults at the time of their milk maturity, can be easily grown on their own plot without spending a lot of effort and time. Many inexperienced vegetable growers do not know how to plant peas correctly and what subtleties in care you should know in order to get a tasty and high yield. People have been cultivating peas for a long time; it was and remains one of the most popular leguminous crops used for food and medicinal purposes. In cooking, peas are an integral component of the first and second courses and the basis of delicious filling for pies; pea flour (with boils and abscesses) and pea broth (with urolithiasis) have healing properties.
Green peas: growing secrets
How to grow peas at home? There is nothing complicated in this agricultural operation: timely watering, periodic weeding and, of course, the correct selection of seed material, of which sugar and shelling varieties are the most optimal in terms of their taste and technical qualities, are important. Sugar peas are characterized by a pleasant taste, husk peas - by their firmness and unpretentiousness in cultivation.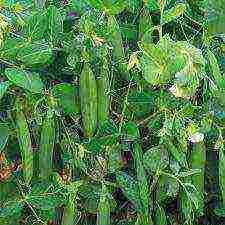
Any agricultural process has its origin; the same applies to planting peas: it is only important to decide on the necessary material, which is peas. How to grow legumes is a secondary issue; first they need to be planted. To do this, you need seeds and a planting container, under which you can use a plastic container or wooden box. The soil composition should consist of one third of loosening materials (sawdust, humus or straw). The planting soil can also be enriched with mineral fertilizers dissolved in water.
Peas: how to grow by seeds
Before planting, pea seeds must be treated with preparations containing molybdenum and boron, and the bacterial fertilizer "Nitragin", which causes an increase in germination and more active growth of shoots. Seeds are planted to a depth of 2-3 cm in loosened moist soil in even rows, the distance between which is 2-3 cm; there is an interval of 1-2 cm between the peas. After planting, the legumes should be carefully watered, using a strainer for better spraying water. 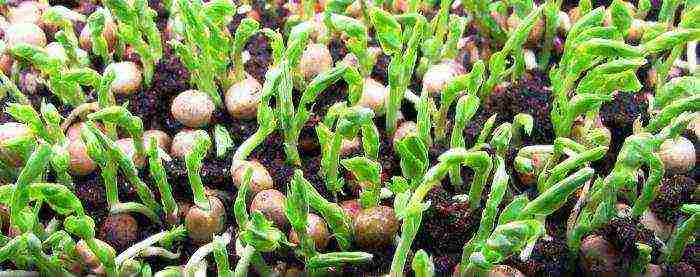 After a month, when the results of your own labor will be visible and green seedlings will appear in the boxes, you should think about how to grow peas on the windowsill further or transplant young plants into open ground.
Tricks of growing peas on a windowsill
When growing legumes on a windowsill, you will need containers (wooden or plastic boxes) in which the peas will grow. How to grow such a crop correctly? What conditions must be observed in order to get a rich tasty harvest that will delight home and surprise guests all year round? 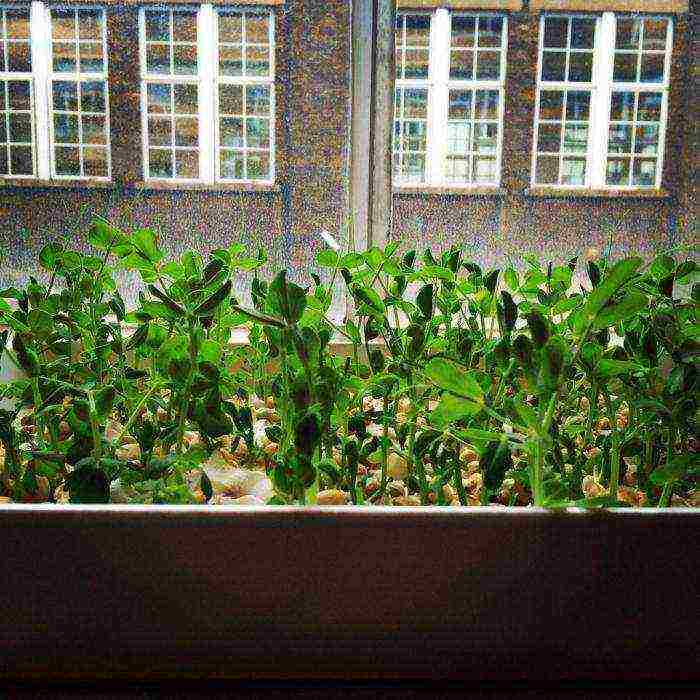 The sprouts are planted in the grooves in even rows, the distance between which is 20 cm, between the plants 10-15 cm. After that, the grooves must be carefully sprinkled with earth, tamped a little and watered with a watering can. Peas are a light-loving plant, therefore, their location should be selected taking into account this factor - on the sunny side of the room.
When the sprouts reach a height of 20 centimeters, it is required to hang a net with large cells above them, along which green shoots will curl, which will provide convenience when harvesting. By the way, the stems curling along the net must be directed in order to evenly distribute the light for each of the sprouts.
Care of planted peas
When growing peas at home, the soil needs periodic weeding, which provides maximum oxygen access to the plant roots. In other words, it is required to loosen the soil after each watering that compresses the surface layer.
The quality of the beans is influenced by the timely feeding of the crop; before the formation of ovaries, the plant must be fertilized with potassium-phosphorus mineral preparations. As a preventive measure, the soil should be fertilized with copper-containing microelements, the action of which is aimed at strengthening the leaves and stems of plants and at destroying harmful bacteria. 
Fruiting of peas lasts for 2 months; collection of ripe pods should be done in the morning. One shoot is capable of producing about half a kilogram of juicy peas. At the end of fruiting, the legumes are cut off.
Peas: how to grow greens
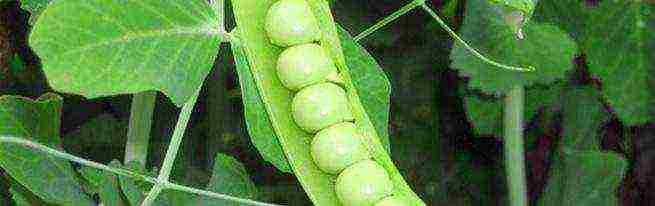
This crop is grown not only for the sake of obtaining beans; juicy greens can replace lettuce leaves, because they contain a sufficient amount of useful vitamins and biologically active substances. For example, in 100 grams of young peas there is a daily dose of vitamin C, which is useful for the human body.
When growing green peas, it is preferable to opt for undersized varieties that have more succulent leaves in comparison with cereals. To obtain constantly fresh greens, peas must be sown in several stages. Coarse stems are pruned, the leaves break off, the plant gives new shoots.
How to grow peas outdoors
Growing peas in the open field is similar to home care, the only difference is in the territorial scale, several times exceeding the "balcony" version. Seeds are planted in open ground in April-early May (when the ground is still wet enough), seedlings - in late spring. Peas are an excellent precursor to all vegetable crops, as their roots contain nodule bacteria that enrich the soil with nitrogen.
The seeds are embedded in the soil to a depth of 3-4 cm, otherwise the birds will be happy to treat them to the grains. Watering the plants should be regular; with a lack of moisture, ovaries and flowers may fall off. Peas are harvested for grain once, when the harvest is 70% ripe. If the culture is consumed fresh or intended for canning, it can be harvested many times, every 2-3 days.
Before growing peas in the country, it is better to germinate its seeds by soaking them for 12-18 hours with regular water changes every 3-4 hours. You can place the legumes in a damp cloth for a few days to ensure that the sprouts hatch as quickly as possible. For summer cottages or garden plots, you can use tall varieties, adapting supports for them.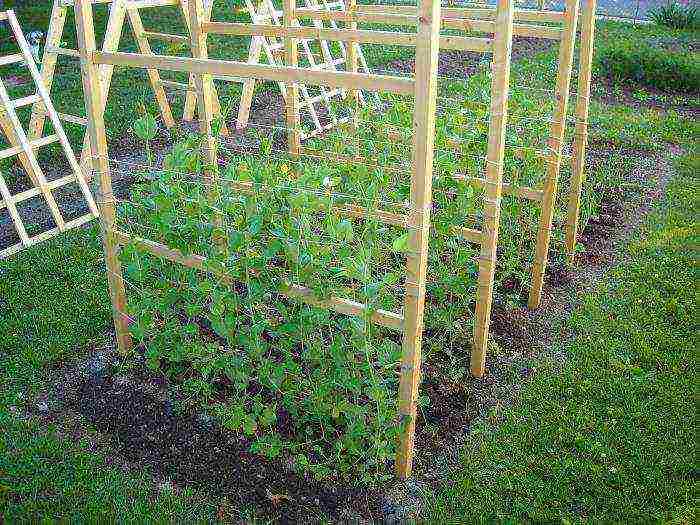
There is a little-known tricky agricultural technique that tells you how to grow peas using their combination with other crops. Mutually beneficial joint planting of plants, in which each of them creates optimal conditions for the qualitative growth of the other and obtaining the highest possible yield, is increasingly being used by many vegetable growers. So, peas, which enrich the soil with nitrogen, go well with corn, carrots, without competing with them for nutrients from the soil due to different ripening periods.
We grow peas at home
 I am glad to welcome you, dear readers!
It is possible to grow peas at home if there is a well-lit window, planting box or pot, 20 cm deep and a little time to care for the plants. If there is a lack of lighting, it may be necessary to use additional lighting.
Growing this culture at home begins with sowing seeds for seedlings. Sowing seeds in a permanent place is not recommended, for the reason that to obtain a crop of peas, the volume of the planting capacity is needed quite large. A small plant that has emerged from a pea will take a long time to master the entire earthen lump. The earth can turn sour. It is better to sow the seeds in small cups, and then, without damaging the roots, transplant them into a larger container. Small cups are easy to reel from old newspapers. It is enough to cut newspaper sheets into strips 10 cm wide, wrap around the glass bottle several times. The edge can be secured with a paper clip, and by folding the bottom edge, we get the bottom. We fill in the planting mixture and the seedling container is ready. The advantages of such cups are that when transplanted into a large container, you do not need to destroy the earthy ball and disturb the roots.
If garden soil is used as an earthen mixture, then it must be harvested in the fall. They take soil from the beds where nightshade or pumpkin plants grew in summer. It must be diluted by one third with a loosening substrate: peat, sand, vermiculite. The prepared mixture, laid out in planting cups, is spilled with a means for the prevention of fungal diseases, Fitosporin is suitable. We place the filled pots in a warm place so that the earth is saturated with moisture and warms up.
Choosing seeds
Peas exist in the form of shelling and sugar varieties. Shelling machines are less demanding on growing conditions, sugar varieties are more difficult to grow, but they are tastier. Read more about the varieties of peas in the article "Growing green peas".
Peas are soaked in water or a weak solution of fertilizers, you can pre-disinfect them in potassium permanganate or aloe juice. The swollen seeds are transferred to individual cups. Sowing depth - three pea diameters. If the seedlings are grown in a planting box, then the seeds are sown in rows. A row from a row is located after 10 cm, the seeds are in 2-3 cm. The crops are covered and wait for germination. The emerging seedlings are placed in the sunniest place. Regular ventilation keeps the ambient temperature within the required range.
The grown seedlings are transplanted to a permanent place - in a box or pot, if possible, without damaging the roots. The distance between the planted shoots in the box is kept 25 cm. It is not recommended to plant more than one plant in a flower pot. The first days after transplanting seedlings, it is better to create light shading for a few days. The soil surface can be mulched to retain moisture.
With the onset of stable heat, the rooted seedlings are taken out to the balcony. After the sprouts have grown to 10-15 cm, they need to be tied to the supports. For this, a mesh with large cells is suitable.
Before flowering, the planting is watered moderately. With the onset of flowering, watering is carried out more often and is regularly fed. The feeding mixture is made up of phosphorus and potassium fertilizers with the addition of trace elements.You should not add nitrogen - nodules from soil bacteria that form on the roots of legumes help to assimilate nitrogen from the air.
After spending growing peas at home harvesting begins when the peas in the pod reach 6-7 mm. Plants will bear fruit for up to two months. Each plant can produce up to 800 g of vegetables.
To avoid fungal diseases of peas, the correct watering regime, planting seedlings at a sufficient distance, watering the plants with copper-containing preparations will allow. The appearance of pests is eliminated with drugs acceptable for use in residential premises. See you, friends!


