Content
- 1 Pine cones and seeds
- 2 Sowing pine seeds at home
- 3 Sowing pine seeds in open ground
- 4 Seed preparation - collecting and growing cones
- 5 Soil preparation for sowing seeds for seedlings
- 6 Stratification - is it really necessary for pine seeds?
- 7 Temperature range for seed germination
- 8 What should be the lighting of seedling containers?
- 9 Watering and fertilizing the soil in containers with seedlings
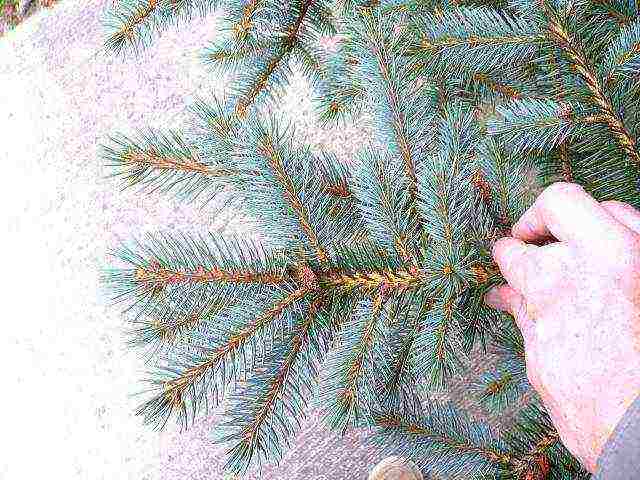
- 10 Features of blue needles
- 11 How to get a quality seedling when grown at home?
- 12 Cutting method: features
- 13 Growing needles from seeds
- 14 Seed collection
- 15 Preparing the soil
- 16 We plant seeds
- 17 Seed germination
- 18 Plant transplant
- 19 How to carry out a transplant correctly?
Download Original] ’class =" imagefield imagefield-lightbox2 imagefield-lightbox2-resizeimgpost-500-500 imagefield-field_imgblogpost imagecache imagecache-field_imgblogpost imagecache-resizeimgpost-500-500 imagecache-field_imgblogpost-resizeimgpost-500-500 ″>
Most evergreen pines are strong vigorous trees, they are not very suitable for growing in the local area. But undersized or decorative forms of various pines will become a real decoration of the site.
It is most convenient for planting in the garden to purchase a ready-made five-year-old pine seedling of the kind you like, but sometimes, not a seedling, but a pine cone with mature seeds, falls into the hands of a coniferous plant lover. The question immediately arises, how to grow a pine tree from a cone? In addition, the technology of growing pine trees from seeds is of great importance for the creation of large decorative green spaces in settlements and for the restoration of coniferous forests.
Content:
- Pine cones and seeds
- Sowing pine seeds at home
- Sowing pine seeds in open ground
Pine cones and seeds
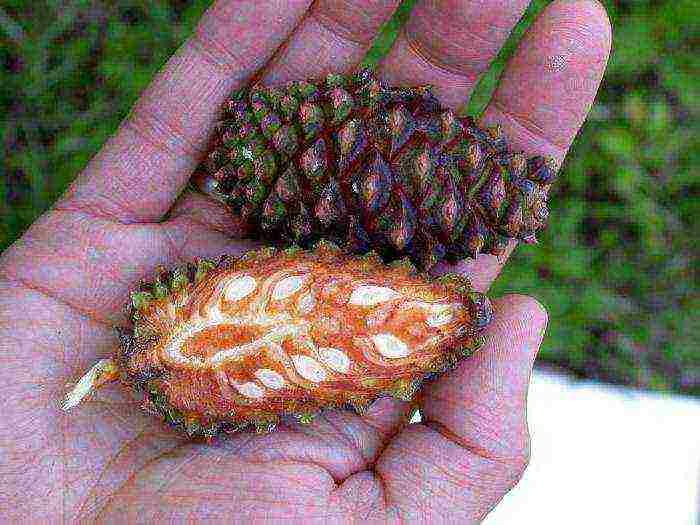
Seeds in all pines are tied in female cones, ovoid or cone-shaped. Cones are formed by rather dense scutes - scales, arranged in rows, one above the other. The scales are at first tightly closed, and during the ripening period they open and expose the seeds. At the same time, pine cones fall entirely to the ground, where it is convenient to collect them to obtain seed.
It is important to know that complete
ripening of seedsit takes two years in the cones of some pine species. In many pine trees, the seeds have a wing and a rather dense outer shell. For some, it is so dense that the fruit of a pine tree resembles a nut.
One cone contains several dozen seeds. For planting, you should free the seeds from the scales of the cone and select ripe specimens, of the correct shape and approximately the same size. To facilitate the release of seeds from the bud, wrap it in a paper bag and place it in a well-ventilated dry place. Shake the bag periodically; as it dries, the seeds will easily come out of their cells. Do not dry out the buds at an elevated temperature, this will impair germination.
Pine seeds have a rather long dormant period, so their germination increases after stratification.
To
plant seeds
pine trees in spring, autumn, immediately after collection, they need to be soaked in water at room temperature for three days. Then mix with clean river or mainland sand in the ratio of one part of seeds to three parts of sand.
For at least two months, boxes with pine seeds must be kept at temperatures from 0 to +5 degrees. To do this, they can be placed in a cellar or dug into a trench and covered with a layer of snow.
In the spring, the seeds are ready for planting in open or protected ground.
Sowing pine seeds at home
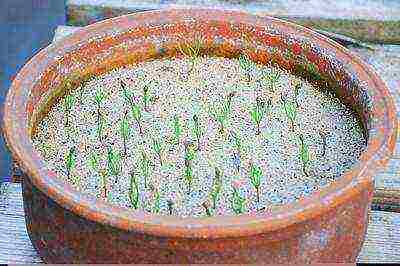
At the end of winter, pine seeds can be planted in planting boxes at home. And when the soil thaws on a shovel bayonet, you can sow directly into open ground.
Planting containers, 15 to 20 cm deep, must be filled with soil. Since young green pine shoots are easily damaged by various fungal diseases, all soil components must be washed and dried in a preheated oven:
- turf land
- peat
- sand
When filling the planting pot with soil to the top, leave 1.5 cm - 2 cm.
Seed container
bring into the room, sift them from the sand and immediately plant, deepening by 2-3 cm. After sowing, pour everything well and cover with a cover film or glass. The soil should be moist all the time, you can even put the pots in a tray of water.
After the emergence of green shoots, remove the glass and put the pots in a well-lit place. For prevention purposes, seedlings must be sprayed with a fungicide solution several times. In early summer or early autumn, pine seedlings can be planted in open ground, but for the winter they will have to be covered with spruce branches.
Sowing pine seeds in open ground
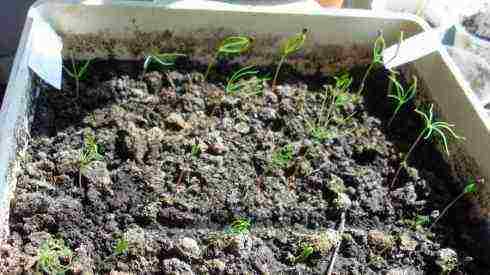
For sowing pine seeds in
open ground
you should dig a trench one and a half to two bayonets of a shovel and 20 to 25 cm wide, fill it with a mixture of one part of sand and two parts of turf or garden soil. Make grooves 3 cm deep. Seed up to a depth of two centimeters, filling the grooves with clean sand. For the first week, you will have to moisten the trench several times a day, preventing even the slightest drying out of the soil. From the eighth day, watering can be reduced.
When shoots appear, and this happens after 14-21 days, they must be protected from direct sunlight, creating an artificial shade. Once a week, young seedlings need protection from fungi, they can be sprayed with a light pink solution of potassium permanganate or any garden fungicide.
In the warm season, it is required to feed the seedlings two to three times; for this, mineral mixtures for conifers are suitable.
Transplant seedlings
best at five years old. At this age, they already reach a height of more than half a measure. It is necessary to remember about the annual covering of young pines for the winter period with spruce branches.
The place where pine cones are planted should be protected from domestic cats and dogs, as they are capable of destroying immature seedlings and all seedlings will disappear. If all the conditions are met, you can get healthy pine seedlings for your garden, even with only one or two cones.
Watch how to plant pine seeds in the video:
Foreword
For the improvement of a suburban economy, it is often important to know how to properly grow a pine tree from seeds and get a beautiful landscaping of the site.
Seed preparation - collecting and growing cones
If you decide to improve your site and plant a pine grove on it, take care of the planting material first. To do this, you need to go to the nearest forest, where strong enough trees of the species you need grow, and notice some of the healthiest among them. Then, starting from mid-September, you need to visit the chosen place from time to time and watch when the cones begin to fall, with the help of which the pine forest reproduces.
You may have to follow up until November, so take a photo of the selected trees in advance. It is advisable to collect fruits from under several pines. Before choosing trees, familiarize yourself with their species, since there are separate varieties of pine, the seeds of which ripen for about two years. After picking up the buds, make sure that they have not yet sprinkled with seeds.

Pine cones selection
Then, carefully placing them in a paper bag or box, transfer them indoors, where try to shake them over a large sheet of white paper, or directly in the bag. If the seeds do not fall, then the buds are not yet fully ripe. You need to dry them on a heating radiator or on a stone stove, if there is one. In the oven, despite the recommendations of many gardeners, it is undesirable to heat, you can not calculate and overheat the seeds. When the cone scales open, gently shake out the planting material.
To select the strongest seeds that will go for propagation, prepare several cups, according to the number of cones collected. Next, we place the seeds from each fruit of the Scotch pine (or other variety) in a separate container and select those that plunged into the water faster than others.Those that remain to float on the surface are not suitable for breeding. Many people advise to dry the planting material and place it in the soil prepared for germination. However, pre-soaking for at least 24 hours in warm water at room temperature is much more effective. Better yet, leave the seeds on damp gauze (between its two layers) until they hatch.
Soil preparation for sowing seeds for seedlings
First of all, it should be noted that pines are quite unpretentious plants, but it is extremely difficult to grow them on heavy soils. The ideal soil for them is considered to be one that is well saturated with oxygen, that is, it can be sandy soils or sandy loam. By placing the seed in heavy and poorly loosening soil, you have every chance of not waiting for the sprout to appear.
In the absence of air access, rot forms at the end of the hatched root, which quickly covers the entire embryo. The same thing happens when there is an excess of moisture in the soil. If planted in sand, then the optimal ratio of its particles with water will be such a state when moisture does not ooze from the lump raised in the fingers, but the individual fractions remain linked by it. The ideal environment where it is recommended to place Scots pine seeds, both for germination and already hatched, is peat compost. And not any, but obtained from the upper layer, more friable.

Peat compost
The fact is that peat is formed from peat moss, which turns under the influence of dampness and in the process of decomposition by bacteria into a kind of compost. This planting substrate, in addition to excellent oxygen saturation, is very rich in various trace elements, initially replacing fertilizer for seeds. Moreover, top peat retains to some extent the antiseptic properties of sphagnum moss and protects pine embryos from rot and fungus.
Low-lying peat is not suitable for sowing pine, since it is too dense soil, practically not saturated with oxygen, slowly absorbing and also slowly releasing moisture. To distinguish between the top and bottom layers of peat, you first need to pay attention to their color by comparing photos or finished samples, the first is much lighter than the second, some redness is inherent in it, while the low-lying layer is closer to brown and dark brown. They also have varying degrees of looseness, as mentioned earlier, and it is enough just to knead a lump with your fingers to understand what type of substrate is in front of you.
To some extent, it is suitable for planting hatched seeds and black soil, which it is advisable to dry beforehand. Before planting, such soil is watered with a weak solution of potassium permanganate to destroy the fungus.
Stratification - is it really necessary for pine seeds?
Some tree species, when growing seedlings from seeds, need mandatory sharp cooling, or, in other words, they need stratification. These include linden, ash, mountain ash and even a pear. This method of activating the development of planting material is also applied to Scots pine seeds.
According to some statistics, stratification somewhat accelerates growth at the initial stage, during the first year, which can be noted by making for comparison a photo of seedlings planted with and without pre-cooling. But at home, such methods of seed preparation are undesirable, since a violation of the temperature regime can eventually lead to decay of the planting material. However, extracted from well-dried cones at room temperature, pine seeds are capable of sprouting even without aging in a cool, humid environment (within 0 degrees).

Dried Pine Seeds
In addition, you can try to apply a method of soaking in ice melt water to a small batch of seeds, which, like stratification, according to some gardeners, activates accelerated growth and saturates the planting material with energy. In general, it is enough to germinate well-dried seeds in warm water in order to get uniform friendly shoots. If stratification for Scots pine seeds is considered by you as a necessary stage of preparation, you can use the following advice from foresters.
When the buds are fully open, the seeds are soaked in cheesecloth for 3 days. To hatch them, you need to keep the planting material in a humid environment for about 10 days, so a shorter period will simply reduce the dormant period. Then the seeds are mixed with coarse-grained sand (preferably river sand, with a rounded shape of fractions), in a ratio of 1: 3, which will require small wooden boxes. Stratification requires keeping seeds cool, at temperatures from 0 to 6 degrees, for which a dry cellar is suitable, or a half-meter deep ditch, subsequently covered with snow.
Temperature range for seed germination
Pine is a thermophilic plant, but here the emphasis should be placed on the word "warm", it does not tolerate high temperatures, especially since the heat dries up the soil, and the seeds need moisture no less oxygen. Even at the drying stage, care should be taken that the air around the seeds does not heat up over 40 degrees. But cooling the environment below 27 degrees is also undesirable. You should not listen to advice on drying in the oven, since 120 degrees are destructive in most cases for planting material.

Drying of planting material
After placing the seeds in peat or in a sandy substrate, you need to try to prevent the pots or containers from getting too hot - the warmer, the more favorable the conditions for fungi. Therefore, do not overheat the plantings in sunlight, provide a constant supply of fresh air. In this case, in no case shade the emerging shoots, the pine needs a lot of light. The optimum soil temperature for active growth is 22-24 degrees, no more. That is, you need to regularly moisten the peat or sandy substrate, at least once a day.
What should be the lighting of seedling containers?
Having mentioned the temperature setting, it will be quite natural to focus your attention on the lighting. As already mentioned, the Scots pine needs a lot of bright sunlight. Therefore, containers are best kept on windows facing south. Shading of sprouts leads to inhibition of their development. However, it should be borne in mind that not just light plays a key role in photosynthesis, but the ultraviolet spectrum, therefore, on a window where natural light is not available all day, the growth of pines will be slower than on open ground.

Pine sprout container
It should be noted that artificial lighting in no way replaces natural lighting. In particular, only bright light and heat can be obtained from incandescent lamps, but not ultraviolet light. Fluorescent lamps do not even provide heat. There are special fluorescent lamps with photosynthetic effect, but they are not powerful enough to fully provide the pine sprouts with the necessary lighting. Therefore, it is easier to make a greenhouse in the garden so that the sun's rays fall on the shoots from morning to evening than to install them at home, an ineffective imitation that consumes electricity.
Watering and fertilizing the soil in containers with seedlings
Moistening of the substrate in which the seeds are placed should be constant, more precisely, daily. The degree of water hardness when growing pine does not play a special role. At the same time, it does not matter at all how the hatched seed is immersed in the soil or sand, spine down or sideways, it will still develop correctly.Moderate watering is recommended so that the oxygen needed by the roots remains in the substrate.
Also, for air access, it is advisable to drill small holes in the walls of containers or pots, so that earth does not spill out of them. In general, it all depends on the volume of soil - if it is prepared more than 500 grams per plant, then you can do without holes in the container. The substrate should not be less than 200 grams per seed. It is best to water not with a stream, which quickly oversaturated the soil, but with water dust from a spray bottle, gradually moistening the peat or sandy substrate. Watering from below is considered a good solution, using wicks from quickly absorbing moisture fibers brought out through the drainage holes in the pot.
Such a container is placed in a pan with water, which is then absorbed from the bottom into the soil. Similarly, you can feed the plantings with soluble mineral fertilizers. As for organic fertilizers, they are categorically contraindicated, since nitrogen oversaturation can occur, and there is a risk that the roots will begin to choke. You need to stop feeding in the middle of summer, so that the winter period of rest comes on time. Attention - over the course of a year, the growth rises by 10-12 centimeters, which can be seen by taking a photo, the pine tree can be transplanted only in the 5th year, when a sufficient number of needles appears, and the stem is formed.
Rate the article:
(6 votes, average: 4.3 out of 5)
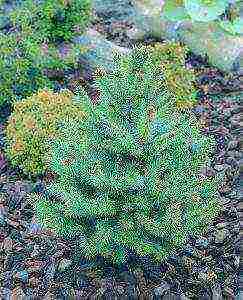
Spruce is a coniferous plant that serves as a classic decoration of the territory. The blue spruce is one of the endangered species, therefore it is listed in the Red Book. This factor affects the cost of pine needles seedlings. But why spend money on buying young trees if you can grow them yourself? We will try to understand together how to grow a spruce from seeds, because in addition to saving finances, the gardener gets a healthy plant adapted to the environment.

Owners of country estates massively purchase cuttings of blue spruce for further cultivation, even despite the high cost. This is because not everyone has an idea of how to grow a spruce from seeds, but you will know for sure.
Features of blue needles
The main difference between conifers of this species is the color of the needles. When growing spruce at home from seeds, it is possible to obtain a tree with 30% of thorns, painted in noble blue, the rest acquire a classic green hue. Therefore, many are interested in the question: "How to grow a spruce from seeds at home and get a high-quality seedling?"
How to get a quality seedling when grown at home?
There are three ways to reproduce spruce trees:
- vaccination;
- by cuttings;
- growing from seeds.
Cutting method: features
This is the easiest way to grow a new coniferous tree. Planting material is rooted in a greenhouse, since open ground has a negative effect on still immature conifers. So, planting a spruce begins with the selection of cuttings. Winter cuttings work best and produce results up to 4 times faster. The most favorable period for rooting is considered the moment of swelling of the kidneys. The main thing when breeding spruce is not to forget about maintaining the temperature regime and the required level of moisture.
Blue spruce, grown in this way, reaches 1 meter in height after 5 years. At this point, the tree can be replanted to a permanent place of growth.
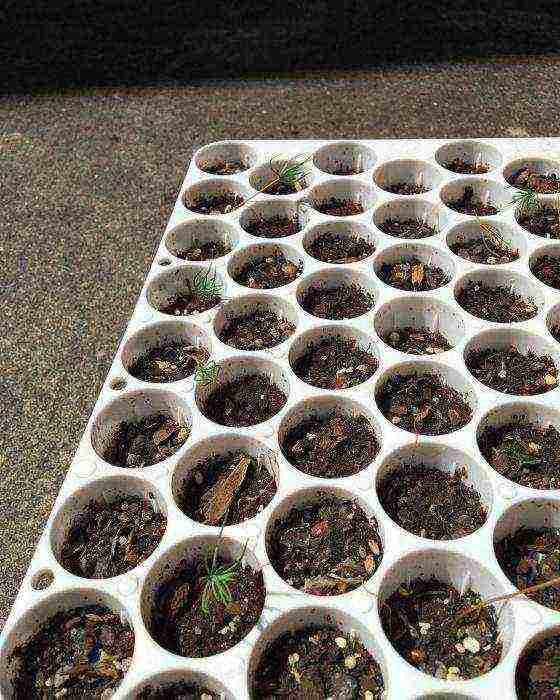
Growing needles from seeds
How to grow spruce from seeds? This process is painstaking and lengthy, and the result depends on the selection of the material and how high-quality it was.
Seed collection
To grow any plant with your own hands, you need selected planting material, which is better not to buy, but to get it yourself. For growing spruce seedlings, seeds obtained from the fruits of a coniferous plant - cones are used.The collection of cones is carried out in mid-February. This is the perfect time to harvest complete spruce seeds. The cones are placed in a cloth bag and placed next to a heater or fireplace, which facilitates quick opening and free access to the grains. After a few weeks, you should be able to reach the seeds without damaging them. After the cones open, the spruce seeds in the bag are rubbed together to cleanse the lionfish. Rinsing under running water will get rid of the greasy film formed due to the release of essential oils. At the final stage of preparation, the planting material is well dried.
To ensure complete protection of seeds from bacteria, they are washed with a weak solution of potassium permanganate, after which they are wiped with a cloth. The prepared seeds are placed in a glass jar, which, tightly closed, is placed in the refrigerator. The conditions in the freezer are as close to natural as possible (in the cold season), where the seeds are kept until mid-March.

How to grow a spruce from seeds yourself? It is very important to get good planting material, which, however, can be purchased on the market if necessary. The main thing is to know a good manufacturer.
Preparing the soil
In order for the blue spruce from seeds to grow healthy at home, it is recommended to prepare the site before sowing the specimens.
Important! Do not sow blue spruce seeds in places where you grow vegetables - they do not take root in the beds and quickly die.
The optimal growing medium is lawn soil mixed with soil taken from a coniferous tree. Growing in greenhouses involves two planting techniques:
- directly into the ground;
- into an additional container.
When planting seeds in pots, do not forget to prepare a peat mixture with the addition of limestone flour and ammophos in a ratio of 6: 0.035: 0.020 kg. The mixture is scattered into containers in which the spruce is planted. The pots themselves are buried deep into the earthen embankment in the greenhouse.
Important! Choosing the first method of planting, an additional top layer is poured over the soil layer - from sawdust and peat.
We plant seeds
First, determine the most favorable date for planting the spruce. The seedling will feel comfortable in nature if the ambient temperature is around + 19 ° C (+ -1-2 ° C).
Important! After changing the temperature regime (i.e. after the refrigerator), they can only be stored for 50 hours.
Before landing, the planting material is treated with a foundationol solution: 20 g per 10 liters of water.
Spruce is planted in well-moistened soil. If the spruce is grown in greenhouse conditions, then the containers are deepened into the ground by 1.5 cm, and a film is pulled from above. If on the open ground, first they tamp the earth in the hole, after which they put the seeds, covering them on top with a peat mixture and a thin layer of sawdust (about 1 cm).
Important! The distance between individual seeds should be at least 3.5-6 cm.
Seed germination
The first shoots can be observed in 10-14 days. If spruce seedlings are placed close to each other, there is a need to thin them out. Of the entire row of plants, only the strongest specimens are left, keeping the distance between them up to 7.5 cm.
When immature seedlings move to the active growth phase, it is necessary to maintain optimal conditions for growing needles, which are as follows:
- cancel watering and put into practice light spraying of seedlings with water - 2 times a day;
- maintain the temperature regime: the minimum temperature is + 13 ° C, the maximum is + 15 ° C.
Important! Remember that night frosts and direct sunlight during the day have a detrimental effect on immature young needles.
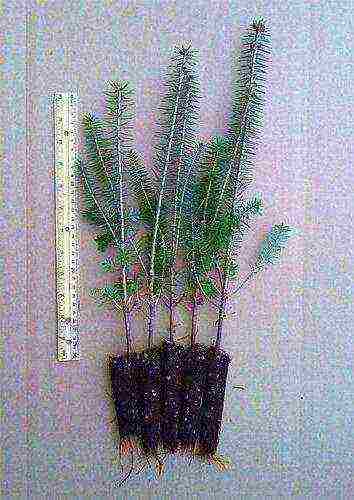
A month later, the seedling of a young blue spruce reaches a height of 3-4 cm. Experts note that indirect diffused sunlight has a good effect on the growth rates of specimens.Since small needles are not resistant to diseases affecting plants, namely to root rot, there is a need for special protection: first, fungicide will be required, after - treatment with an insecticide solution.
Plant transplant
You already know how to grow spruce seedlings from seeds, but it is impossible to do it qualitatively without transplanting annual plants. The procedure is carried out in early spring. After the seedlings reach the required level, it is important to plant the specimens you bred so as not to lose the plants.
Before transplanting, pits are prepared, which are tamped and sprinkled with a layer of earthen mixture from under a coniferous plant.
How to carry out a transplant correctly?
Small Christmas trees are dug out of the ground, separating the interwoven roots of individual specimens. It is necessary to carry out this work quickly, but carefully so as not to damage the root system and not let it dry out.
Blue spruce, grown from seeds at home, requires special care. These are often standard rules.
Interesting! By the third year of growth, less than half of the seedlings survive.
Three years after the sowing of the seeds, the plants are re-transplanted. This is done to provide sufficient space for the roots of the spruce. During this period, the Christmas trees are planted at a distance of 1 m from each other.

Are you wondering how much spruce grows from seed? And we have an answer to this question. After 5 years, you will have a full-fledged spruce, exceeding 1 meter in height.
Such a bluish-green beauty will become a real decoration of the garden or will successfully complement the landscape composition. It is quite difficult to grow plants with your own hands, but due to the entertaining process and in case of a positive result, when it turns out that the efforts were not in vain, you will certainly be proud of your herringbone tree.
 A beautiful Christmas tree in your garden can be grown from an ordinary spruce cone from the nearest forest. This is a longer, but at the same time, more effective way than transplanting an already grown tree.
Seed preparation.
Germination cones are harvested in the fall when they are ripe. They are kept at home in a cool and dry place. And the seeds (nuts) are removed from them 2 months before sowing.
First of all, they must be disinfected in a solution of potassium permanganate, then rinsed under running water and soaked overnight to swell. After these procedures, the seeds are placed in bags or boxes with wet sand and put into a refrigerator for cold stratification, where they will be stored until sowing (what is stratification and why we need it, we wrote here).
Sowing.
Sowing of seeds is carried out in the second half of April in a greenhouse, greenhouse or in early May in open ground with obligatory protection in the form of a film tunnel.
For sowing, coniferous sawdust is spread on loose sandy loam soil with a layer of about 2 cm, seeds are placed on them and sprinkled with fresh sawdust with a layer of 1.5 cm. Then it is abundantly watered and covered with foil.
Planting care.
Seedling care consists in timely watering (sawdust should be wet), weeding, airing a greenhouse or shelter (especially in hot weather) and feeding. The crops are fed three times over the summer with a diluted mullein or hydroponic solution.
Thus, Christmas trees are grown for about 3-4 years. Then they are transplanted to a permanent place.
Transfer.
During transplantation of trees, it is necessary to cut off too long and damaged roots. At the same time, they cannot be shaken, since the mycorrhiza, which is present on the roots and preserved during transplantation, will help the tree in the future to adapt to new conditions and start growing faster.
Other posts on the topic: