Content
- 1 Sowing seeds
- 2 Seedling care
- 3 Growing conditions
- 4 Video "Features of growing red pepper"
- 5 Transfer
- 6 Video "Hot peppers grown on the balcony"
- 7 Growing chili
- 8 In agricultural technology, chile is simple
- 9 Three potential problems with growing hot peppers
- 10 How to get chili seeds?
- 11 Seedling preparation
- 12 Growing chili peppers at home
- 13 Growing chili peppers in soil
- 14 Diseases and pests
Red pepper in our country in terms of cultivation is not as popular as potatoes or tomatoes. But it is quite often grown at home, not only as an ornamental plant, but also as a source of excellent spice for culinary masterpieces. Our article will tell you how to grow this popular spice at home and all the nuances of this process.
Sowing seeds
To grow hot red peppers at home, you need to choose the right seed. The seedlings of sprouts directly depend on its quality. In order for the sowing of seeds to be successful, and you can grow a strong plant, the choice of seed is as follows:
- choose only well-dried seeds;
- they should not show signs of disease or decay, as well as mechanical damage;
- their size should be medium.
You also need to choose the right variety to increase your chances of success when growing it. In order to grow burning fruits at home, it is necessary to choose undersized and compact varieties, whose height will not exceed 50 centimeters. Here it is worth giving preference to such varieties as Confetti, Goldfinger, Falcon's Beak, Bishop's Crown, etc.
For growing at home, sowing seeds can be done all year round. For sowing in an apartment, the best time will be mid-February. At this time, daylight hours already have a duration sufficient for the development of the plant. It should be noted that hot peppers are quite picky about light. This must be taken into account when growing seedlings and an adult plant.
Sowing seeds of red pepper takes place in any container (flower pot or wooden boxes). It all depends on how much planting material is planned to be sown.
To increase the chances of seed germination, they must be additionally stimulated before planting. To do this, you should take the following steps:
- Wrap the seeds in a cloth and put them in water, which has been heated to 40 degrees.
- After that, we close the planting material and leave it for three hours. You can soak the seeds in warm water and leave for a day. During this time, it is important to ensure that the seeds do not dry out.
- The temperature in the room where the soaked planting material will be located should be +25 degrees.
- If the planting will take place in winter, then the seeds must be additionally highlighted.
After the planting material has been stimulated, we sow it into a prepared container filled with soil. We place the seeds in the ground to a depth of 1–1.5 centimeters. Then we water the planting. To keep the soil moisture at the desired level, cover the planting on top with glass or a container.
Hot red pepper varieties germinate for a long time. It can take two weeks from planting to the appearance of the first shoots. Therefore, you need to be patient and not panic if after a week you do not see "glimpses of life."
Seedling care
When the first leaf appears, the seedlings need some care.When sowing seeds in a large container with their dense germination, thinning is necessarily assumed. You need to leave only those shoots that turned out to be the strongest and tallest.
After 2-3 leaves appear in the seedlings, picking into separate pots is necessary. In this case, you need to remove one third of the root. This is done so that the sprout can form the correct root system.
In addition, red pepper at the seedling stage has the following recommendations for growing:
- In the first week, after the first leaf has appeared, the air temperature should be lowered to +20 degrees. At this time, red hot peppers also need additional lighting.
- The pick is carried out in a small container. The optimum diameter of the container is 8–10 cm. It is best to use plastic cups for picking.
- When the sprouts have reached a height of 10-15 centimeters, they need to be transplanted into a larger pot, which should also be well lit. The container with the planted sprouts should be placed in a warm place. Transplanting seedlings into a spacious pot is carried out about two months after the first shoots appear.
- Before planting a plant in a permanent place of growth, it must be hardened for several days.
Red pepper planted in a spacious pot can be grown both on the balcony and on the windowsill. But it must be remembered that at night the temperature of the room where it will be placed should not drop below 10-12 degrees.
Growing conditions
Red hot peppers can be grown in the house without much difficulty. But to get a healthy and strong plant that will bear fruit well, it must be properly cared for. If the care is correct, then the red pepper at home will grow over the years and delight you not only with its fruits, but also with its bright appearance.
Home care for this cultivated plant is slightly different from that which was carried out for seedlings. In this case, you need to consider the following points:
- Lighting. If there is not enough light for the bush, then this, first of all, will affect the condition of its leaves. The leaf will begin to turn yellow and will soon fall off. To avoid such a situation, you need to put the plant pot in a well-lit place - the sill of the window located on the south side.
- Warmly. Temperature and lighting are fundamental parameters when growing hot red peppers. In the warm season, the pot with the plant can be taken out to warm up in the garden, if possible. The optimum temperature will be +18 at night and +22-23 during the day.
- Pinching the top of the bush. This procedure will allow you to get a lush and flowering plant on your windowsill. Some experts argue that if the growing conditions were followed correctly, then pinching is not carried out. But this is an extremely rare case.
- Watering. To get a better crop, watering must be done correctly. Soil moistening is carried out twice a week. Watered only with warm water.
- Air humidity. If the air in the room is dry, then the leaves of the bush must be additionally moistened.
- Loosening the soil. It must be carried out periodically to enrich it with oxygen, stop pathological stagnant processes and make the earth more "fluffy".
- Top dressing. Feeding is an important aspect of grooming. Fertilizers in the container in which the crop is grown should be applied every two weeks. You need to be especially careful with nitrogen-containing fertilizers, an excess of which can lead to the death of the plant.
In addition, there are some more nuances. For example, if you want your hot pepper to bear large fruits, then with its abundant flowering, some of the flowers should be removed. In this case, you need to act carefully so as not to damage the leaves adjacent to the flowers.
Any damaged leaf should be removed completely so that it does not pull on nutrients.
The flowering period of the plant at home falls in May – June. Fruiting, if the care of the plant was correct, can continue until the end of autumn.
Some hot peppers are self-pollinated. If you grow other varieties at home, then pollination should be done with a brush.
If necessary, the bush can be trimmed to give it a more decorative look. But often pruning is carried out in order to remove damaged leaves, as well as those on which signs of the disease have appeared.
Since hot pepper is a heat-loving plant, proper care is most important for it in the cold season. You need to take care of pepper in winter a little differently than in summer. For example, the temperature regime here will be different, it is at least +18 degrees. In winter, feeding can be completely abandoned. In addition, the number of waterings is reduced to a minimum level. The main thing here is not to allow the soil to dry out in the pot.
You need to know that you cannot put sweet and bitter varieties on the same windowsill. Otherwise, due to pollination on the bush of the sweet variety, hot peppercorns will form.
Video "Features of growing red pepper"
About when to plant seedlings, when to plant in the ground and how to care for red pepper, is described in this video.
Transfer
An important step in caring for peppers at home is plant transplantation. It is carried out for seedlings, as well as for adult bushes, in order to transfer them to a permanent place of growth.
At the bottom of the pot you need to make holes to drain the excess water. You need to use a special land for transplanting. It will contain the optimal set of nutrients necessary for the quick adaptation of the transplanted plant.
As you can see, growing red hot peppers at home and caring for them is a feasible job even for inexperienced vegetable growers.
Video "Hot peppers grown on the balcony"
Admire what a beautiful hot pepper bush has grown on the balcony of an apartment building.
Sponsored Links

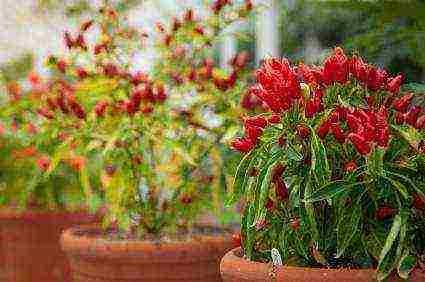
Hot pepper aficionados have long noticed that their fruits have a double benefit. Spicy in taste, they are great helpers in the kitchen, able to turn the heat on any dish. Smart looking - a spectacular window sill decoration and a bright accent for a flower garden. At the end of winter, it is just the right time to sow seeds, to renew the planting of a cute wit on the window, or to grow seedlings for the garden.
Hot peppers: spicy and hot and sweet
Every pepper is not just a vegetable, but a real natural dietary supplement. Even its green pods contain 3 times more vitamin C than citrus fruits, and 4-5 times more in red ones. It also contains spicy aromatic substances that promote the production of endophrins in the body - "hormones of happiness." Therefore, we like so much not only to eat multi-colored pods, but also to grow peppers with our own hands.
In terms of taste and use, all varieties of pepper are divided into sweet - vegetable (Bulgarian) and hot - chili (bitter, spicy). The burning taste of the fruit determines the presence of a special substance in them - the alkaloid capsaicin. The adrenaline rush caused by him is very popular with lovers of everything spicy. Moreover, in moderate quantities, fire pepper not only brings true delight to gourmets, but also brings invaluable benefits to our body, helping to stay active, beautiful and healthy.
On a note
✓ Most capsacin is found in the white heart of the fruit, to which the seeds attach. You can reduce the pungency of the pepper by removing it. But be careful: the essential oils released during cleansing can irritate your skin.
Fire fruits are first of all familiar to us as the main "ignitors" of the most popular adjika, as well as hot sauces: tabasco, chili and salsa. Fans of spicy marinades, rich borscht and pilaf cannot do without friendship with the "hot macho". Its beneficial properties are preserved both dry and ground. Hot pod powder is part of the famous Indian curry mixture.
✓ Keep in mind
Even the smallest peppers can harbor a scalding pungency. Therefore, just one crumb is quite enough for the preparation of marinade or brine and a three-liter jar of spicy cucumbers or tomatoes.
Reference by topic: Growing peppers in pots and containers indoors. Varieties of planting and caring for pepper
Growing chili
Chilli - this is how the Aztecs called this hot pepper for the first time, which translates as red. Now this is the name for all the most pungent varieties of hot peppers to distinguish them from medium and weakly pungent peppers. This is the most famous of all the fiery ones - the snub-nosed Mexican ha-lapeno; fleshy and bright as a flashlight, habanero; cute, like a wide woolen beret with a pompom on the top, bonnet tape; tiny, but no less evil Thai bird's eye pepper; bullet-like mid-early; embarrassing chili-willy ladies; one of the longest - hot and very thin - anaheim ...
All chili peppers (red, cayenne) vary markedly in taste - from soft to scalding. As a general rule of thumb, the smaller the pod, the more pungent it is. Even an international scale with the SHU (Scoville heat units) unit has been developed to measure the pungency of pepper. And if sweet bell pepper has a sharpness of 0 SHU, then in the most fiery varieties it has overcome the barrier of two million units!
✓So you know
Paprika is the spice of the most non-hot red peppers. Chili is one of the hottest. Pepperoni (so affectionately called hot red pepper dwarf) is usually consumed in pickled form and is often used in the preparation of pizza.
In agricultural technology, chile is simple
Seeds of hot pepper for seedlings are sown in February, when daylight hours begin to increase significantly. Amicable and rapid germination of seeds can be stimulated by pre-soaking them for 3-5 days in warm snow water. For this, the seeds are placed between two wet cotton pads and placed in plastic containers. They should be moved as close as possible to the heating radiators. I usually do this: I take a thick book, put it on the battery, and put the container on top. In this case, it is imperative to ensure that the discs do not dry out.
After that, the seeds can be sown in mini greenhouses. Two-piece large plastic bottles are very convenient. Seeds are laid out with tweezers at such a distance that the peppers can then be painlessly planted in pots, and sprinkled on top with a layer of soil 0.8-1 cm. Not dropped on time, they severely inhibit the growth of seedlings.
In greenhouses, the soil never dries up, and the seedlings always feel comfortable. By removing the lid, it is convenient to ventilate and water them. It remains only to find the sunniest place for them on the windowsill.
After a pair of true leaves appear in the peppers, the seedlings are planted in separate pots with a diameter of no more than 8-10 cm. During this period, young plants are very fond of spraying with warm water, which is better combined with top dressing. You should use any complex fertilizers readily soluble in water (like Kemira Lux).
When young hot peppers reach a height of 12-15 cm, and their root system has mastered an earthen ball, they can be transplanted to a permanent place in a greenhouse or in large pots. For adult plants, a volume of 1.5-2 liters is quite enough.
In temperate climates, the heat-loving witty grows and develops better in greenhouse conditions than in open ground.It feels good on sunny balconies and loggias, even if they are not glazed. But it should be borne in mind that peppers in pots should be watered often, and in hot dry weather - 2 times a day.
See also: Decorative indoor peppers - growing
Three potential problems with growing hot peppers
In general, the agricultural technology of hot peppers is no different from sweet ones. But when grown indoors, the plant can make you jittery.
At high air temperatures (above + 30 ... + 35'C), discard flowers and ovaries.
This also happens with a large difference between day and night temperatures, as well as from excessive watering or, conversely, insufficient.
In extreme heat, give a lot curves fruits, what more often Total happens from-per bad pollination.
To prevent this from happening, the bushes need to be gently shaken periodically during flowering. Despite the fact that pepper, like all nightshades, is self-pollinated, for normal pollination it needs air movement around the flower.
Be attacked by pests.
They just love him! Most often, aphids, whiteflies and ticks are obtained. If the stage is initial, you can wash the plant with Fairy foam (at least this procedure has always helped me). You need to take a sponge, moisten it abundantly with foam and apply the latter to the plant so that it is covered with it from head to toe. Especially on the underside of the leaves. The pot with soil must first be covered with foil. Leave the plant in the foam for an hour, and then rinse with warm water under the shower. The whole window should also be washed well. Aphids and whiteflies can be defeated in one go, but if a tick is introduced, then the top layer of soil in the pot should also be replaced. After such a procedure, it is good to place the whole plant in a large plastic bag for a day. Not only adults, but also their eggs will die from high humidity.
✓ If you plan to grow peppers in pots for more than one year, then it is better to remove the first flowers so that the plant has time to get stronger. Some varieties begin to form early buds, and the set fruits can draw off all the nutrients.
Hot pepper seeds can be purchased both in specialized stores and harvested from the pods you like yourself. Those who like hot peppers especially appreciate the varieties brought from southern countries.
To obtain viable seeds, the already reddened ripe pepper pods, without tearing, are kept on the plant for another 10 days. Then they are laid out on the windowsill for several days until they wilt slightly. And only after that the seeds are cut and taken out. Then they are dried for another 10-15 days and put away for storage.
Reference by topic: Pepper at home - planting and care
✓ From personal experience
In indoor conditions, small red and orange peppers feel very good. I usually grow them as two year olds. But their purple-black relatives can generally be attributed to perennials. So that all the peppers have a beautiful shape, bloom profusely and give better fruits, I regularly remove stepchildren from them, leaving only the main branches. At the end of summer, so that all the wits tied to them mature, I pinch the tops. Overwintered plants in the spring must be transplanted into fresh soil and shortened by a third of the elongated shoots.
Sponsored Links
Below are other entries on the topic "Cottage and garden - do it yourself"
Growing peppers in pots and containers indoors. Varieties of planting and caring for peppers: How to grow peppers in indoor ... Spiral Chinese hot peppers - planting and care: Growing hot Chinese chili peppers I want ... Hot peppers: growing in the Rostov region: Hot peppers - cultivars ... Growing pepper - what it happens: Pepper - sweet, bitter, spicy ... Pepper ... Habanero pepper (photo) - growing: Habanero - growing at home ... Planting and caring for pepper (photo) - from seedlings to snacks: Growing pepper: subtleties and rulesVery ... Timing of sowing seeds and planting seedlings - Memo: Timing of sowing seeds and planting ...
Subscribe to updates in our groups.
Let's be friends!
Everyone knows that many plants are used as spices. They give food a more pungent smell and taste. One such spice plant is chili pepper.Today we'll take a look at how to grow peppers at home.
The homeland of this plant is tropical America. There are many varieties of pepper known in the world, which differ in shape, size and taste. Nowadays, pepper is cultivated in countries where a tropical climate prevails, more precisely in India, Indonesia, Thailand. If you provide the pepper at home with a moist and warm environment, then you can achieve fruiting twice a year.
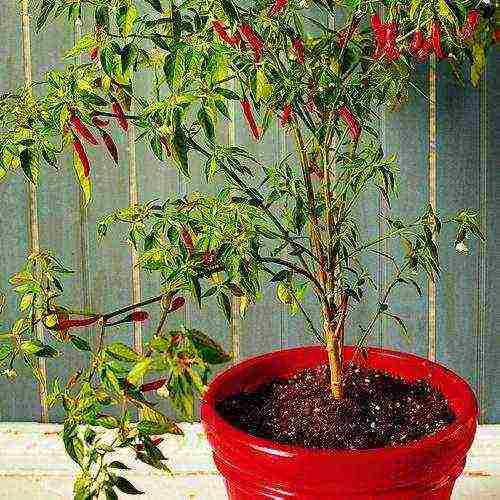
The best time to plant pepper seeds is in spring. Give preference to varieties with small fruits. If you want to have beautiful large plants, be prepared to provide them with more space and a large planting capacity.
Soak the seeds for 24 hours before planting them in the soil as this will speed up the emergence of the plants. You can plant the prepared material in small plastic cups in this way: a centimeter hole is made in the ground, into which the seed is placed, the distance between the holes must be left at 1 - 2 cm.
When the peppers grow up to 5 cm in height, it is advisable to make a pick, in other words, plant the plants in different pots. To avoid this procedure, the seeds must be sown at a distance of 10 cm from each other or in separate pots with this diameter.
Water the seedlings regularly, every two to three days. In this case, it is worth monitoring the humidity, and not pouring too much. To improve growth, you can apply complex fertilizer. Peppers prefer temperatures around 20 degrees Celsius.
The first shoots usually appear after 8 days. Place containers with plants in direct sunlight, this will only benefit them. Glazed balconies and balconies are ideal, especially on the south side of the house. After the peppers bear fruit, they can be removed because peppers are annuals.
Pepper decorates the apartment not so much with its leaves as with fruits, painted in all shades of red. Be careful when caring for them or their subsequent processing, because the essential oils that are part of the fruit can cause skin irritation.

In addition to culinary delights, fruits have another benefit: seeds. After all, they can be used to grow peppers again at home.
If you want to grow something more exotic at home, here's a quick guide on how to grow mangoes at home.
Chili pepper is one of the most popular spices in the world, which has found its place not only in cooking, but also in medicine, cosmetology, and, of course, home gardening. The benefits of this plant were well known to the Aztecs and Mayans - it was from these peoples that the Europeans received the first seeds "as a gift". Today, the cultivation of chili is a business that is quite within the power of even a beginner, and its beautiful bushes will become a real decoration of a windowsill or a vegetable garden, and will certainly delight their owner with sharp, piquant fruits.
Chili peppers: growing
How to get chili seeds?
First of all, it should be noted that the term "chili" unites a number of plants from the legume family: "bird's eye", jalapeno, anaheim, habanero and many others. They differ from each other in the appearance of the fruits, their color, as well as in sharpness, so it is best to make a choice based on your own preferences and the capabilities of the stomach. For example, the jalapeno is considered the most harmless and non-burning of them, and the habanero is considered the most spicy and "evil", although there are also exceptions to the rules.
Hot pepper seeds
There are two ways you can get seed for growing chili peppers: buy seeds at the store or harvest them yourself. In the first case, it is very important to choose high-quality material that can guarantee good germination and productivity of the future plant.
Hot Pepper Fireworks
At the same time, experienced gardeners recommend following a number of rules.
- Before buying seeds, you should carefully evaluate their appearance: damaged, cracked or deformed seeds will most likely not germinate. In addition, they must be large enough - weak, diseased plants are usually obtained from too small seed.
- There should be no brown, orange or yellow spots on the surface of the seeds. This means that high temperatures were used for drying, which have a detrimental effect on the seeds.
- To avoid wasted time and subsequent frustration, seeds can be tested for germination. To do this, put them in a container, pour some water there, add special agents that stimulate plant growth, and wait a day. Then pour a little earth there, and wait for the roots to appear - it usually takes two to three days. If they are not there, then the material is of poor quality.
How to test seeds for germination
To avoid buying low-quality seeds, it is best to harvest them yourself.
Chilli seeds
The basic rule in this case is to let the fruits ripen well, and this time does not come when they are already edible, but much later. The timing of seed collection can be determined by the appearance of the peppers - the pods begin to dry out, and the tip becomes brown. The fruit must be carefully cut in half, shake the seeds out of it, and then grind them in your hands, blowing off the rest of the pulp. It is recommended to use goggles and gloves when doing this, as the contact of small particles in the eyes or on the skin can cause severe irritation. The seeds should be stored in a dry place, never subjecting them to heat treatment.
Extracted pepper seeds
Seedling preparation
Chili peppers can be grown both on a windowsill or loggia, and in an open field or greenhouse. In any case, it is better not to plant the seeds right away in a permanent place, but first grow seedlings from them, otherwise this process will take much longer. This is best done in February, especially if the plant will live in the open field - until spring, the sprouts are strong enough to be transplanted.
- To speed up germination, place the seeds between two damp wipes or paper towels, place them in a container, and leave them in a warm, well-ventilated place for several days. It is important that the seeds are in the same plane - this will ensure an even distribution of moisture. The "readiness" of seeds for planting can be determined by their swelling (some may develop small sprouts).
Chili Seed Preparation
- For sowing, it is recommended to use a large container, which should be thoroughly rinsed and boiled beforehand. Potting potting is best purchased from a store, as regular garden soil can contain bacteria and insect eggs. A little vermiculite is added to the mixture, and drainage is placed on the bottom of the container and soil is poured so that about 2.5 cm remains between its surface and the edge of the pot.
Preparing a pot for planting pepper seeds
- Seeds are planted in shallow holes (0.5 cm), located at a distance of at least 5 cm from each other, otherwise the plants will be cramped. Sprinkle them on top with a small layer of soil, sprinkle with water and cover with glass or polyethylene.
Plant the seed to a depth of about 1.3 cm
- The first shoots above the soil surface appear in about 5-7 days - after that, the container should be rearranged in a sunny place.
Plants should be transplanted into separate pots after the first true leaves appear on them, and for subsequent cultivation in the open field, it is better to choose peat pots. They allow you to transplant so as not to disturb the roots, so that young peppers will take root better.
When diving, take the seedlings by the "ears" so as not to damage the stalk
Water and top up the soil carefully, if necessary
Pepper seedlings
Chilli
Growing chili peppers at home
The main condition for the successful cultivation of hot peppers at home is a sufficient amount of light. With a lack of it, the plants will be too weak, and the fruits will be small and pale. For home cultivation, experienced gardeners recommend choosing those types of peppers that give bushes with small leaves so that the light absorption area is large enough.
Growing hot peppers
The ideal place for growing is a windowsill or balcony that faces southwest or southeast. The optimum temperature depends on the type of plant, but on average it is 22-25 ° C in summer and 16-18 ° C in winter. Another important point is that the daylight hours of chili peppers in natural conditions lasts 18 hours, so in winter the place where it will grow must be equipped with artificial lighting sources. Blue-violet lamps, or a combination of fluorescent lamps with conventional incandescent lamps, are best suited for this. The distance from the top of the plants to the lamps should be at least 25-30 cm.
Chili Pepper Care
Growing hot peppers at home
For growing peppers at home, it is recommended to choose not too deep pots, otherwise the root system of plants will be better developed than the fruiting top. As for the material, it is better to settle for plastic pots with drainage holes. Clay or terracotta containers often draw moisture from the soil, and they can simply dry out. In addition to maintaining the temperature and light conditions, caring for chili peppers consists of regular watering (the soil should be moist, but not too wet) and monthly feeding of plants - for this, mixtures that are used to fertilize tomatoes are suitable.
Watering and fertilizing peppers
As soon as the bushes reach a height of 20 cm, it is better to pinch the tops so that they branch well and form more fruits.
Growing hot peppers at home
Growing chili peppers in soil
The first question that many gardeners ask themselves is where is it better to grow chili peppers, in an open area or in a greenhouse? The answer to this question is unambiguous - in the greenhouse, you can maintain constant conditions of temperature and humidity, so the bushes can reach a meter in height and give a good harvest. In the open field, where these indicators can change several times a day, pepper grows worse, but this option is also possible.
Agrotechnology for growing pepper
For planting, you must choose a well-lit place with nutritious, neutral or slightly acidic soil. Peppers are extremely negative about stagnant water, high humidity and sunburn, therefore, several weeks or months before planting seedlings, it is necessary to improve soil drainage by adding a little river sand and compost. Young plants should be transplanted into the ground after they take root well and grow up to 12-15 cm, and only when the last spring frosts have passed.
- Before planting, the peppers must be hardened so that the change of residence does not become too much of a shock for them. To do this, the pots are taken out every day to fresh air, gradually lengthening the stay of the plants outside - first 2 hours a week, then add one hour every day until they can stay outside for a full 24 hours.
Be sure to temper the seedlings
- In the selected area, dig holes slightly larger than the root system, at a distance of 30 cm from each other (for some varieties, a greater distance may be needed).
Digging holes
- Plant the plants in holes, covering the top of the roots with soil, but not tamping the soil too hard, since chili grows best in loose, well-drained areas.
Remove the plant carefully from the pot, being careful not to disturb the earthy ball.
Plant chili
- After planting, the bushes should be watered, but it is very important to ensure that the soil is moist, not wet through and through.
Water abundantly
Before the transplanted plants begin to bloom and bear the first fruits, it will take at least a month, during which the peppers require careful maintenance. Watering is regular, not too plentiful, but also not meager: do not allow cracks or puddles to appear near the plants. The procedure is best done with warm water, in the morning or evening, when the sun is not too bright yet. It is better not to use the rain watering method - drops of water on the leaves can provoke sunburn. In addition, you need to regularly remove weeds, apply compost and fertilizers containing potassium monthly, and remove flowers and stems that grow inside the bush.
Red hot peppers in the garden
Diseases and pests
Most often, chili peppers are susceptible to a disease called "black leg", as well as wilting disease, with the former affecting mainly young plants, and the latter - adult bushes. To prevent such troubles, it is very important to maintain the temperature and humidity that are optimal for the peppers. The black leg, as its name suggests, is manifested by darkening of the sprouts, and the signs of wilting disease are the browning of the stem and leaf fall, which ultimately leads to death. It is best to remove and destroy diseased plants, otherwise they can infect healthy plants.
Blackleg
As for pests, the greatest damage to peppers is caused by aphids and spider mites.
Spider mite
They can be fought with the help of insecticides of organic origin or infusion of wood ash - pour half a glass of ash into an enamel bowl, pour 5 liters of boiling water, mix well and leave for 12 hours. This solution should be used to rinse the entire plant and lightly shed soil next to it.
One of the great benefits of chili peppers is that most types can be harvested at any time. Green peppers have a bitter taste, and after reaching technical ripeness, they acquire a pungent, pungent, spicy or sweetish taste.
Video - How to grow small-fruited bitter peppers on a windowsill?