Content
- 1 Organization of space
- 2 Room preparation
- 3 Creation of mycelium
- 4 Mycelium care
- 5 How to grow oyster mushrooms at home, video
- 6 What is this mushroom?
- 7 Where to start growing?
- 8 How to choose a room for growing oyster mushrooms?
- 9 What are the stages of growing oyster mushrooms?
- 10 How to cook oyster mushrooms?
- 11 Where to begin
- 12 Room requirements
- 13 Preparing the substrate for oyster mushrooms
- 14 Planting material
- 15 The most crucial moment
- 16 Incubation period
- 17 First fruiting. Important aspects
- 18 Second fruiting
- 19 And if there is no separate room
- 20 Several nuances
- 21 Video: technology for growing oyster mushrooms
It will be about tasty, healthy, unpretentious mushrooms, how to grow oyster mushrooms at home, about all stages of this process. After all, we all eat mushrooms with pleasure, we love to wander through the forest, collecting them, but if there are suitable conditions, interest, a great desire, then it is quite possible to grow mushrooms ourselves. It is worth noting the amazing adaptability of oyster mushrooms: they can grow on stumps, on tyrsa (sawdust), even on paper. They don't need soil. They are characterized by fast fruiting - 1-1.5 months.
Choosing a room and preparing a substrate

To grow oyster mushrooms, it is necessary to equip a non-residential place in advance. For these purposes, basements, garages (in which there are no cars), cellars, sheds or rooms specially equipped for these purposes are excellent. Before starting any preparatory work, it is necessary to decontaminate the place where we will grow oyster mushrooms.
A lime solution (4%) will do this well. Floor, walls, ceiling - all existing surfaces must be thoroughly disinfected, and then the room must be closed for a couple of days. After the specified time has elapsed, you need to open the doors wide open and thoroughly ventilate this place until the smell of lime completely disappears.
The technology of growing oyster mushrooms at home implies the choice of the material most suitable for these purposes. The substrate creates optimal conditions for growth: it can be wood chips, corn stalks, buckwheat or sunflower husks, and cereal stalks. Large fragments of the substrate on which we will grow oyster mushrooms should be finely chopped.

Any material you choose needs processing - pasteurization:
- Fill the substrate with warm water, not hotter +23 .. + 25 ° С, holding time - 20-30 minutes. At the same time, stir the mixture in a container, as if washing it from dirt.
- We drain the dirty water, squeeze out the material and re-fill it with hot water (+80 .. + 90 ° С) and press it down with a heavy object (under oppression). We leave the substrate like this for 6-7 hours, after which we drain the water and finally squeeze it out.
- To increase the productivity of the material and subsequent fruiting, it is necessary to saturate the substrate with active elements. Superphosphate, gypsum, limestone and urea are taken in a proportion of 0.5%: 2%: 2%: 0.5%.
- During the "fertilization" of the substrate with additives, its moisture content should be about 70% - this will allow the chemical elements to stay inside the mixture, not to leak out with water.
After the room is prepared and disinfected, and the substrate is pasteurized, it is the turn of laying the mycelium into the mixture. You can buy oyster mushroom mycelium in the mycological laboratory. You can choose the best quality product from the wide selection of commercial varieties of mushrooms. Specialized online stores are also at your service.
Pre-calculate the volumes - for sowing a 10-kilogram block, you will need 200-250 g of oyster mushroom mycelium (if it is of imported origin) or 100 g more if the raw material is domestic.
↑ to the table of contents ↑ How to grow oyster mushrooms at home step by step
The mycelium is added to the substrate at the rate of 300-500 g per 10 kg of the mixture. In this case, it is necessary to ensure that the temperature of the material at the time of adding the mycelium does not exceed + 30 ° C (so as not to ruin the raw material).
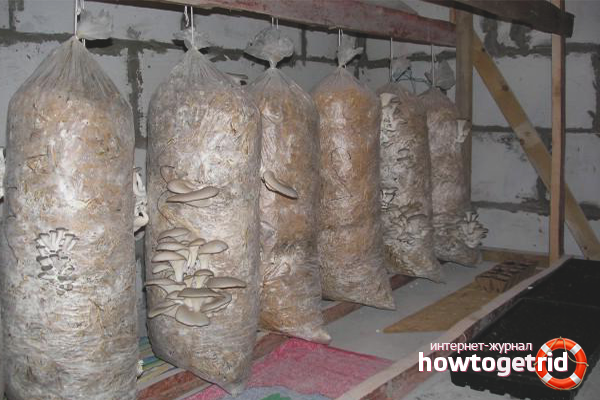
This is followed by the preparation of bags for laying the mixture and oyster mushroom mycelium.For these purposes, it is very convenient to use dense plastic bags and bags. Sizes 40 × 60 cm and 50 × 100 cm are the most optimal. We lay out the resulting composition in bags and carefully twist them, while there should be no air inside.

We make holes in the blocks with a knife. The incisions should be located arbitrarily - at a distance of 10-15 cm from one another. After the performed manipulations, the bags are stacked on top of each other (2-4 pieces each) or suspended on special hooks pre-installed in the ceiling or walls. There should be a distance between the bags to ensure comfortable air circulation.
Also, for growing oyster mushrooms, it is very convenient to use special wooden stakes on a stable basis - blocks with a substrate are simply strung on them in several pieces.
Growing oyster mushrooms at home in bags involves maintaining a certain temperature and light conditions. Thus, for full germination, mushrooms require a temperature level of about +18 .. + 24 ° С along with high humidity (90-95%).

Sometimes, for additional humidification, buckets of water are placed between the rows of bags, and the necessary air exchange is maintained with the help of fans. Ventilation is important in this case - the excessive release of carbon dioxide inhibits the growth of oyster mushrooms. No light is needed during the incubation period. Make sure that flies do not enter the room at all stages of growing and fruiting.
Growing oyster mushrooms at home includes an incubation period of approximately 14-17 days.
In the first days, the temperature inside the blocks rises, make sure that it does not exceed the level of + 30 ° С. If the temperature is about to reach a critical point, direct the running fan towards the bags. As mentioned above, such an indicator (elevated temperature) is detrimental to the mycelium. At the end of the incubation period, the blocks are covered with a white bloom - this is the beginning of germination of oyster mushrooms.
Growing at this stage involves maintaining certain conditions indoors:
- air humidity - not less than 80%, and preferably up to 90-95%;
- air temperature at the level of +12 .. + 17 ° С;
- the required 8-hour lighting is 100-170 lux (as on a cloudy day), ordinary day lamps will do;
- frequent ventilation.
It is possible to maintain humidity by sprinkling the walls and floor with a spray bottle, but the water should not get onto the blocks. This fruiting period lasts about 2 weeks; by the end of the term, the caps of the oyster mushrooms become quite large.
It's harvest time. In this case, you do not need to cut off the myceliums with a knife, but carefully twist them out of the bag with the substrate. After the first removal of the oyster mushroom, you should thoroughly ventilate the room and wait for the second round of fruiting.
The first harvest is the largest, the second is slightly smaller, the third is less than the second - that is, the yield waves follow each other in decreasing order.
The rest period between the "waves" is 8-10 days, and the "waves" themselves can be 4 or even 6.
The substrate, which has already served its term, becomes an excellent fertilizer for summer cottages.
↑ to the content ↑ How to grow oyster mushrooms at home on stumps
An excellent option for owners of summer cottages is the method of growing oyster mushrooms on stumps - this method does not require excessive efforts. For these purposes, it is better to choose freshly cut hemp, but you can also prepare it in advance. They should be placed in shaded areas where there is no access to sunlight, for example, under spreading tree crowns or under vineyards.
Stumps need to be soaked in water and kept for about 3-4 days, older specimens - a week. Then, using a drill (20-25 mm), you need to drill 8-10 holes 7-10 cm deep. These depressions are then filled with oyster mushroom mycelium, the top is covered with clay or clogged with moss.

The stumps must be constantly wet, for this they can be covered with cling film and placed in the basement for a month and a half. When the stumps are overgrown with mycelium (in appearance something like a white film), they can be taken out into the air, placed in shady places.
Studying the possibilities and options for ways to grow oyster mushroom at home, it should be recognized that this method does not require excessive efforts, it is ideal for the owners of summer cottages.
Important information - a prerequisite is the use of respirators and protective masks when working with mycelium, as well as during fruiting! If it enters the respiratory tract, fungal spores can seriously harm your health.
In this matter, commitment and patience will be required of you. Mushroom growing is truly a fun and rewarding activity. The topic of how to grow oyster mushrooms at home finds more and more fans among summer residents and enthusiastic gardeners. In addition to the presence of this tasty and rich product on the dinner table, the cultivation of oyster mushrooms is an interesting and profitable business. Try and grow oyster mushroom at home - a rich harvest for six months will undoubtedly please you.
Oyster mushroom is a low-calorie product rich in potassium, zinc, vitamins B and D, fiber and protein, which, among other things, is a sorbent that can cleanse the body of heavy metals and toxins. This extremely useful mushroom can be cultivated "handicraft", however, many are stopped by the laboriousness of the cultivation technology. The most difficult thing is to work out this procedure for the first time, having provided all the necessary conditions, while caring for the mushroom itself comes down to several tasks. But where to start growing oyster mushrooms at home for the first time, "from scratch"? You need to start this business with arranging a place for growing mushrooms. The availability of suitable premises and the ability to provide this capricious culture with the microclimate it needs determines whether it is worth making a trial attempt or abandoning the undertaking.
Organization of space
The easiest way to grow oyster mushrooms at home is extensive, when the mushrooms grow in their natural environment. This method is suitable for owners of home gardens - for oyster mushrooms you need a fairly shady corner of the garden. In addition, such a cultivation technology does not make it possible to get a crop at any time of the year, and its volume and quality depend on weather conditions.
More reliable and effective is the intensive method when favorable conditions are artificially created for the mushrooms. A specially equipped basement is suitable for growing oyster mushrooms. There are also reviews of successful experiments in cultivating mushrooms on glazed balconies. Such a balcony should be quite dark and damp, as is often the case on the first floors of multi-storey buildings.
Attention!
Oyster mushroom should not be grown in residential premises, since during the cultivation period mushrooms throw spores into the air, the ingestion of which will cause serious harm to health. Therefore, in a room where mushrooms grow, you should work only in a respirator and no longer than three hours in a row.
Room preparation
The room for the cultivation of oyster mushrooms must have the following parameters:
- the ability to stably maintain a temperature of 10-20 ° C in it;
- air humidity - in the range from 85 to 90%;
- the presence of a ventilation system;
- the ability to turn on lighting;
- mold free and clean.
Ideally, if it is a warmed, sealed basement with electricity and ventilation, heating and water supply systems. You will also need a mounting system for hanging substrate bags (slats, ropes) or racks.
 A remedy from which plants grow by leaps and bounds! Just water your plants with it ...
If it is difficult to ensure the regulation of the microclimate, it is necessary to equip two rooms (a separate one for the incubation period), each of which will have the parameters that are necessary for fungi to develop at a particular stage.
See also: "Growing ginger at home from root tubers".
A week before the appearance of the mycelium in the room, its sanitization should be started:
- Make sure there are no pests and, if necessary, carry out pest control.
- Cover the walls with an antifungal solution.
- Treat all surfaces with a bleach solution.
- Close the room as tightly as possible for two days.
- Ventilate for two days.
These procedures must be performed after each mycelium replacement.
Creation of mycelium
Experience shows that 3-4 kg of oyster mushrooms can be grown at home from 1 kilogram of mycelium. The planting material should be stored in the refrigerator at a temperature of 2-4 ° C. Subsequently, it will be possible not to buy mycelium, but to grow it from their crops.
Healthy!
When buying a mycelium, you need to smell it - high-quality material should have a pronounced aroma of forest mushrooms
Substrate preparation
Suitable as a substrate for oyster mushrooms:
- straw (from barley or wheat);
- husk of sunflower seeds, rice, buckwheat;
- corn stalks and ears;
- sawdust (only from deciduous trees).
The substrate does not have to be homogeneous, it is allowed to create mixtures of several components. The material must be dry, free from mold, rot and foreign matter. A good solution for beginners would be to purchase an already prepared substrate, otherwise it will need to be processed before planting.
Processing stages:
- Rinse and dry the substrate base.
- Go through and grind the material into fragments about half a centimeter in size.
- Pour boiling water over the mass and maintain a boil for one and a half to two hours - depending on the hardness of the base.
- Place the mass under the press for a day, allowing the excess liquid to drain.
Before planting, the substrate must be moist, but not wet. To check, squeeze a lump of mixture in a fist - with the correct degree of moisture, you will be able to squeeze out a few drops of water.
Mycelium bookmark
 It is advisable to carry out this procedure in a different room where the oyster mushroom is planned to be grown. Or, at least, fence off a small space for this purpose. This measure is intended to prevent infection of the mycelium. The room in which the bookmark is made must be clean, the work surface and growing bags must be disinfected with alcohol.
There are two ways to bookmark. You can mix the mycelium and substrate on the table and fill the growing bags with the resulting mixture. But more often they use the second method, which involves alternately filling the bag with layers of substrate and mycelium. The width of the layers should be as follows: 8 cm of substrate, 3 cm of mycelium, 15 cm of substrate, 3 cm of mycelium. This should be continued until the bag is filled, while the last should be an eight-centimeter layer of the substrate. The bag should be stuffed tightly, tamping the layers well.
See also: "How to grow cucumbers on the balcony at home."
Tightly tied bags must be perforated by making 2-4 cm long slots or holes along the diameter of a large nail at a distance of 10-15 centimeters. The blade or nail must also be disinfected with an alcohol solution before the procedure. At the bottom of the bag, from where the liquid will drain, the holes are made slightly larger.
Interesting!
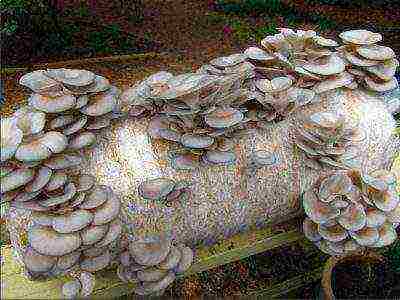
A very decorative way to grow oyster mushrooms is available to the owner of a private house - cultivation on a tree stump. To do this, channels or holes 3-4 cm deep are cut out in the wood of the stump, into which layers of sawdust and mycelium are placed (both the stump and sawdust must belong to a deciduous tree). After that, the stump is tightly wrapped in a transparent film. Such a stump will "bear fruit" for about five years.
Mycelium care
Incubation stage
 The prepared bags with mycelium and substrate are suspended from the mountings in the mushroom growing room. If this is not possible, it is allowed to put them vertically or put them on a rack at some distance from each other (you cannot put one bag on top of another). In the latter case, holes are made only on one, "upper" side of the bag.
The room temperature should be 20-25 ° C, the humidity should be about 90%. It is important that the temperature does not exceed 30 ° C, and its daily fluctuations do not make a difference of more than 1-2 ° C - failure to comply with any of these points will lead to the death of the mushrooms. Ventilation should be avoided and the room should be treated daily with a chlorine solution to avoid the appearance of mold and mildew.
The incubation period lasts about 18, not more than 25 days. Approximately 10 days after filling, the entire contents of the substrate and mycelium bag will turn white. After that, it is necessary to keep the bags under the same conditions for about a week. Then comes the cultivation period.
Cultivation stage
At this stage, the air temperature should be 11-16 ° C, humidity - 90-95%. A room with intensively growing mushrooms must be ventilated frequently (up to 4 times a day). Watering, or rather humidifying the bags by spraying warm water on them, should be done 1-2 times a day. 5 days after the start of cultivation, the mushrooms will need light (5 W per m2). You need to keep the mycelium under the light for 10 hours a day.
Interesting!
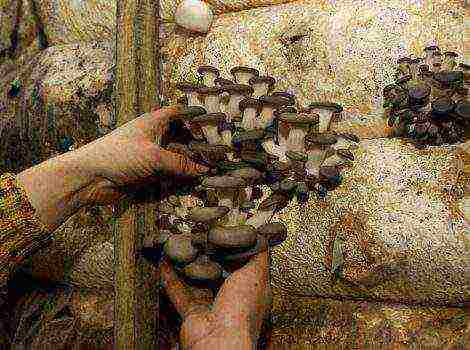
The air temperature affects the color of the caps of future oyster mushrooms. Growing at lower temperatures (11-12 ° C) will result in the formation of light-colored caps in the mushrooms, while in a warmer environment (maximum 20 ° C), mushrooms with dark caps will grow. The taste of the mushrooms, however, does not change.
12-15 days after the start of cultivation, the first harvest of oyster mushrooms will be obtained. The signal that the time to harvest has come will be the noticeably accelerated growth of mushroom caps. In any case, the mushroom must be removed before it turns yellow. It is better to twist mature specimens out of the substrate than to cut them off.
After harvesting, the room needs to be well ventilated and continue to care for the mycelium according to the same principles. After half a month, the second batch of oyster mushrooms will ripen. The third wave will be less productive, and after the fourth, it is necessary to make a new bookmark of mycelium. Before that, you need to sanitize the growing room.
How to grow oyster mushrooms at home, video
If you are looking for a way for yourself to earn money at home, then it may be a good option to grow various mushrooms and plants at home for subsequent sale. One of the most popular products is oyster mushrooms: growing such products is quite simple, and their plus is that you can not only sell them, but also prepare delicious dishes for your family from them.

What is this mushroom?
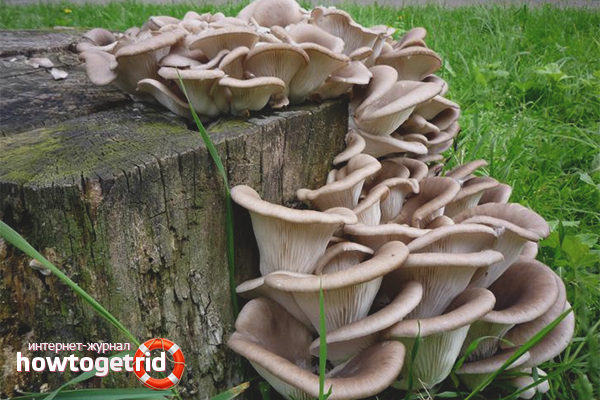
Oyster mushroom is a mushroom growing on dead trees and stumps, but now it is very easy to see it in almost any store. And all because this is one of the most unpretentious, albeit very valuable, types of mushrooms that can be grown even at home. Oyster mushroom is better known abroad as oyster mushroom.
Oyster mushroom is a rather large mushroom of gray or grayish brown color. Its cap, which resembles ears, can reach from 5 to 20 cm in diameter (due to the stiffness of the leg, only it is eaten). The mushroom grows in the form of a bouquet, in which there are up to 30 mushrooms with a total weight of about 2-3 kg.
Why is oyster mushroom so popular? It all lies in the beneficial properties of this mushroom:
- in composition, oyster mushrooms are similar to meat (contain vitamins C, E, D2 and group B);
- nutritional properties are comparable to fruits;
- in terms of phosphorus content, they are on the same level as fish;
- contain 10 out of 14 macro- and microelements necessary for the human body;
- reduce blood cholesterol levels;
- normalize blood pressure;
- remove radioactive substances from the body;
- have bactericidal properties;
- increase potency in men;
- refer to dietary nutrition, since the calorie content per 100 g of mushrooms is 38 kcal.
So, we figured out the properties of oyster mushrooms, and now it's worth talking about growing it for sale. What are the advantages of growing oyster mushrooms for sale? Let's take a look at everything in order:
- the mushroom is completely unpretentious;
- high level of productivity;
- excellent taste;
- minimal investment with high profitability;
- the possibility of growing all year round;
- does not require large areas. Any non-residential premises up to a basement, cellar or garage is enough;
- great demand for mushrooms in restaurants, cafes, pizzerias, shops and the market.
So, if you have decided that this business is interesting for you, then we will go directly to the process of growing oyster mushrooms.
Where to start growing?
To begin with, consider the question of how to prepare a special substrate:
First, the substrate for oyster mushrooms can be from:
- straw of wheat, barley or other cereals;
- hulls of sunflower seeds;
- sawdust or shavings of deciduous trees;
- corn leaves and stalks;
- buckwheat husks;
- reeds.
It is best to use straw with sunflower husk with the addition of corn leaves. To increase yields, it is recommended to add herbal flour, chalk, mineral additives, etc.
Secondly, all components must be clean, free from mold and signs of decay.
Thirdly, the substrate should be crushed to 0.5-4 cm.
Fourth, the substrate should be heat treated:
- we put it in a saucepan;
- fill with water so that it completely covers the surface;
- cook for 1.5-2 hours.
Fifth, after cooking, the water must be well drained, and the substrate must be cooled to 26-28 degrees Celsius. As a result, you should get a lump from which water does not flow, but when pressed, moisture appears.
So, the substrate is ready. Now let's prepare the room.

How to choose a room for growing oyster mushrooms?
When choosing a room, you should adhere to the following criteria:
- the ability to create a different temperature regime (depending on the stage of growing, different temperatures will be required);
- the presence of ventilation;
- the possibility of lighting;
- the floor of the room should be concrete or brick (you can fill it with rubble or sand);
- walls should not be wooden. It is better if they are plastered and whitewashed;
- the ceiling can be sheathed with insulation;
- it is more expedient to divide large rooms into smaller ones (for hygiene, as well as for establishing a year-round harvest).
Alternatively, you can grow them in the garage, although in the latter it is better to organize some kind of mini-production.
What are the stages of growing oyster mushrooms?
1. A special substrate is required for growing.
2. Since oyster mushrooms are grown in plastic bags, it is worth preparing them. The bags must be clean, it is best if they are treated with a quartz lamp or bleach solution (at least 2 hours). The bags need to make holes of 1-2 mm at a distance of about 4-5 cm from each other.
3. It is necessary to purchase mycelium (seed). By the way, you can store the mycelium before sowing it into the substrate in the refrigerator at a temperature of about 2-4 degrees Celsius. Grind the mycelium before adding it to the substrate.
4. The substrate and mycelium are placed in layers in approximately 20: 1 proportions, tamping well. Discard unused substrate.
5. The bags must be tightly tied and placed in a room with a temperature not exceeding 20 degrees Celsius (otherwise the mycelium will die). It is best to ventilate the room 3-4 times a day.
6. After 2 days, white spots will appear on the surface of the substrate (this is the development of the mycelium). At this time, it is important to check the temperature in the bags (it should not exceed 28 degrees Celsius). If the temperature has risen greatly, then you should lower the ambient temperature or pour cold boiled water over the bags.
7.After 1.5-2 weeks, the substrate will be completely covered with mycelium, after which the bags with the substrate should be kept for another 3-5 days under the same conditions. After this period, it is necessary to reduce the temperature to 12-15 degrees Celsius and use fluorescent lamps to create lighting (if there is natural light, then this is also an excellent option).
8. Do not forget about humidity: after the temperature drops, the level should be 85-95%.
9. After another 1.5-2 weeks, the rudiments of fruiting bodies will appear. Holes should be carefully made in these places, and if there are many rudiments, then polyethylene can be completely removed. The humidity should now be 95-100%.
10. After removing the polyethylene, the substrate should be watered, and the room should be constantly ventilated at least 4-5 times a day.
11. Fruiting bodies grow in about 1-1.5 weeks, and in the last days the caps grow intensively. The optimal size of the cap diameter for harvesting is 4-6 cm.
12. After the first harvest, it is not necessary to remove the substrate, since in 10-14 days the second wave of the appearance of fruit bodies will begin.
13. The spent substrate can be used as fertilizer.
So, we figured out the process of how to grow oyster mushrooms. And if you yourself want to taste its taste, then consider other questions.

How to cook oyster mushrooms?
Oyster mushroom is suitable for preparing almost any mushroom dishes. The main thing is to heat the mushrooms.
If you decide to just boil mushrooms, then boil them for no more than 20 minutes in salted water. If you decide to stew or fry, then you don't need to boil the mushrooms, this heat treatment will be enough.
If you are interested in the question of how to pickle oyster mushrooms, then there are two main ways: express pickling and the usual pickling process.
Express pickle is as follows:
- rinse with about 350 g of mushrooms and cut into pieces;
- boil 1 liter of water, add 2 tablespoons of vinegar, 3 teaspoons of salt, 1 tablespoon of sugar, a few leaves of laurel, garlic, black peppercorns to it;
- put the chopped oyster mushrooms in the filling, bring to a boil again;
- reduce heat and simmer for about 20 minutes;
- a couple of minutes before the end of cooking, add a dessert spoon of vegetable oil;
- cool mushrooms and serve with sliced fresh onions.
The usual pickling process:
- Cut 1 kg of peeled and washed mushrooms into pieces, cover with water and put on fire;
- bring to a boil, put on a minimum and cook for about 10 minutes, after the time has passed, drain the water;
- prepare the marinade:
- 2 onions, cut into half rings, pour 2 glasses of cold water and put on fire;
- add 1 tablespoon of salt, 10-14 black peppercorns and 3-5 laurel leaves;
- when the water boils, pour in 60 g of vinegar.
- add oyster mushrooms to the marinade, boil for 4-5 minutes and remove from heat;
- pour the mushroom marinade into sterilized jars and seal them tightly.
As you can see, these mushrooms are a great product: you can make good money on it, and if for some reason sales do not go, then it will become a good decoration for your table!
You can clearly see how these mushrooms are grown in this video:
Did you like the article? Share with your friends:
How to grow oyster mushrooms at home? By a certain technology. Then you don't have to spend money on buying mushrooms. And it will certainly be possible to safely eat them without fear of poisoning.

Where to begin
You always need to start by getting to know the experience of other people, so to speak - studying the materiel. There are many articles and videos about growing oyster mushrooms at home. After acquaintance, you will need:
Two rooms. One directly for growing, the second for the incubation period. It is assumed that this will be one room. Then it is necessary to strictly observe the temperature regime and regulate the level of air humidity.
- Nutrient substrate.Sold ready-made, packaged.
- The mycelium itself. Pay special attention to the expiration date.
- Fan. The most common, household.
- Antiseptic. Rubbing alcohol or chlorine solution.
- Rubber gloves, a gauze bandage for the face, a sharp knife, thick plastic bags.
Naturally, you have to be patient (a process of more than one day) and the desire to taste your own grown oyster mushrooms.
how to grow garlic from bulbs
Room requirements
For growing mushrooms at home, you need to allocate a separate room. It doesn't have to be a bedroom or living room. A basement, a cellar, a shed, a garage - they all fit perfectly. For the incubation period, the temperature should be maintained no higher than 24-26 ° С, the air humidity should be no more than 70%.
Separately, it must be said about cleanliness. Wash every centimeter with bleach is not worth it. It is better to treat it with a sulfur-smoke bomb or simply whitewash the walls with lime with the addition of copper sulfate. Then no extraneous mold will infect the mycelium.
The main condition is that all ventilation openings must be closed with a fine mesh. Mushroom flies strive to fly into the aroma of mycelium and ruin the whole idea from the very beginning.
For the period of germination and harvesting, the humidity in the room should be at the level of 80-95%, the temperature should not be higher than 18 ° C.
Advice. A basement or cellar is the most optimal room. In such places, there is always high humidity, and the temperature can be increased with an ordinary heater.
Preparing the substrate for oyster mushrooms
As a nutrient medium for growing oyster mushrooms at home, you can use any substrate available, as long as it contains cellulose. It is she who feeds on the mycelium. Experienced mushroom growers use sawdust, small branches or shavings. For beginners, it is best to use:
- barley straw
- sunflower seed husks
- corn stalks, leaves
- wheat straw
- buckwheat husk
- corn cobs
First of all, you need to carefully sort out the prepared raw materials. The mass must be clean and dry. The presence of mold or the presence of only the smell of decay already indicates that the raw materials are not suitable for growing oyster mushrooms.
After taking the mass, it is necessary to thermally process it for reliability. This will get rid of harmful bacteria, insect larvae, and at the same time moisturize it. For this, raw materials are poured into metal dishes, poured with clean water. Heat to a boil, boil for about 40 minutes. Then leave for 3 hours.
Then the excess water is drained, and the raw materials are put under a press to remove the remaining liquid. Alternatively, the substrate is poured into a tissue bag and hung.
As soon as the temperature of the mass drops to 24-26 ° C, you can start planting.
Advice. For the best result, a little fresh yeast is added to the raw material before planting. Approximately 50 g per 15 kg total weight.
how to grow a truffle at home
Planting material
It is very difficult to prepare a good quality mycelium on your own. Therefore, it is better to buy it from seed shops or from oyster mushroom growers. How many grams do you need? The calculation is very simple. For 10 kg of raw materials, you need about 400 g of mycelium.
First of all, before buying, you need to carefully examine the package with planting material. Gray or black spots, a distinct smell of ammonia are signs of incipient mold. This mycelium is not suitable for planting. The color of the vegetative body of the fungus should be from bright yellow to orange.
It is not recommended to order planting material through Internet resources. After all, the photograph may show something completely different from what will be in the package.
Advice. If the mycelium was purchased in advance, then it must be stored in the refrigerator before planting, no more than 9 days. Temperature 3-5 ° С is the most optimal.
how to grow an apricot tree from a stone
The most crucial moment
The substrate has been prepared, the planting material has been purchased and has already lain for a day at room temperature.We took a deep breath, we can start.
The most important thing is that there should be no slightest draft in the room. Fungal spores are very volatile. The slightest breath and then you can find oyster mushrooms in places that are completely unsuitable for them.
All instruments must be disinfected. Knife, tight bags, hands. You can wash it thoroughly with laundry soap or wipe it with aseptoline. Hands can be additionally protected with gloves. They also need to be treated with an antiseptic. Be sure to wear a gauze bandage. The ingestion of fungal spores into the lungs is not a very pleasant event.
The process itself:
- The mycelium is crumbled without opening the bag.
- Raw materials are poured into the bottom of the prepared plastic bag.
- Oyster mushroom vegetative body is laid out on top with a thin layer.
- Layers are repeated all the way to the top.
- The bag is tightly tied.
In order for the mushrooms to sprout faster, it is advisable to lay out the planting material closer to the walls of the bag than to the center.
You can do it even easier. Raw materials are poured into prepared bags, small cuts are made with a knife. Mycelium is laid in them, then sealed.
Advice. Don't take huge packages. Anyway, oyster mushrooms will only grow outside. The most optimal size holds about 5-8 kg of the finished mixture.
how to grow an oak from an acorn
Incubation period
So, the bags are full, tied, awaiting their fate. Which? Warmth, darkness, tranquility. The incubation room should have a temperature not higher than 18-20 ° C. The substrate gets very hot, the vegetative body may die. It is impossible to ventilate the room, the emitted carbon dioxide is very important for the germination of oyster mushrooms.

What to do? Fan! Saves the day, helps to cool the bags, does not make drafts.
One day after the laying, the previously made incisions are opened. If the mycelium was laid in layers, then it is imperative to make cuts with a sharp knife. Vertical 2-3 cm high, horizontal about 0.5 cm wide, the distance between them is 10-12 cm.
Packages should not fit tightly to each other. A free space of at least 7-9 cm is left between them.
The incubation time depends on the variety, ranging from 16 to 24 days. Detailed information can be obtained from the manufacturer, or read on the packaging.
It is important to periodically enter the room and inspect the bags. The appearance of black spots and an unpleasant odor indicates that the tools and materials were not sufficiently disinfected. The normal state is a light, almost white color of the contents, a characteristic pleasant aroma of mushrooms.
Advice. Inspection is carried out as quickly as possible. Any light is now not desirable for the mycelium.
First fruiting. Important aspects
It is important not to miss the moment when oyster mushroom rudiments appear. They can be seen with the naked eye. On a white background - gray tubercles. In the meantime, bags with mushrooms are transferred to another room, or the conditions are changed in the same:
- The temperature is reduced to 10-18 ° C.
- Increase air humidity up to 90-95%.
- They put artificial lighting with fluorescent lamps for a period of at least 8 hours per day.
- Be sure to ventilate the room. At least 4 times a day.
The main factor for the first fruiting period is moisture. At the same time, it is impossible to water the oyster mushrooms. They can rot before reaching their size. The ideal way out of the situation would be frequent spraying of walls, floors, spraying water in the air. Care should be taken not to get water on the mushroom caps and bags.
Advice. If light-colored oyster mushrooms are needed, then the temperature is kept at 12 ° C. To obtain a dark cap, the temperature is raised to 18 ° C.
how to properly grow watermelons in the open field
Second fruiting
After the first crop is harvested, the mushroom blocks are not thrown away! Oyster mushroom gives up to 5 harvests from one planting. The mushroom holder rests for about 12 days, then pleases with a new portion of a healthy treat. It is very important not to change conditions during breaks between harvests. Then one block can bear fruit up to 4 months.
And if there is no separate room
How to grow oyster mushrooms at home if there is no separate room? It's also very simple! When did this stop a Russian person, if he needed to? There is no basement, which means growing on stumps is a completely alternative option.
This will require:
- Smooth hemp of non-resinous trees.
- Planting material.
- A secluded spot in the garden with good shade.
- Burlap, film.
- Enthusiasm is welcome.
The wood must be healthy, free from mold, rot or debris. It is advisable that before use it lay no longer than 10 months. Poleshki are soaked in clean water for 3 days, pressing with oppression so that they do not float.
Then holes are made in the tree, preferably with a drill. The diameter is about 1-1.5 cm, the depth is about 5-7 cm. The oyster mushroom planting material is poured inside, the holes are plugged with moss. If there is no drill at hand, then they simply cut off the upper end of a log 5 cm thick, apply a vegetative body. The resulting saw cut is placed on top. For reliability, you can strengthen the structure with nails.
The procedure is carried out in March. Before the logs are planted in the garden, they are folded into a pyramid, covered with burlap and foil. Periodic ventilation, regular inspection for mold growth is the key to success. After a while, the mycelium will completely braid the wood, the hemp will turn white.
With the onset of warm weather (mid or late May), the woods are planted in the garden. They choose shaded places: under trees, vines, on the north side of buildings. The stumps are installed vertically, burying 12-15 cm into the ground. Damp foliage or soaked old barley grains can be placed at the bottom of the holes.
Taking care of the logs consists only in carefully watering the soil around it if the weather is dry and hot.
Subject to the technology, the first harvest appears from the end of August. Lasts until mid-November depending on climate and weather conditions. For the winter, the poles are covered with spruce branches or covered with leaves. Ideally birch. They disinfect well and do not allow the mycelium to rot.
Of course, this method is not suitable for industrial cultivation of oyster mushrooms, but for home use it is very good. Good yields can be obtained at low cost. The only negative is seasonality. Oyster mushrooms do not grow under the snow in winter.
Advice. Such poles with bunches of oyster mushrooms can become an original decoration of the site. They can be cooked as much as there is enough free land. There will be enough mushrooms for themselves and their relatives and for sale.
how to grow medlar
Several nuances
- All work on the cultivation of oyster mushrooms is recommended to be carried out in a gauze bandage. Mushrooms secrete a large number of spores, which can lead to allergies.
- When harvesting, oyster mushrooms are twisted by hand from the substrate. When cutting with a knife, you can infect the mycelium with putrefactive bacteria, then you will have to forget about the next crops. The remaining roots of the mushrooms also harm the mycelium. A large amount of moisture is lost through them.
- If the slightest signs of mold appear in one of the bags, you must immediately remove it from the room so that the rest does not become infected.
- The spent substrate is an excellent fertilizer, it will be a pity to throw it in the trash. Taking it out into the garden or pouring it out in the garden is the right decision. By the way, the remains of mycelium next year can give a small harvest of oyster mushrooms, if you pour the mixture somewhere near a reservoir or under trees.
- When grown indoors, the first two waves of fruiting are the most productive. The second and third years of cultivation are the most prolific on the woodlands.
Growing oyster mushrooms on your own at home is a very real thing. Just follow the instructions and enjoy the result!
how to plant and care for barberry
Video: technology for growing oyster mushrooms