Content
- 1 Where to begin
- 2 Requirements for the premises
- 3 Preparing the substrate for oyster mushrooms
- 4 Planting material
- 5 The most crucial moment
- 6 Incubation period
- 7 First fruiting. Important aspects
- 8 Second fruiting
- 9 And if there is no separate room
- 10 Several nuances
- 11 Video: technology for growing oyster mushrooms
- 12 "Children of the Underground"
- 13 What mushrooms grow on
- 14 Stage one: mycelium - building up mass
- 15 Fruiting process
- 16 Care for future mushrooms
- 17 Value and use
- 18 Technologies for growing oyster mushrooms at home
- 19 How to grow mushrooms in an intensive way
- 20 Extensive breeding of oyster mushrooms
- 21 Harvesting and storage
- 22 Where to grow oyster mushrooms
- 23 The main stages of breeding oyster mushrooms
- 24 Growing methods
- 25 Oyster mushroom care rules
How to grow oyster mushrooms at home? By a certain technology. Then you don't have to spend money on buying mushrooms. And it will certainly be possible to safely eat them without fear of poisoning.
Where to begin
You always need to start by getting to know the experience of other people, so to speak - studying the materiel. There are many articles and videos about growing oyster mushrooms at home. After acquaintance, you will need:
Two rooms. One directly for growing, the second for the incubation period. It is assumed that this will be one room. Then it is necessary to strictly observe the temperature regime and regulate the level of air humidity.
- Nutrient substrate. Sold ready-made, packaged.
- The mycelium itself. Pay special attention to the expiration date.
- Fan. The most common, household.
- Antiseptic. Rubbing alcohol or chlorine solution.
- Rubber gloves, a gauze bandage for the face, a sharp knife, thick plastic bags.
Naturally, you have to be patient (a process of more than one day) and the desire to taste your own grown oyster mushrooms.
how to grow garlic from bulbs
Requirements for the premises
For growing mushrooms at home, you need to allocate a separate room. It doesn't have to be a bedroom or living room. A basement, a cellar, a shed, a garage - they all fit perfectly. For the incubation period, the temperature should be maintained no higher than 24-26 ° С, the air humidity should be no more than 70%.
Separately, it must be said about cleanliness. Do not wash every centimeter with bleach. It is better to treat it with a sulfur-smoke bomb or simply whitewash the walls with lime with the addition of copper sulfate. Then no extraneous mold will infect the mycelium.
The main condition is that all ventilation openings must be closed with a fine mesh. Mushroom flies strive to fly into the aroma of mycelium and ruin the whole idea from the very beginning.
For the period of germination and harvesting, the humidity in the room should be at the level of 80-95%, the temperature should not be higher than 18 ° C.
Advice. A basement or cellar is the most optimal room. In such places, there is always high humidity, and the temperature can be increased with an ordinary heater.
Preparing the substrate for oyster mushrooms
As a nutrient medium for growing oyster mushrooms at home, you can use any substrate available, as long as it contains cellulose. It is she who feeds on the mycelium. Experienced mushroom growers use sawdust, small branches or shavings. For beginners, it is best to use:

- barley straw
- sunflower seed husks
- corn stalks, leaves
- wheat straw
- buckwheat husk
- corn cobs
First of all, you need to carefully sort out the prepared raw materials. The mass must be clean and dry. The presence of mold or the presence of only the smell of decay already indicates that the raw materials are not suitable for growing oyster mushrooms.
After taking the mass, it is necessary to thermally process it for reliability. This will get rid of harmful bacteria, insect larvae, and at the same time moisturize it. For this, raw materials are poured into metal dishes, poured with clean water. Heat to a boil, boil for about 40 minutes. Then leave for 3 hours.
Then the excess water is drained, and the raw materials are put under a press to remove the remaining liquid. Alternatively, the substrate is poured into a tissue bag and hung.
As soon as the temperature of the mass drops to 24-26 ° C, you can start planting.
Advice. For best results, a little fresh yeast is added to the raw material before planting. Approximately 50 g per 15 kg total weight.
how to grow a truffle at home
Planting material
It is very difficult to prepare a good quality mycelium on your own. Therefore, it is better to buy it from seed shops or from oyster mushroom growers. How many grams do you need? The calculation is very simple. For 10 kg of raw materials, you need about 400 g of mycelium.
First of all, before buying, you need to carefully examine the package with planting material. Gray or black spots, a distinct smell of ammonia are signs of incipient mold. This mycelium is not suitable for planting. The color of the vegetative body of the fungus should be from bright yellow to orange.
It is not recommended to order planting material through Internet resources. Indeed, the photograph may show something completely different from what will be in the package.
Advice. If the mycelium was purchased in advance, then it must be stored in the refrigerator before planting, no more than 9 days. Temperature 3-5 ° С is the most optimal.
how to grow an apricot tree from a stone
The most crucial moment
The substrate has been prepared, the planting material has been purchased and has already lain for a day at room temperature. We took a deep breath, we can start.
The most important thing is that there should be no slightest draft in the room. Fungal spores are very volatile. The slightest breath and then you can find oyster mushrooms in places that are completely unsuitable for them.
All instruments must be disinfected. Knife, tight bags, hands. You can wash it thoroughly with laundry soap or wipe it with aseptoline. Hands can be additionally protected with gloves. They also need to be treated with an antiseptic. Be sure to wear a gauze bandage. The ingestion of fungal spores into the lungs is not a very pleasant event.
The process itself:
- The mycelium is crumbled without opening the bag.
- Raw materials are poured into the bottom of the prepared plastic bag.
- Oyster mushroom vegetative body is laid out on top with a thin layer.
- Layers are repeated all the way to the top.
- The bag is tightly tied.
In order for the mushrooms to sprout faster, it is advisable to lay out the planting material closer to the walls of the bag than to the center.
You can do it even easier. Raw materials are poured into prepared bags, small cuts are made with a knife. Mycelium is laid in them, then sealed.
Advice. Don't take huge packages. Anyway, oyster mushrooms will only grow outside. The most optimal size holds about 5-8 kg of the finished mixture.
how to grow an oak from an acorn
Incubation period
So, the bags are full, tied, awaiting their fate. Which? Warmth, darkness, tranquility. The incubation room should have a temperature not higher than 18-20 ° C. The substrate gets very hot, the vegetative body may die.It is impossible to ventilate the room, the emitted carbon dioxide is very important for the germination of oyster mushrooms.
What to do? Fan! Saves the situation, helps to cool bags, does not make drafts.
One day after the laying, the previously made incisions are opened. If the mycelium was laid in layers, then it is imperative to make cuts with a sharp knife. Vertical 2-3 cm high, horizontal about 0.5 cm wide, the distance between them is 10-12 cm.
Packages should not fit tightly to each other. A free space of at least 7-9 cm is left between them.
The incubation time depends on the variety, ranging from 16 to 24 days. Detailed information can be obtained from the manufacturer, or read on the packaging.
It is important to periodically enter the room and inspect the bags. The appearance of black spots, an unpleasant odor indicates that the tools and materials were not sufficiently disinfected. The normal state is a light, almost white color of the contents, a characteristic pleasant aroma of mushrooms.
Advice. Inspection is carried out as quickly as possible. Any light is not desirable for mycelium right now.
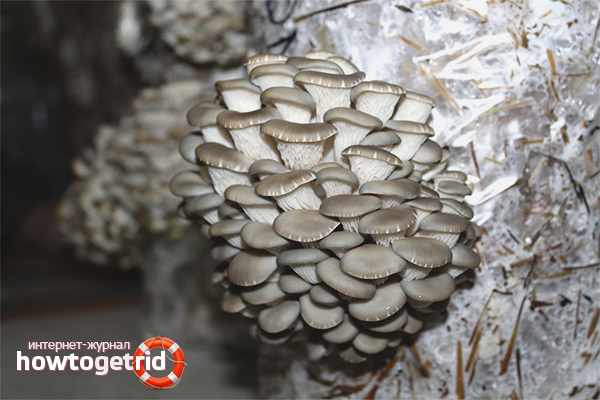
First fruiting. Important aspects
It is important not to miss the moment of oyster mushroom rudiments. They can be seen with the naked eye. On a white background - gray tubercles. In the meantime, bags with mushrooms are transferred to another room, or the conditions are changed in the same:
- The temperature is reduced to 10-18 ° C.
- Increase air humidity up to 90-95%.
- They put artificial lighting with fluorescent lamps for a period of at least 8 hours per day.
- Be sure to ventilate the room. At least 4 times a day.
The main factor for the first fruiting period is moisture. At the same time, it is impossible to water the oyster mushrooms. They can rot before reaching their size. The ideal way out of the situation would be frequent spraying of walls, floors, spraying water in the air. Care should be taken not to get water on the mushroom caps and bags.
Advice. If light-colored oyster mushrooms are needed, then the temperature is kept at 12 ° C. To obtain a dark cap, the temperature is raised to 18 ° C.
how to properly grow watermelons in the open field
Second fruiting
After the first crop is harvested, the mushroom blocks are not thrown away! Oyster mushroom gives up to 5 harvests from one planting. The mushroom holder rests for about 12 days, then pleases with a new portion of a healthy treat. It is very important not to change conditions during breaks between harvests. Then one block can bear fruit up to 4 months.
And if there is no separate room
How to grow oyster mushrooms at home if there is no separate room? It's also very simple! When did this stop a Russian person, if he needed to? There is no basement, which means growing on stumps is a completely alternative option.
This will require:
- Smooth stumps of non-resinous trees.
- Planting material.
- A secluded spot in the garden with good shade.
- Burlap, film.
- Enthusiasm is welcome.
The wood must be healthy, free from mold, rot or debris. It is advisable that before use it lay no longer than 10 months. Poleshki are soaked in clean water for 3 days, pressing with oppression so that they do not float.
Then holes are made in the tree, preferably with a drill. The diameter is about 1-1.5 cm, the depth is about 5-7 cm. The oyster mushroom planting material is poured inside, the holes are plugged with moss. If there is no drill at hand, then they simply cut off the upper end of a log 5 cm thick, apply a vegetative body. The resulting saw cut is placed on top. For reliability, you can strengthen the structure with nails.
The procedure is carried out in March. Before the logs are planted in the garden, they are folded into a pyramid, covered with burlap and foil. Periodic ventilation, regular inspection for mold growth is the key to success. After a while, the mycelium will completely braid the wood, the hemp will turn white.
With the onset of warm weather (mid or late May), the woods are planted in the garden. They choose shaded places: under trees, vines, on the north side of buildings.The stumps are installed vertically, burying 12-15 cm into the ground. Damp foliage or soaked old barley grains can be placed at the bottom of the holes.
Taking care of the logs consists only in carefully watering the soil around it, if the weather is dry and hot.
Subject to the technology, the first harvest appears from the end of August. Lasts until mid-November depending on climate and weather conditions. For the winter, the poles are covered with spruce branches or covered with leaves. Ideally birch. They disinfect well and do not allow the mycelium to rot.
Of course, this method is not suitable for industrial cultivation of oyster mushrooms, but very good for home use. Good yields can be obtained at low cost. The only negative is seasonality. Oyster mushrooms do not grow under the snow in winter.
Advice. Such poles with bunches of oyster mushrooms can become an original decoration of the site. They can be cooked as much as there is enough free land. There will be enough mushrooms for themselves and their relatives and for sale.
how to grow medlar
Several nuances
- All work on the cultivation of oyster mushrooms is recommended to be carried out in a gauze bandage. Mushrooms secrete a large number of spores, which can lead to allergies.
- When harvesting, oyster mushrooms are twisted by hand from the substrate. When cutting with a knife, you can infect the mycelium with putrefactive bacteria, then you will have to forget about the next crops. The remaining roots of the mushrooms also harm the mycelium. A large amount of moisture is lost through them.
- If the slightest signs of mold appear in one of the bags, you must immediately remove it from the room so that the rest does not become infected.
- The spent substrate is an excellent fertilizer, it will be a pity to throw it in the trash. Taking it out into the garden or pouring it out in the garden is the right decision. By the way, the remains of mycelium next year can give a small harvest of oyster mushrooms, if you pour the mixture somewhere near a reservoir or under trees.
- When grown indoors, the first two waves of fruiting are the most productive. The second and third years of cultivation are the most prolific on the woodlands.
Growing oyster mushrooms on your own at home is a very real thing. Just follow the instructions and enjoy the result!
how to plant and care for barberry
Video: technology for growing oyster mushrooms
Growing mushrooms at home and in private plots has not yet become common. What for? After all, and so the forests are filled with white mushrooms, mushrooms, chanterelles and boletus mushrooms every autumn. But there are mushrooms that either do not grow in our forests at all, or do it with great reluctance. They can perfectly diversify the menu, and also make good money on them. For example, an oyster mushroom plantation in your own dacha is more than real! It is an ideal mushroom for household cultivation. Delicious, inexpensive (in terms of labor costs and the cost of the technological process). Oyster mushroom can be grown in different ways, but there is an option chosen by the time and experience of many amateur mushroom growers.
Growing oyster mushrooms at home
"Children of the Underground"
For the first phase of growing mushrooms, which is their reproduction with the help of mycelium (mycelium), you can do with any ground room - a shed, for example.
The second, main phase is better for mushrooms to "live" in a cellar or basement, that is, underground in the cool.
Growing oyster mushrooms - photo
Both premises for a mushroom plantation must be carefully prepared and equipped with ventilation, electricity and water supply. From the inventory, you will definitely need thermometers to control the degree of heating and cooling of air in the room. The equipment will need a water heater.
By the way! Temperature regulation in a room with growing oyster mushrooms is best controlled by conventional ventilation. To do this, you will have to provide for the possibility of wide opening of windows or doors.
There are several mandatory procedures that must be performed in a building or underground room where mushrooms will grow.
- The premises are whitewashed with lime and then dried using active ventilation.
The walls are whitewashed with lime - photo
- Then the place of cultivation is sprayed with bleach (4% solution).
- After processing, the doors / windows are closed and the inside is left to disinfect for two days.
- Then the object is ventilated for the same amount of time.
- A similar disinfection treatment for conveyor re-cultivation must be performed every cycle.
What mushrooms grow on
Oyster mushrooms differ from their forest counterparts in that they do not grow in soil. They need a substrate for successful growth. You can make a suitable mixture from many components:
- dried straw of field cereals;
- the shell of sunflower seeds is suitable;
- it is very good to use sawdust of trees, but not conifers, but deciduous ones;
- corn stalks, reeds are suitable.
Substrate preparation
All this will become an ideal "soil" for oyster mushroom plantations. The components can be used separately, and it is acceptable to mix them in arbitrary combinations and proportions. The ingredients must be dry. Before use, they need to be crushed (the optimal size of fractions is in the range of 0.5-3 cm). The resulting mixture should have a pleasant odor, not contain traces of mold, fungal debris and foreign objects.
Prepare the substrate on the surface of the earth; this is not necessary in the cellar. For proper preparation and compliance with all regulations, certain procedures must be followed.
- The crushed mass is poured with boiling water until it is completely covered, to destroy all kinds of competing organisms in the form of other varieties or harmful microflora.
Moistening and stirring the substrate
- The substrate thus poured, steamed to the state of "porridge", is rammed into large barrels or other containers suitable for the capacity and left to swell up to half a day.
- Then the mass is taken out of the barrel and laid out for complete cooling and evaporation of some of the moisture on a wide film with a thin layer.
Stage one: mycelium - building up mass
Oyster mushroom mycelium
The preparation is over. Mycelium purchased. You can proceed to the first stage, the task of which is to build up its mass.
Advice! How to check the quality of the mycelium of the oyster mushroom progenitor? He must have some characteristics. Snow-white color, with a small proportion of substrate blotches with a darkish tint. The second parameter is smell. Despite the fact that this mushroom does not grow in the forest, the mycelium should smell like forest mushrooms.
- In a dense transparent polyethylene bag, with a volume of 20 to 60 liters, a layer of wet cold substrate is laid. Layer height - 8 cm. Carefully leveled by hands.
Laying the substrate
- Lay on top, ramming tightly, mycelium, in a three-centimeter layer (you can simply break it into small pieces to tamp without voids).
- Then the substrate is laid and compacted, but already with a layer of 15 cm.
- Again a three-centimeter layer of mycelium.
Mushroom substrate bags
- The procedure should be repeated until all the acquired mycelium ends. In this case, there should be a substrate layer of 8 cm on top.
- The resulting "puff cake" is compacted, the bag is tied tightly with twine and set in a vertical position.
- The entire surface of the bag is pierced with a long disinfected (can be ignited on fire) nail, 120-150 mm in size. Not every 25 cm² has one hole.
How to make a perforation of a mushroom block
Advice! There should be more holes at the bottom: this is necessary to drain the liquid constantly forming in the package.
Immediately after the procedure, a clear separation of the layers into dark and light (substrate and mycelium) will be visible through the film of the bag.
The temperature required to increase the mycelium mass should be kept at + 18 ... 26 ° С.Germination of mycelium spores will begin in three days, and ten days later you can observe a miracle. The whole mass will turn into mycelium and become completely white. After that, the bag is untied and multiplication is continued to the required amount.
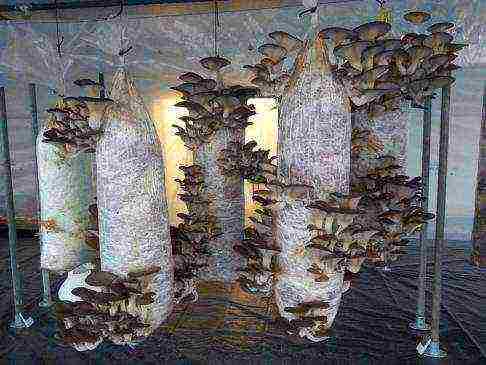
Hanging substrate bags and growing oyster mushrooms
One full standard bag gives life to 8-10 other bags with interlayer (substrate + mycelium). When, finally, the required amount of mycelium for your purposes is formed, then 2 bags from every ten are left for the subsequent increase in mass, and 8 are transferred to obtain the long-awaited harvest of oyster mushrooms.
Fruiting process
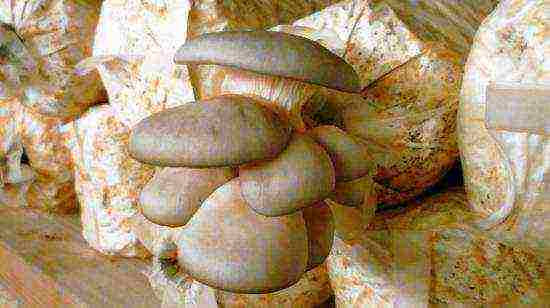
Growing oyster mushrooms
The whitened substrate must be kept in the "native" bag for another 5-6 days after ripening, if this bag is sent for fruiting. During this period, it will finally mature, become "monolithic", will be as dense as possible.
To activate the beginning of the crop formation, bags with completely processed substrate mycelium are kept at + 3 ... 5 ° С for another three days. To enable the mushroom fruiting body to grow, it will need room to grow. To create it, holes 3-5 cm in diameter are cut out in polyethylene (one per square meter). The packages are moved to an underground room in temperature conditions of + 10 ... 16 ° С. Here they are installed at a distance of at least 30-40 cm from each other, always vertically. To make it more convenient to water the mushroom "plantation", the bags are placed with ribbons in three rows with a 70 cm gap between them.
Advice! If you are the happy owner of a high basement, then you can also place bags with future mushrooms on additional shelves located along the walls. Such placement will increase the used area, and hence the mushroom yield.
Care for future mushrooms
Once a day, the bags should be slightly moistened, and the room itself should be thoroughly ventilated, since in the process of fruiting oyster mushrooms, a large amount of carbon dioxide is formed. As for the lighting in the dungeon, during the first week it will not be needed at all, and then it would be nice to illuminate the room. Mushrooms will grow in any case - with or without light - but backlighting can significantly increase the yield.
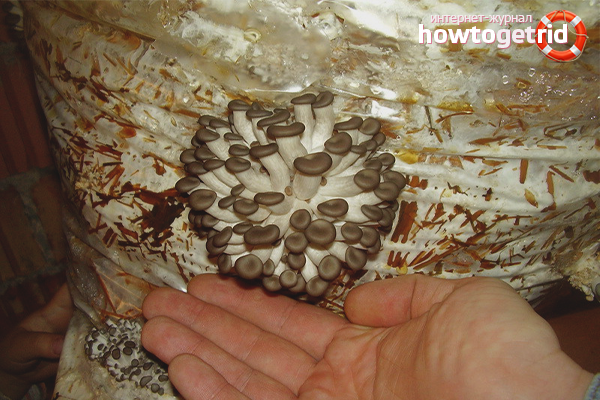
Watering oyster mushrooms
If all conditions are met, the first fruiting will begin in 10 days. When the mushroom heads begin to lighten (after the whitish, dark and greyish brown stages), you can harvest. After some time (about three weeks), the second fruiting will begin with a much lower productivity. Two series of fruiting, taking into account a well-chosen base and high-quality mycelium, yield up to 45 kg of oyster mushrooms from 100 kg of the substrate used. When the harvesting of mushrooms of the second second wave is completed, the packages are taken out of the basement, and, after sanitizing the underground room, a new batch is placed in it. This conveyor method makes it possible to carry out 6 double fruiting cycles per year.
Basic rules for growing oyster mushrooms
Oyster mushrooms grow in a bag of hay
Table. Growing conditions for cycles
| 1 | Germination of mycelium bodies into the substrate | 10-14 | 20-24 | 90 | not required |
| 2 | Ripening and fruiting | 4-5 | 22-28 | 95 | not required |
| 3 | Growth of the fruiting body (1 wave) | 7-10 | 15-19 | 85 | 100 |
| 4 | Growth of the fruiting body (2nd wave) | 7-10 | 13-17 | 85 | 100 |
| 5 | Harvesting, unloading the substrate, disinfection of the chamber | 2 | does not matter | does not matter | not required |
Value and use
Fresh Oyster mushrooms
Oyster mushroom is highly valued for its beneficial nutritional properties. In taste, it is not inferior to the rest of the cultivated mushrooms and even surpasses them, and in terms of the value of the composition, it has no competitors at all. Not hard, but dense texture, light bread flavor and subtle aniseed notes on the palate. For cooking - a godsend, since oyster mushroom is a versatile mushroom. It can be boiled, fried, canned (pickled and salted), stewed, dried. The only product that the popular mushroom doesn't go well with is fish.Otherwise, in salad, hot, soups, as a stand-alone culinary masterpiece - oyster mushrooms are wonderful.
Fresh oyster mushroom - photo
Important! A prerequisite for the preparation of any mushroom dishes is its heat treatment. In its raw form, it contains chitin, which is not absorbed and rejected by the human body.
Growing a mushroom, given the right premises and some free time, can become not only a useful and nutritious hobby, but also a way to make good money by supplying healthy and tasty oyster mushrooms to the retail network.
Video - Room for forcing mushrooms Oyster mushroom
Video - Harvesting Oyster mushrooms
Mushrooms are a popular and healthy product that our housewives know well. Growing oyster mushrooms at home will allow you not only to cook delicious meals for the whole family, but also to get a stable source of income. This type of business is highly profitable.
Technologies for growing oyster mushrooms at home

Growing mushrooms is a rewarding hobby and a profitable business
Oyster mushrooms give a high yield. With 1 kg of these mushrooms, you can get 3 kg of mycelium in a short time. They are unpretentious to the place of growth and feel good in a small area. Such conditions will not affect the amount of the crop.
Growing oyster mushrooms can be a profitable business. To engage in this type of business, it is enough to have a garage or basement at your disposal. You can also grow mushrooms for your own consumption. An ordinary window sill is suitable for this purpose.
There are two growing technologies:
- intense;
- extensive.
The first option involves the growth of mushrooms in artificial conditions. Intensive technology allows you to get an equal amount of crops throughout the year. But in this case, you will need to purchase special equipment to maintain the microclimate necessary for the growth of the mycelium. This will entail financial costs.
The extensive method consists in growing mycelium in natural conditions. This technology does not require significant investment. But the yield depends on the season and climatic conditions.
How to grow mushrooms in an intensive way
Site preparation
Oyster mushrooms are always grown in a sterile room. For this, pre-treatment is carried out with 1% chlorine solution or lime. The temperature must be kept at +18 ° C .. + 26 ° C. If there are ventilation systems in the room, they should be turned off for the period of laying. Doors must be tightly closed.
Selection and processing of the substrate
Any dry organic matter is suitable as a substrate for growing oyster mushrooms.
For oyster mushrooms, you can use various plant residues. It can be:
- stalks and stalks of corn;
- sawdust of non-coniferous wood;
- vine;
- reed;
- sunflower husk;
- wheat and rye straw.
Any material available will do. If straw is used as a substrate, it must be chopped up. This can be done with an ax or knife. Crushed straw to 5-10 cm. This procedure will help to avoid the formation of voids, the presence of which negatively affects the harvest.
Important! You can only use fresh straw that does not have a moldy smell.
The next stage of preparation is heat treatment. Under natural conditions, oyster mushrooms do not grow on the substrate, since their development is impeded by various microorganisms, including mold. Heat treatment eliminates these competing mycelium. This can be done in two ways:
- using pasteurization;
- by sterilization method.
When grown at home, the first method is used. The substrate is placed in a metal container, poured with boiling water, tightly closed with a lid and left for 2-4 hours. Note that it needs to be chilled before being placed in the bags.
Sterilization involves the use of autoclaves and is applied in a production environment.
Video: practical tips for processing the substrate
Formation and installation of blocks with mycelium
Mycelium blocks for oyster mushrooms are formed from bags or boxes
- For growing oyster mushrooms, you can use plastic bags or boxes. It is necessary to pay special attention to the size of the container so that the substrate does not dry out and does not overheat. The size of the bags should correspond to the indicators of 50x100 cm, boxes - 20x40x60 cm.
- For planting, a substrate is used, the temperature of which is +20 ° C ... + 30 ° C. Mycelium should not be added to a hotter mass, this can lead to the death of the mycelium.
- If the oyster mushrooms were in the refrigerator, they must be kept for 24 hours at room temperature before planting.
- Then they are placed in a container and crushed by hand until the grains are separated.
- Observe the sterility of the planting material. Work with rubber gloves disinfected with 1% sodium hydrochloride.
There are two ways to add mycelium:
- In accordance with the first method, the mass is formed in several layers, alternating the substrate with the planting material.
- The second method involves uniform mixing of the components:
- when using bags, shake them after filling;
- then the top is wrapped around the neck to achieve a snug fit of the substrate to the surface;
- 12 holes must be made on both sides, each with a diameter of 10 mm. Cover the neck with tape;
- the amount of mycelium should be 3-5% of the weight of the substrate. An increase in the mass of oyster mushrooms up to 7% is allowed;
- after packaging, the containers are placed in a place for germination.
Important! The number of fungi relative to the substrate must be at least 3%, otherwise there is a possibility of mold.
Video: Forming Mushroom Blocks
Mycelium care
To ensure a good harvest, it is necessary to observe temperature conditions, as well as maintain the required level of humidity.
Oyster mushroom growth is carried out in two stages:
- incubation;
- fruiting.
The first one lasts 14-18 days. During this time, the room must be kept at a temperature of + 24 ° C, humidity - 75–90%. There is no need for lighting and ventilation. After a few days, a white bloom can be seen on the surface of the substrate mass.
Important! Avoid overheating as this can cause mycelial scabs to develop. The presence of such a formation will lead to a decrease in yield. A crust can also appear due to planting an excessive amount of oyster mushrooms.
If an unpleasant odor emanates from the substrate mass with mycelium, moisture is released and the appearance of black, orange or green spots, then this indicates an infection with mold or bacteria. Such bags or boxes must be removed from the premises immediately.
The second stage of cultivation is fruiting. During this time, the temperature regime in the room is changed, ventilation and lighting are provided to the mushrooms. There are two strains of oyster mushrooms:
- shockless;
- shock.
For mushrooms of the first category, a temperature level of +20 ° C must be ensured. After 5 days, the indicator begins to decrease to + 15 ° C. This process is carried out gradually and lasts 5-6 days. Oyster mushrooms with a shock strain need a more significant decrease in temperature. During the first 2-3 days of fruiting, they should be within 4-5 ° C. Then the temperature is raised to + 12 ° C .. + 16 ° C and maintained at this level throughout the entire period.
At this time, the mushrooms need ventilation. They give off carbon dioxide, which must be removed. As a result of oxygen deficiency, the bodies of the fruits are deformed and lose their presentation. But excessive ventilation should also be avoided, dry air is especially harmful to fungi. Under its influence, small fruits dry out, caps of large oyster mushrooms are deformed.
When creating lighting, you need to focus on the size of the room.A 100 W light bulb is used in an area of 15–20 square meters. Lack of light leads to intensive development of the stem, while the fruiting body does not grow to the required size.
The humidity level should not fall below 70%. When growing a small amount of oyster mushrooms, they can be sprayed with a spray bottle. Direct moisture to fruiting bodies.
Extensive breeding of oyster mushrooms
Preparing stumps or logs
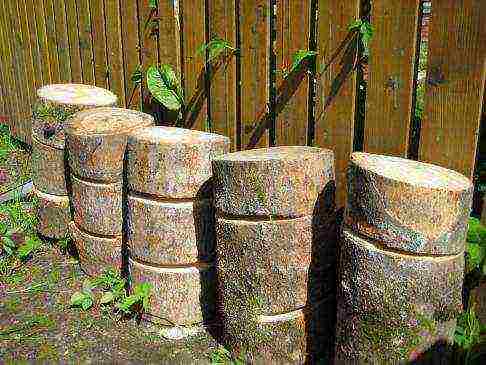
Stumps for growing oyster mushrooms
To implement the extensive method, wood species are used on which oyster mushrooms grow in nature: poplar, birch, aspen, beech, oak, hornbeam. The length of the logs should be 25-30 cm.
Important! Do not use wood with a diameter of less than 15 cm. This will negatively affect the yield.
The logs are placed in water, where they are soaked for a week. The wood should have a moisture content of 80–90%. Freshly cut logs do not need to be subjected to this procedure.
Sowing mycelium
Sowing is started at the end of winter or with the onset of spring. The logs are used to form vertical columns up to two meters high. A layer of grain mycelium 1–2 cm thick is applied to the upper end of each wood segment. The next log is placed on it, which is subjected to a similar treatment. One piece of wood will require 70-100 g of mycelium.
Video: instructions for sowing mycelium
Planting hemp in the ground

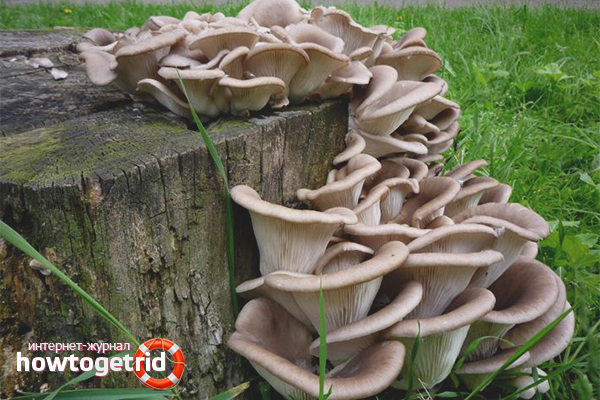
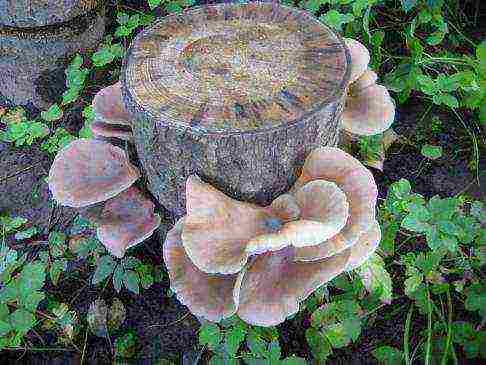
Planting an oyster mushroom stump in the ground
- In May, logs that have already been overgrown with mushrooms are placed in the soil. To do this, choose shaded places near the trees. If there is no suitable site, it can be created using awnings.
- Each log is buried 10-15 cm.
- The segments are arranged in rows. You need to keep a space of 50 cm between them.
Mushroom colony care
During the incubation period, the columns are covered with burlap or straw to maintain the required moisture level. For this purpose, it is not recommended to use a film material - it prevents the penetration of air, which is necessary for the development of fungi.
The wood will be overgrown with mushrooms within two months. In the room where the oyster mushroom logs are installed, the temperature should be at +10 ° C .. + 15 ° C. The air should be humidified, but water should be avoided on the wood. During fruiting, care involves moderate watering of the soil in dry weather.
Video: practical recommendations for caring for oyster mushrooms
Harvesting and storage
When using stumps, the yield is less abundant than when planting in bags
Oyster mushrooms bear fruit several times. With intensive cultivation, the first harvest is obtained in 10-14 days, it is 70% of the total amount. During the second fruiting, 20-25% are harvested, during the third - 5-10%. Oyster mushrooms can continue to yield crops, but their amount will be insignificant.
Important! In economic terms, it is advisable to collect mushrooms only during the first two fruiting.
Extensively grown mushrooms begin to harvest in August or early September. In the first year, approximately 600 g of oyster mushrooms are obtained from one log. Cuts of wood for the winter period are left in the same place. After a year, the number of mushrooms increases. One log gives 2–2.5 kg of oyster mushrooms. The most abundant harvest is obtained during the second and third years of cultivation.
Oyster mushrooms bear fruit in clusters. In the process of collecting, you need to cut them off completely, without leaving even small mushrooms. If the splice is damaged, they will not develop. For storage, use boxes, boxes or baskets.
Important! It is not recommended to repeatedly transfer mushrooms from one container to another, this will ruin their appearance.
Video: harvesting from tree stumps
The storage time depends on the temperature. At +2 ° C .. + 4 ° C oyster mushrooms will not lose their appearance and taste for two months. When you are in a room where the temperature reaches +7 ° C, this period is reduced to 1 week.And at room temperature, mushrooms are stored for no more than a day.
If you decide to grow oyster mushrooms not only for your own consumption, but also for organizing a business, you need to think about ways of implementation. You can sell products in several directions:
- One possible option is vegetable markets. Use a display stand to grab the attention of potential buyers.
- Another area of sale is catering establishments. Offer free product samples first. If the quality of the mushrooms meets the required level, you will not have to look for other marketing options.
- You can also sell oyster mushrooms to supermarkets and grocery stores. But be prepared to face significant competition here. You may have to lower prices for the product. But if the volume of sales is large, it will increase the profitability of the business, as well as justify the discounts.
Breeding oyster mushrooms does not require significant material costs and great efforts. Anyone can organize home production, even without experience in this area and special knowledge. By following the step-by-step instructions, you will get a high-quality harvest, which will allow you to organize a profitable business.

Until recently, oyster mushrooms were considered a delicacy, but today you can enjoy them all year round.
Everything you need: a room free from human habitation, material for growing and full care, observing which, in a few weeks you can harvest the first harvest of oyster mushrooms.
After reading our article, you will learn how to grow oyster mushrooms with your own hands, what nuances of care are important for breeding them, what is the best way to harvest and where to store it.
Where to grow oyster mushrooms
Oyster mushrooms are usually grown in cellars, basements, in greenhouses, at home - in principle, any non-residential premises are suitable for this, although many mushroom pickers claim that growing oyster mushrooms in an apartment is dangerous to health.
For the growth of mushrooms, high humidity is necessary, creating which, you risk not only your own health (allergic cough, high body temperature), but also damage your own home (mold on the walls).
An ideal place for sowing and growing oyster mushrooms is a greenhouse. But, even there, the production of mushrooms is a daily painstaking work and control over the process.
If you decide to grow oyster mushrooms on your own in artificial conditions at home, remember to thoroughly disinfect the room. To do this: treat the walls and floor with a 4% bleach solution, and after two days, ventilate it.
The main stages of breeding oyster mushrooms
The process of breeding oyster mushrooms includes several stages:
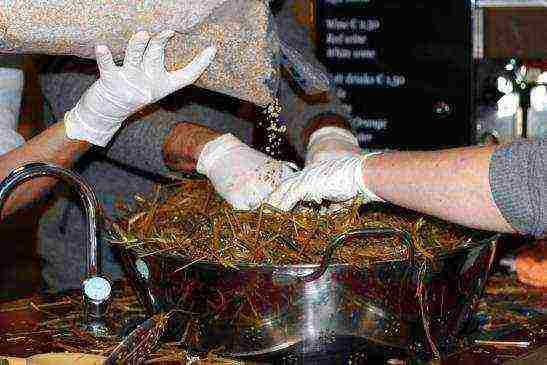
Preparation and processing of the substrate
The substrate is a breeding ground for the growth of fungi, a kind of soil. As a raw material for the substrate, you can use, for example, sunflower husks, fresh straw, buckwheat husks. The main condition for cooking is clean material.
It is better to grind the substrate. To avoid the ingress of harmful microorganisms and foreign particles into it, the substrate is treated with steam (heat treatment). For this: the substrate (for example, take 10 kg) is placed in a container and heated.
Cook the substrate for two hours in a row. Next, drain the water and cool the substrate to a temperature of 25 ° C. The most common technology for processing a substrate today is xerothermal technology.
The essence of this process is that the substrate under the influence of steam is heated to 100 ° C and kept for a certain amount of time (1.5 hours in the case of using straw). After the specified period, the substrate is moistened with water.
Formation of mushroom blocks
Mushroom blocks are polyethylene bags with a size of 350x800 mm, filled with a substrate.For their formation, the substrate and the mycelium (mycelium) are placed in layers in the packages pre-treated with steam, alternating between them. You can easily buy mycelium on the Internet.
The top layer is a substrate. After filling, the bag is tied. Next, we make small holes (1-2 mm) in the bag, leaving a distance of 10 cm between them.
Seedling care
After the formation of mushroom blocks, the incubation period begins (the period of oyster mushroom maturation). At this stage, it is important to create proper oyster mushroom care. Monitor the temperature in the bags (the optimum temperature is + 20 ° C). In addition, the room must be ventilated.
Incubation lasts 2-3 weeks, after which the overgrown mycelium is transferred to another room (nursery room) for growing.
Fruiting
On 7-10 day after transferring the mycelium to a new room, the first rudiments of fungi appear. At this stage, it is important to increase the air humidity to 100%... For this, the floor and walls of the room are sprayed with water. You need to ventilate the room even more often.
And also, mushrooms need lighting before 10 hours a day. Additional lighting can be created using ordinary fluorescent lamps.
Harvesting
It is believed that the correct harvest is the twisting of oyster mushrooms from the substrate. The fact is that when cutting them with a knife, there is a risk getting into the mycelium of microorganisms.
In one room you can spend 4-5 rotations (continuous cultivation) for a year.
Note! After harvesting, the premises are washed with water, disinfected and thoroughly ventilated.
Growing methods
We examined the technology of growing oyster mushrooms, now we will dwell on its methods in more detail. Consider the two most popular and, as practice shows, effective methods of artificially growing oyster mushrooms:
- Extensive method - in natural conditions;
- Intensive method - growing in a special room using a substrate.
Extensive cultivation methods
Oyster mushrooms can be grown in this way on sawdust, shavings, on stumps left in the forest, after tree felling, as well as on fruit-bearing garden trees.
Instructions for the extensive method of growing oyster mushrooms on stumps:
- Preparing the stump for planting oyster mushrooms. The diameter of the stump is 20-40 cm, the length is 30-40 cm. It is best to use a freshly cut stump;
- We set the stump in a small depression, on the bottom of which we lay the substrate (for example, wheat). We also add mycelium (seed) there;
- Place the prepared stump in the recess and cover it with soil.
From time to time, the stump needs to be watered. No other maintenance work is required. The crop can be obtained in the same season when planting was carried out. It is best to plant mushrooms in the spring.
You can also grow oyster mushrooms using wooden blocks. For this:
- We prepare the bars. To do this, we cut them off from a freshly cut hardwood tree. We soak them in water for a week;
- We put the bars on top of each other, and on the end of each we pour the mycelium (mycelium) about 100-150 g. Another way to introduce the mycelium is to drill small holes (10-12 mm) in the bar;
Recommendation! The diameter of the finished bars should be 20-40 cm. The length of each bar can be up to half a meter.
- We wrap the bars with cellophane wrap to prevent the mycelium from drying out;
- On the sides of the bar we make holes with a diameter of 10-12 mm for the mycelium. We cover them with moss, wet sawdust or straw. 10 holes should be enough.
Instructions for growing oyster mushrooms on sawdust:
- We fill up the substrate (nutrient medium) with a layer of 10-15 cm in a previously prepared trench and spray it with a suspension of "mushroom spores" for better reproduction of oyster mushrooms. The depth of the trench should be 15-20 cm. Width - 40-60 cm;
- We prepare the wells for the introduction of the mycelium. The depth of the holes is 5-7 cm. We put 10-20 grams of mycelium in them;
- We cover the holes with branches, cover with polyethylene film and pour a small layer of earth on top.
The first harvest can be expected after 2-3 months.
Intensive cultivation methods
For growing oyster mushrooms in an intensive way, the substrate is important. The substrate can be tree sawdust, cereal straw or sunflower husk.
Let's consider the most widespread technology of artificial cultivation of oyster mushrooms in bags.
This process consists of the following steps:
- Chopped straw is poured into a large tank and filled with water;
- Then a fire is made under the tank. While the straw is "boiled" at a temperature of 70-80 degrees for 8-12 hours, they prepare purchased plastic bags or make themselves from a plastic sleeve. Bags are used in sizes 40 by 60 cm or 50 by 100 cm;
- The water is drained from the tank. The straw is placed in bags and stacked in layers, alternating each layer of straw with a layer of mycelium. At this stage, you can add 10% bran. An obligatory component of the substrate is a 1-2% bioactivator (slaked lime);
- Small holes are made in bags with mycelium (diameter 2 cm). The bag itself is filled with a substrate for 2/3 of the volume;
- The necks of the bags are tied with a rope and set in an upright position;
- Watering the bags. Moreover, the first 5 days, watering is carried out with extreme caution - it is important to prevent water droplets from falling on the bags. Further - using a hose at least twice a day.
Important! The air humidity in the room where the oyster mushrooms grow should be 90-100%.
General growing conditions exist for the normal growth of mycelium. Pay attention to them:
- The mycelium can be sown when the substrate cools down to a temperature of +22 degrees, it easily crumbles and does not stick to the hands;
- The mycelium is introduced at the rate of 150-180 grams of mycelium per one mushroom block (6-8 kg of substrate).
Oyster mushroom care rules
To effectively grow oyster mushrooms at home and get a harvest, you must follow the generally accepted rules:
- The room temperature should be + 22-25 degrees;
- The temperature of the contents of the bag itself should be +28 degrees;
- Air humidity in the room - 90-95%. For this, several cans of water can be installed in the room;
- There must be good ventilation between the bags. They can be stacked on specially made racks or hung from the ceiling;
- Growing temperature should be reduced to + 12-18 degrees;
- For half a day, the room should be illuminated with fluorescent lamps;
- Good air flow is the key to an excellent harvest. If the room is small, you can install ordinary fans and open windows and doors more often. But for rooms with large areas, ventilation with special equipment is needed;
- In premises where oyster mushrooms are grown, it is advisable to wear protective masks. The mask will help prevent allergies and the associated suffocating cough;
- An irrigation system is indispensable. Oyster mushrooms are moisture-loving mushrooms. Remember to water them twice a day.
Oyster mushrooms are delicious, nutritious and natural. But their main advantage is profitability, i.e. ease of growing. By the way, you can cultivate these mushrooms both for yourself and for sale. The main thing is to master the technique of growing and put a little effort into it.
You will learn more about how to grow oyster mushrooms at home in this video.:
Rate the article
(
estimates, average:
out of 5)


