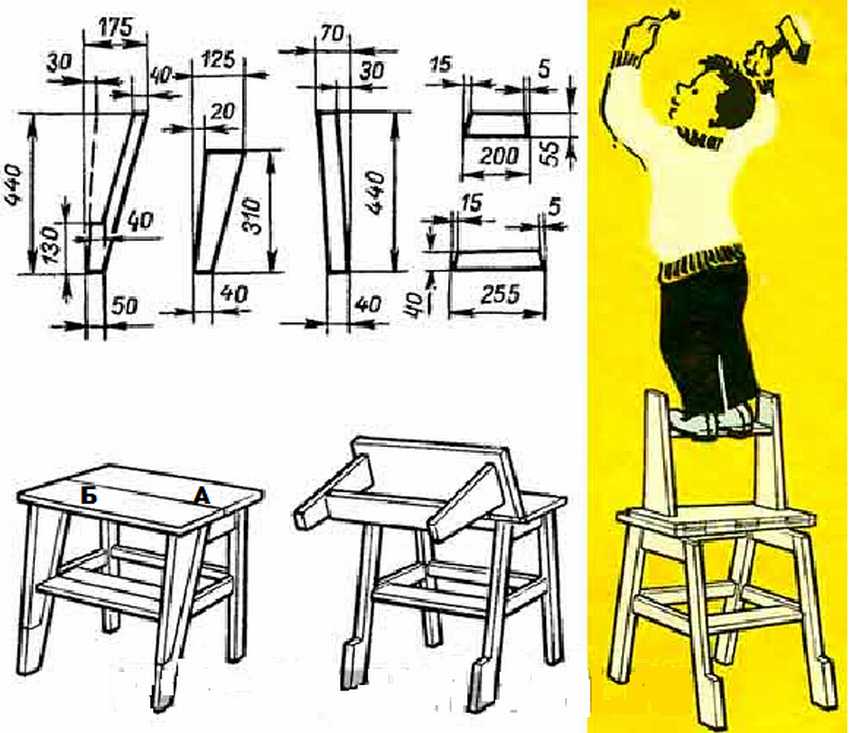
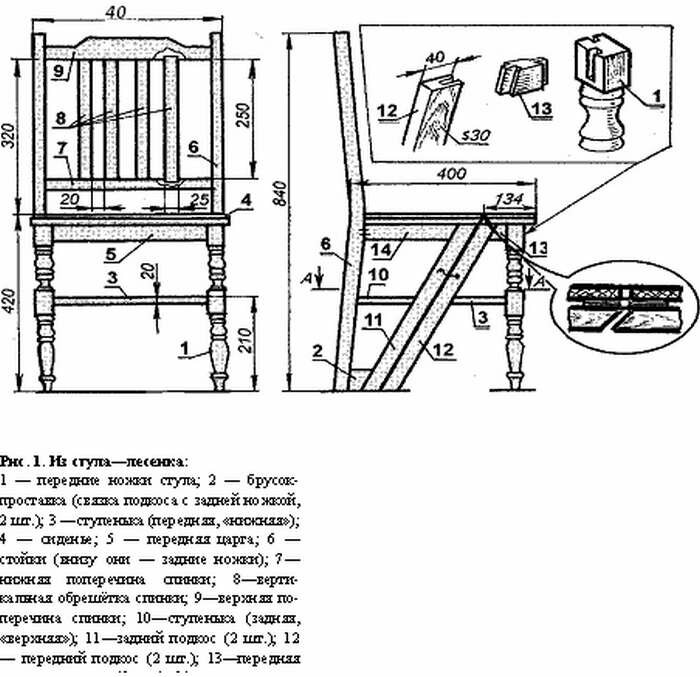
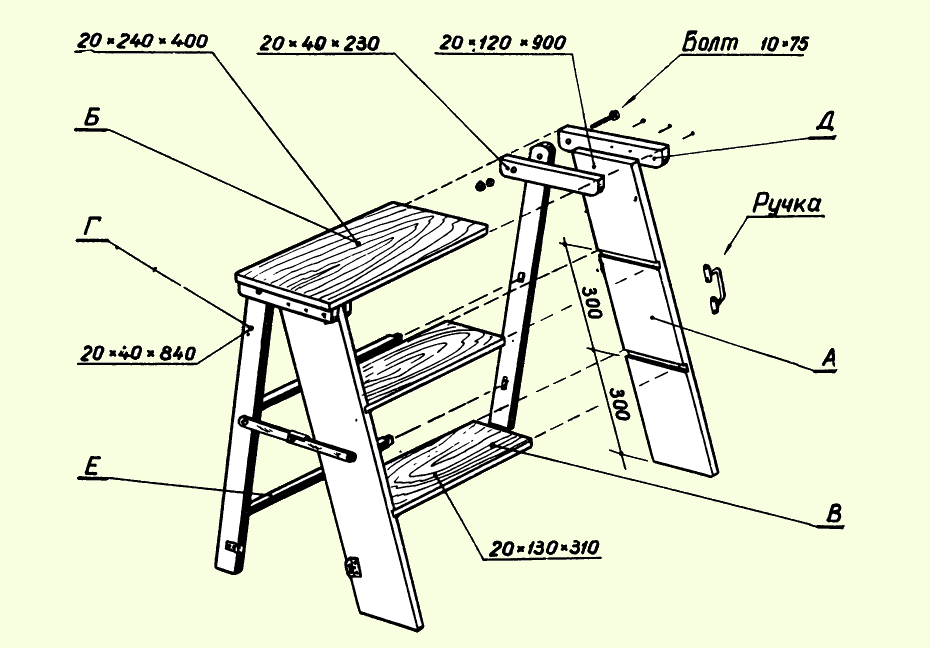
Drawings and dimensions of parts
Before you design a stepladder chair with your own hands, you need to study in detail the drawings and dimensions of the future craft. There are several types of this design:
- transforming chair;
- high stepladder stool;
- ladder chair;
- a stepladder stool with a spiral module.
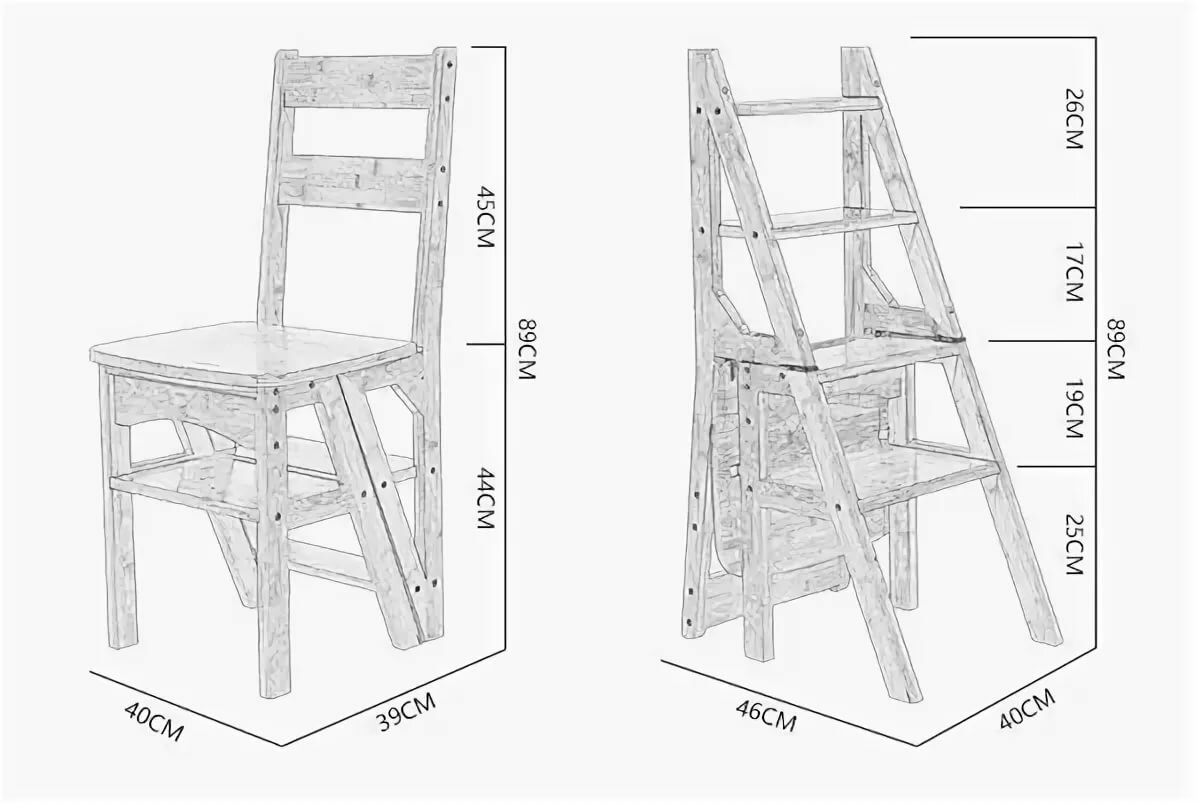
The first model is a transforming chair. When it is of a folded type, it cannot be distinguished from a simple chair with a back. And to get a step-ladder, you just need to expand the elements of the product. If this chair is well designed, it will look beautiful in different interior designs. If the step-ladder has an unfolded or folding appearance, then it will consist of three steps.
The second model is a high stepladder stool. In its design, it has a high chair and a pull-out module, which, if possible, can be pushed under the stool seat. A type of ladder stool is a ladder stool. It comes with or without a back.
There is another type of stepladder chair - this is a stool that has standard sizes. From under the seat of this stool, steps can be extended in a spiral. This chair has many functions, it is unusual in its appearance both in the unfolded type and in the folded one. If you need to make a transforming chair, you must first develop a scheme. It is possible to use the prepared drawings with dimensions or to make the drawings yourself, having examples of designing a suitable model.
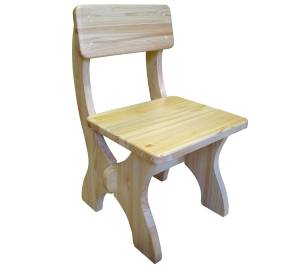
If you rely on the standards, then the seat should be located at least 41 centimeters from the floor. The base of the ladder chair must be at least 41 centimeters deep. Now you need to decide on the height of the structure. You can use the standard specifications or add 11-16 centimeters on top. To make the product more stable, you can use a wide base.
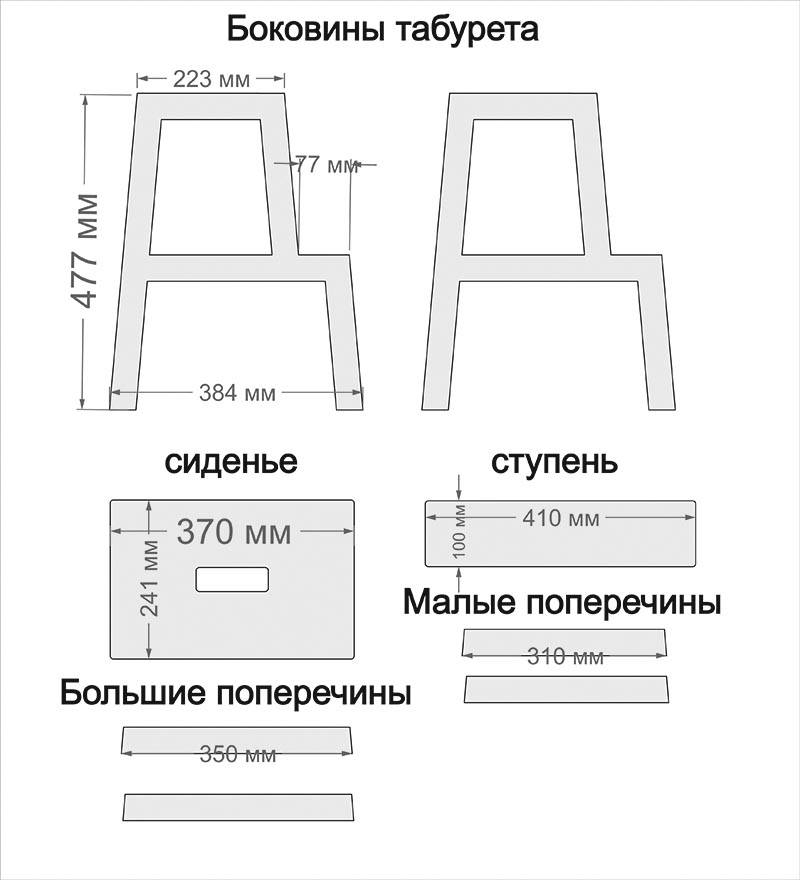
In all drawings of the step-ladder chair, the dimensions of such parts are indicated:
- front and rear sidewalls;
- slats for the back of a chair, seat, steps and so on;
- supports that fold either sequentially or smoothly.
The future structure must have a minimum of 3 steps. The dimensions of the legs should guarantee the quality of the product in various positions. The shape of the supports is similar to the letter "A", since the planks must be in an inclined position and connected by a crossbar. In order for the structure to be stable, you need to know that the tilt angle of the tsar and legs is 80 degrees. The steps should have a distance between themselves no more than 21 centimeters so that the stepladder chair is comfortable to operate. The design has a seat, which should be divided into 2 parts, the division goes along the placement of the central supports.
As soon as the dimensions of the model and the methods of fastening the parts have been determined, the diagram must be transferred to a piece of paper with millimeter markings. It is necessary to thoroughly draw all parts of the product and follow the order of installation of parts. Having all the relevant sketches, you need to prepare a template for the blanks. Using carbon paper, you can transfer the image of the future structure onto a piece of plywood or wood.
Design features
Since you are planning to make a step-ladder with your own hands, you must first consider the device of such a ladder. In essence, this is a more advanced model of an attached design. Its type and purpose may vary. The simplest ladders are adapted only to get to the upper tiers, but nothing more.
There are more advanced models. For example, if you are already making a stepladder, there is no better option than a transformer. It can be used as a folding or regular ladder.Also, the transformer has a spacious upper platform, which serves to ensure the convenience of construction work at a height, that is, it plays the role of a scaffold.
The indisputable advantage of the stepladder is that this design is very compact with its level of convenience and ergonomics. That is why they enjoy such success to this day.
The design of the ladder is essentially two connected ladders
How to do it yourself
Making furniture requires some skills when working with tools, the ability to work with drawings, know the basic requirements for the quality of work performed.
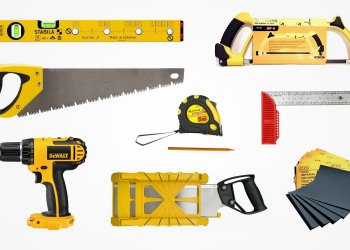
Required tools and materials
For the manufacture of wood products, you need tools at hand for cutting, grinding, drilling, fastening, painting. A set of tools for carpentry work:
- hacksaw;
- Sander;
- screwdriver;
- hammer;
- electric drill;
- paint brushes;
- clamps.
If the design contains parts with a complex configuration, then you will need a jigsaw. The presence of an electric jointer and a circular saw facilitates and improves the quality of carpentry work.

Consumables (adjusted depending on the model):
- drill;
- joiner's glue;
- self-tapping screws;
- screws;
- dowels;
- sandpaper;
- varnishes and paints;
- loops.
The choice of solid wood depends on the preferences of the manufacturer.
You can make a wooden step stool from the following types of wood:
- pine trees;
- birch;
- linden;
- acacia;
- walnut;
- oak;
- beech.
The most budgetary option is to use multi-layer plywood. The sheet thickness of 2-3 centimeters can withstand a weight load of up to 80 kilograms.
Preparatory work
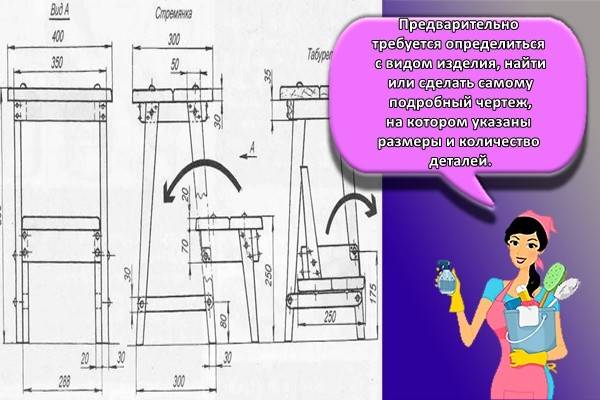
First, you need to decide on the type of product, find or make the most detailed drawing, which indicates the dimensions and number of parts.
Based on the project, a calculation is made:
- by the amount of wood;
- Supplies;
- components.
The manufacturing technology and the tool required for this are determined.
Procedure
According to the drawing, you can prepare patterns for the curly parts of the furniture-stairs.
The sequence of operations (can be adjusted depending on the selected model of the step stool):
- The necessary parts are cut from the array of canvas or blanks.
- The workpieces are sanded, including the ends (for plywood cutting - cut edges).
- Carpentry glue is worn on the ends of the step blanks, connected and fixed until completely dry in clamps.
- Markings are made on the legs for drilling holes for fasteners.
- Drill holes for connections.
- Make the assembly.
The assembly begins with the side guides, to which the legs and steps are attached. The top step is installed last.
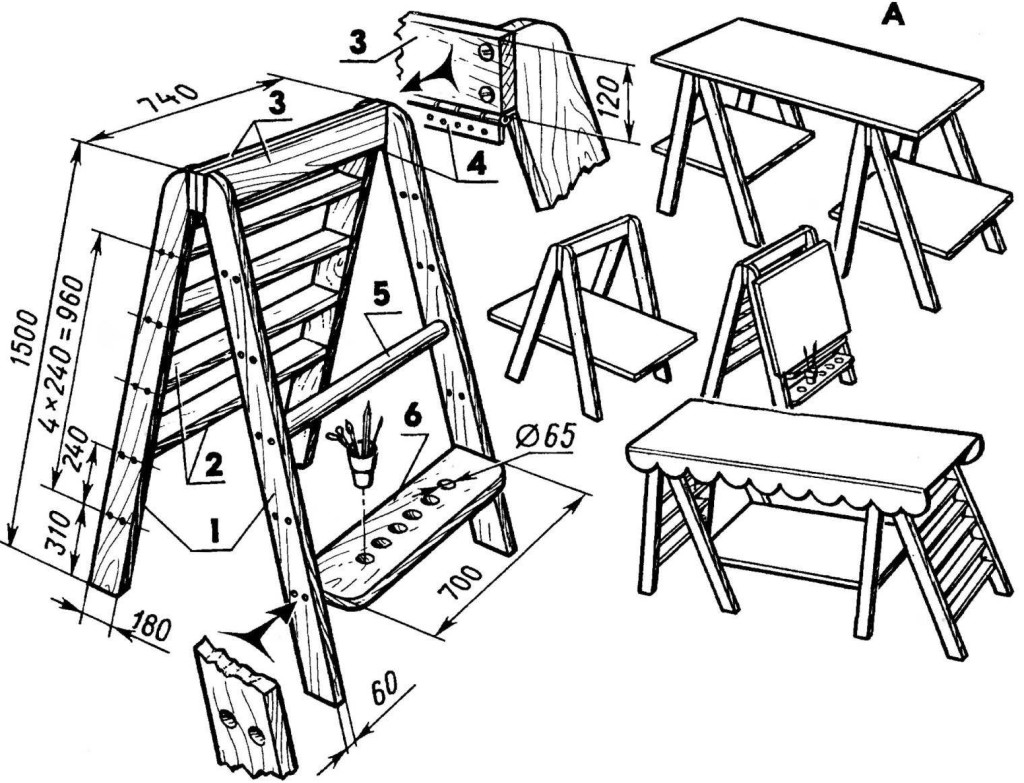

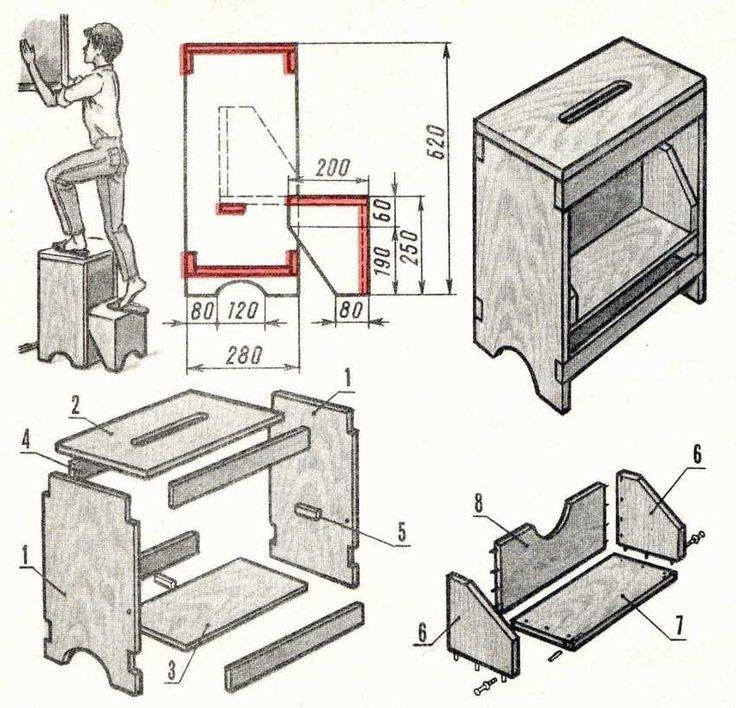
An example of making a stool with a screw module
Unedged board or used building materials are used as a starting material. The surfaces of the boards are leveled on the machine, cleaned of layers. Marking for sitting and cutting is done. The inner edges of the parts are processed with carpentry glue, joined into one solid and clamped with clamps. After drying, the cloth is sanded from all sides and from the ends.
Sitting legs (4 pieces) are cut according to patterns or markings. Are polished. Then two tsars are cut (board joints for the legs). The tsars are connected to the legs: adhesive and self-tapping screws (2 per leg). The seat is attached to the side bars with self-tapping screws (8 pieces on each side). The main frame is ready.
The legs of the steps are cut in pairs of different lengths. Grinding. They are connected with drawers: long with short (for screws and glue). Holes are drilled in the short legs for installing hollow wood tubes. The crossbar is installed and secured using recessed self-tapping screws.

The fastening of the short legs of the step to the legs of the stool is carried out using self-tapping screws screwed into the hollow tubes.The height at which the short legs are connected to the legs of the stool should match the height of the long legs of the step. Two lower drawers are installed on the legs of the stool. The product is ready for finishing.
When the product is completely ready, the decorating process begins. The corners on the ends of the legs, seat and crossbars are pre-cleaned with sandpaper. Depending on the texture of the wood, the surfaces are tinted, varnished in 2-3 layers. Make sure the varnish is completely dry before applying the next coat. Plywood is painted with oil paint in 2 layers and varnished.
Types of stairs that can be made from shaped pipes
A profile pipe is the most durable material for creating frames for buildings of any type, including stairs.
The following profiles are performed:
- The flight staircase is a construction of two beams located at the same level, on which steps are installed. Beams or stringers support the steps from below. The staircase can be single-level or two-level, when it consists of two rows in one span.
- Spiral staircases consist of one kosour, around which steps are attached, fixed on the other side with handrails. A complex design is cool and not very convenient, which very few people can decide to do on their own.
- Boltsev - stairs, the steps of which are attached to a solid wall with bolts or bolts. In this case, only one kosour beam from the profile is used.
- Stepladder - an attached mobile ladder for performing certain tasks: performing any actions at a certain height. Such a ladder should be stable and, preferably, lightweight, so that it can simply be rearranged in the right place, without over-efforts.
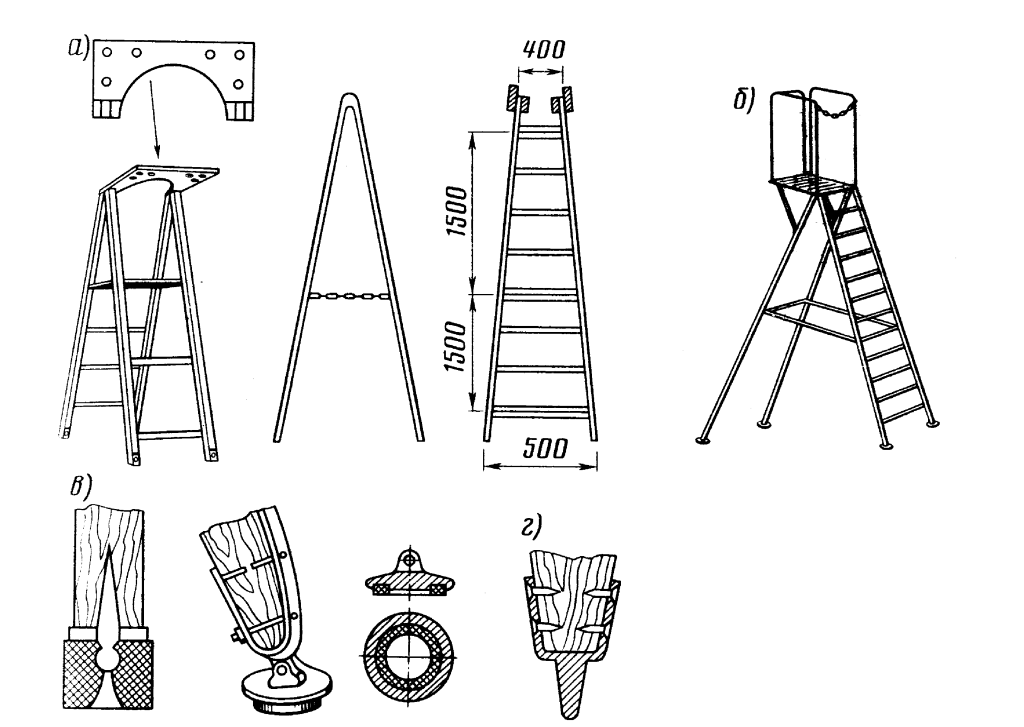
Varieties of stepladders
The stepladder can be one-sided, or it can be made of two parts. Stability in the first case is achieved simply by the wall, which serves as a support.
In the second case, the step-ladder does not need support, both parts are installed at a certain angle of inclination and are fastened together with a canopy that holds both parts. In addition, for fixing the ladder can be secured with an additional strap, which prevents the parts from changing the angle of inclination, that is, moving apart. Both parts can be the same, or one of them is performed simply as a support, without steps.
The first type is the simplest ladder, consisting of two parallel supports, between which the rungs are attached. This fixture is lightweight, although it is quite sturdy and easy to make. A two-sided stepladder is not much more difficult, so making such a structure with your own hands is not difficult.
Manufacturing instruction
As noted, the order of making a ladder directly depends on the type of material chosen.
Made of metal
To create a metal folding ladder, you need:
Cut a metal profile with a section of 20x40 millimeters into 4 equal segments, from which support posts will be made in the future.
Drill at an equal distance on the sides of the guide holes for fastening the steps.
Cut steps of appropriate length from metal.
Fasten the guides like a wigwam with metal hinges.
Fasten the steps to the rails using the bolts. To increase the strength of the structure, it is recommended to weld each part to the support legs
At this stage, it is very important to maintain the level of the steps.
At the end of the process, you also need to fix the restraints, as mentioned earlier.
Made of wood
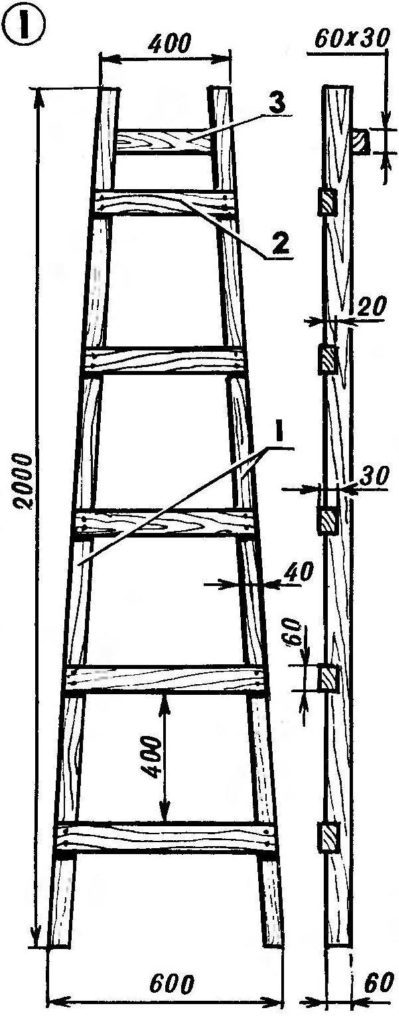
To make a simple folding ladder, you need to prepare bars of the following sizes:
- 2 meters - 4 (for support);
- 59 centimeters - 2;
- 50 and 50.4 centimeters - one at a time;
- 45.5 centimeters - 1;
- 41 centimeters - 3.
You also need to prepare 2 fasteners with hinges. After that, you need to do the following:
- Mark the 2 support posts at a distance of 40 centimeters.The lower step must be fixed at a distance of 10 centimeters from the floor.
- According to the markings, cut out the grooves on the support posts.
- Cut thorns at the edges of the bars to be used as treads.
- Insert the spikes of the steps into the cut grooves and fix the parts with self-tapping screws or nails.
- The two remaining supports are interconnected by strips that are attached in the form of the letter Z (two strips are installed horizontally, and the third is at an angle to the first).
- Connect both supporting structures together using metal locks with hinges or another mechanism that allows you to fold and unfold the ladder.
At the end of the work, it is recommended to fix rubber pads on the legs, and treat the entire structure with an antiseptic and varnish (paint).
Finishing the product
To make a stepladder chair comfortable to use with your own hands, you will need to perform surface treatment. Requires sanding, priming and filling of elements. Plastic or wooden plugs to match the structure are used as plugs for self-tapping screws.
The product must be decorated, the decorative finish is done with paint, and then with a translucent varnish. It is recommended to apply at least 3 coats. After each protective coating, the product is thoroughly dried.
To create a bright decor, you can use paint in contrasting shades for the seat and back. Translucent varnishes are optimal for classic designs or those decorated in the English style. On the chair, a stepladder for Provence-style rooms must be applied with a white color scheme. Designs for a country-style apartment do not require careful processing and can be rough, you just need to emphasize the beauty of the wood with a transparent varnish.
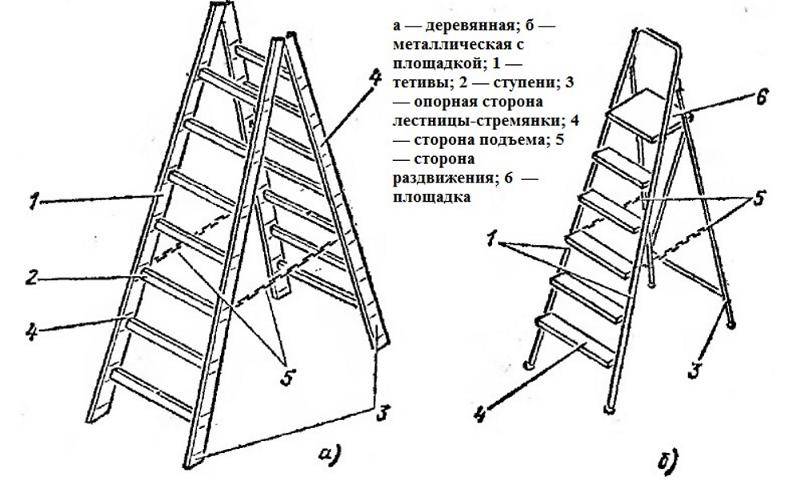
The main types of stairs
A step ladder is a ladder that can stand on its own using any suitable support (wall, for example).
The stepladder can be of one-sided or two-sided type. The design has a frame to which the steps are attached, and the additional elements that the ladder is supplied with are handrails and legs.
The calculation of the height of such a structure from a profile pipe is carried out during the determination of the interval between the floor and the last step. The calculation is carried out with an orientation for an interval of 20-25 cm. Due to the presence of various functional features, the step-ladder can be:
- Classic;
- Universal;
- Transformer.
The constructions of the universal type combine the functionality of a regular ladder and a step-ladder.
The frame of such products can be folding or telescopic. The presented step-ladder has a frame consisting of several sections, while each of the sections consists of 5-7 steps.


Telescopic structures differ in that their sections can be extended gradually. They are fixed with special latches or hooks.
The transformer stepladder can work in several positions. Such products from a profile pipe are very compact, lightweight and can easily fit even in the trunk of a car.
Almost finished stepladder
The frame of the staircase is assembled using metal shaped pipes that serve as load-bearing racks; the steps can be made of wood or a material less durable than the frame.
All connections of the structure made of shaped pipes are joined together using bolted connections.
This allows, if necessary, to quickly replace any damaged element. Some ladders made of metal-profile pipes can be made non-separable - welding is used to create them.
It is worth noting that the most common and practical material for creating the described structures is aluminum or duralumin alloy. A ready-made ladder assembled by hand will have such advantages as:
- ease;
- reliability;
- ease of use.
Fisherman's chair on three legs
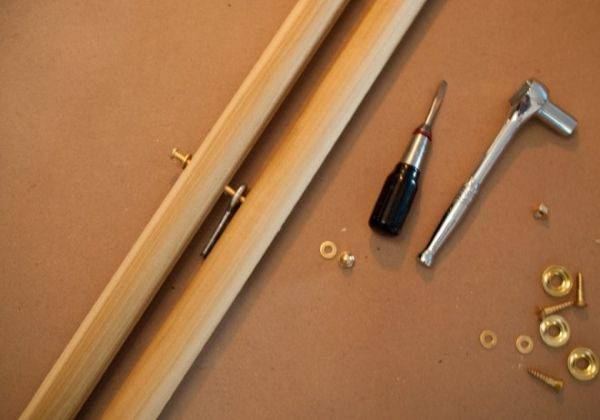
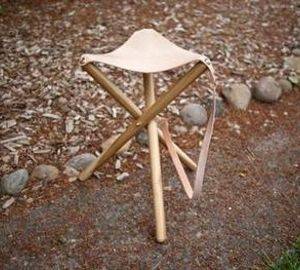 The original three-legged chair can be easily made from the following parts:
- three round leg rods (length about 60 cm);
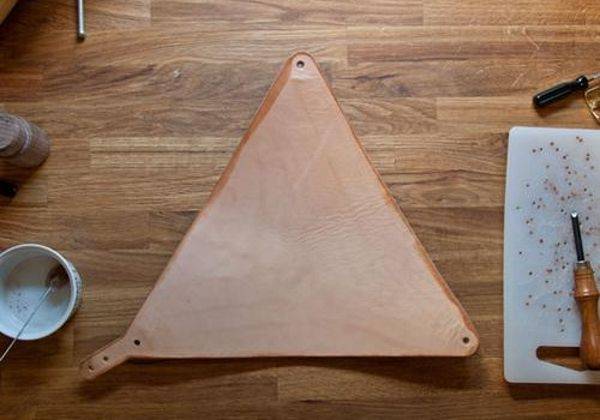
- a triangle made of thick leather or dense fabric;
- Mounting screws (one hinge, the other long);
- three lock washers and three pre-made washers, and two nuts.
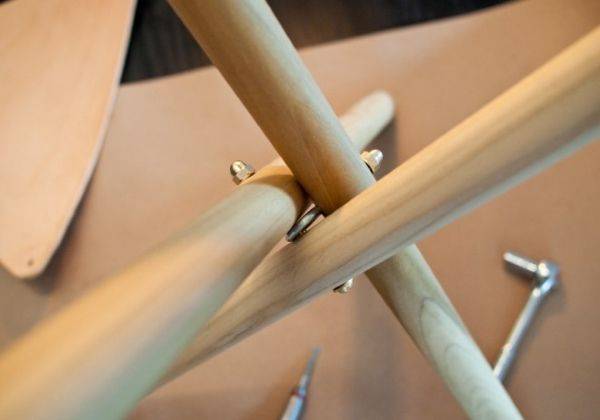
The preparation of parts and assembly of the chair is carried out in several stages:
-
- measure 25 cm on the rods and drill and make holes in the upper cutouts to support the saddle;
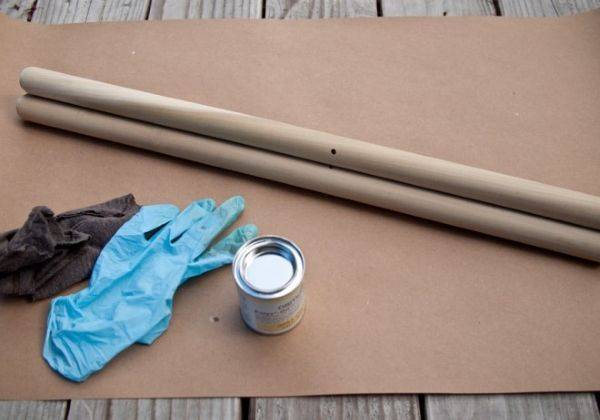
Tip: If you don't have round stones for making chair legs, the cuts of a shovel or other garden tool are ideal.
-
- On the leather part we punch holes in the corners, and on the canvas seat we finish the corners with metal blocks;
-
- Attach the two legs with a long bolt and insert a second bolt with a loop between them;
-
- Fix the third leg with the intermediate bolt and adjust the tension so that the tripod can be folded down easily;
-
- Screw the prepared part of the seat onto the upper ends of the legs;
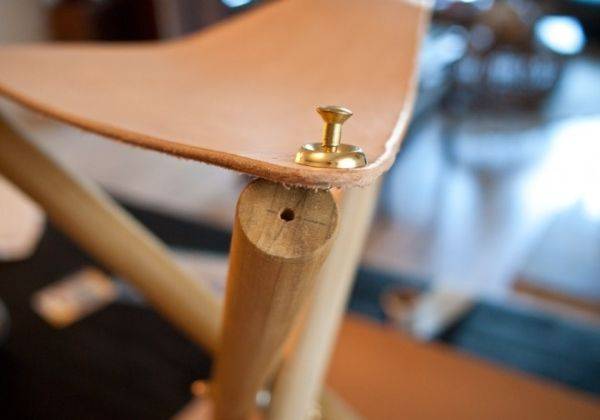
-
- Attach a long strip of leather to the chair so you can wear the folded item over your shoulder or attach it to your backpack.
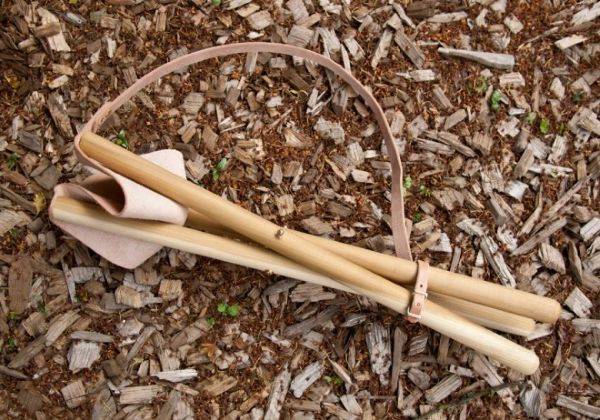
Having mastered the manufacture of a folding fishing chair, you can start creating a more complex model - an armchair or a comfortable chair with a back.
How to make a chair for a boat with your own hands. PVC Watch the video, okay?
Page 4
As for children's furniture, first of all it is necessary to take care of comfort, reliability, durability and safety, including environmental protection.
The best thing is a wooden highchair. Of course, the modern wooden chairs that are offered are of great value if they are made from really valuable and high quality woods.
Why don't you make a DIY chair for your baby? This article will help you choose the best materials for chairs, get detailed instructions and recommendations on how to make and decorate them.
Manufacturing of structural elements
To quickly and correctly make a staircase with your own hands, you need to develop a drawing or at least a sketch of it.
For work you will need:
- Hacksaw for wood,
- Meter ruler or tape measure,
- Square,
- Electric drill,
- Locksmith's hammer.
Do-it-yourself wooden ladder stepladder is made in the following sequence:
- Four elements for the bowstring are cut from the bar. Two - for supporting the steps, two - for the supporting part of the ladder,
- On two bowstrings, grooves are made, the depth of which is 2 cm, and the height is 2.5 cm along the entire width of the bar. The center of the first upper groove should be located from the top of the bowstring at a distance of 12.5 cm. The rest are cut in increments of 290 mm,
- In the support posts, three grooves are made, of the same dimensions, for the jumpers. One is located at the height of the first step of the ladder, the second is at the level of the upper one, and one is in the center,
- The edges of the posts located on top are rounded, sharp corners are removed,
- The lower ends are cut at an angle so that the wooden stepladder is as stable as possible, and is upholstered with rubber,
- Steps are made according to the drawing. In each of them, spikes are made on both sides, 25 mm in diameter, 20 mm long.
Assembling the stairs
Stepladder ladder assembly instructions:
Steps are inserted into the grooves of the racks. To do this, it is better to grease the spikes with wood glue beforehand,
Tip: The grooves in the bowstrings should be made so that the spikes of the steps enter them very tightly, which will prevent the structure from loosening.
- The spikes of the steps are hammered into the grooves of the racks with a hammer. After installing all the steps, they are fixed from the end of the bowstring with nails,
- When assembling a ladder from boards, instead of bars, the actions are slightly different. In this case, the grooves are not made, due to the small thickness of the board. The steps are attached to steel corners with wide shelves screwed on bowstrings,
- To increase reliability and durability, the bowstrings of the working part are additionally fastened with pins. In this case, holes are drilled under the grooves.After installing the steps, studs are inserted into the holes and bolted on both sides,
- After assembling the supporting and working parts, they are connected to each other by hinges with hinges or brackets,
- The last, at the bottom of the ladder, is attached a fixing chain, which will prevent the separation of the supporting and working parts too wide.
To better imagine how wooden step ladders are assembled, you should carefully read the video in this article.
In the case of using hard rubber goods - only fit on glue. It will not work to press the head into such rubber, therefore, it will not be the legs of the ladder that will scratch the floor, but the fasteners themselves. You can do it like this, from scrap materials.

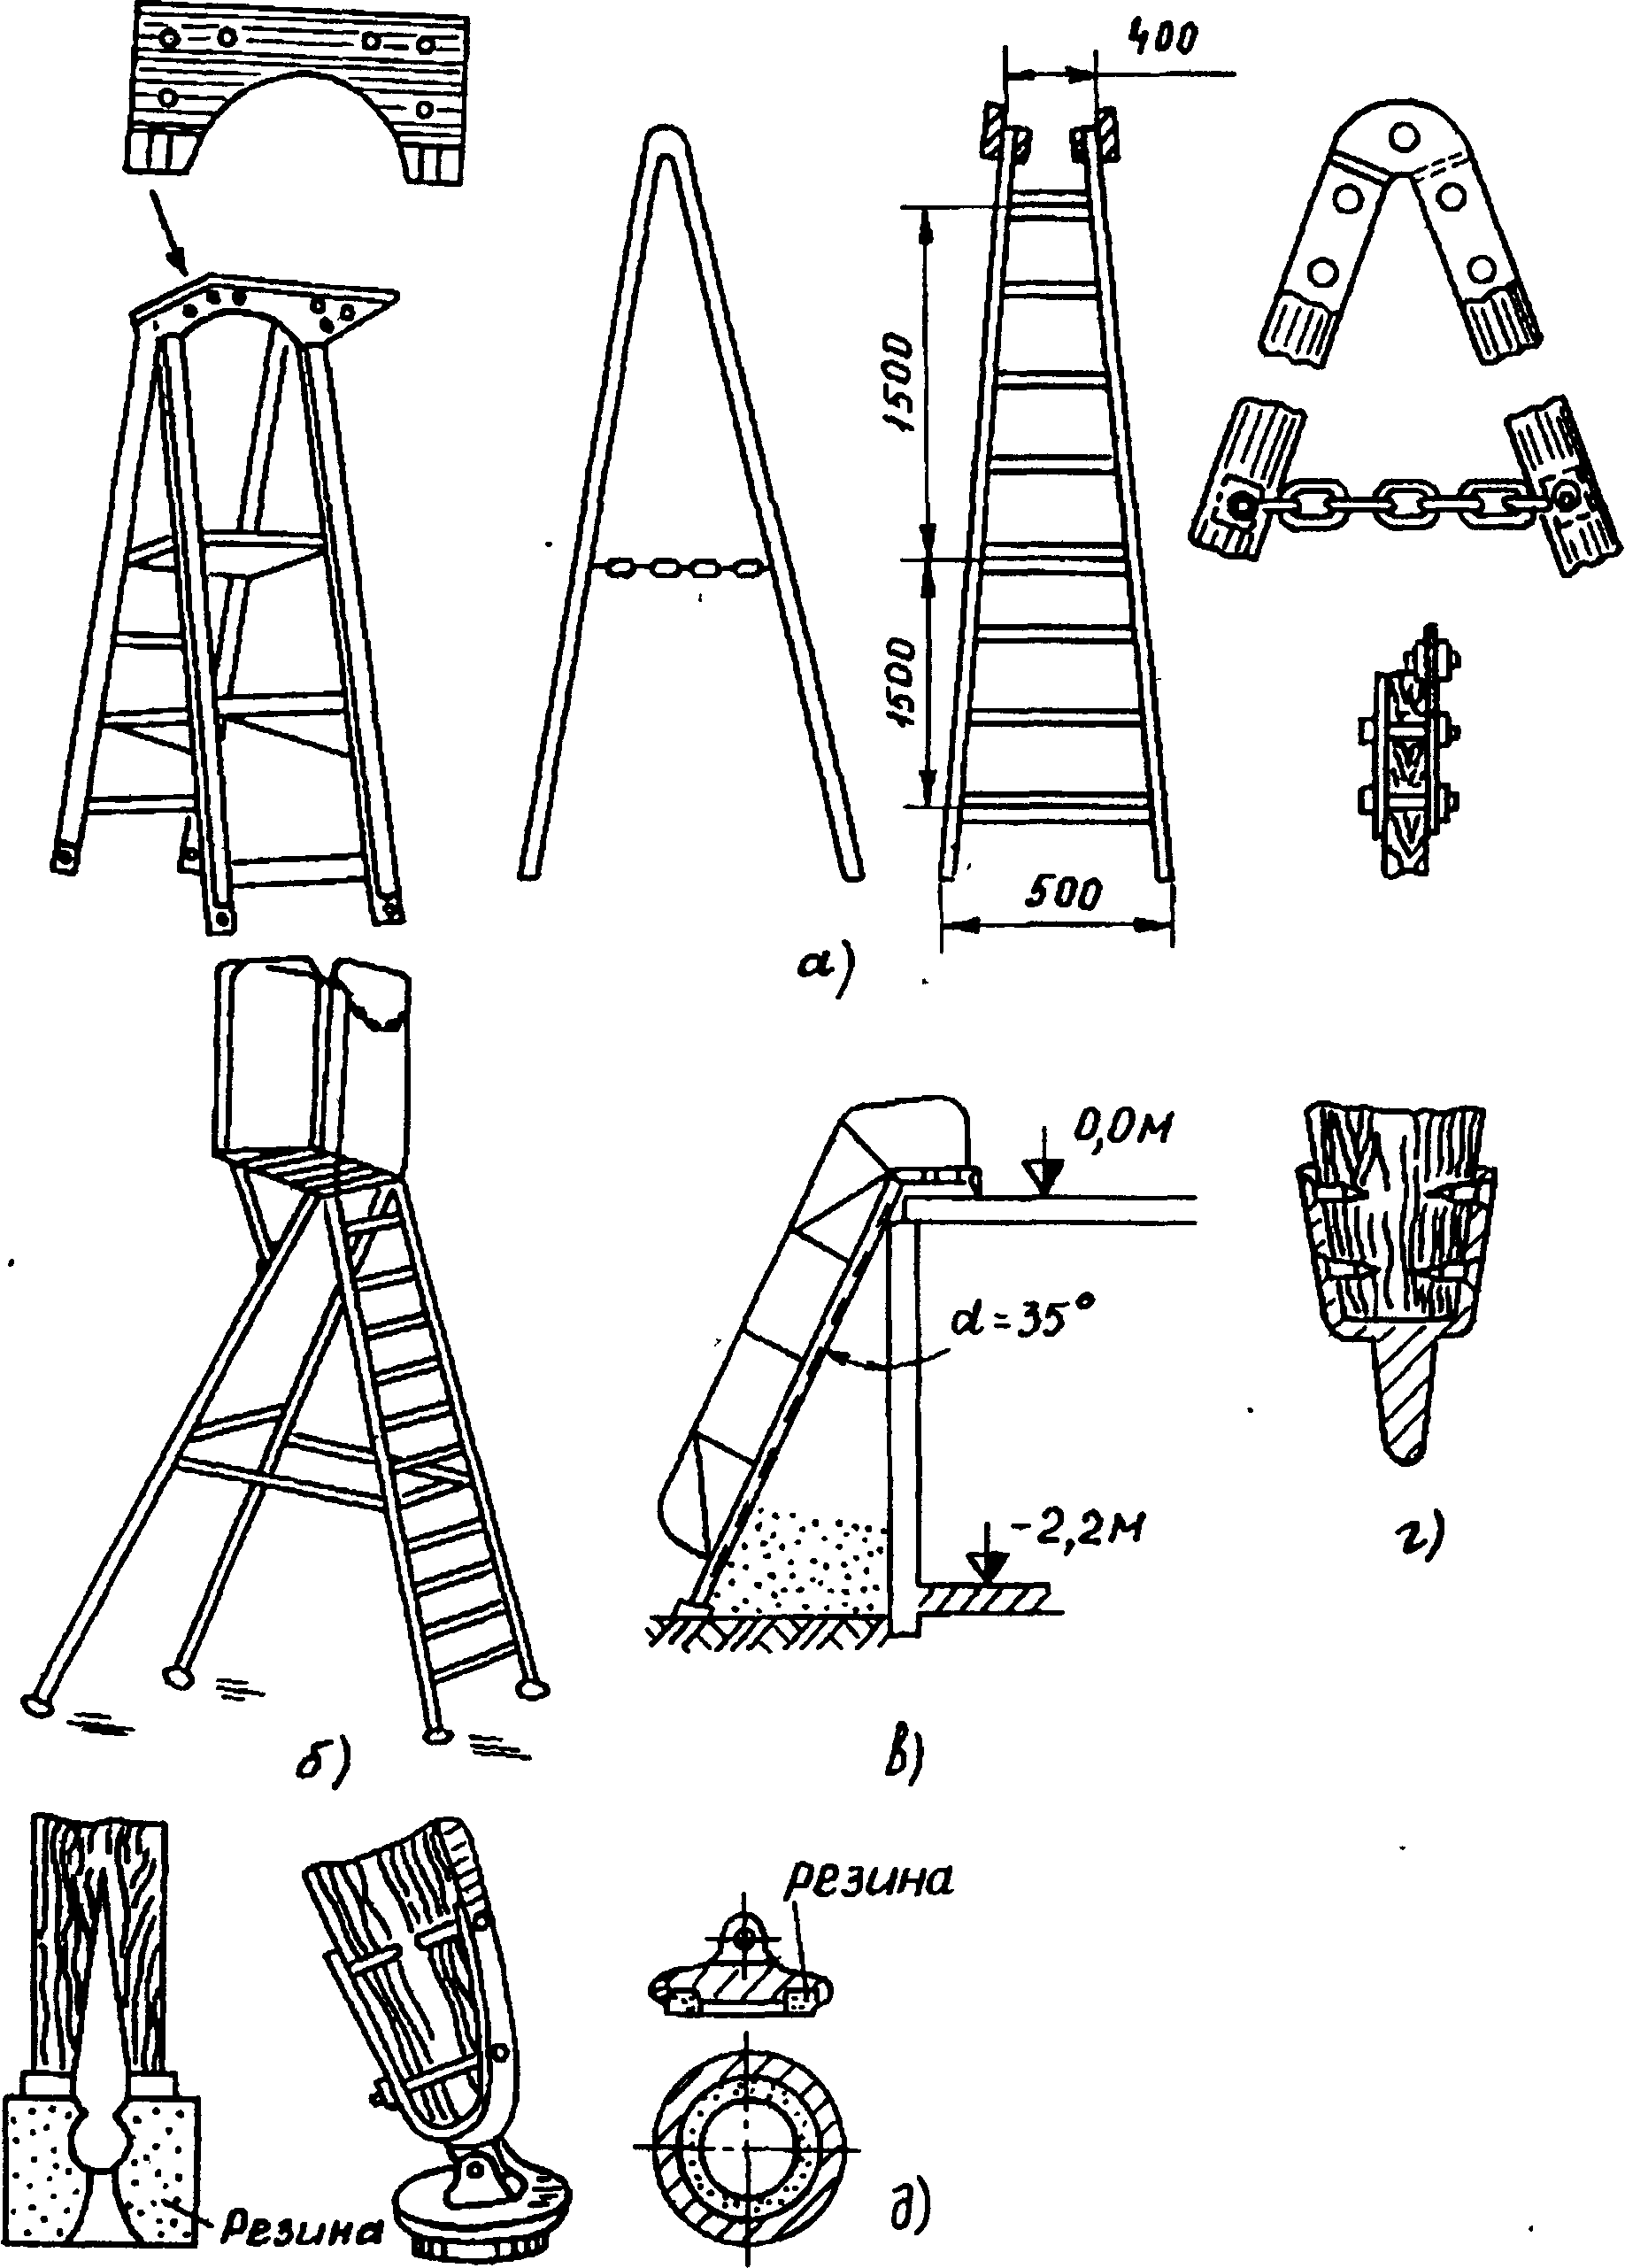
On the side parts of the stringers (at the top, closer to the site), it is advisable to fix a pair of hooks. You can hang a bucket of paint, dishes for collecting fruits, a bag with tools and the like on them. The fact that a stepladder with such devices will be much more convenient to use is obvious. It is a good idea to fix at least one piece of pipe at the top. Better - plastic. You will get a practical case in which you can place a hammer, a long screwdriver or something else that you constantly need to work with.
In order for the "legs" of the ladder to not accidentally disperse during a person's stay on it, the so-called "limiter" is attached to about ½ of the height of the stringers. Such a device is often neglected by home craftsmen, however, the installed cord (chain or long hook) in most cases protects against falling from a mini-ladder.
In principle, making a step-ladder with your own hands is not difficult according to any drawing. The main thing is to take into account all the nuances of its further use and choose the right size for all elements.
Good luck in self-design and assembly of a folding ladder!
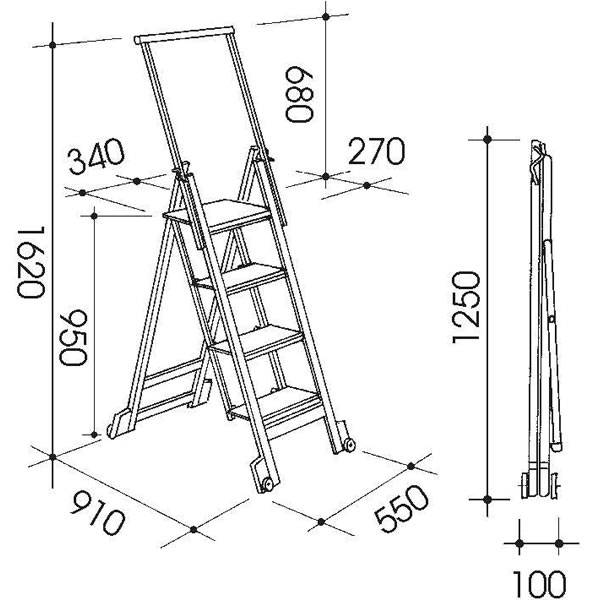
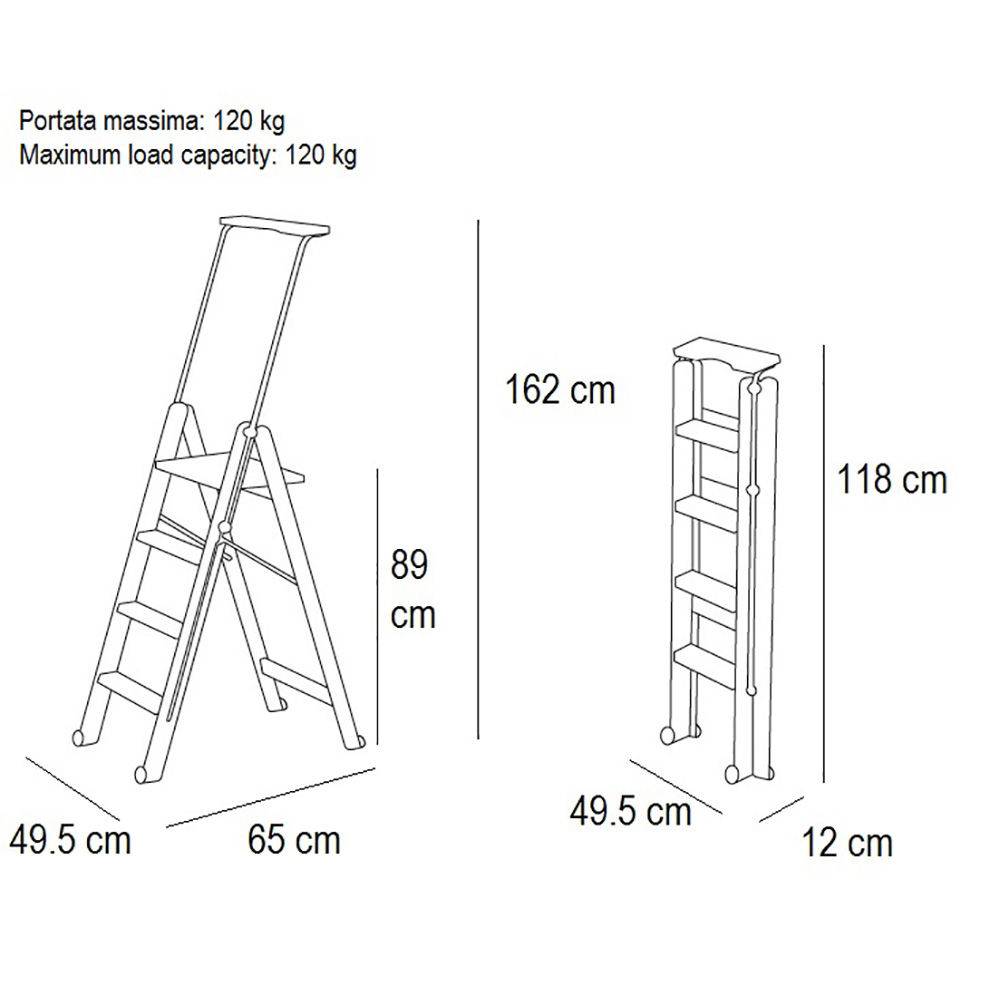
Diy stepladder: how to choose the right material
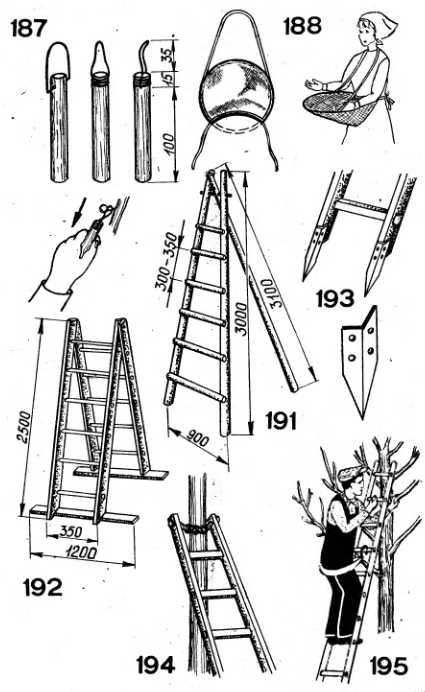
As a rule, folding structures are made of wood or metal (aluminum alloy or steel). The choice of material depends on the purpose of such a ladder, its size and the load that it must withstand.
Stepladders made of light and durable aluminum alloys are very popular.
If you are planning to make a transformer, then you should pay attention to aluminum materials. Structures can be assembled from one type of material, or you can combine several different
For example, a garden folding ladder or a reliable stepladder for construction and repair work can be made from steel pipes (posts) and wood (steps).
To make a portable ladder, the first step is to choose a building material. Taking into account the conditions of its operation, it must have a high degree of wear resistance.
For these purposes, mainly conifers are used, which combine strength and low cost. However, professionals advise to fork out once, but buy quality oak or maple beams. Their service life is much longer than that of conifers.
To work, you will also need a small set of tools and materials:
- saw;
- self-tapping screws;
- screwdriver;
- roulette;
- antiseptic;
- wood glue;
- rubber shoes for an emphasis.
The degree of reliability of the entire structure, as well as its service life, directly depend on the raw materials that were chosen for its manufacture. Even under the condition of drawing up drawings of a wooden step-ladder in the process of creating with your own hands, if poor-quality material was used, the ladder can hardly boast of high strength and reliability
That is why it is so important not to make a mistake in the selection of material.

To make a reliable and durable item, it is necessary to use only high-quality materials.
In addition, the wood selected for construction must be thoroughly dried. The permissible moisture content should not be more than 12%.
Note! The use of too damp wood over time will lead to deformation, and then to the destruction of the structure.

The wood for the ladder must be well dried.
The diameter of the bars also plays an important role. Even if the stringers are very long, the section should reach 4x4, 6x6 or 3x5 cm. This will not greatly affect the weight of the structure, but the reliability of the ladder will be fully ensured. As for the exact dimensions and types of lumber, it makes sense to talk about them only if the dimensions of the future structure are known.
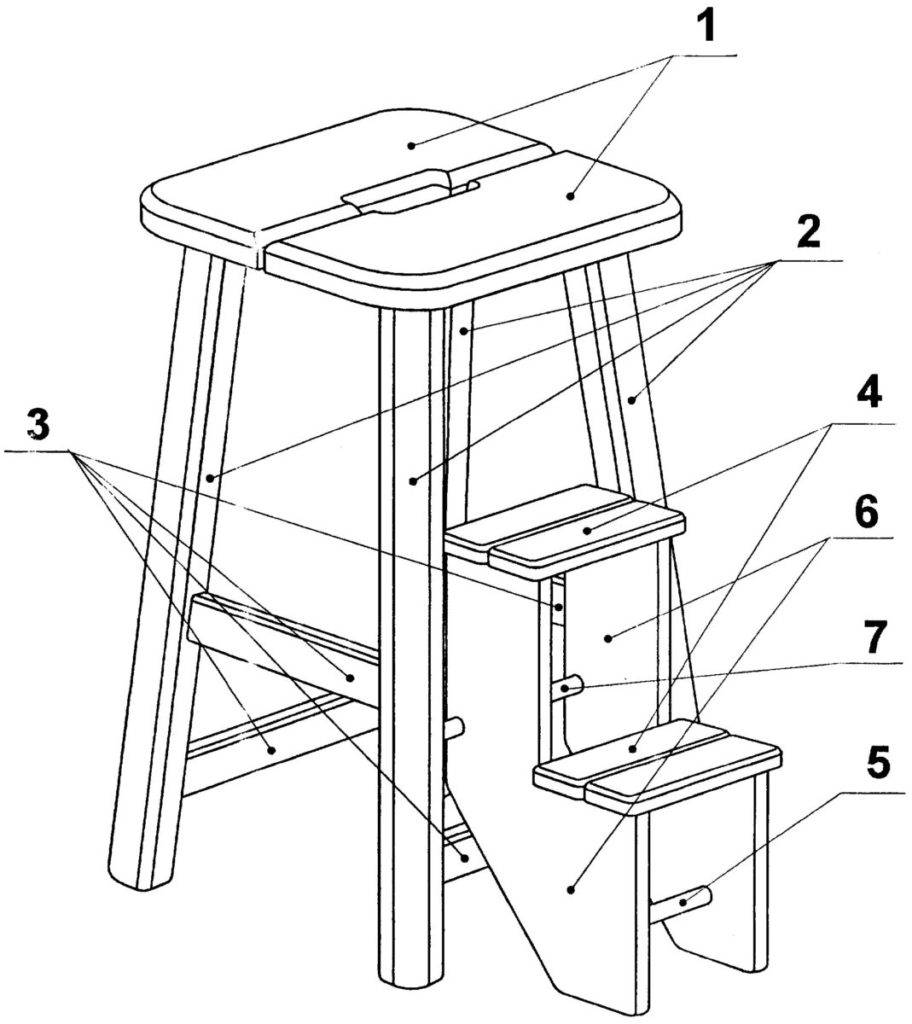
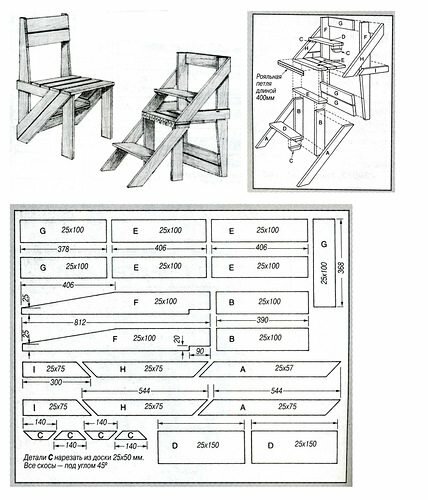
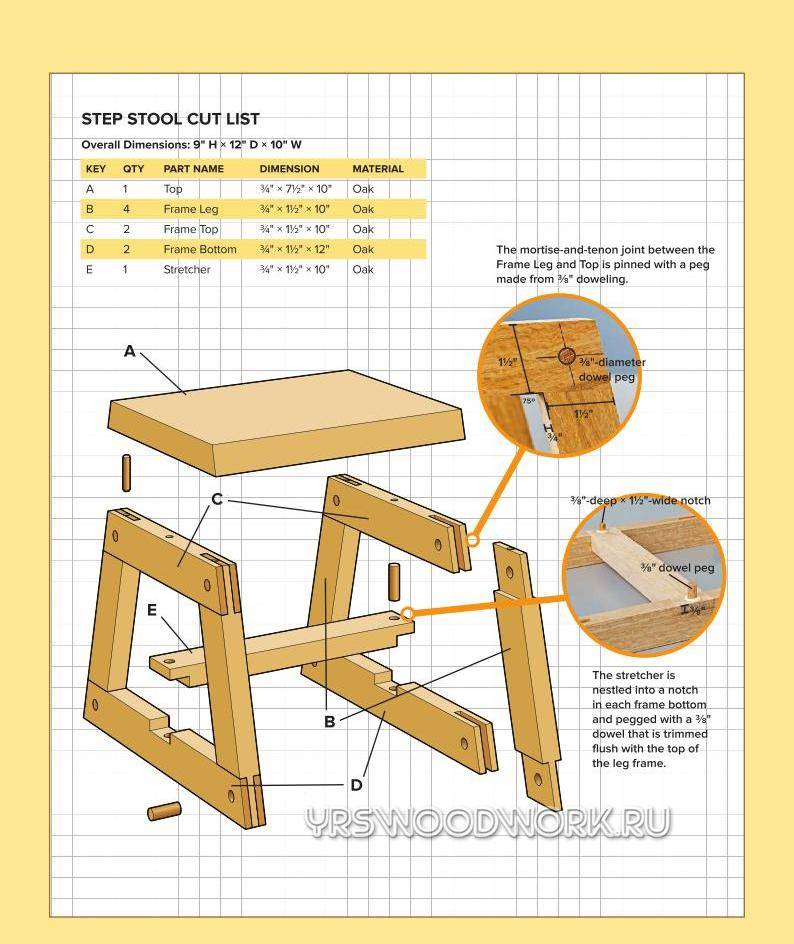
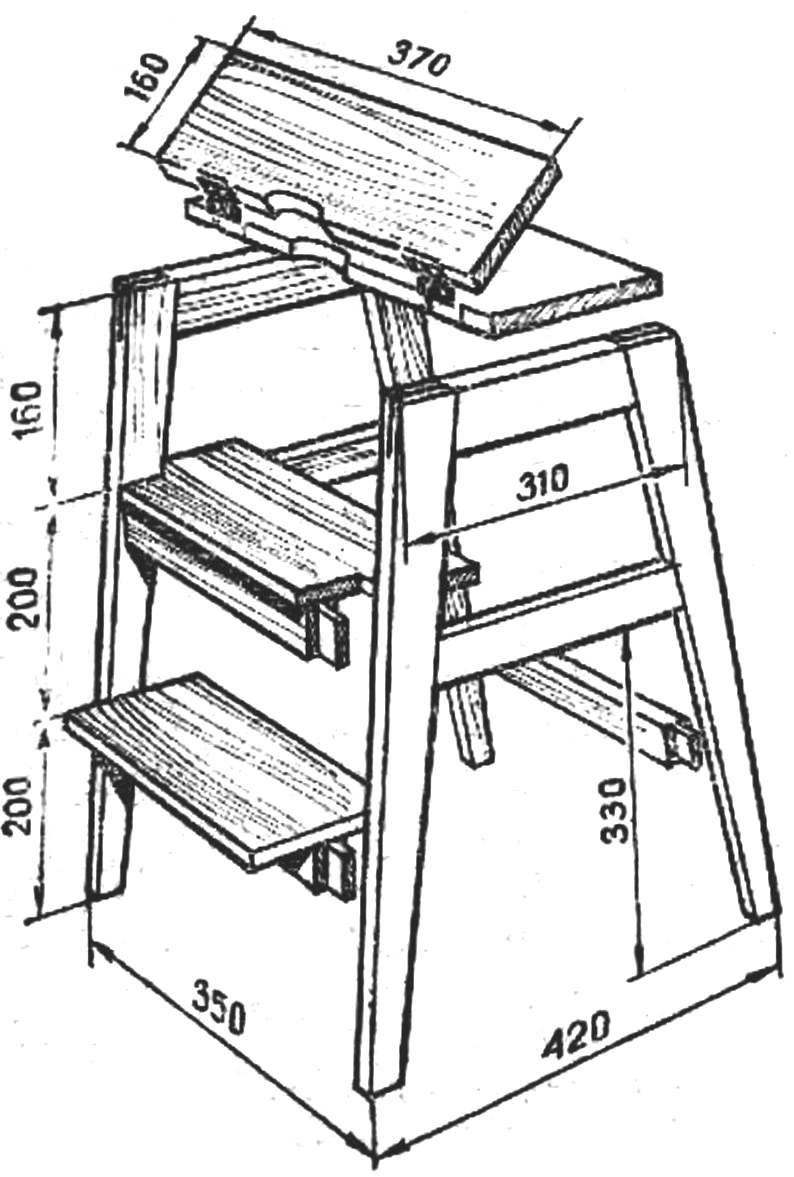
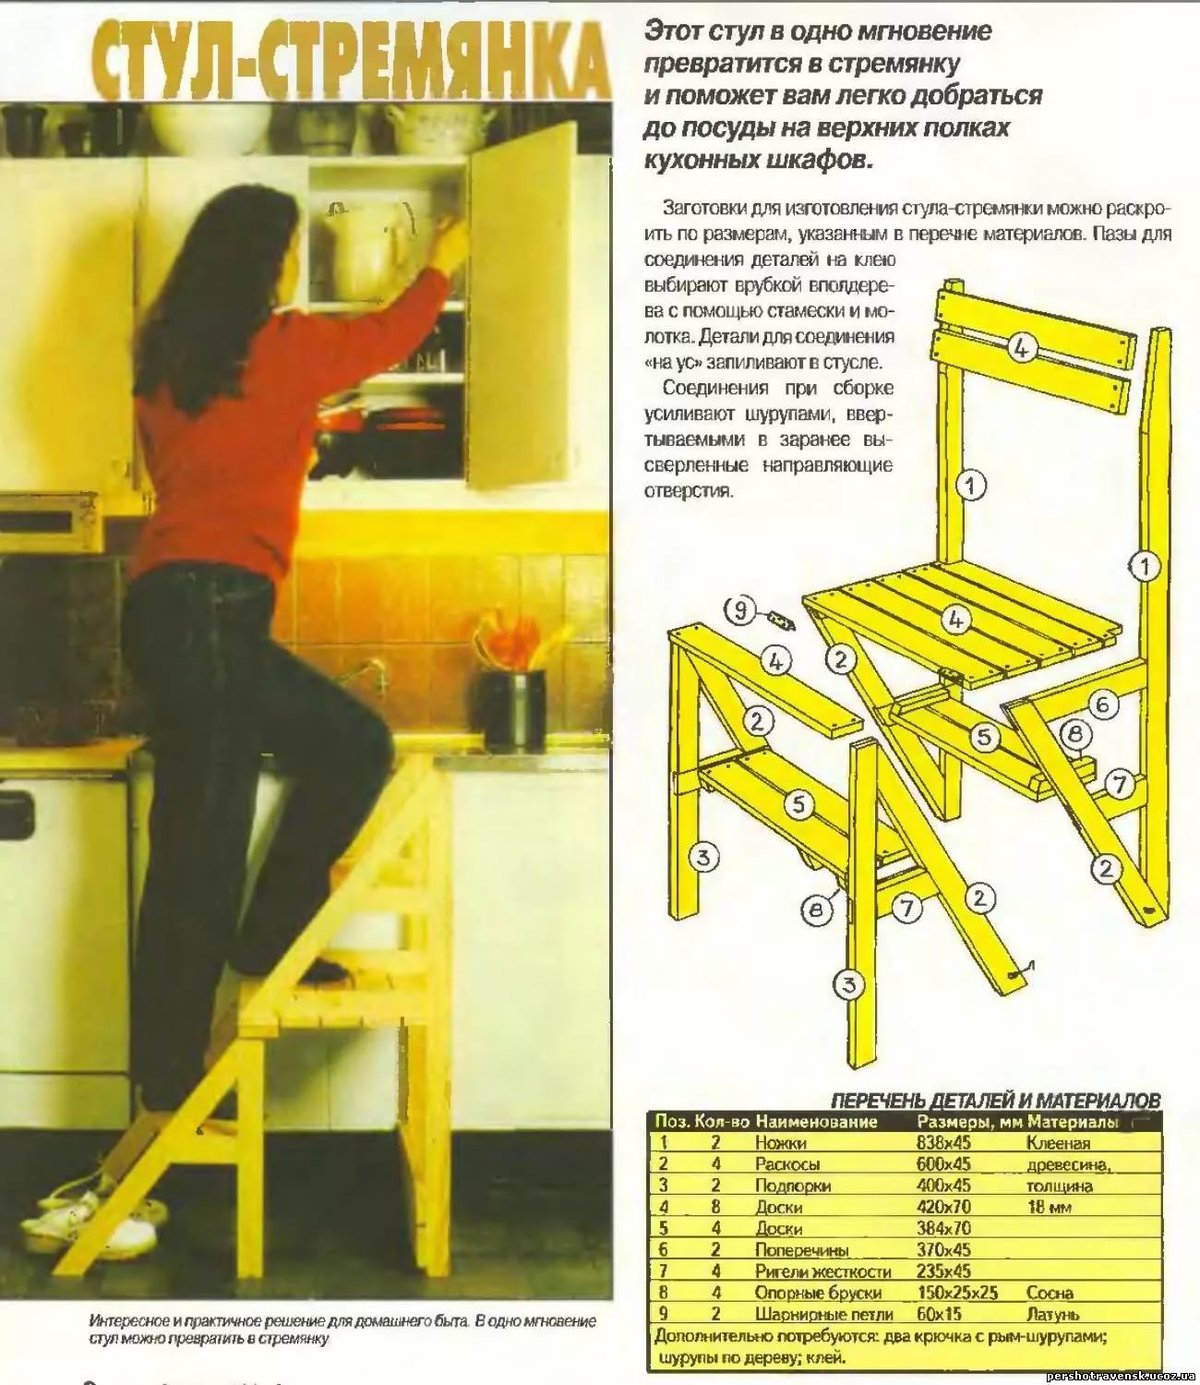
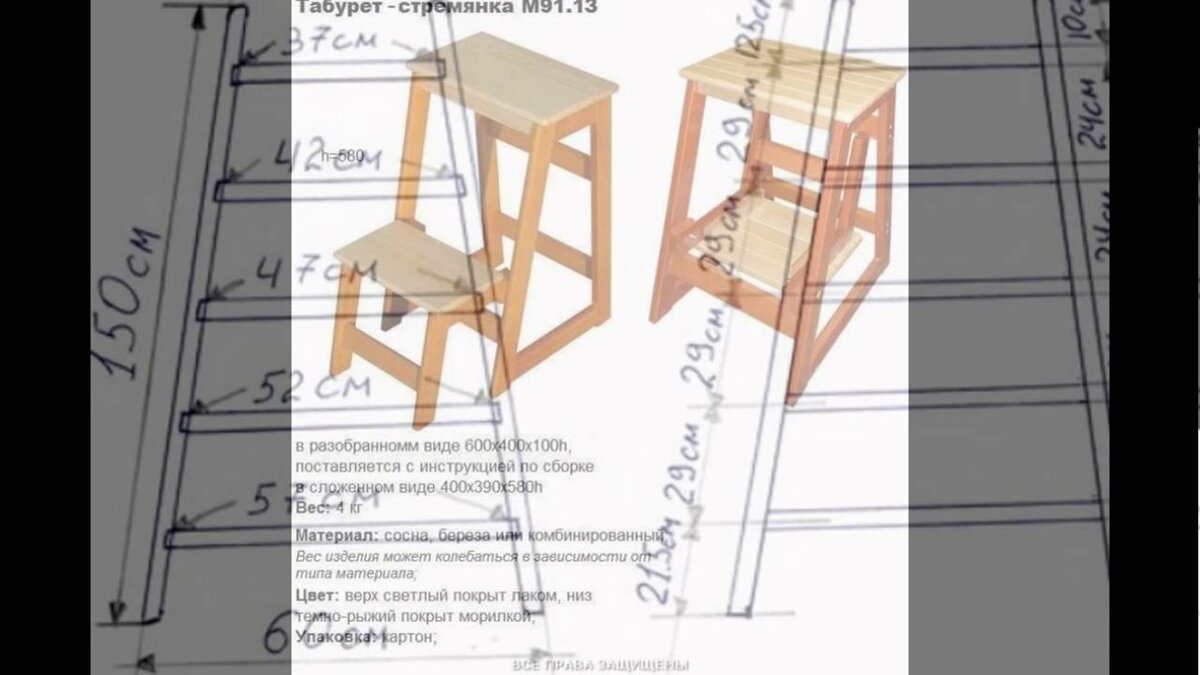
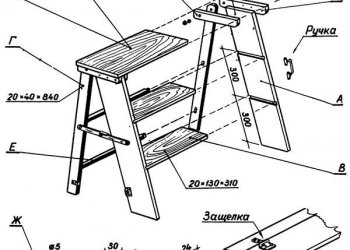
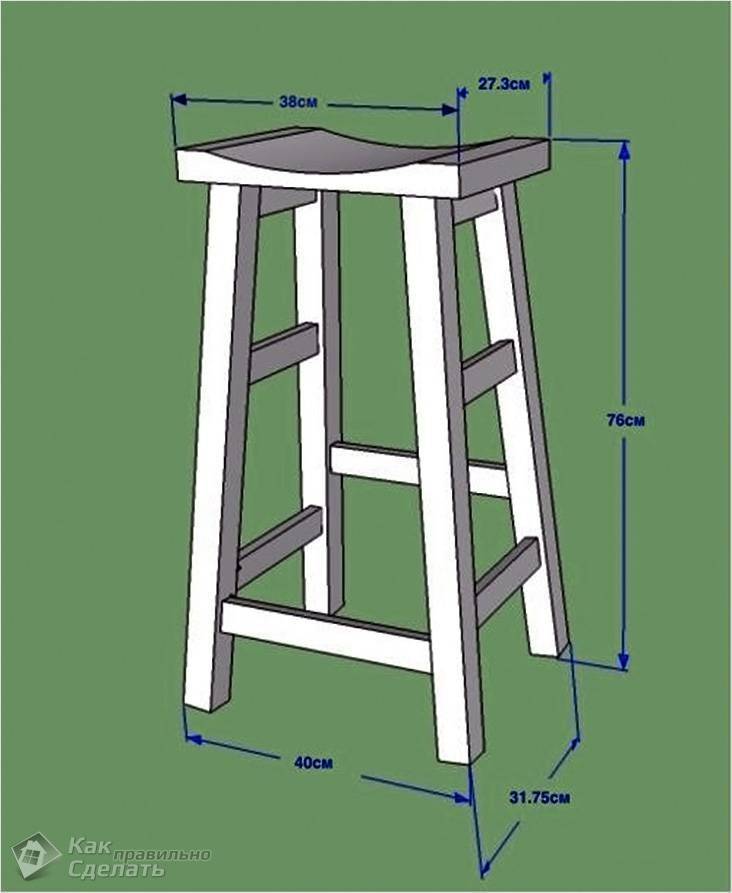
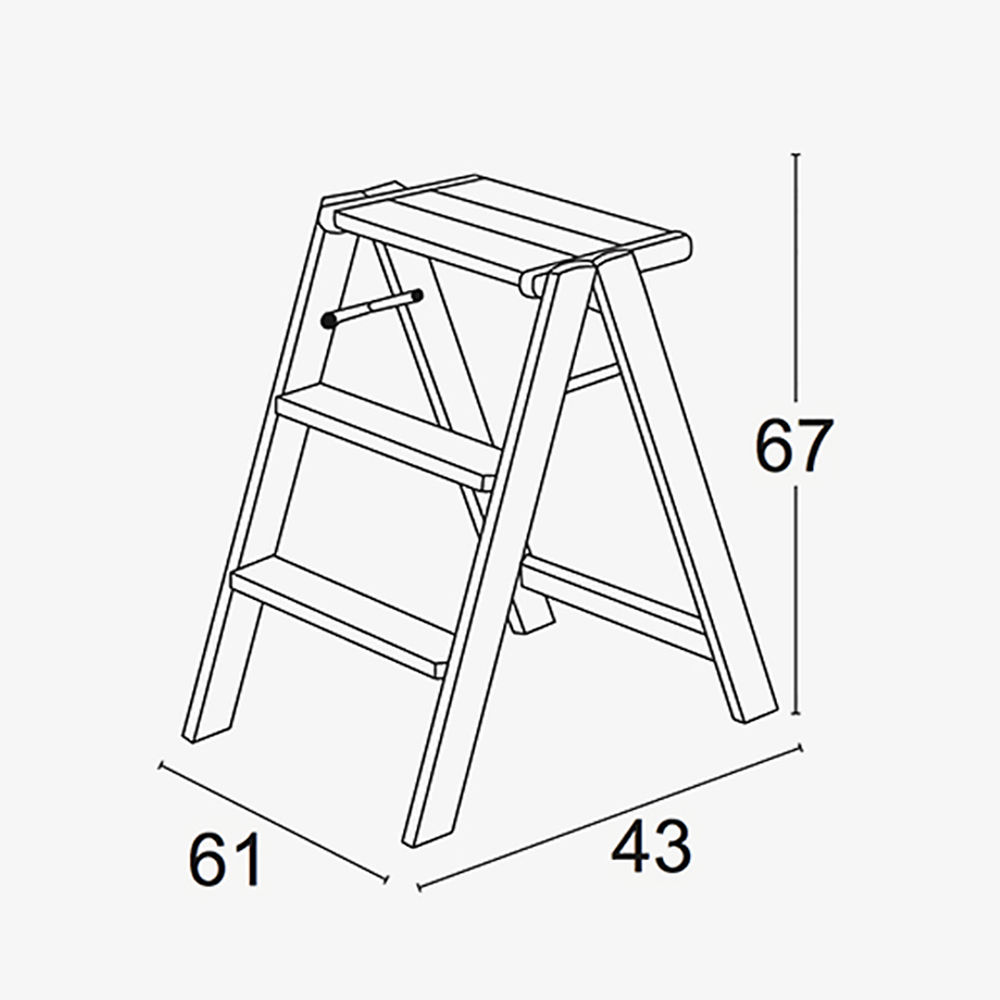
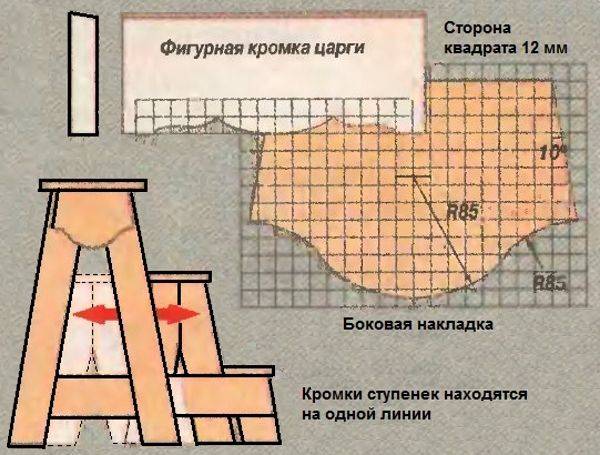
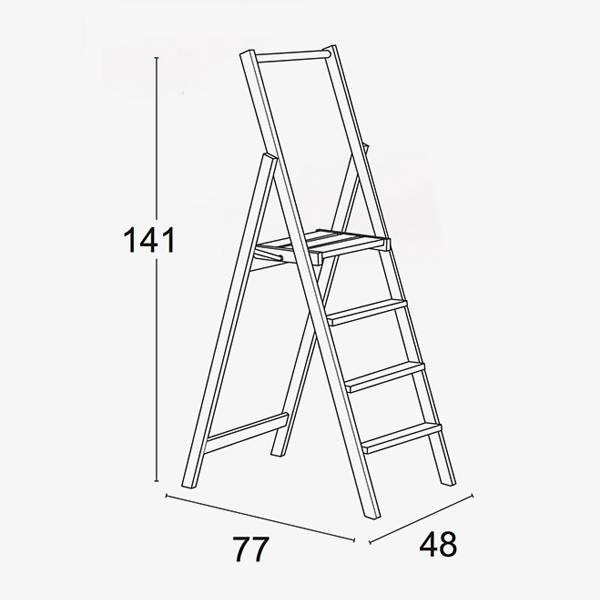
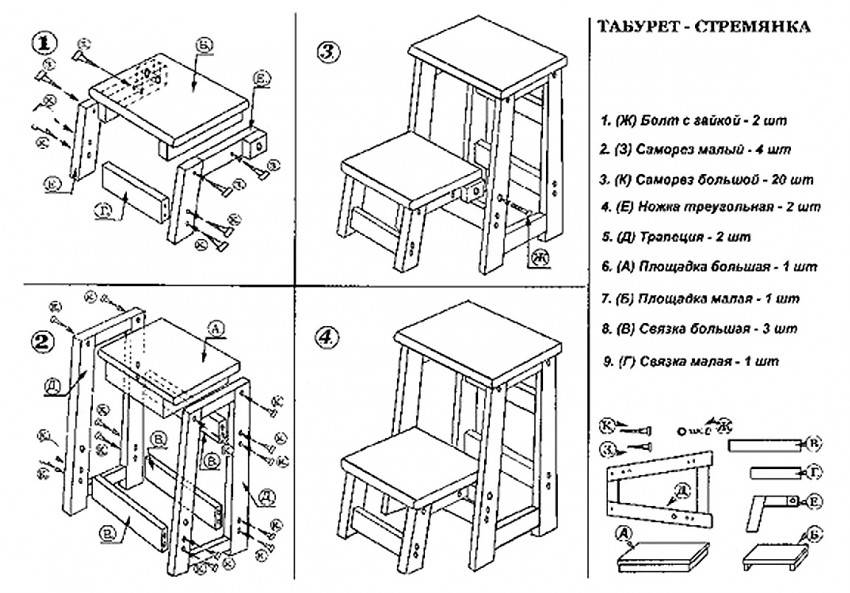
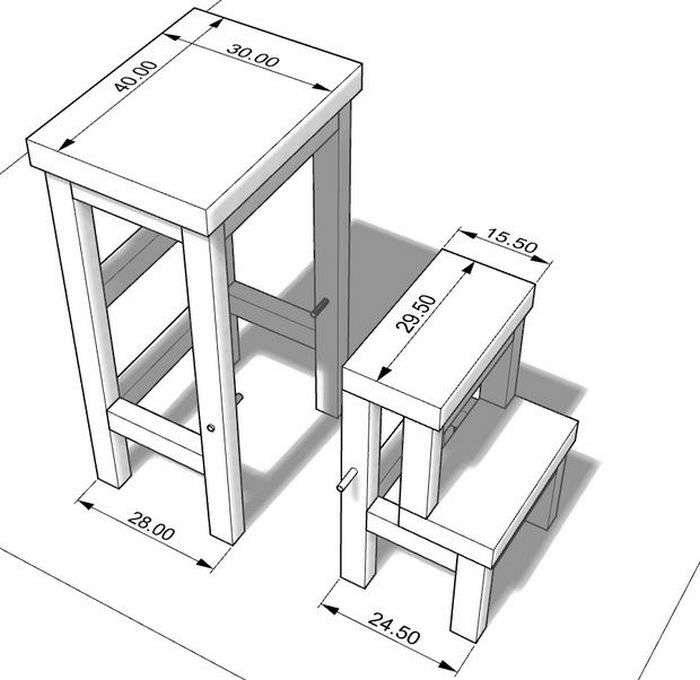
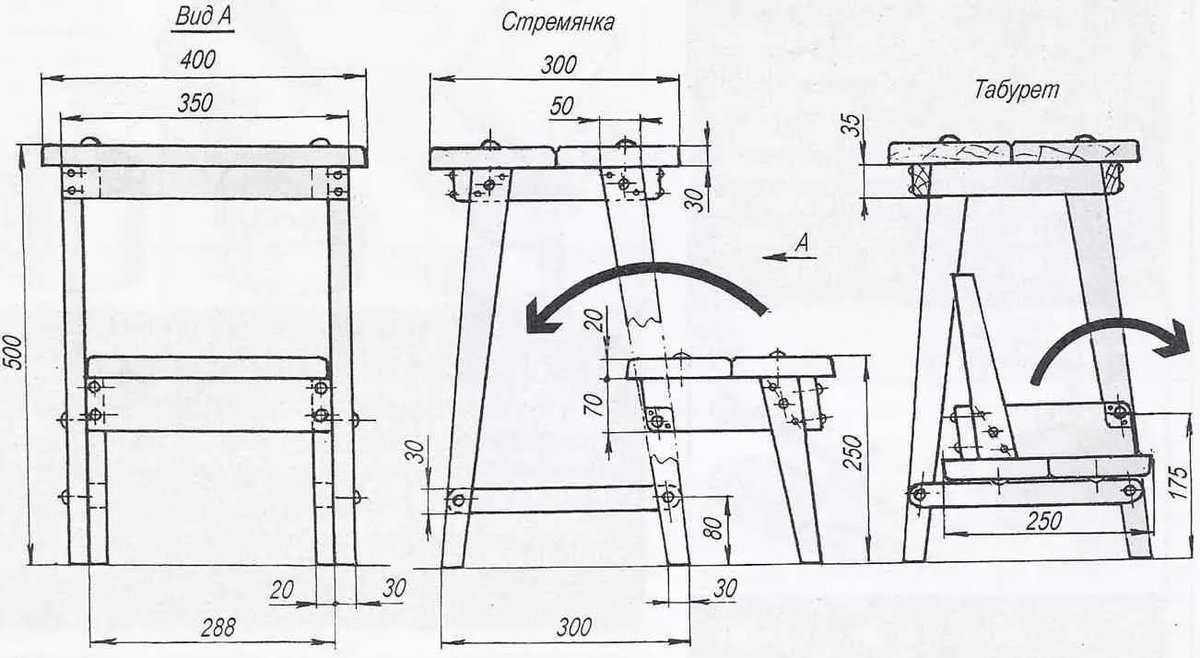
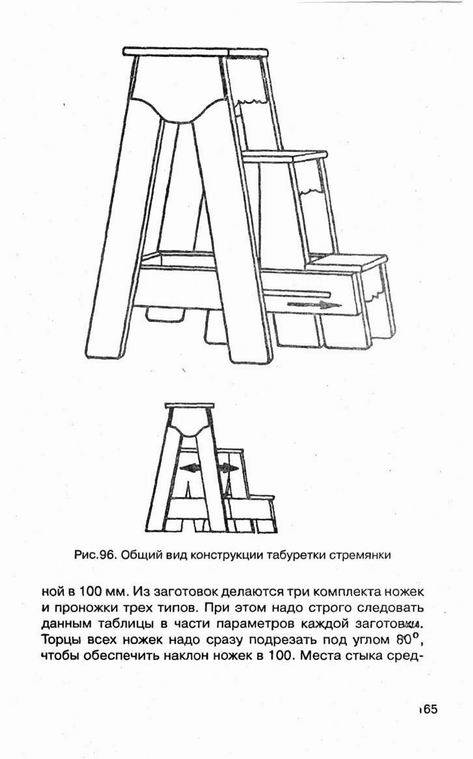
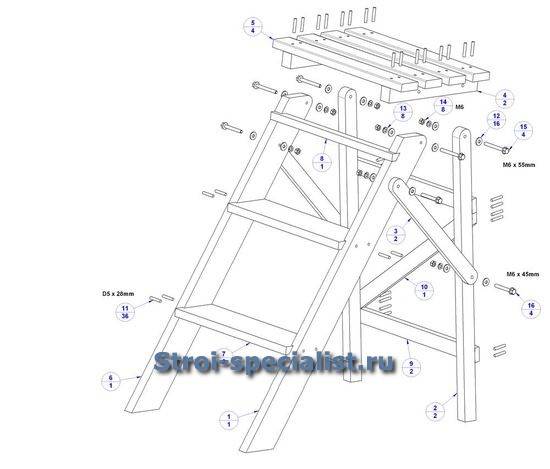
High stepladder stool
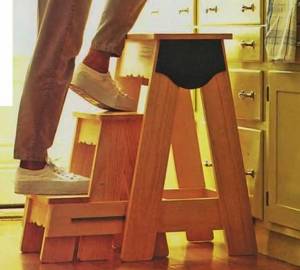 Separate chairs and steps are needed to get a high chair.
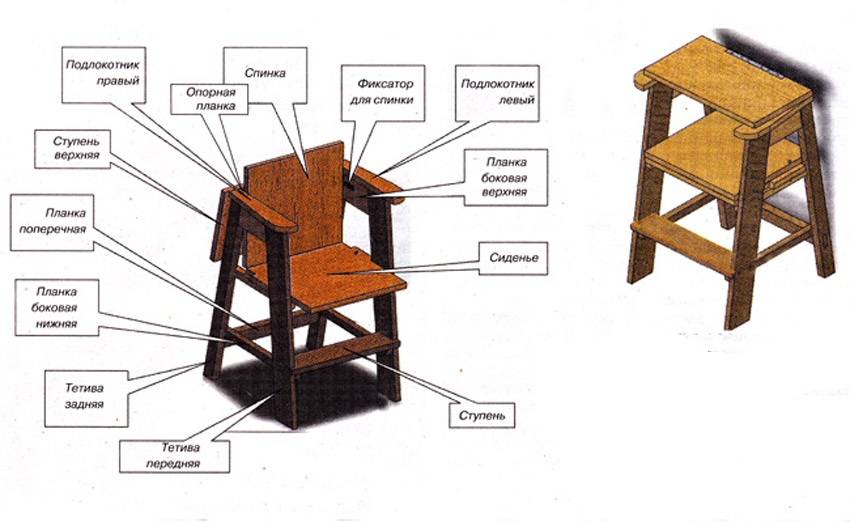
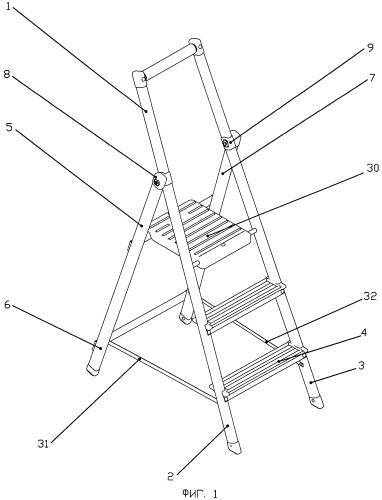
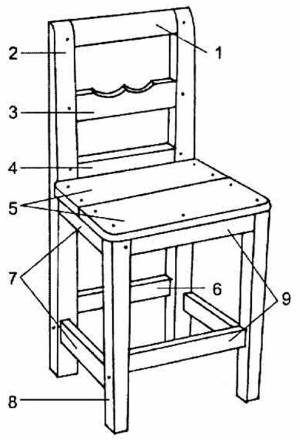
The design of the chair consists of the following elements:
- 4 large legs (1.9 x 10 x 72.5 cm);
- 2 crossbeams for the bottom (1.9 x 10 x 42 cm);
- 2 crossbeams for the top (1.9 x 3.8 x 18 cm);
- Kings: 2 upper (1.9 x 12.5 x 34.5 cm), lower (1.9 x 10.5 x 34.5 cm);
- 2 side plywood covers (30.5 x 17 x 25 cm);
- Top step (1.9 x 27 x 44.5 cm).

To perform operations, prepare blanks with these parameters:
- 4 medium legs (1.9 x 10 x 47 cm);
- 2 cross beams (1.9 x 10 x 40 cm);
- 2 small legs (1.9 x 10 x 21.5 cm);
- 3 front pins (1.9 x 9 x 22 cm);
- 1 rear Zarga (1.9 x 10.5 x 30 cm);
- 2 steps (1.9 x 18 x 29.8 cm)
Working steps:
-
- For a tall chair, it is necessary to properly saw and prepare all the parts, each part must be sanded to perfect smoothness.
- To maintain the stability of the chair, the legs should be parallel to each other at an angle of 10 degrees to each other. Make sure the ends of the cross members and plywood sheathing are separated.
- If wrenches are chosen as mountings for the central legs, make grooves for them (scales are inserted into the holes).
- The ends of the stems should be cut at an angle of 80 °.
- When sawing the bottom step, make two 3.8 x 3.8 cm notches so that it lines up correctly with the smallest feet.
- The large legs and top rails are screwed together, as are the king's gas and the top step.
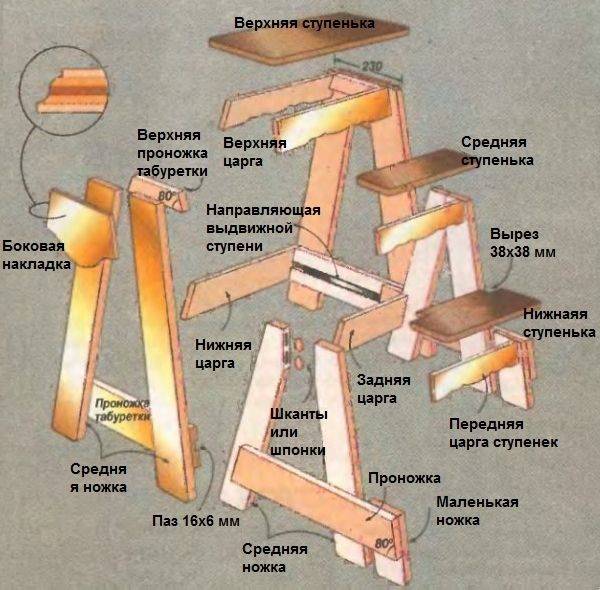
-
- The middle legs are mounted with weights, the rods are fixed. All of these parts are attached together with the rear and front bolts.
- Use screws to connect the small legs and crossbars, attach the front Zarga, steps.
- Set the stool and steps so that they are ready, unscrew the guide. If there are no errors during installation, dismantle the structure in the reverse order and connect all the parts with glue. Collet clamps are used to clamp workpieces.
Types of highchairs
 What chairs are available for children? Modern manufacturers offer a wide range of chairs for children of all ages.
They can differ in purpose, design, material and other criteria.
Many models can be produced independently of each other.
The most common and practical types of feeding chairs are as follows:
- A simple high chair is a regular high chair with a back, as described in this article.
- The reclining chair is a versatile chair with rich functionality. It should be possible to change the angle of the backrest, adjust the steps, attach the table top, etc.
- Rocking chair - the name of the chair speaks for itself. Without exception, all children love to swing in such a chair. Modern models offer the possibility of using a rocking chair as a rocking chair.
- The transformer is a set of chairs and tables that can be set up and used in a variety of ways. When assembled, the transformer serves as a convenient highchair for feeding, during disassembly - as a simple highchair and a separate table.
Some models have adjustable leg height and backrest position, and the high chair “grows” with the child.
If you have little experience in carpentry, it is better to limit yourself to making an ordinary high chair without additional functions. The main thing is to understand the basics and how it works, and in the future you will be able to create more complex chair models.

 In the manufacture of the chair, it is recommended to use environmentally friendly materials with high strength. In most cases, the following materials are used:
- Natural wood;
- Plywood;
- Chipboard.
The production of children's furniture (chairs, beds, tables, etc.) from plastic pipes is very common. After assembling and decorating, you get very attractive and unusual designs, but their reliability and durability are very doubtful.
It is recommended to choose wood, plywood or wood. Particleboard Since these materials are absolutely safe for a child, they have a long service life and other positive characteristics. With this article, you can make a high chair out of wood.
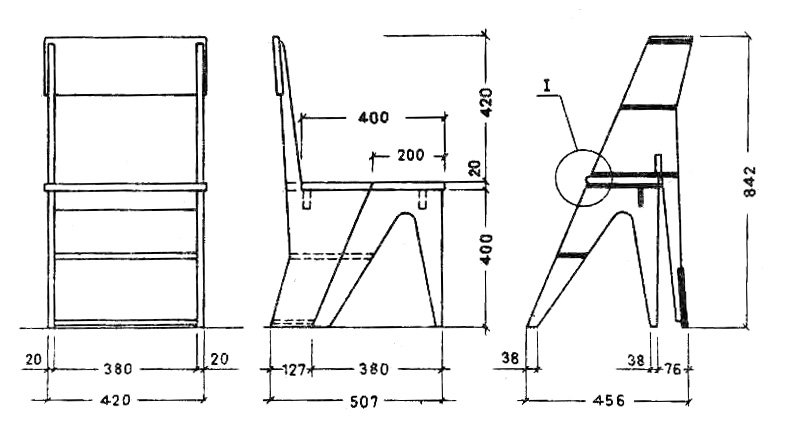
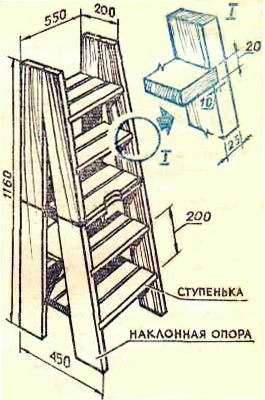
 The following structural elements must be prepared for the chair structure in accordance with this drawing:
- 1 - top rod (1.9 x 4.1 x 16.5 cm);
- 2 - two rear legs (3 x 3 x 55 cm);
- 3 - carved beam (1.4 x 4.1 x 16.5 cm);
- 4, 6 - stripes in the middle and bottom (1.4 x 2.9 x 16.5 cm);
- 5 - Double-sided seat (1.4 x 10.5 x 26.3 cm);
- 7 - two kings and two slats on the sides (1.4 x 2.9 x 17.7 cm);
- 8 - two front legs (3 x 3 x 30.5 cm);
- 9 - two handles and two front stripes (1.4 x 2.9 x 19.5 cm).
For the legs, it is recommended to use pine stones with a cross section of 3 x 3 cm.
The legs of the chair should gradually be as follows: The hind legs should be up to 1.9 cm from the center of the chair and the front legs should be up to 2.4 cm from the center of the chair.
Tip: To make the assembly of ribbons and kings as easy as possible, only the outer edges of the parts should be reduced. This ensures that the inner edges are parallel to each other.
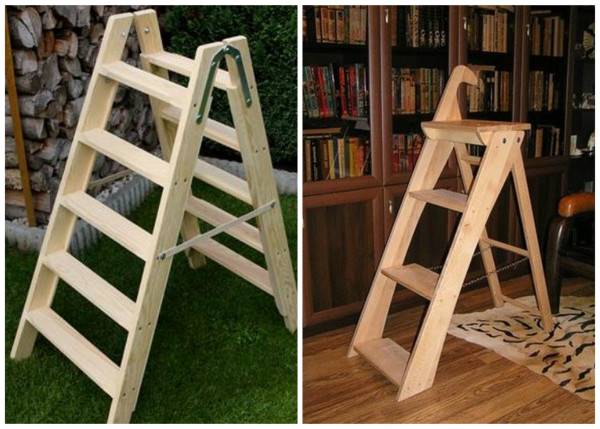
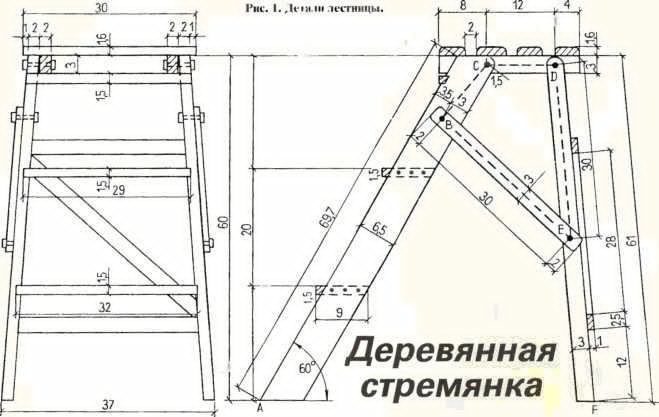
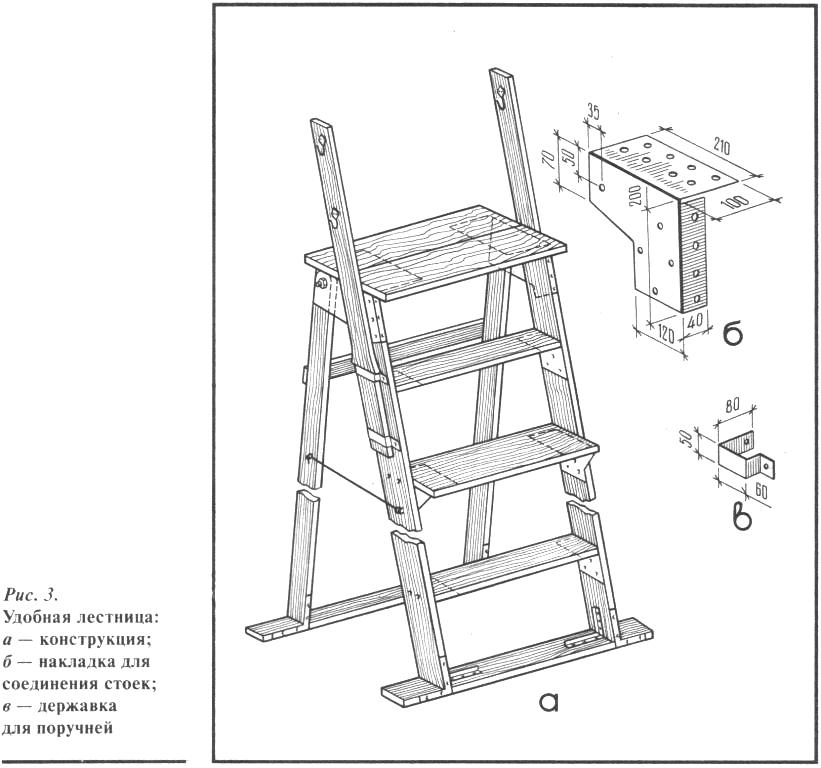
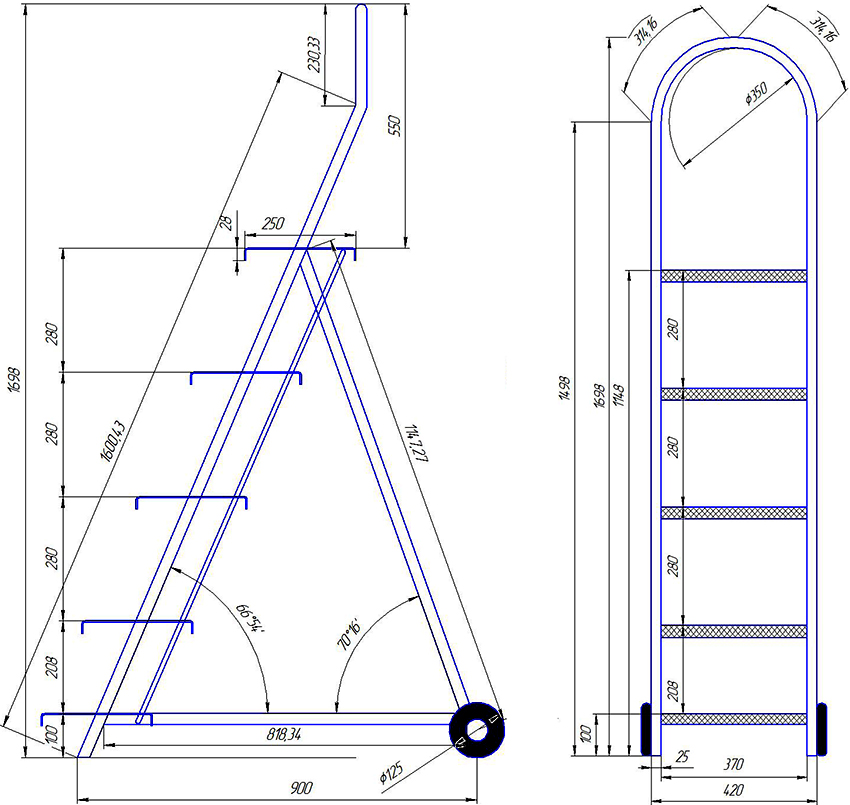
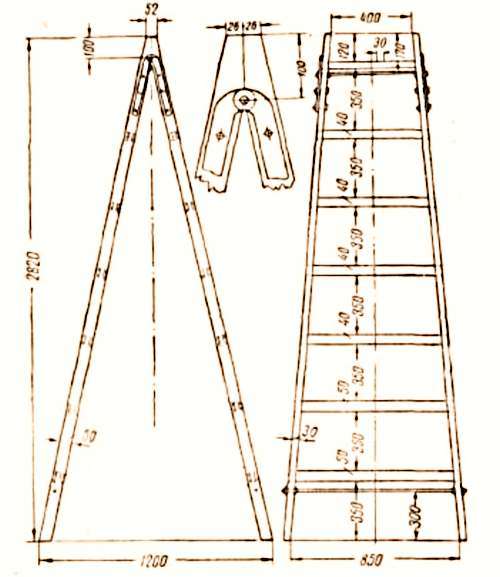
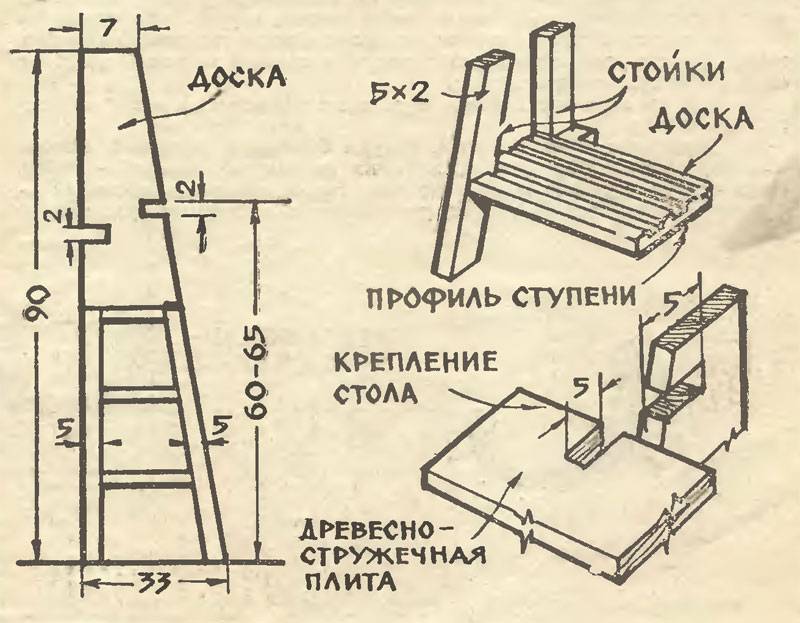
Step-by-step instructions on how to make a ladder ladder with your own hands
Drawing of a stepladder stool.
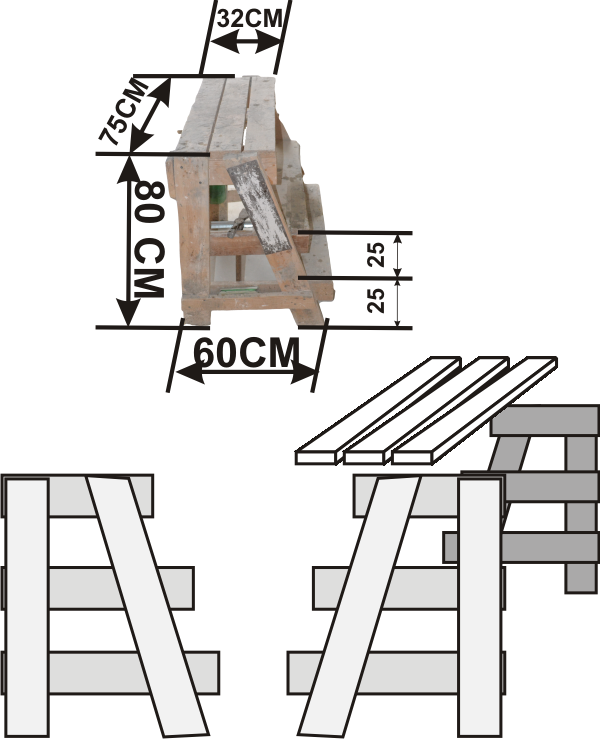
The simplest option will be considered: making a classic stepladder with two ladders made of wooden parts. You can also use a metal base. Then the ladder will be heavier and more durable. The height of the ladder must be chosen by yourself, based on the purpose of the future ladder. The height of the stairs is determined by the length of the stringers, and the width is determined by the length of the rungs (steps). The length of the kosour can be from 50 cm to 8 m.The width of the crossbeams is usually no more than 50 cm.The optimal distance between the steps is 30 cm.
For the manufacture of kosour, a pine timber prepared in advance is taken. It should not have any cracks, chips, protruding knots, dents. The size of the stringer in the section should be approximately 60 by 100 mm. The rungs are made of dense, smooth wooden bars, rectangular or square in cross-section.
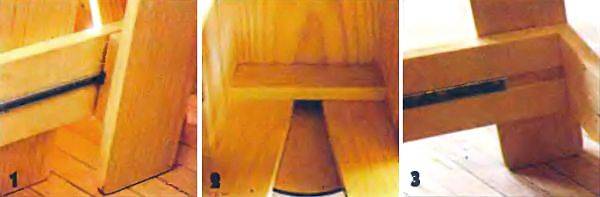
There are several ways to attach the crossbars to the stringer.
Diagram of a stepladder stool with a table.
In the first method, at the junctions of the step and the kosour, the steps are drilled to prevent wood splitting and are attached to the kosour with self-tapping screws or nails. This method of fastening is used for the manufacture of temporary ladders, because the steps can easily come off or bend.
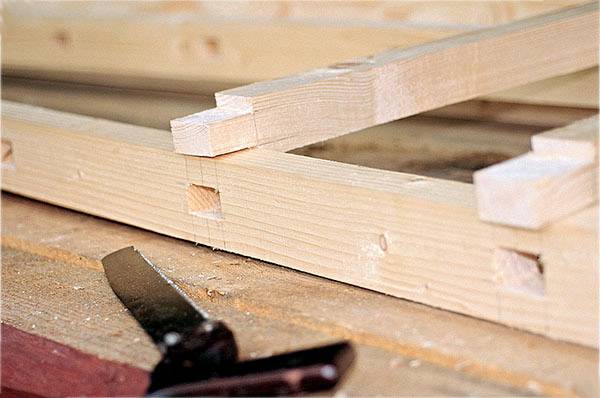
There is another method of fastening: the step is slightly recessed in the stringer, fixed with self-tapping screws at angles to the stringer and at an angle of 90 degrees. But the cuts make the structure less durable, so it is necessary for the stringers to take a thicker bar and make the stairs not very high.
The most reliable method of fastening is when holes are made in the stringer, where the crossbars are inserted, glued with glue and fixed with self-tapping screws. The steps for such a staircase are made of rectangular shape with a thickness of no more than 40 mm. To strengthen the crossbars, metal spokes are fixed under each step with nuts and bolts.
In order to make a stepladder, you need to cut the timber into blanks: we make 4 pieces longer, and then we prepare two pieces of different lengths. Before sawing, do not forget to measure the required length on the bar, mark it, and only then saw. We attach rubber feet to one end of the stringers using screws so that the ladder does not slide on the floor.All prepared parts must be carefully sanded and treated with an antiseptic. To prevent the ladder from sinking into the ground, if you have to work in the garden, you can attach shoes (pipe segments) with a crossbar, usually made of wood, to the base. In addition, a block of wood at the base of the stairs can save life when working with wiring.
The stepladder is made of two ladders that are connected with metal plates. In each of them, it is necessary to cut off the protruding parts, as well as drill a hole in the middle of the wide part and a hole for fastening to the staircase itself. At the same height, the ends of the chain are attached to the kosoura with nuts and bolts so that the ladder does not move apart.
You can make two small ladders with shoes so that they can be inserted one into one. To do this, you need to drill holes in the kosoura, which will coincide with the profile on the second staircase. To make the ladder long, you just need to bolt the two ladders together.
If you work with a ladder on a personal plot, you can very easily make a step-ladder from it. To do this, you just need to attach a metal profile support to the stairs. You can attach a piece of wood. A corner is attached at the end of such a profile or bar. In order not to break the steps of the stairs, the corner must be attached to the additionally made crossbar.
If you want to use a ladder to collect cherries, for example, you can attach a sturdy tape to it. A tarpaulin, a towing strap is suitable for the tape. The tape is attached to the stringers with metal plates. The sling can be folded in half under the linings. This will extend the life of the tape. Attach hooks to the top of the ladder so you can hang the bucket.
So the question is, how to make a step ladder with your own hands from scrap materials, it turned out to be solved. Even a novice builder can make such a ladder.
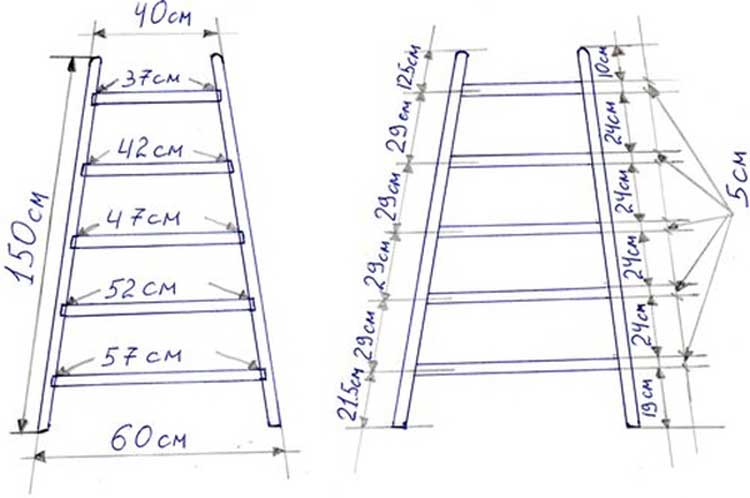
Simple stepladder from a bar
To make a simple garden stepladder, you will need 13-14 meters of timber with a section of 60 × 40 mm. For support posts you need 2 m beams (4 pcs.).
 It will not hurt to make stepladder bars with a margin.
The following bars should be prepared for steps and rungs:
- 590 mm (2 pcs.);
- 545 mm;
- 500 mm;
- 455 mm;
- 410 mm (3 pcs.).
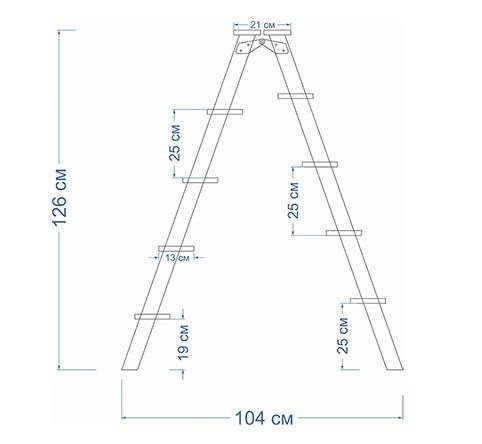
The same markings are applied to the two support posts, to which the steps will be attached. The distance between the steps is 400 mm, the first (bottom) step is at least 100 mm from the edge. According to the marking, 5 grooves with a depth of 15 mm are selected.
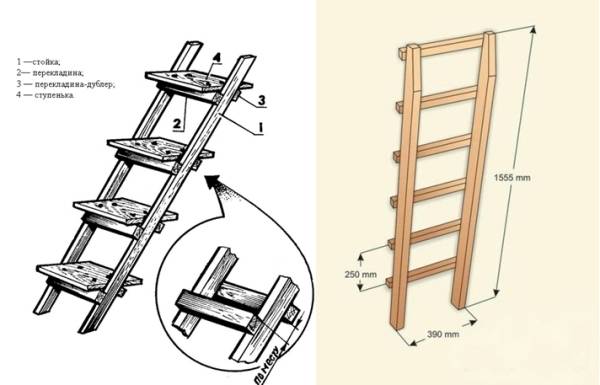
 Marking for steps.
To assemble the main part, the support posts are laid with the grooves up and aligned. The distance between the upper ends is 400 mm, between the lower ends - 600 mm. The steps are inserted into the grooves and fastened with screws or nails. An additional crossbar is mounted at the top on the reverse side.
 Cut grooves for steps.
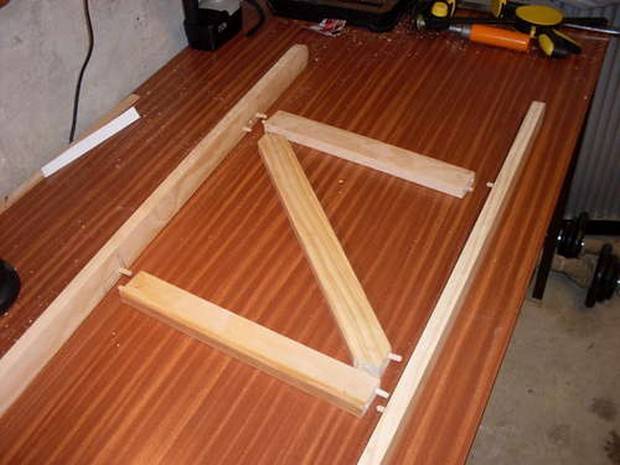
The support has no steps, so its supports are connected with crossbars only at the bottom and top. The design is complemented by a jib
It is important not to be mistaken with the distance between the upper ends - it is equal to 300 mm
 The back support of the ladder can also be fixed in this way.
Having collected both parts, it remains to connect them together. The support is installed so that its "horns" are between the upper step and the additional crossbar of the main part. Such a design does not require fasteners at the top, and the lower ends can be moved to a suitable distance, choosing the most stable position.
 Stepladder ladder drawing.
Add-ons
In wooden stepladders, when the steps are fixed in the grooves simply with glue, knitting needles can be used to increase the reliability and strength of the structure. A metal spoke is inserted under the step (holes are pre-drilled) and fixed with bolts and nuts.
 An easy way to increase reliability is to attach small blocks under the steps.
Nylon cords or metal chains are used to prevent the supports from moving. They are fixed at the same height on both sides, connecting the support to the main part.
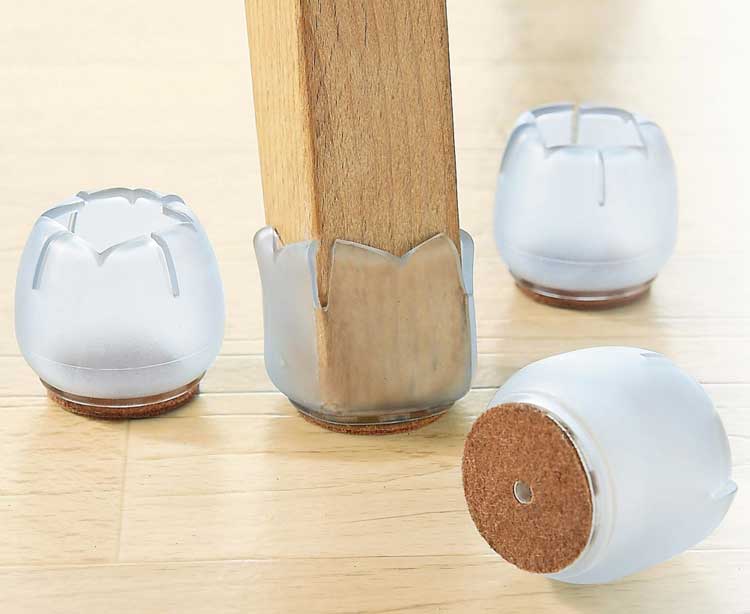
 Type of attachments for the legs of the stepladder against slipping.
By creating a ladder made of wood with your own hands, you can immediately add useful elements to the structure. The upper part, for example, can be equipped with hooks on which it is convenient to hang a bucket of tools. Another option is a cut 10-15 cm high from a pipe with a diameter of about half a meter. Attached to a ladder, it is perfect for storing large tools. Step-by-step production of a wooden step ladder.