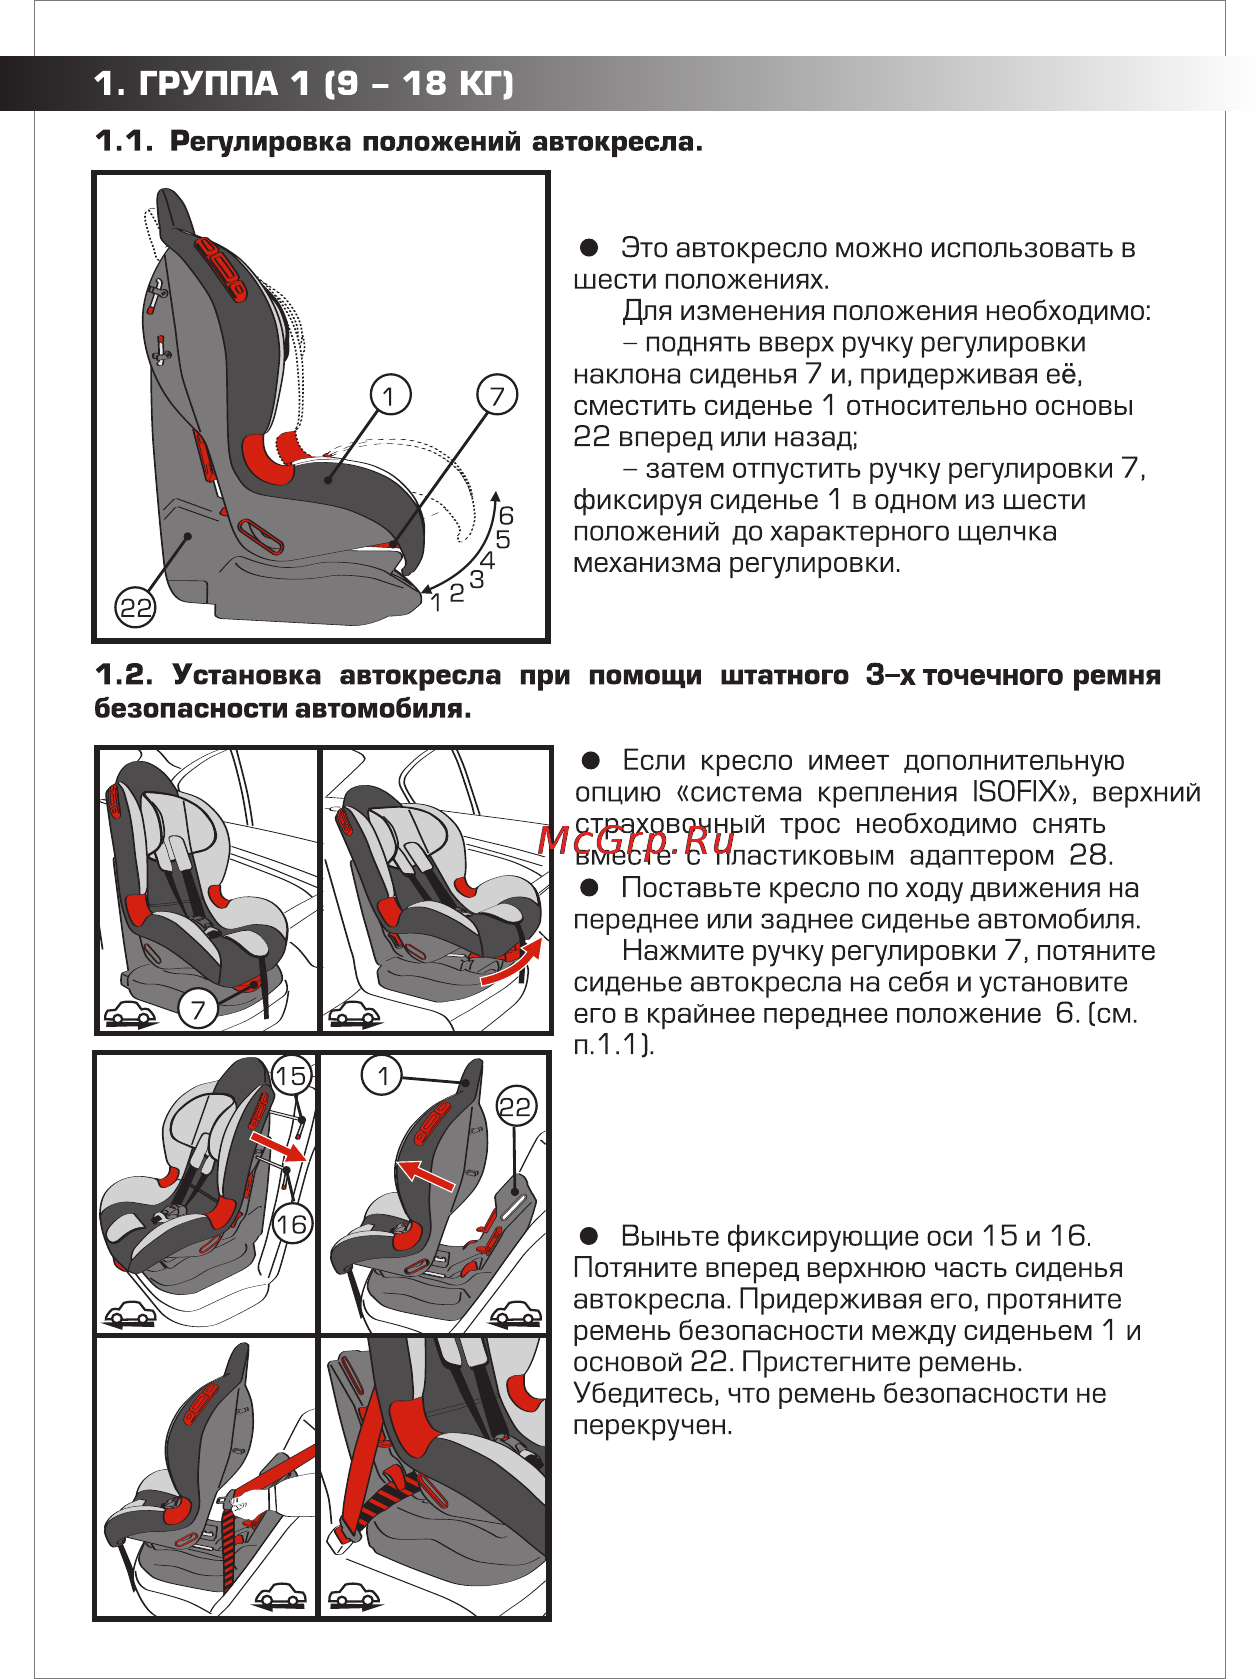
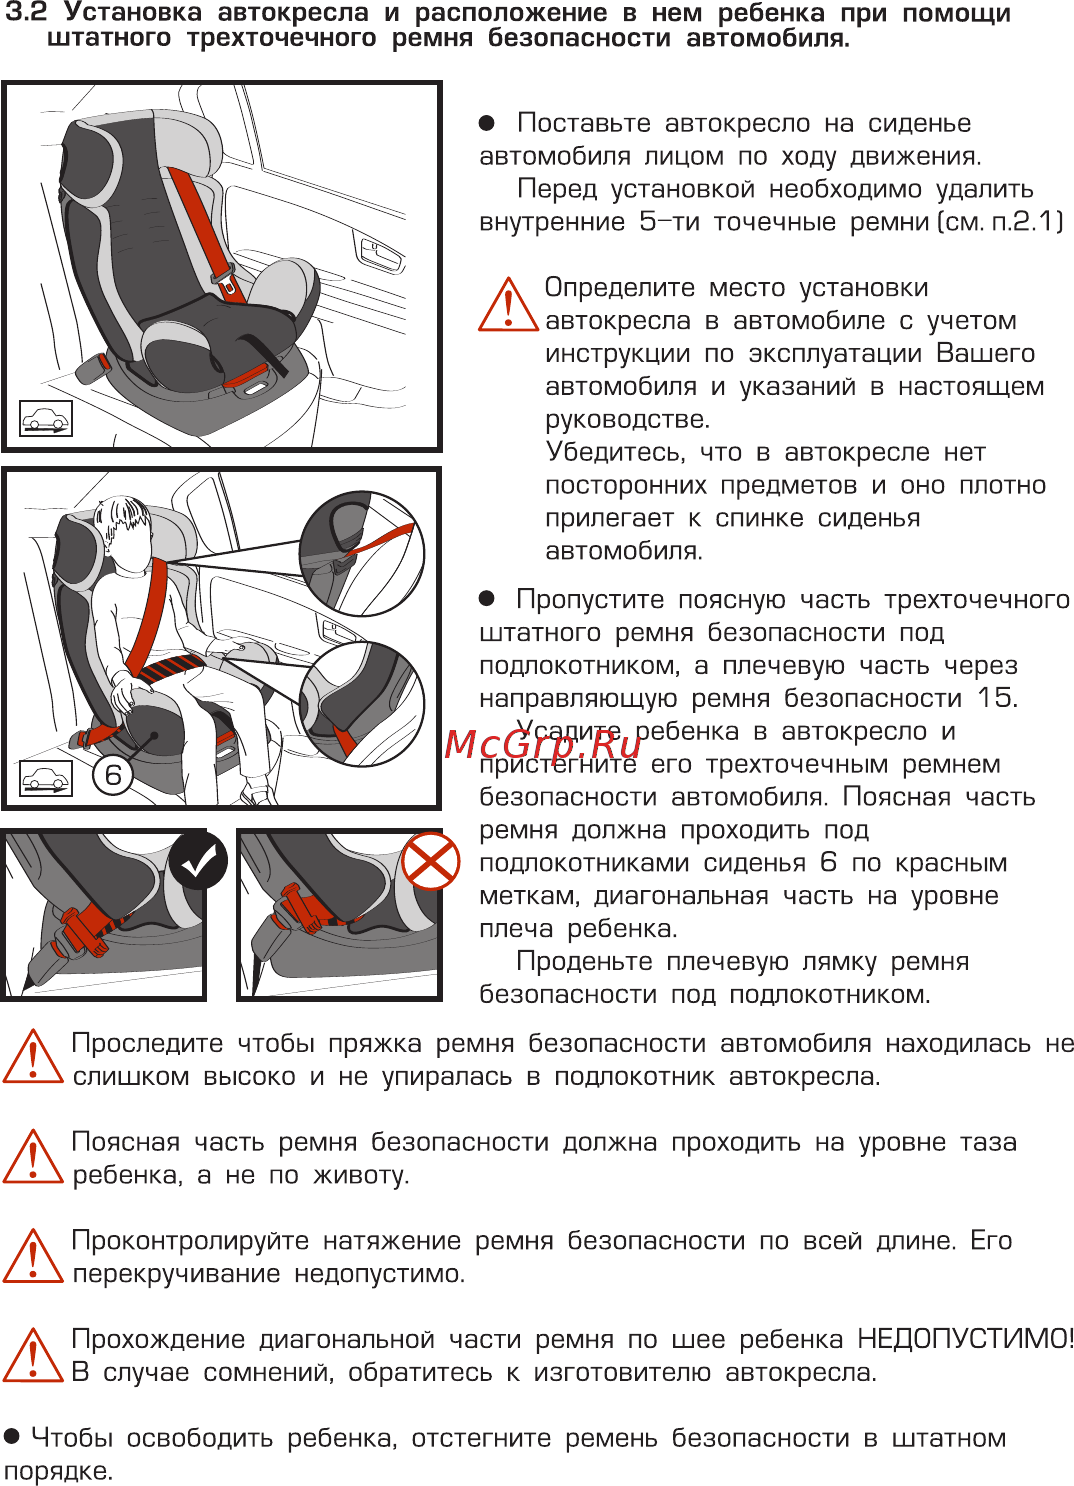
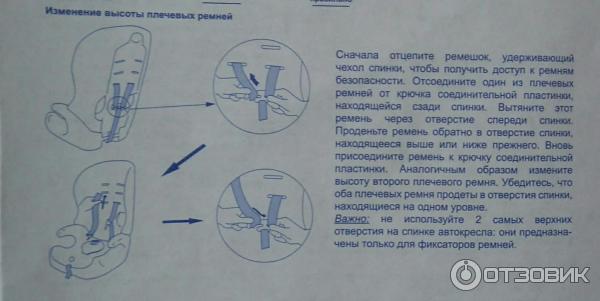
Step by step guide
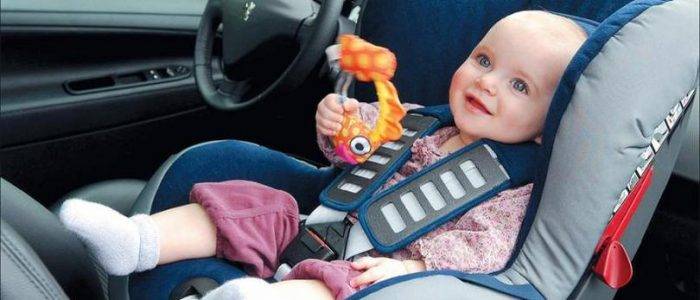
Such an adaptation is an indispensable thing for parents who love to travel with small children.
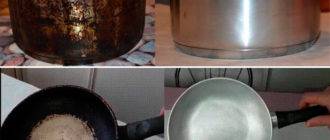
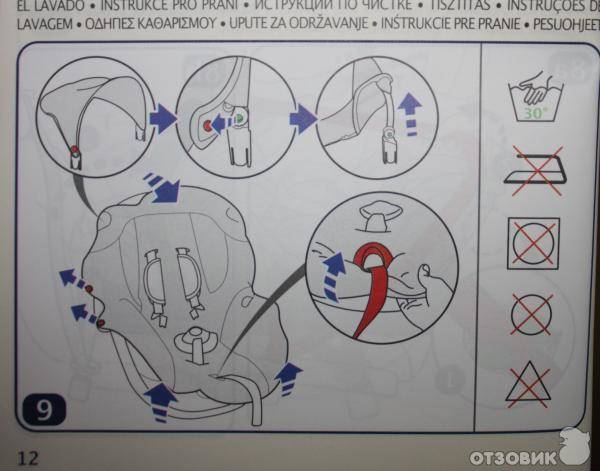
The chair can be washed in the washing machine. The main thing is to observe the temperature regime and not to use the sports regime, jeans and other aggressive types of washing.
Assembling a child car seat usually goes smoothly if instructions are provided. If it is not there, you will have to sweat.
A quick installation is not up to everyone's shoulder, some collect it for a whole week. If you do not want this to happen to you, do not throw away the instructions, do not put it in a prominent place where the baby can get. Keep this manual with all other documents.
How to assemble a child car seat after washing?
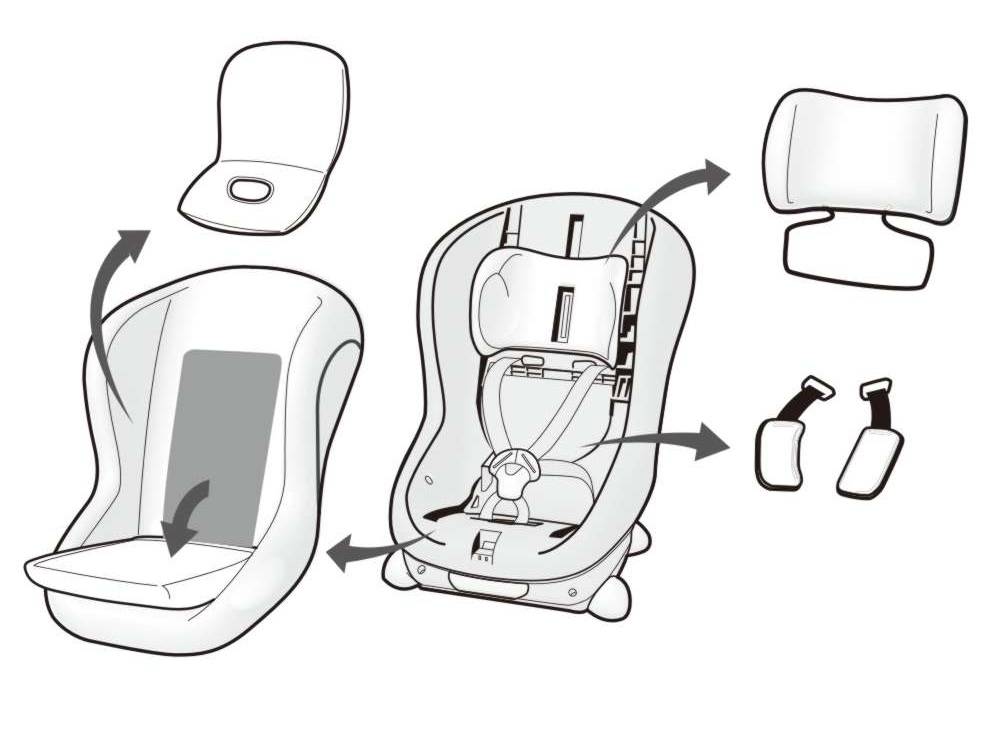
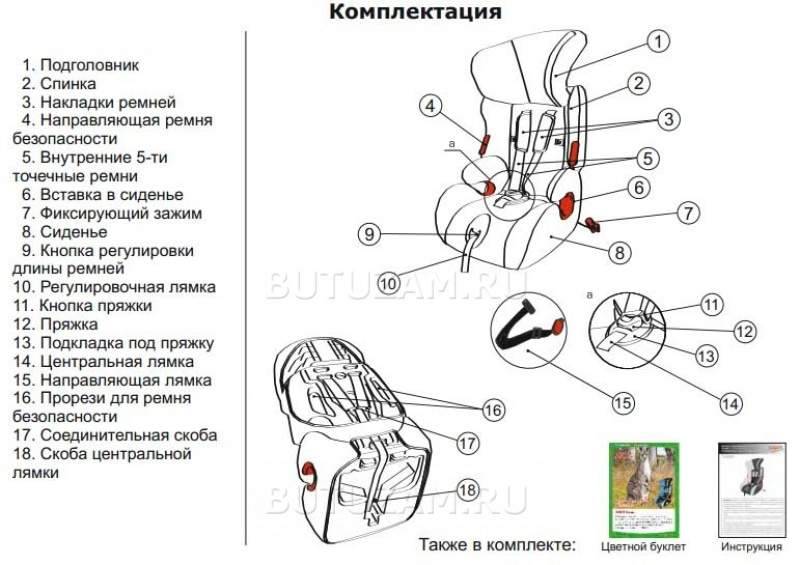
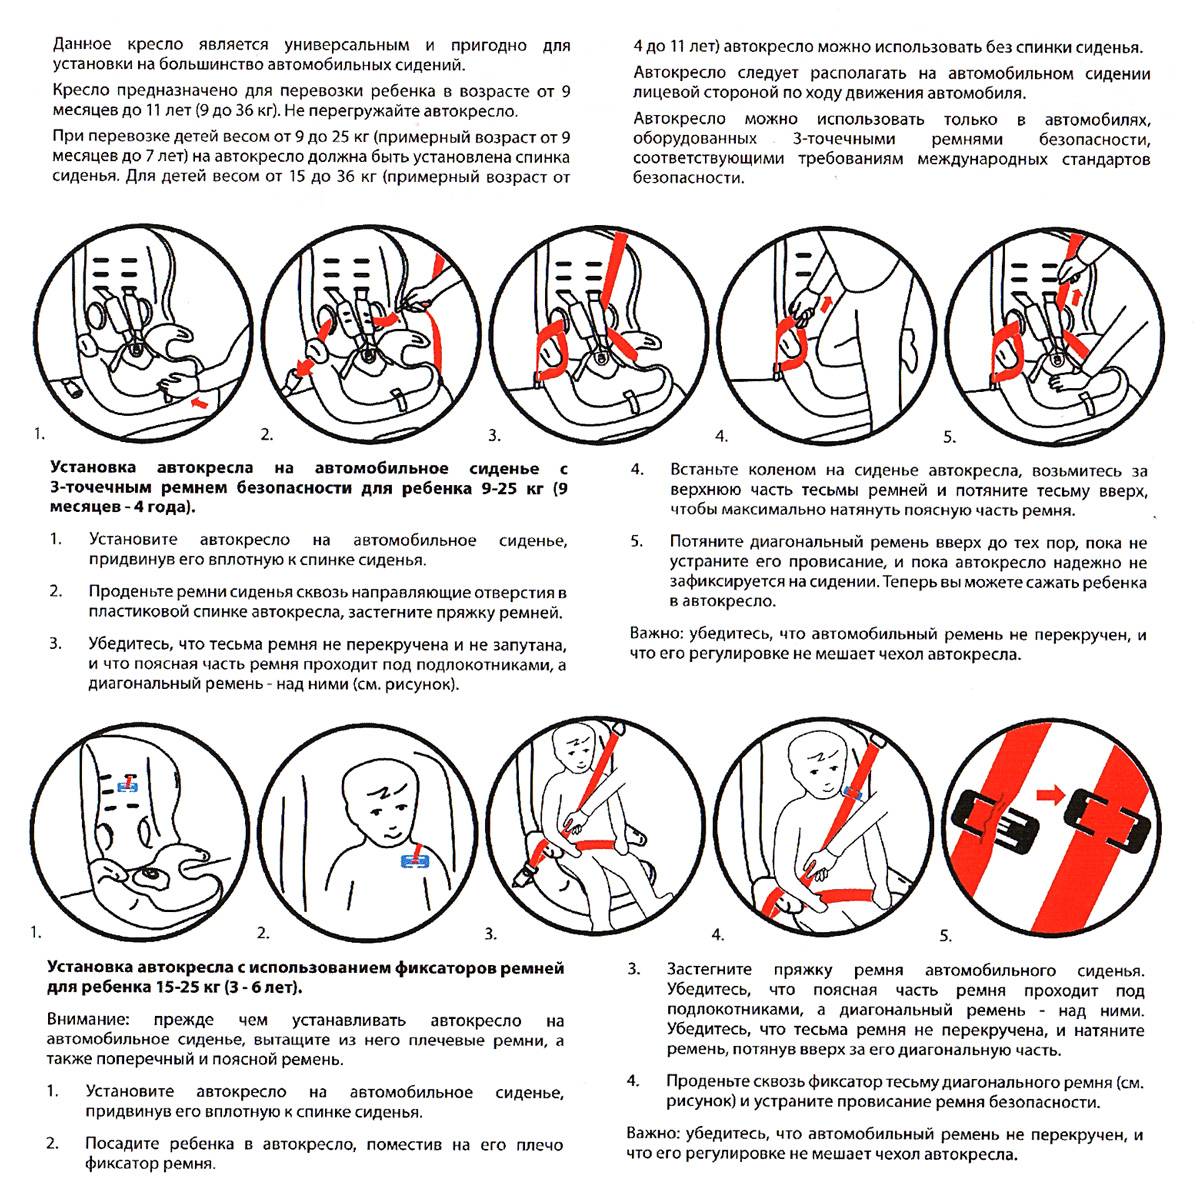
Assembling a child car seat using tarti trt un as an example:
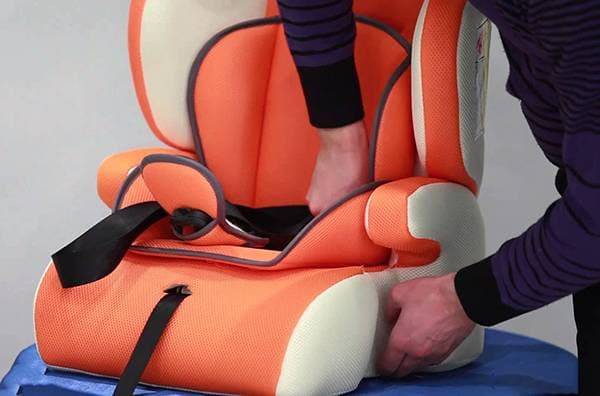
- You will first need to put on the main cover. First of all, pull on the top and secure it. It is fastened with Velcro on the back.
- Then put on the second piece and don't forget to put on the seat belts. Unfold the cover and make sure you put it on well.
- After that, you need to put in place the soft pad so that the slots for the belts are opposite each other.
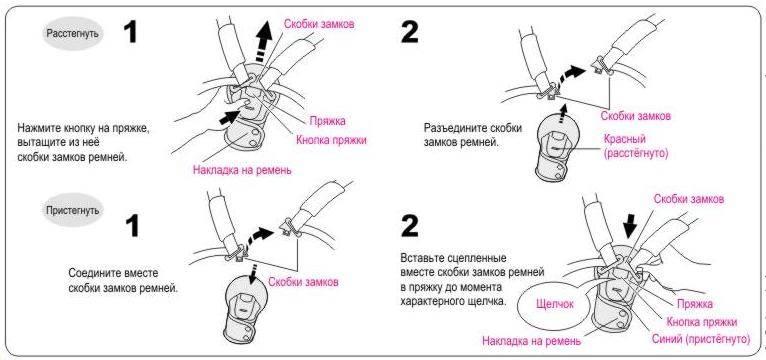
- Next, pass the central locking belt through them and fix it with a metal bracket (the buckle is the point where the belts converge). Be sure to check if this part is securely fixed.
- The next step is to attach the top padding. Place it just above the bottom pad, opposite the shoulder strap slots.
- Pass the shoulder straps and don't forget the special pads to soften the friction.
- Pass the side five-point harnesses through the padded shoulder straps. They are threaded through the cover itself and the car seat frame. On the back of the product, fasten them with a metal clip, it can also be plastic, be careful not to break.
- Check the tension of the belts so that they are not too tight or, conversely, weak. They must keep the child safe and not let him fall out.
- Finally, connect the straps extending from the top of the back with the straps passed through the front. The latter are also put on a metal clip.
Now everyone knows how to assemble a car seat after washing. Then the product is attached to the machine. This shouldn't be a problem.
A similar assembly mechanism can be used for another washed car seat.
Only instead of Velcro, which hold the case in place and prevent it from twisting, there may be buttons or other mechanisms. The rest of the assembly is the same.
If even the detailed instructions did not help solve the problem, ask for help from friends who have repeatedly disassembled and assembled this device for the child.
Assembling the chair quickly and correctly is not a problem at all. Follow the procedure and everything will work out. And over time, it will not be a hassle at all, you will collect it in almost 5 minutes and without outside help.
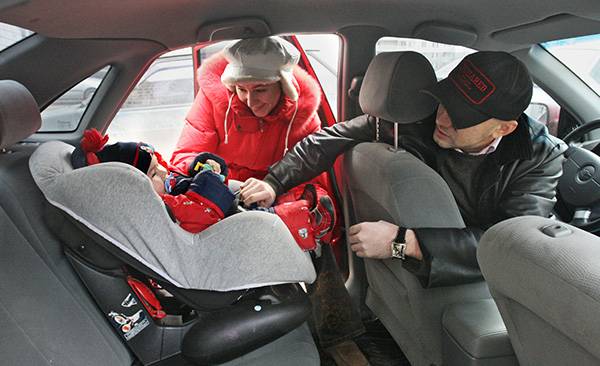
Children may only be transported in a car in a special car seat. During operation, the chair gets dirty and needs to be washed. Cleaning requires an analysis of the structure, after which many drivers often face difficulties and wonder how they can assemble a car seat after washing.
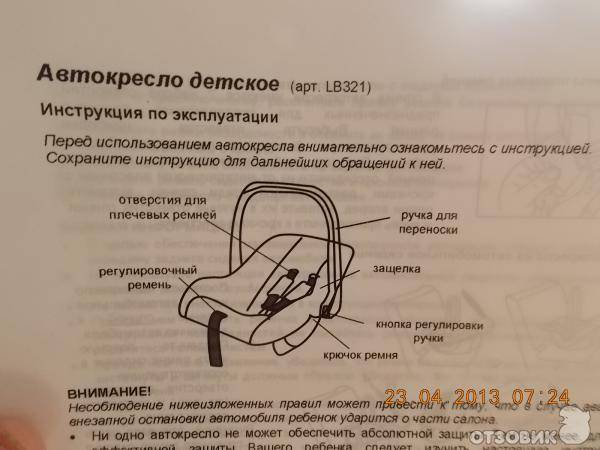
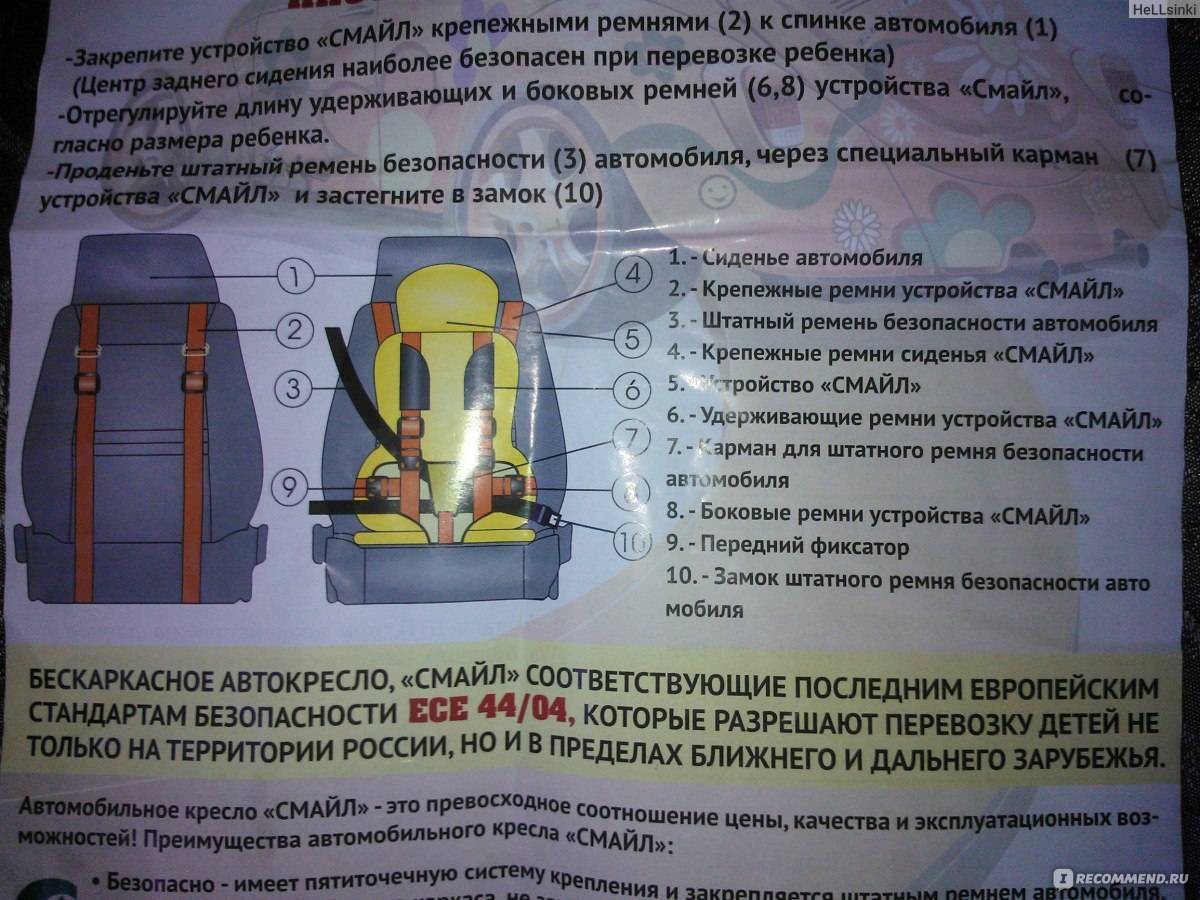
Car mount
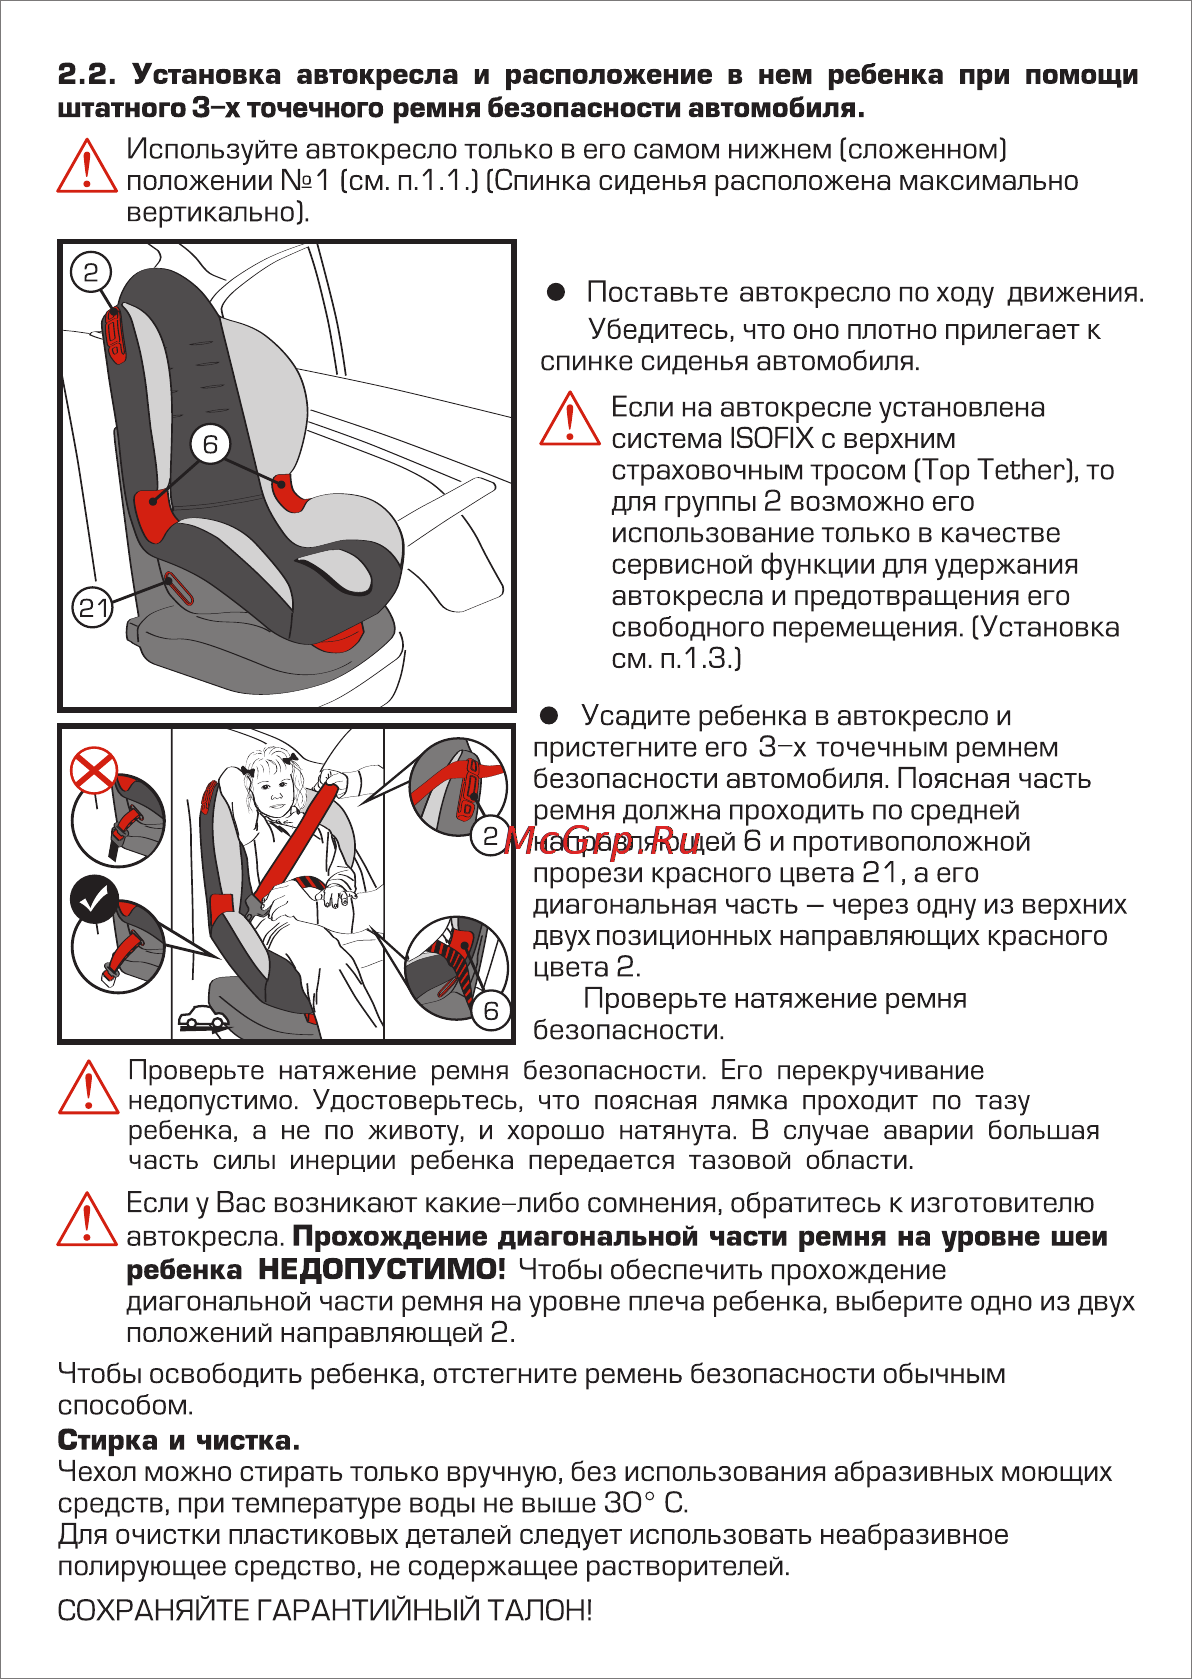
 You can secure the chair with seat belts.
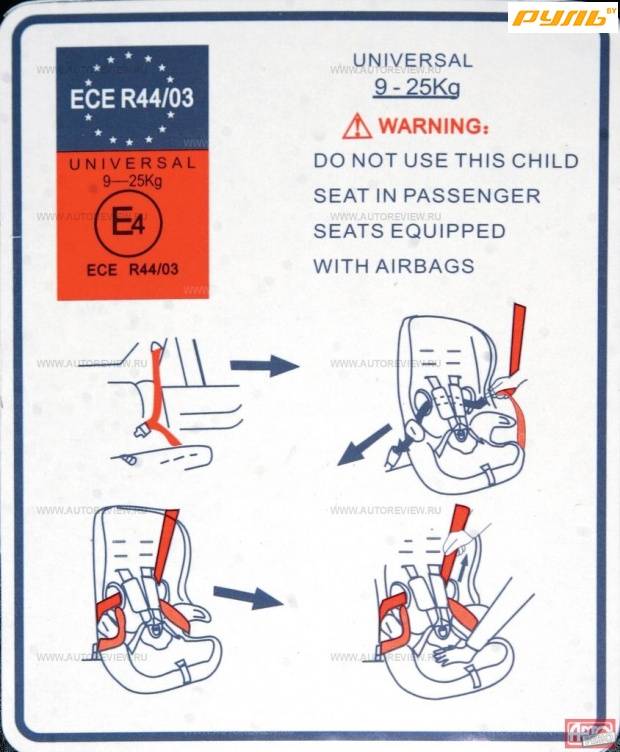
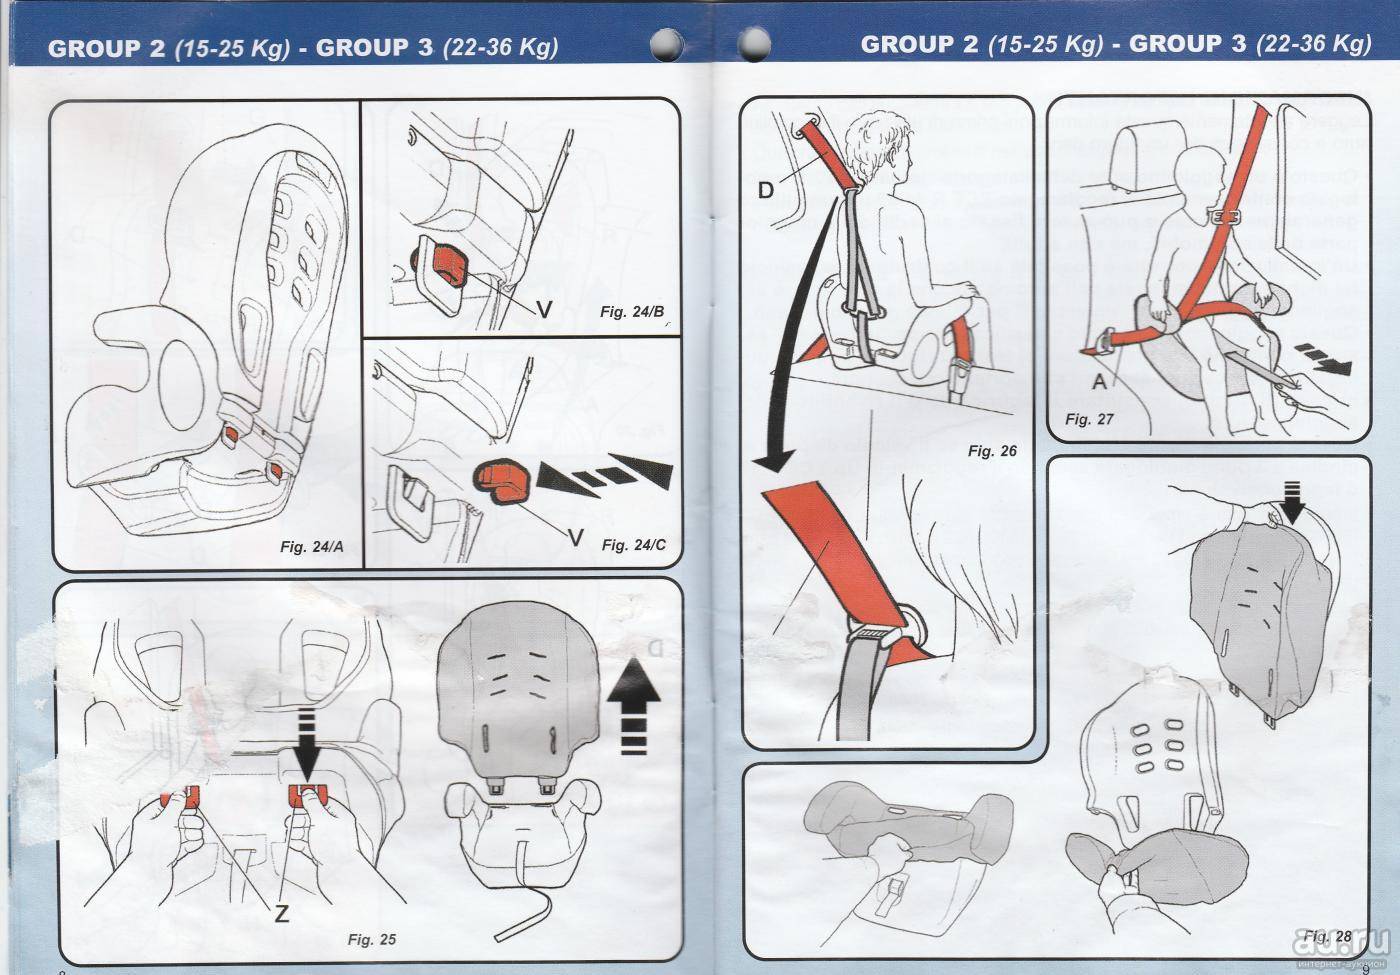
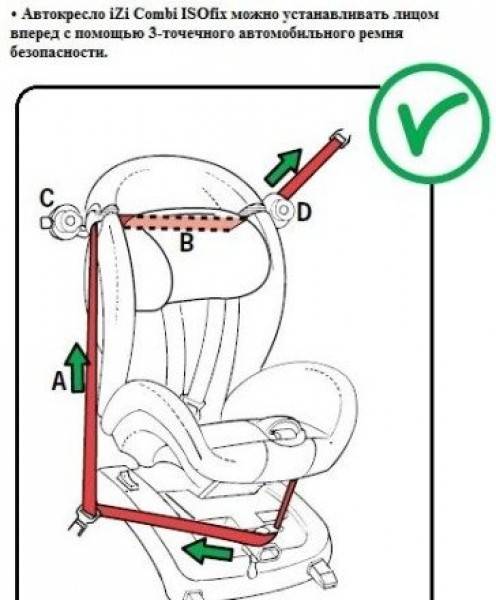
There are two common methods of fixing, depending on the brand of the car seat - using the standard three-point belts and the Isofix system. Such methods are considered effective, safe and versatile. Used in almost every chair model
It is worth noting that the belts and the holes for them should be at the highest point, namely above the child's shoulders. Only in this way it will be not only safe to drive in the car, but also convenient.
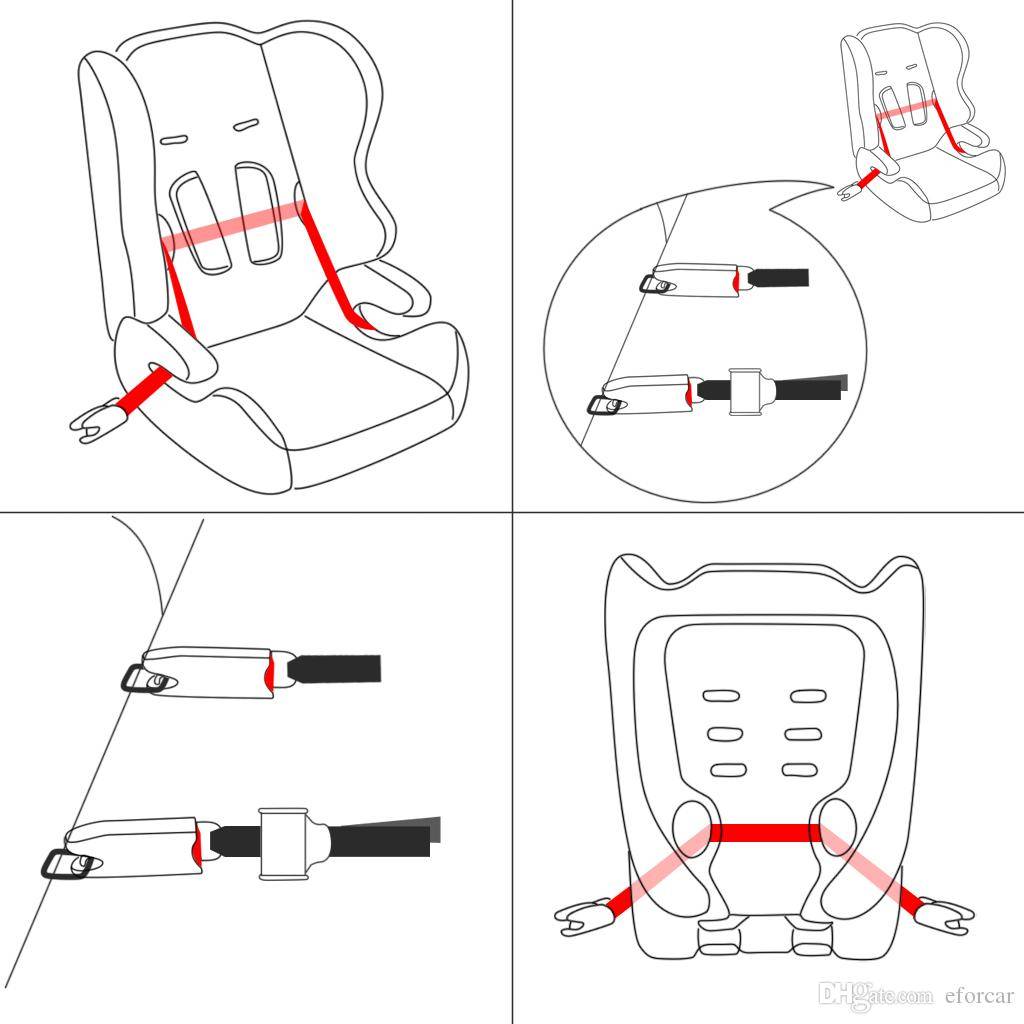
Using regular belts
This mount is considered simple and convenient, but it has its drawbacks. It is believed that such a system is not very reliable, and during the installation of some categories of seats, the length of the belts is often not enough. Before attaching the car seat with standard products, you need to check for the presence of appropriate marks for passing the belts (indicated by different colors depending on the purpose). In the absence of mounted fasteners (internal five-point belts), it is worth making sure of the reliable quality of the regular belts.
Application of the Isofix system
This system is suitable for any brand of seats, it is the most reliable and safe. Special braces make it possible to place the seat between the cushion and backrest, on the front and rear passenger seats. Category 0 seats are easy to pull out as the locks are gently released. It is recommended to additionally use an anchor strap to protect the child from unintentional nodding, since with this system the upper part of the car seat will not be fixed.
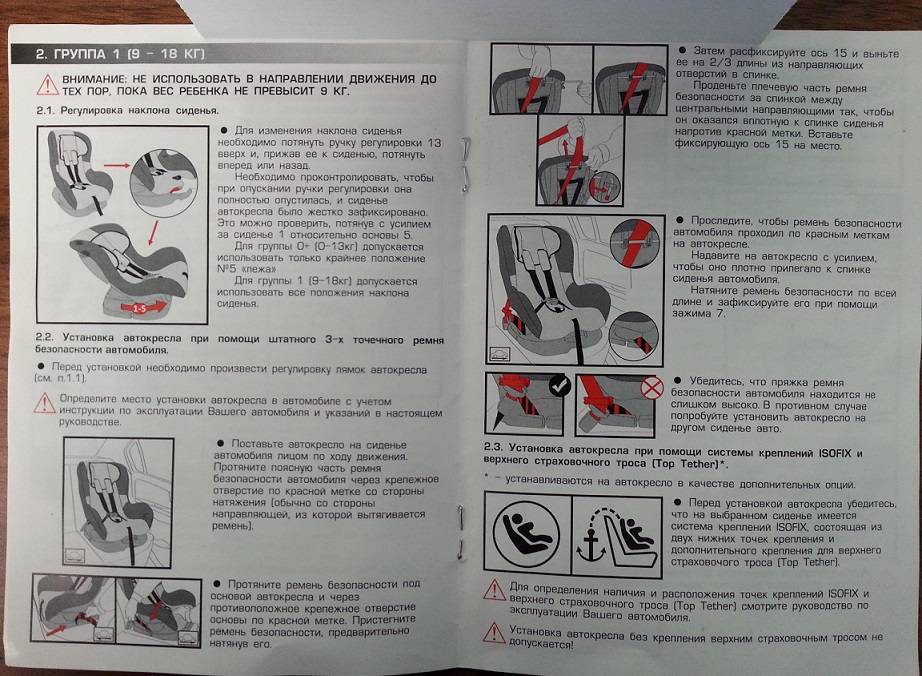
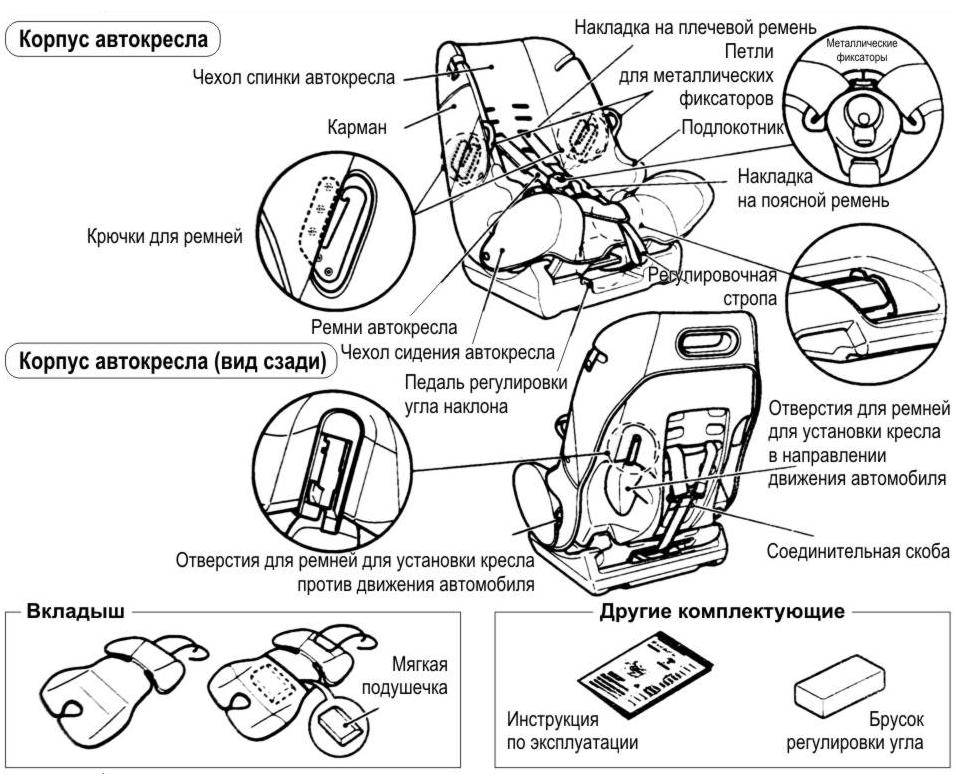
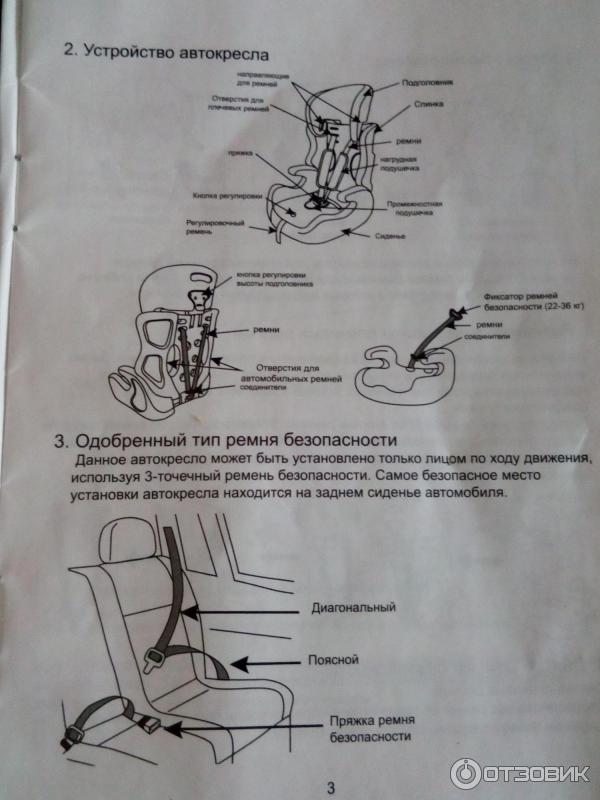
Car seat assembly instructions
During the disassembly of the car seat, it is recommended to record or video the process of detaching each part, in order to then reassemble in the reverse order. If all the details have already been washed and there was a difficulty, you need to adhere to the following instructions:
- Take the seat cover and tie it to the straps on the sides and at the buckle locations.
- Pull on the cover and make sure that all parts are in their grooves, then fasten the latches.
- Place the cover over the backrest and put it on the sides. After tightening, you need to fasten all the buttons.
- Thread the shoulder straps into the grooves on the bottom and attach the pads to cushion the friction.
- Bring the straps to the back and insert them into the slots, and then fasten them to the chair.
Expert advice
The child seat must be handled with the utmost care so as not to destroy the well thought-out structure. But this does not mean that you need to postpone the next wash, fearing to damage the device.
Everything will go smoothly and simply if you follow a few recommendations:
- in case of local contamination, you can clean the cover without removing it from the chair;
- the lining under the cape does not like water - it is better to clean it dry;
- it is impossible to pull on the seat "someone else's" cover - only the original cape, which was sewn taking into account the design of the chair;
- it is more convenient to put the cover on the lower part of the chair if it is placed horizontally;
- do not pull on unfinished covers - due to dampness, mold and an unpleasant odor will appear.
There is no need to be afraid of washing the covers. Everything will be easy if you act consistently and according to the instructions.
The fourth mistake. The bassinet is not installed at a 45 degree angle
Check: Most carrycot car seats have a built-in level to help you position the seat at the desired angle. However, parents often place the chair too upright. If your chair doesn't have a built-in level, take a square piece of paper and fold it in half to make a right triangle. Attach the long side of the triangle - the hypotenuse - to the back of the chair. If the seat is correctly positioned, the top edge of the triangle should be parallel to the ground. Adjust the chair to achieve the correct fit.
Danger: the child's airways are still very small, their diameter does not exceed the cocktail tube. If the back is too upright, the child's heavy head can fall forward and block the airway so that he cannot breathe.
Remedy: Typically, the car seats are tilted back slightly to provide comfort for adult passengers. If it is possible to adjust them, put them in a horizontal position. If this is not possible, place under the back edge of the chair (where the child's legs are) a stick, "noodles" made of polyurethane foam for swimming in the pool (you can buy it in sports stores) or just tightly rolled towels.
The place in the car where the car seat should lie and be fixed
The safest place in the car is the center passenger in the back. In the event of a frontal collision, the inertia will be restrained by the seat belt; in the event of a side collision, the risk of injury from the door is excluded.
The central passenger seat can easily be fitted with a car seat with the Isofix system and with standard seat belts.
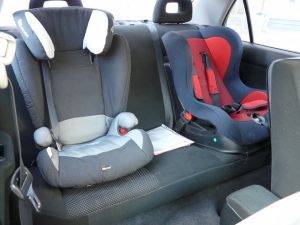
How to fit two and three child car seats in a car
Two child car seats in one car are installed on the rear side seats. Fasteners for all three locations using the isofix system are provided by many brands of cars, therefore, it is possible to place devices for transporting children in each of the three places.
Two car seats with Isofix system in one car
Conditions for the carriage of a child in the front passenger seat
- In the front passenger seat, it is forbidden to transport children against the movement of the car, i.e. in an infant car seat if the car is equipped with an airbag.
- When installing a frame car seat, it is necessary to move the passenger seat back as far as possible.
- In the front seat, children under 12 years old can be transported strictly in a frame car seat of a suitable size (from 01/01/2017);
- Other restraints (FEST, booster, frameless seat) on the front seat are prohibited for use at any age (from 01.01.2017).
Tips for parents
One of the main criteria when choosing a child car seat is its safety and high quality.
In order to use the seat for a long time and not encounter problems, you should pay attention to designs from the following manufacturers:
- Siger. The Russian manufacturer produces comfortable child seats that meet the established rules and regulations. All structures are pre-crash and tested.
- Zlatek. To create the seats, a non-toxic hypoallergenic material is used, which is absolutely safe for children. Injection molding technology cuts costs and helps keep costs down.
- Stiony. The anatomically shaped seats with extra padding provide safety by absorbing the force of impact that occurs in collisions.
- "Bebeton". This brand produces a wide variety of designs for children of different weights and ages. In production, modern technologies are used, which has a positive effect on the quality of products.
- "Mishutka". The most economical and affordable option is the Mishutka armchairs, which are an order of magnitude lower than most alternatives. Despite their low cost, they meet safety regulations and undergo standard testing.
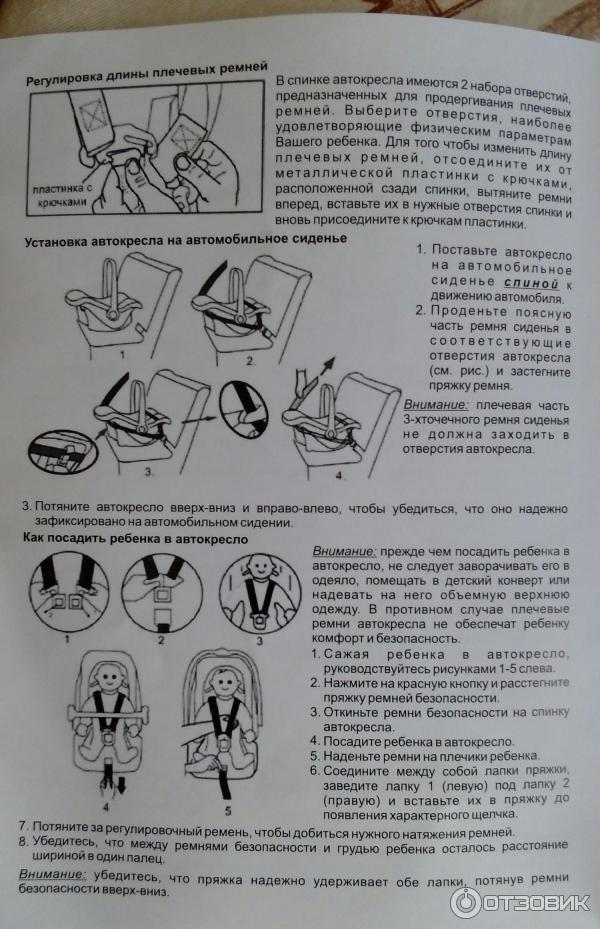
How to reassemble the car seat after cleaning?
After the car seat has been thoroughly cleaned and dried, it must be reassembled and returned to its original place in the passenger compartment. The algorithm for assembling the product is as follows:
The upper part of the cover is put on and well secured with Velcro from the back.
The same is done with the other part, and you need to make sure that the cover is put on correctly, does not form folds.
The pad should be returned to its place so that the belt slots are opposite each other.
The central locking belt is threaded through the slots and fixed in this position
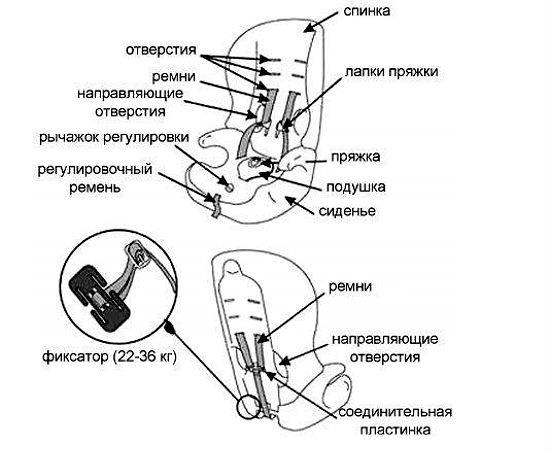

It is important to check how secure this mount is.
The padded top is attached slightly higher than the bottom pad and should fit just between the shoulder strap slots.
The shoulder straps are threaded into the corresponding slots and fitted with friction-reducing pads.
The side straps are passed through the shoulder straps, and they must also pass through the cover itself and the car seat. After that, they are securely fastened at the back.
The mounting bracket can be either metal or plastic, but in any case, you need to handle it with care.
It is important to check the degree of tension of the belts - it should be sufficient to securely fix the child, but at the same time comfortable for him.
The straps extending from the back of the back are connected to the straps coming from the front. There is also a special retainer for this.
The seat is assembled and can be returned to its seat in the vehicle.
Watch the video instructions for assembling the car seat:
Putting it together step by step
Assembling a child car seat is not an easy task. Before getting down to business, it is necessary to study the instructions, which are necessarily attached to each seat. It provides step-by-step instructions for your specific model.
If the manual is lost, then we focus on the standard instructions:
- thread the belts through the holes on the lower part of the seat (on the cover and on the sides of the chair);
- spread the cape over the surface of the car seat so that there are no creases, folds and lumps;
- fasten the cover to the frame using the existing fasteners (the fasteners differ depending on the model and can be in the form of buttons, buttons, clips and Velcro);
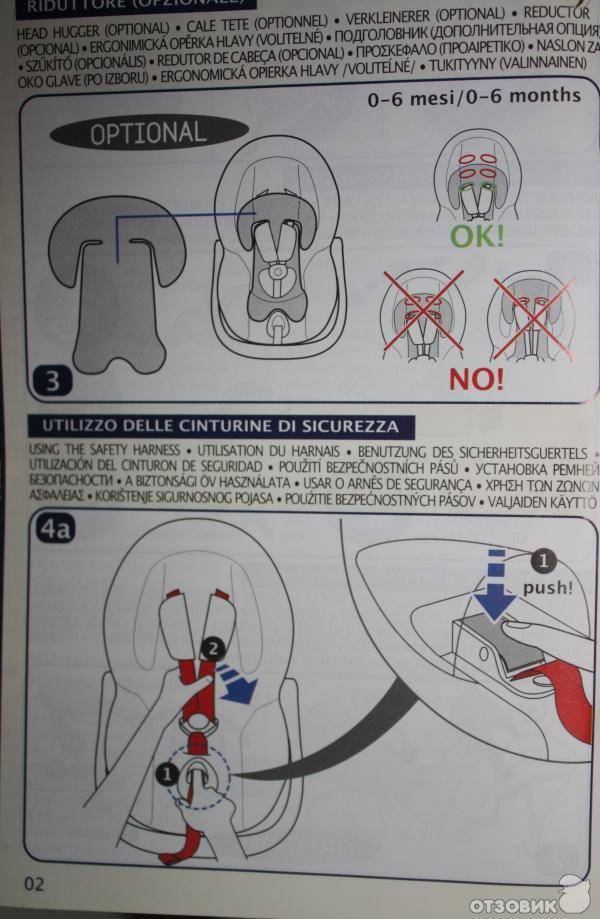
- insert pads - "pads" into the upper belts;
- pull the cape over the back and fix it;
- pass all straps through the provided metal buckle.
On some models, the child car seat is complemented by a detachable headboard. It is placed under the cover and fixed in place. If you cannot cope with the assembly according to the standard instructions, then you should look on the manufacturer's official website for the original manual in electronic format.
Since you are here ...
… We have a small request. The Matrona portal is actively developing, our audience is growing,
but we do not have enough funds for the editorial staff. Many topics that we would like to raise and which
interesting to you, our readers, remain unreported due to financial constraints.
Unlike many media outlets, we deliberately do not make a paid subscription because we want
so that our materials are available to everyone.
But. Matrons - daily articles, columns and interviews, translations of the best English-language articles about family
and nurturing, these are editors, hosting and servers. So you can understand why we are asking for your help.
For example, is 50 rubles a month a lot or a little? A cup of coffee?
Not much for the family budget. For Matrons - a lot.
If everyone who reads Matrona supports us with 50 rubles a month,
it will make a huge contribution to the possibility of the development of the publication and the emergence of new topical
and interesting materials about a woman's life in the modern world, family, raising children,
creative self-realization and spiritual meanings.
Possible problems
After assembling the seat or during the process, various problems may arise. This is especially true for drivers who wash a child car seat for the first time. To fix the problems that have arisen and prevent them from reoccurring, it is worth investigating possible errors.
Infant car seat assembled incorrectly
Disregard of the rules of the instruction or accidental admission of an error often leads to incorrect assembly of the structure. To fix the problem, you need to completely disassemble the car seat and restart the assembly. For convenience, you can watch a video tutorial, which clearly shows the whole process. Using an improperly assembled infant carrier can result in personal injury and damage to parts.
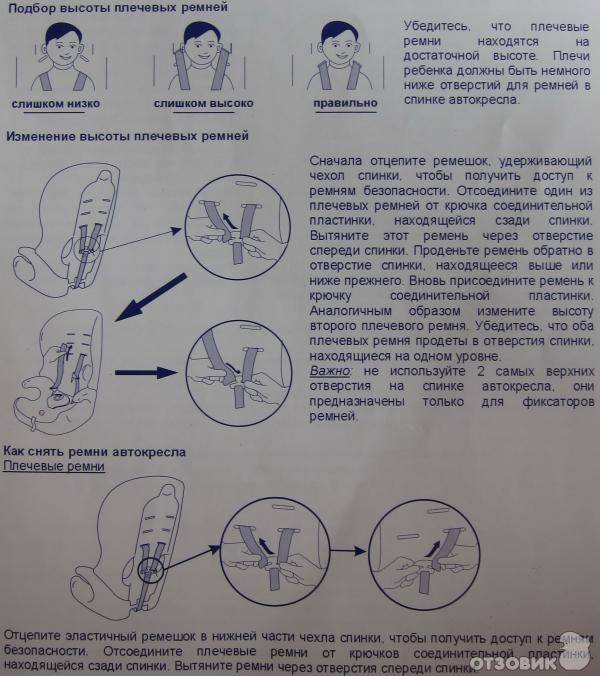
Inconvenient location of belts
The seat belts on the child seat must be exactly at shoulder level. If the belts are uncomfortable for the child, or if they are overtightened and not held in place, the problem is likely to be due to improper attachment. It is necessary to check whether the bases of the belts are fixed in the grooves and, if necessary, re-fasten them.
Sitting discomfort
The inconvenience of finding a child in a car seat is often associated with improper assembly of the structure. If this problem did not arise before washing the seat, you will need to disassemble the infant car seat and reassemble it, following the rules of the instructions.
Child removes seat belts
According to safety rules, the belts must be securely fixed in the fastened position. If the child can reset the belts on their own, they are probably not properly fastened and too loosely fastened.
Deformation of covers
The reasons for the deformation of the covers after washing are the incorrectly selected program on the washing machine or mechanical stress. The deformed cover creates an uncomfortable feeling for the child while in the chair, and also increases the risk of injury. It is possible to restore the original condition of the covers by smoothing them.
If you cannot remove the deformed spots, you will need to purchase new covers. It is not recommended to use the infant car seat without covers, as this will cause contamination to get onto the interior upholstery.

Stains were not removed well
Stubborn stains from the surface of a child car seat may not be removed on the first try. To remove stains, you can wash it again, use a more powerful cleaning agent, or have your car seat covered by a professional dry cleaner.
Incorrect seat attachment
Incorrect seat fixation often leads to breakage of individual elements of the seat and increases the risk of injury. When securing the seat, you need to check each mount and follow the instructions. After fixing the structure, you should make sure that it is secure and correct.


Watch your belts
Particular attention must be paid to the belts. It is difficult to confuse them: the long ones are fixed on the back, the short ones go from below
But it is better to check the fasteners again after installation.
If the belts are too tight, the child will be uncomfortable in the chair. To remedy the situation, it is necessary to loosen the canvases using specially provided regulators. Remember that the straps should not only squeeze, but also dangle - the optimal distance between them and the baby is 2-3 cm. If the holders are too long, you can shorten them to a convenient size.
The correct position of the belts also plays a role. At the top, the straps should "protrude" from the back at the level of the child's shoulders. If the holes are too low, under the shoulder blades, then you should consider buying a new chair. On some height-type models, the position of the holders can be adjusted.
Sometimes belts are inconvenient due to strayed or bent "pads". In this case, remove the pads, straighten them, steam them off and put them back in place.
Error eight. Using car seats that have been discontinued or have been in an accident
Check out your chair: a large number of models have been discontinued in recent years, but many are still in use. Check the make, serial number and date of manufacture (all printed on the seat) against the list of discontinued car seat models.
Danger: The car seat may be discontinued for a variety of reasons, including faulty locks or flammable fabric upholstery. And if a number of reasons for recall do not pose a serious threat, then others can be deadly. Failure to mount can lead to disaster.
Remedy: If you find that your car seat has been discontinued, contact the manufacturer for further instructions.Do not buy second hand car seats - it is quite possible that you will buy a car that has been discontinued or has been in an accident.
Error three. The child is seated too early, facing in the direction of the vehicle.
Check: The child must remain in the car with his back facing forward until he is one year old or until his height and weight exceed the maximum values allowed by the manufacturer of the child car seat. Many parents make the mistake of considering only age, or just height and weight, when both conditions need to be met. In other words, if your child weighs 9 kg on their first birthday, they should continue to ride backwards until their height and weight reach the maximum values allowed for a car seat.
Danger: the spine of a small child is not yet sufficiently developed. In the event of an accident, when the back is positioned in the direction of travel, the impact energy will be taken over by the entire back - the strongest part of the child at this age. When facing forward, the child's still disproportionately heavy head will swing forward and downward and can injure the weak bones of the spine and spinal cord.
Remedy: Carry the child with his back in the direction of the vehicle until he reaches one year of age or exceeds the maximum permissible height and weight for the car seat.

Inspect the mounts and covers
Difficulties in stretching the covers also arise when the cape is deformed after cleaning. Failure to follow the rules for caring for the product leads to loss of shape. As a rule, the reason for the change in size is the heating of water above 40 degrees, the inclusion of a machine spinning or drying on a heater. In any case, it is necessary to correct the situation by repeated washing.
It is not necessary to run the cape in the machine, as well as add detergents. It is enough to fill the basin with water, wet the cover and let the water drain freely. Then, without wringing out, the product is placed on a flat dry surface and left to dry completely.
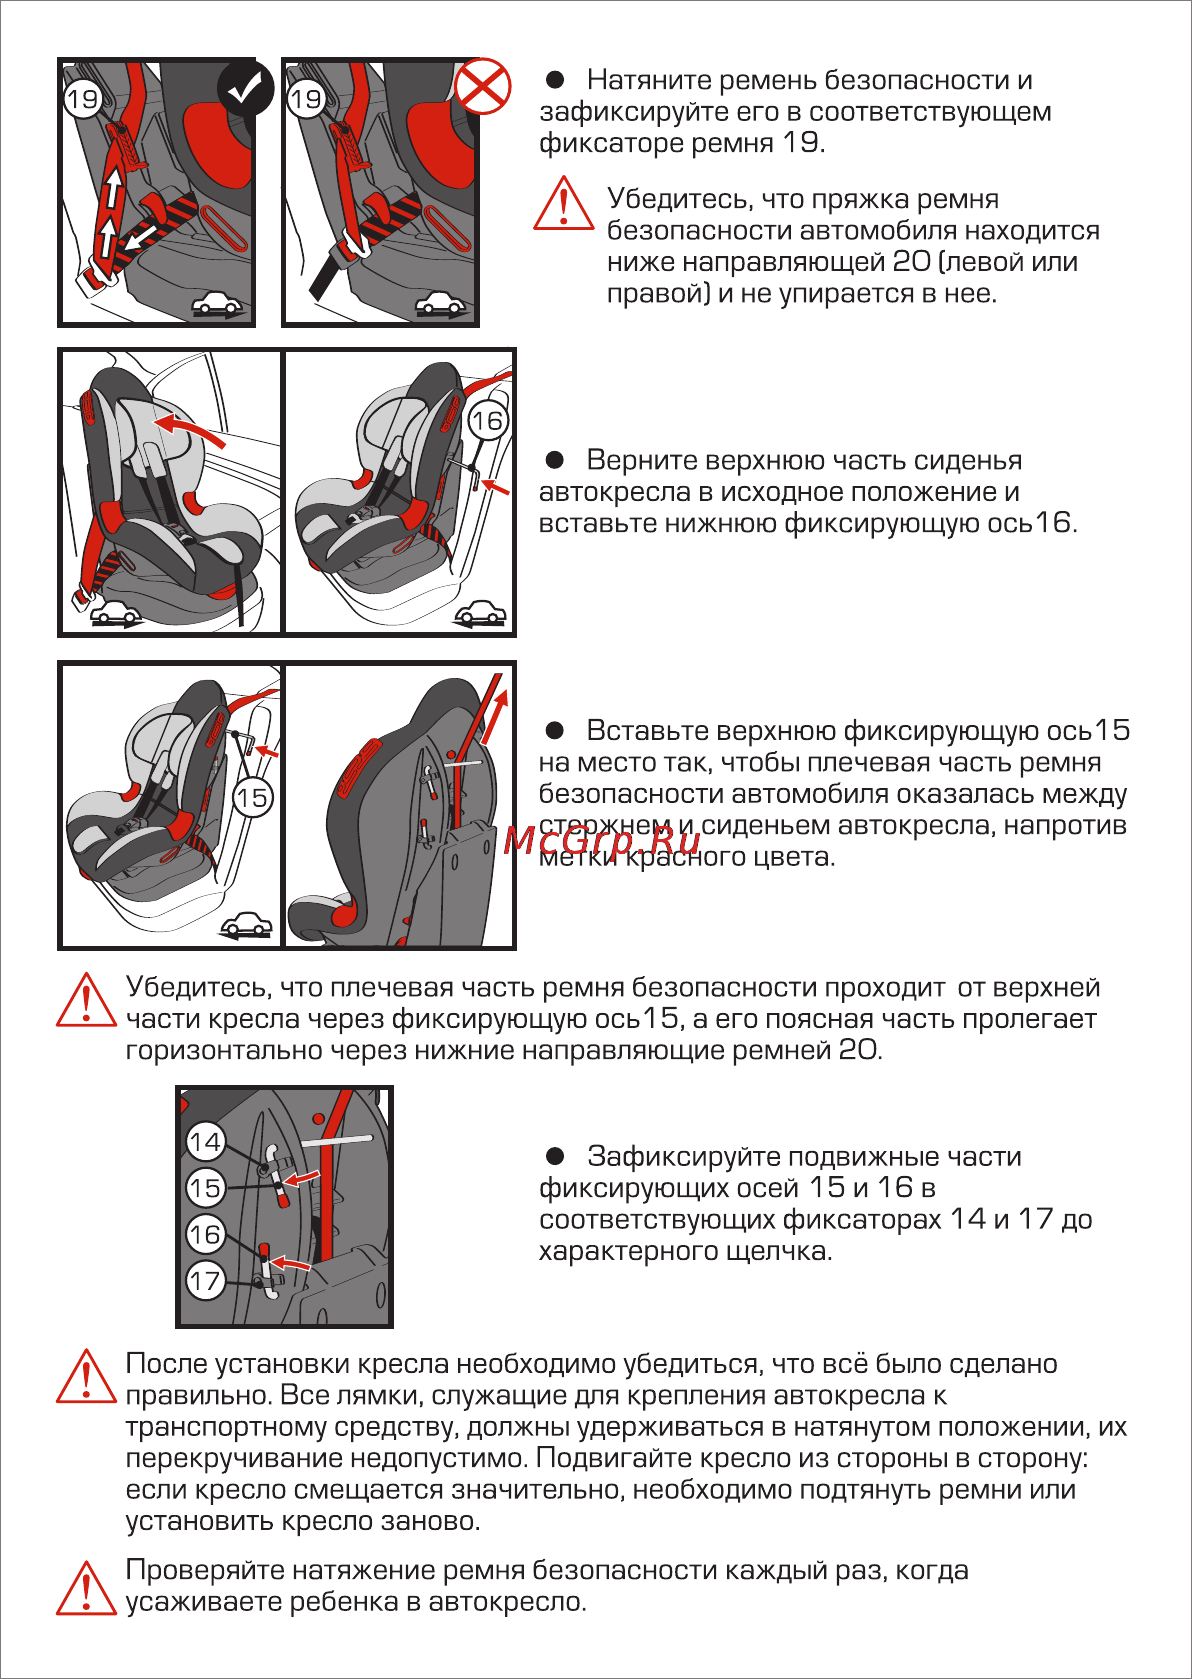
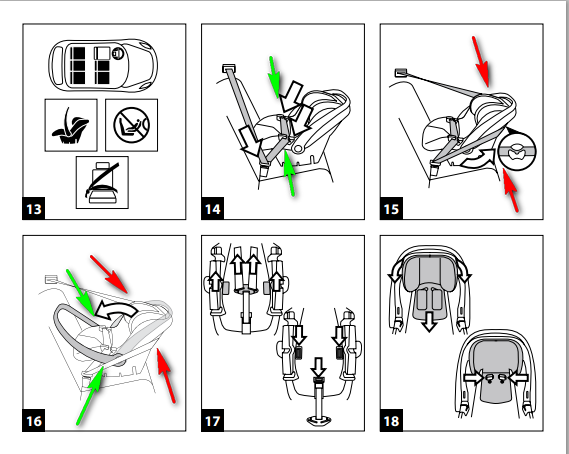
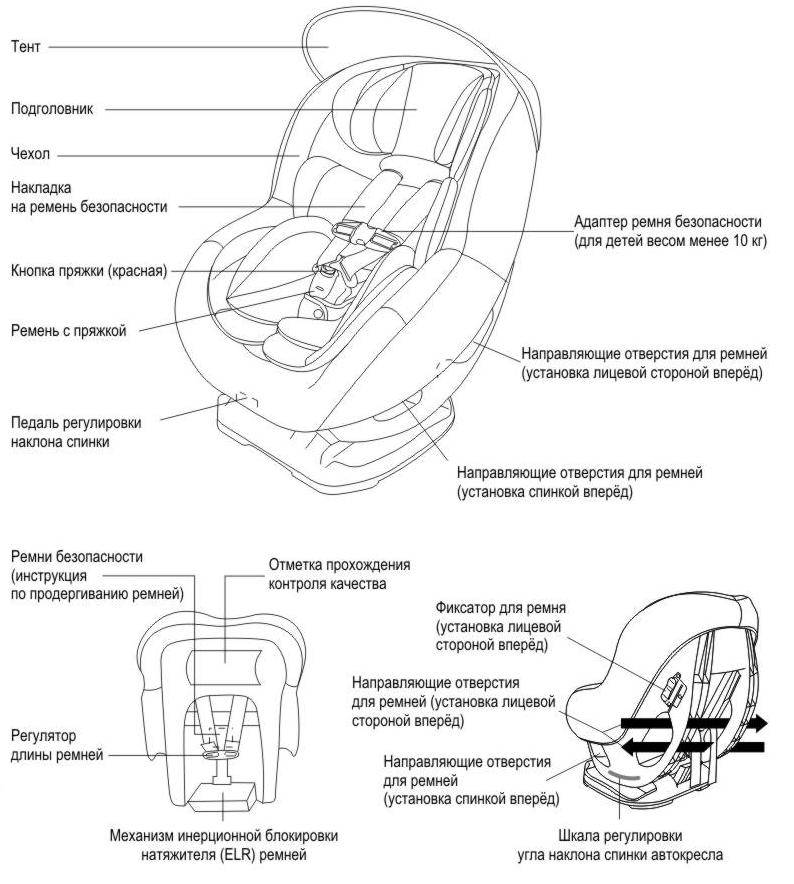
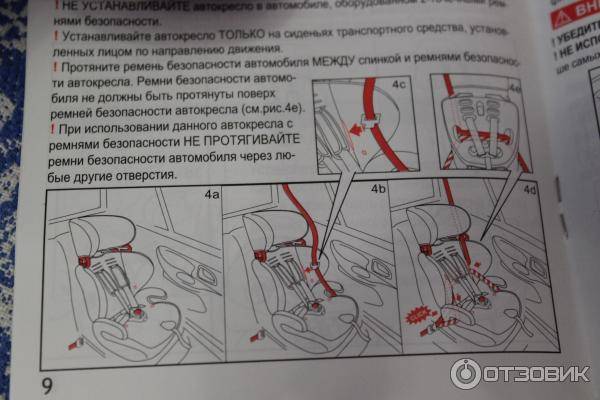
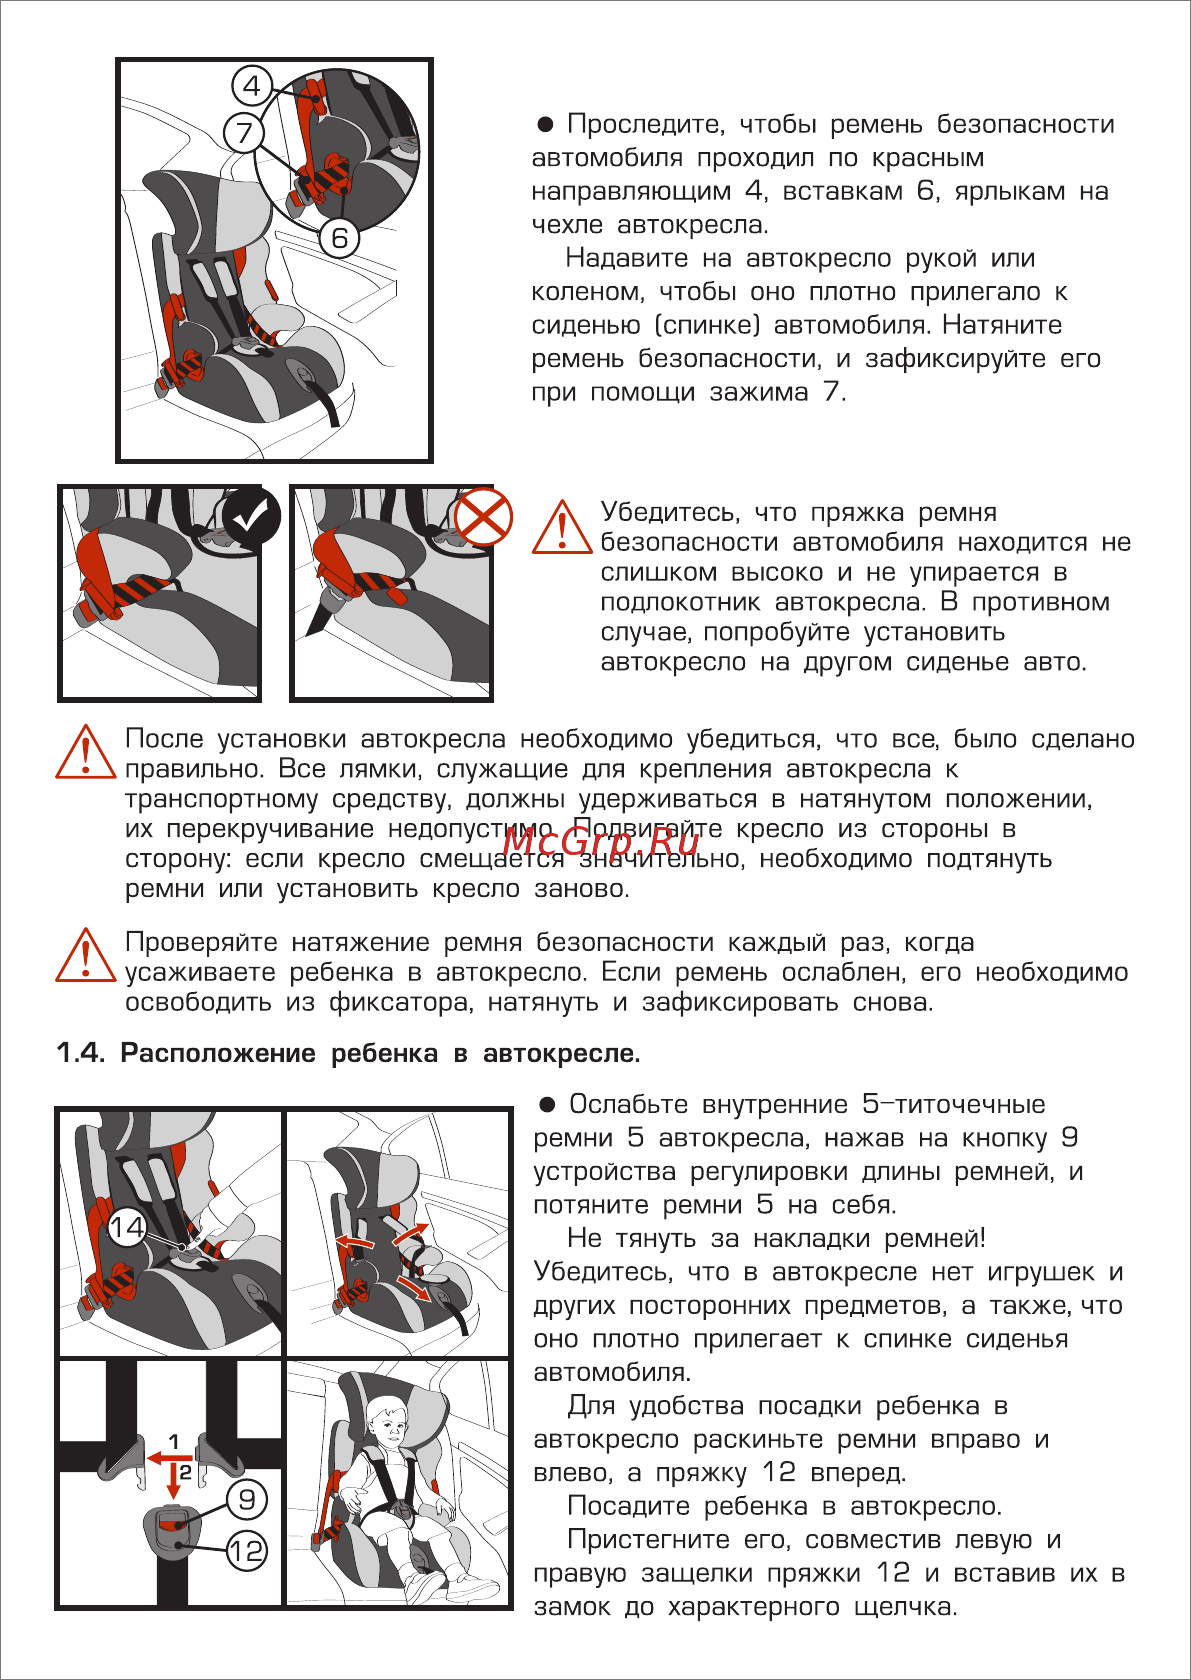
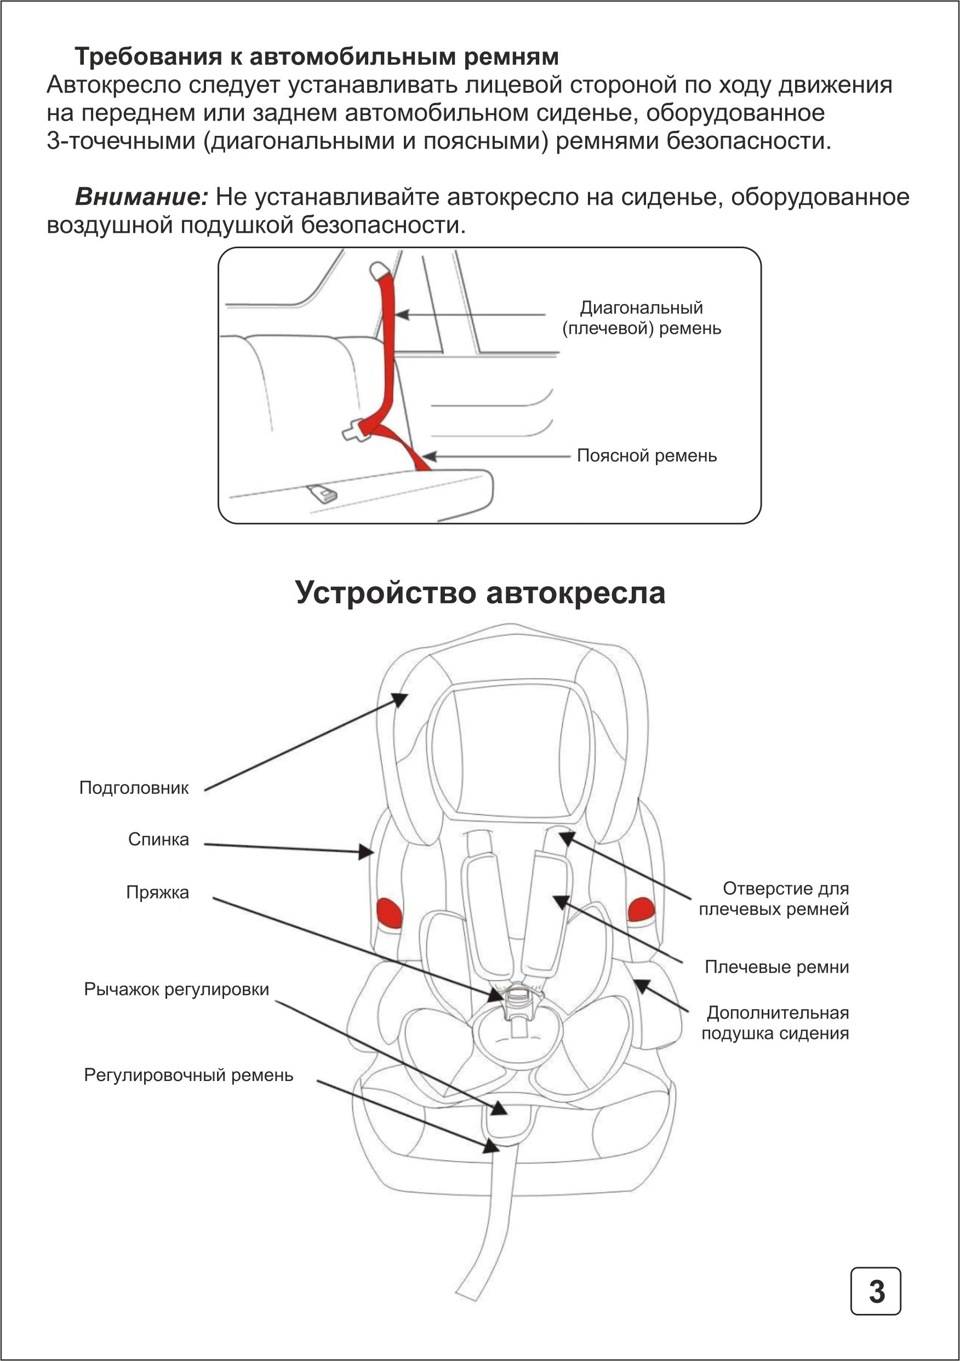
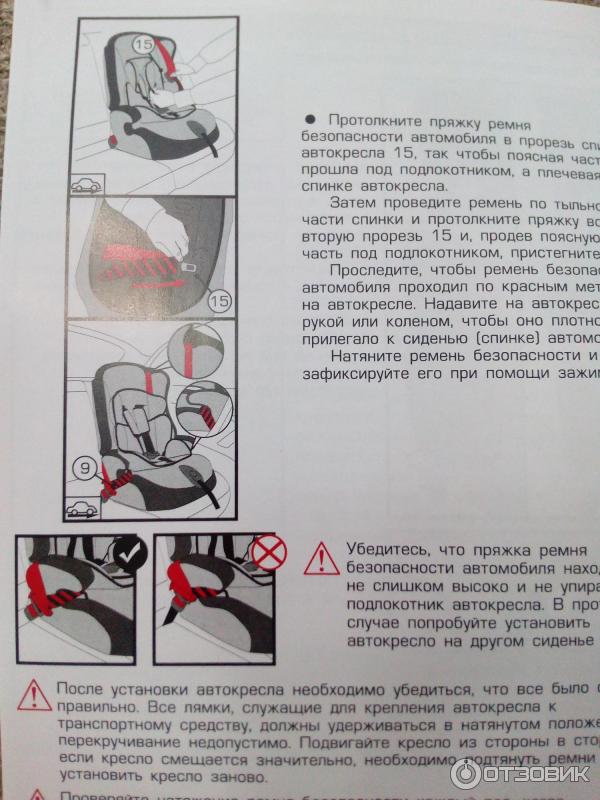
We pay special attention to the correct installation of the chair itself. It must be fixed according to the instructions to ensure the safety of the young passenger.
If the mount has moved somewhere or stability is lost, the structure needs repair.
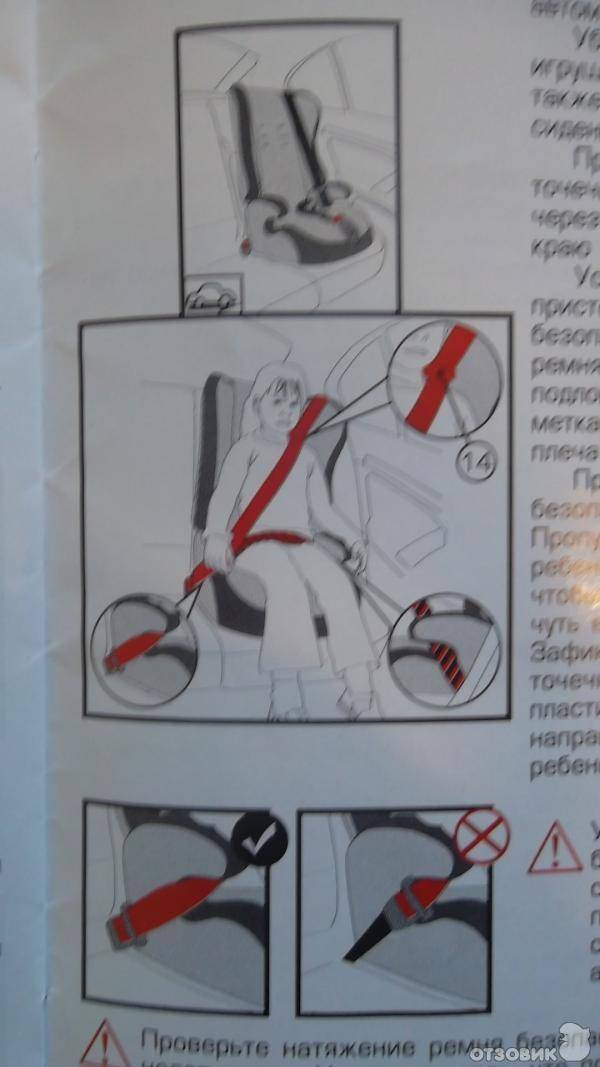
The machine belt must run strictly along the guides. Each model provides its own fixators, but more often the strap passes over the child's shoulder to his thigh, without shifting towards the neck. At the "finish" the holder clings to the latch and is inserted into the groove with a buckle. Slight swinging of the chair in both directions is allowed. The maximum deviation is 2 cm. If the seat moves more strongly, then tighten the standard belts.
How to disassemble a car seat so that it can be easier to assemble later?
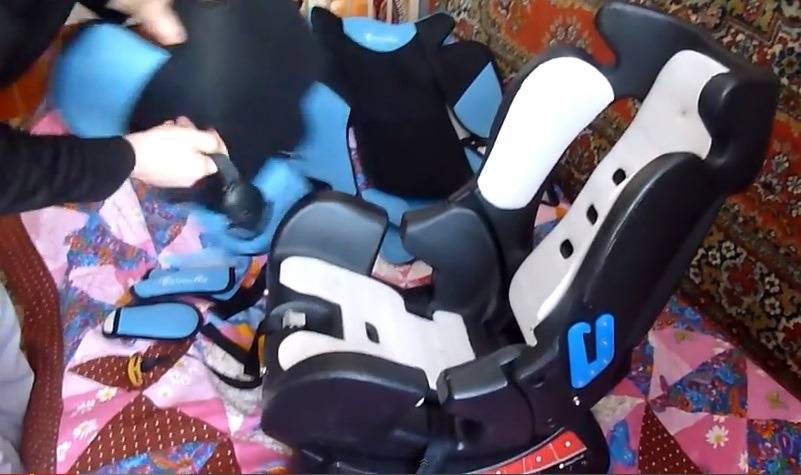
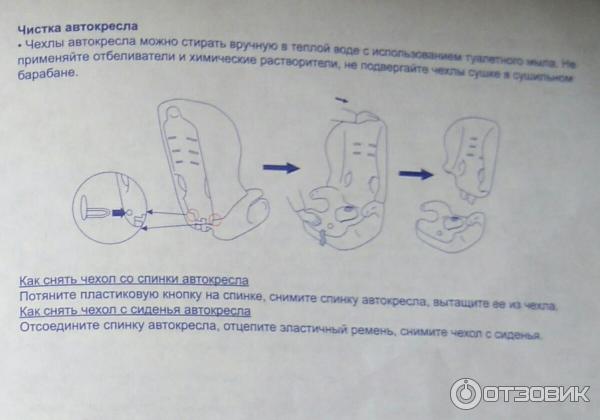
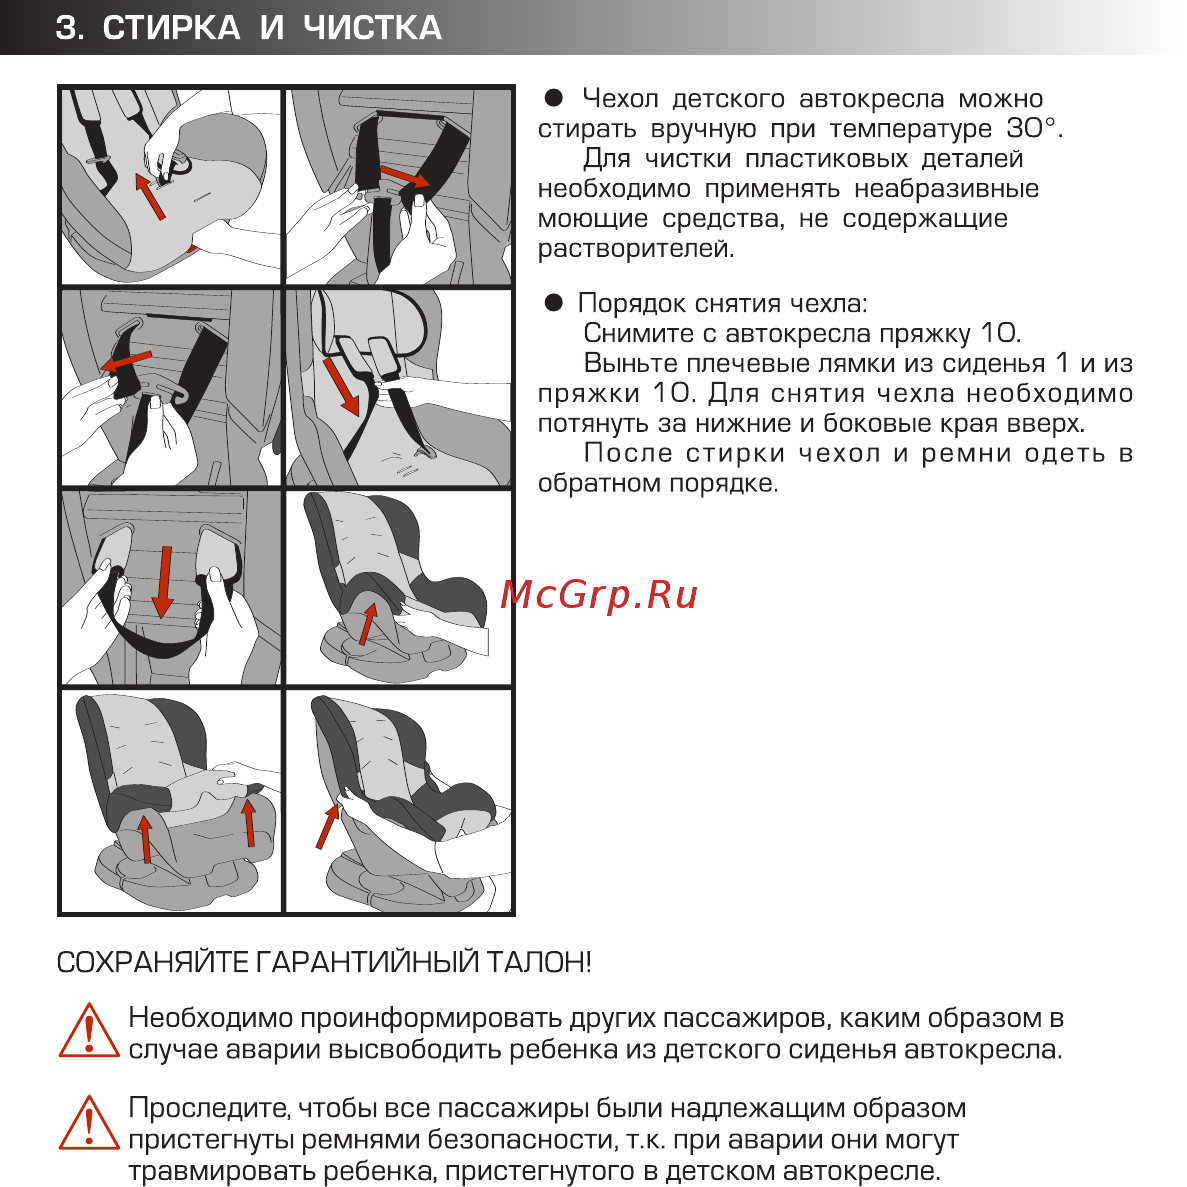
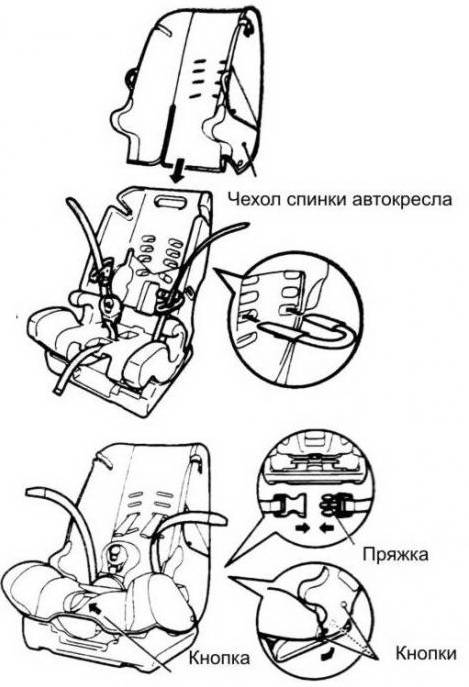
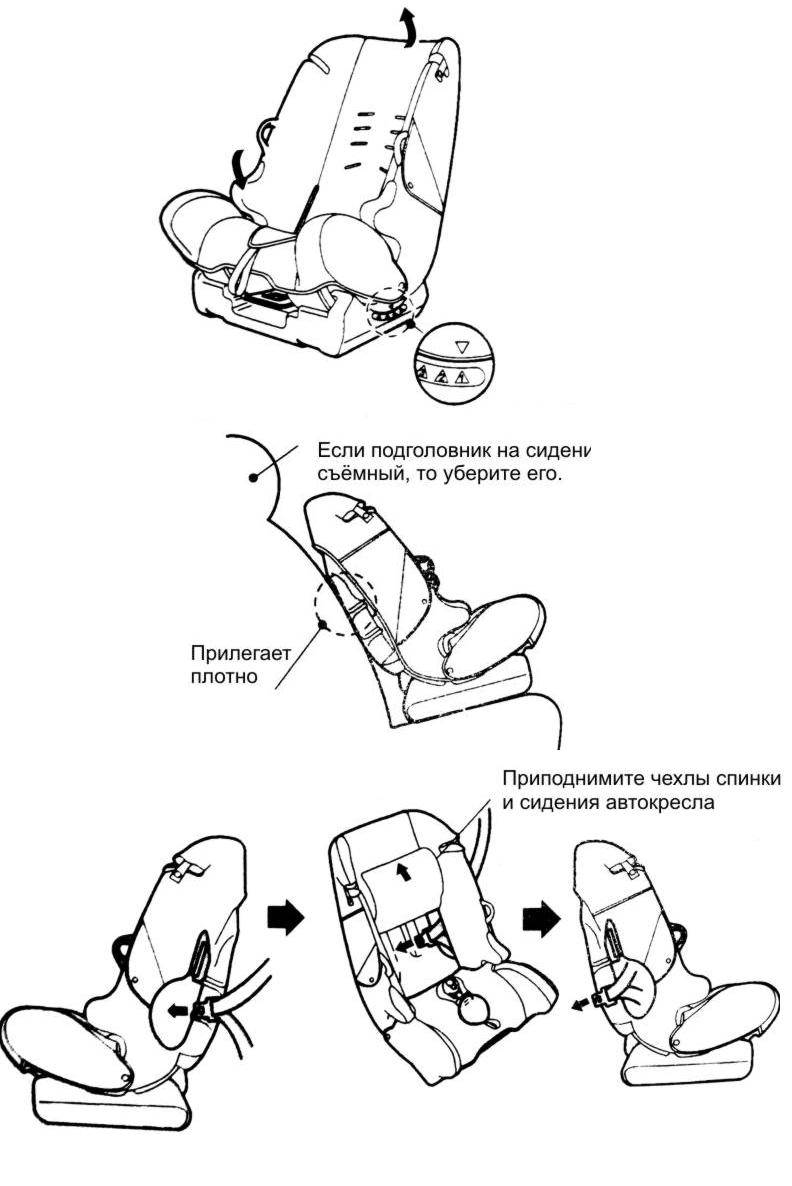
Remove the cover from the child car seat carefully and slowly, without sudden movements. Before removing, you need to carefully look at how the key elements of the product are connected to each other. The seat belts must be removed from the bottom up. After that, you can start removing the covers.
First of all, the seat belts are disconnected. For the correct execution of the process, you need to press a special button at the place where the belts dock. You do not need to pull them by force or pull them out of the cell without pressing a button - this can damage the structure. After removing the belts, it is required to disconnect the upholstery and liner.
Having quickly and inattentively disassembled the chair, you may encounter the complexity of its subsequent assembly. Often parents forget in what order they disconnected all the elements, and there is no step-by-step instruction from the manufacturer. In this regard, it is recommended that when disassembling the elements, fix the sequence on a piece of paper. Just write down the name of the element, numbering the order.

Why doesn't it work?
Everything does not always go according to plan: often it is not possible to assemble a chair. The main reason for this outcome is a violation of the order of actions. Chances are good that the confusion occurred at the disassembly stage.Most likely, the person did not follow the given sequence.
You can avoid mistakes if you record all your actions on video or photo. Then it is easier to stick to the scheme and not forget about the Nth elements.
In order not to get confused, you need to strictly adhere to the instructions. Ideally - focus on "your" leadership, in extreme cases - on "someone else's". There is no significant difference between the algorithms, the main thing is to be able to adapt to the existing differences, including logic and ingenuity.
If you can't assemble the chair, it's worth asking for help. First of all, we go to more handy friends who have already dealt with child seats. They can also consult the store where the device was purchased. There is also the option with the support service on the official website - we find the manufacturer and fill out the appeal form.
Possible problems and solutions
Often mistakes and problems happen after the first cleaning of the car seat. If there is any difficulty, you need to know how to fix it. Let's consider the most common situations.
Incorrect assembly of the car seat
To understand what exactly was done wrong and how it can be corrected, you need to carefully read each paragraph of the instructions again and check all the actions performed. It is even better if there is an opportunity to watch a video instruction - sometimes it is enough to see how to do it once in order to understand your mistake. Under no circumstances should you use an incorrectly assembled seat - this can lead to child injury, even when driving quietly in the car.
Belts are awkward
It is clear that the seat belts are located at the level of the baby's shoulders. The inconvenience may lie in their excessively strong tension, or, conversely, they do not hold in their places. Most likely they are not correctly connected. It is necessary to check all the connections again and adjust the degree of tension of the belts for the child.
The child is uncomfortable in the chair
This defect can also be associated with improper assembly, especially if the child did not complain before cleaning. In this case, you also need to disassemble the chair and reassemble it, exactly following the instructions.
Child removes seat belts
According to the established rules, the fixing device must be such that the child cannot open it on his own. If he does this, then the belts are not fastened correctly or are too loose.
The covers are deformed
If this happens, it means that the product was washed with an incorrectly selected program. If the deformation is very strong and hard folds are formed, most likely you will have to purchase a new cover - the child will not be able to sit comfortably on the crumpled material. You can, of course, try to operate the chair without covers, but then all the dirt will quickly penetrate inside and it will not be so easy to wash them off.
Assembling the car seat after washing is easy if you do it carefully and slowly, following all the steps and correctly securing all the elements.
The article was published in the rubric Household
Most parents often face a problem - how to reassemble the car seat after washing in order to do it right. The instructions will help to cope with this easily and without unnecessary efforts, however, not everyone keeps seemingly unnecessary pieces of paper, and often they are simply thrown away. With active use, the chair will have to be washed quite often so that the assembly proceeds quickly and at the same time all the parts are assembled reliably, it is worth remembering simple recommendations.
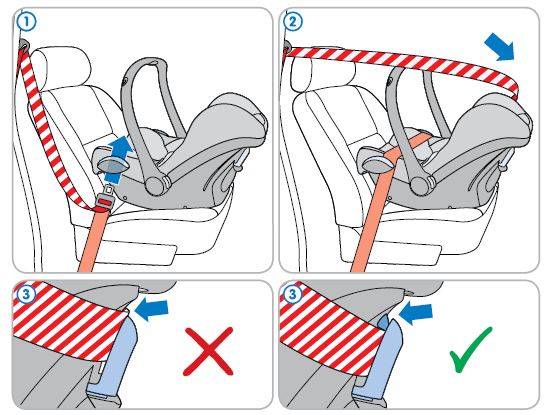
How to fix a child seat in a car with a regular seat belt
Each certified car seat is supplied with detailed instructions in Russian, which must be protected and stored with documents at home or in the glove compartment of a car. The rules of care and fastening are mandatory reading when buying, this is not the case when the operating manual must be opened after a breakdown.The installation method is duplicated on the device itself.
Car seat for newborns and babies
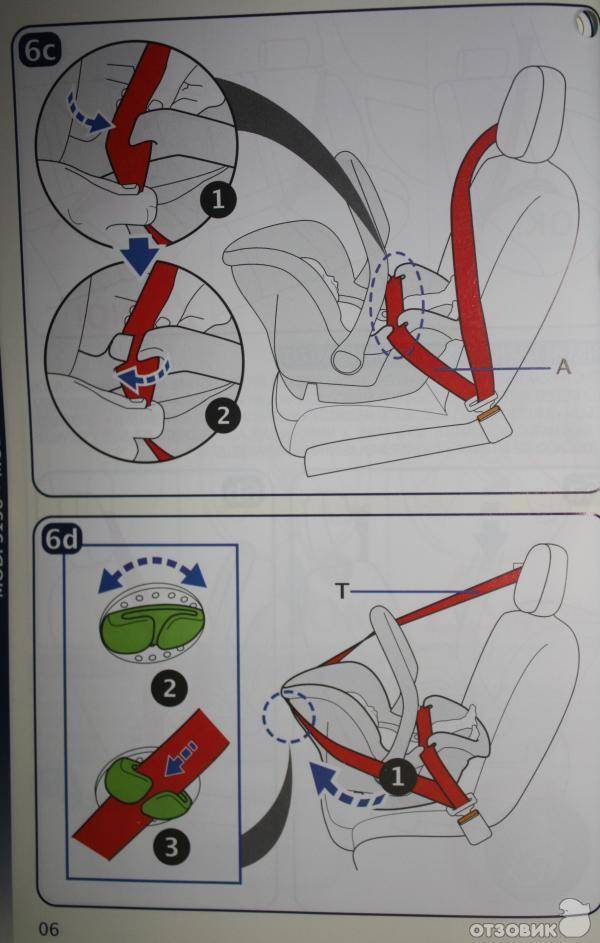
The principle of fastening the infant car seat with standard belts is the same for most manufacturers - side fasteners and fasteners on the back, although minor external changes are possible.
When installing the car carrier, you need to carefully monitor the correct position of the standard seat belt
Video instruction for installing a baby carrier - video

Installing the base for the carrycot
A device with a base gives an advantage to those who are constantly on the road with a child. It attaches to the Isofix or standard belts, and the car seat / infant carrier can be removed with one click.
As in the case of the infant car seat, the base of different manufacturers is fastened with a seat belt in about the same way:
-
one end goes through special grooves of the device;
-
the second is on the back of the cradle.
How to install the base - video
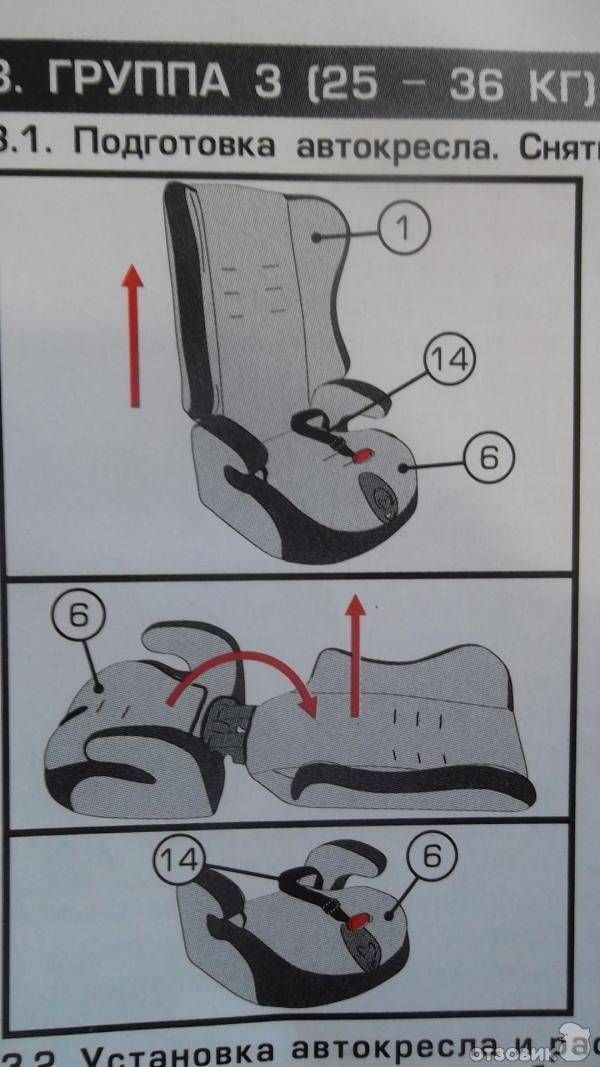
Armchairs without base (category 9-36 kg)
With this group of chairs, everything is somewhat more complicated. There are a lot of types of devices and installations, therefore it is necessary to carefully study the instructions attached to the device.
Universal car seats: installation instructions - video
Frameless car seats: step by step instructions
The frameless car seat is attached to the rear seat of the vehicle with two straps supplied with the device.
All parents can easily cope with the installation of a frameless car seat
Proper washing and drying
Washing a child car seat takes a lot of time and effort.
It is important to understand what fabric the chair is made of and what kind of dirt it has in order to find the right and safe cleaning agent for your care. To cope with this task in the absence of instructions, some tips will help:
The upholstery of the chair is carefully loosened in places where possible
This makes it much easier to clean the metal and plastic surfaces of the frame.
It is important to review the manufacturer's care labels. It can be: hand, machine, dry cleaning or dry cleaning.
Machine wash recommended in gentle mode (delicate or hand wash).
If washing is prohibited, it is better to limit yourself to a vacuum cleaner with special attachments and a brush for clothes.
You need to choose a special baby soap or baby powder as chemicals
If possible, use special washing gels that do not leave streaks.
If the upholstery is not removed, the surface is cleaned with a cloth or sponge dipped in prepared soapy water, then the residues of detergents are thoroughly wiped with clean water. At the end, the chair is blotted with a dry towel to remove excess moisture, and then leave to dry until completely dry.
If possible, it is better to wipe the formed fresh stains immediately with damp wipes or with the help of a soap solution. Old dirt can be difficult to remove.
Do not forget about the seat belts in the car that hold the chair. They are cleaned with warm clean water without the use of aggressive detergents.
The plastic and metal parts of the car seat are washed with a light soapy solution.