Homemade blade for MTZ-82
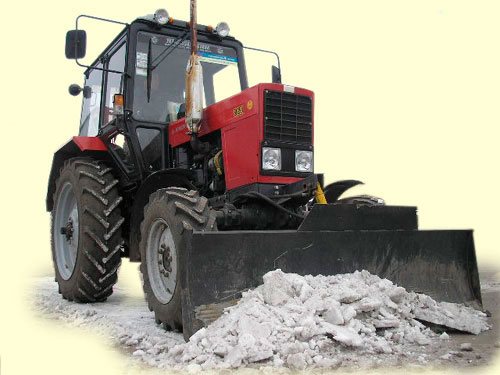
Do-it-yourself blade for the MTZ-82 tractor.
With a competent approach to creating a snow shovel with your own hands and following all instructions, homemade equipment has a large number of advantages:
- with self-selection of materials and parts, subsequently such a device can be easily serviced and repaired, and, if necessary, improved;
- the ability to choose the optimal size for the blade;
- using improvised materials and parts, you can make a blade that will cost much less than the factory version;
- a large number of attachments offered on the Internet are made independently, and therefore, with a minimum of tools, drawings and materials, you can make a blade no worse than factory products.
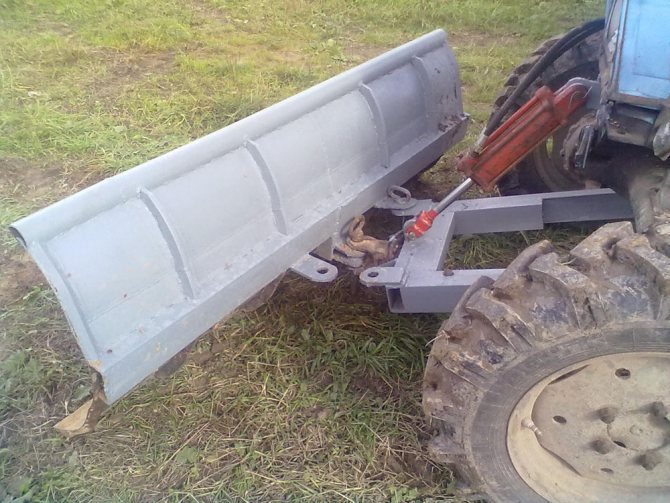
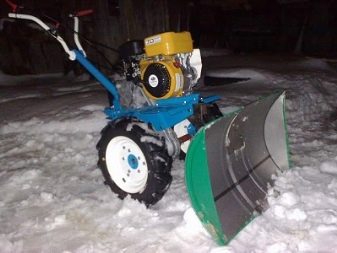
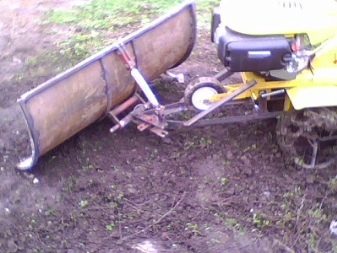
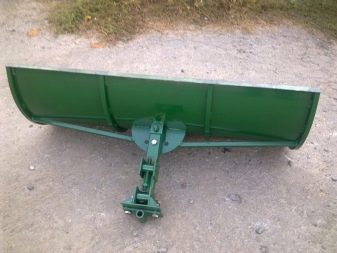
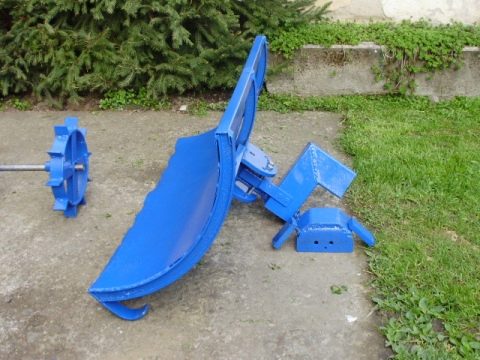
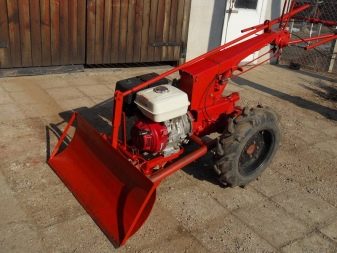
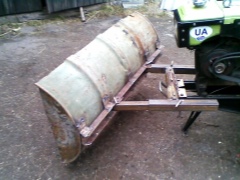
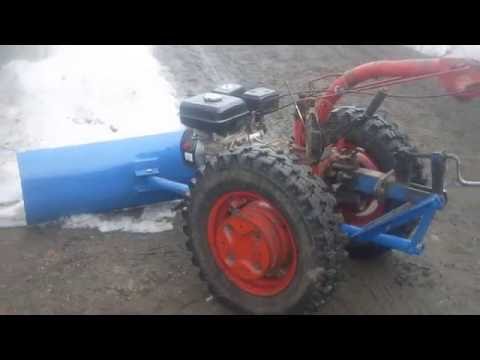
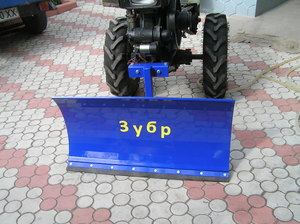
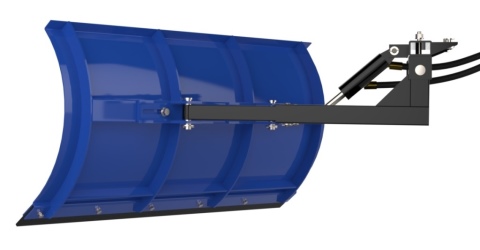
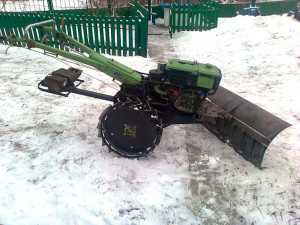
Photo # 1 Ready dump
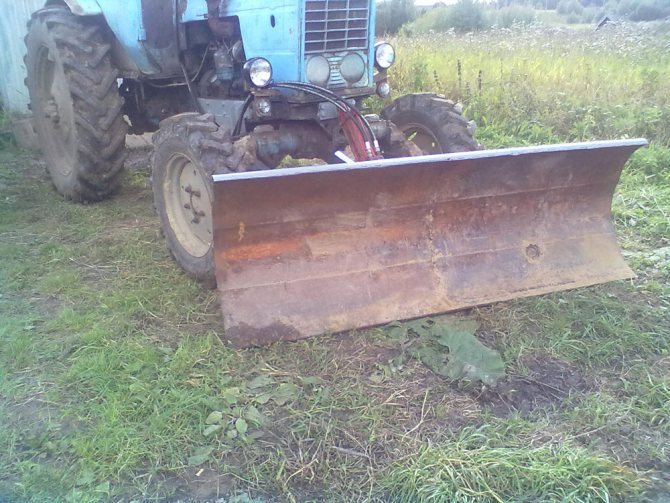
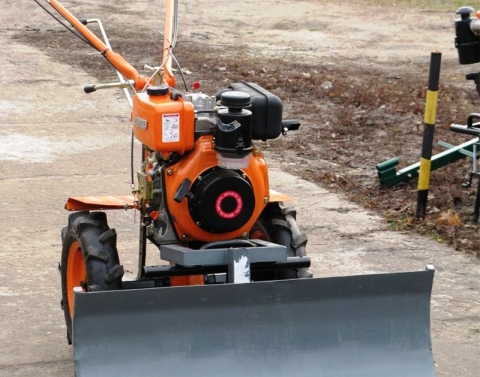
Photo # 2 Front view
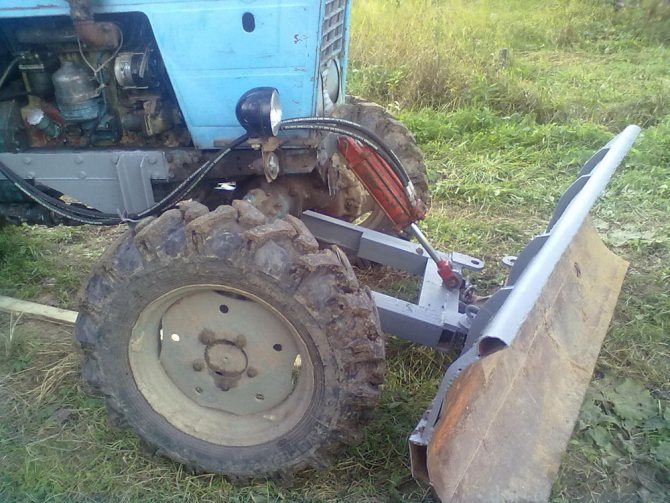
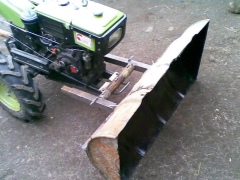
Photo number 3 Side view
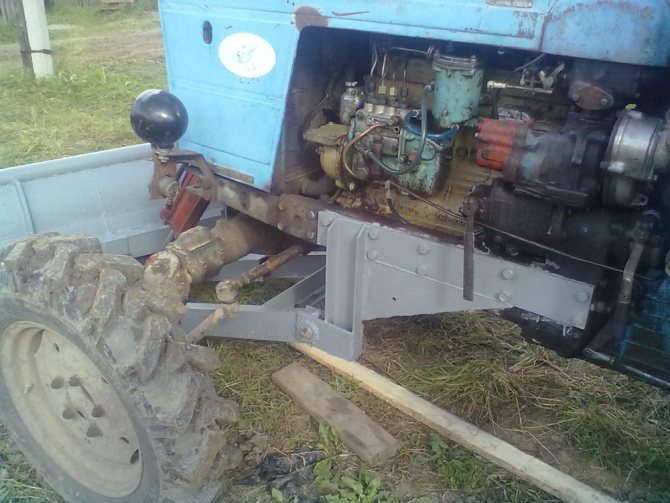
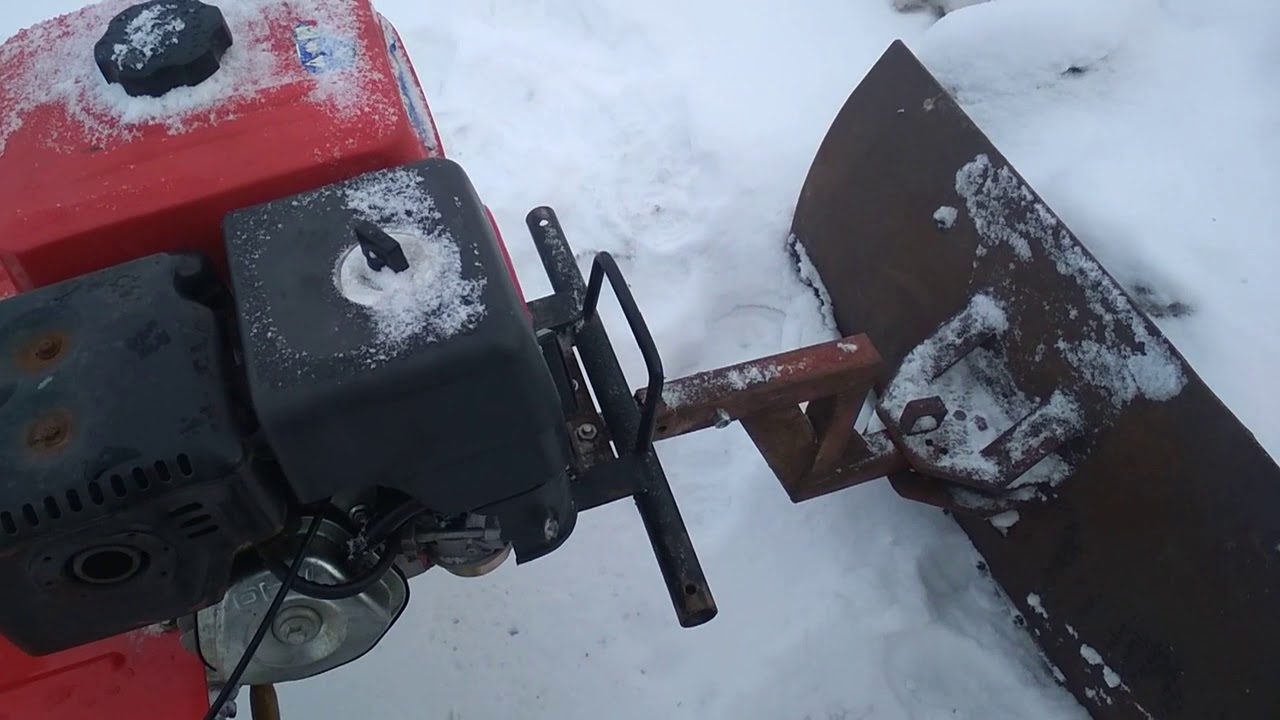
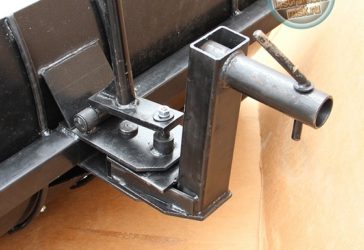
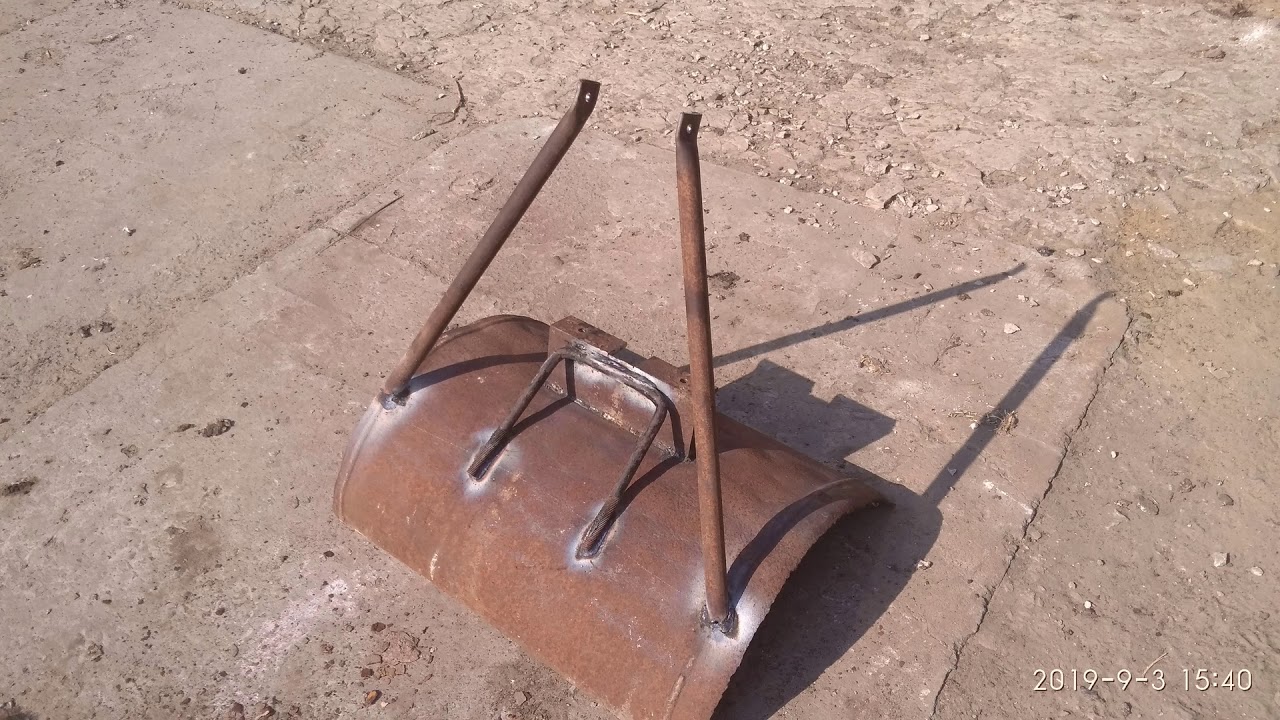
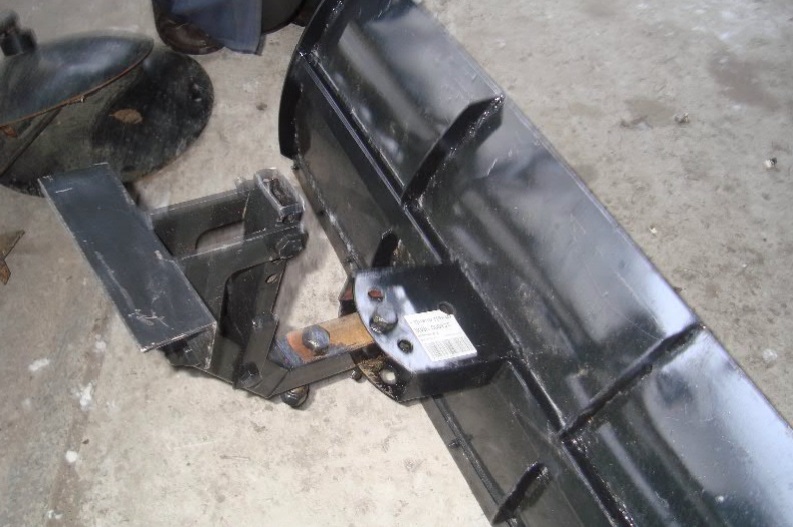
Photo number 4 blade attachment to the bracket
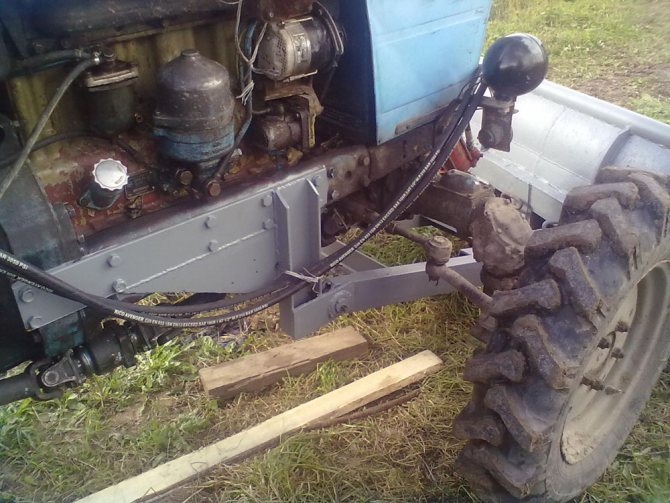
Photo # 5 fastening the bracket to the tractor
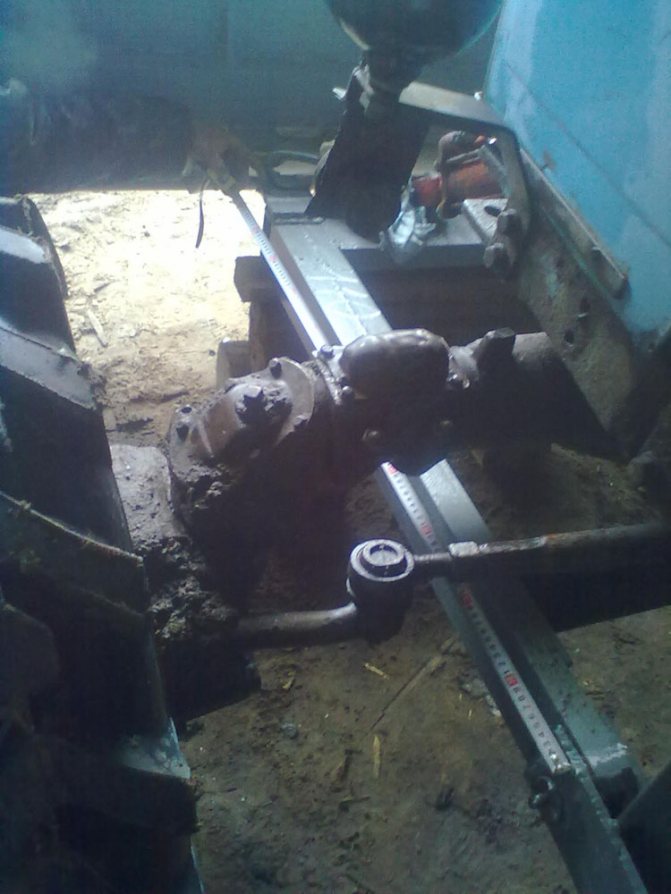
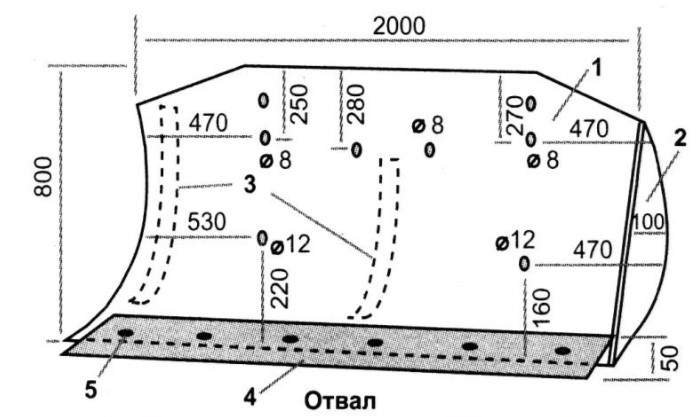
Photo # 6 Bridgehead dimensions
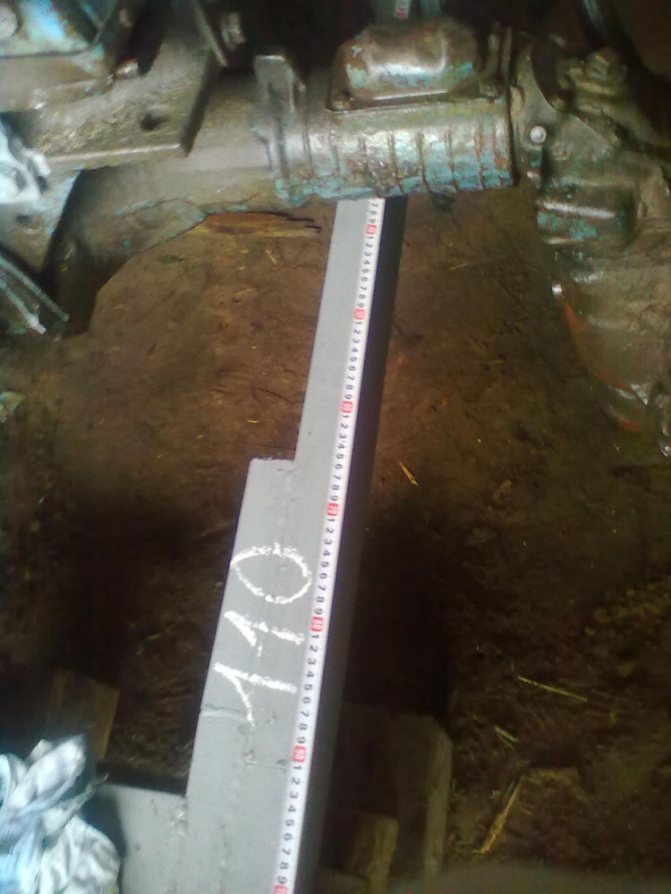
Photo # 7 Dimensions of the dump bridgehead
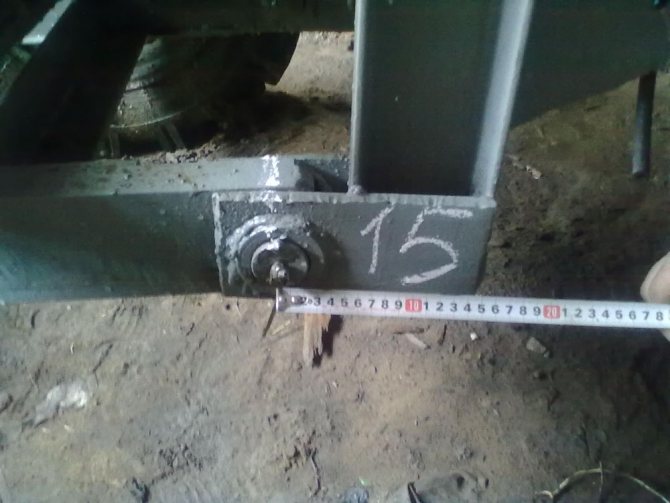
Photo # 8 Shovel bridgehead attachment

Photo # 9 bracket dimensions
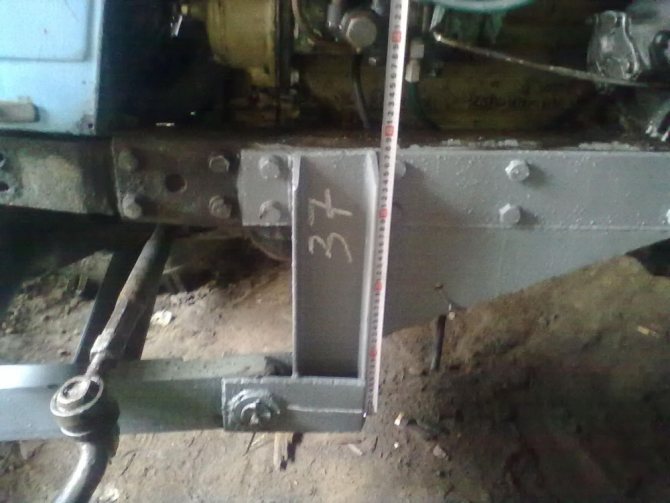
Photo number 10
However, such a shovel also has some disadvantages:
- in case of a breakdown of the MTZ-82 tractor or homemade attachments, warranty service is not provided and you will have to solve the problem yourself;
- in the event of an error in the choice of dimensions for a homemade blade, a significant overload of the tractor is possible, which will lead to serious damage to the unit.
Design features of the device
Snow shovels are effortlessly attached to any type of equipment, significantly speeding up and simplifying the procedure for clearing snow. All snow plow equipment for a multifunctional unit includes 3 basic parts: a snow shovel, a plow angle adjustment mechanism and a mounting module that holds the snow plow to the frame of the unit.
There are a number of designs of factory shovels that are part of the attachments, however, such a device for a walk-behind tractor can be built with your own hands, especially since there is a wide variety of information and drawings on this problem in the global network.
The blade is an integral part of the attachments used in conjunction with a motor cultivator. With his support, you can facilitate such everyday work on your own plot of land as collecting garbage in summer, in winter - clearing snow, in addition, leveling the surface layer of the earth and transporting it from one site to another. Snow plows come in different variations, but in their total mass they are endowed with one principle of operation and design. Basically, they have a number of standard working positions.
These are almost always the 3 points below:
- directly;
- to the left (with a turn of 30 °);
- to the right (with a turn of 30 °).
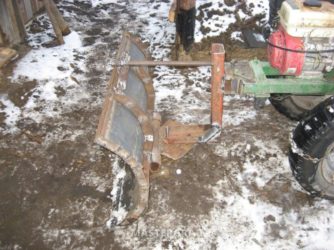
Fastening the bucket to the walk-behind tractor
As a rule, all motor-cultivators have a standard bracket for attaching attachments. It is quite suitable for attaching a front blade. If necessary, an adapter is made to allow the bucket to turn to the right or left.
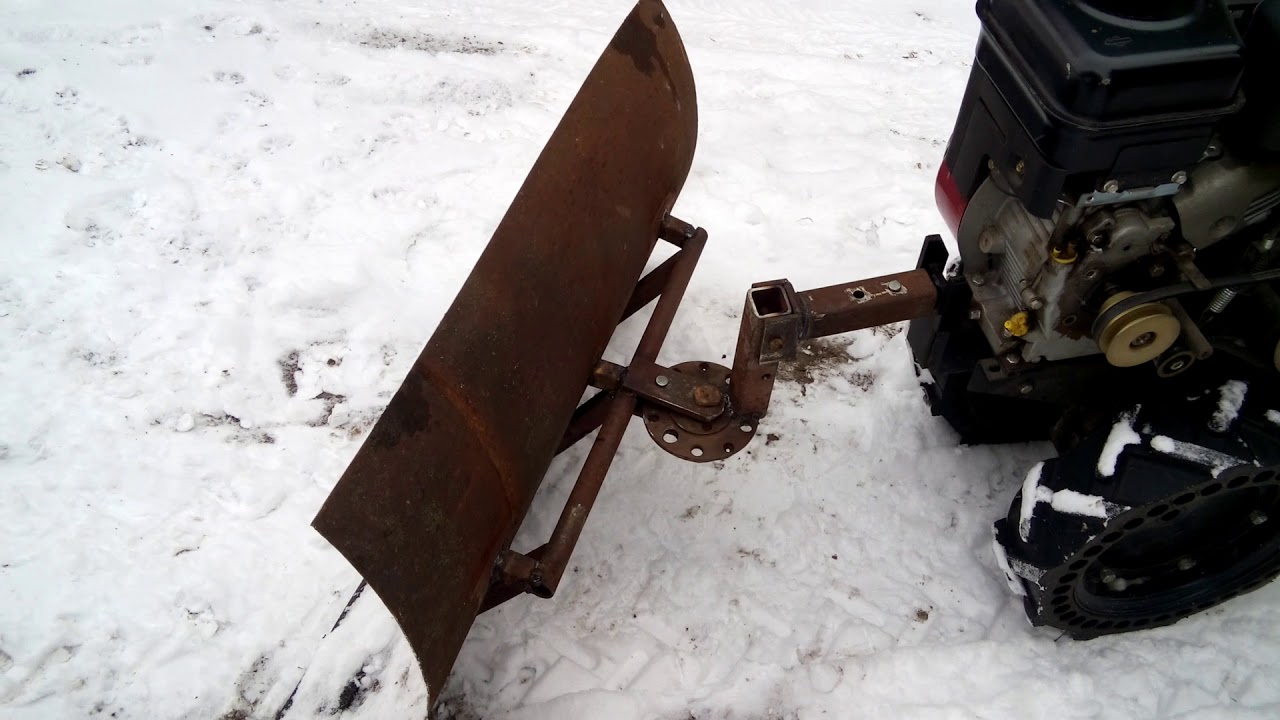
The mount is made in this way:
- A profile pipe is welded from the back of the bucket. To ensure a firm hold, it is advisable to duplicate the weld seam with several bolts.
- A semicircle with a diameter of 20-25 cm is cut from sheet metal 10 mm thick. The workpiece is welded to the shaped tube. Holes are made in it along the edge with an interval of 20 mm to set the angle of the bucket.
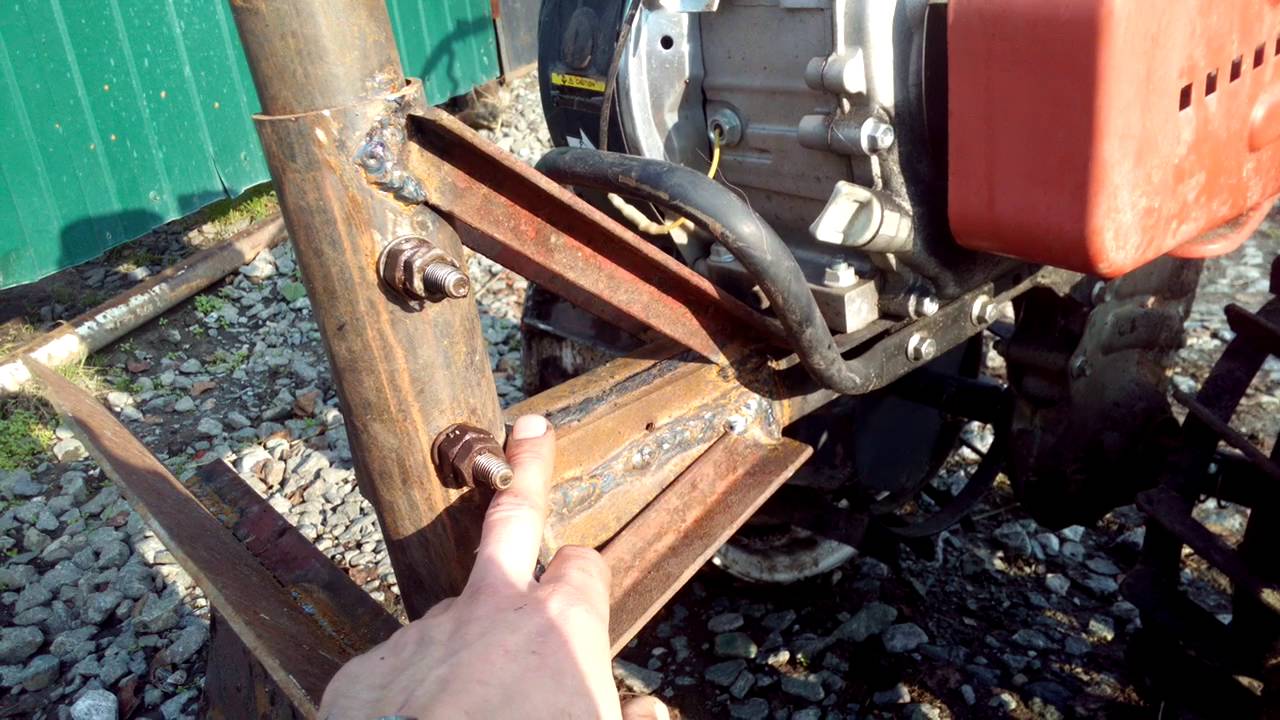
- A holder in the shape of the letter "L" is made from a square tube. The short side of the holder is fixed on the swivel sector, the second end is rigidly fixed on the bracket of the walk-behind tractor. To adjust the height of the knife, bolts are used which are screwed into the adapter.
A simpler connection method is a system of lugs and clamps made of thick sheet steel.
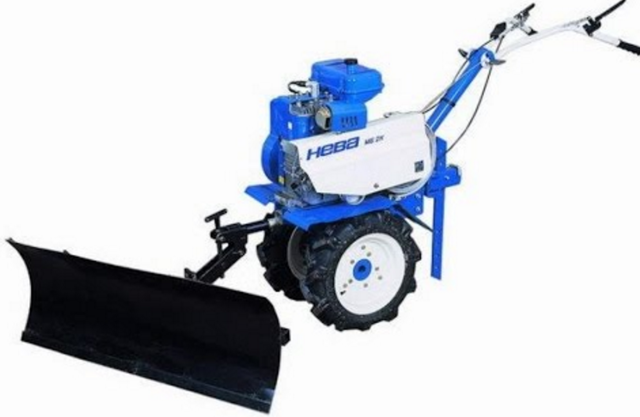
Do-it-yourself blade for the Neva walk-behind tractor, detailing, diagrams
If you have a grinder, welding, drill and some consumables at hand, then you can make a blade with your own hands.
For this you will need:
- A barrel with a volume of 200 liters (can be taken from under the oil);
- 40 × 40 square tube;
- Mounting bracket;
- A semicircle for creating rotation angles.
Manufacturing process
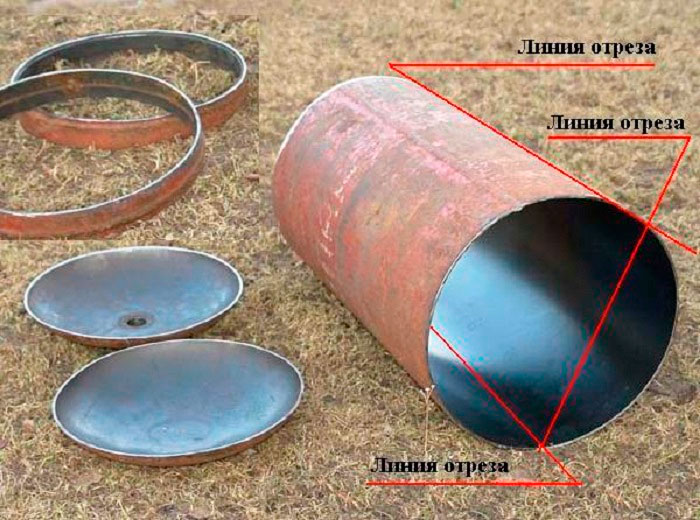
The main working part is the blade itself. To make it, you can take an ordinary steel barrel, then cut it into three parts. Next, take two of them and weld them together along the edging. The result is a 3 mm steel blade, which is usually enough to withstand domestic loads.
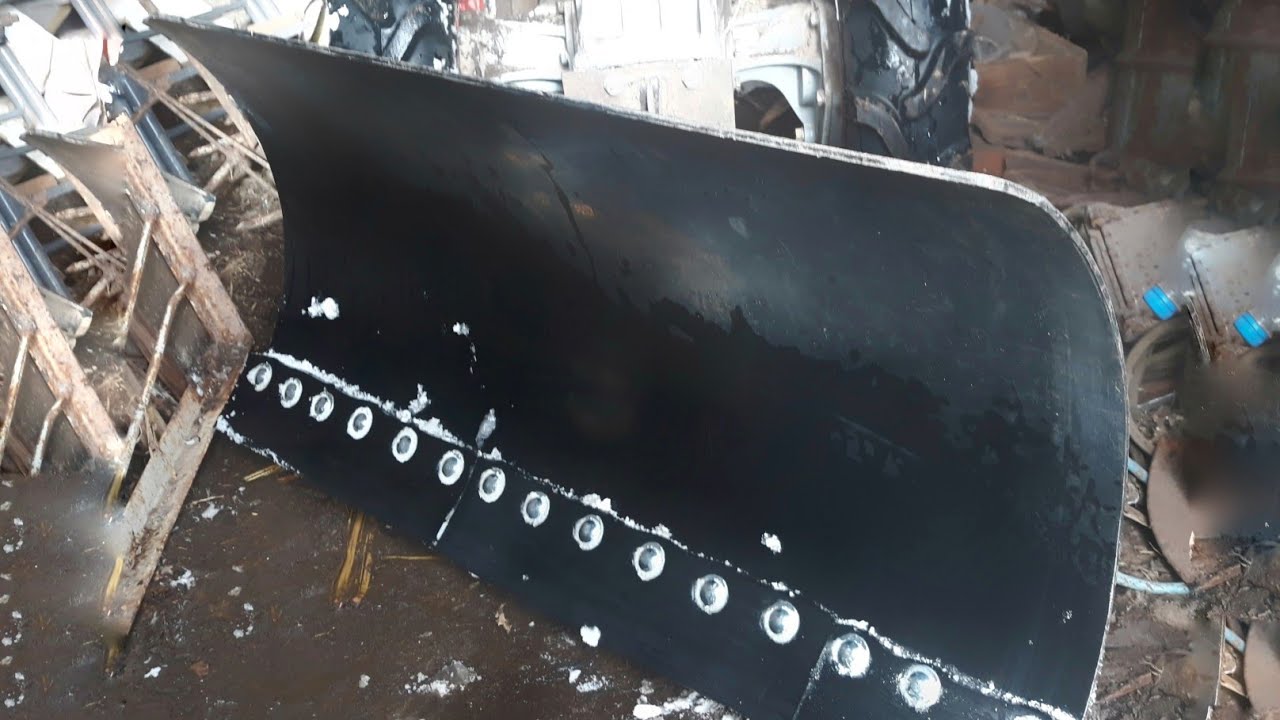
To ensure better grip of the snow, a knife is installed from below. It allows you to trim the bottom layers of snow. For its manufacture, a steel plate with a thickness of 5 mm is taken. Since it is she who has the main load, it must be strengthened. Holes are drilled at a distance of 10 cm, they are necessary for installing a rubber fuse. This is a special gasket between the knife and the bucket itself, thanks to it there is no friction between metal and metal.
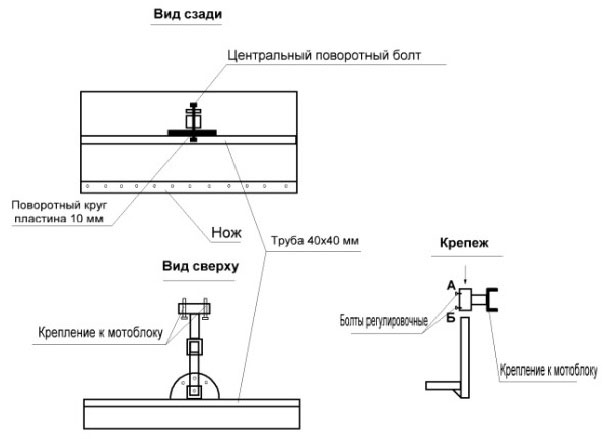
Around the middle of the dump, a 40 × 40 square pipe should be welded. And a semicircle is welded to the pipe, which is necessary for turning the blade. Then holes are drilled in the semicircle and the pipe, which will be necessary to create the angle of rotation and fix the blade in the desired position.
The next part is the holder. For its manufacture, an L-shaped structure should be welded and connected to a pipe from the blade. It will serve to secure the bracket.
This bracket connects the walk-behind tractor and the shovel blade. Its height can be adjusted using bolts and a hitch.
These are general guidelines only, don't be afraid to experiment with dimensions and design improvements.
Peculiarities
A blade is a type of attachment for any walk-behind tractor, which is designed to perform the following functions:
- clearing snow debris near highways and roads;
- cleaning the yard area;
- leveling the soil;
- cleaning sidewalks;
- raking-raking of garbage.

If the dump is made in the form of a bucket, then in addition to all of the above, it carries out loading operations.
The blades are simple in design and light in weight. Depending on the features of the walk-behind tractor, the blade can be fixed to the front of the mechanism or from the back if the steering column of the walk-behind tractor has the ability to rotate 180 degrees.
Blades can be adjustable or non-adjustable. The former are considered universal. They allow you to set any angle of attack: tilt to the right, tilt to the left. Direct installation is also possible. In the second case, the awnings can be fixed in only one position. It cannot be changed further.
As a rule, dumps are equipped with a wide variety of attachments and attachments:
- knives-attachments, which are designed to level the earth;
- rubber parts that are used for effective snow removal.
No springs or slewing gears are used for the production of dumps, so the cost of the equipment is affordable for most homeowners. In areas where snow usually falls in a thick layer, lugs can be used instead of conventional wheels. In this case, moving through the snow-covered area will be easier and more free.


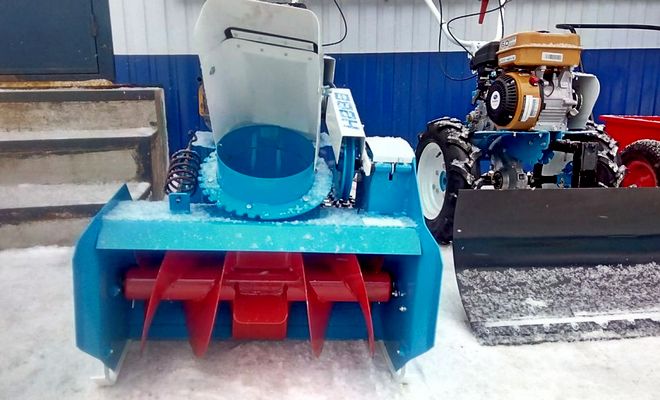
Homemade blade for a walk-behind tractor from a gas cylinder
Instead of a barrel, a gas cylinder will serve as a material for a shovel.The principle of making an attachment for a walk-behind tractor is similar, but there are a number of nuances:
If there are gas residues in the cylinder, it is vented by unscrewing the valve. However, no less dangerous condensation may still remain inside. The bronze valve is completely unscrewed with a key from the cylinder and, turning it over, the remaining liquid is drained
Attention! The condensate from the cylinder is poisonous, flammable and has a pungent toxic odor. You need to think in advance about the way to dispose of the liquid.
Water is poured into the balloon a little not to the top. The upper semicircular plug is cut off with a grinder. The water is poured out, after which the lower plug is cut off - the bottom. The resulting pipe is cut along the grinder into two halves. Semicircular segments are welded together in length.
Further work on assembling a snow blade on a walk-behind tractor with your own hands is based on performing the same actions as with a barrel: making a knife, a frame and a swivel mechanism. The only difference is that the metal from the cylinder is thicker and stronger. The reinforcing lintel from the profile pipe does not need to be welded. Instead, at an equal distance from the edges on the back of the blade, holders for the frame are welded. The connection of yo and the elements of the coupling device is made on bolts. The pivoting shovel assembly can be positioned directly between the walk-behind tractor hitch and the main blade frame.
Required materials and tools
In order to make a shovel for a walk-behind tractor with your own hands, you will need some materials and tools. Depending on the model chosen, these indicators may differ, therefore, all data should be clarified prematurely. As a rule, they are indicated on the sites, where the drawings for certain models are located.
But for a universal design, you will need the following set of tools:
- a steel barrel with a volume of 200 liters;
- an iron strip with an approximate size of 90x105x4 millimeters;
- profile square pipe, 1 meter 40x40 millimeters;
- a set of bolts and nuts of the required parameters;
- drills for metal of suitable sizes;
- pliers;
- a set of keys for the corresponding nuts;
- rubber sheet;
- thick sheet of steel;
- Bulgarian;
- a set of discs for the grinder;
- welding;
- electric drill.
After all the necessary materials and tools are ready, you should start collecting the shovel on the walk-behind tractor with your own hands. The simplest snow removal mechanism can be made from a 200-liter old barrel, since it will have a perfectly round shape from the very beginning, which is just right for such a "gadget". This avoids unnecessary labor costs when heating a sheet of metal and providing it with the desired shape.
 To begin with, in such a barrel, you need to cut off the lid and bottom with a grinder. Then the barrel is sawn with a grinder lengthwise into three parts equal in width. The left and right curved parts must be welded together, thereby forming a bucket for the future apparatus, and the remaining strips must be cut into small parts. These parts will later be used to improve the rigidity of the snow blower. They must be evenly welded to the bucket by welding and, at the same time, do not forget to weld two strips on the sides.
In order for the device to come out reliable and of high quality, it is necessary to weld a knife at the bottom of the bucket. To do this, you need a strip of iron 800x95x3 mm. It is necessary to drill three holes of 5-7 millimeters in it. The distance between the stripes should not exceed 110 millimeters.
Types of dumps
Mini tractor rear blade
According to the method of placement and fastening, several types of this equipment are distinguished:
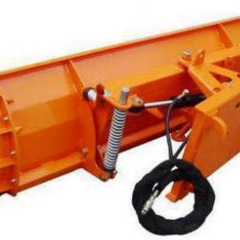
- Front. It has its own hydraulic cylinder with which the equipment is driven.
- Rear-mounted. It is located at the rear of the mini-tractor and is driven by turning on the hitch of the unit.
The front-wheel drive version is most often seen on construction sites, during road works and when clearing snow.Blades can have significant differences, but each of them has its own important characteristics:
- The width of the shovel, depending on the model of the power unit, can range from 1200 to 2000 mm.;
- the power of the mini-tractor used for the installation of light equipment must be at least 16 hp and for heavy equipment - at least 20 hp;
- the weight of the device can vary from 65 to 105 kg. It all depends on the task and the required processing width.
Dump barrel
Cut to size
Skeleton for strength
We weld the frame with our barrel
Type of attachment to the hitch
Blade lift hydraulics
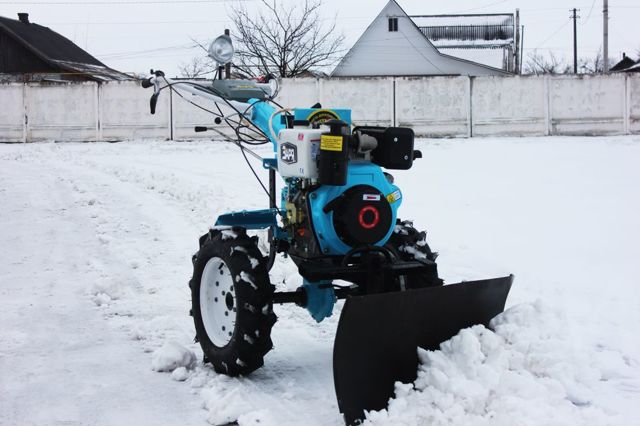
Ready-made painted blade made by hand
That's all the blade is ready
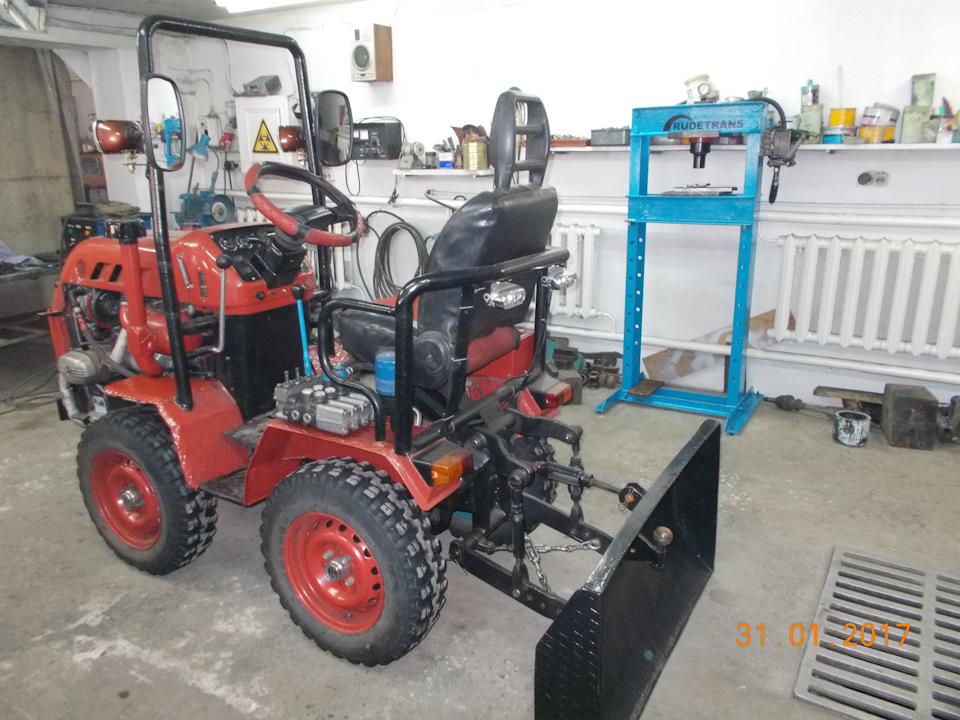
The front blade attachment to the mini-tractor allows you to use the unit as a small bulldozer and level paths on the site, clear snow or remove uneven terrain.
In addition, front-wheel drive implements add additional mass to the powertrain, thereby increasing tractive effort. However, when hitching a shovel, many are faced with the problem of how to raise it to the transport position. The best option is to equip the mini-tractor with a hydraulic cylinder, but not all units are equipped with an additional hydraulic valve. In this case, you can use the hydraulics designed to raise the rear linkage. To do this, install the bracket with the block, and fasten the cable to the grader by means of a bolted connection. After that, transfer the cable to the block located above the blade and then to 2 blocks located under the bottom of the power unit and fix the second end to the rear linkage lifting arm. When the rear linkage is raised, the front-drive shovel will also rise, and vice versa. In this case, no additional equipment is required to lower and raise the shovel. Fastening of the front-wheel grader is carried out in the places provided by the unit design.
You can buy a ready-made blade or make it yourself, as most powertrain owners do. A homemade dump for a mini tractor allows you to save money and at the same time create equipment that will meet all the requirements of the owner of the unit.
Homemade dumps
Now many people prefer to live in their own houses, and accordingly the adjacent territory occupies a large area. To work on a personal plot, motor-cultivators, walk-behind tractors and mini-tractors are purchased.
In winter, snow removal turns into a competition to win who. And owners with motorized equipment prefer to remove snow with its help. Attachments for a walk-behind tractor are not cheap, so craftsmen prefer to make it on their own.
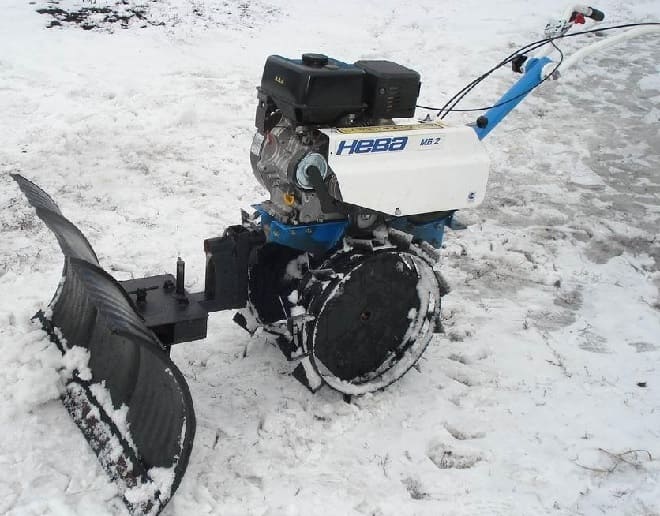
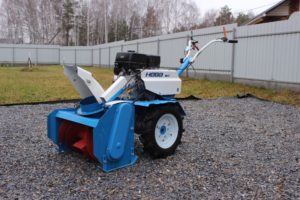
The domestic-made Neva walk-behind tractor is widespread. It has standard attachment points and rubber wheels that are adapted for driving on loose snow. Most of the homemade dumps were made for the Neva.
On the Internet you can find many descriptions and drawings of a shovel for a walk-behind tractor with your own hands. But before manufacturing, you should familiarize yourself with the characteristics of the dumps. Product composition:
- executive (working) body;
- swing mechanism;
- mounting bracket.
Rotation angles:
- to the right by 30 °;
- to the left by 30 °;
- directly.
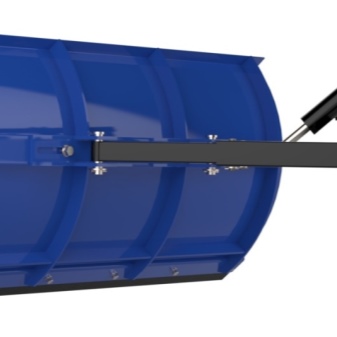
Blade from a cylinder
One of the materials at hand for making a dump is a gas cylinder. Its height is slightly more than a meter, and the recommended width of the shovel is 1000 mm. Manufacturing works proceed in the following sequence:
- Bleed off excess pressure from the cylinder, if any.
- Cut off both sides of the lid so that the width is equal to one meter.
- Cut the resulting pipe lengthwise into two halves
- Using a welding machine, connect these two halves so that the height of the blade is about 700 mm.
- The mounting bracket is manufactured as follows.Cut a kerchief out of thick metal. Drill several holes in it to turn the shovel in different directions. Weld a piece of pipe to the kerchief.
- Weld the resulting device to the shovel at the height of the bracket on the walk-behind tractor.
- Installation is done with a thick finger.
The width of the rubber web is 100-150 mm. Drill holes in the blade with an electric drill to secure the rubber. To securely fix the canvas, a metal strip of 900x100x3 mm is needed. Drill holes in the strip and in the canvas, having previously marked on the blade. Secure with bolts.
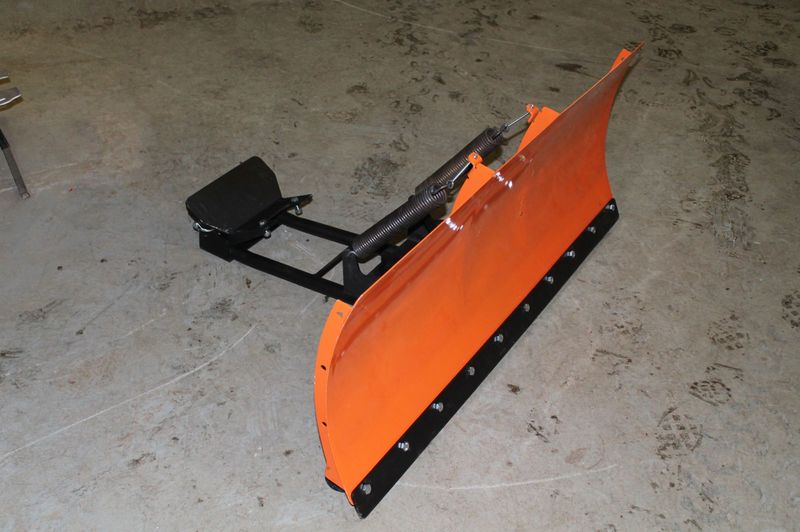
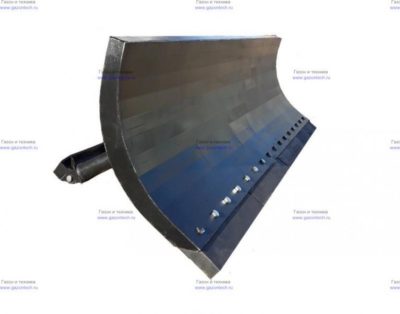
Blade made of sheet steel
 Some craftsmen prefer to use new material, rather than used elements. So you can make a homemade moldboard shovel from steel sheet 3 mm thick. To strengthen the structure, take strip steel with a thickness of at least 5 mm.
The material is cut according to the drawings. The blade of the shovel itself has four parts: frontal, lower and two lateral. The welded structure needs reinforcement. For this, elements cut from the five are welded in the vertical direction.
Next, a swivel mechanism is made. It is an ear with a hole for an axle. The ear is welded to the corner, which is attached to the blade. The axis is fixed at one end of the pipe, and with the other end it is fixed on the walk-behind tractor. The required angle of rotation is fixed with a pin (dowel).
As you can see, to carry out the work you will need:
- working material;
- grinder with discs;
- electric drill with drills;
- bolts with nuts;
- welding machine with electrodes;
- spanners;
- round or shaped pipe.
If you have certain skills, the job is straightforward. And the resulting structure can be used not only in winter, but also in summer. Level the site after construction works, level the area for the children's sandbox and much more. Which design to choose is up to you.
Purchased or homemade snow shovel
A snow shovel, designed to be mounted on a walk-behind tractor, is a hinged iron sheet in the form of a bucket or an arched shovel, and consists of three elements:
- Base;
- Attachment point;
- Spade angle adjuster.
The principle of operation of such a snowplow is to mount it on a tractor - mechanical or automated, in the case described in the article - on a walk-behind tractor.

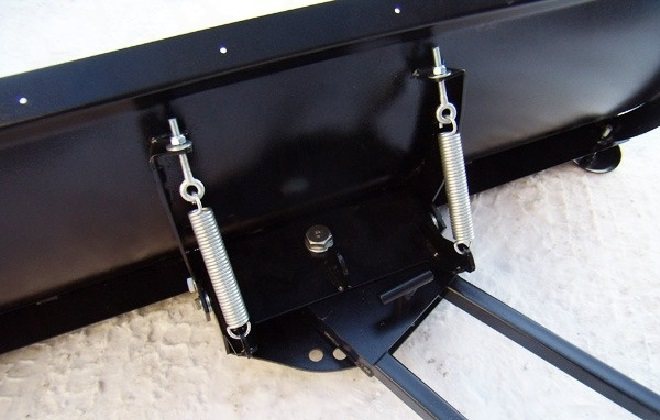
Shovel with attachment mechanism
The factory equipment of the snow plow includes the following elements:
- Bucket (shovel, blade) attached to the base of the electric motor;
- Height adjustment handle, often telescopic;
- An electric motor located under the body with attachments for attachments.

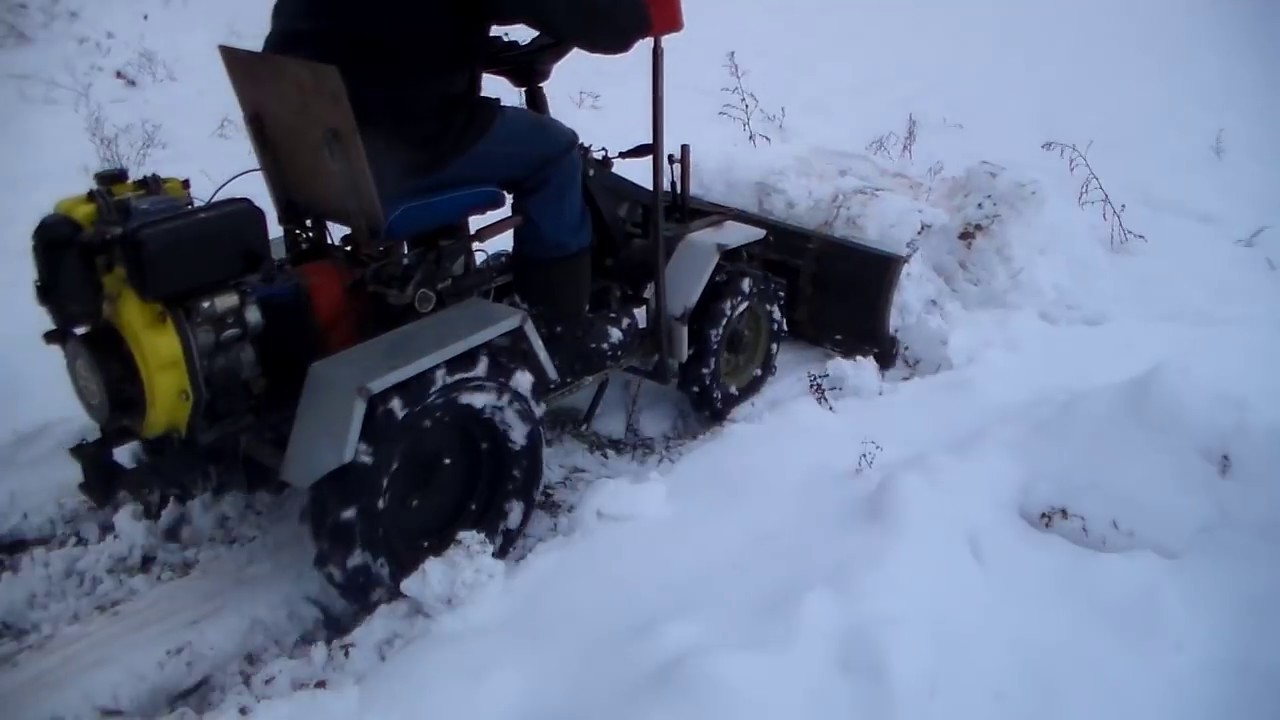
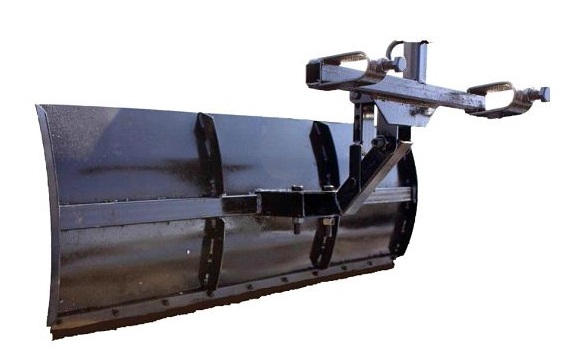
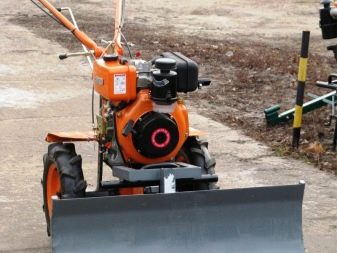
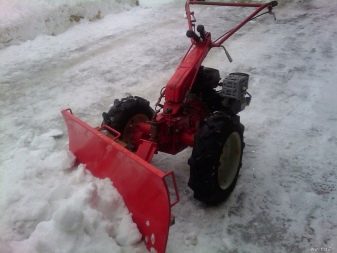
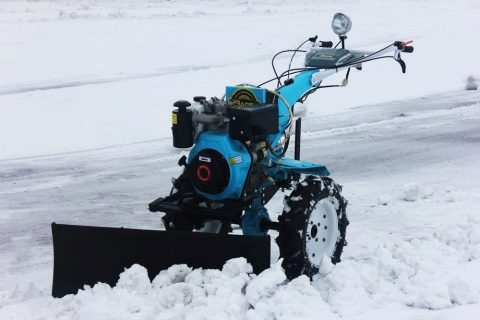
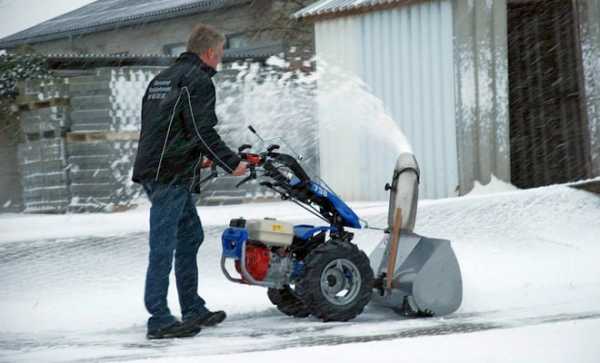
Motoblock with blade on grousers
The attachments, which are equipped with factory models of snow throwing devices, can be made in the form of cord rubber plates, as well as metal knives. Such devices, fixed on the lower wide edge of the dump, remove snow efficiently and level the ground. They can be made and reinforced on a homemade snow blower on your own.
The design allows for variations in the blade angle:
- 30º to the left;
- 30º to the right;
- without turning (forward only).
Changing the angle of rotation provides for fixing the shovel in this position with the help of an L-shaped mount, which increases the convenience of clearing snow.
Required materials and tools
Before proceeding with the selection of materials and creating a blade for the MTZ-82 tractor shown in the photo, you should first draw up a plan and drawings that can be easily found on the Internet. To select the optimal dimensions and weight of the equipment, you should take into account what materials you decide to use, as well as the power and weight of the power unit.
Important! To avoid mistakes, it is best to look at the equipment on the market and simply copy the blade with the optimal parameters.To make a snow shovel for the MTZ-82 tractor with your own hands, you need a minimum set of tools, namely:
To make a snow shovel for the MTZ-82 tractor with your own hands, you need a minimum set of tools, namely:
- measuring instruments;
- hand electric drill;
- welding machine;
- set of drills;
- bolts;
- steel beams or pipes with a diameter of more than 70 mm;
- shock absorbers;
- set of wrenches;
- hydraulic cylinders;
- cutter or scissors for metal;
- Bulgarian;
- steel sheet with a thickness of at least 8 mm;
- rubber strip.
As for materials, the most basic is sheet metal, which will be used for the frame of the unit and directly for the blade itself. The dimensions should be calculated according to the probable maximum loads, or dimensions can be copied from existing factory models.
To make a semi-frame, you will need two thick metal beams, six articulated joints and one hydraulic cylinder. You will also need two pieces of metal pipe of the appropriate size and diameter of the order of 100 mm, and four more swivel joints. But, if a home-made rotary blade is planned, then instead of metal pipes, two more hydraulic cylinders will be needed. This will provide an opportunity to control the rotation of the grader and expand its functionality.
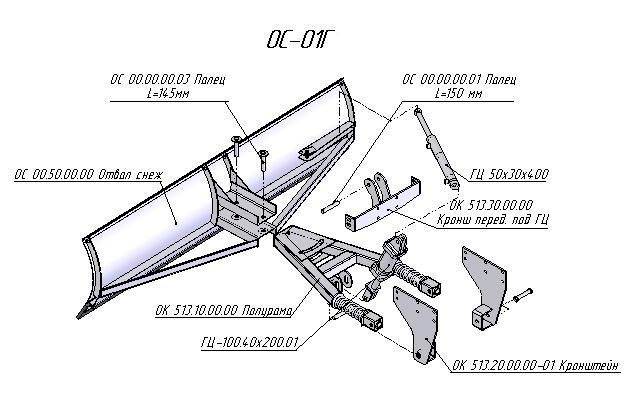
Dump OS-01G.
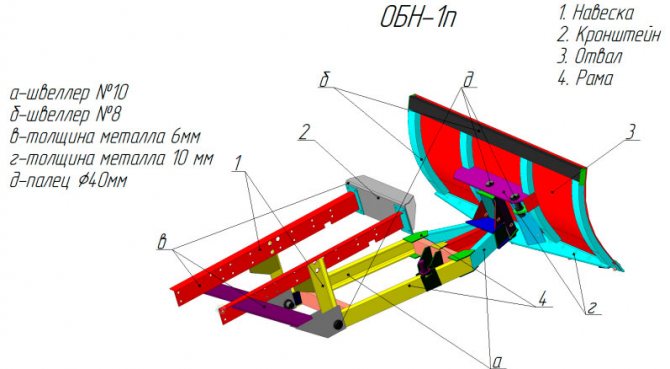
Dump OBN-1p.
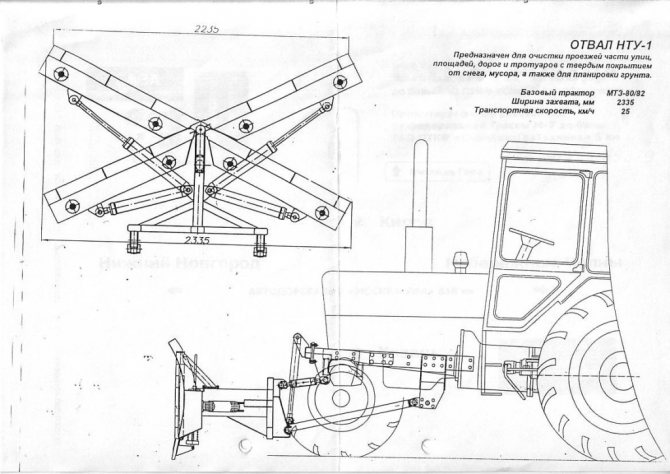
Dump NTU-1.
Installing a snow blower on a walk-behind tractor - about installation in detail
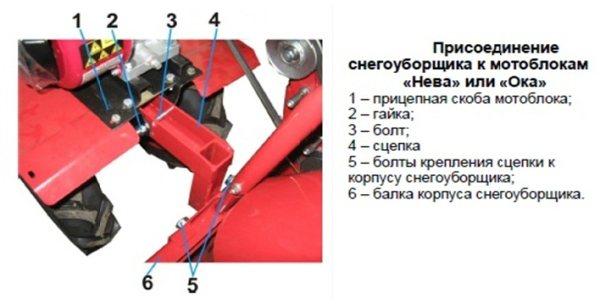
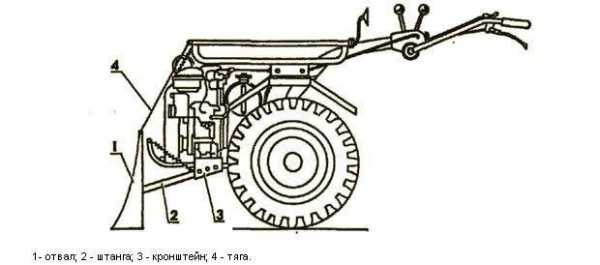
The blade should be fastened to the walk-behind tractor by means of a system of brackets, which should be welded to the supporting structure of the walk-behind tractor. Use two rods that will be inoperative as additional locks. The rods will serve to reduce the load on the brackets used.
It is not recommended to use bolts without brackets for fastening for a number of reasons. Firstly, they can freeze to the structure, which is why you cannot remove the blade from the walk-behind tractor. Secondly, the bolts, even anchor bolts, when operating a walk-behind tractor with a blade, will succumb to strong vibration, which will lead to their deformation or loss right during harvesting. Third, the bolts will not be able to hold the bucket full of snow. As a result, the fasteners will break sooner or later.
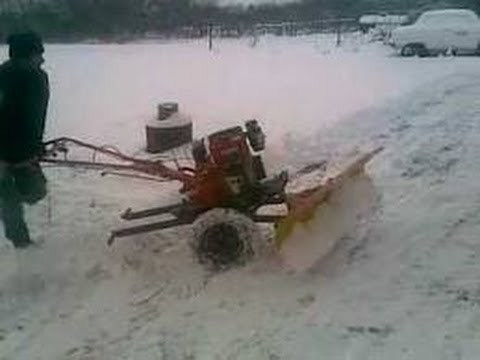
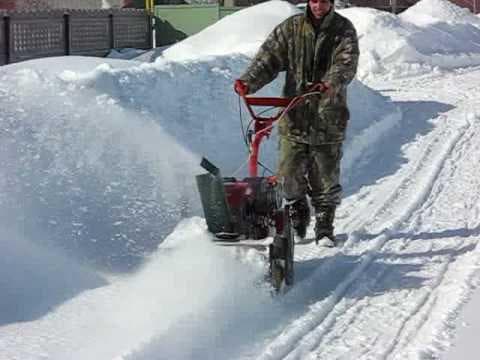
The principle of work with a snow plow for a walk-behind tractor
The mouldboard shovel of the walk-behind tractor must be properly installed before performing its functions. She turns with her hands to the right or to the left at an angle of up to 30 °. The process of adjusting the position ends by setting a suitable angle and fixing the shovel in the chosen position using cotter pins. The grip area of a snow plow for a mobile power unit is usually one meter (some modifications may have different values) with a shovel material thickness of 2 to 3 mm. In an industrial environment, these devices are made from high quality steel.

Features of the blade for the walk-behind tractor
Snow plows, which are aggregated with cultivators, walk-behind tractors, ATVs and other small equipment, are irreplaceable not only in areas with cold and snowy winters (and these occupy most of the territory of Russia), but also as garbage collectors and devices for leveling the land plot. The design of this device includes a working part (actually a shovel), a mechanism for regulating turns, as well as a unit that secures the blade to the walk-behind tractor.
Many small farm equipment manufacturers offer different models of snow plowing equipment in their product range. By far the easiest way to get a snow blower is to buy one. However, if you have drawings and an assembly diagram for a walk-behind tractor, you can do it yourself. Various modifications of dumps have been invented, however, the design and principle of operation are identical for all of them.
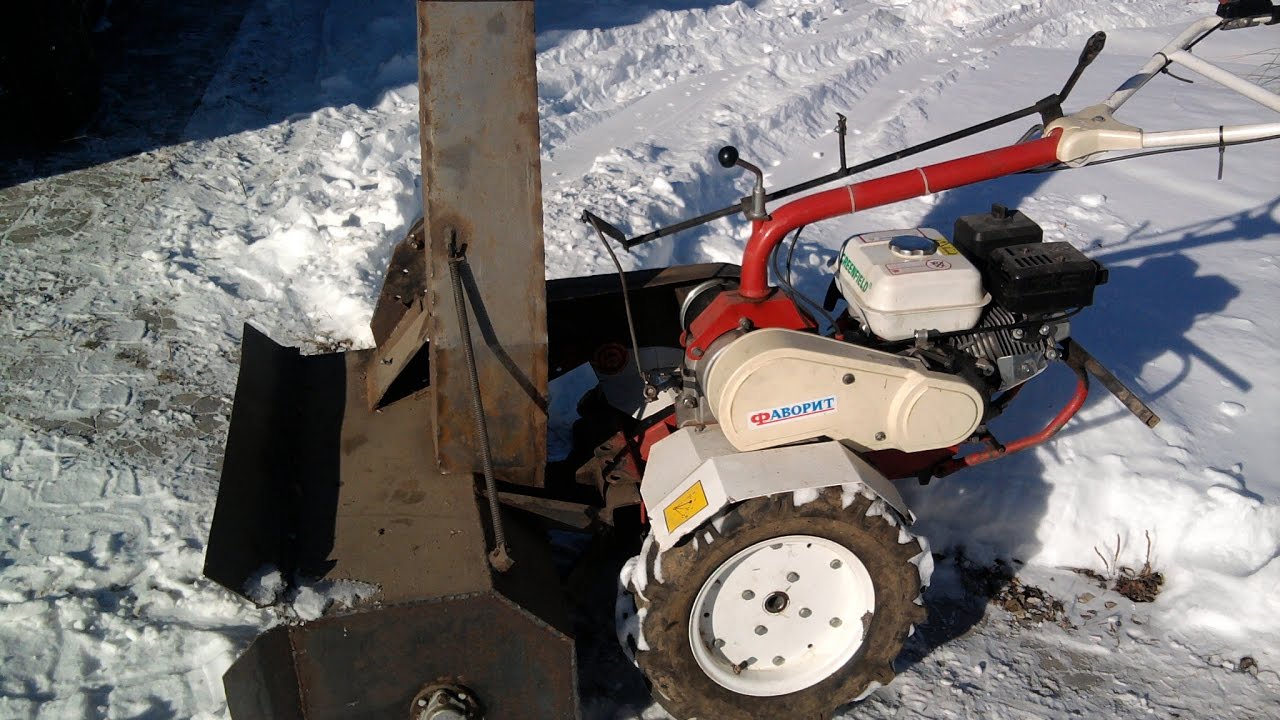
In this video, we will consider homemade shovels for a walk-behind tractor:

How to make a do-it-yourself blade for a walk-behind tractor?
A shovel for a walk-behind tractor is one of the simplest options for a blade, but this does not mean that it will take 30 minutes to make it and a minimum of scrap materials. On the contrary, if you want to make a shovel for a walk-behind tractor, you will need to carefully prepare and purchase all the necessary tools and materials in advance.
In order for the homemade blade to turn out as high quality as possible, be sure to study the drawings. They will advise you on the dimensions and how to attach the stripper elements.
After a detailed study of the drawings, prepare all the necessary equipment and materials. To work you will need:
- tin sheets, at least 3 mm thick. The dimensions of the sheets must be 85 x 22 x 45 cm;
- 1 metal stand - a steel pipe is suitable for this;
- 4 stiffeners, about 4 mm thick;
- a strip of steel long enough to cover the blade. The thickness of the strip must be at least 5 mm;
- 2 lugs for fastening the blade rod;
- a set of washers and nuts;
- square pipe, with a cross section of 4 × 4 cm and a length of 1 m;
- a set of drills with a diameter of 5–6 and 8–9 mm;
- a flat piece of rubber;
- 2 rods, 52 cm long each;
- 1 sheet of steel, 10–12 mm thick with dimensions 60 x 60 cm;
- welding machine;
- grinder with discs for cutting steel;
- hammer drill or electric drill.
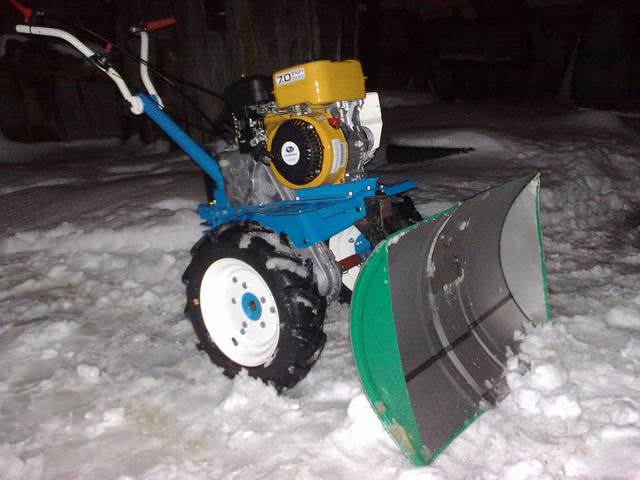
Having at hand all of the above materials and tools, it will be easier for you to make a mounted snow blower for a walk-behind tractor. The correct procedure is as follows:
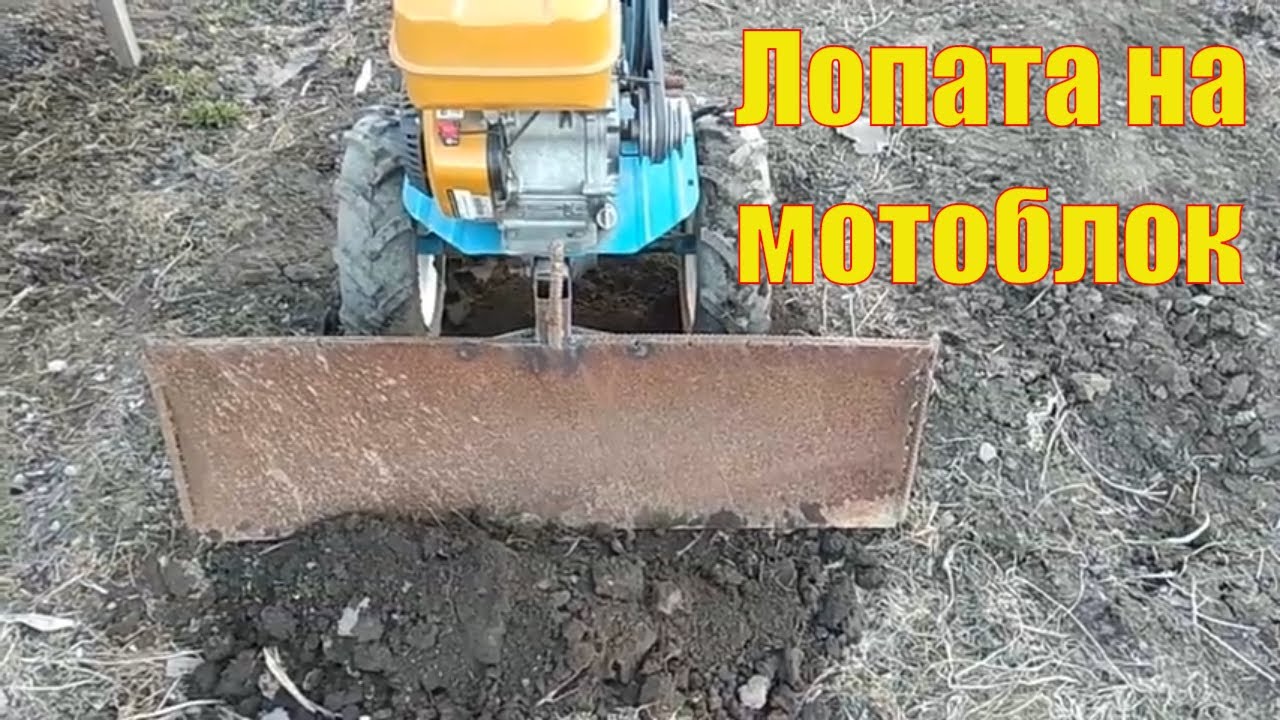
- Make the intake bucket first. To do this, take the stiffeners and weld the frame from them with three horizontal and four vertical guides. Next, heat the steel sheets with a gas burner and carefully bend the metal so that it takes the shape of a ladle. Weld the finished element to the frame made of stiffeners. As a result, you should have a snow plow identical to the one shown in the photo;
- Next, make a knife for clearing snow - this element should grind the packed snow and strengthen the snowplow on the walk-behind tractor. To make a knife, take a steel strip and drill 3 identical holes in it, the diameter of which should be 5–6 mm. The distance between them should not be less than 10 cm. Next, fasten the knife with bolts, putting a rubber gasket between it and the bucket;
- The next step will be the manufacture and installation of the fastening mechanism. Cut a 4 x 4 cm piece of pipe and weld it to the back of the bucket about the middle of the element. In the middle of the tube, weld a piece in the shape of a semicircle - for this, take a thick piece of steel. In a semicircle, make 3 identical holes, which will later be needed to screw in the bolts;
- Next, take the same piece of pipe and make a holder out of it that resembles the letter "G". Carefully insert one end of the holder into one of the holes in the semicircle, and secure the other end securely to the frame of the walk-behind tractor;
- The bucket lifting height can be adjusted by means of two bolts screwed into the surface of the existing recesses in the square tube. A video will tell you more about the manufacture of a snow plow.
Having made a shovel on a walk-behind tractor for cleaning snow, it is imperative to check the operability of the device. First of all, test the serviceability of the blade height adjustment mechanism - this will give confidence that when cleaning in the yard, you will not damage the decorative coating of the local area. The snow plow attachment to the walk-behind tractor should not outweigh the agricultural machine - if you notice that the center of gravity of the unit and attachments is broken, then be sure to fix the weights in the back of the walk-behind tractor.
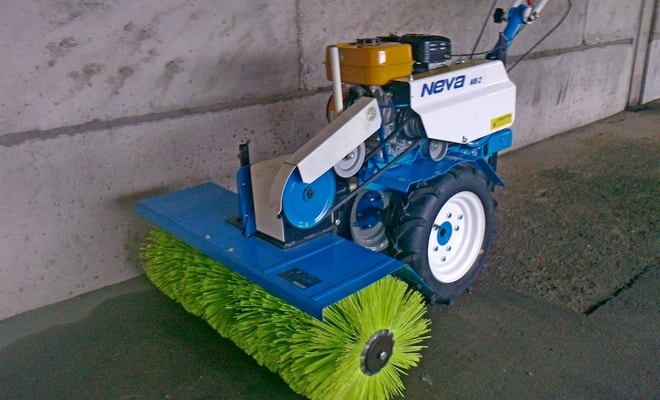
Factory models
 Any company that manufactures motoblocks can also offer a range of snow plows.There are popular models of such manufacturers as Centaur, Neva, Zirka, etc. on sale. The only big advantage of a factory design over a self-made one is that they are made of high-quality steel and are more difficult to damage. Moreover, such models last longer than homemade ones. But, on the other hand, they cost a lot.
There are a lot of options for factory dumps, so you should check before buying whether this model is suitable for your existing walk-behind tractor. At the factory, snow plows are not equipped with spring mechanisms due to the low speed of movement. If the speed of the walk-behind tractor is small, then the protective mechanisms for contact with the ground lose their meaning. Moreover, in the factory models there are no mechanisms for lifting and turning the unit. In this regard, the price of the factory design is reduced.
For higher performance, it is recommended to replace conventional rubber wheels with factory or homemade lugs. This will speed up the work process.