What is drip irrigation?
Drip irrigation is when water flows in even small portions directly to the roots of the plant if the irrigation device is in the ground, or next to the plant in a hole when it is on the surface. Water is received only by the cultivated plant itself, and not by the nearby growing weeds. There is no need to buy a drip irrigation device, you can make it yourself without any special costs. It is best to use a plastic bottle for this, such a device will last for several years with careful treatment.
Drip irrigation from plastic bottles
Pros and cons of drip irrigation
- With this type of watering of the plant, significant water savings occur when compared with conventional watering from a hose or watering can. In addition, you do not have to loosen the ground, as after abundant watering, since a drip does not create a dried crust that interferes with the growth of the plant. There is no spreading of water in different directions.
- Possibility of autonomous irrigation of plants with water. This is very convenient for summer residents who are not on the site every day. The construction will work independently, without endangering the site and the country house.
- The ability to apply fertilizer with ease in the required proportions, and only the plant itself will receive it.
- Also, a significant plus will be the fact that you can use drip irrigation both in greenhouse conditions and in the open field. If this is a place open to the sun, then the water in the bottle will heat up during the day and irrigation with sufficiently warm water continues at night.
Drip irrigation principle
Although this method is very convenient, it cannot be called perfect. Its disadvantages are that:
- Irrigation of large areas is almost impossible. To do this, you will need a lot of drip irrigation devices, and this will be inconvenient and no longer rational.
- If the soil is heavy and contains a lot of clay, then when the irrigation attachment is in the soil, it can become clogged and must be cleaned.
- Such watering cannot completely replace the full-fledged traditional moistening of the earth, especially in hot summers. With the help of irrigation, you can only maintain humidity, but you still have to water the beds abundantly from time to time.
Drip irrigation cannot completely replace traditional soil moisture
Ways to create a watering can for the garden
Option 1
- Insert a slightly curved tube into a clean plastic bottle (1.5-2 L). It should be longer than the height of the bottle so that you can water the seedlings without hindrance, even in the most inconvenient place.
- So that when the tube is bent, it does not decrease in diameter (flatten) one edge of the tube, close up with plasticine or clay, pour water and put it in the frost (you can in the freezer), so that water does not pour out of it.
- When the water turns to ice, bend the tube. In this case, the tube itself will take the desired shape, and the ice will not allow the walls of the tube to shrink.
Option 2
Sometimes seedlings do not need root watering, but with the capture of leaves. In order not to accidentally douse the seedlings with water, make a shower-can with your own hands.
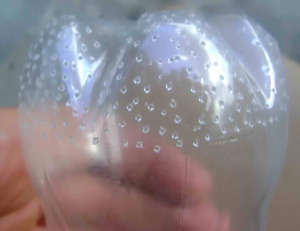
Wash a half-liter plastic bottle thoroughly, remove the stickers from the outside and use a marker to put dots, instead of which you will make holes.
Place the dots with a 5x5 square.
Clamp the head of the nail in pliers and burn the end of the nail on fire (candle) for 20-30 seconds.
Now pierce the dots with a heated nail
When the nail cools down, heat it up again.
On the back of the bottle, use a knife to cut a hole for water filling so that it is 2-4 cm higher than the watering holes.
Fill the bottle with water and carefully position it horizontally over the plants.
For convenience, you can build a handle on a watering can from scotch tape.

Option 3
There are not many leeks either in the country, or at home for seedlings and plants. Many plants cannot be watered with a hose, especially often this rule sounds in greenhouse gardening, so it is best and easiest to have a watering can at every step.
In order not to spend money on a purchase, we suggest making it with your own hands:
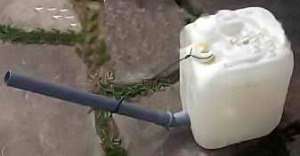
- To do this, take any plastic canister (from water, car oil), a polypropylene pipe 50 cm long and turn it 60 °.
- At the bottom, on a flat place, attach a "turn" and mark the diameter of the future hole with a marker.
- Cut out and measure how easily the tube fits into the canister (there should not be a large gap).
- Thoroughly grease the joint with hot glue, insert the nipple and leave to dry.
- Then you just have to put a piece of pipe on the pipe and, if necessary, shorten it by cutting off the excess. The optimum spout length is the height that does not exceed the canister lid.
- Tie the tube (spout) to the handle of the canister so that it does not break under the pressure of water.
- A trimmed stopper can be inserted into the spout to fan out in a limited flow.
Option 4
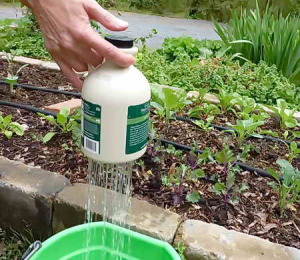
A small plastic container (shampoo bottle) can also make an excellent watering can. To do this, it is enough to make holes at the bottom with an awl or a nail. Collect water in a container, close the neck, turn upside down and water.
Option 5
You can make the most primitive watering can. Make holes in the lid of the plastic canister and on the opposite side for air to escape.
Option 6
If it is not possible to regularly water the seedlings or seedlings, then it makes sense to do automatic watering. To do this, make holes at the bottom of the plastic bottle with a hot nail, fill the container with water and close the lid. Dig bottles into the ground next to each plant in the garden, or one for several seedlings.
As you can see, there are many options for making a watering can with your own hands, choose your own, make and share your suggestions.
Heading: Summer tips, Crazy hands
A metal picket fence is an excellent choice for a summer residence
Cellular polycarbonate greenhouses
The right list of things to give
Choosing a guest sofa
Growing mushrooms on stumps
Whitewash trees - how, when and why
The reasons why the plum does not bear fruit
A three-dimensional church made of matches in the picture. Master Class
Manufacturing process
So, first, with the help of a small thin clove heated on fire, we melt small holes in the bottom of a plastic bottle from liquid soap.
Then, using pliers, we disassemble two dispensers from bottles of liquid soap. Actually, we will need traffic jams.
By the way, it was not for nothing that I took a plastic bottle of liquid soap for the watering can. The fact is that the thread from the neck of such a bottle actually coincides with the thread on the neck of a plastic bottle. And this means that to connect a bottle with a bottle, it will be possible to use stoppers from bottles of liquid soap, which are good because they already have rather wide openings, as well as small areas, thanks to which these stoppers will be very convenient to glue together with a heat gun.
In addition, each stopper has an O-ring, which will also be useful to us to ensure the tightness of our watering can.
Now we glue the two plugs with a heat gun. To ensure better strength and tightness, carefully glue the seam outside the plugs.
Again, for greater strength and tightness, we additionally wrap the glued plugs with electrical tape.
Now we screw our double cork onto the bottle that serves as a watering can.At the same time, do not forget to put a gasket in the cork.
Well, we screw the watering can itself to a two-liter plastic bottle in which water is poured.
Now let's try our watering can.
As you can see, water pours out of it in thin streams, consisting of separate small droplets, which is quite suitable for careful watering of sown seeds and barely grown seedlings.
But that's not all!
Since a large 2 liter plastic bottle is not very comfortable to hold when watering, I decided to attach a handle to it.
However, I didn't even have to do this, because I remembered that I already have such a bottle with a handle, which I made a long time ago, about 5-6 years ago, for pouring seeds and other small food from it into a bird feeder. But for two years now, I have not used it, so this bottle can be used for watering seedlings.
I found this bottle, rinsed it out and reeled up the handle with duct tape. As you can see in the photo, her handle is made of an aluminum strip, which is attached to the bottle body with electrical tape.
I screwed the watering can to this bottle.
As it turned out, it is quite convenient to use it.
The most important thing is that such a watering can can be used for continuous watering of containers with sown seeds or seedlings, placed in a row.
At the same time, it is enough just to slowly lead the watering can along a row of containers, as a result of which, watering will be done carefully, evenly, over the entire area and rather quickly. This will naturally save a lot of time.
When the water in the bottle runs out, you can quickly unscrew the watering can and pour a new portion of water.
Moreover, over time, it will be possible to make several such replaceable watering heads from liquid soap bottles. It will be possible to make a different number of holes in them for different irrigation modes.
Well, that's all for me! Good luck to everyone in growing seedlings!
How to make a watering can
Let's think about how to make a watering can with our own hands, so that it not only helps you with watering, but also looks interesting and unusual.
The first and easiest option is to take a plastic bottle and make holes in its cap with an awl. So that this option does not look too common and banal, you can take a bottle of an unusual shape, having previously examined the entire offered range of drinks in the store.
It will be difficult to paste over such a bottle, therefore, if its color does not suit you, it is advisable to use paint. However, this maneuver applies to bottles, whose surface is dense and does not bend, otherwise the paint will quickly crack.
However, the option of cracked paint is also not bad, because it is also interesting and unusual, but it will suit you if you use a watering can, for example, in your country house. This is not suitable for an apartment option, because peeling paint under our feet is a little different from what we are trying to achieve.

DIY watering can from a glass
A do-it-yourself watering can also be made from a glass. It will be more difficult to process, but this version of the watering can will last much longer and will look much more aesthetically pleasing. For such a device, you need to take a glass or even a ceramic mug, as well as a drill.
You should be very careful with a drill, because while working on creating a hole, the mug may burst or small cracks will appear on it. To prevent this from happening, the hole should be drilled carefully and slowly.
Next, we act like this:
- we take the plastic tube that we prepared, in accordance with the thickness of which we created the hole;
- we paint the tube and the glass itself in one color;
- insert the tube into a glass under a watering can for flowers;
- we fix it with glue so that there are no gaps left through which water could seep.
It is advisable if you choose a mug that has a narrow neck, since it will be inconvenient to cope with the wide top hole, and so that water does not pour out of it, you will need to pour too little water into an already not capacious mug.
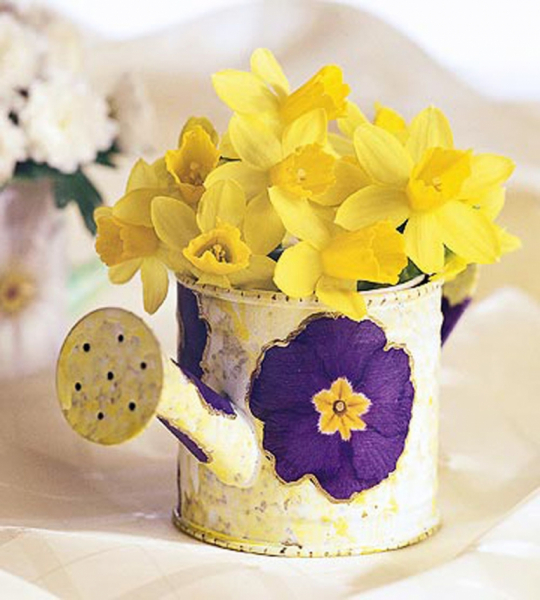
Unusual watering can do it yourself
If the option with an original small watering can does not suit you, and your plans include watering a large number of flowers planted in open ground, the idea of a large original watering can will certainly come in handy.
Take a bottle of some kind of detergent, draw chaotic lines on it using regular paints. You will have an interesting avant-garde watering can that will not show too much dirt. To prevent the drawing from washing off, cover the watering can with varnish. You can also leave such a watering can in the yard if you have an alpine slide near which decorative elements look great.
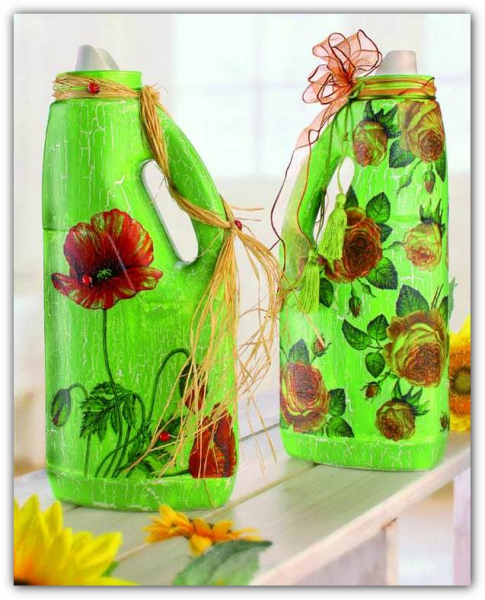
However, a watering can can be a simple decoration for the interior or landscape design of the site. Even if you only have artificial flowers, it doesn't matter, you can put a watering can next to them, this will only decorate and give the atmosphere aesthetics.
Advantages and disadvantages of a homemade system
Compared to an industrial system for supplying water to the root zone, homemade watering options through plastic bottles have slightly different pros and cons.
Advantages:
- as already mentioned, this is a reduction in installation costs. There are plastic bottles in almost every home, there is no need to buy them separately;
- you can not filter the water or get by with coarse filtration from the country water supply. Thanks to the device of home-made "droppers", they are not threatened with fast clogging. If watering with bottles is carried out in clay soil, which quickly "tightens" the holes in the droppers, it is not difficult to replace the damaged bottle;
- by changing the volume of containers used, you can adjust the duration of autonomous irrigation (12 ... 120 hours);
- reduction of water consumption and the possibility of irregular replenishment of the stock. This is especially important for those areas where there is no permanent water supply system or it is limited.
Disadvantages:
- watering the beds with bottles requires periodic renewal of the water supply in them. This can be done with a hose or bucket / watering can, but only by hand;
- impossibility of automation.
A separate plus for summer residents is the ability to arrange watering through bottles only in certain areas, including those inconvenient for permanent access or located remotely from each other. Here, the absence of tapes connecting the droppers and the main water supply serves only to save money.
Peculiarities
It is often assumed that the sprinkler is just an everyday tool. However, this opinion is mainly held by people far from farming. Any gardener knows very well that even such a utilitarian device has more than just functional significance. We need to think about the design to fit into the design of the surrounding area or apartment.
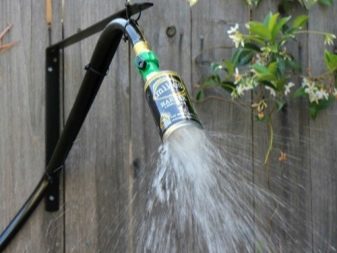

You can make a watering can for an apartment or a private house at home in a single-color version. But such a thing is unlikely to attract enthusiastic glances and delight anyone, including the owners. After all, exactly a similar tool is easy to purchase in a store. Sometimes they use juicy bright stickers applied to the surface. But the complete pasting of the watering can is not recommended, because the naked stickers will quickly deteriorate, peel off.
Only covering with tape helps to avoid the destruction of such decorations.
However, the surface covered with tape is unlikely to look aesthetically pleasing. Experts advise to supplement the watering cans with sprayers. Drip irrigation of home flowers helps to freshen the leaves.
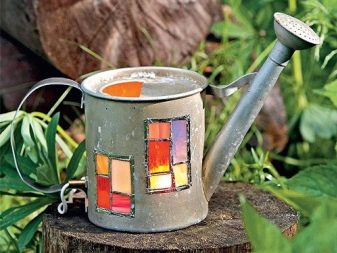
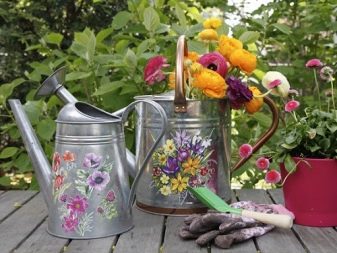
Ways to create a watering can for the garden
Option 1
- Insert a slightly curved tube into a clean plastic bottle (1.5-2 L). It should be longer than the height of the bottle so that you can water the seedlings without hindrance, even in the most inconvenient place.
- So that when the tube is bent, it does not decrease in diameter (flatten) one edge of the tube, close up with plasticine or clay, pour water and put it in the frost (you can in the freezer), so that water does not pour out of it.
- When the water turns to ice, bend the tube. In this case, the tube itself will take the desired shape, and the ice will not allow the walls of the tube to shrink.
Option 2
Sometimes seedlings do not need root watering, but with the capture of leaves. In order not to accidentally douse the seedlings with water, make a shower-can with your own hands.
Wash a half-liter plastic bottle thoroughly, remove the stickers from the outside and use a marker to put dots, instead of which you will make holes.
Place the dots with a 5x5 square.
Clamp the head of the nail in pliers and burn the end of the nail on fire (candle) for 20-30 seconds.
Now pierce the dots with a heated nail
When the nail cools down, heat it up again.
On the back of the bottle, use a knife to cut a hole for water filling so that it is 2-4 cm higher than the watering holes.
Fill the bottle with water and carefully position it horizontally over the plants.
For convenience, you can build a handle on a watering can from scotch tape.
Option 3
There are not many leeks either in the country, or at home for seedlings and plants. Many plants cannot be watered with a hose, especially often this rule sounds in greenhouse gardening, so it is best and easiest to have a watering can at every step.
In order not to spend money on a purchase, we suggest making it with your own hands:
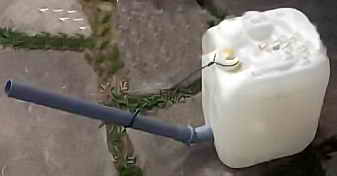
- To do this, take any plastic canister (from water, car oil), a polypropylene pipe 50 cm long and turn it 60 °.
- At the bottom, on a flat place, attach a "turn" and mark the diameter of the future hole with a marker.
- Cut out and measure how easily the tube fits into the canister (there should not be a large gap).
- Thoroughly grease the joint with hot glue, insert the nipple and leave to dry.
- Then you just have to put a piece of pipe on the pipe and, if necessary, shorten it by cutting off the excess. The optimum spout length is the height that does not exceed the canister lid.
- Tie the tube (spout) to the handle of the canister so that it does not break under the pressure of water.
- A trimmed stopper can be inserted into the spout to fan out in a limited flow.
Option 4

A small plastic container (shampoo bottle) can also make an excellent watering can. To do this, it is enough to make holes at the bottom with an awl or a nail. Collect water in a container, close the neck, turn upside down and water.
Option 5
You can make the most primitive watering can. Make holes in the lid of the plastic canister and on the opposite side for air to escape.
Option 6
If it is not possible to regularly water the seedlings or seedlings, then it makes sense to do automatic watering. To do this, make holes at the bottom of the plastic bottle with a hot nail, fill the container with water and close the lid. Dig bottles into the ground next to each plant in the garden, or one for several seedlings.

As you can see, there are many options for making a watering can with your own hands, choose your own, make and share your suggestions.
A watering can for flowers is an indispensable attribute of a personal plot, a summer cottage plot of land, a cottage house and even an apartment. In order for the watering can not only to play its functional role, but also to be combined with landscape design or the interior of a newfangled apartment, you need to understand exactly where you will use it.
Handmade watering cans decorate the interior and are useful to use. Each housewife loves her flowers and takes care of them. Leica is an assistant in this matter.
How the drip irrigation system works
The standard layout consists of:
- unit for water intake. This can be a connection point to a centralized water supply system, a well, a storage tank;
- filter. It is installed for all types of water intake, since the water supplied by the central water supply and rainwater from the storage tank equally have unwanted additives and inclusions of solid particles. In the absence of filtration, droppers quickly become clogged and require replacement;
- fertigation unit.This term is understood as an additive to the liquid for irrigation of fertilizers and / or means for the destruction of pests, other useful additives;
- main water supply. This part of the system supplies purified and prepared water directly to the part responsible for drip irrigation;
- tape or tubing with droppers.
Important: depending on the area of the irrigated area, it is not tapes or tubes with droppers that may leave the main water supply system, but at first the sections of the water supply system that “distribute” to individual fragments. The cross-section of such areas should correspond to the water consumption of the served area of drip irrigation .. Unlike purchased systems, when asked how to make drip irrigation from a bottle, you can skip the points of filtration and arrangement of belts or tubes with droppers
In this case, it remains necessary to take water, add the necessary substances to it and transfer moisture directly to the droppers, which are plastic bottles.
Unlike purchased systems, when asked how to make drip irrigation from a bottle, you can skip the points of filtration and arrangement of belts or tubes with droppers. In this case, it is necessary to take water, add the necessary substances to it and transfer moisture directly to the droppers, which are plastic bottles.
DIY drip irrigation from plastic bottles
This drip irrigation is best for plants with a small root system. It will not be able to feed long roots, but is great for watering shallow roots.
You will need:
- plastic bottle with lid (1.5 - 2 l)
- an awl, a small nail with a hammer or a screwdriver
- a clerical knife or scissors.
1. Make several holes in the plastic bottle cap. This can be done with an awl or screwdriver. It is advisable to preheat the instrument.
2. Make a small hole next to the plants. It should be deep enough to fit 1/3 of a 1.5-2 liter plastic bottle.
3.Use a utility knife or scissors to cut the bottom of the bottle.
4. Insert the bottle into the hole with the neck down. Secure the bottle in place with earth. Place a few stones around the bottle to prevent dirt from getting inside.
5. Fill the bottle with water.
Make a few more similar designs for the rest of the plants.
How to do watering with your own hands
You will need:
- 1.5 liter plastic bottle
- screwdriver or awl
- FUM tape
- clamp.
1. Use an awl to make holes on the side of the bottle. To make the process easier, heat the awl - it will more easily penetrate the bottle.
2. Insert the watering hose into the bottle. However, you should first wrap the end of the hose with FUM tape, thereby ensuring a tight connection between the bottle and the hose.
3. Use a hose clamp to tighten the neck of the sprinkler assembly.
* You can create vertical watering. You will need a small post inserted into the ground. Attach the hose to this post.
4. You can improve the design with ordinary plastic handles. Use a 3L plastic bottle. Make holes in it slightly smaller than the diameter of the fountain pen. Disassemble the handles and insert the top half of each handle into the holes.
If necessary, seal the structure with FUM tape.
Make a hole in the cover and insert the hose adapter into it. It is advisable to treat this adapter with silicone glue to make it more tight. This design will provide water to a large area of your garden and / or vegetable garden.
