Content
- 1 Hello dear readers!
- 2 What you need for a mini-garden
- 3 Growing dill
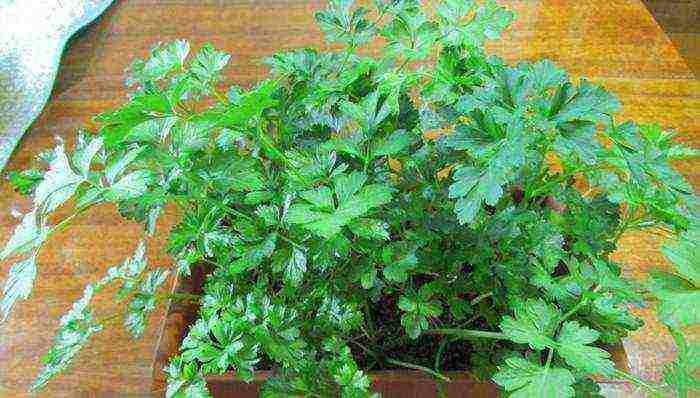
- 4 Growing parsley
- 5 Growing cilantro
- 6 Dill
- 7 Parsley
- 8 Planting parsley and dill
- 9 Growing dill and parsley in eggshells
- 10 What greens can be grown on the windowsill
- 11 What greens can be grown on a windowsill in winter
- 12 How to properly grow greens on a windowsill
- 13 Video "How to grow greens on your windowsill"
Hello dear readers!
I think you will agree with me that it is very pleasant to come to the kitchen on a cold winter morning to drink aromatic coffee and make yourself a sandwich with herbs.
Yes, not a store, expensive and grown in no one knows where, but from your own small home garden.
How sweet it is to look at a frosty window and see a tender greenery on the windowsill - little hello to sunny summer.
So let's create it!
What you need for a mini-garden
◊ Containers. Best of all are plastic (wood can leak) or wide clay pots. Each type of greenery needs its own home (many plants do not go together).
◊ Ground. Suitable soil is a mixture of garden soil, sawdust, peat and clean sand in equal proportions. You can buy ready-made soil for seedlings. Before pouring it into containers, put a thin layer of small pebbles, pieces of broken brick or crumbled polystyrene on their bottom. This is drainage (it is necessary to drain excess water during irrigation, otherwise the greenery on the windowsill can rot).
◊ Lamps (luminescent, white spectrum). It is necessary to illuminate a small garden in the winter months so that the duration of daylight hours is 13-15 hours.
- You can purchase special timers and set the backlight time in advance, which is very convenient.
◊ Plastic wrap. It is necessary to create a greenhouse effect so that seeds germinate better.
But the most important thing that is needed is your desire to always have fresh greenery on the windowsill in winter, good mood in autumn, constant supply of vitamins in spring and beauty of tender seedlings in summer.
Growing dill
This fragrant herb is rather unpretentious for home life. Knowing some tricks, you can provide yourself with a constant supply of fragrant and very healthy herbs.
Choosing a variety
Not every variety of dill will give you a lush greenery on the windowsill with excellent taste. For a mini-garden, the following varieties are better suited:
♦ Early maturing. Harvesting will be possible 35 days after the first shoots.
- Grenadier... Delicate dill, beautiful, with a light shade of leaves. It is unpretentious, with juicy greens.
- Gribovsky... Resistant to diseases, undemanding in care, temperature conditions. The dark green leaves are fragrant and delicious.
♦ Mid-season. They form more greenery and leaves. Dill of these varieties will be ready to decorate your table 40-45 days after germination. They also form umbrellas and seeds ideal for pickling, canning and seasoning.
- Richelieu... Fragrant blue-green lace leaves. One of the most beautiful varieties that will become a highlight in our mini home garden.
- Aelita (abundant leafy).The large, dense dark green crown has a great aroma and excellent taste.
♦ Late ripening. Forms lush, fragrant greenery. Such varieties are distinguished by a high content of nutrients.
- Kibray... The wide, green leaves with a pale yellow tint have a large supply of vitamins and have a sweetish taste.
- Salute... The dark crown of a bluish shade is spicy and aromatic. Greens on the windowsill with this variety of dill are very fruitful. It grows back quickly after being cut.
Seeds
Soak the seeds for a day in heated water. Change the water every 6 hours. Then dry them a little and immediately sow them into abundantly moistened soil.
Sow in 15 cm beds in the pre-made grooves. Or directly on the soil, sprinkling on top with a layer of soil of 2 cm.
- Advice. Sow seeds every 3 weeks. Then you will provide yourself with fragrant greens for the entire winter.
Cover the dill kindergarten on top with polyethylene and hide in a darkened place for a week, where the temperature will be at least + 20 ° C.
As soon as the first shoots appear, lower the air temperature overnight.
Dill care
| What does dill need | Tips | |
| Watering | plentiful drink | regular watering, especially during seed germination |
| Top dressing | complex mineral fertilizers ("Rainbow" is better suited) | fertilize the soil every 14 days after watering |
| air temperature | the best t ° for him is from + 18 ° to + 20 ° С | dill on the windowsill will also transfer a lower temperature (up to + 8 ° С), if the temperature exceeds the limit of + 20 ° С, increase the illumination (otherwise it will grow sluggish and too light) |
You can sow greens all the time (every three weeks) on the freed area after cutting.
Growing parsley
Fragrant parsley will become a useful decoration for any dish and a constant supplier of vitamins all year round.
Like dill, this greenery on the windowsill is quite unpretentious in home gardening.
Choosing a variety
There are two types of parsley. Root (use its roots in cooking, to prepare medicinal decoctions) and leaf (to get lush, thick and fragrant greens to the table).
♦ Root parsley. It forms thickened light roots. Early ripening varieties are best for drying, and late ripening varieties for long-term storage.
- Sugar (early variety). 3 months after the first sprouts appear, this parsley is ready for use. Such root greens on the windowsill have the best taste.
- Yielding (mid-season). Parsley fully ripens in 4-5 months. The white pulp of the root vegetable has a mild aroma.
- Berlin (late ripening). The crop can be harvested after 5-6 months. This variety has a delicate spicy taste, very juicy.
♦ Sheet. These varieties are grown for lush, aromatic greenery. Leaf parsley has two types of leaves: regular and curly (they are very effective when decorating dishes). Cut leaves retain their aroma for a long time and do not turn yellow for a week. Leafy greens on the windowsill grow back very quickly after cutting.
- Curly Sue (early maturing, curly). You can cut it after 1-2 months after germination. Differs in dark green, curly leaves. It is fragrant, rich in vitamins and exquisitely beautiful.
- Esmeralda (mid-season, curly). The dense curly crown is very aromatic and has a sweetish taste. The crop can be removed after 2 months.
- Bogatyr (late ripening, smooth). One of the best varieties of leafy parsley. Differs in especially fragrant leaves and high yield. Parsley of this variety can be cut to the table in 2-3 months.
Seeds
Soak a cotton cloth (or gauze) in boiled water, put the seeds in it. Wrap gauze with parchment and place in the cold. Let the seeds stay there for a week.
Ventilate them every day, re-moisten the gauze. After a week, the seeds are ready to take root in the ground.
Sow them 0.5 cm deep, cover them with a layer of soil on top.Then cover the pot with plastic and place it in a dark place.
Cover the ground with a damp cloth. Water every two days. Keep an eye on the seeds - ventilate and moisturize every day with a spray bottle. After three days, the first timid shoots will appear.
Remove the cloth from the ground and transfer the pot to a well-lit windowsill. As soon as there are more shoots, build a dome-shaped support from thick wire and use it to raise the film a little higher.
It can be removed completely when the shoots are pricked up. Spray the young growth with water often.
Young shoots must be thinned out so that the distance between them is at least 4 cm.
Parsley care
| What parsley likes | Tips | |
| Watering | moderate watering | do watering every 3-4 days, do not allow completely dry soil, or vice versa, excessive soil moisture |
| Top dressing | standard superphosphate solution | dilute 5 grams of granules per 1 liter of boiled water, parsley at home requires feeding once a month |
| air temperature | the best t ° from + 22 ° to + 24 ° С | this greenery is very afraid of drafts and cold |
If the leaves of the grass begin to turn yellow, remove them immediately. Perhaps this is a sign of a disease. In case of recurrence of yellowness, make an aqueous solution of organic soap and spray it all over the plant.
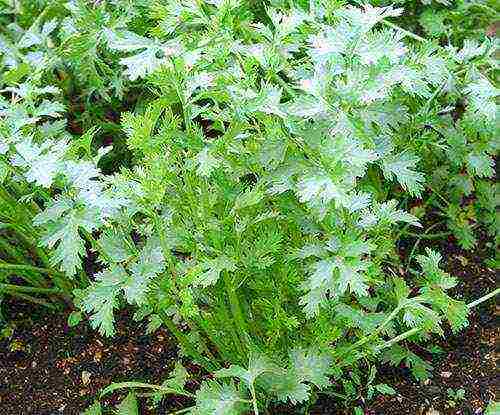
Growing cilantro
Cilantro (or coriander) is a very unpretentious, cold-resistant plant. It is of the same class as parsley (it is even called "Chinese parsley").
But this greenery on the windowsill will fill the whole garden with a stronger, deeper aroma. Cilantro is brighter, richer in taste, and its leaves are softer.
Choosing a variety
To get a rich harvest, it is best to plant coriander of essential oil seed varieties: Ray, Amber, Change.
By the way, coriander greens must be eaten before flowering. During the appearance of flowers, cilantro develops a specific, not very pleasant aroma.
Seeds
In order for the cilantro to rise faster, its seeds must first be germinated in wet sawdust at a temperature of air from + 17 ° C to + 20 ° C.
As soon as the first sprouts appear, we replenish our greenery on the windowsill with a new plant. We plant sprouted cilantro seeds in moistened soil to a depth of 2 cm. Sow in rows with a distance of 5-10 cm, cover the seeds with a layer of earth on top.
Cover the pots with foil for the first time. But be sure to check them every day, water and air them.
After two or three weeks, coriander will make itself felt by the first shoots. And we solemnly transfer them to our home garden.
At first, greenery needs good air humidity (spray it more often from a spray bottle).
Cilantro care
| The whims of coriander | Tips | |
| Watering | moderate watering | water constantly, in small portions, do not allow the soil to dry out, otherwise the plant will be weak |
| Top dressing | complex fertilizers (best of all "Flora") | dilute the composition at the rate of a liter of water for 3-5 ml of the product |
| air temperature | favorable temperature from + 10 ° С to + 12 ° С | cilantro can withstand frosts down to -5 ° C (it is best to grow coriander on the balcony) |
The first harvest after the emergence of sprouts can be removed after a month. Cilantro on a windowsill can only carry one cut. But if you remove 1-2 leaves from the coriander, then extend this period by two weeks.
After you cut all the plants, dig up the soil, renew it by one third and add ash (50 grams of ash per 6 kg of soil). Then moisten the soil with a heated manganese solution (1%) and sow the coriander again.
The greenery on the windowsill will bring you a lot of pleasure, joy from the beauty you have created yourself, which in gloomy autumn and frosty winter will remind you of a warm summer.
I wish you a rich home harvest!
Now, my dear readers, you know how to grow lemons, vitamin greens (dill, parsley, cilantro) at home, and in the next article of this series ("Garden on the windowsill") I will talk about growing peppers at home. What other plants would you like to grow at home? Write about it in the comments and I will try to describe in detail the process of growing these plants.
See you soon!
You can also read on this topic:
Tags: cilantro, parsley, dill
In winter and at the beginning of spring, a person really needs vitamins: fruits and vegetables have practically ended since last year, and there is still a long way to go before harvesting a new crop. And there is only one way out in such cases - to grow fresh herbs right on the windowsill. This is not only useful, but also pleasant, especially since you can grow both green onions and celery, dill, parsley, cilantro and various salads in winter. And today we will tell you just about how to plant dill and parsley on the windowsill.
Growing dill and parsley on a windowsill
Let's start with a brief description of these cultures.
Dill
It is known primarily for being a strong antioxidant, and it also removes toxins from the skin due to its high content of ascorbic acid. In addition, regular consumption of dill enhances gastrointestinal motility, increases appetite, normalizes metabolic processes, reduces blood pressure, and so on.
Growing dill
If dill grows in the garden on almost any type of soil, then for cultivation on the windowsill you will need a fertile soil mixture, which you need to prepare yourself (more details on this will be discussed later).
Parsley
Parsley is another rich source of vitamins and minerals. The plant is kept frozen for a long time (about one year), but it does not lose its useful properties. Parsley is not only eaten, but also used for cosmetic purposes, due to the high content of vitamin A.
Parsley on the windowsill
Despite the fact that the growing procedure for both parsley and dill is practically the same, it is recommended not to sow the first one in winter, but to grow it with the help of root crops. Instructions for sowing both plants will be given below, but in fairness, now we will briefly consider the features of growing parsley from root crops.
You can also grow parsley from root vegetables
You can get root vegetables in one of two possible ways:
- purchase them in the market or in a specialized store;
- dig up in the garden in the fall, and then store in the refrigerator in a plastic bag on a vegetable shelf.
Note! It is very important that the root diameter is at least two to three centimeters. If the roots are too long, then they should be cut off, wait a while (the cut off part should be hardened) and only then start planting. Otherwise, the roots will simply rot.
The roots are planted in specially equipped boxes, always in rows (the distance between the latter should be nine to ten centimeters). The distance between the plants themselves should vary within three to four centimeters. If desired, instead of boxes, you can use flower pots 13-14 centimeters high - in this case, several root crops should be planted in each pot at once. It is also important that the top of the head is not covered with earth during planting.
Selection and planting of root crops
Parsley should be watered only once a week, since this culture cannot stand an excess of moisture. The water used for irrigation must be settled and always at room temperature.
Seedlings require regular watering
After each application of moisture, the earth is loosened. Containers with parsley should be placed on light windowsills - in this case, the first greens can be cut off after three to four weeks.
Light must suffice for parsley
Actually, that's all. Now let's get acquainted with the peculiarities of planting these crops on the windowsill.
Planting parsley and dill
Is it worth growing dill in an apartment
Let's make a reservation right away that there are no special varieties intended specifically for "window-sill" cultivation in nature, therefore, when buying seed, you should pay attention, first of all, to the ripening time.It is very important not to be mistaken with the choice: of course, early varieties quickly give green mass, but they also stretch quickly into flower stalks, moreover, they are not as leafy as early ripening crops. As for the late varieties, they do not ripen in the beds during the summer, but they are excellent for home cultivation. Now - directly to the workflow.
Stage one. We prepare everything you need
You should start by preparing everything that is required for cultivation. For the convenience of visitors, the information is given in the form of a table.
Table. What is required in the work
|
Boxes or pots |
These are simple containers (made of ceramic or plastic), the same ones used for flowers. If pots were chosen, then their volume should be one to two liters (the specific figure depends on how much greenery will be grown). The bottom of each container must necessarily have holes for removing excess liquid. |
|
Drainage |
Expanded clay drainage, for example, can be easily purchased at any specialty store. |
|
The soil
Coconut pills |
It is desirable that it contains vermicompost. There is an alternative - the use of coconut tablets, but this method is more expensive. |
|
Potassium permanganate |
With its help, you need to pickle the seeds. Yes, today it is far from everywhere possible to purchase potassium permanganate, therefore, several alternative options will be given in the text. |
After preparing everything you need, you can start pickling the beans.
Stage two. Seed preparation
Planting dill includes proper seed preparation, it begins a few days before sowing
Dill Gribovsky
If the seeds are more than two to three years old, then they should be soaked in warm water overnight. In the morning, the water must be drained, and the seeds themselves must be soaked in a heated solution of potassium permanganate (the color should be bright pink) for about two hours. This is necessary in order to disinfect the grains - the plants after processing will not hurt.
Soak the seeds
If it was not possible to purchase potassium permanganate, then you can use one of the following methods.
Method one... Use a 2 or 3 percent hydrogen peroxide solution. It should be preheated to a temperature of 38-40 degrees, after which the seeds should be soaked in it for about six to eight minutes.
Hydrogen peroxide
Method two... Use of boric acid. In this case, you need to dilute ½ teaspoon of acid in a glass of water. The seeds should be soaked in the resulting solution for two to three hours, while the temperature should vary within 25-30 degrees. After dressing, the seeds are thoroughly rinsed under the tap.
Boric acid
Stage three. Sowing seeds
While the seeds are pickling, you can start preparing the pots. The algorithm of actions should be as follows.
Step one... Expanded clay drainage is poured to the bottom with a layer of two to three centimeters.
Backfilled drainage
Step two... Soil is poured over the drainage, not reaching the upper edge about three or four centimeters. The soil is abundantly watered with pre-settled water. Everything, containers are ready for further sowing.
Step three... After dressing the seeds, the potassium permanganate is drained, and they themselves are laid out on a piece of gauze to drain the remaining liquid.
Note! It is necessary to leave for sowing only the seeds that sank to the bottom during soaking. The fact is that the seeds left afloat will have a low germination rate.
Step four... Dried seeds are sown in pots. This can be done in the usual way, that is, simply sprinkle them with a pinch, or plant them in any convenient order - in a checkerboard pattern, in rows, etc.
Sowing dill
Step four. A layer of soil with a maximum thickness of two centimeters is poured over the seeds, after which you can additionally water a little.
Step five... The pots are covered with cling film or PET bags to create a greenhouse effect. Then they are placed on the windowsill.It is important that the optimal temperature for germination is maintained in the room - it is about 18 degrees.
Cover the container with the sown seeds with foil
The pots can now be left alone until the first shoots are formed. For parsley it takes no more than two weeks, for dill it takes from seven to ten days.
Stage four. Further care
When shoots appear, the film must be removed.
Dill seedlings
Further care for plants is to comply with standard requirements.
- Water should be moderate but regular during the first month. In summer, watering should be abundant, and in winter, again moderate.
- Dill "loves" spraying with a spray bottle, even with ordinary tap water.
- Plants need to be provided with enough sunlight - at least three to four hours a day. It is for this reason that the seeds are best sown in the spring (around March).
- Growing temperature should be 18 degrees (+/- 2). Although dill is able to withstand a drop in temperature up to eight degrees, which means that this culture can be bred on a balcony (that must be glazed) until late autumn.
- Rotate the pots 180 degrees daily, otherwise the stems will stretch to one side.
Further care for dill
Note! Three to four weeks after germination, it is advisable to add soil a few more centimeters. Such a simple action will replace picking, that is, germinating seeds in small cups, followed by transplanting them into larger pots.
Actually, this is all you need to know about caring for parsley and dill. Now all that remains is to wait for the harvest, which will appear after 1.5 months (for parsley) and five weeks (for dill) after the introduction of seeds. As for overseeding, in our case it is not required, since the described crops yield a harvest throughout the year.
Not only beautiful, but also delicious greens in the house
Video - Growing dill in the winter
Growing dill and parsley in eggshells
Eggshells, which account for thousands of tons of waste annually, are 95-97% calcium carbonate. In addition, it contains nitrogen, calcium and phosphoric acid - everything that plants need for development. For this reason, the shell is actively used in horticulture. It can also be used to grow parsley and dill on a windowsill.
You can grow greens right in the eggshell
The procedure itself is not complicated and consists of several simple steps.
Step one... First, the shell is prepared - it needs to be washed and dried.
We wash the shell
Step two... A small hole is made in the lower part of the shell, through which excess liquid will be removed.
Step three... The shell is ½ filled with soil.
We fill the shells with soil
Step four... A few seeds are placed inside, on top of which a little more soil is poured.
Step five... On the shell, you can write with a marker which plant is planted there.
Step six... The shell is placed in an egg tray, which is placed on the windowsill. From time to time, plants need to be watered with a small amount of settled water.
Don't forget to water the sprouts
In this case, of course, it is not worth waiting for large bushes, but the shell will play the role of additional fertilizer and provide plants with useful elements.
Useful Tips
Video - Growing parsley on a windowsill
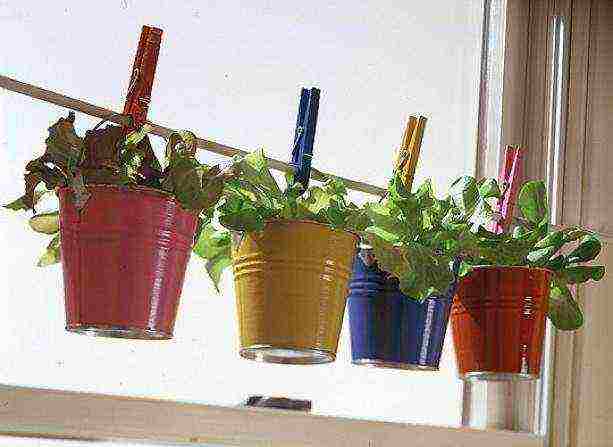
Sooner or later, all housewives begin to understand how nice it would be to have a bunch of fresh herbs always at hand. Whether it's winter or summer, it doesn't matter. Greenery on the windowsill all year round is not a myth! To fulfill this desire, it is not at all necessary to have a magic wand, just a packet of soil, seeds and patience will be enough.
What greens can be grown on the windowsill
Green onions
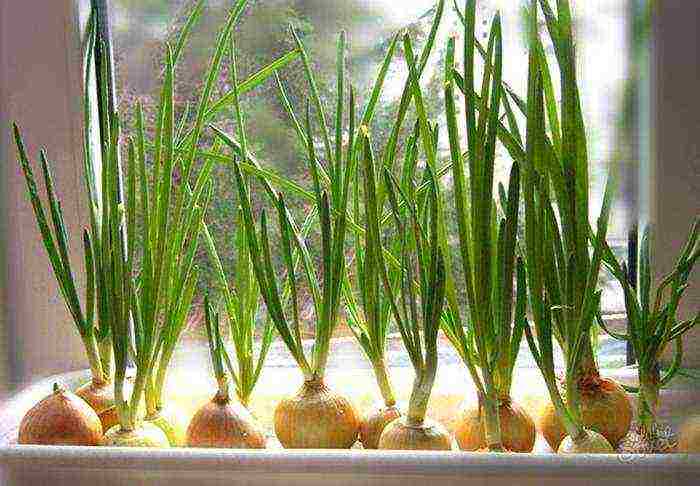
This is ideal for a vegetable garden on a windowsill.Planting material can be both onion sets (small onion bulbs for seedlings) and turnip onions (already adult fruits).
Sevok takes longer to germinate and yield less. But the feather tastes better and softer. Green bunches can be cut from the turnip in a week. However, the set takes much less space on the windowsill.
A turnip can be grown in two ways - in water and in soil.
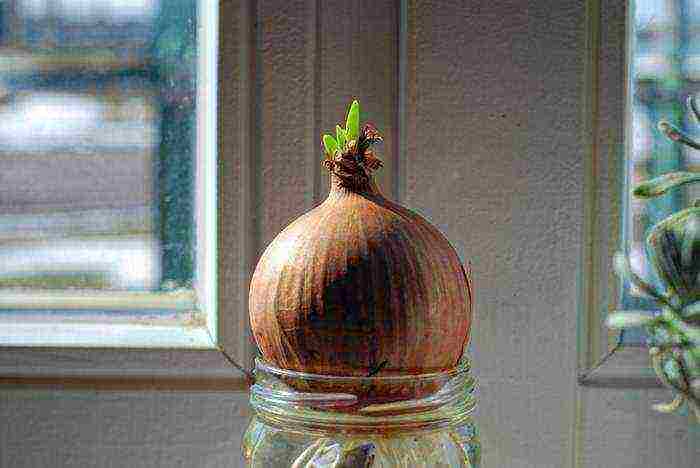
This requires a small container of water. At the turnip, carefully cut off the top and bottom. Place the onion from top to bottom so that it slightly touches the water.
The disadvantage of this method is that after a while, the bulb begins to rot and give off a characteristic odor.
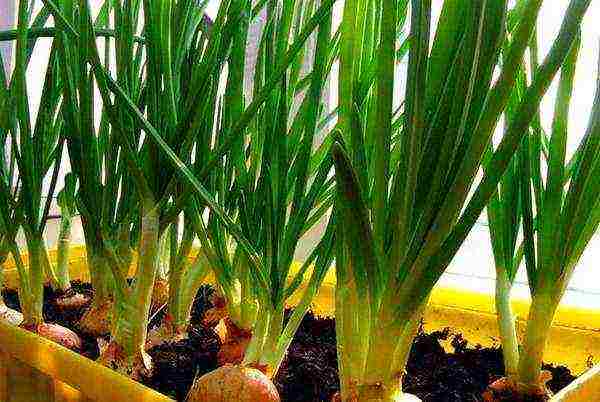
We fill up the soil in a small container and plant a turnip or sevok in it. We pour water and wait for the first green feathers.
A hydrogel pre-soaked in water can be placed on the bottom of the container. Thus, you will save the plant from drying out.
Dill

Growing dill on a windowsill is not easy. And not every housewife can grow dill on a windowsill in winter, because in the cold season, seeds germinate for a long time and with great difficulty. The best option would be to buy dill seedlings and plant them in pots.
But if you are firmly decided to grow a fragrant plant from seeds on your own, then you need to sow the soil in steps, to sow in small portions in a month. So you can provide yourself with greenery on the windowsill all year round.
Seeds are best placed in the ground to a depth of 1-2 cm.When shoots appear, you need to carefully thin them out, leaving a gap of 2-3 cm between the shoots. You should also ensure abundant watering. And if there is dry air in the room, it is necessary to additionally spray the greens, otherwise the leaves will become coarse. Mineral fertilizers should be used as top dressing.
Parsley
Seed parsley sprouts rather slowly, so be patient. The plant is photophilous, this must be taken into account when choosing a location for greenery. At the same time, parsley calmly reacts to temperature changes, and feels comfortable on a cold windowsill. When watering, it does not require special treatment.
To increase the likelihood of seed germination, you need to soak them for a day in water or a weak solution of potassium permanganate (about 0.2%). After that, wrap them in cheesecloth until white sprouts appear.
How to grow parsley on a windowsill in winter?
Since there is a shortage of sunlight during the cold period, the problem of how to grow parsley on the windowsill is solved by choosing the sunniest location for the future green bed. You can also eliminate the lack of light by illuminating the plant with a special phytolamp.
Do not forget about fertilizing with mineral fertilizers.
Cilantro
This spice plant loves fertile soil, but does not impose special temperature requirements. Therefore, with a responsible approach to the choice of soil and feeding, the question of how to grow cilantro on the windowsill can be considered closed.
The plant belongs to the category of early ripening, so you won't have to wait long for the harvest. However, special attention should be paid to watering - do not let the coriander (this is another name for the plant) dry out.
Basil
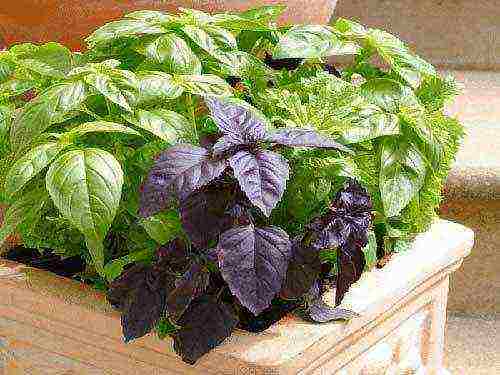
This is a sun-loving and unpretentious plant. After sowing the soil, water it and cover it with cling film until shoots appear.
Also, these greens can be grown from a freshly cut stem. You need to place the stem in water and wait for the roots to appear. Then it must be planted in the ground.
In order for the basil to bush and grow in breadth, and not in height, after the appearance of 5-6 leaves, it is necessary to cut off the top. When buds appear, they should be removed as the plant will produce flowers, not leaves.
What greens can be grown on a windowsill in winter
First of all, these are early ripening plants: watercress, coriander, mustard, as well as everyone's favorite leek.
Green leaves are a real storehouse of vitamins.They will help fill the deficiency of nutrients and nutrients in the body, tired of winter beriberi. They also diversify the home menu and decorate any dish with their presence on the plate.
In order to have homemade greens at hand all year round, it is necessary to finish sowing the beds with seeds about once a month, creating a so-called "green conveyor".
How to properly grow greens on a windowsill
Despite the fundamental difference between plants and their needs, there are rules that apply to all potential tenants on your windowsill.
• Lighting. The winter period is characterized by a lack of light, so the plants need additional lighting. Special phytolamps will help to fill the deficit. It is best to connect a timer to such a lamp - so the backlight will turn on automatically for the required amount of time and you will not have to constantly monitor it.
• Ground. To grow plants in winter, you will need a soil mixture that contains fertilizers and has already been cleared of debris. Also, a drainage layer must be laid at the bottom of the pot - it will save the roots from decay and prevent moisture from accumulating at the bottom of the box. Drainage can be bought in a store or you can use improvised means - breaking bricks, pebbles, crumbled foam.
• Seeds and seedlings. The need to buy special seeds for growing at home is not necessary - ordinary "garden" seeds feel great on the windowsill. If you are a novice gardener, you can buy herbs in containers, already with roots, instead of seeds. You just need to transplant and care for the plants.
Also, a great helper for plant breeders is a hydrogel - a substance that contains nutrients and swells, absorbing water. The hydrogel is laid on the bottom of the flower pot in a swollen state. With the help of it, you will protect your plants from drying out (the hydrogel will give up its water) and from excess moisture (the substance will absorb the excess).
Soil is not the only medium for growing greenery. There is one more, rather unconventional method.
An unusual way of growing greens
We take a thin layer of sterile cotton wool and place it on the bottom of the container. Moisten with boiled warm water (temperature 30-35 ̊С) and drain off the excess. We sow and close the container on top with glass or polyethylene. We place crops in a warm place. This creates a moist chamber with the most favorable conditions for seed germination.
The first shoots will delight you in 5-7 days.
Now you know that it is not difficult to take care of the green bed on the windowsill, it is enough to follow simple rules and adhere to the required watering regime for the plants. Then your mini-garden will delight you with a tasty and healthy harvest all year round!
Video "How to grow greens on your windowsill"
> Materials:
Many grow green onions on the windowsill. In addition to it, other greens are also suitable for winter cultivation. We will give you recommendations on how to grow watercress, mustard leaves, parsley, celery and basil on the windowsill in winter.
The main feature of these crops is that they calmly tolerate a lack of sunlight and grow very quickly: after 2-3 weeks they can delight you with juicy greens. At the same time, watercress and mustard grow well from seeds in winter, but parsley, celery and onions can be obtained faster in the forcing process. As for basil, it propagates well by cuttings.
This is not only unpretentious fast-growing greens, but also a very useful product for the human body, since it normalizes blood pressure indicators and relieves insomnia.
When choosing seeds for winter sowing, preference should be given to early ripening varieties. Dansky, Dukat and Vesti are well suited.
Watercress grows well even without soil.Place a layer of porous paper, cotton wool, or hydrogel on the bottom of the growth container. Moisten the base well and sow the seeds.
It is necessary to sow watercress densely, in this case the seedlings "support" each other in the process of growth and form a green mass pleasant to the eye.
For the first few days, before germination, cover the container with the planted seeds with cling film and place in a warm, shaded place. When the seeds germinate together, remove the film and place the container on the windowsill. Don't forget to turn, water and spray your crops: Watercress loves moisture very much. After a few weeks, the first crop can be cut. The leaves are considered ready for cutting when they grow up to 6-10 cm.
In the same way as watercress, the leafy Sarepta mustard is grown. Keep in mind that this culture grows well at a temperature of 10-20 ° C, so place a container with seedlings on a glazed insulated loggia. In an apartment, it is better to choose the coolest windowsill for greenery. For growing indoors, varieties such as Freckle, Volnushka, Mustang are suitable.
A rosette of leaves that grows 20-25 days after germination is suitable for eating. Mustard leaf will enrich your diet with vitamins B1, B2, PP, ascorbic acid, carotene, calcium, magnesium, iron, phosphorus and other useful substances.
For early germination, the seeds can be soaked in a solution of trace elements for 12 hours, and then dried until flowable. After sowing, place the container with seeds in a warm, shaded place. When the seeds have sprouted, transfer the mustard to a cool, light place. Mustard mustard is undemanding to the soil, just like watercress, its seeds can be sown on cotton wool, porous paper, in a hydrogel, or in a universal fertile soil.
Harvesting mustard leaves should be done either by pulling out the entire rosette of leaves from the ground, or by carefully cutting off individual leaves and maintaining the growth point.
If you want to get fresh greens throughout the winter, then new batches of watercress and Sarepta mustard should be sown every 20-25 days.
An onion in a jar - a familiar plant for Soviet window sills - is no longer so often pleasing to the eye and stomach with a sharp little taste.
For forcing onions on a feather, choose solid, medium-sized bulbs. To make the feather germinate faster, cut off the top of the bulb. And if you find the bulbs that have already been turned on, then you do not need to cut anything. A large onion will produce more greenery, but will take up a lot of space. It is better to plant such specimens separately, lowering the bottom with germinating roots into a container of water.
If you plant onions in soil, you can add a hydrogel soaked in a nutrient solution to it. It will prevent the soil from drying out, which often happens in indoor conditions.
For planting, you can use containers of any size. If there are no holes in them for the drain of excess liquid, pour expanded clay on the bottom, and then about half of the volume - soil with or without hydrogel. After slightly compacting the mixture, plant the bulbs in it close to each other, without burying them in the soil. Water abundantly and expect harvest.
Growing parsley and celery from seeds is not easy in winter. But if in the fall you have the roots of these plants in the bins, the greens can be obtained by forcing. Pick up small, undried roots and immerse them in water for several hours. Then plant in a pot with soil along the "shoulders" so that the soil does not fall on the growing point of the greenery.
Place the containers with roots in a shaded place first. After the first leaves appear, the pots must be transferred to the lightest windowsill, because parsley and celery are very light sensitive. Water the plantings no more than twice a week.
You need to carefully cut off the grown greens, leaving a three-centimeter petiole on the root crop. Fresh greens grow back in about a month.
Cutting is one of the easiest ways to get basil greens in winter.The main difficulty is to find a growing specimen in order to cut cuttings from it, in this case you can try to root even branches bought in a store.
Cuttings 10-15 cm long are placed in water until roots appear.
Basil cuttings should be planted in separate pots filled with universal soil. Basil loves light, nutritious loose soil, so pay special attention to drainage. In addition, basil is very light-requiring. Find the lightest window sill for him and, if possible, on cloudy days, supplement the crops with special LED or fluorescent lamps.
Read more about the use of phytolamps in our material "Lighting for seedlings at home".
Caring for rooted shoots is the same as for adult plants: water them regularly with warm (30⁰C) water, periodically loosen the soil and fertilize. The harvest of green basil can be obtained within a month after planting the cuttings in the ground.
As you can see, it is not at all difficult to organize a vegetable garden on the windowsill in winter and grow fragrant fresh herbs in it. The main thing is to choose the right crops and follow our instructions.
I know more about it
I want to offer you a topic
- Front page
- news
- Trends
- Technology
- Style
- Inspiration
- Garden affairs
- Fertilizers and stimulants
- Diseases and pests
- Greenhouses and hotbeds
- Soil and fertility
- garden tools
- All about the bath
- In the garden
- Strawberry
- Apple tree, pear
- Cherry, sweet cherry
- Plum, cherry plum, apricot
- Grape
- Raspberry, blackberry
- In the garden
- Tomatoes
- Cucumbers
- Potato
- Pepper, eggplant
- Carrots, beets, radishes
- Cabbage, onions, garlic
- In the flower garden
- Roses
- Tulips, Daffodils
- Other bulbous
- Peonies
- Asters, Chrysanthemums
- Begonias, Dahlias
- Site design
- Design ideas
- Alpine slides
- Flower beds and flower beds
- Lawn
- Small architecture
- Gazebos, pergolas
- Our services
- Seed catalog
- Disease catalog
- Gardener's calendar
- Forum
- Our brochure
- about the project
- Advertising placement
- Restrictions and notifications
- We are in social networks
The site may contain content that is not intended for persons under the age of 16.
Materials:
So the calendar winter has begun, there is still little snow, but very soon everything around will be white, like a blank sheet of paper. At this time, the human eye simply has nothing to catch on to, and so I want to dwell on something green and beautiful. But in addition to beauty, this "something" should also be beneficial, because now every person suffers from a lack of vitamins, which are more than enough in summer. How to combine business with pleasure? The answer is very simple - to plant a vegetable garden on the windowsills and grow the most common and not demanding green crops: dill, parsley and cilantro.
So, the idea is there, it's time to start implementing it. What do we need in order for the greens to turn out to be both elegant and tasty? Of course, the containers in which, in fact, it will grow; soil, which is definitely indispensable; additional lighting lamps, better than the cold spectrum and plastic wrap required at the stage of seed germination.
So, containers, the best option is clay or plastic, plastic is more durable, it just doesn’t kill, but it “doesn’t breathe”, clay “breathes” in it, plants grow better, but it can break, which is up to you to choose, the main thing is to each plant was in a separate container.
Soil: the best option is a mixture of ordinary garden soil, peat, rotted sawdust and river sand in equal proportions. The soil can be made independently or bought in the store; ordinary seedling soil will do. But whatever the soil is, before placing it in a container on the bottom of the dishes, be sure to put drainage, the best option is expanded clay, with a layer of 1.5-2 cm.
Lamps are fluorescent, cold spectrum, they must shine at least 13 hours a day.
Film - it is necessary to cover the soil with it immediately after sowing the seeds and remove it only with the appearance of mass shoots.
All is ready? Let's get started!
HLet's start with dill - fragrant and beautiful greenery.Dill is unpretentious, but does not really like to grow at home, but this is not a problem, there are a number of varieties for which a house or a vegetable garden is all the same. These are early Grenadier and Gribovsky, middle Richelieu and Aelita, late Kibray and Salut. In order for the seeds to sprout faster, they need to be soaked in water at room temperature for a day, changing it every 8-9 hours. After that, the seeds should be dried on a napkin and sown in slightly moistened soil. It is advisable to sow in grooves, leaving a distance of 12-13 cm between them (if there is more than one groove in the dish). The depth of the groove is 1-1.5 cm, it must be sprinkled with a layer of soil 0.5-1 cm. We advise you to sow varieties of different ripening periods in a separate dish, then you will definitely prolong the harvesting season for fresh herbs.
All that dill needs for normal growth is a temperature of about + 22 ° C before germination and + 19-20 ° C after their emergence, as well as an abundance of light and moisture. In about 18-20 days, the first crop can be harvested.
Parsley- no salad is complete without this fragrant, tasty, healthy and beautiful greenery, so why not grow it on the windowsill? In order for everyone to gasp in surprise, look for seeds of such varieties as Leaf and Curly Sue (early variety), Esmeralda (medium) and Bogatyr (late). Before sowing, parsley seeds should also be soaked, but not for a day, but for two and not in plain water, but with a small addition of potassium permanganate (0.5%). You need to sow seeds so that they are at a depth of about a centimeter, no more. It is advisable to cover them with a very thin layer of soil (2-3 mm) and immediately after that cover them with plastic wrap, until friendly shoots appear.
Parsley loves the abundance of moisture in the soil (but not excess), therefore, in addition to watering, you can also spray it with a spray bottle. As for the temperature, the best option is + 22-23 ° C, the main thing is that there are no drafts, their parsley is very afraid.
Cilantro, its aroma is brighter, stronger, and the leaves are much softer than that of parsley. Such varieties as Amber, Smena and Luch have especially bright taste and aroma. Before sowing, the seeds of any of these varieties must be slightly germinated by placing them in wet sawdust and placing them in a room with a temperature of + 18-21 ° C for 2-3 days. These seeds should be planted in moist soil to a depth of about two centimeters. If the dishes allow, then you can make several rows with a distance of 6-8 cm between them. For a couple of days, the dishes can be covered with plastic wrap so that the seedlings start growing faster. In the future, it is important to monitor the moisture content of the soil, conducting periodic watering as it dries up and the temperature - optimal for cilantro + 11-15 ° C, therefore it is better to grow it on a glazed, but poorly heated balcony or loggia. Do not forget about spraying, cilantro is very responsive to this. For spraying, it is advisable to use soft water at room temperature (for example, melted snow).
When growing at home, the first crop of cilantro can be harvested 25-28 days after sowing the seeds. Unfortunately, in such conditions, cilantro, as a rule, tolerates only a single cut, but if you cut off just a few leaves at a time, then you can extend the harvesting period by 7-8 days.
Usually, after harvesting the entire crop, it is enough to dig up the soil in a pot, remove about a third of it and add fresh, after mixing it with wood ash in an amount of 10 grams per 1 kg of soil, moisten it and you can sow cilantro again.
N.V. Khromov, Cand. biol. sciences, source