Content
- 1 Features
- 2 The benefits of green onions
- 3 Cultivation methods on the windowsill
- 4 Rules for growing green onions in water
- 5 Rules for growing green onions in the ground
- 6 Step-by-step instructions for growing "onion cactus"
- 7 Hydroponic plant
- 8 Forcing methods
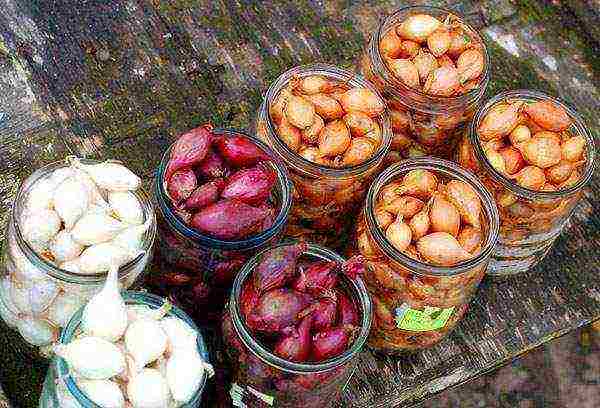
- 9 Planting material
- 10 Forcing in the substrate
- 11 Distillation in water
- 12 Smart solutions
In winter, you will not surprise anyone with jars of bulbs on the windowsills in apartments. In the season when the sun is so little, fresh greenery on the windows pleases the eye. And finely chopped green onions add attractiveness and spice to the dishes.
How to grow green onions on a windowsill in winter
Features
Chives have been cultivated as an agricultural crop since the fourth millennium BC. During this period, all possible ways of its cultivation have been studied. It has been known since school that it is very easy to get a harvest at home.
Kitchen garden on the windowsill
On a note! Using traditional methods, you can get a harvest of green onions at home either by planting the bulbs in the ground or in a container with water.
Each of these methods has its own pros and cons. But the hostess has her own secret for getting the best harvest. This has spawned many unusual new ways.
Home garden in winter
The benefits of green onions
Green onions
- It contains a large amount of vitamins. It contains vitamins A, B, PP. It is especially worth noting the presence of important vitamin C, which enhances the body's defenses during the cold period, which helps to effectively fight viral diseases.
- Green onions also include elements necessary for human life. These include potassium, magnesium, nitrogen, iron, phosphorus, calcium, zinc. Phosphorus and calcium are needed to maintain normal bones and teeth. The heart needs potassium, which helps the normal functioning of the myocardium. Zinc is useful for restoring immunity. It also helps to strengthen nails and hair, maintaining their beauty.
- There is also a substance quercetin. It prevents the development of tumor diseases and is an antioxidant, that is, it fights the aging process of the body.
- Finally, onions produce chlorophyll, the beneficial properties of which are to participate in the formation of blood. Another useful function of chlorophyll is to fight against harmful bacteria.
The benefits of green onions
Growing green onions at home
Cultivation methods on the windowsill
- Hydroponics - this mysterious term is called the usual and familiar to everyone growing green onion feathers from a bulb in a container with water.
- An alternative to growing in water is planting the bulbs in a container with soil... This method is more complicated, but the harvest will turn out to be more solid and with better nutritional properties.
- A new version of the previous method, invented by resourceful housewives, is the so-called onion cactus... It is a five-liter plastic bottle in which bulbs are laid between layers of soil. Green feathers sprout from pre-drilled holes on the sides of the jar.
- Turning the windowsill into a conveyor for growing green onions will help hydroponic plant... It helps to accelerate growth, and thereby increase yields.
Sprouting onions in water
Onions in an egg tray
Rules for growing green onions in water
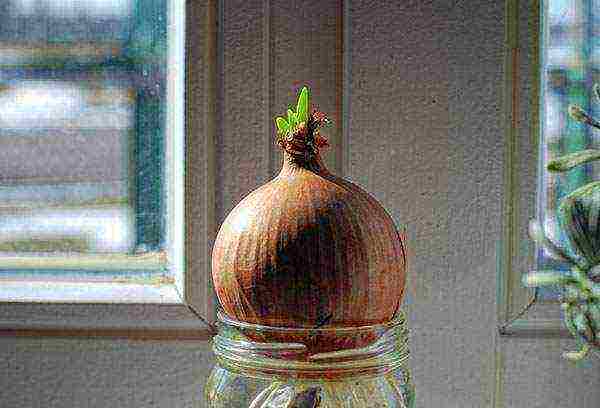
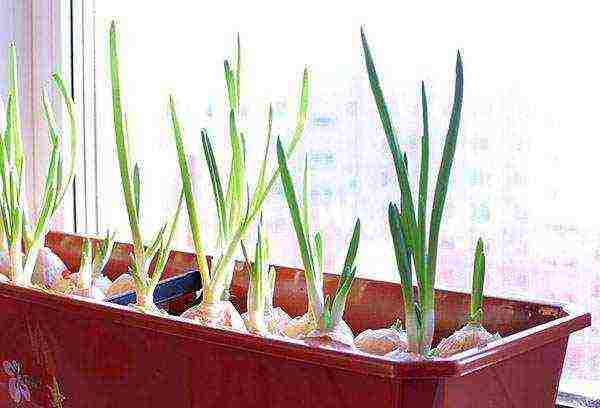
To get green onion arrows in winter, it is not at all necessary to prepare pots or boxes of soil.Most often they do it easier, using a simple jar of water as a container for the onion. In addition to the obvious advantage of the method, which is its simplicity, there is another plus - the absence of dirt on the windowsill.
Always have fresh green onions at hand
Cooking the onions
To get good arrows of green onions, you will need to select the bulbs that are not damaged. Heads that are slightly smaller than average are best, with a cross-sectional diameter of about 4 cm. The tops of the bulbs must be cut off so that they do not interfere with the young sprouts breaking through. Then the heads are placed in heated water or potassium permanganate solution. Ash can be used instead of potassium permanganate. After 20 minutes, they are transferred to cool water. Before planting the bulbs, the husks are removed from them.
Preparing the bulbs for planting
Planting Preparation - Trimming the Top
Containers for growing in water
The most suitable containers for these purposes are all kinds of cans, cups or bottles. The main requirement is a neck of sufficient width for the bulb to hold. The container is filled with water to the top so that the bottom of the bulb is slightly immersed in it (water). It is not recommended to immerse the bulb strongly in water in order to avoid rotting of the lower part. Until the roots appear, you will have to make sure that the bottom of the head touches the water, and top up if necessary.
Growing green onions on a windowsill in a juice container
For sprouting onions, not only glass containers are suitable. You can use transparent food containers. They must be covered with a piece of cardboard of sufficient density to support the weight of the bulbs. You will need to make holes for the bow heads in this cardboard. The container is also filled with water, and the bulbs are planted in the cardboard box. In this case, the same rule for shallow immersion of the bulb in water is observed as when planting in a jar.
Green onions in a plastic food container
On a note! In addition, a simple plate can also be adapted for forcing onions. Its bottom must be filled with water. The bulbs are placed tightly and vertically so that neighboring heads serve as a support for them. It is advisable not to allow the onion to sink in water by more than 25%.
When growing green onions in this way, it can take almost half a month from planting to obtaining long feathers. To speed up the process, you can add mineral fertilizing to the water.
Growing green onions in a plastic bottle
Fertilizer amount per liter of water
- Two teaspoons of a mineral complex.
- Superphosphate: 2 g, ammonium nitrate: 1.5 g, potassium chloride: 1.5 g.
- Wood ash: 5 g.
Important! Top dressing should be added when roots begin to grow and greenery sprouts.
Fertilizers are applied during watering
To get a harvest of green onions from a jar of water, it is recommended to adhere to simple principles:
- the container in which the arrows will be grown must be pre-treated with a weak composition of potassium permanganate;
- you need to moisten only the very bottom of the onion head, avoiding deep immersion in water in order to avoid decay;
- until the roots appear, it is advisable to place containers with onions for forcing greens away from heat sources;
- in the same period, the water should be renewed 2 times a day. After the arrows begin to grow, this action must be performed only once a day. If top dressing is introduced into the water, then the first should be replaced no more than 1 time in 7 days;
- it is advisable to periodically rinse the roots under running water. The container also needs to be rinsed when changing moisture;
- you can prevent onion decay if you take it out of the water from time to time and leave it in the air for 3 hours;
- in order to always have fresh onion shoots on the table, you need to put new bulbs for germination on the windowsill every 14 days.
Green onions on the windowsill - the benefits and subtleties of growing
Another way to grow in water
Rules for growing green onions in the ground
For forcing onion arrows with the placement of planting material in the ground, the following measures are required:
- selection of suitable onion heads;
- preparation of containers for growing - all kinds of containers and boxes, the height of which is more than 7 cm;
- planting onion seedlings in the soil with which the container is filled;
- installation of the container on the windowsill.
Landing in the ground
How to grow green onions on a windowsill
The method of germinating onion feathers in a container with soil differs from the uncomplicated method with planting in water.
- First you need to properly prepare the ground. A universal soil is suitable for bulbs. You can prepare a substrate from sand mixed with expanded clay or gravel. In this case, the mixture must be doused with a heated solution of potassium permanganate, and then rinsed with water.
Soil preparation
- The next step is to fill the container with soil or substrate. In the first case, it is enough to pour a 4-cm layer, and in the second, you need to leave 1 cm above the level of the substrate for water.
- Planting material is prepared in the same way as when landing in water. All husks are removed from the onion, the upper part is cut off and placed in water heated to + 40 ° C. The container with the bulbs in the water is placed on the battery or next to it so that the shoots hatch faster.
- The seedlings are set in the ground so that they touch on their sides. This allows them to be held upright by relying on their neighbors. It is not recommended to deepen the bulbs by more than a third into the ground. There should be enough room in the soil for normal root development.
- The seedlings must be kept warm for the first week after planting. It is undesirable to allow the temperature in this place to drop below + 25 ° C. When green arrows begin to appear, the bow can be placed on the windowsill.
Photo of onions on the windowsill
Lighting and temperature
Green onions love the sun's rays, but cannot stand the heat. Onion seedlings will thrive on well-lit windowsills when the windows face south, southeast or southwest.
Important! If it is not possible to put containers on the sunny side, then it is recommended to install phytolamps above them for additional light.
The success of green onion cultivation also depends on the indoor temperature. It is not recommended to place seedlings in a hot room where the air is heated above + 20 ° C.
For growing, window sills that face south, southeast or southwest are suitable.
Watering and fertilizing
For watering the bulbs, running water at room temperature is suitable. Water must first be defended. Water enough once every 48 hours to avoid flooding the roots. Excess moisture can lead to decay of the root system. Drying of the soil is also undesirable for the plant.
Onion seedlings do not need fertilization. But a little feeding can still improve the development of green shoots. To do this, the seedlings are watered with a solution of 5 g of ash per liter of water.
Growing green onions in water. How to grow onions on a windowsill
Additional recommendations
You should not rush to collect the first green shoots. Otherwise, the development of the plant may be slowed down. For the first time, it is advisable to trim onion feathers no earlier than after 3 weeks. The arrows in the middle do not need to be touched. The green onions are harvested by cutting off the side feathers.
The constant collection of green onions throughout the winter will ensure that new batches of seedlings are planted in separate containers every 2 weeks. The arrows of the onion will grow evenly if you expose each side of the container to the light in turn.
Growing onions for greens in winter at home
Step-by-step instructions for growing "onion cactus"
A new original way of forcing green onions - an invention of resourceful housewives. It allows you to free up space on the windowsill for other needs, as well as decorate the interior of the kitchen with the help of such "exotic".
You can grow a green onion for the winter table yourself in your apartment
You can not cut off the top of the bottle, then small bulbs will be needed for planting.
You will need bulbs, a 5 liter plastic bottle, a sharp hole punching tool, and all-purpose primer.
Preparing everything you need
Table. Step by step guide to planting.
|
Step 1 |
A plastic bottle and a tool for cutting circles are taken (here is a heated self-tapping screw, which must be held with pliers). |
|
Step 2 |
3-cm round holes are cut in the container. |
|
Step 3 |
The first layer of soil is poured into the container up to the holes. The bulbs are laid so that their tops go out into the holes, and the roots go deep into the jar. |
|
Step 4 |
A new layer of soil is sprinkled on top. Steps 3 and 4 are repeated until complete. |
|
Step 5 |
Several onion seedlings are planted vertically on the surface. |
The bulb arrangement should be placed on a well-lit windowsill. In order for the arrows of greenery to grow evenly, it is recommended to periodically expose different sides of the container to the sun. The rules for watering and feeding should be the same as in the general case of planting bulbs in the ground. It is only necessary to ensure that the soil does not erode.
Green onions can also be grown in water
Hydroponic plant
For those who like to feast on a green onion from the garden on the windowsill in winter, special devices have been invented. They work hydroponically.
Hydroponic bed "Onion Happiness", a device for growing green onions
The box is filled with water, the bulbs are seated on top of the holes so that their lower surface hardly comes into contact with water. A special compressor forms a moisture suspension inside the container. Thus, the likelihood of root decay is excluded. It is noticed that with this method, the arrows of the bow grow much faster.
Growing green onions is not only healthy, but also convenient.
Video - Growing green onions in a package
How great it is in summer and winter to always have fresh herbs on hand, for example, onion feathers. After all, it is so often needed for salads and pies, and it is very easy to grow it right on the windowsill. In this resource, you will find 2 step-by-step instructions on how to grow green onions at home on water or in the ground.
Method 1. How to grow onions for herbs in water
It would seem that this method of growing onions at home is so simple and known to everyone that it does not even require instructions. After all, you just need to put the head in water and wait for the harvest. However, this method has two problems - the rapid decay of the vegetable and the appearance of an unpleasant odor. To minimize these costs and speed up the growth process, we suggest growing onions using the following improved instructions.
What you need:
- Common onion from the store. Ideally, it is best to pick up an already sprouted bow with small arrows. Any medium-sized bow will do, however, as long as the head is firm and healthy.
- A glass or jar with a small neck.
- Standing water.
- Activated carbon 1-2 tablets.
Instructions:
Step 1. First of all, you need to prepare the onion for distillation. To do this, pre-peel the onion from the top layer of the husk, pierce its root cup with a skewer and cut off the top of the head by 1-1.5 cm as shown in the photo (if the onion is already sprouted, then the top does not need to be cut off).
Preparing onions for forcing on water
Step 2. Next, we need to lower the onion into a container of water just enough so that the water covers only its root cup. This is necessary in order for the onion to take root, and it will take root in a day.
Step 3. After one day, when the roots grow on the onion, you can drain a little water from the glass so that the water only covers them and does not touch the cup. This simple trick will keep the onions from rotting and smelling longer.
Step 4. It remains only to wait 2 weeks and during this time periodically change the water. Once the feathers have sprout up to about 15cm, it's time to harvest.
Sprouted onion
Tips & Tricks:
- To prevent the onion from rotting even longer, add 1-2 tablets of activated carbon to the water.
- If you want to sprout a lot of onions at home, while spending a minimum of effort, purchase the Onion Happiness hydroponic plant in the store. It works as follows: 20 heads are inserted into the wells, the container is filled with water, then the compressor creates an air-water environment. Due to the fact that the root cups almost do not come into contact with water, the bulbs do not rot, and due to the saturation of the roots with oxygen, they give 2 crops per month with a length of 30-40 cm.
- It is very convenient to germinate a dozen bulbs in an egg carton on the windowsill at once. To build such a "hydroponic installation" with your own hands, you just need to divide the container into two halves, cut holes in the cells of the upper "tier", and fill the lower "pan" with water and cut off the extra bumps from it. Then fold the two pieces on top of each other and place wooden skewers between them, as shown in the photo below.
- By the same principle, you can also grow leeks bought in a store on the windowsill with your own hands. To do this, cut off the white roots from the feathers (in the photo below), and then place them in a container of water, only 1 cm deep. Leave the roots in water for 2 weeks, changing it periodically (preferably every day). However, a week after forcing, when young shoots appear, the leek can be transplanted into the ground.
Method 2. How to grow onions for herbs in the ground
It is best to grow onions on a feather at home in the soil, and not in water. It is almost as simple, but the bulb will be able to produce at least 2 crops, stand for 1-2 months, and at the same time emit practically no smell. In addition, if you plant turnips in a pretty pot, then your mini-garden will also decorate your windowsill.
What you need:
- Priming. In winter, you can buy a suitable soil in the store (for example, it can be a mixture for cacti with a high content of sand or just a universal soil), and in summer you can take soil from the nearest land plot.
- Several small healthy bulbs, preferably not fresh, but lying down for a couple of months and sprouted. If you wish, you can grow sets on a feather, but then the feathers will have to wait longer, and you will not be able to use the sprouted set a second time. Another alternative to onions is leeks. It must first be germinated in water for 7 days (as described in the first instruction) and only then transplanted into the ground.
- Container, pot, or any other container of a suitable size.
- Standing water for irrigation.
Instructions:
Step 1. From the selected turnips, remove one layer of the upper husk, cut off 1-1.5 cm of the tops (if the bulbs are without sprouts), and then soak their root cups for a couple of hours or more in warm water so that they germinate a little. All of these techniques will speed up feather growth.
Step 2. While the bulbs are soaking, fill the soil with a depth of 4-7 cm into the container.
Step 3. Now we plant the bulbs or sets every 2 cm, but without deepening. That is, so that only the root cups of the heads come into contact with the soil. Remember that the less the bulb is in contact with the soil, the less likely it is to rot. When you have planted all the onions, pour a little warm water over the soil to keep the soil slightly moist without the onions getting wet.
- To plant a set on a feather, you need to use loose soil and plant the onions 1-2 cm deep, tightly to each other.
- To plant leeks, it must also be dug into loose soil to a depth of 2 cm.However, it will take longer to wait for the harvest - about three weeks.
Step 4. You should not immediately place the onion bed on the windowsill: it is better to put it in a dark, cool place for germination for literally a few days. If you have planted an onion that has already lain and sprouted, then this stage can be dispensed with.
Step 5. Well, that's all.Now it remains only to wait a couple of weeks, when the greens grow to 15 cm, and at this time, lightly water the garden once every 3-4 days. You need to cut off mature feathers in the middle of the bunch and not too close to the bulb, then it will have sprouts that will soon give the next harvest.
Tips & Tricks:
- To save space on the windowsill, you can create a vertical bed with your own hands. To do this, take a 5-liter plastic bottle with a stable bottom, cut off its neck, make several holes at the bottom and cut holes on the walls in a checkerboard pattern at intervals of 3-4 cm (you will get about 4 tiers). Then gradually start filling the bottle with soil.
Planting bulbs in a vertical bed from a bottle
- Once the soil reaches the first tier, place the bulbs in the holes as shown in the photo above, water the soil and repeat the above steps to fill the bottle to the very top. Place the bottle on a plate and water the soil every 4 days for 2 weeks.
- Leeks and onions can be grown in the same garden bed.
- Another secret: to always have fresh herbs in the house, grow onions in 2-3 containers, planting them every 10 days. Then you will have a "vitamin conveyor".
- To speed up the growth process and improve the taste of greens, in the evening and at night, the garden bed on the windowsill can be illuminated with a fluorescent lamp. This advice is especially relevant in winter.
- Also, for greater juiciness, you can periodically spray the feathers, but so that moisture does not get on the turnips themselves.
- In summer, make sure that the temperature in the area of the windowsill where the onion grows does not rise above 30 °. Otherwise, the feather will stop growing. To protect the crop from overheating, you can wrap the tray with foil.
(Rate the material! Already voted: Average rating: out of 5)
Hey! We started a channel on Yandex Zen to get even closer to you. Subscribe not to miss the most interesting posts! Read also:
- How to grow dill and parsley on a windowsill
- How to grow basil on a windowsill
- Indoor flowers and plants for the kitchen - choose unpretentious, useful and beautiful
- How to get rid of midges in flowers
- 8 questions and answers about honey storage
"Onion from seven ailments" - this phrase must have been heard by every person. Knowing how to grow green onions on a windowsill, you can provide households with a healthy product that is so necessary in winter. Green feathers are rich in vitamins, minerals, antioxidants, and phytoncides that can ward off colds. A home onion bed is a tempting idea.
Forcing methods
It is very easy to get a rich harvest of greenery in winter. There are two main techniques for forcing a feather:
- forcing onions in the substrate - involves planting the bulbs in the ground;
- forcing onions in water - the bottom of the onion head is placed in a container with water.
Indoor gardening lovers have improved their techniques by thinking of cultivating onions in plastic bottles and special hydroponic installations.
Advice
Get your toddler involved in green cultivation. Such an interesting activity will delight, and the harvested crop will become a source of pride for the crumbs.
Planting material
Vegetable crops are propagated by seed and vegetative methods. On the windowsill, stinging sprouts are obtained using various planting material:
- seeds (nigella);
- seeding of a large fraction (samples);
- small onion heads with a diameter of 4 cm.
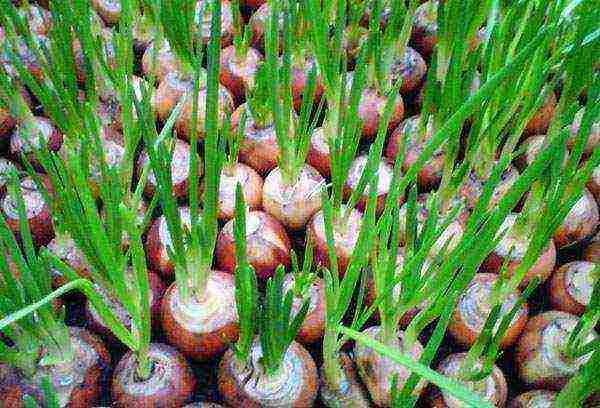
Since seedlings are usually grown from seeds and the process takes a long time, nigella is used extremely rarely for obtaining green onions. Onion sets are ideal for forcing in the substrate. Sevka bulbs are less susceptible to spoilage, and greens can be removed along with the root crop.
Small onions can be distilled in any way. With proper care, the green onion crop is produced for about two months, after which the bulb depletes and dies.
Rules for the selection and preliminary preparation of planting material:
- select heads of the same size;
- when using turnips, it is better to take material with small seedlings;
- wash the bulbs with warm water;
- remove the top layer of integumentary scales;
- conduct a thorough examination of the onions for damage, areas of decay, pest activity;
- if there are no sprouts on the turnips, cut off 1.5 cm of the crown;
- soak the planting material in a light pink solution of potassium permanganate;
- place a container with bulbs for a day in a dark corner near the heater.
This treatment will awaken the bulbs and stimulate growth. A solution of potassium permanganate will destroy pathogens, extend the useful life of the planting material.
Forcing in the substrate
To harvest healthy greens using this method, you will need:
- prepared planting material;
- container for planting;
- suitable substrate;
- drainage.
Industrial enterprises cultivate greens in greenhouses with special equipment. Such a greenhouse is equipped with ridges, lighting, irrigation systems, and heating. The task of the indoor gardener is to recreate favorable conditions for the cultivation of green onions.
You don't have to worry about heating, because the batteries are on in winter. It is important to maintain a temperature background of 15-18 ⁰C for the normal development of greenery. You don't have to worry about a room-scale irrigation system either.
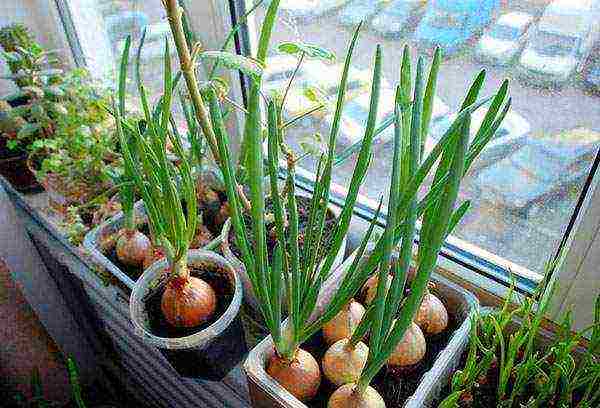
As for the selection of a container for planting a crop, here the gardener has relative freedom of choice. Onions on a feather can be grown in any container:
- a flower pot of a suitable size;
- plastic box for seedlings;
- a cut-off bottom from a plastic bottle;
- "Tetra pake" for food products - milk, juice, sour cream.
Be sure to make drainage holes to drain fluid, normal respiration of the roots. The height of the pots must be at least 10 cm.
Purchased soil, which includes vermicompost, is suitable for cultivation. You can use a sandy substrate for succulents. A mixture of fertile garden soil and sand is also suitable.
Advice
To prevent the development of pathogenic microorganisms, pour the garden soil with a hot solution of potassium permanganate or steam it.
The lack of light in winter adversely affects the quality of the product. So that the feathers do not grow too thin, they resort to additional lighting. Use a special phytolamp or cold glow illuminators (fluorescent, diode).
How to plant onions?
Instructions for planting onions and sets:
- pour drainage into the bottom of the pot with a layer of 3 cm;
- pour a layer of soil on top of the drainage, not reaching the edge of the container 3-4 cm;
- moisten the ground with warm water;
- tightly to each other set the bottom of the onions on the substrate layer. Planting material should not be pressed in, as this will slow down the growth of roots;
- add the required amount of soil - two-thirds of the head should be above the surface of the substrate;
- when planting the seed of the bulb, deepen it by 2 cm;
- water the garden bed.
Take your time to put the bow on the window. The heads need to root in order to cast feathers. Let the pot stand in a dark, warm place for several days. When green sprouts appear, it's time to move the pots under the lamp, and lower the temperature to 15-18 ⁰C.
Room garden care
The first crop of green onions can be harvested 2-3 weeks after sprouting. During this time, the shoots will stretch 15-20 cm.
Caring for a room bed does not take much time.
- Water the soil every 3-4 days, trying to avoid getting water on the heads.
- Supplement the onions so that the daylight hours are at least 15-16 hours.
- Remember that feathers feed on juicy scales, so they don't need feeding.
- Sprinkling occasionally will make the green onions juicier.
- Cut off the outermost feathers first, otherwise the forcing of new foliage will stop.
To make a vertical bed, use a 3-5 liter plastic bottle. Cut off the top of the bottle. Cut out circles in the sides of such a diameter that a third of the head sticks out of them when planting.Cut the holes in tiers at a distance of 4-5 cm from each other.
For planting, fill in the drainage, and on top of it - a layer of soil. The soil should reach the bottom edge of the tier from the circles. Arrange the onions in a circle, pushing the tops of the tops into the holes. Fill in a layer of substrate up to the edge of the next tier. Fill the container layer by layer. This design will save space on the windowsill.
Advice
To get a real conveyor, form a new bed every week and a half.

Distillation in water
To grow feathers in this way, it is enough to place the prepared planting material in the bottom of the water. Do not completely dip the entire head, otherwise it will certainly rot from excess moisture.
Suitable containers for distillation:
- Plastic container;
- baby food jars;
- glass beaker.
Use only settled water, and the addition of an activated carbon tablet will help to avoid deterioration of the liquid. Growing and harvesting rules apply to this forcing method as well. Only instead of watering, the liquid level should be replenished.
Advice
If the onion falls through, cut a circle out of cardboard with a hole for the bottom, and place it on the neck of the container.
A home hydroponic plant can help prevent liquid deterioration and oxygenate the roots. It can be built using a plastic egg container.
- Divide the container into two halves.
- Cut holes about the size of the onion base at the bottom of the container.
- Place the turnips in the egg trays.
- Fill the top of the container with water.
- Place the pieces on top of each other using wooden skewers.
- Insert the hose from the aquarium compressor into a container with water.
Turn on the compressor periodically, add water if necessary.
Whichever method you choose to get a green feather on the windowsill, we wish you a rich harvest!

When snow is falling outside the window and fluffy snowdrifts lie, it is so nice to see fresh greens on the table! In addition, in winter, natural vitamins are especially needed by our body. And the first helper in the fight against colds or flu is green onions. Phytoncides secreted by onions disinfect the room, destroying bacteria, viruses and fungi.
Smart solutions
Its healing properties help to cope with vitamin deficiency and spring fatigue, increase immunity and improve digestion. Green onion feathers will not only serve as a bright decoration for dishes, but will also have a beneficial effect on the body.
Although green onions can be bought in the supermarket both winter and summer, they are not comparable to those grown on your own windowsill. Firstly, by planting green onions at home, you can pick the required number of feathers for cooking at any time, and secondly, you will be sure that the greens were grown without the use of any harmful substances and chemicals.

By planting green onions at home, you can pluck the required number of feathers at any time for cooking.
Growing onions at home may seem affordable to any child - stuck a bulb in the ground in a flower pot and watch how green feathers appear. However, if you decide to get serious about the matter and eventually collect a rich harvest of not only greens, but also the bulbs themselves, you will need to take into account a number of basic rules and nuances.
Video about growing green onions at home
Instructions on how to grow green onions at home
In winter, you can achieve greenery from the bulbs by forcing them onto a feather, that is, by germinating the root crops themselves. For this, onions are usually used, which you grew in your garden or bought in the store. Multi-primordial varieties are optimal (Timiryazevsky, Spassky, Strigunovsky, Arzamassky, Pograsky, Soyuz). The bulbs should be approximately the same diameter - about 2 cm, not damaged or diseased.
Place the calibrated bulbs in a container with hot water (+40 degrees) and put them on the central heating battery for a day.After soaking, a layer of brown husk can be removed to ensure the quality of the selected root crops and to remove the damaged layer, if any. Before planting, the top of the bulbs is cut off by one and a half centimeters.

In winter, you can get greenery from the bulbs by forcing on a feather.
Prepare the soil in the container
To sprout onions at home, you can use any boxes, bowls, containers or pallets with a depth of 7 cm or more.It is best to prepare two containers so that you can grow green onions in a conveyor way - then you do not have to wait for the next portion of onion feathers to sprout.
As a soil, you can use land or substrate: fine expanded clay, fine gravel, sand. The substrate should be pre-washed with a hot concentrated solution of potassium permanganate and running water. Fill the boxes with soil 3-4 cm, if you chose a substrate, fill it with water so that it covers the surface by 1 cm. Dip the prepared bulbs into the ground every two centimeters, keeping them upright. It is not necessary to deepen the onion too much, only the roots should be in the water, otherwise the bulbs will rot.
Further care of greens 
Water the planted bulbs every other day with warm water
The container is placed in a warm place for a week, where the temperature does not drop below +25 degrees. When feathers 1-2 cm high appear on the bulbs, you should transfer the box to the windowsill. Windows that face southwest, south and southeast are ideal. If there is not enough sunlight, you can additionally illuminate the containers with fluorescent lamps. Only in the presence of sufficient light will green onion feathers accumulate useful substances and acquire a rich taste.
Water the planted bulbs every other day with warm water. Make sure that the water is constantly at a level just below the surface of the substrate, and the soil does not dry out.
The first green feathers should not be cut, otherwise further growth of greenery will stop. Cutting is done three weeks after planting the onion, and it is better to cut off the outermost feathers first, since the feather grows from the middle. In order for the greens to grow continuously, the interval between planting in different boxes should be 10-12 days.
Video about growing green onions
Growing green onions in water
There is another popular way to grow onions at home without using potting soil. The bulbs are processed as described above and stacked tightly in an upright position on a shallow tray. Water is poured into the pan so that it covers the bulbs by a quarter. As the water level decreases, you will need to refill it. In about two weeks you will have fresh green feathers ready to eat.
The greens do not need additional feeding, since it takes all the nutrients during growth from the bulbs. But to accelerate the regrowth of feathers, you can add water with wood ash dissolved in it (10 liters 50 g).
Rate the article:
(5 votes, average: 3.2 out of 5)