Content
- 1 Technology features
- 2 Variety selection
- 3 Optimal conditions
- 4 Preparatory work
- 5 Planting potatoes using the Dutch method
- 6 Care and harvesting technique
- 7 What is the essence of Dutch potato growing technology
- 8 Suitable varieties for cultivation
- 9 Growing technique in the garden
- 10 Potatoes at home
- 11 What is the reason for the high yield when using the Dutch growing method?
- 12 The specifics of planting and growing potatoes using Dutch technology: advantages and disadvantages of the method
- 13 Dutch potato growing technology: rules, recommendations and instructions
- 14 Caring for potatoes after planting
- 15 Diseases and pests
- 16 Harvesting
- 17 Growing potatoes using Dutch technology
- 18 Technology detail
Foreword
For those who like to experiment on their beds, we propose to learn a new way of growing our favorite potatoes, discuss planting them using Dutch technology. What is the essence of this method, and is it really as effective as agronomists assure? Let's figure it out!
Technology features
The main feature of Dutch technology is the sufficient supply of oxygen and moisture to the plant, that is, the main emphasis is on soil aeration. However, you should not think that only by thoroughly loosening the soil, you will get an excellent result - the Dutch technique is a combination of a number of operations and conditions performed in a strictly specified time frame. And if at least one of the requirements is not satisfied, then all the work is in vain.

So, the variety of potatoes plays a huge role. Do you want to collect more than 250 kg per one hundred square meters? Do not skimp on planting material, buy only a good product of the first or second reproduction. Monitor the quality of the soil and take all the necessary measures to improve it, prevent various diseases and control pests. In addition, this tuberous plant can be planted in the same place only once every three, and preferably in four years. At the same time, the rest of the time it is most advisable to use the site for grain crops, but if you sow it with pumpkin, then do not count on a good collection of potatoes.

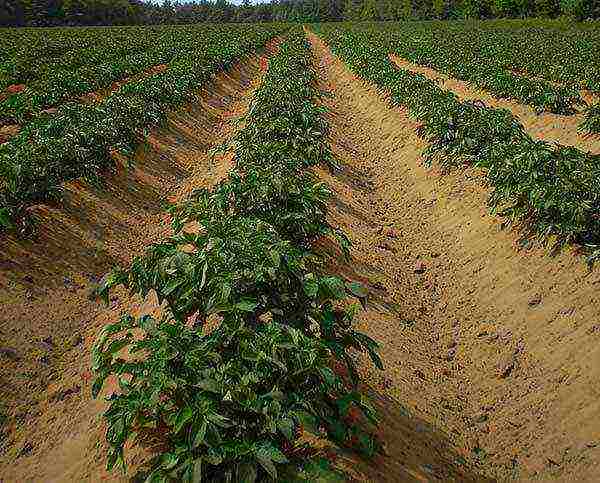
In order for the aeration process to take place sufficiently, the rows should be spaced from each other at a distance of at least 70 cm.With us, quite often, for the sake of saving space, this parameter is not kept, but with this method of sowing the material for planting is consumed more, and the yield is weaker, yes and the quality of the product is worse. Only if all the conditions of the Dutch technology are met, up to 2 kg of crop can be harvested from one bush.
Variety selection
Now let's say a few words about choosing the right potatoes for planting using Dutch technology. Of course, it is better to give preference to the varieties least prone to various diseases.And in order to prevent the weather, which is not controlled by us, a hindrance, several types of different ripening periods should be planted. The Mona Lisa variety has excellent resistance to viral diseases, in addition, if you carry out all the measures for feeding the soil with nitrogen fertilizers, then a yield of more than 2 kg is guaranteed.

Also worth noting are the early varieties of Jarla, Cleopatra and Prior. The first is not whimsical also to the quality of the soil, so that it can be grown in almost any area. After planting Cleopatra, make sure that she is not struck by scab, this species is not resistant to such a disease. Eba and Frisia are mid-late. Both varieties are distinguished by excellent immunity to viral diseases. But farmers who prefer the Asterix variety can boast of an excellent harvest with a long shelf life.

Optimal conditions
So, it is not recommended to start planting before the temperature outside the window reaches + 8 ° C, while it is also advisable to wait one to two weeks after reaching such a mark on the thermometer. If you listen to folk signs, then wait for the first greenery to appear on the birch, this is a sure sign that the earth has warmed up enough. But you should also not sit too long, there is another way to determine if the land is ready for planting potatoes. A handful of soil is taken and clenched tightly in a fist, and then thrown from a height of one meter (approximately from the level of the belt). If the earth crumbled from the impact, then it is quite mature, and the time for planting has come.

Another condition for a good harvest is adherence to feeding technology. It is not recommended to lay fertilizers below the level at which the planting tuber will be located. Since in this case the plant will not be able to receive the necessary nutrients immediately, but only after good rooting, and this is a wasted time and money, because the minerals will not be absorbed in full.

It will also have a beneficial effect on the cultivation of potatoes according to Dutch technology when an infertile layer of soil is just below the level of the tubers at the time of planting. In this case, the tubers will grow on the formed ridge, which means they will receive the required amount of oxygen. This will be facilitated by the fact that initially the planting material is buried shallowly, at a distance of only 6-8 centimeters from the ground surface to improve aeration.
Preparatory work
So, deciding to use the Dutch method of planting potatoes, you should prepare both the seed and the soil. Only high quality and healthy tubers 5–6 cm in diameter are selected. This size is considered optimal, since a larger potato is already a commercial one and it is impractical to use it for planting, and a small one will not be able to receive the required amount of nutrients in the first growing season, so its development will be somewhat delayed. Before burying the tubers in the ground, it is necessary that sprouts appear on them. Optimum conditions should be created; this will require a bright room. First, we warm up the room to +18 ° С, then wait until the eyes begin to germinate, after which we lower the temperature to +8 ° С.

The material, ready for planting, should have strong two-centimeter sprouts. If they are long, then planting the potatoes carefully and not breaking them is unlikely to succeed.
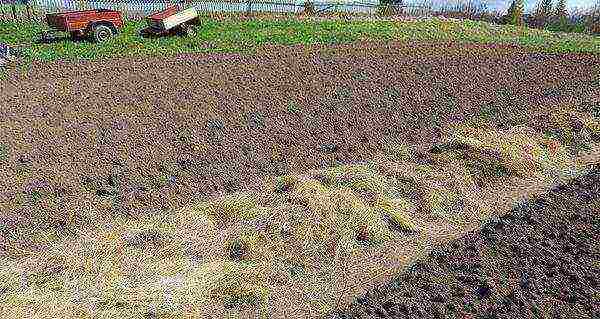
Within the framework of the Dutch technology, quite serious requirements are also imposed on the land plot. It must be smoothly planned and without slopes, otherwise the ridges will collapse. In addition, the soil should be well-loosened, only in this case the optimal amount of oxygen will be available to the plant's root system. Therefore, preparatory work should begin in the fall, having dug up the entire site, but in the spring the land is cultivated.

If we are talking about a large amount of work, then you cannot do without special equipment, but ordinary pitchforks are quite suitable for a home garden. It is necessary to plow to a depth of at least 30 cm; in parallel, mineral and organic substances are introduced. One hundred square meters account for five kilograms of nitrogen fertilizers, the same amount of superphosphate and 2 kg of potassium chloride. In addition, the topsoil should be 2% humus.
Planting potatoes using the Dutch method
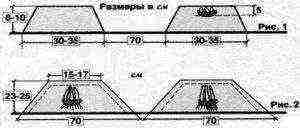
Dutch technology techniques are quite simple. So, it is necessary to dig 6-8 cm deep beds from north to south. The distance between the rows is maintained from 70 to 90 cm, and the tubers are located after 30 cm. As a result, from 500 to 1000 plant units are placed on one hundred square meters, with each of they will receive a sufficient amount of light and the earth will dry out quickly after rain.

A little ash is pre-poured into each hole and the planting material is placed on top, sprout up. If the potatoes are too small, then they are used whole, and the larger ones are cut. By adding onion peel to the hole, you will protect the plant from slugs. There is no need to immediately form ridges, the first two weeks the potatoes are covered with an even layer of earth.

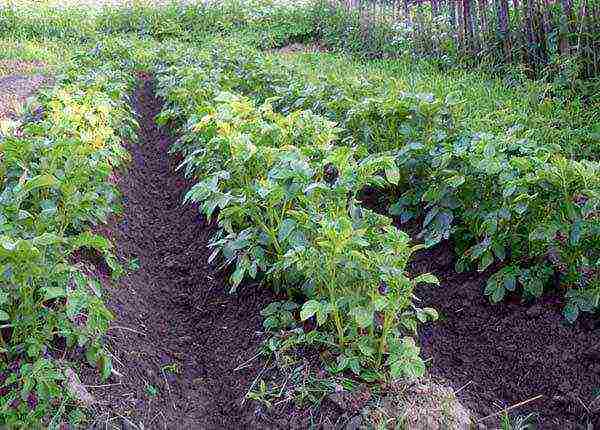
As soon as sprouts appear, the first hilling is carried out. The height of the mound is about 10 cm and the width is 30 cm, under such a ridge, optimal conditions are created for the development of this culture. The soil allows air to flow well to the root system, which activates all biological processes. After about 14 days, they huddle again, and the height of the ridges doubles, and the width at the base reaches half a meter. At the same time, it is necessary to carry out active weed control.
Care and harvesting technique
The role of watering cannot be underestimated and it must be carried out at least four times per season, while it is necessary to moisten the soil immediately before flowering and two weeks after. During this period, tubers are formed, and they need a lot of moisture to gain mass. Sometimes, after a heavy downpour, a crust appears on the soil surface, swimming occurs, which should be eliminated. This is done very carefully so as not to damage the plant. So, if the sprouts are about to appear outward, you must first loosen the tops, and then carefully move the rake from the base to the top. During hilling, both the aisles and the ridge itself are processed, but just as carefully, otherwise its configuration can be damaged.

In addition, the Dutch method of planting varietal potatoes also implies the implementation of complex measures aimed at combating diseases and pests. But do not wait until they damage the plant, it is sprayed with chemicals in advance, for example, a few days before flowering. You should also carry out the prevention of phytophthora. If the disease struck a resident of the garden, then it must be urgently removed in order to avoid an epidemic. It is advisable to carry out regular feeding with mullein or chicken droppings, as well as mulching.
Let's move on to harvesting. Sowing and food material is taken out of the soil at different times. So, for the first, July is considered the optimal time, for the second, the end of August or, in general, the beginning of September is more suitable. Previously, in two weeks, the entire ground part of the plant is removed, and then the fruits are dug up. Why take off the tops, wouldn't it be a waste of time? Not at all! Firstly, this way, various pathogenic microbes carried by small pests like aphids will not transfer to the tubers. Secondly, the ripening process is significantly accelerated and a dense skin is formed that protects the potatoes from mechanical damage.

The most suitable period for removing the tops of seed is considered to be the time when the latter has reached a size of 30-50 mm in diameter.If you are growing a food product, you should wait until the stems begin to turn black, and only then remove them. Of course, if we are talking about farmland, then all operations are carried out using special equipment, in a small garden of a summer cottage it is wiser to use a manual method. So, for example, the aerial part of the plant is simply mowed or cut with a knife.
Rate the article:
(1 vote, average: 5 out of 5)
It is difficult to find a gardener in Russia who would not grow potatoes, but not everyone can boast of consistently high yields. This culture is absolutely rightly considered relatively unpretentious, but simply throwing tubers into the ground and forgetting about them until autumn is fundamentally the wrong approach. The Dutch technology for growing potatoes, which until recently was considered suitable exclusively for large farms, is now being successfully mastered by amateur gardeners. With strict adherence to the recommendations, you can get more tubers from a smaller garden bed. Thus, space is saved on the site, and this is always true for the owners of standard "six acres".
What is the essence of Dutch potato growing technology
Growing potatoes using Dutch technology will take a lot of time and effort from the gardener. This applies to both pre-planting preparation and crop care during the growing season. The main thing that needs to be done is to create optimal conditions for the development of the root system. Strong, healthy roots provide the plant with enough nutrition to form more large tubers. If done correctly, 420-450 kg per 100 m² is quite possible. A typical harvest when the summer is warm and sunny is about 200–250 kg per 100 m².
When grown according to Dutch technology, the yield of potatoes increases by 2-2.5 times
It is impossible to achieve success if you practice potatoes from time to time. The essence of the method is the exact execution of certain actions in a clearly defined time frame. Recommended agrotechnical measures harmoniously complement each other, and a yield of 2–2.5 kg per bush is possible only with an integrated approach.
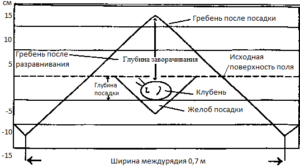
The main feature of the Dutch technology is the gradual formation of high ridges, in contrast to traditional ridges at ground level with holes in them. Potatoes buried by 10 cm or more are "squeezed" by the weight of the soil, they are not able to develop normally due to a lack of oxygen, heat and sunlight. If there are heavy rains, water stagnates in the substrate for a long time, it turns sour, which may well provoke the rapid development of rot.
High ridges ensure proper aeration of the root system and prevent acidification of the substrate if the summer is rainy
Tubers are planted in furrows with a maximum depth of 2–3 cm, sprinkled on top with a layer of light fertile soil, rotted compost or humus of the same thickness. As the plant develops, the height of the ridge is gradually increased to ensure proper aeration and eliminate moisture stagnation.
The fundamental principles on which the method is based:
- The use of exclusively high quality planting material. Only tubers of the first or second reproduction ("elite" and "superelite") from reputable suppliers are suitable.
- Compliance with crop rotation. Growing potatoes on one bed for no more than three years. Mandatory use of green manure plants, including those planted before winter.
- Annual application of fertilizers to the garden. Potatoes need much more phosphorus and potassium than nitrogen. Another very important trace element for him is magnesium.
- Compulsory fight against diseases and pests through the use of insecticides and preparations of biological origin.
- Exact adherence to the timing of a particular procedure, strict adherence to the established technology.
Suitable varieties for cultivation
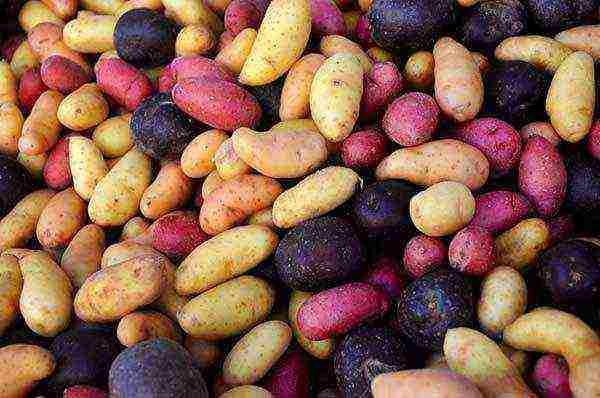
The technology is best suited for the Dutch potato varieties, which are deservedly popular not only in their homeland, but throughout the world. Amateur gardeners and professional farmers appreciate them for their high yield, the presence of "innate" immunity to many diseases dangerous to the culture, the ability to adapt to not always favorable climatic and weather conditions. However, they are not genetically modified. Problems with the purchase of planting material in Russia have not arisen for a long time. Elite and super elite mini-tubers can be found in any specialty store.
Among the varieties that have successfully adapted to the Russian climate, the following are the most popular among domestic gardeners:
- Santa. Oval tubers with a yellowish-beige skin and butter-colored pulp. The variety is resistant to viral diseases.
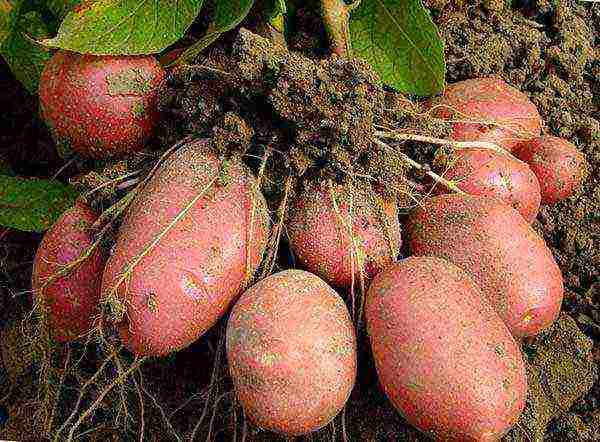
- Red Scarlett. Not picky about the quality of the soil. The tubers are one-dimensional, with bright red skin and yellowish flesh. Insensitive to mechanical damage. One of the most successful achievements of Dutch breeders.
- Romano. Large potatoes with bright crimson skin and almost white flesh. Differs in excellent taste. Not affected by late blight.
- Mona Lisa. Even against the background of other Dutch varieties, it stands out for its yield. Tubers are elongated, one-dimensional. The only drawback is low resistance to late blight.
- Cleopatra. One-dimensional tubers of regular shape with reddish-pink skin and pale yellow flesh. Differs in good keeping quality, which is, in principle, atypical for early varieties.
- Asterix. Strongly elongated tubers with pinkish skin and bright yellow flesh. Little dependent on the vagaries of the weather,
- Eba. A medium late variety, however excellent for Dutch cultivation. The flesh and skin are bright yellow.
- Ukama. One of the ultra-early varieties, tubers ripen less than two months after germination. The skin is creamy, the flesh is pale yellow. Poorly tolerates heat and drought.
- Latona. One of the best varieties of potatoes with yellow skin. Tubers are large and round. Does not suffer from heat, scarcity or abundance of rainfall. Differs in excellent keeping quality and transportability.
- Condor. Medium early grade. The tubers are large, elongated. The skin is red, rather rough. Produces high yields regardless of soil quality.
Photo gallery: popular varieties of Dutch potatoes in Russia
Most of the listed varieties are classified as early maturing. This significantly reduces the risk of crop-hazardous diseases and pest attacks. Some of them simply do not have time to go through a full life cycle before the harvest is ripe.
You can simultaneously grow on the site and several varieties of different ripening periods. This will allow you to maximize the productive period, feasting on fresh potatoes for a couple of months.
Growing technique in the garden
Growing potatoes using Dutch technology begins with a careful selection of planting material. The tubers should be one-dimensional, regular in shape, weighing about 50 g. The average diameter of such a potato is 3–5 cm. They are germinated for 4–6 weeks in a dark place at a temperature of 16–18 ° C, scattered in one layer on newspapers or on a cloth spread on the floor. The sprouts of tubers ready for planting are 5–8 mm long, and there should be at least five of them. Those that are longer than 2 cm will simply break when planted.
Mini-potato tubers should be purchased in specialized stores or nurseries, and not at agricultural fairs and, moreover, not from hands
The garden bed is also being prepared in advance, since the previous fall. The soil is plowed, at the same time fertilizers are applied to the soil.For each m² - 15–20 liters of humus or rotted manure, 20 g of potassium sulfate and 50 g of simple superphosphate. The site is sown with rapeseed, alfalfa, mustard, and other green manure.
Mustard is one of the most common green manure
In early spring, the bed is plowed again, adding nitrogen-containing fertilizers (urea, ammonium sulfate) - 45-50 g / m². After that, they do not cover it so that the soil warms up faster. Professional farmers use special multifunctional cultivators or cultivator cutters to prepare the beds; in a private garden plot, it is quite possible to do with ordinary pitchforks. You just need to choose the right tool. The optimum thickness of the teeth is 5–6 mm, the distance between them is 3–3.5 cm.
The potato bed must be fertilized and dug twice
When choosing a place for a garden, keep in mind that the site should be flat, potatoes, like most garden crops, love warmth and sunlight. The soil is desirable fertile (with a humus content of 3-4% or more), but loose, however, subject to proper fertilization, Dutch varieties bring a bountiful harvest in almost any substrate, with the exception of an outright swamp. Find out the acidity level of the soil in advance. Potatoes categorically do not tolerate acidic soil. The indicators can be brought to neutral by adding dolomite flour (350-400 g / m²) during the digging of the beds.
Dolomite flour is a good deoxidizing agent that allows you to bring the acidity of the soil to neutral, an alternative to it is sifted wood ash or powdered eggshell
Often, Russian gardeners strive to plant potatoes before everyone else in order to quickly harvest. At the same time, they completely forget that this is originally a South American culture, which means it is a thermophilic culture. Tubers are planted only when the soil warms up to at least 8–10 ° C. It is quite possible to be guided by time-tested folk omens - dandelions and bird cherry blossoms that have begun to bloom, leaves on birch trees. Another way to test is to take a handful of soil, squeeze lightly and drop it on the ground. If it crumbles, and does not remain in the form of a lump, the soil is ready.
It is advisable to hold the tubers intended for planting in the autumn for several days in the sun, the green skin contains a poisonous substance (solanine), which will protect them from diseases and pests after planting
At this point, it is worth guessing the end of the pre-planting potato preparation period. The gap between these two treatments will help "dry out" the sprouted tubers and increase the time to germination. A handful of sifted wood ash, a little onion husks or crushed eggshells are placed in each prepared hole (if you have doubts about your own eye gauge, it is better to mark the bed in advance). The first is a natural source of potassium and phosphorus, the rest effectively repels many pests. Tubers are placed in the hole, sprouts up.
Potatoes planted according to the Dutch method must have sufficient feeding area. Leave at least 70 cm between the rows (preferably 80–85 cm), between adjacent tubers - at least 30 cm. Furrows are located in a north-south direction. It seems that on such beds a lot of space is simply empty, but this is more than pays off with a higher yield. In addition, it is much easier to care for plantings, it is easier to deal with pests. On an area of 100 m², an average of 500-1000 tubers are planted. The specific number of them depends on how powerful and spreading the bushes are in a given variety. There are about 30 stems per 1 m², respectively, it is 5-6 bushes.
Planting potatoes using Dutch technology requires careful adherence to the scheme
The first shoots that appear are immediately huddled. Typically, the germination process for potatoes takes 2–2.5 weeks. They are covered with a layer of earth 10–12 cm thick and 30–35 cm wide. Pre-weed the garden bed.The combs are refreshed several times, after about a month their height should reach 25–30 cm, and their width should be 65–70 cm.
According to Dutch technology, potatoes are spud immediately after the first shoots appear.
Further weeding by technology is not expected, therefore, special preparations are used to control weeds - hebricides (Titus, Zellek Super, Centurion, Lazurit). Any of these are poisonous, so it's worth taking care of yourself by thinking about suitable clothing and personal protective equipment in advance. In small areas, you can get by with mulch in the aisles (peat chips, humus, freshly cut grass).
Mulch helps save weeding time and retains moisture in the soil
Late blight poses a particular danger to many varieties of Dutch potatoes. To combat a pathogenic fungus, it is advisable to use only insecticides or preparations of biological origin. Folk remedies are ineffective even as a prophylaxis. In total, no more than 5-6 treatments are carried out per season, the last one - no later than 20 days before the expected harvest. The pathogenic fungus does not tolerate copper compounds, therefore, a 2% solution of Bordeaux liquid or copper sulfate is used to spray the bushes, as well as the preparations HOM, Kuprozan, Oleocobrite, Abiga-Peak, Skor, Topaz, Horus.
Late blight is a dangerous disease that affects both the tops and tubers of potatoes, it can also develop during storage
Do not forget about the fight against such a common pest as the Colorado potato beetle. The first treatment is carried out before the flowering of potato bushes. Then it is repeated 3-4 times with an interval of 10-12 days. Suitable drugs Corado, Tanrek, Prestige, Bazudin, Boverin, Aktara, Mospilan, Bankol, Zhukoed. It is advisable to use a new remedy every time - pests quickly develop immunity. In this case, flowering bushes should not be sprayed with pesticides.
Colorado potato beetle - a pest familiar to any gardener, very dangerous for potatoes
Usually potatoes, including Dutch ones, have enough natural precipitation. But still, during the summer it needs to be watered at least three times - before the buds bloom, 8-10 days after the end of flowering, and after another 3 weeks. At the same time, high ridges effectively drain excess water, if the summer is rainy, it simply flows down the "slopes". The culture does not like stagnation of moisture at the roots. Accurate adherence to Dutch technology assumes the presence of a drip irrigation system. At the same time, the soil is saturated with moisture evenly, the ridges do not lose their shape. The substrate should get wet to the base of the ridge, but at the same time the water flowing from it is already too much.
Drip irrigation allows you to uniformly saturate the soil with moisture, but at the same time not oversaturate it, turning it into a swamp
It is very important to remove the potatoes on time. Tubers left in the garden for a long time lose their taste, their keeping quality is sharply reduced. In this case, seed potatoes are dug up 3–3.5 weeks earlier than the one intended for eating. For most Dutch varieties, the optimal time is the beginning and end of August, respectively.
Spreading ridges will need to be refreshed several times during the season.
7-10 days before harvesting, the tops must be mowed, leaving only bare "hemp" 5-7 cm high. This procedure promotes the ripening of tubers, their skin will thicken and become more reliable protection against diseases and pests. All plant debris is immediately removed from the garden and burned. This is an effective measure for the prevention of late blight, which may well spread from infected foliage to still healthy tubers. An alternative to the mowing procedure is the use of special preparations that dry the tops (Basta, Reglon Super), but this method is very rarely used in small garden plots.
The tops mowed in time prevents the possible development of late blight of tubers
It is important to store the harvested potatoes in optimal conditions. He needs a temperature at the level of 2-4 ° C and humidity not higher than 65-70%. The room should be dark and well ventilated. The best packaging is cardboard boxes or wooden crates. A layer of hygroscopic material (sand, sawdust, straw, scraps of newsprint) must be poured onto the bottom. It needs to be changed about once a month. Layers of potatoes are poured in the same way.
The best place to store potatoes in winter is a basement or cellar
The storage is disinfected in advance by wiping all horizontal surfaces with a slaked lime solution. Or you can simply burn a small piece of a sulfur checker in a cellar or basement.
Tubers intended for storage are dried in the open air during the day, but not in direct sunlight. Then the potatoes are cleaned of adhering soil. It is advisable to select tubers that do not have the slightest mechanical damage, but among the Dutch varieties there are also those that can be stored with "injuries" on the skin.
All the efforts spent on growing potatoes using Dutch technology are more than compensated for by the abundance of the crop.
Potatoes very poorly tolerate the neighborhood with other vegetables and fruits. The exception is beets, which absorb moisture well. A layer of root vegetables can be poured on top of the tubers to protect them from possible high humidity.
Video: how to properly store potatoes
Not all gardeners can fully comply with the Dutch cultivation technology. In small household plots, it is quite difficult to observe crop rotation. Also, certain difficulties are observed with maintaining the optimal distance between bushes and between planting rows. There is also a real risk of acquiring low-quality planting material. Few of the gardeners are able to "by eye" distinguish elite tubers from ordinary small potatoes.
Video: growing potatoes according to European standards
Potatoes at home
Not all Russians can boast of the presence of garden plots. Some of those who are unlucky are not ready to put up with this situation and successfully grow various crops, including potatoes, at home. The fundamental principles of the Dutch method can be applied here as well. Its main goal is to increase yields, and with a shortage of space, this is especially important.
It is quite possible to grow potatoes at home, tubers that ripen at an inopportune time seem especially tasty
Homemade potatoes are most often grown on a closed balcony or loggia. And if there is also heating, you cannot wish for the best. When space permits, you can place boxes in the apartment, for example, by hiding them under the bed or "disguising" as a chair or other interior items. An alternative to boxes is bags or buckets.
It should be borne in mind that in warmth and in the light, tubers germinate quickly. Therefore, they need to be buried deeper into the soil, which should not be too light and loose. The optimum depth of the container is about 25 cm.
Potatoes intended for planting are placed in layers with approximately equal intervals between them. The lowest one is at a distance of 6–7 cm from the bottom of the box. Thus, you get three layers at a depth of 6–7 cm, 12–13 cm and 18–19 cm. Rotted compost or fertile turf rich in humus is suitable as a substrate. At the bottom, a drainage layer 2-3 cm thick is required. Tubers must first germinate, as described above. If there is a shortage of planting material, it is permissible to cut them, but so that each part has at least 2-3 "eyes".
Potatoes on the balcony are grown by planting tubers in layers, this saves space
Optimal conditions for potatoes grown at home are temperature 25–32 ° C and humidity 65–75%. Planting is watered no more than once every 12-15 days and moderately enough so as not to provoke the development of rot.
Most often, potatoes are grown at home in boxes, but this is by no means the only option.
The crop is harvested about five months after the tubers are planted. If, as provided by Dutch technology, the planting material was of high quality, the potatoes are arranged so tightly that they resemble a mosaic laid out by a human hand. This is due to the fact that the lack of air and heat stimulate intensive division of tubers. By weight, they are about 1.5 times less than those that would have matured in the garden, but the taste does not suffer at all.
Ripe potatoes, when grown in a confined space, are very dense
In the process of growth, potato bushes must be fed, once every 7-10 days, watering with a solution of any liquid complex mineral fertilizer. If you do everything right, you get 1.5-2 kg of potatoes from a bush on the balcony - not much less than in the open field.
Video: growing potatoes at home
What is the reason for the high yield when using the Dutch cultivation method
Regularly obtaining bountiful potato yields, promised when growing crops according to Dutch technology, is based on a careful study of all the requirements "imposed" on them for the environment and meeting them as much as possible.
Any plants love loose fertile soil. Potatoes are no exception. Not everyone can boast of a garden plot with black soil, therefore, for most gardeners, fertilization and deep digging of the soil are mandatory procedures. The oxygenated soil accelerates the emergence of seedlings. The area chosen for the bed must be even - moisture on the slopes is distributed unevenly. Both an excess of water and its deficiency are harmful for potatoes.
Regular crop rotation prevents the spores of pathogenic fungi, viruses, bacteria, larvae and insect eggs from accumulating in the soil. Any diseases negatively affect the yield. In addition, the soil inevitably depletes over time, therefore, it is imperative to sow green manure, which improves the quality of the soil, saturating it with nitrogen and other necessary macroelements without the use of chemicals.
The quality of the planting material is a critical issue. Healthy varietal tubers fully pay off the costs of them with one hundred percent germination, high yield and excellent quality of harvested potatoes.
Sufficient feeding area is provided for each tuber planted. A developed root system can "feed" a greater number of large numbers of tubers. It is also easier to care for such plantings. Gradually formed high ridges do not allow the tubers to rot, the loose soil ensures proper aeration.
Video: growing potatoes using Dutch technology on an industrial scale
The essence of growing potatoes using Dutch technology is to create optimal conditions for the development of the potato root system. In this case, the tubers receive more nutrition, their number increases, and the quality improves. With strict adherence to all recommendations, it is quite possible to remove 1.5-2 times more potatoes from the same garden bed area than using the conventional growing method, that is, caring for the crop on a residual basis.
27 years old, higher legal education, broad outlook and interest in a variety of topics. Rate the article:
(0 votes, average: 0 out of 5)
The potato is an undemanding plant that produces stable yields of quality tubers. But with improper planting, ignorance of the features, the yield is sharply reduced. Recently, the Dutch method of growing potatoes has become very popular.Basically, table varieties are planted for this purpose. With this method, optimal conditions are created for the roots of the plant, and as a result, an intensive formation of tubers occurs in comparison with the conventional method. Mostly it is used on farms, but it is a versatile technology, and for this reason it can be successfully used in ordinary summer cottages.

The specifics of planting and growing potatoes using Dutch technology: advantages and disadvantages of the method
In short, the main principle of the Dutch method of growing potatoes is to abandon holes and beds altogether, instead of them they make long furrows in which the prepared tubers are planted.

The positive aspects of growing potatoes using Dutch technology include the following points:
- The tubers are placed no deeper than 10 cm from the soil surface, which allows oxygen to penetrate unhindered to the roots.
- Moisture does not accumulate in the furrows, which prevents root rot.
- All bushes are well lit by the sun, this allows the potatoes to form a good harvest.
These advantages make it possible to collect about 1.5-2 kg of potatoes from each bush. But keep in mind that such a result will be only if all the recommendations are fulfilled, which complement each other and do not act independently. High yields are achieved thanks to efficient technologies. Most of the Dutch varieties are mid-early to mid-season, they develop quickly and form a harvest early. Less commonly, late varieties are planted using this method.
Dutch potato growing technology: rules, recommendations and instructions
The peculiarity of the Dutch potato varieties is the correct shape, small eyes, an attractive appearance of the tubers. However, the tops of Dutch varieties are often affected by late blight, for this reason, plants need fungicide treatments during growth. Most of these varieties are good at resisting scab and other potato infections.
Soil and bed preparation
Growing tubers using Dutch technology begins with choosing a place and preparing the soil on the site. The bed should be located on level ground, without the slightest tilt. You should not choose a place in the lowlands where melt and rainwater collects. You need the sun to illuminate the potato bushes all day. It is important that the area with potatoes is not located where the wind often blows, which quickly dries the beds. The soil should be water-permeable, contain a lot of air, light and fertile.
Important! It is good to place the potato beds where cereals, beans or peas previously grew.
It is necessary to prepare the soil for the potatoes in advance, mark the beds and dig up the ground. Preparation begins in the fall, dig up the site to a depth of about 25 cm, add organic matter (mullein) and add 500 gr. superphosphate and 200 gr. potassium sulfate for every hundred square meters.
With the onset of spring, the site is fed with 500 grams of urea. per one hundred square meters and processed with a cultivator cutter or in suburban conditions loosened with a pitchfork to a depth of no more than 15 cm. This allows you to preserve air chambers in deep soil layers through which air will circulate and water will flow to the roots.
Preparation of planting material
For planting using Dutch technology, you need to choose intact potatoes 3-5 cm in diameter and weighing about 50 g, there is no point in using smaller tubers - the shoots will grow too weak. Make sure there are at least 5 eyes on each tuber.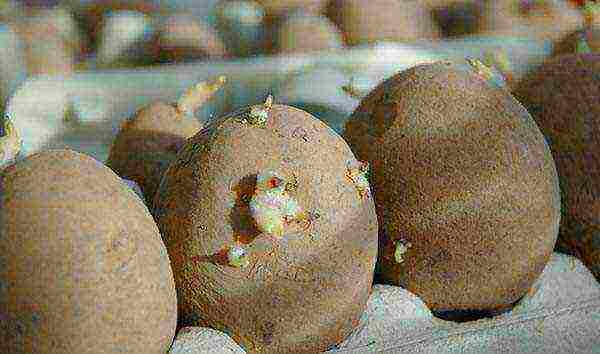
A month before planting in the soil, you need to germinate potatoes. It is germinated within a month in a dark place at a temperature of + 16-18 degrees, scattered in one layer on newspapers or fabric spread on the floor.
According to the Dutch method, tubers are planted when they have sprouts 5-8 mm long, of which there should be at least 5.Those processes that are longer than 1-2 cm will simply break off with a mechanical planting, but for a manual (summer cottage) version, they are quite suitable.
Attention! Planting sprouted tubers is a 100% guarantee of germination.
For planting, it is better to choose elite Dutch varieties than the first, at least the second reproduction ("elite" and "superelite"), because they resist disease well, they have regular tubers, and the plants are highly productive. Growing several varieties of different early maturity makes it possible to extend the productive period and feast on fresh potatoes for several months.
Important! Tubers for planting need to be purchased in specialized stores or nurseries, and not at agricultural fairs, and even more so not from hands, otherwise such savings will definitely come out sideways.
The most popular varieties of Dutch potatoes in Russia are:
- Santa;
- Red Scarlett;
- Romano;
- Mona Lisa;
- Cleopatra;
- Asterix;
- Eba;
- Ukama;
- Latona;
- Condor.
Thanks to the main advantage of the Dutch varieties - good yield, from 1 weave (100 square meters) you can collect from 200 to 400 kg of high-quality tubers.
When to plant potatoes
In our climate, it is necessary to choose the right time for planting potatoes, including the Dutch method. You cannot rush too much, otherwise the seedlings will suffer from frost. Tubers are planted only when the soil warms up to at least + 8-10 degrees. By the way, you can also focus on time-tested folk omens - dandelions and bird cherry blossoms that have begun to bloom, leaves blooming on birches. Another way to check is to take a handful of soil in your hand, squeeze it lightly and drop it on the ground. If it crumbles, and does not remain in the form of a lump, the soil is ready.
Step-by-step instructions for planting potatoes
The Dutch method involves planting tubers immediately after finishing the preparation of the site. The delay will lead to the drying out of the earth and the loss of positive qualities. Work can be started immediately after the soil warms up, dries slightly and stops sticking to the shovel.
Place for planting and growing
A person who comes across this method for the first time will immediately think that a lot of space is wasted in vain, since 1 sq. meter has only 6-8 tubers. But the prudent Dutchmen calculated everything - spreading plants with strong roots grow, and you can get a better harvest than using the usual technology.
Dutch technology will provide the tuber:
- a lot of heat;
- a sufficient amount of air ("ventilation" of the root system);
- the required amount of nutrients.
It is required to choose a site with a deep arable layer, because the tubers must be immersed to a depth of 10 cm. When the first seedlings appear, they are sprinkled with soil on top. When the shoots appear again, the procedure is repeated. As a result, the potato planting depth is the same as with the conventional planting method.
Dutch potato planting scheme
Potatoes planted using the Dutch method must have sufficient nutritional area. therefore between the rows leave a free space of about 75 cm (better 80-85 cm), but bushes place in the ranks at a distance of about 30 cm (preferably 35-40 cm).
Which gives a large distance between plants:
- For hilling, the soil from the rows is used, for this reason the tubers are located above the ground level. The ridges are well warmed up in the sun, there is enough air for the roots
- In a rainy summer, plants will not die from excess moisture, water will drain between the rows.
- In a dry year, the amount of moisture necessary for growth is retained in the ridge.
Fertilizers are poured into the holes so that the tuber is located under them. Good humus or rotted manure is used as fertilizer during sowing. If you don't have manure, you can use some old chicken manure (over 1 year old).For potatoes, the ideal top dressing is crushed egg shells and wood ash. Eggshells need to be poured about a handful, and wood ash needs to be taken about 100 grams. for each hole. Adding a little onion husk will save the potatoes from wireworms and slugs.
In the holes, the tubers are placed with sprouts up and after that they are covered with soil by 4-6 cm. A week later, the first sprouts of weeds should appear. They must be destroyed immediately before they have time to take root.
Caring for potatoes after planting
After the emergence of shoots (and this usually happens after 2-3 weeks), the planting is spud so as to raise the height of the ridges is up to 8-12 cm and the width is up to 30-35 cm, and before that all the weeds are removed... After 4 weeks, the soil near the seedlings is carefully weeded and after that the soil is shoveled from the row spacings so that the ridges are already raised to the height about 23-30 cm, at the base of the ridges should be width near 70-75 cm.
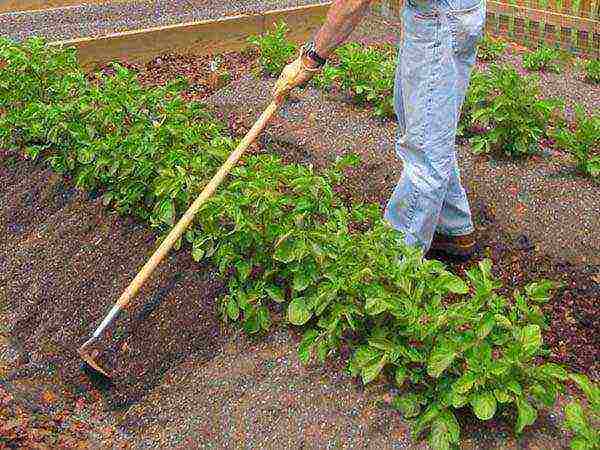
Further weeding with Dutch technology is not expected. As for the removal of weeds in the aisles, then, according to the Dutch technology, they are used against them herbicides... These drugs include: "Titus", "Zellek super", "Centurion", "Lazurit" and others.
To water the site is needed no more than 3 times... The first time you need to moisten the area before flowering, again - 10 days after flowering, the last time - after the end of flowering, at this time tubers begin to grow.
By the way! If you completely follow the Dutch cultivation technology, then it assumes the presence of a drip irrigation system.
Diseases and pests
On the potato plantation, it is necessary to carry out preventive treatment with pest control agents. Late blight is a real danger for most varieties of Dutch potatoes. To combat a pathogenic fungus, it is advisable to use only insecticides or preparations of biological origin. Naturally, you will also have to confront the Colorado potato beetle and wireworm. Treatment against these pests is recommended to be carried out strictly before the flowering of the bushes.

Harvesting
It is very important to remove the potatoes on time. Tubers left in the garden for a long time lose their taste, and their shelf life is sharply reduced.
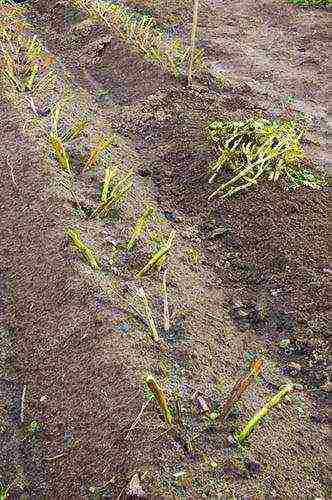
You need to prepare for the collection of tubers, for this you need to remove the tops from potato bushes 10-15 days before harvesting, leaving only bare "hemp" about 5-7 cm high. Then the tubers are kept in the soil for another 10-15 days until they will ripen, and a strong peel will not form on the tubers. The potato tubers are then less damaged during harvest and will be better stored.
Potatoes for food or sale are harvested in late August - early September, and seed potatoes much earlier - in late July - early August.
Attention! On large plantations, the tops are not mown, but a desiccation method is used, this allows you to dry the green mass using special formulations to simplify the subsequent harvesting.
Thus, Dutch planting of potatoes is common in most European countries and is widely used on our farms. You just need to strictly adhere to the rules of planting and care, and a rich harvest is guaranteed.
Video: planting and hilling potatoes in the Netherlands
Growing potatoes in Dutch is a technique that takes into account every little thing. When planting using this technology, up to 250-300 kg of tubers are harvested from one hundred square meters.
Dutch technology provides potatoes:
- sufficient warmth;
- oxygen supply to the roots;
- fertilizers.
Growing potatoes using Dutch technology
How many technologies for growing potatoes are there
In addition to traditional and Dutch cultivation, there are other new methods: Chinese; technology developed by the doctor of agricultural sciences Jacob Mitlider from the USA; the method of Galina Aleksandrovna Kizima, who spent her childhood in a working village in the South Urals.
 Planting in straw using Kizima technology
Which varieties are suitable
Professionals recommend updating the potato variety every 4 years, as it can get sick.
The varieties from Holland are immune to diseases, they are high-yielding, but they are not not suitable for planting in the north of Russia... It is better to plant domestic zoned varieties there, adapted for home conditions.
It is required to plant early and late potatoes in the country.
Suitable Dutch potato varieties:
- Anosta - early. The tubers are yellow, even. The pulp is creamy. Potatoes are immune to nematodes.
- Red Scarlett - early. The tubers are scarlet, the flesh is snow-white, does not change color when cooked.
- Impala - early variety. It is planted in the Central regions of Russia and in the Siberian Federal District. It takes 50 days from germination to harvest.
- Jarl - early. Unpretentious in care, they are planted even in depleted lands.
- Prior - early. He has immunity to viral diseases, nematodes, late blight.
- Romano - medium early. The tubers are pinkish, the flesh is snow-white. Immune to late blight.
- Monaliza - medium early. It is immune to all diseases.
- Sante - mid-season. The tubers are yellow, the flesh is creamy. Resistant to mechanical damage.
- Eba - medium late. Immune to viral diseases. Tubers are yellowish.
Domestic varieties:
- Nevsky - mid-early grade. Immune to nematodes, cancer, scab, mosaic and other diseases. But its minus - the tubers are stored at a temperature of about 0 degrees, otherwise they will germinate.
- Zhukovsky early... It is immune to disease. It tastes great, but there is very little starch in the tubers, so it does not boil over. You can collect 600 kg of potatoes from a hundred square meters.
- Luck - early variety. It is immune to all diseases. The tubers are yellowish, the flesh is snow-white.
- Zdabytak - late grade. Immune to diseases. There is a large amount of starch in tubers.
Is this method suitable for growing potatoes in the country
Potatoes are grown in the fields, using technology, and in summer cottages, doing all the operations by hand.
Technology detail
What is the Dutch way
- For cultivation of tubers, varieties from Holland are taken, immune to diseases, in which a large number of tubers grow. And in the northern regions of Russia, domestic zoned varieties are planted. Select required only healthy tubers... Change the varieties you planted.
- Tuber crops are selected with 3-5 cm in diameter, with 100% germination.
- According to the planting scheme, 1 m2 is planted 6-8 tubers... It seems to the Russian gardener that with such a planting, the land is empty in vain, but according to this technology, the bushes grow sprawling, they have powerful roots, and the harvest is greater than with the traditional planting method.
- The Dutch also feed potatoes, taking into account the needs of this variety.
- It is required to spud and fill combs with a height of 10 cm.
- The crop must be harvested on time. If you need seed, then the potatoes are dug up a month earlier than the tubers intended for consumption.
Selection and preparation of seed material
For planting, even healthy tubers are chosen. diameter 3-5 cm, best varietal.
Potatoes, which are smaller in size, should not be chosen, since the grown bushes will be very weak. Larger potatoes are only planted if the harvest is from their own seeds. Each selected tuber has 5 eyes.
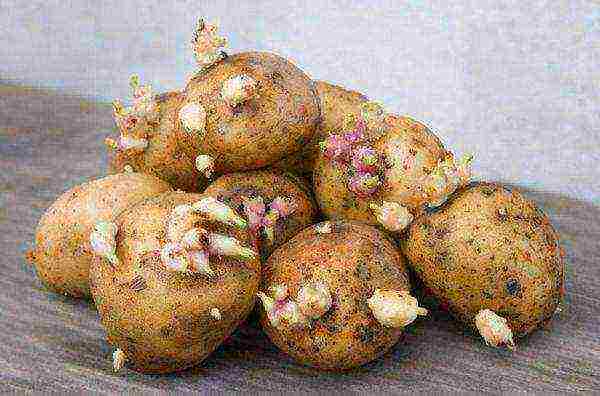 A month before planting, potatoes are germinated
A month before planting, the potatoes are germinated. Potatoes are planted when the sprouts at the eyes are 0.5 cm, but this is for mechanized planting.
It is required to choose the right planting time so that the sprouts do not die from return frosts. The tubers are carefully placed in polyethylene bags with handles, when the sprouts are 0.5 cm high. So the potatoes are conveniently transported to the place of disembarkation. For planting by hand, they wait until the sprouts, placed in plastic bags, grow to 2.5-3 cm.
Land cultivation before planting
Potatoes will be less sore and less affected by pests if planted in one place every 3 years... It is required to give the soil a rest and not plant anything at all for 1 year, but mow the weeds.If you do not have this opportunity, then plant tubers in the place where beans, peas, oats, rye grew before.
Phosphorus, potassium, nitrogen are scattered on a level place in the fall, and the soil is dug to a depth of 22-27 cm.
If you have a slope, then in the fall, do not dig up the soil and do not put top dressing, since in the spring the flood will wash away all the nutrients.
Care
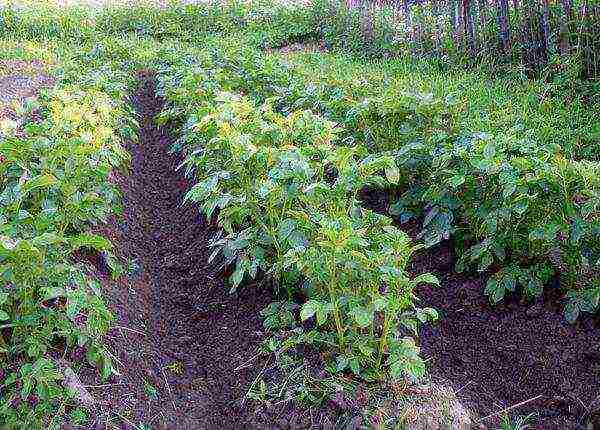 The distance between the rows should be 75cm
- In the spring they dig up the soil, make holes 6-8 cm deep... The distance between the rows is kept at 75 cm, and between the holes - 30 cm.But such a long distance has its advantages:
- The soil for hilling is poured from the aisles, because of this, the tubers are located above the aisles. The ridges are well illuminated by the rays of the sun, and oxygen is supplied to the root system.
- The cross-sectional area of the ridge is 1200-1500 cm².
- With heavy rains, the water does not stagnate under the bushes, as it is in the aisles;
- In case of heat and no rain, there is enough moisture in the ridge so that the potatoes do not die from drought to rain or watering.
- Rotted manure or humus is first put into the hole.
- Then add 100 g of ash and a handful of crushed egg shells, as well as a little onion husk, which will scare away the wireworm and slugs.
- Tubers placed in the wells sprouts up and sprinkle with soil.
- If you see weeds growing, pull them out.
- When sprouting sprouts, spud them so that the ridges have a height of 10 cm.
- If there is a threat of frost, then young shoots are sprinkled with soil, and tall shoots are bent and sprinkled with earth. When the weather is warm again, the bushes are raised and poured with water from a watering can.
- 14 days after planting, weeds are pulled out, and the soil from the rows sprinkled with sprouts so that the ridges become about 25 cm high, the width of the ridges at the base is 75 cm, and at the top - 30 cm.
- When Colorado beetles attack, the bushes are sprayed with insecticides.
- If there is a drought, then the bushes are watered 1-3 times per season (1-2 times before the buds bloom, once - when the flowers bloom).
When and how to harvest
Mow the tops first, then dig out the bushes after 10 days.
Then the peel will be strong, and the potatoes will be able to lie for a longer amount of time without spoiling.
That is, growing potatoes in the Dutch way is planting tubers at a distance of 30 cm, observing a distance between rows of 70 cm. This is also poured high ridges and taking into account the need for potatoes in fertilizers.


