Content
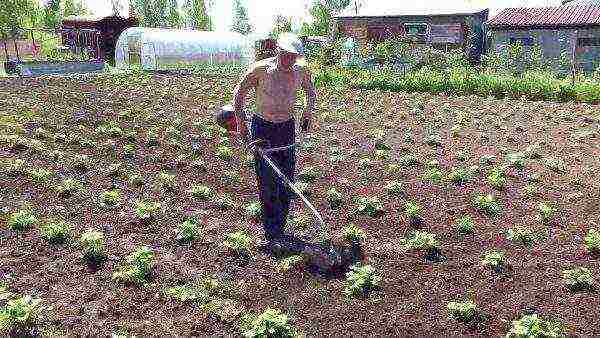
The straight lines of the potato bushes look very nice, showing order and creating comfort for self-hilling or using a cultivator. Unpleasant routine activities with the help of certain devices, for self-landing, can be fun, unpretentious and enjoyable activity, and designing your necessary manual equipment can be a process of technical creativity.
Today there are special devices - a marker, a scribe, hedgehogs, a plow for planting and weeding potatoes. They will greatly facilitate the work of the gardener. The work, when using these simple devices, happens much faster, and the result is the same effective, high-quality if it was done by hand.
A marker is a device that is necessary to facilitate manual activities when planting, as well as to keep the beds even, with evenly spaced holes for potatoes. As a result, such beds are not difficult to process with mechanized or manual devices.
Today you can buy ready-made markers, but it is better to make a homemade device, then the distance between adjacent plows, for organizing holes for planting, will fully correspond to the distance between the wheels of a motor-cultivator or tractor.
Markers can be basic or very complex. You can make them from any material that is at hand:
- Wooden stakes;
- Durable board;
- Special or round metal pipes.
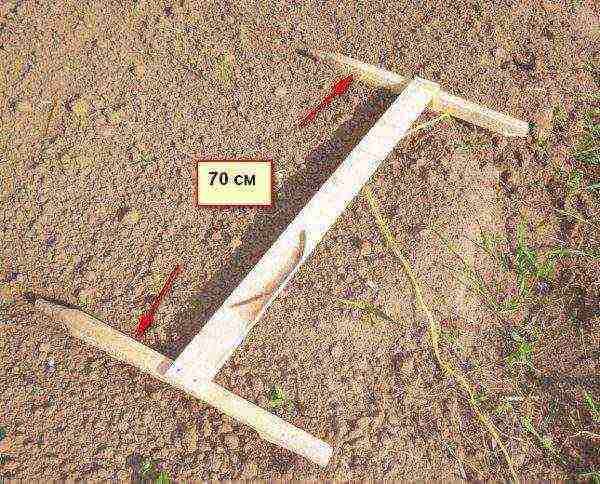
Elementary marker
This is a wooden stake about 90 centimeters and about 60-70 millimeters... The horizontal bar, which is fixed at a height of about 150 millimeters from the base, will serve as a support limiting the depth of the hole. Before starting work with this device, it is necessary to outline future holes with twine. It is pulled along the length of the rows at a distance of about 40, 50, 60, 70 or 80 centimeters between the beds.
The distance between the beds depends on the subsequent method of cultivating the land, manual or mechanized. The spacing between pits in a row is about 30 centimeters, depending on the size and variety of potatoes to be planted.
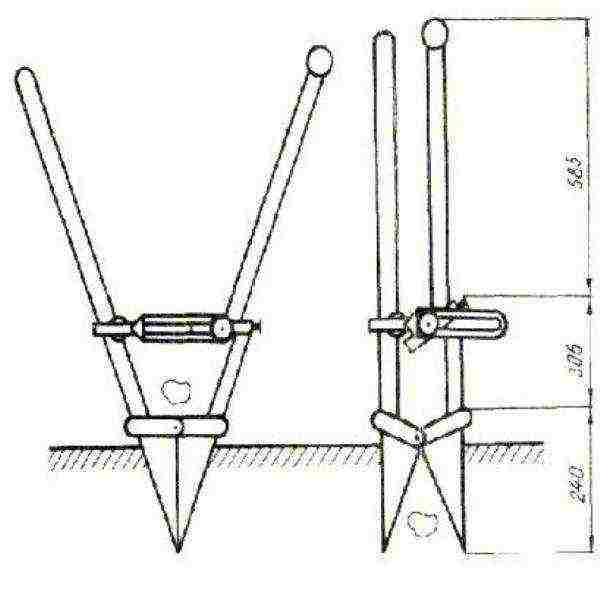
Mittlider marker
This is a more sophisticated version of the marker, which is made from a pipe with an outer Ø 21 mm. In this case, the distance between the holes will be equal to 29 centimeters. The cone, with the help of which the holes are made, is made from a pipe Ø 55-65 mm. It must be welded to the frame.
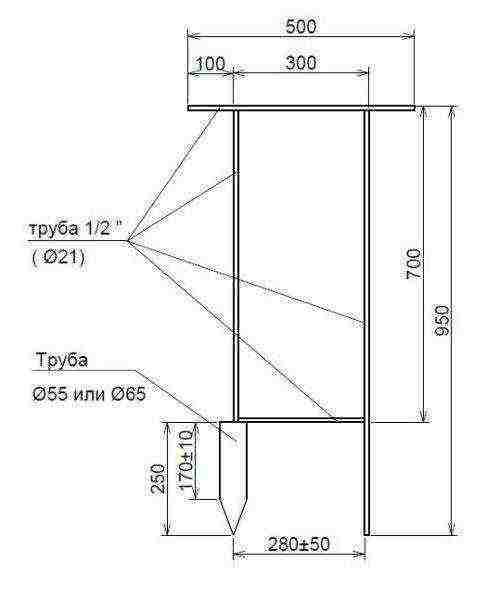
On the initial row, the frame is placed parallel to the twine and, applying the necessary force, is immersed in the soil. Then we put a cone in the hole that we have outlined, and so we continue. In the other row, holes are made like on a chessboard. A marker made using this method allows you to plant potatoes in small areaswhile getting a high yield.
Three holes at the same time
This model consists of metal pipes and 3 cones.
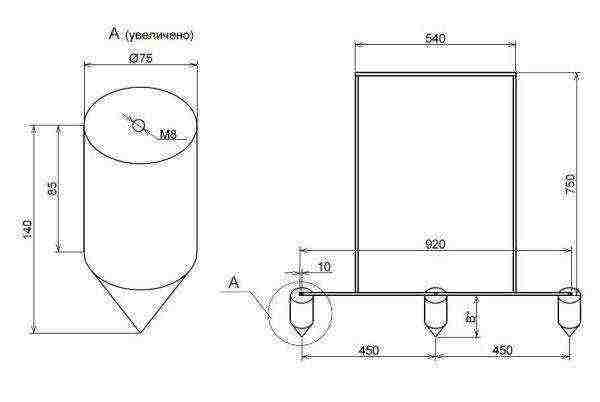
The welded marker frame is made of a special light and strong pipe measuring 25x25x2 mm. To do this, you can take an ordinary steel pipe Ø 32 mm, which is used for a water supply or gas pipeline. Cones are made of aluminum or acacia wood, oak.
A hole is made in the cylindrical part and an M8 thread is cut.Three such through holes of Ø 9 mm are made in the pipe. Through these holes, the cones are attached to the frame with M8 bolts. Using bolts measuring 40-80 millimeters, you can adjust the depth of the fossa. The distance between the cones is 45 centimeters... In order not to get injured, plugs must be put on the open ends of the supporting pipe. The height of the bolts can vary. This will depend on the depth of the desired fossa. The larger the bolt, the wider the possibilities.

Wood cones must be sandpaper, varnish or drying oil applied, so that the soil does not stick to them during work. All metal components must be treated to prevent corrosion. The height of the frame must be made to suit your height. The values indicated in the drawing are suitable for a summer resident with a height of 175 centimeters.
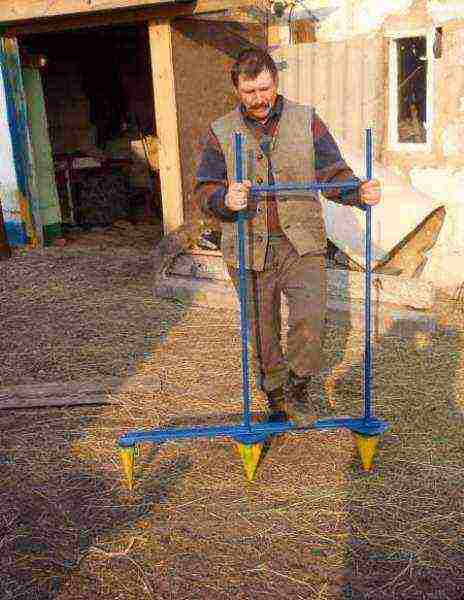
Scraper for planting potatoes
Planting potatoes with a scraper will shorten this process several times. Everything is done easily and without straining. It is not difficult to make it, any man will be able to do it and will take no more than 2 hours.
To make it, you will need two stakes. Ø 10 centimeters and two boards one and a half meters long... Stakes are made from dried blocks or not thick spruce trunks. They need to be processed, sharpened and handles made. Then nail the wooden crossbars to them.
It is necessary to make the required distance between the stakes. If the potatoes are subsequently processed with a mini-tractor, then the distance should be about 65-70 centimeters, if with a cultivator, then a distance of 60 centimeters will be rational. For manual processing, the stakes must be positioned at a distance of 45-55 centimeters.
Pens need to be made for yourself, so that later there will be no problems when working. The board from below must be installed so that, when pressing on it, a hole is obtained, with a depth of approximately 10-15 centimeters.
The idea of working with a scribe is as follows: putting it on the edge of the site, you must hold it with your hands by the handles in front of you. Then press on the board from below, while the stakes are immersed in the soil, and the mark leaves a mark. Then they move her hands, making back and forth movements in order to enlarge the fossa. You should get two ridges of pits, and the third ridge will be a note from which you need to follow, but in the other direction, setting the stake to the mark.
At the same time, a person who plants potatoes follows the scriber. The whole process is quick and easy. Use this technique and make your job on site easier.
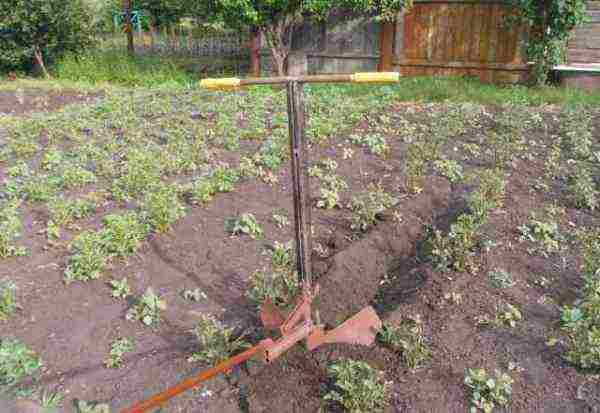
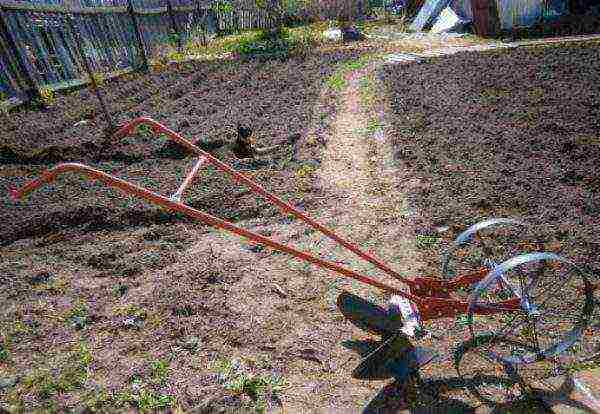
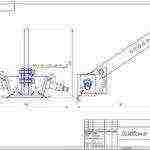
Homemade hand plow
When it comes time to plant potatoes, summer residents act according to the following scheme: they make markings for planting, dig holes with a shovel, put potatoes in them and then cover them with their hands. While the potatoes are growing, it must be spud more often it is done with a hoe. It takes a lot of time and effort. Today this process can be facilitated as much as possible.
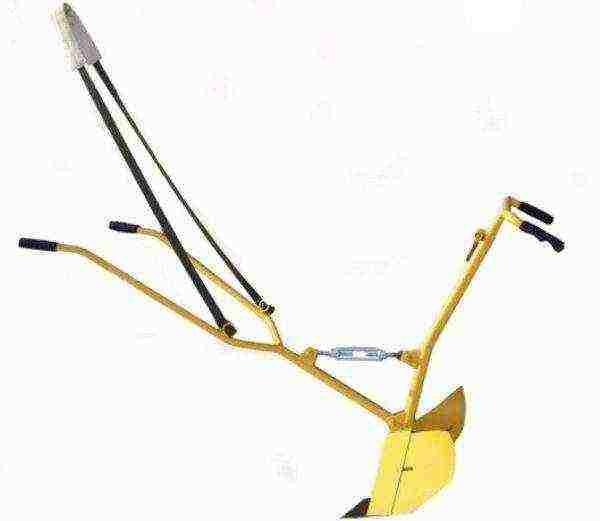
The hand plow is a very simple device that can be used by 2 people at the same time. It consists of:
- 2 dump body for work, with a pruning knife;
- Pull front, so that one person pulls it forward;
- Back handles, to control the second person.
It also performs work on cutting rows for planting, helps with hilling potatoes, and also loosens the soil.
In order to make such a device it will be necessary:
- Hollow pipe for vertical post Ø2.5 centimeters, about 1 meter long.
- Hollow pipe piece Ø3 / 4 inches for the manufacture of traction front and rear;
- A piece of sheet traction 2 mm thick, for the manufacture of dumps;
- For connecting the front rod with a vertical strut a lanyard will be needed, which can be replaced with a metal plate with holes to adjust the angle of attack;
- Blowtorch or a gas burner to heat the metal at the folds;
- Welding equipment;
- For processing joints you need a grinder.
The long pipe must be bent at a distance of about 30 centimeters from the beginning, while the angle should be 10-15 °. To make bends, a pipe bend will help. In its absence, you can make a fold by the following technique:
- We fill the pipe sand;
- We put on the edges of the pipe plugs;
We heat the estimated place of bending with a blowtorch and begin to bend.
The smaller pipe as well as the perpendicular post must be bent. To adjust the height, we make holes on the upper edge and the same holes on the vertical section of the proposed fork.
The pull from the front looks the same as from the back, but differs in size. The height of the handle should be such that the one in front can easily be between the handles, clasping them.
The height of the vertical part must be 60 centimeters, it must be flattened at the ends and holes drilled to connect to the vertical section.
At a distance 30 centimeters from the bottom to the vertical rack attach the foreshortening for traction in front... Then, at a distance of 25 centimeters from this hole, the same 25x25 corner is welded to the fork. A hole is also made in it, and it is welded to the rack above the first corner.
2-moldboard plow
You will need 2 identical plates with a thickness 2 millimeter. Round the bends on them. With the help of welding, with even seams, we attach 2 halves of the plow to the perpendicular post. We grind them with a grinder so that they are sharp.
Pruning knife
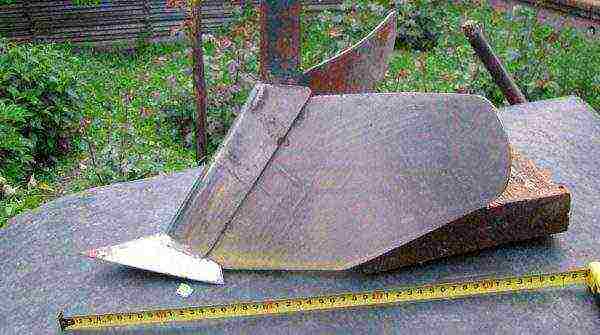
We take the most durable carbon steel. Cut out a knife in the form of an arrowhead, sharpen it at an angle 45°. This angle will make the knife sharp for a long time. Using welding, we attach it to the vertical post from below, grind it.
The manual plow is ready for work on the site!
Weeding hedgehogs cultivator
They remove grass with roots, unlike flat cutters, which only chop the stems. Hedgehogs row the soil between the rows, resulting in distinct rows and beautiful beds. The loosened soil allows oxygen and liquid to pass through well, which increases the growth of potato roots, and this is already a guarantee of an excellent harvest.
Weeding with a walk-behind tractor is carried out using certain legs or a rotating cutter... The cutter is turned by the power take-off shaft. The advantage of the legs is ease of installation and thoroughness in loosening the earth. They loosen the soil at a depth of 4-7 centimeters, depending on its condition.
For work, the legs must be fixed in certain fasteners at a distance equal to the width of the row. The fasteners should have a slight overlap that will cover both legs. Devices can be either one or two-sided. If the device is one-sided, then it is necessary to fasten the legs so that the blades are located towards the row spacing.
There is another hand weeding device called a weeding machine. This is a frame, with a knife and a drum. Its wheels are placed in the aisles, a knife chops the grass, and a spinning drum catches it and throws it back.
Cultivators are manual, electric with a gasoline engine. For weeding, devices with 2 knives are used, which are attached at an angle of 45 °. It is best to carry out weeding with a cultivator, on which three toothed mini forks are installed instead of knives.
For comfort, these devices are mounted on wheels: the summer resident pushes him, pressing him as close to the garden as possible.
Using a device with a nozzle, the hedgehog immediately weeds and spud the potatoes. The hedgehog consists of 2 cones fixed to the frame. The cone is made of 3 steel wheels with different diameters. Sharpened spikes are welded to the wheels. 2 hedgehogs are attached to the frame, spinning, they hook the grass in parallel and row the soil from row spacing.
Electric cultivators are more dynamic, they are used for small vegetable gardens. Their main drawback is the need to pull the cable from the outlet, which is not always comfortable. It is more rational to use cultivators with a gasoline engine. But such cultivators are less dynamic than manual ones, but the most productive. Hedgehog attachments are put on all types of cultivators. The power of the engine is selected depending on the state of the earth, the heavier it is, the stronger the device.
Weeding attachments with trimmer
For weeding, a trimmer is used with an electric motor on top. Between the rows, they are often weeded with a trimmer head with fishing line.
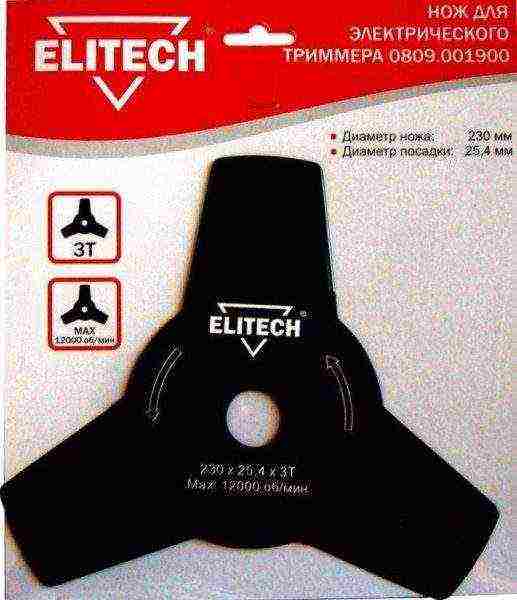
It happens that a 3-blade knife is used to remove grass. The steel knives are mounted on a trimmer with a straight stand. If the rack is curved, then attach plastic nozzles. If the knife hits any obstacle, the device will be thrown back or broken.
At the market or in the store you can buy trimmer attachments with earth milling cutters, which are in the form of disks with curved blades, and are attached to a single axle. More often in one nozzle there are 4 cutters.
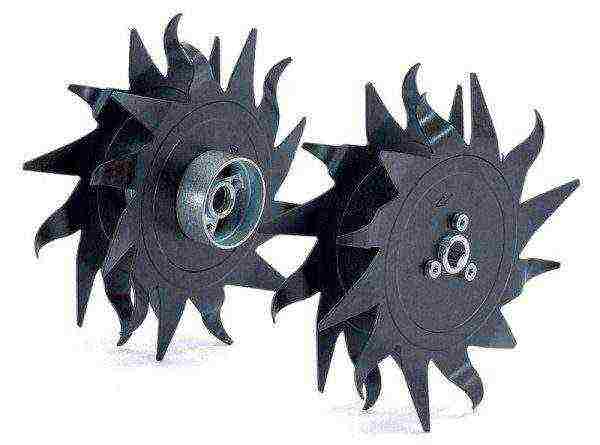
The size, diameter and number of cutters depend on the power of the brushcutter engine. The instructions for use for the attachment indicate which brushcutter it is suitable for.
Professional summer residents, before using the trimmer, treat all rubbing elements with silicone grease.
Rules for processing potatoes using a trimmer:
- Before processing, you need protect eyes and butc, since during weeding, the cutters rotate at high speed, raising dust and dirt into the air.
- It is necessary to treat the area from weeds when the grass is still small. Processing must be done every two weeks..
- It is better to rinse in the morning, then during the day the grass dries up and turns into straw.
- No need to immerse cutters to a depth of more than one and a half centimeters... With this technique, the land is cultivated, and the soil receives oxygen and nitrogen, which has a great effect on potatoes.
- You must not immerse the cutters also because it is may damage the device.
- If the engine on the device is not very powerful, then it is necessary take a break every quarter of an hour.
- At the end of the summer season nozzles must be treated with a disinfectant, to remove all germs.
A broken cutter can be replaced with a do-it-yourself cutter. To do this, you need to carve a circle out of a steel sheet, and bend the cavities. The diameter cannot be larger than that of the cutters used. It is forbidden to put additional cutters on the trimmer axis.
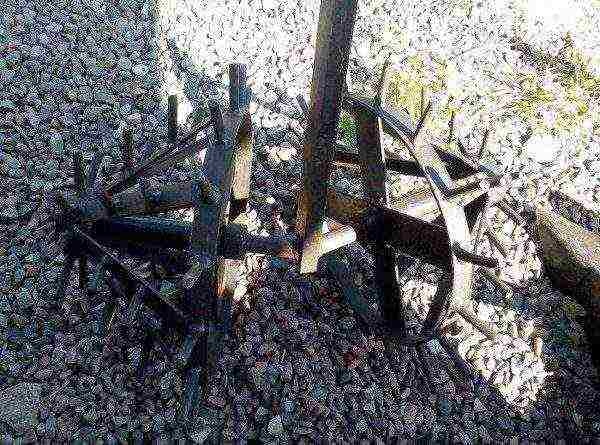
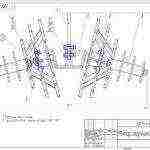
How to make hedgehogs with your own hands, drawings
If the summer resident likes to work with the tool and at the same time save a lot, then you can make hedgehogs for weeding with your own hands or order them from an organization for working with metal. First of all, you need to understand how hedgehogs will work, draw several drawings. They can be used both on the cultivator and for working by hand.
-
- Rotor hiller
-
- Ripper
-
- Base
-
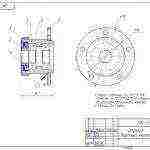
- Hub
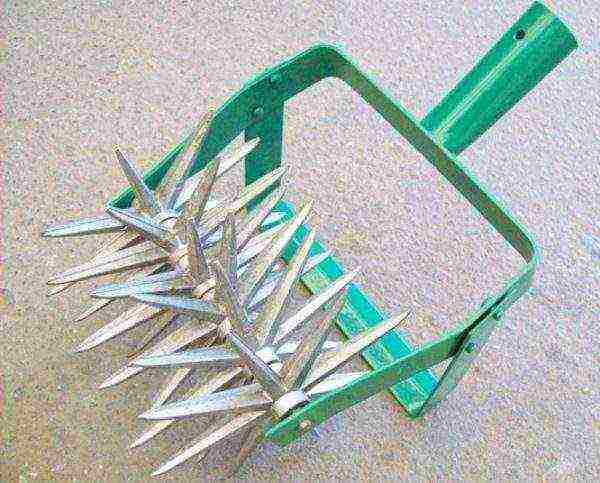
Hand hedgehogs can consist of a ripper, a frame and a holder. The ripper is a hollow tube with steel teeth welded to it. It is fixed on a spacer frame and a wooden handle is attached.Using it, you need to roll the soil back and forth, which requires certain physical strength.
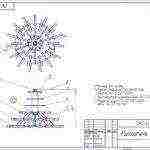
There are many versions of hedgehogs for a walk-behind tractor and a cultivator. Many developers have made their own individual devices. The traditional version is also made with steel discs. You will need 3 discs of various diameters:
- 100, 200, 300 mm;
- 240, 180, 100 mm.
The assembly of the device is carried out on a Ø25 mm pipe. Using jumpers, steel discs are attached to each other, starting with the largest and ending with the minimum. There are developers who use 5- and 6-sided drives instead of discs. The distance between them should be 18 centimeters, and the maximum disc is Ø 36 centimeters. For the teeth, a steel bar is used, cut into 40 pieces.
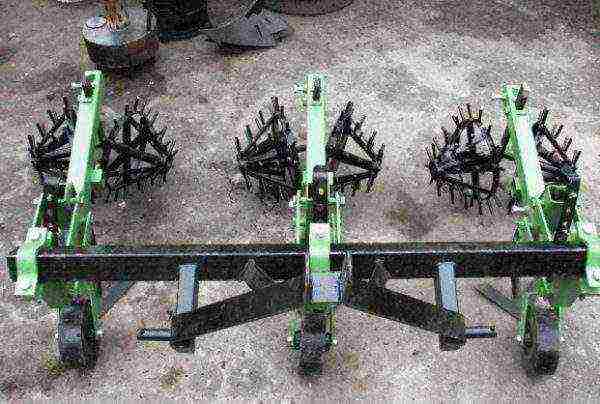
Roughly for the design, you will need 5 pieces of spikes for a small disk, 10 pieces for a medium one, 15 pieces for a maximum one. It happens that it is required to weld auxiliary studs to the axle. The length of one spike is 14 centimeters.
Today there are several varieties of hedgehogs:
- Rotary... The main task of such hedgehogs is weeding and hilling. They will fit any device.
- Conical... Required to remove grass before germination.
Summing up the results, it can be noted that the use of devices for planting, harrowing, weeding and hilling potatoes at their summer cottage will make this process easy andnot time consuming... Using a variety of samples, it is safe to say that the harvest will be plentiful and will delight the gardener.