Content
What is Redborough Collard f1 and how it is grown
Collard greens or redbor is the choice of those who appreciate not only taste, but also beauty. It is rich in flavonoids, dietary fiber and vitamin C. It has a quirky appearance that makes it an excellent decoration for your summer cottage. This article will tell you how to grow this vegetable.
Description of the variety
It is an annual vegetable plant, a domesticated form of the "Cabbage" species. Its main difference from the usual white cabbage is the absence of a head of cabbage. Height varies from 40 centimeters to 2 meters.
There are many varieties: white, red, pink, green, palm-shaped, variegated, Mosbakh - these are the most common varieties of vegetables. It grows with rather large and beautiful leaves that can be pink, green and purple.
Redbor's gastronomic qualities
Low-calorie content, which removes the restriction on the amount of kale eaten.
The high content of dietary fiber, which is absorbed over a long time, so the feeling of hunger does not come soon.
The presence of vitamin C, which activates the carnitine production mechanism, and flavonoids, which help fight cancer cells.
It is consumed baked, fried and raw. Steamed is suitable for those who don't like the hardness of the cabbage leaves. Oven-baked slices sprinkled with seasoning will appeal to chip lovers.
Beneficial features
Contains antioxidants: glucosinolate and sulforaphane, which prevent the formation of cancer cells. The vitamins and minerals it contains reduce the risk of heart disease. Lutein and Zeaxanthin protect eyes from damage caused by sunlight. Due to the abundance of vitamin C and beta-carotene, the consumption of cabbage leaves in food leads to the elimination of skin problems: it becomes elastic, wrinkles disappear. Thanks to the iron, the skin is saturated with oxygen and the skin is healed.
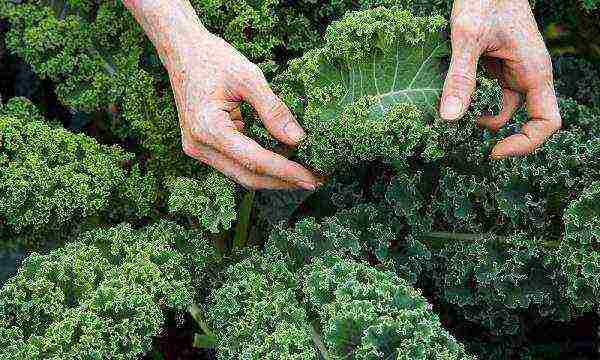
Growing kale
Its cold resistance makes cultivation possible in the fall. It is a culture resistant to harsh conditions, so it grows well and does not suffer from pests and diseases. The characteristic of the variety is a reddish-purple color, in which it is colored by the anthocyanin contained in the leaves.
There are varieties grown recklessly. But, basically, the cultivation is carried out by seedlings.
You can sow seedlings in late February - early March, planting under film in April. Sowing in these terms will provide the harvest in May. On the 45th day, seedlings are planted in open ground. It is necessary to sow in open ground with an interval of 60 cm between rows.
Pest damage will be less if planted in late summer. Then it will ripen in late autumn.
Land preparation and choice of fertilizers
Alkaline, acidic and poor soils are suitable for growing collard greens. The area should be light and drained. If the area is windy, a wind shield should be installed. Soil preparation should be started in the fall. If the soil is heavy, then in the fall it must be fertilized with green manure. The following fertilizers must be applied to the crop:
- Buru (1.6 - 2 g / sq. M);
- Superphosphate (75 - 90 g / sq. M);
- Potassium salt (105 - 120 g / sq. M);
- Humus (2.5 - 4 kg per sq. M).
After the remains of the plants are removed and loosening is done, you need to wait a week, and then scatter the above fertilizers over the site. Then the soil should be dug up (depth - at least 30 cm) and fertilizer should be repaired. Before winter, the prepared soil is left in blocks so that the soil is better frozen and most of the pest larvae die.
Seedling and bush care
When the plants reach 7-8 cm, they can be thinned out; the preferred distance between thinned bushes is 30-60 cm (the distance depends on the variety).
Water either in the morning or in the evening. Watering in the middle of the day is not recommended. Young shoots need moisture, but as they mature, the number of waterings should be reduced. It must be remembered that overdrying the soil is one of the reasons for the appearance of nitrates in the fruit body of a vegetable.

On infertile land, after 10 days have passed since the planting of seedlings, it is necessary to add 10 g of urea, 15-20 g of superphosphate and potassium salt (the listed fertilizers should be dissolved in 10 liters of water). The second feeding should be done after 20 days. The second feeding should be increased by 1.5 times, and to it should be added: ammonium molybdate (in a quantity of 1 g) and borax (in a quantity of 3 g).
How to get rid of diseases and pests
Cabbage fly and keela are well tolerated by the plant. But aphids can significantly damage the vegetable. Pests will be deterred by spraying with infused tomato tops, infused peel of potatoes or red pepper. The use of a solution of tobacco with households. soap will destroy aphids. Or wood ash, dissolved in water from households, can be used. soap (6 g of household soap, 25 g of ash per 1 liter of water). As soon as 10-15 days have passed after planting, it is necessary to spray the ash over the rows during hot and dry weather. This measure will prevent harm from earthen fleas. Ash can be replaced by fluff-lime sprayed over the rows.
To increase yields and disease resistance, the bushes are treated with a growth biostimulant. This is done 3 weeks after disembarkation. For this, substances such as sodium humate, Immunofit, etc. are used.
- Cabbage fly
- Keela of cabbage root
- Aphids on a cabbage leaf
Harvesting
Bushes grow until the end of summer. While summer lasts, you can cut off the growing leaves. They must be cut so as not to expose the stem. Cut leaves should be freed from the petioles, because they are bitter. The final harvest should take place before the leaves begin to coarse and lose flavor.
This is a wonderful vegetable that will not only feed its owner, but also decorate his summer cottage. It can be fried, steamed, and even made into chips. The plant is a source of cancer-suppressing substances. It is valuable for its low calorie content and the presence of dietary fiber, which bring long-term satiety.