Content
- 1 Description of Clematis with photo
- 2 Classification
- 3 Choosing a variety of Clematis for the Moscow region with a photo
- 4 Clematis
- 4.1 Let's talk more about how to plant and how to grow clematis
- 4.2 Soil erosion
- 4.3 How to care for clematis
- 4.4 Watering and fertilizing
- 4.5 Watering
- 4.6 New strength - new shoots
- 4.7 Shelter of clematis for the winter
- 4.8 Lay down, covering with leaves
- 4.9 Clematis in the spring
- 4.10 Requirements
- 4.11 The soil
- 4.12 Landing
- 5 Landing
- 6 Wintering
- 7 Reproduction of clematis
- 8 Fascination of numbers
- 9 Botanical description
- 10 Types of clematis
- 11 Reproduction methods
- 12 When to plant clematis
- 13 General rules for planting clematis
- 14 How to plant clematis in spring
- 15 How to plant clematis in the fall
- 16 Description of Clematis with photo
- 17 Classification
- 18 Choosing a variety of Clematis for the Moscow region with a photo
- 19 Clematis
- 19.1 Let's talk more about how to plant and how to grow clematis
- 19.2 Soil erosion
- 19.3 How to care for clematis
- 19.4 Watering and fertilizing
- 19.5 Watering
- 19.6 New strength - new shoots
- 19.7 Shelter of clematis for the winter
- 19.8 Lay down, covering with leaves
- 19.9 Clematis in the spring
- 19.10 Requirements
- 19.11 The soil
- 19.12 Landing
- 20 Landing
- 21 Wintering
- 22 Reproduction of clematis
- 23 Fascination of numbers
- 24 Botanical description
- 25 Types of clematis
- 26 Reproduction methods
- 27 When to plant clematis
- 28 General rules for planting clematis
- 29 How to plant clematis in spring
- 30 How to plant clematis in the fall
- 31 Clematis planting and care in the open field
- 32 Description and origin of clematis
- 33 Types and varieties of clematis, photo
- 34 Planting clematis
- 35 Planting time for clematis
- 36 Planting clematis in the fall and subsequent care
- 37 Preparing clematis for winter
- 38 Planting clematis in open ground in spring and care
- 39 Pruning
- 40 Transplant of clematis
- 41 Top dressing of clematis
- 42 Breeding methods for clematis
- 43 Features of growing clematis in the Urals
- 44 Clematis for beginners
- 45 Pests of clematis
- 46 Diseases of clematis and their treatment
- 47 Possible growing problems
- 48 Clematis in landscape design
- 49 Clematis in combination with other plants
- 50 Final part
- 51 Video advice from a specialist in the cultivation of clematis
- 52 Growing clematis in the open field with photos and videos
- 53 Clematis care
- 54 Reproduction of clematis
- 55 Pruning
- 56 Diseases and pests
- 57 Varieties and types of clematis
- 58 What to do with clematis after buying a seedling and how to save it before planting
- 59 When and how to plant clematis in open ground
- 60 Outdoor clematis care
- 61 Choosing a place and preparing for planting clematis in open ground
- 62 When is clematis planted in the ground?
- 63 Planting clematis in the ground
- 64 Outdoor clematis care
- 65 Description of Clematis with photo
- 66 Classification
- 67 Choosing a variety of Clematis for the Moscow region with a photo
- 68 Clematis
- 68.1 Let's talk more about how to plant and how to grow clematis
- 68.2 Soil erosion
- 68.3 How to care for clematis
- 68.4 Watering and fertilizing
- 68.5 Watering
- 68.6 New strength - new shoots
- 68.7 Shelter of clematis for the winter
- 68.8 Lay down, covering with leaves
- 68.9 Clematis in the spring
- 68.10 Requirements
- 68.11 The soil
- 68.12 Landing
- 69 Landing
- 70 Wintering
- 71 Reproduction of clematis
- 72 Fascination of numbers
- 73 Description of Clematis with photo
- 74 Classification
- 75 Choosing a variety of Clematis for the Moscow region with a photo
- 76 Clematis
- 76.1 Let's talk more about how to plant and how to grow clematis
- 76.2 Soil erosion
- 76.3 How to care for clematis
- 76.4 Watering and fertilizing
- 76.5 Watering
- 76.6 New strength - new shoots
- 76.7 Shelter of clematis for the winter
- 76.8 Lay down, covering with leaves
- 76.9 Clematis in the spring
- 76.10 Requirements
- 76.11 The soil
- 76.12 Landing
- 77 Landing
- 78 Wintering
- 79 Reproduction of clematis
- 80 Fascination of numbers
- 81 Botanical description
- 82 Types of clematis
- 83 Reproduction methods
- 84 When to plant clematis
- 85 General rules for planting clematis
- 86 How to plant clematis in spring
- 87 How to plant clematis in the fall
- 88 Clematis planting and care in the open field
- 89 Description and origin of clematis
- 90 Types and varieties of clematis, photo
- 91 Planting clematis
- 92 Planting time for clematis
- 93 Planting clematis in the fall and subsequent care
- 94 Preparing clematis for winter
- 95 Planting clematis in open ground in spring and care
- 96 Pruning
- 97 Transplant of clematis
- 98 Top dressing of clematis
- 99 Breeding methods for clematis
- 100 Features of growing clematis in the Urals
- 101 Clematis for beginners
- 102 Pests of clematis
- 103 Diseases of clematis and their treatment
- 104 Possible growing problems
- 105 Clematis in landscape design
- 106 Clematis in combination with other plants
- 107 Final part
- 108 Video advice from a specialist in the cultivation of clematis
- 109 Growing clematis in the open field with photos and videos
- 110 Clematis care
- 111 Reproduction of clematis
- 112 Pruning
- 113 Diseases and pests
We will tell you how to plant clematis outdoors and how to care for it as a beginner. Please note that clematis requires special attention to itself. With proper care, they will delight you with their flowering and decorate your home.
The article presents the most complete material for caring for clematis planted in open ground. Once familiarized, you will be able to grow beautiful healthy flowers, and you will not have any difficulties.
Clematis will become an aesthetic element of your exterior. One of the most frequent questions coming to our editorial office: what varieties of clematis are suitable for the Moscow region. We tried to reveal the topic of the selection of varieties for different growing regions as much as possible.
Description of Clematis with photo
Belongs to the buttercup family. In nature, there are about 300 species that can be found on all continents (except Antarctica) - in forests, steppes, along river banks, in gorges and on rocky placers.
- Types of clematis vary greatly among themselves. In herbaceous perennials (C. mandshurica, C. recta, C. texensis) shoots die off by the end of the growing season. Semi-shrubs (C. heracleifolia, C. integrifolia) have a lignified lower part that persists for several years, and an upper one that dies off every year.
- Shrubs (C. fruticosa f. Lobata) have completely lignified wintering shoots. Most of the same species (C. tangutica, C. vitalba, C. viticella) belongs to the group of lianas-leaf climbers, which use supports, climbing them with the help of leaf stalks.
- The root system of clematis is of two types: pivotal (C. tangutica, C. serratifolia) and fibrous, C. viticella). It must be remembered that clematis with a tap root system does not tolerate transplantation well. It is better to plant them immediately in a permanent place.
Name
The name "clematis" comes from the Greek wordklema, which once denoted every climbing plant. Of the many popular names (lozinka, grandfather's curls, warthog, etc.), "clematis" is most often used in Russia. Probably, this vine was named so because of the strong smell of dug roots or because its seeds have a curved outgrowth.
Escapes
Clematis have thin, 2-5 mm in diameter shoots of the current year. In herbaceous species, they are round, green, in woody ones - four-hexagonal, light or dark reddish-brown in color. They develop in spring from dormant buds on the underground part of the plant or from aboveground buds of overwintered shoots.
Clematis leaves are paired, simple or complex, consisting of three, five or seven leaves, in addition to the usual green, there are forms with a purple color.
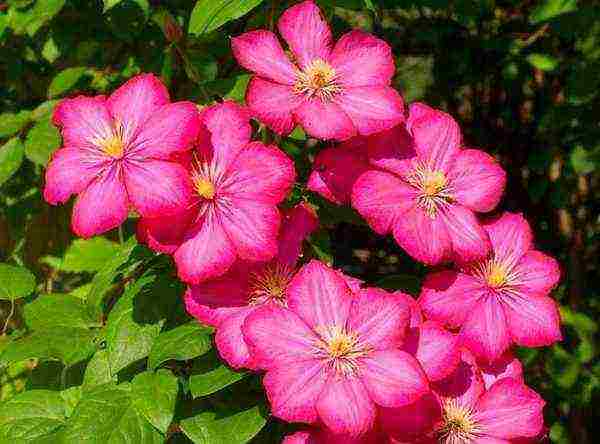
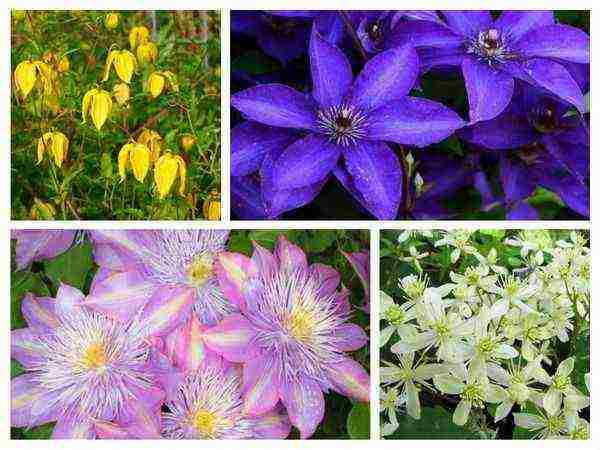
Clematis flowers, as a rule, are bisexual, single or collected in inflorescences of various shapes (scutellum, panicle, semi-umbrella). The role of petals in clematis is played by sepals, in number from four to eight, in double varieties - up to seventy.
"Spider"
In the center of a simple flower is the so-called lush "spider" (many pistils and stamens], it often has a different color than the "petals", which gives the flower a special charm.And the delicate flowers are painted very whimsically: white, yellow, all the nuances of transitions from pale pink and pale blue to velvety shimmering shades of red and blue.
- And this charming picture pleases more than one day - the life of a flower lasts a week or two, and a double one - almost three. By choosing the right varieties, you can achieve flowering clematis in the garden from spring to autumn.
- After all, the early species are covered with flowers two months after the spring awakening, and the later ones - at the end of summer. Their flowering will be interrupted only by stable frosts.
- Short-term drops in temperature at night (up to -2 ... -7 ° С) and light snow are not terrible for clematis - after warming, the buds open. The flowers of some species exude the scent of jasmine, primrose, almond.
Clematis fruits are numerous achenes with short or long pubescent columns and hairy beaks, collected in fluffy silky heads. 
From the history
the beginning of clematis cultivation in Western Europe dates back to the 16th century, and in Japan the clematis culture has an even longer history. In Russia, clematis appeared at the beginning of the 19th century as greenhouse plants.
Active work on the cultivation and introduction of clematis in our country began to develop only in the middle of the 20th century. And as a result of selection work, wonderful varieties and forms have been created, which further emphasize the unique charm of these magnificent plants.
Classification
with all the variety of species, varieties and forms of clematis, there is a convenient classification for gardeners, which allows not only to easily group plants according to the shape and color of flowers, but also to choose the appropriate agricultural technology. All varieties are divided into groups.
Zhakman
- large shrub vines with shoots 3-4 m long and a well-developed root system. The flowers are large, blue-violet-purple tones, odorless.
- They are distinguished by abundant and long flowering on the shoots of the current year.
- For the winter, the shoots are cut to the level of the soil or the bases of the shoots are left with 2-3 pairs of buds.
- The ancestor of the varieties of this group is the large-flowered variety 'Zhakman'(‘Jackmanii’) or K. x Zhakman(Jackmanii = Clematis x Jackmanii), when crossed with varieties of other groups.
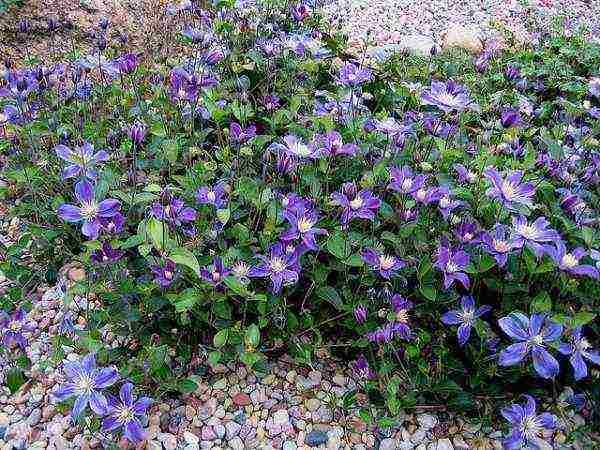
Viticella
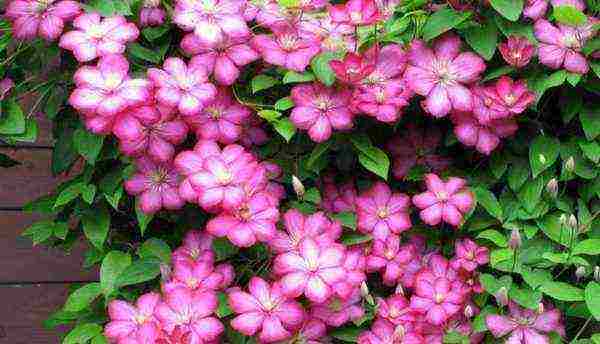
- shrub vines 3-3.5 m long. The flowers are open with a predominance of pink-red-purple velvety tones in color. They are characterized by lush and long flowering in summer on the shoots of the current year. Shoots are cut for the winter. The cultivars are obtained from the crossing of C. violet (C. viticella) with forms and cultivars of other groups. 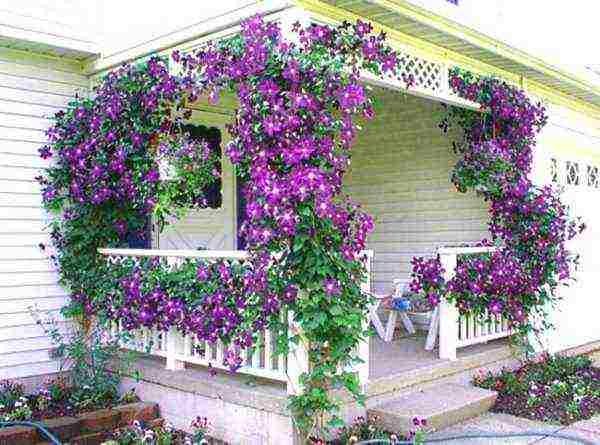
Lanuginose
- shrub vines with thin shoots up to 2.5 m long. The flowers are large, wide open, mostly light in color (white, blue, pink). They are distinguished by massive flowering on the shoots of the previous year. When pruning shoots in the fall of the next year, flowering begins in the second half of summer on the shoots of the current year.
Patens
- shrub vines 3-3.5 m long. Flowers are open, single, up to 15 cm in diameter or more, color from light to bright blue-violet-purple, deep violet tones. Many varieties have double flowers. Blooming on shoots last year. Shoots in the fall should only be shortened, removing the faded part, and covered until spring. Varieties from spreading clematis (C. patens) with varieties and species of other groups.
Florida
- shrub vines with shoots up to 3 m long. The flowers are open, of various colors, but light colors prevail. Blooming on shoots last year. They should be shortened to 1.5-2 m in length and kept under cover during the winter.
If you cut them off completely, then a rather weak flowering occurs only from the second half of summer on the shoots of the current year. The varieties were obtained by crossing the flowering clematis (C. florida) with species and varieties of other groups.
Integrifolia
- vigorous, climbing semi-shrubs up to 1.5 m high.The flowers are half-open, bell-shaped, up to 12 cm in diameter, of various colors. Bloom profusely in the summer on the shoots of the current year. Shoots are cut for the winter. The varieties are obtained from whole-leaf clematis (C.integrifolia) when crossed with other species and varieties. Many interesting, profusely flowering hybrids of this group were created in the Nikitsky Botanical Garden by A. N. Volosenko-Valenis and M. A. Beskaravaynaya.
- Depending on the size of the flower, there are small-flowered (up to 5 cm in diameter) and large-flowered (more than 5 cm in diameter) clematis. Large-flowered curly clematis include varieties and forms from the Jacqueman, Viticella, Lanuginoza, Patens groups.
- For large-flowered bush clematis - varieties and forms from the Integrifolia group.
- Large-flowered clematis are considered especially beautiful and graceful, but small-flowered ones are no less good, moreover, they are very undemanding to growing conditions, give a lot of greenery and easily propagate by seeds.
Small-flowered clematis are unusually graceful, they bloom abundantly, and the original seed heads adorn the plant in autumn. 
Choosing a variety of Clematis for the Moscow region with a photo
For planting in the North-Western regions of the European part of the country, Siberia, the Far East, where the summer is relatively short and the frosts are fair in winter, it is better to choose early and mid-early varieties from the Jacquemann, Viticella and Integrifolia groups, which bloom profusely on the shoots of the current year:
- Ville de Lyon,
- Japsi Queen,
- Victoria,
- Star of India,
- Luther Burbank,
- Hagley Hybrid,
- Madame Baron Vilar,
- Blue flame,
- Alexandrite,
- Golden Jubilee,
Alyonushka, Silver Stream, Polish Varshavyanka, Victory Salute. Anastasia Anisimova. Cosmic Melody. Huldin, Rouge Cardinal, Gray Bird, Cloud, AnEre Le-Roi. Lilac Star, Niobe ...
- However, there are hybrids from the Zhakman group that are more suitable for the south: Elegy, Alpinist, Biryuzinka. Openwork.
- In the north, these varieties bloom poorer over the years, although the mass of shoots increases. Clematis of the Lanuginoza groups, Patens, Florida (their first flowering occurs on the shoots of last year) are less winter-hardy and require shelter of vines even in the middle lane.
- However, the varieties Madame Van Hutte, Losoniana, Nelly Moser, Stone Flower, Ramona, Lazurshtern, Ball of Flowers, Nadezhda, V.E. Gladstone, Mrs. Hope, Mrs. Cholmondeli, and in such inhospitable conditions, flaunt the sophistication of shapes and colors.
- In the southern regions, clematis with double flowers bloom profusely: Madame Bajjun, Daniel Deronda, Jeanne d'Arc, Lord Neville. In the middle lane, these varieties will have only the first flowers on overwintered last year's shoots.
Species clematis
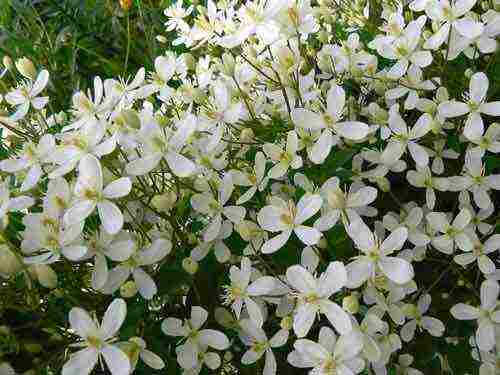
They know less, although many of them are not only quite effective, but also unpretentious, grow quickly, and are resistant to drought and fungal diseases. The average duration of flowering of small-flowered clematis ranges from 2-2.5 weeks to 3-4 months, the record holders include eastern, Texas, Tangut clematis, and Peter's clematis and mustachioed Balearic bloom in the south of the country even in winter.
In addition to these advantages, some of them have a wonderful aroma: almonds - Armand's and David's clematis, burning; primroses - straight clematis, Manchurian, Redera; jasmine - paniculata clematis. 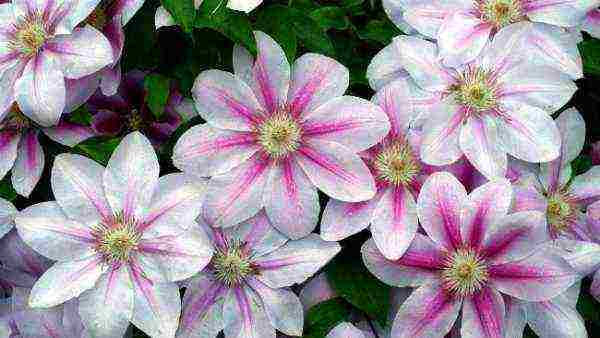
Location
clematis are light-loving plants. If there is not enough light, not only will you not achieve good flowering, you may not even wait for it at all. Therefore, in the middle lane, it is best to plant them in sunny or slightly shaded areas at midday. Only in the southern regions, where clematis often suffer from overheating of the soil, are they planted in partial shade.
For group plantings, each plant should receive enough light, and the distance between the bushes should be at least 1 meter. The wind is a terrible enemy of clematis not only in summer, but also in winter: it breaks and confuses shoots, damages flowers. Where snow is blown off in winter, planting clematis is not a good idea.And in the lowlands, where cold air accumulates, clematis feel uncomfortable.
Clematis are very demanding on moisture: during their growth, they need abundant watering. At the same time, wet, swampy areas with a high standing of groundwater (less than 1.2 times are not suitable for them, even if the water stagnates only for a short time. Waterlogging of the soil is dangerous not only in summer, but also in early spring during and after snow melting. planting clematis, you need to think about the natural outflow of water from the bush: add earth, plant bushes on ridges or dig slopes with a slope.
The soil
Clematis prefer fertile sandy loam or loamy soil, rich in humus, loose, from slightly alkaline to slightly acidic reaction.
Landing
since clematis can grow in one place for more than 20 years, they prepare the ground very deeply in advance. Usually, holes are dug with a size of at least 60x60x60 cm, and for group plantings, the site is prepared over the entire area.
- 2-3 buckets of humus or compost, 1 bucket of peat and sand, 100-150 g of superphosphate, 200 g of complete mineral fertilizer, preferably 100 g of bone meal, 150 -200 g of lime or chalk, 200 g of ash.
- On light soils, more peat, leaf humus and clay are added.
- If the soil on the site is wet, dense or clayey, then a 10-1 5-cm layer of crushed stone, broken brick or coarse sand is poured onto the bottom of the pit. Thoroughly mixed earthen mixture is poured into the pit and compacted.
In the southern regions it is preferable to do this in autumn (from late September to early November; in the middle lane the best time is September (in warm weather - and later); even further north, clematis are planted in spring (late April - May) or early autumn. Plants in containers can be planted whenever you want (except for winter, of course). 
Support
A solid, rigid support is installed in the center of the pit. A stretched rope is not suitable here, it will not protect young fragile whips from gusts of wind. Having covered the hole with soil about half, they make a mound on which the roots of clematis are spread to the sides and down. Holding the plant with your hand, pour the mixture to the roots, making sure that the clematis is planted deeply.
- Only then will he develop a tillering center, on which new buds are subsequently laid, shoots and roots are formed.
- Such bushes better tolerate severe winters, suffer less from heat. Clematis planted flush with the surface are short-lived: they do not bush, grow in 1-2 stems, their root system suffers from soaking.
- The larger the seedling, the deeper the planting should be. Young one-two-year-old plants are buried by 8-12 cm and the lower pair of buds, more mature and divided bushes - by 12-18 cm.
- If clematis is planted in the spring, then the planting pit is not filled with earth to the brim, but left 5-8 cm uncovered so that the “newcomer” does not “suffocate”.
As the shoots become lignified, this space is gradually filled with soil. After planting, clematis is watered abundantly, shaded from the sun, and the surface of the earth around the plant is mulched with peat. When planting in the fall, the ground is poured to the edges, the entire aboveground part is cut off to the soil level or slightly higher.
Requirements. to the planting material
when planting in autumn, clematis must have developed vegetative buds; when planting in spring, at least one shoot. The seedlings must have a minimum of 3 roots less than 10 cm long. Plants with a weak root system are placed in a “school” for growing. Use only healthy planting material (the roots of the seedlings should be elastic, without visible damage, swelling and thickening). 
Support
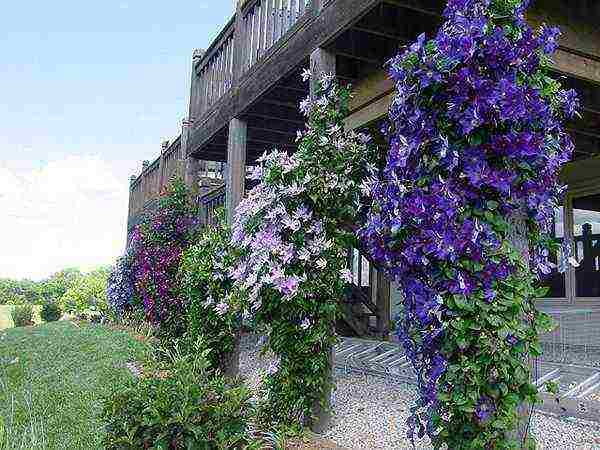
are of great importance for the normal development, abundant and prolonged flowering of clematis. It is important that they are not only practical and comfortable for the plant, but also beautiful. As a supporting structure, galvanized pipes with a diameter of 3/4 inch are used.Wooden lattices impregnated with linseed oil or stain, a strongly stretched mesh made of nylon rope or thick fishing line with a mesh of 15x15 cm go well with them.
Supports for clematis are often bushes of weigela, chubushnik, forsythia.
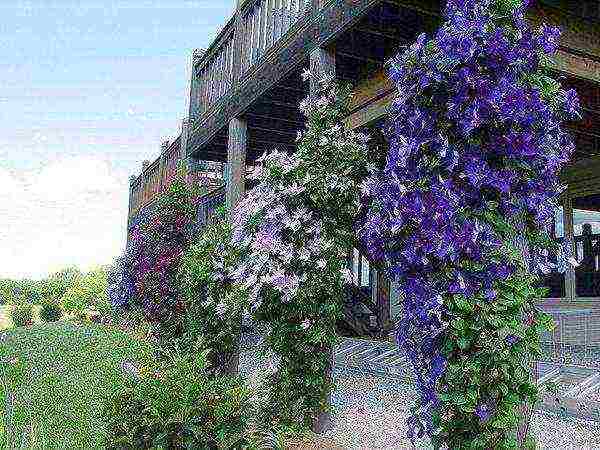
Vines cling to them, rise up, hang freely, and in the second half of summer the bushes hide under garlands of flowers. Screens and arches are traditionally considered to be excellent supports. Clematis look very impressive on horizontal surfaces. for example, on wire-mesh hoops with a diameter of about 1 m, attached to a galvanized pipe at different heights. All supports are made removable and removed for the winter.
| The reddish brick wall is very close to the purple star-shaped flowers of Clematis. However, his lashes need reliable support. To do this, a wire in the form of an extended letter S was pulled on hooks driven into the wall. If you keep running the clematis shoots by the wire all the time, its foliage will soon completely close the support and our "bindweed" will appear in all its glory. |
| A bamboo fence, braided in the photo on the left with a clematis variety ‘Nelly moser', Or an ordinary picket fence, as in the picture below, will provide the clematis with excellent conditions for climbing exercises. It is only necessary to evenly distribute its shoots over the surface of the fence. It is best to pass them between the planks or tie them to them with a cord so that the fence becomes covered with a solid floral carpet faster. |
Care
in the spring, clematis is spilled with milk of lime (200 g of lime per 10 liters of water per square meter). In dry weather, clematis are watered not often, but abundantly, making sure that the stream of water does not fall into the center of the bush. Clematis are fed at least four times per season after irrigation with full mineral fertilizer with microelements at the rate of 20-40 g per 10 liters of water or a diluted fermented mullein (1:10). Mineral and organic dressings alternate.
In summer, once a month, plants are watered with a weak solution of boric acid (1-2 g) and potassium permanganate (2-3 g per 10 liters of water), and the bushes are also sprayed with urea (0.5 tablespoons per 10 liters of water). Since clematis can suffer from overheating and dryness of the soil, in the spring, after the first watering and loosening of the planting, they should be mulched with peat or humus (in the northern regions) or sawdust (in the southern regions). To protect the soil from overheating and to close the lower part of the shoots, clematis are “knocked out” by lettucers.
In the spring, only for the first time, the vines are directed along the support in the right direction and tied up. Otherwise, the ones growing on the run will intertwine so much that no forces will be able to unravel them. Only in the varieties of the Integrifolia group, shoots and leaves are deprived of the ability to twine around supports, therefore, they are tied up as they grow all summer. In the fall, before sheltering for the winter, clematis bushes are cut and carefully cleaned of old leaves.
The first two or three years, young specimens require particularly careful care: in the fall or early spring, well-rotted manure mixed with any potash and phosphorus fertilizer, as well as wood ash (a handful of each in a bucket of humus) is added to the bushes, liquid fertilizing is done every 10-15 days in small doses. 
Pruning
the beauty of clematis largely depends on how correctly pruning is done. The first time the shoots are shortened when planting, this is important for the formation of the aboveground part and the development of the root system. One or two shoots grow from the lower pair of buds left during planting, which must be pinched in the summer. Regulatory pruning is carried out in the summer. To extend flowering, some of the shoots are cut in the spring.
At the beginning of summer, vines can be shortened again to the first vegetative buds, which will give rise to new shoots with buds. Tall varieties such as Gypsy Queen, Luther Burbank, Stone Flower, Ernest Markham have flowers at the top of the bush.
- Here it is worth cutting off several vines at a height of 0.7 to 1.5 m, then they will be covered with buds more evenly.Now about pruning for the winter.
- In the varieties of the Zhakman and Viticella groups, the flowers of which are formed on the shoots of the current year, before the shelter for the winter, the entire aerial part is cut off to a real leaf or to the soil level. Do the same with the varieties of the group.
- Integrifolia and some small-flowered clematis: Manchu, straight, Texas and six-petal. In varieties belonging to the Lanuginoza, Patens and Florida groups, flowers are formed on the shoots of the current year and last year.
Their first flowering occurs in early summer on overwintered shoots. The second is on the shoots of the current year, from mid-summer to autumn. The small-flowered clematis Armanda and mountainous belong to the same company. In the fall, before the bushes of these groups are sheltered for the winter, the vines are removed from the supports, all dry, weak, broken shoots are cut out, and the most developed, strong ones are shortened to 1-1.5 m, bent to the ground or rolled up in a ring and placed at the base of the bush. 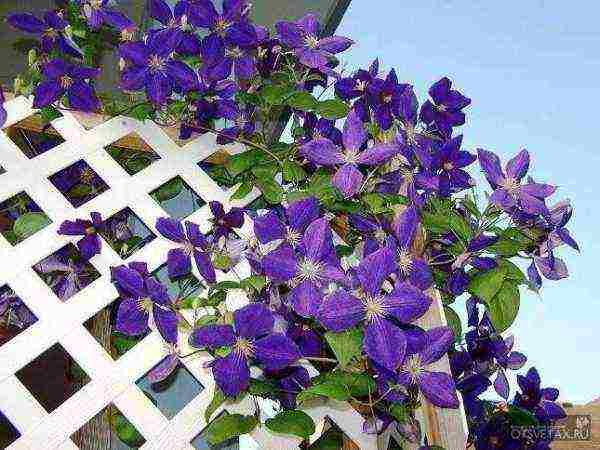
Clematis
Open-root clematis can be planted in fall or spring. If the clematis seedlings are in containers, then you can transfer them into the garden at any time of the year, except for winter.
Usually, clematis seedlings are purchased at the age of one to two years; annual seedlings are much cheaper.
Clematis seedlings may have a thin stem 5–20 cm long (it seems dry to many novice growers). Sometimes seedlings are sold without a stem at all, in the form of a bunch of roots with sprouts or with awakened buds.
If clematis seedlings were purchased after the onset of autumn cold weather, dig them in the garden and cover them with earth.
When in the fall it is not possible to plant purchased clematis, postpone planting seedlings until spring. In winter, store them in a cold, frost-free cellar or basement (at a temperature no higher than + 5C). Cover the root system of the seedlings with a slightly damp mixture of sawdust and sand, or other suitable loose soil.
In storage, plants need to be pinched to curb the rapid growth of shoots. Each pinch restrains their growth for 2-3 weeks. The growth rate of shoots depends on the temperature of the seedlings. By spring, clematis germinates strongly in the storage, therefore, after planting in the garden, seedlings with young shoots during the acclimatization period are shaded from the sun (in the first 10 days).
Clematis can withstand frosts down to -6C. 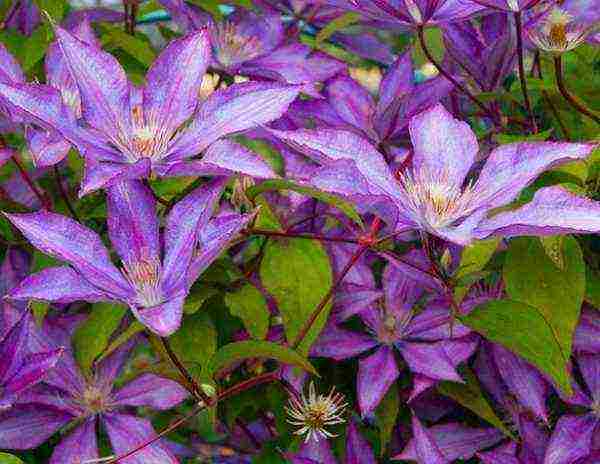
Let's talk more about how to plant and how to grow clematis
The cultivation of clematis usually begins with the acquisition of a one-year-old seedling.How and when to plant it? How to care for clematis in the future?
The best time to plant is early summer, when the danger of late frosts is over. But you can plant it in the fall, a month and a half before real frosts. The seedlings should have enough time to take root.
- It is recommended to plant clematis in a well-lit, wind-protected place.
- These plants thrive on alkaline, neutral or slightly acidic soils. For planting clematis, they dig holes, on heavy soils 70x70x70 cm, on light soils 50x50x50 cm.
- The distance between the pits is from 70 cm to one meter. Clematis cannot stand waterlogging and stagnant water. If the groundwater is close, gravel is placed on the bottom, broken brick with a layer of 10-15 cm.
Before planting clematis, the pits are filled with nutritious soil (fatty loose clay is well suited), add 1-2 buckets of humus and 50-100 g of superphosphate or nitrophosphate. Clematis seedlings are buried 6-8 cm, leaving a hole around the plant. The next year, the plants are deepened by another 10-15 cm. The degree of deepening depends on the soil - on heavy soils they deepen less, on light soils more. After planting, the shoots are cut shortly, leaving 2-4 lower buds. After a few weeks, when the shoots grow back, they are pruned again. Vigorous pruning of clematis in the first two years of life promotes better root development.
Soil erosion
After you have planted clematis, water it abundantly; for better access of water and preventing soil erosion, you can make a hole around the plant. It is a good idea to mulch the soil with sawdust or peat. The seedling must be shaded from direct sunlight.
When planting clematis, do not forget about the supports. They need to be installed right now. There are many beautiful fences, lattices, ladders on sale. You can make supports yourself, but remember that they must be not only strong, but also attractive in appearance, because lashes of clematis will close them only in the second half of summer. The height of the supports is from 1.5 to 3 meters.
As clematis grows, every 2-3 days, the shoots need to be tied to a support so that the wind does not tear them off. 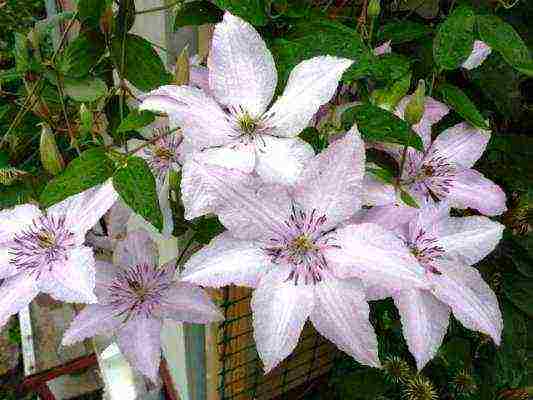
How to care for clematis
Watering and fertilizing
Clematis is water-loving: it requires abundant three-bucket watering at least once a week, and up to three times in the summer heat. Dig in three pots with a hole in the bottom to keep the plant moist enough. They will accumulate water during rain or watering and slowly feed the vine's root system on dry days.
- If the soil is not mulched, you will have to loosen it a day after watering, while weeding the weeds.
- Mulch protects the soil from excessive drying out, weathering and freezing, enriches it with microelements, helps in weed control.
- Do not neglect this manipulation. Mulch the soil around the clematis with sawdust, peat, or moss.
Several times a season, the plant needs to be fed. In May - with urea (1 tablespoon per bucket of water), from June to August - complex fertilizer for garden flowers at least twice. After the second bloom, provide nourishment for the clematis in winter. To do this, add 1 tablespoon of potassium sulfate and superphosphate to a bucket of water.
Watering
When growing clematis, watering plays an important role. Clematis must be watered abundantly, especially in the first two years after planting. Under three-year-old bushes, you need to pour 2-3 buckets once or twice a week. Proper watering is the key to a beautiful and lush flowering of plants.
For better moisture retention, it is recommended to loosen and mulch the soil near the plants. For mulching, you can use humus, peat, rotted sawdust.
In the first two years, clematis mainly grow horses, few shoots are formed, only 1-3. Single flowers appearing on these shoots are best cut off. Then, with proper, careful care, 5-6 year old bushes will develop dozens of shoots and hundreds of beautiful flowers will bloom on them. 
New strength - new shoots
From the third year, clematis are gaining strength, many new shoots grow. By pruning and pinching the shoots during the summer, flowering times can be adjusted. So, if you shorten some of the strong shoots, clematis flowers will appear on the growing new shoots later and the flowering will be longer.
Clematis are very responsive to feeding.
It is recommended to fertilize grown plants once a week. They are fed with full mineral fertilizer (30 g per 10 l of water per 2 sq. M of soil).
Can be fed with wood ash (1 cup per plant). As a fertilizer, mullein is well suited, which is diluted at the rate of ten parts of water for one part of manure.
| Plant calendula or marigold bushes at the roots of clematis. These plants secrete substances that repel pests. In addition, they will protect the clematis roots from overheating. |
Shelter of clematis for the winter
Clematis are natives of the warmest places of the globe, so they need shelter for the winter. In late autumn, all clematis are pruned, but pruned in different ways, depending on which group the variety belongs to.
So clematis from the Florida, Patens, Lanuginoza groups, whose flowers are formed on last year's shoots, are cut off by one third after the first frost, and then the vines of the plants are placed in rings on the ground and are well covered.The next year, in the first half of summer, large flowers will bloom on these shoots, later flowers will appear on the shoots of the current year.
And those clematis, the flowers of which are formed on annual shoots, for example, in the varieties of the Zhakman and Viticella group, in the fall need to be cut off, leaving hemp with 2-3 nodes.
After that, the plants are covered with boards, boxes, covered with earth, leaves, spruce branches, sawdust, rotted manure, weathered peat with a layer of 20-30 cm. And when snow falls, it must be thrown on top. 
Lay down, covering with leaves
Some growers do not cut the vines, but after laying them on the ground, cover the lower part with fallen leaves, crushed peat, dry inflorescences of large perennials about 20 centimeters thick. On such plants, lashes up to half a meter long with live buds are preserved. In the spring, they remove the shelter, cut off the dead parts of the vines.
- Then lateral shoots begin to develop faster, which bloom profusely all summer.
- Currently, varieties of frost-resistant clematis have been bred, blooming on last year's shoots. These are clematis: alpine, large-petal, Siberian, mountain.
- For such varieties, pruning is not necessary and they can winter without shelter in the middle lane. Siberian Clematis also withstands colder wintering, up to -30 degrees.
In the fall, it must be remembered that too dense shelter impedes ventilation, and plants can die from this.
Clematis in the spring
In spring, one should not rush to open clematis: intermittent frosts and bright sun have a detrimental effect on the kidneys. And when the danger of spring frosts has passed, the shelter is removed, after which the clematis are fed with nitrogen fertilizers, for example, urea - 40 g per 10 liters of water. On acidic soils, clematis is watered with milk of lime (200 g of slaked lime per 10 liters of water per 1 square meter of soil).
Requirements
For the successful cultivation of clematis, it is imperative to considera number of requirements this culture. Clematis are photophilous and prefer sunny places protected from the wind. The soil should be permeable, loamy, slightly alkaline (calcareous) or neutral, fertile, well fertilized and loose. Saline, damp, heavy, acidic soils are unsuitable for clematis. Please note that fresh manure and sour peat harm clematis.
Clematis does not tolerate nearby groundwater. In this case, plant the plants on a mound (on additionally filled soil), otherwise the roots of clematis, reaching a length of 1 meter or more, will rot.
If the soil in the garden is clay, from the clematis planting site, make a drainage groove to drain excess water and cover it with sand. At the bottom of the planting pit (60x60x60 cm in size), lay a layer of rubble 10-15 cm, perlite, etc. for drainage. 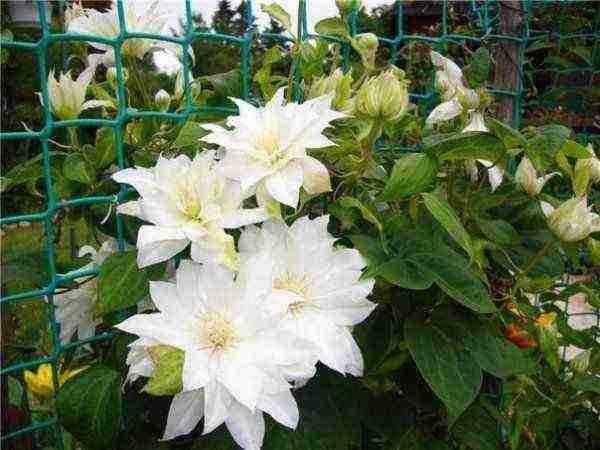
The soil
Completely replace the infertile soil layer extracted from the pit with fertile soil with the addition of humus (humus from the Californian worm, well-rotted compost).
- Also add 150 g of superphosphate and 200 g of lime, or 400 g of dolomite flour to the substrate, mix everything thoroughly.
- It is advisable to prepare the soil a year before planting the seedlings, so that it can be neutralized with lime material and settle well.
- Install supports before planting clematisfor vines (preferably removable for the winter) with a height of 2-2.5 meters. The support system should provide support for the vines in strong winds.
Never plant clematis close to a wall or fence, there should always be a space of 10–20 cm between them. At the very wall, the soil is usually very dry, and this, as a rule, leads to poor growth, rare flowering and plant death. When planting clematis near the house, install supports for them at least 30 cm from the wall. The water flowing down from the roof should not fall on the vines.
Landing
After the preparation of fertile soil, planting pits and the installation of supports,planting clematis... If the roots of the seedling are dry, soak the plant in cold water for several hours before planting.At the bottom of the planting pit, pour a bump of earth, put a clematis seedling on it and straighten it, evenly distribute its roots over the bump.
- Cover all the roots, the root collar of the seedling and the stem (if any) up to 5–10 cm with earth, making a depression to prevent water spreading during irrigation.
- If you are planting clematis in the spring, then cover it with earth up to the first internode. Abundantlypour a bucket of water.
- Until autumn, gradually add fertile soil so that the depression is filled up.
When planting clematis in the fall in the spring, you can remove part of the soil from the plants themselves, and add soil until autumn. This should be done in order to facilitate the emergence of shoots, weakened after plant transplantation, to the soil surface. 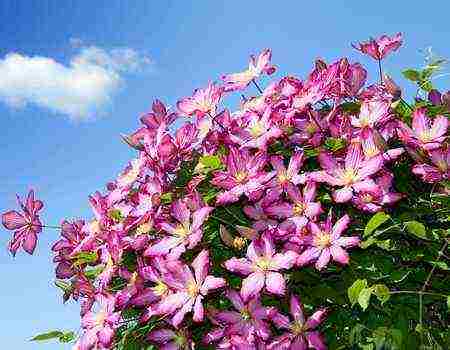
Landing
Choose a "cozy" spot on your site. There should be no strong wind here. It is advisable to take the place well lit. Clematis belongs to the vines, which means that he will need support. However, do not rush to plant a clematis plant near the wall of the house - the water dripping from the roof is extremely unfavorable for this gentle garden dweller. Retreat at least 30 cm from the walls of the building or fence. Remember that the flowers of the plant will unfold to the south, southeast.
The roots of an adult plant reach 1 m in depth, but they do not like swampy soil. If your site is located in a lowland, in the immediate vicinity of groundwater, you will have to fill in a mound in advance to raise the planting. When the place is chosen, dig a hole 60x60x60 cm. At the bottom, fill in a layer of drainage 10-15 cm thick. For this, broken brick, crushed stone, expanded clay, polystyrene are suitable. Then lay a layer of soil 5 cm thick. Next, fill the hole with nutrient mixture with the addition of 200 g of garden lime.
Now prepare a hole under the seedling clod, 10 cm deep more than the height of the clod itself. At the bottom, form a slide and lower the seedling, gently spreading the roots around it. Fill the remaining depression with soil to the level of the landscape. If the top of the plant loves sunlight, then the roots are shaded. Therefore, it is recommended to plant a cover plant within a radius of 1 m from clematis. Pansies and lobelia work well for this. These flowers will protect the soil from drying out and will not compete with the vine for nutrients, not to mention their aesthetic beauty.
Support
Select and install a vine support immediately after planting. Supports can be homemade - one or three bamboo or walnut rods connected by a pyramid. In garden centers, more decorative models are presented in the form of arches or metal nets in different versions. Place the first shoots on a support by hand, straighten and tie them up. Subsequently, the plants will cling to themselves due to the peculiarities of the structure of their stems.
In the first two years after planting, the shoots will grow slowly. Do not worry, this is due to the fact that at first clematis grows the root system, and only in the third year - the aerial part. But with the beginning of active growth, young branches can add up to 10-15 cm per day, reaching 2-4.5 m per season.
Clematis care includes:
- regular deep watering (at least 1 time per week, and in extreme heat - 2-3 times);
- loosening the soil (if it is not mulched);
- weed removal;
- top dressing (preferably organic) during the growing season - about 2 times a month.
In the first year after planting, clematis seedlings do not need to be fertilized. Further fertilize them in the same way as regular perennial flowers. Top dressing of clematis with "Strawberry Concentrate" showed good results. A suitable top dressing is water in which unsalted meat or fish has been washed.
Every spring, water clematis with milk of lime (dolomite flour, chalk) and a solution containing copper (one tablespoon per bucket of water).
Good results are obtained by dusting the lower part of the vines with wood ash after rain - this prevents clematis shoots from withering during frequent rains, especially on heavy soils.On light soils, wilt of clematis is rarely observed.
Formation
Clematis vines reach the greatest decorativeness at the age of 3-7 years.
After the age of seven, the flowers of clematis begin to shrink due to the lack of fertilizers and water, because in the heat, in the absence of good rains, irrigation water no longer penetrates deep to the roots (they reach a length of 60–70 cm or more). To prevent this from happening, you can dig 3-4 pots with a hole in the bottom around the clematis bush. When watering the plants, the pots are filled with water, which does not spread anywhere and penetrates deeply.
Clematis also suffer from overheating of the soil, and therefore mulch the ground around them with humus or moss. At the base of the vines, plant low-growing plants, for example, "marigolds" -calendula, which will also serve as protection of clematis from nematodes.
You can plant clematis on lawns, then the grass will protect the roots of the vines from the sun and overheating.
Almost all common varieties of clematis climb themselves to the support with the help of twisted or bifurcated leaf antennae, petioles. However, be sure to tie up young clematis once in the spring. To increase the decorativeness of the plant, direct some of the shoots in the right direction, first in the horizontal direction. Directional shoots will bloom below the main body of the plant. But bend the stems of the clematis very carefully, since the young green shoots are very brittle. During a warm evening and night, the shoots lengthen by 5–10 cm or more.
A clematis seedling grows 1-5 shoots over the summer, and in some varieties - up to 30. In the fall, before the onset of frost, cut the stems of the vines. 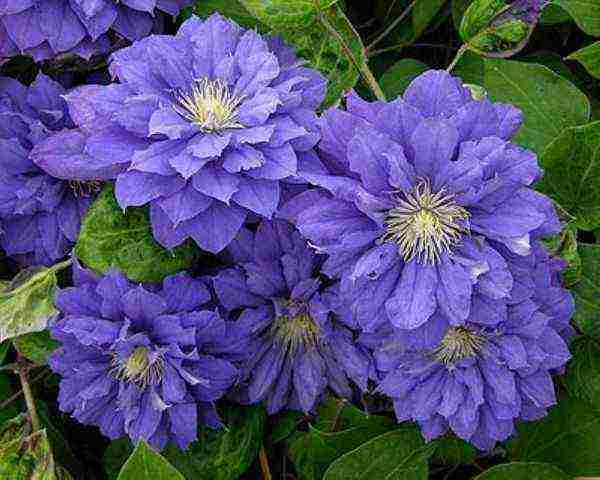
Wintering
Depending on the variety, clematis winter in different ways. They are divided into three groups: those that do not require cutting off shoots, that require cutting at a height of about 1 meter, and that require cutting at a height of 10-15 cm from the ground. This nuance must be graphically indicated on the package with the plant. Clematis do not freeze down to -6 ° C, in central Russia they require shelter.
- If your variety needs to prune shoots at a height of 1 meter, after pruning, carefully remove them from the support, twist them into a ring and lay them on the base of the stem.
- Sprinkle the plant with sawdust or leaves, cover with a wooden box without a bottom (such as in which fruit is sold in the markets), and on top - with a film, tar paper or roofing felt, pressing down their edges with stones.
- Do not cover the clematis too tightly, otherwise it may overheat.
In the spring, clematis does not show signs of activity for a long time, even if it tolerated the cold well. In this case, many novice gardeners make the mistake of digging up the plant and examining the roots. Liana does not like this very much, she does not tolerate any anxiety. Continue your routine, be sure to feed with urea in May, and be patient. Shoots will certainly appear when the time is right.
Wintering
with proper shelter, clematis bushes can withstand frosts up to 40-45 °, however, the main danger in winter and early spring is not frost, but waterlogging of the soil. In addition, after frequent thaws during the day and night frosts, layers of ice can form above the soil, which can break the roots and destroy the center of tillering.Therefore, it is important to completely exclude the ingress of water in winter to the soil surface and the base of the bush.
They cover the bushes when frosty weather sets in, the air temperature drops to minus 5-7 ″ and the soil begins to freeze. In the middle lane, this falls on November. The bushes of the Zhakman, Vititsella and Integrifolia groups cut into one or two pairs of buds (10-15 cm) or to ground level are covered with dry earth or weathered peat, a mound with a diameter of 60-80 cm is formed above the plant.
Each plant takes about 3-4 buckets. Together with snow, such a shelter will reliably protect the root system of clematis from freezing.
If you need to preserve the lashes in the varieties of the Lanuginoza, Patens and Florida groups, in addition to dry land, the bushes are covered with boards, spruce branches, and on top with pieces of roofing material or sheets of old iron.If the frosts are too strong or there is little snow, it is added to the bushes additionally. In the spring, the shelter is removed gradually, part of the peat is left until the night frosts are gone. 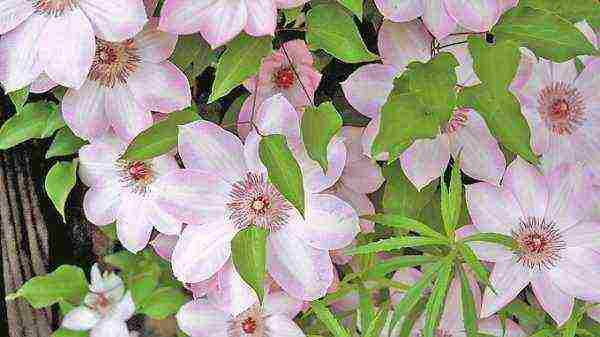
Pruning
is necessary for clematis to obtain long-term and abundant flowering, control flowering times, biological renewal of the bush and harmonious spatial distribution of shoots.
The degree of pruning depends on the difference in the biological properties of clematis from different taxonomic groups.
Depending on the characteristics of pruning and the intensity of flowering, clematis are combined into three groups. According to the new classification, there is no distinction between types of clematis in large-flowered varieties; they are now divided only by the method of cutting into three groups:
First group pruningand or group A
- unites clematis, in which flowers are formed on the shoots of the previous year. On the shoots of the current year, flowers sometimes appear in small quantities. This group includes species and varieties of clematis from the former groups of Atragene, Montana, etc., which are grown without pruning (or after flowering, the generative part of the shoot is cut off). If the bush is very dense, then some of the faded, weaker shoots are cut to the base. This contributes to the development of more vital shoots of the current year, which will bloom next year.
Before sheltering for the winter in clematis of group A, only the generative (flowering) part of the shoots of the current year is cut off and weak shoots are completely cut out.
Second trim group or group B
- unites clematis, in which flowers develop both on the shoots of the current year and on last year's shoots. These include the former groups of clematis Lanuginosa, Florida, Patens and some varieties with characteristics similar to these groups. These clematis have early flowering in late May-June on the shoots of the previous year. The flowers are large, often double or semi-double; flowering time is short.
The second, or summer, flowering of clematis occurs on the shoots of the current year, it is abundant - it begins in July and continues until autumn.
To get a long flowering of these clematis, they are pruned in two steps. First, in the summer, the generative (flowering) part of the shoot of the previous year is cut off after flowering; if the bush is very dense, the entire shoot is cut out.
Shoots of the current year are pruned before clematis shelter for the winter.
Depending on the density of the bush or to obtain early flowering next year, a different degree of pruning is used. Only the generative part of the current year's shoot is removed if they want to achieve early flowering. Medium pruning (up to the first true leaf) and strong (removal of the entire shoot) are used when adjusting the number of shoots and for uniform flowering of group B clematis in the next year. 
Third group pruningand or group C
- unites clematis, in which the bulk of flowers are formed on the shoots of the current year (former groups Jackmanii, Viticella and their hybrids). They bloom from July to mid-September; the maximum flowering is observed at the end of July - in August. Pruning this group of clematis is very simple: before sheltering for the winter, cut off all the shoots to the first true leaf (you can leave more buds)or to the bottom.
After the autumn pruning of clematis, they are carried outshelter before wintering.
Clematis of the third pruning group
in the fall, cut the shoots to the first bud, counting from the ground, or, as a last resort, in early spring (but then the bushes will be more difficult to cover for the winter). Cover them lightly before wintering. For a winter shelter, it is enough to overlay the base of the clematis bush with woody leaves, placing spruce paws or "dog" mint under the leaves to protect the shoots from damage by rodents. Cover the top of the shelter with a piece of whole plastic wrap, shading it from the sun. The winter shelter of clematis should be loose, but thick enough.
Clematis have the second and first trimming groups
you can leave some of the shoots, cutting them at a height of 70-100 cm to large ripe buds. If there are no such buds (and this can happen during a cold short summer), then the shoots must be cut to the level of the soil or the lower part of the shoots 20–30 cm long should be left. more often this happens after a cold summer, when they do not have time to ripen.
- For clematis of the second and third pruning groups, cut off the leaves on the remaining vine and lay it on spruce paws or on "dog" mint, or just on the ground. The shoots left in the spring can be used to propagate clematis by layering. Pour dry leaves on top of the shoots, put wooden shields on the leaves.
- Place bricks or any other suitable material underneath to prevent snow shields from falling on the ground. Lay a whole plastic wrap on top of the shields.
You can do it differently: put shields on bricks, lay dry leaves on the shields, and a whole plastic wrap on top of the leaves. - This method will require more leaves, and from the severity of the snow, the leaves are caked, which means that part of the thermal insulation is lost. But on the other hand, with this method of shelter, there are not many mouse nests under the shields. Mice use clematis shoots for nests, and the water rat eats the inside of the shoots.
Temperature
Shoots of clematis are afraid not so much of frost as of wet and cold weather, icing. Therefore, it is important to keep the clematis shoots dry in winter.
But with excessive cover, the shoots can get out.
It is also very important in the spring to remove the shelter from the clematis in time.
Never use sawdust to cover clematis - they get wet, freeze, thaw very slowly in spring (because of this, in spring it is impossible to remove the shelter in time), which can lead to damping of plants.
- Next year, on the left and overwintered shoots of clematis, flowers will appear 20-30 days earlier than on the shoots of the current year. And in some varieties, flowers can even be semi-double.
Some clematis (Jackmanii, Viticella) tolerate severe frosts - up to -40C (MA Beskaravaynaya). - But this only applies to the underground part of the plant. The soil temperature rarely drops below critical, and it is always much higher than the air temperature (especially if the ground is covered with at least a thin layer of snow).
- In urban conditions, during thaws, snow melts faster than in fields.
Clematis that are not sheltered for the winter are damaged by sudden changes in temperature and humidity. The least winter-hardy is the root collar of clematis. If an uncovered vine is on the surface, then its bark will crack from frost; during a thaw, moisture gets under the bark, which freezes and expands the cracks even more.
Many varieties and hybrids of clematis in the fall, before the ground freezes, sprouts underground from the root collar, which do not break through to the soil surface until warm spring days. These sprouts can suffer from winter frosts. 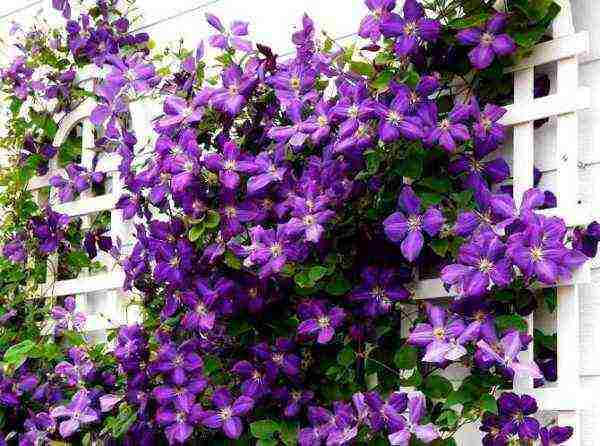
Reproduction of clematis
can be done in several ways, the simplest of which are:
- division of bushes;
- spring pinning of shoots;
- reproduction by autumn and summer layering;
Division of bushes
clematis is carried out at the age of no older than 6-7 years. Later, it is very difficult to do this because of the developed powerful root system, which breaks off strongly. Dig up the clematis bushes, free them from the ground and cut them into pieces with a pruner or knife so that each plant has buds on the root collar.
- For breeding clematisautumn layering in October, cut off all the leaves from the shoots, the faded part to a well-developed bud. Tie the shoots neatly into a bundle (you can use a ring, as space permits), put them in the grooves.
- Pour a layer of peat under the tourniquet and on top (peat by its nature is a very moisture-absorbing material, retains moisture for a long time and allows air to pass through well), and then compact the earth and soil, cover the whole plant well.
- Water often and abundantly the next year.After the sprouts appear, mulch the soil surface with humus, moss, peat. By autumn, most of the young plants that have emerged are ready for planting. Only well-developed clematis buds grow.
- Roots are formed throughout the shoot, but the largest number of roots are located under the buds. It is better to dig up plants with a pitchfork - less damage to the roots.
Layers for propagation can be laid in prepared grooves in spring, but then it is more difficult to keep the shoots in winter.
Better to spend in the springpinning shoots of clematis in pots with soil. The essence of this method is that last year's clematis shoots are pinned at the site of the knot into pots prepared in advance and dug into the ground, which are filled with very loose soil with peat. The pots should be buried in the soil below its level so that the water does not spread during watering. Gradually, as the seedling grows, moisture-absorbing soil is poured in the form of a tubercle. By the fall, high-quality clematis seedlings grow from the pinned shoots.
Summer layering
it is most convenient to propagate clematis in a vertical way. To do this, in the spring, put a box without a bottom on a growing plant. As the clematis shoots grow, pour light fertile soil into the box until it is almost filled to the top. However, it is always necessary to leave the upper part of the shoot with well-developed two buds uncovered, otherwise the covered young shoots of clematis will stop growing.
Water the soil frequently and abundantly. With good care, by the fall, some of the well-developed clematis will be ready for planting in the ground (the rest require growing, since they have a weak root system). Keep weak plants buried in the basement in winter.
Fascination of numbers
Clematis can be propagated in three ways: by seed, by rooted layering and by dividing the rhizome. The seeds are treated with a rooting stimulant and planted on seedlings. For the first year, you can plant them in the ground for insulation. The seedlings have no peculiarities of care.
- You can propagate clematis by layering. To do this, select a section of the stem with an internode, leave one or two nearby leaves and plant it in a hole, deepening the internode into the ground.
- In the first year, the plant can also be planted under insulation, and the next year, it can be planted in a permanent place.
- The root of an adult, but not older than seven years, clematis can be cut into pieces with a sharp pruner and planted.
As you can see, clematis is not as difficult to grow as many people think. But in their decorativeness, they are superior to many other plants. Abundant flowering will delight you twice a summer, and luscious greenery - a whole season, if you give the liana enough attention and love.
Choosing distribution methods
There are several ways to propagate clematis: by seeds, layering, cuttings and dividing the bush.
Clematis from seeds appear at different times. After sowing the seeds, do not be upset if they do not sprout from you in the same summer. The seeds of some varieties of clematis germinate only in the second and even in the third year, and sometimes even later. It is useful to water such crops in the summer after 2-3 weeks with a weak solution of boric acid (1-2 grams per bucket) and potassium permanganate (2-3 grams per bucket).
When clematis is propagated by layering, a young shoot 20-30 cm long must be bent to the ground and laid in a groove 5-10 cm deep.In the places of internodes, pin the shoot with wire brackets or press with pebbles and cover it all with earth, leaving a free top with several leaves. As the shoot grows, fill in new internodes, leaving only its tip above the soil. Remember to water the soil regularly and abundantly.
Leave the rooted shoot of clematis in place for the winter. And in the spring, cut the lashes between the knots and plant the plants in a permanent place.
Reproduction of clematis by cuttings is also possible.Cuttings with one or two internodes should be cut at the beginning of flowering plants from the middle part of the vine, leaving 2 cm above the node and 3-4 cm below.To accelerate root formation, place the cuttings for 16-24 hours in an aqueous solution of heteroauxin (50-75 grams for 1 liter of water).
Cuttings
Plant the cuttings of clematis obliquely in boxes or containers in washed sand, peat or a mixture of sand and peat in equal parts. At a temperature of 20-25 degrees, cuttings root better, so spoil the container with a film and put it in a greenhouse or greenhouse. It is very useful to spray the cuttings during the rooting process.
Depending on the variety of clematis and the conditions created, the cuttings take root in a month or two. After that, they need to be transplanted into pots with nutrient soil. If it is too late to plant seedlings in the ground, keep the plants in a room with a low temperature of + 2-7 degrees during the winter. Water sparingly, but be careful not to dry out the ground. In the spring of next year, clematis seedlings are suitable for planting in a permanent place. Plants from cuttings, rooted in summer, will bloom by the fall of next year.
Fertilization
small-flowered clematis propagate, as a rule,seeds... Large-flowered plants are bred exclusively vegetatively. The easiest way to do this is by dividing the bush. In varieties with a high tillering ability (Anastasia, Anisimova, Zhanna d'Arc, Hagley Hybrid, Madame Baron Villard, Cosmic Melody), the division of the bush is used for rejuvenation, since very dense bushes, even with good care, often lose their decorative effect.
Clematis can be divided both in the fall and in the spring, until the buds have started to grow or have just begun to swell.
However, if in the fall this operation is almost painless for plants, since the buds are only marked and small, then in the spring time it is necessary to meet extremely tight deadlines (from the moment the soil thaws to the beginning of growth), since it is easy to damage the rapidly growing shoots. Clematis, divided in spring, will be about 2-3 weeks behind in growth compared to its autumn counterpart. In an adult 5-8-year-old plant that has a sufficient number of shoots, the ground part is cut off, leaving only 2-3 pairs of buds below.
Dig up with a clod of earth
The bush is carefully dug out with a clod of earth, taking care not to damage the long cord-like roots. If the soil is not easily shaken off, the roots are washed with water from a hose. Then with a knife it is divided through the center of the bush into independent plants. They work without haste, carefully, making sure that each section has enough roots and at least one shoot with buds.
However, you can do without digging. On one side of the bush, a trench 50-70 cm deep is torn off, and the bayonet of the shovel is buried in the soil radially to the center of the bush in order to damage as few roots as possible.
At a half-dug bush, shoots with roots are separated with a tool, each of which will become an independent plant. Before planting, the delenki are examined, only healthy ones are used. The roots are pruned and disinfected in a pink solution of potassium permanganate.
Layers
It is quite easy to propagate your favorite variety by layering. There are several techniques. Here is the first one. The bush is sprinkled with peat or humus along the bottom 2-3 pairs of leaves. Within a year or two, the lower nodes of the shoots are overgrown with their own roots. Having removed the poured substrate, the rooted shoots are cut off from the mother plant and planted.
- This method is good because the bush itself is not injured. The second method requires some free space.
- In late summer or autumn, grooves 8-10 cm deep are dug around the bush in the radial direction. Clematis shoots with well-formed buds are removed from the support, laid out in grooves one at a time, pressing them to the ground with staples made of thick wire, and sprinkled with loose nutrient soil.
- The top of the shoot (20 cm) is taken out. You can do the same with a vine rolled around the base of the bush and covered for the winter.
In the spring, when the plant is freed from the shelter, one or more of these lashes are laid in a groove. Layers are regularly watered and fed during the summer. From almost all the covered buds, vertical shoots begin to grow, and rooting occurs at each node.
It is best to separate rooted shoots from the bush in the fall of next year or in the spring of a year later. By this time, each new shoot will have a good root system. From one sprinkled lash in a year or two, you can get up to 10 seedlings that do not need growing, the bush itself does not suffer. Another way of vegetative propagation isgreen cuttings. 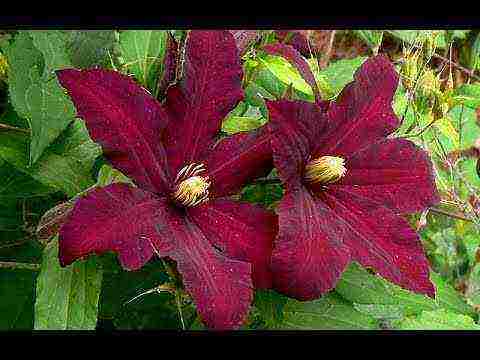
Clematis is a beautiful plant belonging to the Buttercup family. It is widespread in subtropical and temperate climates. Often found in forests, near rivers. Gardeners actively use clematis, aka clematis, in landscape design. This flower is especially good for decorating trellises and arbors. The plant has many varieties, distinguished by bright flowering, a variety of shades and shapes. Today we will talk about the types of clematis, planting and caring for them in the open field for beginners who usually do not know where to start growing these flowers on their site.
Botanical description
Clematis is a perennial plant with a varied structure. Lianas are most often found, but there are tree-like dwarf shrubs and grasses. Rhizomes are fibrous or pivotal. Young shoots of plants are covered with smooth green bark. By structure, ribbed and rounded shoots are distinguished. Rarely there is a glandular pile on the surface. The diameter of the shoots is only 25 mm, the length is one meter. Leaves grow along the entire length of the processes. The color of the leaves is often green, but there are varieties with purple leaves.
Clematis usually blooms in spring. Flowers are collected in panicles, scutes or semi-umbrellas, can grow singly. Petals in the corolla are up to 8 pieces, in terry varieties there can be up to 70 of them. Coloring - yellow, white, red, blue, blue. There are streaks or streaks on the surface. Each flower blooms for up to three weeks. A scent of flowers with notes of almonds, jasmine and spices.
Types of clematis
There are more than 300 main types of clematis. All of them are divided into many decorative varieties. Plants are distinguished by the size of flowers, by the place where the buds appear.
- Clematis Jacques. This is a group of varieties with flexible long shoots. Varieties differ in feathery leaves. Flowers can be of any color other than white. The flowers are large, odorless. This group includes varieties: Star of India, Rouge Cardinal.
- Clematis hot. Liana grows up to five meters in height. It has leaves with ovoid lobes. Flowers bloom in June-August. They are white with narrow petals. The buds are paniculate inflorescences. A prominent representative of the group is the Miss Bateman variety, which blooms twice a year.
- Clematis of Manchuria. A branchy plant requires good lighting, frost-resistant. Shoots grow up to three meters. Small bright green leaves. In summer, the plant covers many white star-shaped flowers with a delicate aroma.
- Clematis Tangut. The culture reaches three meters in height. Shoots are ribbed. The leaves are feathery, bright green in color. They are sparsely located, the flowers are tulip-shaped, beige or yellow in color.
- Clematis purple. Shoots are covered with delicate foliage. The flowers are large, most often of purple hues. Varieties: Ville de Lyon, Polish Spirit.
- Flowering clematis. Shoots reach three meters in height. The petals are light pink in color. The most popular varieties: Comtesse de Bouchaud, Vivian Pennel, Purpurea Plena Elegance.
Reproduction methods
Cultivation of clematis requires certain knowledge. Clematis reproduces vegetatively and by seeds. Small-flowered, species plants mainly reproduce by seeds. The varieties differ in seed size:
- small seeds germinate in a month or two;
- medium seeds germinate in 20-24 weeks;
- large seeds give irregular shoots after 30-32 weeks.

When is it better to plant clematis seeds in spring? In early spring, small seeds are sown. Larger ones are planted in December. It is recommended to pre-plant seedlings. For this, the planting material is soaked in warm water for 10 days, the water is changed up to five times a day. Then the seeds are planted in a shallow box, where a mixture of garden soil, sand, peat is poured. They are sealed to a landing depth of no more than 10 mm. The box is covered with foil and kept at a temperature of 25 ° C. You regularly need to spray the soil, ventilate the seedlings.
As soon as the seedlings appear, you need to provide the seedlings with diffused bright lighting. When two true leaves appear, the sprouts dive into separate containers. Planting is done in early summer. Clematis is first placed on the garden bed in a shaded area. The distance when planting is 20 cm. The tops of the shoots are pinched. A reliable shelter for the winter is required. In the spring, a transplant is carried out, increasing the distance to half a meter. Two-year-old seedlings can already be replanted.
Reproduction by layering is also effective. This method is used in autumn and summer. Summer layers develop better and faster, but winter worse. The peduncle should be removed to the nearest bud. A groove is made in the ground, where a thick layer of peat is introduced, where the branch is fixed along its entire length. Cover the branch from above with earth and compact the soil. As soon as the cold weather sets in, you need to insulate the bush. In the spring, young shoots appear, the plant will be fully formed by autumn, it will be ready for division. Digging is carried out using a pitchfork.
Perennial bush clematis (6-7 years) are divided into several parts. Old bushes have a developed rhizome that can be easily damaged. The shrub is completely dug up in the spring, freed from the soil, cut with a knife or pruner into pieces. It is necessary that each part has several buds at the root collar.
Clematis can be propagated by cuttings. In summer and spring, semi-lignified or green shoots with two knots are cut. At the bottom, they are treated with a growth stimulant. It is best to root in a special greenhouse with high humidity. The temperature should be 18-20 degrees.
When to plant clematis
Planting time, clematis care depends on the type of root system. If cuttings with closed seedlings are planted in a permanent place, this should be done in spring or autumn. Cuttings with an open root system should be planted in the spring, in April-May. It is important not to miss the dates, since the vine has an early growing season.
Planting clematis in the fall has many features, in contrast to the spring planting. The plant should take root before frost. You will need to think about insulating the planting site for the vines for the winter. Dry leaves, lutrasil or other covering material can be used.
General rules for planting clematis
How to plant clematis in spring
Planting clematis in the spring is carried out with a strong burial of seedlings. The root collar is placed 10 cm below the ground level. It is necessary to take into account when planting and other preferences of clematis. Seedlings for planting are purchased in specialized stores. If leaves have already appeared on the purchased seedling, you need to put them on the windowsill until spring, caring for them like an ordinary flower. If there are still no buds on the seedling, it is better to keep the seedlings in the cellar until spring.
They start planting clematis in open ground when the frost has passed. For plants with dormant buds and open roots, it is preferable to plant in April. A well-lit place is selected, but it is also worth considering the planting region: planting in the Urals will differ from planting clematis in the Leningrad region. It is necessary to take into account the variety of clematis, some varieties prefer partial shade.
They dig a large enough planting hole if the soil for clematis is fertile, if the soil is sandy, clayey, the hole should be 50x50. Be sure to put the nutrient mixture into the pit.You can make it from peat, forest land, humus, sand, adding ash and mineral fertilizers there. Ash feeding is especially useful for clematis. If the soil is acidic, fertilize it with dolomite flour or lime.
In the first year after planting, one should not hope for a rapid growth of the shoot. The ground part will develop. The upper part is trimmed, leaving 3 buds on each shoot. It is necessary to cover the shoots from the sun, water more often. When buds appear, they must be removed immediately. After a year, the bush will take root and begin to actively develop.
How to plant clematis in the fall
Autumn planting of clematis should be carried out in September. It is not recommended to plant the plant later. A young seedling needs to take root before the onset of winter. If the seedling was purchased later, it is better not to leave it for the winter in the basement or cellar. Planting and caring for clematis outdoors in autumn and spring is not much different.
Caring for clematis in the fall consists of feeding, watering and autumn pruning. In dry autumn, clematis should be watered regularly. But watering should be moderate, too abundant watering is destructive for plants. It is not recommended to feed clematis in the fall.
We will tell you how to plant clematis outdoors and how to care for it as a beginner. Please note that clematis requires special attention to itself. With proper care, they will delight you with their flowering and decorate your home.
The article presents the most complete material for caring for clematis planted in open ground. Once familiarized, you will be able to grow beautiful healthy flowers, and you will not have any difficulties.
Clematis will become an aesthetic element of your exterior. One of the most frequent questions coming to our editorial office: what varieties of clematis are suitable for the Moscow region. We tried to reveal the topic of the selection of varieties for different growing regions as much as possible.
Description of Clematis with photo
Belongs to the buttercup family. In nature, there are about 300 species that can be found on all continents (except Antarctica) - in forests, steppes, along river banks, in gorges and on rocky placers.
- Types of clematis vary greatly among themselves. In herbaceous perennials (C. mandshurica, C. recta, C. texensis) shoots die off by the end of the growing season. Semi-shrubs (C. heracleifolia, C. integrifolia) have a lignified lower part that persists for several years, and an upper one that dies off every year.
- Shrubs (C. fruticosa f. Lobata) have completely lignified wintering shoots. Most of the same species (C. tangutica, C. vitalba, C. viticella) belongs to the group of lianas-leaf climbers, which use supports, climbing them with the help of leaf stalks.
- The root system of clematis is of two types: pivotal (C. tangutica, C. serratifolia) and fibrous, C. viticella). It must be remembered that clematis with a tap root system does not tolerate transplantation well. It is better to plant them immediately in a permanent place.
Name
The name "clematis" comes from the Greek wordklema, which once denoted every climbing plant. Of the many popular names (lozinka, grandfather's curls, warthog, etc.) in Russia, "clematis" is most often used. Probably, this vine was named so because of the strong smell of dug roots or because its seeds have a curved outgrowth.
Escapes
Clematis have thin, 2-5 mm in diameter shoots of the current year. In herbaceous species, they are round, green, in woody ones - four-hexagonal, light or dark reddish-brown in color. They develop in spring from dormant buds on the underground part of the plant or from aboveground buds of overwintered shoots.
Clematis leaves are paired, simple or complex, consisting of three, five or seven leaves, in addition to the usual green, there are forms with a purple color.
Clematis flowers, as a rule, are bisexual, single or collected in inflorescences of various shapes (scutellum, panicle, semi-umbrella).The role of petals in clematis is played by sepals, in number from four to eight, in double varieties - up to seventy.
"Spider"
In the center of a simple flower is the so-called lush "spider" (many pistils and stamens], it often has a different color than the "petals", which gives the flower a special charm. And delicate flowers are painted very whimsically: white, yellow, all the nuances of transitions pale pink and pale blue to velvety shimmery reds and blues.
- And this charming picture pleases more than one day - the life of a flower lasts a week or two, and a double one - almost three. By choosing the right varieties, you can achieve flowering clematis in the garden from spring to autumn.
- After all, the early species are covered with flowers two months after the spring awakening, and the later ones - at the end of summer. Their flowering will be interrupted only by stable frosts.
- Short-term drops in temperature at night (up to -2 ... -7 ° С) and light snow are not terrible for clematis - after warming, the buds open. The flowers of some species exude the aroma of jasmine, primrose, almond.
Clematis fruits are numerous achenes with short or long pubescent columns and hairy beaks, collected in fluffy silky heads. 
From the history
the beginning of the cultivation of clematis in Western Europe dates back to the 16th century, and in Japan the culture of clematis has an even longer history. In Russia, clematis appeared at the beginning of the 19th century as greenhouse plants.
Active work on the cultivation and introduction of clematis in our country began to develop only in the middle of the 20th century. And as a result of selection work, wonderful varieties and forms have been created, which further emphasize the unique charm of these magnificent plants.
Classification
with all the variety of species, varieties and forms of clematis, there is a convenient classification for gardeners, which allows not only to easily group plants according to the shape and color of flowers, but also to choose the appropriate agricultural technology. All varieties are divided into groups.
Zhakman
- large shrub vines with shoots 3-4 m long and a well-developed root system. The flowers are large, blue-violet-purple tones, odorless.
- They are distinguished by abundant and long flowering on the shoots of the current year.
- For the winter, the shoots are cut to the level of the soil or the bases of the shoots are left with 2-3 pairs of buds.
- The ancestor of the varieties of this group is the large-flowered variety 'Zhakman'(‘Jackmanii’) or K. x Zhakman(Jackmanii = Clematis x Jackmanii), when crossed with varieties of other groups.
Viticella
- shrub vines 3-3.5 m long. The flowers are open with a predominance of pink-red-purple velvety tones in color. They are characterized by lush and long flowering in summer on the shoots of the current year. Shoots are cut for the winter. The cultivars are obtained from the crossing of C. violet (C. viticella) with forms and cultivars of other groups. 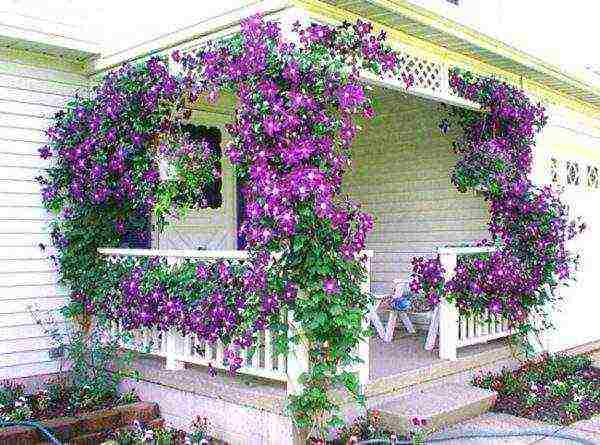
Lanuginose
- shrub vines with thin shoots up to 2.5 m long. The flowers are large, wide open, mostly light in color (white, blue, pink). They are distinguished by massive flowering on the shoots of the previous year. When pruning shoots in the fall of the next year, flowering begins in the second half of summer on the shoots of the current year.
Patens
- shrub vines 3-3.5 m long. Flowers are open, single, up to 15 cm in diameter or more, color from light to bright blue-violet-purple, deep violet tones. Many varieties have double flowers. Blooming on shoots last year. Shoots in the fall should only be shortened, removing the faded part, and covered until spring. Varieties from spreading clematis (C. patens) with varieties and species of other groups.
Florida
- shrub vines with shoots up to 3 m long. The flowers are open, of various colors, but light colors prevail. Blooming on shoots last year. They should be shortened to 1.5-2 m in length and kept under cover during the winter.
If you cut them off completely, then a rather weak flowering occurs only from the second half of summer on the shoots of the current year. The varieties were obtained by crossing the flowering clematis (C. florida) with species and varieties of other groups.
Integrifolia
- vigorous, climbing dwarf shrubs up to 1.5 m high. The flowers are semi-open, bell-shaped, up to 12 cm in diameter, of various colors. Bloom profusely in summer on the shoots of the current year. Shoots are cut for the winter. The varieties are obtained from whole-leaf clematis (C.integrifolia) when crossed with other species and varieties. Many interesting, profusely flowering hybrids of this group were created in the Nikitsky Botanical Garden by A. N. Volosenko-Valenis and M. A. Beskaravaynaya.
- Depending on the size of the flower, there are small-flowered (up to 5 cm in diameter) and large-flowered (more than 5 cm in diameter) clematis. Large-flowered climbing clematis include varieties and forms from the Jacqueman, Vititsella, Lanuginoza, Patens groups.
- For bush large-flowered clematis - varieties and forms from the Integrifolia group.
- Large-flowered clematis are considered especially beautiful and graceful, but small-flowered ones are no less good, moreover, they are very undemanding to growing conditions, give a lot of greenery and easily propagate by seeds.
Small-flowered clematis are unusually graceful, they bloom abundantly, and the original seed heads adorn the plant in autumn. 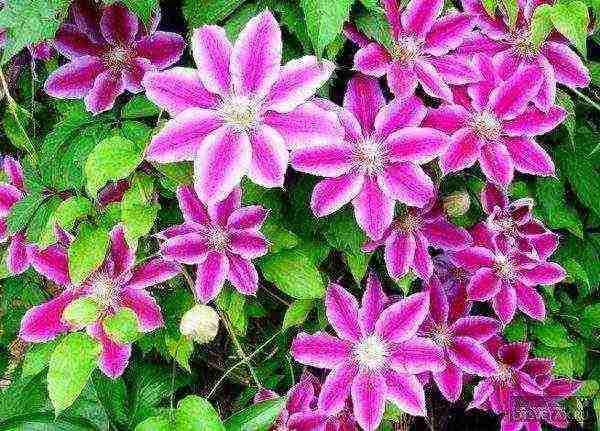
Choosing a variety of Clematis for the Moscow region with a photo
For planting in the North-Western regions of the European part of the country, Siberia, the Far East, where the summer is relatively short and the frosts are fair in winter, it is better to choose early and mid-early varieties from the Jacquemann, Viticella and Integrifolia groups, which bloom profusely on the shoots of the current year:
- Ville de Lyon,
- Japsi Queen,
- Victoria,
- Star of India,
- Luther Burbank,
- Hagley Hybrid,
- Madame Baron Vilar,
- Blue flame,
- Alexandrite,
- Golden Jubilee,
Alyonushka, Silver Stream, Polish Varshavyanka, Victory Salute. Anastasia Anisimova. Cosmic Melody. Huldin, Rouge Cardinal, Gray Bird, Cloud, AnEre Le-Roi. Lilac Star, Niobe ...
- However, there are hybrids from the Zhakman group that are more suitable for the south: Elegy, Alpinist, Biryuzinka. Openwork.
- In the north, these varieties bloom poorer over the years, although the mass of shoots increases. Clematis of the Lanuginoza groups, Patens, Florida (their first flowering occurs on the shoots of last year) are less winter-hardy and require shelter of vines even in the middle lane.
- However, the varieties Madame Van Hutte, Losoniana, Nelly Moser, Stone Flower, Ramona, Lazurshtern, Ball of Flowers, Nadezhda, V.E. Gladstone, Mrs. Hope, Mrs. Cholmondeli, and in such inhospitable conditions, flaunt the sophistication of shapes and colors.
- In the southern regions, clematis with double flowers bloom profusely: Madame Bajjun, Daniel Deronda, Jeanne d'Arc, Lord Neville. In the middle lane, these varieties will have terry only the first flowers on overwintered last year's shoots.
Species clematis
They know less, although many of them are not only quite effective, but also unpretentious, grow quickly, and are resistant to drought and fungal diseases. The average duration of flowering of small-flowered clematis ranges from 2-2.5 weeks to 3-4 months, the record holders include eastern, Texas, Tangut clematis, and Peter's clematis and mustachioed Balearic bloom in the south of the country even in winter.
In addition to these advantages, some of them have a wonderful aroma: almonds - Armand's and David's clematis, burning; primroses - straight clematis, Manchurian, Redera; jasmine - paniculata clematis. 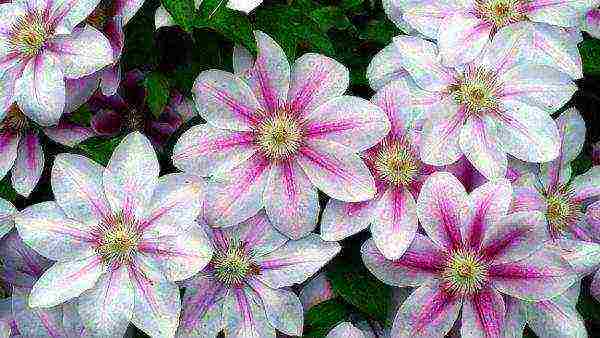
Location
clematis are light-loving plants. If there is not enough light, not only will you not achieve good flowering, you may not even wait for it at all. Therefore, in the middle lane, it is best to plant them in sunny or slightly shaded areas at midday. Only in the southern regions, where clematis often suffer from overheating of the soil, are they planted in partial shade.
For group plantings, each plant should receive enough light, and the distance between the bushes should be at least 1 meter. The wind is a terrible enemy of clematis not only in summer, but also in winter: it breaks and confuses shoots, damages flowers. Where snow is blown off in winter, planting clematis is not a good idea. And in the lowlands, where cold air accumulates, clematis feel uncomfortable.
Clematis are very demanding on moisture: during their growth, they need abundant watering. At the same time, wet, swampy areas with a high standing of groundwater (less than 1.2 times are not suitable for them, even if the water stagnates only for a short time. Waterlogging of the soil is dangerous not only in summer, but also in early spring during and after snow melting. planting clematis, you need to think about the natural outflow of water from the bush: add earth, plant bushes on ridges or dig slopes with a slope.
The soil
Clematis prefer fertile sandy loam or loamy soil, rich in humus, loose, from slightly alkaline to slightly acidic reaction.
Landing
since clematis can grow in one place for more than 20 years, they prepare the ground very deeply in advance. Usually, holes are dug with a size of at least 60x60x60 cm, and for group plantings, the site is prepared over the entire area.
- 2-3 buckets of humus or compost, 1 bucket of peat and sand, 100-150 g of superphosphate, 200 g of complete mineral fertilizer, preferably 100 g of bone meal, 150 -200 g of lime or chalk, 200 g of ash.
- On light soils, more peat, leaf humus and clay are added.
- If the soil on the site is wet, dense or clayey, then a 10-1 5-cm layer of crushed stone, broken brick or coarse sand is poured onto the bottom of the pit. Thoroughly mixed earthen mixture is poured into the pit and compacted.
In the southern regions, it is preferable to do this in autumn (from late September to early November; in the middle lane the best time is September (in warm weather - and later); even further north, clematis are planted in spring (late April - May) or early autumn. Plants in containers can be planted whenever you want (except for winter, of course). 
Support
A solid, rigid support is installed in the center of the pit. A stretched rope is not suitable here, it will not protect young fragile whips from gusts of wind. Having covered the hole with soil about half, they make a mound on which the roots of clematis are spread to the sides and down. Holding the plant with your hand, pour the mixture to the roots, making sure that the clematis is planted deeply.
- Only then will he develop a tillering center, on which new buds are subsequently laid, shoots and roots are formed.
- Such bushes better tolerate severe winters, suffer less from heat. Clematis planted flush with the surface are short-lived: they do not bush, grow in 1-2 stems, their root system suffers from soaking.
- The larger the seedling, the deeper the planting should be. Young one-two-year-old plants are buried by 8-12 cm and the lower pair of buds, more mature and divided bushes - by 12-18 cm.
- If clematis is planted in the spring, then the planting pit is not filled with earth to the brim, but left 5-8 cm uncovered so that the “newcomer” does not “suffocate”.
As the shoots become lignified, this space is gradually filled with soil. After planting, clematis is watered abundantly, shaded from the sun, and the surface of the earth around the plant is mulched with peat. When planting in the fall, the earth is poured to the edges, the entire aboveground part is cut off to the soil level or slightly higher.
Requirements. to the planting material
when planting in autumn, clematis must have developed vegetative buds; when planting in spring, at least one shoot. The seedlings must have a minimum of 3 roots less than 10 cm long. Plants with a weak root system are placed in a “school” for growing. Use only healthy planting material (the roots of the seedlings should be elastic, without visible damage, swelling and thickening). 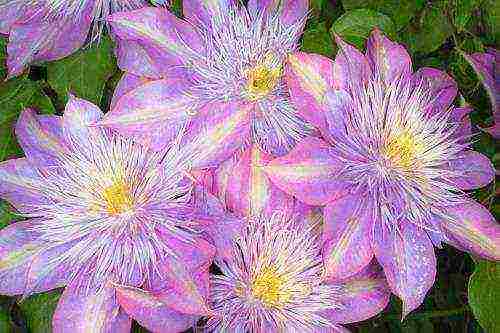
Support
are of great importance for the normal development, abundant and prolonged flowering of clematis. It is important that they are not only practical and comfortable for the plant, but also beautiful. As a supporting structure, galvanized pipes with a diameter of 3/4 inch are used. Wooden lattices impregnated with linseed oil or stain, a strongly stretched mesh made of nylon rope or thick fishing line with a mesh of 15x15 cm, go well with them.
Supports for clematis are often bushes of weigela, chubushnik, forsythia.
Vines cling to them, rise up, hang freely, and in the second half of summer the bushes hide under garlands of flowers. Screens and arches are traditionally considered to be excellent supports. Clematis look very impressive on horizontal surfaces. for example, on wire-mesh hoops with a diameter of about 1 m, attached to a galvanized pipe at different heights. All supports are made removable and removed for the winter.
| The reddish brick wall is very close to the purple star-shaped flowers of Clematis. However, his lashes need reliable support. To do this, a wire in the form of an extended letter S was pulled on hooks driven into the wall. If you keep running the clematis shoots by the wire all the time, its foliage will soon completely close the support and our "bindweed" will appear in all its glory. |
| A bamboo fence, braided in the photo on the left with a clematis variety ‘Nelly moser', Or an ordinary picket fence, as in the picture below, will provide the clematis with excellent conditions for climbing exercises. It is only necessary to evenly distribute its shoots over the surface of the fence. It is best to run them between the planks or tie them to them with a cord so that the fence becomes covered with a solid floral carpet faster. |

Care
in the spring, clematis is spilled with milk of lime (200 g of lime per 10 liters of water per square meter). In dry weather, clematis is watered not often, but abundantly, making sure that the stream of water does not fall into the center of the bush. Clematis are fed at least four times per season after irrigation with full mineral fertilizer with microelements at the rate of 20-40 g per 10 liters of water or a diluted fermented mullein (1:10). Mineral and organic dressings alternate.
In summer, once a month, plants are watered with a weak solution of boric acid (1-2 g) and potassium permanganate (2-3 g per 10 liters of water), and the bushes are also sprayed with urea (0.5 tablespoons per 10 liters of water). Since clematis can suffer from overheating and dryness of the soil, in the spring, after the first watering and loosening of the planting, they should be mulched with peat or humus (in the northern regions) or sawdust (in the southern regions). To protect the soil from overheating and to close the lower part of the shoots, clematis are “knocked out” by lettucers.
In the spring, only for the first time, the vines are guided along the support in the right direction and tied up. Otherwise, the ones growing on the run will intertwine so strongly that no forces will be able to unravel them. Only in the varieties of the Integrifolia group, shoots and leaves are deprived of the ability to wrap around supports, therefore they are tied up as they grow all summer. In the fall, before sheltering for the winter, clematis bushes are cut and carefully cleaned of old leaves.
The first two or three years, young specimens require particularly careful care: in the fall or early spring, well-rotted manure mixed with any potash and phosphorus fertilizer, as well as wood ash (a handful of each in a bucket of humus) is added to the bushes, liquid fertilizing is done every 10-15 days in small doses. 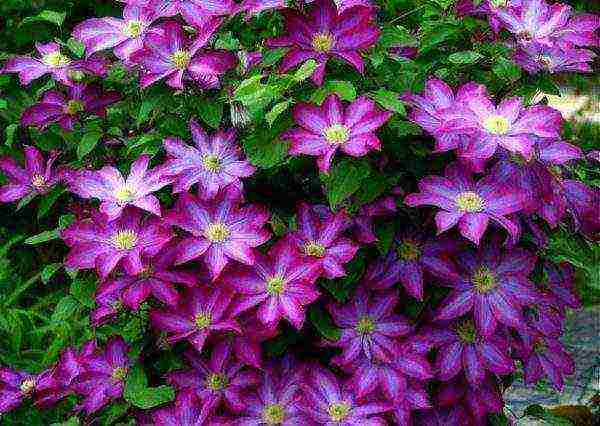
Pruning
the beauty of clematis largely depends on how correctly pruning is done. The first time the shoots are shortened during planting, this is important for the formation of the aboveground part and the development of the root system. One or two shoots grow from the lower pair of buds left during planting, which must be pinched in the summer. Regulatory pruning is carried out in the summer. To extend flowering, some of the shoots are cut in the spring.
At the beginning of summer, vines can be shortened again to the first vegetative buds, which will give rise to new shoots with buds.Tall varieties such as Gypsy Queen, Luther Burbank, Stone Flower, Ernest Markham have flowers at the top of the bush.
- Here it is worth cutting off several vines at a height of 0.7 to 1.5 m, then they will be covered with buds more evenly. Now about pruning for the winter.
- In the varieties of the Zhakman and Viticella groups, the flowers of which are formed on the shoots of the current year, before the shelter for the winter, the entire aerial part is cut off to a real leaf or to the soil level. Do the same with the varieties of the group.
- Integrifolia and some small-flowered clematis: Manchu, straight, Texas and six-petal. In varieties belonging to the Lanuginoza, Patens and Florida groups, flowers are formed on the shoots of the current year and last year.
Their first flowering occurs in early summer on overwintered shoots. The second is on the shoots of the current year, from mid-summer to autumn. The small-flowered clematis Armanda and mountainous belong to the same company. In the fall, before the bushes of these groups are sheltered for the winter, the vines are removed from the supports, all dry, weak, broken shoots are cut out, and the most developed, strong ones are shortened to 1-1.5 m, bent to the ground or rolled up in a ring and placed at the base of the bush. 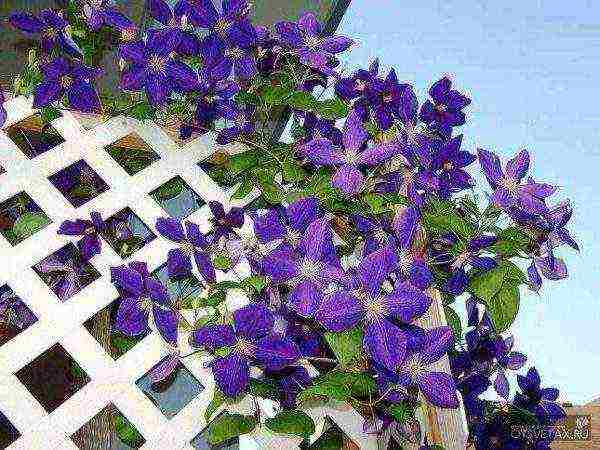
Clematis
Open-rooted clematis can be planted in fall or spring. If the clematis seedlings are in containers, then you can transfer them into the garden at any time of the year, except for winter.
Usually, clematis seedlings are purchased at the age of one to two years; annual seedlings are much cheaper.
Clematis seedlings may have a thin stem 5–20 cm long (it seems dry to many novice growers). Sometimes seedlings are sold without a stem at all, in the form of a bunch of roots with sprouts or with awakened buds.
If clematis seedlings were purchased after the onset of the autumn cold, dig them in the garden and cover them with earth.
When in the fall it is not possible to plant purchased clematis, postpone planting seedlings until spring. In winter, store them in a cold, frost-free cellar or basement (at a temperature no higher than + 5C). Cover the root system of the seedlings with a slightly damp mixture of sawdust and sand, or other suitable loose soil.
In storage, plants need to be pinched to curb the rapid growth of shoots. Each pinch restrains their growth for 2-3 weeks. The growth rate of shoots depends on the temperature of the seedlings. By spring, clematis germinates strongly in the storage, therefore, after planting in the garden, seedlings with young shoots during the acclimatization period are shaded from the sun (in the first 10 days).
Clematis can withstand frosts down to -6C. 
Let's talk more about how to plant and how to grow clematis
The cultivation of clematis usually begins with the acquisition of a one-year-old seedling.How and when to plant it? How to care for clematis in the future?
The best time to plant is early summer, when the danger of late frosts is over. But you can plant it in the fall, a month and a half before real frosts. The seedlings should have enough time to take root.
- It is recommended to plant clematis in a well-lit, wind-protected place.
- These plants thrive on alkaline, neutral or slightly acidic soils. For planting clematis, they dig holes, on heavy soils 70x70x70 cm, on light soils 50x50x50 cm.
- The distance between the pits is from 70 cm to one meter. Clematis cannot stand waterlogging and stagnant water. If the groundwater is close, gravel is placed on the bottom, broken brick with a layer of 10-15 cm.
Before planting clematis, the pits are filled with nutritious soil (fatty loose clay is well suited), add 1-2 buckets of humus and 50-100 g of superphosphate or nitrophosphate. Clematis seedlings are buried 6-8 cm, leaving a hole around the plant. The next year, the plants are deepened by another 10-15 cm. The degree of deepening depends on the soil - on heavy soils they deepen less, on light soils more. After planting, the shoots are cut shortly, leaving 2-4 lower buds.After a few weeks, when the shoots have grown, they are pruned again. Vigorous pruning of clematis in the first two years of life promotes better root development.
Soil erosion
After you have planted clematis, water it abundantly; for better access of water and preventing soil erosion, you can make a hole around the plant. It's a good idea to mulch the soil with sawdust or peat. The seedling must be shaded from direct sunlight.
When planting clematis, do not forget about the supports. They need to be installed right now. There are many beautiful fences, lattices, ladders on sale. You can make supports yourself, but remember that they must be not only strong, but also attractive in appearance, because lashes of clematis will close them only in the second half of summer. The height of the supports is from 1.5 to 3 meters.
As clematis grows, every 2-3 days, the shoots need to be tied to a support so that the wind does not rip them off. 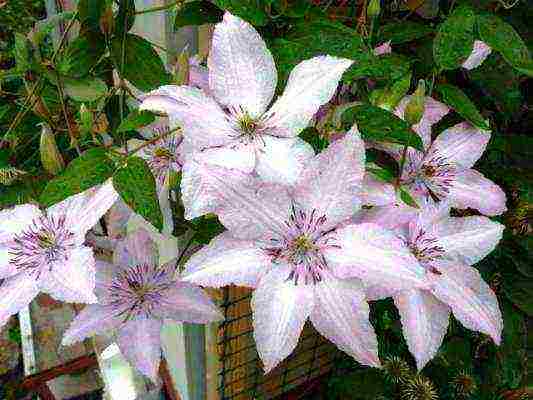
How to care for clematis
Watering and fertilizing
Clematis is water-loving: it requires abundant three-bucket watering at least once a week, and up to three times in the summer heat. To keep the plant moist enough, dig three pots with a hole in the bottom into the soil around it. They will accumulate water during rain or watering and slowly feed the vine's root system on dry days.
- If the soil is not mulched, you will have to loosen it a day after watering, while weeding the weeds.
- Mulch protects the soil from excessive drying out, weathering and freezing, enriches it with microelements, helps in the fight against weeds.
- Do not neglect this manipulation. Mulch the soil around the clematis with sawdust, peat, or moss.
Several times a season, the plant needs to be fed. In May - with urea (1 tablespoon per bucket of water), from June to August - complex fertilizer for garden flowers at least twice. After the second bloom, provide nourishment for the clematis in winter. To do this, add 1 tablespoon of potassium sulfate and superphosphate to a bucket of water.
Watering
When growing clematis, watering plays an important role. Clematis must be watered abundantly, especially in the first two years after planting. Under three-year-old bushes, you need to pour 2-3 buckets once or twice a week. Proper watering is the key to a beautiful and lush flowering of plants.
For better moisture retention, it is recommended to loosen and mulch the soil near the plants. For mulching, you can use humus, peat, rotted sawdust.
In the first two years, clematis mainly grow horses, few shoots are formed, only 1-3. Single flowers appearing on these shoots are best cut off. Then, with proper, careful care, 5-6 year old bushes will develop dozens of shoots and hundreds of beautiful flowers will bloom on them. 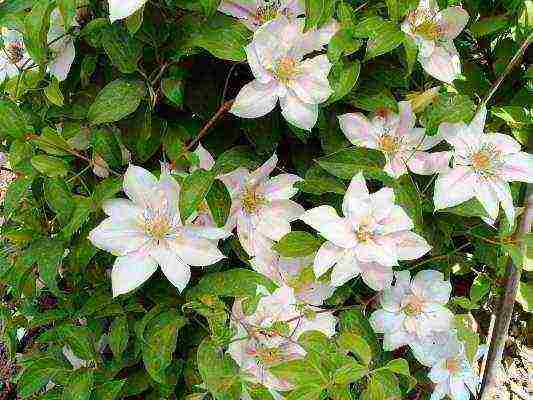
New strength - new shoots
From the third year, clematis are gaining strength, many new shoots grow. By pruning and pinching the shoots during the summer, flowering times can be adjusted. So, if you shorten some of the strong shoots, clematis flowers will appear on the growing new shoots later and the flowering will be longer.
Clematis are very responsive to feeding.
It is recommended to fertilize grown plants once a week. They are fed with full mineral fertilizer (30 g per 10 l of water per 2 square meters of soil).
Can be fed with wood ash (1 cup per plant). As a fertilizer, mullein is well suited, which is diluted at the rate of ten parts of water for one part of manure.
| Plant calendula or marigold bushes at the roots of clematis. These plants secrete substances that repel pests. In addition, they will protect the clematis roots from overheating. |
Shelter of clematis for the winter
Clematis are natives of the warmest places of the globe, so they need shelter for the winter. In late autumn, all clematis are pruned, but pruned in different ways, depending on which group the variety belongs to.
So clematis from the Florida, Patens, Lanuginoza groups, whose flowers are formed on last year's shoots, are cut off by one third after the first frost, and then the vines of the plants are placed in rings on the ground and are well covered. The next year, in the first half of summer, large flowers will bloom on these shoots, later flowers will appear on the shoots of the current year.
And those clematis, the flowers of which are formed on annual shoots, for example, in the varieties of the Zhakman and Vititsella group, must be cut off in the fall, leaving hemp with 2-3 nodes.
After that, the plants are covered with boards, boxes, covered with earth, leaves, spruce branches, sawdust, rotted manure, weathered peat with a layer of 20-30 cm. And when snow falls, it must be thrown on top. 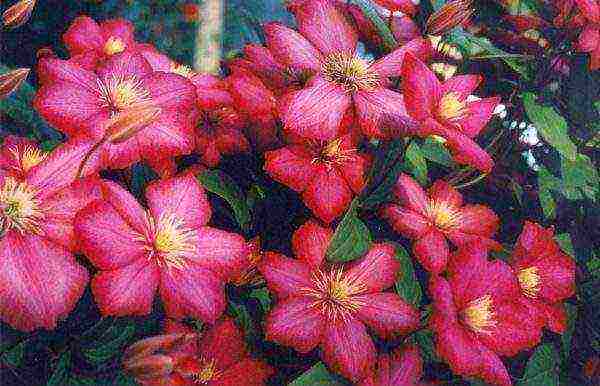
Lay down, covering with leaves
Some growers do not cut the vines, but lay them on the ground, cover the lower part with fallen leaves, crushed peat, dry inflorescences of large perennials about 20 centimeters thick. On such plants, lashes up to half a meter long with live buds are preserved. In the spring, they remove the shelter, cut off the dead parts of the vines.
- Then lateral shoots begin to develop faster, which bloom profusely all summer.
- Currently, varieties of frost-resistant clematis have been developed, blooming on last year's shoots. These are clematis: alpine, large-petal, Siberian, mountain.
- For such varieties, pruning is not necessary and they can winter without shelter in the middle lane. Siberian Clematis also withstands colder wintering, up to -30 degrees.
In the fall, remember that too dense shelter impedes ventilation, and plants can die from this.
Clematis in the spring
In spring, one should not rush to open clematis: intermittent frosts and bright sun have a detrimental effect on the kidneys. And when the danger of spring frosts has passed, the shelter is removed, after which the clematis are fed with nitrogen fertilizers, for example, urea - 40 g per 10 liters of water. On acidic soils, clematis is watered with milk of lime (200 g of slaked lime per 10 liters of water per 1 square meter of soil).
Requirements
For the successful cultivation of clematis, it is imperative to take into accounta number of requirements this culture. Clematis are photophilous and prefer sunny places protected from the wind. The soil should be permeable, loamy, slightly alkaline (calcareous) or neutral, fertile, well fertilized and loose. Saline, damp, heavy, acidic soils are unsuitable for clematis. Please note that fresh manure and sour peat harm clematis.
Clematis does not tolerate nearby groundwater. In this case, plant the plants on a mound (on additionally filled soil), otherwise the roots of clematis, reaching a length of 1 meter or more, will rot.
If the soil in the garden is clay, from the clematis planting site, make a drainage groove to drain excess water and cover it with sand. At the bottom of the planting pit (60x60x60 cm in size), lay a layer of 10-15 cm crushed stone, perlite, etc. for drainage. 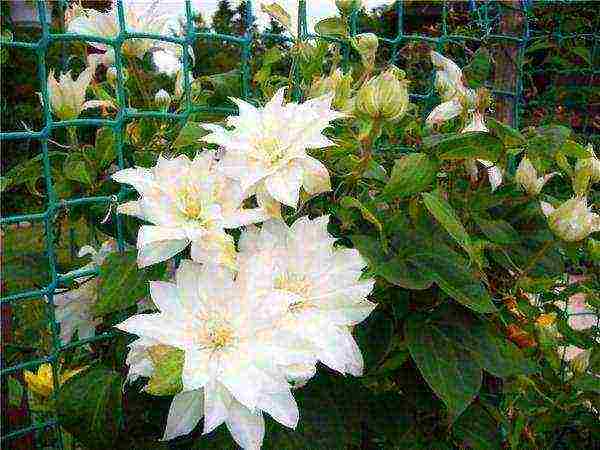
The soil
Completely replace the infertile soil layer extracted from the pit with fertile soil with the addition of humus (humus from the Californian worm, well-rotted compost).
- Also add 150 g of superphosphate and 200 g of lime, or 400 g of dolomite flour to the substrate, mix everything thoroughly.
- It is advisable to prepare the soil a year before planting the seedlings so that it can be neutralized with lime material and settle well.
- Install supports before planting clematisfor vines (preferably removable for the winter) with a height of 2-2.5 meters. The support system should provide support for the vines in strong winds.
Never plant clematis close to a wall or fence, there should always be a space of 10–20 cm between them. At the very wall, the soil is usually very dry, and this, as a rule, leads to poor growth, rare flowering and plant death. When planting clematis near the house, install supports for them at least 30 cm from the wall.The water flowing down from the roof should not fall on the vines.
Landing
After the preparation of fertile soil, planting pits and the installation of supports,planting clematis... If the roots of the seedling are dry, soak the plant in cold water for several hours before planting. At the bottom of the planting pit, pour a bump of earth, put a clematis seedling on it and straighten it, evenly distribute its roots over the bump.
- Cover all the roots, the root collar of the seedling and the stem (if any) up to 5–10 cm with earth, making a depression to prevent water spreading during irrigation.
- If you are planting clematis in the spring, then cover it with earth up to the first internode. Abundantlypour a bucket of water.
- Until autumn, gradually add fertile soil so that the depression is filled up.
When planting clematis in the fall, you can remove some of the soil from the plants themselves, and add soil until autumn. This should be done in order to facilitate the emergence of shoots, weakened after plant transplantation, to the soil surface. 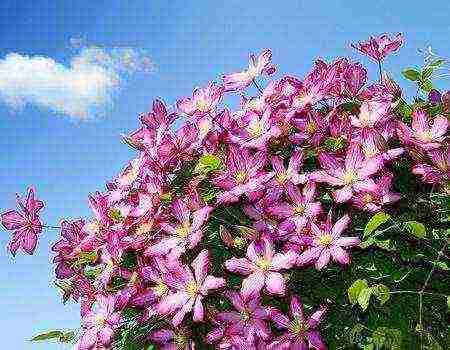
Landing
Choose a "cozy" spot on your site. There should be no strong wind here. It is advisable to take the place well lit. Clematis belongs to the vines, which means that he will need support. However, do not rush to plant a clematis plant near the wall of the house - the water dripping from the roof is extremely unfavorable for this gentle garden dweller. Step back at least 30 cm from the walls of the building or fence. Remember that the flowers of the plant will unfold to the south, southeast.
The roots of an adult plant reach 1 m in depth, but they do not like swampy soil. If your site is located in a lowland, in the immediate vicinity of groundwater, you will have to fill in a mound in advance to raise the planting. When the place is chosen, dig a hole 60x60x60 cm. At the bottom, fill a layer of drainage with a thickness of 10-15 cm. For this, broken brick, crushed stone, expanded clay, polystyrene are suitable. Then lay a layer of soil 5 cm thick. Next, fill the hole with nutrient mixture with the addition of 200 g of garden lime.
Now prepare a hole under the seedling clod, 10 cm deep more than the height of the clod itself. At the bottom, form a slide and lower the seedling, gently spreading the roots around it. Fill the remaining depression with soil to the level of the landscape. If the top of the plant loves sunlight, then the roots are shaded. Therefore, it is recommended to plant a cover plant within a radius of 1 m from clematis. Pansies and lobelia work well for this. These flowers will protect the soil from drying out and will not compete with the vine for nutrients, not to mention their aesthetic beauty.
Support
Select and install a vine support immediately after planting. Supports can be homemade - one or three bamboo or walnut rods connected by a pyramid. In garden centers, more decorative models are presented in the form of arches or metal nets in different versions. Place the first shoots on a support by hand, straighten and tie them up. Subsequently, the plants will cling to themselves due to the peculiarities of the structure of their stems.
In the first two years after planting, the shoots will grow slowly. Do not worry, this is due to the fact that at first clematis grows the root system, and only in the third year - the aerial part. But with the beginning of active growth, young branches can add up to 10-15 cm per day, reaching 2-4.5 m per season.

Clematis care includes:
- regular deep watering (at least 1 time per week, and in extreme heat - 2-3 times);
- loosening the soil (if it is not mulched);
- weed removal;
- top dressing (preferably organic) during the growing season - about 2 times a month.
In the first year after planting, clematis seedlings do not need to be fertilized. Further fertilize them in the same way as regular perennial flowers. Top dressing of clematis with "Strawberry Concentrate" showed good results. A suitable top dressing is water in which unsalted meat or fish has been washed.
Every spring, water clematis with milk of lime (dolomite flour, chalk) and a solution containing copper (one tablespoon per bucket of water).
Good results are obtained by dusting the lower part of the vines with wood ash after rain - this prevents clematis shoots from withering during frequent rains, especially on heavy soils. On light soils, wilt of clematis is rarely observed.
Formation
Clematis vines reach the greatest decorativeness at the age of 3-7 years.
After the age of seven, the flowers of clematis begin to shrink due to a lack of fertilizers and water, because in the heat, in the absence of good rains, irrigation water no longer penetrates deep to the roots (they reach a length of 60–70 cm or more). To prevent this from happening, you can dig 3-4 pots with a hole in the bottom around the clematis bush. When watering the plants, the pots are filled with water, which does not spread anywhere and penetrates deeply.
Clematis also suffer from overheating of the soil, and therefore mulch the ground around them with humus or moss. At the base of the vines, plant low-growing plants, for example, "marigolds" - calendula, which will also serve as protection of clematis from nematodes.
You can plant clematis on lawns, then the grass will protect the roots of the vines from the sun and overheating.
Almost all common varieties of clematis themselves climb onto the support with the help of twisted or bifurcated leaf antennae, petioles. However, be sure to tie up young clematis once in the spring. To increase the decorativeness of the plant, direct some of the shoots in the right direction, first in the horizontal direction. Directional shoots will bloom below the main body of the plant. But bend the stems of the clematis very carefully, since the young green shoots are very brittle. During a warm evening and night, the shoots lengthen by 5–10 cm or more.
A clematis seedling grows 1-5 shoots over the summer, and in some varieties - up to 30. In the fall, before the onset of frost, cut the stems of the vines. 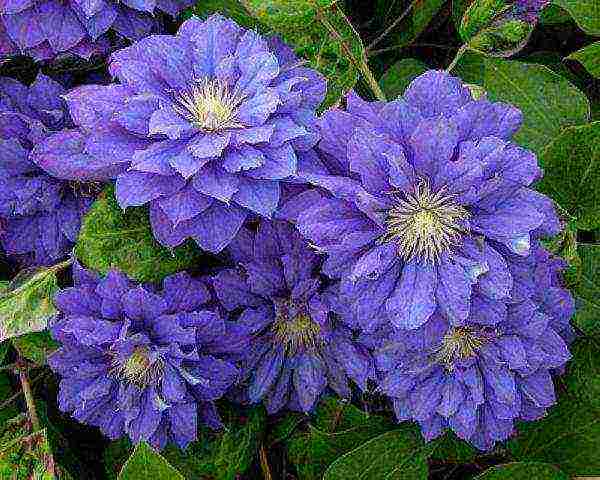
Wintering
Depending on the variety, clematis winter in different ways. They are divided into three groups: those that do not require cutting off shoots, that require cutting at a height of about 1 meter, and that require cutting at a height of 10-15 cm from the ground. This nuance must be graphically indicated on the package with the plant. Clematis do not freeze down to -6 ° C, in central Russia they require shelter.
- If your variety needs to prune shoots at a height of 1 meter, after pruning, carefully remove them from the support, twist them into a ring and lay them on the base of the stem.
- Sprinkle the plant with sawdust or leaves, cover with a wooden box without a bottom (such as in which fruit is sold in the markets), and on top - with a film, tar paper or roofing felt, pressing down their edges with stones.
- Do not cover the clematis too tightly, otherwise it may overheat.
In the spring, clematis does not show signs of activity for a long time, even if it tolerated the cold well. In this case, many novice gardeners make the mistake of digging up the plant and examining the roots. Liana does not like this very much, she does not tolerate any anxiety. Continue your routine, be sure to feed with urea in May, and be patient. Shoots will certainly appear when the time comes.
Wintering
with proper shelter, clematis bushes can withstand frosts up to 40-45 °, however, the main danger in winter and early spring is not frost, but waterlogging of the soil. In addition, after frequent thaws during the day and night frosts, layers of ice can form over the soil, which can break the roots and destroy the center of tillering.Therefore, it is important to completely exclude the ingress of water in winter to the soil surface and the base of the bush.
They cover the bushes when frosty weather sets in, the air temperature drops to minus 5-7 ″ and the soil begins to freeze. In the middle lane, this falls on November. The bushes of the Zhakman, Vititsella and Integrifolia groups cut into one or two pairs of buds (10-15 cm) or to ground level are covered with dry earth or weathered peat, a mound with a diameter of 60-80 cm is formed above the plant.
Each plant takes about 3-4 buckets. Together with snow, such a shelter will reliably protect the root system of clematis from freezing.
If you need to preserve the lashes in the varieties of the Lanuginoza, Patens and Florida groups, in addition to dry land, the bushes are covered with boards, spruce branches, and on top with pieces of roofing material or sheets of old iron. If the frosts are too strong or there is little snow, it is added to the bushes additionally. In the spring, the shelter is removed gradually, part of the peat is left until the night frosts are gone. 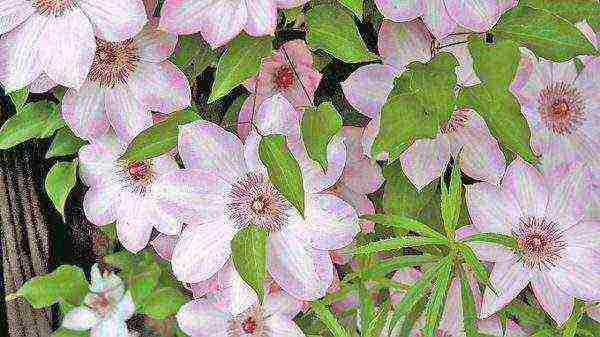
Pruning
is necessary for clematis to obtain long-term and abundant flowering, control flowering times, biological renewal of the bush and harmonious spatial distribution of shoots.
The degree of pruning depends on the difference in the biological properties of clematis from different taxonomic groups.
Depending on the characteristics of pruning and the intensity of flowering, clematis are combined into three groups. According to the new classification, there is no distinction between types of clematis in large-flowered varieties; they are now divided only by the method of cutting into three groups:
First group pruningand or group A
- unites clematis, in which flowers are formed on the shoots of the previous year. On the shoots of the current year, flowers sometimes appear in small quantities. This group includes species and varieties of clematis from the former groups of Atragene, Montana, etc., which are grown without pruning (or after flowering, the generative part of the shoot is cut off). If the bush is very dense, then some of the faded, weaker shoots are cut to the base. This contributes to the development of more vital shoots of the current year, which will bloom next year.
Before sheltering for the winter in clematis of group A, only the generative (flowering) part of the shoots of the current year is cut off and weak shoots are completely cut out.
Second trim group or group B
- unites clematis, in which flowers develop both on the shoots of the current year, and on last year's shoots. These include the former groups of clematis Lanuginosa, Florida, Patens and some varieties with characteristics similar to these groups. These clematis have early flowering in late May-June on the shoots of the previous year. The flowers are large, often double or semi-double; flowering time is short.
The second, or summer, flowering of clematis occurs on the shoots of the current year, it is abundant - it begins in July and continues until autumn.
To get a long flowering of these clematis, they are pruned in two steps. First, in the summer, the generative (flowering) part of the shoot of the previous year is cut off after flowering; if the bush is very dense, the entire shoot is cut out.
The shoots of the current year are cut before the clematis shelter for the winter.
Depending on the density of the bush or to get early flowering next year, a different degree of pruning is used. Only the generative part of the current year's shoot is removed if they want to achieve early flowering. Medium pruning (up to the first true leaf) and strong (removal of the entire shoot) are used when adjusting the number of shoots and for uniform flowering of group B clematis in the next year. 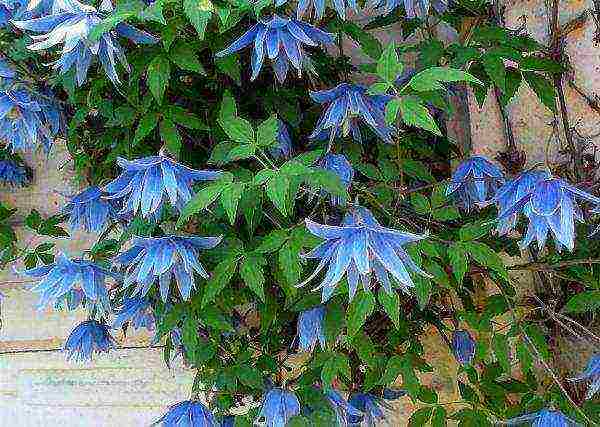
Third group pruningand or group C
- unites clematis, in which the bulk of flowers are formed on the shoots of the current year (former groups Jackmanii, Viticella and their hybrids). They bloom from July to mid-September; the maximum flowering is observed at the end of July - in August. Pruning this group of clematis is very simple: before sheltering for the winter, cut off all the shoots to the first true leaf (you can leave more buds)or to the bottom.
After the autumn pruning of clematis, they are carried outshelter before wintering.
Clematis of the third pruning group
in the fall, cut the shoots to the first bud, counting from the ground, or, as a last resort, in early spring (but then the bushes will be more difficult to cover for the winter). Cover them lightly before wintering.For a winter shelter, it is enough to overlay the base of the clematis bush with woody leaves, placing spruce paws or "dog" mint under the leaves to protect the shoots from damage by rodents. Cover the top of the shelter with a piece of whole plastic wrap, shading it from the sun. The winter shelter of clematis should be loose, but thick enough.
Clematis have the second and first trimming groups
you can leave some of the shoots, cutting them at a height of 70-100 cm to large ripe buds. If there are no such buds (and this can happen during a cold short summer), then the shoots must be cut to the level of the soil or the lower part of the shoots 20–30 cm long should be left. more often this happens after a cold summer, when they do not have time to ripen.
- For clematis of the second and third pruning groups, cut off the leaves on the remaining vine and lay it on spruce paws or on "dog" mint, or just on the ground. The shoots left in the spring can be used to propagate clematis by layering. Pour dry leaves on top of the shoots, put wooden shields on the leaves.
- To prevent snow shields from falling on the ground, place bricks or any other suitable material under them. Lay a whole plastic wrap on top of the shields.
You can do it differently: put shields on the bricks, lay dry leaves on the shields, and a whole plastic wrap on top of the leaves. - This method will require more leaves, and from the severity of the snow, the leaves are caked, which means that part of the thermal insulation is lost. But on the other hand, with this method of shelter, there are not many mouse nests under the shields. Mice use clematis shoots for nests, and the water rat eats the inside of the shoots.
Temperature
Shoots of clematis are afraid not so much of frost as of wet and cold weather, icing. Therefore, it is important to keep the clematis shoots dry in winter.
But with excessive cover, the shoots can get out.
It is also very important in the spring to remove the shelter from clematis in time.
Never use sawdust to cover clematis - they get wet, freeze, thaw very slowly in spring (because of this, in spring it is impossible to remove the shelter in time), which can lead to damping of plants.
- Next year, on the left and overwintered shoots of clematis, flowers will appear 20-30 days earlier than on the shoots of the current year. And in some varieties, flowers can even be semi-double.
Some clematis (Jackmanii, Viticella) tolerate severe frosts - up to -40C (MA Beskaravaynaya). - But this only applies to the underground part of the plant. The soil temperature rarely drops below critical, and it is always much higher than the air temperature (especially if the ground is covered with at least a thin layer of snow).
- In urban conditions, during thaws, snow melts faster than in fields.
Clematis that are not sheltered for the winter are damaged by sudden changes in temperature and humidity. The least hardy root collar of clematis. If an uncovered vine is on the surface, then its bark cracks from frost; during a thaw, moisture gets under the bark, which freezes and expands the cracks even more.
Many varieties and hybrids of clematis in the fall, before the soil freezes, sprouts underground from the root collar, which do not break through to the soil surface until warm spring days. These sprouts can suffer from winter frosts. 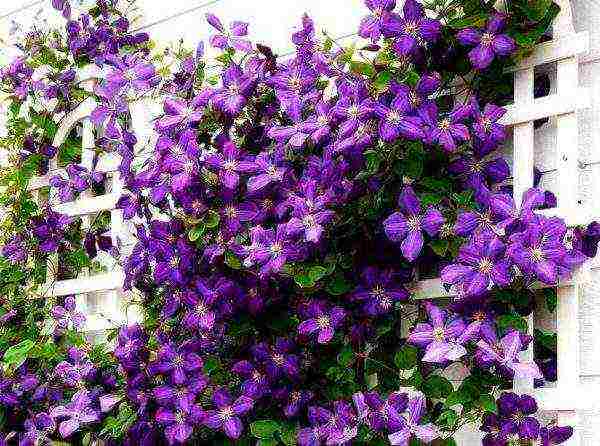
Reproduction of clematis
can be done in several ways, the simplest of which are:
- division of bushes;
- spring pinning of shoots;
- reproduction by autumn and summer layering;
Division of bushes
clematis is carried out at the age of no older than 6-7 years. Later, it is very difficult to do this because of the developed powerful root system, which breaks off strongly. Dig up the clematis bushes, free them from the ground and cut them into pieces with a pruner or knife so that each plant has buds on the root collar.
- For breeding clematisautumn layering in October, cut off all the leaves from the shoots, the faded part to a well-developed bud. Tie the shoots neatly into a bundle (you can use a ring, as space permits), put them in the grooves.
- Pour a layer of peat under the tourniquet and on top (peat is by its nature a very moisture-absorbing material, retains moisture for a long time and allows air to pass through well), and then compact the earth and soil, cover the whole plant well.
- Water often and abundantly for the next year. After the sprouts appear, mulch the soil surface with humus, moss, peat. By autumn, most of the young plants that have emerged are ready for planting. Only well-developed clematis buds grow.
- Roots are formed throughout the shoot, but the largest number of roots are located under the buds. It is better to dig up plants with a pitchfork - less damage to the roots.
Layers for propagation can be laid in prepared grooves in spring, but then it is more difficult to keep the shoots in winter.
Better to spend in the springpinning shoots of clematis in pots with soil. The essence of this method is that last year's clematis shoots are pinned at the site of the knot into pots prepared in advance and dug into the ground, which are filled with very loose soil with peat. The pots should be buried in the soil below its level so that the water does not spread during watering. Gradually, as the seedling grows, moisture-absorbing soil is poured in the form of a tubercle. By the fall, high-quality clematis seedlings grow from the pinned shoots.
Summer layering
it is most convenient to propagate clematis in a vertical way. To do this, in the spring, put a box without a bottom on a growing plant. As the clematis shoots grow, pour light fertile soil into the box until it is almost filled to the top. However, it is always necessary to leave the upper part of the shoot with well-developed two buds uncovered, otherwise the covered young shoots of clematis will stop growing.
Water the soil frequently and abundantly. With good care, by the fall, some of the well-developed clematis will be ready for planting in the ground (the rest require growing, since they have a weak root system). Keep weak plants buried in the basement in winter.

Fascination of numbers
Clematis can be propagated in three ways: by seed, by rooted layering and by dividing the rhizome. The seeds are treated with a rooting stimulant and planted on seedlings. For the first year, you can plant them in the ground for insulation. The seedlings have no peculiarities of care.
- You can propagate clematis by layering. To do this, select a section of the stem with an internode, leave one or two nearby leaves and plant it in a hole, deepening the internode into the ground.
- In the first year, the plant can also be planted under insulation, and the next year, it can be planted in a permanent place.
- The root of an adult, but not older than seven years, clematis can be cut into pieces with a sharp pruner and planted.
As you can see, clematis is not as difficult to grow as many people think. But in their decorativeness, they are superior to many other plants. Abundant flowering will delight you twice a summer, and luscious greenery - a whole season, if you give the liana enough attention and love.
Choosing distribution methods
There are several ways to propagate clematis: by seeds, layering, cuttings and dividing the bush.
Clematis from seeds appear at different times. After sowing the seeds, do not be upset if they do not sprout from you in the same summer. The seeds of some varieties of clematis germinate only in the second and even in the third year, and sometimes even later. It is useful to water such crops in the summer after 2-3 weeks with a weak solution of boric acid (1-2 grams per bucket) and potassium permanganate (2-3 grams per bucket).
When clematis is propagated by layering, a young shoot 20-30 cm long must be bent to the ground and laid in a groove 5-10 cm deep.In the places of internodes, pin the shoot with wire brackets or press with pebbles and cover it all with earth, leaving a free top with several leaves.As the shoot grows, fill in new internodes, leaving only its tip above the soil. Remember to water the soil regularly and abundantly.
Leave the rooted shoot of clematis in place for the winter. And in the spring, cut the lashes between the knots and plant the plants in a permanent place.
Reproduction of clematis by cuttings is also possible. Cuttings with one or two internodes should be cut at the beginning of flowering plants from the middle part of the vine, leaving 2 cm above the node and 3-4 cm below.To accelerate root formation, place the cuttings in an aqueous solution of heteroauxin (50-75 grams for 1 liter of water).
Cuttings
Plant the cuttings of clematis obliquely in boxes or containers in washed sand, peat or a mixture of sand and peat in equal parts. At a temperature of 20-25 degrees, cuttings root better, so spoil the container with a film and put it in a greenhouse or greenhouse. It is very useful to spray the cuttings during the rooting process.
Depending on the variety of clematis and the conditions created, the cuttings take root in a month or two. After that, they need to be transplanted into pots with nutrient soil. If it is too late to plant the seedlings in the ground, keep the plants in a room with a low temperature of + 2-7 degrees during the winter. Water sparingly, but be careful not to dry out the ground. In the spring of next year, clematis seedlings are suitable for planting in a permanent place. Plants from cuttings, rooted in summer, will bloom by the fall of next year.
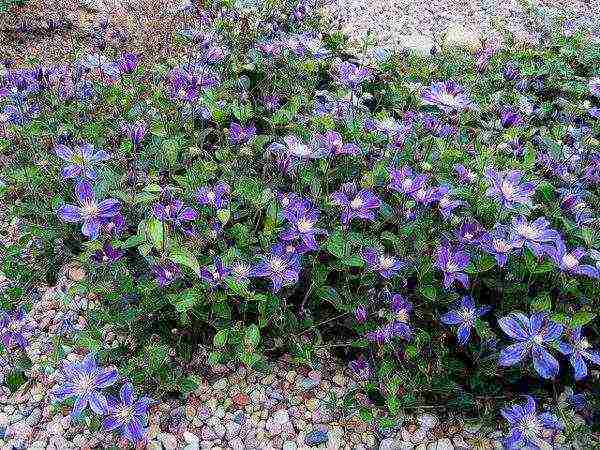
Fertilization
small-flowered clematis propagate, as a rule,seeds... Large-flowered plants are bred exclusively vegetatively. The easiest way to do this is by dividing the bush. In varieties with a high tillering ability (Anastasia, Anisimova, Jeanne d'Arc, Hagley Hybrid, Madame Baron Villard, Cosmic Melody), the division of the bush is used for rejuvenation, since very dense bushes, even with good care, often lose their decorative effect.
Clematis can be divided both in the fall and in the spring, until the buds have started to grow or have just begun to swell.
However, if in the fall this operation is almost painless for the plants, since the buds are only marked and small, then in the spring time it is necessary to meet the extremely tight deadlines (from the moment the soil thaws to the beginning of growth), since it is easy to damage the rapidly growing shoots. Clematis, divided in spring, will be about 2-3 weeks behind in growth compared to its autumn counterpart. In an adult 5-8-year-old plant that has a sufficient number of shoots, the ground part is cut off, leaving only 2-3 pairs of buds below.
Dig up with a clod of earth
The bush is carefully dug out with a clod of earth, taking care not to damage the long cord-like roots. If the soil is not easily shaken off, the roots are washed with water from a hose. Then with a knife it is divided through the center of the bush into independent plants. They work without haste, carefully, making sure that each section has enough roots and at least one shoot with buds.
However, you can do without digging. On one side of the bush, a trench 50-70 cm deep is torn off, and the bayonet of the shovel is buried in the soil radially to the center of the bush in order to damage as few roots as possible.
At a half-dug bush, shoots with roots are separated with a tool, each of which will become an independent plant. Before planting, the delenki are examined, only healthy ones are used. The roots are pruned and disinfected in a pink solution of potassium permanganate.
Layers
It is quite easy to propagate your favorite variety by layering. There are several techniques. Here is the first one. The bush is sprinkled with peat or humus along the bottom 2-3 pairs of leaves. Within a year or two, the lower nodes of the shoots are overgrown with their own roots. Having removed the poured substrate, the rooted shoots are cut off from the mother plant and planted.
- This method is good because the bush itself is not injured. The second method requires some free space.
- In late summer or autumn, grooves 8-10 cm deep are dug around the bush in the radial direction. Clematis shoots with well-formed buds are removed from the support, laid out in grooves one at a time, pressing them to the ground with staples made of thick wire, and sprinkled with loose nutrient soil.
- The top of the shoot (20 cm) is taken out. You can do the same with a vine rolled around the base of the bush and covered for the winter.
In the spring, when the plant is freed from the shelter, one or more of these lashes are laid in a groove. Layers are regularly watered and fed during the summer. From almost all the covered buds, vertical shoots begin to grow, and rooting occurs at each node.
It is best to separate rooted shoots from the bush in the fall of next year or in the spring of a year later. By this time, each new shoot will have a good root system. From one sprinkled lash in a year or two, you can get up to 10 seedlings that do not need growing, the bush itself does not suffer. Another way of vegetative propagation isgreen cuttings. 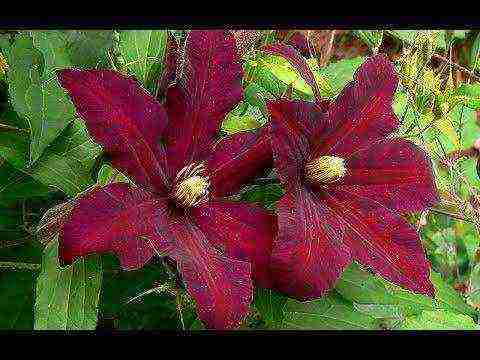
Clematis is a beautiful plant belonging to the Buttercup family. It is widespread in subtropical and temperate climates. Often found in forests, near rivers. Gardeners actively use clematis, aka clematis, in landscape design. This flower is especially good for decorating trellises and arbors. The plant has many varieties, distinguished by bright flowering, a variety of shades and shapes. Today we will talk about the types of clematis, planting and caring for them in the open field for beginners who usually do not know where to start growing these flowers on their site.
Botanical description
Clematis is a perennial plant with a varied structure. Lianas are most often found, but there are tree-like dwarf shrubs and grasses. Rhizomes are fibrous or pivotal. Young shoots of plants are covered with smooth green bark. By structure, ribbed and rounded shoots are distinguished. Rarely there is a glandular pile on the surface. The diameter of the shoots is only 25 mm, the length is one meter. Leaves grow along the entire length of the processes. The color of the leaves is often green, but there are varieties with purple leaves.
Clematis usually blooms in spring. Flowers are collected in panicles, scutes or semi-umbrellas, can grow singly. Petals in the corolla are up to 8 pieces, in terry varieties there can be up to 70 of them. Coloring - yellow, white, red, blue, blue. There are streaks or streaks on the surface. Each flower blooms for up to three weeks. A scent of flowers with notes of almonds, jasmine and spices.
Types of clematis
There are more than 300 main types of clematis. All of them are divided into many decorative varieties. Plants are distinguished by the size of flowers, by the place where the buds appear.
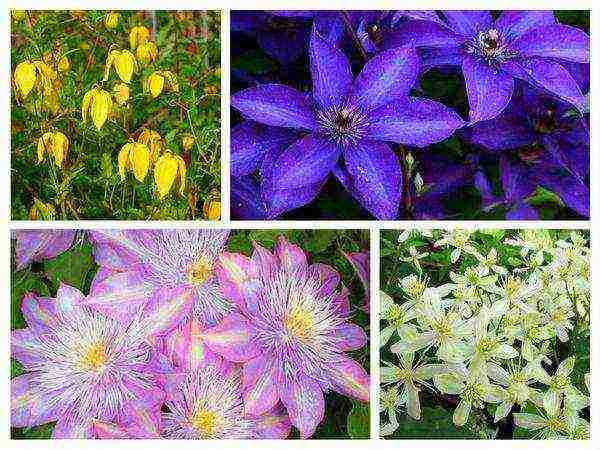
- Clematis Zhakmana. This is a group of varieties with flexible long shoots. The varieties differ in feathery leaves. Flowers can be of any color other than white. The flowers are large, odorless. This group includes varieties: Star of India, Rouge Cardinal.
- Clematis hot. Liana grows up to five meters in height. It has leaves with ovoid lobes. Flowers bloom in June-August. They are white with narrow petals. The buds are paniculate inflorescences. A prominent representative of the group is the Miss Bateman variety, which blooms twice a year.
- Clematis of Manchuria. A branchy plant requires good lighting, frost-resistant. Shoots grow up to three meters. Small bright green leaves. In summer, the plant covers many white star-shaped flowers with a delicate aroma.
- Clematis Tangut. The culture reaches three meters in height. Shoots are ribbed. The leaves are feathery, bright green in color. They are sparsely located, the flowers are tulip-shaped, beige or yellow in color.
- Clematis purple. Shoots are covered with delicate foliage. The flowers are large, most often of purple hues. Varieties: Ville de Lyon, Polish Spirit.
- Flowering clematis. Shoots reach three meters in height. The petals are light pink in color.The most popular varieties: Comtesse de Boucher, Vivian Pennel, Purpurea Plena Elegance.
Reproduction methods
Cultivation of clematis requires certain knowledge. Clematis reproduces vegetatively and by seeds. Small-flowered, species plants mainly reproduce by seeds. Varieties differ in seed size:
- small seeds germinate in a month or two;
- medium seeds germinate in 20-24 weeks;
- large seeds give irregular shoots after 30-32 weeks.
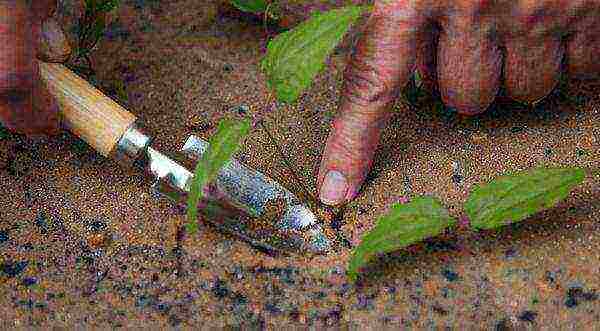
When is it better to plant clematis seeds in spring? In early spring, small seeds are sown. Larger ones are planted in December. It is recommended to pre-plant seedlings. For this, the planting material is soaked in warm water for 10 days, the water is changed up to five times a day. Then the seeds are planted in a shallow box, where a mixture of garden soil, sand, peat is poured. They are sealed to a landing depth of no more than 10 mm. The box is covered with foil and kept at a temperature of 25 ° C. You need to spray the soil regularly, ventilate the seedlings.
As soon as the seedlings appear, you need to provide the seedlings with diffused bright lighting. When two true leaves appear, the sprouts dive into separate containers. Planting is done in early summer. Clematis is first placed on the garden bed in a shaded area. The distance when planting is 20 cm. The tops of the shoots are pinched. A reliable shelter for the winter is required. In the spring, a transplant is carried out, increasing the distance to half a meter. Two-year-old seedlings can already be replanted.
Reproduction by layering is also effective. This method is used in autumn and summer. Summer layers develop better and faster, but winter worse. The peduncle should be removed to the nearest bud. A groove is made in the ground, where a thick layer of peat is introduced, where the branch is fixed along its entire length. Cover the branch from above with earth and compact the soil. As soon as the cold weather sets in, you need to insulate the bush. In the spring, young shoots appear, the plant will be fully formed by autumn, it will be ready for division. Digging is carried out using a pitchfork.
Perennial bush clematis (6-7 years) are divided into several parts. Old bushes have a developed rhizome that can be easily damaged. The shrub is completely dug up in the spring, freed from the soil, cut with a knife or pruner into pieces. It is necessary that each part has several buds at the root collar.
Clematis can be propagated by cuttings. In summer and spring, semi-lignified or green shoots with two knots are cut. At the bottom, they are treated with a growth stimulant. It is best to root in a special greenhouse with high humidity. The temperature should be 18-20 degrees.
When to plant clematis
Planting time, clematis care depends on the type of root system. If cuttings with closed seedlings are planted in a permanent place, this should be done in spring or autumn. Cuttings with an open root system should be planted in the spring, in April-May. It is important not to miss the dates, since the vine has an early growing season.
Planting clematis in the fall has many features, in contrast to the spring planting. The plant must take root before frost. You will need to think about insulating the planting site for the vines for the winter. Dry leaves, lutrasil or other covering material can be used.
General rules for planting clematis
How to plant clematis in spring
Planting clematis in the spring is carried out with a strong burial of seedlings. The root collar is placed 10 cm below the ground level. It is necessary to take into account when planting and other preferences of clematis. Seedlings for planting are purchased in specialized stores. If leaves have already appeared on the purchased seedling, you need to put them on the windowsill until spring, caring for them like an ordinary flower. If there are still no buds on the seedling, it is better to keep the seedlings in the cellar until spring.
They start planting clematis in open ground when the frost has passed. For plants with dormant buds and open roots, it is preferable to plant in April.A well-lit place is selected, but it is also worth considering the planting region: planting in the Urals will differ from planting clematis in the Leningrad region. It is necessary to take into account the variety of clematis, some varieties prefer partial shade.
They dig a large enough planting hole if the soil for clematis is fertile, if the soil is sandy, clayey, the hole should be 50x50. Be sure to put the nutrient mixture into the pit. You can make it from peat, forest land, humus, sand, adding ash and mineral fertilizers there. Ash feeding is especially useful for clematis. If the soil is acidic, fertilize it with dolomite flour or lime.
In the first year after planting, one should not hope for a rapid growth of the shoot. The ground part will develop. The upper part is trimmed, leaving 3 buds on each shoot. It is necessary to cover the shoots from the sun, water more often. When buds appear, they must be removed immediately. After a year, the bush will take root and begin to actively develop.
How to plant clematis in the fall
Autumn planting of clematis should be carried out in September. It is not recommended to plant the plant later. A young seedling needs to take root before the onset of winter. If the seedling was purchased later, it is better not to leave it for the winter in the basement or cellar. Planting and caring for clematis outdoors in autumn and spring is not much different.
Caring for clematis in the fall consists of feeding, watering and autumn pruning. In dry autumn, clematis should be watered regularly. But watering should be moderate, too abundant watering is destructive for plants. It is not recommended to feed clematis in the fall.

Clematis planting and care in the open field
Clematis, due to the variety of colors, types of flowers and abundant flowering, are rightfully considered the kings of lianas. Clematis has many varieties and species, perfectly adapted for growing in a wide variety of climatic conditions. But still, flower growers often do not dare to grow it, although clematis planting and care in the open field, which does not require excessive efforts, is a worthy decoration of any garden.
Description and origin of clematis
Clematis (Clematis), which in translation from Greek means "climbing plant", in Russia is also called clematis or warthog. According to the classification, clematis can be classified as arboreal: after two to three years, the stem becomes fibrous, becomes stiff, although there are herbaceous varieties of this interesting plant.
In our latitudes, clematis are most widespread, shedding their foliage at the end of the growing season - with the onset of autumn cold weather. But in the more southern regions, evergreen varieties also grow.
The growing season for clematis begins when the soil warms up to + 4-6 ° C (April). If the liana blooms on the shoots of the second year, then the flowers appear in early summer - late May or early June.
Simple clematis bloom for a week, terry - up to three weeks. The color of clematis flowers, their structure and the shape of the petals are very diverse, depending on the species or variety.
The intensity of the color of the flowers largely depends on the illumination: the thicker the shadow, the paler the flowers. However, too bright light for extended periods of time also causes the flowers to lose their brightness.
Until the 16th century, clematis was cultivated as an ornamental plant in Japan, then it settled in Europe, and it came to the greenhouse of Russia in the 19th century. In the last century, as a result of the efforts of breeders, clematis left closed premises and began to be grown outdoors.
Types and varieties of clematis, photo
The classification of clematis today is based on its characteristics such as flower size, flowering time, place of origin. An important classification feature is the method of pruning clematis.
Today, large-flowered groups are widespread among gardeners: Vititsella, Zhakmana, Patens, Lanugizona, Florida, Integrifolia.They are successfully used for vertical landscaping - walls or fences, uprights and supports.
Small-flowered varieties are actively used in landscape design: mountain, burning, paniculate, eastern serrate-leaved clematis. Since they have small flowers, they are not used as often as large-flowered ones. Although they have a number of advantages, and above all it is their good winter hardiness.
K. Zhakman is a stable large-flowered hybrid that grows up to 4 meters per season and gives about a dozen additional shoots. It was this hybrid that became the basis of numerous species grown in modern flower beds.
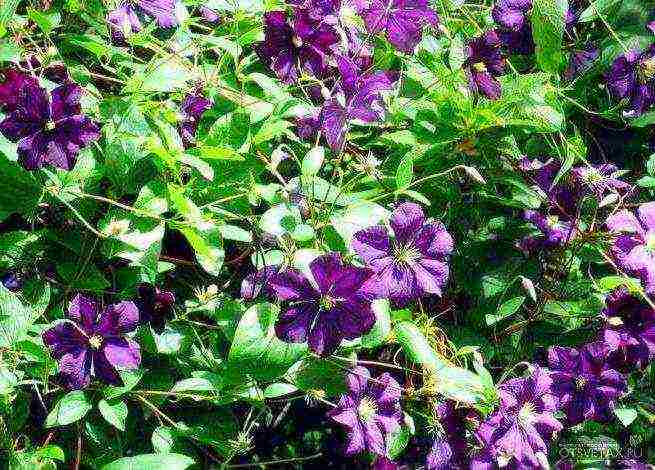
A distinctive feature of K. Zhakman - large, up to 12-15 centimeters flowers, blue, violet and purple tones, devoid of aroma. Abundant flowering on young shoots occurs throughout the summer.
They require moist soils with good drainage, good lighting, and places inaccessible to the wind. Before winter, they are cut almost to the ground level, and in the case of a shallow planting, 3-4 buds are left. Lianas of this group are distinguished by their unpretentiousness.
All K. Zhakman are distinguished by high resistance to diseases, frost resistance. Even in the North-West region, which is unfavorable for floriculture, these clematis grow well and quickly, bloom actively. For a safe wintering of K. Zhakman, the vines of this group are subject to pruning in late autumn.
Another name for clematis belonging to this group is woolly. This includes shrub vines up to 2.5 meters high. Flowering occurs on the shoots of the previous season and on young ones. They are called woolly because the lower surface of their leaves up to 12 centimeters in size seems to be covered with wool.
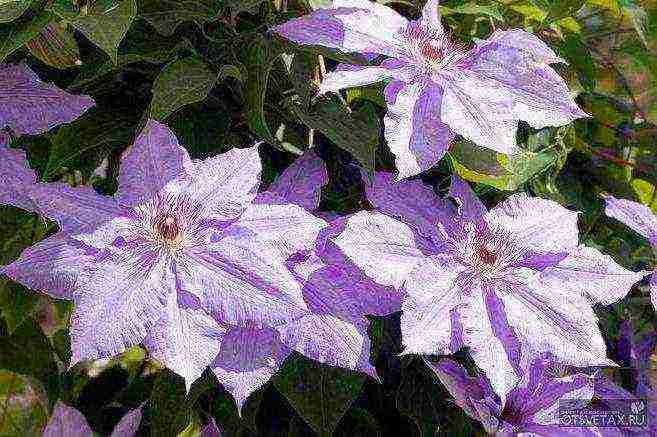
Flowers of K. Lanugizon are usually white or purple in color, their pedicels are also woolly, the diameter of the flowers is 12-20 centimeters.
A feature of caring for K. Lanugizon is pruning, which is carried out in the fall at a level of one meter from the ground. After pruning, the branches are insulated with peat or sawdust to ensure normal wintering.
Curly liana, reaching 5-6 meters, leaves are often feathery, up to 6 centimeters long.
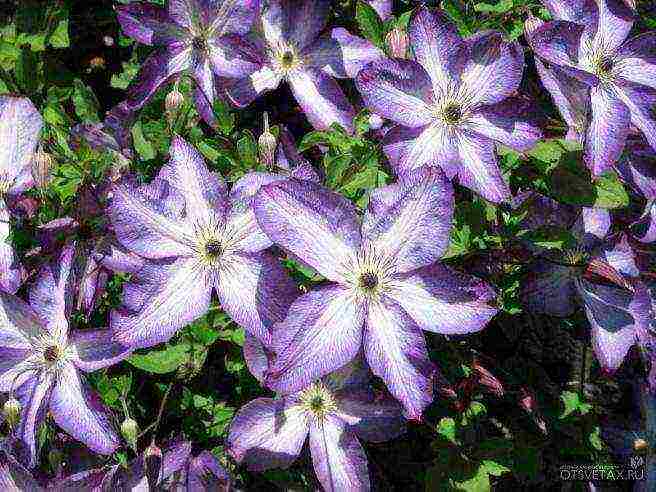
Blossoms K. Viticella flowers up to 12 centimeters in diameter, from early June to September. On an adult liana, there are about a hundred flowers at the same time, painted in red-purple, lilac and blue-violet tones.
These clematis bloom on the shoots of the current year, so they are completely pruned before winter.
This group includes shrub vines, spreading, up to 3.5 meters high. The flowers are star-shaped, single, large - up to 15 centimeters, among which there are double ones. Color palette - from light to rich dark blue, violet, purple tones.
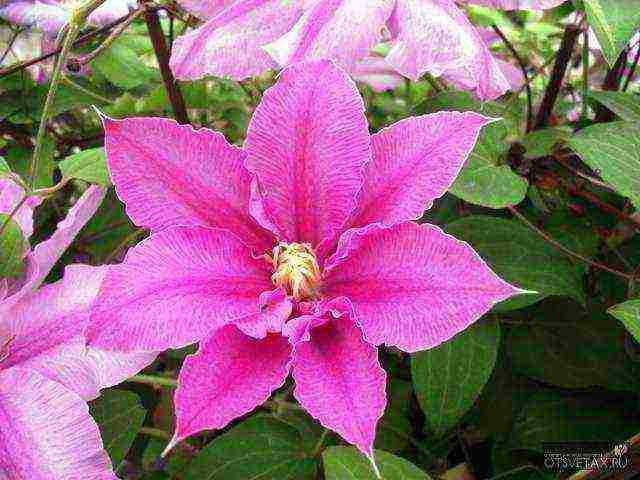
Flowering lasts from spring to late autumn. K. Patens is shortened a little in the fall, the liana itself is covered.
Shrub vines, growing up to 3 meters in length, with flowers of 8-12 centimeters. The color is varied, more often in light colors. Florida blooms from the beginning of summer on last year's shoots, from August - on young ones.
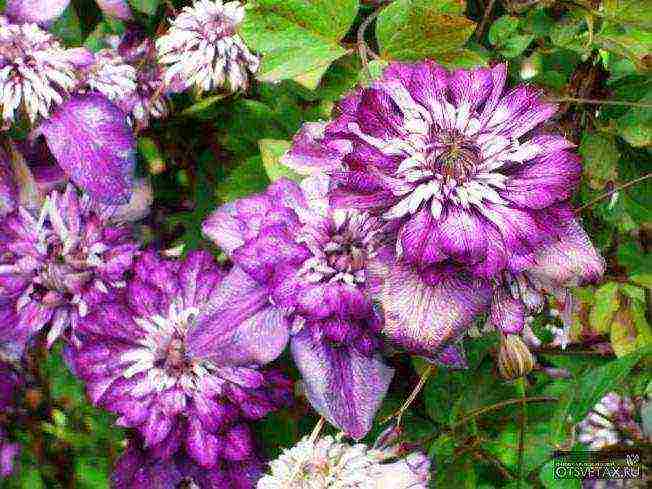
Podzimnyaya pruning is carried out 1-1.5 meters, after which the liana takes shelter from the cold.
This group was bred by the staff of the Nikitsky Botanical Garden. These are relatively low semi-shrubs - up to one and a half meters high, they often do not need support. The flowers are drooping, about 12 centimeters in size, usually bell-shaped.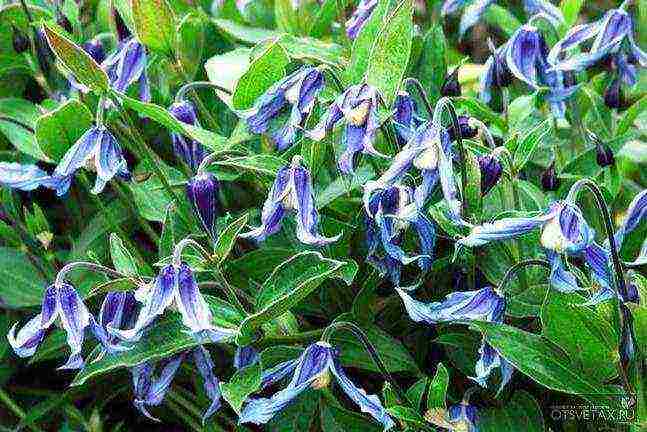
Planting clematis
Seat selection
Since clematis grow in one place for up to twenty years, the choice of a planting site and its preparation must be taken very seriously. First of all, the place should be well lit, protected from strong and northerly winds.
Important! In southern regions, clematis should be planted in slightly shaded areas. Landing near the walls of buildings and structures is not recommended.
Clematis does not like waterlogged soils, therefore, planting it in lowlands or meta, where water cannot accumulate after rains or melting snow, the roots very quickly begin to rot. If the groundwater is close (up to a meter), a 20 cm drainage layer must be provided. Often, in addition to the drainage layer, an artificial elevation is constructed.
Important! If clematis are planted to decorate the walls of buildings, you need to arrange them so that water does not drain from the roof onto them.
Landing hole sizes:
- light soils - 50 x 50 x 50 cm;
- heavy soils - 70 x 70 x 70 cm.
Sometimes, depending on the volume of the seedling roots, the holes have to be made wider.
Soil and planting rules
Clematis need soil that is light, breathable, fertilized, slightly alkaline or neutral. In the case of heavy soils, the soil dug out from the planting hole is mixed with sand, rotted compost, etc.
For backfilling the seedlings, a nutrient mixture is prepared:
- peat - 1 part;
- humus (compost) - 2 parts;
- garden (garden) land - 2 parts;
- sand - 1 part.
The following are immediately added to the soil mixture:
- Ash - 2 cups.
- Mineral fertilizers - 100 grams.
- Dolomite flour - 150 grams.
The mixture prepared in this way meets all the requirements of clematis and is suitable for filling holes dug on both loam and sandy loam.
A mound is made from this mixture in the planting hole, the roots of the seedling are distributed along its slopes, covered with part of the mixture, watered - and so gradually until the hole is filled.
Important! The tillering node must be deepened by at least 5-8 centimeters for young seedlings and 8-10 centimeters for older vines.
The tillering nodes are covered with well-washed river sand, adding charcoal and ash to it. The sand will not retain water, which will protect this vulnerable spot of clematis from decay.
Deepening the tillering nodes protects the root system of clematis from both winter frosts and summer overheating.
After filling the planting hole with nutritious soil mixture, clematis must be watered well. This is done through a special hole, which is dug out at a distance of 15-20 centimeters from the seedling itself.
Then the seedlings are covered with peat or humus and shaded from direct sunlight.
Important! A support for clematis is installed during planting, so as not to damage its roots later.
Planting time for clematis
It is believed that clematis can be planted during their entire growing season - from spring to autumn. At the same time, in the summer, those plants that were contained in containers are usually planted - they are simply transferred together with an earthen clod into a prepared planting pit.
But there are several important points that determine the optimal timing of planting seedlings:
- Closed-root clematis, that is, purchased or grown in containers, are planted throughout the warm season. Such seedlings, acquired long before the onset of spring, can be kept in a greenhouse or at home, on a windowsill.
- Clematis with an open root system, acquired in late winter - early spring, are planted in April-May. Planting must be done before the kidneys wake up. Otherwise, it is better to postpone this event until the time when the threat of return frosts has passed.
- Autumn planting (also called late summer) is suitable in any case. It is important here that the seedlings have time to firmly take root before the onset of cold weather.
Planting clematis in the fall and subsequent care
The optimal timing of the autumn planting of clematis seedlings is from mid-August to the end of September, more specifically, the timing is determined by climatic conditions. The plant needs at least a month to root well, in this case it will survive the winter without loss. Seedlings purchased at a later time are best left for wintering in a cool, dark room.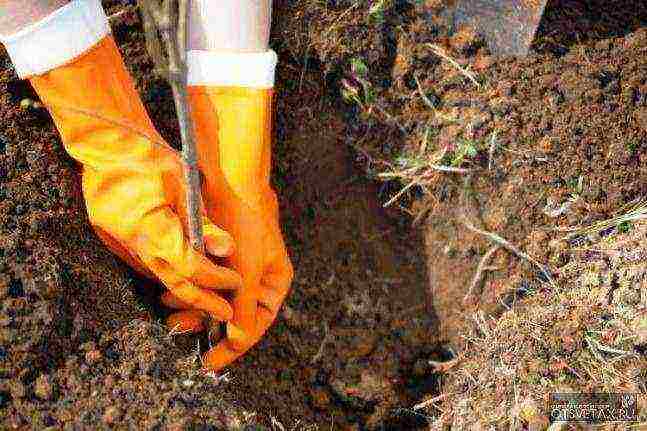
The rules for autumn planting completely coincide with the general rules for planting clematis.
Important! Autumn planting requires the removal of almost the entire aerial part of the plant: two or three buds remain on the liana.
During the fall, before the onset of cold weather, caring for clematis and their seedlings is simple:
- Moderate watering during periods when there is no rain for 5 days or more. Abundant watering in the cool season is very harmful for clematis.
- Top dressing of clematis at this time of the year is usually not done, unless the varietal characteristics of the vines require it. In warm regions, you can carry out autumn feeding by adding superphosphate or potassium sulfate.
- Loosening the soil and removing weeds.
Preparing clematis for winter
An integral part of clematis autumn care is preparing them for winter. This is a special process that not only consists of several stages, but also differs for different types of plants.
Pruning clematis depends on their variety and type:
- Clematis, which form flowers on last year's shoots. Trimming is more of a formative nature. In this case, the main goal is to protect young shoots from frost. Non-resistant varieties must be prepared and then securely covered for the winter.
- Clematis, the formation of flowers in which occurs on the shoots of the past and current seasons. Pruning is carried out for about a third of the length of the shoots, after which the vines are removed from the supports and covered.
- Clematis blooming on the shoots of the current year are cut to 20-30 centimeters above ground level so that 2 - maximum 3 pairs of buds remain.
To prevent infection of clematis with fungal diseases, they are sprayed with foundationol, powdered with wood ash. Then, the bushes are hilled with humus, compost or weathered peat about 12-15 centimeters in height.
Shelter for the winter is carried out with the onset of stable light frosts - up to -5-7˚С. Preference should be given to the air-dry method, so as not to cause wetting, arguing or decay of the roots.
Important! In areas with warm winters or frequent thaws, the shelter should be arranged in such a way that during the warming period, clematis can be ventilated to avoid overheating.
The role of insulation for clematis can be played by dry foliage, preferably birch or oak, spruce branches, crushed foam. Since almost all covering materials during the winter are usually caked under the snow, the vines are usually also protected by frame structures - wooden boxes, shields, cut branches or vines.
It is also necessary to protect the plants from mice, either by spreading the poison under the vines or repelling agents.
Frame structures are usually used to shelter species that have minimal clipping. At the same time, it is better to remove the vines from the supports, so it is easier to cover them, and their safety will be higher.
As for those clematis that are completely cut off before winter, they are first covered with dry leaves or spruce branches, then a wooden or mesh plastic box is installed, which are then covered with a waterproof film and covered with earth or peat, if the winter is little or snowless, but frosty.
You can also cover those clematis in which the shoots are shortened. They are removed from the support, placed in rings around the base of the bush on a pillow made of spruce branches, brushwood or foam. Then the whole plant is covered in the same way as in the previous case.
For group plantings of clematis, you can use a common shelter, which is built from shields installed on supports and film materials.
Instead of foliage or other materials for clematis, dry stems of marigold (tagetes), coriander (cilantro), tarragon or pyrethrum are often used. In addition to the fact that they serve as a good shelter, they protect the vines from wintering many pests on them, and also scare away rodents with their smell.
Interesting! If there is a suspicion that clematis did not survive the winter, you should not immediately uproot them. Most often, they recover, forming new shoots from the roots. True, this usually happens within two to three years after an unsuccessful wintering.
Left affected clematis for the winter should be covered according to general rules.
Planting clematis in open ground in spring and care
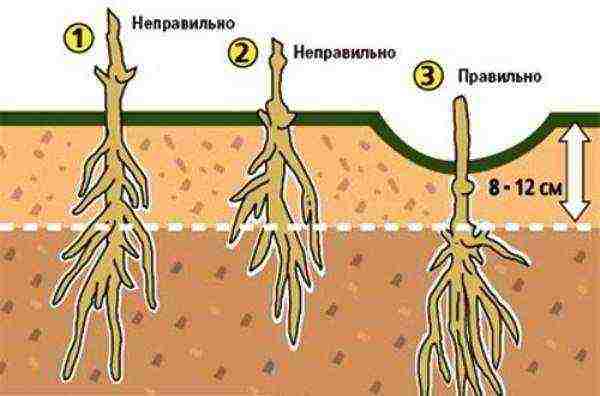
The most successful for planting clematis seedlings in spring is the period from late April to May.
Important! Seedlings with buds that have not yet swollen are subject to planting in open ground. As the buds develop, planting becomes more and more risky from the point of view of the upcoming wintering, the normal rhythm of development is disrupted in clematis, they take root worse, and they may not endure the winter.
Caring for clematis planted in spring consists of watering, fertilizing, loosening and weeding from weeds.
Moderate watering is carried out weekly, in especially hot and dry periods, the frequency of watering is increased to 2 or 3 times a week. Dolomite flour or chalk, as well as copper-containing preparations, are usually added to water for spring irrigation.
In the first year after planting, there is no need to feed clematis, but starting from the second year, regular application of organic matter is required, alternating it with mineral fertilizers.
In the first year of growth in clematis, it is necessary to remove all buds that form so that the plant forms a strong root system. In the future, this need disappears, it is replaced by stimulating pruning.
Important! The root system of clematis does not tolerate overheating, therefore it is necessary to protect it from exposure to sunlight.
The best way to protect is planting flowering annuals, various ground cover plants. You can also mulch the root zone with humus or moss.
Also, the garter of vines to the supports belongs to the care measures. Walls, a fence - all those parts of buildings and structures for the decoration of which clematis are planted can serve as a support.
Supports can also be specially designed, that is, elements of landscape design - arches, pergolas, screens made of solid wood or metal.
Often they try to use stretched ropes as a support, however, this is a bad decision, and this method is suitable only for those types of clematis that bloom on the shoots of the current year.
Supports for clematis can also be natural - the trunks of ornamental shrubs such as lilac, or weigela, or jasmine.
Pruning
Correctly in the right time, the pruning of clematis guarantees abundant flowering and helps to rejuvenate the vines.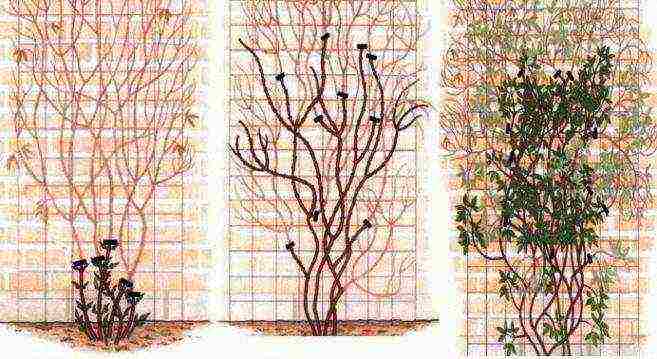
In those clematis that bloom on the shoots of the previous year, pruning is carried out at the end of flowering, while the generative parts of the shoots, as well as those branches that bloomed especially abundantly, and weak, poorly developed, are subject to removal.
For clematis blooming on all shoots, there are two pruning steps. In the summertime, the flowering branches of the last season are removed. The second pruning is carried out already when preparing the plant for winter. The same vines that bloom on the shoots of the current year are not pruned in summer.
Transplant of clematis
Transplanting clematis is even more responsible than planting them. They do not tolerate this process very well. This is especially true for those varieties and species that have a pivotal root system. It is best, of course, not to injure the vines, but in some situations the transplant is simply vital:
- the wrong place for clematis was chosen;
- there are signs of wilting (wilt);
- it is necessary to divide the bush.
Also, the need for a transplant arises when redeveloping a personal plot.
When replanting a plant, it is necessary to carefully examine its roots before planting. Those parts that have mechanical damage, swelling, signs of rot are removed, the cuts are processed with crushed charcoal or brilliant green.
Since clematis grow in one place for a very long time, their root system becomes quite large - about one and a half meters in diameter, and sometimes more. Therefore, the pit for planting the transplanted plant needs to be dug more than usual, by 20 centimeters on each side.
A couple of buckets of compost or humus, one and a half buckets of peat and sand, as well as 100-200 grams of lime, ash and fertilizers - potash and superphosphate - are added to the soil that was dug while digging a hole.
Important! If the soil is too light (sandy loam), more compost or humus is added.
A 20-cm layer of drainage is laid at the bottom of the pit, then it is filled with the prepared soil mixture about half, the support is strengthened, and the transplanted plant is placed. Its roots are carefully straightened and the pit is covered with soil mixture.
Transplanting is usually done in spring or autumn, at the same time as planting. The rules for caring for transplanted clematis do not differ from caring for seedlings. Watch video material about clematis transplant.
2>Top dressing of clematis
Since clematis, as a rule, blooms profusely and for a long time, and many varieties also renew their green part every year, it requires an increased amount of nutrients.
Top dressing is usually applied four times during the growing season, in small portions, so as not to get too high a concentration of fertilizers in the soil. Before applying, their plants are well watered.
When and what clematis is fed depends on the growing season.
The first top dressing of the season, spring, is carried out when the shoots grow back. It is best at this time to carry out foliar feeding with synthetic urea - 3 grams per bucket of water. Spraying is carried out either in the evening hours, or in cloudy, but not rainy, weather.
Two to three weeks after the first feeding, potassium nitrate is added - 25 grams per 10 liters of water.
At the end of summer, clematis are fed again with potassium sulfate, and in September, phosphorus fertilizers are applied, for example, bone meal, on which the development of roots and shoots, as well as the condition of the leaves, depends, are usually introduced in autumn. Bone meal is usually added at the rate of 200 grams per square meter.
If, when planting clematis, all the necessary fertilizers were applied, then in the first year he will not need additional fertilizing.
In total, clematis is fed 4 times during the season, alternating organic fertilizers with mineral fertilizers.
Important! Fresh manure must not be used!
Breeding methods for clematis
In total, there are five ways to breed clematis:
Seed propagation
The sowing time and, accordingly, the seed germination time is influenced by their size. Clematis seeds are divided into three groups by size:
- small - from 1.5 x 3 to 3 x 5 mm;
- medium - from 3 x 5 to 5 x 6 mm;
- large - from 5 x 6 to 10 x 12 mm.
Small seeds of clematis emerge in two weeks to three months. They are suitable for direct planting into the ground. Germination of small seeds lasts for 4 years.
Medium seeds germinate in one and a half to six months. It is better to germinate such seeds in indoor conditions - greenhouses, greenhouses, etc. Seed germination lasts for three years.
Large seeds germinate for a long time, more than six months, sometimes more than a year. Although their germination persists for four years, it is preferable to propagate varieties of large-seeded clematis in other ways.
By the way, for the germination of large and medium-sized seeds, many additional measures are required: stratification, bubbling, etc. Although these measures reduce the time for the appearance of the first seedlings, many gardeners prefer other methods of reproduction.
Reproduction by layering
It is considered the easiest way to propagate clematis from early spring to autumn. The method is not expensive and does not require additional devices.
Layers are horizontal, vertical and airy.
Horizontal layering - an intact healthy shoot with several buds is selected and placed in a prepared groove, the depth of which should be 7-8 centimeters. So that the elastic stem does not rise up, it is pressed with metal pins, and then covered with earth, leaving the apical part of the shoot unsprayed.Layers will need regular watering, loosening and weeding. For the next season, they can be separated from the mother bush and planted.
Vertical layers are formed by digging in the first or second bud on the shoot. The rest will grow upward. This method is good for expanding a young bush, in this case, the grown new bushes are not dug out, but left in place.
Air layering is a more troublesome method. To obtain an air layer on the shoot, a large node with well-developed buds is chosen. An incision is made near such a node to the middle of the shoot. This incision is generously treated with growth stimulants and wrapped in a damp moss pillow.
The upper part of the shoot is removed, and the rest is wrapped in plastic wrap and tied to a support. The cuttings are considered ready for independent development in the soil when their roots grow through the moss. The cut is cut and planted.
Propagation by cuttings
A more massive way of breeding clematis is green cuttings. Cuttings can be cut throughout the growing season, but the most productive are those that are cut in the spring, during the period when the vine forms buds.
Cuttings of hybrid varieties of clematis can be harvested until July inclusive, and small-flowered ones - until mid-August.
The best time of day for cutting cuttings is early morning or light twilight, as well as cloudy days - this way the shoots will be protected from possible moisture deficiency.
Shoots for cuttings are cut over the first or second true leaf. The best quality cuttings are obtained from the middle part of the clematis shoot: the vines on the upper part have few buds, or they are completely absent, and the lower part is usually lignified, and therefore takes root worse.
Important! Cut off no more than a third of the total number of shoots on the bush for cuttings.
To get a good cutting, it is enough to have one bud on it. Cut them with a sharp knife. The lower cut is made oblique, it should be 5-6 centimeters below the kidney, the upper cut is straight, at a distance of 2 centimeters from the kidney.
Then the cuttings are immersed in a growth stimulant solution overnight (10-12 hours), after which they are planted either in specially prepared places - hotbeds, greenhouses, or in pots.
The soil for rooting cuttings should be light, breathable, moisture-retaining. The best materials for soil are a mixture of sand or humus with peat, as well as coconut fiber or perlite.
For better rooting, cuttings need diffused light, so you need to take care that the cuttings are not in direct bright sun. It is recommended to whiten the glass in greenhouses, or use thin white fabrics to diffuse light.
The cuttings are planted at a distance of 5-6 centimeters from each other, while deepening the kidney by 1 centimeter. This measure will prevent it from drying out.
Conditions of keeping cuttings during their rooting: temperature 18-22˚С; high air humidity; regular watering and spraying.
With daily watering for the first 4-5 weeks, you need to spray the cuttings once or twice a day. However, in extreme heat, this should be done more often - up to five times a day.
After a month, watering the cuttings is reduced to 2 or 3 times a week. Rooting usually takes place within one and a half to two months, but they are planted in open ground for growing in the spring, leaving them for the winter in a cuttings.
After the season spent in the "school" growing in the fall, the cuttings are planted in a permanent place.
Many gardeners also successfully use lignified cuttings, which are cut after the autumn pruning of clematis.
Important! For better rooting of woody cuttings of rare and valuable varieties of clematis, they are carefully split into two longitudinal halves. Such cuttings take root more easily.
You can also root cuttings in water. This method is well applicable for large-flowered vines.They are also cut at the budding stage, placed in a vessel so that only the ends of the cuttings are in the water.
The vessel should be opaque and placed in a warm, shaded place. Sometimes they even drop it in a suitable area in the garden, carefully monitoring the water level.
Roots are formed within 8-10 weeks. When they grow 3-5 centimeters, they are transplanted into cuttings, providing them with constant temperature and high humidity.
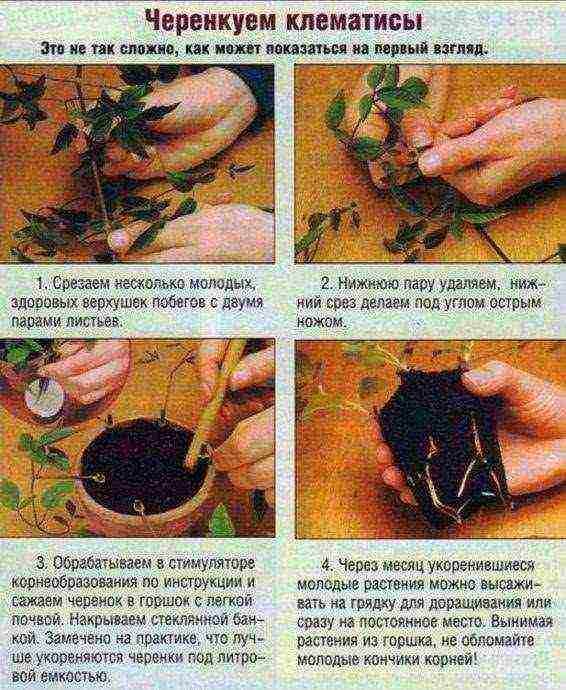
Reproduction by grafting
A very rare and time-consuming method of propagating clematis, used when there are only one or two suitable cuttings available. As a rootstock, not shoots of a plant are often used, but its roots, or rather, segments of roots.
In addition, vaccination requires special knowledge and skills, which is why it has been encountered as a method of reproduction in recent years very rarely.
Features of growing clematis in the Urals
Observing all the basic rules of planting and care, clematis are also grown in areas with difficult climatic and biological conditions, which include the Urals - long frosty winters, frequent strong winds, and the predominance of acidic soils. All recommendations for growing clematis in the Ural region briefly look like this:
- Clematis varieties blooming on the shoots of the current year are most suitable for successful cultivation and full flowering. However, if you strictly follow all the rules for preparing clematis for winter and reliably and correctly cover them in the cold, almost all varieties will develop and bloom well.
- It is best to plant clematis in open ground in spring: only in this case, before the onset of cold weather, the plants will have time to take root well.
- When adding humus as a top dressing, it is necessary to add chalk, this will reduce the acidity of the soil.
Clematis for beginners
Vigorous, hardy beauties, clematis grow easily and quickly, and do not cause any special difficulties in growing. However, for those who for the first time are going to plant beautifully flowering vines in their garden, you need to take into account a few tips.
The easiest varieties to grow are considered to be varieties that do not need to be covered for the winter, but it will be enough to cut them to ground level. The International Clematis Society has even compiled a list of varieties recommended for beginners.
The list includes varieties of clematis that are highly reliable and unpretentious. Among them are small and large-flowered varieties, with different flowering periods, a wide range of colors.
Pests of clematis
Nematodes. Get on plants from weeds or from contaminated soil. Leaves affected by nematodes dry up and die off pretty soon. The worms living in the stems cause curvature of the shoots, a sharp deterioration in growth. Fitoverm is used as an effective means of control.
As a prevention of the appearance of nematodes, it is necessary to carefully examine the roots of the seedlings before planting. If they are largely "seeded" with larvae, it is better to refuse planting.
It is also necessary to regularly remove weeds and loosen the soil. Planting natural insecticides that repel these worms will be a good protection against nematodes: marigolds (tagetes) or calendula, garlic or aromatic garden herbs.
End moth and moth butterfly. They lay eggs on green parts of plants, from which caterpillars then feed on leaves.
To combat and prevent them, regular spraying with insecticides is required, and it is also often necessary to manually collect caterpillars and then destroy them. It's a good idea to involve birds in this work. So that they willingly nest in the garden, the necessary conditions are created for them: feeders, drinkers.
Beet aphids settle on the underside of vine leaves, sucking the juices out of them. To combat it, use any insecticides, including those from folk remedies.
The spider mite causes the leaves, shoots, buds to dry out, the plant becomes covered with cobwebs.Good results in the fight against this pest are given by Actellik, as well as an infusion of garlic.
Slugs and snails, willingly eating leaves and young shoots of clematis. They are usually removed by hand, or traps are arranged for them.
Diseases of clematis and their treatment
Diseases of clematis can be divided into two large groups: fungal and viral.
Wilt (wilt) caused by clogging of the vessels of the root system with fungal spores. Plants are usually exposed to this disease in early spring if the winter was warm. Also, the reasons may be stagnant water, excessive shading.
For treatment, remove all the affected parts of clematis and spill it well with a solution of foundationol or copper sulfate. As a preventive measure, usually in the spring, plants are watered with copper-containing preparations, as well as top dressing and weeds are weeded on time.
Gray rot, manifested by brown spots on stems and leaves. Most often, plants are affected by it in rainy years, as well as with poor ventilation of the stems with excessive moisture. As a prophylaxis and treatment, clematis is periodically treated with fungicides.
Ascochitosis, or leaf spot, is brown spots with clear edges, causing drying and brittleness of the leaves. This disrupts the normal process of photosynthesis, which negatively affects the development of the vine.
For treatment, they are treated with copper sulfate or other copper-containing fungicide.
Powdery mildew usually infects plants towards the end of summer, when the days are still hot and the nights are colder. As a preventive measure, plants are treated with solutions of copper-containing preparations with the addition of soap or a solution of soda ash.
Rust - red "pads" on the surface of the leaves, containing spores. During treatment, the affected leaves are removed, the liana itself is subjected to treatment with Bordeaux liquid.
Alternaria usually affects vines in late August - September, causing leaf death and shoot necrosis. As a means of control, any preparations containing copper are used.
Septoria, which disrupts photosynthesis, manifests itself in gray spots with a reddish border on the leaves. For treatment, copper sulfate or Bordeaux liquid is used.
Most often, clematis are affected by yellow mosaic of leaves. This is due to infection with viruses carried by sucking insects. Unfortunately, at the moment there is no effective treatment for this disease, so the affected plants have to be removed.
If hosts, peonies, delphinium or bulbous plants are planted nearby, the risk of mosaic infection increases.
Important! Compliance with the regimes of watering and fertilizing, as well as all melted agricultural techniques of clematis, minimizes all risks of infection with fungal and viral diseases.
Possible growing problems
Stopping growth. It usually happens in the first year, in the month of June. By this time, the young plant grows up to 20 centimeters. This is usually due to impaired care. To help the liana start growing again, they carry out 2- or 3-fold feeding with nitrogen fertilizers in combination with complex mineral fertilizers.
Drying of the tops, twisting them on young shoots. This happens either with insufficient watering, or with the appearance of aphids. If there is a lack of moisture, it is necessary to normalize watering. If the problem is related to the appearance of pests, it is necessary to spray the clematis several times with insecticides or infusions of garlic or hot pepper.
Shrinking flowers. This usually happens when clematis reaches 5-6 years of age, and more often in large-flowered varieties. The reason is lack of moisture. The roots of clematis go very deep into the soil, and often during watering, the required amount does not reach the roots.
It is often easy to fix the situation by digging plastic bottles at the soil level (with the neck down) at a distance of 40-45 centimeters from the base of the vine.If watering and feeding is done through these bottles, there is a full guarantee that the plant will receive everything it needs - both moisture and nutrients - in the right amount.
Delayed development. This manifests itself in unsatisfactory flowering - rare, scarce, as well as a small increase in shoots. The reason lies in the initially incorrect fit and insufficient penetration. You can slightly correct the situation by adding fresh soil up to 10 centimeters. However, it would be best to transplant it according to all the rules and to the required depth.
Clematis in landscape design
More than two thousand varieties of clematis reveal wide possibilities of using it in landscape design:
- A hedge that distracts the attention of outsiders from what is happening behind it.
- Decoration of gazebos or arches that protect from the sultry sun.
- Alpine slides decoration, herbaceous varieties are perfect here.
- Spectacular vines perfectly decorate the trunks of old trees.
- Creating a background for flower beds.
Several varieties and colors of clematis planted together will create a magnificent composition that blooms from early to late summer.
Beautifully blooming bright clematis will hide from the eyes the walls of outbuildings and fences that are far from perfect, and can also serve as a screen separating the various zones of the personal plot.
Important! The shade that clematis gives contributes to the appearance of dampness, so it is undesirable to decorate the northern walls with them.
Clematis in combination with other plants
The most "royal" combination of clematis with garden flowers is its neighborhood with a rose. In England, their joint growth has already become a tradition. The neighborhood of clematis with a climbing rose, which serves as an excellent support for a vine, is especially successful.
Important! A climbing rose should be at least 3-4 years old to become a good support for clematis. In addition, by this age, she will have developed enough so as not to suffer from her neighbor and to withstand his weight.
Since the rules for the care and maintenance of roses and clematis are quite similar, vines can be given the opportunity to grow with a carpet creeping between the bushes. At the same time, if you pick up varieties of roses and clematis that bloom at different times, the flower garden will always look extremely impressive.
When planting these wonderful plants next to them, the following rules are applied:
- roses must be well adapted in place;
- the root system of clematis must be strengthened before replanting to the rose;
- if the plants are planted at the same time, a partition must be installed between them in the ground;
- the height and volume of the bushes must match each other;
- clematis and roses should not cover each other from the sun;
- when replanting to roses, clematis seedlings are slightly tilted towards the center of the rose bush;
- small-flowered clematis will look most impressive next to roses.
In addition to roses, clematis coexist well with many other garden flowers. Such a neighborhood is especially useful in that it shades the roots of the vines, sensitive to overheating. At the same time, annual and perennials with a superficial root system are selected for joint plantings: marigolds, calendula, subulate phlox, geraniums, astilbe, as well as irises.
Shrubs can also become neighbors of clematis: chubushnik, barberry, acacia, some conifers. They will look great against the background of ivy or grapes.
Final part
Elegant clematis, which have become extremely popular in recent years, will decorate any garden or flower garden, if their planting, and also the subsequent care in the open field, will be done according to all the rules. A bit of a hassle, but long-term abundant flowering will delight even the most critical gardeners.
Video advice from a specialist in the cultivation of clematis
Quoted1>> Materials:
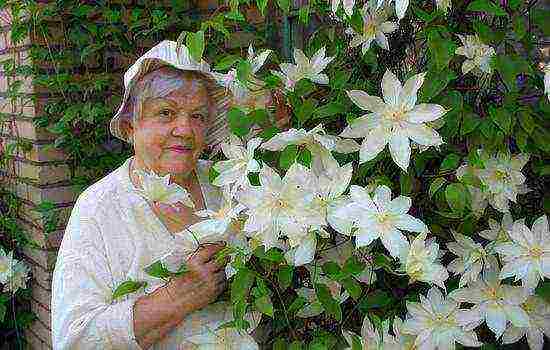
Clematis, or as they are also called clematis, always attract the eye.
This plant allows you to implement various landscape solutions on the site.
Although this vine has gained the fame of a demanding and painful plant, in fact, growing clematis does not require huge efforts from the grower.
To do this, you just need to choose a suitable variety and plant bushes, taking into account the peculiarities of agricultural technology.
When buying seedlings, pay attention to the following signs:
• the roots of plants should be healthy in appearance, elastic, even (if they have swellings, then they are affected by root gall nematodes;
• seedlings must have at least three shoots with buds;
• it is necessary to acquire clematis no earlier than mid-September;
• the best age for seedlings is 2 years. Container plants are transplanted in spring and fall. Annuals dug directly from the ground can be taken directly from private florists.
When choosing clematis, you must take into account the climatic conditions of your region and the varietal characteristics of the plant. The easiest to care for are varieties with purple flowers. More whimsical vines with flowers of red shades. The most demanding are the white clematis. Some species require winter shelter and pruning.
For central Russia, those varieties are suitable that do not need shelter and bloom on the shoots of the current year. For beginner growers, clematis blooming on the shoots of last year (the so-called princes) are suitable for growing: they do not need to be cut and covered for the winter. Although their flowers are smaller and more modest than those of large-flowered ones, they bloom early and profusely even in partial shade. Among them, such varieties as Blue Bird, Maidwell Hall, Memm, Rosie O'Grady, Pink, Flamingo are popular.
Among the clematis that form flowers on new shoots, the vines of the Zhakman, Viticela, Integrifolia groups are easy to grow (varieties Avangard, Purpurea Plena Elegans, Lemon Dream, Markham's Pink, Stolwijk Gold, Comtesse de Bouchaud, Purple Dream, Stasik, Hagley Hybrid, Rouge Cardinal ).
Experienced gardeners can take up the cultivation of clematis of the Florida, Patens, Laginuza groups, which include the most beautiful varieties. They bloom twice a season: in May-June on last year's shoots, in July-August on new stems. The second bloom will be weaker than the first. The most famous varieties: President, Multi Blu, Fair Rosamond, Nadezhda, Joan Picton, Ballerina, Jeanne d'Arc, Helly Moser.
Choosing a landing site. For growing clematis, a sunny area, sheltered from the winds, with fertile loose soil is best suited. If you want to plant these vines near the wall of the house, then the distance from it to the bush should be at least 70 cm. Clematis does not tolerate overheating of the roots, so you need to plant small plants in front of the bushes to shade the root zone. It is better if it is calendula, parsley, marigolds that repel the nematode.
Clematis needs enough sunlight. Therefore, it is better to place rows with bushes from east to west, leaving at least 0.7 m between them. On the support, the shoots are positioned so as to observe the maximum illumination of the leaves.
For varieties of clematis with solid or double flowers (Lady Betti Belfor, Niobe, Westerplatte, Rouze Cardinal, Rosemur), an open area is preferable. Two-color varieties (Dr. Ruppel, Hania, Hally Moser, Nadezhda, Minister) need a light partial shade, which will add richness to the color.
The soil. Clematis grow well in fertilized and drained soil with a slightly alkaline reaction. The land under the bushes must be loosened after watering. Mulching keeps soil moisture longer. Humus is used as mulch.
Planting dates depend on the region where clematis is grown. In the middle zone of the Russian Federation, clematis is planted starting from the end of April. In the southern regions, they are planted in September - early October. If the autumn planting fails, then the purchased seedling is stored in a cool room with a temperature of +5 oC, sprinkling the roots with wet sawdust and sand.
Clematis is grown vegetatively (layering, dividing the bush, grafting, grafting) and seeds.
When propagating by layering, the shoots are bent to the ground, laid in a shallow (up to 10 cm deep) dug trench, pinned with metal hooks or simply pressed down with stones and sprinkled with soil. For the winter, they are covered with spruce branches, sawdust. In the spring, such shoots in the places where they are pinned must be watered. As soon as new shoots appear, the surface around them is mulched with peat or humus.In autumn, young rooted plants are separated from each other and transplanted to a permanent place. This operation can be done directly into pots dug into the ground below the surface level.
By dividing the bush, you can propagate plants no older than 6 years, while the root system lends itself to this operation. In addition, the delenki of old bushes take root worse. The bush is dug up, the roots are cleaned of the ground and cut into pieces with a pruning shears so that each of them has buds on the root collar. The planted plants bloom in the same year.
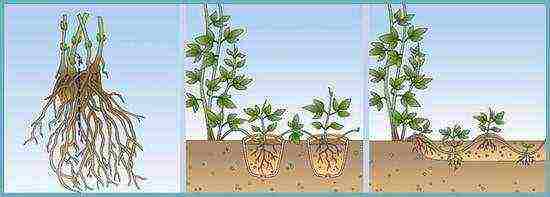
Reproduction of clematis by dividing the bush and layering
Cutting is the simplest and most popular breeding method for many gardeners. It is better to take cuttings from the middle part of the shoot before the plant begins to bloom. The lower cut is made oblique at a distance of 4-6 cm from the knot, the upper one - even, 2 cm higher from the knot. The resulting cuttings are processed in a root formation stimulator (root, heteroauxin) and planted in a greenhouse, a greenhouse in a mixture of peat and sand. In this case, the node is buried in the soil by 1 cm. Water the cuttings every day, and after rooting (30-60 days), watering is reduced to 1-2 times a week. For the winter, they are covered with peat or sawdust. In the fall of next year, the seedlings are transferred to a permanent place.
Some growers root the cuttings in a jar of water. The vessel is placed in a warm place, protected from direct sunlight, only the tips of the cuttings should be in the water. Roots are formed in 1-2 months.
Fresh clematis seeds germinate best. However, with proper storage (at a temperature of + 18-23 ° C in paper bags), the seed material remains viable for four years. Large seeds (groups of Durand, Zhakman) are sown immediately after harvesting in autumn, medium (whole-leaved, Manchurian, Douglas) - in January, small (clematis tangut, grape-leaved) - in March-April.
To accelerate germination, the seeds are soaked for 10 days in water, changing it 4-5 times daily. Then the seed is laid out in containers with a wet substrate, sprinkled with sand on top and covered with glass. The germination temperature should be + 25-30 oC. When seedlings appear, they are provided with diffused lighting. A pick into individual pots is carried out when the first pair of true leaves appears. Seedlings are planted in open ground in May. Leave 15-20 cm between the plants. To stimulate branching, the seedlings must be pinched. In autumn, young plants are covered, and in spring they are transplanted at intervals of 0.5 m, the shoots are shortened to several nodes. Within two to three years, the root system of seedlings reaches a length of 10-15 cm - now they are ready for planting in a permanent place.
Reproduction of clematis by grafting is now quite rare because of its laboriousness.
Planting clematis is carried out according to the following scheme:
• dig a hole 60x60x60 in size;
• at the bottom arrange drainage from crushed stone, large expanded clay or chipped bricks;
• add 2 buckets of humus or compost to the soil removed from the pit, 10 kg each of sand, peat, 2 glasses of wood ash, superphosphate (50g);
• pour a mound of prepared earthen mixture onto the drainage;
• spread the roots of the seedling on a mound and cover it with soil (the stem of the shoot up to the first node should be 5-10 cm underground);
• water the plant and mulch the ground around the bush with peat;
• seedlings are placed at a distance of 1 m from each other;
• when planting in autumn, the seedling is covered with lutrasil for the winter.
Correct planting of the clematis bush
Watering. Clematis are moisture-loving plants and need abundant weekly watering. Young plants are watered with 10-20 liters for each bush after 7-10 days, adults - 20-40 liters. In hot weather, watering is carried out 2-3 times a week. With a shortage of water in adult large-flowered clematis, flowers begin to shrink. Therefore, it is important to shed the soil well so that the water reaches the roots and does not spread over the surface. To do this, you can use this technique: stepping back 30-40 cm from the bush, dig in clay flower pots with drainage holes around the circumference, fill them with water, which will slowly flow into the soil to the roots.
Supports. Arches, obelisks, openwork pipes made of metal mesh are used as support. Their size depends on the type of clematis: some vines reach 4 meters in length. Moreover, all structures must be strong and stable in order to withstand the weight of the plant.
Top dressing.Clematis need additional feeding to feed a large volume of deciduous mass. If the soil was properly prepared during planting, then no fertilizer is applied in the first year of the growing season of a young plant. In the second year, clematis are fed 4 times per season. Due to the active growth of shoots during the season, nitrogen is required, its maximum is needed in the spring. As such a top dressing, mullein or bird droppings are introduced (1:10), they are alternated with mineral preparations (ammonium nitrate, ammonium sulfate or urea). During flowering, fertilizers are not applied, since clematis, because of this, reduce the duration of flowering. In the fall, bone meal (200 g / m2) or superphosphate (20 g / 10 l of water) is added under each bush. In the spring add potassium sulfate 20-30 g / bucket of water.
Shelter for the winter: Many varieties of clematis need winter shelter. Before this, the bushes must be treated with a foundation for the prevention of fungal diseases and sprinkled with ash. After that, the base of the bush is spud. When the temperature is -5-7 ° C, it is time to cover the vines with spruce branches, dry foliage, brushwood. Some types of clematis need pruning (partial or complete) before sheltering.
Pruning clematis into groups
Gall nematode: The larvae of this pest settle in the roots. The secretions of the vital activity of the larvae cause the proliferation of root cells - gall. The plant grows poorly, leaves and flowers are deformed, their color changes. With further parasitism, the root system dies. The affected liana cannot be saved, it must only be destroyed. To scare off nematodes, you can plant parsley, marigolds, calendula next to clematis.
Other pests (thrips, slugs, snails, aphids) that do not pose a particular danger to clematis can be fought with folk remedies (infusion of garlic, ash, tobacco dust). Insecticides (Aktellik, Fitoverm, Iskra, etc.) should be used in extreme cases.
The most common clematis disease is wilt - vegetative wilting caused by various phytopathogenic fungi. Infection occurs through damaged roots or stem base. The mycelium of the fungus, growing in the vessels of the "host", clogs it and disrupts the nutrition of the plant. Stems and leaves can fade in a matter of hours. Most often, wilting damage occurs in wet weather with an excess of nitrogen in the soil, on heavy soils.
For the prevention of fungal diseases, the soil under the bushes is spilled with fungicides (Fitosporin-M), copper oxychloride or a solution of potassium permanganate, the root collar of the plant is sprinkled with ash and crushed coal during planting.
Powdery mildew affects domestic varieties less often than foreign ones. On young shoots, leaves, a whitish, flour-like bloom appears, the tissues under which gradually turn brown and dry. Such parts of the plant are destroyed, and the rest of the plant is treated with a solution of copper sulfate or colloidal sulfur, Fundazol.
Rust is manifested by the appearance of orange spots on leaves, shoots, peduncles. With severe damage, the leaves dry out and crumble, the stems become brittle. The infected parts of the plant are removed and burned, the rest are sprayed with Bordeaux liquid. Of the chemicals, Topaz, ProfitGold are used.
Portal editor-in-chief: Ekaterina Danilova
Email: This email address is being protected from spambots. You need JavaScript enabled to view it.
Editorial office phone: +7 (965) 405 64 18
Editorial office address: st. Suschevskaya, 21
Materials:
Clematis is a beautiful vine covered with hundreds of colorful flowers. This plant is very popular in our area. Such a colorful and lush garland will become the most amazing decoration for gazebos, fences or walls of houses. But most importantly, this plant is unpretentious in care and even the most inexperienced gardener can grow it.
Growing clematis in the open field with photos and videos
Planting in spring
Site selection and soil preparation
In the spring, in mid-May, you should start planting clematis in open ground.The plant loves areas with a slight shadow (in the bright sun, flowers of a rich color fade) and protection from wind and draft. Therefore, before disembarking, you should select and prepare a place.
First you need to prepare the soil for planting. It should absorb water well and be loose - the flower loves light and nutritious soil. Loamy or fertile soils are suitable for clematis.
Do not plant bushes in heavy and acidic soils. Since it will lead to the death of the plant. As for fertilizers in the form of fresh manure and peat, they will only harm the bush.
When choosing a planting site, special attention should be paid to soil moisture. Since clematis does not tolerate groundwater, it will be correct to plant it on a small hill made with your own hands. This will save the long roots of the plant from rotting. It is worth noting that in clematis, the rhizome reaches 1 meter in length.
If the soil is clayey in the garden where the bush is planned to be planted, then you can make a small groove and fill it with sand in order to divert all unwanted water from the flower.
Clematis can cover a fence or building
Planting pit
The next step is to prepare the pit for planting. Digging should be no more than 70 cm deep. Then pour a small layer of rubble on the bottom. All the soil that was obtained by digging the hole must be replaced with the prepared substrate. It is done in the following way:
- take a bucket of earth,
- add 0., 5 buckets of humus to it,
- then add 100g of slaked lime and mix everything well.
Before planting the plant, you need to take care of the supports that can support the clematis garlands.
Landing
When everything is ready, you can start planting. First, you need to inspect the clematis root, if it is dry, then you should put the plant in water for a couple of hours.
Then, in the dug hole, on top of the rubble, pour a small layer of earth, and put a seedling on top.
Planting clematis in spring and autumn is almost the same
The roots must be distributed evenly over the width of the pit, covered with 12 cm of substrate from above.
It is very important that the hole in which clematis is planted is not completely filled up. The remaining substrate is poured evenly until autumn.
Important: if you plan to plant clematis near the wall of the house, then the distance should be at least 40 cm between the bush and the wall. It is impossible for the water that flows from the roof after the rain to fall on the flower, this can destroy it.
In the case when it is planned to plant several clematis bushes, the distance between them should be at least 25 cm.
Planting and growing honeysuckle honeysuckle - beautiful vine
Preservation and planting of clematis seedlings: video
Planting in autumn
Many gardeners try to plant clematis in the fall. And if the seedling was purchased in the summer, then it is stupid to wait for the onset of spring. The plant should be planted in the fall.
The most optimal time for such manipulation is September. If you plant clematis later, then it will not have time to take root and may die. And if you plant earlier, the plant will grow for the winter, as a result, death is inevitable.
The planting method is exactly the same as the spring planting method. The only difference is filling the pit with a substrate, it must be completely filled up.
With the approach of the cold time, you need to take care of the preservation of clematis. A planted bush will need to be well covered for the winter, when choosing the time for this procedure, they are always guided by garden roses.
In the spring, you need to remove the shelter from the bush in time. Otherwise, it may die due to high humidity. And in order to determine the correct time for cleaning the insulation, you can navigate by the weather conditions. In this case, the forecast will help. The most important thing is that all frosts are left behind.
Important: Clematis lives and pleases with flowering for an average of 30 years. Therefore, when choosing a place for its landing, this feature must be taken into account.
Clematis care
After clematis is planted, it needs regular care.There is nothing difficult in this. The main thing is to pay attention to the flower in time.
For good development you will need:
- watering;
- fertilizer;
- weed removal.
Watering
When watering, it is always worth remembering that the plant does not tolerate excess water. In the spring, it can be watered no more than once a week. One bush requires 0.5 buckets of water.
When summer comes, and with it comes a strong heat, watering is increased up to twice a week. The volume of water remains the same. You need to water the bushes only in the evenings.
Fertilizer
As for soil fertilization, it must be applied during the growing period. And when the first flowers appear on clematis, all feeding stops until autumn. Once a month is enough. This technique works for an adult plant.
In the first year after planting the plant, it is not fertilized at all. Since in the first year, the bush received all the required fertilizing when planting.
Good fertilizer for this plant, concentrate for strawberries. You can also use ordinary water in which raw unsalted meat was washed. Or buy a special product from a flower shop.
In the spring, when clematis wakes up from hibernation, it must be watered with a solution of chalk with the addition of copper sulfate. This will save him from many diseases.
It is not difficult to prepare such a mixture, for 15 liters of water you need to add 500 grams of chalk and 200 grams of copper sulfate. Mix everything well and water the plants at the rate of one bush ½ bucket of solution.
Weed removal
Regularly from the flower bed where clematis grows, it is required to pull out all the weeds. Since this plant takes all the moisture and nutrients for itself. The best option would be to sow with special grass all the flower beds where clematis grows. Such a procedure will help protect the bush from harmful plants, as well as save it from the strong sun.
This is the kind of beauty you can grow in your home
Reproduction of clematis
Clematis can be propagated both in spring and autumn. There are several breeding methods:
- seeds;
- cuttings;
- air layering.
Seeds
To grow clematis from seeds, you need to use seeds from the new crop. They should be sorted out. The larger ones are sown back in January, since they germinate for a very long time. And those that are sown smaller in March, from such seeds, the first sunrises appear in two weeks.
For sowing, a special substrate is being prepared, you can make it yourself, for this you need sand, peat and earth in equal parts. Everything is mixed and the soil for planting is ready.
Cuttings
Clematis should be cut in the fall. One of the main conditions is the age of the bush, it must be at least five years old. Cuttings are cut from the shoots, on which there should be two developed buds. Then, each shoot is treated with a phytohormone (you can use Fitosporin).
After this procedure, the cuttings are buried in a container with earth and lowered into the basement. Thus, they are stored until spring. During storage, you need to monitor the condition of the earth, it must be constantly wet. And the temperature is preferably about 0 ° C. At the end of February, they are transferred to a room with a temperature of 10-15 ° C.
You can breed clematis in the summer - with green cuttings
The first small shoots will appear in March. Containers with cuttings are taken out to the greenhouse. When the shoots reach 10 cm, the lower leaves are pinched off to give an impetus for root growth. In open ground, seedlings are planted in mid-May.
Air layering
This breeding method is the easiest.
- First you need to dig up the soil around the bush.
- Then level the soil and make a 6 cm deep groove in it.
- Put in the groove the shoot chosen for removal and press it in several places with ordinary wire.
- Next, take a little humus mixed with wet soil and sprinkle the shoot on top.
- The tip should remain on the surface.
This method should be used in the fall. Therefore, before winter, the place where the layering is located must be thoroughly insulated.
In the spring, the insulation is removed. When a sprout appears, you will need to mulch all the soil that is around the cut. When September comes, the already grown seedling can be dug up and planted in a permanent place.
The shoot is laid in a groove, watered and covered with earth
Pruning
It is necessary to prune clematis in the fall, when the plant has bloomed and shed its leaves. In the south of Russia, in Ukraine, this procedure is performed in early November. In the suburbs, the Middle zone, the Urals, Siberia no later than mid-October. A dry and cloudless day is chosen for pruning.
How a young bush is pruned
If the plant is the first year of life, then all shoots are cut off by 25 cm. When pruning, you need to try to leave a pair of buds on each shoot. This will help create additional vines as they grow, and next year the whole bush will be much more beautiful and lush.
Pruning an old bush
If clematis has been growing for many years, then all diseased, dry and broken shoots are removed from the bush. And the rest are shortened by 10 cm.
There are many varieties of clematis. And if a grower grows a bush that blooms twice a season, then the pruning will be slightly different. In this case, healthy shoots are cut in half. And dry, sick and superfluous are cut off at the root.
Universal way
There is also a universal cropping method. All bushes are pruned according to the principle of one.
One shoot is shortened in half.
The second is cut so that only 2 buds remain on it.
This is done throughout the plant.
Thanks to this method, the bush will turn out to be lush and well-groomed for the next flowering.
Important: Pruning clematis is necessary to give it a beautiful shape and so that the flowering lasts as long as possible. Mowing should only be done before wintering or early spring.
Pruning clematis flowering on this year's shoots
Diseases and pests
Clematis, like other plants, is susceptible to disease. One of the most common diseases is wilting "Wilt"... It is easy to see it, the first signs of damage are wilted leaves on the tops of the shoots. And if you do not start the fight in time, clematis may die.
Clematis disease - wilt
In the case when this disease was detected, all infected shoots should be immediately cut off at the root. And the bush itself, pour abundantly with a weak solution of potassium permanganate.
Very often, at the end of flowering on the leaves of clematis, appears gray necrosis... To defeat this disease, it is enough to spray with a 1% solution of copper sulfate.
Very dangerous for this plant and a disease called rust... Its first sign is the leaves covered with a brown bloom. Over time, the leaves dry out from rust, and the shoot itself is greatly deformed.
To cure the bush, a solution of potassium permanganate of medium strength will come to the rescue. The whole plant is thoroughly sprayed with it, and before that, each infected leaf is removed.
They do a lot of harm and pests... One of the most dangerous parasites is nematode... It affects the root system of the plant, as a result of which it does not receive everything it needs for its growth from the soil. The problem is that you can fight the nematode in one way, the complete destruction of the entire bush.
In order to prevent the appearance of these parasites, when buying clematis, you need to carefully check its root.
It is very important to understand that if this parasite managed to manifest itself on at least one plant, it should be immediately destroyed, otherwise the nematode will spread throughout the garden.
And the place where the bush grew must be processed to destroy all the eggs of this pest. Boiling water is the most suitable method.
Pruning and sheltering clematis for the winter
And in conclusion, I would like to add, clematis is one of the most luxurious plants in the garden. Let him please with his flowering, and diseases and parasites bypass him.
This is how novice summer residents are arranged that they find themselves immensely eager for a variety of colors on their site.But clematis stands alone among all the handsome men. It is impossible not to feel a special attraction to this flower. Indeed, according to some gardeners, if the rose is the queen of the garden, then clematis is the king. It is no coincidence that it is so difficult to take your eyes off the living waterfall of colossally beautiful flowers. However, in order for the luxurious clematis to live, bloom and not need anything, its owners need to make a lot of efforts. This article will discuss in what time frame, where and how it is better to plant a vine in spring and autumn in open ground, how to properly care for it after planting, as well as pruning and shelter for the winter.
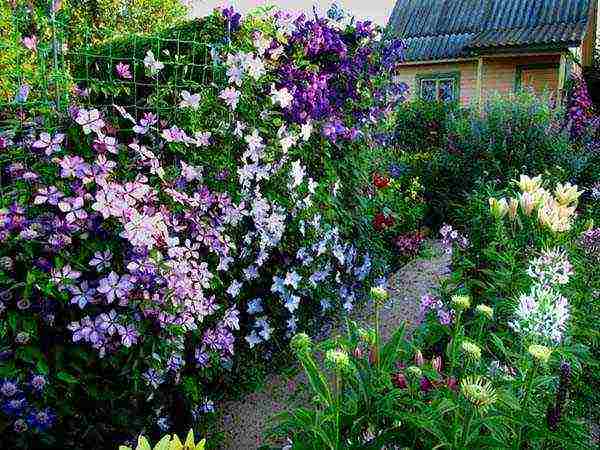
Varieties and types of clematis
There are tens of hundreds of clematis varieties, which one is right for you, your region and climate, you can determine by watching one of the videos below.
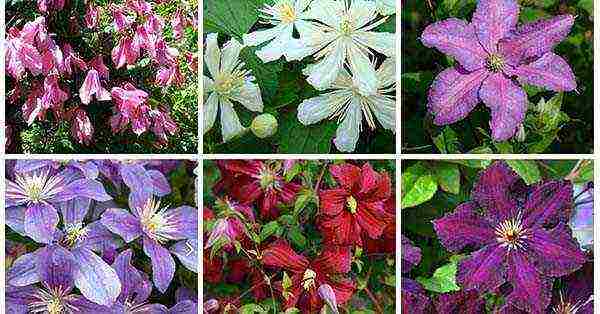
Video: the best varieties of clematis for the Central strip and the Moscow region
Video: the best varieties for planting in the Urals
Video: the best varieties for growing in Siberia
What to do with clematis after buying a seedling and how to save it before planting
Before you buy a clematis seedling, you need to determine which pruning group it belongs to. This is very important in order to properly care for the vine.
Clematis seedlings can be sold in a completely different form. This can be an annual rooted shoot in a bag with loose peat, or annual seedlings in pots with a closed root system. It is worth knowing that their storage before planting is somewhat different.
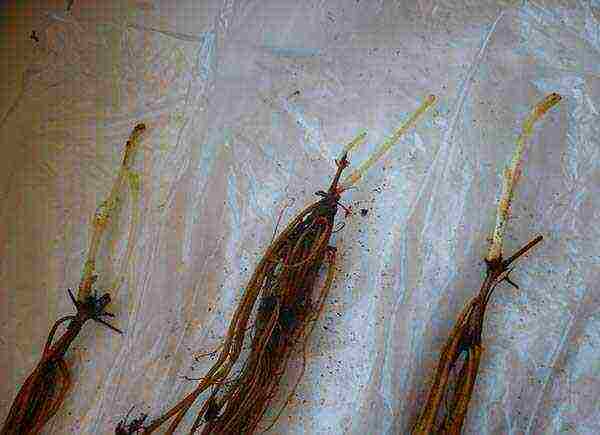
The rooted shoot should be immediately removed from the bag and placed in a two-liter plastic bottle with the neck cut off and with drainage holes. And then dig it for a year in the garden, where it will grow up all this time, and then transplant it to a permanent place in the garden.
Video: what to do with purchased annual rooted clematis shoots
It is advisable to purchase a clematis seedling in a pot with a closed root system no more than 3-4 weeks before planting.
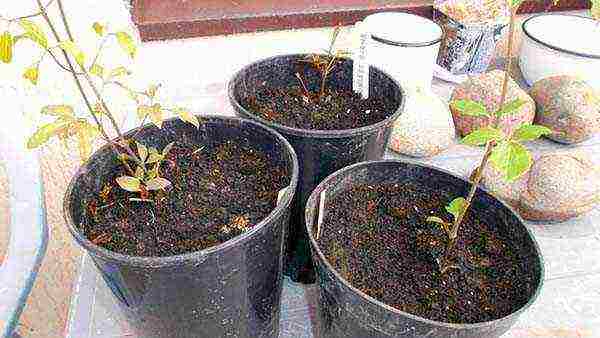
To preserve and bring clematis seedlings in pots (with a closed root system) to planting, you must first of all monitor watering. Due to the fact that the pots are rather small, and the soil in them is "transportable" (based on peat), it may well happen that once it dries up, the soil will retain moisture very poorly in the future. Therefore, you should regularly monitor soil moisture.
To disinfect the soil, it is advisable to spill the seedling with a solution of phytosporin once a week after purchase. It is also recommended to spray the root zone with the same solution.
After buying a seedling, you should not immediately put it on the sunniest place in the apartment. It is better to keep it a little away from direct sunlight for the first time, otherwise the plant may get sunburn. And then, of course, you need to put it on a light windowsill, otherwise the clematis will begin to stretch out due to lack of light.
If you notice that the seedling has large enough buds, they should be cut off (preferably with scissors and only the buds!). After all, the plant is too weak to bloom, and such a load is completely useless and even dangerous to it.
Video: how to keep clematis before planting
When and how to plant clematis in open ground
Landing dates
The optimal time for planting clematis is the second half of spring (from April to May) or the first half of autumn (September to early October).
In spring, clematis is planted, as a rule, in colder and northern regions, for example, in the Central zone (Moscow region), in Siberia and the Urals. Autumn planting is preferable for warmer climatic zones, for example, for the southern regions (Krasnodar Territory).
Thus, you need to choose the time when it is better to plant clematis based on your place of residence.
Pick-up location
Clematis loves to grow in sunny places (which are lit by the sun almost all day) and does not tolerate drafts.The flower will also not be able to develop normally in the place where the water stagnates, so it is optimal to plant it on a certain hill or on a raised bed.
Important! However, it is worth considering that some types of clematis can grow in a small and delicate shade. These include those varieties that have a fairly bright color.
It is extremely important to take into account the condition of the groundwater. If they lie close enough (less than 1 meter), then be sure to carry out a reclamation system, in other words, be sure to dig a hole somewhere so that your clematis feels good. The plant does not tolerate close groundwater.
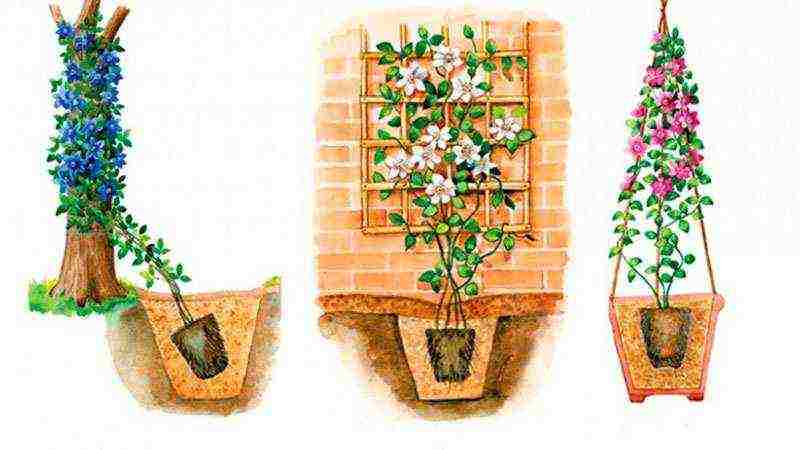
Choose a place where you can place the supports, as it is a climbing plant.
If you are going to plant a plant near a country house or a shed, then it is advisable to step back at least 50 cm from the room so that the root system can develop normally.
Soil and planting hole
The soil for clematis requires neutral (6.5 pH), the plant does not like acidic soils. If you doubt the acidity of your soil, then it is advisable to lime (neutralize) it by adding a couple of glasses of wood ash to the soil, and then thoroughly mix with the earth. Alternatively, you can use a special soil deoxidizer.
Nutrients should also be added to the soil. If you use organic fertilizers such as compost or humus, then you must be completely sure of their quality (that they are fully ripe). Chicken droppings are also great for feeding. Naturally, you can also use mineral fertilizers.
Advice! Neutralizing and nutrient substances must be well mixed with the soil, thereby leveling its nutritional value.
If you have heavy soil, then in addition to neutralizing and feeding it, it is recommended to add some kind of loosening element to it. This can be, for example, peat.
A planting pit for clematis is required large enough. Despite the fact that the seedling is quite small, in the future it will still grow. Its optimal size is 60 (height) by 60 (diameter) centimeters or even more.
On heavy soils, drainage must be done, and on light soils, it is necessary to make the bottom of the pit heavier by taking clay or sod land. The plant should not get wet.
You can use any inert material for drainage. It can be gravel, expanded clay, firewood (pieces of charred wood). The thickness of the drainage layer is about 15 centimeters.
Advice! Spare no drainage materials! He will save your plant when it rains heavily.
Direct planting in the ground
Advice! If you have a seedling with an open root system, it is advisable to soak it in one of the root growth stimulants, for example, in the root, the day before planting. If closed, exactly with the instructions below.
Step-by-step instructions for planting a clematis seedling in open ground:
- Dig a landing hole.
- Drain or make the bottom of the pit heavier.
- Prepare the soil mixture by its initial neutralization (deoxidation to 6.5 pH), fertilizing with fertilizer and loosening.
- Fill the hole with the soil mixture made earlier and compact slightly with your foot.
- Make a small hole in the middle about the size of the pot in which the seedling is placed.
- Pull out the seedling together with the lump, after spilling it well, so that it gets better.
- Place the seedling in the hole, dig in and compact with your hand. It is worth deepening clematis only if the shoots in its lower part are all lignified. In other words, the root collar should be deepened by 8-12 centimeters. If there are green shoots among the shoots, then it is impossible to immediately deepen it by dropping it, otherwise they will simply mate and provoke diseases of the root system and the aerial part.
- Make a small groove within 10 centimeters of the seedling and then gently pour from a small watering can.
- Place a small support next to the seedling and tie it to it so that the plant does not loosen from the wind. In the future, it will be necessary to install larger trellises to support it.
- After planting and watering, it will be desirable to mulch the near-trunk circle (for example, with peat, sawdust or shavings, coconut fiber) so that the soil retains moisture longer. This will prevent the soil from overheating.
- For 1.5 months after planting, it is advisable to enclose the plant from the sunny side, creating a kind of screen of non-woven material. In such conditions, the plant will be in a very calm environment and quickly take root: the sun will not burn it, the wind will not blow it in addition.
It is very good if you plant some low-growing annuals next to the shoots so that the ground does not dry out, and the lower part of the stems is also covered. All this is very beneficial for the plant. The best neighbors for this vine will be marigolds and calendula, they will also be able to protect the plant from insect pests.
Video: planting clematis and care
Growing clematis from seeds
You can try growing clematis from seed by planting it on seedlings. Most importantly, do not forget to stratify its seeds before sowing, keeping them for a month or two in the refrigerator on the lower shelf. The further process of planting and leaving them is no different from growing any other flower crop from seeds. See the next video for more details.
Video: clematis from seeds - planting and caring for seedlings
Outdoor clematis care
Full care for clematis in the open field should include the following garden manipulations: watering, feeding, pruning and shelter. Further, about each in more detail.
And do not forget to build or install a support around which clematis will curl!
Watering
Watering clematis should be regular. Liana loves moist soil, but, as you remember, without stagnant water. If the summer is dry, then in the heat it is worth watering 2-3 times in 7 days. The rest of the time, watering should be a little less frequent and more abundant, about 1 time per week. In this case, the soil should be well moistened to a depth of about 30 centimeters. After a couple of days after each watering, it is advisable to loosen the land around the seedling (if it was not previously mulched).
Top dressing
In the first year after planting, clematis does not require feeding. Starting from the second year, it should be fertilized with both mineral and organic fertilizers. He especially loves feeding with wood ash (1 glass per 1 bucket of water) and ammonia (at the rate of 1 tablespoon per 1 bucket of water).
Recommendation! All fertilizers for clematis must be applied in liquid form. It is not recommended to pour fertilizer into the trunk circle.
Liana for good development and growth of green mass in the spring especially requires nitrogen fertilization. For example, you can fertilize it with urea (carbamide) (1-1.5 tablespoons per bucket of water).
During the budding period, preference should be given to potassium-phosphorus dressings, while it is worth focusing on potassium. After the vine blooms and fades, again potassium-phosphorus fertilizers.
Video: caring for clematis in spring, summer and autumn - feeding
For better flowering and growth, clematis should be fed 3-4 times a season with the following fertilizers: infusion of mullein (in the calculation of 1 liter of funds per bucket of water) or chicken droppings (1 liter of funds for 15 liters of water). In this case, you can also add mineral fertilizers to such solutions, for example, 1-1.5 tbsp. spoon of superphosphate in a bucket of water.
Remember! Fertilizer should only be applied after watering, otherwise you may burn the plant's root system.
Pruning and sheltering
In order for the vine to bloom efficiently, you must make sure to which pruning group the clematis belongs to. And accordingly, you need to properly cut and cover it for the winter.
- Group 1 is vines that bloom on last year's shoots.They need to be covered well enough, it is desirable to cut them in the spring, but you can also cut them by 1 / 3-1 / 4 in the fall.
- Group 2 - these are vines that bloom on last year's and current shoots. They are more popular. For the winter, such clematis must also be covered carefully. It is better to cut off in 2 stages - in the summer the part that has bloomed, and in the fall, cut off by 1/3 or even 1/2 those shoots that have formed during the current year. Sanitary pruning should be done in the spring.
- Group 3 - these are vines that bloom on the shoots of the current year. Most popular group. In fact, no shelter is required for the winter; pruning in the fall is carried out at 2-4 lower nodes.
By the way! Read more about preparing clematis for winter (about pruning and covering it) read in this material.
Video: pruning and covering clematis in the fall
Praise and glory to those flower growers who, with their work, give the opportunity to admire the catchy flowering of an exquisite liana all summer, and sometimes even autumn. But in order for your work to go in the right direction, follow our recommendations for proper planting and competent care of clematis, and it will undoubtedly delight you with exuberant and long-term flowering.
Video: everything about growing clematis for beginners
Clematis (photo) is the brightest, unforgettable liana on Russian sites. If the summer resident only has to "tame" clematis, planting and caring for them in the open field is the key to success.
If everything is done correctly, the plants have been developing and blooming in one place for more than 20 years, annually decorating the house and the backyard with hundreds of simple and double flowers of different colors and shapes.
Choosing a place and preparing for planting clematis in open ground
Preparing for planting begins with choosing the right place. Clematis are photophilous, but under the direct rays of the sun, the liana feels depressed, the flowers fade and shrink.
Plants are extremely negative about the wind, the proximity of groundwater. Although plants need a lot of moisture for active growth, its stagnation threatens with root rot.
Novice growers are mistaken when clematis are planted in the ground near the wall of the house, where the vine regularly falls under the drain or, due to the lack of access to fresh air, is attacked by pests and pathogenic fungi.
It is best to find a place at a distance of at least 70 cm from the wall, and build a strong lattice, arch or trellis for support. Such a distance from the capital structure will simplify the care of clematis after planting in the open field and protect it from streams of rain and melt water. Since the vines should grow strongly, without lack of nutrition and moisture, a gap of at least 1-1.5 meters is left between individual bushes.
If a multi-row planting is planned, the planting trenches are located from north to south. This will ensure that all plants are evenly and safely illuminated throughout the day.
For a single bush, it is better to find a place with good morning light.
When is clematis planted in the ground?
The time of transfer of clematis to open ground depends on the selected planting material. Saplings with an open or peat-packed root system cannot wait long. When to plant clematis in open ground in the spring?
They are planted in the spring, in April or in the first decade of May, before the shoots grow. Delay or summer planting threatens that clematis will enter the soil weakened, its acclimatization will last longer, and sometimes the plant dies.
An early purchased clematis seedling is often grown at home, therefore, by the usual planting time, it already has young shoots. If you take it out into the garden in April, when the main planting of clematis in open ground in the Moscow region is underway, the greens will suffer from frost. Such plants are planted in the second half of May, by which time all natural threats have passed.
Seedlings of clematis with a closed root system tolerate planting without problems during the entire warm period. Shading on hot days will make acclimatization easier and faster.
In autumn, clematis is planted in open ground from August to October. For the time remaining before the onset of cold weather, the plant takes root and adapts to life in the garden. The specific dates of planting depend on the weather and climatic conditions of the region. Late leads to freezing of vines that did not have time to settle down. For the winter, the soil is mulched, and the plants themselves are covered with foliage, spruce branches or dense non-woven material.
Planting clematis in the ground
Choosing the right place for clematis, which grows for a long time without transplanting, is very important. Even more important is the competent organization of a pit for planting clematis in open ground in spring or autumn.
In areas with closely lying groundwater, the danger of flooding, or simply dense heavy soil at the bottom of a trench or pit 60 cm deep, a high drainage is made of expanded clay, crushed red brick, stone chips and sand. Additionally, drainage ditches are equipped, through which excess water can freely leave the flower garden.
Supports for clematis are prepared in advance. In order not to disturb the root system, arches, trellises, mesh or other types of supports are dug in at the same time as planting.
A planting pit for a single clematis is made 60 cm deep and wide. Group planting requires the preparation of a single trench at the rate of one running meter per bush.
A drainage pillow is made at the bottom, and the soil selected from the pit is loosened, cleaned of weeds and mixed in equal parts with humus, peat. It is useful to add fertile garden soil to sandy soil. In the clay, dense soil for clematis, on the contrary, loosening sand is mixed. As a fertilizer, 100 grams of complex mineral fertilizing are applied to each bucket of soil, as well as about a liter of purified wood ash. The increased acidity of the soil is neutralized with dolomite flour, slaked lime or other similar means.
The planting hole is half filled, in the form of an equilateral mound in the middle, with a prepared substrate. A seedling with pre-straightened rhizomes is placed on its top. The root collar, or tillering site, should be below the estimated ground level, and the depth depends on the size and age of the decorative liana.
For seedlings 2-3 years old, it is 6-12 cm, that is, you will have to deepen not only the base of the plant, but also the first pair of leaves or buds. 3-4 year old clematis deepen another 5-10 cm more. Such a measure will help the plant to survive the winter frosts and summer heat, and also stimulates the formation of several strong shoots.
After planting, the soil near clematis is watered, compacted and mulched, and protection from the sun and wind is built over the young plant.
Outdoor clematis care
The first year after planting is the time for acclimatization and active growth. Therefore, the soil under the clematis is loosened and weeded as necessary. Watering should be regular, but not excessive. Strong seedlings form buds already in the first summer, but experienced flower growers advise to cut off future flowers, which risk seriously weakening another small plant. If minerals with organic matter were introduced into the planting pit, the first feeding is carried out only a year later, in the spring.
The growing shoots are carefully attached to the installed support and monitor the state of the greenery. At the beginning of summer, there is a high risk of damage to young shoots by sucking insects. Closer to autumn, with an increase in humidity and the difference between day and night temperatures, the risk of fungal diseases increases. Therefore, the care of clematis in the open field must include preventive and urgent treatments with plant protection products.
If the seedling gave only one strong shoot, it can be pushed towards tillering by pinching the tender top. Subsequently, to activate growth, you can use deep watering and fertilizing with nitrogen fertilizers. You can add them;
- as a solution on wet ground;
- dry with obligatory loosening and watering;
- as a foliar dressing, spraying.
In acidic soil, the root system of clematis develops extremely slowly. Spring watering with lime milk at the rate of 200 grams of lime per bucket of water will help deacidify the soil under plantings.
3-4 years after planting clematis in open ground, a summer resident may face unforeseen difficulties in caring for it. Subject to agricultural technology, the flowers become smaller, and the liana grows noticeably more slowly than before. The most common problem is lack of moisture. Compacted soil does not allow water to reach the roots, and loosening at such a depth is impossible. In this case, the system of intra-soil irrigation will help, which allows saturating the deep layers of the soil, and then preventing them from drying out. At a distance of 30–40 cm from clematis, several plastic bottles are poured in with an open neck down. During watering, they are filled with water, which gradually flows to the very roots of the flowering liana.
Perennial clematis also need regular pruning, which helps plants get rid of damaged, old, dried out shoots. And the summer resident, who has mastered the features of cutting different types of clematis, will receive the most lush and early flowering of his wards.
Video about planting clematis
We will tell you how to plant clematis outdoors and how to care for it as a beginner. Please note that clematis requires special attention to itself. With proper care, they will delight you with their flowering and decorate your home.
The article presents the most complete material for caring for clematis planted in open ground. Once familiarized, you will be able to grow beautiful healthy flowers, and you will not have any difficulties.
Clematis will become an aesthetic element of your exterior. One of the most frequent questions coming to our editorial office: what varieties of clematis are suitable for the Moscow region. We tried to reveal the topic of the selection of varieties for different growing regions as much as possible.
Description of Clematis with photo
Belongs to the buttercup family. In nature, there are about 300 species that can be found on all continents (except Antarctica) - in forests, steppes, along river banks, in gorges and on rocky placers.
- Types of clematis vary greatly among themselves. In herbaceous perennials (C. mandshurica, C. recta, C. texensis) shoots die off by the end of the growing season. Semi-shrubs (C. heracleifolia, C. integrifolia) have a lignified lower part that persists for several years, and an upper one that dies off every year.
- Shrubs (C. fruticosa f. Lobata) have completely lignified wintering shoots. Most of the same species (C. tangutica, C. vitalba, C. viticella) belongs to the group of lianas-leaf climbers, which use supports, climbing them with the help of leaf stalks.
- The root system of clematis is of two types: pivotal (C. tangutica, C. serratifolia) and fibrous, C. viticella). It must be remembered that clematis with a tap root system does not tolerate transplantation well. It is better to plant them immediately in a permanent place.
Name
The name "clematis" comes from the Greek wordklema, which once denoted every climbing plant. Of the many popular names (lozinka, grandfather's curls, warthog, etc.) in Russia, "clematis" is most often used. Probably, this vine was named so because of the strong smell of dug roots or because its seeds have a curved outgrowth.
Escapes
Clematis have thin, 2-5 mm in diameter, shoots of the current year. In herbaceous species, they are round, green, in woody ones - four-hexagonal, light or dark reddish-brown in color. They develop in spring from dormant buds on the underground part of the plant or from aboveground buds of overwintered shoots.
Clematis leaves are paired, simple or complex, consisting of three, five or seven leaves, in addition to the usual green, there are forms with a purple color.
Clematis flowers, as a rule, are bisexual, single or collected in inflorescences of various shapes (scutellum, panicle, semi-umbrella). The role of petals in clematis is played by sepals, in number from four to eight, in double varieties - up to seventy.
"Spider"
In the center of a simple flower is the so-called lush "spider" (many pistils and stamens], it often has a different color than the "petals", which gives the flower a special charm.And the delicate flowers are painted very whimsically: white, yellow, all the nuances of transitions from pale pink and pale blue to velvety shimmering shades of red and blue.
- And this charming picture pleases more than one day - the life of a flower lasts a week or two, and a double one - almost three. By choosing the right varieties, you can achieve flowering clematis in the garden from spring to autumn.
- After all, the early species are covered with flowers two months after the spring awakening, and the later ones - at the end of summer. Their flowering will be interrupted only by stable frosts.
- Short-term drops in temperature at night (up to -2 ... -7 ° С) and light snow are not terrible for clematis - after warming, the buds open. The flowers of some species exude the aroma of jasmine, primrose, almond.
Clematis fruits are numerous achenes with short or long pubescent columns and hairy beaks, collected in fluffy silky heads.
From the history
the beginning of clematis cultivation in Western Europe dates back to the 16th century, and in Japan the clematis culture has an even longer history. In Russia, clematis appeared at the beginning of the 19th century as greenhouse plants.
Active work on the cultivation and introduction of clematis in our country began to develop only in the middle of the 20th century. And as a result of selection work, wonderful varieties and forms have been created, which further emphasize the unique charm of these magnificent plants.
Classification
with all the variety of species, varieties and forms of clematis, there is a convenient classification for gardeners, which allows not only to easily group plants according to the shape and color of flowers, but also to choose the appropriate agricultural technology. All varieties are divided into groups.
Zhakman
- large shrub vines with shoots 3-4 m long and a well-developed root system. The flowers are large, blue-violet-purple tones, odorless.
- They are distinguished by abundant and long flowering on the shoots of the current year.
- For the winter, the shoots are cut to the level of the soil or the bases of the shoots are left with 2-3 pairs of buds.
- The ancestor of the varieties of this group is the large-flowered variety 'Zhakman'(‘Jackmanii’) or K. x Zhakman(Jackmanii = Clematis x Jackmanii), when crossed with varieties of other groups.
Viticella
- shrub vines 3-3.5 m long. The flowers are open with a predominance of pink-red-purple velvety tones in color. They are characterized by lush and long flowering in summer on the shoots of the current year. Shoots are cut off for the winter. The cultivars are obtained from the crossing of C. violet (C. viticella) with forms and cultivars of other groups.
Lanuginose
- shrub vines with thin shoots up to 2.5 m long. The flowers are large, wide open, mostly light in color (white, blue, pink). They are distinguished by massive flowering on the shoots of the previous year. When pruning shoots in the fall of the next year, flowering begins in the second half of summer on the shoots of the current year.
Patens
- shrub vines 3-3.5 m long. Flowers are open, single, up to 15 cm in diameter or more, color from light to bright blue-violet-purple, deep violet tones. Many varieties have double flowers. Blooming on shoots last year. Shoots in the fall should only be shortened, removing the faded part, and covered until spring. Varieties from spreading clematis (C. patens) with varieties and species of other groups.
Florida
- shrub vines with shoots up to 3 m long. The flowers are open, of various colors, but light colors prevail. Blooming on shoots last year. They should be shortened to 1.5-2 m in length and kept under cover during the winter.
If you cut them off completely, then a rather weak flowering occurs only from the second half of summer on the shoots of the current year. The varieties were obtained by crossing the flowering clematis (C. florida) with species and varieties of other groups.
Integrifolia
- vigorous, climbing semi-shrubs up to 1.5 m high.The flowers are half-open, bell-shaped, up to 12 cm in diameter, of various colors. Bloom profusely in summer on the shoots of the current year. Shoots are cut off for the winter. The varieties are obtained from whole-leaf clematis (C.integrifolia) when crossed with other species and varieties. Many interesting, profusely flowering hybrids of this group were created in the Nikitsky Botanical Garden by A.N. Volosenko-Valenis and M.A.Beskaravaynaya.
- Depending on the size of the flower, there are small-flowered (up to 5 cm in diameter) and large-flowered (more than 5 cm in diameter) clematis. Large-flowered curly clematis include varieties and forms from the Jacqueman, Viticella, Lanuginoza, Patens groups.
- For large-flowered bush clematis - varieties and forms from the Integrifolia group.
- Large-flowered clematis are considered especially beautiful and graceful, but small-flowered ones are no less good, moreover, they are very undemanding to growing conditions, give a lot of greenery and easily propagate by seeds.
Small-flowered clematis are unusually graceful, they bloom abundantly, and the original seed heads adorn the plant in autumn.
Choosing a variety of Clematis for the Moscow region with a photo
For planting in the North-Western regions of the European part of the country, Siberia, the Far East, where the summer is relatively short and the frosts are fair in winter, it is better to choose early and mid-early varieties from the Jacquemann, Viticella and Integrifolia groups, which bloom profusely on the shoots of the current year:
- Ville de Lyon,
- Japsi Queen,
- Victoria,
- Star of India,
- Luther Burbank,
- Hagley Hybrid,
- Madame Baron Vilar,
- Blue flame,
- Alexandrite,
- Golden Jubilee,
Alyonushka, Silver Stream, Polish Varshavyanka, Victory Salute. Anastasia Anisimova. Cosmic Melody. Huldin, Rouge Cardinal, Gray Bird, Cloud, AnEre Le-Roi. Lilac Star, Niobe ...
- However, there are hybrids from the Zhakman group that are more suitable for the south: Elegy, Alpinist, Biryuzinka. Openwork.
- In the north, these varieties bloom poorer over the years, although the mass of shoots increases. Clematis of the Lanuginoza groups, Patens, Florida (their first flowering occurs on the shoots of last year) are less winter-hardy and require shelter of vines even in the middle lane.
- However, the varieties Madame Van Hutte, Losoniana, Nelly Moser, Stone Flower, Ramona, Lazurshtern, Ball of Flowers, Nadezhda, V.E. Gladstone, Mrs. Hope, Mrs. Cholmondeli, and in such inhospitable conditions, flaunt the sophistication of shapes and colors.
- In the southern regions, clematis with double flowers bloom profusely: Madame Bajjun, Daniel Deronda, Jeanne d'Arc, Lord Neville. In the middle lane, these varieties will have only the first flowers on overwintered last year's shoots.
Species clematis
They know less, although many of them are not only quite effective, but also unpretentious, grow quickly, and are resistant to drought and fungal diseases. The average duration of flowering of small-flowered clematis ranges from 2-2.5 weeks to 3-4 months, the record holders include eastern, Texas, Tangut clematis, and Peter's clematis and mustachioed Balearic bloom in the south of the country even in winter.
In addition to these advantages, some of them have a wonderful aroma: almonds - Armand's and David's clematis, burning; primroses - straight clematis, Manchurian, Redera; jasmine - paniculata clematis.
Location
clematis are light-loving plants. If there is not enough light, not only will you not achieve good flowering, you may not even wait for it at all. Therefore, in the middle lane, it is best to plant them in sunny or slightly shaded areas at midday. Only in the southern regions, where clematis often suffer from overheating of the soil, are they planted in partial shade.
For group plantings, each plant should receive enough light, and the distance between the bushes should be at least 1 meter. The wind is a terrible enemy of clematis not only in summer, but also in winter: it breaks and confuses shoots, damages flowers. Where snow is blown off in winter, planting clematis is not a good idea.And in the lowlands, where cold air accumulates, clematis feel uncomfortable.
Clematis are very demanding on moisture: during their growth, they need abundant watering. At the same time, wet, swampy areas with a high standing of groundwater (less than 1.2 times are not suitable for them, even if the water stagnates only for a short time. Waterlogging of the soil is dangerous not only in summer, but also in early spring during and after snow melting. planting clematis, you need to think about the natural outflow of water from the bush: add earth, plant bushes on ridges or dig slopes with a slope.
The soil
Clematis prefer fertile sandy loam or loamy soil, rich in humus, loose, from slightly alkaline to slightly acidic reaction.
Landing
since clematis can grow in one place for more than 20 years, they prepare the ground very deeply in advance. Usually, holes are dug with a size of at least 60x60x60 cm, and for group plantings, the site is prepared over the entire area.
- 2-3 buckets of humus or compost, 1 bucket of peat and sand, 100-150 g of superphosphate, 200 g of complete mineral fertilizer, preferably 100 g of bone meal, 150 -200 g of lime or chalk, 200 g of ash.
- On light soils, more peat, leaf humus and clay are added.
- If the soil on the site is wet, dense or clayey, then a 10-1 5-cm layer of crushed stone, broken brick or coarse sand is poured onto the bottom of the pit. Thoroughly mixed earthen mixture is poured into the pit and compacted.
In the southern regions, it is preferable to do this in autumn (from late September to early November; in the middle lane the best time is September (in warm weather - and later); even further north, clematis are planted in spring (late April - May) or early autumn. Plants in containers can be planted whenever you want (except for winter, of course).
Support
A solid, rigid support is installed in the center of the pit. A stretched rope is not suitable here, it will not protect young fragile whips from gusts of wind. Having covered the hole with soil about half, they make a mound on which the roots of clematis are spread to the sides and down. Holding the plant with your hand, pour the mixture to the roots, making sure that the clematis is planted deeply.
- Only then will he develop a tillering center, on which new buds are subsequently laid, shoots and roots are formed.
- Such bushes better tolerate severe winters, suffer less from heat. Clematis planted flush with the surface are short-lived: they do not bush, grow in 1-2 stems, their root system suffers from soaking.
- The larger the seedling, the deeper the planting should be. Young one-two-year-old plants are buried by 8-12 cm and the lower pair of buds, more mature and divided bushes - by 12-18 cm.
- If clematis is planted in the spring, then the planting pit is not filled with earth to the brim, but left 5-8 cm uncovered so that the “newcomer” does not “suffocate”.
As the shoots become lignified, this space is gradually filled with soil. After planting, clematis is watered abundantly, shaded from the sun, and the surface of the earth around the plant is mulched with peat. When planting in the fall, the earth is poured to the edges, the entire aboveground part is cut off to the soil level or slightly higher.
Requirements. to the planting material
when planting in autumn, clematis must have developed vegetative buds; when planting in spring, at least one shoot. The seedlings must have a minimum of 3 roots less than 10 cm long. Plants with a weak root system are placed in a “school” for growing. Use only healthy planting material (the roots of the seedlings should be elastic, without visible damage, swelling and thickening).
Support
are of great importance for the normal development, abundant and prolonged flowering of clematis. It is important that they are not only practical and convenient for the plant, but also beautiful. As a supporting structure, galvanized pipes with a diameter of 3/4 inch are used.Wooden lattices impregnated with linseed oil or stain, a strongly stretched mesh made of nylon rope or thick fishing line with a mesh of 15x15 cm go well with them.
Supports for clematis are often bushes of weigela, chubushnik, forsythia.
Vines cling to them, rise up, hang freely, and in the second half of summer the bushes hide under garlands of flowers. Screens and arches are traditionally considered to be excellent supports. Clematis look very impressive on horizontal surfaces. for example, on wire-mesh hoops with a diameter of about 1 m, attached to a galvanized pipe at different heights. All supports are made removable and removed for the winter.
| The reddish brick wall is very close to the purple star-shaped flowers of Clematis. However, his lashes need reliable support. To do this, a wire in the form of an extended letter S was pulled on hooks driven into the wall. If you keep running the clematis shoots by the wire all the time, its foliage will soon completely close the support and our "bindweed" will appear in all its glory. |
| A bamboo fence, braided in the photo on the left with a clematis variety ‘Nelly moser', Or an ordinary picket fence, as in the picture below, will provide the clematis with excellent conditions for climbing exercises. It is only necessary to evenly distribute its shoots over the surface of the fence. It is best to pass them between the planks or tie them to them with a cord so that the fence becomes covered with a solid floral carpet faster. |
Care
in spring, clematis are spilled with milk of lime (200 g of lime per 10 liters of water per square meter). In dry weather, clematis is watered not often, but abundantly, making sure that the stream of water does not fall into the center of the bush. Clematis are fed at least four times per season after irrigation with full mineral fertilizer with microelements at the rate of 20-40 g per 10 liters of water or a diluted fermented mullein (1:10). Mineral and organic dressings alternate.
In summer, once a month, plants are watered with a weak solution of boric acid (1-2 g) and potassium permanganate (2-3 g per 10 liters of water), and the bushes are also sprayed with urea (0.5 tablespoons per 10 liters of water). Since clematis can suffer from overheating and dryness of the soil, in the spring, after the first watering and loosening of the planting, they should be mulched with peat or humus (in the northern regions) or sawdust (in the southern regions). To protect the soil from overheating and to close the lower part of the shoots, clematis are “knocked out” by lettucers.
In the spring, only for the first time, the vines are directed along the support in the right direction and tied up. Otherwise, the ones growing on the run will intertwine so strongly that no forces will be able to unravel them. Only in the varieties of the Integrifolia group, shoots and leaves are deprived of the ability to twine around supports, therefore they are tied up as they grow all summer. In the fall, before sheltering for the winter, clematis bushes are cut and carefully cleaned of old leaves.
The first two or three years, young specimens require especially careful care: in the fall or early spring, well-rotted manure mixed with any potash and phosphorus fertilizer, as well as wood ash (a handful of each in a bucket of humus) is added to the bushes, liquid fertilizing is done every 10-15 days in small doses.
Pruning
the beauty of clematis largely depends on how correctly pruning is done. The first time the shoots are shortened when planting, this is important for the formation of the aboveground part and the development of the root system. One or two shoots grow from the lower pair of buds left during planting, which must be pinched in the summer. Regulatory pruning is carried out in the summer. To extend flowering, some of the shoots are cut in the spring.
At the beginning of summer, vines can be shortened again to the first vegetative buds, which will give rise to new shoots with buds. Tall varieties such as Gypsy Queen, Luther Burbank, Stone Flower, Ernest Markham have flowers at the top of the bush.
- Here it is worth cutting off several vines at a height of 0.7 to 1.5 m, then they will be covered with buds more evenly.Now about pruning for the winter.
- In the varieties of the Zhakman and Viticella groups, the flowers of which are formed on the shoots of the current year, before the shelter for the winter, the entire aerial part is cut off to a real leaf or to the soil level. Do the same with the varieties of the group.
- Integrifolia and some small-flowered clematis: Manchu, straight, Texas and six-petal. In varieties belonging to the Lanuginoza, Patens and Florida groups, flowers are formed on the shoots of the current year and last year.
Their first flowering occurs in early summer on overwintered shoots. The second is on the shoots of the current year, from mid-summer to autumn. The small-flowered clematis Armanda and mountainous belong to the same company. In the fall, before the bushes of these groups are sheltered for the winter, the vines are removed from the supports, all dry, weak, broken shoots are cut out, and the most developed, strong ones are shortened to 1-1.5 m, bent to the ground or rolled up in a ring and placed at the base of the bush.
Clematis
Open-rooted clematis can be planted in fall or spring. If the clematis seedlings are in containers, then you can transfer them into the garden at any time of the year, except for winter.
Usually, clematis seedlings are purchased at the age of one to two years; annual seedlings are much cheaper.
Clematis seedlings may have a thin stem 5–20 cm long (it seems dry to many novice growers). Sometimes seedlings are sold without a stem at all, in the form of a bunch of roots with sprouts or with awakened buds.
If clematis seedlings were purchased after the onset of the autumn cold, dig them in the garden and cover them with earth.
When there is no way to plant purchased clematis in the fall, postpone planting seedlings until spring. In winter, store them in a cold, frost-free cellar or basement (at a temperature no higher than + 5C). Cover the root system of the seedlings with a slightly damp mixture of sawdust and sand, or other suitable loose soil.
In storage, plants need to be pinched to curb the rapid growth of shoots. Each pinch restrains their growth for 2-3 weeks. The growth rate of shoots depends on the temperature of the seedlings. By spring, clematis germinates strongly in the storage, therefore, after planting in the garden, seedlings with young shoots are shaded from the sun during the acclimatization period (in the first 10 days).
Clematis can withstand frosts down to -6C.
Let's talk more about how to plant and how to grow clematis
The cultivation of clematis usually begins with the acquisition of a one-year-old seedling.How and when to plant it? How to care for clematis in the future?
The best time to plant is early summer, when the danger of late frosts is over. But you can plant it in the fall, a month and a half before real frosts. The seedlings should have enough time to take root.
- It is recommended to plant clematis in a well-lit, wind-protected place.
- These plants thrive on alkaline, neutral or slightly acidic soils. For planting clematis, they dig holes, on heavy soils 70x70x70 cm, on light soils 50x50x50 cm.
- The distance between the pits is from 70 cm to one meter. Clematis cannot stand waterlogging and stagnant water. If the groundwater is close, gravel is placed on the bottom, broken brick with a layer of 10-15 cm.
Before planting clematis, the pits are filled with nutritious soil (fat loose clay is well suited), add 1-2 buckets of humus and 50-100 g of superphosphate or nitrophosphate. Clematis seedlings are buried 6-8 cm, leaving a hole around the plant. The next year, the plants are deepened by another 10-15 cm. The degree of deepening depends on the soil - on heavy soils they deepen less, on light soils more. After planting, the shoots are cut shortly, leaving 2-4 lower buds. After a few weeks, when the shoots grow back, they are pruned again. Pruning clematis vigorously in the first two years of life promotes better root development.
Soil erosion
After you have planted clematis, water it abundantly; for better access of water and preventing soil erosion, you can make a hole around the plant. It's a good idea to mulch the soil with sawdust or peat. The seedling must be shaded from direct sunlight.
When planting clematis, do not forget about the supports. They need to be installed right now. There are many beautiful fences, grates, ladders on sale. You can make supports yourself, but remember that they must be not only strong, but also attractive in appearance, because lashes of clematis will close them only in the second half of summer. The height of the supports is from 1.5 to 3 meters.
As clematis grows, every 2-3 days, the shoots need to be tied to a support so that the wind does not rip them off.
How to care for clematis
Watering and fertilizing
Clematis is water-loving: it requires abundant three-bucket watering at least once a week, and up to three times in the summer heat. To keep the plant moist enough, dig three pots with a hole in the bottom into the soil around it. They will accumulate water during rain or watering and slowly feed the vine's root system on dry days.
- If the soil is not mulched, you will have to loosen it a day after watering, while weeding the weeds.
- Mulch protects the soil from excessive drying out, weathering and freezing, enriches it with microelements, helps in the fight against weeds.
- Do not neglect this manipulation. Mulch the soil around the clematis with sawdust, peat, or moss.
Several times a season, the plant needs to be fed. In May - with urea (1 tablespoon per bucket of water), from June to August - complex fertilizer for garden flowers at least twice. After the second bloom, provide nourishment for the clematis in winter. To do this, add 1 tablespoon of potassium sulfate and superphosphate to a bucket of water.
Watering
When growing clematis, watering plays an important role. Clematis must be watered abundantly, especially in the first two years after planting. Under three-year-old bushes, you need to pour 2-3 buckets once or twice a week. Proper watering is the key to a beautiful and lush flowering of plants.
For better moisture retention, it is recommended to loosen and mulch the soil near the plants. For mulching, you can use humus, peat, rotted sawdust.
In the first two years, clematis mainly grow horses, few shoots are formed, only 1-3. Single flowers appearing on these shoots are best cut off. Then, with proper, careful care, 5-6 year old bushes will develop dozens of shoots and hundreds of beautiful flowers will bloom on them.
New strength - new shoots
From the third year, clematis are gaining strength, many new shoots grow. By pruning and pinching the shoots during the summer, flowering times can be adjusted. So, if you shorten some of the strong shoots, clematis flowers will appear on the growing new shoots later and the flowering will be longer.
Clematis are very responsive to feeding.
It is recommended to fertilize grown plants once a week. They are fed with full mineral fertilizer (30 g per 10 l of water per 2 sq. M of soil).
Can be fed with wood ash (1 cup per plant). As a fertilizer, mullein is well suited, which is diluted at the rate of ten parts of water for one part of manure.
| Plant calendula or marigold bushes at the roots of clematis. These plants secrete substances that repel pests. In addition, they will protect the clematis roots from overheating. |
Shelter of clematis for the winter
Clematis are natives of the warmest places of the globe, so they need shelter for the winter. In late autumn, all clematis are pruned, but pruned in different ways, depending on which group the variety belongs to.
Clematis leaves are paired, simple or complex, consisting of three, five or seven leaves, in addition to the usual green, there are forms with a purple color.
And those clematis, the flowers of which are formed on annual shoots, for example, in the varieties of the Zhakman and Vititsella group, must be cut off in the fall, leaving hemp with 2-3 nodes.
After that, the plants are covered with boards, boxes, covered with earth, leaves, spruce branches, sawdust, rotted manure, weathered peat with a layer of 20-30 cm. And when snow falls, it must be thrown on top.
Lay down, covering with leaves
Some growers do not cut the vines, but lay them on the ground, cover the lower part with fallen leaves, crushed peat, dry inflorescences of large perennials about 20 centimeters thick. On such plants, lashes up to half a meter long with live buds are preserved. In the spring, they remove the shelter, cut off the dead parts of the vines.
- Then lateral shoots begin to develop faster, which bloom profusely all summer.
- Currently, varieties of frost-resistant clematis have been developed, blooming on last year's shoots. These are clematis: alpine, large-petal, Siberian, mountain.
- For such varieties, pruning is not necessary and they can winter without shelter in the middle lane. Siberian Clematis also withstands colder wintering, up to -30 degrees.
In the fall, it must be remembered that too dense shelter impedes ventilation, and plants can die from this.
Clematis in the spring
In spring, one should not rush to open clematis: intermittent frosts and bright sun have a detrimental effect on the kidneys. And when the danger of spring frosts has passed, the shelter is removed, after which the clematis are fed with nitrogen fertilizers, for example, urea - 40 g per 10 liters of water. On acidic soils, clematis is watered with milk of lime (200 g of slaked lime per 10 liters of water per 1 square meter of soil).
Requirements
For the successful cultivation of clematis, it is imperative to considera number of requirements this culture. Clematis are photophilous and prefer sunny places protected from the wind. The soil should be permeable, loamy, slightly alkaline (calcareous) or neutral, fertile, well fertilized and loose. Saline, damp, heavy, acidic soils are unsuitable for clematis. Please note that fresh manure and sour peat harm clematis.
Clematis leaves are paired, simple or complex, consisting of three, five or seven leaves, in addition to the usual green, there are forms with a purple color.
If the soil in the garden is clay, from the clematis planting site, make a drainage groove to drain excess water and cover it with sand. At the bottom of the planting pit (60x60x60 cm in size), lay a layer of 10-15 cm crushed stone, perlite, etc. for drainage.
The soil
Completely replace the infertile soil layer extracted from the pit with fertile soil with the addition of humus (humus from the Californian worm, well-rotted compost).
- Also add 150 g of superphosphate and 200 g of lime, or 400 g of dolomite flour to the substrate, mix everything thoroughly.
- It is advisable to prepare the soil a year before planting the seedlings so that it can be neutralized with lime material and settle well.
- Install supports before planting clematisfor vines (preferably removable for the winter) with a height of 2-2.5 meters. The support system should provide support for the vines in strong winds.
Never plant clematis close to a wall or fence, there should always be a space of 10–20 cm between them. At the very wall, the soil is usually very dry, and this, as a rule, leads to poor growth, rare flowering and plant death. When planting clematis near the house, install supports for them at least 30 cm from the wall. The water flowing down from the roof should not fall on the vines.
Landing
After the preparation of fertile soil, planting pits and the installation of supports,planting clematis... If the roots of the seedling are dry, soak the plant in cold water for several hours before planting. At the bottom of the planting pit, pour a bump of earth, place a clematis seedling on it and straighten it, evenly distribute its roots over the bump.
- Cover all the roots, the root collar of the seedling and the stem (if any) up to 5–10 cm with earth, making a depression to prevent water spreading during irrigation.
- If you are planting clematis in the spring, then cover it with earth up to the first internode. Abundantlypour a bucket of water.
- Until autumn, gradually add fertile soil so that the depression is filled up.
When planting clematis in the fall, you can remove some of the soil from the plants themselves, and add soil until autumn. This should be done in order to facilitate the emergence of shoots, weakened after plant transplantation, to the soil surface.
Landing
Choose a "cozy" spot on your site. There should be no strong wind here. It is advisable to take the place well lit. Clematis belongs to the vines, which means that he will need support. However, do not rush to plant a clematis plant near the wall of the house - water dripping from the roof is extremely unfavorable for this gentle garden dweller. Retreat at least 30 cm from the walls of the building or fence. Remember that the flowers of the plant will unfold to the south, southeast.
Clematis leaves are paired, simple or complex, consisting of three, five or seven leaves, in addition to the usual green, there are forms with a purple color.
Now prepare a hole under the seedling clod, 10 cm deep more than the height of the clod itself. At the bottom, form a slide and lower the seedling, gently spreading the roots around it. Fill the remaining depression with soil to the level of the landscape. If the top of the plant loves sunlight, then the roots are shaded. Therefore, it is recommended to plant a cover plant within a radius of 1 m from clematis. Pansies and lobelia work well for this. These flowers will protect the soil from drying out and will not compete with the vine for nutrients, not to mention their aesthetic beauty.
Support
Select and install a vine support immediately after planting. Supports can be homemade - one or three bamboo or walnut rods connected by a pyramid. In garden centers, more decorative models are presented in the form of arches or metal nets in different versions. Place the first shoots on a support by hand, straighten and tie them up. Subsequently, the plants will cling to themselves due to the peculiarities of the structure of their stems.
Clematis leaves are paired, simple or complex, consisting of three, five or seven leaves, in addition to the usual green, there are forms with a purple color.
Clematis care includes:
- regular deep watering (at least 1 time per week, and in extreme heat - 2-3 times);
- loosening the soil (if it is not mulched);
- weed removal;
- top dressing (preferably organic) during the growing season - about 2 times a month.
In the first year after planting, clematis seedlings do not need to be fertilized. Further fertilize them in the same way as regular perennial flowers. Top dressing of clematis with "Strawberry Concentrate" showed good results. A suitable top dressing is water in which unsalted meat or fish has been washed.
Every spring, water clematis with milk of lime (dolomite flour, chalk) and a solution containing copper (one tablespoon per bucket of water).
Good results are obtained by dusting the lower part of the vines with wood ash after rain - this prevents clematis shoots from withering during frequent rains, especially on heavy soils. On light soils, wilt of clematis is rarely observed.
Formation
Clematis vines reach the greatest decorativeness at the age of 3-7 years.
After the age of seven, the flowers of clematis begin to shrink due to a lack of fertilizers and water, since in the heat, in the absence of good rains, irrigation water no longer penetrates deep to the roots (they reach a length of 60–70 cm or more). To prevent this from happening, you can dig 3-4 pots with a hole in the bottom around the clematis bush. When watering the plants, the pots are filled with water, which does not spread anywhere and penetrates deeply.
Clematis leaves are paired, simple or complex, consisting of three, five or seven leaves, in addition to the usual green, there are forms with a purple color.
You can plant clematis on lawns, then the grass will protect the roots of the vines from the sun and overheating.
Almost all common varieties of clematis climb themselves to the support with the help of twisted or bifurcated leaf antennae, petioles. However, be sure to tie up young clematis once in the spring. To increase the decorativeness of the plant, direct some of the shoots in the right direction, first in the horizontal direction. Directional shoots will bloom below the main body of the plant. But bend the stems of the clematis very carefully, since the young green shoots are very brittle. During a warm evening and night, the shoots lengthen by 5–10 cm or more.
A clematis sapling grows 1-5 shoots over the summer, and in some varieties - up to 30. In the fall, before the onset of frost, cut the stems of the vines.
Wintering
Depending on the variety, clematis winter in different ways. They are divided into three groups: those that do not require cutting off shoots, that require cutting at a height of about 1 meter, and that require cutting at a height of 10-15 cm from the ground. This nuance must be graphically indicated on the package with the plant. Clematis do not freeze down to -6 ° C, in central Russia they require shelter.
- If your variety needs to prune shoots at a height of 1 meter, after pruning, carefully remove them from the support, twist them into a ring and lay them on the base of the stem.
- Sprinkle the plant with sawdust or leaves, cover with a wooden box without a bottom (such as in which fruit is sold in the markets), and on top - with a film, tar paper or roofing felt, pressing down their edges with stones.
- Do not cover the clematis too tightly, otherwise it may overheat.
In the spring, clematis does not show signs of activity for a long time, even if it tolerated the cold well. In this case, many novice gardeners make the mistake of digging up the plant and examining the roots. Liana does not like this very much, she does not tolerate any anxiety. Continue your routine, be sure to feed with urea in May, and be patient. Shoots will certainly appear when the time is right.
Wintering
with proper shelter, clematis bushes can withstand frosts up to 40-45 °, however, the main danger in winter and early spring is not frost, but waterlogging of the soil. In addition, after frequent thaws during the day and night frosts, layers of ice can form over the soil, which can break the roots and destroy the center of tillering.Therefore, it is important to completely exclude the ingress of water in winter to the soil surface and the base of the bush.
Clematis leaves are paired, simple or complex, consisting of three, five or seven leaves, in addition to the usual green, there are forms with a purple color.
Each plant takes about 3-4 buckets. Together with snow, such a shelter will reliably protect the root system of clematis from freezing.
If you need to preserve the lashes of the varieties of the Lanuginoza, Patens and Florida groups, in addition to dry earth, the bushes are covered with boards, spruce branches, and on top with pieces of roofing material or sheets of old iron. If the frosts are too strong or there is little snow, it is added to the bushes additionally. In the spring, the shelter is removed gradually, part of the peat is left until the night frosts leave.
Pruning
is necessary for clematis to obtain long-term and abundant flowering, control flowering times, biological renewal of the bush and harmonious spatial distribution of shoots.
The degree of pruning depends on the difference in the biological properties of clematis from different taxonomic groups.
Depending on the characteristics of pruning and the intensity of flowering, clematis are combined into three groups. According to the new classification, there is no distinction between types of clematis in large-flowered varieties; they are now divided only by the cutting method into three groups:
First group pruningand or group A
- unites clematis, in which flowers are formed on the shoots of the previous year.On the shoots of the current year, flowers sometimes appear in small quantities. This group includes species and varieties of clematis from the former groups of Atragene, Montana, etc., which are grown without pruning (or after flowering, the generative part of the shoot is cut off). If the bush is very dense, then some of the faded, weaker shoots are cut to the base. This contributes to the development of more vigorous shoots of the current year, which will bloom next year.
Before sheltering for the winter in clematis of group A, only the generative (flowering) part of the shoots of the current year is cut off and weak shoots are completely cut out.
Second trim group or group B
- unites clematis, in which flowers develop both on the shoots of the current year, and on last year's shoots. These include the former groups of clematis Lanuginosa, Florida, Patens and some varieties with characteristics similar to these groups. These clematis have early flowering in late May-June on the shoots of the previous year. The flowers are large, often double or semi-double; flowering time is short.
Clematis leaves are paired, simple or complex, consisting of three, five or seven leaves, in addition to the usual green, there are forms with a purple color.
Depending on the density of the bush or to get early flowering next year, a different degree of pruning is used. Only the generative part of the current year's shoot is removed if they want to achieve early flowering. Medium pruning (up to the first true leaf) and strong (removal of the entire shoot) are used when adjusting the number of shoots and for uniform flowering of group B clematis in the next year.
Third group pruningand or group C
- unites clematis, in which the bulk of flowers are formed on the shoots of the current year (former groups Jackmanii, Viticella and their hybrids). They bloom from July to mid-September; the maximum flowering is observed at the end of July - in August. Pruning this group of clematis is very simple: before sheltering for the winter, cut off all the shoots to the first true leaf (you can leave more buds)or to the bottom.
After the autumn pruning of clematis, they are carried outshelter before wintering.
Clematis of the third pruning group
in the fall, cut the shoots to the first bud, counting from the ground, or, as a last resort, in early spring (but then the bushes will be more difficult to cover for the winter). Cover them slightly before wintering. For a winter shelter, it is enough to overlay the base of the clematis bush with woody leaves, placing spruce paws or "dog" mint under the leaves to protect the shoots from damage by rodents. Cover the top of the shelter with a piece of whole plastic wrap, shading it from the sun. The winter shelter of clematis should be loose, but thick enough.
Clematis have the second and first trimming groups
you can leave some of the shoots, cutting them at a height of 70-100 cm to large ripe buds. If there are no such buds (and this can happen in a cold short summer), then the shoots must be cut to the level of the soil or the lower part of the shoots 20–30 cm long should be left. more often this happens after a cold summer, when they do not have time to ripen.
- For clematis of the second and third pruning groups, cut off the leaves on the remaining vine and lay it on spruce paws or on "dog" mint, or just on the ground. The shoots left in the spring can be used to propagate clematis by layering. Pour dry leaves on top of the shoots, put wooden shields on the leaves.
- Place bricks or any other suitable material underneath to prevent snow shields from falling on the ground. Lay a whole plastic wrap on top of the shields.
You can do it differently: put shields on the bricks, lay dry leaves on the shields, and a whole plastic wrap on top of the leaves. - This method will require more leaves, and from the severity of the snow, the leaves are caked, which means that part of the thermal insulation is lost.But on the other hand, with this method of shelter, there are not many mouse nests under the shields. Mice use clematis shoots for nests, and the water rat eats the inside of the shoots.
Temperature
Shoots of clematis are afraid not so much of frost as of wet and cold weather, icing. Therefore, it is important to keep the clematis shoots dry in winter.
But with excessive cover, the shoots can get out.
It is also very important in the spring to remove the shelter from clematis in time.
Never use sawdust to cover clematis - they get wet, freeze, thaw very slowly in spring (because of this, in spring it is impossible to remove the shelter in time), which can lead to damping of plants.
- Next year, on the left and overwintered shoots of clematis, flowers will appear 20-30 days earlier than on the shoots of the current year. And in some varieties, flowers can even be semi-double.
Some clematis (Jackmanii, Viticella) tolerate severe frosts - up to -40C (M. A. Beskaravaynaya). - But this only applies to the underground part of the plant. The soil temperature rarely drops below critical, and it is always much higher than the air temperature (especially if the ground is covered with at least a thin layer of snow).
- In urban conditions, during thaws, snow melts faster than in fields.
Clematis that are not sheltered for the winter are damaged by sudden changes in temperature and humidity. The least hardy root collar of clematis. If an uncovered vine is on the surface, then its bark cracks from frost; during a thaw, moisture gets under the bark, which freezes and expands the cracks even more.
Many varieties and hybrids of clematis in the fall, before the soil freezes, sprouts underground from the root collar, which do not break through to the soil surface until warm spring days. These sprouts can suffer from winter frosts.
Reproduction of clematis
can be done in several ways, the simplest of which are:
- division of bushes;
- spring pinning of shoots;
- reproduction by autumn and summer layering;
Division of bushes
clematis is carried out at the age of no older than 6-7 years. Later, it is very difficult to do this because of the developed powerful root system, which breaks off strongly. Dig up the clematis bushes, free them from the ground and cut them into pieces with a pruner or knife so that each plant has buds on the root collar.
- For breeding clematisautumn layering in October, cut off all the leaves from the shoots, the faded part to a well-developed bud. Tie the shoots neatly into a bundle (you can use a ring, as space permits), put them in the grooves.
- Pour a layer of peat under the tourniquet and on top (peat is by its nature a very water-absorbing material, retains moisture for a long time and allows air to pass through well), and then compact the earth and soil, cover the whole plant well.
- Water often and abundantly for the next year. After the sprouts appear, mulch the soil surface with humus, moss, peat. By autumn, most of the young plants that have emerged are ready for planting. Only well-developed clematis buds grow.
- Roots are formed throughout the shoot, but the largest number of roots are located under the buds. It is better to dig up plants with a pitchfork - less damage to the roots.
Layers for propagation can be laid in prepared grooves in spring, but then it is more difficult to keep the shoots in winter.
Better to spend in the springpinning shoots of clematis in pots with soil. The essence of this method is that last year's clematis shoots are pinned at the site of the knot into pots prepared in advance and dug into the ground, which are filled with very loose soil with peat. The pots should be buried in the soil below its level so that the water does not spread during watering. Gradually, as the seedling grows, moisture-absorbing soil is poured in the form of a tubercle. By the fall, high-quality clematis seedlings grow from the pinned shoots.
Summer layering
it is most convenient to propagate clematis in a vertical way.To do this, in the spring, put a box without a bottom on a growing plant. As the clematis shoots grow, pour light fertile soil into the box until it is almost filled to the top. However, it is always necessary to leave the upper part of the shoot with well-developed two buds uncovered, otherwise the covered young shoots of clematis will stop growing.
Clematis leaves are paired, simple or complex, consisting of three, five or seven leaves, in addition to the usual green, there are forms with a purple color.
Fascination of numbers
Clematis can be propagated in three ways: by seed, by rooted layering and by dividing the rhizome. The seeds are treated with a rooting stimulant and planted on seedlings. For the first year, you can plant them in the ground for insulation. The seedlings have no peculiarities of care.
- You can propagate clematis by layering. To do this, select a section of the stem with an internode, leave one or two nearby leaves and plant it in a hole, deepening the internode into the ground.
- In the first year, the plant can also be planted under insulation, and the next year, it can be planted in a permanent place.
- The root of an adult, but not older than seven years, clematis can be cut into pieces with a sharp secateurs and planted.
As you can see, clematis is not as difficult to grow as many people think. But in their decorativeness, they are superior to many other plants. Abundant flowering will delight you twice a summer, and luscious greenery - a whole season, if you give the liana enough attention and love.
Choosing distribution methods
There are several ways to propagate clematis: by seeds, layering, cuttings and dividing the bush.
Clematis from seeds appear at different times. After sowing the seeds, do not be upset if they do not sprout from you in the same summer. The seeds of some varieties of clematis germinate only in the second and even in the third year, and sometimes even later. It is useful to water such crops in the summer after 2-3 weeks with a weak solution of boric acid (1-2 grams per bucket) and potassium permanganate (2-3 grams per bucket).
Clematis leaves are paired, simple or complex, consisting of three, five or seven leaves, in addition to the usual green, there are forms with a purple color.
Leave the rooted clematis shoot in place for the winter. And in the spring, cut the lashes between the knots and plant the plants in a permanent place.
Reproduction of clematis by cuttings is also possible. Cuttings with one or two internodes should be cut at the beginning of flowering plants from the middle part of the vine, leaving 2 cm above the node and 3-4 cm below.To accelerate root formation, place the cuttings for 16-24 hours in an aqueous solution of heteroauxin (50-75 grams for 1 liter of water).
Cuttings
Plant the cuttings of clematis obliquely in boxes or containers in washed sand, peat or a mixture of sand and peat in equal parts. At a temperature of 20-25 degrees, cuttings root better, so spoil the container with a film and put it in a greenhouse or greenhouse. It is very useful to spray the cuttings during the rooting process.
Clematis leaves are paired, simple or complex, consisting of three, five or seven leaves, in addition to the usual green, there are forms with a purple color.
Fertilization
small-flowered clematis propagate, as a rule,seeds... Large-flowered are bred exclusively vegetatively. The easiest way to do this is by dividing the bush. In varieties with a high tillering ability (Anastasia, Anisimova, Zhanna d'Arc, Hagley Hybrid, Madame Baron Villard, Cosmic Melody), the division of the bush is used for rejuvenation, since very dense bushes, even with good care, often lose their decorative effect.
Active work on the cultivation and introduction of clematis in our country began to develop only in the middle of the 20th century. And as a result of breeding work, wonderful varieties and forms have been created, which further emphasize the unique charm of these magnificent plants.
However, if in the fall this operation is almost painless for the plants, since the buds are only marked and small, then in the spring time it is necessary to meet the extremely tight deadlines (from the moment the soil thaws to the beginning of growth), since it is easy to damage the rapidly growing shoots. Clematis, divided in spring, will be about 2-3 weeks behind in growth compared to its autumn counterpart. In an adult 5-8-year-old plant that has a sufficient number of shoots, the ground part is cut off, leaving only 2-3 pairs of buds below.
Dig up with a clod of earth
The bush is carefully dug out with a clod of earth, taking care not to damage the long cord-like roots. If the soil is not easily shaken off, the roots are washed with water from a hose. Then with a knife it is divided through the center of the bush into independent plants. They work without haste, carefully, making sure that each section has enough roots and at least one shoot with buds.
Active work on the cultivation and introduction of clematis in our country began to develop only in the middle of the 20th century. And as a result of breeding work, wonderful varieties and forms have been created, which further emphasize the unique charm of these magnificent plants.
At a half-dug bush, shoots with roots are separated with a tool, each of which will become an independent plant. Before planting, the delenki are examined, only healthy ones are used. The roots are pruned and disinfected in a pink solution of potassium permanganate.
Layers
It is quite easy to propagate your favorite variety by layering. There are several techniques. Here is the first one. The bush is sprinkled with peat or humus along the bottom 2-3 pairs of leaves. Within a year or two, the lower nodes of the shoots are overgrown with their own roots. Having removed the poured substrate, the rooted shoots are cut off from the mother plant and planted.
- This method is good because the bush itself is not injured. The second method requires some free space.
- In late summer or autumn, grooves 8-10 cm deep are dug around the bush in the radial direction. Clematis shoots with well-formed buds are removed from the support, laid out in grooves one at a time, pressing them to the ground with staples made of thick wire, and sprinkled with loose nutrient soil.
- The top of the shoot (20 cm) is taken out. You can do the same with a vine rolled around the base of the bush and covered for the winter.
In the spring, when the plant is freed from the shelter, one or more of these lashes are laid in a groove. Layers are regularly watered and fed during the summer. From almost all covered buds, vertical shoots begin to grow, and rooting occurs at each node.
It is best to separate rooted shoots from the bush in the fall of next year or in the spring of a year later. By this time, each new shoot will have a good root system. From one sprinkled lash in a year or two, you can get up to 10 seedlings that do not need growing, the bush itself does not suffer. Another way of vegetative propagation isgreen cuttings.
We will tell you how to plant clematis outdoors and how to care for it as a beginner. Please note that clematis requires special attention. With proper care, they will delight you with their flowering and decorate your home.
The article presents the most complete material for caring for clematis planted in open ground. Once familiarized, you will be able to grow beautiful healthy flowers, and you will not have any difficulties.
Clematis will become an aesthetic element of your exterior. One of the most frequent questions that comes to our editorial office: what varieties of clematis are suitable for the Moscow region. We tried to reveal the topic of the selection of varieties for different growing regions as much as possible.
Description of Clematis with photo
Belongs to the buttercup family.In nature, there are about 300 species that can be found on all continents (except Antarctica) - in forests, steppes, along river banks, in gorges and on rocky placers.
- Types of clematis vary greatly among themselves. In herbaceous perennials (C. mandshurica, C. recta, C. texensis) shoots die off by the end of the growing season. Semi-shrubs (C. heracleifolia, C. integrifolia) have a lignified lower part that persists for several years, and an upper one that dies off every year.
- Shrubs (C. fruticosa f. Lobata) have completely lignified wintering shoots. Most of the same species (C. tangutica, C. vitalba, C. viticella) belongs to the group of lianas-leaf climbers, which use supports, climbing them with the help of leaf stalks.
- The root system of clematis is of two types: pivotal (C. tangutica, C. serratifolia) and fibrous, C. viticella). It must be remembered that clematis with a tap root system does not tolerate transplantation well. It is better to plant them immediately in a permanent place.
Name
The name "clematis" comes from the Greek wordklema, which once denoted every climbing plant. Of the many popular names (lozinka, grandfather's curls, warthog, etc.) in Russia, "clematis" is most often used. Probably, this vine was named so because of the strong smell of dug roots or because its seeds have a curved outgrowth.
Escapes
Clematis have thin, 2-5 mm in diameter shoots of the current year. In herbaceous species, they are round, green, in woody ones - four-hexagonal, light or dark reddish-brown in color. They develop in spring from dormant buds on the underground part of the plant or from aboveground buds of overwintered shoots.
Clematis leaves are paired, simple or complex, consisting of three, five or seven leaves, in addition to the usual green, there are forms with a purple color.
Clematis flowers, as a rule, are bisexual, single or collected in inflorescences of various shapes (scutellum, panicle, semi-umbrella). The role of petals in clematis is played by sepals, in number from four to eight, in double varieties - up to seventy.
"Spider"
In the center of a simple flower is the so-called lush "spider" (many pistils and stamens], it often has a different color than the "petals", which gives the flower a special charm. And delicate flowers are painted very whimsically: white, yellow, all the nuances of transitions pale pink and pale blue to velvety shimmery reds and blues.
- And this charming picture pleases more than one day - the life of a flower lasts a week or two, and a double one - almost three. By choosing the right varieties, you can achieve flowering clematis in the garden from spring to autumn.
- After all, the early species are covered with flowers two months after the spring awakening, and the late ones - at the end of summer. Their flowering will be interrupted only by stable frosts.
- Short-term drops in temperature at night (up to -2 ... -7 ° C) and light snow are not terrible for clematis - after warming, the buds open. The flowers of some species exude the aroma of jasmine, primrose, almond.
Clematis fruits are numerous achenes with short or long pubescent columns and fleecy beaks, collected in fluffy silky heads.
From the history
the beginning of clematis cultivation in Western Europe dates back to the 16th century, and in Japan the clematis culture has an even longer history. In Russia, clematis appeared at the beginning of the 19th century as greenhouse plants.
Active work on the cultivation and introduction of clematis in our country began to develop only in the middle of the 20th century. And as a result of breeding work, wonderful varieties and forms have been created, which further emphasize the unique charm of these magnificent plants.
Classification
with all the variety of species, varieties and forms of clematis, there is a convenient classification for gardeners, which allows not only to easily group plants according to the shape and color of flowers, but also to choose the appropriate agricultural technology. All varieties are divided into groups.
Zhakman
- large shrub vines with shoots 3-4 m long and a well-developed root system. The flowers are large, blue-violet-purple tones, odorless.
- They are distinguished by abundant and long flowering on the shoots of the current year.
- For the winter, the shoots are cut to the level of the soil or the bases of the shoots are left with 2-3 pairs of buds.
- The ancestor of the varieties of this group is the large-flowered variety 'Zhakman'(‘Jackmanii’) or K. x Zhakman(Jackmanii = Clematis x Jackmanii), when crossed with varieties of other groups.
Viticella
- shrub vines 3-3.5 m long. The flowers are open with a predominance of pink-red-purple velvety tones in color. They are characterized by lush and long flowering in summer on the shoots of the current year. Shoots are cut for the winter. The cultivars are obtained from the crossing of C. violet (C. viticella) with forms and cultivars of other groups.
Lanuginose
- shrub vines with thin shoots up to 2.5 m long. The flowers are large, wide open, mostly light in color (white, blue, pink). They are distinguished by massive flowering on the shoots of the previous year. When pruning shoots in the fall of the next year, flowering begins in the second half of summer on the shoots of the current year.
Patens
- shrub vines 3-3.5 m long. Flowers are open, single, up to 15 cm in diameter or more, color from light to bright blue-violet-purple, deep violet tones. Many varieties have double flowers. Blooming on shoots last year. Shoots in the fall should only be shortened, removing the faded part, and covered until spring. Varieties from spreading clematis (C. patens) with varieties and species of other groups.
Florida
- shrub vines with shoots up to 3 m long. The flowers are open, of various colors, but light colors prevail. Blooming on shoots last year. They should be shortened to 1.5-2 m in length and kept under cover during the winter.
If you cut them off completely, then a rather weak flowering occurs only from the second half of summer on the shoots of the current year. The varieties were obtained by crossing the flowering clematis (C. florida) with species and varieties of other groups.
Integrifolia
- vigorous, climbing dwarf shrubs up to 1.5 m high. The flowers are semi-open, bell-shaped, up to 12 cm in diameter, of various colors. Bloom profusely in summer on the shoots of the current year. Shoots are cut for the winter. The varieties are obtained from whole-leaf clematis (C.integrifolia) when crossed with other species and varieties. Many interesting, profusely flowering hybrids of this group were created in the Nikitsky Botanical Garden by A. N. Volosenko-Valenis and M. A. Beskaravaynaya.
- Depending on the size of the flower, there are small-flowered (up to 5 cm in diameter) and large-flowered (more than 5 cm in diameter) clematis. Large-flowered climbing clematis include varieties and forms from the Jacqueman, Vititsella, Lanuginoza, Patens groups.
- For bush large-flowered clematis - varieties and forms from the Integrifolia group.
- Large-flowered clematis are considered especially beautiful and graceful, but small-flowered ones are no less good, moreover, they are very undemanding to growing conditions, give a lot of greenery and easily propagate by seeds.
Small-flowered clematis are unusually graceful, they bloom abundantly, and the original seed heads adorn the plant in autumn.
Choosing a variety of Clematis for the Moscow region with a photo
For planting in the North-Western regions of the European part of the country, Siberia, the Far East, where the summer is relatively short and the frosts are fair in winter, it is better to choose early and mid-early varieties from the Jacquemann, Viticella and Integrifolia groups, which bloom profusely on the shoots of the current year:
- Ville de Lyon,
- Japsi Queen,
- Victoria,
- Star of India,
- Luther Burbank,
- Hagley Hybrid,
- Madame Baron Vilar,
- Blue flame,
- Alexandrite,
- Golden Jubilee,
Alyonushka, Silver Stream, Polish Varshavyanka, Victory Salute. Anastasia Anisimova. Cosmic Melody. Huldin, Rouge Cardinal, Gray Bird, Cloud, AnEre Le-Roi. Lilac Star, Niobe ...
- However, there are hybrids from the Zhakman group that are more suitable for the south: Elegy, Alpinist, Biryuzinka. Openwork.
- In the north, these varieties bloom poorer over the years, although the mass of shoots increases. Clematis of the Lanuginoza groups, Patens, Florida (their first flowering occurs on the shoots of last year) are less winter-hardy and require shelter of vines even in the middle lane.
- However, the varieties Madame Van Hutte, Losoniana, Nelly Moser, Stone Flower, Ramona, Lazurshtern, Ball of Flowers, Nadezhda, V.E. Gladstone, Mrs. Hope, Mrs. Cholmondeli, and in such inhospitable conditions, flaunt the sophistication of shapes and colors.
- In the southern regions, clematis with double flowers bloom profusely: Madame Bajjun, Daniel Deronda, Jeanne d'Arc, Lord Neville. In the middle lane, these varieties will have terry only the first flowers on overwintered last year's shoots.
Species clematis
They know less, although many of them are not only quite effective, but also unpretentious, grow quickly, and are resistant to drought and fungal diseases. The average duration of flowering of small-flowered clematis ranges from 2-2.5 weeks to 3-4 months, the record holders include eastern, Texas, Tangut clematis, and Peter's clematis and mustachioed Balearic bloom in the south of the country even in winter.
In addition to these advantages, some of them have a wonderful aroma: almonds - Armand's and David's clematis, burning; primroses - straight clematis, Manchurian, Redera; jasmine - paniculata clematis.
Location
clematis are light-loving plants. If there is not enough light, not only will you not achieve good flowering, you may not even wait for it at all. Therefore, in the middle lane, it is best to plant them in sunny or slightly shaded areas at midday. Only in the southern regions, where clematis often suffer from overheating of the soil, are they planted in partial shade.
For group plantings, each plant should receive enough light, and the distance between the bushes should be at least 1 meter. The wind is a terrible enemy of clematis not only in summer, but also in winter: it breaks and confuses shoots, damages flowers. Where snow is blown off in winter, planting clematis is not a good idea. And in the lowlands, where cold air accumulates, clematis feel uncomfortable.
Clematis are very demanding on moisture: during their growth, they need abundant watering. At the same time, wet, swampy areas with a high standing of groundwater (less than 1.2 times are not suitable for them, even if the water stagnates only for a short time. Waterlogging of the soil is dangerous not only in summer, but also in early spring during and after snow melting. planting clematis, you need to think about the natural outflow of water from the bush: add earth, plant bushes on ridges or dig slopes with a slope.
The soil
Clematis prefer fertile sandy loam or loamy soil, rich in humus, loose, from slightly alkaline to slightly acidic reaction.
Landing
since clematis can grow in one place for more than 20 years, they prepare the ground very deeply in advance. Usually, holes are dug with a size of at least 60x60x60 cm, and for group plantings, the site is prepared over the entire area.
- 2-3 buckets of humus or compost, 1 bucket of peat and sand, 100-150 g of superphosphate, 200 g of complete mineral fertilizer, preferably 100 g of bone meal, 150 -200 g of lime or chalk, 200 g of ash.
- On light soils, more peat, leaf humus and clay are added.
- If the soil on the site is wet, dense or clayey, then a 10-1 5-cm layer of crushed stone, broken brick or coarse sand is poured onto the bottom of the pit. Thoroughly mixed earthen mixture is poured into the pit and compacted.
In the southern regions, it is preferable to do this in autumn (from late September to early November; in the middle lane the best time is September (in warm weather - and later); even further north, clematis are planted in spring (late April - May) or early autumn. Plants in containers can be planted whenever you want (except for winter, of course).
Support
A solid, rigid support is installed in the center of the pit. A stretched rope is not suitable here, it will not protect young fragile whips from gusts of wind. Having covered the hole with soil about half, they make a mound on which the roots of clematis are spread to the sides and down. Holding the plant with your hand, pour the mixture to the roots, making sure that the clematis is planted deeply.
- Only then will he develop a tillering center, on which new buds are subsequently laid, shoots and roots are formed.
- Such bushes better tolerate severe winters, suffer less from heat.Clematis planted flush with the surface are short-lived: they do not bush, grow in 1-2 stems, their root system suffers from soaking.
- The larger the seedling, the deeper the planting should be. Young one-two-year-old plants are buried by 8-12 cm and the lower pair of buds, more mature and divided bushes - by 12-18 cm.
- If clematis is planted in the spring, then the planting pit is not filled with earth to the brim, but left 5-8 cm uncovered so that the “newcomer” does not “suffocate”.
As the shoots become lignified, this space is gradually filled with soil. After planting, clematis is watered abundantly, shaded from the sun, and the surface of the earth around the plant is mulched with peat. When planting in the fall, the earth is poured to the edges, the entire aboveground part is cut off to the soil level or slightly higher.
Requirements. to the planting material
when planting in autumn, clematis must have developed vegetative buds; when planting in spring, at least one shoot. The seedlings must have a minimum of 3 roots less than 10 cm long. Plants with a weak root system are placed in a “school” for growing. Use only healthy planting material (the roots of the seedlings should be elastic, without visible damage, swelling and thickening).
Support
are of great importance for the normal development, abundant and prolonged flowering of clematis. It is important that they are not only practical and convenient for the plant, but also beautiful. As a supporting structure, galvanized pipes with a diameter of 3/4 inch are used. Wooden lattices impregnated with linseed oil or stain, a strongly stretched mesh made of nylon rope or thick fishing line with a mesh of 15x15 cm go well with them.
Supports for clematis are often bushes of weigela, chubushnik, forsythia.
Vines cling to them, rise up, hang freely, and in the second half of summer the bushes hide under garlands of flowers. Screens and arches are traditionally considered to be excellent supports. Clematis look very impressive on horizontal surfaces. for example, on wire-mesh hoops with a diameter of about 1 m, attached to a galvanized pipe at different heights. All supports are made removable and removed for the winter.
| The reddish brick wall is very close to the purple star-shaped flowers of Clematis. However, his lashes need reliable support. To do this, a wire in the form of an extended letter S was pulled on hooks driven into the wall. If you keep running the clematis shoots by the wire all the time, its foliage will soon completely close the support and our "bindweed" will appear in all its glory. |
| A bamboo fence, braided in the photo on the left with a clematis variety ‘Nelly moser', Or an ordinary picket fence, as in the picture below, will provide the clematis with excellent conditions for climbing exercises. It is only necessary to evenly distribute its shoots over the surface of the fence. It is best to pass them between the planks or tie them to them with a cord so that the fence becomes covered with a solid floral carpet faster. |
Care
in spring, clematis are spilled with milk of lime (200 g of lime per 10 liters of water per square meter). In dry weather, clematis is watered not often, but abundantly, making sure that the stream of water does not fall into the center of the bush. Clematis are fed at least four times per season after irrigation with full mineral fertilizer with microelements at the rate of 20-40 g per 10 liters of water or a diluted fermented mullein (1:10). Mineral and organic dressings alternate.
In summer, once a month, plants are watered with a weak solution of boric acid (1-2 g) and potassium permanganate (2-3 g per 10 liters of water), and the bushes are also sprayed with urea (0.5 tablespoons per 10 liters of water). Since clematis can suffer from overheating and dryness of the soil, in the spring, after the first watering and loosening of the planting, they should be mulched with peat or humus (in the northern regions) or sawdust (in the southern regions). To protect the soil from overheating and to close the lower part of the shoots, clematis are “knocked out” by lettucers.
In the spring, only for the first time, the vines are directed along the support in the right direction and tied up.Otherwise, the ones growing on the run will intertwine so strongly that no forces will be able to unravel them. Only in the varieties of the Integrifolia group, shoots and leaves are deprived of the ability to twine around supports, therefore they are tied up as they grow all summer. In the fall, before sheltering for the winter, clematis bushes are cut and carefully cleaned of old leaves.
The first two or three years, young specimens require especially careful care: in the fall or early spring, well-rotted manure mixed with any potash and phosphorus fertilizer, as well as wood ash (a handful of each in a bucket of humus) is added to the bushes, liquid fertilizing is done every 10-15 days in small doses.
Pruning
the beauty of clematis largely depends on how correctly pruning is done. The first time the shoots are shortened during planting, this is important for the formation of the aboveground part and the development of the root system. One or two shoots grow from the lower pair of buds left during planting, which must be pinched in the summer. Regulatory pruning is carried out in the summer. To extend flowering, some of the shoots are cut in the spring.
At the beginning of summer, vines can be shortened again to the first vegetative buds, which will give rise to new shoots with buds. Tall varieties such as Gypsy Queen, Luther Burbank, Stone Flower, Ernest Markham have flowers at the top of the bush.
- Here it is worth cutting off several vines at a height of 0.7 to 1.5 m, then they will be covered with buds more evenly. Now about pruning for the winter.
- In the varieties of the Zhakman and Viticella groups, the flowers of which are formed on the shoots of the current year, before the shelter for the winter, the entire aerial part is cut off to a real leaf or to the soil level. Do the same with the varieties of the group.
- Integrifolia and some small-flowered clematis: Manchu, straight, Texas and six-petal. In varieties belonging to the Lanuginoza, Patens and Florida groups, flowers are formed on the shoots of the current year and last year.
Their first flowering occurs in early summer on overwintered shoots. The second is on the shoots of the current year, from mid-summer to autumn. The small-flowered clematis Armanda and mountainous belong to the same company. In the fall, before the bushes of these groups are sheltered for the winter, the vines are removed from the supports, all dry, weak, broken shoots are cut out, and the most developed, strong ones are shortened to 1-1.5 m, bent to the ground or rolled up in a ring and placed at the base of the bush.
Clematis
Open-rooted clematis can be planted in fall or spring. If the clematis seedlings are in containers, then you can transfer them into the garden at any time of the year, except for winter.
Usually, clematis seedlings are purchased at the age of one to two years; annual seedlings are much cheaper.
Clematis seedlings may have a thin stem 5–20 cm long (it seems dry to many novice growers). Sometimes seedlings are sold without a stem at all, in the form of a bunch of roots with sprouts or with awakened buds.
If clematis seedlings were purchased after the onset of the autumn cold, dig them in the garden and cover them with earth.
When in the fall it is not possible to plant purchased clematis, postpone planting seedlings until spring. In winter, store them in a cold, frost-free cellar or basement (at a temperature no higher than + 5C). Cover the root system of the seedlings with a slightly damp mixture of sawdust and sand, or other suitable loose soil.
In storage, plants need to be pinched to curb the rapid growth of shoots. Each pinch restrains their growth for 2-3 weeks. The growth rate of shoots depends on the temperature of the seedlings. By spring, clematis germinates strongly in the storage, therefore, after planting in the garden, seedlings with young shoots during the acclimatization period are shaded from the sun (in the first 10 days).
Clematis can withstand frosts down to -6C.
Let's talk more about how to plant and how to grow clematis
The cultivation of clematis usually begins with the acquisition of a one-year-old seedling.How and when to plant it? How to care for clematis in the future?
The best time to plant is early summer, when the danger of late frosts is over. But you can plant it in the fall, a month and a half before real frosts. The seedlings should have enough time to take root.
- It is recommended to plant clematis in a well-lit, wind-protected place.
- These plants thrive on alkaline, neutral or slightly acidic soils. For planting clematis, they dig holes, on heavy soils 70x70x70 cm, on light soils 50x50x50 cm.
- The distance between the pits is from 70 cm to one meter. Clematis cannot stand waterlogging and stagnant water. If the groundwater is close, gravel is placed on the bottom, broken brick with a layer of 10-15 cm.
Before planting clematis, the pits are filled with nutritious soil (fatty loose clay is well suited), add 1-2 buckets of humus and 50-100 g of superphosphate or nitrophosphate. Clematis seedlings are buried 6-8 cm, leaving a hole around the plant. The next year, the plants are deepened by another 10-15 cm. The degree of deepening depends on the soil - on heavy soils they deepen less, on light soils more. After planting, the shoots are cut shortly, leaving 2-4 lower buds. After a few weeks, when the shoots have grown, they are pruned again. Vigorous pruning of clematis in the first two years of life promotes better root development.
Soil erosion
After you have planted clematis, water it abundantly; for better access of water and preventing soil erosion, you can make a hole around the plant. It is a good idea to mulch the soil with sawdust or peat. The seedling must be shaded from direct sunlight.
When planting clematis, do not forget about the supports. They need to be installed right now. There are many beautiful fences, lattices, ladders on sale. You can make supports yourself, but remember that they must be not only strong, but also attractive in appearance, because lashes of clematis will close them only in the second half of summer. The height of the supports is from 1.5 to 3 meters.
As clematis grows, every 2-3 days, the shoots need to be tied to a support so that the wind does not tear them off.
How to care for clematis
Watering and fertilizing
Clematis is water-loving: it requires abundant three-bucket watering at least once a week, and up to three times in the summer heat. Dig in three pots with a hole in the bottom to keep the plant moist enough. They will accumulate water during rain or watering and slowly feed the vine's root system on dry days.
- If the soil is not mulched, you will have to loosen it a day after watering, while weeding the weeds.
- Mulch protects the soil from excessive drying out, weathering and freezing, enriches it with microelements, helps in weed control.
- Do not neglect this manipulation. Mulch the soil around the clematis with sawdust, peat, or moss.
Several times a season, the plant needs to be fed. In May - with urea (1 tablespoon per bucket of water), from June to August - complex fertilizer for garden flowers at least twice. After the second bloom, provide nourishment for the clematis in winter. To do this, add 1 tablespoon of potassium sulfate and superphosphate to a bucket of water.
Watering
When growing clematis, watering plays an important role. Clematis must be watered abundantly, especially in the first two years after planting. Under three-year-old bushes, you need to pour 2-3 buckets once or twice a week. Proper watering is the key to a beautiful and lush flowering of plants.
For better moisture retention, it is recommended to loosen and mulch the soil near the plants. For mulching, you can use humus, peat, rotted sawdust.
In the first two years, clematis mainly grow horses, few shoots are formed, only 1-3. Single flowers appearing on these shoots are best cut off. Then, with proper, careful care, 5-6 year old bushes will develop dozens of shoots and hundreds of beautiful flowers will bloom on them.
New strength - new shoots
From the third year, clematis are gaining strength, many new shoots grow. By pruning and pinching the shoots during the summer, flowering times can be adjusted. So, if you shorten some of the strong shoots, clematis flowers will appear on the growing new shoots later and the flowering will be longer.
Clematis are very responsive to feeding.
It is recommended to fertilize grown plants once a week. They are fed with full mineral fertilizer (30 g per 10 l of water per 2 sq. M of soil).
Can be fed with wood ash (1 cup per plant). As a fertilizer, mullein is well suited, which is diluted at the rate of ten parts of water for one part of manure.
| Plant calendula or marigold bushes at the roots of clematis. These plants secrete substances that repel pests. In addition, they will protect the clematis roots from overheating. |
Shelter of clematis for the winter
Clematis are natives of the warmest places of the globe, so they need shelter for the winter. In late autumn, all clematis are pruned, but pruned in different ways, depending on which group the variety belongs to.
So clematis from the Florida, Patens, Lanuginoza groups, whose flowers are formed on last year's shoots, are cut off by one third after the first frost, and then the vines of the plants are placed in rings on the ground and are well covered. The next year, in the first half of summer, large flowers will bloom on these shoots, later flowers will appear on the shoots of the current year.
And those clematis, the flowers of which are formed on annual shoots, for example, in the varieties of the Zhakman and Viticella group, in the fall need to be cut off, leaving hemp with 2-3 nodes.
After that, the plants are covered with boards, boxes, covered with earth, leaves, spruce branches, sawdust, rotted manure, weathered peat with a layer of 20-30 cm. And when snow falls, it must be thrown on top.
Lay down, covering with leaves
Some growers do not cut the vines, but after laying them on the ground, cover the lower part with fallen leaves, crushed peat, dry inflorescences of large perennials about 20 centimeters thick. On such plants, lashes up to half a meter long with live buds are preserved. In the spring, they remove the shelter, cut off the dead parts of the vines.
- Then lateral shoots begin to develop faster, which bloom profusely all summer.
- Currently, varieties of frost-resistant clematis have been bred, blooming on last year's shoots. These are clematis: alpine, large-petal, Siberian, mountain.
- For such varieties, pruning is not necessary and they can winter without shelter in the middle lane. Siberian Clematis also withstands colder wintering, up to -30 degrees.
In the fall, it must be remembered that too dense shelter impedes ventilation, and plants can die from this.
Clematis in the spring
In spring, one should not rush to open clematis: intermittent frosts and bright sun have a detrimental effect on the kidneys. And when the danger of spring frosts has passed, the shelter is removed, after which the clematis are fed with nitrogen fertilizers, for example, urea - 40 g per 10 liters of water. On acidic soils, clematis is watered with milk of lime (200 g of slaked lime per 10 liters of water per 1 square meter of soil).
Requirements
For the successful cultivation of clematis, it is imperative to considera number of requirements this culture. Clematis are photophilous and prefer sunny places protected from the wind. The soil should be permeable, loamy, slightly alkaline (calcareous) or neutral, fertile, well fertilized and loose. Saline, damp, heavy, acidic soils are unsuitable for clematis. Please note that fresh manure and sour peat harm clematis.
Clematis does not tolerate nearby groundwater. In this case, plant the plants on a mound (on additionally filled soil), otherwise the roots of clematis, reaching a length of 1 meter or more, will rot.
If the soil in the garden is clay, from the clematis planting site, make a drainage groove to drain excess water and cover it with sand. At the bottom of the planting pit (60x60x60 cm in size), lay a layer of rubble 10-15 cm, perlite, etc. for drainage.
The soil
Completely replace the infertile soil layer extracted from the pit with fertile soil with the addition of humus (humus from the Californian worm, well-rotted compost).
- Also add 150 g of superphosphate and 200 g of lime, or 400 g of dolomite flour to the substrate, mix everything thoroughly.
- It is advisable to prepare the soil a year before planting the seedlings, so that it can be neutralized with lime material and settle well.
- Install supports before planting clematisfor vines (preferably removable for the winter) with a height of 2-2.5 meters. The support system should provide support for the vines in strong winds.
Never plant clematis close to a wall or fence, there should always be a space of 10–20 cm between them. At the very wall, the soil is usually very dry, and this, as a rule, leads to poor growth, rare flowering and plant death. When planting clematis near the house, install supports for them at least 30 cm from the wall. The water flowing down from the roof should not fall on the vines.
Landing
After the preparation of fertile soil, planting pits and the installation of supports,planting clematis... If the roots of the seedling are dry, soak the plant in cold water for several hours before planting. At the bottom of the planting pit, pour a bump of earth, put a clematis seedling on it and straighten it, evenly distribute its roots over the bump.
- Cover all the roots, the root collar of the seedling and the stem (if any) up to 5–10 cm with earth, making a depression to prevent water spreading during irrigation.
- If you are planting clematis in the spring, then cover it with earth up to the first internode. Abundantlypour a bucket of water.
- Until autumn, gradually add fertile soil so that the depression is filled up.
When planting clematis in the fall in the spring, you can remove part of the soil from the plants themselves, and add soil until autumn. This should be done in order to facilitate the emergence of shoots, weakened after plant transplantation, to the soil surface.
Landing
Choose a "cozy" spot on your site. There should be no strong wind here. It is advisable to take the place well lit. Clematis belongs to the vines, which means that he will need support. However, do not rush to plant a clematis plant near the wall of the house - the water dripping from the roof is extremely unfavorable for this gentle garden dweller. Retreat at least 30 cm from the walls of the building or fence. Remember that the flowers of the plant will unfold to the south, southeast.
The roots of an adult plant reach 1 m in depth, but they do not like swampy soil. If your site is located in a lowland, in the immediate vicinity of groundwater, you will have to fill in a mound in advance to raise the planting. When the place is chosen, dig a hole 60x60x60 cm. At the bottom, fill in a layer of drainage 10-15 cm thick. For this, broken brick, crushed stone, expanded clay, polystyrene are suitable. Then lay a layer of soil 5 cm thick. Next, fill the hole with nutrient mixture with the addition of 200 g of garden lime.
Now prepare a hole under the seedling clod, 10 cm deep more than the height of the clod itself. At the bottom, form a slide and lower the seedling, gently spreading the roots around it. Fill the remaining depression with soil to the level of the landscape. If the top of the plant loves sunlight, then the roots are shaded. Therefore, it is recommended to plant a cover plant within a radius of 1 m from clematis. Pansies and lobelia work well for this. These flowers will protect the soil from drying out and will not compete with the vine for nutrients, not to mention their aesthetic beauty.
Support
Select and install a vine support immediately after planting. Supports can be homemade - one or three bamboo or walnut rods connected by a pyramid.In garden centers, more decorative models are presented in the form of arches or metal nets in different versions. Place the first shoots on a support by hand, straighten and tie them up. Subsequently, the plants will cling to themselves due to the peculiarities of the structure of their stems.
In the first two years after planting, the shoots will grow slowly. Do not worry, this is due to the fact that at first clematis grows the root system, and only in the third year - the aerial part. But with the beginning of active growth, young branches can add up to 10-15 cm per day, reaching 2-4.5 m per season.
Clematis care includes:
- regular deep watering (at least 1 time per week, and in extreme heat - 2-3 times);
- loosening the soil (if it is not mulched);
- weed removal;
- top dressing (preferably organic) during the growing season - about 2 times a month.
In the first year after planting, clematis seedlings do not need to be fertilized. Further fertilize them in the same way as regular perennial flowers. Top dressing of clematis with "Strawberry Concentrate" showed good results. A suitable top dressing is water in which unsalted meat or fish has been washed.
Every spring, water clematis with milk of lime (dolomite flour, chalk) and a solution containing copper (one tablespoon per bucket of water).
Good results are obtained by dusting the lower part of the vines with wood ash after rain - this prevents clematis shoots from withering during frequent rains, especially on heavy soils. On light soils, wilt of clematis is rarely observed.
Formation
Clematis vines reach the greatest decorativeness at the age of 3-7 years.
After the age of seven, the flowers of clematis begin to shrink due to the lack of fertilizers and water, because in the heat, in the absence of good rains, irrigation water no longer penetrates deep to the roots (they reach a length of 60–70 cm or more). To prevent this from happening, you can dig 3-4 pots with a hole in the bottom around the clematis bush. When watering the plants, the pots are filled with water, which does not spread anywhere and penetrates deeply.
Clematis also suffer from overheating of the soil, and therefore mulch the ground around them with humus or moss. At the base of the vines, plant low-growing plants, for example, "marigolds" -calendula, which will also serve as protection of clematis from nematodes.
You can plant clematis on lawns, then the grass will protect the roots of the vines from the sun and overheating.
Almost all common varieties of clematis climb themselves to the support with the help of twisted or bifurcated leaf antennae, petioles. However, be sure to tie up young clematis once in the spring. To increase the decorativeness of the plant, direct some of the shoots in the right direction, first in the horizontal direction. Directional shoots will bloom below the main body of the plant. But bend the stems of the clematis very carefully, since the young green shoots are very brittle. During a warm evening and night, the shoots lengthen by 5–10 cm or more.
A clematis seedling grows 1-5 shoots over the summer, and in some varieties - up to 30. In the fall, before the onset of frost, cut the stems of the vines.
Wintering
Depending on the variety, clematis winter in different ways. They are divided into three groups: those that do not require cutting off shoots, that require cutting at a height of about 1 meter, and that require cutting at a height of 10-15 cm from the ground. This nuance must be graphically indicated on the package with the plant. Clematis do not freeze down to -6 ° C, in central Russia they require shelter.
- If your variety needs to prune shoots at a height of 1 meter, after pruning, carefully remove them from the support, twist them into a ring and lay them on the base of the stem.
- Sprinkle the plant with sawdust or leaves, cover with a wooden box without a bottom (such as in which fruit is sold in the markets), and on top - with a film, tar paper or roofing felt, pressing down their edges with stones.
- Do not cover the clematis too tightly, otherwise it may overheat.
In the spring, clematis does not show signs of activity for a long time, even if it tolerated the cold well. In this case, many novice gardeners make the mistake of digging up the plant and examining the roots. Liana does not like this very much, she does not tolerate any anxiety. Continue your routine, be sure to feed with urea in May, and be patient. Shoots will certainly appear when the time is right.
Wintering
with proper shelter, clematis bushes can withstand frosts up to 40-45 °, however, the main danger in winter and early spring is not frost, but waterlogging of the soil. In addition, after frequent thaws during the day and night frosts, layers of ice can form above the soil, which can break the roots and destroy the center of tillering.Therefore, it is important to completely exclude the ingress of water in winter to the soil surface and the base of the bush.
They cover the bushes when frosty weather sets in, the air temperature drops to minus 5-7 ″ and the soil begins to freeze. In the middle lane, this falls on November. The bushes of the Zhakman, Vititsella and Integrifolia groups cut into one or two pairs of buds (10-15 cm) or to ground level are covered with dry earth or weathered peat, a mound with a diameter of 60-80 cm is formed above the plant.
Each plant takes about 3-4 buckets. Together with snow, such a shelter will reliably protect the root system of clematis from freezing.
If you need to preserve the lashes in the varieties of the Lanuginoza, Patens and Florida groups, in addition to dry land, the bushes are covered with boards, spruce branches, and on top with pieces of roofing material or sheets of old iron. If the frosts are too strong or there is little snow, it is added to the bushes additionally. In the spring, the shelter is removed gradually, part of the peat is left until the night frosts are gone.
Pruning
is necessary for clematis to obtain long-term and abundant flowering, control flowering times, biological renewal of the bush and harmonious spatial distribution of shoots.
The degree of pruning depends on the difference in the biological properties of clematis from different taxonomic groups.
Depending on the characteristics of pruning and the intensity of flowering, clematis are combined into three groups. According to the new classification, there is no distinction between types of clematis in large-flowered varieties; they are now divided only by the cutting method into three groups:
First group pruningand or group A
- unites clematis, in which flowers are formed on the shoots of the previous year. On the shoots of the current year, flowers sometimes appear in small quantities. This group includes species and varieties of clematis from the former groups of Atragene, Montana, etc., which are grown without pruning (or after flowering, the generative part of the shoot is cut off). If the bush is very dense, then some of the faded, weaker shoots are cut to the base. This contributes to the development of more vital shoots of the current year, which will bloom next year.
Before sheltering for the winter in clematis of group A, only the generative (flowering) part of the shoots of the current year is cut off and weak shoots are completely cut out.
Second trim group or group B
- unites clematis, in which flowers develop both on the shoots of the current year and on last year's shoots. These include the former groups of clematis Lanuginosa, Florida, Patens and some varieties with characteristics similar to these groups. These clematis have early flowering in late May-June on the shoots of the previous year. The flowers are large, often double or semi-double; flowering time is short.
The second, or summer, flowering of clematis occurs on the shoots of the current year, it is abundant - it begins in July and continues until autumn.
To get a long flowering of these clematis, they are pruned in two steps. First, in the summer, the generative (flowering) part of the shoot of the previous year is cut off after flowering; if the bush is very dense, the entire shoot is cut out.
Shoots of the current year are pruned before clematis shelter for the winter.
Depending on the density of the bush or to get early flowering next year, a different degree of pruning is used. Only the generative part of the current year's shoot is removed if they want to achieve early flowering. Medium pruning (up to the first true leaf) and strong (removal of the entire shoot) are used when adjusting the number of shoots and for uniform flowering of group B clematis in the next year.
Third group pruningand or group C
- unites clematis, in which the bulk of flowers are formed on the shoots of the current year (former groups Jackmanii, Viticella and their hybrids). They bloom from July to mid-September; the maximum flowering is observed at the end of July - in August. Pruning this group of clematis is very simple: before sheltering for the winter, cut off all the shoots to the first true leaf (you can leave more buds)or to the bottom.
After the autumn pruning of clematis, they are carried outshelter before wintering.
Clematis of the third pruning group
in the fall, cut the shoots to the first bud, counting from the ground, or, as a last resort, in early spring (but then the bushes will be more difficult to cover for the winter). Cover them lightly before wintering. For a winter shelter, it is enough to overlay the base of the clematis bush with woody leaves, placing spruce paws or "dog" mint under the leaves to protect the shoots from damage by rodents. Cover the top of the shelter with a piece of whole plastic wrap, shading it from the sun. The winter shelter of clematis should be loose, but thick enough.
Clematis have the second and first trimming groups
you can leave some of the shoots, cutting them at a height of 70-100 cm to large ripe buds. If there are no such buds (and this can happen during a cold short summer), then the shoots must be cut to the level of the soil or the lower part of the shoots 20–30 cm long should be left. more often this happens after a cold summer, when they do not have time to ripen.
- For clematis of the second and third pruning groups, cut off the leaves on the remaining vine and lay it on spruce paws or on "dog" mint, or just on the ground. The shoots left in the spring can be used to propagate clematis by layering. Pour dry leaves on top of the shoots, put wooden shields on the leaves.
- To prevent snow shields from falling on the ground, place bricks or any other suitable material under them. Lay a whole plastic wrap on top of the shields.
You can do it differently: put shields on the bricks, lay dry leaves on the shields, and a whole plastic wrap on top of the leaves. - This method will require more leaves, and from the severity of the snow, the leaves are caked, which means that part of the thermal insulation is lost. But on the other hand, with this method of shelter, there are not many mouse nests under the shields. Mice use clematis shoots for nests, and the water rat eats the inside of the shoots.
Temperature
Shoots of clematis are afraid not so much of frost as of wet and cold weather, icing. Therefore, it is important to keep the clematis shoots dry in winter.
But with excessive cover, the shoots can get out.
It is also very important in the spring to remove the shelter from clematis in time.
Never use sawdust to cover clematis - they get wet, freeze, thaw very slowly in spring (because of this, in spring it is impossible to remove the shelter in time), which can lead to damping of plants.
- Next year, on the left and overwintered shoots of clematis, flowers will appear 20-30 days earlier than on the shoots of the current year. And in some varieties, flowers can even be semi-double.
Some clematis (Jackmanii, Viticella) tolerate severe frosts - up to -40C (MA Beskaravaynaya). - But this only applies to the underground part of the plant. The soil temperature rarely drops below critical, and it is always much higher than the air temperature (especially if the ground is covered with at least a thin layer of snow).
- In urban conditions, during thaws, snow melts faster than in fields.
Clematis that are not sheltered for the winter are damaged by sudden changes in temperature and humidity. The least winter-hardy is the root collar of clematis. If an uncovered vine is on the surface, then its bark will crack from frost; during a thaw, moisture gets under the bark, which freezes and expands the cracks even more.
Many varieties and hybrids of clematis in the fall, before the ground freezes, sprouts underground from the root collar, which do not break through to the soil surface until warm spring days. These sprouts can suffer from winter frosts.
Reproduction of clematis
can be done in several ways, the simplest of which are:
- division of bushes;
- spring pinning of shoots;
- reproduction by autumn and summer layering;
Division of bushes
clematis is carried out at the age of no older than 6-7 years. Later, it is very difficult to do this because of the developed powerful root system, which breaks off strongly. Dig up the clematis bushes, free them from the ground and cut them into pieces with a pruner or knife so that each plant has buds on the root collar.
- For breeding clematisautumn layering in October, cut off all the leaves from the shoots, the faded part to a well-developed bud. Tie the shoots neatly into a bundle (you can use a ring, as space permits), put them in the grooves.
- Pour a layer of peat under the tourniquet and on top (peat by its nature is a very moisture-absorbing material, retains moisture for a long time and allows air to pass through well), and then compact the earth and soil, cover the whole plant well.
- Water often and abundantly the next year. After the sprouts appear, mulch the soil surface with humus, moss, peat. By autumn, most of the young plants that have emerged are ready for planting. Only well-developed clematis buds grow.
- Roots are formed throughout the shoot, but the largest number of roots are located under the buds. It is better to dig up plants with a pitchfork - less damage to the roots.
Layers for propagation can be laid in prepared grooves in spring, but then it is more difficult to keep the shoots in winter.
Better to spend in the springpinning shoots of clematis in pots with soil. The essence of this method is that last year's clematis shoots are pinned at the site of the knot into pots prepared in advance and dug into the ground, which are filled with very loose soil with peat. The pots should be buried in the soil below its level so that the water does not spread during watering. Gradually, as the seedling grows, moisture-absorbing soil is poured in the form of a tubercle. By the fall, high-quality clematis seedlings grow from the pinned shoots.
Summer layering
it is most convenient to propagate clematis in a vertical way. To do this, in the spring, put a box without a bottom on a growing plant. As clematis shoots grow, pour light fertile soil into the box until it is almost filled to the top. However, it is always necessary to leave the upper part of the shoot with well-developed two buds uncovered, otherwise the covered young shoots of clematis will stop growing.
Water the soil frequently and abundantly. With good care, by the fall, some of the well-developed clematis will be ready for planting in the ground (the rest require growing, since they have a weak root system). Keep weak plants buried in the basement in winter.
Fascination of numbers
Clematis can be propagated in three ways: by seed, by rooted layering and by dividing the rhizome. The seeds are treated with a rooting stimulant and planted on seedlings. For the first year, you can plant them in the ground for insulation. The seedlings have no peculiarities of care.
- You can propagate clematis by layering. To do this, select a section of the stem with an internode, leave one or two nearby leaves and plant it in a hole, deepening the internode into the ground.
- In the first year, the plant can also be planted under insulation, and the next year, it can be planted in a permanent place.
- The root of an adult, but not older than seven years, clematis can be cut into pieces with a sharp pruner and planted.
As you can see, clematis is not as difficult to grow as many people think. But in their decorativeness, they are superior to many other plants. Abundant flowering will delight you twice a summer, and luscious greenery - a whole season, if you give the liana enough attention and love.
Choosing distribution methods
There are several ways to propagate clematis: by seeds, layering, cuttings and dividing the bush.
Clematis from seeds appear at different times. After sowing the seeds, do not be upset if they do not sprout from you in the same summer. The seeds of some varieties of clematis germinate only in the second and even in the third year, and sometimes even later. It is useful to water such crops in the summer after 2-3 weeks with a weak solution of boric acid (1-2 grams per bucket) and potassium permanganate (2-3 grams per bucket).
When clematis is propagated by layering, a young shoot 20-30 cm long must be bent to the ground and laid in a groove 5-10 cm deep.In the places of internodes, pin the shoot with wire brackets or press with pebbles and cover it all with earth, leaving a free top with several leaves. As the shoot grows, fill in new internodes, leaving only its tip above the soil. Remember to water the soil regularly and abundantly.
Leave the rooted shoot of clematis in place for the winter. And in the spring, cut the lashes between the knots and plant the plants in a permanent place.
Reproduction of clematis by cuttings is also possible. Cuttings with one or two internodes should be cut at the beginning of flowering plants from the middle part of the vine, leaving 2 cm above the node and 3-4 cm below.To accelerate root formation, place the cuttings in an aqueous solution of heteroauxin (50-75 grams for 1 liter of water).
Cuttings
Plant the cuttings of clematis obliquely in boxes or containers in washed sand, peat or a mixture of sand and peat in equal parts. At a temperature of 20-25 degrees, cuttings root better, so spoil the container with a film and put it in a greenhouse or greenhouse. It is very useful to spray the cuttings during the rooting process.
Depending on the variety of clematis and the conditions created, the cuttings take root in a month or two. After that, they need to be transplanted into pots with nutrient soil. If it is too late to plant the seedlings in the ground, keep the plants in a room with a low temperature of + 2-7 degrees during the winter. Water sparingly, but be careful not to dry out the ground. In the spring of next year, clematis seedlings are suitable for planting in a permanent place. Plants from cuttings, rooted in summer, will bloom by the fall of next year.
Fertilization
small-flowered clematis propagate, as a rule,seeds... Large-flowered plants are bred exclusively vegetatively. The easiest way to do this is by dividing the bush. In varieties with a high tillering ability (Anastasia, Anisimova, Jeanne d'Arc, Hagley Hybrid, Madame Baron Villard, Cosmic Melody), the division of the bush is used for rejuvenation, since very dense bushes, even with good care, often lose their decorative effect.
Clematis can be divided both in the fall and in the spring, until the buds have started to grow or have just begun to swell.
However, if in the fall this operation is almost painless for the plants, since the buds are only marked and small, then in the spring time it is necessary to meet the extremely tight deadlines (from the moment the soil thaws to the beginning of growth), since it is easy to damage the rapidly growing shoots. Clematis, divided in spring, will be about 2-3 weeks behind in growth compared to its autumn counterpart. In an adult 5-8-year-old plant that has a sufficient number of shoots, the ground part is cut off, leaving only 2-3 pairs of buds below.
Dig up with a clod of earth
The bush is carefully dug out with a clod of earth, taking care not to damage the long cord-like roots.If the soil is not easily shaken off, the roots are washed with water from a hose. Then with a knife it is divided through the center of the bush into independent plants. They work without haste, carefully, making sure that each section has enough roots and at least one shoot with buds.
However, you can do without digging. On one side of the bush, a trench 50-70 cm deep is torn off, and the bayonet of the shovel is buried in the soil radially to the center of the bush in order to damage as few roots as possible.
At a half-dug bush, shoots with roots are separated with a tool, each of which will become an independent plant. Before planting, the delenki are examined, only healthy ones are used. The roots are pruned and disinfected in a pink solution of potassium permanganate.
Layers
It is quite easy to propagate your favorite variety by layering. There are several techniques. Here is the first one. The bush is sprinkled with peat or humus along the bottom 2-3 pairs of leaves. Within a year or two, the lower nodes of the shoots are overgrown with their own roots. Having removed the poured substrate, the rooted shoots are cut off from the mother plant and planted.
- This method is good because the bush itself is not injured. The second method requires some free space.
- In late summer or autumn, grooves 8-10 cm deep are dug around the bush in the radial direction. Clematis shoots with well-formed buds are removed from the support, laid out in grooves one at a time, pressing them to the ground with staples made of thick wire, and sprinkled with loose nutrient soil.
- The top of the shoot (20 cm) is taken out. You can do the same with a vine rolled around the base of the bush and covered for the winter.
In the spring, when the plant is freed from the shelter, one or more of these lashes are laid in a groove. Layers are regularly watered and fed during the summer. From almost all the covered buds, vertical shoots begin to grow, and rooting occurs at each node.
It is best to separate rooted shoots from the bush in the fall of next year or in the spring of a year later. By this time, each new shoot will have a good root system. From one sprinkled lash in a year or two, you can get up to 10 seedlings that do not need growing, the bush itself does not suffer. Another way of vegetative propagation isgreen cuttings.
Clematis is a beautiful plant belonging to the Buttercup family. It is widespread in subtropical and temperate climates. Often found in forests, near rivers. Gardeners actively use clematis, aka clematis, in landscape design. This flower is especially good for decorating trellises and arbors. The plant has many varieties, distinguished by bright flowering, a variety of shades and shapes. Today we will talk about the types of clematis, planting and caring for them in the open field for beginners who usually do not know where to start growing these flowers on their site.
Botanical description
Clematis is a perennial plant with a varied structure. Lianas are most often found, but there are tree-like dwarf shrubs and grasses. Rhizomes are fibrous or pivotal. Young shoots of plants are covered with smooth green bark. By structure, ribbed and rounded shoots are distinguished. Rarely there is a glandular pile on the surface. The diameter of the shoots is only 25 mm, the length is one meter. Leaves grow along the entire length of the processes. The color of the leaves is often green, but there are varieties with purple leaves.
Clematis usually blooms in spring. Flowers are collected in panicles, scutes or semi-umbrellas, can grow singly. Petals in the corolla are up to 8 pieces, in terry varieties there can be up to 70 of them. Coloring - yellow, white, red, blue, blue. There are streaks or streaks on the surface. Each flower blooms for up to three weeks. A scent of flowers with notes of almonds, jasmine and spices.
Types of clematis
There are more than 300 main types of clematis. All of them are divided into many decorative varieties. Plants are distinguished by the size of the flowers, by the place where the buds appear.
- Clematis Zhakmana. This is a group of varieties with flexible long shoots. The varieties differ in feathery leaves. Flowers can be of any color other than white. The flowers are large, odorless. This group includes varieties: Star of India, Rouge Cardinal.
- Clematis hot. Liana grows up to five meters in height. It has leaves with ovoid lobes. Flowers bloom in June-August. They are white with narrow petals. The buds are paniculate inflorescences. A prominent representative of the group is the Miss Bateman variety, which blooms twice a year.
- Clematis of Manchu. A branchy plant requires good lighting, frost-resistant. Shoots grow up to three meters. Small bright green leaves. In summer, the plant covers many white star-shaped flowers with a delicate aroma.
- Clematis Tangut. The culture reaches three meters in height. Shoots are ribbed. The leaves are feathery, bright green in color. They are sparsely located, the flowers are tulip-shaped, beige or yellow in color.
- Clematis purple. Shoots are covered with delicate foliage. The flowers are large, most often of purple hues. Varieties: Ville de Lyon, Polish Spirit.
- Flowering clematis. Shoots reach three meters in height. The petals are light pink in color. The most popular varieties: Comtesse de Bouchaud, Vivian Pennel, Purpurea Plena Elegance.
Reproduction methods
Cultivation of clematis requires certain knowledge. Clematis reproduces vegetatively and by seeds. Small-flowered, species plants mainly reproduce by seeds. The varieties differ in seed size:
- small seeds germinate in a month or two;
- medium seeds germinate in 20-24 weeks;
- large seeds give irregular shoots after 30-32 weeks.
When is it better to plant clematis seeds in spring? In early spring, small seeds are sown. Larger ones are planted in December. It is recommended to pre-plant seedlings. For this, the planting material is soaked in warm water for 10 days, the water is changed up to five times a day. Then the seeds are planted in a shallow box, where a mixture of garden soil, sand, peat is poured. They are sealed to a landing depth of no more than 10 mm. The box is covered with foil and kept at a temperature of 25 ° C. You regularly need to spray the soil, ventilate the seedlings.
As soon as the seedlings appear, you need to provide the seedlings with diffused bright lighting. When two true leaves appear, the sprouts dive into separate containers. Planting is done in early summer. Clematis is first placed in a garden bed in a shaded area. The distance when planting is 20 cm. The tops of the shoots are pinched. A reliable shelter for the winter is required. In the spring, a transplant is carried out, increasing the distance to half a meter. Two-year-old seedlings can already be replanted.
Reproduction by layering is also effective. This method is used in autumn and summer. Summer layers develop better and faster, but winter worse. The peduncle to the nearest bud should be removed. A groove is made in the ground, where a thick layer of peat is introduced, where the branch is fixed along its entire length. Cover the branch from above with earth and compact the soil. As soon as the cold weather sets in, you need to insulate the bush. In the spring, young shoots appear, the plant will be fully formed by autumn, it will be ready for division. Digging is carried out using a pitchfork.
Perennial bush clematis (6-7 years) are divided into several parts. Old bushes have a developed rhizome that can be easily damaged. The shrub is completely dug up in the spring, freed from the soil, cut with a knife or pruner into pieces. It is necessary that each part has several buds at the root collar.
Clematis can be propagated by cuttings. In summer and spring, semi-lignified or green shoots with two knots are cut. Below they are treated with a growth stimulant. It is best to root in a special greenhouse with high humidity. The temperature should be 18-20 degrees.
When to plant clematis
Planting time, clematis care depends on the type of root system.If cuttings with closed seedlings are planted in a permanent place, this should be done in spring or autumn. Cuttings with an open root system should be planted in the spring, in April-May. It is important not to miss the dates, since the vine has an early growing season.
Planting clematis in the fall has many features, in contrast to the spring planting. The plant should take root before frost. You will need to think about insulating the planting site for the vines for the winter. Dry leaves, lutrasil or other covering material can be used.
General rules for planting clematis
How to plant clematis in spring
Planting clematis in the spring is carried out with a strong burial of seedlings. The root collar is placed 10 cm below the ground level. It is necessary to take into account when planting and other preferences of clematis. Seedlings for planting are purchased in specialized stores. If leaves have already appeared on the purchased seedling, until spring you need to put them on the windowsill, caring for them like an ordinary flower. If there are still no buds on the seedling, it is better to keep the seedlings in the cellar until spring.
They start planting clematis in open ground when the frost has passed. For plants with dormant buds and open roots, it is preferable to plant in April. A well-lit place is selected, but it is also worth considering the planting region: planting in the Urals will differ from planting clematis in the Leningrad region. It is necessary to take into account the variety of clematis, some varieties prefer partial shade.
They dig a large enough planting hole if the soil for clematis is fertile, if the soil is sandy, clayey, the hole should be 50x50. Be sure to put the nutrient mixture into the pit. You can make it from peat, forest land, humus, sand, adding ash and mineral fertilizers there. Ash feeding is especially useful for clematis. If the soil is acidic, fertilize it with dolomite flour or lime.
In the first year after planting, one should not hope for a rapid growth of the shoot. The ground part will develop. The upper part is trimmed, leaving 3 buds on each shoot. It is necessary to cover the shoots from the sun, water more often. When buds appear, they must be removed immediately. After a year, the bush will take root and begin to actively develop.
How to plant clematis in the fall
Autumn planting of clematis should be carried out in September. It is not recommended to plant the plant later. A young seedling needs to take root before the onset of winter. If the seedling was purchased later, it is better not to leave it for the winter in the basement or cellar. Planting and caring for clematis outdoors in autumn and spring is not much different.
Caring for clematis in the fall consists of feeding, watering and autumn pruning. In dry autumn, clematis should be watered regularly. But watering should be moderate, too abundant watering is destructive for plants. It is not recommended to feed clematis in the fall.
Clematis planting and care in the open field
Clematis, due to the variety of colors, types of flowers and abundant flowering, are rightfully considered the kings of lianas. Clematis has many varieties and species, perfectly adapted for growing in a wide variety of climatic conditions. But still, flower growers often do not dare to grow it, although clematis planting and care in the open field does not require excessive efforts, is a worthy decoration of any garden.
Description and origin of clematis
Clematis (Clematis), which in translation from Greek means "climbing plant", in Russia is also called clematis or warthog. According to the classification, clematis can be classified as arboreal: after two or three years, its stem becomes fibrous, acquires rigidity, although there are also herbaceous varieties of this interesting plant.
In our latitudes, clematis are most widespread, shedding their foliage at the end of the growing season - with the onset of autumn cold weather. But in the more southern regions, evergreen varieties also grow.
The growing season for clematis begins when the soil warms up to + 4-6 ° C (April). If the liana blooms on the shoots of the second year, then the flowers appear in early summer - late May or early June.
Simple clematis bloom for a week, terry - up to three weeks. The color of clematis flowers, their structure and the shape of the petals are very diverse, depending on the species or variety.
The intensity of the color of the flowers largely depends on the illumination: the thicker the shadow, the paler the flowers. However, too bright light for extended periods of time also causes the flowers to lose their brightness.
Until the 16th century, clematis was cultivated as an ornamental plant in Japan, then it settled in Europe, and it came to the greenhouse of Russia in the 19th century. In the last century, as a result of the efforts of breeders, clematis left closed premises and began to be grown outdoors.
Types and varieties of clematis, photo
The classification of clematis today is based on its characteristics such as flower size, flowering time, place of origin. An important classification feature is the method of pruning clematis.
Today, large-flowered groups are widespread among gardeners: Vititsella, Zhakmana, Patens, Lanugizona, Florida, Integrifolia. They are successfully used for vertical landscaping - walls or fences, uprights and supports.
Small-flowered varieties are actively used in landscape design: mountain, burning, paniculate, eastern serrate-leaved clematis. Since they have small flowers, they are not used as often as large-flowered ones. Although they have a number of advantages, and above all it is their good winter hardiness.
K. Zhakman is a stable large-flowered hybrid that grows up to 4 meters per season and gives about a dozen additional shoots. It was this hybrid that became the basis of numerous species grown in modern flower beds.
A distinctive feature of K. Zhakman - large, up to 12-15 centimeters flowers, blue, violet and purple tones, devoid of aroma. Abundant flowering on young shoots occurs throughout the summer.
They require moist soils with good drainage, good lighting, and places inaccessible to the wind. Before winter, they are cut almost to the ground level, and in the case of a shallow planting, 3-4 buds are left. Lianas of this group are distinguished by their unpretentiousness.
All K. Zhakman are distinguished by high resistance to diseases, frost resistance. Even in the North-West region, which is unfavorable for floriculture, these clematis grow well and quickly, bloom actively. For a safe wintering of K. Zhakman, the vines of this group are subject to pruning in late autumn.
Another name for clematis belonging to this group is woolly. This includes shrub vines up to 2.5 meters high. Flowering occurs on the shoots of the previous season and on young ones. They are called woolly because the lower surface of their leaves up to 12 centimeters in size seems to be covered with wool.
Flowers of K. Lanugizon are usually white or purple in color, their pedicels are also woolly, the diameter of the flowers is 12-20 centimeters.
A feature of caring for K. Lanugizon is pruning, which is carried out in the fall at a level of one meter from the ground. After pruning, the branches are insulated with peat or sawdust to ensure normal wintering.
Curly liana, reaching 5-6 meters, leaves are often feathery, up to 6 centimeters long.
Blossoms K. Viticella flowers up to 12 centimeters in diameter, from early June to September. On an adult liana, there are about a hundred flowers at the same time, painted in red-purple, lilac and blue-violet tones.
These clematis bloom on the shoots of the current year, so they are completely pruned before winter.
This group includes shrub vines, spreading, up to 3.5 meters high. The flowers are star-shaped, single, large - up to 15 centimeters, among which there are double ones.Color palette - from light to rich dark blue, violet, purple tones.
Flowering lasts from spring to late autumn. K. Patens is shortened a little in the fall, the liana itself is covered.
Shrub vines, growing up to 3 meters in length, with flowers of 8-12 centimeters. The color is varied, more often in light colors. Florida blooms from the beginning of summer on last year's shoots, from August - on young ones.
Podzimnyaya pruning is carried out 1-1.5 meters, after which the liana takes shelter from the cold.
This group was bred by the staff of the Nikitsky Botanical Garden. These are relatively low semi-shrubs - up to one and a half meters high, they often do not need support. The flowers are drooping, about 12 centimeters in size, usually bell-shaped.
Planting clematis
Seat selection
Since clematis grow in one place for up to twenty years, the choice of a planting site and its preparation must be taken very seriously. First of all, the place should be well lit, protected from strong and northerly winds.
Important! In southern regions, clematis should be planted in slightly shaded areas. Landing near the walls of buildings and structures is not recommended.
Clematis does not like waterlogged soils, therefore, planting it in lowlands or meta, where water cannot accumulate after rains or melting snow, the roots very quickly begin to rot. If the groundwater is close (up to a meter), a 20 cm drainage layer must be provided. Often, in addition to the drainage layer, an artificial elevation is constructed.
Important! If clematis are planted to decorate the walls of buildings, you need to arrange them so that water does not drain from the roof onto them.
Landing hole sizes:
- light soils - 50 x 50 x 50 cm;
- heavy soils - 70 x 70 x 70 cm.
Sometimes, depending on the volume of the seedling roots, the holes have to be made wider.
Soil and planting rules
Clematis need soil that is light, breathable, fertilized, slightly alkaline or neutral. In the case of heavy soils, the soil dug out from the planting hole is mixed with sand, rotted compost, etc.
For backfilling the seedlings, a nutrient mixture is prepared:
- peat - 1 part;
- humus (compost) - 2 parts;
- garden (garden) land - 2 parts;
- sand - 1 part.
The following are immediately added to the soil mixture:
- Ash - 2 cups.
- Mineral fertilizers - 100 grams.
- Dolomite flour - 150 grams.
The mixture prepared in this way meets all the requirements of clematis and is suitable for filling holes dug on both loam and sandy loam.
A mound is made from this mixture in the planting hole, the roots of the seedling are distributed along its slopes, covered with part of the mixture, watered - and so gradually until the hole is filled.
Important! The tillering node must be deepened by at least 5-8 centimeters for young seedlings and 8-10 centimeters for older vines.
The tillering nodes are covered with well-washed river sand, adding charcoal and ash to it. The sand will not retain water, which will protect this vulnerable spot of clematis from decay.
Deepening the tillering nodes protects the root system of clematis from both winter frosts and summer overheating.
After filling the planting hole with nutritious soil mixture, clematis must be watered well. This is done through a special hole, which is dug out at a distance of 15-20 centimeters from the seedling itself.
Then the seedlings are covered with peat or humus and shaded from direct sunlight.
Important! A support for clematis is installed during planting, so as not to damage its roots later.
Planting time for clematis
It is believed that clematis can be planted during their entire growing season - from spring to autumn. At the same time, in the summer, those plants that were contained in containers are usually planted - they are simply transferred together with an earthen clod into a prepared planting pit.
But there are several important points that determine the optimal timing of planting seedlings:
- Closed-root clematis, that is, purchased or grown in containers, are planted throughout the warm season. Such seedlings, acquired long before the onset of spring, can be kept in a greenhouse or at home, on a windowsill.
- Clematis with an open root system, acquired in late winter - early spring, are planted in April-May. Planting must be done before the kidneys wake up. Otherwise, it is better to postpone this event until the time when the threat of return frosts has passed.
- Autumn planting (also called late summer) is suitable in any case. It is important here that the seedlings have time to firmly take root before the onset of cold weather.
Planting clematis in the fall and subsequent care
The optimal timing of the autumn planting of clematis seedlings is from mid-August to the end of September, more specifically, the timing is determined by climatic conditions. The plant needs at least a month to root well, in this case it will survive the winter without loss. Seedlings purchased at a later time are best left for wintering in a cool, dark room.
The rules for autumn planting completely coincide with the general rules for planting clematis.
Important! Autumn planting requires the removal of almost the entire aerial part of the plant: two or three buds remain on the liana.
During the fall, before the onset of cold weather, caring for clematis and their seedlings is simple:
- Moderate watering during periods when there is no rain for 5 days or more. Abundant watering in the cool season is very harmful for clematis.
- Top dressing of clematis at this time of the year is usually not done, unless the varietal characteristics of the vines require it. In warm regions, you can carry out autumn feeding by adding superphosphate or potassium sulfate.
- Loosening the soil and removing weeds.
Preparing clematis for winter
An integral part of clematis autumn care is preparing them for winter. This is a special process that not only consists of several stages, but also differs for different types of plants.
Pruning clematis depends on their variety and type:
- Clematis, which form flowers on last year's shoots. Trimming is more of a formative nature. In this case, the main goal is to protect young shoots from frost. Non-resistant varieties must be prepared and then securely covered for the winter.
- Clematis, the formation of flowers in which occurs on the shoots of the past and current seasons. Pruning is carried out for about a third of the length of the shoots, after which the vines are removed from the supports and covered.
- Clematis blooming on the shoots of the current year are cut to 20-30 centimeters above ground level so that 2 - maximum 3 pairs of buds remain.
To prevent infection of clematis with fungal diseases, they are sprayed with foundationol, powdered with wood ash. Then, the bushes are hilled with humus, compost or weathered peat about 12-15 centimeters in height.
Shelter for the winter is carried out with the onset of stable light frosts - up to -5-7˚С. Preference should be given to the air-dry method, so as not to cause wetting, arguing or decay of the roots.
Important! In areas with warm winters or frequent thaws, the shelter should be arranged in such a way that during the warming period, clematis can be ventilated to avoid overheating.
The role of insulation for clematis can be played by dry foliage, preferably birch or oak, spruce branches, crushed foam. Since almost all covering materials during the winter are usually caked under the snow, the vines are usually also protected by frame structures - wooden boxes, shields, cut branches or vines.
It is also necessary to protect the plants from mice, either by spreading the poison under the vines or repelling agents.
Frame structures are usually used to shelter species that have minimal clipping. At the same time, it is better to remove the vines from the supports, so it is easier to cover them, and their safety will be higher.
As for those clematis that are completely cut off before winter, they are first covered with dry leaves or spruce branches, then a wooden or mesh plastic box is installed, which are then covered with a waterproof film and covered with earth or peat, if the winter is little or snowless, but frosty.
You can also cover those clematis in which the shoots are shortened. They are removed from the support, placed in rings around the base of the bush on a pillow made of spruce branches, brushwood or foam. Then the whole plant is covered in the same way as in the previous case.
For group plantings of clematis, you can use a common shelter, which is built from shields installed on supports and film materials.
Instead of foliage or other materials for clematis, dry stems of marigold (tagetes), coriander (cilantro), tarragon or pyrethrum are often used. In addition to the fact that they serve as a good shelter, they protect the vines from wintering many pests on them, and also scare off rodents with their smell.
Interesting! If there is a suspicion that clematis did not survive the winter, you should not immediately uproot them. Most often, they are restored, forming new shoots from the roots. True, this usually happens within two to three years after an unsuccessful wintering.
Left affected clematis for the winter should be covered according to general rules.
Planting clematis in open ground in spring and care
The most successful period for planting clematis seedlings in spring is the period from late April to May.
Important! Seedlings with buds that have not yet swollen are subject to planting in open ground. As the buds develop, planting becomes more and more risky from the point of view of the upcoming wintering, the normal rhythm of development is disrupted in clematis, they take root worse, and they may not endure the winter.
Caring for clematis planted in spring consists of watering, fertilizing, loosening and weeding from weeds.
Moderate watering is carried out weekly, in especially hot and dry periods, the frequency of watering is increased to 2 or 3 times a week. Dolomite flour or chalk, as well as copper-containing preparations, are usually added to water for spring irrigation.
In the first year after planting, there is no need to feed clematis, but starting from the second year, regular application of organic matter is required, alternating with mineral fertilizers.
In the first year of growth in clematis, it is necessary to remove all buds that form so that the plant forms a strong root system. In the future, this need disappears, it is replaced by stimulating pruning.
Important! The root system of clematis does not tolerate overheating, therefore it is necessary to protect it from exposure to sunlight.
The best way to protect is planting flowering annuals, various ground cover plants. You can also mulch the root zone with humus or moss.
Also, the garter of vines to the supports belongs to the care measures. Walls, fences - all those parts of buildings and structures for the decoration of which clematis are planted can serve as a support.
Supports can also be specially designed, that is, elements of landscape design - arches, pergolas, screens made of solid wood or metal.
Often they try to use stretched ropes as a support, however, this is a bad decision, and this method is suitable only for those types of clematis that bloom on the shoots of the current year.
Supports for clematis can also be natural - the trunks of ornamental shrubs such as lilac, or weigela, or jasmine.
Pruning
Correctly in the right time, the pruning of clematis guarantees abundant flowering and helps to rejuvenate the vines.
In those clematis that bloom on the shoots of the previous year, pruning is carried out at the end of flowering, while the generative parts of the shoots, as well as those branches that bloomed especially abundantly, and weak, poorly developed, are subject to removal.
For clematis blooming on all shoots, there are two pruning steps.In the summertime, the flowering branches of the last season are removed. The second pruning is carried out already when preparing the plant for winter. The same vines that bloom on the shoots of the current year are not pruned in summer.
Transplant of clematis
Transplanting clematis is even more responsible than planting them. They do not tolerate this process very well. This is especially true for those varieties and species that have a pivotal root system. It is best, of course, not to injure the vines, but in some situations the transplant is simply vital:
- the wrong place for clematis was chosen;
- there are signs of wilting (wilt);
- it is necessary to divide the bush.
Also, the need for a transplant arises when redeveloping a personal plot.
When transplanting a plant, it is necessary to carefully examine its roots before planting. Those parts that have mechanical damage, swelling, signs of rot are removed, the cuts are processed with crushed charcoal or brilliant green.
Since clematis grow in one place for a very long time, their root system becomes quite large - about one and a half meters in diameter, and sometimes more. Therefore, the pit for planting the transplanted plant needs to be dug more than usual, by 20 centimeters on each side.
A couple of buckets of compost or humus, one and a half buckets of peat and sand, as well as 100-200 grams of lime, ash and fertilizers - potash and superphosphate - are added to the soil that was dug out when digging a hole.
Important! If the soil is too light (sandy loam), more compost or humus is added.
A 20-centimeter drainage layer is laid at the bottom of the pit, then it is filled with the prepared soil mixture about half, the support is strengthened, and the transplanted plant is placed. Its roots are carefully straightened and the pit is covered with soil mixture.
Transplanting is usually done in spring or autumn, at the same time as planting. The rules for caring for transplanted clematis do not differ from caring for seedlings. Watch the video material about clematis transplantation.
2>Top dressing of clematis
Since clematis, as a rule, blooms profusely and for a long time, and many varieties also renew their green part every year, it requires an increased amount of nutrients.
Top dressing is usually applied four times during the growing season, in small portions, so as not to get too high a concentration of fertilizers in the soil. Before applying, their plants are well watered.
When and what clematis is fed with depends on the growing season.
The first top dressing of the season, spring, is carried out when the shoots grow. It is best at this time to carry out foliar feeding with synthetic urea - 3 grams per bucket of water. Spraying is carried out either in the evening hours, or in cloudy, but not rainy, weather.
Two to three weeks after the first feeding, potassium nitrate is added - 25 grams per 10 liters of water.
At the end of summer, clematis are fed again with potassium sulfate, and in September, phosphorus fertilizers are applied, for example, bone meal, on which the development of roots and shoots, as well as the condition of the leaves, depends, are usually introduced in autumn. Bone meal is usually added at the rate of 200 grams per square meter.
If, when planting clematis, all the necessary fertilizers were applied, then in the first year he will not need additional fertilizing.
In total, clematis is fed 4 times during the season, alternating organic fertilizers with mineral fertilizers.
Important! Fresh manure must not be used!
Breeding methods for clematis
In total, there are five ways to breed clematis:
Seed propagation
The sowing time and, accordingly, the seed germination time is influenced by their size. Clematis seeds are divided into three groups by size:
- small - from 1.5 x 3 to 3 x 5 mm;
- medium - from 3 x 5 to 5 x 6 mm;
- large - from 5 x 6 to 10 x 12 mm.
Small seeds of clematis emerge in two weeks to three months. They are suitable for direct planting into the ground.Germination of small seeds lasts for 4 years.
Medium seeds germinate in one and a half to six months. It is better to germinate such seeds in indoor conditions - greenhouses, greenhouses, etc. Seed germination lasts for three years.
Large seeds germinate for a long time, more than six months, sometimes more than a year. Although they retain their germination for four years, it is preferable to propagate varieties of large-seeded clematis in other ways.
By the way, for the germination of large and medium-sized seeds, many additional measures are required: stratification, bubbling, etc. Although these measures reduce the time for the appearance of the first seedlings, many gardeners prefer other methods of reproduction.
Reproduction by layering
It is considered the easiest way to propagate clematis from early spring to autumn. The method is not expensive and does not require additional devices.
Layers are horizontal, vertical and airy.
Horizontal layering - an intact healthy shoot with several buds is selected and placed in a prepared groove, the depth of which should be 7-8 centimeters. So that the elastic stem does not rise up, it is pressed with metal pins, and then covered with earth, leaving the apical part of the shoot unsprayed. Layers will need regular watering, loosening and weeding. For the next season, they can be separated from the mother bush and planted.
Vertical layers are formed by digging in the first or second bud on the shoot. The rest will grow upward. This method is good for expanding a young bush, in this case, the grown new bushes are not dug out, but left in place.
Air layering is a more troublesome method. To obtain an air layer on the shoot, a large node with well-developed buds is chosen. An incision is made near such a node to the middle of the shoot. This incision is generously treated with growth stimulants and wrapped in a damp moss pillow.
The upper part of the shoot is removed, and the rest is wrapped in plastic wrap and tied to a support. The cuttings are considered ready for independent development in the soil when their roots grow through the moss. The cuttings are cut off and planted.
Propagation by cuttings
A more massive way of breeding clematis is green cuttings. Cuttings can be cut throughout the growing season, but the most productive are those that are cut in the spring, during the period when the vine forms buds.
Cuttings of hybrid varieties of clematis can be harvested until July inclusive, and small-flowered ones - until mid-August.
The best time of day for cutting cuttings is early morning or light twilight, as well as cloudy days - this way the shoots will be protected from possible moisture deficiency.
Shoots for cuttings are cut over the first or second true leaf. The best quality cuttings are obtained from the middle part of the clematis shoot: the vines on the upper part have few buds, or they are completely absent, and the lower part is usually lignified, and therefore takes root worse.
Important! Cut off no more than a third of the total number of shoots on the bush for cuttings.
To get a good cutting, it is enough to have one bud on it. Cut them with a sharp knife. The lower cut is made oblique, it should be 5-6 centimeters below the kidney, the upper cut is straight, at a distance of 2 centimeters from the kidney.
Then the cuttings are immersed in a growth stimulant solution overnight (10-12 hours), after which they are planted either in specially prepared places - hotbeds, greenhouses, or in pots.
The soil for rooting cuttings should be light, breathable, moisture-retaining. The best materials for soil are a mixture of sand or humus with peat, as well as coconut fiber or perlite.
For better rooting, cuttings need diffused light, so you need to take care that the cuttings are not in direct bright sun.It is recommended to whiten the glass in greenhouses, or use thin white fabrics to diffuse light.
The cuttings are planted at a distance of 5-6 centimeters from each other, while deepening the bud by 1 centimeter. This measure will prevent it from drying out.
Conditions of keeping cuttings during their rooting: temperature 18-22˚С; high air humidity; regular watering and spraying.
With daily watering for the first 4-5 weeks, you need to spray the cuttings once or twice a day. However, in extreme heat, this should be done more often - up to five times a day.
After a month, watering the cuttings is reduced to 2 or 3 times a week. Rooting usually takes place within one and a half to two months, but they are planted in open ground for growing in the spring, leaving them for the winter in a cuttings.
After the season spent in the "school" growing in the fall, the cuttings are planted in a permanent place.
Many gardeners also successfully use lignified cuttings, which are cut after the autumn pruning of clematis.
Important! For better rooting of woody cuttings of rare and valuable varieties of clematis, they are carefully split into two longitudinal halves. Such cuttings take root more easily.
You can also root cuttings in water. This method is well applicable for large-flowered vines. They are also cut at the budding stage, placed in a vessel so that only the ends of the cuttings are in the water.
The vessel should be opaque and placed in a warm, shaded place. Sometimes they even drop it in a suitable area in the garden, carefully monitoring the water level.
Roots are formed within 8-10 weeks. When they grow 3-5 centimeters, they are transplanted into cuttings, providing them with constant temperature and high humidity.
Reproduction by grafting
A very rare and time-consuming method of propagating clematis, used when there are only one or two suitable cuttings available. As a rootstock, not shoots of a plant are often used, but its roots, or rather, segments of roots.
In addition, vaccination requires special knowledge and skills, which is why it has been encountered as a method of reproduction in recent years very rarely.
Features of growing clematis in the Urals
Observing all the basic rules of planting and care, clematis are also grown in areas with difficult climatic and biological conditions, which include the Urals - long frosty winters, frequent strong winds, and the predominance of acidic soils. All recommendations for growing clematis in the Ural region briefly look like this:
- Clematis varieties blooming on the shoots of the current year are most suitable for successful cultivation and full flowering. However, if you strictly follow all the rules for preparing clematis for winter and reliably and correctly cover them in the cold, almost all varieties will develop and bloom well.
- It is best to plant clematis in open ground in spring: only in this case, before the onset of cold weather, the plants will have time to take root well.
- When adding humus as a top dressing, it is necessary to add chalk, this will reduce the acidity of the soil.
Clematis for beginners
Energetic, hardy, handsome clematis grows easily and quickly, and do not cause any particular difficulties when growing. However, for those who for the first time are going to plant beautifully flowering vines in their garden, you need to take into account a few tips.
The easiest varieties to grow are considered to be varieties that do not need to be covered for the winter, but it will be enough to cut them to ground level. The International Clematis Society has even compiled a list of varieties recommended for beginners.
The list includes varieties of clematis, which are highly reliable and unpretentious. Among them are small- and large-flowered varieties, with different flowering periods, a wide range of colors.
Pests of clematis
Nematodes. Get on plants from weeds or from contaminated soil. Leaves affected by nematodes dry up and die off pretty soon.The worms living in the stems cause curvature of the shoots, a sharp deterioration in growth. Fitoverm is used as an effective means of control.
As a prevention of the appearance of nematodes, it is necessary to carefully examine the roots of the seedlings before planting. If they are largely "seeded" with larvae, it is better to refuse planting.
It is also necessary to regularly remove weeds and loosen the soil. Planting natural insecticides that repel these worms will be a good protection against nematodes: marigolds (tagetes) or calendula, garlic or aromatic garden herbs.
End moth and moth butterfly. They lay eggs on green parts of plants, from which caterpillars then feed on leaves.
To combat and prevent them, regular spraying with insecticides is required, and it is also often necessary to manually collect the caterpillars and then destroy them. It's a good idea to involve birds in this work. So that they willingly nest in the garden, the necessary conditions are created for them: feeders, drinkers.
Beet aphids settle on the underside of vine leaves, sucking the juices out of them. To combat it, use any insecticides, including those from folk remedies.
The spider mite causes the leaves, shoots, buds to dry out, the plant becomes covered with cobwebs. Good results in the fight against this pest are given by Actellik, as well as an infusion of garlic.
Slugs and snails, willingly eating leaves and young shoots of clematis. They are usually removed by hand, or traps are arranged for them.
Diseases of clematis and their treatment
Diseases of clematis can be divided into two large groups: fungal and viral.
Wilt (wilt) caused by clogging of the vessels of the root system with fungal spores. Plants are usually exposed to this disease in early spring if the winter was warm. Also, the reasons may be stagnant water, excessive shading.
For treatment, remove all the affected parts of clematis and spill it well with a solution of foundationol or copper sulfate. As a preventive measure, plants are usually watered with medicinal preparations in the spring, as well as top dressing and weeds are weeded on time.
Gray rot, manifested by brown spots on stems and leaves. Most often, plants are affected by it in rainy years, as well as with poor ventilation of the stems with excessive moisture. As a prophylaxis and treatment, clematis is periodically treated with fungicides.
Ascochitosis, or leaf spot, is brown spots with clear edges, causing drying and brittleness of the leaves. This disrupts the normal process of photosynthesis, which negatively affects the development of the vine.
For treatment, they are treated with copper sulfate or other copper-containing fungicide.
Powdery mildew usually infects plants towards the end of summer, when the days are still hot and the nights are colder. As a preventive measure, plants are treated with solutions of copper-containing preparations with the addition of soap or a solution of soda ash.
Rust - red "pads" on the surface of the leaves, containing spores. During treatment, the affected leaves are removed, the liana itself is subjected to treatment with Bordeaux liquid.
Alternaria usually affects vines in late August - September, causing leaf death and shoot necrosis. As a means of control, any preparations containing copper are used.
Septoria, which disrupts photosynthesis, manifests itself in gray spots with a reddish border on the leaves. For treatment, copper sulfate or Bordeaux liquid is used.
Most often, clematis are affected by yellow mosaic of leaves. This is due to infection with viruses carried by sucking insects. Unfortunately, at the moment there is no effective treatment for this disease, so the affected plants have to be removed.
If hosts, peonies, delphiniums or bulbous plants are planted nearby, the risk of mosaic infection increases.
Important! Compliance with the regimes of watering and fertilizing, as well as all melted agricultural techniques of clematis, minimizes all risks of infection with fungal and viral diseases.
Possible growing problems
Stopping growth. It usually happens in the first year, in the month of June. By this time, the young plant grows up to 20 centimeters. This is usually due to impaired care. To help the liana start growing again, they carry out 2- or 3-fold feeding with nitrogen fertilizers in combination with complex mineral fertilizers.
Drying of the tops, twisting them on young shoots. This happens either with insufficient watering, or with the appearance of aphids. If there is a lack of moisture, it is necessary to normalize watering. If the problem is related to the appearance of pests, it is necessary to spray the clematis several times with insecticides or infusions of garlic or hot pepper.
Shrinking flowers. This usually happens when clematis reaches 5-6 years of age, and more often in large-flowered varieties. The reason is lack of moisture. The roots of clematis go very deep into the soil, and often during watering, the required amount does not reach the roots.
It is often easy to fix the situation by digging plastic bottles at the soil level (with the neck down) at a distance of 40-45 centimeters from the base of the vine. If watering and feeding is done through these bottles, there is a complete guarantee that the plant will receive everything it needs - both moisture and nutrients - in the right amount.
Delayed development. This manifests itself in unsatisfactory flowering - rare, scarce, as well as a small increase in shoots. The reason lies in the initially incorrect fit and insufficient penetration. You can slightly correct the situation by adding fresh soil up to 10 centimeters. However, it would be best to transplant it according to all the rules and to the required depth.
Clematis in landscape design
More than two thousand varieties of clematis reveal wide possibilities of using it in landscape design:
- A hedge that distracts the attention of outsiders from what is happening behind it.
- Decoration of gazebos or arches that protect from the sultry sun.
- Alpine slides decoration, herbaceous varieties are perfect here.
- Spectacular vines perfectly decorate the trunks of old trees.
- Creating a background for flower beds.
Several varieties and colors of clematis planted together will create a magnificent composition that blooms from early to late summer.
Beautifully blooming bright clematis will hide from the eyes the walls of outbuildings and fences that are far from perfect, and can also serve as a screen separating the various zones of the personal plot.
Important! The shade that clematis gives contributes to the appearance of dampness, so it is undesirable to decorate the northern walls with them.
Clematis in combination with other plants
The most "royal" combination of clematis with garden flowers is its neighborhood with a rose. In England, their joint growth has already become a tradition. The neighborhood of clematis with a climbing rose, which serves as an excellent support for a vine, is especially successful.
Important! A climbing rose should be at least 3-4 years old to become a good support for clematis. In addition, by this age, she will have developed enough so as not to suffer from her neighbor and to withstand his weight.
Since the rules for the care and maintenance of roses and clematis are quite similar, vines can be given the opportunity to grow with a carpet creeping between the bushes. At the same time, if you pick up varieties of roses and clematis that bloom at different times, the flower garden will always look extremely impressive.
When planting these wonderful plants next to them, the following rules are applied:
- roses must be well adapted in place;
- the root system of clematis must be strengthened before replanting to the rose;
- if the plants are planted at the same time, a partition must be installed between them in the ground;
- the height and volume of the bushes must match each other;
- clematis and roses should not cover each other from the sun;
- when replanting to roses, clematis seedlings are slightly tilted towards the center of the rose bush;
- small-flowered clematis will look most impressive next to roses.
In addition to roses, clematis coexist well with many other garden flowers. Such a neighborhood is especially useful in that it shades the roots of the vines, sensitive to overheating. At the same time, annual and perennials with a superficial root system are selected for joint plantings: marigolds, calendula, subulate phlox, geraniums, astilbe, as well as irises.
Shrubs can also become neighbors of clematis: chubushnik, barberry, acacia, some conifers. They will look great against the background of ivy or grapes.
Final part
Elegant clematis, which have become extremely popular in recent years, will decorate any garden or flower garden, if their planting, and also the subsequent care in the open field, will be done according to all the rules. A bit of a hassle, but long-term abundant flowering will delight even the most critical gardeners.
Video advice from a specialist in the cultivation of clematis
Quoted1>> Materials:
Clematis, or as they are also called clematis, always attract the eye.
This plant allows you to implement various landscape solutions on the site.
Although this vine has gained the fame of a demanding and painful plant, in fact, growing clematis does not require huge efforts from the grower.
To do this, you just need to choose a suitable variety and plant bushes, taking into account the peculiarities of agricultural technology.
When buying seedlings, pay attention to the following signs:
• the roots of plants should be healthy in appearance, elastic, even (if they have swellings, then they are affected by root gall nematodes;
• seedlings must have at least three shoots with buds;
• it is necessary to acquire clematis no earlier than mid-September;
• the best age for seedlings is 2 years. Container plants are transplanted in spring and fall. Annuals dug directly from the ground can be taken directly from private florists.
When choosing clematis, you must take into account the climatic conditions of your region and the varietal characteristics of the plant. The easiest to care for are varieties with purple flowers. More whimsical vines with flowers of red shades. The most demanding are the white clematis. Some species require winter shelter and pruning.
For central Russia, those varieties are suitable that do not need shelter and bloom on the shoots of the current year. For beginner growers, clematis blooming on the shoots of last year (the so-called princes) are suitable for growing: they do not need to be cut and covered for the winter. Although their flowers are smaller and more modest than those of large-flowered ones, they bloom early and profusely even in partial shade. Among them, such varieties as Blue Bird, Maidwell Hall, Memm, Rosie O'Grady, Pink, Flamingo are popular.
Among the clematis that form flowers on new shoots, the vines of the Zhakman, Viticela, Integrifolia groups are easy to grow (varieties Avangard, Purpurea Plena Elegans, Lemon Dream, Markham's Pink, Stolwijk Gold, Comtesse de Bouchaud, Purple Dream, Stasik, Hagley Hybrid, Rouge Cardinal ).
Experienced gardeners can take up the cultivation of clematis of the Florida, Patens, Laginuza groups, which include the most beautiful varieties. They bloom twice a season: in May-June on last year's shoots, in July-August on new stems. The second bloom will be weaker than the first. The most famous varieties: President, Multi Blu, Fair Rosamond, Nadezhda, Joan Picton, Ballerina, Jeanne d'Arc, Helly Moser.
Choosing a landing site. For growing clematis, a sunny area, sheltered from the winds, with fertile loose soil is best suited. If you want to plant these vines near the wall of the house, then the distance from it to the bush should be at least 70 cm. Clematis does not tolerate overheating of the roots, so you need to plant small plants in front of the bushes to shade the root zone. It is better if it is calendula, parsley, marigolds that repel the nematode.
Clematis needs enough sunlight. Therefore, it is better to place rows with bushes from east to west, leaving at least 0.7 m between them. On the support, the shoots are positioned so as to observe the maximum illumination of the leaves.
For varieties of clematis with solid or double flowers (Lady Betti Belfor, Niobe, Westerplatte, Rouze Cardinal, Rosemur), an open area is preferable. Two-color varieties (Dr. Ruppel, Hania, Hally Moser, Nadezhda, Minister) need a light partial shade, which will add richness to the color.
The soil. Clematis grow well in fertilized and drained soil with a slightly alkaline reaction. The land under the bushes must be loosened after watering. Mulching keeps soil moisture longer. Humus is used as mulch.
Planting dates depend on the region where clematis is grown. In the middle zone of the Russian Federation, clematis is planted starting from the end of April. In the southern regions, they are planted in September - early October. If the autumn planting fails, then the purchased seedling is stored in a cool room with a temperature of +5 oC, sprinkling the roots with wet sawdust and sand.
Clematis is grown vegetatively (layering, dividing the bush, grafting, grafting) and seeds.
When propagating by layering, the shoots are bent to the ground, laid in a shallow (up to 10 cm deep) dug trench, pinned with metal hooks or simply pressed down with stones and sprinkled with soil. For the winter, they are covered with spruce branches, sawdust. In the spring, such shoots in the places where they are pinned must be watered. As soon as new shoots appear, the surface around them is mulched with peat or humus. In autumn, young rooted plants are separated from each other and transplanted to a permanent place. This operation can be done directly into pots dug into the ground below the surface level.
By dividing the bush, you can propagate plants no older than 6 years, while the root system lends itself to this operation. In addition, the delenki of old bushes take root worse. The bush is dug up, the roots are cleaned of the ground and cut into pieces with a pruning shears so that each of them has buds on the root collar. The planted plants bloom in the same year.
Reproduction of clematis by dividing the bush and layering
Cutting is the simplest and most popular breeding method for many gardeners. It is better to take cuttings from the middle part of the shoot before the plant begins to bloom. The lower cut is made oblique at a distance of 4-6 cm from the knot, the upper one - even, 2 cm higher from the knot. The resulting cuttings are processed in a root formation stimulator (root, heteroauxin) and planted in a greenhouse, a greenhouse in a mixture of peat and sand. In this case, the node is buried in the soil by 1 cm. Water the cuttings every day, and after rooting (30-60 days), watering is reduced to 1-2 times a week. For the winter, they are covered with peat or sawdust. In the fall of next year, the seedlings are transferred to a permanent place.
Some growers root the cuttings in a jar of water. The vessel is placed in a warm place, protected from direct sunlight, only the tips of the cuttings should be in the water. Roots are formed in 1-2 months.
Fresh clematis seeds germinate best. However, with proper storage (at a temperature of + 18-23 ° C in paper bags), the seed material remains viable for four years. Large seeds (groups of Durand, Zhakman) are sown immediately after harvesting in autumn, medium (whole-leaved, Manchurian, Douglas) - in January, small (clematis tangut, grape-leaved) - in March-April.
To accelerate germination, the seeds are soaked for 10 days in water, changing it 4-5 times daily. Then the seed is laid out in containers with a wet substrate, sprinkled with sand on top and covered with glass. The germination temperature should be + 25-30 oC. When seedlings appear, they are provided with diffused lighting. A pick into individual pots is carried out when the first pair of true leaves appears. Seedlings are planted in open ground in May. Leave 15-20 cm between the plants. To stimulate branching, the seedlings must be pinched. In autumn, young plants are covered, and in spring they are transplanted at intervals of 0.5 m, the shoots are shortened to several nodes. Within two to three years, the root system of seedlings reaches a length of 10-15 cm - now they are ready for planting in a permanent place.
Reproduction of clematis by grafting is now quite rare because of its laboriousness.
Planting clematis is carried out according to the following scheme:
• dig a hole 60x60x60 in size;
• at the bottom arrange drainage from crushed stone, large expanded clay or chipped bricks;
• add 2 buckets of humus or compost to the soil removed from the pit, 10 kg each of sand, peat, 2 glasses of wood ash, superphosphate (50g);
• pour a mound of prepared earthen mixture onto the drainage;
• spread the roots of the seedling on a mound and cover it with soil (the stem of the shoot up to the first node should be 5-10 cm underground);
• water the plant and mulch the ground around the bush with peat;
• seedlings are placed at a distance of 1 m from each other;
• when planting in autumn, the seedling is covered with lutrasil for the winter.
Correct planting of the clematis bush
Watering. Clematis are moisture-loving plants and need abundant weekly watering. Young plants are watered with 10-20 liters for each bush after 7-10 days, adults - 20-40 liters. In hot weather, watering is carried out 2-3 times a week. With a shortage of water in adult large-flowered clematis, flowers begin to shrink. Therefore, it is important to shed the soil well so that the water reaches the roots and does not spread over the surface. To do this, you can use this technique: stepping back 30-40 cm from the bush, dig in clay flower pots with drainage holes around the circumference, fill them with water, which will slowly flow into the soil to the roots.
Supports. Arches, obelisks, openwork pipes made of metal mesh are used as support. Their size depends on the type of clematis: some vines reach 4 meters in length. Moreover, all structures must be strong and stable in order to withstand the weight of the plant.
Top dressing. Clematis need additional feeding to feed a large volume of deciduous mass. If the soil was properly prepared during planting, then no fertilizer is applied in the first year of the growing season of a young plant. In the second year, clematis are fed 4 times per season. Due to the active growth of shoots during the season, nitrogen is required, its maximum is needed in the spring. As such a top dressing, mullein or bird droppings are introduced (1:10), they are alternated with mineral preparations (ammonium nitrate, ammonium sulfate or urea). During flowering, fertilizers are not applied, since clematis, because of this, reduce the duration of flowering. In the fall, bone meal (200 g / m2) or superphosphate (20 g / 10 l of water) is added under each bush. In the spring add potassium sulfate 20-30 g / bucket of water.
Shelter for the winter: Many varieties of clematis need winter shelter. Before this, the bushes must be treated with a foundation for the prevention of fungal diseases and sprinkled with ash. After that, the base of the bush is spud. When the temperature is -5-7 ° C, it is time to cover the vines with spruce branches, dry foliage, brushwood. Some types of clematis need pruning (partial or complete) before sheltering.
Pruning clematis into groups
Gall nematode: The larvae of this pest settle in the roots. The secretions of the vital activity of the larvae cause the proliferation of root cells - gall. The plant grows poorly, leaves and flowers are deformed, their color changes. With further parasitism, the root system dies. The affected liana cannot be saved, it must only be destroyed. To scare off nematodes, you can plant parsley, marigolds, calendula next to clematis.
Other pests (thrips, slugs, snails, aphids) that do not pose a particular danger to clematis can be fought with folk remedies (infusion of garlic, ash, tobacco dust). Insecticides (Aktellik, Fitoverm, Iskra, etc.) should be used in extreme cases.
The most common clematis disease is wilt - vegetative wilting caused by various phytopathogenic fungi. Infection occurs through damaged roots or stem base. The mycelium of the fungus, growing in the vessels of the "host", clogs it and disrupts the nutrition of the plant. Stems and leaves can fade in a matter of hours.Most often, wilting damage occurs in wet weather with an excess of nitrogen in the soil, on heavy soils.
For the prevention of fungal diseases, the soil under the bushes is spilled with fungicides (Fitosporin-M), copper oxychloride or a solution of potassium permanganate, the root collar of the plant is sprinkled with ash and crushed coal during planting.
Powdery mildew affects domestic varieties less often than foreign ones. On young shoots, leaves, a whitish, flour-like bloom appears, the tissues under which gradually turn brown and dry. Such parts of the plant are destroyed, and the rest of the plant is treated with a solution of copper sulfate or colloidal sulfur, Fundazol.
Rust is manifested by the appearance of orange spots on leaves, shoots, peduncles. With severe damage, the leaves dry out and crumble, the stems become brittle. The infected parts of the plant are removed and burned, the rest are sprayed with Bordeaux liquid. Of the chemicals, Topaz, ProfitGold are used.
Portal editor-in-chief: Ekaterina Danilova
Email: This email address is being protected from spambots. You need JavaScript enabled to view it.
Editorial office phone: +7 (965) 405 64 18
Editorial office address: st. Suschevskaya, 21
Materials:
Clematis is a beautiful vine covered with hundreds of colorful flowers. This plant is very popular in our area. Such a colorful and lush garland will become the most amazing decoration for gazebos, fences or walls of houses. But most importantly, this plant is unpretentious in care and even the most inexperienced gardener can grow it.
Growing clematis in the open field with photos and videos
Planting in spring
Site selection and soil preparation
In the spring, in mid-May, you should start planting clematis in open ground. The plant loves areas with a slight shadow (in the bright sun, flowers of a rich color fade) and protection from wind and draft. Therefore, before disembarking, you should select and prepare a place.
First you need to prepare the soil for planting. It should absorb water well and be loose - the flower loves light and nutritious soil. Loamy or fertile soils are suitable for clematis.
Do not plant bushes in heavy and acidic soils. Since it will lead to the death of the plant. As for fertilizers in the form of fresh manure and peat, they will only harm the bush.
When choosing a planting site, special attention should be paid to soil moisture. Since clematis does not tolerate groundwater, it will be correct to plant it on a small hill made with your own hands. This will save the long roots of the plant from rotting. It is worth noting that in clematis, the rhizome reaches 1 meter in length.
If the soil is clayey in the garden where the bush is planned to be planted, then you can make a small groove and fill it with sand in order to divert all unwanted water from the flower.
Clematis can cover a fence or building
Planting pit
The next step is to prepare the pit for planting. Digging should be no more than 70 cm deep. Then pour a small layer of rubble on the bottom. All the soil that was obtained by digging the hole must be replaced with the prepared substrate. It is done in the following way:
- take a bucket of earth,
- add 0., 5 buckets of humus to it,
- then add 100g of slaked lime and mix everything well.
Before planting the plant, you need to take care of the supports that can support the clematis garlands.
Landing
When everything is ready, you can start planting. First, you need to inspect the clematis root, if it is dry, then you should put the plant in water for a couple of hours.
Then, in the dug hole, on top of the rubble, pour a small layer of earth, and put a seedling on top.
Planting clematis in spring and autumn is almost the same
The roots must be distributed evenly over the width of the pit, covered with 12 cm of substrate from above.
It is very important that the hole in which clematis is planted is not completely filled up. The remaining substrate is poured evenly until autumn.
Important: if you plan to plant clematis near the wall of the house, then the distance should be at least 40 cm between the bush and the wall. It is impossible for the water that flows from the roof after the rain to fall on the flower, this can destroy it.
In the case when it is planned to plant several clematis bushes, the distance between them should be at least 25 cm.
Planting and growing honeysuckle honeysuckle - beautiful vine
Preservation and planting of clematis seedlings: video
Planting in autumn
Many gardeners try to plant clematis in the fall. And if the seedling was purchased in the summer, then it is stupid to wait for the onset of spring. The plant should be planted in the fall.
The most optimal time for such manipulation is September. If you plant clematis later, then it will not have time to take root and may die. And if you plant earlier, the plant will grow for the winter, as a result, death is inevitable.
The planting method is exactly the same as the spring planting method. The only difference is filling the pit with a substrate, it must be completely filled up.
With the approach of the cold time, you need to take care of the preservation of clematis. A planted bush will need to be well covered for the winter, when choosing the time for this procedure, they are always guided by garden roses.
In the spring, you need to remove the shelter from the bush in time. Otherwise, it may die due to high humidity. And in order to determine the correct time for cleaning the insulation, you can navigate by the weather conditions. In this case, the forecast will help. The most important thing is that all frosts are left behind.
Important: Clematis lives and pleases with flowering for an average of 30 years. Therefore, when choosing a place for its landing, this feature must be taken into account.
Clematis care
After clematis is planted, it needs regular care. There is nothing difficult in this. The main thing is to pay attention to the flower in time.
For good development you will need:
- watering;
- fertilizer;
- weed removal.
Watering
When watering, it is always worth remembering that the plant does not tolerate excess water. In the spring, it can be watered no more than once a week. One bush requires 0.5 buckets of water.
When summer comes, and with it comes a strong heat, watering is increased up to twice a week. The volume of water remains the same. You need to water the bushes only in the evenings.
Fertilizer
As for soil fertilization, it must be applied during the growing period. And when the first flowers appear on clematis, all feeding stops until autumn. Once a month is enough. This technique works for an adult plant.
In the first year after planting the plant, it is not fertilized at all. Since in the first year, the bush received all the required fertilizing when planting.
Good fertilizer for this plant, concentrate for strawberries. You can also use ordinary water in which raw unsalted meat was washed. Or buy a special product from a flower shop.
In the spring, when clematis wakes up from hibernation, it must be watered with a solution of chalk with the addition of copper sulfate. This will save him from many diseases.
It is not difficult to prepare such a mixture, for 15 liters of water you need to add 500 grams of chalk and 200 grams of copper sulfate. Mix everything well and water the plants at the rate of one bush ½ bucket of solution.
Weed removal
Regularly from the flower bed where clematis grows, it is required to pull out all the weeds. Since this plant takes all the moisture and nutrients for itself. The best option would be to sow with special grass all the flower beds where clematis grows. Such a procedure will help protect the bush from harmful plants, as well as save it from the strong sun.
This is the kind of beauty you can grow in your home
Reproduction of clematis
Clematis can be propagated both in spring and autumn. There are several breeding methods:
- seeds;
- cuttings;
- air layering.
Seeds
To grow clematis from seeds, you need to use seeds from the new crop. They should be sorted out.The larger ones are sown back in January, since they germinate for a very long time. And those that are sown smaller in March, from such seeds, the first sunrises appear in two weeks.
For sowing, a special substrate is being prepared, you can make it yourself, for this you need sand, peat and earth in equal parts. Everything is mixed and the soil for planting is ready.
Cuttings
Clematis should be cut in the fall. One of the main conditions is the age of the bush, it must be at least five years old. Cuttings are cut from the shoots, on which there should be two developed buds. Then, each shoot is treated with a phytohormone (you can use Fitosporin).
After this procedure, the cuttings are buried in a container with earth and lowered into the basement. Thus, they are stored until spring. During storage, you need to monitor the condition of the earth, it must be constantly wet. And the temperature is preferably about 0 ° C. At the end of February, they are transferred to a room with a temperature of 10-15 ° C.
You can breed clematis in the summer - with green cuttings
The first small shoots will appear in March. Containers with cuttings are taken out to the greenhouse. When the shoots reach 10 cm, the lower leaves are pinched off to give an impetus for root growth. In open ground, seedlings are planted in mid-May.
Air layering
This breeding method is the easiest.
- First you need to dig up the soil around the bush.
- Then level the soil and make a 6 cm deep groove in it.
- Put in the groove the shoot chosen for removal and press it in several places with ordinary wire.
- Next, take a little humus mixed with wet soil and sprinkle the shoot on top.
- The tip should remain on the surface.
This method should be used in the fall. Therefore, before winter, the place where the layering is located must be thoroughly insulated.
In the spring, the insulation is removed. When a sprout appears, you will need to mulch all the soil that is around the cut. When September comes, the already grown seedling can be dug up and planted in a permanent place.
The shoot is laid in a groove, watered and covered with earth
Pruning
It is necessary to prune clematis in the fall, when the plant has bloomed and shed its leaves. In the south of Russia, in Ukraine, this procedure is performed in early November. In the suburbs, the Middle Lane, the Urals, Siberia no later than mid-October. A dry and cloudless day is chosen for pruning.
How a young bush is pruned
If the plant is first year of life, then all shoots are cut off by 25 cm. When pruning, you need to try to leave a pair of buds on each shoot. This will help create additional vines as they grow, and next year the whole bush will be much more beautiful and lush.
Pruning an old bush
If clematis has been growing for many years, then all diseased, dry and broken shoots are removed from the bush. And the rest are shortened by 10 cm.
There are many varieties of clematis. And if a grower grows a bush that blooms twice a season, then the pruning will be slightly different. In this case, healthy shoots are cut in half. And dry, sick and superfluous are cut off at the root.
Universal way
There is also a universal cropping method. All bushes are pruned according to the principle of one.
One shoot is shortened in half.
The second is cut so that only 2 buds remain on it.
This is done throughout the plant.
Thanks to this method, the bush will turn out to be lush and well-groomed for the next flowering.
Important: Pruning clematis is necessary to give it a beautiful shape and so that the flowering lasts as long as possible. Mowing should only be done before wintering or early spring.
Pruning clematis flowering on this year's shoots
Diseases and pests
Clematis, like other plants, is susceptible to disease. One of the most common diseases is wilting "Wilt"... It is easy to see it, the first signs of damage are wilted leaves on the tops of the shoots.And if you do not start the fight in time, clematis may die.
Clematis disease - wilt
In the case when this disease was detected, all infected shoots should be immediately cut off at the root. And the bush itself, pour abundantly with a weak solution of potassium permanganate.
Very often, at the end of flowering on the leaves of clematis, appears gray necrosis... To defeat this disease, it is enough to spray with a 1% solution of copper sulfate.
Very dangerous for this plant and a disease called rust... Its first sign is the leaves covered with a brown bloom. Over time, the leaves dry out from rust, and the shoot itself is greatly deformed.
To cure the bush, a solution of potassium permanganate of medium strength will come to the rescue. The whole plant is thoroughly sprayed with it, and before that, each infected leaf is removed.
They do a lot of harm and pests... One of the most dangerous parasites is nematode... It affects the root system of the plant, as a result of which it does not receive everything it needs for its growth from the soil. The problem is that you can fight the nematode in one way, the complete destruction of the entire bush.
In order to prevent the appearance of these parasites, when buying clematis, you need to carefully check its root.
It is very important to understand that if this parasite has managed to manifest itself on at least one plant, it should be immediately destroyed, otherwise the nematode will spread throughout the garden.
And the place where the bush grew must be processed to destroy all the eggs of this pest. Boiling water is the most suitable method.
Pruning and sheltering clematis for the winter
And in conclusion, I would like to add, clematis is one of the most luxurious plants in the garden. Let him please with his flowering, and diseases and parasites bypass him.