Content
How to grow chamomile at home
 Chamomile grows well not only in garden but also at home. Usually, small varieties or hybrids (10-20 cm) of potted plants or pyrethrum appear on sale. You can grow such a flower yourself from seeds.
To grow chamomile, you need to choose a sunny windowsill. It is advisable to use a pot not too deep, but spacious in width, plastic white. At the bottom - drainage, the soil needs light and nutritious, good moisture permeability. It is good to transplant the purchased plant into a mixture of equal parts of universal soil, sand and earth taken in a greenhouse (it contains rotted sawdust, forest soil, ash and chicken droppings). By the way, many indoor plants like to grow in such a substrate, for example, coleus, pelargoniums, balsams, crotons, aglaonems, roses.
In the fall, with the beginning of the heating season, place the pots with daisies on the kitchen window sill (south-west side), where they still bloom, if necessary, add additional lighting. And then cut off the shoots and put them in a cool, bright room.
Reduce watering until February, but not so much that the earthen lump is completely dry. And at the end of February, return to warmth, but do not increase watering until the plant resumes growth. And when the buds wake up in last year's outlets, you can start feeding, as well as watering in summer mode. At this time, it would be good to spray the bush with water so that pests do not appear from the dry air.
In the summer, the plant is taken out to an open balcony. In the heat, it is important not to dry out the earthen lump, although the flower tolerates drought persistently, but this affects the quality of flowering. I add a little fertilizer for flowering plants to the irrigation water every two weeks.
Chamomiles in flower beds look great, but in order for them to grow healthy and beautiful, the gardener needs to organize its correct sowing, choose the appropriate method of planting, feeding, care, and most importantly, learn the intricacies of pest and disease control.
The content of the article:
- Prerequisites for growing chamomile
- Sowing chamomile
- Chamomile breeding methods
- Chamomile varieties
- Garden chamomile care
- Chamomile feeding
- Chamomile pests and diseases
Modern cultivated daisies can hardly be called wildflowers today. However, it is wild daisies that are the founders of the entire selection of garden daisies. Daisies have won the hearts of flower growers due to their delicate beauty. In Russia, chamomile began to be actively planted in flower beds around the 18-19th century. However, long before the peak of its popularity, in Russia, the flower was considered the personification of innocence and beauty, the field chamomile was often woven into braids and wreaths. Chamomile was revered in ancient Rome, not only for its decorative qualities, but also for its healing properties. In ancient Egypt, this flower was glorified as the flower of the sun god. Today, perennial garden chamomile is a merit of breeders and the subject of their long and painstaking work.
Prerequisites for growing chamomile

Without exception, all chamomile varieties are partial to well-lit areas, sunlight is necessary for the growth and proper development of the plant. Neutral soils with low acidity are considered the best for growing chamomiles.The soil for the cultivation of these flowers must be fertile, but chamomile is not capricious and will grow well on poor soil, subject to the mandatory conditions of care: feeding and watering. Since garden chamomile is a cultivated plant, it needs frequent watering for stable and large flowering. Regular watering must be established not only in drought, but also if you have sandy loam soil. However, in no case should you allow stagnation of water in the area with chamomiles, the flowers can simply die from putrefactive diseases. It is better to make artificial drainage if groundwater occurs on your site in order to protect the plants from excess moisture.
Reproduction of cultivated chamomile can be done in different ways. Chamomile is propagated by seeds, seedlings or cuttings and rhizomes. Select only healthy shrubs with good quality flowering for propagation. When the flower stalks are ripe, and the petals become dry and begin to fall off, the brown seed baskets should be cut and dried in a well-ventilated warm room. Then collect the seeds, sort them, clean them of debris and store them in a special bag with holes until sowing so that the seeds do not deteriorate. Well, if your bush has grown, then you can divide it into several plants, for this you need to dig up the chamomile in the fall, carefully divide the bush, and so that the root system is evenly distributed between them. Then determine the chamomile to a new habitat, with mandatory feeding.
Sowing chamomile

Sowing can be started in the first decade of autumn or early spring, the time of chamomile flowering will depend on the sowing time. If you are sowing seeds, then it is better to do this in early spring, and in a month you will be happy with the shoots. However, keep in mind that low temperatures can harm garden vegetation, so sowing flowers should be carried out when the frost has completely receded. So, the depth for planting chamomile seeds should not exceed 3 centimeters. Chamomile can be sown both in rows and in a nesting method. The main thing is not to be mistaken with the spacing of the rows, for your own convenience when watering and caring for the plant. Seedlings are planted a month later in open ground. Planting is done in the same way as with seeds. Chamomile responds well to enriched, drained soils, and prefers well-lit areas. In the shade, the plant will stretch upward and curve. It is better to pre-prepare loamy soils before planting chamomile, add peat or chopped straw mixed with sawdust to the soil in the fall. And in the spring, start sowing with peace of mind. Otherwise, loamy soil will lead to plant disease.
Chamomile breeding methods

As described above, chamomile propagation can be carried out in different ways, and one of the simplest is seed. Depending on the climate in your region, seeds begin to be planted between April and May. After sowing, it is better to cover the area with seedlings with polyethylene, you can wait for seedlings with this method of cultivation in two or three weeks. It is recommended to harden the seeds before sowing to avoid sowing stress.
Refrigerate the seeds for about a week. If you live in a region with an unstable climatic situation, it is better to sow seedlings in early April, and plant them in open ground in May when the frosts recede. To do this, pour the prepared or purchased soil into the container, sow the seeds and put them on the windowsill, from the sunny side, organize watering. When the seedlings pick up two, three leaves can be planted in open ground, given the temperature regime, at night the temperature should not fall below +15 degrees, otherwise the plant will simply wither away. It is easiest to plant seedlings in a nesting way in holes to such a depth that the soil covers all the roots.A young plant can be planted together with the soil in which it was sown, to do this, remove the chamomile from the container, place it in the hole and dig in with soil, lightly pressing down. After planting is complete, water the plants with warm water.

Chamomile is one of those plants that grow rapidly under favorable conditions. Proceeding from the fact that large bushes give small flowers, and the likelihood of being affected by fungal diseases increases every year, every five six years, it is necessary to transplant the plant, dividing the bush into separate families. It is permissible to dig up plants only in autumn, after the end of flowering. Dividing a bush is not a difficult procedure, just divide the bush equally, form a separate one and transplant it to a new prepared place. After completing the transplant, add top dressing. Reproduction of chamomile garden can also be carried out using cuttings, however, this process is complicated and is used in practice by gardeners in rare cases when the root system of chamomile is damaged, or it is not possible to collect plant seeds.
Chamomile varieties
Today, there are quite a few varieties of chamomile, they all differ in terms of flowering time, size of buds, height and other vegetative characteristics. Famous varieties of chamomile, which are always heard not only among flower growers, but also among flower growers, are daisy, doronicum, pyrethrum, small-petal and pharmacy chamomile.

Nivyanik. Large garden chamomile, includes about twenty varieties. Many flower growers choose for their plots, the most common common, large and Kuril daisy. Such flowers are large in size, have beautiful double petals and a yellow core. Sycamore plants, like other varieties of chamomile, prefer a sunny area and nutritious soil. Daisy bushes grow quickly, so they need to be planted every three or four years. The main difference between the daisy and other varieties of chamomile is its large size.
Small petals. The plant at maturity reaches a meter in height. Blooms from early June. Flowering lasts about two months. Small petal flowers come in different shades, are white, blue and pink.

Feverfew or Persian chamomile. The plant is bushy, reaching a height of one and a half meters. The size of the buds varies depending on the quality of the soil, the color is pink, yellow, red and white. Depending on the variety, it has double petals or ordinary ones. Loves saturated, well-drained soils, medium humidity and top dressing. It is recommended to plant the plant after reaching the age of four. Serves as a good remedy in the fight against house moths. It gets along well in a flower bed with others like them, as well as any varieties of poppy, bell and other garden plants.
Doronicum. This chamomile variety belongs to perennial plants with an early flowering period. It reaches a height of up to a meter. Flowers are unpretentious, feel great on poorly nutritious soil, thrive in shaded areas. Doronicum flowers are predominantly yellow. The plant begins to bloom early, flowering lasts about two months.

Pharmaceutical camomile. This widespread variety won the hearts of gardeners for a reason. Pharmacy chamomile has a whole range of medicinal properties. Chamomile serves as an antiseptic, pharmaceutical chamomile is used not only in pharmacology, but also in the beauty industry. Infusions and decoctions of chamomile fight against many diseases and are used in cosmetology. Chamomile retains its medicinal properties even in dried form, therefore, pharmacy chamomile is often found on domestic beds. Pharmacy chamomile does not differ in outstanding decorative qualities, the flowers are small, the plant grows up to 50 centimeters in height, and is unpretentious to the soil.
Garden chamomile care
Chamomile is not a whimsical plant, however, like all garden vegetation, it needs loosening, weeding, watering, replanting and protection from temperature extremes. So that the flowers do not grow smaller, and the plant pleases you with its appearance, chamomile must be transplanted every four years. To do this, the bush is dug out, divided in half and transplanted from the same place to a new one. Thus, the plant rejuvenates, giving new shoots. Chamomile is a strong plant with a well-developed root system, however, the proximity to weeds, and the struggle for a nutrient medium, can affect flowering. Therefore, the neighborhood with weeds is inappropriate, for this, weed as needed. Chamomile responds well to drained soils, with good aeration, for this, loosen the soil, but with care so as not to damage the roots and young plants. Chamomile winters well in an area protected from the wind, but if in your area the winter is cold enough, then you need to cover the flowers for the winter. The material will be straw, peat or sawdust. After the end of the growing season, the chamomile must be cut off, the entire ground part of the plant is cut off with garden shears.

Achieving a lush chamomile bloom is not difficult, you just need to take care of the plant. Regular watering and timely removal of wilted flowers will help achieve the desired result. The bushes will delight you with their lush flowering for a long time. Many gardeners recommend mulching the soil with chamomile plantings, in a thin layer in hot months and a layer of at least 20 centimeters in cold winter. Mulching perfectly protects chamomile bushes from the sun's heat, retains moisture, and in winter a thick layer of mulch protects the plant from the cold. In the spring, when the frosts recede, the mulch must be removed, since the overwintered plant will begin to grow actively, and for this it needs to be warmed up by the sun's rays; in addition, pests and dangerous pathogens of fungal infections can settle in the mulch after winter.
Chamomile feeding
In order for chamomile to bloom well, remain healthy and strong, it needs feeding. Top dressing will depend on the growing season of the plant. First of all, chamomile should be fed before flowering. To do this, dilute the purchased fertilizers for garden flowers according to the instructions and water the plant. You can use nitrophoska fertilizer, diluted with water in accordance with the instructions for use.

Subsequent feeding is carried out after the completion of the flowering of the plant. Chamomile is fertilized with superphosphate and potassium. To process multiple bushes, you will need about eight liters of fertilizer. To protect chamomile from pathogenic flora, it is recommended, at the end of flowering, to add wood ash to the soil and loosen the soil well.
Chamomile pests and diseases
Chamomile has a fairly stable immunity, however, like all cultivated plants, it is susceptible to certain diseases. The main feature in preventing flower disease is prevention. Do not allow water to stagnate in the area, otherwise, the plant may be affected by diseases such as gray rot, fusarium, rust and other fungal diseases. Before replanting chamomile, treat the soil with fungicidal preparations. Cut off dead parts of the plant in time, apply insecticides.
Chamomile is perfect for decorating flower beds and making flower arrangements, and due to its unpretentiousness, ease of care and variety of varieties, it will satisfy the requirements of even the most capricious grower.
Method 1 Germinating chamomile seeds indoors
-
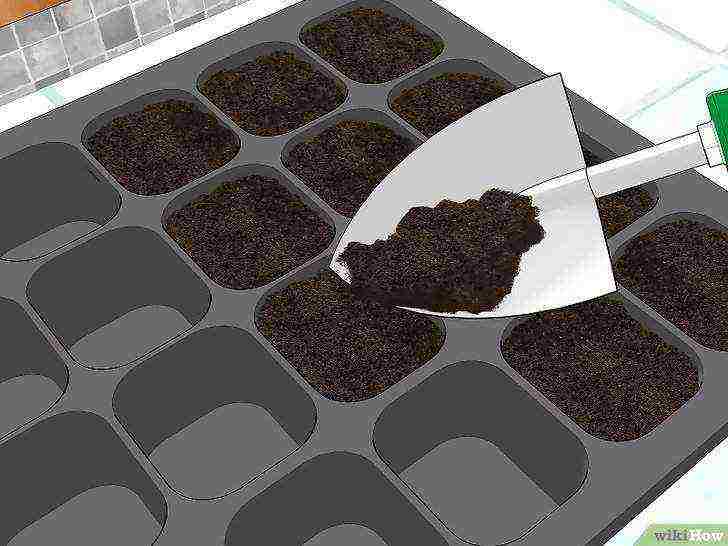
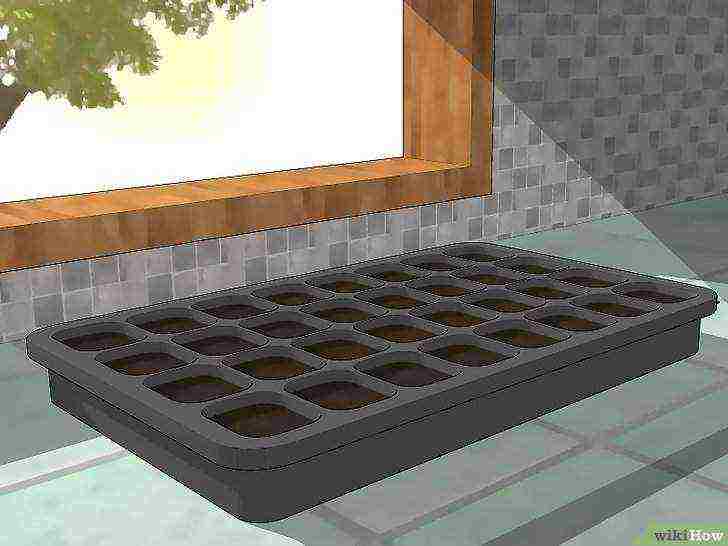
Indoor chamomile seeds should be germinated at the end of winter, 4 to 6 weeks before the last frost in your climate. Fill the seedling trays with sections with wet potting mix. Level and harden the soil with an old spoon handle.
-
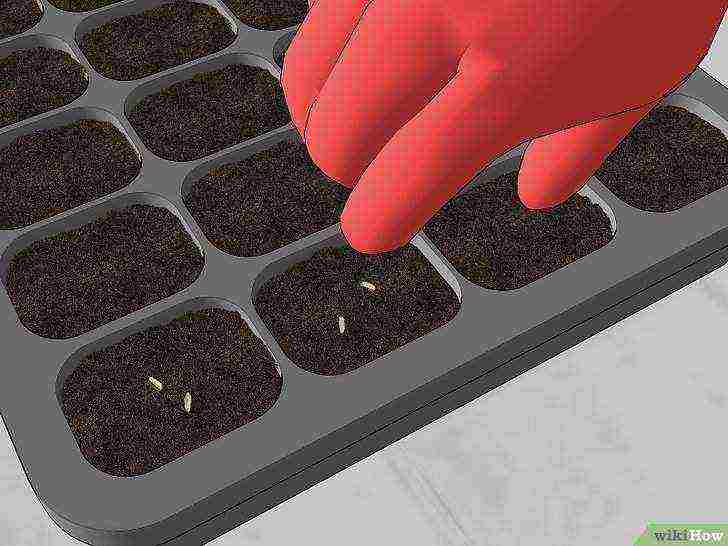
Plant two to three chamomile seeds in each cell, then cover the seeds with a thin layer of potting mixture.
-
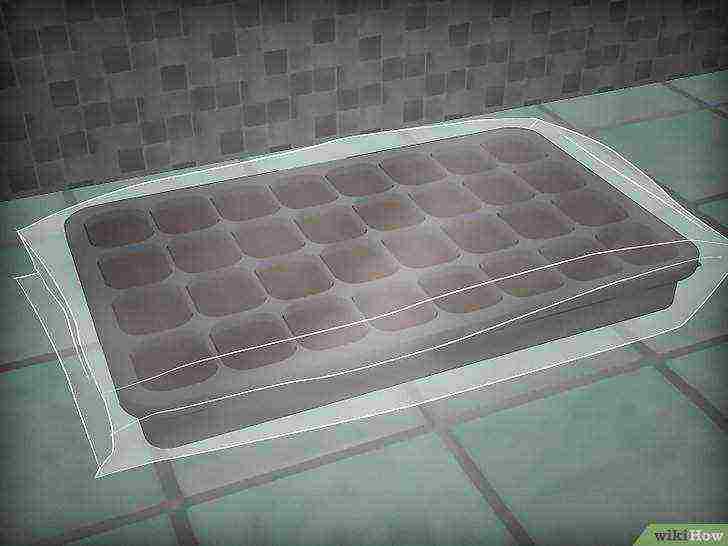
Cover the seedling tray with clear plastic wrap. Place the tray in a moderately lit area, but not in front of a window. Passing through the glass will become too intense for seed to germinate. For plants, a place a few steps from a sunny window is suitable.
-

Check your chamomile seeds every day. If the planting mix becomes dry, spray it with water from a spray bottle. Maintain soil moisture at all times. In dry soil, chamomile seeds can develop a disease called blackleg, which can cause them to die.
-
When the chamomile seeds sprout, remove the plastic and move the planting tray to a sunny window. If you don't have windows on the sunny side, place a planting tray under two fluorescent lights and turn on the lights for at least 14 hours every day. For seedlings, normal room temperature is suitable, but you should not put the tray in a draft from doors or windows.
-
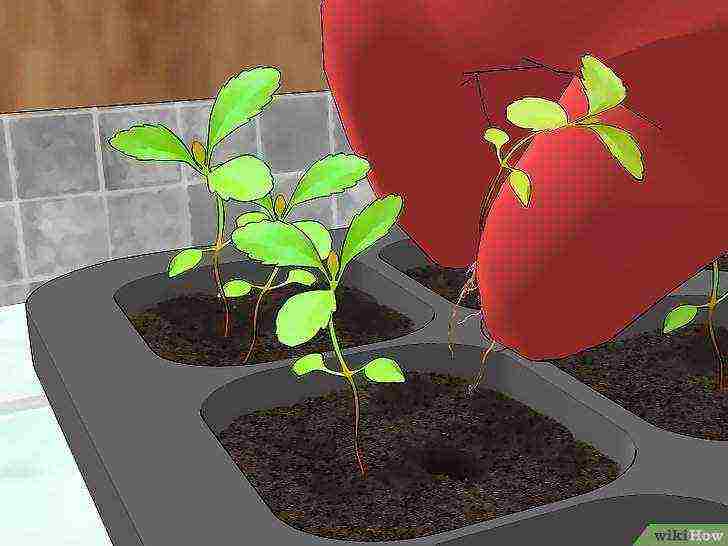
When the seedlings are 0.5 cm tall, thin out the chamomile seedlings, leaving only one healthy seedling in each cell. For thinning, it is enough to pinch off the sprout at ground level. Do not pull out the shoots by the roots, as this can damage the roots of the plant that you leave for growing.
-
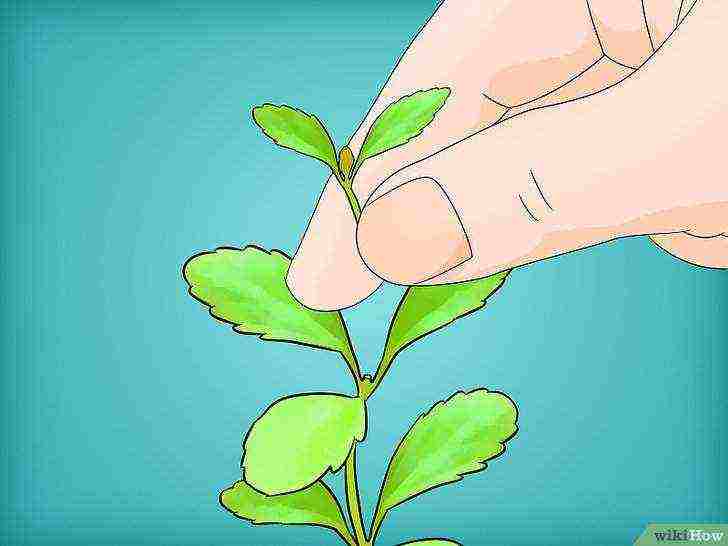
Pinch off the overgrown tip of each chamomile sprout. Thanks to pinching, the seedlings will not grow inward, but in breadth and become more bushy.
Method 2 Transplanting chamomile seedlings into open ground
-
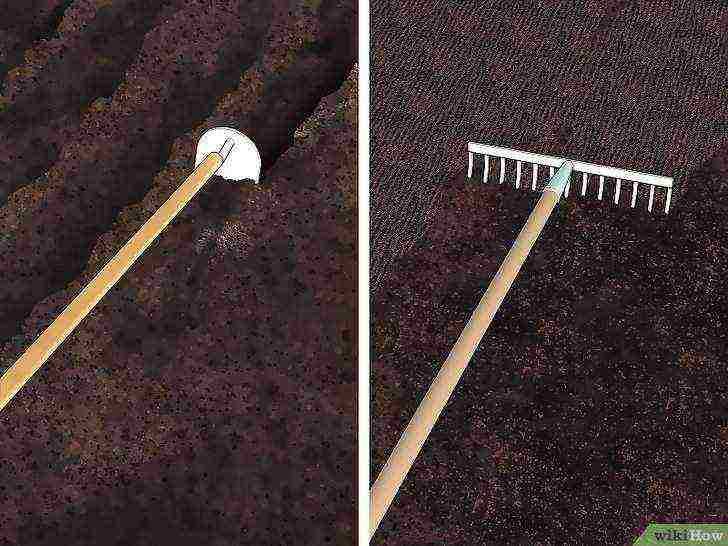
Prepare a site for planting. Loosen the topsoil (15 cm) with a hoe and then level the surface with a rake.
-
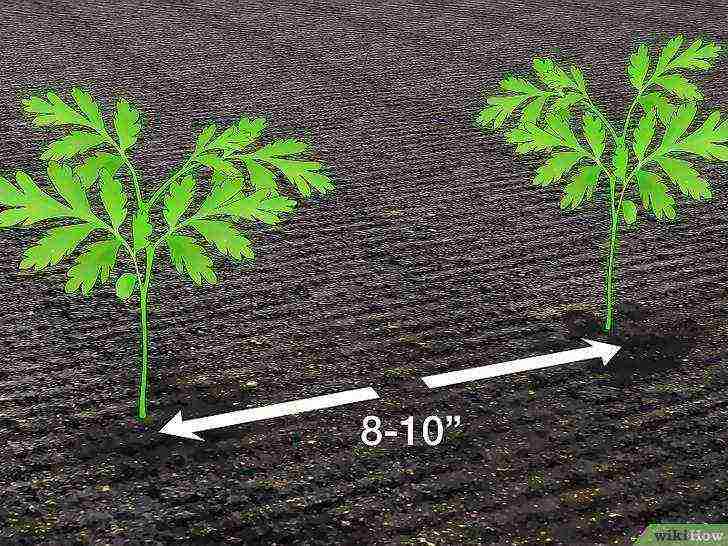
Use a garden trowel or small spatula to dig a hole for each chamomile plant. The distance between the plants should be 20 to 25 cm. Plant the chamomile seedlings in the holes, and then strengthen the soil around the roots.
-

Watering chamomile seedlings should be done carefully, being careful not to wash the plants out of the ground. A hose with a nozzle is suitable for this purpose. Moisten the soil around the chamomile seedlings until you see they have grown significantly.
Method 3 Planting chamomile seeds in open ground
-
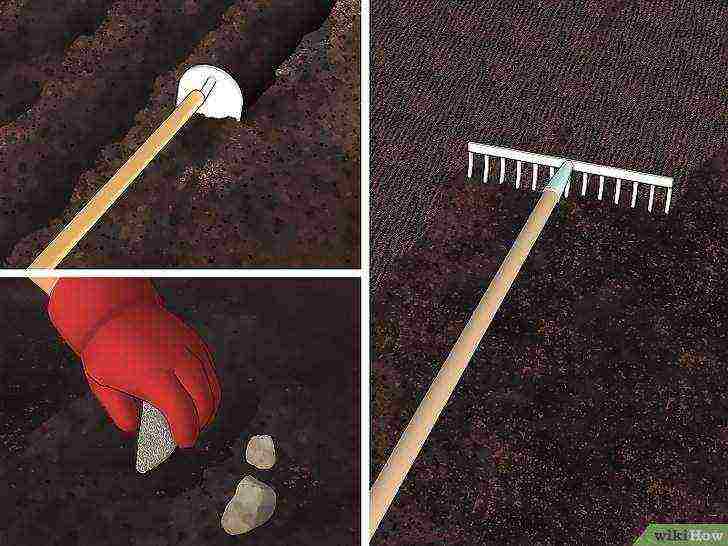
Loosen the soil with a hoe and remove stones from the selected area. Level the soil with a rake.
-
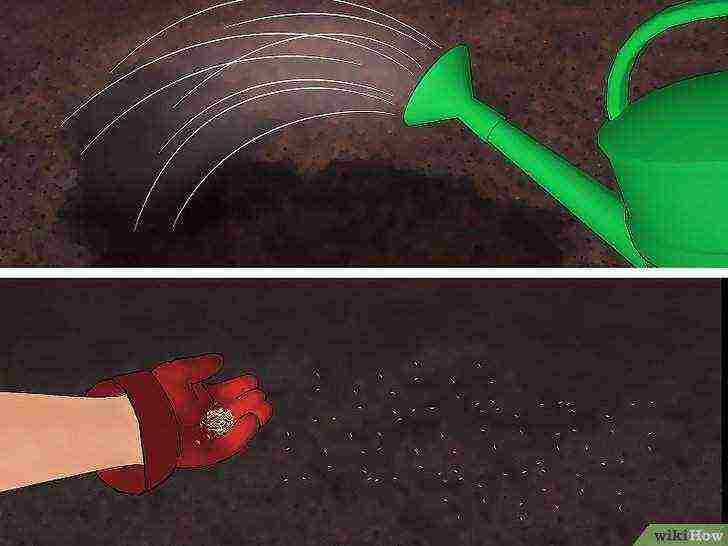
Water the planting area lightly, then sprinkle the topsoil with chamomile seeds. You do not need to bury the seeds, it is enough to pour them with a thin stream of water. Chamomile seeds will germinate in 2-3 weeks.
-

When the seedlings are 0.5 cm tall, thin out the chamomile seedlings, leaving 20 to 25 cm between each seedling. For thinning, it is enough to pinch off the sprout at ground level. Do not pull out the shoots by the roots, as this can damage the roots of the remaining seedlings.
Method 4 Caring for Chamomile Plants
-
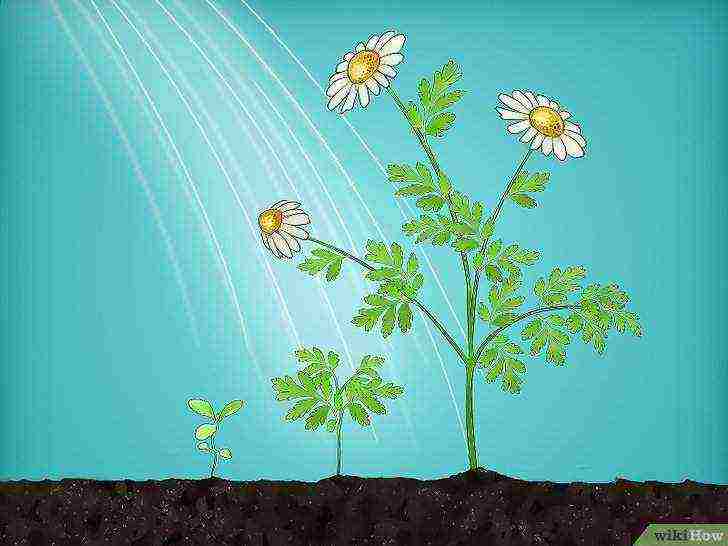
Until the chamomile seedlings grow, they should be watered regularly. Once the plants have taken root, they should be watered infrequently, only in dry weather.
-
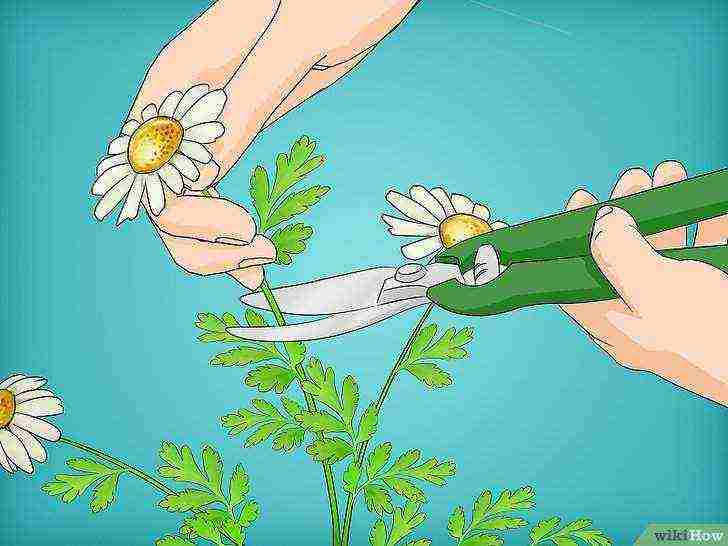
Collect chamomile flowers when they are fully bloomed by cutting off the heads with garden shears. Flowers can be dried or used fresh.
-
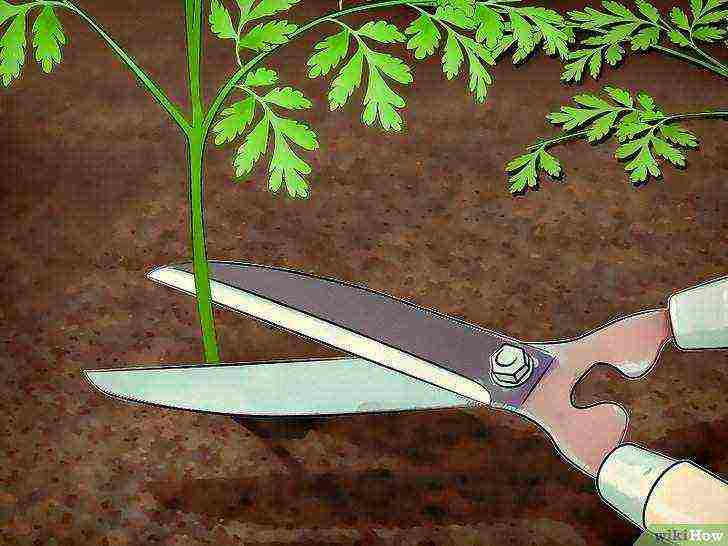
In the fall, cut off the ground parts of the chamomile plants using garden shears or a weed trimmer. After that, cover the plants with a layer of dry leaves or straw 8 to 10 cm thick to protect the plants from the winter cold. In the spring, the plant needs to be reopened by removing leaves or straw with a rake.
Tips
- Chamomile seedlings should be transplanted into open ground when there is no chance of freezing. Do not repot the seedlings too early, they will grow weak.
What do you need
- Chamomile seeds
- Seedling tray with cells
- Pot mix
- Old spoon
- Transparent plastic bag (film)
- Spray
- Two fluorescent lamps (as required)
- Hoe
- Rake
- Hose and nozzles
- Gardening scissors
- Weed trimmer (optional)
- Straw or leaves for insulation
Article Information
This page has been viewed 9,727 times.
Was this helpful?
Table of contents:
- How to grow a garden chamomile?
- How to grow medicinal chamomile?
- Growing chamomile at home
Field and garden chamomile can be planted on balconies or in flower beds, if you only know how to grow chamomile from seeds. Bouquets of garden daisies look very attractive, and they cover a piece of land with a white carpet. But you can still use them for treatment, harvesting for future use.
How to grow a garden chamomile?
Fortunately, the task of how to grow a garden chamomile from seeds is absolutely not difficult. You can buy garden chamomile seeds at a flower shop.
There are two landing options:
- in the spring for seedlings in a greenhouse;
- in the fall directly into the open ground.
If the seeds are sown in spring, the seedlings will appear in two to three weeks. To accelerate germination, the beds can be covered with a special material. The first sprouts that appear must be dived so that they grow and develop better in the future. Otherwise, tightly seated plants will begin to reach for the light and turn out to be too long and unattractive.
 In May, chamomile seedlings can already be transferred to the ground, to a permanent place of residence. Young plants need to be planted about half a meter from each other, in this case they can grow well.
It should be borne in mind that chamomiles are sun-loving plants, so a site well-lit by the sun should be allocated for them.
- The soil (neutral or lime) must be prepared in advance.
- The planting beds must be carefully dug up, fertilized and watered abundantly.
- Remembering that chamomiles do not like stagnant water, you need to add sand to the soil or organize drainage.
- Unpretentious chamomile can be fed with mineral and organic fertilizers. The best fertilization option for them is a composition containing nitrogen, phosphorus and potassium.
- Garden chamomile should be watered sparingly and as needed only when the ground becomes dry. But the soil should not dry out during the growing season and flowering. To prevent moisture from evaporating quickly, the soil can be mulched with cut grass.
- Shoots with the arrival of autumn should be cut off.
- Before the onset of winter, trimmed plants need to be covered with special material or ordinary fallen leaves. In the second case, at the onset of spring, the foliage must be quickly removed so that the roots do not get stuck.
- When warm spring days come, it is advisable to treat the chamomile with a solution of saltpeter, and when the stems grow up to 20 cm, repeat the feeding. Next, you need to monitor the plants: if they are healthy, with green juicy foliage, then they do not need nitrogen, and if they are pale and weak, then one more feeding will be required.
Video on how to grow a garden chamomile
How to grow medicinal chamomile?
Despite the fact that this plant surrounds us in abundance in nature, many are interested in learning how to grow medicinal chamomile from seeds. These seeds are not difficult to collect from mature plants or buy from a flower shop.
 They should be planted in early spring immediately in open ground, after waiting for the snow cover to melt. If you sow chamomile in early August, you get winter sowing. You can even do this in the fall a couple of weeks before frost, carrying out a subwinter sowing.
- Choose an area well-lit by the sun for planting. Dig up the earth, add organic matter (humus or manure) in the amount of a bucket per square meter. Instead of organic, you can use mineral fertilizers - nitrogen (40 g / m2) or phosphorus (15 g / m2).
- Water the prepared soil generously.
- Sow seeds, consuming 0.5 g per square meter.
- Cover the crops with well-loosened soil or mulch; chopped peat is perfect, which will not allow the soil to dry out.
- Seed germination requires regular watering to keep the soil moist at all times. When the plants rise, abundant watering should be strongly moderated, watering only the dried up soil.
- If necessary, plants can be dived after the first leaves appear, so that they do not sit too densely.
- In the summer, it remains to periodically loosen the ground, weed weeds and harvest flowers for the winter to drink chamomile tea.
There is another easy way to grow medicinal chamomile. At the beginning of autumn, you need to find in the meadow and dig out a bush of this plant along with a voluminous lump of earth and transfer it to your site, after fertilizing and watering the soil there. When the flowers finish blooming, seeds will fall from them to the ground, which will sprout in spring and give generous shoots.
Growing chamomile at home
 Those who do not have their own plot may be interested in how to grow chamomile from seeds in a pot. Most often, there are short or hybrid potted pyrethrum or nivyanniks on sale. You can also grow chamomile seeds.
- For the dwelling of chamomile, you need to take the sunniest window sill.
- Better to use shallow but wide white plastic pots. Pour drainage at the bottom.
- The soil needs nutritious and light, not retaining moisture. It is good to transplant the purchased plant into a mixture where sand, greenhouse soil (containing forest soil, ash, rotted sawdust and chicken droppings) and universal soil are equally present. A similar substrate is suitable for many indoor plants - balsams, pelargoniums, roses, coleus, crotons.
- When the heating season begins in the fall, the chamomile pots should be moved to the southwest side, where the chamomile will continue to bloom. Can be supplemented with artificial lighting. Closer to winter, the shoots need to be cut off and the pot removed to a bright, cool room.
- Watering until February should be reduced, but not to allow the earthen coma to completely dry out. At the end of winter, return the pot to warmth without increasing watering until the plant starts growing.
- When the buds wake up in the old outlets, the chamomile can be fed and the summer watering regime can be resumed. In the summer, spraying plants with water has a positive effect so that pests do not start from dry air.
- In summer, pots of daisies should be placed on an open balcony. An earthen lump should not dry out in the heat - despite the resistance of chamomile to drought, it will bloom worse.
- A little fertilizer should be added to the water for irrigation 2 times a month.
Would you like to grow chamomile in your summer cottage? Let us know in the comments.
Video on how to grow chamomile