Content
- 1 Basic requirements for growing
- 2 Kiwi - growing at home
- 3 Features of vegetative reproduction of kiwi
- 4 How to get a big harvest?
- 5 Seed preparation
- 6 Germination
- 7 Growing seedlings
- 8 Landing in a permanent place
- 9 How to care for kiwi
- 10 A Few Tips
- 11 Video: how to grow kiwi in the country
- 12 Step one - preparing the seeds
- 13 Step two - planting seeds
- 14 The third step is planting germinated seeds in the ground
- 15 Home care for kiwi
- 16 Watering and lighting
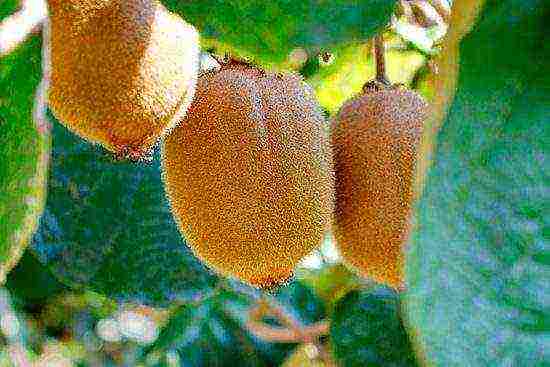
Almost all growers seeking to improve their own skills at one point decide to grow fruit-bearing crops, such as citrus fruits, coffee or vines. And many are wondering if it is possible to start growing kiwi at home. In reality, this is quite possible, however, certain requirements must be observed in the process.
How kiwi appeared: an interesting fact
Kiwi is also known as Chinese gooseberry. And in order for this culture to begin to bear fruit, you need to simultaneously grow two varieties of plants - male (required for pollination) and female. If you plan to grow by seed, then be prepared to wait for the flowering period, because that's when you can determine the gender of the vine. In most cases, kiwi blooms in the sixth year of life.
We grow kiwi at home
Basic requirements for growing
So, the growing process is not difficult, but you will have to show accuracy, care and patience.
How kiwi is grown
You can grow kiwi:
- cuttings;
- seeds;
- accessory buds of the roots.
All methods have their own nuances, advantages and disadvantages, which we will get acquainted with a little later. However, there are a number of general rules that apply to kiwi breeding.
Kiwi is a distant relative of grapes, and therefore uses a similar cultivation technology here. The described culture is warm and photophilous, so it must be placed in a well-lit place (preferably without drafts). It should be remembered that the direct rays of the sun can lead to burns of foliage, therefore, the light should fall from the side. An even better option is vertically directed artificial lighting.
Kiwi from seed
In the process of development, the pots should be periodically scrolled clockwise (every two weeks, 10-15 °). This will provide the plants with a straight silhouette, and the crown will turn out to be dense and uniform.
Note! There are many varieties of kiwi, but, characteristically, almost all of them are suitable for growing at home.
Kiwi varieties
Yellow kiwi
It should also be remembered that kiwi is a dioecious crop, and therefore one male and at least two or three female plants are required for normal fruiting. If kiwi is grown from seed, then about 80 percent of the seedlings are male, so there should be as many of them as possible.
Now let's look directly at the workflow.
Kiwi - growing at home
It is better to start growing kiwi in early spring, because then the highest germination of seeds is observed. This is a very important point, so do not delay sowing. Also consider the fact that kiwi naturally grows in regions with long and warm summers, so the conditions for the plant should be as comfortable as possible.
Traditionally, the process begins with the preparation of everything needed.
If you really want to grow kiwi at home, make sure you have enough free space.
Stage one. We prepare everything you need
To grow vines, you must prepare:
- one ripe kiwi fruit;
- neutral or slightly acidic soil intended for citrus crops (you can purchase it at any specialized store);
Citrus primer
- thoroughly cleaned river sand;
- mini greenhouse (you can use PET film instead);
Mini greenhouse
- fine-fraction expanded clay - it will be used for drainage.
"Shop" soil can be replaced with a self-prepared soil mixture consisting of peat, sand and black soil (in equal proportions). By the way, when you dive seedlings into pots, this soil mixture will also work well, only there should be less peat in it.
Stage two. Preparing the seeds
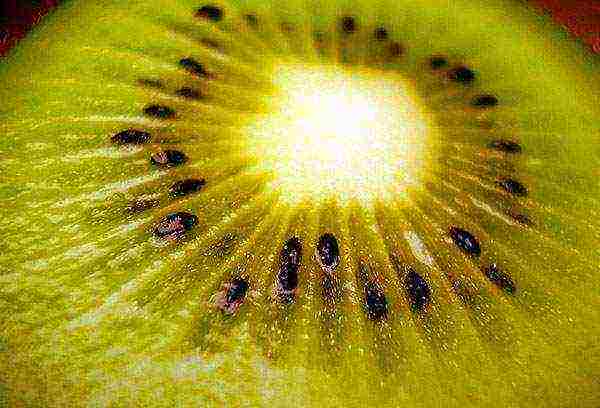
Cut the fruit in half
Take a ripe fruit and cut it in half. You can eat one part, and extract about 20 grains from the other. Peel the pulp from the grains (otherwise they will rot in the ground), but do it carefully, do not damage the shell. To simplify the procedure, you can throw the seeds into water, mix them well and leave to settle for a while. Repeat the process two to three times to minimize the risk of seeds rotting.
Then spread the seeds on a napkin and dry for four hours.
Collection of kiwi seeds
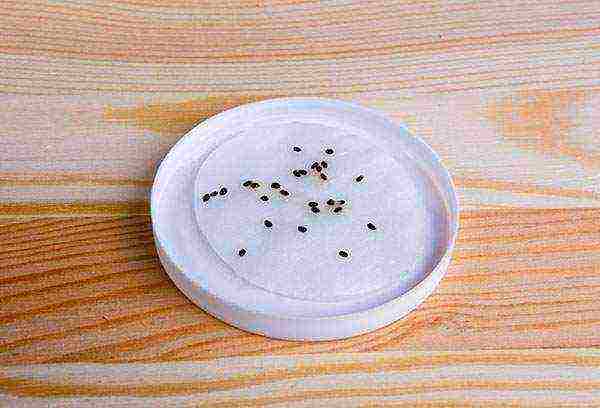
Stage three. Germinating seeds
Step one. Place a piece of cotton wool in a saucer and pour boiling water over it. There should be enough water so that the cotton wool is saturated with it, but the saucer should not be poured.
Step two. Cover the saucer with a piece of plastic and place in the lightest spot in your home.
Step three. Remove the film every evening, and return it the next morning, adding a small amount of water (the cotton wool should be damp all the time).
Soak the seeds
Step four. After about a week, when the first shoots appear (in the form of thin white roots), you should plant the seeds in the soil.
Germinating seeds
Stage four. We transplant seeds into soil
As for the soil, then it should be the same as indicated in one of the previous paragraphs. Pour it into prepared containers or pots (the bottom must be previously covered with expanded clay drainage layer) and make small holes on the surface (the depth should not exceed one centimeter). Place the seeds in the holes, sprinkle lightly with soil, but do not tamp.
Cover the containers with foil or glass and place in a warm place. Alternatively, you can put them in a mini greenhouse. Thereafter, water the ground daily. It should not dry out, otherwise the sprouts will simply die. When watering, you can use a spray bottle, or you can place the pots in a pan and pour water there.
Seed-grown kiwi sprouts
Note! When the first shoots are formed, start accustoming to fresh air. To do this, remove the glass / film daily, increasing the ventilation time over time.
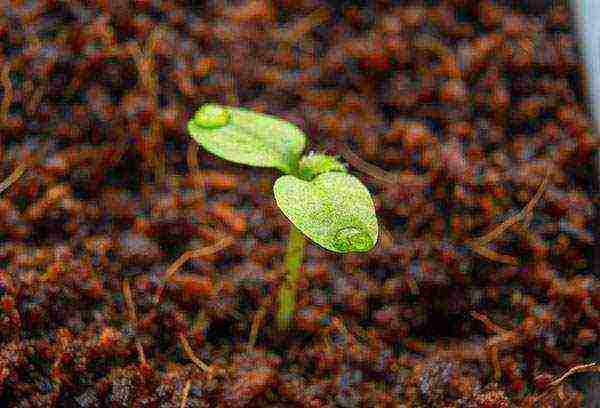
Stage five. Making a pick
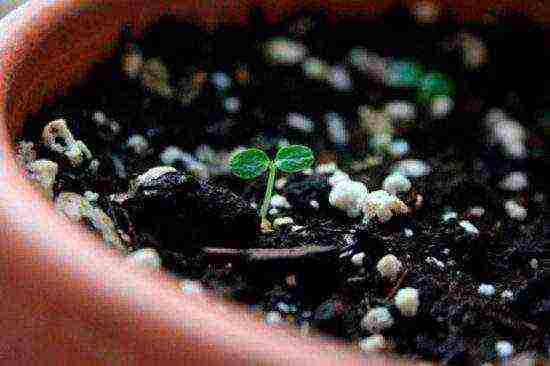
About four weeks after planting the seeds, when there are several true leaves on the seedlings, perform a pick, that is, transplant the plants into individual pots. The soil at this stage, as noted earlier, should already contain less peat, while more sod soil can be used. At the same time, act very carefully, because the root system of vines is extremely delicate and located on the surface, which means that it is easy to damage it.
Kiwi after a dive
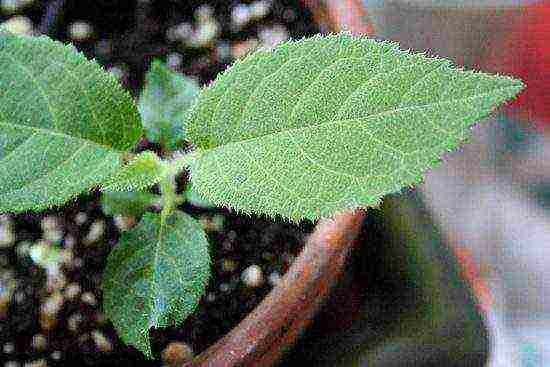
What is a transplant for? The fact is that this plant has rather wide leaves, which, as they develop, will shade each other.
Sprouts with large leaves
How to grow kiwi at home
Stage six. Further care
To ensure that conditions are as close to natural as possible, you must adhere to a number of rules.Let's consider these rules in more detail.
Growing kiwi from seeds
Table. Key Requirements
| Humidity | The earth, as we have already found out, should not dry out, so take care of uniform watering. It is preferable to use a spray bottle rather than a watering can - this will moisten the entire soil surface at once, and the plants will not be damaged. It is also advisable to count the number of sprinkler clicks so that each time the amount of moisture introduced is the same. |
| Pinching | Pinch the upper part of the vine from time to time - this will stimulate the formation of lateral processes, and the plant itself will turn out to be stronger. |
| Lighting | Kiwi needs a long day of light, which means, if possible, place containers on windowsills on the south side. If this is not enough, extend the lighting time artificially with a fluorescent lamp. In winter, the lighting should be horizontal. |
| Feeding | Use organic fertilizer - compost or vermicompost. Apply it every year, digging a small trench around each plant beforehand. In this case, when watering, the top dressing will gradually flow to the root system, so that the vines will grow healthy. |
Note! In the summer, additionally apply a complex type of mineral fertilizer. Do this about once every seven to ten days.
Features of vegetative reproduction of kiwi
Seedlings of this culture are grown using the same technology as described above. The only difference is that the seed must be sown in January. Two years later, a kiwi of one or another variety is grafted onto a seedling, which by that time will grow up and get stronger.
Kiwi seedlings
Seedlings before planting in soil
Grafting can be done in the same ways that are used for other plants; in particular, these are:
- budding;
- cleavage with a green handle;
- a similar process, but with a lignified cuttings.
The vine can then be planted in open soil. If the kiwi will be grown indoors, as in our case, then you should take care of a container of sufficient depth (the roots should have a lot of room for further growth).
You can also grow seedlings from rooted cuttings. The disadvantage of this method is considered to be low germination in indoor growing - there are either few or no plants at all. As for further care, it is the same as when growing by seeds. When the cutting / seedling enters a period of active growth, it will no longer be afraid of low temperatures and can easily adapt to any conditions.
Planted kiwi seedling
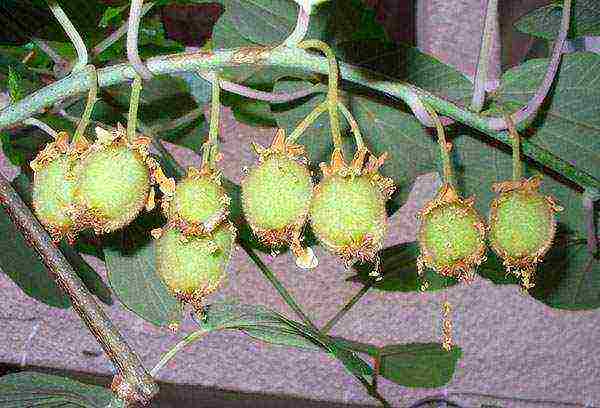
How to get a big harvest?
Liana needs to be placed correctly. It needs a lot of space, so it is better to grow it on an insulated balcony. Also organize a support along which the plant will climb, or make a beautiful and original balcony frame out of it. The length of one liana, by the way, can reach seven meters.
Kiwi on the loggia
Note! Pollination should be taken care of to obtain fruit. In natural conditions, insects are engaged in this, in our case, you must do everything with your own hands.
If there are too many male vines, you can plant "eyes" on them from female vines, which will allow you to get fruit. Ideally, five or six females should fall on a male plant, and if the proportions are not correct, then it is better to vaccinate. The “eyes” take root well, thanks to which the yield will increase significantly.
Video - Kiwi inoculation
Also, periodically inspect the kiwi leaves, and for two reasons at once.
- This will allow you to detect the fungus in time and clean the leaves.
- Liana can be "infected" by various pests from neighboring plants, so in addition to inspection, try to place kiwi as far away from them as possible.
With the onset of autumn, cut off old shoots: those branches that have already borne fruit are recommended to be removed.This will free up space for new shoots, and the vine itself will not age and will bear fruit for many years.
Kiwi harvest
If the vine grows on the balcony, then in winter you will have to additionally protect it from frost. To do this, remove the shoots after scrapping and wrap them up. When spring comes, they will sprout more young shoots.
And in conclusion - one more useful advice. For some reason, cats love the branches and foliage of kiwi, so if you have such a pet, then take care of protecting the plant - you can, for example, enclose it with a net. Otherwise, the kiwi may die.
How to wean a cat from walking on flowers? Ordinary toothpicks will help you.
Seedlings in a cage
Video - Features of growing kiwi
 Is it possible to grow a kiwi tree indoors? Experienced gardeners say yes! Moreover, even a beginner can get a house plant on the windowsill that will bear fruit. Its cultivation is quite painstaking, but many people call the process fascinating for this. Description and photo instructions will help you understand the algorithm.
Home growing kiwi: what you need to know before planting
In the wild, the Chinese gooseberry kiwi, like apples or pears, is a small 30-gram fruit. The habitual large fleshy fruits from 100 g and heavier were received by breeders of New Zealand. Today fruits with a refreshing delicate taste are popular all over the world. In addition, they are very useful and are used in cosmetology, as well as for the prevention of a large number of diseases.
Kiwi grows on beautiful, tree-like vines that resemble a vine. At home, the fruit tree is grown from seeds. Key points to consider before boarding:
Kiwi needs plenty of sunlight
- Kiwi is a dioecious crop. To grow fruit at home, you need at least two plants. You can only determine which specimen is female and which is male only during flowering. Therefore, it is better to plant several vines at once.
- Under optimal conditions of maintenance and care, you will receive the first flowering and fruits no earlier than after 4-6 seasons.
- Any varieties are suitable for growing in a room setting.
- The plant needs about the same conditions as the grapes. For example, in the abundance of sunlight.
If your home does not have south-facing or adjacent windows, a normally developed plant may not come out.
Attention! There are special frost-resistant varieties that are suitable for growing in the open field of the middle lane. The conditions and care in this case are similar to those in the room. Only for the winter should the plant be wrapped. It may take up to 10 years to wait for fruits from such vines.
Planting kiwi: technology and features
Gardeners recommend starting all kiwi planting procedures in early spring. This time is considered optimal to obtain maximum germination. Kiwi seed is not difficult to find. Buy a fully ripe fruit that is soft and crumbly. Without peeling, cut it in half.
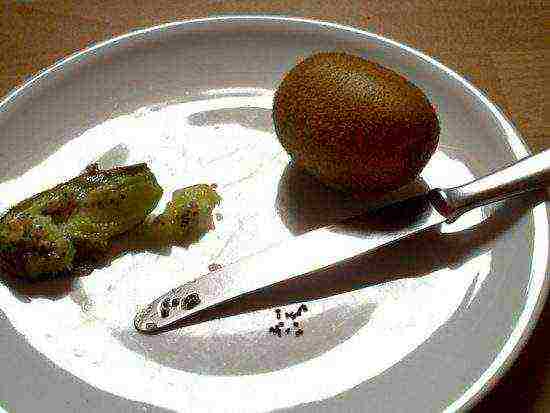
Take seeds from ripe juicy fruit
Then proceed like this:
- remove about 20 seeds, carefully remove the pulp from them;
- wrap the material in gauze and rinse several times with tap water;
- Spread the seeds on a saucer and leave to dry for a couple of hours under normal room conditions.
Attention! At the stage of harvesting seeds, you need to completely get rid of the pulp. Otherwise, the material will start to rot.
The next step is to germinate the seeds to speed up germination:
- Place cotton wool, moderately soaked in hot water, on a saucer. Place the seed on it.
- Place the plate on a well-lit windowsill and cover with plastic wrap. The mini-greenhouse should be opened at night. But make sure that there are no drafts at this time. In the morning, wet the cotton wool again with hot water and stretch the film.
Under these conditions, the seeds should form seedlings in 7-10 days. Maintain the regimen until you see delicate white roots.Now the germinated seeds should be transplanted into the soil:
Kiwi sprout
- Mix equal parts humus, peat, turf and sand.
- Fill small pots with soil. In each, right on the surface, put a few seeds. Sprinkle them on top with a thin layer of soil. You can't ram the ground.
- Spray the planting daily, keeping the topsoil moist. Use only a spray bottle, simple watering cannot be carried out.
Advice. Moistening the earthy coma during this and subsequent stages of growing is extremely important for the plants. Therefore, other methods are also suitable for these purposes. For example, installing a mini greenhouse with half plastic bottles above each pot. However, an excessive amount of water for the root system of the plant will be detrimental.
Growing kiwi: caring for young plants
For fruit tree care to be effective, bring the growing conditions as close as possible to their native, natural ones. Kiwi grows in a climate of long, warm and humid summers. In addition to low humidity or an excess of water, the plant does not like:
- cool climate, temperatures below +20 ° C;
- a sharp drop in temperature even in warm weather;
- wind;
- lack of sunlight.
Advice. If these features are taken into account, you can take the plant outside in summer, and at other times of the year - on a warmed loggia or balcony.
Other nuances of kiwi care:
Fertilize your kiwi fruit regularly
- The key to the health and beauty of the tree is feeding with organic fertilizers: vermicompost or compost. The mixture is applied in the spring, no more than 2-3 times. You can add the entire composition of fertilizers and one-time, dry, in a trench dug around the stem. In the process of watering, the substances will gradually flow to the roots.
- In summer, gardeners recommend fertilizing kiwi with mineral complexes. Frequency - 3-4 times a month.
- Pinching the top from time to time will help to strengthen and make the vine more branched.
- A month after rooting in the ground, the plant will need a new transplant.
- Each plant needs a separate pot. It is important that wide leaves do not block the access of light to each other.
- Room conditions will not limit the growth of vines. An adult plant can grow up to 7 m in length. For vines, you need a support (for example, trellises), along which the kiwi will climb to the ceiling.
How to get a kiwi harvest at home
The optimal ratio of male and female plants for a good harvest is 1 to 5-6. It is very likely that by blooming you will find that this is not the case. Often there will be more male specimens than necessary. In this case, grafting of female twigs-eyes on their stems is effective.
The gardener will have to pollinate the plants on his own. Transfer pollen from male flowers to female flowers with clean and disinfected tweezers.
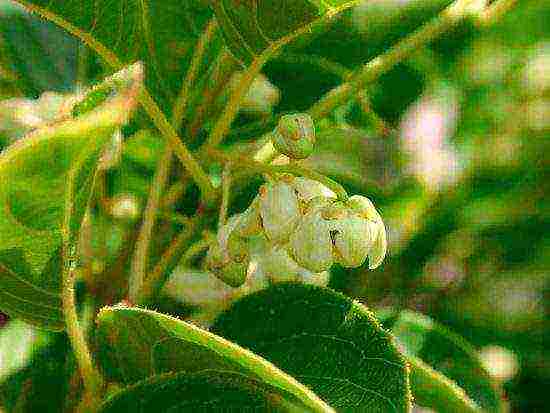
Flowering kiwi
To prevent the plant from degenerating, remove old branches in the fall, especially if the shoot has already borne fruit. This will make room for young vines and keep fruiting at the same level.
Attention! Kiwi is not very resistant to pests and diseases of indoor plants. Keep it away from other plants. In cases of infection, use standard methods of control and prevention of a specific ailment.
Kiwi is surprisingly easy to grow in your home. Attentive owners will be able to enjoy the exotic taste from their own windowsill.
Growing kiwi at home: video
It has long been in the past when only a classic set of vegetables and fruits was grown on the site. Today anyone, even the laziest gardener, wants something like that to grow on his windowsill or in the garden. Exotic! Let's plant a kiwi? Tasty, healthy, interesting, no hassle - what else do you need?
Of course, residents of the southern regions can do their own "fi". They have kiwi growing on almost every corner. But few people know that this vine can withstand frosts down to -30 ° C. Or grow beautifully on a windowsill, in a greenhouse, in a winter garden.That is, residents of middle regions can successfully grow a plant at home.
How to grow kiwi at home? You don't have to run through flower shops looking for a suitable sprout. This empty and useless exercise costs good money. Making it easier. We go to the market or to the store and buy kiwi fruits. Pieces 7.6 of them we eat. And we leave one, the most ripe and beautiful fruit for seeds. Moreover, it does not matter at all whether the kiwi has a fluff. You can also grow at home from the seeds of "bald" berries. Yes, from a botanical point of view, it is a berry.
But this is not what interests us now. The classic way to grow kiwi from seeds at home includes the following important points:
- seed preparation
- germination
- growing seedlings
- landing in a permanent place
- care questions
Well, as you can see from the list, everything is simple. There are no unimaginable moments or difficult points. Let's analyze each separately.
Seed preparation
You can't just pick out the seeds and stuff them into the ground. All this will safely rot and you will get thin compost instead of a beautiful liana. First, the seeds must be freed from the pulp. It is not easy to do this with your bare hands. There is an exit. Anyone who has ever collected their tomatoes for planting knows a very simple fermentation method.
For this, the mashed pulp is poured with a small amount of clean water and placed in a warm place. After a day, a maximum of two, the mixture will begin to ferment. In this case, all the pulp will remain below, and the seeds will float. Here they also need to be collected. A spoon, a strainer, a piece of paper. In any convenient way.
Then they need to dry for about 2 hours. Everything, the seeds are ready for further action.
how to grow mango from seed
Germination
To be sure of germination for sure, kiwi seeds must be germinated. This can be done in two ways: on a rag or in a "snail". Both options are equally good. The only difference is the convenience of the subsequent transplant.
- On a rag. A cotton rag is placed on a plate, a little hot water is poured. Spread out the seeds, then cover with a clear bag or plastic container. Placed in a warm place, ventilate once a day. After 5 days, tiny sprouts will appear. If the seeds are dense, then it will be inconvenient to separate them for transplanting. And if it is wide, then a large area will be needed.
- In the "snail". A strip of polyethylene 10 cm wide is placed on the table. A strip of toilet paper is placed on top and slightly moistened with water. At a distance of 0.5 cm from the top, spread kiwi seeds along the length of the entire workpiece. It is convenient to do this with a wet toothpick. Then, starting from the edge, the resulting structure is carefully twisted into a loose roll. This is called a "snail".
Such a wrapping is placed in a glass so that the kiwi seeds are at the top. 1.5-2 cm of pure water is poured into the bottom of the glass, then the reconciliation is closed with a transparent bag. The entire structure is placed in a warm place. When sprouts appear, it will be very convenient to plant them by simply unrolling the "snail".
how to grow pomegranate from seed
Growing seedlings
After our kiwi seeds have given tiny sprouts, we need to plant them. No, not outside. And not even in a pot. The sprouts are still too weak for this. We will plant them in a wide, low container for now.
Normal land is not suitable for planting. It is too thick and oily. We need a loose, light and at the same time slightly nutritious mixture. For this we take soil, fine peat and clean sand. We mix everything in equal proportions. Next, we disinfect the resulting substrate, because the black leg does not sleep. It doesn't matter at all what you have planted - ordinary tomatoes or exotic kiwi. She will ruin everything. Therefore, spill it thoroughly with a solution of potassium permanganate of medium strength and bake it in the oven at 110 ° C.
Now we take a prepared container 10 cm high (washed with potassium permanganate and dried), make drainage holes. Kiwi sprouts love to drink, but will not grow in a swamp.We pour a layer of prepared soil about 3 cm. According to the scheme 1.5 by 1.5 cm, we make small holes. Depth no more than 5 mm. And carefully lay out the hatched kiwi seeds. Pour no more than 2 mm of soil mixture on top. We can say - lightly sprinkle.
Gently and without fanaticism, spray with clean warm water from a spray bottle, cover with glass. We put in a dark warm place. We remove the glass at night so that cold condensation does not form, which can lead to diseases. In the morning, cover the container again. Instead of glass, you can use a plastic bag or a piece of clear plastic.
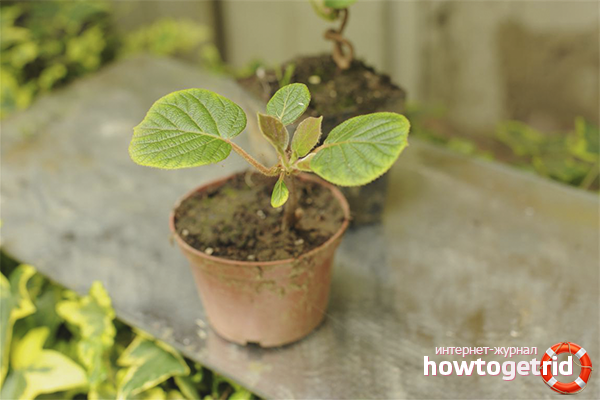
After the kiwi seeds have sprouted, they need to be transplanted into more suitable containers. But not immediately, but only after the formation of a pair of true leaves. It is not worth delaying with this, since a powerful root system develops very quickly in kiwi. Wait a little and then you will have to tear the tangled roots. And this will not benefit the plants. In addition, the kiwi leaves themselves are wide and lush. They will have little space and light, so the sprouts will stretch strongly.
To avoid this, we plant the plant in a container with a diameter of at least 10-12 cm.Two pieces, no more. We put on the lightest windowsill. This southern liana is very fond of light. If you cannot provide good lighting from 7 am to 9 pm, then give up the idea - you are not at all a gardener! Plant rutabagas, it does not require much maintenance. And give a kiwi a fluorescent lamp or additional daylight illumination. A real gardener always has such lamps.
All this time, strictly monitor the moisture content of the earthen mixture. It is strictly forbidden to allow the soil to dry out! Otherwise, why all this dancing with germination and measurement of distances between plants, if you are going to kill them with drought? Better every day, a little spray of plantings from a spray bottle with clean warm water. Moreover, they like to drink kiwi in leaves. Of course, the shelter is being removed. It is no longer needed.
how to grow lemon at home
Landing in a permanent place
After the kiwi has 3 pairs of true leaves, they need to be planted in a permanent place. On the street or in a pot. In this case, the soil should consist of fertile soil and peat, 1 to 1. It is advisable to transplant kiwi by the transfer method so as not to affect the root system. That is, we take out the sprout from the container along with the earth, place it in a hole or pot. Then we add soil from all sides so that the plant is firmly fixed and does not sway.
Kiwi should be placed in a well-lit place without drafts.
How to care for kiwi
Despite the exoticism, kiwi care is not difficult at all. Weeding, regular loosening. Be sure to monitor soil moisture. In extreme heat, kiwi is well sprayed with clean water.
Top dressing. From October to March, kiwi is fed with any available complex mineral fertilizer. Approximately every 12-14 days. After all, this is a vine, and for good growth it needs a lot of nutrients. The fertilizer solution is applied directly under the root on wet soil.
Organic food is fed from April to September, once a month. Carefully dig a groove around the perimeter, put good compost or rotted manure there. Not fresh! Otherwise, you will burn the roots. After several waterings, all the nutrients will reach the plant.
As for pests or diseases, they have not yet been found in the middle lane for kiwi, except for ... cats. Yes, young kiwi plants are very fond of chewing by representatives of the feline family. Therefore, it is better to install a fence for the first three years. In the future, cats lose all interest in kiwi.
how to grow a peach from a stone
A Few Tips
- Kiwi is a dioecious plant. Therefore, one on the site or windowsill will not bear fruit. It is possible to find out whether it is male or female only after flowering.By the way, it occurs in the open field for 3-4 years of growth, on the windowsill - only for 6 years. Male flowers are large, yellowish in color, there are usually a lot of them. Women's - snow-white, large with a large protruding pistil. There are fewer of them on the plant.
- To get a consistently high yield of kiwi, 4-5 female plants are planned for planting on one male plant. You can not wait for favors from bees or bumblebees and pollinate the flowers yourself.
- Pinch the tops of the shoots. So the kiwi will grow in breadth, not length.
- For the winter, kiwi is removed from the trellises (liana) and covered. Moreover, it is better not to put vines on the ground. Place boards or spruce branches. Arches are placed on top, then covered with three layers of greenhouse film. One layer of dense non-woven fabric can be inserted between them. In winter, it is advisable to cover the shelter with snow from above.
- With the onset of March, the film is periodically opened for a short time. This is done so that the vine cools slightly and does not grow ahead of time. After all, March pranks are very insidious: the sun warms up during the day, and frosts occur at night. Therefore, the biological cycle of kiwi is slightly suspended by short-term airing.
- By the way, it happens that return frosts, even short ones, can completely destroy the entire aerial part of an adult plant. Take your time to uproot. During the summer season, a completely independent plant will grow from them.
- Now varieties are already presented for sale that can winter without shelter, and can withstand frosts down to -28 ° C. Try to get this kind of fruit or seedling, and then you don't have to bother with film or other shelter. By the way, the taste of these varieties is excellent.
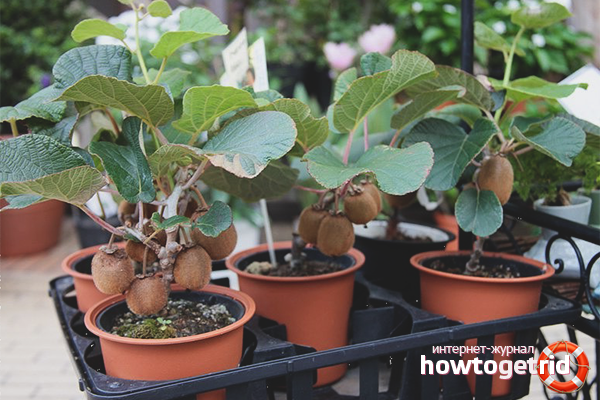
- Kiwi berries are harvested in late October or early November, before real frosts set in. Vines have a very long growth and fruit cycle. But they ripen well in a warm room.
- In an unripe state, kiwis are perfectly stored until February in the simplest plastic bag.
- Those who grow liana on the windowsill, in the winter garden or in the insulated balcony, you can absolutely not worry about the arrival of cold weather. And their kiwis ripen completely on the plant. The only thing to think about is good nutrition for your pet and pollination of the flowers. After all, there are no insects in the house that perform this function.
How to grow kiwi at home? It turns out to be very simple. Follow the above recommendations and you will enjoy your own grown berries every year. Now, when the guests gasp when they see your plant, you can dismissively dismiss it with the words - yes, this is a kiwi, you found something to be surprised, it grows for me by itself.
how to grow pineapple at home
Video: how to grow kiwi in the country
Even inexperienced growers can plant this overseas fruit at home. The whole process can be divided into three stages, which do not require special skills or special knowledge.
Step one - preparing the seeds
Seed preparation for planting is as follows. The seeds must be removed with a spoon, then placed in a fine sieve (gauze can be used) and rinsed under running warm water, carefully separating them from the fruit pulp.
Important!
Fragments of pulp should not remain on the seeds, the further health of the seedlings depends on this.
The number of seeds should be determined on the basis that many of them may not germinate. It is best to start germination with 20-30 pieces, leaving the strongest ones as they grow. Growing kiwi from seeds at home does not require much time or money. The main thing to remember is that this plant is a rainforest inhabitant. He needs warmth, good lighting and regular moisture (both the soil and its aboveground part).
Step two - planting seeds
There are three ways you can start germinating your seeds.
- Peeled and washed kiwi seeds are placed in a tank with settled (or boiled) water at room temperature. A vessel with planting material is placed in a warm room, it is possible near heating devices. The most "live" seeds will hatch by the end of the first week, but if germination is delayed, you should replace the water with fresh water and wait a few more days.
- The second method is similar to the first, but differs in that the kiwi seeds are placed in a napkin or cotton wool soaked in warm water. The water should completely soak the cotton wool, but it should not fill the entire area of the plate. Next, a plate with seeds is tightly covered with cling film and placed on a warm windowsill. At night, it is better to remove the film, allowing the seeds to breathe. In a week, the most active of them will be revealed.
- The third method is fundamentally different from the previous ones. It consists in sowing kiwi seeds directly into peat without presoaking. The peat should be well and evenly moistened, the seeds are sown to a depth of no more than 5 mm. For early germination, it is necessary to create a kind of greenhouse at home. The container with seeds is covered with cling film and placed in a place with an air temperature of at least + 25 ° C. Watering should be done regularly, the soil should not dry out.
Advice
It is better to moisten the soil with a spray gun, so as not to erode the soil and not wash the seeds on its surface.
The third step is planting germinated seeds in the ground
When the soaked seeds opened up and small roots appeared, it's time to continue growing kiwi in specially prepared soil. The soil can be mixed at home on your own, or you can buy ready-made soil mixture for vines. The main thing is that it should be well aerated, with a high content of coconut fibers and vermiculite. Seeds are placed in prepared pots in several pieces. In the future, only one, the strongest sprout is left, the rest are removed at an early stage (in the presence of two or three leaves).
Important!
The plant needs to provide a full-fledged drainage system, since the health of the root system depends on it.
A thick layer of expanded clay is poured onto the bottom of the pot, which will become a permanent "home" for a still young plant, which will prevent excess moisture from stagnating at the roots, and will also provide soil respiration. As a material for drainage, not only expanded clay is suitable, but also calcined pebbles, broken tiles, pieces of foam.
The pot with future seedlings is covered with glass, transparent plastic or film. The best place for such an impromptu greenhouse is the southern window sill in a warm room. Growing kiwi at home requires compliance with a certain temperature regime. Before the first sprouts appear, the air temperature should be at least 25 degrees Celsius, bottom heating of the pot is allowed.
The greenhouse is aired daily. The soil is regularly moistened with warm, settled water using a spray bottle. In no case should it be allowed to dry completely. When the sprouts reach 1–1.5 cm, the greenhouse is completely opened.
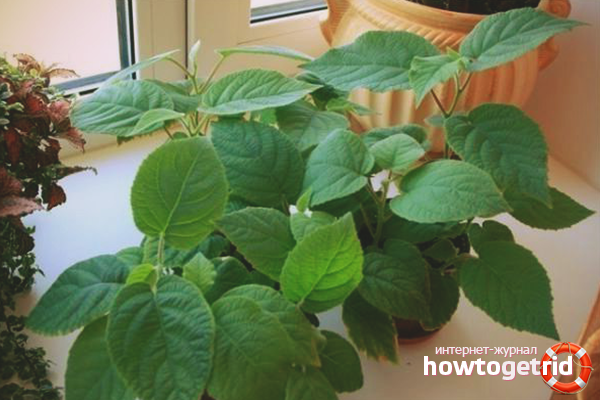
Home care for kiwi
It should be borne in mind that kiwi is a fast-growing liana, which needs strong support for growth. In nature, the plant uses nearby trees for these purposes. In indoor conditions, these should be well-fixed nets, artificial trunks and other suitable supports available in the house.
According to the principle of growth, kiwi resembles grapes. Under natural conditions, its length can reach 8 meters, in culture - about 3. Starting from tiny seeds, it is difficult to imagine that in the coming years an exotic liana will bear fruit at home.
Important!
Kiwi is a fast growing plant that actively consumes nitrogen. Every spring (at the beginning of the growing season), it is imperative to feed the plant, replenishing the lack of essential minerals in the soil.First of all, it is worth remembering the saturation of the substrate with nitrogen. In no case should such events be carried out in the autumn-winter period.

Watering and lighting
Since the kiwi is a native of tropical rainforests, it is necessary to create the appropriate conditions for it to feel "at home." First of all, this applies to high humidity. It can be created using special air humidifiers, as well as by regularly spraying the plant (which is extremely important). A good result is given by placing the pot in a pallet with expanded clay and water.
Drying out the soil is very dangerous and can destroy the plant. With a lack of moisture, the leaves droop, and if measures are not taken in time, they begin to dry at the edges and subsequently fall off. Water the plant so that the water completely moistens the soil and goes out through the drainage holes into the pan.
Lighting for a plant, both in nature and at home, needs bright, which is an indispensable condition for the full growth and fruiting of vines. In this case, direct sunlight can leave burns on the leaves.
Advice
In summer, at home, you should create the effect of diffused sunlight during the hottest hours of the day. Tulle works well for this.
The lack of light has an extremely negative effect on kiwi - the plant stretches out, the leaves become smaller and brighter, the flowers do not develop, and fruiting does not come.
Planting a kiwi at home is not difficult at all, and growing it is not a hassle. All that needs to be done is watering, fertilizing and pruning in a timely manner (this process is practically no different from pruning grapes). The plant, in turn, will surely thank you with its vitamin fruits!