Content
- 1 Seed stratification
- 2 Accelerated stratification
- 3 Seedling care
- 4 Wintering and transplanting seedlings into open ground
- 5 Conclusion
- 6 Features of the cedar tree
- 7 Seed collection
- 8 Where to get the necessary seed composition
- 9 On what soil does it grow
- 10 Requirements for preparation for germination
- 11 Growing container
- 12 Watering mode
- 13 Temperature regime
.
Cedar is one of the most beautiful conifers. The duration of its life is 450-500 years, and the cedar pine reaches maturity by 80-85 years. This long-liver pleases not only with its sprawling long needles, but also with delicious pine nuts, rich in vitamins, microelements, fats and protein.
Cedar can be grown from a nut
You can meet cedars both in summer cottages and on the territory of country houses. Most often they are planted with annual seedlings, but not many people know how to grow a cedar from a nut at home.
Planting material
Growing cedar from a nut is not an easy task, since there are no high-quality planting raw materials on sale. The nuts that you can buy in the store are absolutely not suitable for growing cedar at home. Most often they are shelled and fried. Not many people decide to germinate seeds on their own, because it is much easier to buy an annual seedling and plant it in the ground.
Hand-buying pine nuts is also not a good idea. The seeds retain their germination for 1 year, in the second year it decreases by 50%, and after that the seed will not germinate at all.
In addition to the shelf life of nuts, its conditions can also be violated, which negatively affects the planting material.
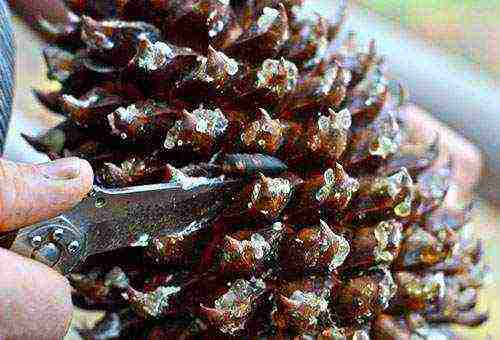
To grow cedar from seeds at home, you have to collect pine nuts yourself. This can be done in places where cedar pine grows at the end of October, November. At this time, the collection of ripe cones begins. You can take seeds or buds with seeds that have fallen to the ground, but they can be damaged by mold or rodents, and there is a high probability that this will be last year's harvest.
It is better to pick the cone directly from the tree, but this is not easy because of the height of the cedar pines. Pickers use long sticks with mallets at the ends, knocking the buds off the very tops. These seeds are more likely to germinate.
To collect seeds, it is best to pick the cone from the tree yourself.
Preparing seeds for germination
To plant seeds, you need to remove them from the bud. This is done quite simply. The cone is placed near heating appliances or quickly burned with a flame from all sides. Under the influence of temperature, the scales open up, releasing the seeds. On an industrial scale, special devices are used that crush the pine cone without damaging the pine nuts.
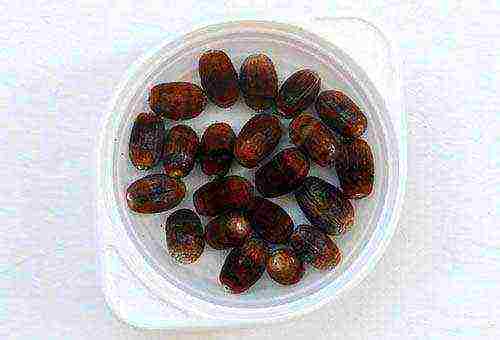
After removing the seeds, you need to take care of their disinfection. To prevent many fungal diseases, pine nuts are soaked in a solution of potassium permanganate for 2-3 hours before planting.
Planting seeds
An important point in the cultivation of cedar from seeds is stratification - the creation of conditions as close as possible to natural ones. In the forest, pine nuts, falling into the ground in November-December, winter under the snow and germinate only in spring. It's pretty easy to create something like this at home:
- After soaking in potassium permanganate, pine nuts are planted in a specially prepared substrate to a depth of 1–2 cm. Too deep planting prevents seeds from germinating.
- The seeds planted in a container are watered so that the whole earth is wet, but not sour from excess moisture. Otherwise, the nuts will start to rot.
- 5-7 cm of snow is laid on the surface of the substrate.The container is covered with polyethylene and placed on the lower shelf of the refrigerator for 3 months. If the weather conditions do not allow immediately covering the plantings with snow, then this can be done later.
- Once a month or as the soil dries, the nuts are watered with water at room temperature. It is advisable to use melted snow.
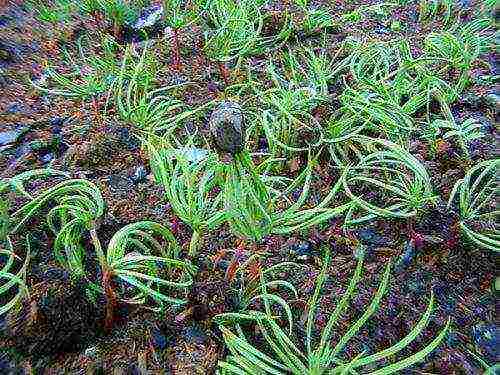
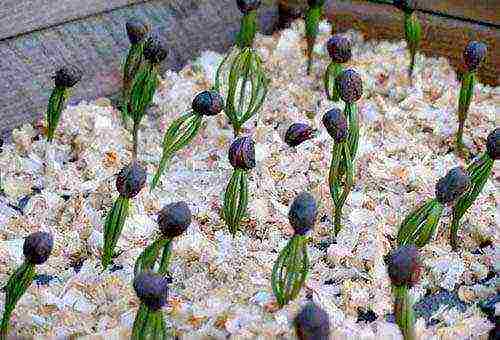
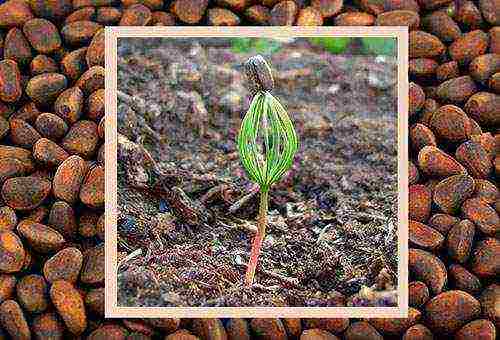
After 3 months of stratification, the container with the cedars planted in it is taken out of the refrigerator and placed on the south window. Most often, the first shoots appear already in the second week.

Cedar sprouts well on the south window
Seed planting substrate
The quality and composition of the soil play an important role in the cultivation of cedar at home. Seeds should be germinated in a mixture:
- river sand;
- small crumbs of gravel;
- peat.
Sand and gravel are calcined before planting. This prevents the development of many diseases, kills mold spores. Sometimes cedar seeds are germinated in a mixture of coniferous sawdust and fertile soil. Such a composition is very similar to the soil of a cedar forest, but it dries up quickly enough, so you need to carefully monitor the watering of the sprouted nuts.

Before planting nuts, the soil should be calcined
Transplanting seedlings
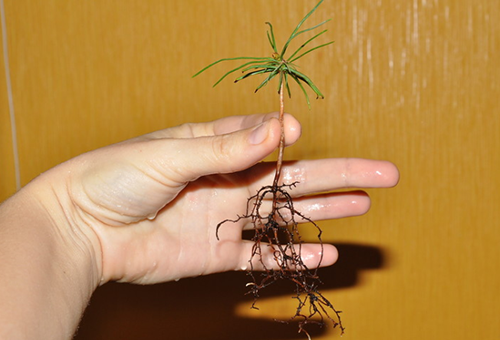
When the cedar sprouts have reached 3 cm, they must be planted in separate containers, where they will grow for the first year. The main thing when transplanting is to carefully handle the delicate roots so as not to damage them.
Drainage is laid at the bottom of the pot, you can buy it in the store or use pine cones. The second option is better, because it brings the growing conditions closer to natural ones. The substrate is made from river sand, fertile soil and coniferous sawdust.
A month after transplanting, you can start hardening the seedlings. First, they arrange airing, and after a while they take it out into the street.
You cannot leave a young tree under the scorching sun, but the shade does not suit it either. You need to put the cedar pot in a place with a diffused shadow - under another tree or canopy.
For the first 10 years, cedar pine grows very slowly, but with good care it will grow sharply. It is better to plant a seedling in the ground up to three years. Such a tree is well accepted and easily tolerates winter.
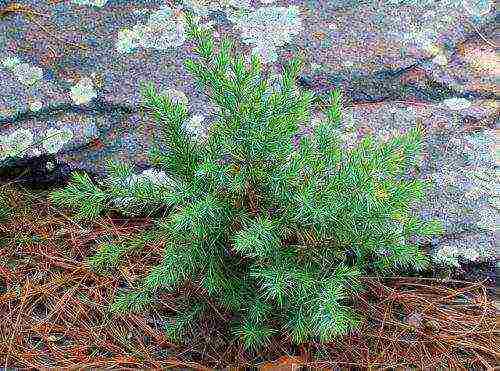
A three-year-old seedling can already be planted in the ground
Young tree care
If it was possible to plant a cedar in the country and the tree took root, then all the requirements for growing pine were carefully observed. Now you can start caring for the seedling. Remember the following guidelines:
- For full development, forest trees enter into symbiosis with myceliums. This useful neighborhood will help the cedar grown in the country to grow stronger. To do this, take 5 handfuls of forest litter and pre-chopped caps of ripe forest mushrooms, soak it all in a bucket of warm water. After a day, the cedar is watered with the resulting mixture.
- It is impossible to loosen the ground around the tree, since the roots are located very close to the surface, there is a possibility of damage.
- The soil around the seedling is mulched to retain moisture and control weeds. Shredded pine or other coniferous cones, sawdust, pine nut shells are used as mulch.
- Water the plant as the soil dries out, but the cedar reacts painfully to waterlogging and may die. Fertilizers for conifers should be applied annually in spring and autumn. If you take good care of the cedar for the first 10 years of its life, then it will actively grow and bear fruit well.
Subscribe Be aware of new products on our site
Siberian cedar is a symbol of health and strength, a tree of life that you can try to grow at home. Growing a cedar from a nut is not as difficult as it seems. First you need to purchase planting material: it is desirable that it be a whole cone with large scales - the seeds are stored in it better. It is important that it is fresh, of a new crop, without mold or foreign smell: such buds are sold in the fall, from the end of September.Roasted or dried pine nuts are not suitable for this purpose - the embryo dies at high temperatures. It is better to find a reliable seller in advance. You should not buy cones in places where cedars definitely do not grow.
Advice
To extract the seeds, the cone must be scalded with boiling water - then it will open. From the remaining scales, you can prepare a healing tincture or decoction, which are used to treat many diseases.
Seed stratification
When growing cedar at home, the only difficulty may arise: the stratification of seeds, which is necessary for their germination. It takes place in several stages.
- First, the nuts are soaked in hot water for three days, changing it daily. Some of them may float up - these are empty seeds, they can be thrown away immediately.
- The rest must be treated with a pale pink solution of potassium permanganate and a fungicide, dipping nuts into it for several hours.
- The next stage is cold stratification. Nuts need to be mixed with clean, moist fine-grained sand (you can pre-ignite it in the oven), sawdust or peat chips in a ratio of 1: 3.
- The resulting mixture must be placed in a cloth bag and put in a small wooden box, in which holes are made in advance so that there is air access.
- The container with nuts is placed on the lower shelf of the refrigerator (in the vegetable compartment) or placed in the cellar for at least 3 months. The temperature for seed germination should be about + 4-6 ° C, lowering to –4 ° C is allowed for no more than 2-3 days.
Every 15 days, the bag must be ventilated, the mixture must be moistened to its original state, and the nuts must not be rotted or moldy (the damaged ones must be removed and the sand replaced). After a while, they will start to sprout. The best period for sowing is considered to be April-May. If at this time the seeds are sown without treatment, they can germinate after a year.
Accelerated stratification
There is a faster way to germinate cedar seeds at home, but it is less reliable than stratification in the refrigerator. You will need fresh, clean nuts, which must first be washed in warm water, freed from resin, and then kept in cold (no higher than 0 ° C) for about 3 days. It should not heat up, otherwise it will not work. To prevent this from happening, ice cubes can be periodically added to the container. Seeds that have sunk to the bottom are suitable for planting.
You can plant them in a substrate prepared in advance (sandy loam, loamy soils or a mixture of peat and sand are best suited), the temperature of which should not be higher than 15 ° C. Nuts are sown to a depth of 2-3 cm, compacting the soil from above - this will help the sprouts get rid of the hard shell. Containers are needed with a height of at least 8 cm and a volume of about 300 ml. Crops are mulched with sawdust or peat chips, placed in the lightest part of the house, but without access to direct sunlight, and watered regularly. The seedlings need a temperature of about 20-22 ° C.
Another option for fast stratification can be used.
- Pine nuts are soaked in warm water for about 8 days. It needs to be changed every 2 days.
- After that, a sand-peat mixture is made, into which the seeds are placed.
- Crops are kept at home at room temperature, periodically moistened and shaken, for 30 days, until they begin to hatch.
- The seedlings are then refrigerated and stored at about 0 ° C until planted in the ground or immediately planted in a pot.
Seedling care
Growing cedar at home from seeds is somewhat more difficult than in the open field, since this tree is very demanding on lighting. If there is not enough light, it is best to supplement the seedlings with special lamps. It is necessary to prepare for the wintering of seedlings in the first year of life, if they stay at home, and will not be planted in the ground: they will need a temperature of no higher than 10 ° C. Such parameters can be on a glassed-in balcony or in a barn.If this condition is not met, young plants will die after transplanting into open ground.
Advice
One of the main enemies of crops is a fungal disease - "black leg". To prevent it, you need regular treatment of plants with a fungicide (once every 2 weeks).
It is better to start immediately accustoming young cedars to the open air: as soon as the threat of frost has passed, take them out into the garden or onto the balcony. This should be done gradually. Plants from seeds, grown at home, and not in the ground, are very delicate and can easily die from hypothermia or, conversely, overheating. The soil from above should be mulched with sawdust, pine needles or peat chips so that it does not dry out. Watering these plants needs moderate, no frills, otherwise the risk of decay of the root system will increase, but the soil should not be allowed to dry out. Cedars respond very well to feeding. For this purpose, you can use special fertilizers for conifers. They need to be brought in infrequently: 1 time in the spring and 2 times in the summer.
Wintering and transplanting seedlings into open ground
Young cedars grow very slowly: in the first year of life, they look like stems about 2–3 cm high with a bunch of short needles at the top. On the second, they can grow up to 7 cm, and in four years reach 20-30 cm. As they grow, the seedlings will need to be transferred into larger containers, making sure that they are planted at the same depth. Plants can overwinter at home on the balcony or in the garden; it is not necessary to add pots in drops if the temperature is not lower than 10 ° C.
Young cedars should be transplanted into open ground before they reach a growth of 1 meter. The landing site should be shaded, with a low level of groundwater. Such seedlings will bear fruit no earlier than 20 years later - for this you need to plant several trees so that they pollinate each other.
Conclusion
Growing cedar at home from seeds is complicated only by the need to stratify and create the right temperature for the wintering of seedlings. The latter is necessary to prepare plants for transplanting into open ground. Caring for young trees consists of regular watering and feeding.
In many ways, getting good seedlings depends on the planting material. When choosing, you need to focus on the size of the cone and its scales - the larger they are, the better. Cold stratification for several months gives an optimal result, as it is close to the natural conditions for seed germination. You can try several ways to grow a tree that will delight with the beauty not only its owner, but also his grandchildren.
Ornamental conifers captivate with their grace and beauty. Since it is possible to grow various forms for our climatic zone, the question arises, how to grow a cedar from a nut? A few facts about the cultivation and properties of the plant will help answer the problem.
Features of the cedar tree
You need to know the characteristics of the plant in order to understand how to grow a cedar. This evergreen plant attracts the eyes of gardeners due to its appearance features:
- lush paws;
- densely planted abundant covering with needles;
- rich green color;
- beautiful cones;
- high smooth trunk;
- bright bark;
- nice smell.
Growing a plant requires patience and careful adherence to all instructions. But the result can amaze the most demanding esthete. Because the cedar can ennoble any area.
The cedar has a high, even trunk
The root system of the tree is very pronounced. The main root is surrounded by strong lateral branches, it keeps well in the soil. Which makes it possible for the plant to keep the lump. Covering the area around the trunk with its needles, the cedar creates a special temperature and exchange regime.
Seed collection
One of the sources of seed material may be its natural growing conditions.To do this, it is not necessary to visit the cedar forest; for the necessary samples, you can go to the nearest botanical garden or order seeds from the forestry.
You need to get the seeds in the cone. Since during transportation with a nut, various processes can occur:
- drying out;
- frostbite;
- damage by various insects;
- loss of surface integrity;
- debate.
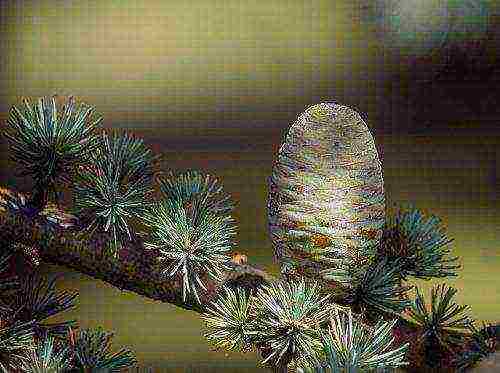
In the cone, they are protected from external mechanical and climatic influences. You should not buy nuts in the store or in the markets, since the seeds are treated with hot oil for culinary purposes. This means that they are no longer suitable for disembarkation.
You need to get cedar seeds in the cone
Where to get the necessary seed composition
For a novice gardener, an important question is where to get the necessary material. Buying samples from unverified sources does not guarantee seed germination and viability. You can write out cedar seeds through:
- garden societies;
- botanical gardens;
- Departments of Botany and Horticulture of Universities;
- thanks to independent sellers;
- from the forestry;
- through the seed almanacs.
Any of the methods will make it possible to obtain the required amount for germination and planting. To be sure of the result, it is worth ordering several cones at once. Pay attention to the date of collection of cones, they should have been taken in the period from October to November. The age of collection matters, the average duration of seed germination is 2 years.
Pay attention to the timing of harvesting your buds
On what soil does it grow
When preparing, it is necessary to take into account an important fact when planning to undertake germination. One of the most significant factors in the successful obtaining of resistant planting material where cedar grows. Knowing this question increases the likelihood of getting normal seedlings.
In nature, cedar trees love gray podzols. It is a soil consisting of:
- humus;
- silica;
- silt;
- trivalent metals;
- sulfonic acids;
- loam;
- orstein grains;
- forest litter.
Such soils are considered characteristic of:
- Siberia;
- Southern Canada;
- Northern Europe;
- Far East;
- Central United States.
They have a pronounced shape. Gray loose composition from the upper horizon, more dense reddish lower one. Accordingly, the seed germinated material should be planted in similar conditions.
Requirements for preparation for germination
To germinate pine nuts, you can carry out preliminary preparation:
- soak the seeds in an aqueous solution with the addition of Kornevin;
- withstand a three-day period;
- change the aquatic environment once a day;
- mix with refined river sand;
- place in a canvas bag;
- the container must have air holes;
- put in the refrigerator;
- remove moldy samples.
Better to use small seedling containers
The next step will be planting the material:
- after 6 months, plant it in the ground;
- the substrate must contain a large amount of sand;
- hole depth 1 cm;
- the storage location of the container must be at room temperature;
- the germinated material is placed in the light.
Thus, seedlings suitable for further planting are obtained.
Growing container
Many people wonder how to grow a cedar from a nut in home pots. First rule, it shouldn't be too old. Even after being treated with manganese, mold is likely to appear.
It is better to use small containers for seedlings, connected in pallets. They have a shallow depth, making it easy to extract the plant. Moreover, in this version, it is easy to observe them. Any material will do, since the plant is only temporarily enclosed in a container.
Water a cedar seedling from a spray bottle
Watering mode
You need to water the plant from a spray bottle. To avoid washing out the necessary substances from the soil. The most common method is to check how dry the soil is with a match. Moisturize as needed, at intervals of no longer than one day.
Moisture requirements are necessary as the sprout has to break through the thick rind. The gradual soaking of the surface gives a kind of swelling effect, after which the sprout can violate the integrity of the cover.
Successful germination can be achieved by adding one serving of various growth stimulants. The dosage guide is indicated on the package. This will make it possible to more efficiently obtain the necessary planting material. You should not flood the plant, since this way you can achieve its decay.
When planting a nut in the soil, it should have an average temperature
Temperature regime
When planting a nut in the soil, it should have an average temperature, since under natural conditions the seed has similar conditions. After the first shoots appear, it is necessary to add surface heating. This can be done with a lamp, turning it on for a few hours. Or by placing palettes with sprouts in a brighter place. During this period, you should carefully monitor watering, you will have to moisturize every day.

Cedar is an evergreen coniferous tree. It personifies strength, health, beauty, longevity and purity. Cedar cultivation is a noble business, but extremely laborious. Of course, the easiest way is to buy ready-made seedlings, because after planting they practically do not require maintenance, except for regular soil moisture. But it is much better to grow a cedar from a nut - this way you will be next to your tree from the first minutes, and when after many years it spreads its rich crown above the ground, the pleasure will be incomparable.
How to grow a cedar from a nut at home?
- Nuts bought at the grocery store or at the market are not suitable for growing cedar, as they are prepared for consumption by boiling in boiling salted water. Your best bet is to find a smooth, pleasant-smelling cedar cone with no signs of mold or staleness.
- Remove the nuts from the cone and rinse with warm water. Additionally, you can rub the shell with a toothbrush or sponge - this will wash off the resin, which blocks moisture from accessing the core itself.
- After you have cleared the nuts from excess resin, it is necessary to stratify, that is, keep them in cold (about 0 ° C) water for three days, changing the water once a day. After this time, you will notice that some of the seeds have risen to the surface of the water, and some have sunk to the bottom. Emerging nuts are empty or of poor quality, even with proper planting, they will not sprout, but drowned seeds can and should be planted in the ground.
- After three days, drain the water and mix the nuts with peat, forest soil or coarse washed sand, then slightly moisten the mixture and place it in a wooden box with air holes or a perforated flower pot. After all the manipulations, the container with nuts can be removed to a dark, cool place - now the seeds should lie for several months (from 3 to 6 to simulate natural winter) at a temperature of about + 4 ° C. Take out the seeds every couple of weeks and moisten the soil. Try to choose the time so that the planting of the seeds falls on March-April.
- After a long preparation of the seeds, you can finally start planting. It is better to use natural forest soil, but in the absence of such, you can buy special soil for conifers at a flower shop. The volume of the pot should be small, about 200 grams, and the planting depth is about 2 cm. Seeds can be sprinkled on top with needles or sawdust. Protect the sown seeds from high temperatures and bright sun: it is better to put the pot with the future tree in a shaded place with a temperature of 18-20 ° C. And, of course, the soil should be periodically moistened, while at the same time avoiding "flooding" of the seeds.
- It is best to plant the maximum number of seeds, because only 10-15% of them will sprout.Depending on the quality of the seeds, the first shoots will sprout in 2-3 months and will be barely noticeable - up to five years, the cedar grows very slowly, and the growth is up to 6-7 cm.By the third year of life, the sprout can reach 15 cm, and after five to six years, it can be planted in an open space.
- Cedar likes well-drained stony or loamy soils. Therefore, it is advisable to mix the soil in the place where the cedar is supposed to be planted with sand and gravel.
There is another interesting nuance: they say that before planting pine nuts, you need to hold them in your mouth for a few minutes - so the future tree will absorb your energy and information about you, and only then will it really grow into your truly grateful cedar. Of course, this moment is very similar to superstition, but in the first years of life, the cedar definitely needs your love and care.