Content
- 1 Is it easy to grow calla lilies?
- 2 Lighting
- 3 Watering and humidity
- 4 Indoor temperature
- 5 The pot must be chosen correctly
- 6 Soil composition
- 7 Transfer
- 8 Bulbs
- 9 How to feed?
- 10 Finally
- 11 How calla lilies reproduce
- 12 Planting calla lilies in a pot
- 13 Calla lily care at home
- 14 Conclusion
- 15 Flowers of death
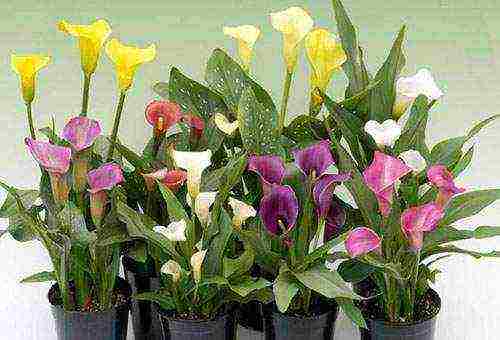
- 16 Varieties of calla lilies
- 17 Breeding features
- 18 Seed propagation
- 19 Air temperature and humidity
- 20 How to transplant calla lilies at home?
- 21 Watering and spraying
- 22 Top dressing and fertilization
- 23 Houseplant diseases
- 24 Calla: home care - reproduction, transplant
- 25 Calla lilies in pots: home care - soil, lighting, temperature and humidity, conditions for flowering
- 26 Conditions for flowering: why does calla not bloom?
- 27 Calla: home care - feeding and watering
- 28 Potted calla lilies: home care - why do they die?
- 29 Why do calla lilies at home turn yellow leaves?
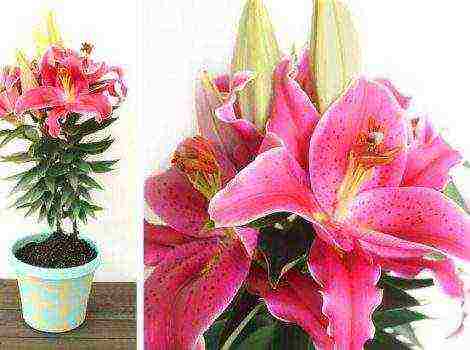
Calla is a herbaceous perennial plant that belongs to the aroid family. There are other names: calla and arum. The homeland of this plant is the African continent. In this climate, calla lilies can grow up to two and a half meters in height. The plant has rather large, heart-shaped, arrow-shaped leaves. Calla lilies bloom in small flowers, neatly wrapped in a large "blanket", which creates something like a funnel. This makes the flower attractive to many gardeners.
Homemade calla lilies in a pot, which everyone can take care of, usually does not smell. But those plants that grow in the garden, in warm weather, exude a pleasant and delicate aroma, reminiscent of pineapple combined with vanilla. So, calla lilies in pots: how to care?
Is it easy to grow calla lilies?
Many people find it very difficult to grow these plants at home, as they require careful maintenance. However, this is not at all the case. According to experts, calla lilies in a pot, photos of which prove their beauty, are unpretentious, and no special tricks are needed to grow them. The main thing is to create optimal conditions that will be as close as possible to natural for this plant. It's actually not that hard to grow calla lilies. To make the plant feel comfortable, you just need to follow a few rules.
Lighting
So, calla lilies in a pot, home care for which does not require much effort, are very demanding on light. In addition, it is a thermophilic plant. These two facts should be taken into account when choosing a place. This is one of the basic rules of success. Calla lilies grow well in places where there is diffused sunlight or partial shade. There is one more peculiarity. Callas need a small dose of direct sunlight in the evening. For the formation of peduncles, these plants need a day of light lasting more than 12 hours. This is one of the important conditions. After flowering, daylight hours should be at least 8 hours and no more than 10.
Watering and humidity
Calla is a moisture-loving plant. Do not forget about this. This is especially important when growing Ethiopian calla lilies. After all, this plant grows almost in a swamp, where there is very high humidity not only of the air, but also of the soil.
Calla flowers in pots can have different shades of bedspreads. This makes them popular among flower growers. Plants with colored bedspreads are not so demanding on moisture. However, don't forget about regular watering. The amount of water depends on the period. For example, watering should be more abundant during flowering and moderate during dormancy. It is not recommended to overdry the soil in the pot.
The room must have high humidity. Of course, this is very difficult to achieve. To keep the plant comfortable, you can spray it more often.
Indoor temperature
Growing calla lilies in a pot is a simple process. Of course, if you follow certain rules. Do not forget that calla lilies usually grow in southern latitudes, where temperatures are constantly high. These plants are very difficult to tolerate when this figure drops to 8 ° C. Therefore, keeping calla lilies on the balcony is only worthwhile in warm weather. In winter, the plant should be transferred to a room where heating devices are installed. The most favorable temperature for the growth of calla lilies is from 20 to 25 ° C.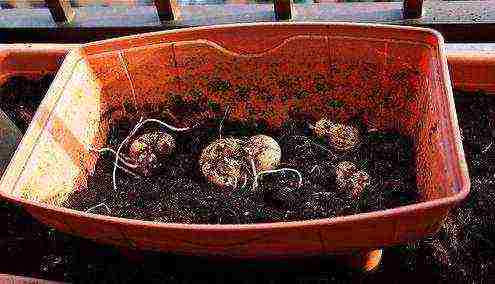
The pot must be chosen correctly
An important role in the cultivation is played by the capacity in which the calla lilies will grow. For Ethiopian, it is best to use a pot or container that is large enough. If the container is small in volume, then the calla will simply not bloom. Even with fertilization, only the green part of the plant will develop and new leaves will appear. But calla lilies in a pot will not bloom. Home care for this plant consists not only in timely watering, but also in the correct selection of temperature conditions, containers for planting and soil. It is worth noting that Ethiopian calla lilies prefer to grow in splendid isolation.
For one plant, you should choose a pot with a diameter of more than 20 centimeters. As for the material from which the container is made, it is better to give preference to porous ones. This will allow the plant to breathe, and excess moisture will go away faster.
You don't need to be an inventor to grow red calla lilies in a pot. In terms of free space, these plants are not particularly capricious. For them, a three-liter container is quite suitable.
Soil composition
How is calla lilies grown in a pot? Home care for this plant must be carried out throughout the year. Do not plant calla lilies in regular soil. They grow best in a mixture of sand, rotted manure, peat and garden soil. It should be noted that the acidity of the soil should not exceed 6.
Transfer
Planting calla lilies in a pot is another crucial moment. Do not transplant a weak plant or damaged shoots. In order for the calla to get used to its new place faster, you should use not ordinary soil, but soil, which is as close as possible to natural in composition.
Before replanting the plant, it is necessary to rinse the roots. This should be done with extreme caution. Otherwise, you can infect the flower with a new disease or introduce bacteria into the wounds. As a result, in a new place, calla will suffer from a new ailment.
After that, a little soil should be poured into the pot and the plant should be placed. The transplant does not end there yet. The roots should be carefully sprinkled with soil, and then watered. Calla is a plant that requires a lot of water. Therefore, the transplanted sprouts should be watered abundantly. Of course, you should not be too zealous in this regard.
Bulbs
Let's figure out how to plant a calla in a pot and grow it from an onion. First of all, the use of such material is the easiest method for growing such plants. Calla lilies reproduce very easily by roots and bulbs. The main thing is to create optimal conditions for their growth.
For those who do not know what a bulb is: this is where the growth of a new plant begins. It's not really root. But in terms of its structure, the calla bulb is very similar to it. To be more precise, it is a thick and rather large process of the main root, from which young shoots appear in the future.
As soon as the calla bulb accumulates a sufficient amount of moisture and useful components, it begins to release new shoots.In the process of photosynthesis, the bulb will supply all the necessary substances to the plant.
Planting calla lilies in a pot is a simple process. To prevent the bulb from spoiling in the pot, it is recommended to make drainage holes. After that, a hole is made in the container with a depth of at least 10 centimeters. An onion can be planted in the resulting hole. You need to place it so that the sprouted tips look up and are placed strictly horizontally. After that, you can sprinkle the roots with earth and water the calla.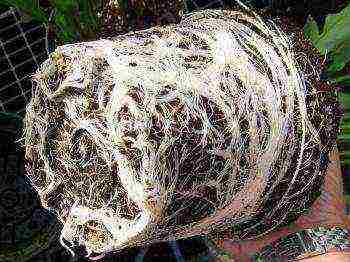
How to feed?
So how is calla lilies grown in a pot correctly? Home care for this plant consists not only in timely watering, but also in high-quality feeding.
If the climate in your country is mild and the temperature never drops below zero, then you have the opportunity to have flowering calla lilies in your garden all year round. Of course, this takes a lot of time and effort. The plant should be fed once a year without fail. However, this is not enough for calla lilies to bloom all year round. To achieve what you want, it is worth fertilizing more often. This should be done regularly, about twice a month. Fertilizer can be added to the compost in the soil, or you can mix the slurry with water for irrigation. Even a beginner can take care of calla lilies in pots. Using various tricks, you can grow charming flowers that will delight not only the eyes, but also the soul.
However, when applying fertilizer, you should be careful. After all, the plant can be overfed. In this case, the calla can die. Burnt leaf edges are signs of excessive fertilization. This indicates that the plant has received a lot of nitrogen.
In addition, there is another rule, without which growing calla lilies in a pot is not possible. So, the less the plant receives solar heat and light, the more fertilizer needs to be applied to the soil. This has a positive effect on the flowering of calla lilies. Therefore, it is very important to place the plant pot correctly and calculate the required amount of fertilizer.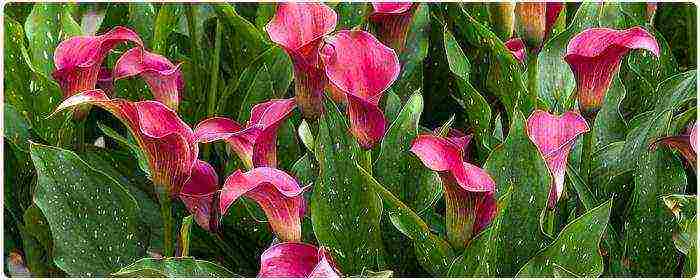
Finally
Calla is an elegant and very beautiful flower. Caring for this plant is not that difficult. The main thing is to follow all the rules and carefully take care of the calla lily. This is the only way to achieve abundant flowering, which will delight any gardener. It is worth noting that calla lilies can be grown not only in pots, but also in the garden. These plants will perfectly decorate the site and the house. In addition, they just look amazing in bouquets.
Not all city dwellers can go to summer cottages, and in order not to get away from nature, they arrange a flower garden on the windowsill. Planting calla lilies at home will give the room a solemnity and style. That part of the plant, which is usually called a flower, is actually a veil, a large bracts that envelop the ear, on the stem of which there are many small flowers. Calla lilies can also be grown outdoors, in regions where the temperature does not drop below 0⁰, they can even bloom all year round if provided with proper care. The flower is good at home in a pot, and in a flower bed, and in bouquets.
How calla lilies reproduce
Calla tuber quickly grows overgrown with children. If you do not transplant a flower every year at home, soon the entire area of the pot will be covered with new young shoots, and caring for the plant will become impossible. When transplanting from one copy, you can get a lot of planting material. When you remove the onion from the ground, carefully separate each piece with a bud with your hands. It can be planted at home in a new container or in a flower bed. If you are a little late and the babies do not separate from the mother tuber, just break the rhizome into pieces. Sprinkle the wounds with crushed coal.
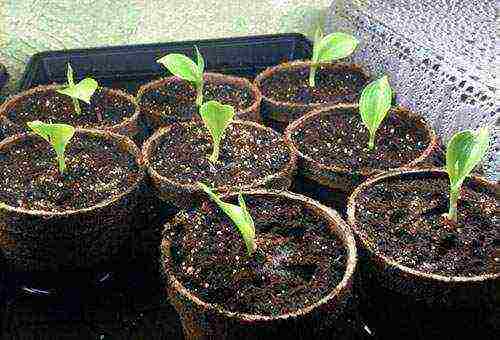
Planting flowers by seeds is possible.There are not always pollinating insects indoors, sometimes at home you will have to arm yourself with a brush and start transferring pollen from flower to flower. Do not store the grains: the fresher they are, the better they will germinate. Place them in a damp cloth immediately after collection and keep in a warm place at home. Usually, after 2 days, the seeds begin to hatch. Sow the swollen specimens in a pot of seedling potting soil. Until shoots appear, plantings are easily rotting. The best care is not to water them from above, but to fill the sump with water so that the soil is moistened through the drainage holes. Spray the dry surface of the earth with a spray bottle.
When sprouts appear, place the container in the light and keep at home at a temperature of about + 22⁰. After 2 months, cut the seedlings into separate pots, and after a year, plant them in a permanent place. Some flower growers prefer not to pick, but immediately plant 2 swollen grains in a glass. After the emergence of shoots, the strongest plant is left, and the second copy is removed or transferred to another container. All care for young plants is reduced to watering as the soil dries out.
Usually, planting and growing from seeds at home allows you to get a new species that does not look like the parent plants. There are different colors of the bedspread:
- white;
- yellow;
- pink;
- red;
- blue;
- purple;
- black.
Perhaps the seeds you received in 2 years will give an unexpected result and at home there will be a flower of a completely unusual shade on the windowsill. Try transferring pollen from a black flower to a white or red flower and see what happens. On a warm day, you can take the pots outside and entrust the breeding work to insects. If you don't like surprises, buy seeds of the desired variety from the store.
Planting calla lilies in a pot
In order for calla lilies to develop well at home and give large inflorescences, you need to properly equip the place where the cultivation will take place and provide the plant with good care. The roots should be spacious, so choose a pot of at least 0.5 m with a diameter of 0.4 m or more. Check drainage - although this plant lives in swamps in its homeland, stagnant water is harmful to it. Cover the bottom with expanded clay or pebbles for drainage. You can buy special soil for calla lilies, or you can independently prepare a composition of equal parts of leafy soil, turf and compost.
You can take the bulbs from friends when they transplant their flower. When buying planting material, pay attention to its appearance.
A quality bulb has certain characteristics:
- large, even, firm;
- have a peel of uniform color without wounds and damaged areas;
- have a healthy kidney.
Calla planted in March takes root well at home. Before planting, soak the tubers in a pale pink solution of potassium permanganate, and then inspect each specimen. Remove all sore spots, growths and other defects, and treat the wounds with a disinfectant solution. It is a good idea to keep the bulbs in a growth stimulant solution, then planting and growing will give the best results.
Indoor calla lilies produce large leaves, a long stem, and a heavy inflorescence. In order for the rhizome to hold tightly to the soil, when planting at home, bury it to a depth of 6 to 12 cm. Until a sprout appears from the ground, keep the pot under the film so that it is warm and humid inside. At this time, maintenance is not required, just open the container every day for ventilation and make sure that the soil does not dry out. After the emergence of the shoot, the pot must be placed in a place with a temperature of + 15⁰ to + 18⁰, where the maximum lighting occurs in the afternoon. The southwest window of the house is very suitable, only the cracks must first be repaired so that the plant does not suffer from drafts.
Advice
If you have purchased rare bulbs, please read the instructions carefully.They may need shallow landing or special care.
Calla lily care at home
These plants are accustomed to the conditions of African swamps, so caring for calla lilies at home should be special. When a plant is actively developing, it needs a constantly moist soil. In order not to go around every day with a watering can, install a watering system for indoor flowers. Flowering will end, and the great need for liquid will disappear, water only when the top layer of the earth dries up.
The aerial part of the flower also needs moisture when growing. If the air is dry at home, place a pallet of wet pebbles next to the pot. In warm weather, spray the leaves with a spray bottle.
Advice
Calla lilies will warn you of changing weather better than meteorologists with accurate instruments. When dewdrops appear on the leaves and bedspreads, wait for rain.
You need to feed the plant with a special fertilizer for calla lilies. During the period of growth and flowering, more careful care is required, the flower needs to be fertilized every 2 weeks. If using other formulations, choose a formulation with a low nitrogen content. From an excess of nitrates, the flower can get sick. If you notice that dry areas have appeared on the edges of the leaves, completely eliminate nitrogen from the dressings.
From pests, aphids and spider mites can attack calla lilies at home. You can simply wash the leaves with soapy water, and if these measures do not help, treat them with insecticides.
At high humidity, the flower is sometimes attacked by fungal infections.
- Gray rot. A grayish bloom appears on the leaves and flowers. The bush must be treated with fungicides.
- Brown rot. Leaves and peduncles dry up. Stop watering, add hydrogel to the soil, and treat the plant with fungicides.
- Bacterial rot. The peduncles and the base of the leaves darken. Gradually, the entire aerial part turns yellow and fades. The disease is almost not amenable to treatment, the affected specimens must be destroyed.
- Anthracnose. Brown spots appear on the leaves, which gradually increase and turn into a reddish circle with a light center. Cut off the damaged parts, and treat the entire flower with fungicides.
Ripening of the seeds weakens the tuber of the plant. If you are not going to harvest the seed at home, cut the peduncle when the bedspread begins to take on a green tint. After that, in some varieties, the leaves wilt and fall off, and in some they remain green. Usually, the aerial part of the calla lily with a white veil is preserved, and the colored ones shed their greens and immerse themselves in a dormant period. At this time, the plant needs to be transplanted, and the bulb must be freed from small children. When transplanting, remember that the tubers are poisonous. Keep children away from them and wash your hands thoroughly after handling.

Conclusion
Capricious African calla lilies can bloom at home on the windowsill, even in the far north, if the plant is properly cared for. A large bush needs a lot of nutrients, do not forget to feed and water the flower in time. You need to be especially careful about moisture: a marsh plant does not tolerate dry air and soil, but it can get sick from excess water.
If the leaves do not wither on their own, some growers cut them off and let the bulb rest until the next growing season. Other indoor flower lovers have been growing calla lilies at home as evergreens for years. You can choose this option, just watch your pet carefully. If you notice that, despite good care, the plant has become depressed, the flowers are small, then do not torture it, cut off the leaves and let it rest.
It is difficult to grow calla lilies for bouquets at home: each plant produces one flower. To collect several compositions for a wedding or anniversary, you need to make all the window sills with pots.Planting and growing flowers in greenhouses or winter gardens will help to plant flowers for cutting, and at home several beautiful flowerpots will decorate the interior, create a good mood for the inhabitants of the home and guests. Do not chase after quantity, 2-3 pots with colorful huge petals will create a cozy atmosphere even in the darkest room.
Calla is an exquisite and incredibly beautiful flower. Most often it can be seen in a sophisticated and romantic house. This flower is a representative of the aroid family, which came to us from distant South Africa.
The main feature of calla lilies is its unpretentious attitude to the place of its growth. She feels equally well in the wild and at home.
Flowers of death
It is very common to hear that calla lilies are the flowers of death. The sources of this opinion are unknown. According to one of the versions of its origin, calla lilies are very often brought to funerals in some countries. Therefore, they began to be called the flowers of death.
But in real life, they have nothing to do with death. In many states, these flowers are a symbol of love. They are often used in the preparation of wedding bouquets in European countries.
Varieties of calla lilies
In the modern world, there are more than a hundred varieties of calla lilies, which differ from each other in the color of the buds and their shape. All these flowers have been divided into two types by professional florists: terrestrial and wetland.
The care that calla lilies require at home (photos of the plant are posted in this article) is not particularly difficult. It must be planted in a wide, small container. In order for it to grow well, it is necessary to build drainage in the pot, provide the plant with regular watering and timely fertilization.
Breeding features
Reproduction of calla lilies at home can be done in three ways:
- tuberous;
- shoots;
- seeds.
The first method of how to grow calla lilies at home and propagate them involves separating the minor tubers from the mother's root. This planting material can be seen in almost every flower shop. Daughter nodules are small (5-15 millimeters), so they should be grown before planting. To do this, they must be buried in the nutrient soil.
To carry out reproduction with the help of shoots, it is required to separate them from the main stem and root in the nutrient soil. And only after that they are transplanted into a pot filled with fertile and drained soil.
Seed propagation
The most troublesome is the propagation of calla lilies from seeds at home. This is due to the low level of their germination. Therefore, sprouts very rarely appear even in experienced professionals.
Before propagating calla lilies at home by planting seeds in the soil, they must be kept for about six hours in a growth stimulant solution. After that, they are placed on a damp cloth in a warm place for about seven days. After this period, the seeds should sprout. Only then can they be planted in the ground.
Open soil is not the best option for growing calla flowers at home, as they most often die in it. To prevent decay of planting material, watering should be reduced to a minimum. The best way to replenish calla seeds with moisture is through a small hole at the bottom of the pot.
Air temperature and humidity
When growing calla lilies at home, you need to pay attention to some of the characteristic features of this process. This flower is a light-loving plant, so it is necessary to provide the place of its growth with good lighting both in summer and in winter. In addition, in the spring, it is necessary to gradually accustom the plant to the fact that the length of daylight hours increases.
These flowers are lovers of warmth.Therefore, they develop very poorly in cold conditions. The temperature regime in the room where they grow should be in the range of 18-23 degrees Celsius. Airing the room must be done very carefully, excluding the formation of drafts.
The air in the room must be humid. To do this, you can plant plants in pots with pallets, which will eventually function as water tanks. As the moisture evaporates, it will saturate the air while simultaneously increasing the humidity in the room.
How to transplant calla lilies at home?
The first transplant should be done only after the seedlings have hardened. A tall and wide pot is suitable for this. Sand drainage is placed at its bottom and filled with nutrient soil. After that, holes must be made in the soil, into which sprouts with roots are laid.
During this operation, it is advisable to process seedling roots with a growth biostimulator. But this must be done very carefully in order to avoid harming the immature flower sprouts. After transplanting, the plant is carefully watered with distilled water.
If the calla was purchased in a store, it should be immediately transplanted into a larger pot at home. The most optimal for this flower is a slightly acidic soil. You can do it yourself using deciduous soil, peat, and a small amount of sand. Mature plants are best replanted in late autumn, in November.
Watering and spraying
Calla has fairly wide leaves that require regular maintenance. Dust must be especially carefully removed from them with a damp, soft piece of cloth. In addition, they need to be sprayed regularly.
An important condition for good growth and development of calla lilies at home is watering. It was already mentioned above that these flowers love moisture. Therefore, watering them should be carried out regularly and often. If the soil in their pot dries up, a variety of diseases can develop, which often lead to the death of the plant. Particular attention should be paid to watering during the hot summer months.
It is especially important to keep the soil moisture in the container at the correct level during the growing season of the plant. After the flowers have ripened, watering can be reduced. They should be carried out only after the topsoil has dried.
Top dressing and fertilization
Many people are interested in how to make calla lilies bloom at home. When growing these flowers, one should not forget about periodic feeding. In order for these plants to please you with their flowering year-round, you need to significantly increase the amount of dressings. But too much will not do him any good. For example, nitrogen in large quantities can provoke the appearance of blackening along the edges of the leaves.
The best time to feed calla lilies at home is January - March. In order to ensure full flowering, fertilization should be carried out once every 5-7 days.
For these plants, those types of fertilizers are suitable that stimulate growth and flowering. These include superphosphate and potassium nitrate. In the assortment of flower shops there is a large number of special dressings containing the optimal amount of trace elements and nutrients.
Also, calla lilies must be fed with organic fertilizers at least once a year.
Houseplant diseases
The main pathogens of domestic calla lilies are fungi and bacteria. However, you will never come across them if you know how to care for calla lilies at home. The best way to fight disease is prevention.
It is necessary to very carefully monitor the condition of the soil in the pot, excluding its drying out or waterlogging. You also need to protect the flower from direct sunlight and drafts.
The key to a successful fight against emerging ailments is knowledge of their features and symptoms.The most common diseases of this indoor flower include:
- anthracnose, accompanied by the appearance of brown spots on the leaves. Over time, they crack and dry out;
- gray rot that forms on all parts of the plant due to improper care, high humidity or soil;
- bacterial rot, which is very difficult to treat and quite often requires immediate destruction of the infected flower to prevent spread to other plants;
- root rot, which contributes to the gradual wilting of the plant and appears as a result of abundant watering and waterlogging of the soil;
- lack of flowering as a result of frequent rearrangements or transplants of calla lilies, poor lighting or insufficient fertilization, and so on.
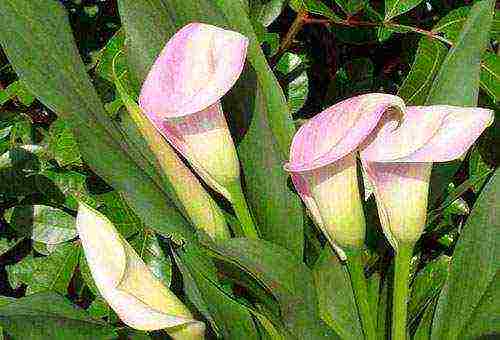
How to care for calla lilies at home is not a very difficult process. But do not forget that the varieties of these plants require different care. For example, white calla lilies at home require more moisture. But at the same time, they do not stop growing during dormancy or lack of flowering.
Calla lilies "mix" at home are unpretentious to humidity and soil. But at the same time, good lighting is required for their good development. In addition, during the dormant period, such a flower sheds its foliage. Therefore, you should not panic - the plant is just sleeping. And with the onset of summer, its leaves will grow back.
Calla is one of the most elegant plants in the Aroid family, flowering indoors.
Its "popular" names: calla, arum. She comes from the swampy forests of South Africa.
In nature, there are 8 types of calla lilies, which are divided into 2 groups: tuberous and rhizome.
In addition to the type of root system, they differ in the size and color of the bedspread (varieties of tuberous calla lilies have different colors, and rhizomes bloom mainly with white flowers).
Of these, suitable for growing at home:
• Calla Ethiopian (Zantedeschia) - the largest species cultivated in indoor floriculture. The large leaves are heart-shaped. It blooms with funnel-shaped white flowers. Unlike colored calla lilies, it retains its leaves during the dormant period and remains green. The most popular varieties: Green Goddess, Pearls, Nikolay, Childsiana; Albomaculata.
• Calla Eliot reaches a height of up to 50cm. It has large variegated leaves, a yellow flower cover. Notable varieties: Black-eyed Beauty, Yellow Corner, Vermeer, Black Beauty, Captain Chelse.
• Calla Remani - compact tuberous species (up to 70 cm high). On its basis, varieties with red, pink, purple, black shades of bedspreads have been bred. Popular varieties: Chameleon, Evening, Indian Summer. Anneke, Black Forest, Bolero.
Calla lilies in pots, home care, which are not as difficult as it seems at first glance, still need a special approach. In order for them not only to grow, but also to bloom in indoor conditions, the grower is required to create an optimal combination of conditions that are most similar to natural ones.
Calla: home care - reproduction, transplant
Reproduction
At home, calla lilies are propagated mainly vegetatively. In zantedeschia, the rhizome is divided into parts. Each of them must have at least one kidney. Sections are dried and powdered with charcoal powder or disinfected with brilliant green. The division of rhizomes must be carried out at least once every 4 years. Otherwise, lateral small shoots are formed around the mother bush, which will not give flowering. After that, the delenki are planted in a separate pot.
In colored calla lilies, daughter nodules are separated from the mother.
An overgrown calla lily is ready to divide
Seed propagation is the most difficult way. This is due to the low percentage of their germination.If you managed to get ripe seeds, then they must be soaked in a growth stimulator (Kornevin, Epin, Heteroauxin, Etamon, Zircon) before planting, and then left to germinate in a warm place on a damp sponge or gauze. After the seeds have hatched, they can be planted in the ground. However, another difficulty arises here: the planting material often rots. To reduce losses to a minimum, it is better to moisten the sprouts not from above, but through a wick. Planting is grown at a temperature of + 22 ° C. Seedlings dive 2 months after sowing.
Transfer
Calla lilies are transplanted annually in the spring after the end of the dormant period. At the same time, you can divide the rhizomes or tubers. The pots are wide, not too deep. At the bottom, drainage is required up to 5 cm thick. Calla are planted in pots no deeper than 5-10 cm.
In colored calla lilies, the selected tubers should be firm, lively, with a smooth yellowish skin. Before planting, it is recommended to keep them in a weak solution of potassium permanganate or treat them with a fungicide.
Strips of white calla lilies are planted to a depth equal to their 3-fold diameter of their rhizomes.
At first, it is not worth watering the planting too much - there is a high probability of decay (it is better to spray it from a spray bottle). After the emergence of sprouts (approximately 14 days after transplantation), active watering and feeding begin.
Calla lilies in pots: home care - soil, lighting, temperature and humidity, conditions for flowering
The soil
For tuberous varieties of calla lilies, a suitable soil composition will be as follows: leafy, soddy soil, humus, coarse sand in a ratio of 1: 2: 1: 0.5. For rhizome varieties, you can use a universal soil for flowering plants or replace it with such a mixture: equal parts of humus, leafy soil, coarse sand, 2 parts of sod land, ¼ part of clay. In both versions, 1 tablespoon of superphosphate is added to 3 liters of the total volume of the substrate.
Lighting and location
Callas need bright, diffused light. The duration of daylight hours should be 10-12 hours. In autumn and winter, it is necessary to provide additional lighting with an intensity of at least 700-800 Lux. Lack of light leads to a loss of decorativeness of the plant: leaf petioles are stretched, there is no flowering, in tuberous calla lilies, the color of bracts is fading.
In summer, the best location for zantedeschia will be the west and east windows. In winter, on the contrary, to get additional sunlight, it is better to rearrange it to the south side.
Air temperature and humidity
For different types of calla lilies, the temperature and humidity in the room has some differences.
Rhizome plants during the active growing season feel good at + 17-21 ° C. After flowering during the dormant period, they are kept at + 10-13 ° C for at least 2 months.
"White" calla lilies need high air humidity (70-80%). To do this, their leaves are sprayed with soft water, the pots are placed on pallets with wet moss, expanded clay. Better yet, use special humidifiers.
The optimum temperature for the development of "colored" calla lilies will be + 20-24 ° C. During the "rest" of plants, it is increased to + 25-28 ° C, so that the tubers ripen and flower buds form. Tuberous calla lilies have a fairly moderate air humidity (50-60%). Every day they wipe the leaves with a damp sponge.
Conditions for flowering: why does calla not bloom?
It often happens that a calla lily bought in a store does not bloom at home. One of the reasons for this behavior is that the "vegetation-rest" regime is violated. Plants on sale are "pumped up" with phytohormones to maintain a presentable appearance. To send the arum to "hibernation", it is necessary to reduce watering and put the pot in a cool room.
The wrong irrigation regime also "slows down" the beginning of flowering. Calla, as a tropical plant, likes to actively "quench their thirst" during the growing season. This is especially true for Ethiopian calla lilies.It is important to remember that it is impossible to water these "green African women" with cold water - there is a high probability of decay of the roots. It is better to use soft warm (+ 20-25оС) settled water for this.
An inappropriate pot size is another likely reason for calla lilies not flowering. This Tropicana is growing pretty fast. When it becomes cramped in the pot, it stops growing and is in no hurry to please with its elegant flowers. After a dormant period in the expanded "family", it is necessary to separate the "children" that weaken the mother plant and transplant them into separate pots. At the same time, the soil is changed to fresh.
An incorrect feeding regime negatively affects the ability of calla to bloom. With an excess of nitrogen, the plant "fattens" - it develops a deciduous mass to the detriment of flowering. Therefore, it is necessary to apply phosphorus-potassium fertilizers, "responsible" for flowering.
With an insufficient depth of planting of a tuber or rhizome, an active growth of lateral shoots takes place in the soil. If they are not separated and transplanted, then there will be no flowering.
Calla: home care - feeding and watering
Watering
Calla lilies also have different requirements for watering. So, "colored" calla lilies are watered moderately: stagnation of moisture in the soil can become fatal for them (rot is formed on the tubers). Excess water is drained from the pallet. The next watering is carried out when the topsoil dries up to 2-3 cm deep.
"White" calla lilies love abundant watering, especially during the period of active growth. The soil in the pot should always be moist.
After flowering in all species of this plant, watering is reduced to 1 time per week, and tuberous specimens after 1-2 months of this regime stop watering altogether.
Top dressing
With the release of calla lilies from the dormant period, they are fed every 2 weeks, alternating mineral and organic fertilizers. When carrying out foliar dressing, the plants are sprayed so that the liquid does not get on the bracts (ugly spots form on them and the flower loses its decorative effect).
Potted calla lilies: home care - why do they die?
Calla lilies in pots at home most often die with improper care, as a result of which weakened plants are exposed to pests and diseases.
The most malicious "lovers" of calla are spider mites, whiteflies and aphids... To destroy them, acaricides (Aktelik, Sunmayt, Vertimek) and insecticides (Fitoverm, Biotlin, Aktara, Akarin) are used.
With the wrong irrigation and temperature conditions, calla lilies are often affected by various bacterial and fungal infections. Root rot can be recognized by such signs: massive wilting of leaves and peduncles, necrotization of the root system. Its occurrence is promoted by high humidity and air temperature, excess nitrogen in the soil. To help the plant in this case, it is necessary to temporarily stop watering it, partially replace the wet soil with a dry one, treat the plant with a fungicide solution (Fundazol, Previkur, Rovral).
Gray rotcaused by the pathogenic fungus Botrytis cinerea, spreads through contaminated soil, water, and wind. Its characteristic feature is a gray bloom on the plant.
On defeat bacterial rot peduncles, roots, leaf bases darken, over time the plant dies. Sick calla lilies should be destroyed.
If round-shaped brown spots appear on the leaves, gradually merging, this means the plant is sick with anthracnose. The damaged parts of the calla are removed, the plant itself is treated with fungicidal preparations.
Why do calla lilies turn yellow leaves at home?
Calla lily leaves turn yellow when kept at home for 2 reasons: preparation for a dormant period and errors in care.
After the plant has bloomed, it begins to prepare for a "well-deserved rest": in "colored" calla lilies, all the leaves turn yellow and die off, and the "white" zantedeschia retain their green foliage.
Improper care of calla lilies affects the appearance of the plant. As a tropical plant, it needs high air humidity, which is difficult to maintain at the proper level in living quarters (especially during the heating season). Therefore, calla lilies should often be sprayed with settled water, rearranged away from heating devices.
Waterlogging or overdrying of the substrate also leads to a change in the color of the leaves and their wilting.
Although feces require a long daylight hours (10-12 hours), too bright light depressing it. Therefore, if the plant is on the south window, it must be shaded or rearranged to another place.
Calla leaf burn
Long-term cultivation of calla lilies in one pot without replanting and replacing the soil leads to its depletion and, as a result, to yellowing of the leaves. Nutrient deficiencies also cause increased fragility of leaf petioles. With a lack of nitrogen, the leaves lose their gloss, their ends droop, and with the grasp of potassium, they rise up.
source