Content [show]
Beans are one of the most unpretentious and useful garden crops. To get good yields, the gardener just needs to provide the bean sprouts with access to moderate amount of sunlight, regular watering and a small amount of fertile soil. How to sprout beans at home with minimal effort, in the presence of the listed components, will be considered in this review.
You can germinate beans before planting at home.
How sprouted beans are used on the farm
Most often, sprouting beans at home in an accelerated and guaranteed way is necessary in order to solve the following three tasks:
- prepare sprouts for planting in open ground;
- prepare food using sprouts;
- conduct school experiments with the child on growing sprouts from seeds.
Healthy eating habits eat sprouted bean sprouts
The procedure for sprouting beans for all these cases differs only in the number of seeds that need to be grown and in the necessary tools at hand. After all, it is clear that by sprouting three grains, you can get by with much less inventory than laying beans on seedlings for a garden bed.
How to grow seedlings
The fact that beans are an unpretentious crop does not relieve gardeners from the obligation to ensure that all seeds sprout well in the garden.
The seedlings of beans are the beans themselves.
The traditional way of growing beans involves sowing beans in the beds and then caring for the sprouted shoots. However, this method has disadvantages:
- under unfavorable weather conditions (frequent rains, a drop in temperature), beans rot in the open field;
- sowing non-germinated seedlings significantly increases the waiting time for the harvest.
Growing beans outdoors requires preparatory work with the seeds
Germinating seed beans at home and planting mature shoots in the ground allow you to avoid possible troubles.
You can sprout beans at home for planting in several ways:
- in a flat dish;
- using rolls of cellophane and toilet paper.
Judging by the reviews of the owners who have tried different methods of germination, the latter is the most convenient.
Growing seedlings "in diapers" is popular
Using hand-rolled beans, you can quickly sprout asparagus, common white beans and other varieties of it at home.
To make a roll-up you will need:
- seeds (beans, you can get regular beans from the store);
- a roll of cellophane 7-10 cm wide and 30-50 cm long (for these purposes, you can use rolls in which garbage bags are rolled when sold, the strip of the bag is of sufficient width, length and keeps its shape well during the entire germination process);
- toilet paper.
A layer of toilet paper is laid on a strip of cellophane. Toilet paper must be evenly moistened with water, for which you can use a syringe. Seeds are laid out on a moistened layer of paper with an indent of one centimeter from the top edge. The distance between the seeds is small: from 0.5 cm to 1 cm.Seeds can be laid in different ways, it doesn't matter.
After the seeds are laid out in a row along the top edge of the strip, cover them with another layer of toilet paper and also moisten the paper from the syringe. After that, the strip must be rolled up. As a result, you should get a roll with a height of 7 to 10 cm, with a diameter of about 8 cm, along the upper edge of which beans are laid.
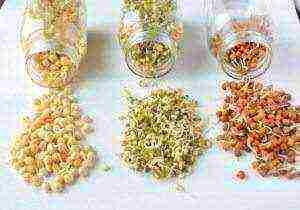
Place the empty edge of the roll in a container of water and ensure that there is always enough water. In a few days sprouts will appear, and in a week and a half, strong sprouts ready for planting in open ground will reap from the roll.
Bean sprouts in cooking
Connoisseurs of healthy food use not only the beans themselves, but also their sprouts for cooking. For these purposes, both common beans and small mung beans are suitable.
Sprouts can be fried, can be used raw for salads. The main requirement for sprouts as a food product is juiciness, tender structure and freshness.
You can grow Indian mung beans with your own hands
It is very inconvenient to use a roll to get such sprouts. There is a more rational way to sprout beans for use in sprouts cooking. It can be seen in the example of mung bean.
For cooking you will need:
- a glass of masha;
- colander;
- a bowl in which you can place a colander;
- gauze;
- water.
Before germination, mung beans must be sorted out and damaged seeds must be removed. After that, the colander should be sent with one layer of cheesecloth and put the sorted mung bean on the cheesecloth.
A colander with mash is installed in a bowl into which water is poured. You need enough water to cover the mung bean.
Cover the bowl with a colander and wave with a towel and place in a warm place. The water in the bowl should be changed every three hours.
If everything is done correctly, the mung bean will sprout quickly, literally the next day.
However, this is not yet a finished product. To be able to use mung bean for food, it must grow for 4-5 days.
It is obvious that it is not difficult and very economical to grow tasty and healthy bean shoots at home.
Any bean seeds, even from a store, are suitable for germination.
School experiences
Growing a bean shoot for school experiments at home is a task that is feasible for a primary school student.
For this you will need:
- nylon cover;
- several cotton pads;
- a few beans.
At the bottom of the lid, you need to lay several halves of cotton pads, abundantly moistened with water. Three to four beans are placed on the discs. From above, the beans are covered with the remaining halves of cotton pads, also abundantly moistened with water.
The contents of the cap are watered daily. At the same time, it is not necessary to pour heavily (so that there is water in the lid). Watering should be done in moderation, but every day.
After 4-5 days, sprouts will appear from the beans, and already from them you can grow a strong fruiting plant at home.
Beans are known to every inhabitant of our vast country, but not everyone knows about their varieties and growing rules. Cultivating this kind of culture at home is a snap. Beans are rich in various vitamins and microelements by their composition. With all this, in terms of care, it is an unpretentious plant. So, how to plant beans correctly, and what care features are there?
Description of beans
The plant belongs to the legume family, which unites about 97 species. His homeland is considered

Lat. Phaséolus
Latin America and India. Beans are widespread in England, France, Brazil, Germany, etc. In Russia, it appeared in the 16th century. An interesting fact - initially this plant was grown only for decorative purposes, and after several centuries, it began to be cultivated as a vegetable crop.
This is a truly unique plant, since its fruits contain a huge amount of useful elements that are so necessary for the human body.
There are a lot of species of this plant: mainly common beans were common in our country. Beans can be:
- curly;
- half-crumpled;
- bush.
In the first case, the length of the plant can reach five meters or more, in the second - up to 1.5 meters, and in the third, the height can vary from 20 - 70 cm. In Russia, bush varieties are more preferred.
During the flowering period, the plant can become a decoration for a vegetable garden, a garden plot or a local area. It has rather large leaves, and the flowers are irregular butterflies, collected in inflorescences of 2 - 6 per brush. The length of the pod depends on the variety, it can vary from 5 - 25 cm.Their color can be different:
- White;
- Red;
- Purple;
- Black.
In addition, beans are subdivided depending on the structure of the valves:
- Sugar or asparagus;
- Semi-sugar;
- Peeling varieties.
An interesting fact: the plant is thermophilic, because its seeds germinate only at a soil temperature of about 10 degrees, in this regard, the culture is sown at the same time as cucumbers.
How to choose the right variety of beans for your home?

Bean pods
Is there a difference between a greenhouse and a glazed loggia? The answer is no. We choose a place for location along the walls so that our plant does not shade others.
Above, we figured out that there are several types of this plant: climbing, semi-climbing and bush. The latter species is the fastest ripening, which is important for some regions of our country. Curly plants will have to be tied to a trellis (a lattice that serves as a support for plants), and bush plants can be tied to sticks up to 60 cm high and this will be quite enough.
It is better to refuse hulling varieties of beans right away, they are not suitable for growing in greenhouses.
For a loggia, sugar or asparagus beans are ideal. The most popular of these are the following varieties:
- "Caramel";
- The Oil King;
- "Sachs 615".
First grade: in 2 months, the bush can give pods of a pleasant sugar taste. It should be noted that this variety is resistant to all diseases.
The second can be harvested in less than 2 months. The pods are tubular in shape and can reach a length of 25 cm. The taste is delicate. They can be used both fresh and harvested for future use.
The last variety has a length of no more than 40 cm. As in the second case, it has tubular pods up to 12 cm. They contain a huge amount of nutrients and sugar.
Preparation of planting material and land
The fruit of the bean has a hard shell; it grows rather poorly from dry seeds.

Bean seedlings on the windowsill
Immediately before sowing, it is not recommended to soak them, because they will simply rot in the cold soil.
Professionals proceed as follows: the seeds are placed in a small container and poured with a weak solution of potassium permanganate. The temperature of the solution should be at least 70 degrees. After this procedure, the seeds should be sown immediately. Pour the rest of the hot solution into the ground.
Or you can do it differently: dilute a weak pink solution of potassium permanganate in water, its temperature should be approximately 60 degrees. Pour the soil with this solution and sow the beans immediately.
If you are going to grow beans at home, it is important that the balcony or loggia is glazed. As a rule, they begin to sow it in late spring. If you do not have a balcony, but you still want to enjoy delicious fruits, do not despair. Containers or seed boxes can also be placed on the windowsill in the room, but in this case the seeds are sown in mid-March.
The soil for this plant should be loose, fertile and rich in various trace elements.
It does not tolerate acidic soil, it must be slightly alkaline, therefore, a deoxidizer should be added before sowing seeds.For this, you can use chalk, dolomite or ash.
Planting stages
Remember that the planting site must be well lit, otherwise the plant will not grow in the shade. And this means only one thing: if you are going to grow beans in a room, then it will need additional lighting.
Stage 1

First shoots
Seeds can be planted in the ground immediately (as described above) or previously germinated. If you prefer the second method, then the scheme is very simple:
- We take the required amount of seeds and wrap them in cheesecloth;
- We collect a little warm water in a small container and dip the seeds into it;
- As it evaporates, add water to the container.
It is important to know that all specimens must be carefully examined for defects before planting.
Damaged seeds are sifted out immediately. Only in this way will you protect your plant from pests, and they can ruin the harvest even on a loggia or in an apartment.
Stage 2
Particular attention should be paid to the choice of a box or container for planting a plant. For bush varieties, we choose a container with a volume of at least 2 liters, and for climbing varieties - at least 35 liters.
Once you have acquired the correct box, you should tackle the soil. For the selected varieties, we use the following composition: 2 parts of soil and one part of humus.
Stage 3 Disembarkation
There is no difficulty in this. It is enough just to adhere to some rules and recommendations:
Before planting the seeds, even if you have soaked them beforehand, you should dip them in hot water or pour it over the soil.
Seeds are planted at a distance of 10 cm from each other, while two grains can be placed in one hole at once.
The optimal time for planting is late spring. After 5 - 7 days, the beans will give their first shoots, after 6 weeks - the plant will bloom, and in a few weeks it will give the first harvest.
Care and watering

Sprouting beans
In order for our plant to give a good harvest, it is necessary to carry out proper watering.
Absolutely the entire legume family loves water, especially the plant needs it when the pods appear. Watering should be carried out as it dries, it should be moderate.
Water should not get on the leaves, otherwise the plant can get sick with a fungal disease.
Watering is best done in the morning. It is stopped after the appearance of the second pair of leaves, and resumed from the beginning of flowering of the plant.
On cloudy and cold days, beans need extra lighting. After the first shoots have appeared in the container, you need to stick a stick to which in the future they should be tied.
The plant does not need special fertilizers, but they will not be superfluous either. For this, you should choose a mixture containing potassium and phosphorus. Fertilizer should be applied no more than once every 2 weeks.
Important! Even at home, the plant can be affected by a spider mite or caryopsis.
The latter can fall into the ground during planting, and then settle inside the fruit. If this still happened to your plant, then it is important to treat it with special biological products.
Harvesting the first harvest
The pods, as soon as they are ripe, are immediately removed and used. In this case, several pieces can be left for the next planting, but they must fully mature. Growing this crop at home cannot be called large-scale, but, for example, 8 planted bushes will be enough to harvest after 2 months.
Cool weather can shift the timing of fruiting somewhat. If you decide on curly varieties, then it will be enough to plant about 5 bushes on the loggia.
While watching the video, you will learn about growing beans.
Beans, of course, are useful, because they are rich in useful vitamins and minerals, and they also contain vegetable protein, which is similar in composition to meat. It is unpretentious in care, the main thing is that you must strictly follow all the rules and recommendations and you will achieve a rich harvest.
Have you noticed a mistake? Select it and press Ctrl + Enter to tell us.
Legumes
It is not difficult to sprout beans on your own at home, this does not require special skills or special equipment, you just need a little free time and patience. But in order to quickly get a harvest in a short time, it is important to know the rules for sprouting beans, which you will learn about below.
Useful properties of the product
Sprouted beans are an irreplaceable food product that has a lot of useful qualities. Bean sprouts look like seeds with small roots and are leafless. Only 2 varieties of beans are suitable for such a process:
- Mash
- Azuki
Bean sprouts are a storehouse of vitamins and minerals. In ordinary grains, the content of these substances is two times lower than in germinated grains.
Bean sprouts
This product is rich in vitamin C, so it is indispensable for people with reduced immunity. Its daily use helps to eliminate toxins and toxins from the body. Its high potassium content helps to strengthen the heart muscle. In addition, such a product has the following properties:
- diuretic
- antimicrobial
Many experts recommend introducing it into the diet of people with various chronic diseases, for example, diabetes mellitus.
Such a product must be consumed during the period of weight loss, as well as to recuperate after physical exertion.
The calorie content of sprouted beans is 14 kcal per 100 grams of product.
In addition to all this, this product is extremely useful for pregnant women:
- Able to prevent various fetal pathologies, as it contains a large amount of folic acid or vitamin B9
- Prevention of anemia and toxicosis during pregnancy
- The risk of seizures is significantly reduced
This product has its own contraindications, therefore, before using it, you must seek the advice of a specialist. You should not engage in amateur performances, otherwise you can only harm your body.
Contraindications to use

Dangerous with stomach ulcers
Even the most useful product has its own contraindications, and sprouted beans are no exception. Should not be used by people or should limit the daily allowance for those who suffer from the following pathologies:
- flatulence
- individual intolerance to vegetable protein
- stomach and duodenal ulcer
- children under 12 years old
The daily intake of bean sprouts should be no more than 100 grams. The pediatric dose should be halved. It is best to start with a small dose of 50 grams, and then, if there are no side effects, you can gradually increase it.
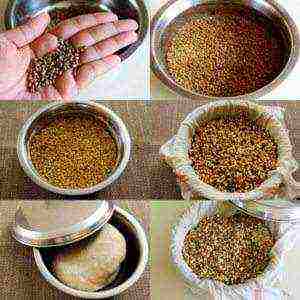
How to properly prepare the seed?
Preparing seeds for germination is quite simple. To begin with, you should carefully sort out the seed. Throw away any shriveled, moldy, or dried beans. After you have removed all damaged specimens, the seeds need to be rinsed well, while removing foreign debris.
The preparatory process is over, you can proceed to one of the germination methods, which you will learn about below in the article.
Several germination methods
So, there are quite a few methods of germination, but they are united by one principle: the seeds should be provided with a lot of moisture and light, so that the hard skin gets wet faster, the seeds swell and sprouts appear.
Since there are quite a few methods, we will consider the most common:
Using gauze
- The seed should be placed on a moistened gauze, then cover with another layer of gauze on top. It is necessary to ensure that the lower and upper layers of the material are always moist, but water should not show through to the surface, otherwise the grains will simply rot and will not germinate. In order to prevent the formation of plaque on the seeds, it is necessary to promptly rinse the gauze / cloth.For rapid growth, you can add special preparations to the water that contribute to the early appearance of sprouts. They can hatch as early as 24 hours after planting, then they can be planted in the ground.
- For the second method, you will need a flat glass container. This is where the beans are placed, after which the container is covered with damp gauze / cloth. The container with the contents must be removed to a warm place so that the beans do not start to grow moldy. With this method, the first shoots hatch on the third day. By the way, this method is very convenient, because germination can be observed thanks to a glass container. As soon as the sprouts reach 3 cm in length, they need to be transplanted into the ground.
- Sprouting method on cotton balls. This method is also quite convenient, because you can personally observe how a sprout grows from a seed and how it develops in the future. So, we send the healthy seed to cotton balls, then transfer it to a transparent container, moisten it with a little water and put it in a warm, bright place. After 24 hours, you will watch the first shoots hatch. And of course, in such a container it is very convenient to look at the germination process, because it is interesting not only for children, but also for adults.
It is important to know: after the first sprouts of beans appear, they should be germinated no more than 2 days.
The appearance of a small sprout is, of course, an extraordinary miracle, which any person awaits with excitement, no matter how old he is. If you decide on this for the first time, then for this it is better to buy small green beans Mash (Mung). They are fairly easy to find as they are sold in any store today. They are especially appreciated by supporters of a healthy diet.
Method of sprouting beans for eating
Why is the product so useful? It is rich in many vitamins and minerals. It is especially recommended to be introduced into the diet during the peak of the incidence of influenza and ARVI. How to sprout beans for food correctly?
Ready to eat
For this we need a small plastic container. Several small holes need to be made in the bottom of the container so that water does not accumulate, but flows out. Place a small bowl under the plastic container. It should not touch the bottom of the container.
Put a small layer of gauze on the bottom of the plastic container. Top with pre-selected beans. Dry, damaged or moldy fruits should be thrown out in advance.
Then fill the grains with lukewarm water, so that they are covered by 1/3. Cover the grains with another layer of gauze on top and place the container with the contents in a warm place.
It is recommended to water the grains every 2-3 hours, so the sprouts will sprout twice as fast. The water from the bowl must be drained periodically. The very next day, the first shoots will hatch, but watering and draining of water will need to be continued. Sprouted beans should be consumed only on the 4th day, when the length of the growth is 5-7 cm.
Before using the product, it should be well rinsed and skinned.
It should be remembered that such a product should be introduced into the diet gradually. You can add it a couple of teaspoons to smoothies or vegetable salads. Try to chew well, wash down the sprouts with tea or juice.
It is better to consume such a product in the morning, otherwise you will not be able to fall asleep at night due to the stimulating effect.
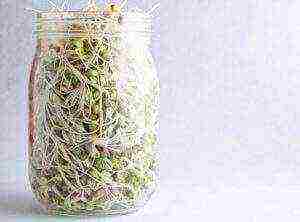
It is better to collect the remaining sprouts in a glass container, put them on the top shelf of the refrigerator and store in this form for no more than 5 days.
Germinating beans at home is not difficult, the main thing is that you should strictly follow all the rules and recommendations. It is possible and even necessary to use such a product, but in small quantities - no more than 100 grams per day. Sprouted beans are a storehouse of vitamins, but even they have their own contraindications.
Have you noticed a mistake? Select it and press Ctrl + Enter to tell us.
Aug 3, 2017
There are several popular methods. All of them begin with the need to sort out the beans: to discard the spoiled, damaged grains. Here's what to do next:
- Take a wide flat dish, cover it with a dense natural cloth or gauze, which must first be wetted. The fabric must be damp. Grains are laid on it, and they are covered with a layer of damp cloth on top. Place the dishes in a room with an air temperature of at least 25 ° C. Wait six hours, rinse the beans with running water, cover again with a damp cloth. It is necessary to wash the grains at least twice a day, in the morning and in the evening. This will prevent plaque buildup. The fabric on which the beans are lying should be moist all the time, but not too much: excess water will lead to rotting of the seeds. How quickly can beans germinate in this way? If done correctly, the sprouts will hatch within 36 hours.
- Fold the beans into a clean glass jar with a wide mouth and pour water at room temperature so that it completely covers the beans. Soak for three to four hours, drain the water, rinse the beans. Place them in the jar again, do not fill in with anything, and close the neck of the jar with damp gauze. This method excludes rotting of the grains, since an excess of moisture is not formed. Rinse the beans twice a day, remembering to cover the jar with a wet cloth each time. The jar should stand in a warm place, if you keep it in the light, the beans will be rich in vitamin C, and if in the dark - vitamin B2.
- How to sprout beans at home and observe sprouting? Place cotton balls moistened with water on the bottom of a wide glass container, gently put beans on them. Put the container in the light, do not cover with anything. The beans will sprout by the end of the next day.
Bean sprouts can be eaten raw or cooked. They contain a large amount of iron and vitamin C, increase hemoglobin and strengthen the immune system.
When planting sprouted beans on the beds, you need to remember that the distance between the grains should be at least 20 centimeters. Planting must be done carefully so as not to accidentally damage the sprouts.