Content
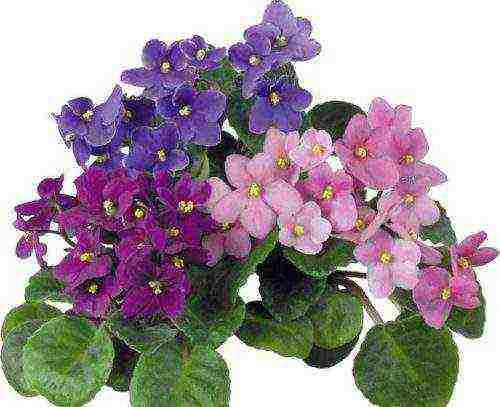
- 1 Variety of violets
- 2 Habitat
- 3 Violet care
- 4 Reproduction of violets
- 5 Video: secrets of caring for capricious violets
- 6 How to choose the right violet leaf
- 7 How to grow violets in containers of water
- 8 How to grow a violet from a leaf in the ground
- 9 Methods and the best way to breed violets
- 10 Leaf selection
- 11 Step-by-step instructions for rooting
- 12 Further care
- 13 Video "Reproduction of violets at home"
Amazingly beautiful delicate inflorescences of violets are a real decoration of alpine slides, flower beds, balconies and loggias. But there is a variety of these plants that are grown at home. And their scientific name is "Saintpaulia".
Despite the fact that indoor violets are unpretentious plants, for some reason they do not take root in some novice flower growers. There may be several reasons for this, and all of them, as a rule, are associated with violations of the requirements for caring for Saintpaulias.
Variety of violets
The home violet is a relative of the garden. Therefore, their "claims" are practically the same. But you should still make an estimate for the growing conditions, because artificially created ones cannot fully reproduce the natural habitat for these flowers.
Therefore, in the apartments you can see mostly hybrid varieties of violets, which are grown to adapt to the home climate. In the variety of species, there are varieties that differ not only in size and colors (monochromatic or buzzing with a large range of colors), but also different in the shape of petals and inflorescences.
Along with traditionally developing bushes, ampel varieties are also found among domestic violets. But on branched stems, smoothly "flowing" down, inflorescences are much smaller.
10 shade-loving indoor plants to decorate your home
Habitat
When you are going to have a room violet, try to create conditions close to natural for it. First of all, the comfort of Saintpaulia depends on the habitat, or rather, on the soil in which it will grow.
The soil for violets should be sufficiently nutritious and have a loose structure. Great importance is attached here to the proportional ratio of the components included in the substrate. Take leafy soil (black soil) as a basis - it should be in 5 parts. 3 parts of the substrate is peat and 1 part is sand. As additional components - sphagnum moss and charcoal.
Drainage also plays an important role here, so do not forget to put expanded clay balls or river pebbles on the bottom of the flower pot. This will prevent stagnation of water in the soil. Otherwise, excess fluid will provoke root rot.
When choosing a flower pot, you should take into account the characteristics of the plant itself. The roots of the violet do not grow into the depths, but "spread" to the sides, being located in the upper layer of the soil. So the container should not be chosen deep, but rather spacious in width. The following dimensions of a flower pot are considered optimal for growing home violets: depth within 6 - 9 cm, width - at least 4 cm.
Violet care
Calling a violet capricious, flower growers thus justify their either ignorance of the rules for caring for indoor plants, or inattention to pets. If, however, strictly observe the modes of cultivation of flowers on the windowsills, then Saintpaulia will bestow colorful splendor. And the violet can bloom throughout the year.
Having studied the rules of caring for indoor plants, you will understand that even a lazy person can cope with the "character" of violets.
- Temperature conditions. Violets do not need a hot temperature. Therefore, the room should be kept constant in the range from 20 to 24C in summer and 18 to 20C in winter. A lack of oxygen can kill the plant. Therefore, the room should be regularly ventilated. And for this period, the violet will have to be taken to another room.
- Illumination. Violet loves to "bathe" in the sun. But direct light exposure to the plant should, nevertheless, be avoided in order to prevent burns. Blinds on the windows will provide good dispersion of direct sunlight. For abundant flowering in winter, it will be necessary to artificially extend the daylight hours (the total duration of lighting should be at least 12 hours).
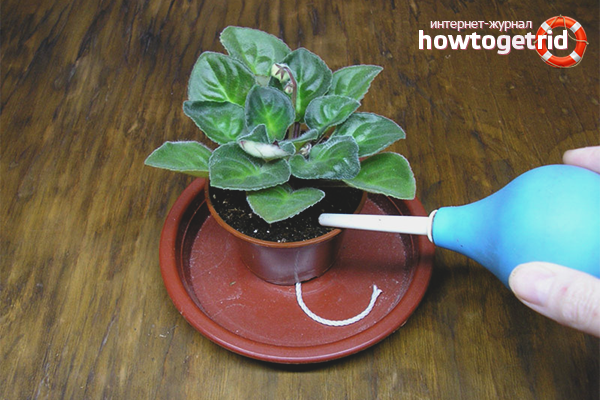
- Irrigation regime. Violet loves to "drink", but it is impossible to overmoisten the soil - regulate watering. Its frequency should not exceed 2 times a week at any time of the year. But the indicator for the next watering should be the degree of moisture of the soil substrate. The best option would be irrigation through a pallet - lay expanded clay or peat on it.
- Air humidity. Avoid dry air in the room where the violet grows. But there should be no excessive moisture, so that it does not "fall" with dew on the plants. In this situation, watering the flowers will have to be reduced. Try not to refresh the violet with sprays (especially during the flowering period) - it will start to hurt.
- Top dressing. Saintpaulia needs to be "fed" only with fertilizers specially developed for violets. The feeding scheme depends on the season: in autumn and spring, mineral fertilizers are applied once a month; in winter - organic 1 time per season; in the summer they look at the state of the flower.
how to water flowers while on vacation
Reproduction of violets
As the violet grows, it is transplanted into larger containers. The best period for this is spring (March or April). At the same time, flower propagation is also carried out. Saintpaulia can be bred in several ways.
- Stealing. In an adult plant, stepchildren are carefully cut off with a scalpel, on which at least 3 leaves have formed. The stepson can be planted directly into the soil, the composition of which was described above. Or first in a peat tablet, and when the stepson takes root, transplant it into the ground.
- Child sockets. The violet develops in inflorescences. And the more of them in one pot, the more difficult it is for the plant to develop. When daughter outlets are formed, they should be cut off from the mother plant and planted in separate pots.
- Cuttings. Vegetative propagation of violets is the most popular, and the method of cuttings is the simplest. But only the leaves located in the second row of the plant should be cut off. Propagation by grafting can be done in 2 ways: by planting directly into an earthen substrate, or by pre-rooting the leaf in a solution of activated carbon.
Breeding features
Whichever method of reproduction is chosen, cutting off parts of the plant is carried out with extreme caution.
The cut points must be sprinkled with activated carbon powder (crush the tablet). This will prevent the violet from being attacked by germs.
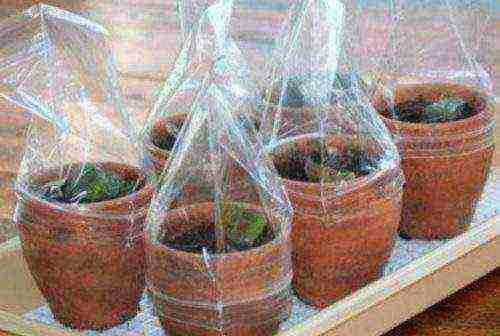
In order for the rooting of the planting material to take place faster, it is necessary to create greenhouse conditions. Cover the container with a plastic bag or a piece of glass and soak in this way for several days. But do not forget to ventilate daily so that young sprouts do not rot.
Video: secrets of caring for capricious violets
 Violets are very beautiful flowers and many seek to expand their collection with other varieties or start growing new ones from the existing ones. At home, reproduction of such a plant is carried out with leaves, which are cut from the specimen you like.
This method of growing violets is considered the simplest and most common and even beginners can master it.The most favorable time for this is spring and summer, when there is plenty of light and warmth. However, an experienced florist is able to grow it even during a period when the daylight hours are short. So how to grow a violet at home? Let's try to figure it out.
How to choose the right violet leaf
 Reproduction of this flower will be successful if the planting material is selected correctly. If the leaf is weak or sick, then its offspring will grow rather frail, which is why it should be approached with all responsibility.
Experienced growers do not recommend choosing leaves for reproduction that are located on the lowest tier, closest to the ground, since they are mostly old and weakened there. In addition, bacteria and fungal spores often settle on them.
For planting material, it is best to use a cutting from the second or third tier, where there are sufficiently formed leaves of the required size with a pronounced turgor.
Sometimes the material for growing is drooping, having lost its elasticity and appearance. This happens if the leaf is purchased in a store, sent by mail from the nursery or received from friends.
A long journey, and in some cases irregular watering, adversely affects the condition of the leaf plate and the cutting. Therefore, before landing, they should be for several hours. put in warm boiled water with the addition of several crystals of potassium permanganate.
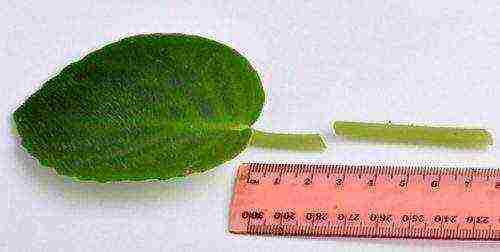
Thanks to this action, the sheet is disinfected and returned to its original state. After that, the stalk is carefully trimmed with a sharp knife at a distance of 3-4 cm from the base of the leaf plate, most often at a right angle.
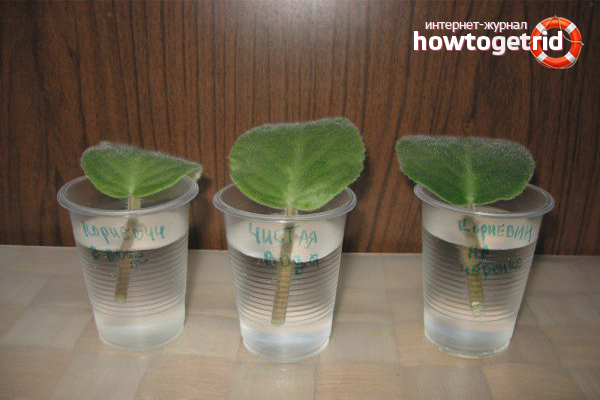
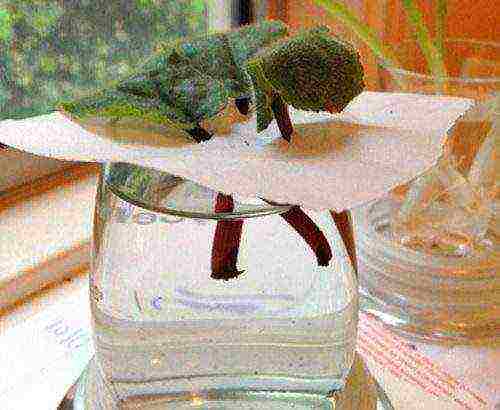
How to grow violets in containers of water
 The sooner the leaf is in the water, the faster its roots will begin to form. For those who have never cultivated these flowers before, it is easier to use for rooting. boiled or settled water.
This allows you to: accurately track the state of the planting material; timely prevent rotting of the cuttings and see the formation of roots.
The vessel for breeding violets must be carefully wash and sterilize... It is best to use bubbles or small glasses made of dark glass for these purposes, which will prevent the formation of green algae on the walls and water pollution.
The rooting procedure is carried out as follows:
- deepen the sheet into a container of water by 1.5-2 cm;
- so that the cut of the cutting does not touch the vessel, the sheet is fixed with a lid;
- to prevent the development of microscopic algae and pathogenic bacteria, an activated carbon tablet should be immersed in the water;
- if the liquid begins to evaporate, it must be poured using settled clean water for this.
Depending on the variety of the selected violet, you can wait for the roots to appear in 2-4 weeks. If suddenly not roots appear on the cut, but traces of rot, the leaf should be removed from the water, dried and carefully trimmed, removing the damaged tissue.
The appearance of rot will help prevent Activated carbon in the form of a powder, with which a new cut is processed, after which the sheet plate is again immersed in water. When strong roots appear in large quantities, it is transplanted into the ground.
Transplanting the cuttings into the soil
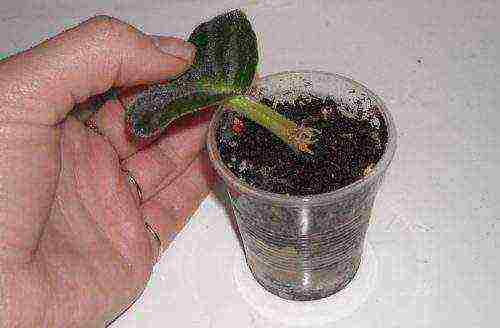
 You can grow a violet from a leaf in small plastic cups or pots with holes for draining water. The container is filled by a third with shallow drainage, after which it is covered with soil to the top.
Plant the stalk together with the leaf to a shallow depth, otherwise the resulting sockets will have difficulty reaching the surface, weaken, or may not hatch at all.
The soil around the cutting should be compacted, moistened, after which the pot with the violet is covered with a bag to create a favorable atmosphere for it and retain moisture.
The plant will remain in this form until small children appear at the cutting. This means that the cultivation of violets from the leaf was successful. Young shoots are planted in different pots.
How to grow a violet from a leaf in the ground
 Almost all experienced flower growers are unanimous in the opinion that if you immediately plant a violet in the soil, then it will grow much more efficient, since the cuttings are less likely to rot, take root faster and form more children.
In order to plant a violet, you can purchase a special soil, in which you must add the following leavening agents: Styrofoam, vermiculite, sphagnum moss or perlite. But it is best to prepare the mixture yourself by mixing perlite and vermiculite in equal proportions without adding nutrient soil.
Perlite is mandatory component for growing violets, as it provides air access to the roots. And vermiculite makes a loose soil mixture and absorbs moisture well.
The process of rooting a leaf in the soil is as follows:
- The stalk is taken away from the violet and broken off, after which the leg is cut obliquely, dipped for a few seconds in a weak solution of potassium permanganate and left to dry for half an hour.
- A plastic cup with drainage holes is filled with a slightly moistened warm substrate.
- The violet stalk is planted in the mixture and compacted slightly for stability.
- It is not recommended to water the flower right away.
- Then the cup with the handle is placed in any plastic box or covered with a plastic bag.
To prevent the appearance of mold on the soil, the seedling should be ventilated. At first, it may fade a little, which is considered normal. After a while, with the appearance of roots, the leaf will again become elastic.
Watering the cutting is necessary once a week not too intensively, and it is undesirable to fertilize it. This will allow it to take root faster in search of nourishment.
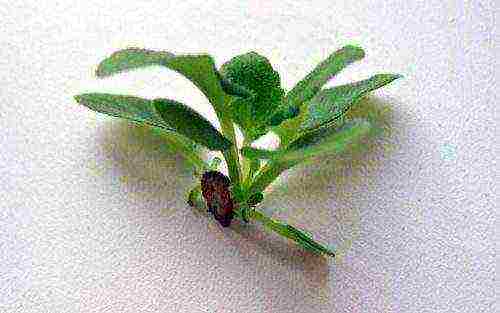
Separation of children when breeding violets from a leaf
 As soon as daughter rosettes appear at the base of the cutting, the plant is planted. Children should be separated so that each small plant has at least one pair of leaves and a small number of roots.
The separation will not be too traumatic, if the soil in the pot is well moistened, the plant is removed together with an earthen lump, and the roots should be carefully cleaned from the soil.
Thus, we figured out how to plant violets from a leaf at home. This process is not too time-consuming and even a beginner can cope with it. The main thing is adhere to certain rules and then everything can work out the first time.
Experienced growers are able to grow these flowers at any time of the year, which gives them a lot of pleasure.
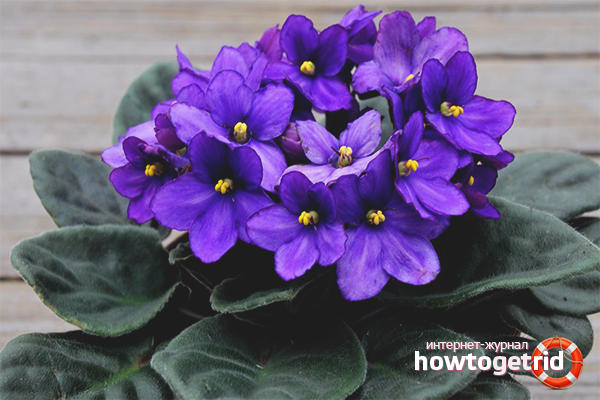
Saintpaulias or indoor violets are some of the most common house flowers. And how can these miniature beauties not please the eye with a variety of shapes and shades! However, the owners of Saintpaulias know that these flowers are quite capricious and whimsical in their care. What if you want to start a small garden, but do not know how to plant violets? Our article will not only tell you how to grow violets at home, but also reveal some secrets of caring for them.
Methods and the best way to breed violets
There are several ways to breed Saintpaulia: growing from seeds, transplanting stepchildren, peduncles and rooting cuttings. For the first planting, as a rule, preference is given to growing flowers from seeds. The seeds are pretreated: moistened and mixed with charcoal and sand. Then the seeds are immersed in special soil and planted in a container with a lid.
The container is placed in a dark place at room temperature. It is also recommended to use some river sand and moss treated for parasites. This method is quite laborious, so many people plant a violet with the help of leaves.The cuttings are germinated in a container of water or rooted directly into the ground. The correct approach in this case will allow you to quickly grow roots, and later get young shoots.
If you do not mind pruning a flower, you can grow Saintpaulia from stepchildren - cutting off the "head" of a plant or peduncle and then rooting. However, why such sacrifices, if possible, grow a violet from a leaf?
Leaf selection
First of all, you need to think about how to choose the right leaf for growing. A good stalk is the key to a productive result. It is not recommended to choose weak or unhealthy leaves, otherwise there may be no offspring at all or it will be unviable. Leaves from the lower tier of Saintpaulia will not work either, since they are old and prone to colonization of bacteria and fungi due to their proximity to the soil.
When breeding, cuttings of the second and third rows with fully formed leaves of the required size are ideal. The stalk should be strong, deep green in color. If you ordered leaflets from the store and they lost their appearance, put them in warm boiled water for a few minutes. You can add a few drops of potassium permanganate. In this way, you will disinfect the leaf and return it to its previous shape.
Step-by-step instructions for rooting
There are two ways to breed violets using a cutting: by growing the roots in water and by rooting the leaf directly into the ground. The first way is somewhat more complicated, however, flower growers note that the leaves are better rooted if they are first germinated in water.
Let's consider this method in more detail:
- Separate a healthy large leaf from the bush, preferably using a sterile knife. Cut the stalk obliquely, rinse the cut and place in a container of boiled water. The leaf should not be deeply immersed in water, otherwise it will rot.
- After a few weeks, roots will begin to appear from the cut site. When the roots are about 2 cm long, you can transplant the cutting into the ground. For breeding violets, it is better to use a substrate with drainage. You can also put pebbles or shells on the bottom of the pot.
- Before planting, moisten the soil, make a small hole, carefully set the leaf, cover and lightly crush the soil.
- Cover a container with a violet with something to form an impromptu greenhouse.
- Remove the greenhouse after a month.
- When "babies" sprout next to the mother's cuttings, moisten the soil well, pull out the young together with lumps of earth, separate them and plant them. You need to plant strong young shoots with dark green leaves. Each young plant should have at least a couple of leaves.
The second method of breeding Saintpaulia is carried out in the same way, only without first placing the cuttings in water. You should also water the seedling abundantly and keep the temperature above average.
The flower will take about a year to grow from a small shoot to the size of an average violet of this variety.
Further care
As you can imagine, business does not end with successful breeding: the Saintpaulia needs proper care. One of the paramount conditions for proper care of violets is a comfortable temperature and light conditions. On average, the temperature should be in the range of 17-22 degrees. It all depends on the variety of your plant. Significant sudden temperature fluctuations should be avoided.
Saintpaulias need abundant lighting. It is better to choose a shaded, sunny place that will provide a diffused hit of rays on the flower. If there is not enough natural room light, fluorescent lamps can be used.
You should also take care of sufficient moisture in the air: indoor violets are oppressed by excessively dry air, they stop blooming and get sick. Taking care of a plant means, first of all, watering it. It is important not only to underfill, but also not to overfill.Before each watering or spraying, try the dryness of the soil - it will tell you if Saintpaulia needs moisture or not.
It is best to pour water into special trays under the pots.
During the period of active growth and flowering, do not forget about feeding the flower. Use compound fertilizers or alternate organic and mineral fertilizers. Top dressing should be used no more than once a month. Freshly transplanted plants should not be fertilized at all! And of course, take care of the beauty of your pet. Prune leaves, stepsons, faded inflorescences regularly. This will rejuvenate your plant and give it a beautiful crown shape.
Breeding violets at home is not easy, but definitely worth it. A riot of bright colors will decorate even the most boring interior.
Video "Reproduction of violets at home"
In this video, you will learn how you can propagate violets yourself.
Usambara violets, or saintpaulias, have earned special respect for indoor floriculture lovers.
They are easy to care for, reproduce and maintain, but delight with a variety of colors, shapes and an abundance of flowering almost all year round. Saintpaulias are propagated vegetatively, which guarantees the preservation of the properties and appearance of the mother plant. Learn how to grow a violet from a leaf to get the flower you like quickly and for free. This process is very easy and doesn't take long.
- Choosing a leaf suitable for propagation
- Rooting preparation technology
- Pot and soil preparation
- Planting seedlings in individual containers
- Highlights for Successful Violet Growing
Choosing a leaf suitable for propagation
The procedure for growing violets from a leaf can be divided into several stages:
- selection of a suitable sheet;
- preparation for rooting;
- rooting;
- preparation of the planting container and substrate;
- seating starters.
Violet leaf cutting should only be taken from a completely healthy plant. Leaves should be free of brown spots, bloom, have the correct turgor and anatomical shape.
Best suited for rooting middle row sheets... The lower rows are old leaves that will take a long time to root or disappear altogether, and the upper rows are too young leaves, they have not yet had time to gain enough strength for rooting.
Cut a leaf with a 2-4 cm handle, a sharp knife or blade. The place of the cut on the mother plant is sprinkled with crushed coal to prevent decay.
The optimal time for breeding violets is in the spring, but breeding is allowed all year round.
Rooting preparation technology
Rooting of a violet leaf can be carried out both in a container with water and directly in the ground.
For water rooting the container is chosen so that the stalk is immersed in water for at least 1/2 of its length, and the diameter should be less than the leaf part of the stalk in order to exclude decay.
If there is no container of this diameter, then they take a sheet of paper in which a hole is made for the stalk, the violet leaf remains above the surface of the paper sheet, which is placed on a container with water, and the stalk itself is immersed in water.
A little crushed coal can be added to a container of water to reduce the likelihood of the multiplication of pathogens. The water should be at room temperature, as it evaporates, it is added to the required level.
To root a violet leaf in the ground a special soil composition for Saintpaulias is poured into the glass, moistened and the cutting is deepened by 2-3 cm. In this case, it is necessary to create greenhouse conditions, for example, cover the glass with a plastic bag, but you need to remember about mandatory regular ventilation. The disadvantage of this method is that the root formation process is not visible behind the soil layer, as a result of which there is a risk of missing the rotting of the cutting.
A cuttings placed in water will develop roots after about two weeks.In the ground, the process takes a longer period of time, on average three weeks. If rooting took place in the ground, then it is not worth replanting the plants until the children are formed.
Preparing the pot and soil
Planting leaves of violets in the ground is carried out when a bunch of roots with a length of at least 2 cm is formed.
Soil for violets should be slightly acidic or neutral, moisture-consuming, well aerated. You can use ready-made soil for Saintpaulias or prepare the mixture yourself: for this, leaf soil, peat and river sand are mixed in proportions 4:1:1.
Operating procedure:
- A drainage layer of expanded clay or other suitable materials (for example, broken brick, crushed charcoal) is poured onto the bottom of a small glass.
- Then the soil is laid, into which, carefully, trying not to damage the roots, the leaf is buried.
- The earth is moistened, and the glass is placed in a greenhouse or a plastic bag is put on to create a greenhouse effect.
Planting seedlings in individual containers
After about 2-3 weeks, small bushes - babies - begin to grow at the base of the leaf. Usually 3-5 pieces. At this time, young plants have their own root system, which allows the children to independently obtain nutrients and moisture from the soil, and not through the mother leaf, therefore, it gradually dies off.
When the root system develops enough for independent existence, and the young bushes themselves have a developed outlet, we can assume that the plant is a starter, that is, no longer a child, but not yet an adult specimen.
At this stage, violets must be planted in individual pots - one outlet in one container. It is necessary to separate the sockets by cutting the roots connecting them with a sharp blade or knife, sprinkling the cuts with crushed coal.
Saintpaulias do best in plastic pots, which should have drainage holes at the bottom.
Landing technique:
- Pour 2-3 cm of drainage, prepared soil mixture and carefully transplant the starter.
- The earth is moistened with a spray bottle, avoiding moisture on the leaves of the plant.
- After seating, containers with violets are transferred to a permanent place.
Further care is carried out as for an adult flower.
Highlights for Successful Violet Growing
Violets are best kept on western or eastern windows, avoiding direct sunlight. The temperature of the content should be in the range of 20-25 degrees, a sharp drop in temperature by more than 5 degrees from the daily average is undesirable.
Watering is carried out with water at room temperature as the top layer of the soil dries out. Usually watered in summer once every two days, less often in winter, depending on the heating intensity.
Violets do not really need fertilizers. If the plant is transplanted into new soil every year, then there will be no lack of nutrients. But if universal fertilizers are still used, then they should be diluted in half the concentration specified by the manufacturer.
To form an even and symmetrical rosette, the plant is turned around its axis by a quarter to the light source once a week. This will keep the leaves from stretching and growing evenly.
Adult violets are transplanted every 1-2 years, in the spring. At the same time, the lower row of leaves is removed, and the cut points are sprinkled with crushed coal. The plants are deepened to the level of the cut of the lower leaves, thereby rejuvenating the rosettes.
By learning how to grow violets from a leaf, you will quickly build your own collection of Saintpaulias that bloom beautifully at different times. Learn to propagate other plants, such as seed avocados or seed plumeria.
Add this page to your favorites and share interesting information with your friends on social networks!