Content
Plants make our home more comfortable and beautiful. Someone chooses the easier way and buys flowers in the store, while someone stops at the more laborious growing of indoor plants from seeds. Consider what flowers can be grown in this way at home.
Features of growing at home
Sowing of most indoor flowers is carried out in the spring. The favorable period for planting is usually indicated on the seed package.
When choosing a pot from under another plant, do not forget to process the container
What kind containers are suitable for sowing:
- plastic or polystyrene pots;
- clay pots;
- boxes with square or round cells of different sizes;
- peat cups for seedlings.
If you use containers that were already in use, they should be well treated with soda solution and soap before planting. This is necessary, since tender seedlings can become infected with various fungal diseases (rot, mold).
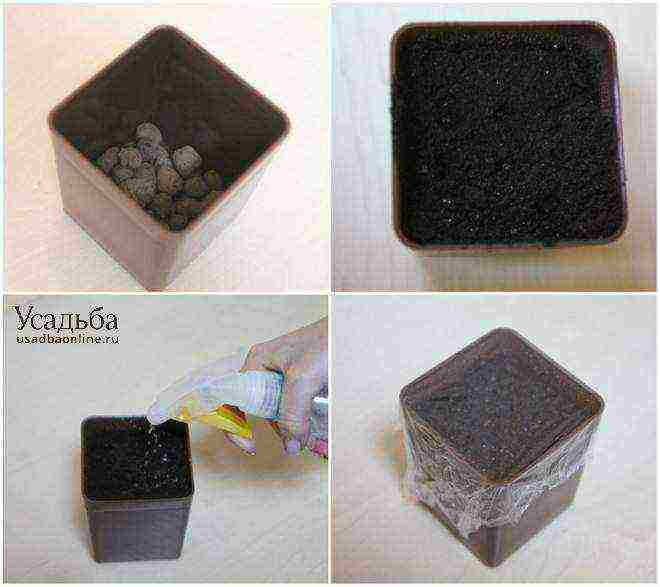
In any container, before planting at the bottom, you must do hole for draining excess moisture.
The choice of soil is at your discretion. You can purchase a special plant mix or make your own. For cooking, mix one part of peat crumb, one part of sand and two parts of sifted earth from the garden.
Before filling the container with earth, drainage should be made from pebbles, clay shards, expanded clay, polystyrene, pieces of red brick.
Next, fill the containers with soil mixture to a height of 1.5 - 2 cm from the edgepressing it down a little. Distribute the seeds evenly and not very densely from above. If the seeds are small, then they can be mixed with sand and distributed over the container.
Choose a ready-made substrate or cook it yourself - it is not important for a flower, if all proportions are observed
We do not cover small seeds with earth, but press a little into it. Cover larger seeds with a thin layer of earthen mixture, then press down a little.
It is advisable to water with a spray bottle or a watering can with a fine "rain". Second option - for watering, place the pot in a shallow container of water for a couple of hours to moisten the soil through the drainage holes.
After watering, it is recommended to close the pot with a transparent plastic lid or glass to create a greenhouse effect. You need to place a mini-greenhouse in a well-lit, warm place.
To prevent the formation of a large amount of condensation, it is necessary to remove the glass or plastic cover for ventilation every 3-4 days.
Germination time each plant has its own: from several days to several weeks. Additional factors affecting the germination rate are seed freshness, moisture level, temperature background, timeliness of watering.
When the first sprouts appear, the lid must be removed and the container moved to a well-lit place, but not under the scorching sun.
Next stage - picking new plants into separate pots.
A pick is carried out when the first true leaves appear at the seedlings. The whole process must be carried out carefully and carefully so as not to damage the delicate sprouts.
For this:
| Step 1 | remove the plants along with the earthy clump and carefully separate their roots |
| Step 2 | holding the seedlings by their leaves, place each one in the holes in the soil in new pots |
| Step 3 | lightly press the ground around, covering the roots and water gently |
| Step 4 | as soon as the plant is well rooted and grows up, after about a year, you can transplant it into a new, more spacious pot |
What indoor flowers can be grown from seeds at home
Many indoor plants reproduce by seeds: decorative-leaved, decorative-flowering, succulents, palms.
Among decorative flowering - various varieties of begonias, cyclamen, passionflower, streptocarpus, balsam, gloxinia, abutilon, anthurium, hibiscus and even fussy orchids.
Among decorative leaf - coleus, dracaena bordered, asparagus, bokarnea, antarctic cissus, croton, coffee, cordilina.
Among palm trees - washingtonia, squat hamerops, date, Forster's hoveya, graceful hamedorea.
Exotic plants
At home, amateur flower growers often take on the cultivation of exotic plants from seeds. Of course, you will get flowers and fruits from a purchased flower faster, but they often die in an apartment.
Grown from seed are more resilient from the start.
For the successful cultivation of exotic plants, you should comply with a number of measures:
- sterility of the soil;
- preliminary preparation of seeds (soaking, treatment with microelements, bubbling, scarification, stratification);
- thermal and light conditions;
- air humidity;
- the use of growth regulators.
Among the exotics that settled on the windowsills, you can find avocado, kiwi, coffee, citrus fruits, pomegranate, figs, feijoa, dates, passion fruit. With proper care, you can achieve not only flowering plants, but also enjoy their fruits.
Do I need to process the seeds of indoor plants
Special treatment of seeds to improve their properties is usually carried out by the manufacturer. If, however, pre-treatment is required before planting, you will find the instructions on the package.
Processing options seeds:
- dense-coated seeds are sometimes recommended warm up, dipping in a very warm solution of potassium permanganate for 12-16 hours, a solution of boric acid or hydrogen peroxide for 15-20 minutes. Then you need to rinse the seeds in clean water.
- to accelerate germination, before sowing the seeds can be soak in epine, zircon, potassium, sodium (up to 12 hours).
- Stuck seeds, or hard-to-sprout seeds, can be arranged cold and hot shower: Soak in cold and hot water alternately.
- Stratification - placing the seeds in the cold, the temperature is from 2 to 5 heat. The seeds are placed on a damp cloth and placed in a bag and sent to the refrigerator for 2-3 days.
In this case, the fabric must be damp. Then we sow it into the ground. For tropical and subtropical plants, this processing method is rarely used.
- Scarification - damage to the hard shell of seeds before soaking (puncture, incision, filing with a nail file).
Indoor flowers from seeds
Orchids
Orchids have won the hearts of many people, not just avid flower growers. Phalaenopsis, Vandu, Cymbidium, Dendrobium, Zygopatelum can add to your collection and can be grown from seeds.
Initially, we prepare the inventory (flasks) by calcining it in the oven at a high temperature. This is followed by sterilization:
| Sterilization Is a major step in growing orchids that should not be overlooked. | priming | can be sterilized in the oven |
| the seeds | disinfected before sowing by dipping them into a filtered calcium hypochlorite solution for 10 minutes |
You can sow orchid seeds "over steam": a grate is placed over a pot of boiling water, a flask with soil is placed on it.With a pipette, seeds are taken from the solution and transferred to the substrate. At the same time, we act quickly.
Next, the flask must be closed with a swab and put on germination. The temperature regime must be maintained from 18 to 23 degrees Celsius. Light mode - from 12 to 14 hours (daylight, if necessary - additional illumination with lamps).
The backlight for flowers can be assembled at home by yourself
Orchid sprouts develop slowly. You need to be patient and after about 3-4 years they will delight you with the first flowers. We described everything in more detail in the article on orchid flowering at home.
Salvia
Salvia is a perennial plant. When grown in a flower bed - annual or biennial.
Can be grown indoors from seeds or granules. The granules germinate more slowly.
Sowing seeds is carried out from mid-February to early March in moist, loose soil superficially or to a depth of 2 mm. Temperature regime - 25 ° C. Seedlings appear within 2-4 weeks.
The pick is made twice.... After the appearance of the third or fourth leaf, the seedlings are pinched to form a beautiful bush.
Dracaena bordered
Dracaena can decorate any room, which is why they are so popular. If you are fortunate enough to have purchased plant seeds from a store, you can try growing them.
The process is enough long and laborious, germination can last up to six months. Unfortunately, not all seeds germinate.
If you want to grow dracaena from seeds, you have to be patient.
Stages of growing dracaena from seeds:
- Place the seeds in a little water. Cover with a cloth and place in a dark, warm place.
- Sprouted seeds plant one at a time in a container with drainage and soil for dracaena to a depth of 1 cm. Sprinkle with earth. Spray with water using a spray bottle.
- Cover the container with a flower with foil or glass and place it in a warm place to germinate. Ventilate and water periodically.
- When will the sprouts appear and grow up to several centimeters, remove the film and place the plants in a warm, bright place.
A detailed description of the flower (also known as marginata) can be found in the section on dracaena varieties.
Peony roses
Peony roses appeared at the end of the 20th century... It is a hybrid plant whose official name is Austin roses.
The propagation of roses by seeds is theoretically possible, but it is rarely carried out, since it takes more than one year to grow them.
The main problem in growing roses from seeds is unpredictable result... Flowers on new bushes differ from their parents almost completely.
It is better to propagate peony roses using cuttings, layering. But for the purpose of experiment, you can try to grow flowers from seeds:
| Training | First, the seeds must be placed in a cold and damp place for several months. |
| Sowing | After about 2 months, they need to be sown in a pot with nutritious soil and sand. |
| Layout | Seeds are spread on the surface, sprayed with a spray bottle. You can sprinkle a little with sand |
| Result | Sprouts should appear in a month |
We described other points related to reproduction in the article on planting and breeding peony roses.
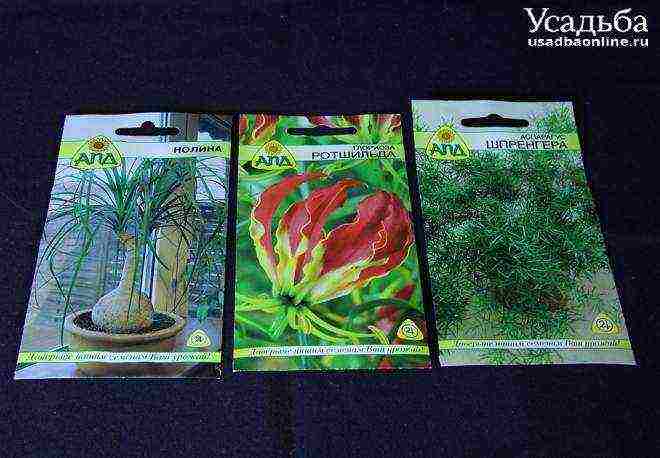
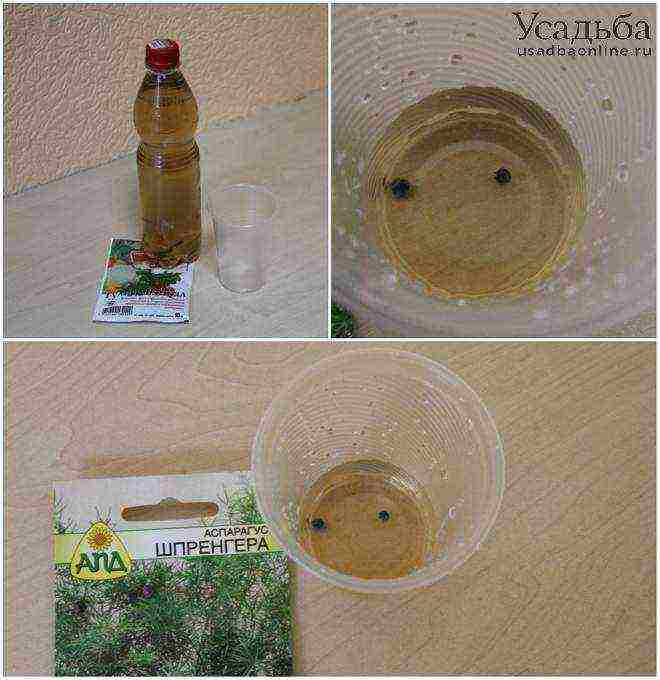
Asparagus Sprenger
Asparagus Sprenger is often found in the homes of florists. It is not difficult to grow a flower from seeds.
March and april the most favorable months for planting a plant. Before planting, it is advisable to soak the seeds for 2 days in a damp cloth. Next, we sow in a slightly moist soil mixture of peat and river sand.
We do not deepen the seeds, sprinkle a little with soil on top.
When watering, keep in mind that the seeds can be washed out due to a slight deepening
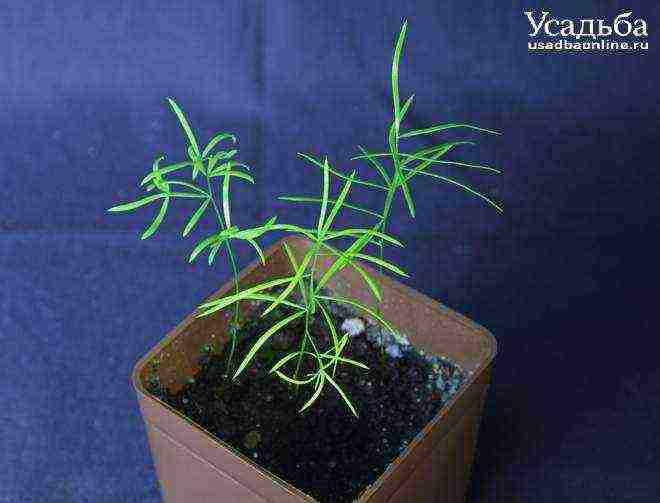
Cover the container with foil or glass. We ventilate and spray daily. Seedlings should be expected after a month. We carry out a pick with sprouts of 8-10 cm. After 4 months we transplant into a more spacious pot.
We presented the description and photos of the plant in a separate section on the Ethiopian asparagus (Sprenger).
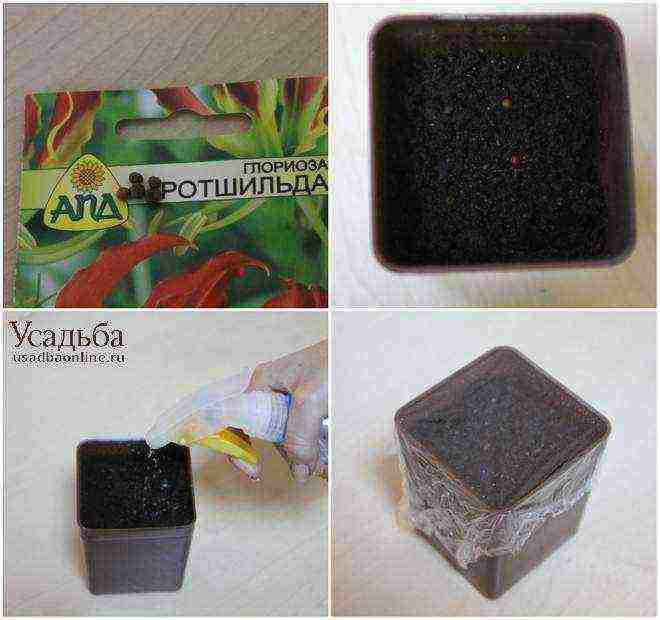
Gloriosa Rothschild
Gloriosa Rothschild is often propagated with tubers. To grow it from seeds, you need to be patient.
Seeds quickly lose their germination and should be plant immediately after harvest... The soil mixture should consist of peat, turf and sand in equal proportions. It is necessary to sow seeds in late autumn - early winter.
The temperature regime should correspond to 20-24 degrees Celsius. The soil must be moist, not allowed to dry out.
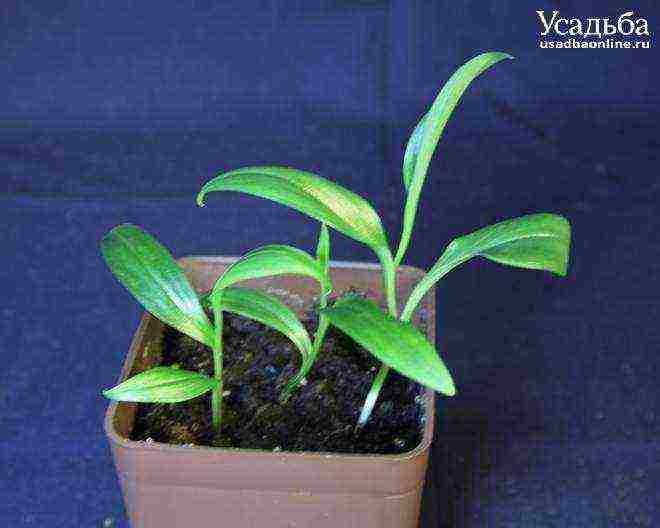
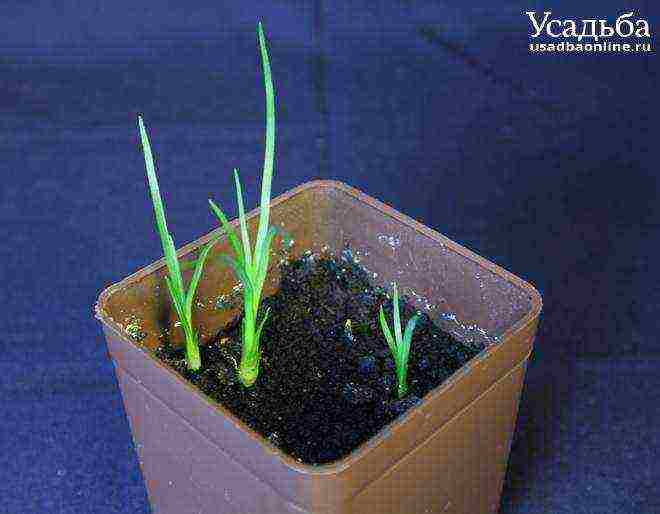
Seedlings should be expected after 1.5 - 2 months, or even later. Next, you should very carefully thin out the strengthened seedlings.
Next stage - seating in separate pots. Gloriosa can be expected to bloom in about 3 years.
Gloriosa is a very unusual and beautiful plant for the home
Nolina (bokarney)
Nolina, or bokarney, is an ornamental-leaved plant with an unusual trunk shape - a bottle (for this reason, it is also called the "bottle tree"). Nolin is propagated by cuttings and seeds.
Stages of growing nolina from seeds:
- Soaking the seeds in a light solution of salt or potassium permanganate for a day. Swollen full seeds go down, "empty" - float up.
- We use drowned full seeds for planting.
- Sowing is done into a sand-peat mixture... Before use, the soil must be steamed for 30 minutes. You can add vermiculite to the soil mixture.
- The pot should have a hole for draining excess moisture, drainage.
The optimal light regime for germination is 14-16 hours (at least 12).
- Seeds we sit down superficially, slightly pressing down with a board.
- From above, the pots need to be covered with foil or glass, when shoots appear, remove.
- Temperature range - 22-27 ° C.
- After the formation of three true leaves, we dive the seedlings into separate shallow pots with drainage.
It is interesting that at home a flower does not grow taller than 2.5 meters, while in the wild, the height can reach 8 meters. Nolina's appearance and general care points can be found in the section on growing bokarnei at home.
The choice of plants for growing from seeds is a responsible process, since each variety has its own requirements.
The process of growing indoor flowers from seeds at home is sometimes quite laborious and painstaking. But, as a result, a new plant, grown by your own hands, will appear in your home.
3 parts: How to plant seeds How to care for shoots How to eliminate possible problems
One of the main reasons why people grow plants from seeds is the huge selection of different plants in the seed catalogs. In addition, it is much cheaper than buying ready-made plants. Moreover, in this case, you can follow all the stages of growth and enjoy the process of gardening. For starters, you can try growing vegetables or flowers.
Part 1 How to plant seeds
-
Choose seeds.
At your local gardening store, you can purchase seeds that are appropriate for your area and season. For beginners, it is best to use vegetable and herb seeds, for example
green beans
, lettuce and
basilica
... In addition, flowers such as
sunflower
, cosmeya and
poppy
.
- Fresh seeds germinate more easily than old seeds.
- While picking seeds from plants yourself is risky, it can be done as an experiment. Due to cross-pollination and grafting (transplanting shoots of one species onto the stem or roots of another), child plants may differ from their parents.
- Determine the planting time.
In most cases, seeds are planted indoors. However, it depends on what exactly you are going to grow. For example, lettuce and green beans germinate better when planted directly in the open air.This means that you can plant the plants before the end of the spring frost. Frost-resistant plants can be planted indoors in late winter or early spring. It is better to plant more thermophilic plants later, in the middle or late spring, when it is already warm and there is no night frost.
- It usually takes three to six weeks for a seed to grow into a large plant ready to be transplanted onto normal soil, but some plants may take up to fifteen weeks.
- Choose a suitable container.
Seeds planted outdoors are susceptible to diseases, insects and bad weather. You can germinate more seeds if you plant them indoors and take care of the young seedlings. You can purchase a seeding tray from your garden supply store. Any small container with drainage holes can be used.
- Before using an old container, wipe it thoroughly with soap and water. Wash the container in an aqueous solution of household bleach (1 part bleach to 9 parts hot water) and air dry. This will destroy microorganisms that can damage the seeds.
- Some plants, such as lettuce, cucumbers, melons and sunflowers, do not tolerate transplanting, which disrupts their root system. Their seeds can be planted immediately in the open air after the end of the spring frost, or each seed can be planted in a separate cell of a special seedling tray, and then the sprouts can be transplanted into the ground along with clods of earth.
- Fill up with seedling soil.
It is easy to make your own, which will save you money. Just mix equal parts perlite, vermiculite and coconut flakes (or peat moss). This lightweight mixture drains well to prevent rotting and allows sprouts to easily break through to the surface.
Water the prepared soil well and fill the seedling tray with it so that the soil is about 6 millimeters below the edge of the tray. Press down gently with a clean tool to create a firm, level surface. Wait for excess water to drain.
- If you are using commercially available seedling soil, check to see if it contains compost. In this case, there is no need to fertilize the shoots. Don't add compost to your first homemade seedling soil - it will be more difficult than good.
- If you are using peat moss instead of coconut flakes, add hot water to mix the soil well. Since peat moss is acidic, it is recommended to add garden lime (calcium carbonate) to neutralize it. Try adding ¼ teaspoon (1 gram) of lime for every 4 liters of soil.
- Plant the seeds.
If the seedling soil has time to dry, water it again before planting the seeds. Look at the bag of seeds, at what depth and at what distance from each other they should be planted, or follow these rules:
- One tray - one type of seed... Place the seeds loosely and evenly over the entire area of the tray.
- One tray - several types of seeds... Use a clean ruler to make small rows in the ground, 2.5–5 centimeters apart. Plant each seed in a separate row and mark the rows.
- Separate pots or tray with cells... Plant one large seed (such as a cucumber or melon seed) or two small seeds (such as flower seeds) in each cell.
- Sprinkle soil over the seeds.
When doing this, proceed from the size of the seeds. As a rule, the seeds should be covered with a layer of soil twice as thick as their diameter. Most small seeds (such as petunia, lettuce, and snapdragon seeds) require light to germinate. Leave these seeds on the surface of the soil.
- Dry vermiculite or ground sphagnum (but not peat) moss are perfect for dusting the seeds.You can also use a dry seed germination mix.
- Spray the soil lightly. Do not water it too much, or it will thicken and make it difficult for the sprouts to break through.
- Retain moisture with a plastic cover or wrap.
The seeds are very sensitive to lack or excess of moisture. Cover the seed tray with a plastic lid or plastic wrap to retain moisture until they germinate.
- Most seed trays come with a plastic lid to help keep moisture out. If you purchased a tray without a lid, you can make a miniature greenhouse or germinate seeds in an old aquarium with a lid.
- Keep your seeds in a warm place out of direct sunlight.
If the seed bag does not have a germination temperature indicated, keep the daytime temperature at 18-24ºC and the nighttime temperature at least 13ºC.
If the room is colder, place a heating pad under the seed tray. Most seeds require a lot of light, but do not expose them to direct sunlight if the tray is covered with a lid or plastic.
- Some seeds germinate better in complete darkness - these include tomatoes, larkspur, calendula and coriander. In this case, cover the tray with black plastic or cardboard.
- To get the best results, you can search the reference books for the temperature regime that is most suitable for a particular plant. However, in most cases, at the "wrong" temperature, only a few seeds will not sprout, or it will take a little longer for the shoots to germinate.
- Check the humidity level every day or every other day.
If the soil seems too dry, place the seed tray in a container of water to allow the soil to absorb the moisture it needs.
This is less risky than watering from above, as the latter can cause seeds to wash out or flood.
- As mentioned above, a plastic cover or film is usually sufficient to retain moisture during seed germination. To be on the safe side, you can control the humidity level.
Part 2 How to care for shoots
- After the seeds have sprouted, remove the plastic cover.
Most seeds germinate within two weeks. As soon as the shoots appear from the soil, remove the plastic cover or film (if you used it).
- If you planted different seeds in the tray, cut strips out of plastic wrap or cloth and cover the rows with those seeds that have not yet emerged.
- Provide bright lighting as soon as the shoots appear.
Move the tray to a well-lit area, such as the sill of a south-facing window. If the temperature or lighting in the new location is too different from the previous one, move the tray gradually so that the seedlings have time to get used to the new conditions. Sudden changes can kill plants.
- If it is rather cold outside, an insulating mat can be placed between the seedling tray and the window so that the cold from the window does not penetrate into the ground and slow down the growth of the shoots.
- In high northern and southern latitudes, where there is little sunlight, you can place a plant lamp 15 centimeters above the seedlings and turn it on for 14-16 hours a day. Raise the lamp higher as the seedlings grow, so that it does not burn the shoots.
- Rotate the seedling tray daily.
As plants grow, they are drawn towards the light. If light comes only through a window, the shoots will lean towards it, resulting in long, weak stems. Rotate the seedling tray 90 degrees each day so that it grows even.
- Maintain a constant temperature.
Unless otherwise indicated on the seed bag, keep the daytime temperature between 18-24ºC and do not drop below 13ºC at night. Excessive heat or cold during the germination stage can negatively affect the shoots, for example, seedlings can develop weak and thin stems.
- Water the shoots regularly.
The soil mixture must be moist, but not wet, otherwise the delicate roots can rot or drown (that is, they cannot absorb oxygen). It is best to place a container of water under the tray so that the soil absorbs it as needed. Watering delicate sprouts from above can damage them or cause disease.
- If the soil mixture dries out, the seeds will die quickly. Check at least once a day if the soil is damp.
- Apply fertilizer to the soil as soon as the first true leaves appear.
The set of the first leaves is called the cotyledons. The second set of leaves represents the first "true" leaves and serves as evidence that the seedling is mature and ready for serious growth. Dilute the fertilizer at the rate of ¼ of the recommended dose. Pour the fertilizer solution into a suitable container and place the shoot tray in it so that the fertilizer is absorbed into the soil. Do this once a week or as often as directed in the fertilizer instructions.
- If you planted your seeds in a soil mixture that already contained compost, do not fertilize them. Too much fertilizer can cause burns and other problems.
- Once you transplant the seedlings into larger pots, you can use ½ of the recommended fertilizer dose and add the full dose as they grow.
- Transplant the shoots into separate pots.
If you have planted seeds in a shared tray, the seedlings may become cramped as they grow. However, this does not apply to all plants and is species specific. If, nevertheless, it becomes necessary to plant seedlings, wait until they are strong enough to be able to transfer the transplant. As a rule, gardeners choose the largest and healthiest shoots for transplanting. The rest of the shoots can be composted or discarded. Transplant the plants as follows:
- Wash the new pot with soap and water and rinse to remove any soap.
- Fill a new pot with moist soil for houseplants. The soil should be at room temperature. Make a hole large enough for the seedling roots in the soil.
- Gently shake off the old soil from the roots of the seedling. Use an ice cream stick or similar object when doing this.
- Lift the seedling up by the top leaves. Don't grab the stem.
- Dip the plant into the prepared hole. Use a pencil to spread the roots slightly apart (you don't have to achieve perfect placement).
- Sprinkle the roots with moist soil so that they are at the same depth as before. Press down lightly on the soil.
- Maintain the temperature and light at the same level for at least a few days until the plant recovers from repotting.
- Temper the plants.
"Tempering" means that the seedlings are gradually exposed to variable temperatures and weather conditions in the open air, as a result of which they do not experience shock during the subsequent transplantation. Start hardening two weeks before transplanting plants into the open field:
- Lower the room temperature slightly.
- Water the seedlings less often, but make sure they do not dry out.
- Move the plants to fresh air for 1 to 2 hours a day and place them in a shady and wind-protected place. At the same time, make sure that the air temperature does not fall below 7ºC.
- Increase the time the seedlings are outdoors by about one hour each day. Gradually accustom your plants to sunlight. The time spent in the sun depends on the type of plants and where you plan to plant them.
- Transplant the plants outdoors.
Once the weather is warm and the seedlings are able to grow outdoors, transplant them into a pot or garden bed. Follow the rules for growing these plants - each species requires certain temperature and light conditions. Here are the basic rules:
- If possible, repot your plants on a cloudy, calm morning.
- Water the soil in the pot and at the planting site.
- Transfer the roots carefully to a new location. Try to widen the roots while planting without damaging them.
- Sprinkle soil over the roots at the same level as in the previous place.
- Water the plant well so that the soil sticks to the roots.
-
Take care of the plants. The seedlings are difficult to transplant, and it may take several weeks for them to settle in a new place. Keep watering the plants and keep the soil moist, but not too wet. Cover the seedlings from strong winds and rain until they get stronger.
Part 3 How to troubleshoot possible problems
- Try to prevent fungal infections.
Young shoots often die due to fungal diseases, this phenomenon is called damping. If the seedlings die, try planting other seeds and try to prevent spore infestation. Proceed as follows:
- Use a sterile primer and wash all pots and tools with an aqueous solution of household bleach (one part bleach to 9 parts water).
- After planting the seeds, sprinkle the surface of the soil with dry vermiculite or perlite.
- Make sure that the soil does not freeze and is not too wet. If water comes out of the soil when pressed, it is too wet.
- It is best to treat the seedling soil with a fungicide. Observe the instructions for use when doing this.
- Consider why tree seeds are not sprouting.
The seeds of many trees, including oranges and apple trees, require special conditions for germination. For best results, follow the recommendations included with the seeds. Most seeds of this type require the following:
- Scarification. If the seeds are covered with a hard shell, it should be removed or thinned. Try rubbing the seeds with a nail file or cutting the shell with a knife. You can even boil the seeds to soften the tough shell.
- Stratification. Under natural conditions, the seeds of many trees lie on the ground throughout the winter and germinate in the spring. This can be simulated: put the seeds in a cold and humid place for several weeks so that they "understand" that they need to germinate soon. Place the seeds between two damp towels in an open plastic bag and place in the refrigerator.
Tips
- Select in advance a site in the garden for future seedlings. You may need to change the soil or take other steps to prepare the site for replanting sprouted seedlings.
- Some gardeners “knead” the tops of the seedlings every day. This is believed to help produce sturdier, shorter stems. Conversely, a weak wind tends to make the stems longer and weaker. On the other hand, strong winds strengthen the stems of the plants, so try placing a fan near the seedlings.
What do you need
- Seeds
- Seedling soil, purchased or homemade
- Seedling tray or pots
- Fertilizers
- Water
- sunlight
- Insulation mat (optional)
Article Information
This page has been viewed 15,679 times.
Was this helpful?
Do you want to decorate your home with a unique exotic plant, but are not ready to shell out a tidy sum for it? There is an exit! Grow it yourself from inexpensive seeds. And we will tell you how to do it.
Exotics living in the tropics are not as picky as it might seem at first glance. Many of them grow well from seeds in normal household conditions. We decided not to give decent money for original plants, therefore, having bought high-quality and inexpensive seeds, we tried to grow several types of exotic plants on our own.
You can sow seeds all year round. But it is important that during germination they are in a room with an air temperature of at least 22-25 ° C.
Asparagus Sprenger
This perennial dwarf shrub with almost invisible scaly needle-leaves is loved by many flower growers.With proper care in late spring - early summer, white or light pink small flowers appear on it, in place of which red berries are then formed.
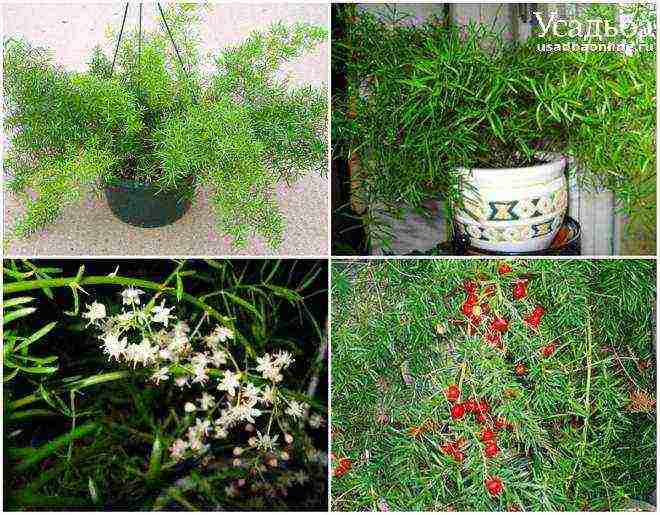
Asparagus loves diffused lighting (a suitable place for it is a low cabinet near the window), regular and abundant watering. The plant is not demanding on the air temperature (the main thing is that it is not lower than 10 ° C), with proper care it does not get sick and is not attacked by pests.
Growing asparagus from seeds
Soak the seeds in warm water for 2 days (any growth stimulant can be added there).
Pour drainage into a small container, and on top of it - ready-made nutritious soil. Sow the seeds at a distance of 3 cm from each other and sprinkle with a thin layer of soil. Wrap the container with plastic wrap or cover with a plastic lid and place in a warm and well-ventilated area. Moreover, the place does not have to be well lit: asparagus seeds germinate well in the dark. But the air temperature must be at least 18 ° C.
Asparagus seeds germinate unevenly: the first shoots may appear in a week, and the last ones - after 2 months.
When the first shoots appear, place containers on the lightest windowsill or under a phytolamp so that they develop well. And when the seedlings reach a height of 10 cm, carefully cut them into separate pots. In this case, do not forget to pour drainage on the bottom.
Gloriosa Rothschild
This spectacular tropical liana with bright yellow-red flowers (10 cm in diameter) and elongated brilliant green leaves will leave no one indifferent! It blooms throughout the summer: new buds immediately appear in the place of faded buds.
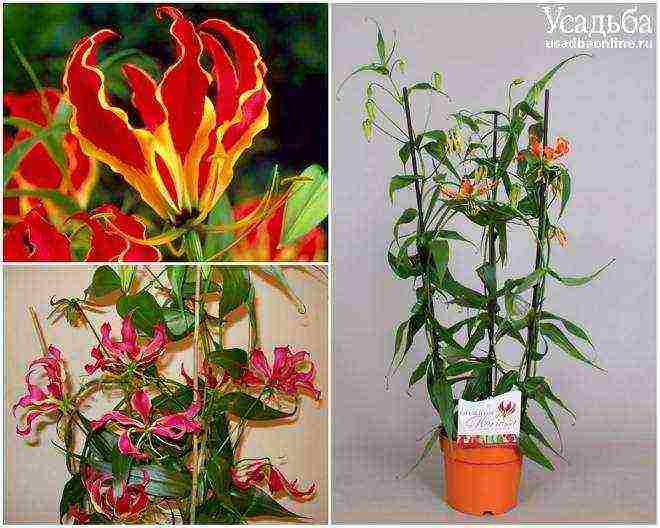
Gloriosa prefers diffused light, high humidity, abundant watering (except for the dormant period of tubers) and does not tolerate drafts. Its curly stems grow up to 3 m and need a garter to support it.
From September to February, gloriosa should be retired. Stop watering it and, without removing the tubers from the pot, put it in a dark and dry room with room temperature. In February, transplant the tubers into fresh soil. If you wish, you can dig them up in the fall, put them in a box with sand or peat, place them on the refrigerator door and store there until February.
Gloriasis is poisonous if ingested, so keep this plant away from pets (especially cats that like to taste flowers) and small children.
Gloriosa from seeds is a reality!
Although gloriosa is most often propagated by tubers, it is also possible to grow a beautiful vine from seeds. In January-March, sow seeds in a nutritious soil, lightly sprinkle them with earth, water well, cover with foil and keep warm (at least 22 ° C) and in good lighting.
The first entries should appear after 2-4 weeks. At the same time, the seeds often hatch at the same time.
Please note: this plant is suitable for patient people. It grows slowly (about 20 cm per year) and blooms only for 3-4 years.
Nolina, or bokarney
This houseplant (succulent) is often referred to as the bottle tree and elephant leg. The thing is that its unusual shape of the trunk resembles a bottle or the limb of an animal. Around a rather thick stem, narrow leaves up to 1 m long are located, which makes it possible to perfectly fit nolina into an interior of any style.

In summer, the plant loves warmth, and in winter it "retires" and feels great at a temperature of 10-15 ° C. And Nolina also prefers bright light and does not tolerate waterlogging of the soil. It should be watered only after the soil is completely dry - about once every 5-7 days, and in winter - no more often than 2 times a month.
Growing a bottle tree from seeds
It is very easy to grow nolina from seeds on your own. The key to success is high-quality seeds, which must be soaked in water or a growth stimulator for 1-2 days, sowed in a nutritious soil, lightly sprinkled with soil on top, covered with polyethylene and put in a well-lit place. Seedlings sprout amicably and grow rapidly at a temperature of 20-25 ° C.

As a rule, seedlings appear a month after sowing the seeds.
What else can you grow from seeds?
Today on sale you can find seeds of other, no less attractive exotic plants, such as elegant dizigoteka, myrtle, Japanese fatsia, graceful hamedorea.But their seeds are more capricious and sprout more slowly. For example, chamedorea germinates only 30-50 days after sowing. If you have enough patience and time, try growing these unusual houseplants as well.

***
Do not be lazy to spend time sowing seeds and caring for young sprouts of exotic plants! It is not so difficult, and your collection will be replenished with new interesting specimens of plants that not all growers have.
Quite a few. First, all citrus fruits. True, the seeds must be sown almost fresh. Several types of palms, the most common is to sow a bone from a dry date. Perfectly and extremely easily and quickly propagated by seeds, such a deservedly widespread plant as pelargonium, better known as geranium. If sowing is done now, then in a week, or even earlier, seedlings will appear, and by the beginning of summer, flowers will appear. If, after the threat of frost, the plant is planted on a balcony or a personal plot, it will develop a powerful bush over the summer, which must be removed to a room before the onset of cold weather, where it will delight with flowers for a long time. By the way, geranium is an excellent donor of positive energy.
Seeds are grown for violets, passionflower, coleus, gloxinia, amaryllis and many other plants for indoor use. After sowing, some of them need to be placed in the refrigerator for several weeks for stratification - this will accelerate the emergence of seedlings.
In general, there is a special seed series "Indoor flowers".
I really like to grow indoor flowers, because it is not always possible to grow an indoor flower bought in a store, which after a few days - withers / dies.
In order not to be disappointed in the flowers purchased from the shops, it will be just right to grow the same flowers from seeds, which can also be purchased in flower shops.
It is known that it is difficult to grow flowers from seeds, but if you try, you can succeed.
Usually, it is possible to grow from seeds, well-known indoor flowers, these are - cyclamen, gloxinia, geranium, cacti, dracaena, orchid, abutilone, palm.
To achieve good germination, you need to plant correctly, each plant has its own chapter.
I will add that now new pelargoniums and gloxinia are growing on the windowsill. One of these days I will dive. Lemon eucalyptus grows beautifully and quickly, but if you want a beautiful bush, you will have to sow every two years. I did not succeed in propagating it by layering, but it loses its beauty quickly. But the scent is amazing.
A cyclamen grows on the loggia. He is hot in the apartment, but cold on the loggia in winter. Therefore, they came up well, but growing them turned out to be a problem for me.
Rosemary is a favorite plant in the kitchen. I use it for cooking. Seed germination was poor. They sprang up for a long time and not amicably. I left myself one. Now I will try to renew it vegetatively.
And the child is also trying to grow cacti. They ascended well, but not all survived. They grow slowly. They are now two months old.
The rest of the photos will not be duplicated. You can see them in the previous answer. One of these days I will try to sow cyperus. I don’t know why I need it …….
The well-known geranium can be grown from seeds. Seeds in stores are sold in bags with the name quot; pelargoniumquot;. Buying a plant already in a pot is still not cheap, and it is not difficult to grow from seeds, you can even grow several plants with flowers of different colors. It is advantageous that the plant grows rather quickly and begins to bloom after 3-4 months. There was a case when I did not cut off a faded geranium umbrella in time, pods appeared in place of flowers and I decided to let the seeds ripen. So these seeds had 100% germination
This is a tricky question. You can't list everything, you will definitely forget something. I will say this - everything can be grown from seeds, propagated by seeds. There are plants that reproduce only by children or cuttings, so they certainly cannot be propagated by seeds))
Those plants that I planted with seeds, I will tell and for the most part show.
For example Muraya, a very healthy tree and leaves and the smell of flowers and fruits, everything is edible and healthy. it reproduces by seeds easily, blooms within half a year after germination, the first flowers fall off, but already next year everything blooms and the fruits are tied.
Dracaena dragon, planted nuts, there is a photo of how it grew and developed, transported to work, because. At home, there is not enough space for dracaena.
AdeniumI sowed, sprouted perfectly, out of 5 seeds 4, unfortunately I lost 2 in the process of growth, but 2 remained. now they are already much larger than in the photo, but they have not bloomed yet ((.
Asparagus, I really wanted Cirrus, I bought the seeds, but the usual ones sprung up.
Cactus the mix came up very amicably, they are still growing.
Nightshade, though the seeds are not from the store, a friend shared, but this is what has grown, by the way, the plant is poisonous and the berries are too!
CyclamenThey sprout well, too, but they didn’t work for me, the air is hot and dry in winter, although I suffered with them for several years, and their seeds ripened and planted them with their own seeds, but gradually everything came to naught ..
Mother of thousands, this beauty grows, even though it is oblique, it grows fast, it reproduces itself by seeds in all pots, it is simply not replaceable for covering the earth in large pots.
This is what was planted in recent years, when the camera appeared, and how much was planted and not captured ...
I grew balsam. The most difficult thing was to collect the seeds: when ripe, they were quot; shotquot; out of the box. I had to wear quot; muzzlequot; from a cellophane casing of a cigarette pack. Since the seeds were from a white-pink hybrid, the new flowers came out in a variety of colors: white, pink, crimson.
He is a big fan of indoor flowers, I especially love those flowers that bloom and delight the eye. I always go to a store where they sell flower seeds, buy, experiment. Frankly, I planted Cyclomen, Posiflora, Balzamin, everything was not successful. They didn't even sprout, although the seeds were fresh. And how many times I plant them, the result is always zero. What is the reason for this is not clear. But on the other hand, Abutilon rises after 4 days and grows beautifully. No matter how much you plant, everything rises. I have already given it to all my friends and relatives. Still growing well and the main thing that blooms for me is Katarantus. I bought mixed varieties of Katarantus and now they bloom with different flowers in one pot. White (beige), pink, red and lilac. Very beautiful. Nightshade grows well, but most of all with seeds I liked planting and growing succulents. They are not whimsical at all, they grow quickly, they are beautiful. Echeveria cushion blooms very beautifully. The sedum is also very beautiful.