Content
- 1 Origin of plumeria and description of appearance
- 2 Growing plumeria from seeds
- 3 Further care of the plant
- 4 Table: protection against diseases and pests
- 5 Video: growing plumeria from seeds and tips for caring for an exotic plant
- 6 Florist reviews
- 7 What does home grown plumeria look like?
- 8 Plant features
- 9 What microclimate to create for flowering
- 10 Where to place plumeria
- 11 Self-cultivation methods
- 12 How seeds are planted
- 13 Plumeria: care for cuttings
- 14 Transplanting adult plants
- 15 Interesting facts about plumeria
- 16 What is Plumeria
- 17 How to propagate plumeria seeds at home
- 18 Further care of the plant
- 19 Plumeria care at home
- 20 Video review
- 21 Main types
The hardest part of growing plumeria from seeds at home is finding planting material. In Russian specialized stores, seeds of an exotic plant are practically not sold, but they can be purchased from collectors and on foreign sites. It is impossible to confuse planting material with other seeds. This is a rather large seed with lionfish at the end. The subsequent care of the flower is also important, which is quite simple to carry out.
Origin of plumeria and description of appearance
The homeland of plumeria is the islands of the Caribbean. It grows in Bali, Thailand, Hawaii, and is found in the forests of Central America: Mexico, Panama, Colombia, Nicaragua, Costa Rica, Cuba. In these countries, plumeria can often be found in parks, it looks great both alone and in group plantings.
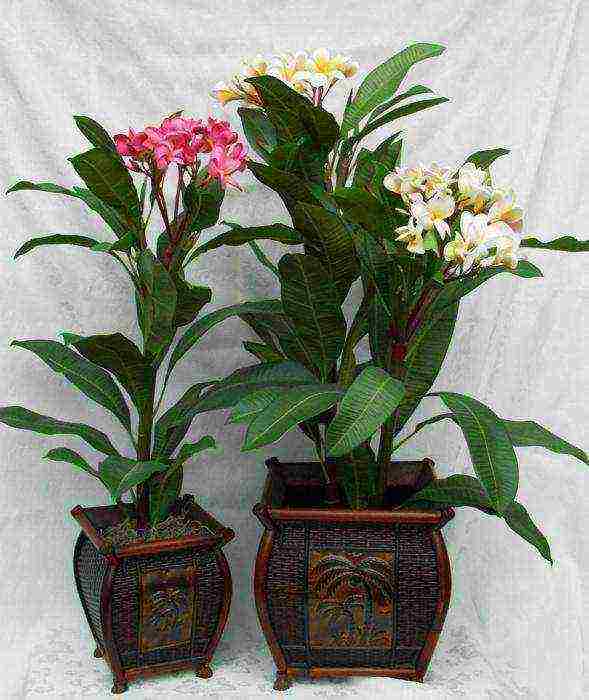
Plumeria is an evergreen plant with a magnificent aroma of flowers; it is a tree or shrub with a spreading crown, reaching three meters in height. For indoor floriculture, dwarf and semi-dwarf forms were bred, which vegetate well in an ordinary apartment.
"Tropicanka" grows both in humid forests and poor soils, the plant adapts well to any conditions, which makes it desirable for many collectors of exotic plants.
Plumeria is prized by flower growers for its spectacular flowers that exude a divine scent. For the first time this quality of plumeria was appreciated by the Italian marquis Frangipani, who used fragrant flowers to create perfumes and creams. Currently in Europe, plumeria is called the name of the perfumer - frangipani.
Indoor conditions, it is preferable to grow dwarf and semi-dwarf varieties.
Plumeria species
- Semi-deciduous tree - white plumeria - grows naturally in the Caribbean.The flowers of this species of plumeria are dense, waxy, white with a yellow center. Each flower has five petals arranged in a spiral.
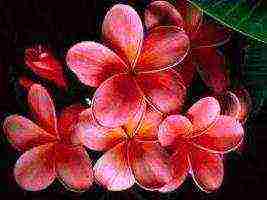
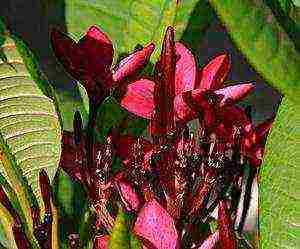
- Red plumeria, which can reach six meters in height, has large leathery leaves. Wax flowers of bright red color are collected in corymbose inflorescences, in each of which there are 15-17 pieces.
- Large fragrant flowers up to 10 cm in diameter in blunt plumeria - a native of South America. The petals are snow-white with a yellow center.
- A characteristic feature of bashful plumeria is its unusual spoon-shaped leaves. The flowering is very spectacular and long (lasts up to six months), however, unlike other types of frangipani, the flowers of bashful plumeria do not have a scent.
- Narrow-leaved plumeria is a small and compact bush up to 1.5 m in height. The plant is very suitable for growing in containers. Delicate flowers with narrow and long white petals exude the sweet scent of jasmine.
- Silk-leaved plumeria has beautiful foliage with embossed veins, and the flowers have a pleasant citrus aroma.
Photo gallery: popular plant species
Is it possible to reproduce plumeria by seeds at home?
Plumeria can be propagated by seed. The seeds are quite large, have lionfish like those of maple, thanks to which they can spread through the wind. The seeds ripen in a long pod for nine months.
This method has its drawbacks as well. With seed reproduction, the varietal characteristics of plumeria are not always preserved, but this is the beauty of planting with seeds, you can get plants with unexpected color of flowers.
Plumeria seeds ripen in a long pod for nine months
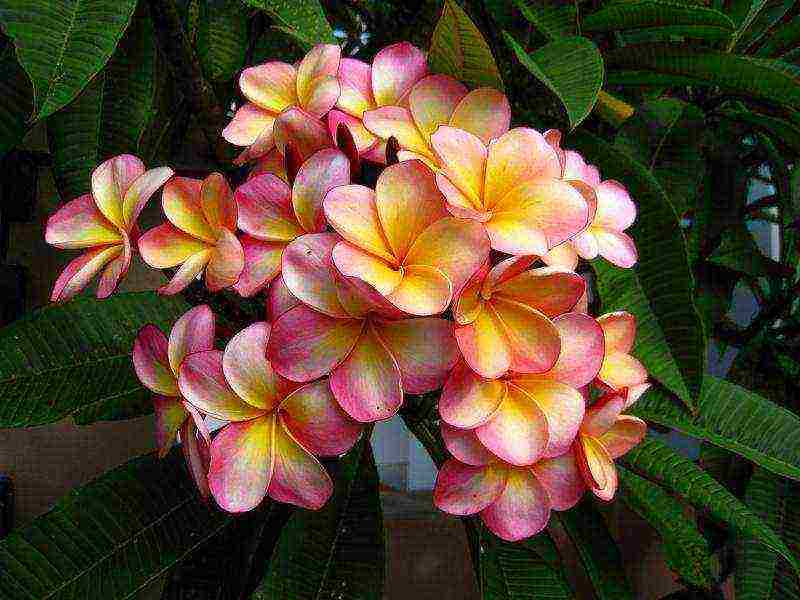
Photo gallery: examples of flowering plumeria grown from seeds
Growing plumeria from seeds
No special tools are required for sowing seeds. It is enough to prepare:
- container for soaking seeds;
- knife or scissors;
- cotton pads or foamiran.
In addition, you will need:
- warm water;
- disinfectant solution;
- nutritious soil;
- glass or plastic film for the device of a mini-greenhouse.
Method number 1. Germinating seeds in water - step by step instructions
- Consider a plumeria seed. Its upper part is lionfish. You do not need to cut them off; during germination, they should be above the surface of the soil or water.
- Soak the seeds for three hours in warm water. And so that it does not cool down, put the bowl on the battery.
- After that, disinfect the planting material, which will prevent further infection with rot. Dip the seeds in hydrogen peroxide for 2 seconds. Repeat the procedure three times. A very good effect is obtained by treating plumeria seeds with a fungicide. Dry the seeds after processing.
- Poke holes in a cotton pad (or a piece of foamiran) with a knife. Their number should be equal to the number of seeds.
- Insert the plumeria seeds into the holes so that the lionfish are on one side.
Insert the plumeria seeds into the holes so that the lionfish are on one side.
- Pour warm water into a bowl and put a cotton pad with seeds so that the lionfish are in the air, and the bottom of the seeds is in warm water.
Only the bottom of the plumeria seeds should be in the water.
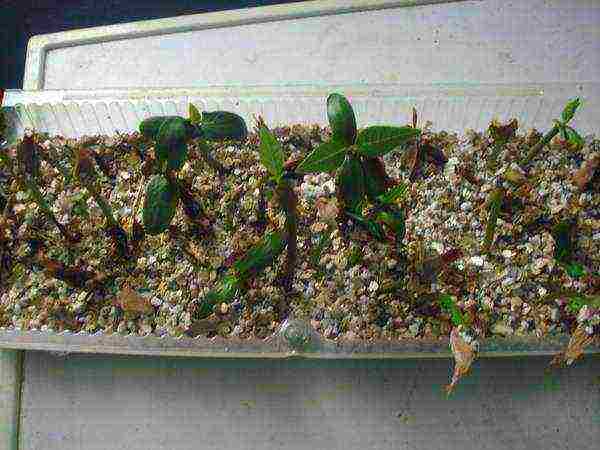
- After about a week, white roots will appear.
Plumeria seeds, when germinated in water, hatch almost simultaneously
- Now you can start planting the hatched seeds in the ground. Make up a nutritious soil mixture. Mix two parts of leafy soil, one part of peat, add perlite or vermiculite to keep the substrate loose and breathable. You can use ready-made soil for adeniums or cacti.
- Place the substrate in a container with drainage holes. Do not crush the earth.
For looseness, add vermiculite or perlite to the substrate
- In the center of the pot, make a small hole in the ground with a stick and plant the hatched seed so that the lionfish are in the air.
- Moisten the substrate and cover the planting with a plastic bag or glass to retain the warmth and moisture necessary for germination of seeds.
Cover containers with plantings with a transparent lid or glass
- Open the greenhouse daily and wipe off any condensation. Water the seeds sparingly and avoid waterlogging or they may rot.
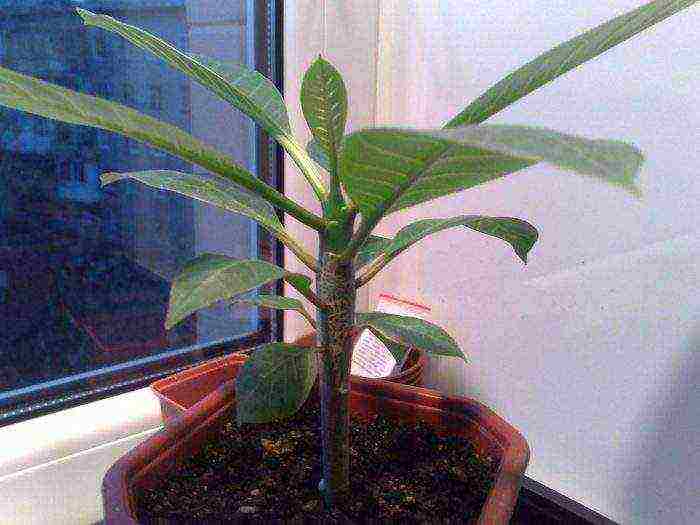
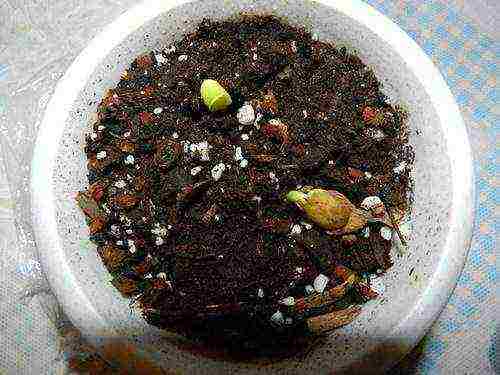
- The cotyledons will appear in about a week. Transfer the container with seedlings to a warm, bright place. When the first true leaves grow, you can remove the lid from the mini greenhouse.
When the first real leaves appear, it will be possible to remove the lid from the mini-greenhouse and transfer the plants to a warm place.
Method number 2. Germinating seeds in toilet paper - step by step instructions
- Fold toilet paper or tissue paper in several layers, place on a plate or saucer and moisten.
- Spread the plumeria seeds on it and cover the top with toilet paper. Cover with a bag and place the dishes with seeds for germination in a warm place, for example, on a radiator.
The method is good because you can see how the seeds germinate.
- Inspect the seeds daily and moisten when the paper dries a little.
- When white roots appear, plant the seeds in small containers. The lionfish should be sticking out of the ground.
Lionfish should stick out of the ground
- Moisten the substrate and cover the planting with a plastic bag, plastic transparent lid or glass.
Plumeria seedlings picking
When the plants grow enough, the seedlings will be about 6 cm long and three true leaves will appear, they will need to be dived. Get larger pots. At the bottom, put drainage from pebbles or expanded clay and pour light fertile soil.
Moisten the substrate and make a hole in the middle of the pot with a stick (you can use a pencil) to a depth of about 5 cm.
Carefully dig in the plumeria seedlings and remove them with a clod of earth. Plant them in prepared pots, while deepening the stem 2-3 cm. Place the cut plumeria in a warm, sunny place.
Video: growing plumeria from seeds
Errors and difficulties of flower growers when growing plumeria from seeds
The germination rate of plumeria seeds is very good, if, of course, the planting material is of excellent quality. Usually 90% of seeds germinate.
The main failure when growing plumeria by seed is rotting of the planting material. To prevent this, keep the container with plantings in a warm place, ventilate the greenhouse daily and wipe off the condensation formed on the lid. Do not overmoisten or let the soil sour.
Another difficulty that growers face is the lionfish remaining on the cotyledons. It happens that a flower cannot shed its "skin" on its own, and you need to help it to do this, since the growth of a plant can slow down and even completely stop.
Do not try to pull off the scales, as they are hard enough and delicate leaves can be easily injured. Moisten a cotton pad and wrap the skin around it. Leave it on for 30-60 minutes. This time will be enough for the crusts to soften. Remove the "skin" from the leaves by prying it with a toothpick from below.
The seedling cannot shed its "skin" on its own, and you need to help him to do this, since the growth of the plant can slow down and even completely stop
Further care of the plant
Watering
The frequency of watering plumeria depends on the size of the container, the temperature and humidity of the air, and the season. In the summer, water the plant abundantly, preventing the potted substrate from drying out.
Water sparingly in winter, especially when kept in a cool room. Try to avoid getting water droplets on the flowers. Additional moistening in the form of spraying plumeria is not required, it is enough to periodically wipe the leaf blades from dust.
Top dressing
Plumeria is very responsive to feeding... In the period from April to August, apply once every two weeks a complex fertilizer for decorative flowering indoor plants in the dose indicated on the package. You can alternate mineral fertilizing with organic fertilizers.
Pruning and shaping the crown
In the hope of branching, you should not cut off the plumeria, it gives only one replacement shoot, and you cannot get a fluffy bush in this way. Branching can be created naturally by cutting off the top of 2-3 branches and rooting it. A compact bush can be obtained from such a cutting.
Another way to get the plumeria seedling to branch is to use a special paste with plant hormones, for example, cytokinin. To do this, you need to cut off the shoot and apply a little paste on a fresh cut, it will stimulate cell division, and several shoots will appear. Apply the paste very carefully and in small quantities, as in case of an overdose, it inhibits the growth of the plant.
A large amount of cytokinin paste inhibits plant growth, so be careful
Table: protection against diseases and pests
Plumeria has a poisonous milky sap, which insects really do not like, so they rarely annoy her. Nevertheless, sometimes the plant is affected by pests and diseases.
Video: growing plumeria from seeds and tips for caring for an exotic plant
Florist reviews
Plumeria is a luxurious tropical plant with incredibly fragrant flowers. Just one flowering bush will turn your home into a garden of paradise, filling it with a divine scent. It is not difficult to grow frangipini from seeds, the plant is not capricious, so it is worth keeping an exotic "Tropicana" at home.
I am fond of many things. Handicraft, gardening, floriculture and cooking are just a few of my hobbies. I am constantly discovering something new and learning something interesting. I am ready to share all my knowledge with my readers. Rate the article:
(1 vote, average: 5 out of 5)
The genus of tropical trees Plumeria belongs to the Kurtovaya family. They are widespread in tropical regions of South America, Mexico, the Caribbean, California, the Pacific Islands, and Thailand. In mild natural conditions, it grows in open soil, and in cool climates only in greenhouses is plumeria found. At home, you can grow several species of this plant, which has beautiful fragrant inflorescences.
What does home grown plumeria look like?
 In nature, trees grow up to 5-10 m. And plumeria at home, limited by space, does not exceed 2 m. Several non-hybrid species of this plant are distinguished, but in our climate conditions only Red Plumeria (Plumeria rumba) can be grown.
Since it is a tree, it has a trunk, dense fleshy branches (2-5 cm thick), leaves of a dark green color, sometimes tinged with gray or purple. The shape of the leaves is elliptical, sometimes lanceolate, the width is about 15 cm, the length reaches 45 cm, the veins on the leathery surface are clearly visible. The sheet plate at the end can be rounded or have a sharp end, the reverse side is pubescent.
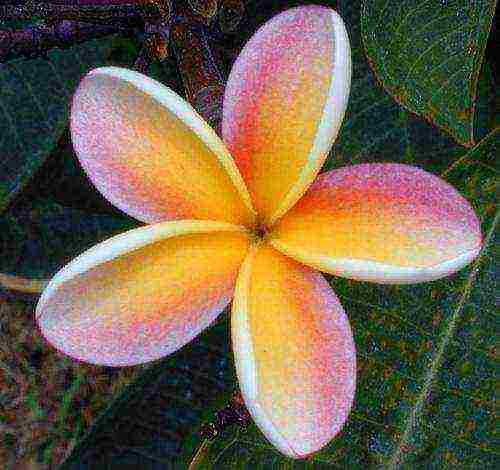
Flowers are formed in the apical parts of young shoots. Plumeria boasts that they are large - more than 5 cm in diameter, have 5 petals. But 4, 6, 7 petals are not a deviation from the norm. They are oval, sometimes in the shape of a spatula, differing in shape from other species. The color is varied: white, yellow, purple, red, pink. They can be in the center of one shade, and at the tips they smoothly transition into another. The aroma is pronounced, changes depending on the environment.
Plant features
Indoor plumeria has some characteristics that you need to know about.
- This is a poisonous plant, therefore it is not afraid of pests. The only thing that can hit him is a spider mite.
- The juice from parts of the plumeria is poisonous, so you need to take care of it with gloves, and if the liquid does get on the skin, rinse immediately with plenty of water.
- In winter, the tree sheds its leaves, a natural process lasting from 3 weeks to 1.5 months.
- Fragrant flowers do not have nectar, therefore they are not pollinated by bees, however, plants grown from the same parent may differ in the color of the buds.
- The fruits cannot be used for food, after flowering they are only suitable for seeds.
What microclimate to create for flowering
Having decided that plumeria will decorate your home, you need to provide it with the necessary care at home. It consists in proper watering, lighting, fertilization and other important indicators. In the spring and summer, you need to water it often enough, as soon as the top layer of soil in the pot dries up. From October to March, you need to moisten the soil less often so that it does not completely dry out.
The air must be humid: for this purpose, spraying is regularly carried out during the growing season. Water is used soft, settled, avoiding getting it on the flowers. To increase the moisture around the plumeria, the pot with the plant can be placed on a pallet with damp moss, gravel or expanded clay so that the roots do not reach them.
At the time of the beginning of the growth of new leaves, top dressing should be introduced. First with a high nitrogen content for leaf growth, then with phosphorus and trace elements for a lush bloom. Fertilization frequency is 2-3 weeks. By autumn, the amount of dressings is reduced, and in winter they are not carried out at all.
Plumeria at home should receive a sufficient amount of sunlight. You can take it outside at temperatures above 18 ° C. In summer, you need to maintain the temperature in the region of 24-29 ° C, and in winter - 15-18 ° C.
Where to place plumeria
The plant is best placed where there is most sunlight - on the south side. If this is not possible, then at least in the east or west. When placing it on the balcony, it is worth protecting it from rain and wind. A small tree will feel great on a lighted windowsill, and a large plant can be placed in the living room or bedroom. If there are children in the house, make sure they do not break the leaves or put them in their mouths.
Self-cultivation methods
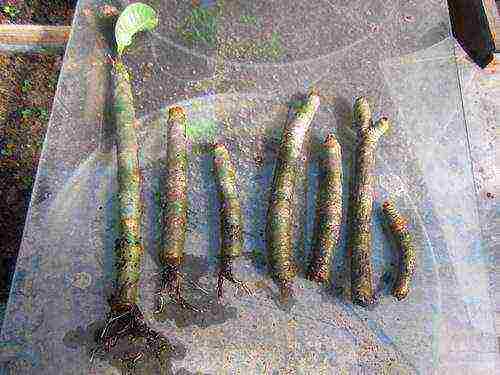
Plumeria reproduces at home in two ways: cuttings and seeds. Both are feasible, only flowering will occur at different times. A quicker way to get a flowering plant is to use plumeria cuttings. They are harvested in autumn or winter, cutting off lignified branches. They can be stored without planting and other maintenance for about 6 months. Seeds are obtained from narrow, cylindrical pods that form after flowering. They are usually reddish-brown or green in color, pointed at the ends. Let's take a closer look at how plumeria is grown from seeds and how planting cuttings differs.
How seeds are planted
 The rudiments are used together with lionfish. The seeds are poured with warm water and left for a couple of hours. If possible, it is better to dip them in a fungicide solution and then in hydrogen peroxide - this will prevent rotting during germination (after all, it is difficult to control the watering process when the seedlings are not visible). It is advisable to steam the soil in a microwave oven or in an oven. Leafy and turfy soil, loose enough and allowing a lot of air, is suitable.
A small amount of soil is poured into a wide box and seeds are planted, leaving the lionfish on the surface. Cover with glass, leaving some space for ventilation. The soil is not watered, but sprayed from a spray bottle. After a week or two, the seeds germinate, and when 2 full leaves are formed on them, they are transplanted into separate peat cups. Subsequently, plants can be planted in a pot with them.
The seed container should be placed in a warm and sunny place.Over time, the procedure for separating the peel from the seed should be carried out so that it does not slow down the growth of the plant. Find the embryo, wet a cotton swab and apply it to the skin for a while, it will soften and easily fall behind. Plumeria from seeds will bloom not earlier than in 2-3 years. Don't be discouraged if you don't get results right away.
Plumeria: care for cuttings
 To grow a tree from such a "blank", first, its cut off tip is dipped in water and powdered with a root former. First, the stalk is placed in perlite (it can be enriched with peat) to a depth of 10 cm. The pot must be heated underneath and placed in a bright light. The temperature should be kept within 24-28 ° C. As it dries, the substrate is watered.
Rooting can take up to 3 months. The main sign of success is the beginning of leaf growth. After a while, the plant is transplanted into a large pot. You can get blooming buds in the first year, but not later than the second. Be aware that colorful plumeria will not bloom right away at home, growing from seeds or cuttings will take some time and will require careful care and control.
Transplanting adult plants
 So, you have coped with the planting, have grown plumeria, which pleases the home with bright flowers and fragrant aroma. Providing her with the right conditions is not all you have to do now. It must be replanted every 2 years in spring, and young plants every year. The tree has a strong root system, so choose a large, spacious pot. When the plant is already quite adult, and there is nowhere else to increase the capacity, you can limit yourself to replacing the topsoil.
Prepare a nutritious substrate using peat, humus, turf soil and sand in a ratio of 1: 1: 2: 1. Be sure to install drainage, fine expanded clay at the bottom of the pot. The transplant should be carried out with rubber gloves so that the milky juice does not get on the skin. They also prune weak, deformed, too long, diseased blackened branches after flowering. Wipe the knife or pruner with alcohol before processing. Good cuttings will make cuttings suitable for propagation.
Interesting facts about plumeria
- This beautiful tropical tree is named after the French botanist Charles Plumiere.
- Another name for the plant is frangipani, in honor of a nobleman from Italy who first created a perfume with the scent of these unusual flowers.
- The smell they spread is impossible to describe accurately: they smell of spices, jasmine, gardenia, citrus fruits. The scent can change. Especially pronounced in the morning.
- It is the national flower of Laos and Bali.
- The ancient Maya perceived plumeria as a symbol of love in an erotic manifestation.
- In some countries of the Buddhist religion, these flowers symbolize immortality, so they are planted in large numbers around temples.
- Plumeria extract is used in cosmetology: it has a regenerating, anti-inflammatory, antioxidant effect on the skin. Included in night creams and cleansers.
Let your home be decorated with decorative plumeria: growing from seeds is not difficult if you focus on this matter.
Plumeria is a plant extremely appreciated by flower growers for its decorative appearance, variety of color shades and amazing aroma. Reproduction by seeds at home is a great opportunity not only to replenish the collection with new specimens growing in exotic countries, but also to try on the role of a breeder. It is a time consuming process, but the result of cultivation and proper care is worth it.
What is Plumeria
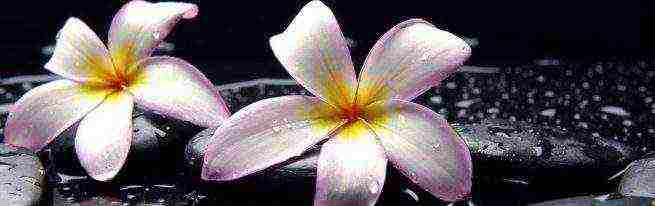
Plumeria flowers fascinate with the beauty of petals and delicate aroma
The smell of plumeria cannot be accurately described. At different times of the day, the tree smells like jasmine, gardenia, orange blossom or exotic spices. The aroma is felt most strongly in the morning.
Plumeria is a genus of tropical trees of the Kutrovy family. They are distributed throughout the globe - South and Central America, the Caribbean, California, Southeast Asia, Oceania. Under natural conditions, the height of the tree is 8-10 m, at home it is reduced to 2 m. Some types of plumeria are even suitable for the formation of bonsai.
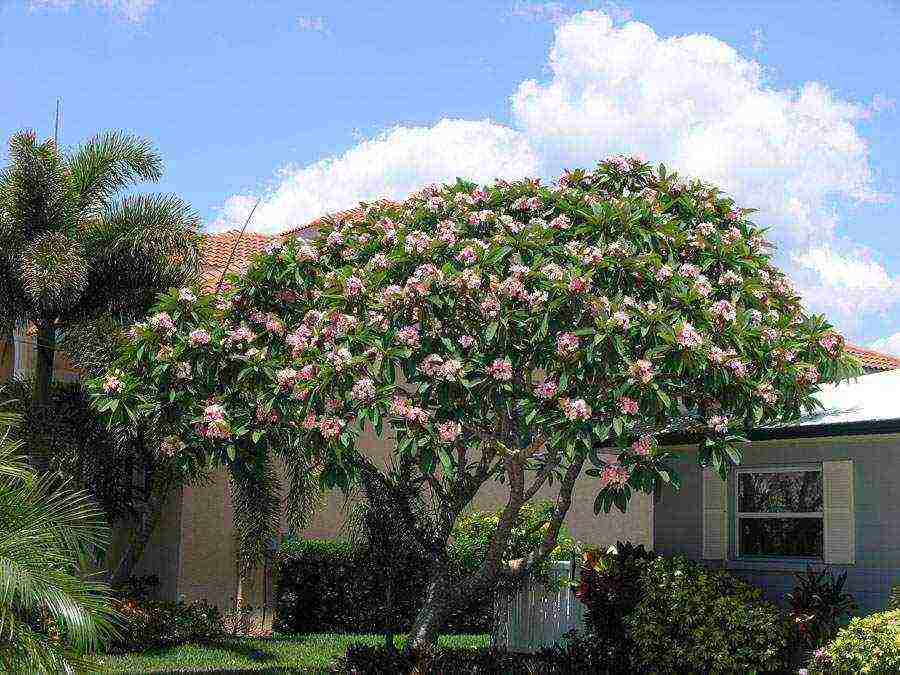
Plumeria in hot countries is widely used in landscape design.
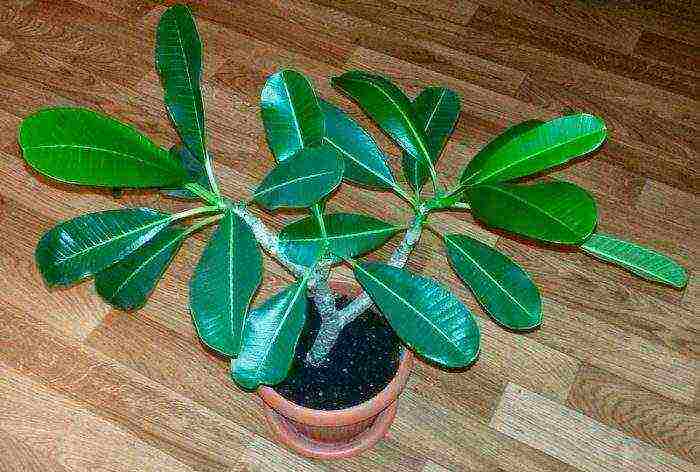
Even grown in a small pot, plumeria is unmistakably identified as a tree. It has a trunk and rather thick (2–5 cm) branches. Leaves are smooth, glossy-shiny, with well-visible veins, dark green in color. Sometimes there is a noticeable gray, reddish, or purple tint. In most varieties, the underside of the leaf blade is slightly pubescent. Leaf shape - oval or lanceolate, with a pointed tip. Under natural conditions, the length of the leaf reaches 40–45 cm, the width is 10–15 cm, at home - the parameters are reduced by about three times.
Inflorescences are formed at the tops of young shoots. The flowers are distinguished by their size (up to 5 cm) and an amazing aroma. The most common plumeria with five-petal flowers, but 4, 6 or 7 are also quite within the norm. A characteristic feature is that the petals seem to be layered on top of each other. The colors are very diverse - snow white, vanilla, cream, pale yellow, lemon, beige, pastel and hot pink, salmon, peach, reddish, lilac. There are also various combinations of them - such trees look even more impressive.
Under natural conditions, the tree blooms almost all year round. And at home it is limited to a couple of summer months.
Those who are going to grow plumeria should know that the sap of the plant is very poisonous. This property also has a positive side - the tree practically does not suffer from diseases and pests. The only exception is the spider mite. For the gardener, this means carrying out any grooming procedures only with rubber gloves. And if the juice does get on the skin or mucous membranes, it must be washed off immediately under running cool water.

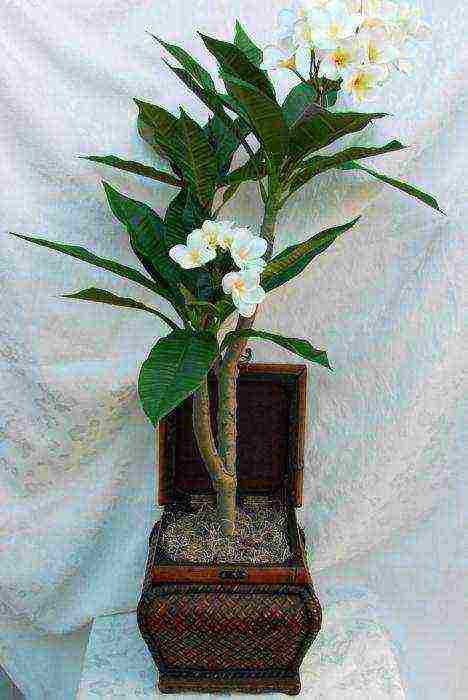
In a pot, plumeria looks no less impressive than in natural conditions
The tree needs a dormant period, as abundant flowering takes a lot of energy. Do not be alarmed when it begins to shed its leaves in late autumn - this is completely normal. The period lasts from 20 to 45 days.
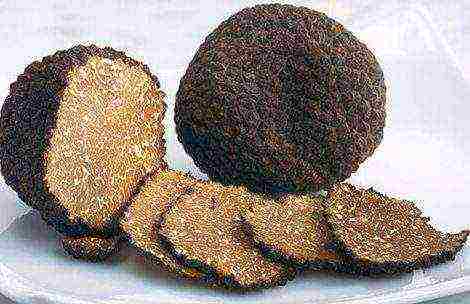
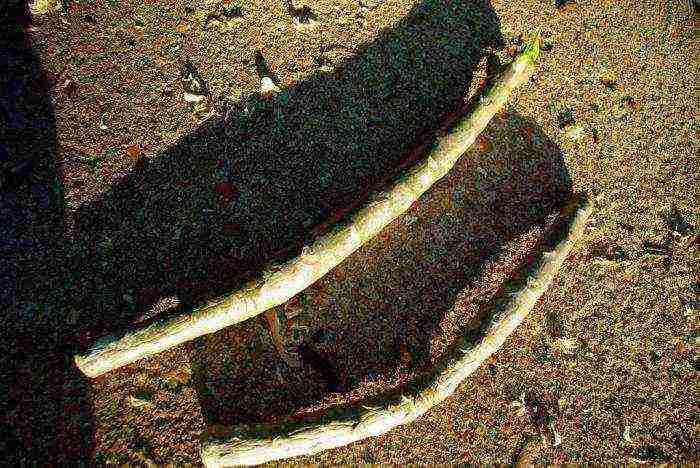
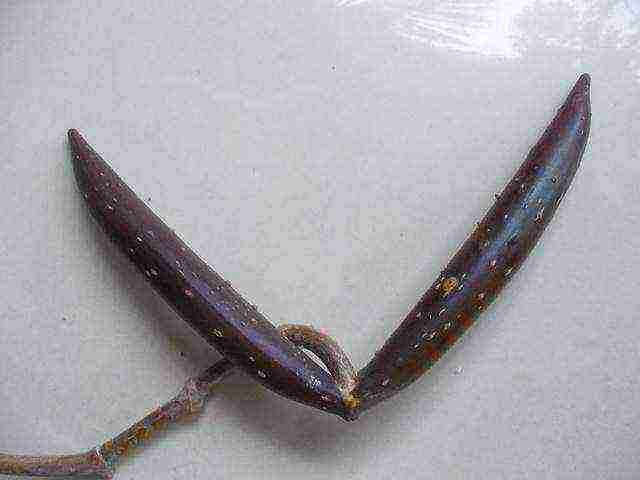
Plumeria can be propagated by seeds - this is the only way provided by nature itself for all varieties of this tree. The seeds ripen in fruits that resemble rounded green or brownish pods about 8-10 cm long. They need to be removed only when the pods are dry and wrinkled. If they are smooth and fleshy, it means the seeds are not ripe. Under natural conditions, ripe pods fall to the ground on their own, but at home this happens extremely rarely. The normal maturation period is 8-10 months.
Plumeria seeds ripen in such pods
The plumeria got its official name in honor of the French botanist Charles Plumier (or Plumier), who introduced this Asian tree to Europe. The second name "frangipani", loved by the inhabitants of Southeast Asia, is a tribute to the memory of the Italian aristocrat Mercutio (or Muzio) Frangipani, who first created a perfume based on an extract from plumeria flowers, calling them by his own name. Catherine de Medici herself was delighted with the scent. Plumeria is also known as the "temple tree". This is due to the fact that the plant in Buddhism symbolizes immortality. That is why trees are planted in large numbers near temples.
Video: different types of plumeria
How to propagate plumeria seeds at home
Currently, plumeria are widespread in the Hawaiian Islands. Those who have visited them at least once are certainly familiar with the local custom of meeting tourists by putting flower garlands (so-called leis) around their necks.However, plumeria is not a typical species for the islands; it was brought there in 1860 by the German doctor and botanist William Hildebrandt.
Seed propagation of plumeria is a very exciting process. With almost 100% probability, daughter trees will not retain the varietal characteristics of the parent tree. This primarily concerns the color of flower petals. Therefore, any plumeria grown by you from seed is an absolute exclusive.
You will have to wait 3-4 years to see the result, but it is definitely worth it. This type of reproduction has led to the fact that now in nature there are more than 300 species of plumeria, not counting the hybrids bred by breeding. Those wishing to experiment are recommended tree seeds, the flower petals of which are colored reddish and all shades of pink. They give the most unexpected results.
Preparation of planting material
Plumeria seeds are carefully removed from the pod. If it is not completely dry, it contains poisonous juice, so you must first put on gloves. First, with a sharp knife, a dense skin is cut lengthwise. Inside there is a soft rod of the same shape, but slightly smaller in diameter, into which flat seeds are pressed. They must be removed along with the wing. On fully ripe seeds, the root is well distinguished in its embryonic state.
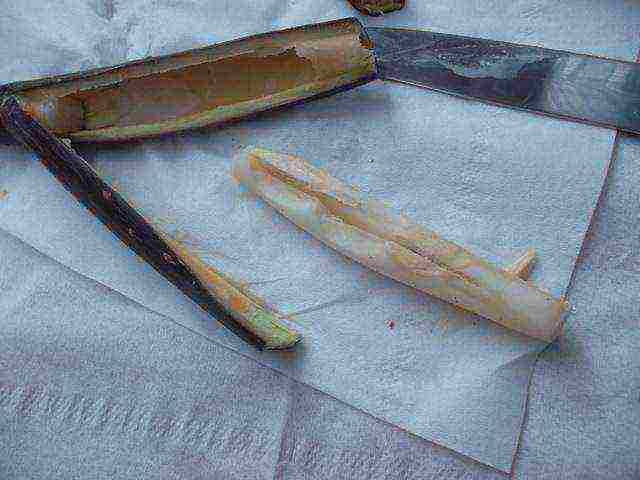
This is what an opened plumeria pod looks like.
In some varieties of plumeria, it is simply impossible not to notice the ripening of seeds. The pods literally explode, scattering them around the tree. So that you do not have to collect seeds later, put a paper bag on the plant in advance.
Then the seeds are dried for 3-4 hours, spreading them on fabrics in a dark, warm place and protecting them from direct sunlight. If you purchased them from a store, skip this step. In any case, the seeds should be used as soon as possible. With long-term storage, their germination is significantly reduced.
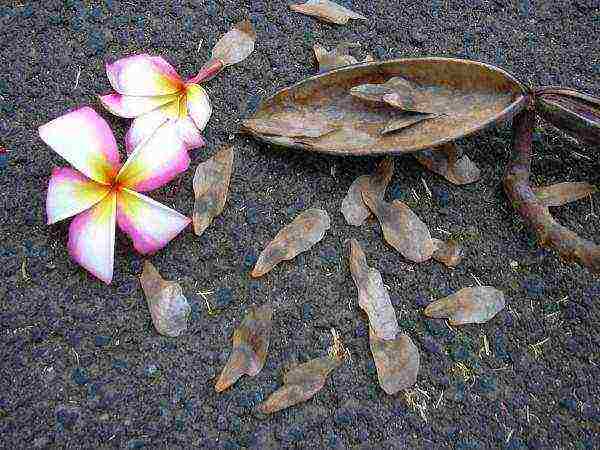
Plumeria seeds - the so-called lionfish
Seeds are prepared for planting as follows:
- They are laid out in one layer on thin cotton napkins, cotton pads or gauze, sprinkled with water. Cover the top with another layer of fabric, which is also moistened.
- All this will be placed in a transparent plastic bag, plastic or glass container and placed in a place where sunlight will fall on the seeds for at least 6-8 hours. The sill of a window facing south, east or southwest is ideal. In winter, a heating battery is a good alternative, if you put a towel rolled up in several layers under the container.
- Leave the seeds in this form for a day. Drying fabric should be periodically moistened by spraying from a spray bottle.
- Before you put the seeds to warm up, they can be dipped for 10-15 minutes in a solution of Epin, Zircon, HB-101 or potassium humate to increase germination and stimulate root growth, or a pale pink solution of potassium permanganate, hydrogen peroxide or Bordeaux liquid (5 ml peroxide or fungicide per 1 liter of water) for disinfection. Plumeria almost does not suffer from diseases and pests, but it is better to play it safe.
In no case should the winglet be separated from the seed - neither during preparation for planting, nor when planting in the ground.
Soil selection
The land of plumeria needs to be light and loose enough. This will provide sufficient aeration for the forming roots.
The best option is sod or leafy soil. You can also use a mixture of coarse river sand and peat in equal parts or a universal soil for indoor plants with sand, peat and humus, mixed in a 2: 1: 1: 1 ratio.
In the soil, especially if you collect it in your own garden, there may well be spores of pathogenic fungi, bacteria and viruses, as well as pest eggs. Therefore, it is disinfected by spilling it with boiling water, steaming it or placing it in a heated oven or refrigerator for 20–25 minutes.The fastest processing takes place in a microwave oven - a couple of minutes is enough.
Sowing seeds
The process of planting plumeria seeds looks like this:
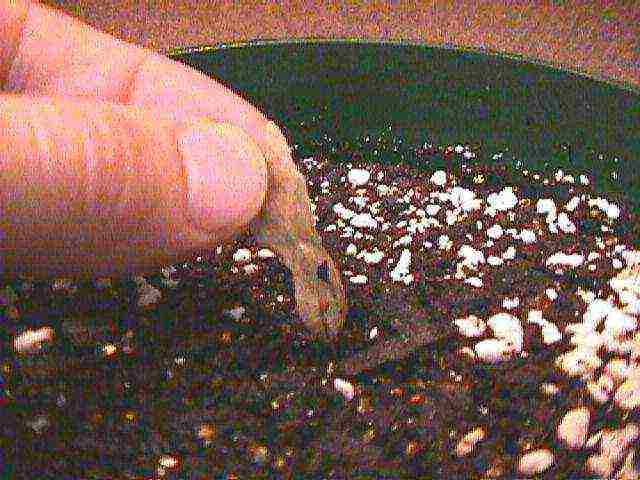
- A layer of soil about 5 cm thick is poured into wide and flat wooden boxes.
- The seeds are buried in the soil by a maximum of a third, leaving the winglet completely above it, strictly perpendicular to the surface. The soil around the seed is lightly pressed. The interval between two adjacent seeds and between rows is 5-7 cm.
Another option is to gently spread the seeds on moist soil and sprinkle with soil on top. The thickness of the top layer should not exceed 0.7–1 cm.
Under no circumstances separate the winglet from the seed and do not bury it in the ground.
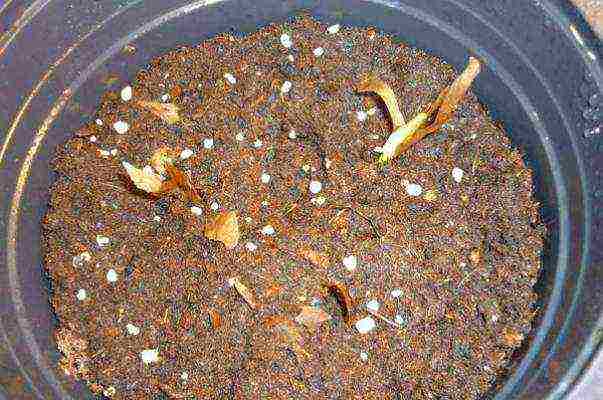
- The box is covered with plastic wrap or transparent glass and placed in a warm place with adequate lighting. If there is no sun, fluorescent lamps will do. The optimum temperature is + 23 ... + 25 ºС. Cold drafts or sudden changes in temperature should be avoided - the seeds will begin to rot very quickly. At this time, they especially need light (on average 15 hours a day).
- Future plants need ventilation, so the container with seeds is opened a little every day for 20-30 minutes. If you are using glass to create a greenhouse effect, leave a small (1–1.5 cm) gap between it and the edge of the box. Punch a few holes in the plastic wrap.
- The soil is regularly sprayed from a spray bottle, not allowing the soil to dry completely.
- The normal time for root emergence is 7–12 days, but to make sure that the plant does not emerge, you need to wait about a month. For some varieties, 20-25 days is a normal period. Then, after a couple of weeks, the stem and cotyledons appear. The winglet will help you know if the plant is rooting. As soon as they begin to form, the winglet will tilt.
If the seeds are harvested fully ripe, the germination rate will be 80–90% if all conditions are met.

Plumeria wing tilts as the root forms
- Since the winglet has not yet separated, you need to carefully remove it, the shell attached to it and the thin film located under it. Otherwise, the leaves will not be able to develop normally. In the worst case, they will simply rot. In order not to damage future leaves, spray the wing from a spray bottle, fix a wet piece of bandage or a cotton pad on it and leave it for a couple of hours. After this time, the peel will soften, and it can be removed without damage to the plant by gently prying from the bottom up with tweezers or a toothpick. Your main enemy in the process of releasing the plant is shaking hands and general lack of confidence in movement.
Young sprouts of plumeria should be helped to get rid of the winglet.
For those who wish to personally observe the development of seeds, there is an alternative way of germination:
- The seeds sprinkled with water are laid out one at a time at equal intervals on the top edge of a paper napkin folded in half.
- The napkin is folded lengthwise again so that only the wings stick out from under the paper.
- A napkin with seeds is placed in a bag with a sealed reusable fastener, after making several holes in it with a hole punch, and sprayed with a spray bottle.
- The bag is closed and hung so that direct sunlight falls on it.
- As the napkin dries, it is moistened through the holes made.
- When the roots appear, the seeds need to be transplanted into separate pots.
The advantage of this method is clarity. It also allows you to avoid the negative reaction of very young plants to early transplantation.
Planting seeds and further care for them - video
How to transplant sprouts
When two real leaves appear on the seedlings, they can be dived. They are seated in individual peat pots with a diameter of 5–7 cm. Subsequently, the pots can not be removed by replanting the grown plumeria to a permanent “place of residence”.
In this form, the seedlings can already be planted in separate pots.
Not all growers welcome this procedure. It is reasonably believed that plumeria does not tolerate transplantation well. To avoid the death of seedlings, they recommend immediately planting seeds in separate containers. But in this case, it is much more problematic to care for them.
The most suitable soil for seedlings is a mixture of peat and soil for flowering indoor plants in equal parts. Add to it 2 times less baking powder (Agroperlite, Seramis) and 4 times less vermicompost.
The pots should be kept in a warm, bright room. Seedling care consists in regular watering as the soil dries up, fertilizing with fertilizers for indoor plants with nitrogen content (Bio-Vita, Bona Forte, Ambulance, Power of Life, Kemira-Lux, AVA) and shading from too bright sun. At the same time, scattered sunlight is vital for plumeria at least 5–6 hours daily. Those who plant seeds in winter should take care of a fluorescent lamp in advance.
Initially, the seedlings, like the seeds, are covered with plastic wrap, airing only for 30 minutes a day. After about a month, you need to start accustoming future trees to room temperature, increasing the time without a greenhouse every day.
The worst thing you can do at this stage is to fill in the plumeria. When the potted soil turns into a swamp, the roots rot very quickly. In this case, the tree needs another transplant. Carefully remove it from the soil, cut off all damaged roots with a sharp disinfected knife and rinse the pot. Then fill it with fresh soil and repot the plant.
To keep the flower getting enough moisture, fill the pot pan with damp moss or pebbles. Place a container filled with water next to it. Another option is to purchase a humidifier. Pouring water into the pan of a pot is not a good idea.
After a year, the plant is transplanted into a deep pot with a volume of about 2 liters. After another year, you will need a three-liter pot. After the first flowering, you can get by with one transplant every 2-3 years.
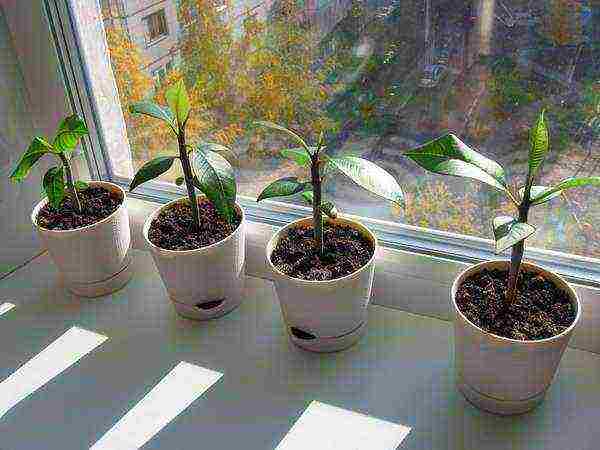
After a dive, plumeria need warmth and diffused sunlight.
Growing trees in peat tablets - video
Further care of the plant
Young trees during the first two years of life are especially demanding to care for. If you do everything correctly, after this time the tree reaches a height of 90-100 cm.
Lighting and temperature control
The optimum temperature for young plumeria is + 25… + 28 ºС. Find a place where they will be protected from sudden drafts and temperature changes.
Sunlight is also vital, but only diffused. Direct sunlight will burn the delicate leaves very quickly.
Watering
Adjust watering according to the weather outside. The next portion of moisture is needed by the plant only after the top layer of the earth is completely dry.
In the hot summer, plumeria needs daily watering. Additionally, you can spray the leaves. In spring and autumn, one watering every 2-3 days is enough. In winter, "hibernating", the tree practically does not need water. Spray the soil with a spray bottle every 7-10 days.
Top dressing
For the first time, you can feed a plumeria seedling in 40-50 days after germination.During this period, nitrogen is especially important, stimulating the plant to build up green mass. Top dressing is carried out every 1.5–2 months.
When the plant is one year old, feeding is carried out according to the following scheme:
- In the spring, when new leaves begin to form actively, watering with a fertilizer solution containing nitrogen, phosphorus and potassium in approximately equal proportions every 12-15 days. We recommend Indoor Plant Fertiliser, Orchid Pocon and Rainbow. Thus, plumeria are fed from late March to mid-May.
- Since it is not yet time for young seedlings to bloom, they are stimulated to further growth.In May and June, plumeria are watered with a fertilizer solution with a high phosphorus content at the same frequency. The most commonly used drugs are Super flowering-plus, Merry flower girl, Ideal, Schultz Plant Food. If your tree already needs to bloom by its age, continue feeding in the same way. The main thing is that the fertilizer contains more potassium than phosphorus, and phosphorus - more than nitrogen.
- Further, plumeria continue to be fertilized until the end of September. ArganiQ works best. It contains potassium, phosphorus and magnesium. The fertilizer is a natural sapropel disinfected with silver ions. Those who live next to a clean pond or lake can save money by collecting a couple of buckets of silt right there. Any plant native to the tropics responds well to fossil silt. This is not difficult to explain if you remember what kind of climate and soil there is.
- With the onset of a dormant period (when most of the leaves will be shed), plumeria does not need feeding.
In Indonesia, Micronesia and the Philippines, plumeria flowers are an integral part of most ghost legends. Also, for some reason, it is believed that they can scare away vampires.
Pest control
The toxicity of plumeria sap protects the tree from most pests and diseases that other indoor plants are susceptible to. The exception is the spider mite.
At an early stage, on a plumeria affected by a spider mite, one can notice individual thin filaments intertwining the leaves or their petioles, as well as small whitish dots on the lower part of the leaf plate. If the process has gone too far, the plant literally hides under a thick layer of whitish mass that resembles a cobweb. At the very tips of the leaves, a continuous moving carpet of many bodies of spider mites is formed.
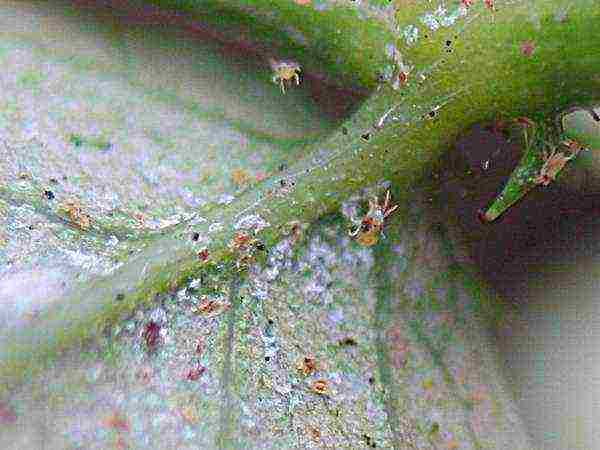
Spider mite is the only pest that plumeria suffers from at home
The spider mite feels great in insufficiently humidified air, therefore, regularly spray the leaves for prevention. But you shouldn't be too zealous with this either - the liquid accumulating in the axils of the leaves, especially in winter, will very quickly lead to the decay of the flower. Also, do not hope to drown the pests by periodically submerging the entire plant in water. Ticks can form a bubble of air that effectively protects them.
Perform sanitary pruning in a timely manner - remove old dried leaves and flowers.
The fight against spider mites begins by wiping the leaves with a solution of laundry soap or dishwashing liquid in warm water. If the pest has not yet hit the tree en masse, water the plant abundantly (0.5 liters of water) and cover it with a plastic bag on top for 2-3 days, sealing it on the pot. Due to the increased humidity, the pests inside the bag will die. All this time, watch the plant (especially in summer) so that sunburn does not appear on the leaves.
In advanced cases, spraying the flower with solutions of Karbofos, Inta-Vir, Fitoverm, Zolon, Marshal, Apollo, Videit, Actellik, Aktara, as well as products containing the oil of the Neem tree, will help. At the same time, Temik or Aldicarb granules can be added to the soil. When preparing the solution, be sure to follow all the manufacturer's instructions.
A significant disadvantage of these funds is that ticks quickly develop immunity to them. If a single spray did not solve the problem, alternate the preparations.
Do not limit yourself to surface spraying. The spider mite prefers secluded places, such as leaf axils. It is also useful to handle the pots, stands for them and the window sill.
In addition to high humidity, these pests do not like ultraviolet light. That is why they prefer to settle on the underside of the sheet plate. If you have a fluorescent lamp, shine it on the leaves.
You can try the following folk remedies:
- Onion infusion. 10-15 g of finely chopped onion or 2 times less husk is poured with a liter of water at room temperature and insisted for 8-10 hours. Filter the infusion before use.
- Infusion of dandelion roots. Pour a tablespoon of finely chopped raw materials with a liter of warm water and leave for 2-3 hours.
- Garlic infusion. Gruel from peeled cloves (12-15 pieces) is poured with a liter of water and infused for 4-5 days. Then they mix thoroughly and take a teaspoon of liquid for spraying, again diluting it in a liter of water.
In order to finally defeat the pest, it is recommended that at least 4-5 treatments (preferably with different means) with an interval of about a week.
Folk remedies for pest control in the photo
If in the summer you put a pot with a plant on a balcony, loggia or veranda, for prevention, spray it with fungicides every 15-20 days to protect it from rot, mold and other fungal diseases. The most common option is a 1% solution of Bordeaux liquid (10 ml per liter of water). It is quite easy to notice the development of the disease. Brown spots appear on plumeria leaves.
Plumeria flowers were highly prized by the Incas, Aztecs and Mayans. Ordinary people were forbidden not only to pluck them from the tree, but even to smell them. The punishment for breaking the ban was the death penalty. The priests used the fallen flowers to decorate altars and religious ceremonies.
The plumeria tree, personally grown from a seed, is an exclusive specimen that no one else has. By carefully studying the recommendations and instructions, you will make sure that the process of planting seeds and caring for them is simple. And the result is definitely worth spending a little time and effort finding and caring for seeds.
27 years old, higher education in law, broad outlook and interest in a variety of topics.
Kind like plumeria (Plumeria) is directly related to the kutrov family. This genus includes about 65 different plant species. French botanist Charles Plumer, who lived in the 17th century, was very famous, and it was in honor of him that this genus got its name. In nature, such a plant can be found in the north of South America.
This genus is represented by trees and shrubs. At home, plumeria is grown because of its lovely flowers, which can be painted in pale pink, white or yellow. Flowering lasts a very long time, almost the entire summer period. The flowers are quite large (up to 10 centimeters in diameter).
In mid-latitudes, such a plant is rarely grown, so it is rarely seen in flower shops. When kept in an apartment, this plant reaches 200 centimeters in height. Plumeria grows best in a greenhouse.
Plumeria care at home
Illumination
This is a very light-loving plant. South-facing windows are perfect for placing it, because at least 6 hours a day it must be illuminated by direct rays of the sun, otherwise flowering will not occur. It can also be grown on east or west facing windows. The north window is not suitable for growing, as due to too little light, flowering will definitely not come there. In the warm season, it is recommended to move the plant to fresh air. However, it is impossible to expose it immediately in the sun, but you should gradually accustom it. In this case, the plumeria must be protected from drafts, as well as from rain. A freshly purchased plant should not be exposed to direct sunlight, as burns can form on the leaves.
Temperature regime
A very thermophilic plant. So, from the middle of spring to the end of the summer period, the temperature should be in the range from 25 to 30 degrees. In autumn, the temperature is gradually lowered, and in winter, it is necessary to ensure that it does not drop below 16 degrees.
How to water
In the warm season, when kept in an apartment, watering is carried out immediately after the top layer of the substrate dries out. To do this, use necessarily settled and soft water. In winter, it is necessary to water much less, but at the same time make sure that the soil does not dry out. Overflow for the plant is also very dangerous. In this regard, on cloudy summer days and during cool wintering, watering should be done very carefully.
Humidity
During active growth, plumeria is recommended to be sprayed systematically. For this, soft and well-settled (at least 24 hours) water is perfect. Also, in order to increase the humidity of the air, you can pour a little pebbles or expanded clay into the pallet, and then pour water into it. However, care must be taken to ensure that the bottom of the flowerpot does not come into contact with the liquid in the tray. When spraying, avoid getting water on the flowers.
Fertilizer
After the beginning of the period of intensive growth in spring, you should start feeding the plumeria, which is produced once every 2 weeks. Complex fertilizer for flowering plants is excellent for feeding. In the case when the plant is transferred to the street in the summer, it can be fertilized alternately with the root and foliar methods. It is necessary to spray the foliage on both sides in the evening with a prepared solution. For this, the amount of water that is used to dilute the required dose of fertilizer must be doubled. Spraying is carried out once every 1–1.5 weeks. In the autumn, the plant needs to be fertilized less often, and in the winter, it cannot be fed.
Dormant period
If the plant is grown in an apartment, then in the winter it has a dormant period. It can last from 3 to 6 weeks (the duration directly depends on the species). During the dormant period, old leaves fall off the plumeria. After this period ends, young foliage begins to actively grow, as well as flowers.
Transplant features
The transplant is carried out at the beginning of the spring period. While the young tree is subjected to this procedure annually, older specimens can be transplanted once every 2 years. A flower pot should be chosen slightly (2 or 3 centimeters) larger than the previous one. In the absence of such a capacity, you can simply cut the root system by about 5 centimeters. At the bottom of the pot, you need to pour fresh earth mixture over the drainage layer. To create a suitable mixture, it is necessary to combine peat, turf and humus soil, as well as sand in a ratio of 1: 2: 1: 1. Don't forget to make a good drainage layer on the bottom of the pot. To do this, one fifth of it should be filled with broken brick and expanded clay, you can also use egg shells.
Seed propagation
For sowing seeds, small pots are used, the diameter of which is 6 centimeters. After the seedlings have a well-developed root system, they should be carefully transplanted (or better transferred) into pots with a diameter of 9 centimeters. The soil mixture is suitable for the one that is used for transplanting. As a rule, a plumeria that has grown from a seed has clear differences from the parent plant. Such a plant begins to bloom at two or three years of age.
Propagation by cuttings
Cutting is recommended in the last winter or early spring weeks. Cuttings must be cut at an oblique angle. After that, the cut must be moistened in water, and then in a means that stimulates root formation. To plant the cuttings, fill a third of the pot with an earth mixture, a third with perlite, and then add the earthen mixture again. The cutting is planted so that it is in an upright position, and its cut must be immersed in perlite. For successful rooting, you will need warmth from 25 to 28 degrees. To maintain this high temperature, bottom heating is recommended. You will need good lighting, if necessary, you can provide backlighting with fluorescent lamps.Watering is done carefully. Evidence of successful rooting will be the appearance of young leaves. This usually happens after 8-12 weeks. Watering should gradually become more abundant. Then they are transshipped into a large container and provided with care, as for an adult plant. Flowering usually occurs after a year, but may start earlier.
Warning
This plant contains poison in the juice, which, if it gets on the skin or on the mucous membrane, can cause serious irritation. If the juice gets on the mucous membrane or skin, you should urgently thoroughly rinse this place with plenty of water, which must be running.
Video review
Main types
White Plumeria (Plumeria alba)

In the wild, you can meet in the Antilles. These trees can be up to 10 meters in height. The leaves are linear. On their seamy side there are thick whitish hairs. At the leaf plate, the edges are slightly raised. The leaves are approximately 30 centimeters long and 7 centimeters wide. Fragrant small flowers (up to 2.5 centimeters in diameter) are white and have a yellowish eye.
Red Plumeria (Plumeria rubra)
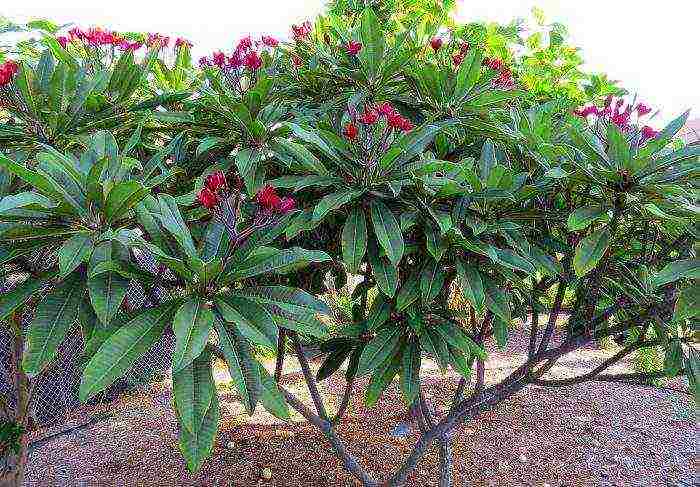
Under natural conditions, you can meet in Mexico or Venezuela. Deciduous trees can be up to 5 meters tall. The egg-shaped leaves reach 50 centimeters long and 15 centimeters wide. There are specimens, the seamy side of the leaves of which can be either smooth or have pubescence. As a rule, the apex of the leaves is obtuse, but there is also a sharply pointed one. Flowers are collected in a brush at the top of the stems, the diameter of which can reach 5 centimeters. In different varieties, flowers can be painted in different colors, for example, white, yellow, pink, red, as well as lilac. Different varieties also differ in the shape of the leaves.